Difference between revisions of "Where to change my info"
| (8 intermediate revisions by the same user not shown) | |||
| Line 2: | Line 2: | ||
=Company title= | =Company title= | ||
| − | In Settings // Company | + | In Settings // Company Information // Name. |
| − | [[File: | + | [[File:Company info path new navigation.png|1200px| center]] |
<br/><br/> | <br/><br/> | ||
=Company url= | =Company url= | ||
| Line 13: | Line 13: | ||
'''Paid:''' | '''Paid:''' | ||
Create a new system with the desired name in url, go to Plans&Prices // Additional items and select "Copy system to new system" , make payment and our developers will transfer your data. After you made a payment, you need to contact support, tell them old company name and new company name (confirm ownership of both accounts), and request transfer of the system.<br/> | Create a new system with the desired name in url, go to Plans&Prices // Additional items and select "Copy system to new system" , make payment and our developers will transfer your data. After you made a payment, you need to contact support, tell them old company name and new company name (confirm ownership of both accounts), and request transfer of the system.<br/> | ||
| − | [[File:Copy | + | <span style="background-color:#ffe9e9; padding:5px; border-radius:5px;">'''Please note!''' Reviews as well as HTML formatting in descriptions will not be copied to the new system.</span> |
| + | [[File:Copy sytem new price.png | center]] | ||
<br/><br/> | <br/><br/> | ||
=Company logo and background= | =Company logo and background= | ||
| − | In Settings // Design | + | In Settings // Design settings // Additional theme settings. <br/> |
| − | [[File: | + | [[File:Theme settings path new navigation.png|1200px | center ]]<br/><br/> |
[[File:Add logo and banner v3.png | center]] | [[File:Add logo and banner v3.png | center]] | ||
| + | =Favicon= | ||
| + | It is not possible to modify the logo (favicon) that you see in the browser tab as well as the /v2/ part in the URL of the booking website.<br> | ||
| + | These elements are fixed and cannot be altered. | ||
| + | [[File:Favicon expl.png|1200px|center|link=https://help.simplybook.me/images/d/da/Favicon_expl.png]] | ||
=Design= | =Design= | ||
| − | In Settings // Design | + | In Settings // Design settings.<br/> |
[[File:Theme selection v3.png | center ]] <br/><br/> | [[File:Theme selection v3.png | center ]] <br/><br/> | ||
;Recommended themes: | ;Recommended themes: | ||
| Line 27: | Line 32: | ||
<br/><br/> | <br/><br/> | ||
=Texts and language= | =Texts and language= | ||
| − | If you need to adjust any texts on your booking page (for example change Employee to Therapist, Coach or Room), you can do it in | + | If you need to adjust any texts on your booking page (for example change Employee to Therapist, Coach or Room), you can do it in Settings // Custom Wording & Translations. |
| − | + | [[File:Custom translation path new navigation.png|1200px| center ]] | |
| − | + | <br/><br/> | |
| − | [[File:Custom | ||
| − | |||
| − | |||
There, you can also change language of your booking page by clicking on the corresponding flag and pressing "Save custom translations". If your language is not in the list you can translate the system yourself. | There, you can also change language of your booking page by clicking on the corresponding flag and pressing "Save custom translations". If your language is not in the list you can translate the system yourself. | ||
| − | |||
| − | |||
[[File:Booking module texts.png | center ]] | [[File:Booking module texts.png | center ]] | ||
<br/><br/> | <br/><br/> | ||
| + | =SEO Settings= | ||
| + | By default the <span style="background-color:#d4f8e5; padding:5px; border-radius:5px;">Title tag</span> is represented by your company name that you have inserted in <span style="background-color:#d4f8e5; padding:5px; border-radius:5px;">Settings</span> -> <span style="background-color:#d4f8e5; padding:5px; border-radius:5px;">Company information</span> -> <span style="background-color:#d4f8e5; padding:5px; border-radius:5px;">Name</span> and automatic addition of <span style="background-color:#d4f8e5; padding:5px; border-radius:5px;">Scheduling and Booking Website</span> text.<br> | ||
| + | <span style="background-color:#d4f8e5; padding:5px; border-radius:5px;">Meta description</span> is taken from the text that you have added in <span style="background-color:#d4f8e5; padding:5px; border-radius:5px;">Settings</span> -> <span style="background-color:#d4f8e5; padding:5px; border-radius:5px;">Design settings</span> -> <span style="background-color:#d4f8e5; padding:5px; border-radius:5px;">Home page</span> -> description text for <span style="background-color:#d4f8e5; padding:5px; border-radius:5px;">About Us</span> booking website block. | ||
| + | <br><br> | ||
| + | If you need you can set these two options to contain different data and thus influence your booking website SEO.<br> | ||
| + | To set own <span style="background-color:#d4f8e5; padding:5px; border-radius:5px;">Title tag</span> and <span style="background-color:#d4f8e5; padding:5px; border-radius:5px;">Meta description</span> please navigate to <span style="background-color:#d4f8e5; padding:5px; border-radius:5px;">Settings</span> -> <span style="background-color:#d4f8e5; padding:5px; border-radius:5px;">Design settings</span> -> <span style="background-color:#d4f8e5; padding:5px; border-radius:5px;">Home page</span> and add the desired texts to the corresponding fields there.<br> | ||
| + | [[File:Seo_settings_home_page.png|1200px|border|center]] | ||
| + | <br><br> | ||
| + | '''<span style="background-color:#ffe9e9; padding:5px; border-radius:5px;">Please note!'''<span style="background-color:#ffe9e9; padding:5px; border-radius:5px;">We recommend using no more than 60 symbols for Title tag.</span></span><br> | ||
| + | <span style="background-color:#ffe9e9; padding:5px; border-radius:5px;">Meta description is limited to 400 characters and if you try to add a longer abstract it will be automatically cut when saving the settings.</span> | ||
| + | <br><br> | ||
= Our Time= | = Our Time= | ||
| − | Your time on the booking page is the time of the company's time zone. You can change your time zone in | + | Your time on the booking page is the time of the company's time zone. You can change your time zone in Setting//Main configuration//Time zone. |
| − | [[File: | + | [[File:Main configuration path new navigation.png|1200px| center]] |
[[File:Company timezone v3.png| center]] | [[File:Company timezone v3.png| center]] | ||
<br/><br/> | <br/><br/> | ||
=About section= | =About section= | ||
| − | In Settings // Design // Home page // Company description.<br/> | + | In Settings // Design settings // Home page // Company description.<br/> |
| − | [[File: | + | [[File:Home page path new navigation.png|1200px |center ]] |
<br/><br/> | <br/><br/> | ||
=Address= | =Address= | ||
| − | In Settings // Company | + | In Settings // Company Information // Address.<br/> |
| − | [[File: | + | [[File:Company info path new navigation.png|1200px| center ]] |
<br/><br/> | <br/><br/> | ||
=Company Contacts= | =Company Contacts= | ||
| − | You can | + | <br><br> |
| − | [[File: | + | You can edit them in <span style="background-color:#d4f8e5; padding:5px; border-radius:5px;">Settings</span> -> <span style="background-color:#d4f8e5; padding:5px; border-radius:5px;">Company information</span><br> |
| − | <br/><br/> | + | [[File:Company info path new.png|1200px|center|link=https://help.simplybook.me/images/a/a6/Company_info_path_new.png]] |
| + | <br><br> | ||
| + | The following details can be added/edited: | ||
| + | * Email address | ||
| + | * Phone number | ||
| + | * Website address | ||
| + | * WhatsApp phone | ||
| + | * Facebook profile url | ||
| + | * X.com (Twitter) page link | ||
| + | * Instagram page url | ||
| + | * LinkedIn page | ||
| + | <br><br> | ||
| + | An example of the client side look. | ||
| + | [[File:Contact us client side new.png|1200px|center|link=https://help.simplybook.me/images/4/44/Contact_us_client_side_new.png]] | ||
| + | <br><br> | ||
| + | The clients will be able to, for example, click on WhatsApp number and be redirected to the WhatsApp messenger to easily contact you there. | ||
| + | <br><br><br><br> | ||
| + | |||
=Working hours= | =Working hours= | ||
Working hours block on the booking page:<br/> | Working hours block on the booking page:<br/> | ||
[[File:Working hours.png | center ]]<br/> | [[File:Working hours.png | center ]]<br/> | ||
| − | To change working hours block go to | + | To change working hours block go to Settings // Company opening hours. <br/> |
[[File:Company week schedule.png| center ]]<br/> | [[File:Company week schedule.png| center ]]<br/> | ||
| − | If you wish to display times different from real working hours there you can use "Use custom working hours" in Settings// | + | If you wish to display times different from real working hours there you can use "Use custom working hours" in Settings//Design settings//Home page. |
[[File:Custom working hours v3.png |center]] | [[File:Custom working hours v3.png |center]] | ||
<br><br> | <br><br> | ||
| − | = | + | =Calendar Layout= |
| − | You can change | + | You can change calendar layout in Settings // Design settings // Calendar Layout settings // Calendar Layout drop-down<br/> |
| − | [[File: | + | [[File:Calendar layout path new navigation.png|1200px | center ]]<br/> |
| − | There are | + | There are 8 types of calendar layout:<br/> |
[[File:Select timeline type.png| center ]]<br/> | [[File:Select timeline type.png| center ]]<br/> | ||
:'''Slots weekly''' - shows available time in the intervals equal to your service duration for a week. Starts counting from the first available time. | :'''Slots weekly''' - shows available time in the intervals equal to your service duration for a week. Starts counting from the first available time. | ||
| Line 77: | Line 105: | ||
:'''Flexible provider'''- shows available times for providers in the intervals equal to your [[Need_to_change_interval_(timeframe)| timeframe]] duration. Starts counting from the first available time on selected date. | :'''Flexible provider'''- shows available times for providers in the intervals equal to your [[Need_to_change_interval_(timeframe)| timeframe]] duration. Starts counting from the first available time on selected date. | ||
:'''Classes'''- shows available times for classes in the intervals equal to class duration. Starts counting from the first available time. | :'''Classes'''- shows available times for classes in the intervals equal to class duration. Starts counting from the first available time. | ||
| − | :'''''Please note!''''' [[Custom_Features#Multiple_Bookings | Multiple Bookings]] custom feature currently does not work with Classes | + | :'''''Please note!''''' [[Custom_Features#Multiple_Bookings | Multiple Bookings]] custom feature currently does not work with Classes layout. |
If you have services that have fixed start times, you can try using [[Custom_Features#Appointment_at_Fixed_Time| Appointment at fixed time]] Custom Feature. | If you have services that have fixed start times, you can try using [[Custom_Features#Appointment_at_Fixed_Time| Appointment at fixed time]] Custom Feature. | ||
<br/><br/> | <br/><br/> | ||
=Interval= | =Interval= | ||
| − | You can change it in Settings // | + | You can change it in Settings // Main configuration // Timeframe.<br/> |
[[File:Timeframe drop down v3.png| border | center ]]<br/><br/> | [[File:Timeframe drop down v3.png| border | center ]]<br/><br/> | ||
| − | You can also try to change | + | You can also try to change calendar layout to flexible in order to show availability according to your interval. Check types of Calendar Layouts [[Where_to_change_my_info#Timeline| here]]. |
| − | |||
| − | |||
| − | |||
| − | |||
| − | |||
| − | |||
<br/><br/> | <br/><br/> | ||
Latest revision as of 12:09, 14 March 2024
Company title
In Settings // Company Information // Name.

Company url
Unfortunately, there is no option to change url within the system. In order to change it, you need to register a new company with desired url.
Free:
You can create a new company with the desired name in url and manually transfer all data and settings there. You can create services and providers, and copy list of clients to new system with Import Clients Custom Feature (see instructions here). Bookings and other settings cannot be transferred.
Paid:
Create a new system with the desired name in url, go to Plans&Prices // Additional items and select "Copy system to new system" , make payment and our developers will transfer your data. After you made a payment, you need to contact support, tell them old company name and new company name (confirm ownership of both accounts), and request transfer of the system.
Please note! Reviews as well as HTML formatting in descriptions will not be copied to the new system.

Company logo and background
In Settings // Design settings // Additional theme settings.

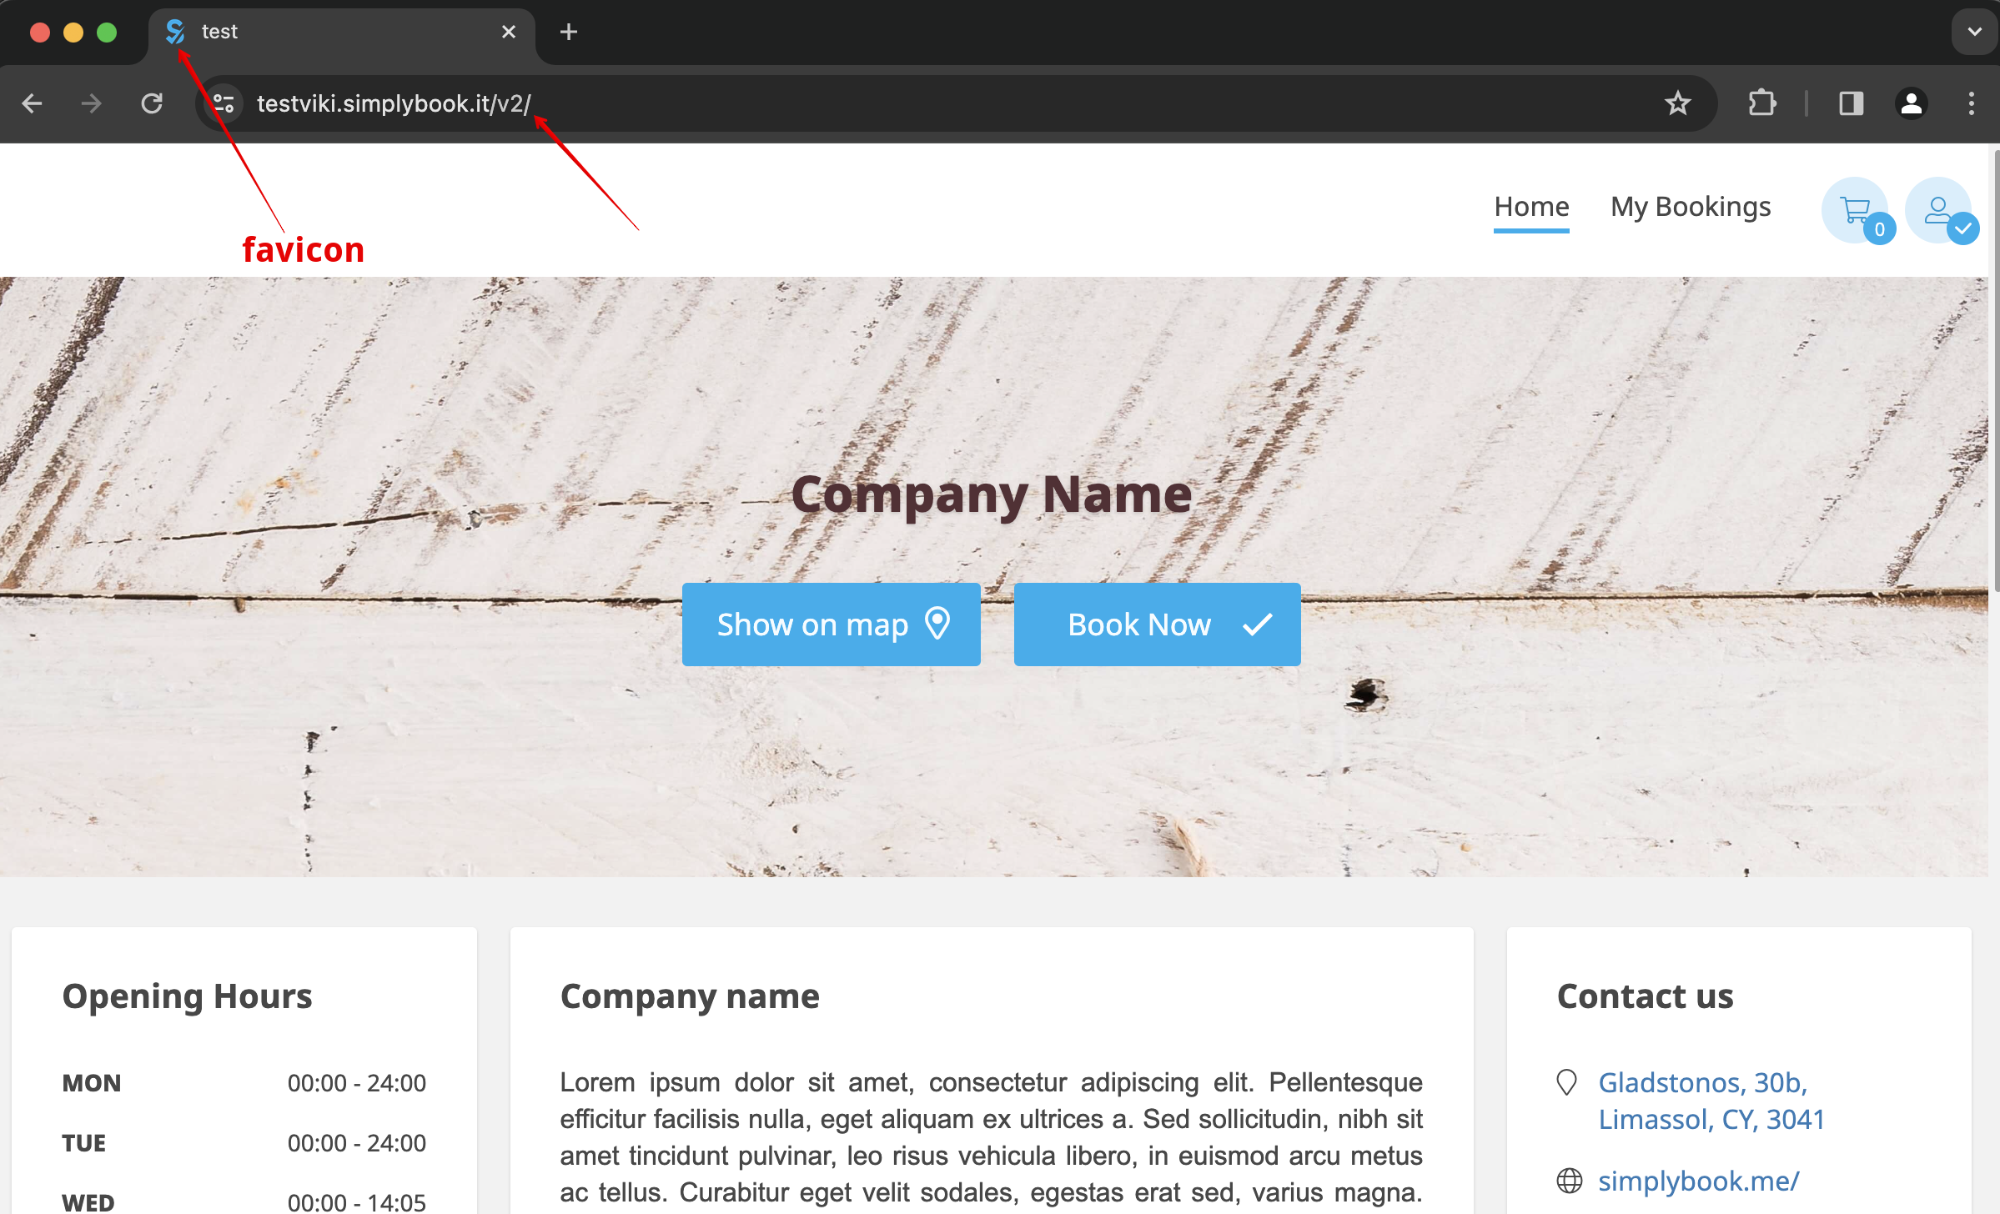
Favicon
It is not possible to modify the logo (favicon) that you see in the browser tab as well as the /v2/ part in the URL of the booking website.
These elements are fixed and cannot be altered.
Design
In Settings // Design settings.

- Recommended themes
- All new ones
Those themes support all new functionality and have the option to adjust the colors of your booking page.
Texts and language
If you need to adjust any texts on your booking page (for example change Employee to Therapist, Coach or Room), you can do it in Settings // Custom Wording & Translations.

There, you can also change language of your booking page by clicking on the corresponding flag and pressing "Save custom translations". If your language is not in the list you can translate the system yourself.

SEO Settings
By default the Title tag is represented by your company name that you have inserted in Settings -> Company information -> Name and automatic addition of Scheduling and Booking Website text.
Meta description is taken from the text that you have added in Settings -> Design settings -> Home page -> description text for About Us booking website block.
If you need you can set these two options to contain different data and thus influence your booking website SEO.
To set own Title tag and Meta description please navigate to Settings -> Design settings -> Home page and add the desired texts to the corresponding fields there.

Please note!We recommend using no more than 60 symbols for Title tag.
Meta description is limited to 400 characters and if you try to add a longer abstract it will be automatically cut when saving the settings.
Our Time
Your time on the booking page is the time of the company's time zone. You can change your time zone in Setting//Main configuration//Time zone.


About section
In Settings // Design settings // Home page // Company description.

Address
In Settings // Company Information // Address.
Company Contacts
You can edit them in Settings -> Company information
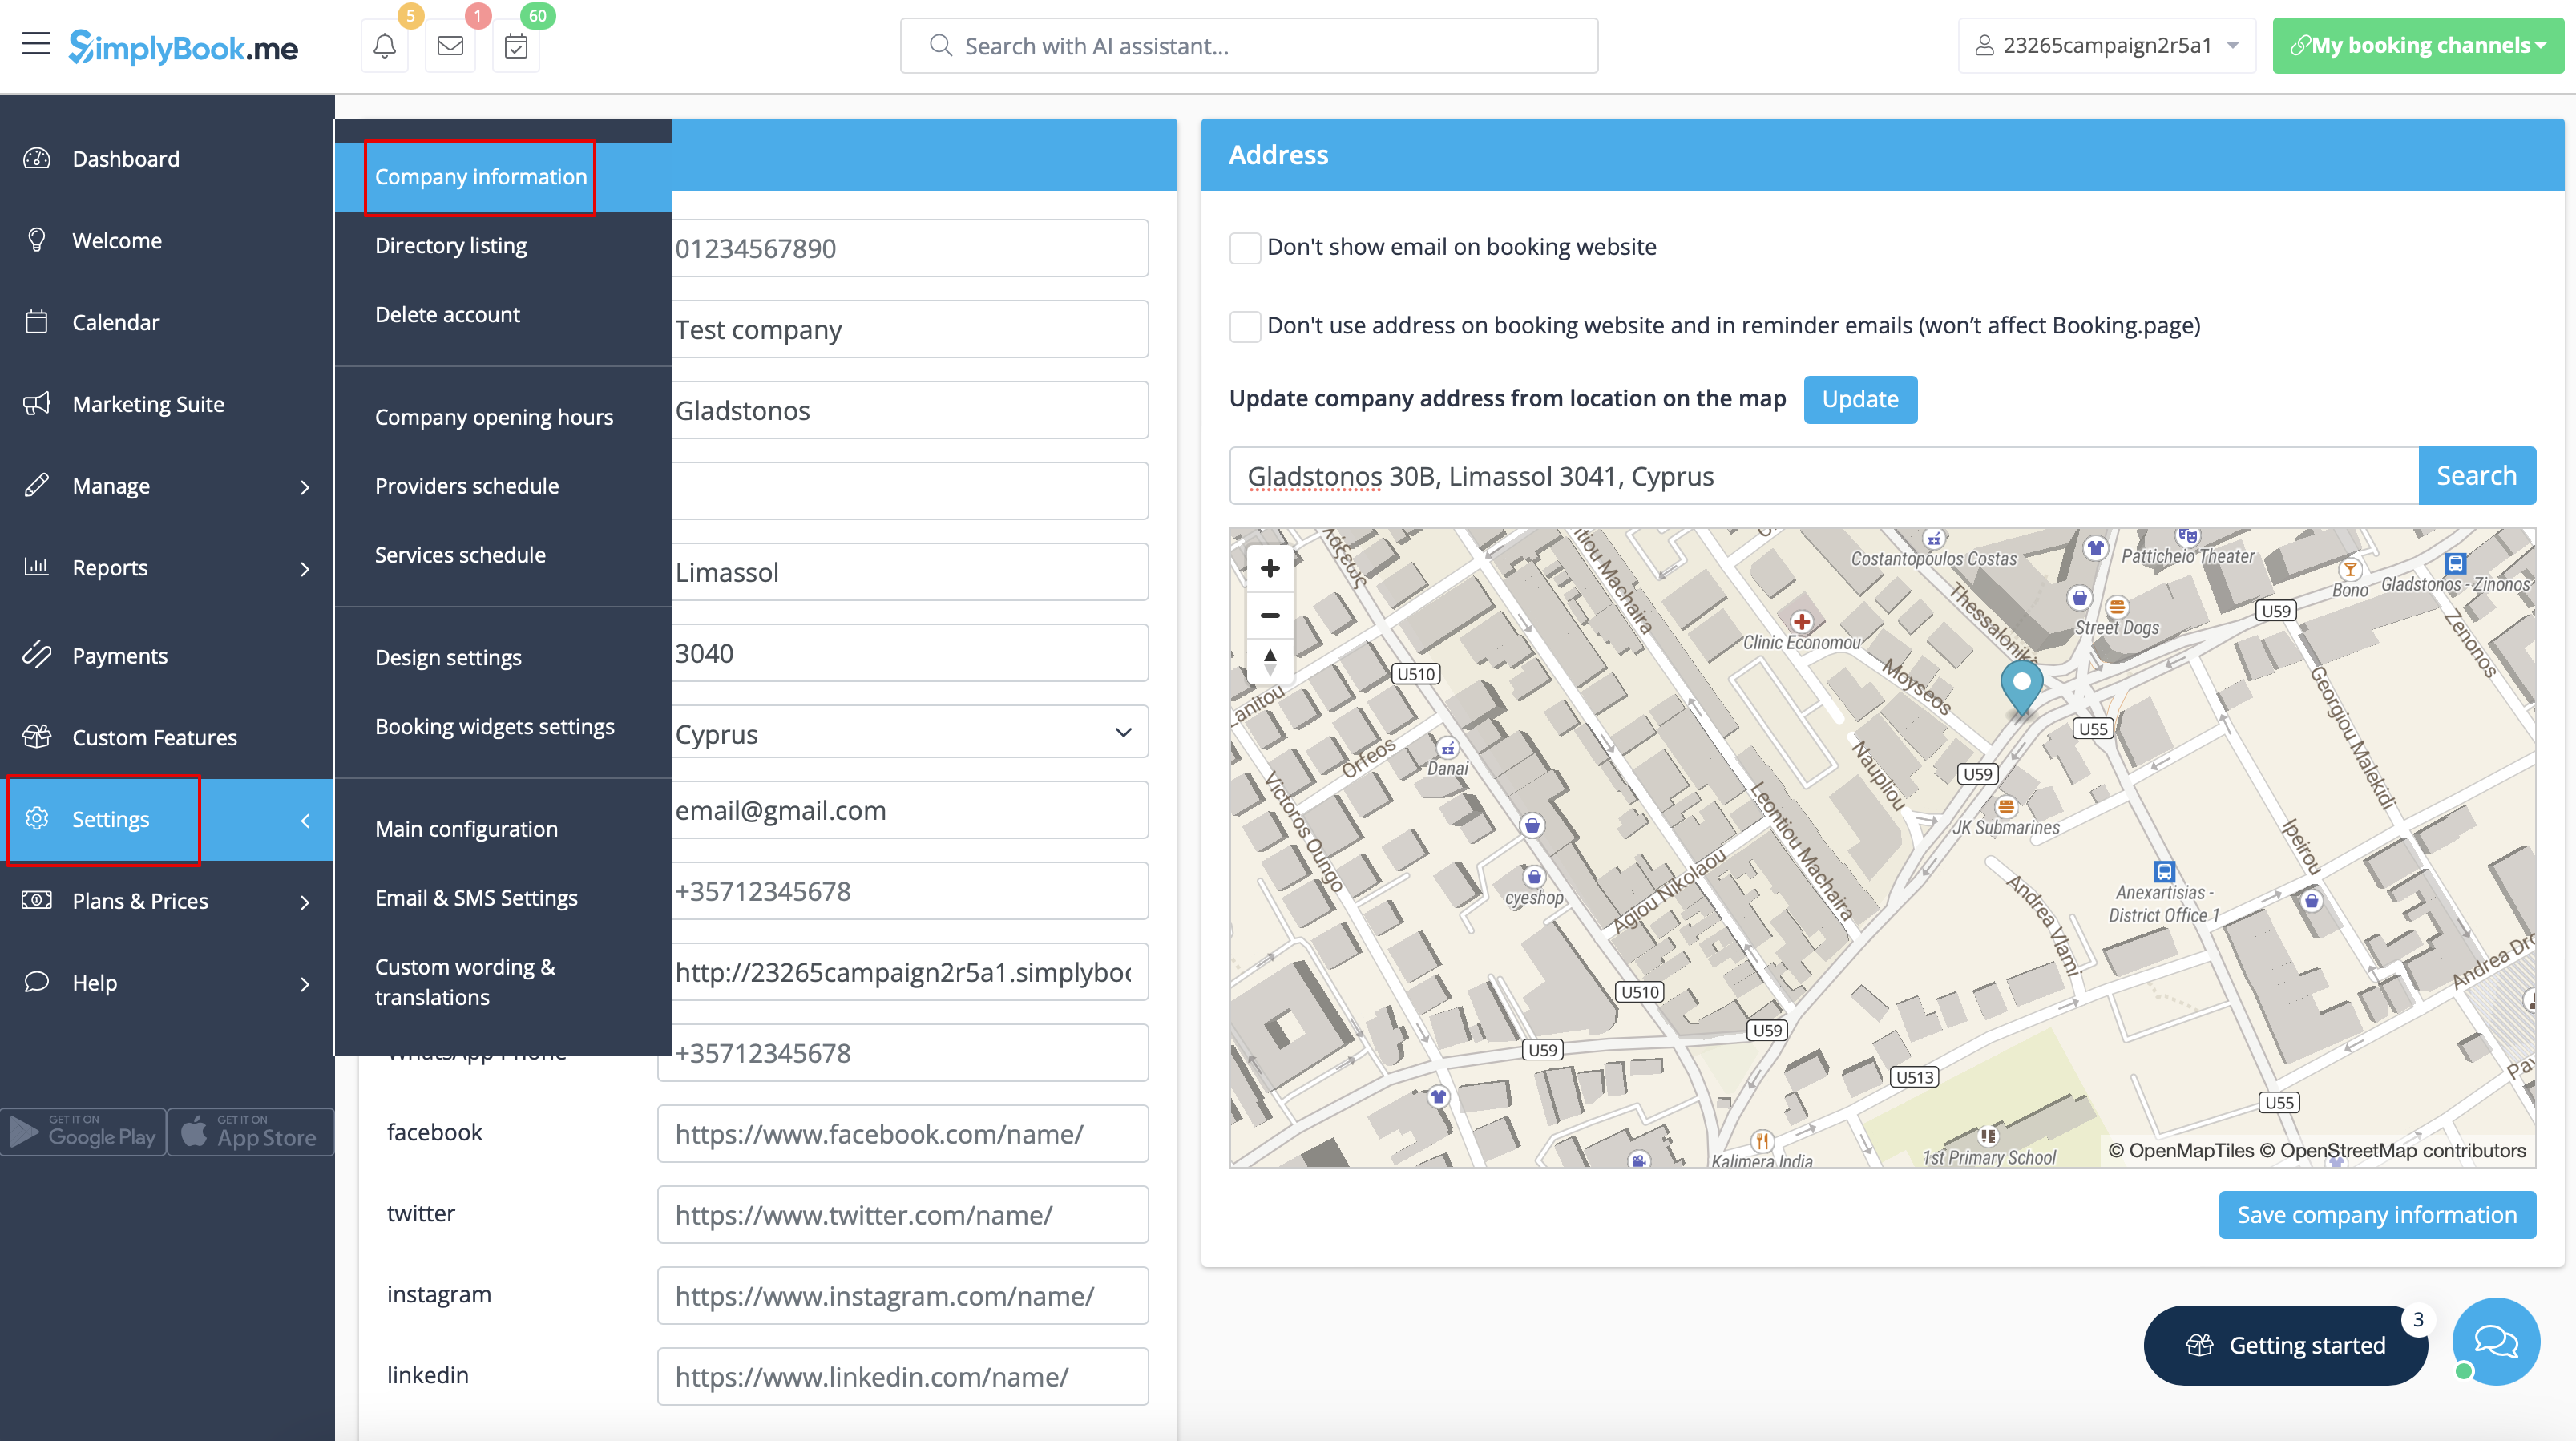
The following details can be added/edited:
- Email address
- Phone number
- Website address
- WhatsApp phone
- Facebook profile url
- X.com (Twitter) page link
- Instagram page url
- LinkedIn page
An example of the client side look.
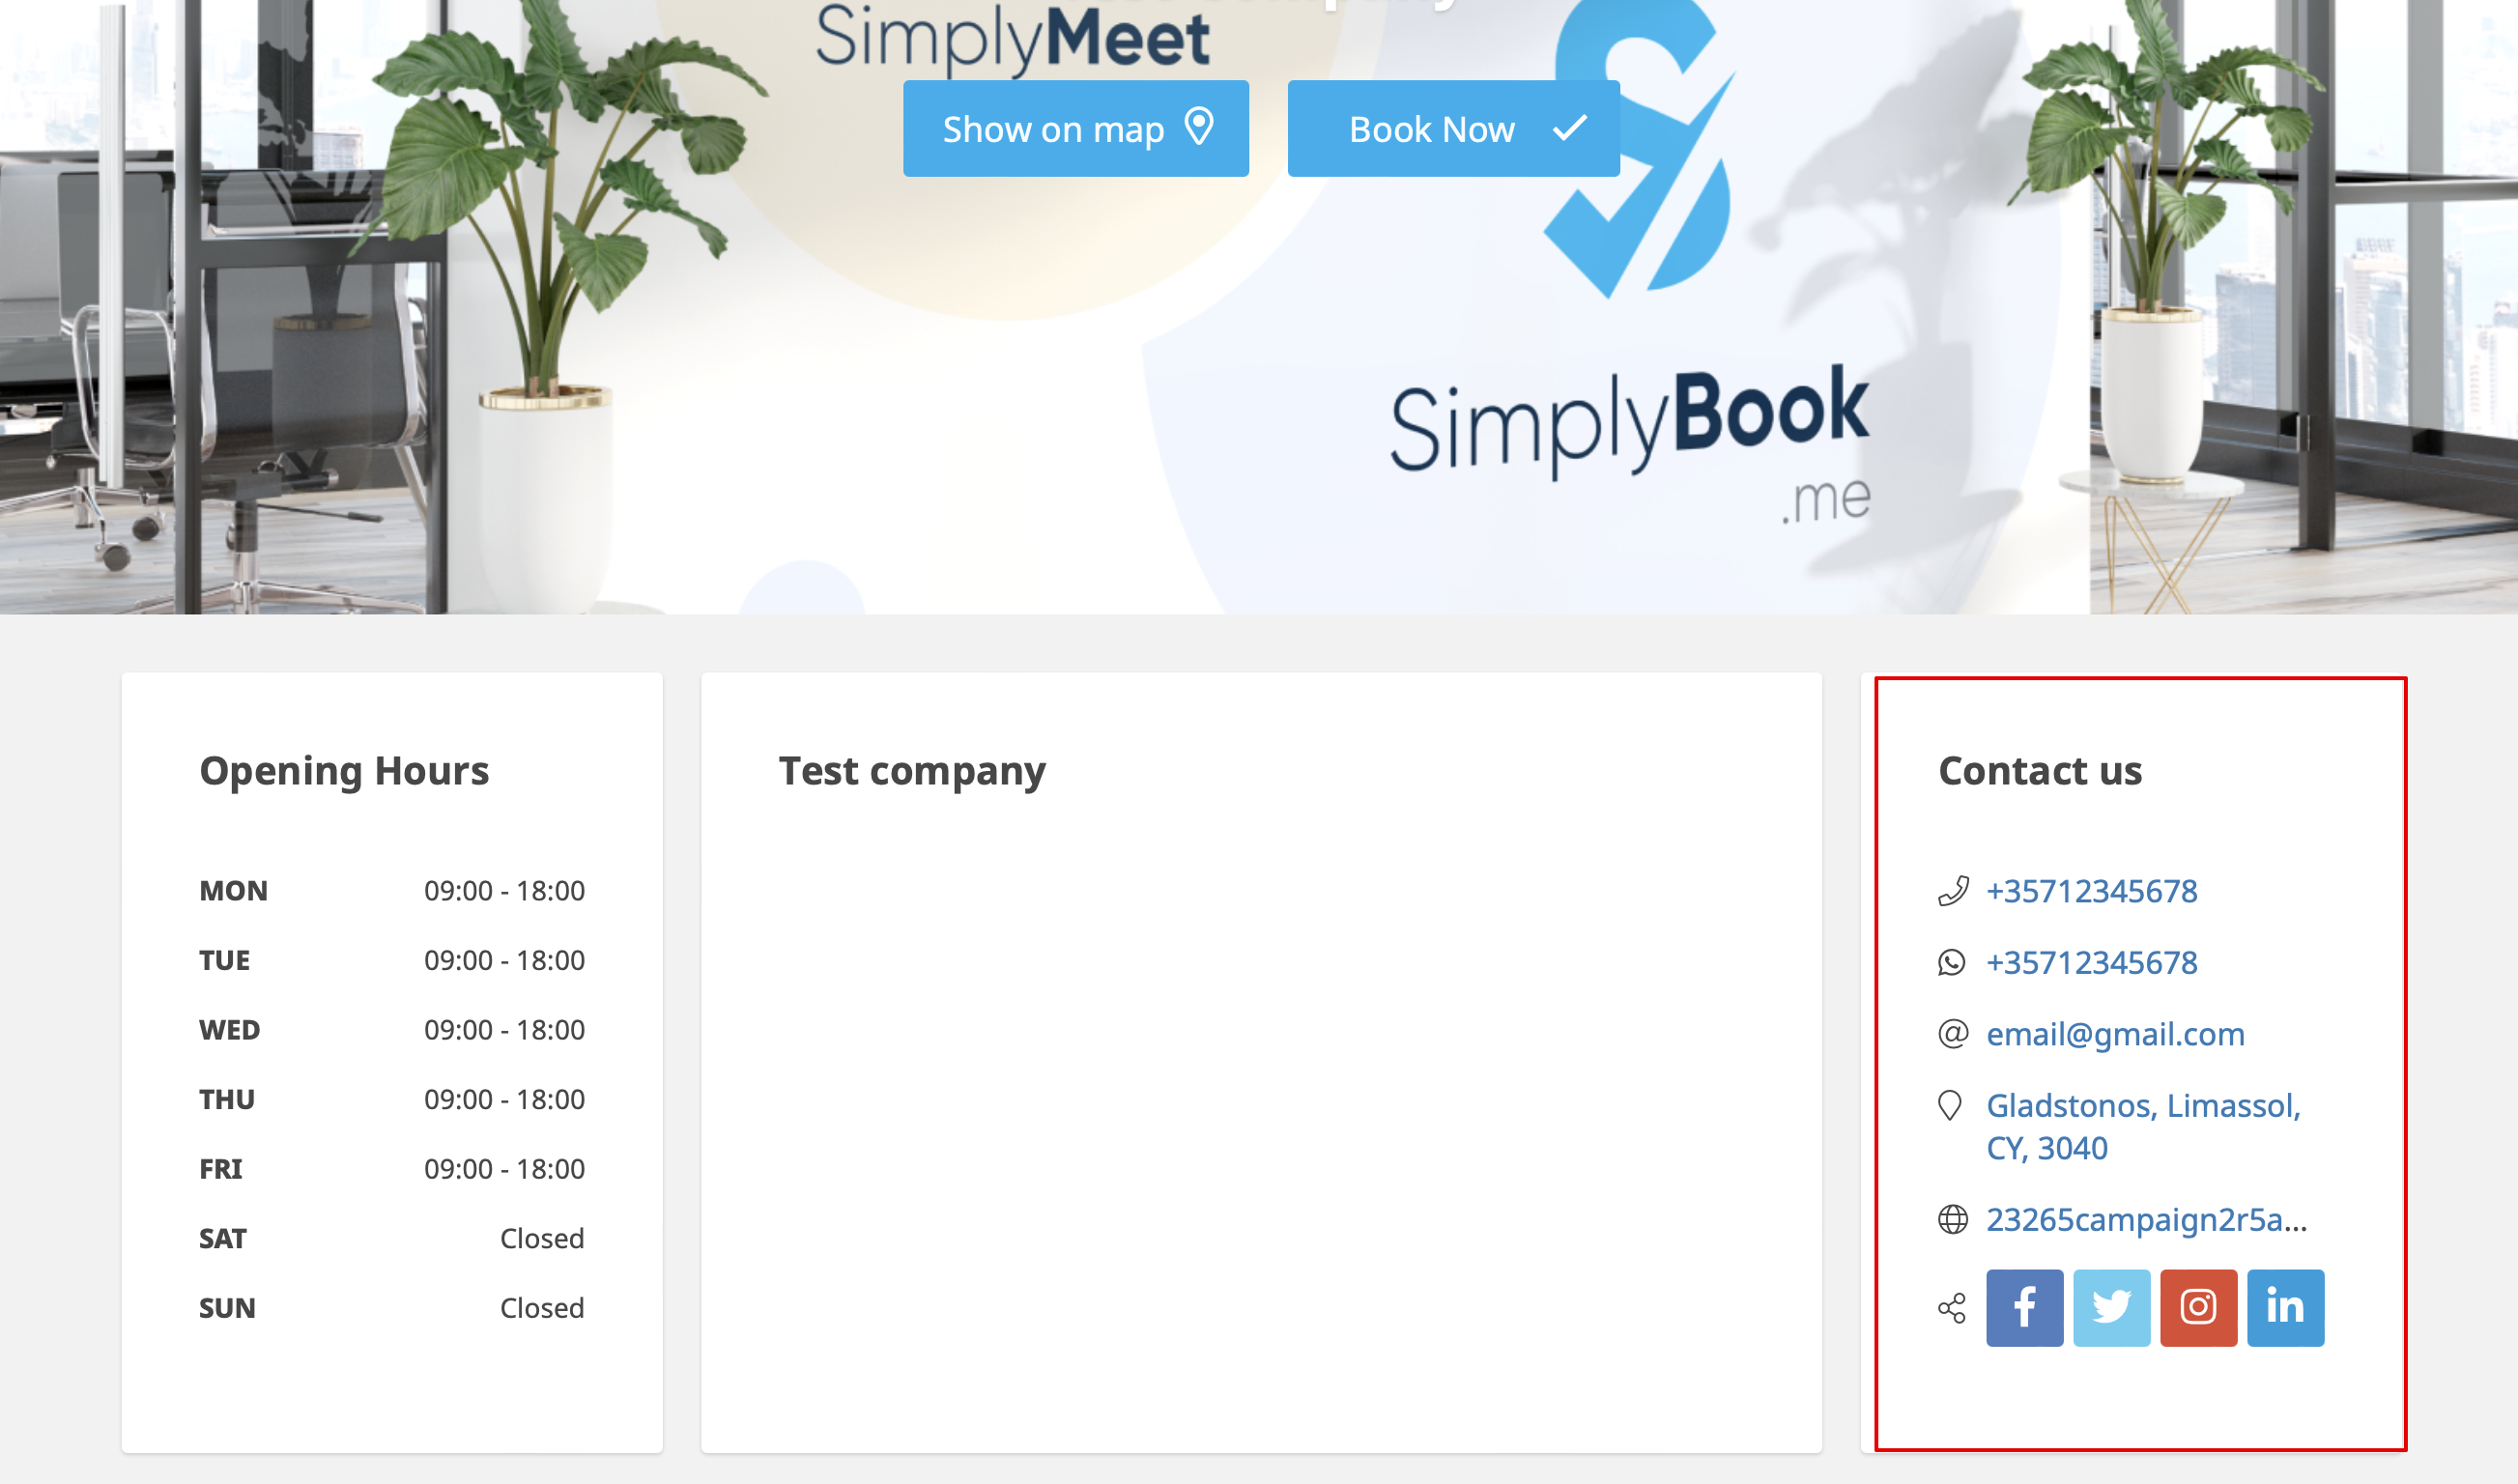
The clients will be able to, for example, click on WhatsApp number and be redirected to the WhatsApp messenger to easily contact you there.
Working hours
Working hours block on the booking page:

To change working hours block go to Settings // Company opening hours.

If you wish to display times different from real working hours there you can use "Use custom working hours" in Settings//Design settings//Home page.

Calendar Layout
You can change calendar layout in Settings // Design settings // Calendar Layout settings // Calendar Layout drop-down

There are 8 types of calendar layout:

- Slots weekly - shows available time in the intervals equal to your service duration for a week. Starts counting from the first available time.
- Modern - shows available time in the intervals equal to your service duration for a day. Starts counting from the first available time.
- Flexible weekly - shows available time in the intervals equal to your timeframe duration for a week. Starts counting from the first available time.
- Flexible - shows available time in the intervals equal to your timeframe duration for a day. Starts counting from the first available time.
- Modern provider - shows available time for providers for chosen date. Starts counting from the first available time of all providers.
- Flexible provider- shows available times for providers in the intervals equal to your timeframe duration. Starts counting from the first available time on selected date.
- Classes- shows available times for classes in the intervals equal to class duration. Starts counting from the first available time.
- Please note! Multiple Bookings custom feature currently does not work with Classes layout.
If you have services that have fixed start times, you can try using Appointment at fixed time Custom Feature.
Interval
You can change it in Settings // Main configuration // Timeframe.

You can also try to change calendar layout to flexible in order to show availability according to your interval. Check types of Calendar Layouts here.