Created page with "Zusätzliche Felder" |
Created page with "|description=Erstellen Sie Formulare, um Kundeninformationen vor Terminen zu sammeln. Personalisieren Sie den Buchungsprozess. Jetzt aktivieren!" Tags: Mobile edit Mobile web edit |
||
| (6 intermediate revisions by 2 users not shown) | |||
| Line 1: | Line 1: | ||
<languages/> | <languages/> | ||
{{#seo: | {{#seo: | ||
|title=Intake Forms custom feature - SimplyBook.me | |title=Intake Forms custom feature - SimplyBook.me | ||
|description=Erstellen Sie Formulare, um Kundeninformationen vor Terminen zu sammeln. Personalisieren Sie den Buchungsprozess. Jetzt aktivieren! | |||
|titlemode=append | |titlemode=append | ||
|keywords=faq, frequently asked questions, booking software, appointment system questions, appointments online, calendar software, booking system, booking calendar, scheduling software, online appointment scheduling, online scheduling, plugins, custom features, additional functionality, additional questions, ask at checkout, additional information, request information, ask questions | |keywords=faq, frequently asked questions, booking software, appointment system questions, appointments online, calendar software, booking system, booking calendar, scheduling software, online appointment scheduling, online scheduling, plugins, custom features, additional functionality, additional questions, ask at checkout, additional information, request information, ask questions | ||
| Line 18: | Line 18: | ||
;Wie man es benutzt | |||
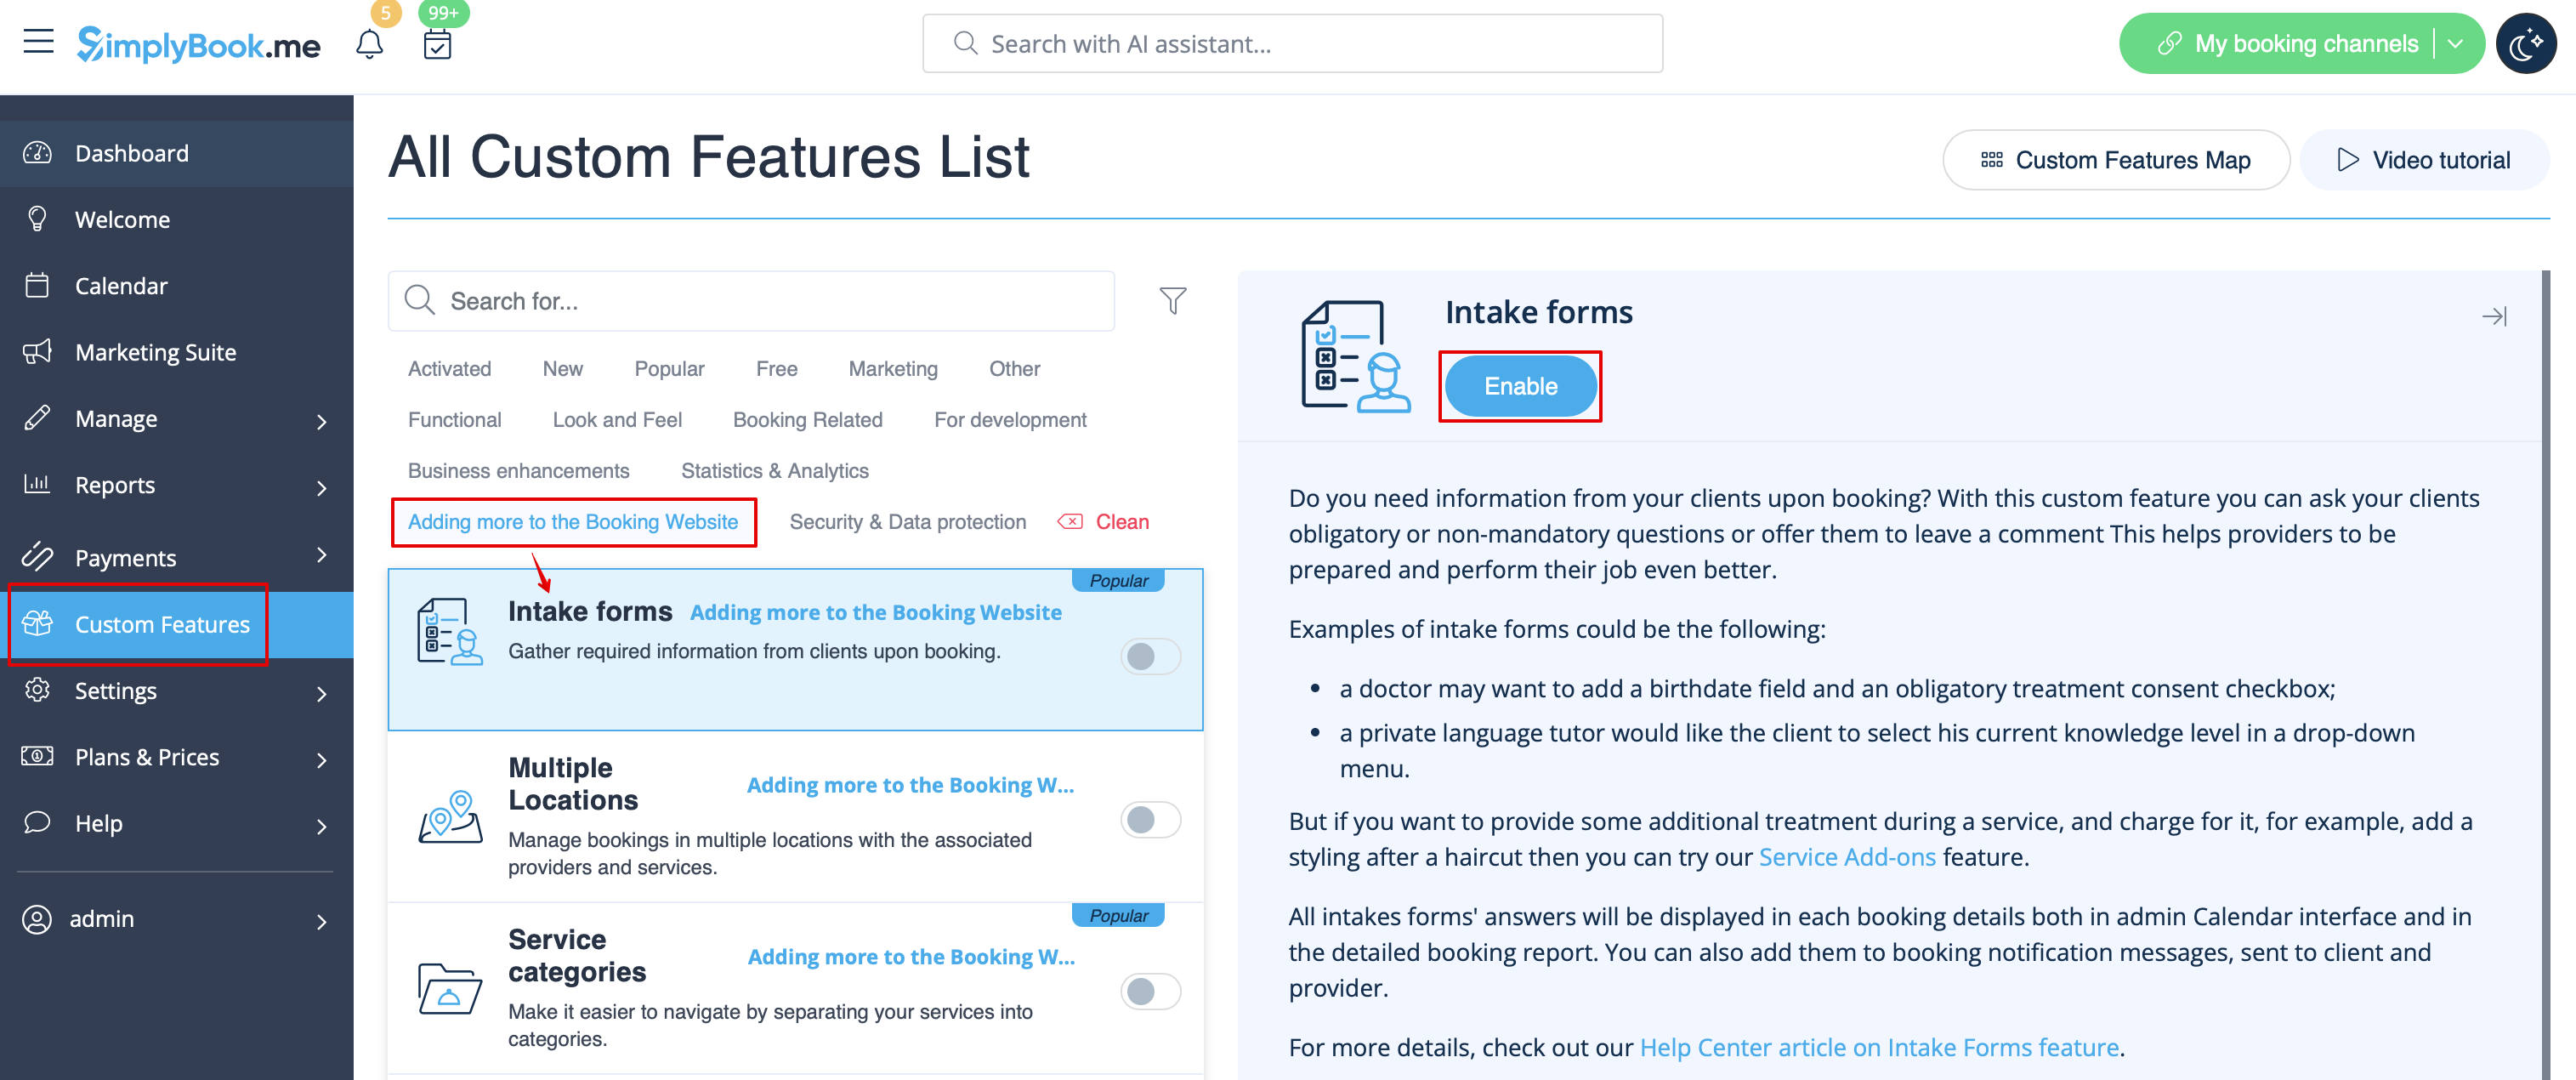
; | 1. Aktivieren Sie die individuelle Funktion "Zusätzliche Felder" in der Funktion " Individuelle Funktion//Weiteres zur Buchungsseite hinzufügen. | ||
[[File:Intake forms enable path redesigned.png|1200px | center|link=https://help.simplybook.me/images/d/d7/Intake_forms_enable_path_redesigned.png]] | |||
[[File:Intake forms enable path | |||
: | |||
<br><br> | <br><br> | ||
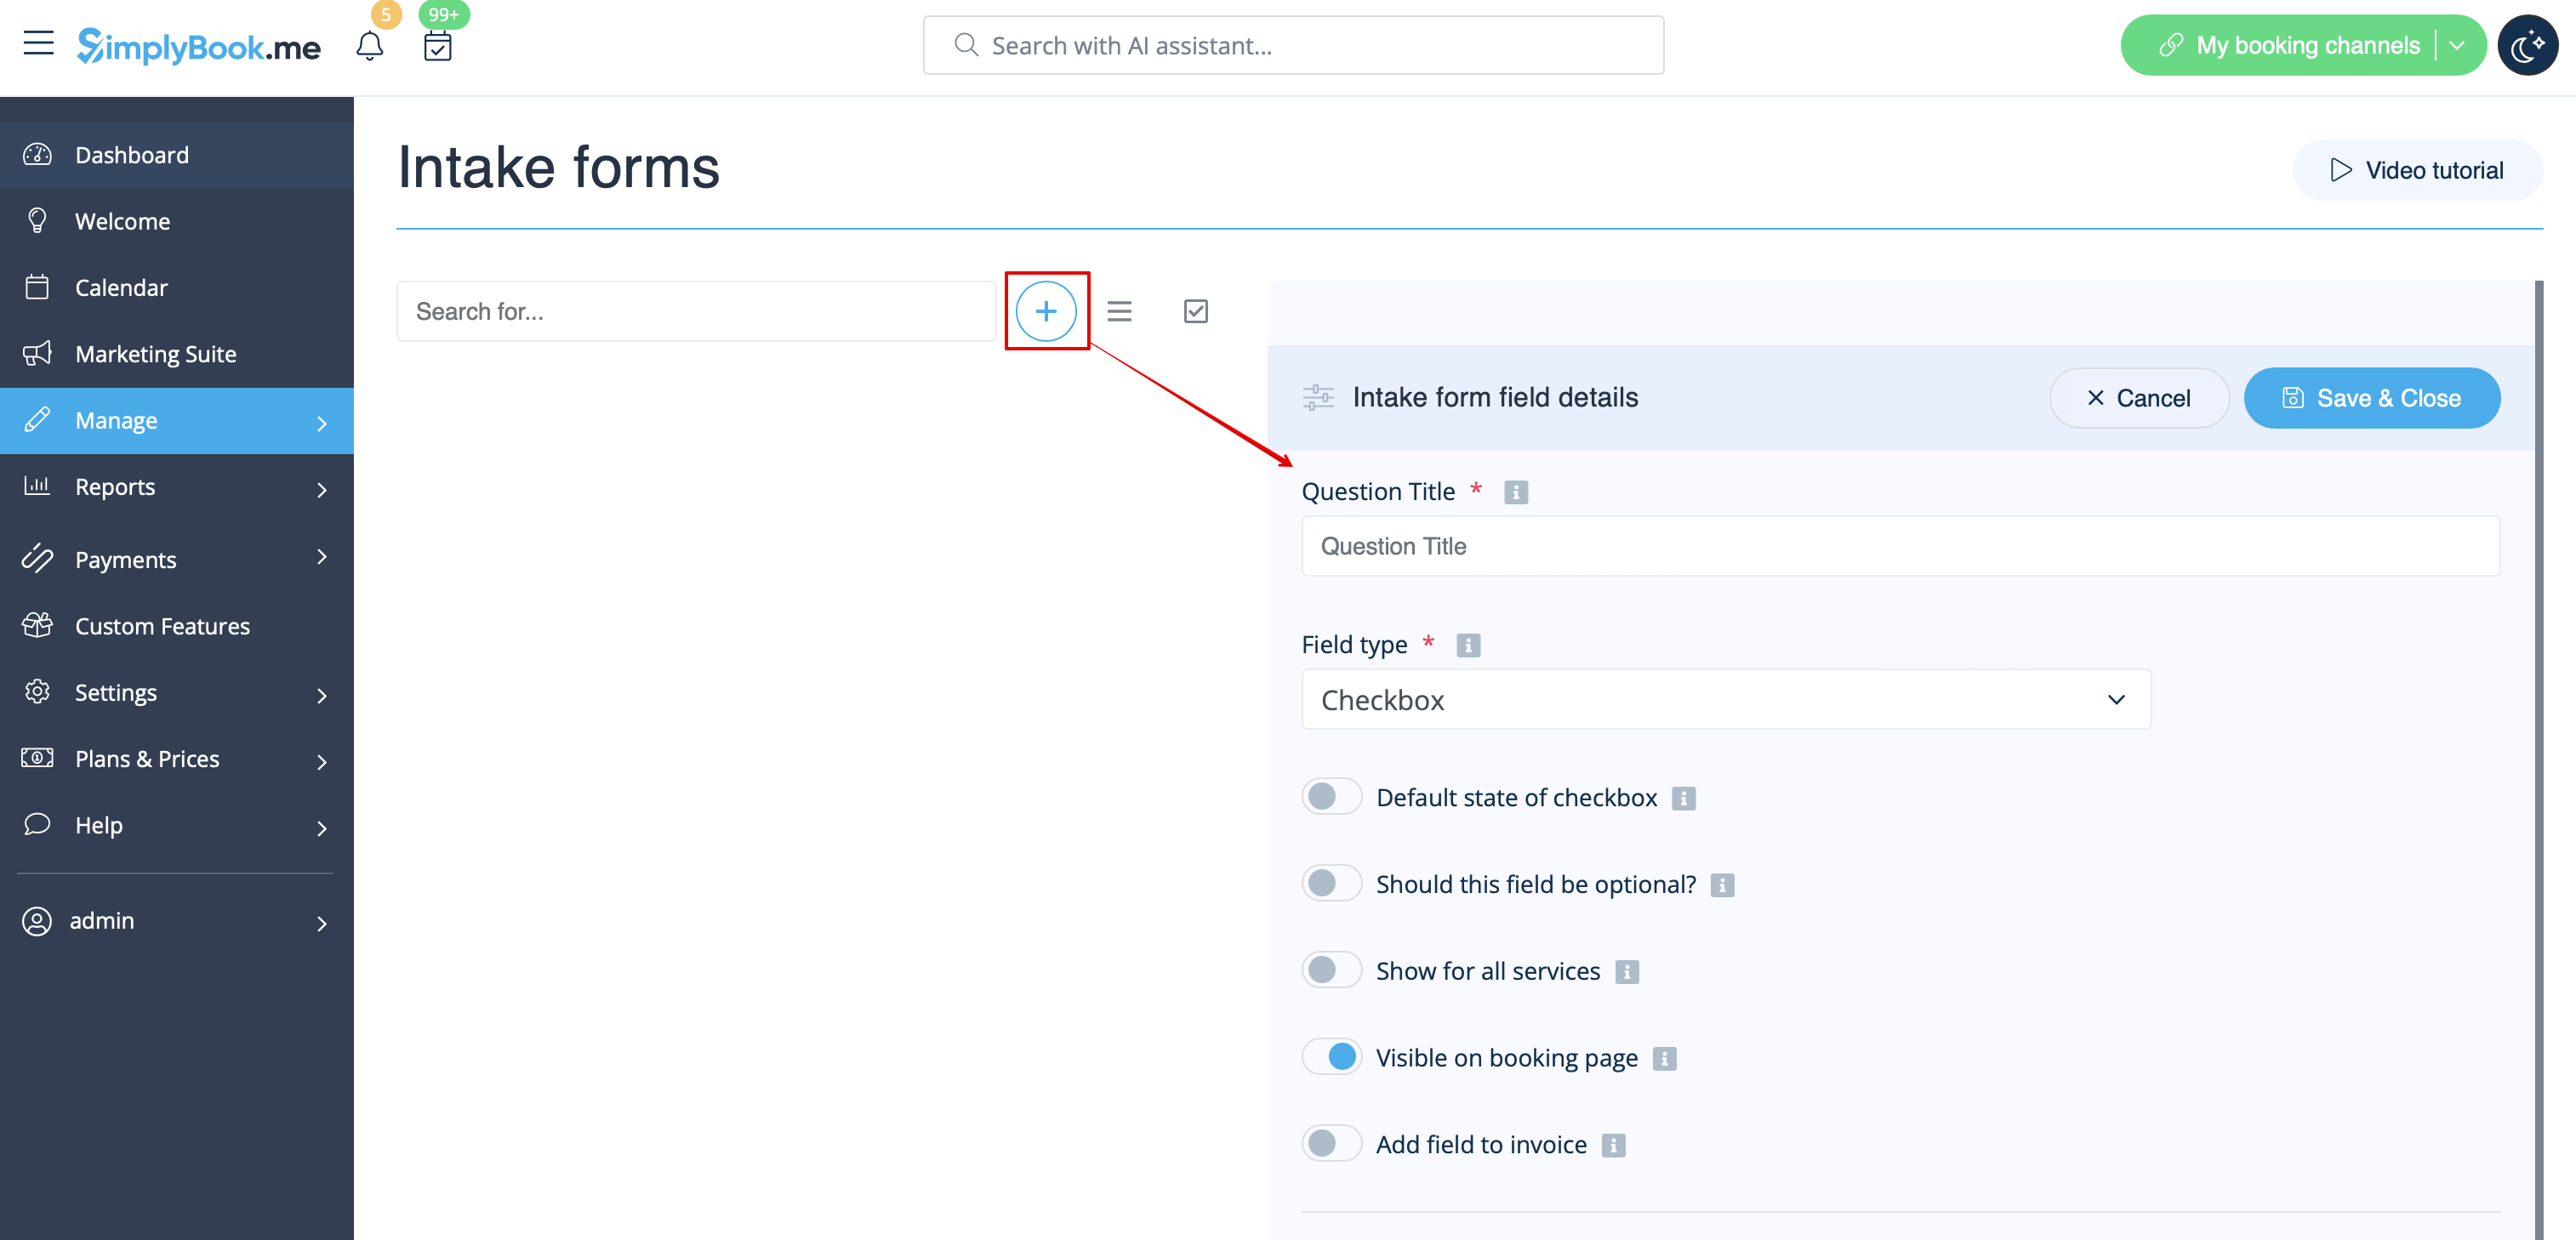
2. Gehen Sie zur Verwaltung oder zur Seite Verwalten//Anmeldeformulare. | |||
[[File:Intake forms settings path redesinged.png|1200px | center|link=https://help.simplybook.me/images/6/64/Intake_forms_settings_path_redesinged.png]] | |||
[[File:Intake forms | |||
<br><br> | <br><br> | ||
3. Drücken Sie auf die Schaltfläche "+" in den Einstellungen der individuellen Funktion, um ein neues Formular zu erstellen. | |||
[[File:New intake form form redesigned.png|1200px | center|link=https://help.simplybook.me/images/1/1c/New_intake_form_form_redesigned.png]] | |||
[[File: | |||
<br><br> | <br><br> | ||
: | 4. Schreiben Sie in das Feld "Fragentitel" die Frage, die Sie Ihren Kunden stellen möchten. Zum Beispiel: Alter, Vorlieben, Haben Sie gesundheitliche Probleme? usw. | ||
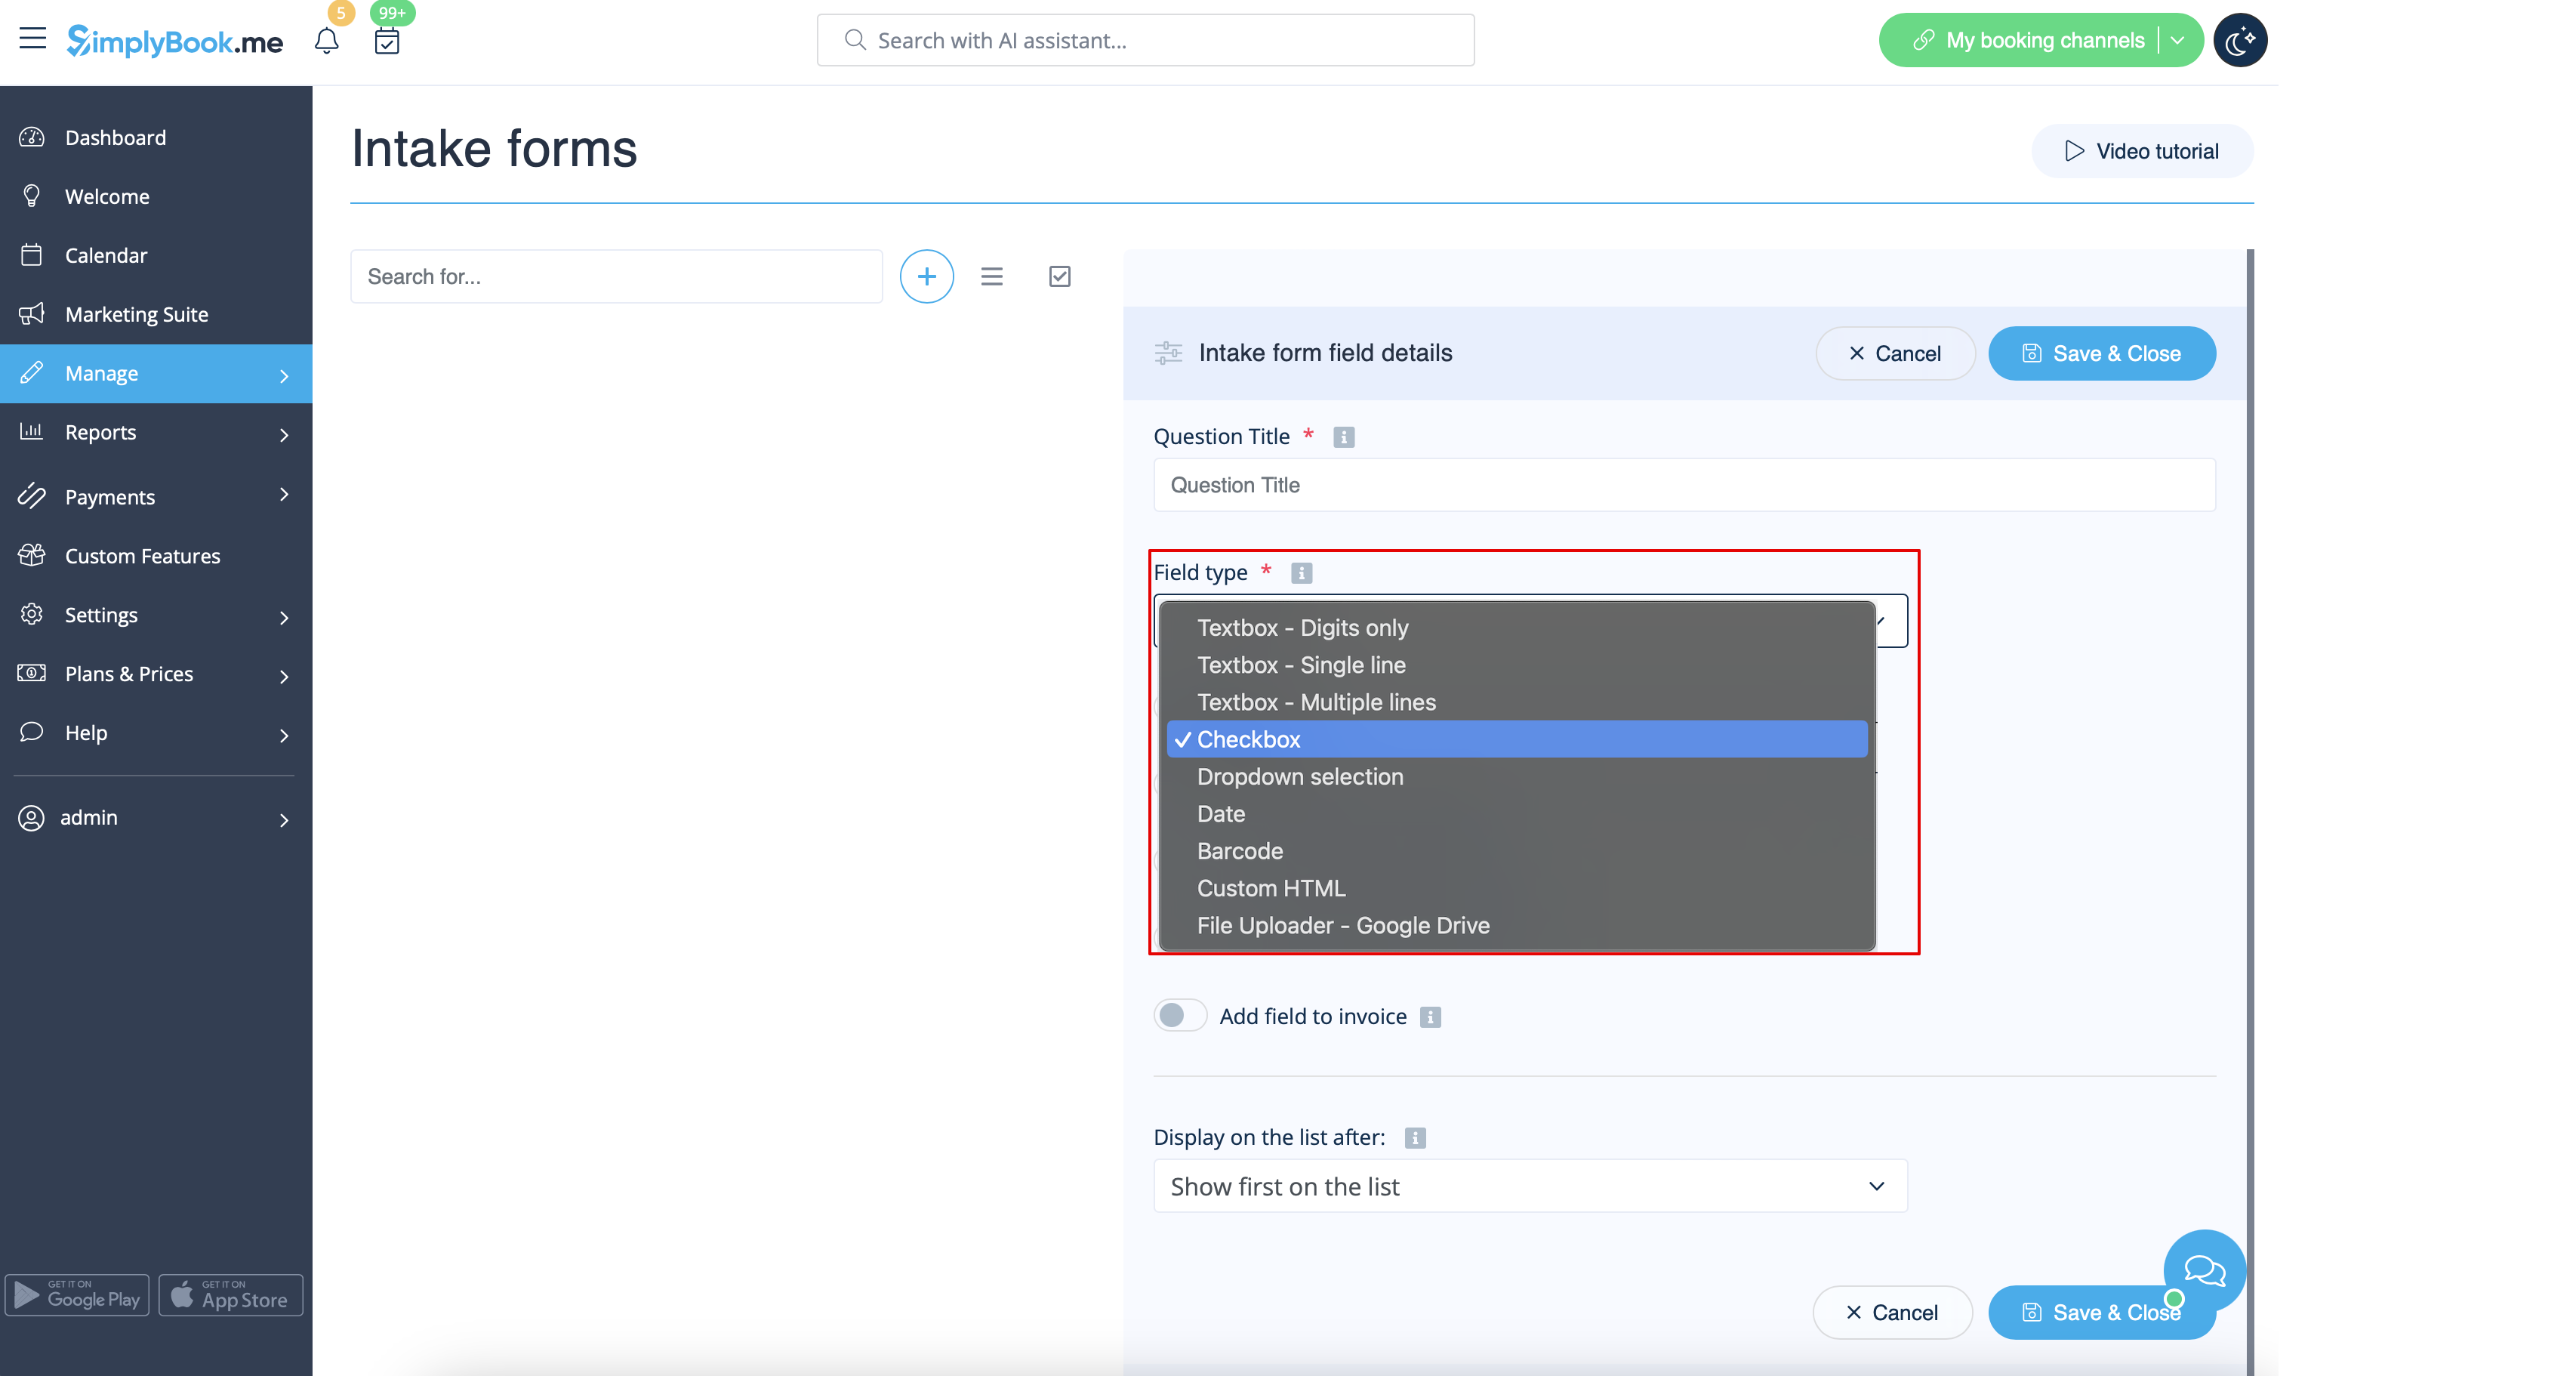
[[File: | 5. Wählen Sie den Feldtyp:<br> | ||
'''Nur Ziffern''' - erlaubt nur die Eingabe von Zahlen. Nützlich, wenn Sie das Alter, die Größe oder eine andere Information benötigen, die nur Ziffern erfordert.<br> | |||
'''Einzeilig''' - wird normalerweise für kurze Antworten verwendet<br> | |||
'''Mehrzeilig''' - verwenden Sie diese Art von Feld, wenn Sie längere Erklärungen von Ihren Kunden erwarten | |||
Kontrollkästchen - erstellt ein Kontrollkästchen, das der Kunde entweder ankreuzen oder nicht ankreuzen soll. Nützlich für Fragen, die eine binäre Antwort erfordern, z. B. "Ich benötige zusätzliche Dienstleistungen".<br> | |||
'''Dropdown-Auswahl''' - erstellt eine Dropdown-Liste mit der Möglichkeit, nur eine Option auszuwählen. Um dieses Feld zu erstellen, müssen Sie eine Liste von Werten im Abschnitt "Dropdown-Optionen und Standardoption" erstellen. Sie können auch den Standardwert auswählen, der zugewiesen wird, wenn nichts aus der Liste ausgewählt wird.<br> | |||
'''Datum''' - erstellt eine Datumsauswahloption mit Kalender.<br> | |||
'''Barcode''' - ermöglicht das Scannen von Barcodes über die mobile Verwaltungsanwendung und das Abrufen der Werte aus dem Scanvorgang. Erlaubt auch einfache Texteingaben wie in einzeiligen Eingabeformularen.<br> | |||
'''Benutzerdefiniertes HTML''' - ermöglicht das Hinzufügen von visuellen Trennlinien oder zusätzlichem Text neben dem Aufnahmeformular. Kann nicht für Kundeneingaben verwendet werden. | |||
[[File:Intake forms types redesigned.png|1200px|border |center|link=https://help.simplybook.me/images/1/1b/Intake_forms_types_redesigned.png]]<br><br> | |||
6. Mit Hilfe des Schalters "optional" können Sie festlegen, ob die Eingabe obligatorisch ist oder nicht. | |||
Fügen Sie das Feld (sowohl Titel als auch Antwort) in Kundenrechnungen ein, wenn Sie es benötigen und wenn Sie die individuelle Funktion [[Special:MyLanguage/Accept_payments_custom_feature|Zahlungen akzeptieren]] verwenden. | |||
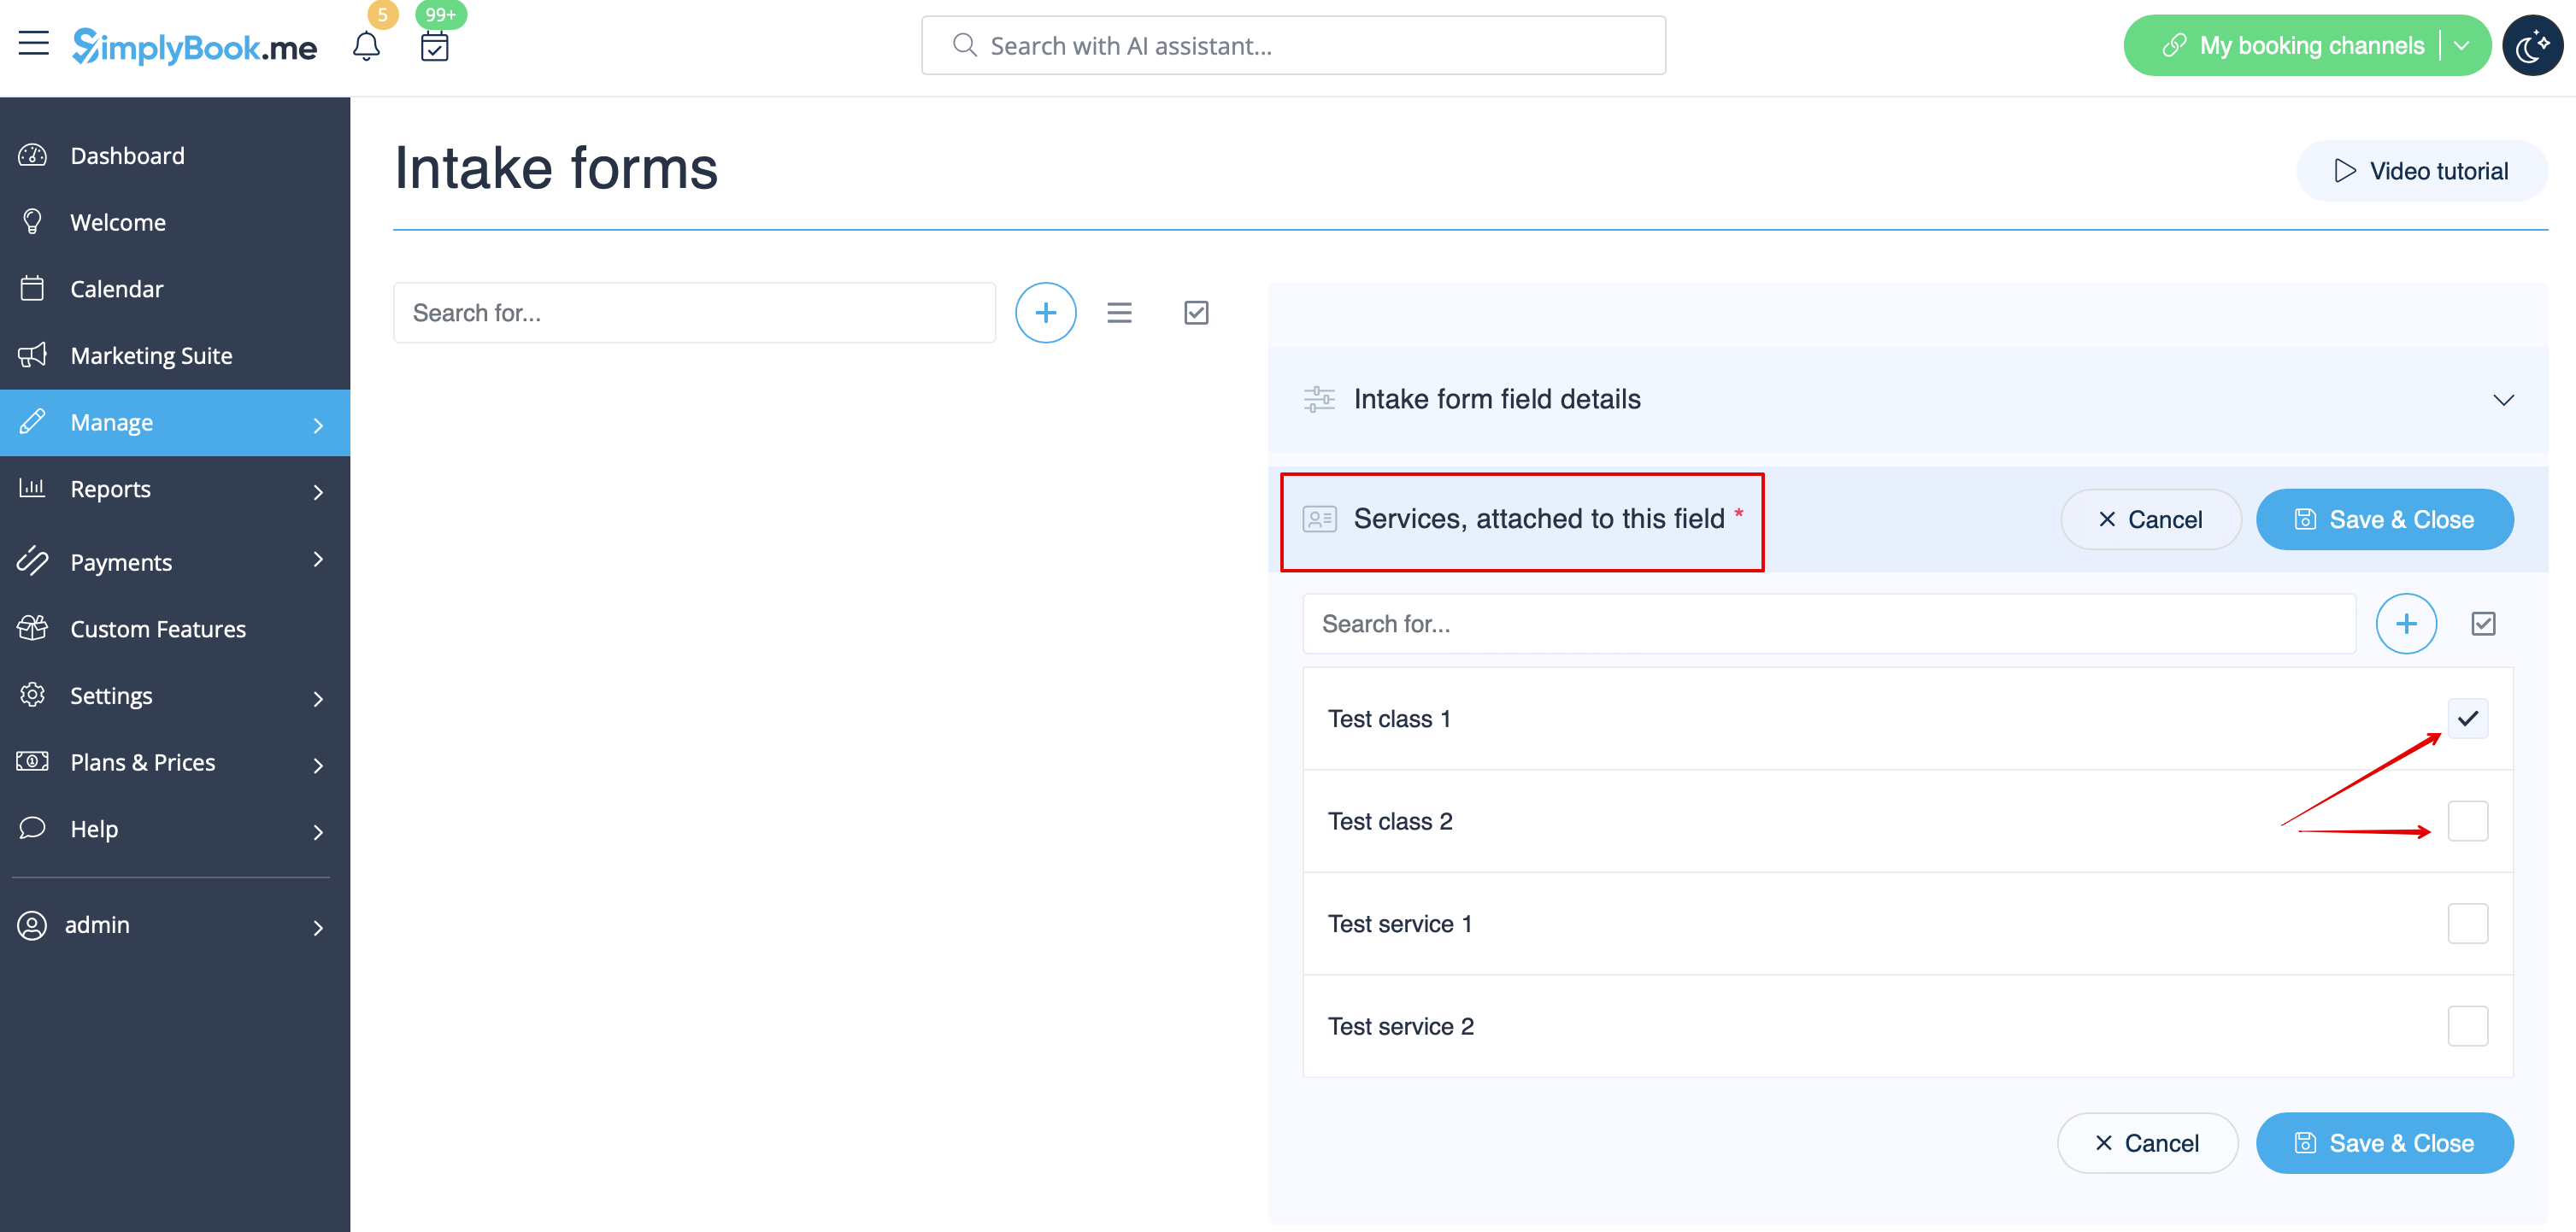
7. Wenn Sie das Formular mit bestimmten Dienstleistungen verknüpfen möchten, wählen Sie die Registerkarte "Dienstleistungen, die mit diesem Feld verknüpft sind" und markieren Sie die Kästchen neben den entsprechenden Dienstleistungen. | |||
[[File:Connect intake form to services redesigned.png|1200px| center|link=https://help.simplybook.me/images/6/66/Connect_intake_form_to_services_redesigned.png]] | |||
<br><br> | <br><br> | ||
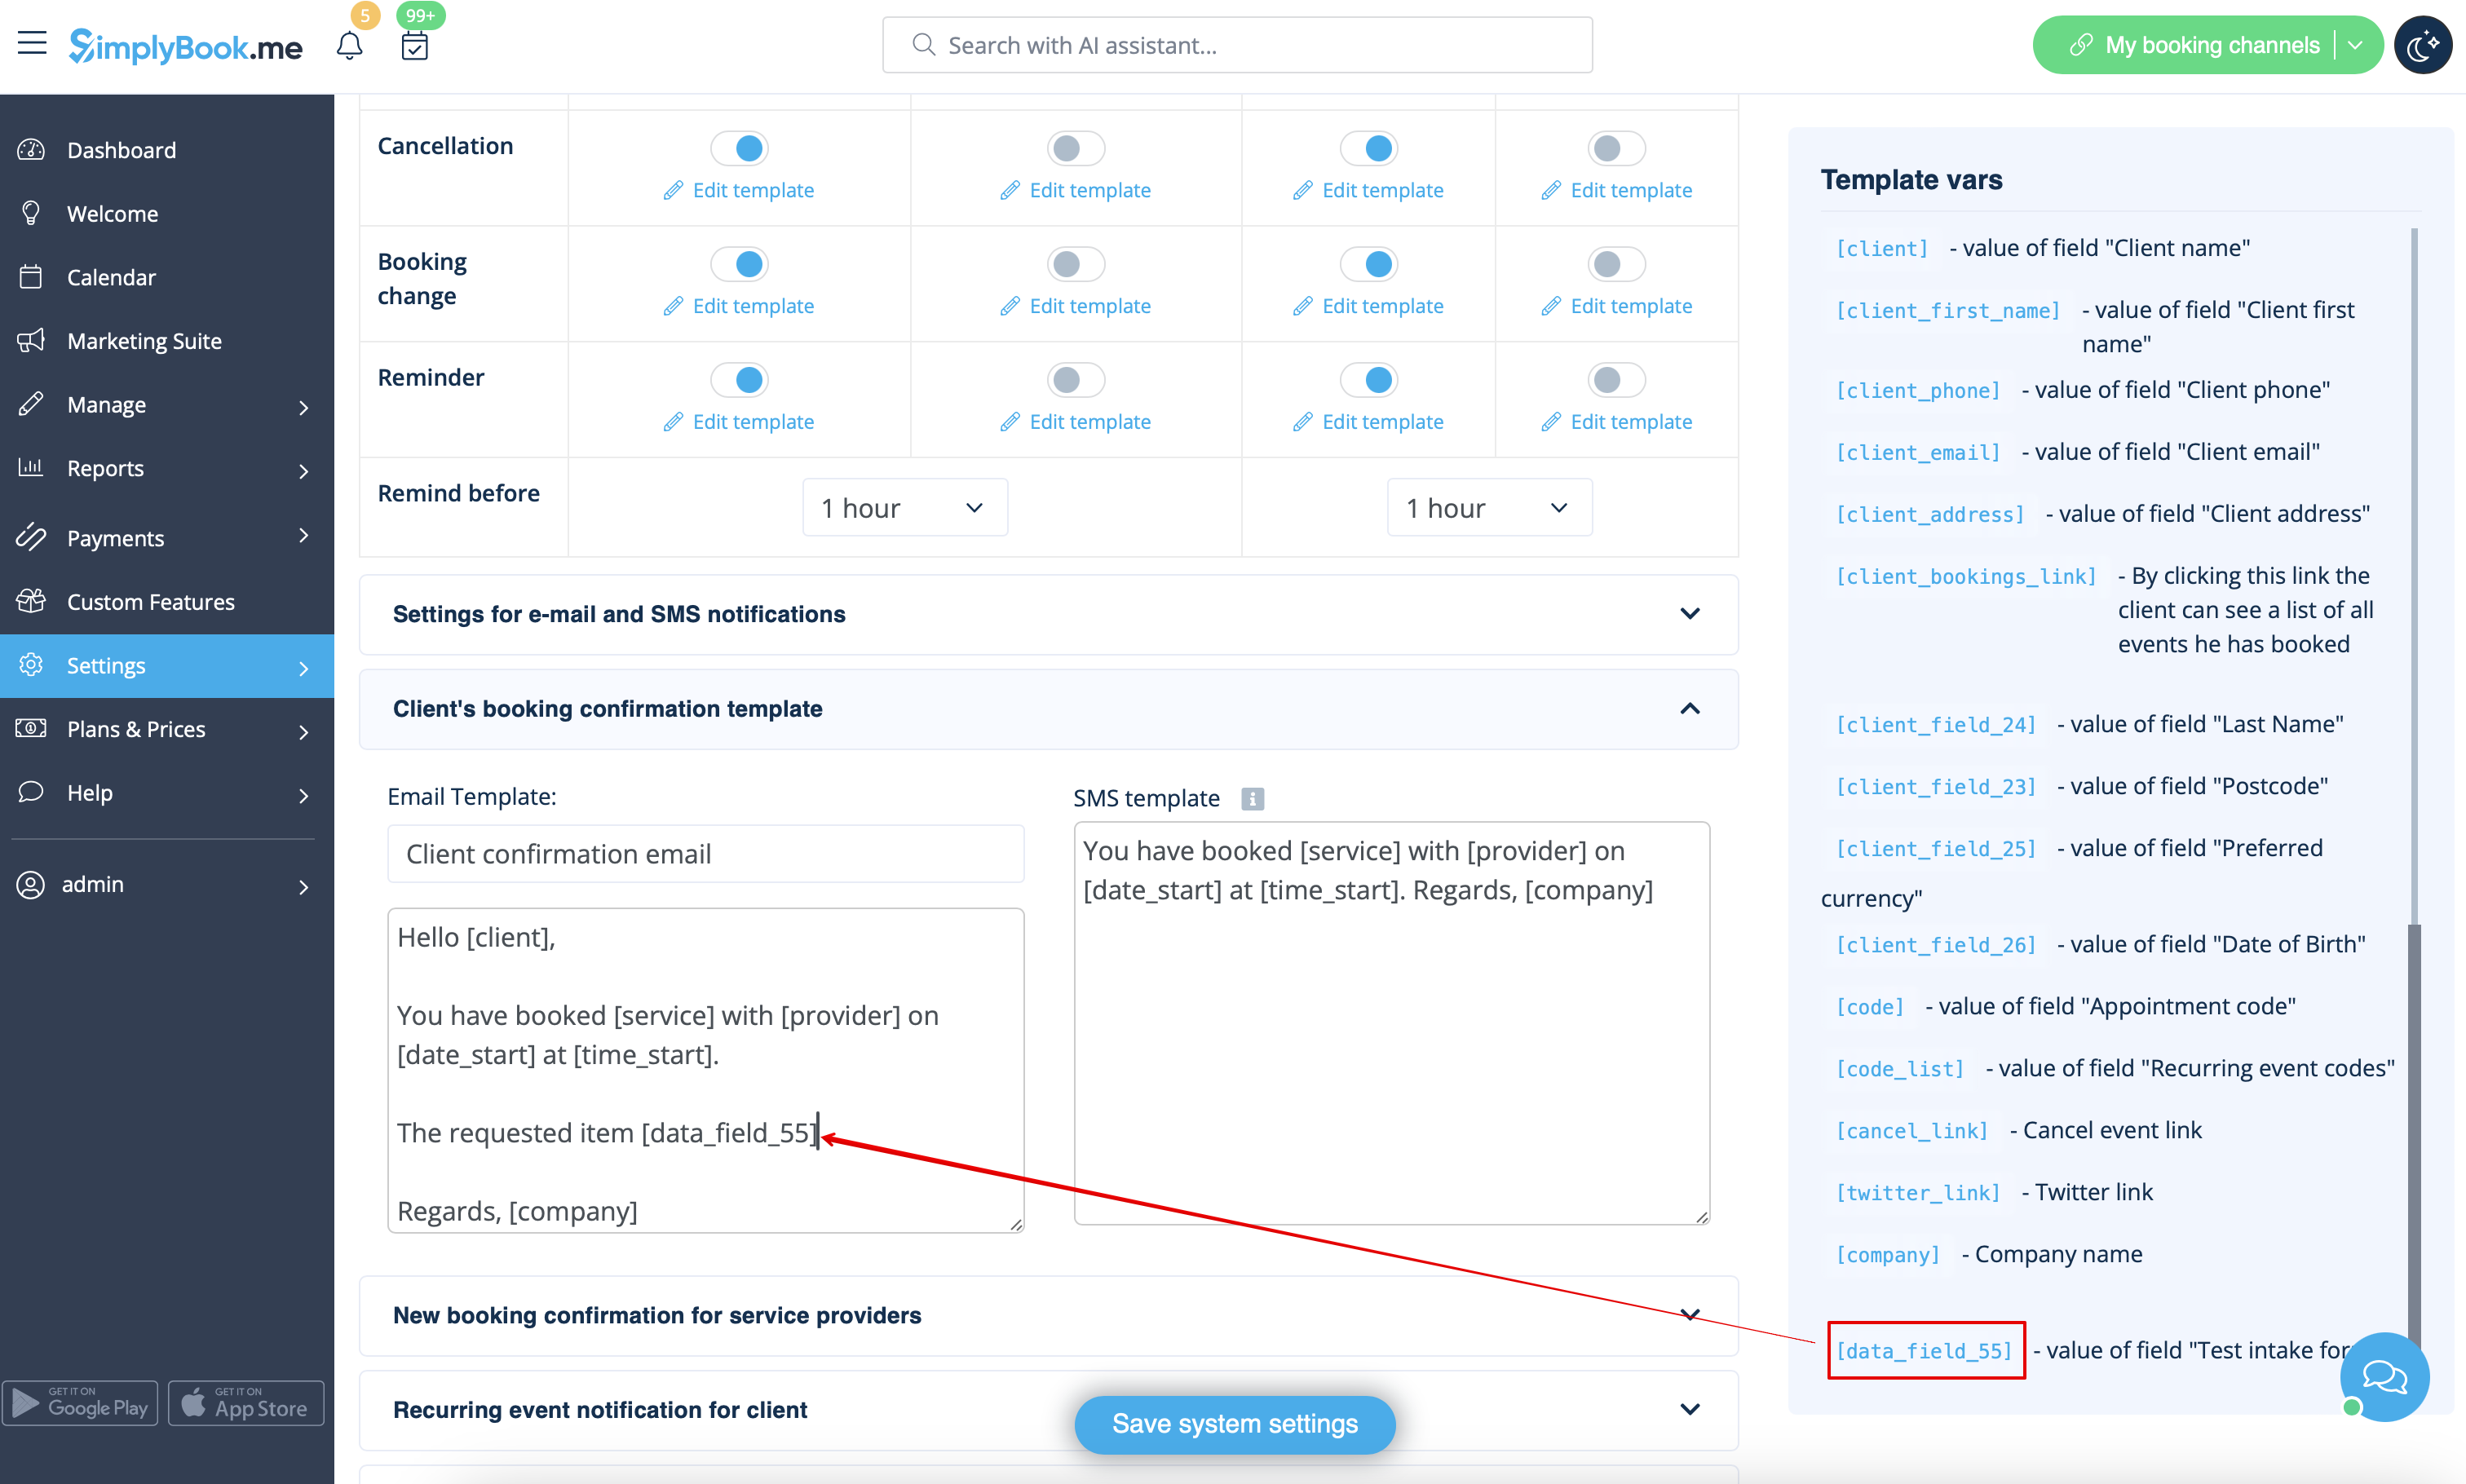
< | 8. Wenn Sie die Informationen des Aufnahmeformulars in E-Mail-Vorlagen einfügen möchten, suchen Sie die Variablen des Aufnahmeformulars und fügen Sie sie den Vorlagen unter Einstellungen/E-Mail- und SMS-Einstellungen hinzu. | ||
[[File:Add notification variable to template intake form redesigned.png|1200px | center|link=https://help.simplybook.me/images/5/59/Add_notification_variable_to_template_intake_form_redesigned.png]]<br><br> | |||
Latest revision as of 17:14, 16 January 2025
Die individuelle Funktion "Intake Forms" ermöglicht es Ihnen, während des Buchungsvorgangs weitere Informationen von Ihren Kunden anzufordern. Sie können mehrere Fragen stellen, die in verschiedenen Feldtypen beantwortet werden können, z. B. in Textzeilen, Dropdown-Listen, Textfeldern usw.
- Wie man es benutzt
1. Aktivieren Sie die individuelle Funktion "Zusätzliche Felder" in der Funktion " Individuelle Funktion//Weiteres zur Buchungsseite hinzufügen.
2. Gehen Sie zur Verwaltung oder zur Seite Verwalten//Anmeldeformulare.

3. Drücken Sie auf die Schaltfläche "+" in den Einstellungen der individuellen Funktion, um ein neues Formular zu erstellen.
4. Schreiben Sie in das Feld "Fragentitel" die Frage, die Sie Ihren Kunden stellen möchten. Zum Beispiel: Alter, Vorlieben, Haben Sie gesundheitliche Probleme? usw.
5. Wählen Sie den Feldtyp:
Nur Ziffern - erlaubt nur die Eingabe von Zahlen. Nützlich, wenn Sie das Alter, die Größe oder eine andere Information benötigen, die nur Ziffern erfordert.
Einzeilig - wird normalerweise für kurze Antworten verwendet
Mehrzeilig - verwenden Sie diese Art von Feld, wenn Sie längere Erklärungen von Ihren Kunden erwarten
Kontrollkästchen - erstellt ein Kontrollkästchen, das der Kunde entweder ankreuzen oder nicht ankreuzen soll. Nützlich für Fragen, die eine binäre Antwort erfordern, z. B. "Ich benötige zusätzliche Dienstleistungen".
Dropdown-Auswahl - erstellt eine Dropdown-Liste mit der Möglichkeit, nur eine Option auszuwählen. Um dieses Feld zu erstellen, müssen Sie eine Liste von Werten im Abschnitt "Dropdown-Optionen und Standardoption" erstellen. Sie können auch den Standardwert auswählen, der zugewiesen wird, wenn nichts aus der Liste ausgewählt wird.
Datum - erstellt eine Datumsauswahloption mit Kalender.
Barcode - ermöglicht das Scannen von Barcodes über die mobile Verwaltungsanwendung und das Abrufen der Werte aus dem Scanvorgang. Erlaubt auch einfache Texteingaben wie in einzeiligen Eingabeformularen.
Benutzerdefiniertes HTML - ermöglicht das Hinzufügen von visuellen Trennlinien oder zusätzlichem Text neben dem Aufnahmeformular. Kann nicht für Kundeneingaben verwendet werden.
6. Mit Hilfe des Schalters "optional" können Sie festlegen, ob die Eingabe obligatorisch ist oder nicht. Fügen Sie das Feld (sowohl Titel als auch Antwort) in Kundenrechnungen ein, wenn Sie es benötigen und wenn Sie die individuelle Funktion Zahlungen akzeptieren verwenden. 7. Wenn Sie das Formular mit bestimmten Dienstleistungen verknüpfen möchten, wählen Sie die Registerkarte "Dienstleistungen, die mit diesem Feld verknüpft sind" und markieren Sie die Kästchen neben den entsprechenden Dienstleistungen.
8. Wenn Sie die Informationen des Aufnahmeformulars in E-Mail-Vorlagen einfügen möchten, suchen Sie die Variablen des Aufnahmeformulars und fügen Sie sie den Vorlagen unter Einstellungen/E-Mail- und SMS-Einstellungen hinzu.