From SimplyBook.me
No edit summary |
No edit summary |
||
| Line 8: | Line 8: | ||
}} | }} | ||
</translate> | </translate> | ||
<translate> | |||
| Line 15: | Line 16: | ||
__FORCETOC__ | __FORCETOC__ | ||
<br> | <br> | ||
</translate> | |||
<translate> | |||
==Option 1 (as Service with its own schedule)== | ==Option 1 (as Service with its own schedule)== | ||
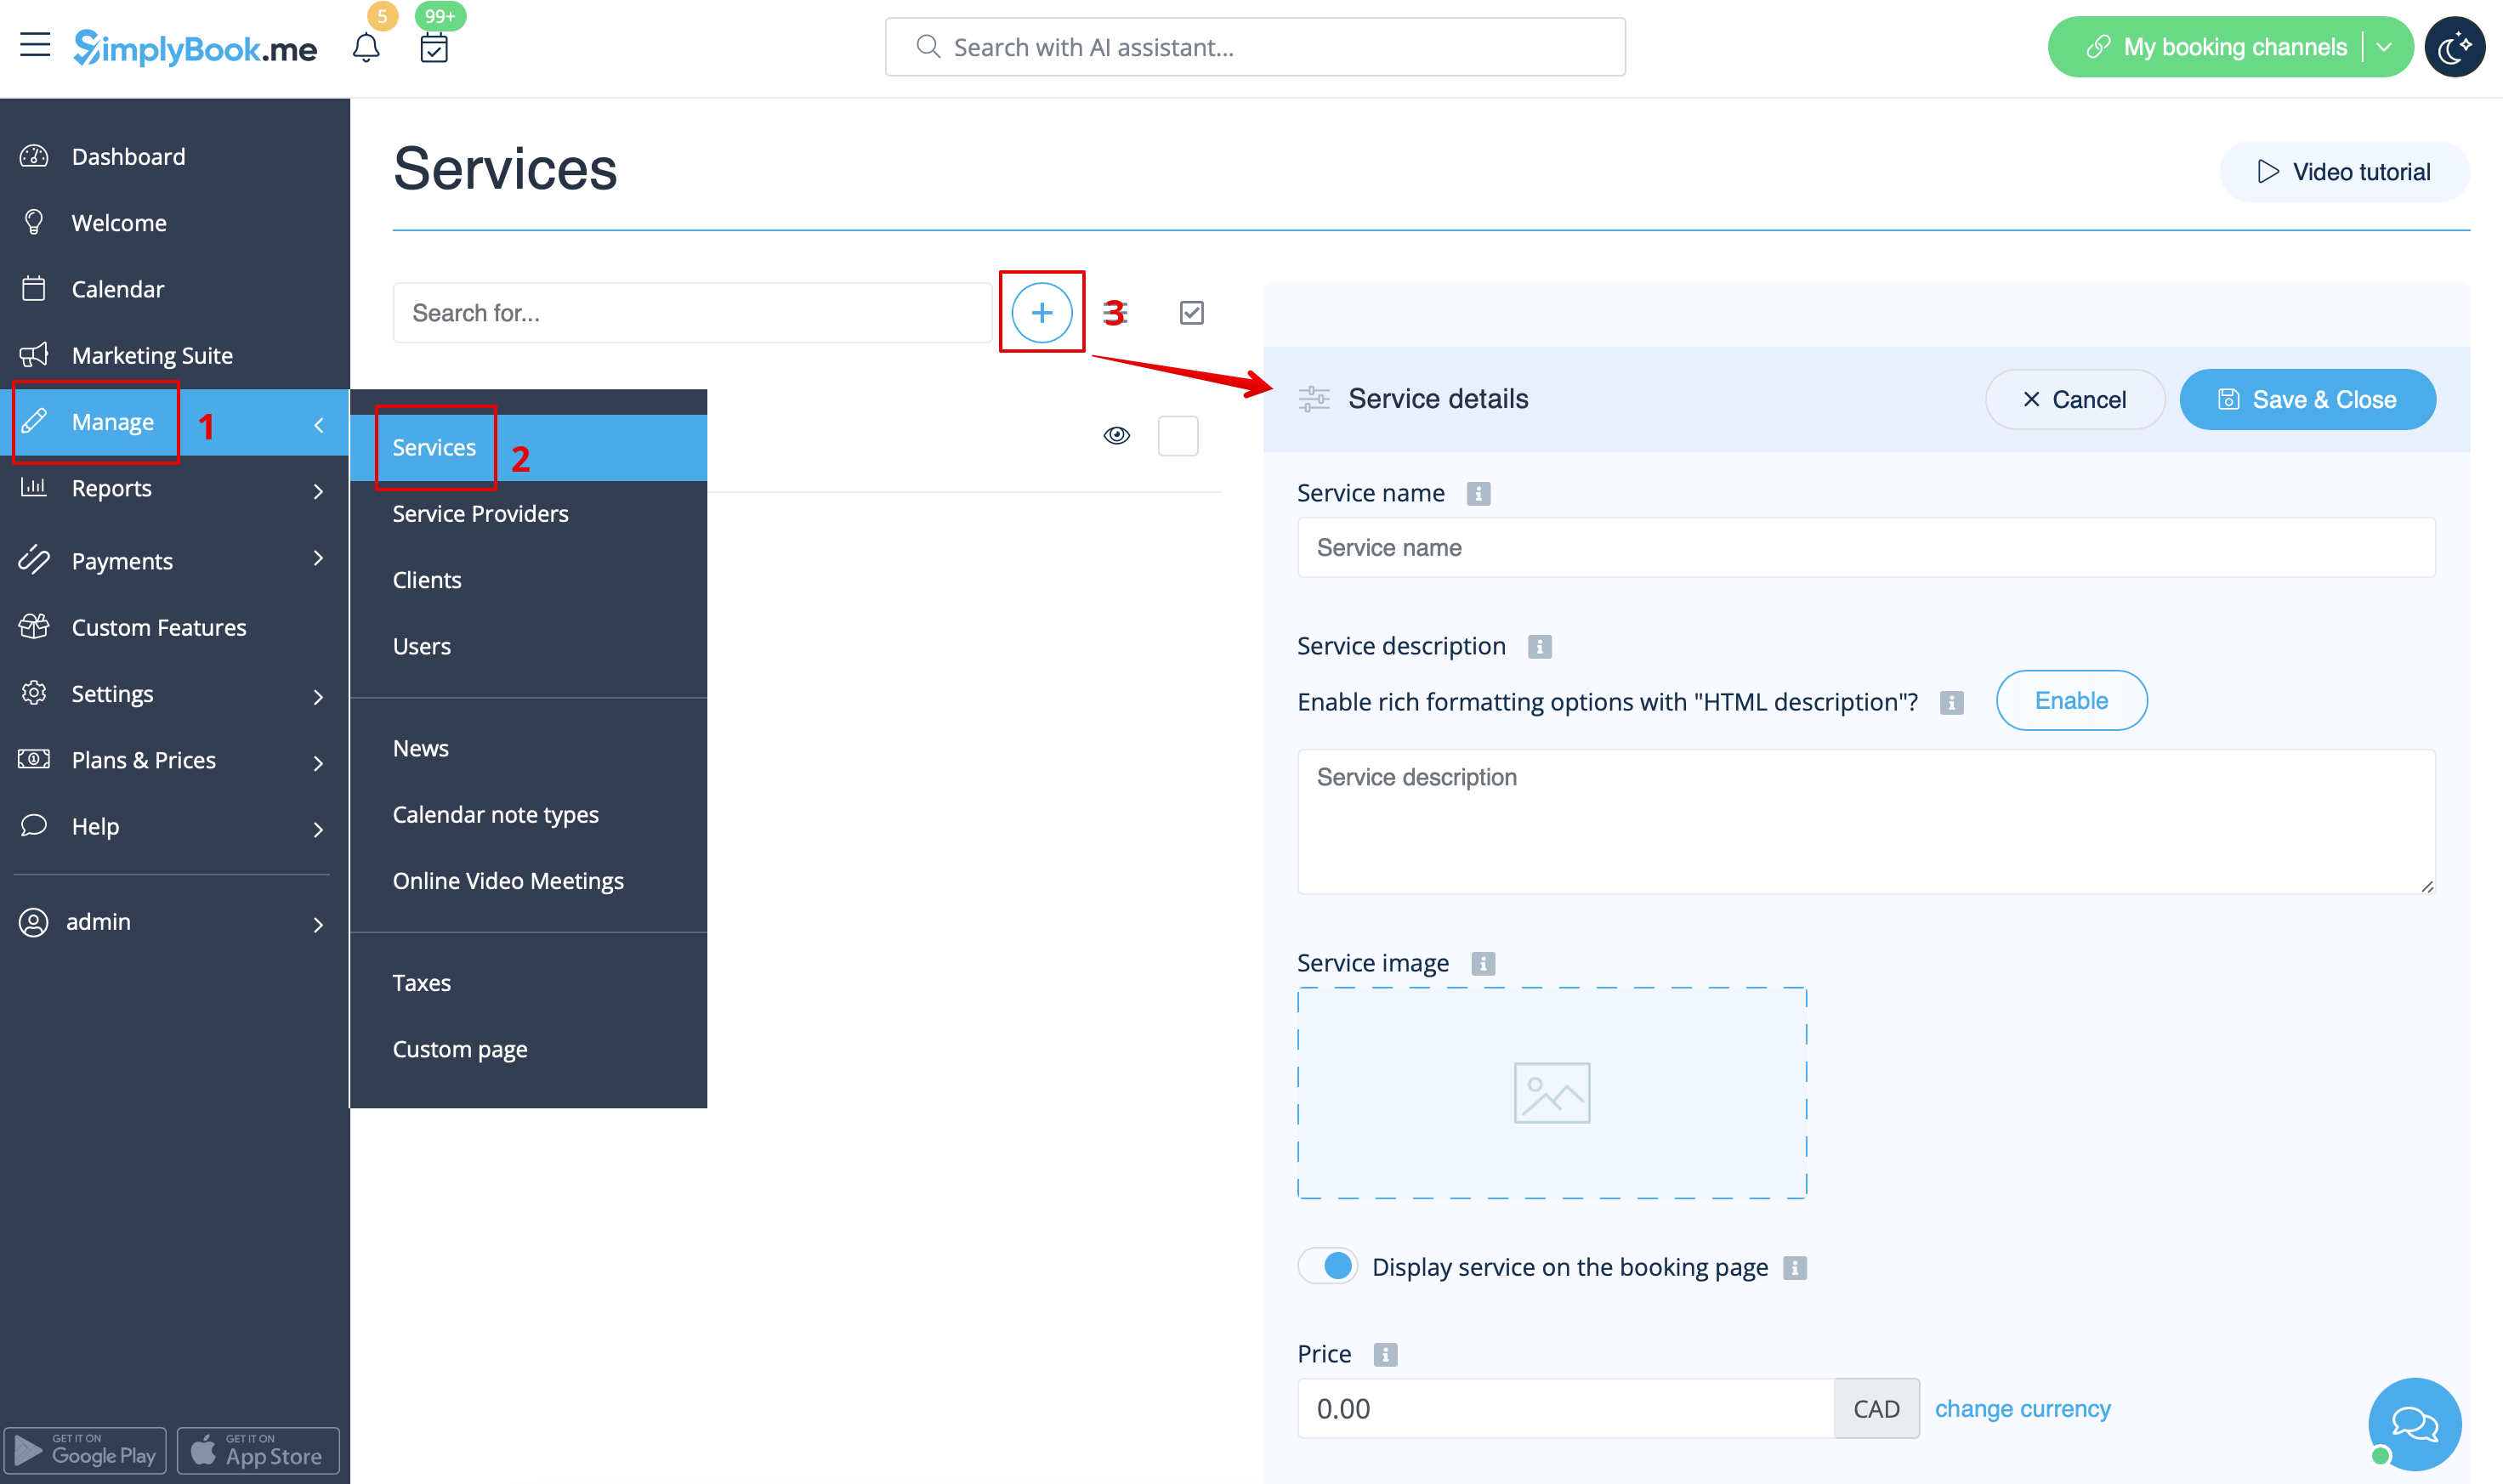
:1. In Manage//Services click on "+" icon to create new service. | :1. In Manage//Services click on "+" icon to create new service. | ||
| Line 20: | Line 23: | ||
[[File:Create new service redesigned.png|1200px| center|link=https://help.simplybook.me/images/2/2d/Create_new_service_redesigned.png ]] | [[File:Create new service redesigned.png|1200px| center|link=https://help.simplybook.me/images/2/2d/Create_new_service_redesigned.png ]] | ||
<br> | <br> | ||
</translate> | |||
<translate> | |||
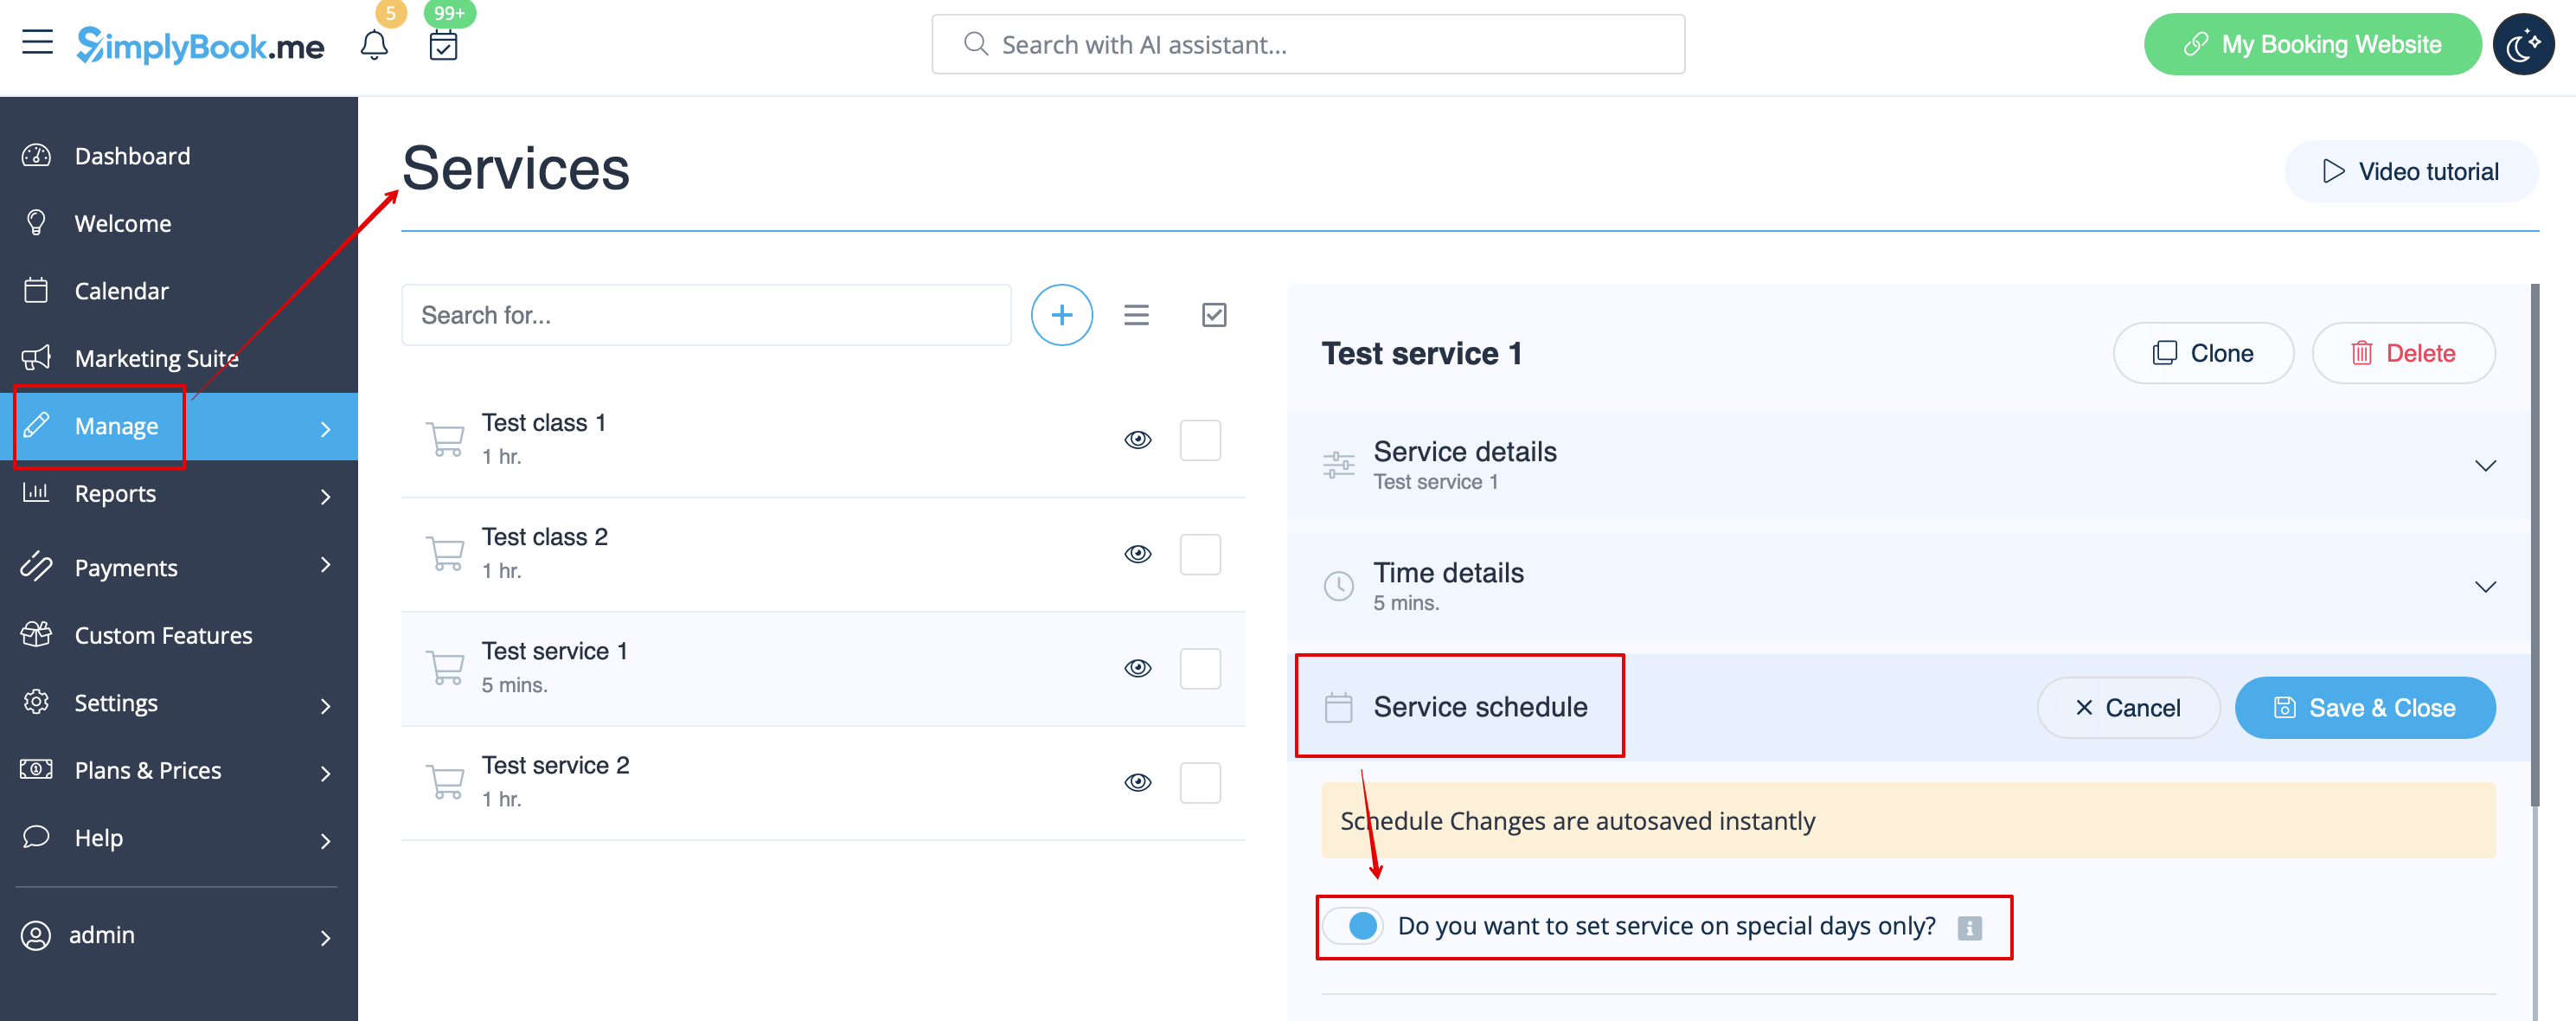
:2. In Manage//Services choose "Service schedule" tab on the newly created service switch on the option "Do you want to set service on special days only?". | :2. In Manage//Services choose "Service schedule" tab on the newly created service switch on the option "Do you want to set service on special days only?". | ||
<br> | <br> | ||
[[File:Service special days only redesigned.png|1200px | center|link=https://help.simplybook.me/images/f/f2/Service_special_days_only_redesigned.png]] | [[File:Service special days only redesigned.png|1200px | center|link=https://help.simplybook.me/images/f/f2/Service_special_days_only_redesigned.png]] | ||
<br><br> | <br><br> | ||
</translate> | |||
<translate> | |||
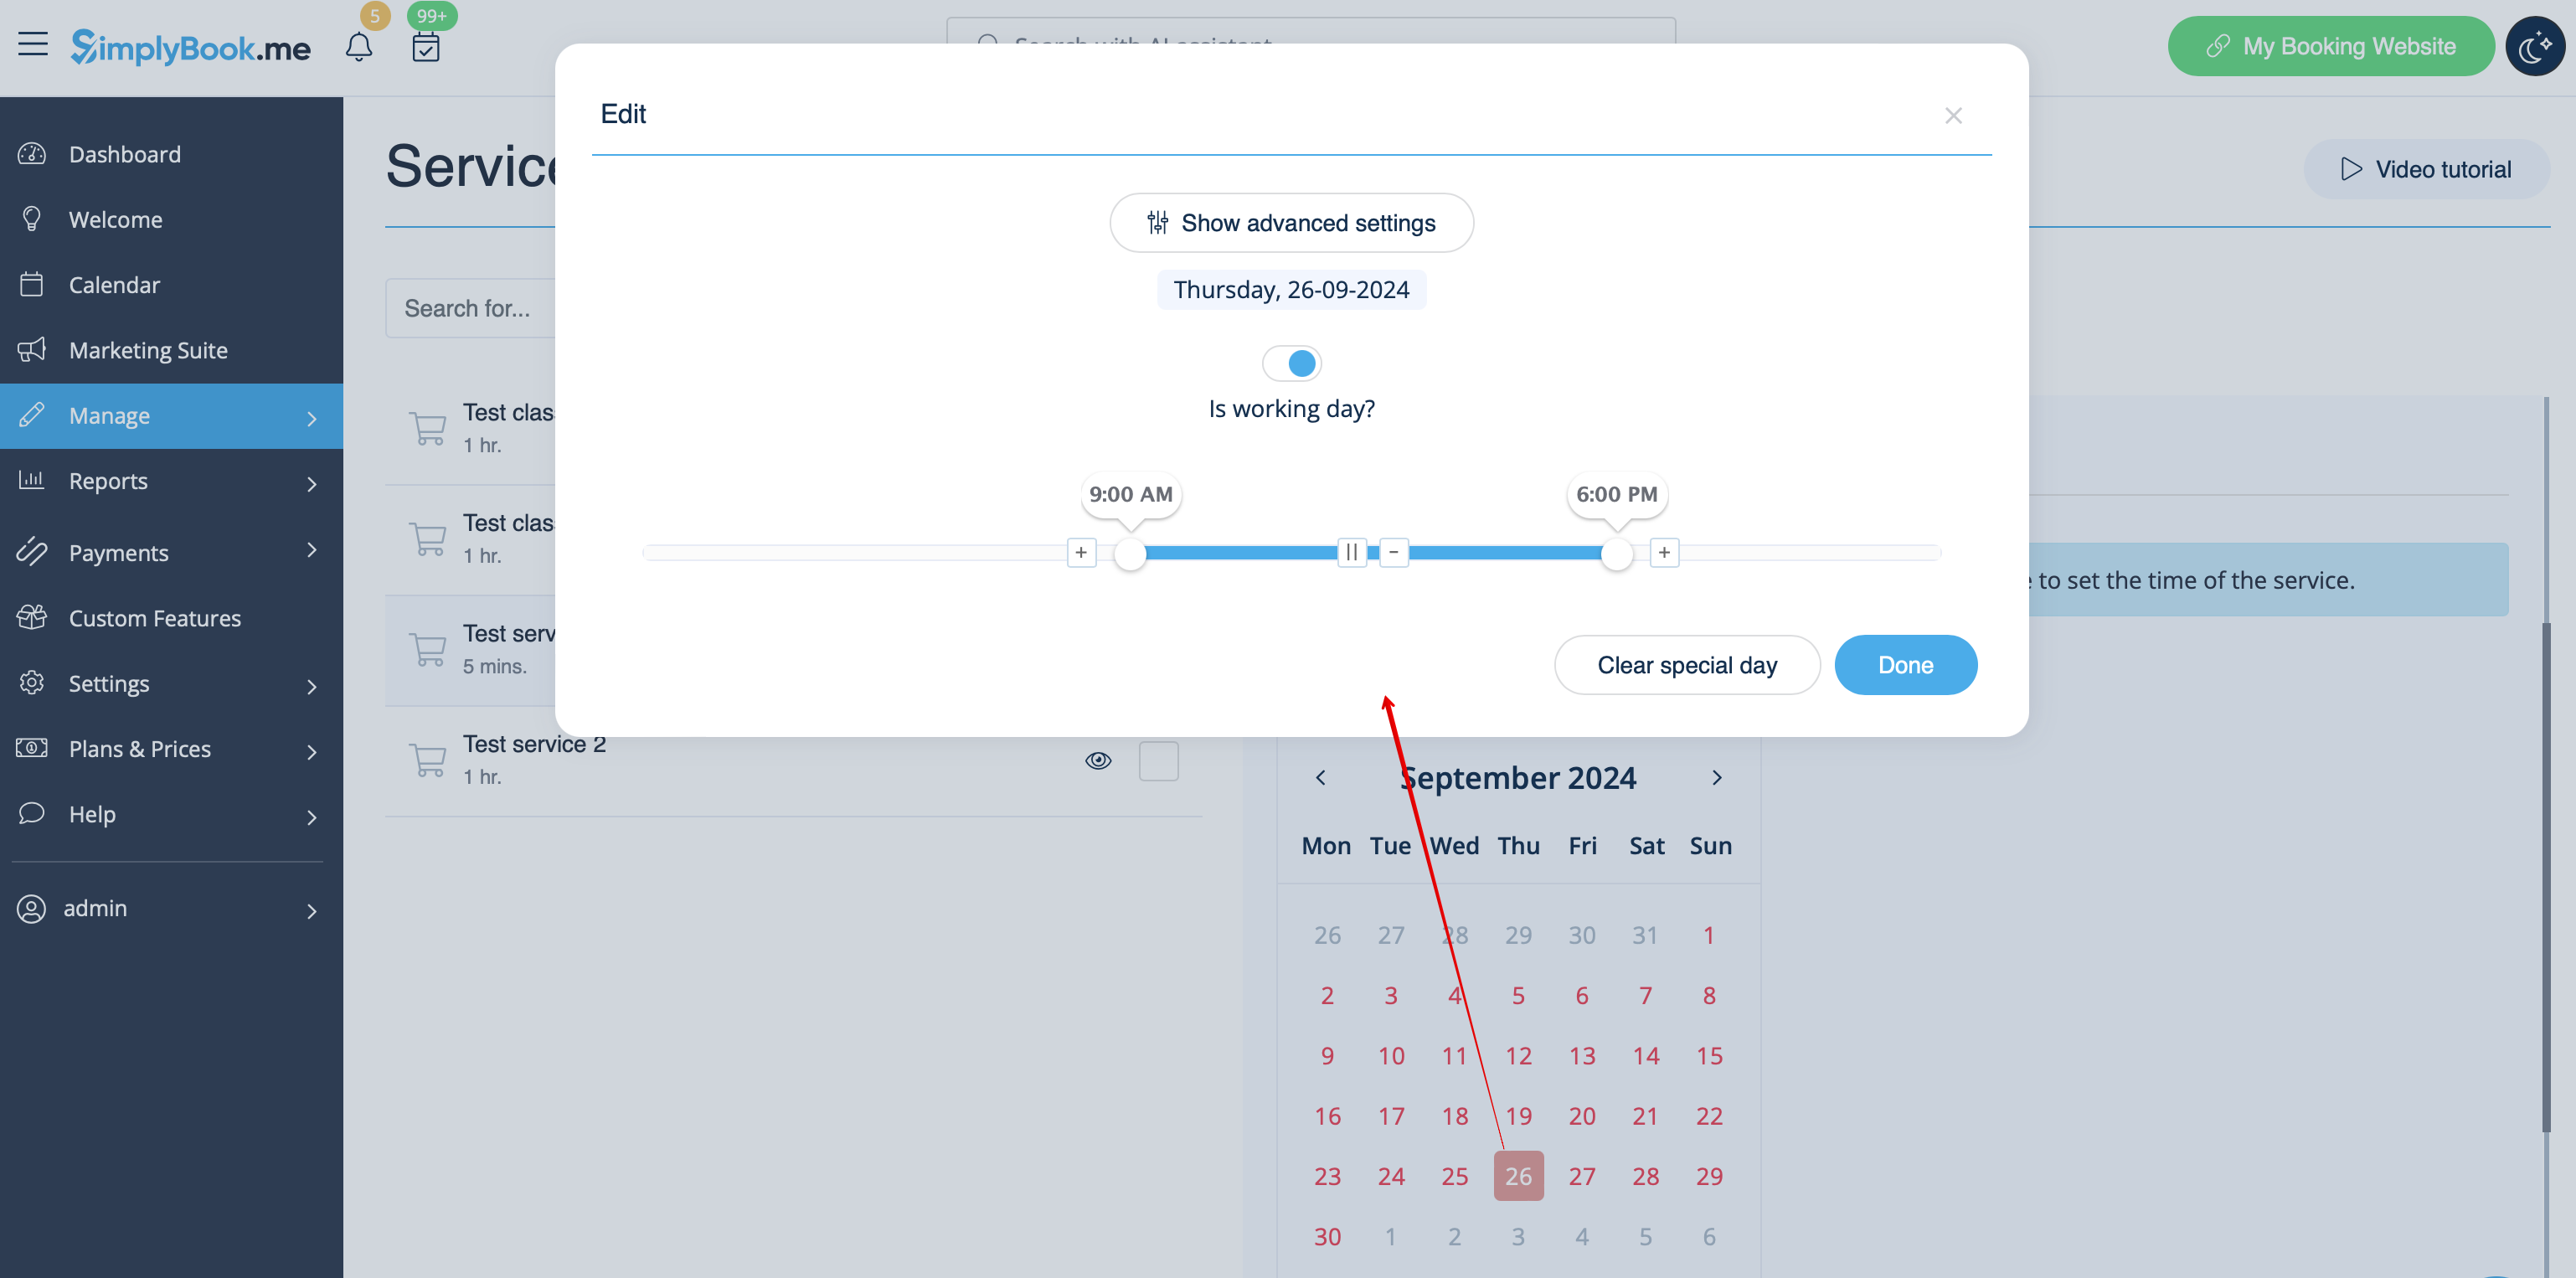
:3. Then use the calendar, click on the dates that you want to open and set the schedule for these dates by moving the sliders(bright blue zone is open time). | :3. Then use the calendar, click on the dates that you want to open and set the schedule for these dates by moving the sliders(bright blue zone is open time). | ||
<br> | <br> | ||
[[File:Events set schedule by date redesigned.png|1200px | center|link=https://help.simplybook.me/images/c/c6/Events_set_schedule_by_date_redesigned.png]] | [[File:Events set schedule by date redesigned.png|1200px | center|link=https://help.simplybook.me/images/c/c6/Events_set_schedule_by_date_redesigned.png]] | ||
<br><br> | <br><br> | ||
</translate> | |||
<translate> | |||
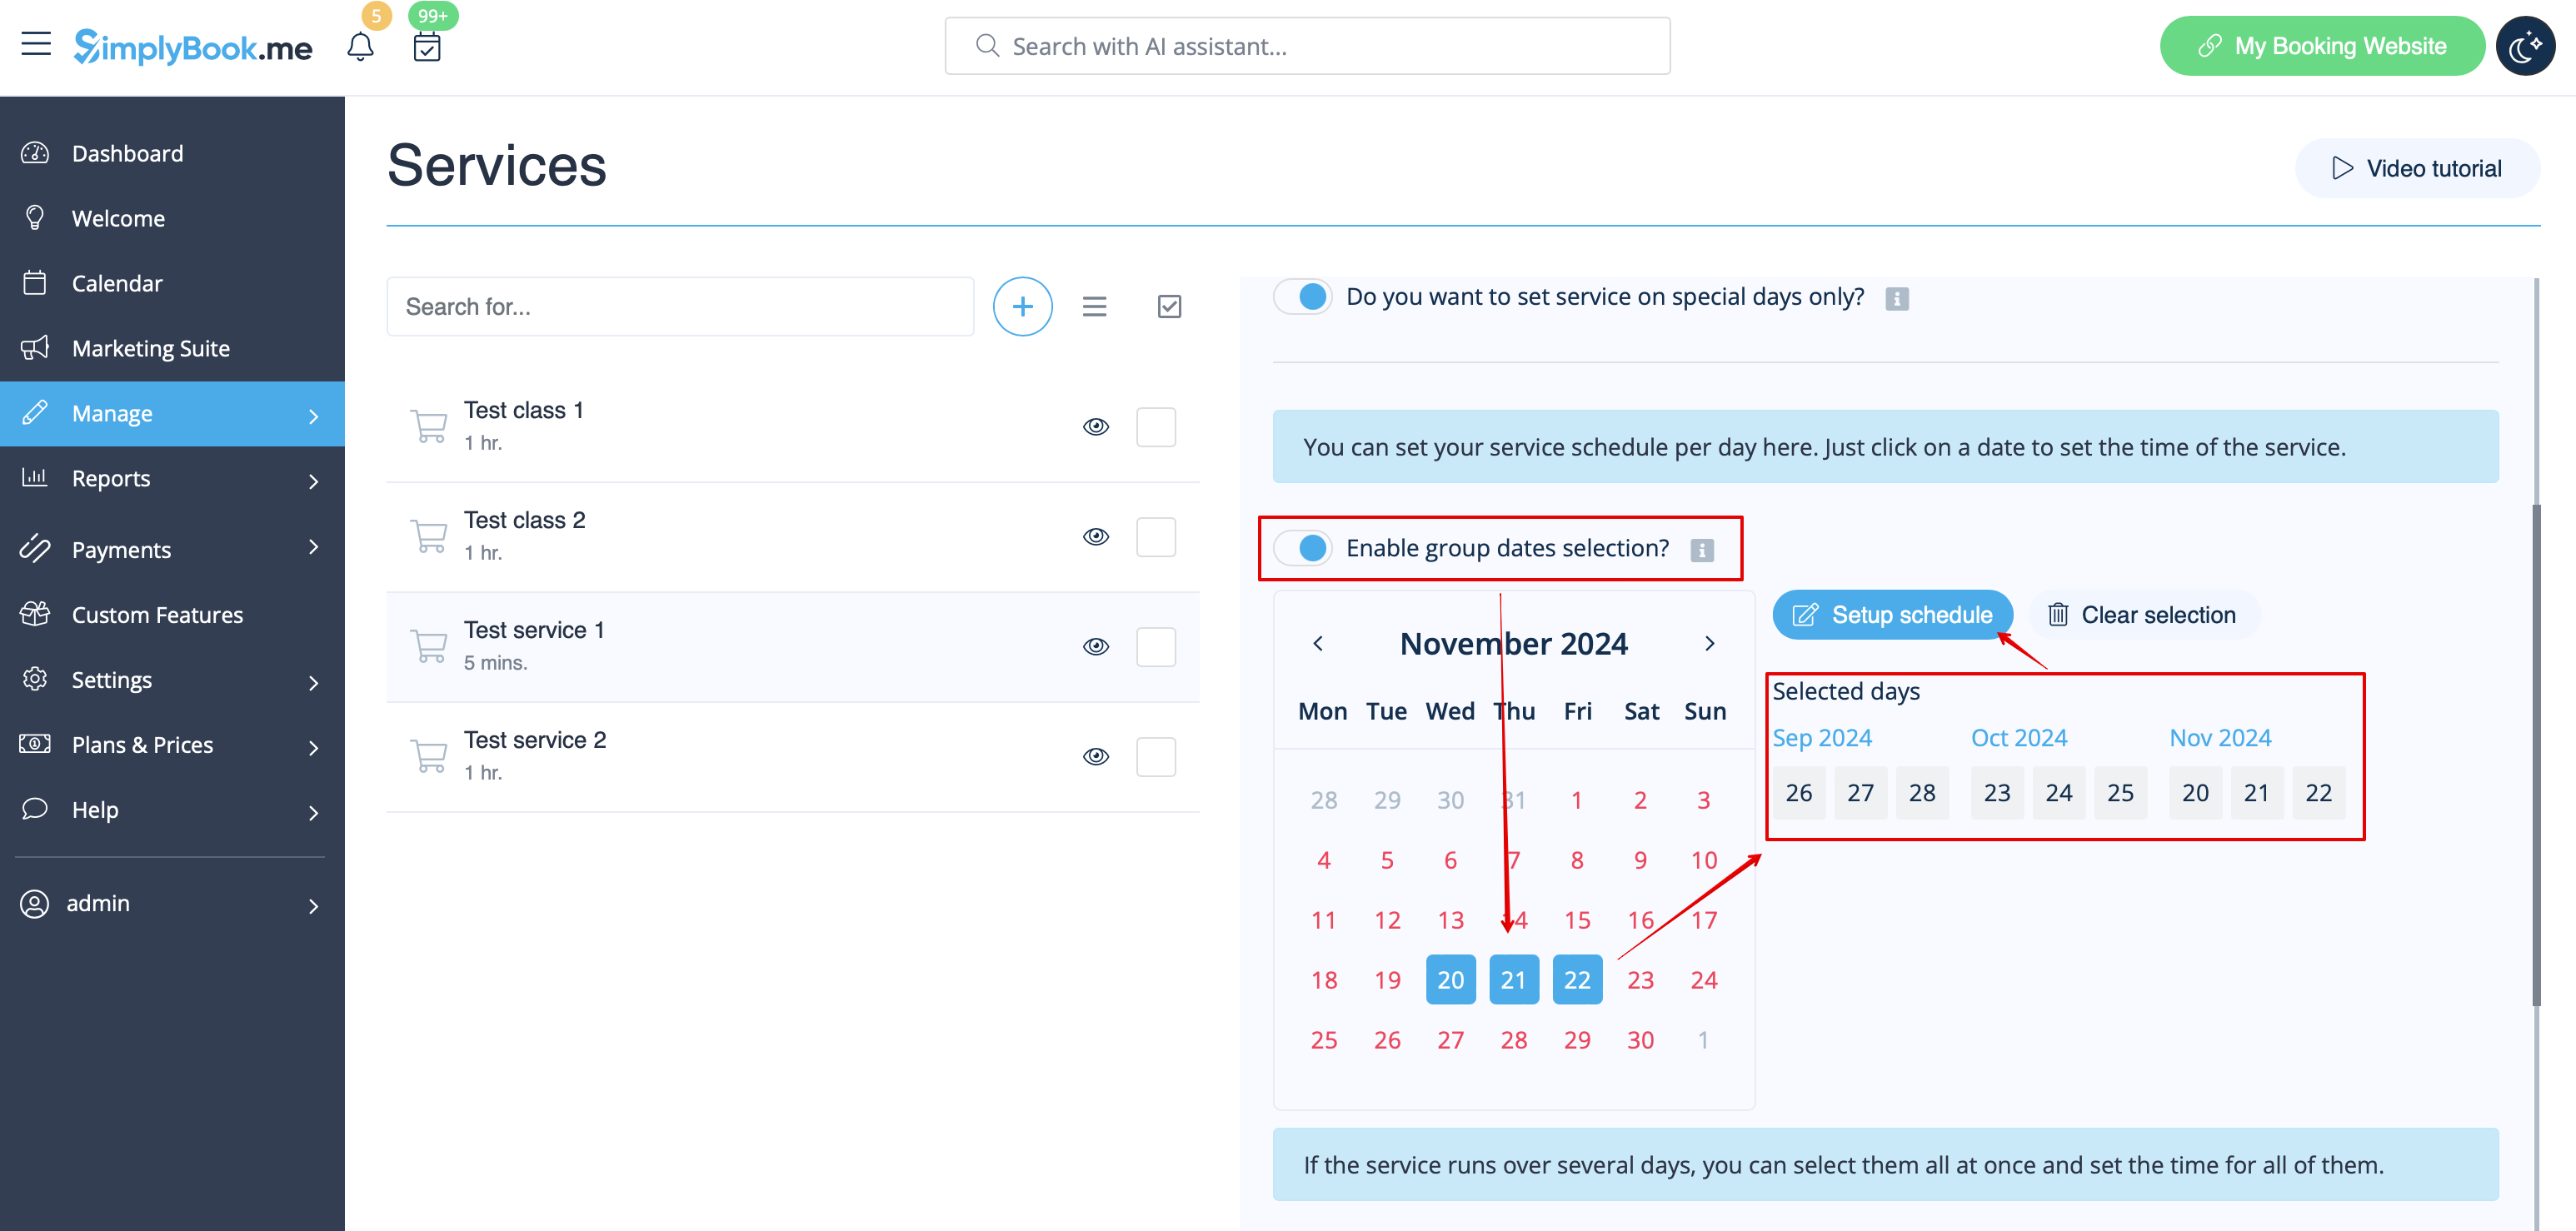
:If you need to select several dates at once please switch on "Enable group dates selection?", choose the dates to edit and click on "Setup schedule" to set the times. | :If you need to select several dates at once please switch on "Enable group dates selection?", choose the dates to edit and click on "Setup schedule" to set the times. | ||
<br> | <br> | ||
[[File:Events group dates selection redesigned.png|1200px |center|link=https://help.simplybook.me/images/6/61/Events_group_dates_selection_redesigned.png]] | [[File:Events group dates selection redesigned.png|1200px |center|link=https://help.simplybook.me/images/6/61/Events_group_dates_selection_redesigned.png]] | ||
<br><br> | <br><br> | ||
</translate> | |||
<translate> | |||
:4. Connect service to necessary provider in "Service providers" tab. | :4. Connect service to necessary provider in "Service providers" tab. | ||
| Line 39: | Line 50: | ||
[[File:Classes enable path redesigned.png|1200px|border | center|link=https://help.simplybook.me/images/e/ef/Classes_enable_path_redesigned.png]] | [[File:Classes enable path redesigned.png|1200px|border | center|link=https://help.simplybook.me/images/e/ef/Classes_enable_path_redesigned.png]] | ||
<br><br> | <br><br> | ||
</translate> | |||
<translate> | |||
:2. Navigate to Manage//Classes page and create a new class. | :2. Navigate to Manage//Classes page and create a new class. | ||
[[File:Create new class form redesigned.png|1200px | center|link=https://help.simplybook.me/images/0/04/Create_new_class_form_redesigned.png ]] | [[File:Create new class form redesigned.png|1200px | center|link=https://help.simplybook.me/images/0/04/Create_new_class_form_redesigned.png ]] | ||
<br/><br/> | <br/><br/> | ||
</translate> | |||
<translate> | |||
:3. Choose "Class schedule" tab on the newly created class and switch on the option "Do you want to set service on special days only?" | :3. Choose "Class schedule" tab on the newly created class and switch on the option "Do you want to set service on special days only?" | ||
:4. Then use the calendar, click on the dates that you want to open and set the schedule for these dates by moving the sliders(bright blue zone is open time). | :4. Then use the calendar, click on the dates that you want to open and set the schedule for these dates by moving the sliders(bright blue zone is open time). | ||
<br><br> | <br><br> | ||
</translate> | |||
<translate> | |||
| Line 52: | Line 69: | ||
[[File:Event client side booking.png|1200px|border | center]] | [[File:Event client side booking.png|1200px|border | center]] | ||
<br><br> | <br><br> | ||
</translate> | |||
<translate> | |||
==Events only== | ==Events only== | ||
| Line 57: | Line 76: | ||
Video available [[File:Youtube-Logo.png|link=https://www.youtube.com/watch?v=Edh3_PJ1ua8]] | Video available [[File:Youtube-Logo.png|link=https://www.youtube.com/watch?v=Edh3_PJ1ua8]] | ||
<br> | <br> | ||
</translate> | |||
<translate> | |||
If you plan to have 1 event or several events without regular services you should do the following: | If you plan to have 1 event or several events without regular services you should do the following: | ||
| Line 63: | Line 84: | ||
:2. Create events you need in Manage // Services // "+". See detailed tutorial about services [[Adding_services,_providers_and_availability(new_interface)#How_to_set_service_as_one-time_event| here]]. | :2. Create events you need in Manage // Services // "+". See detailed tutorial about services [[Adding_services,_providers_and_availability(new_interface)#How_to_set_service_as_one-time_event| here]]. | ||
<br><br> | <br><br> | ||
</translate> | |||
Revision as of 09:27, 16 May 2025
- Video tutorial on events and special days available

Option 1 (as Service with its own schedule)
- 1. In Manage//Services click on "+" icon to create new service.
- 2. In Manage//Services choose "Service schedule" tab on the newly created service switch on the option "Do you want to set service on special days only?".
- 3. Then use the calendar, click on the dates that you want to open and set the schedule for these dates by moving the sliders(bright blue zone is open time).
- If you need to select several dates at once please switch on "Enable group dates selection?", choose the dates to edit and click on "Setup schedule" to set the times.
- 4. Connect service to necessary provider in "Service providers" tab.
Option 2 (as Event with the help of Classes custom feature)
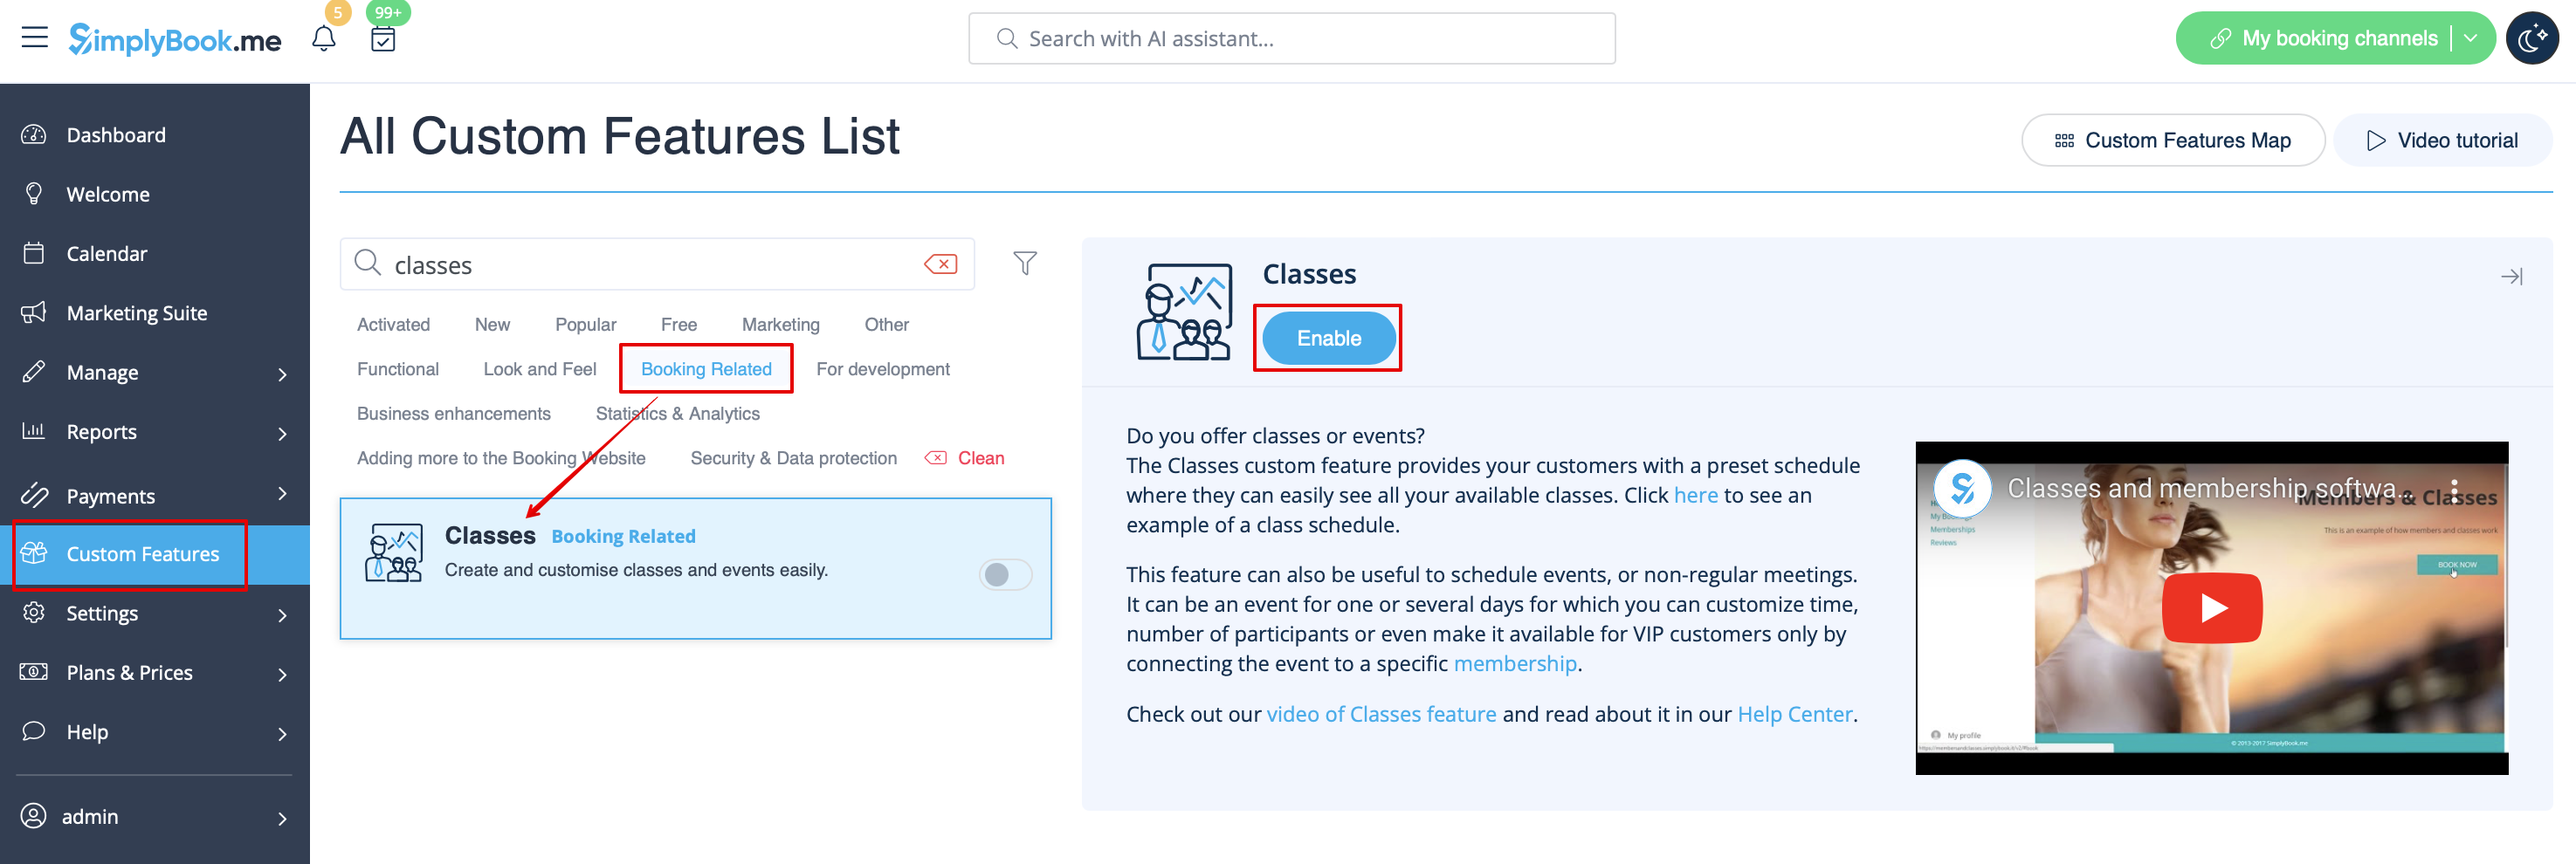
- 1. Enable Classes custom feature on your Custom features page.
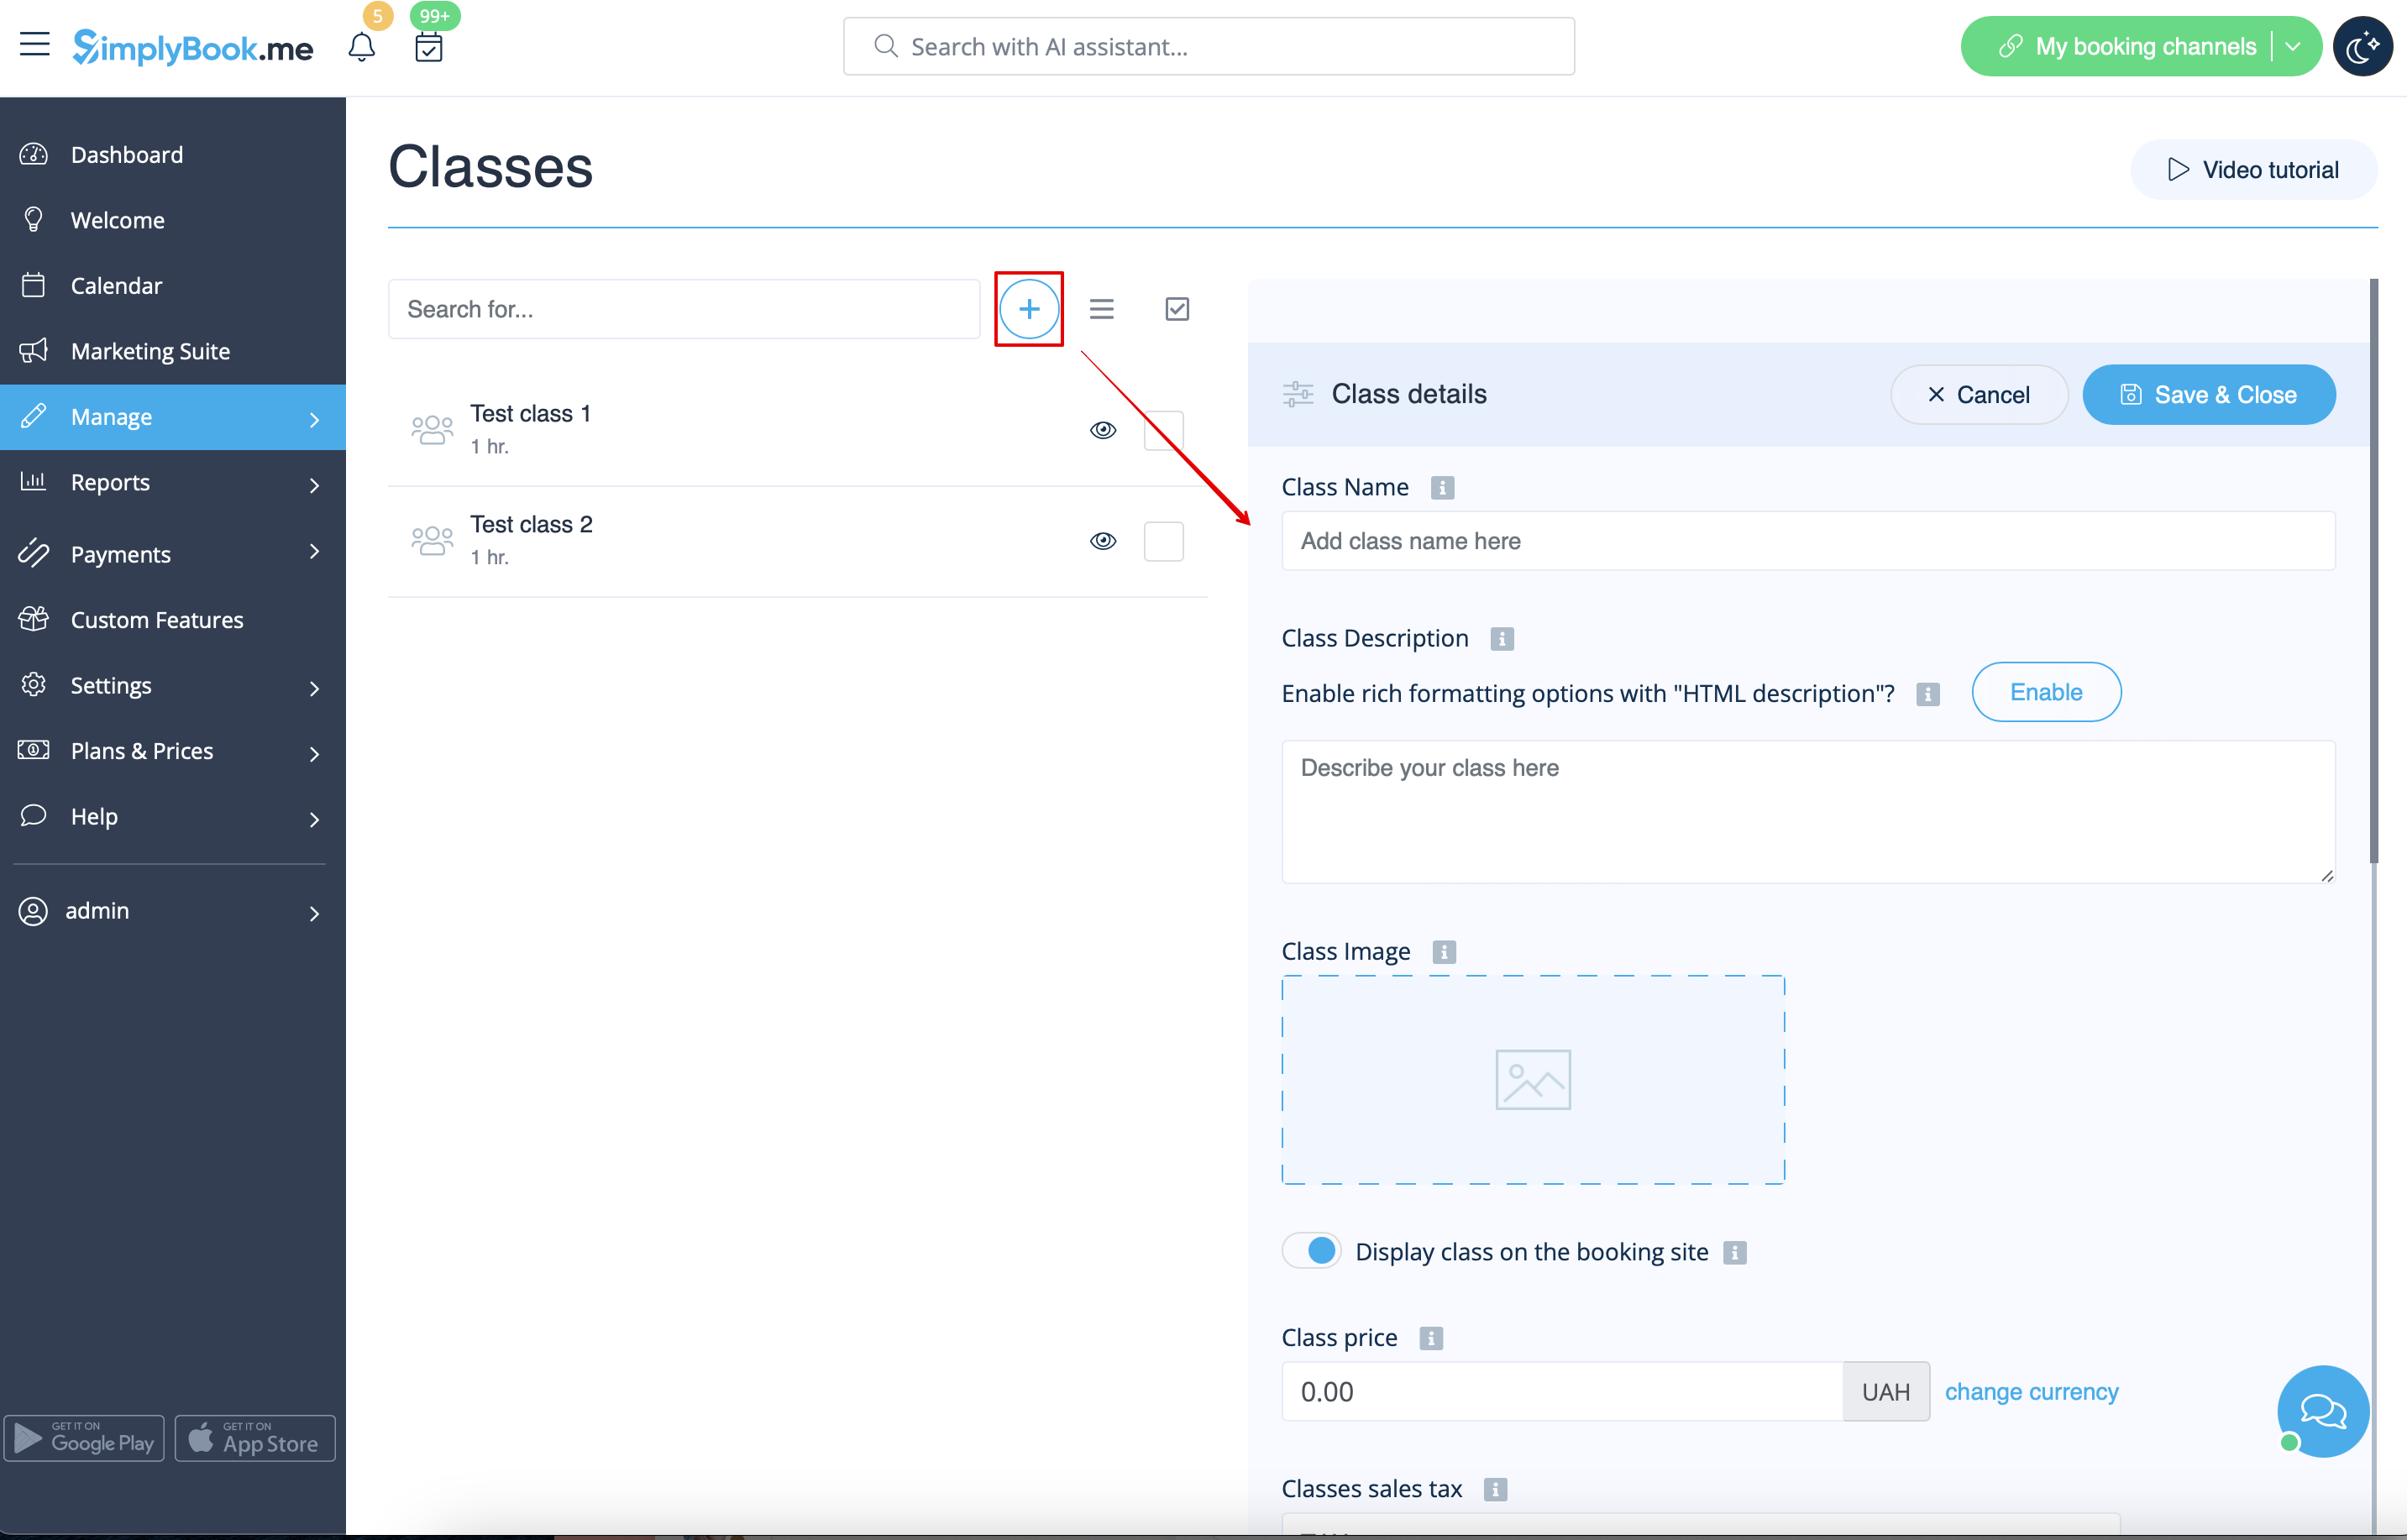
- 2. Navigate to Manage//Classes page and create a new class.
- 3. Choose "Class schedule" tab on the newly created class and switch on the option "Do you want to set service on special days only?"
- 4. Then use the calendar, click on the dates that you want to open and set the schedule for these dates by moving the sliders(bright blue zone is open time).
- How events(classes) work
The general logic of event(class) is creating Service + Provider related to it with dates selected in the settings of the event(class) as special days. When you use Classes custom feature the event creates service+provider related to it with identical name. In order to preserve proper functioning of the event on the dates needed, you should not delete provider with identical name related to event (but you can easily change his/her name) and should not disconnect provider from the event.

Events only
Video available ![]()
If you plan to have 1 event or several events without regular services you should do the following:
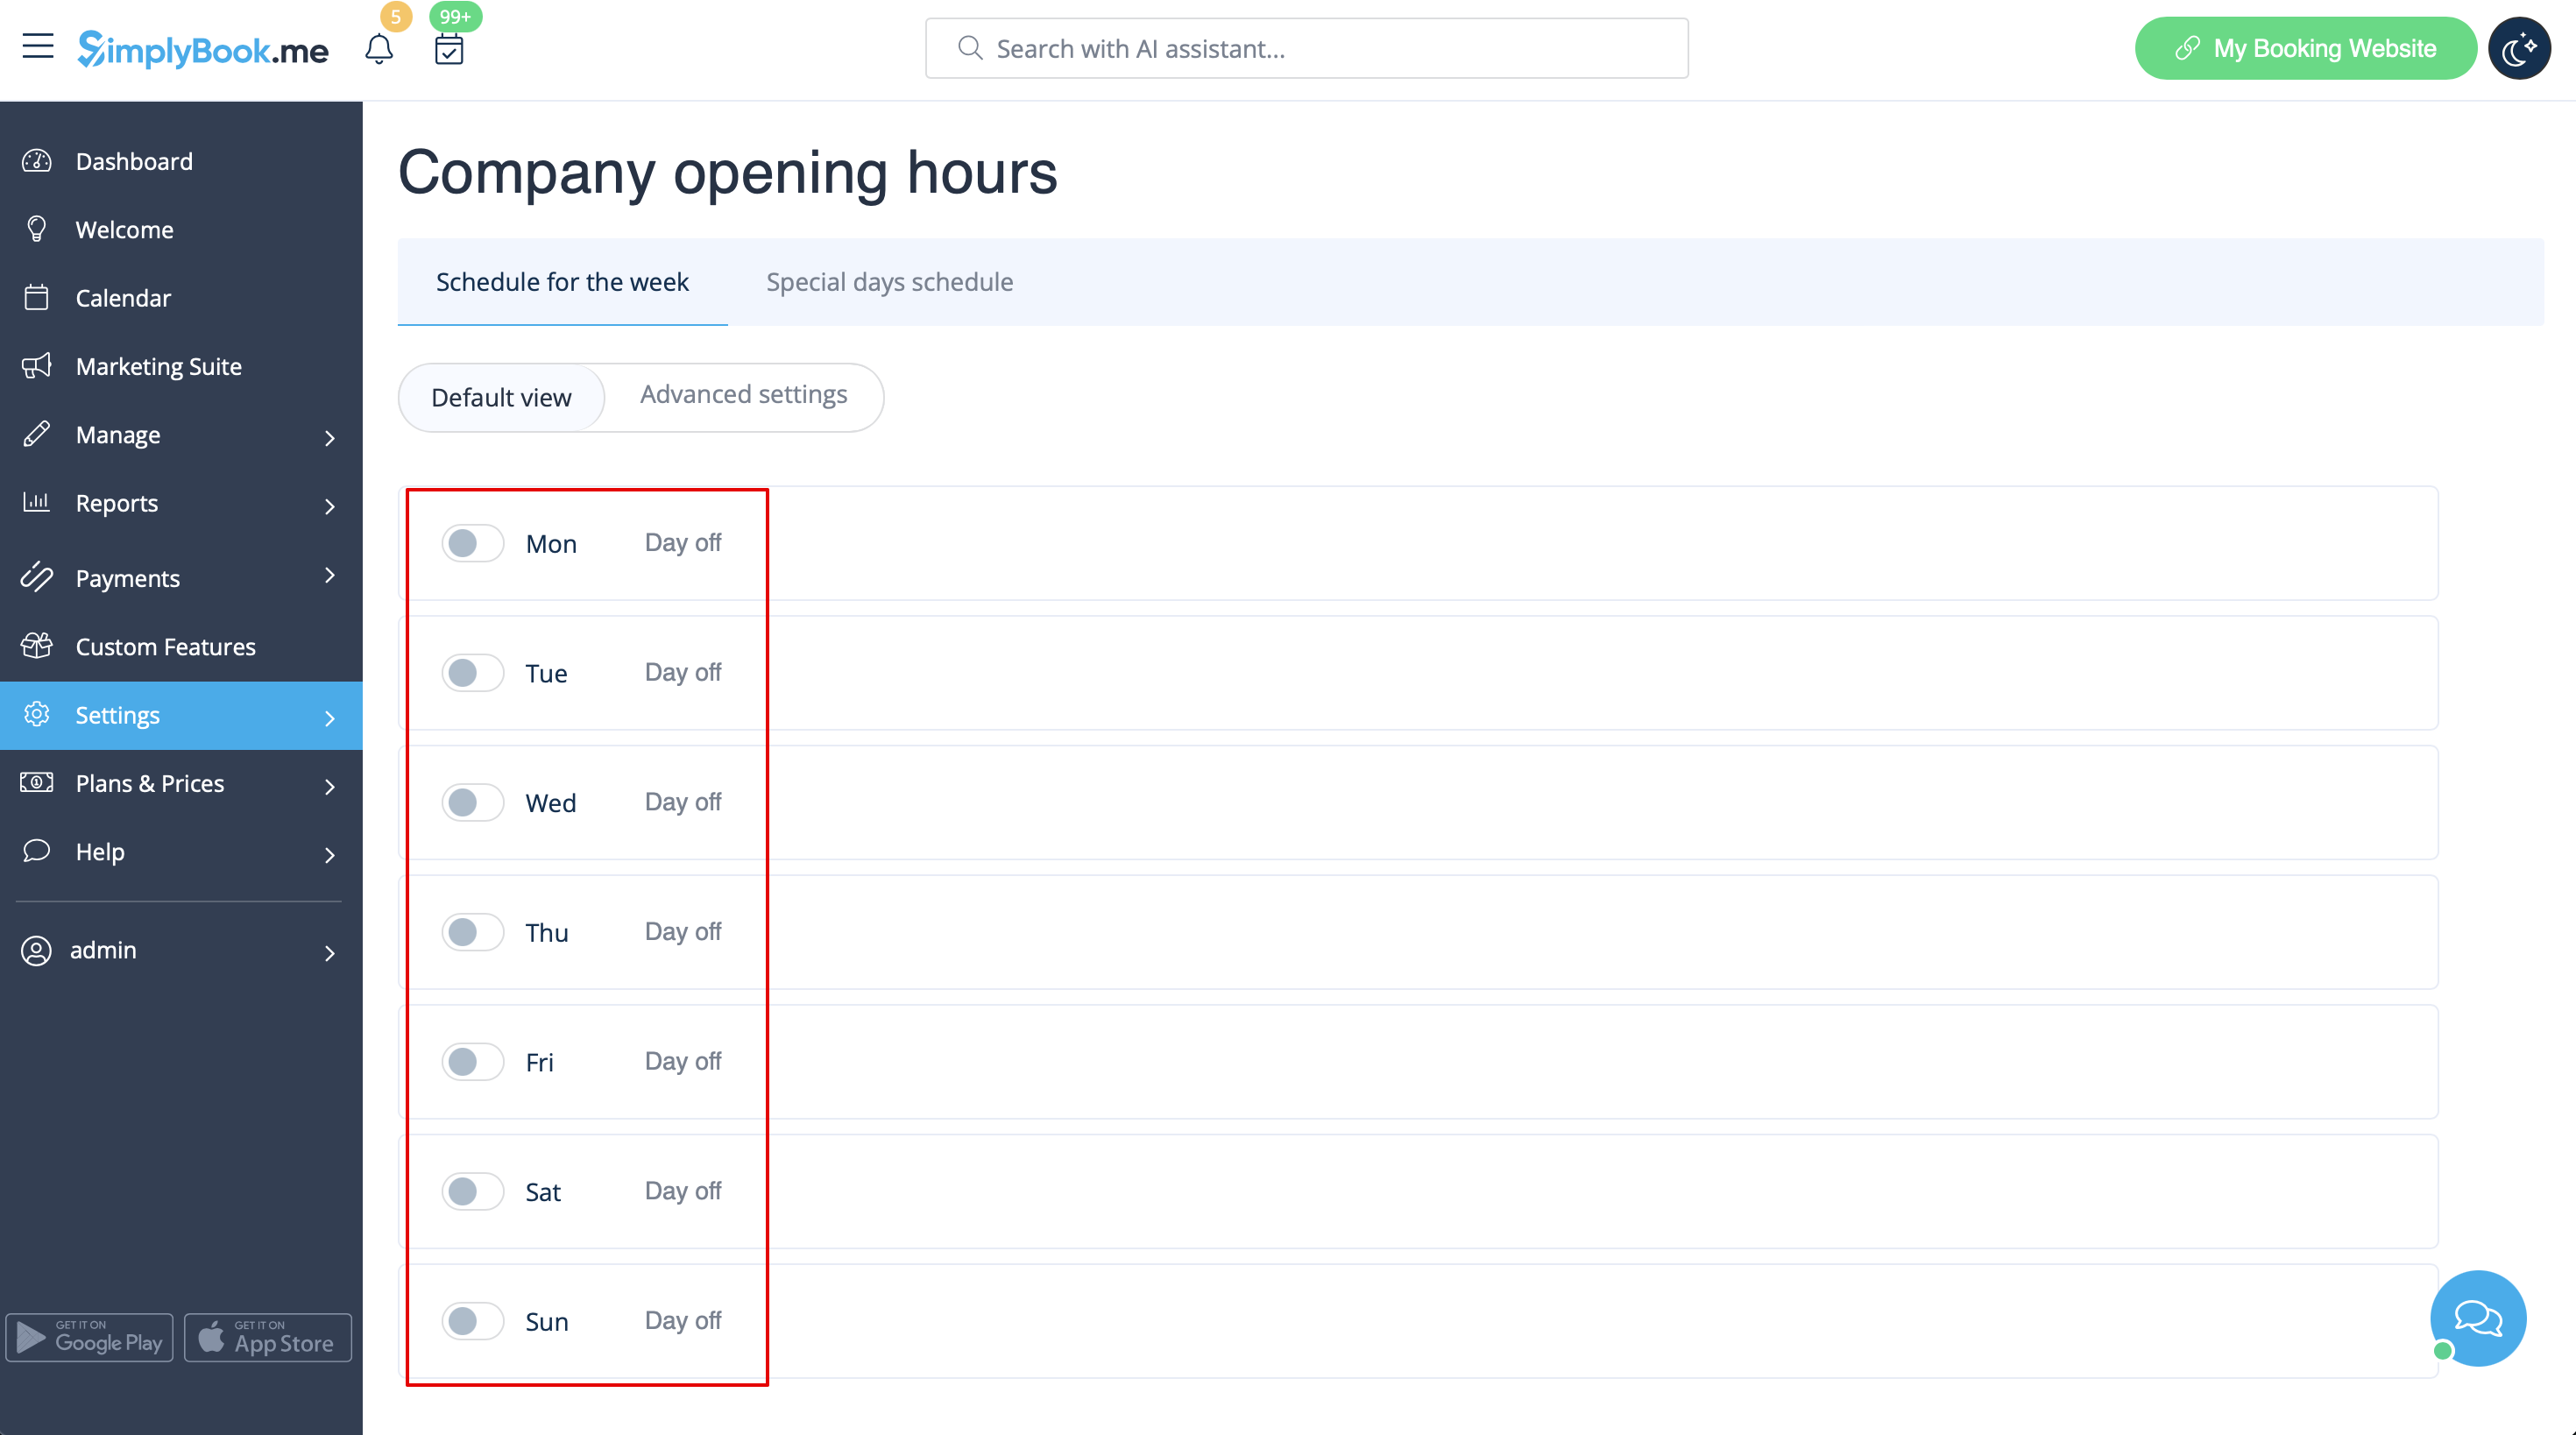
- 1. Close all company opening hours in Settings // Company opening hours - use switcher to set it to off position
- 2. Create events you need in Manage // Services // "+". See detailed tutorial about services here.