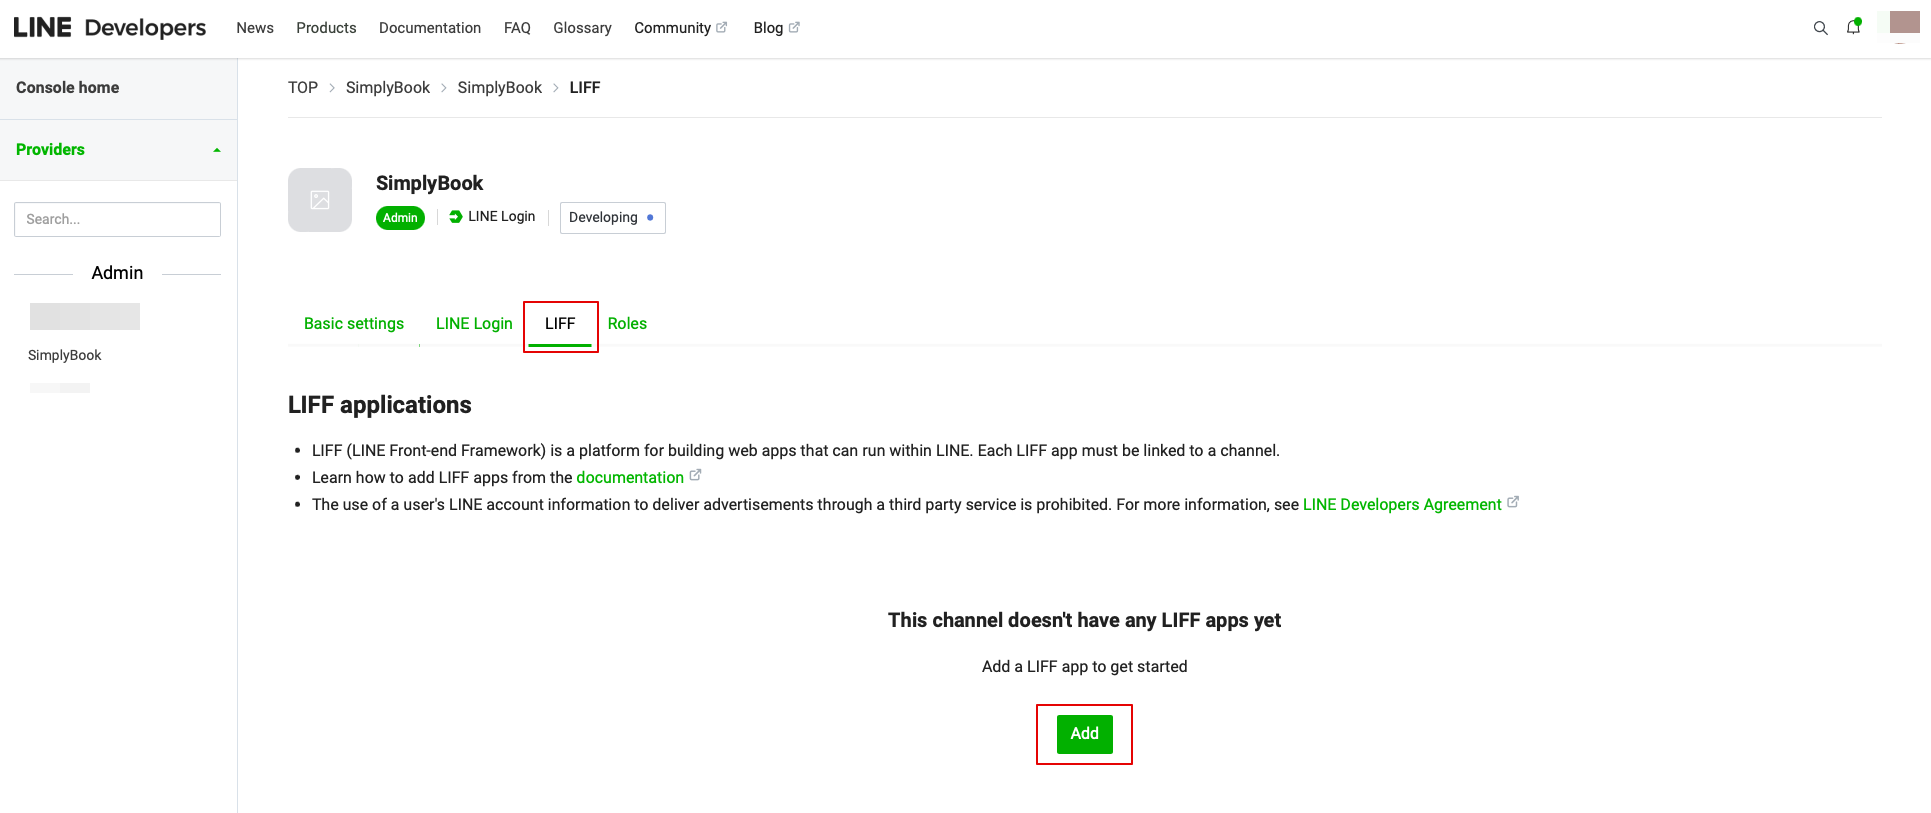
Created page with ":6. Når LINE Login er oprettet, skal du klikke på fanen LIFF og tilføje LIFF-appen der. 1200px|center|link=https://help.simplybook.me/images/2/21/Add_liff_app_path.png" |
Created page with "LINE LIFF-tilføjelsesfunktion" |
||
| Line 68: | Line 68: | ||
[[File:Line liff webhook url to.png|1200px|center|link=https://help.simplybook.me/images/9/98/Line_liff_webhook_url_to.png]] | [[File:Line liff webhook url to.png|1200px|center|link=https://help.simplybook.me/images/9/98/Line_liff_webhook_url_to.png]] | ||
:10. I Messaging API på LINE-siden skal du rulle ned til Channel access token, udstede det, kopiere resultatværdien og indsætte den i Simplybook.me LINE LIFF-indstillingerne. | |||
:10. | |||
[[File:Line liff access token copy.png|1200px|center|link=https://help.simplybook.me/images/3/3b/Line_liff_access_token_copy.png]] | [[File:Line liff access token copy.png|1200px|center|link=https://help.simplybook.me/images/3/3b/Line_liff_access_token_copy.png]] | ||
[[File:Line liff channel access token redesigned.png|1200px|center|link=https://help.simplybook.me/images/2/2e/Line_liff_channel_access_token_redesigned.png]] | [[File:Line liff channel access token redesigned.png|1200px|center|link=https://help.simplybook.me/images/2/2e/Line_liff_channel_access_token_redesigned.png]] | ||
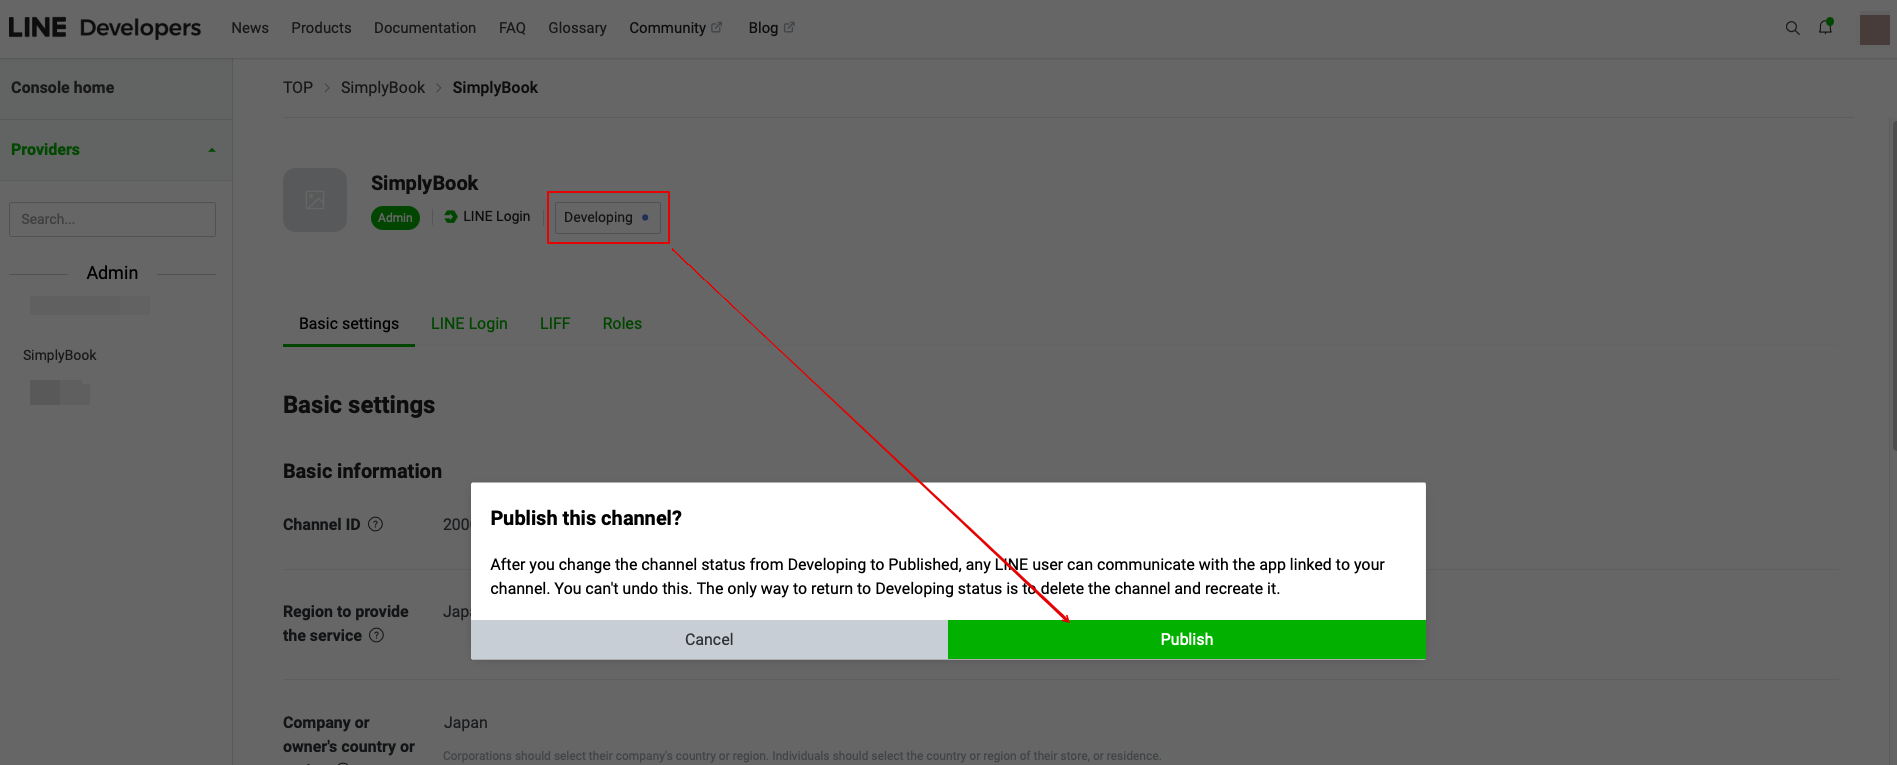
11. Gå tilbage til LINE Login-kanalen, klik på Developing status under kanalnavnet, og ændr det til Publish.<br> | |||
11. | |||
[[File:Line liff publish channel.png|1200px|center|link=https://help.simplybook.me/images/9/9a/Line_liff_publish_channel.png]] | [[File:Line liff publish channel.png|1200px|center|link=https://help.simplybook.me/images/9/9a/Line_liff_publish_channel.png]] | ||
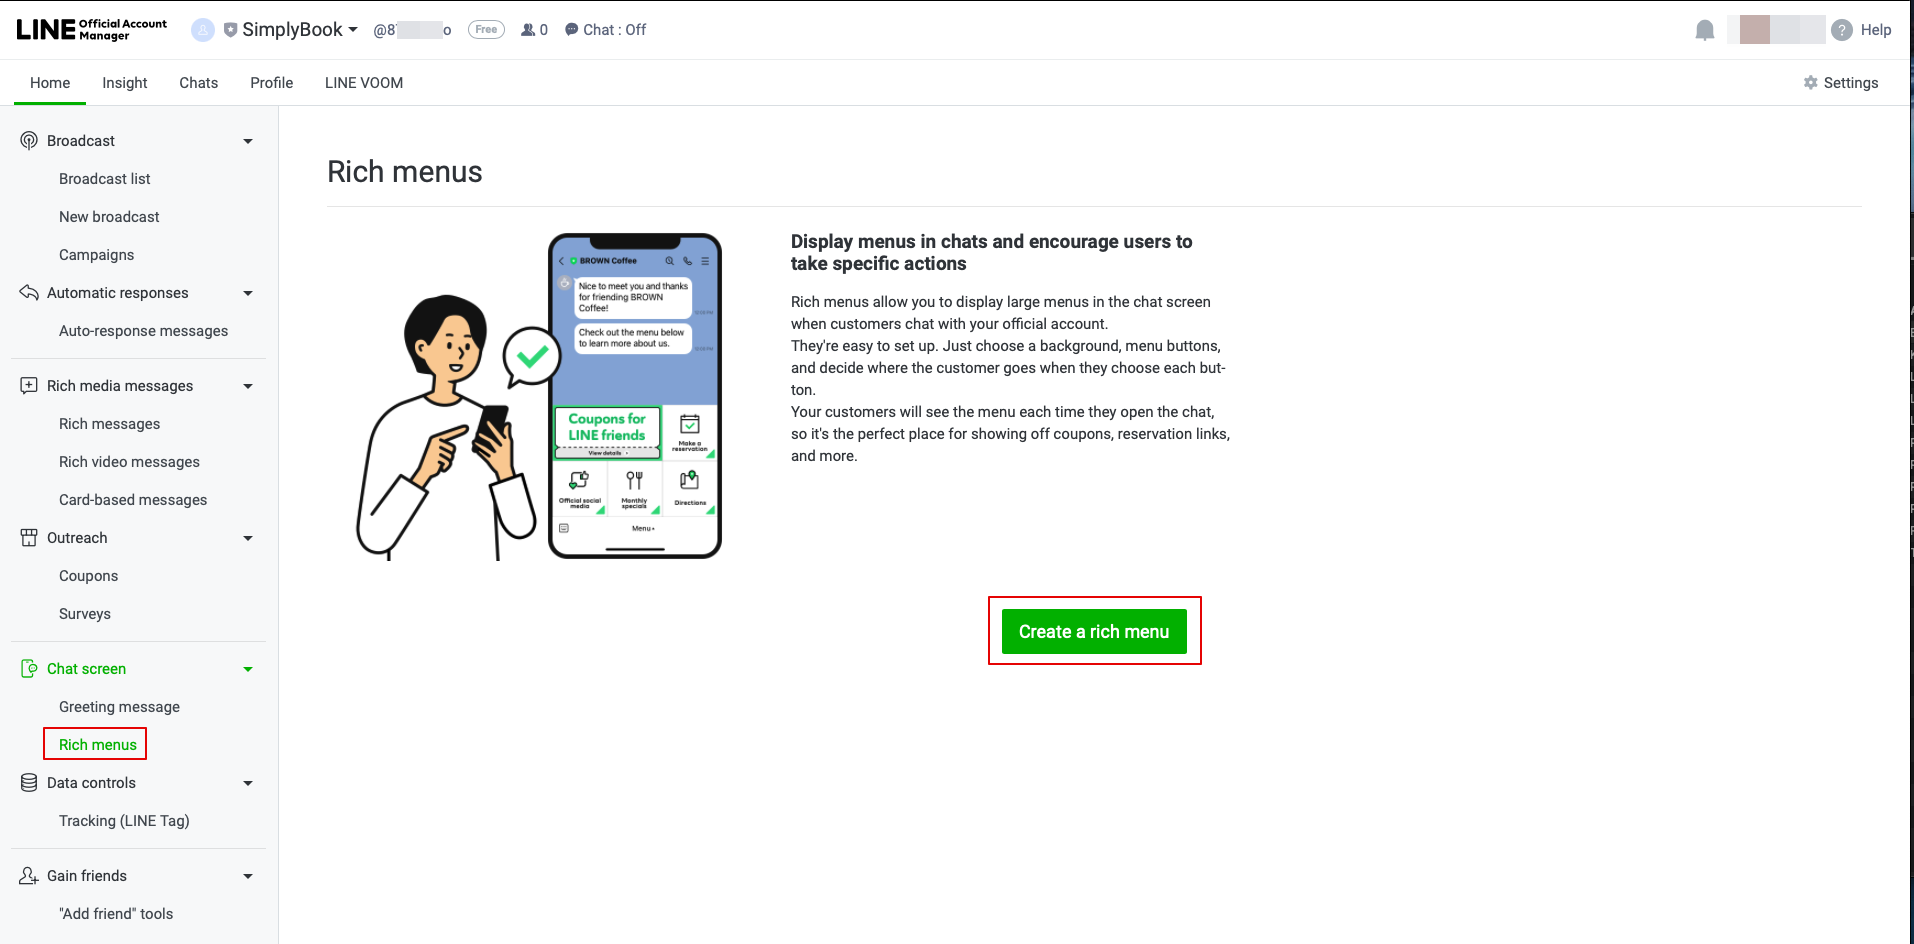
:12. Når oversættelsen er offentliggjort, skal du logge ind på [https://manager.line.biz/ Line Official Account] med samme LINE-konto som Developers Console. | |||
:12. | :Når du åbner siden, skal du klikke på Rich Menu i navigationsmenuen og derefter på Create a Rich Menu. | ||
: | |||
[[File:Create a rich menu line liff.png|1200px|center|link=https://help.simplybook.me/images/8/80/Create_a_rich_menu_line_liff.png]] | [[File:Create a rich menu line liff.png|1200px|center|link=https://help.simplybook.me/images/8/80/Create_a_rich_menu_line_liff.png]] | ||
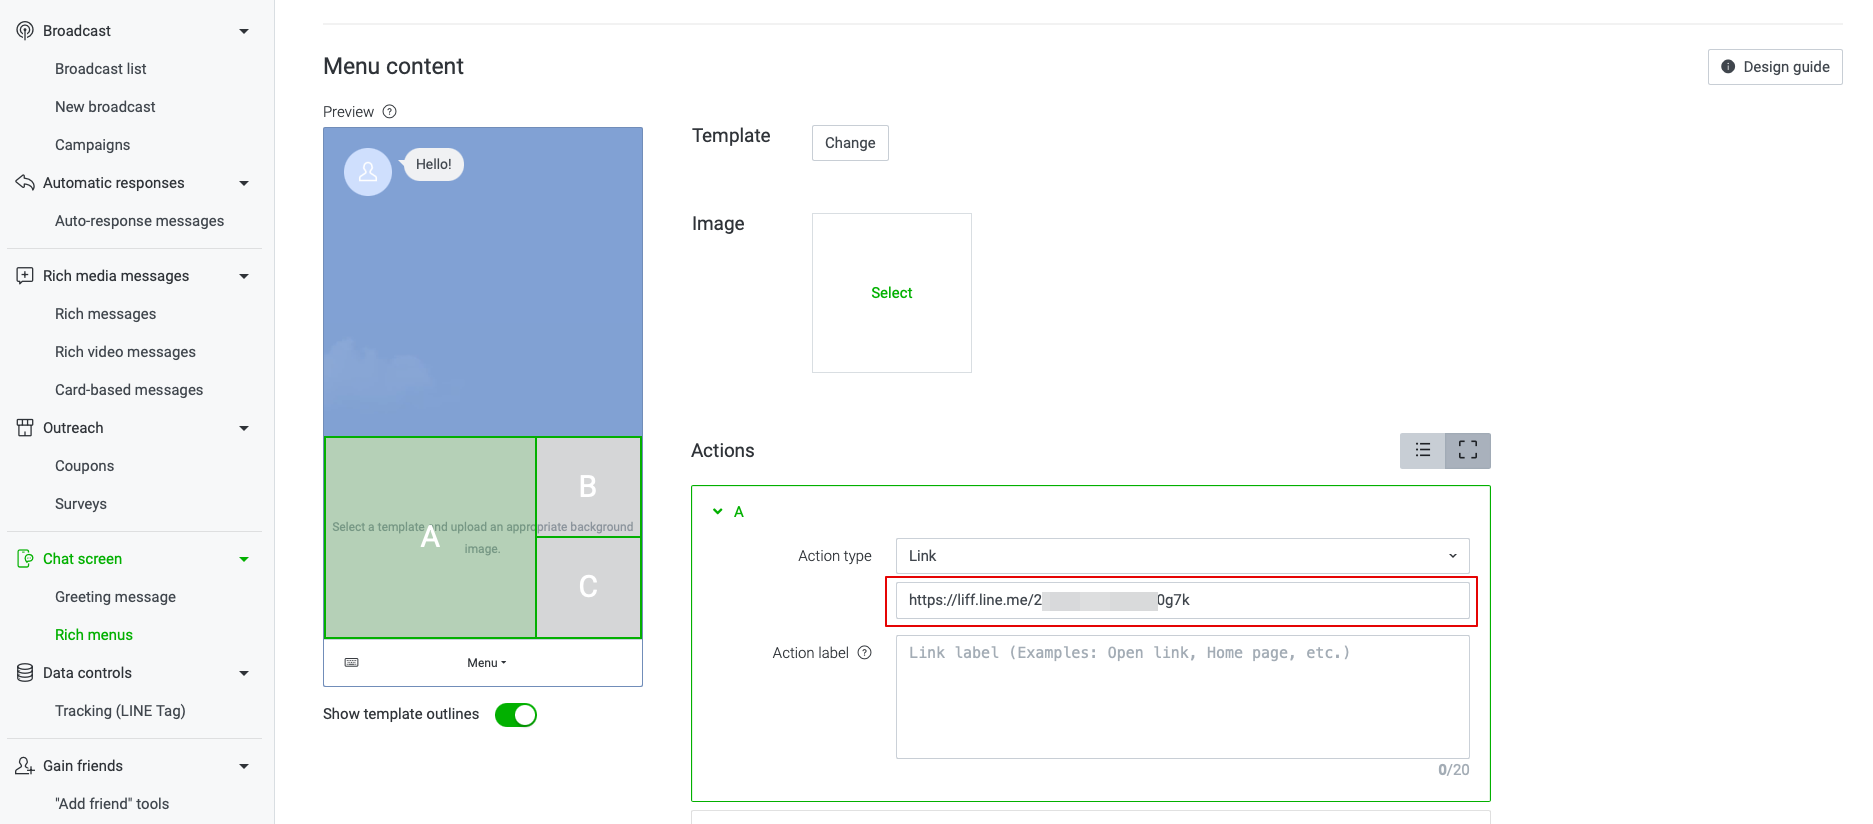
:13. Udfyld de obligatoriske felter. | |||
:13. | :I menuen Indhold skal du vælge skabelonen og tilføje billedet. | ||
: | :Vælg "Link" i blokken Handlinger, og tilføj LIFF-URL'en fra udviklerkonsollen//LINE Login-kanalen. | ||
: | |||
[[File:Action type link.png|1200px|center|link=https://help.simplybook.me/images/4/4b/Action_type_link.png]] | [[File:Action type link.png|1200px|center|link=https://help.simplybook.me/images/4/4b/Action_type_link.png]] | ||
[[File:Line liff url.png|1200px|center|link=https://help.simplybook.me/images/0/00/Line_liff_url.png]] | [[File:Line liff url.png|1200px|center|link=https://help.simplybook.me/images/0/00/Line_liff_url.png]] | ||
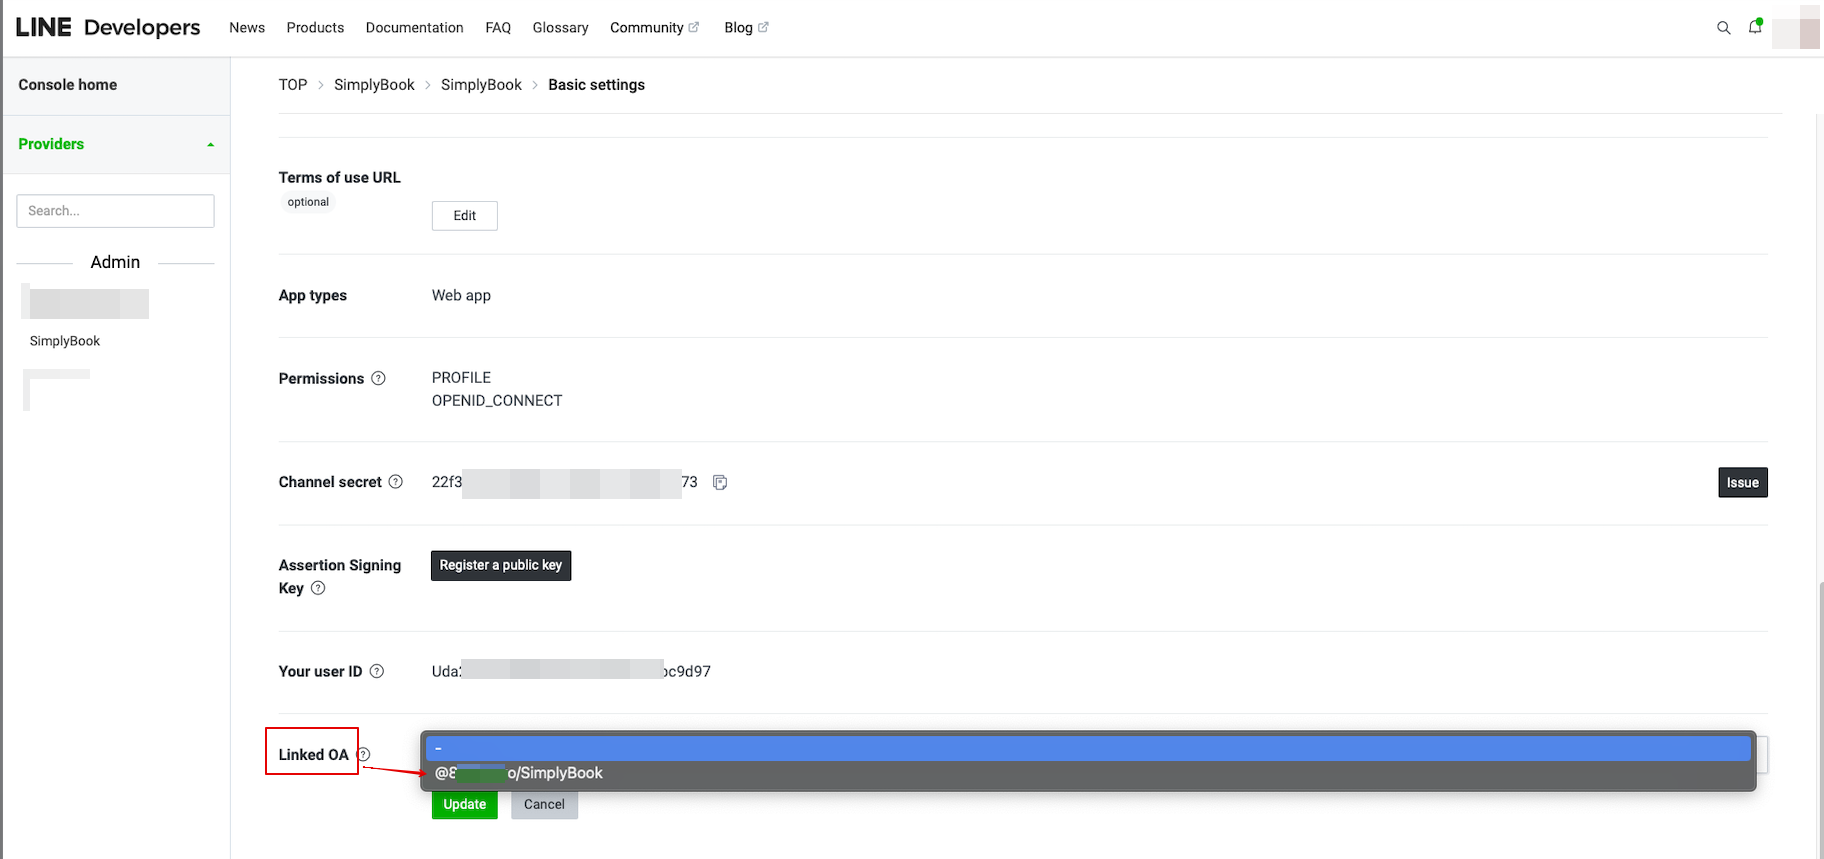
:14. For at forbinde LINE Official-kontoen med LINE Developers-kontoen skal du gå til Developer Console og klikke på LINE Login-kanalen. I Linked OA skal du vælge Official-kontoen for at forbinde de to dele. | |||
:14. | |||
[[File:Connect official account.png|1200px|center|link=https://help.simplybook.me/images/2/2e/Connect_official_account.png]] | [[File:Connect official account.png|1200px|center|link=https://help.simplybook.me/images/2/2e/Connect_official_account.png]] | ||
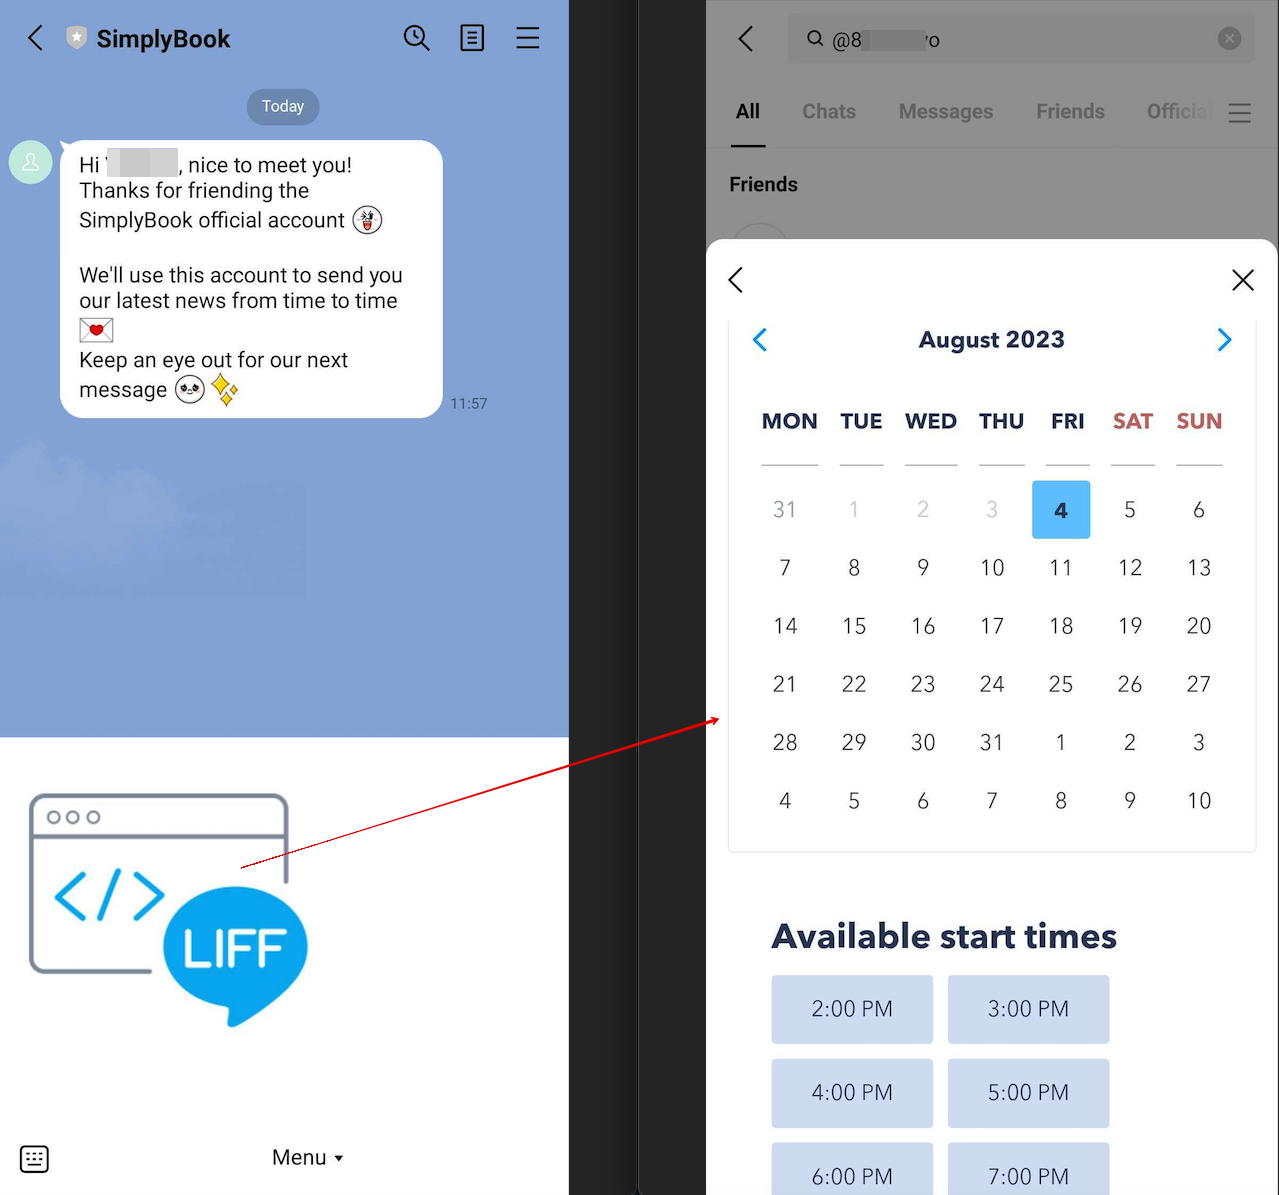
:15. Når kunderne har åbnet den officielle LINE-kontoside i LINE-appen, kan de klikke på menuen for at starte bookingprocessen. Under processen kan de vælge de tjenester, dato og tidspunkt, de ønsker at reservere, logge ind med deres LINE-konto og bekræfte reservationen. | |||
:15. | :Integrationen giver også kunderne mulighed for nemt at se deres bookinger i denne widget i appen. | ||
: | |||
[[File:Line app booking process.png|1200px|center|link=https://help.simplybook.me/images/0/0d/Line_app_booking_process.png]] | [[File:Line app booking process.png|1200px|center|link=https://help.simplybook.me/images/0/0d/Line_app_booking_process.png]] | ||
< | <span id="How_to_customize_LINE_Official_Account_notifications?"></span> | ||
== | == Hvordan tilpasser jeg LINE Official Account-meddelelser? == | ||
Gå til SimplyBook.me-administrationspanelet, vælg Indstillinger → E-mail- og SMS-indstillinger. Teksterne i LINE-bookingnotifikationerne vil være i overensstemmelse med indholdet af SMS-notifikationerne. Hvis du vil justere de inkluderede oplysninger, kan du redigere de tilsvarende skabeloner der. | |||
[[File:Sms templated path redesigned.png|1200px|center|link=https://help.simplybook.me/images/8/8d/Sms_templated_path_redesigned.png]] | [[File:Sms templated path redesigned.png|1200px|center|link=https://help.simplybook.me/images/8/8d/Sms_templated_path_redesigned.png]] | ||
'''Bemærk:''' Hvis du ikke markerer afkrydsningsfelterne for SMS-beskeder til klienter i Indstillinger → E-mail- og SMS-indstillinger, sender systemet stadig automatisk aftalepåmindelser og andre aftalebeskeder via LINE.<br> | |||
''' | |||
Latest revision as of 15:30, 19 May 2025
Integrationen af LINE LIFF med SimplyBook.me giver virksomheder en fantastisk mulighed for at forbedre deres aftalebookingsproces og kundeengagement. Ved at tilbyde en problemfri og effektiv oplevelse direkte i Line-messagingappen kan virksomheder tiltrække og fastholde kunder, strømline deres drift og forblive konkurrencedygtige på markedet.
Bemærk! Den tilpassede funktion "Kundefelter" er ikke kompatibel med LINE LIFF-funktionen.
- Sådan bruges
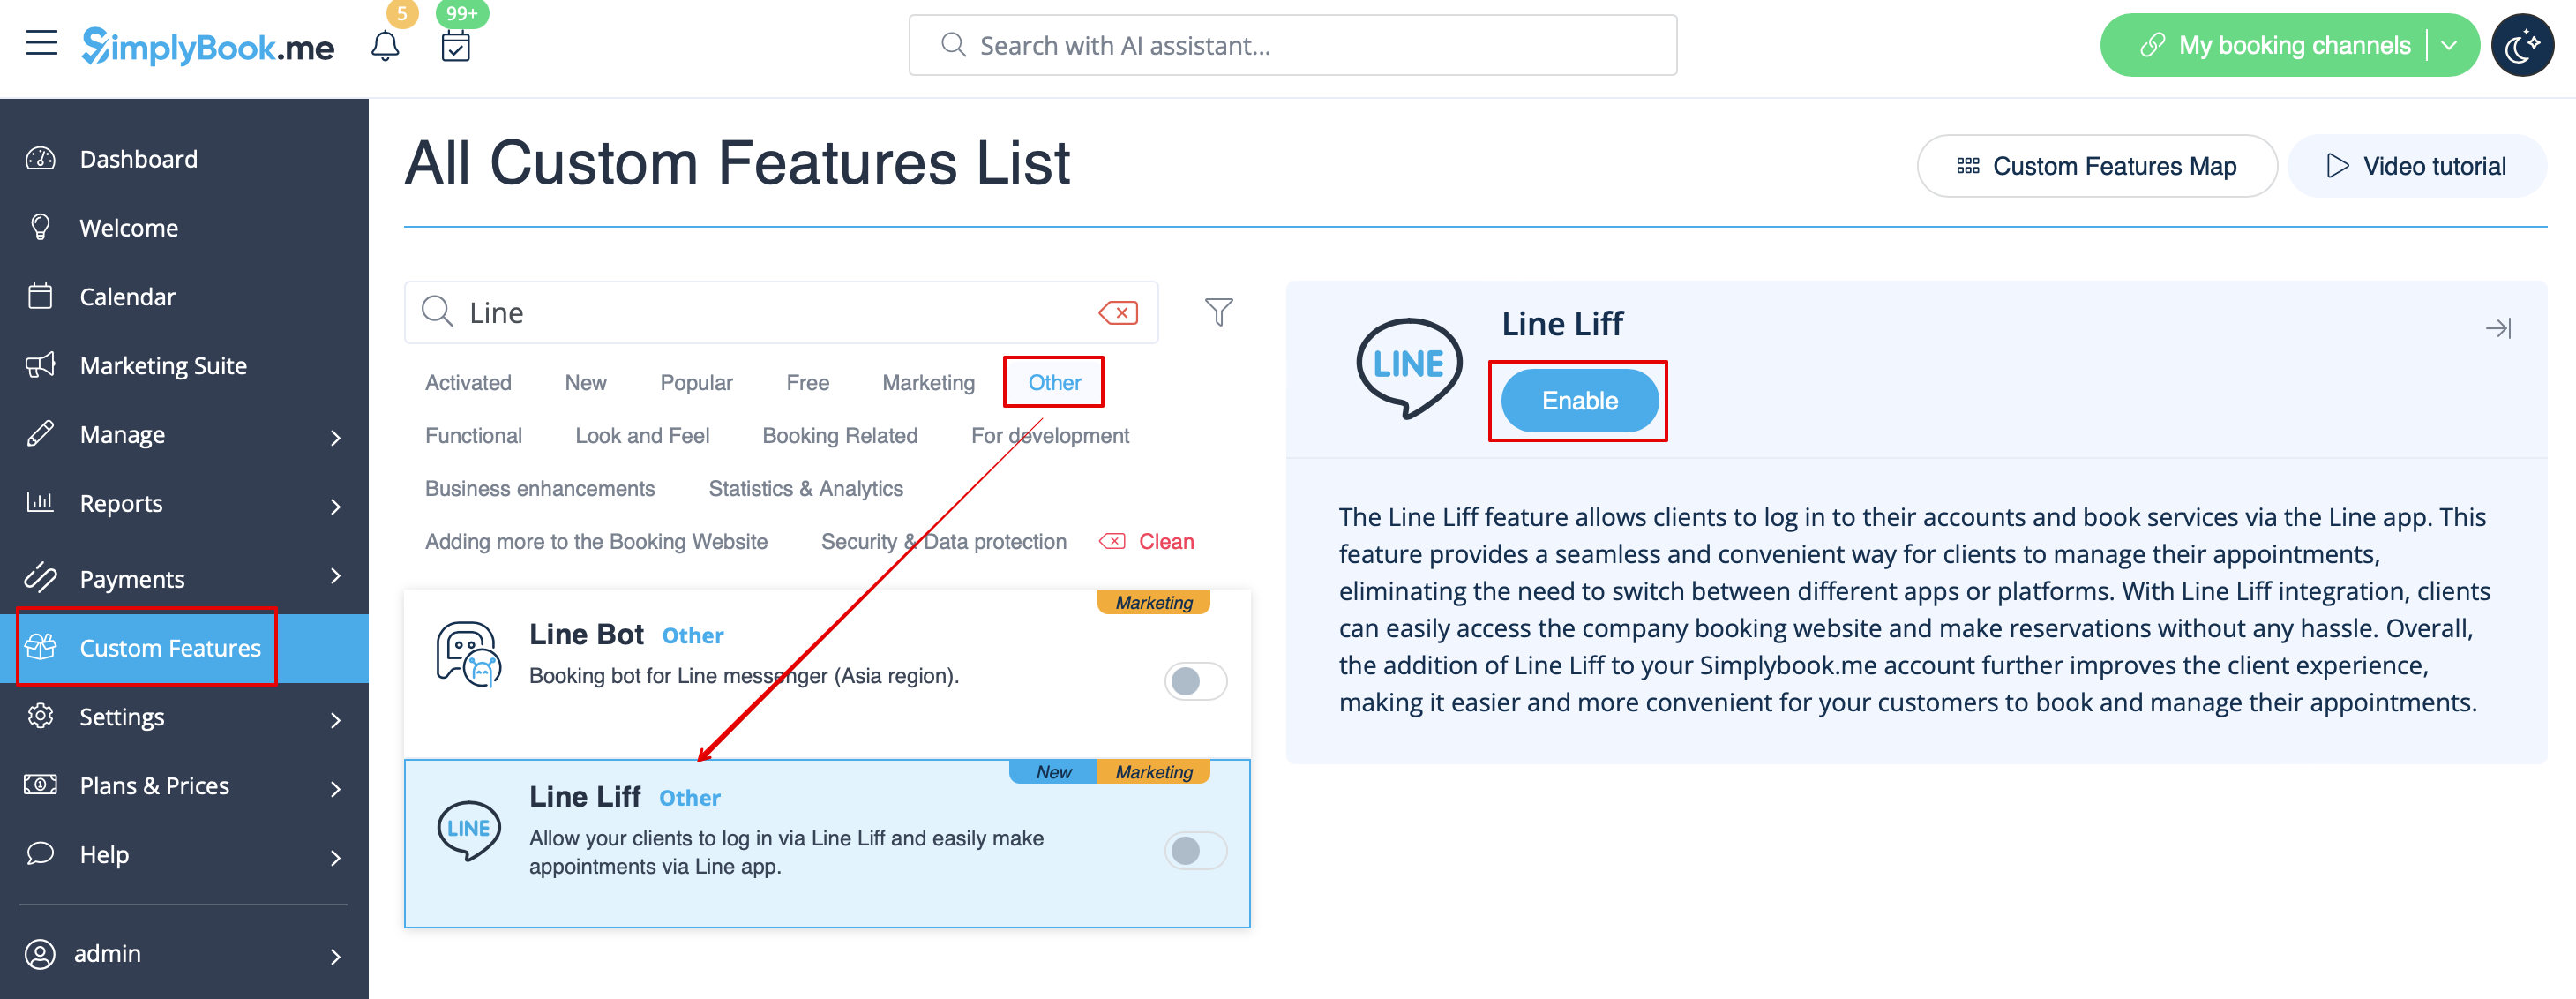
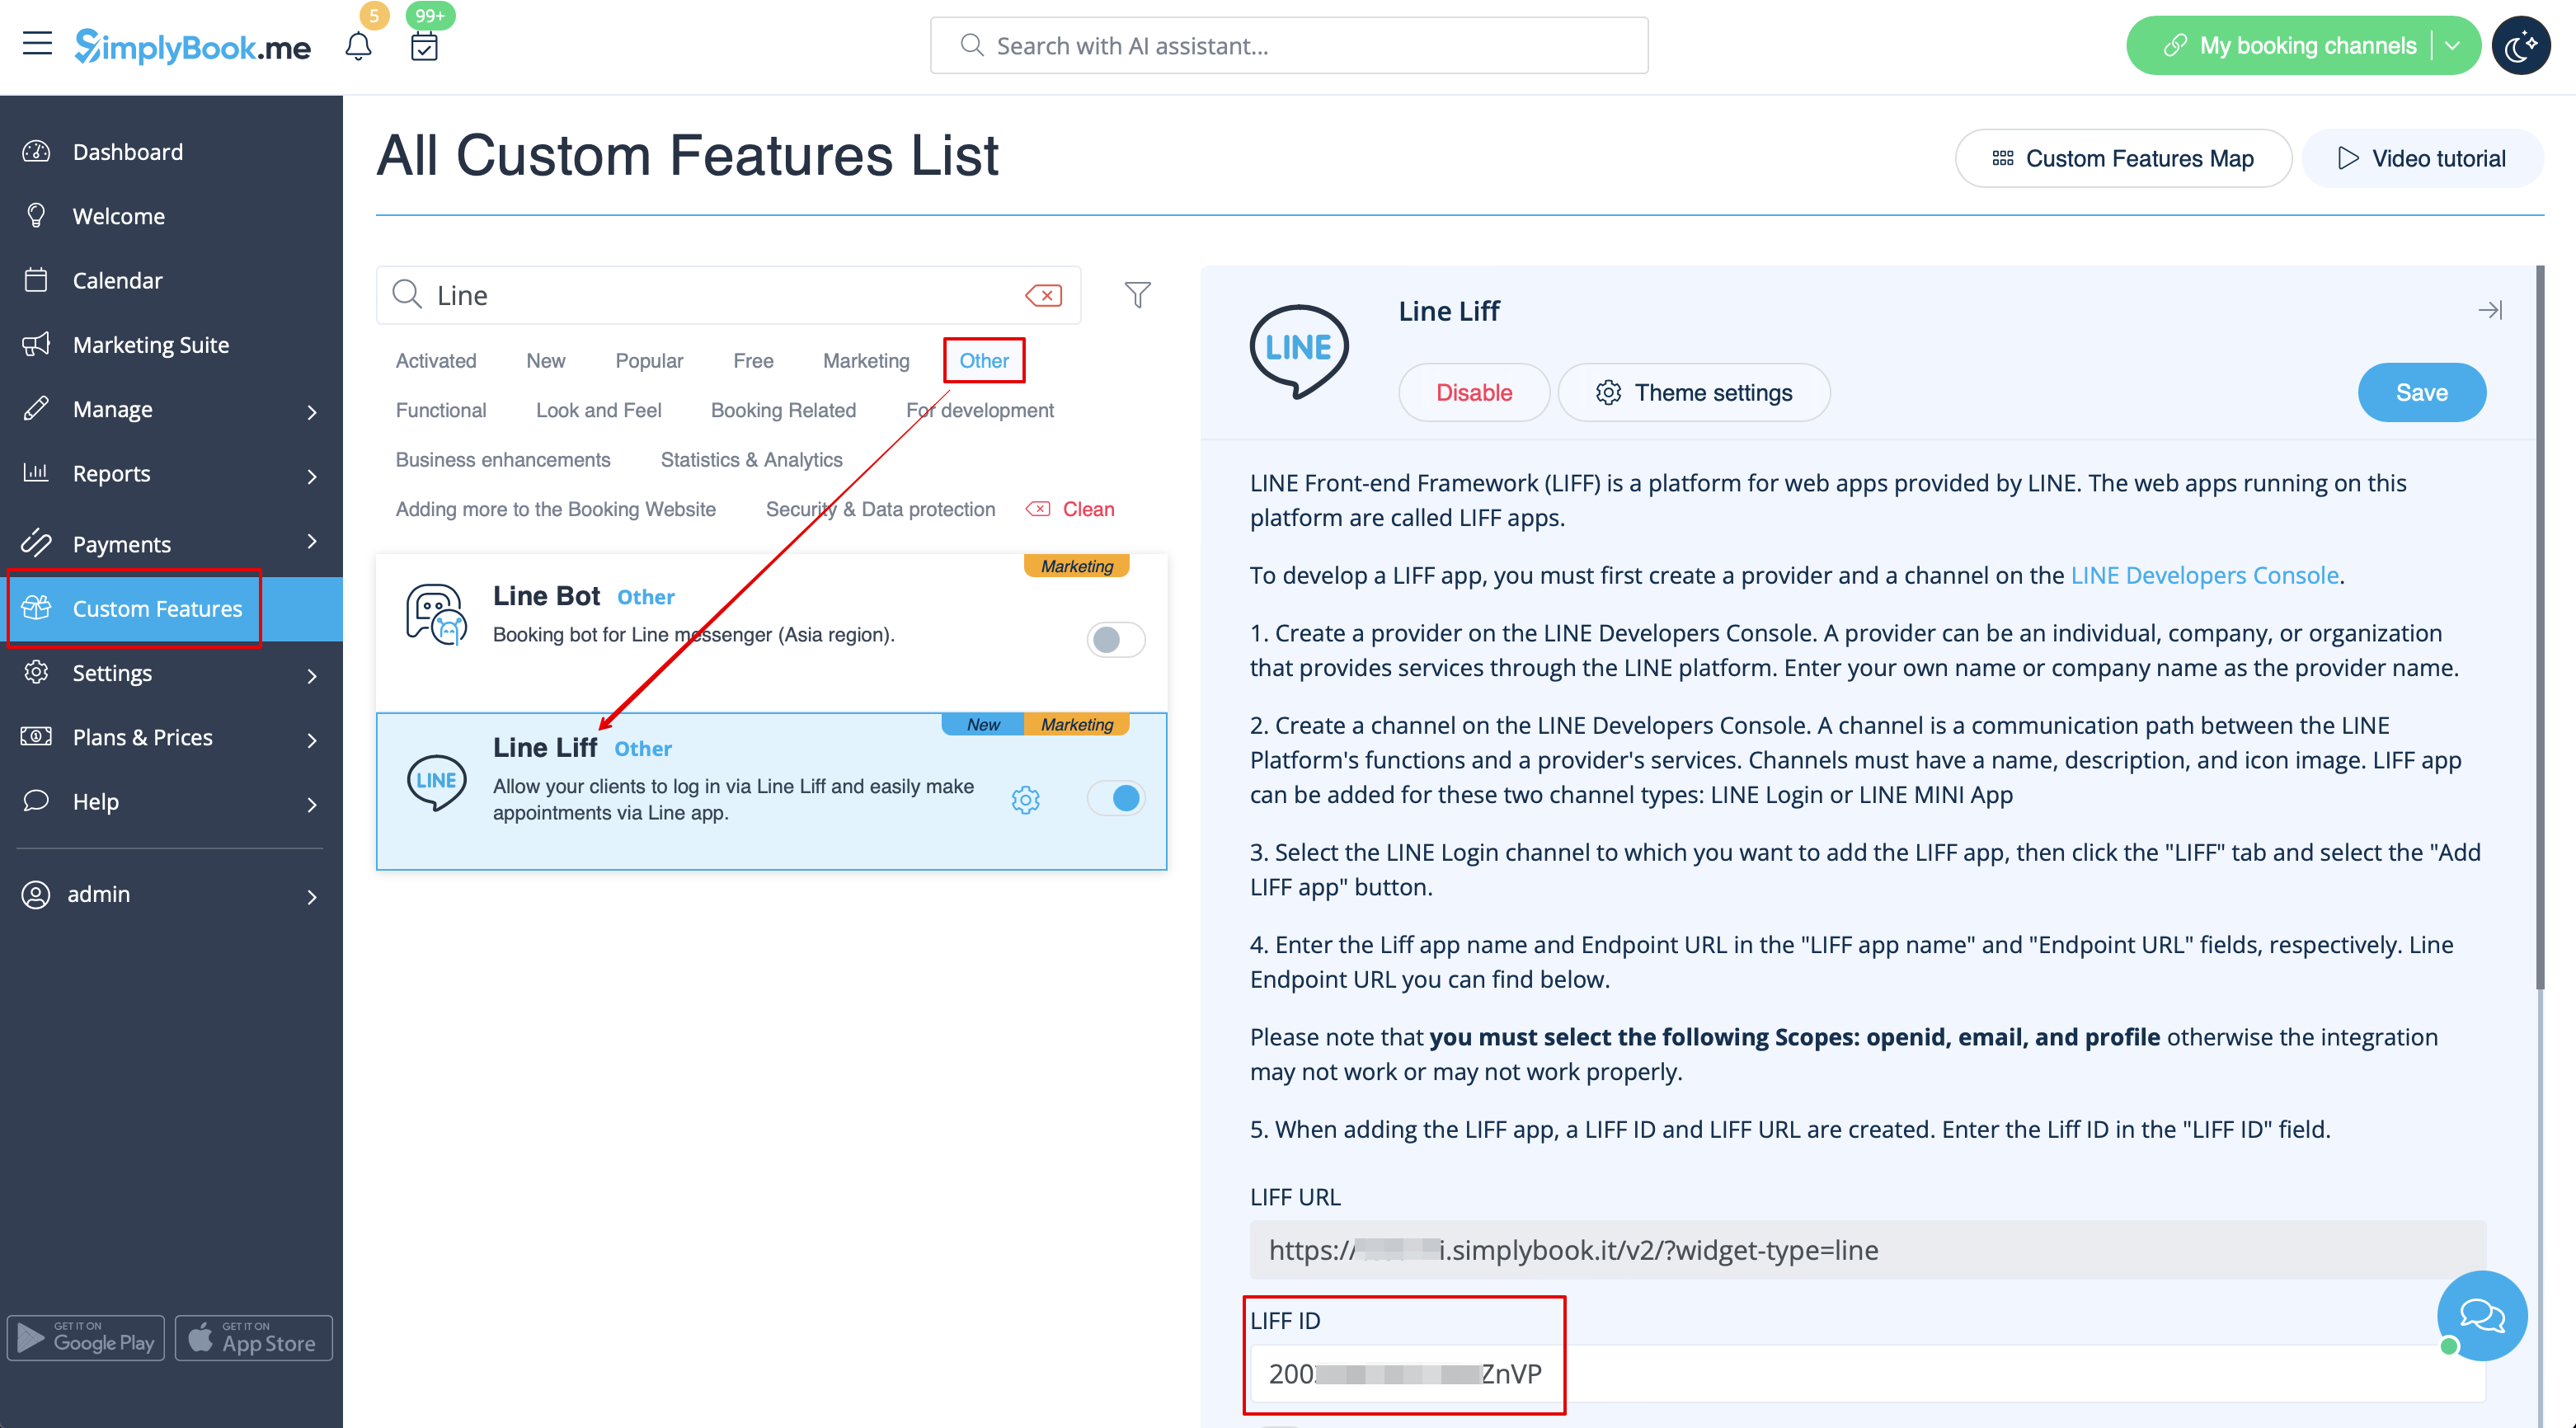
- 1. For at aktivere denne funktion skal du gå til afsnittet Brugerdefinerede funktioner i menuen til venstre i din admin-grænseflade, finde LINE LIFF og klikke på knappen Aktivér eller bruge kontakten.
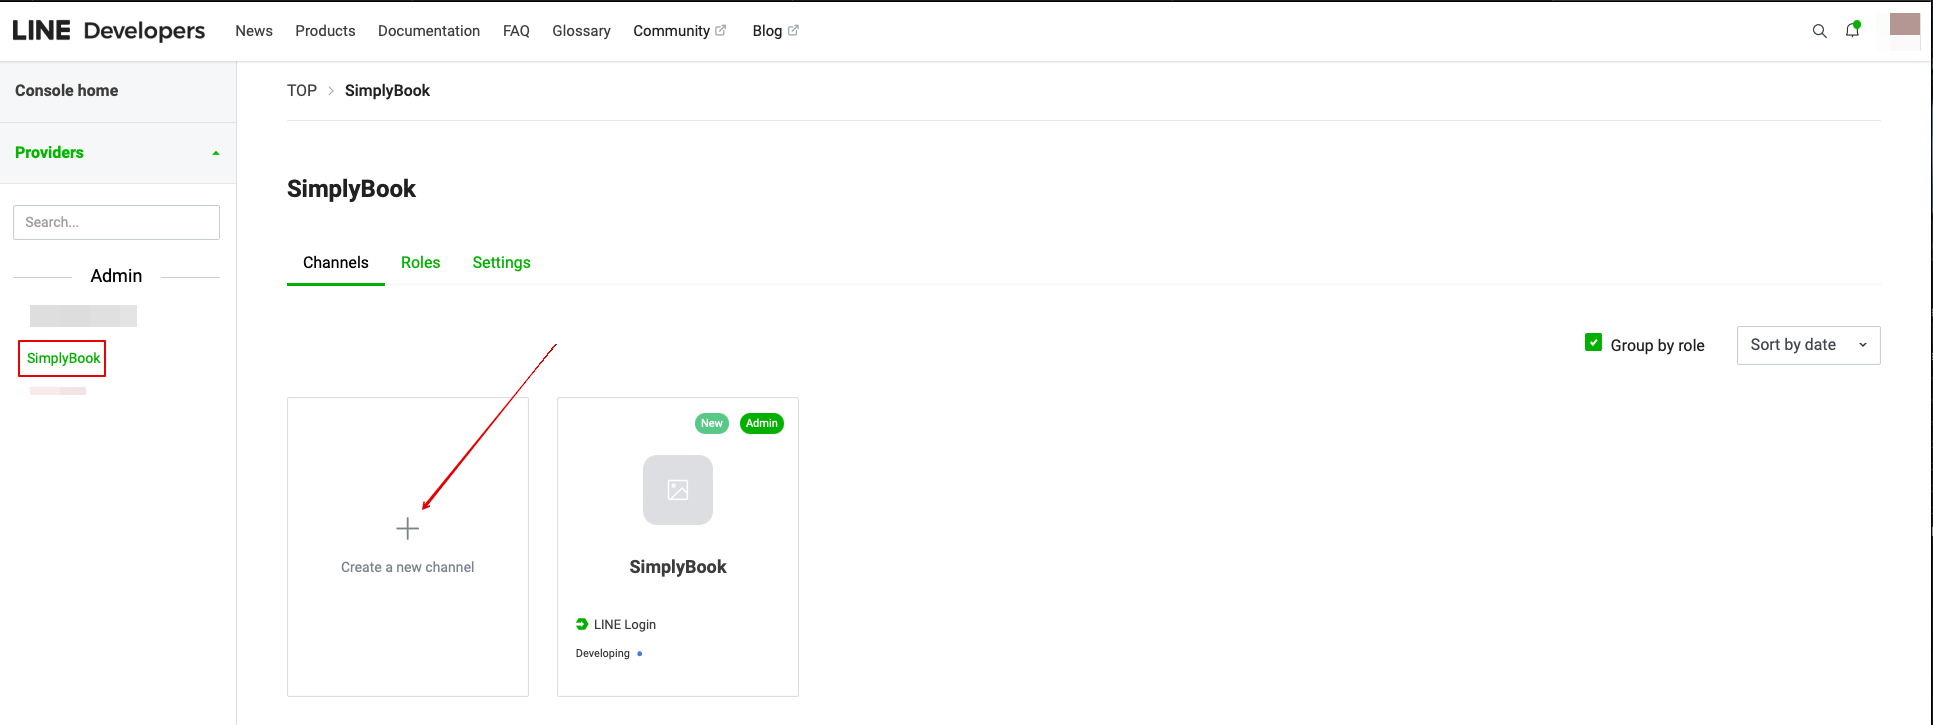
- 2. For at integrere en LIFF-app skal du oprette en udbyder og en kanal på LINE Developers Console.
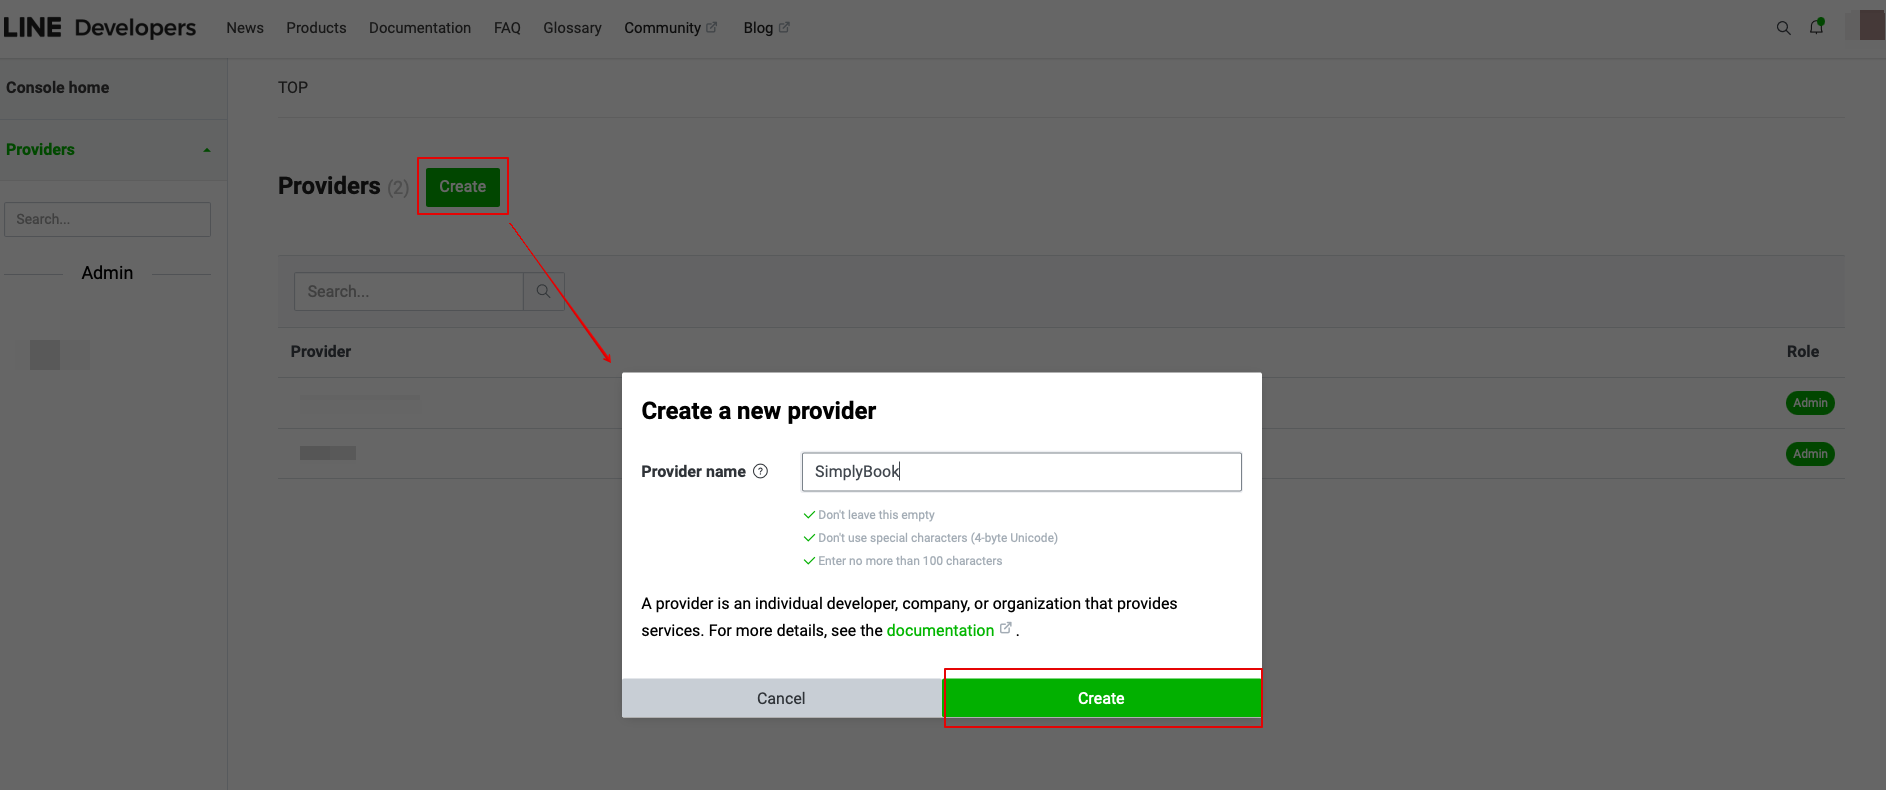
- 3. Når du har tilmeldt dig, skal du fortsætte med at oprette en udbyderinstans.
- (udbyderen kan være en person, et firma eller en organisation, der leverer tjenester via LINE-platformen)
- Indtast det ønskede navn eller firmanavn som udbydernavn i det relevante felt.
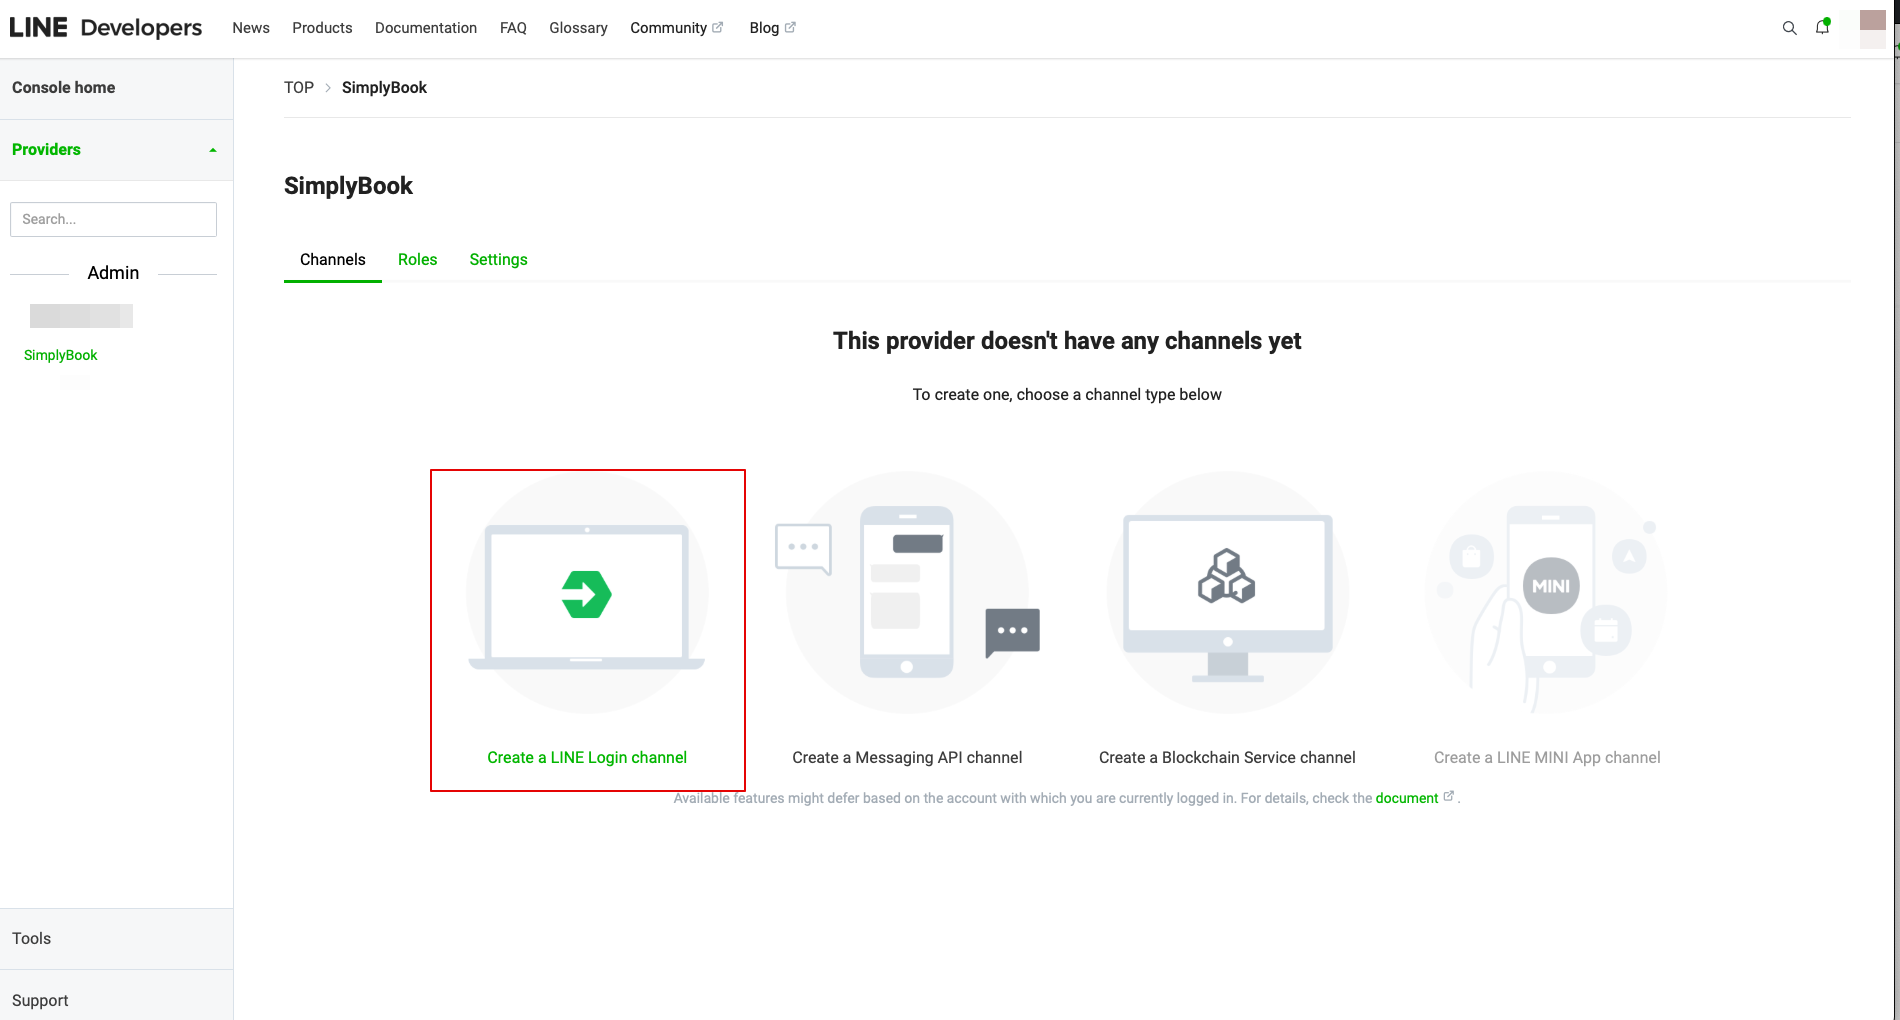
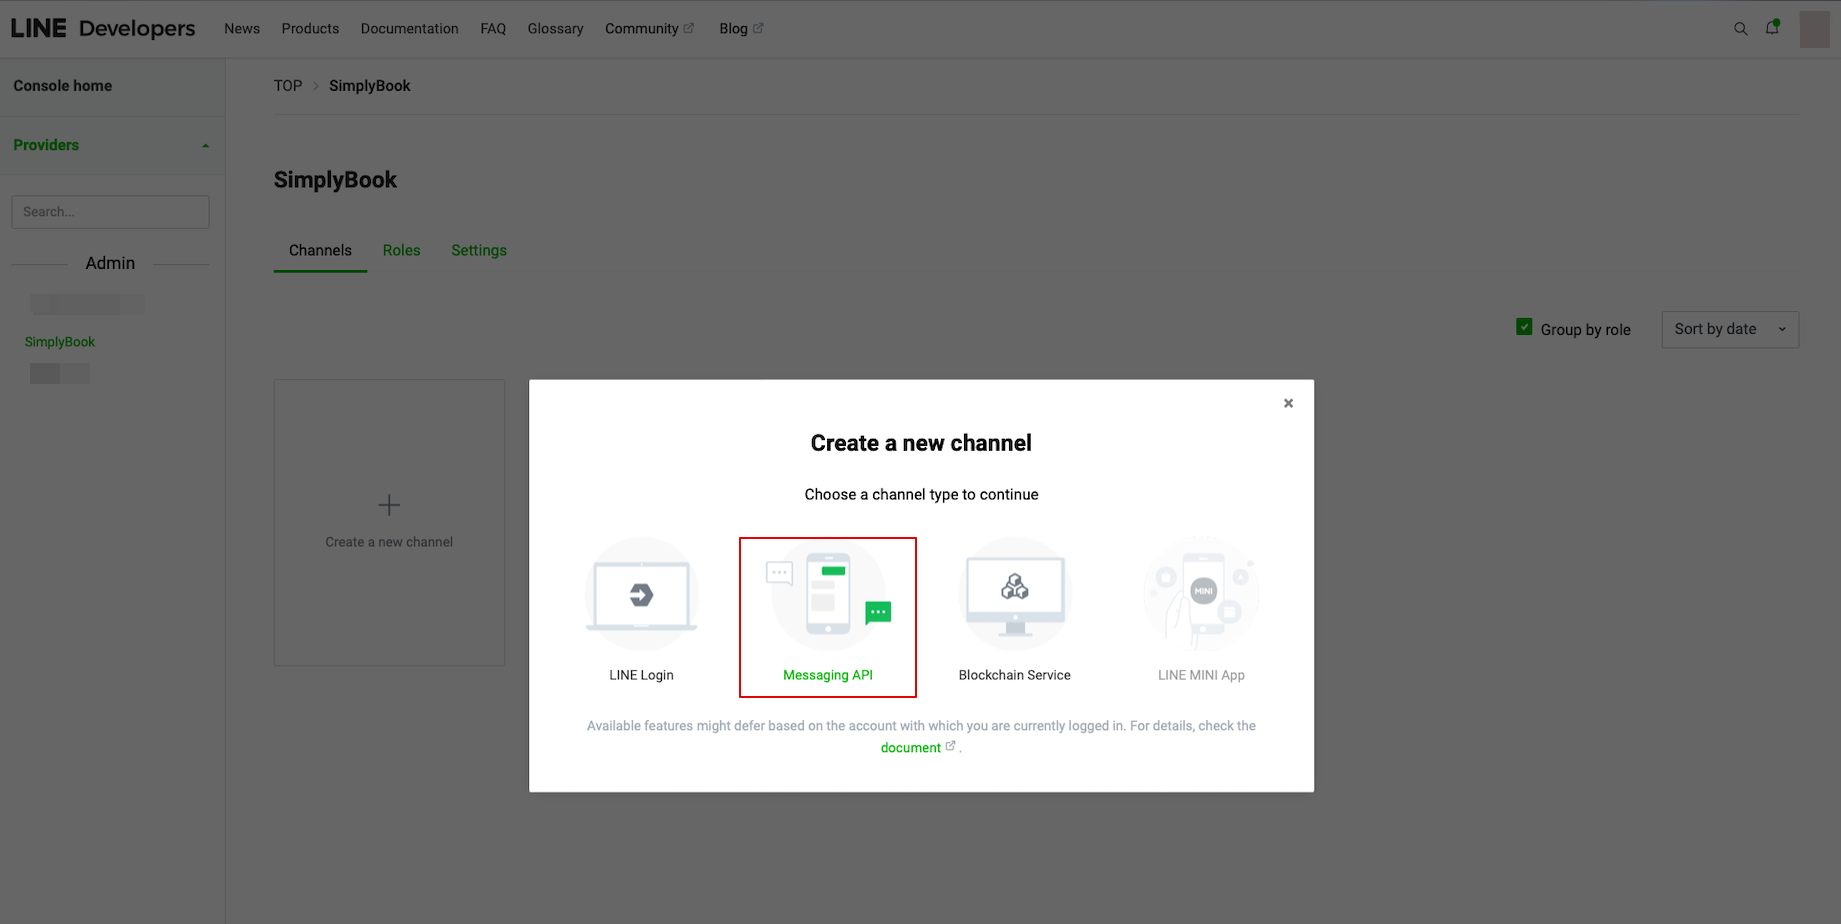
- 4. Gå derefter til Opret en LINE Login-kanal.
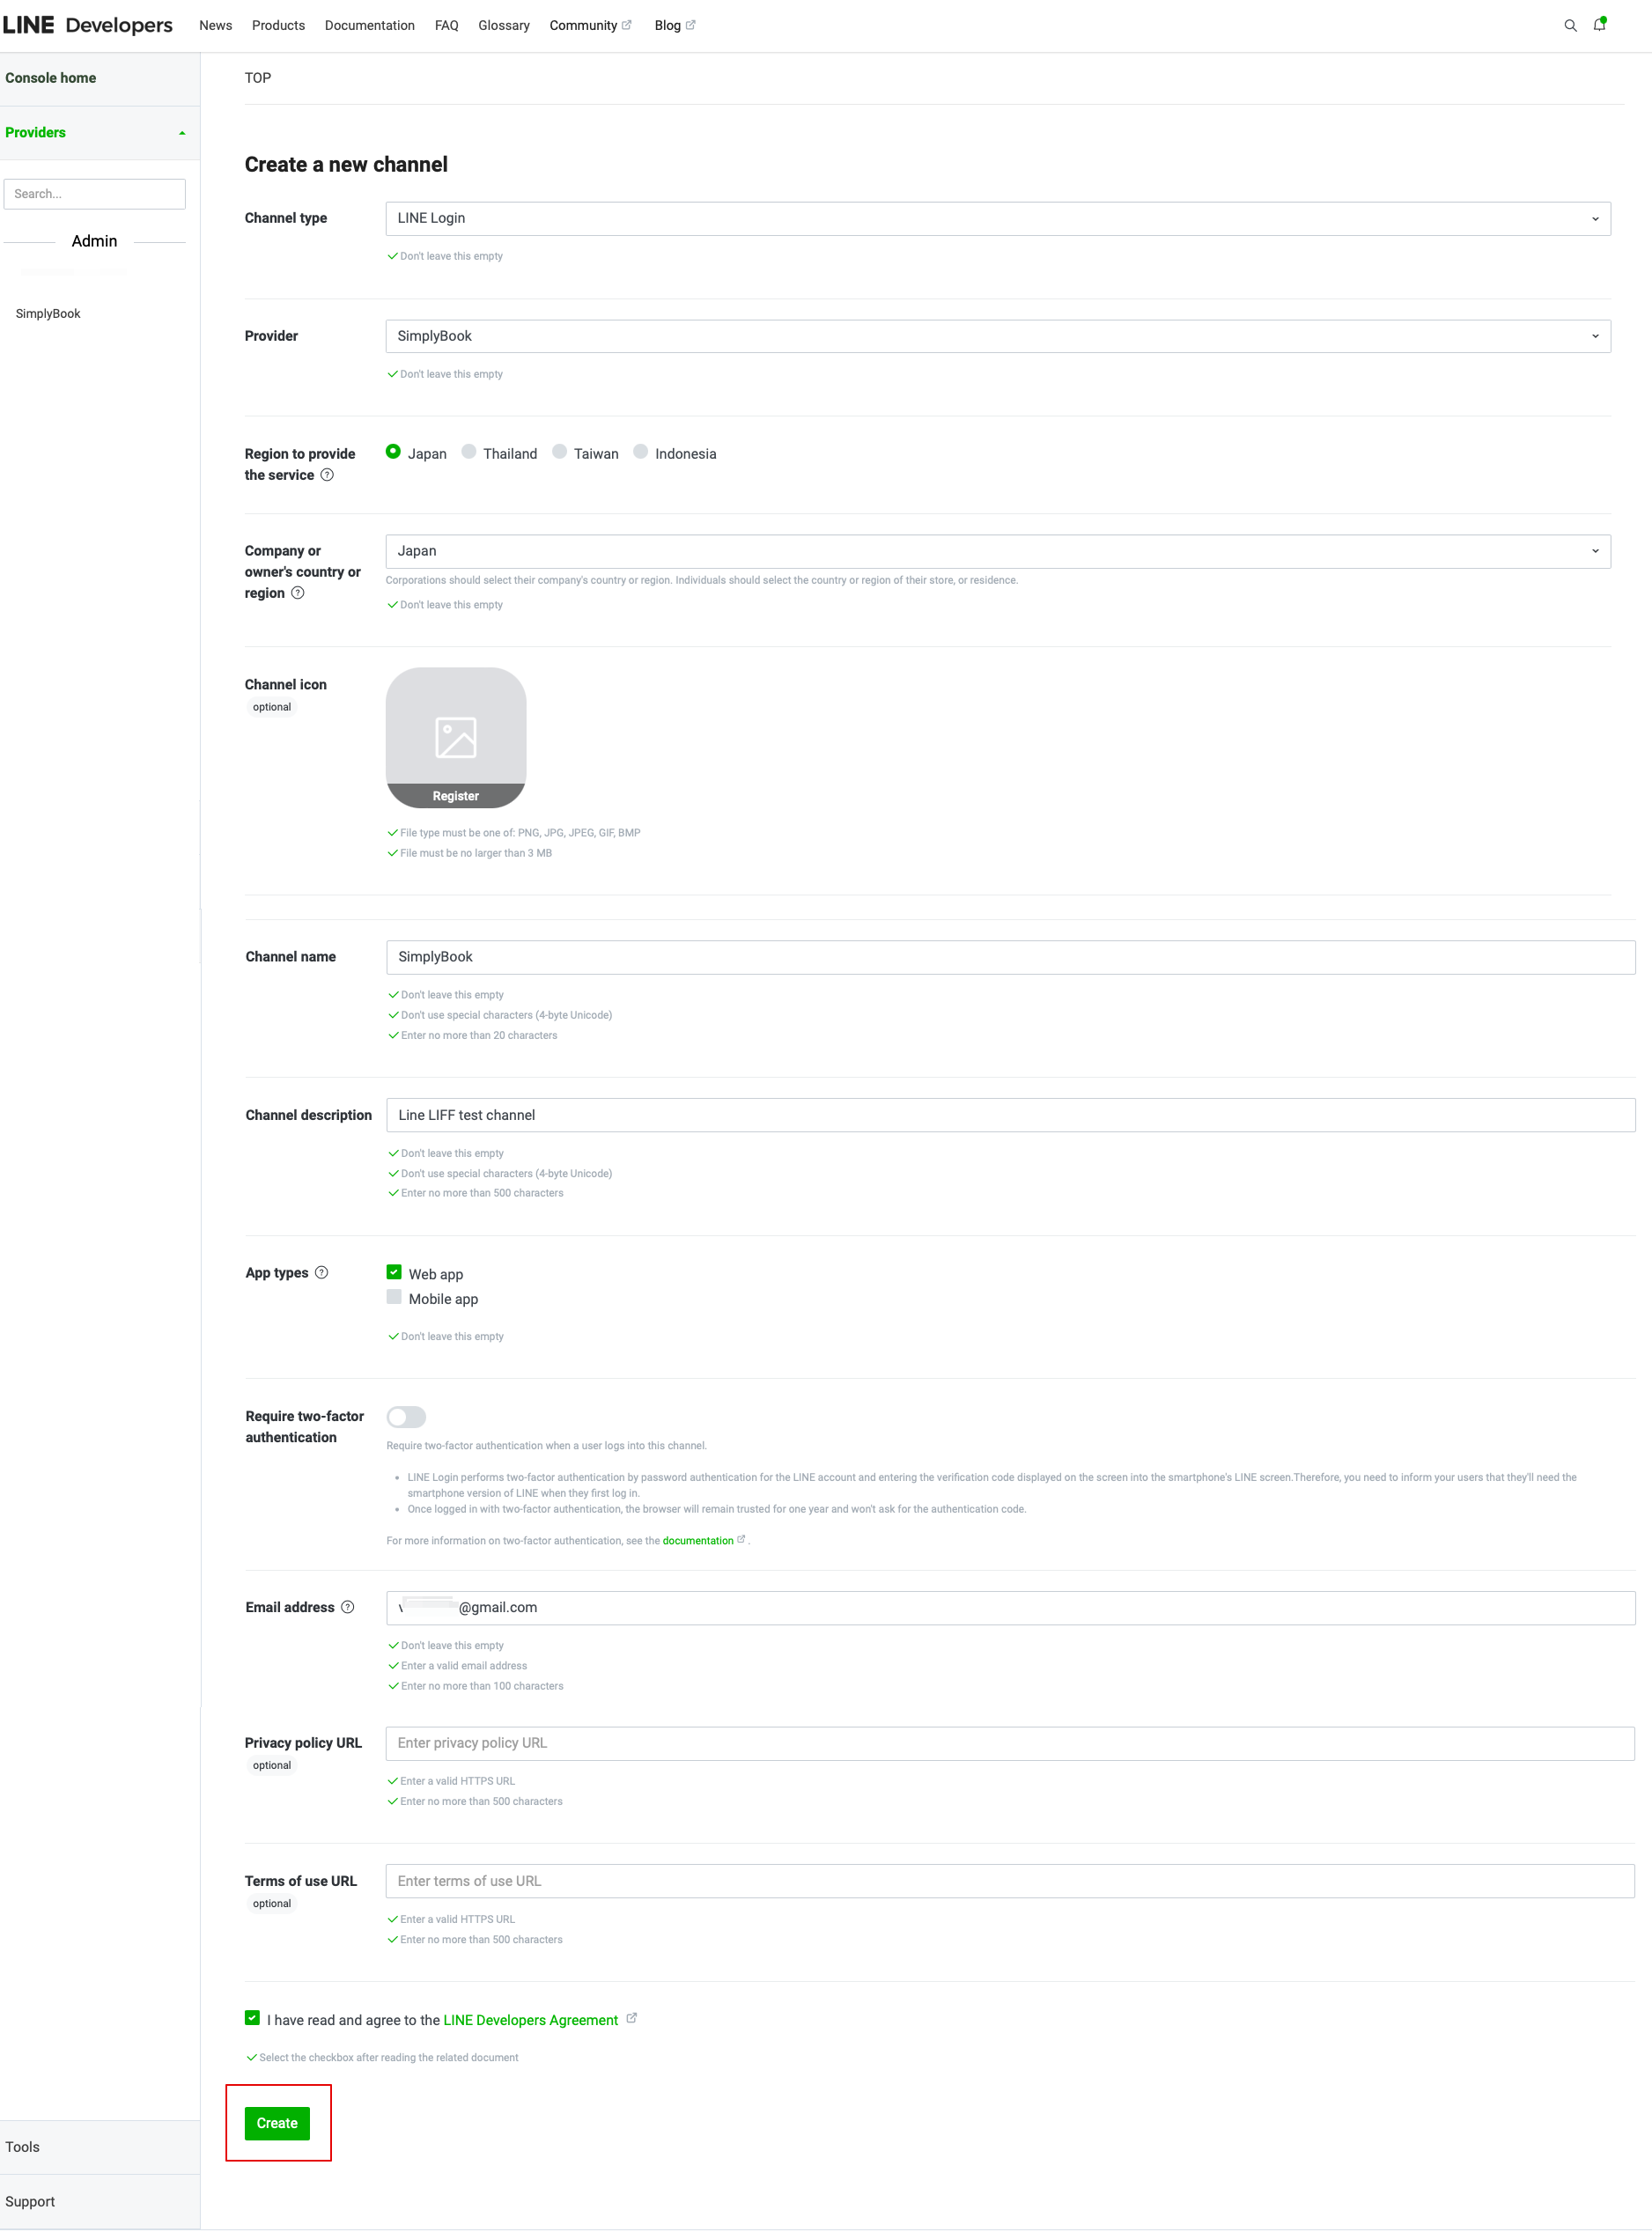
- 5. Indtast oplysningerne i de obligatoriske felter.
- Sørg for at vælge Web-appen i afsnittet "App-typer" og indtast også e-mail-adressen.
- Når du har accepteret "LINE Developers agreement" (LINE-udvikleraftale), skal du klikke på knappen "Create" (Opret) for at afslutte dette trin.
- 6. Når LINE Login er oprettet, skal du klikke på fanen LIFF og tilføje LIFF-appen der.
Du skal indtaste følgende data:
- LIFF-appnavn: dit brand/firmanavn;
- Vælg appstørrelse;
- Endpoint-URL: skal kopieres fra LIFF-URL (Simplybook.me LINE LIFF-indstillinger);
- (obligatorisk) Vælg følgende omfang: openid og profil, ellers fungerer integrationen muligvis ikke eller ikke korrekt;
- Bot Link-funktionen skal være aktiveret.
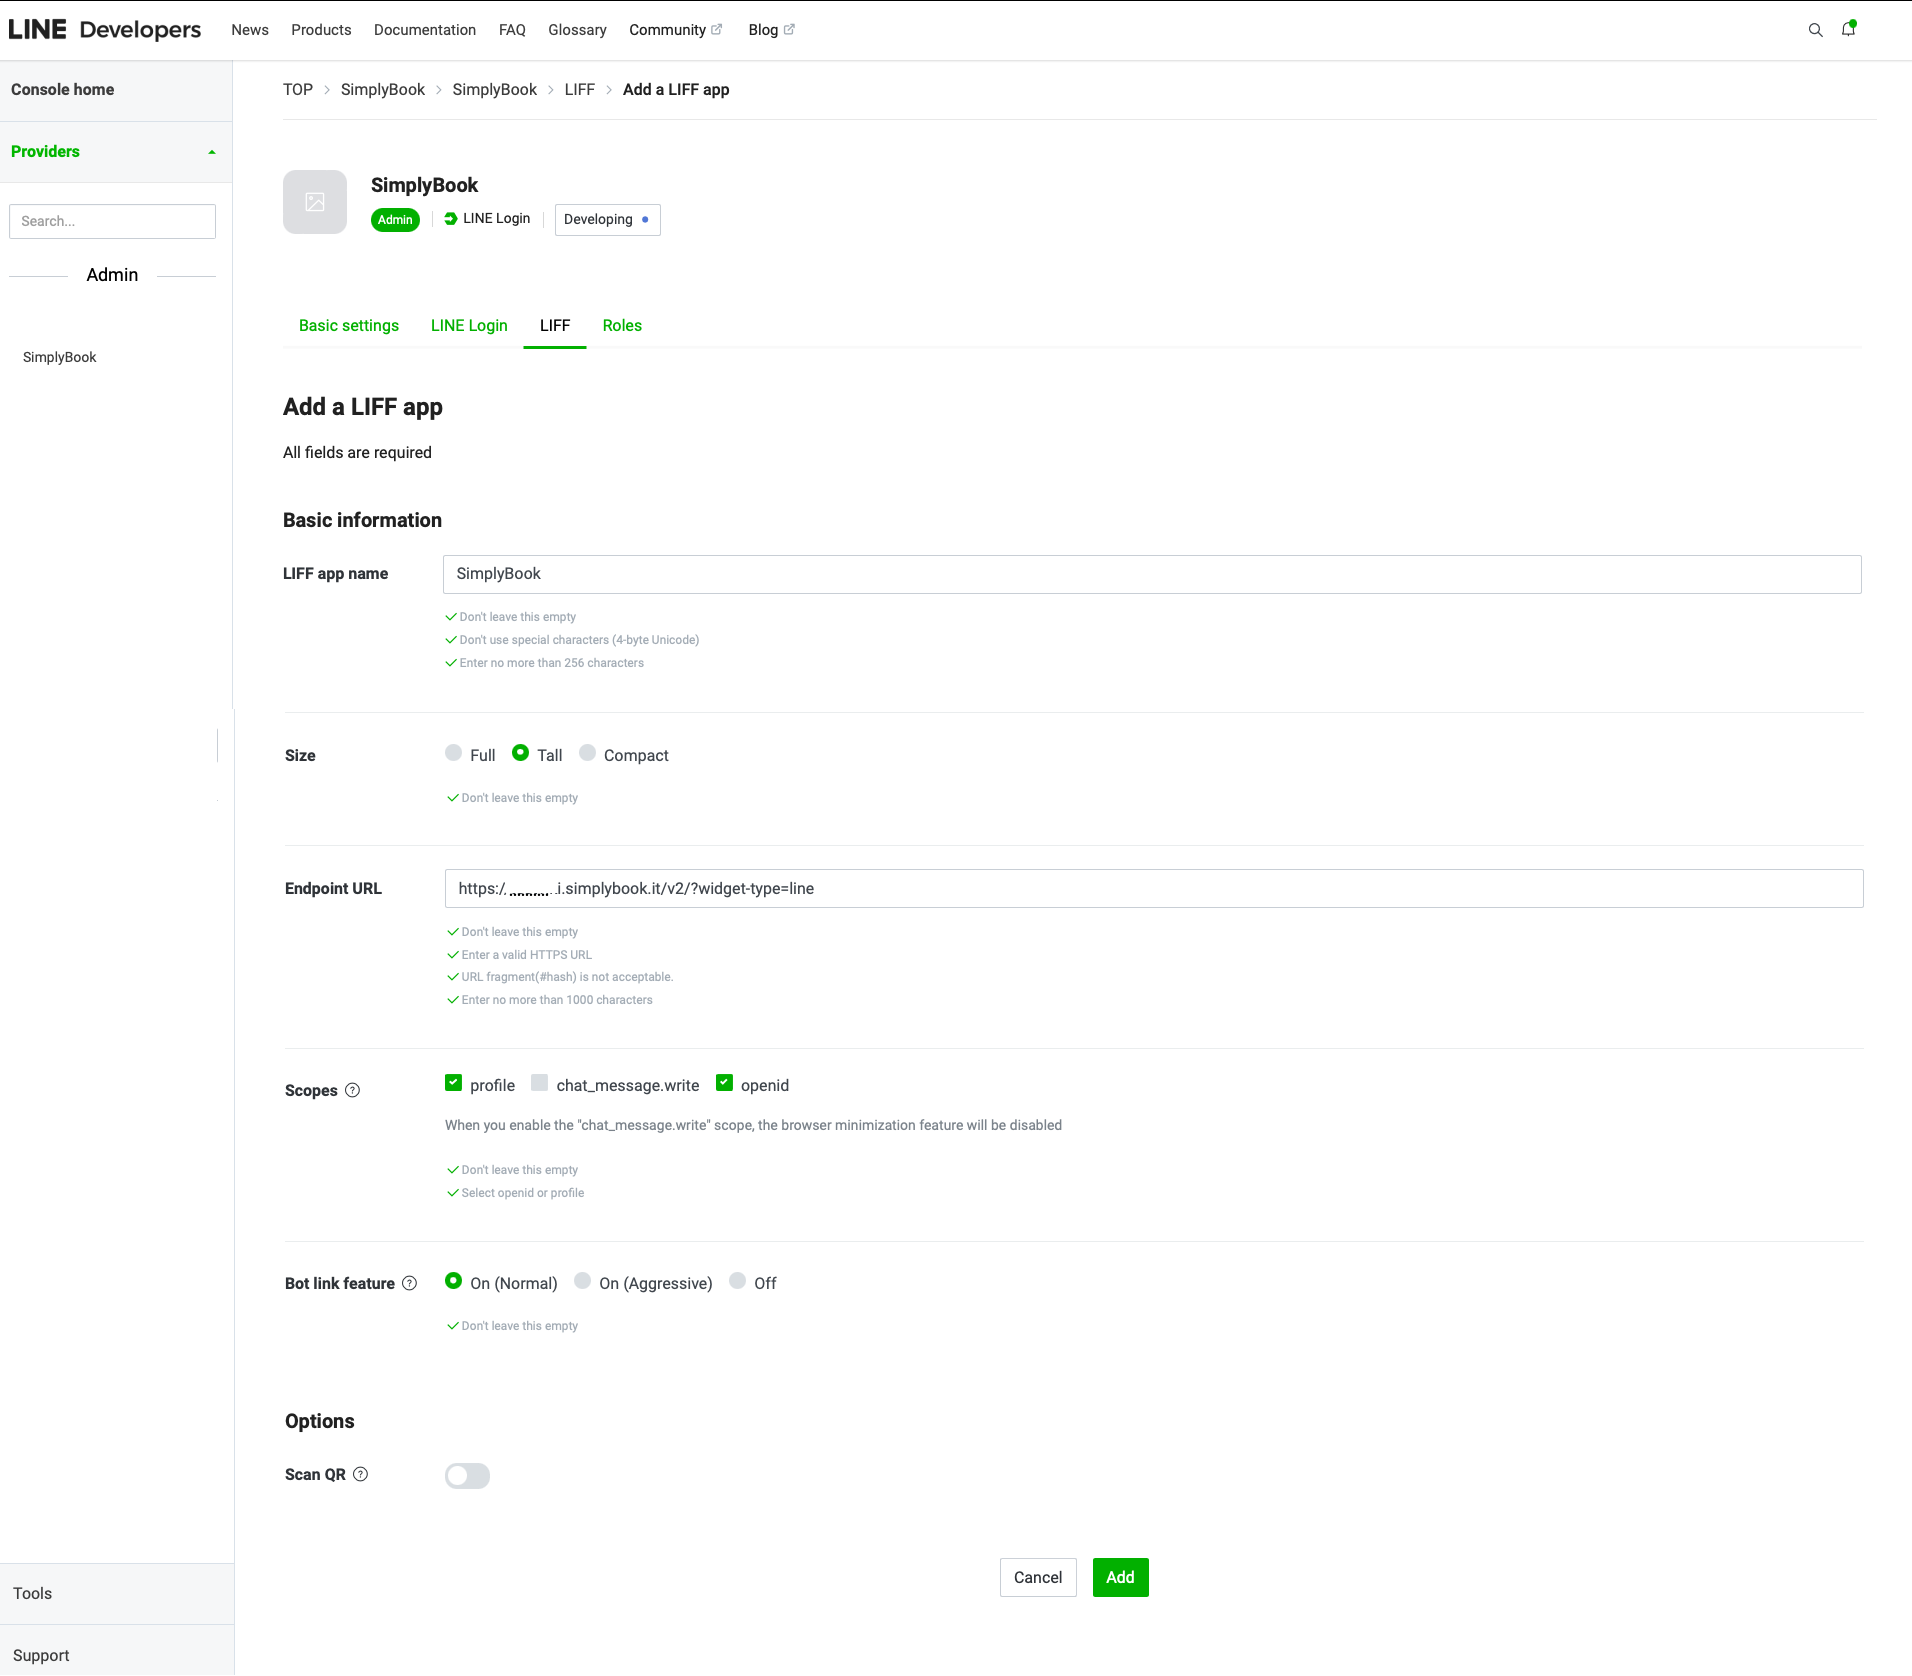
- Når alle ovenstående indstillinger er færdige, skal du klikke på den grønne knap Tilføj for at tilføje LINE LIFF.
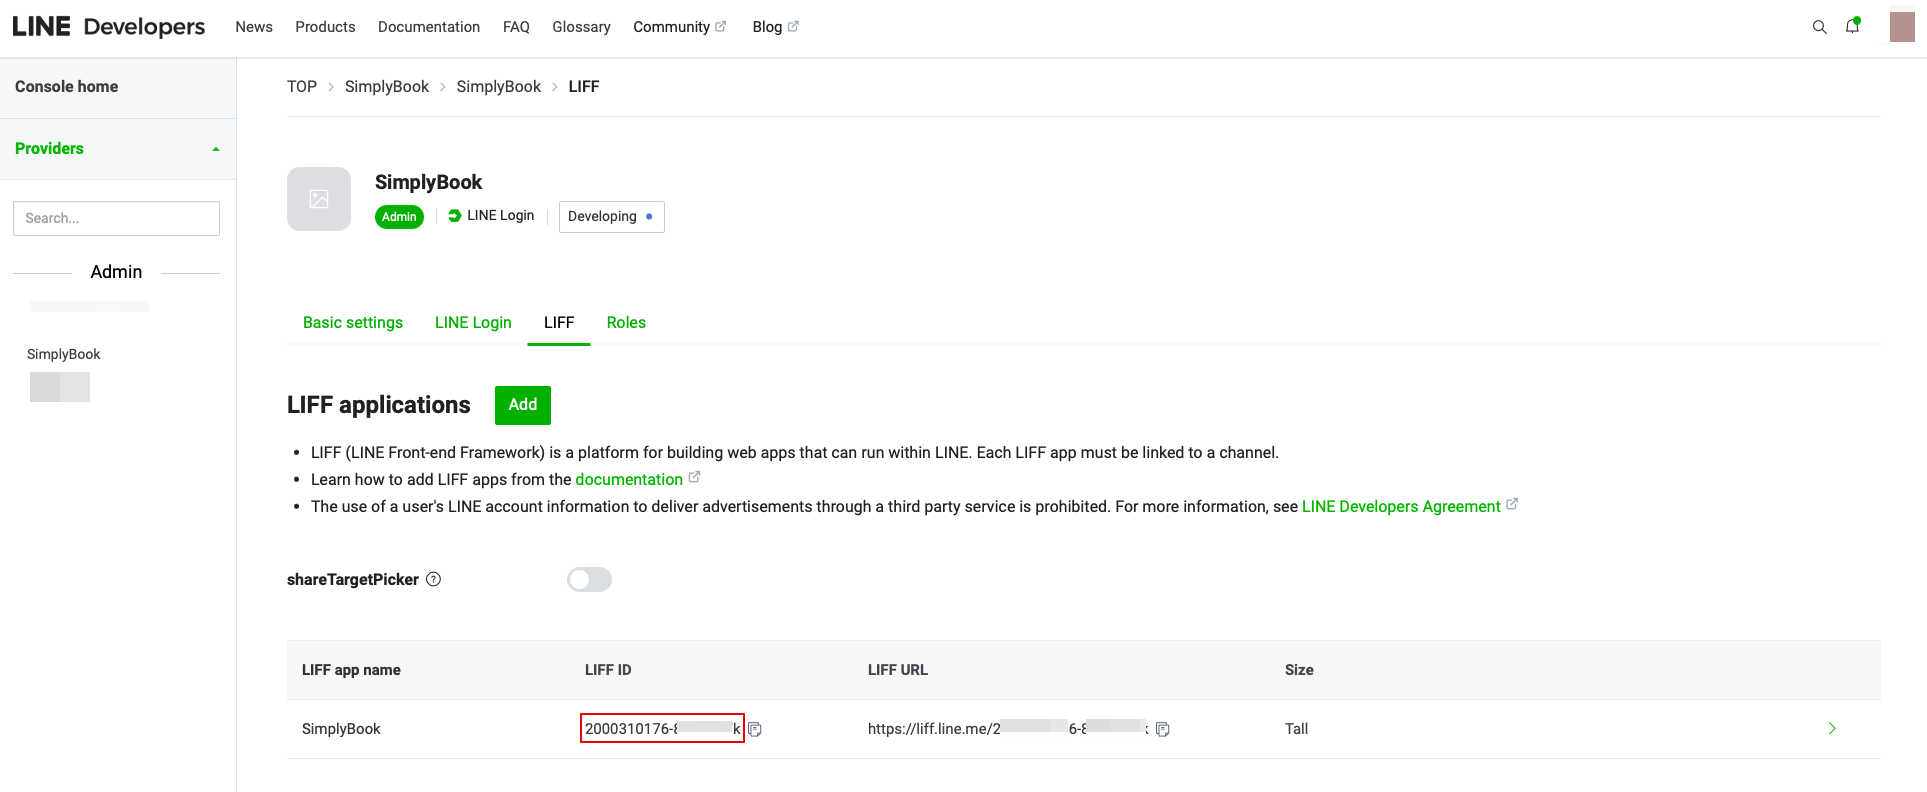
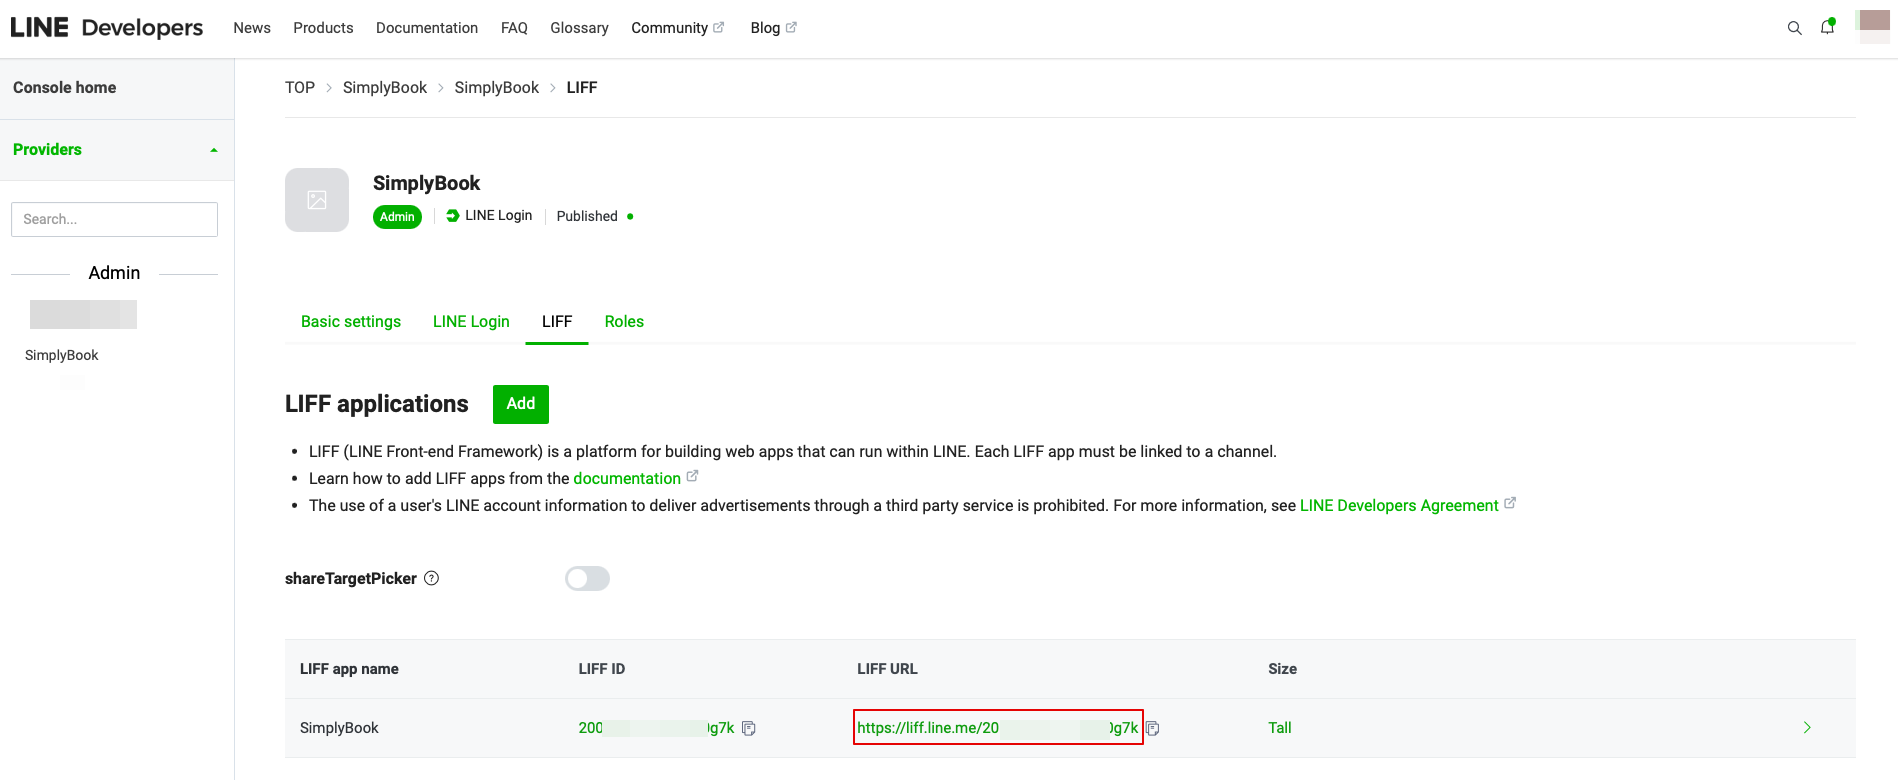
- 7. Derefter bliver du dirigeret til siden, hvor du kan se dit LIFF-id.
- Kopier LIFF-id'et og indtast det i det tilsvarende felt på Simplybook-siden.
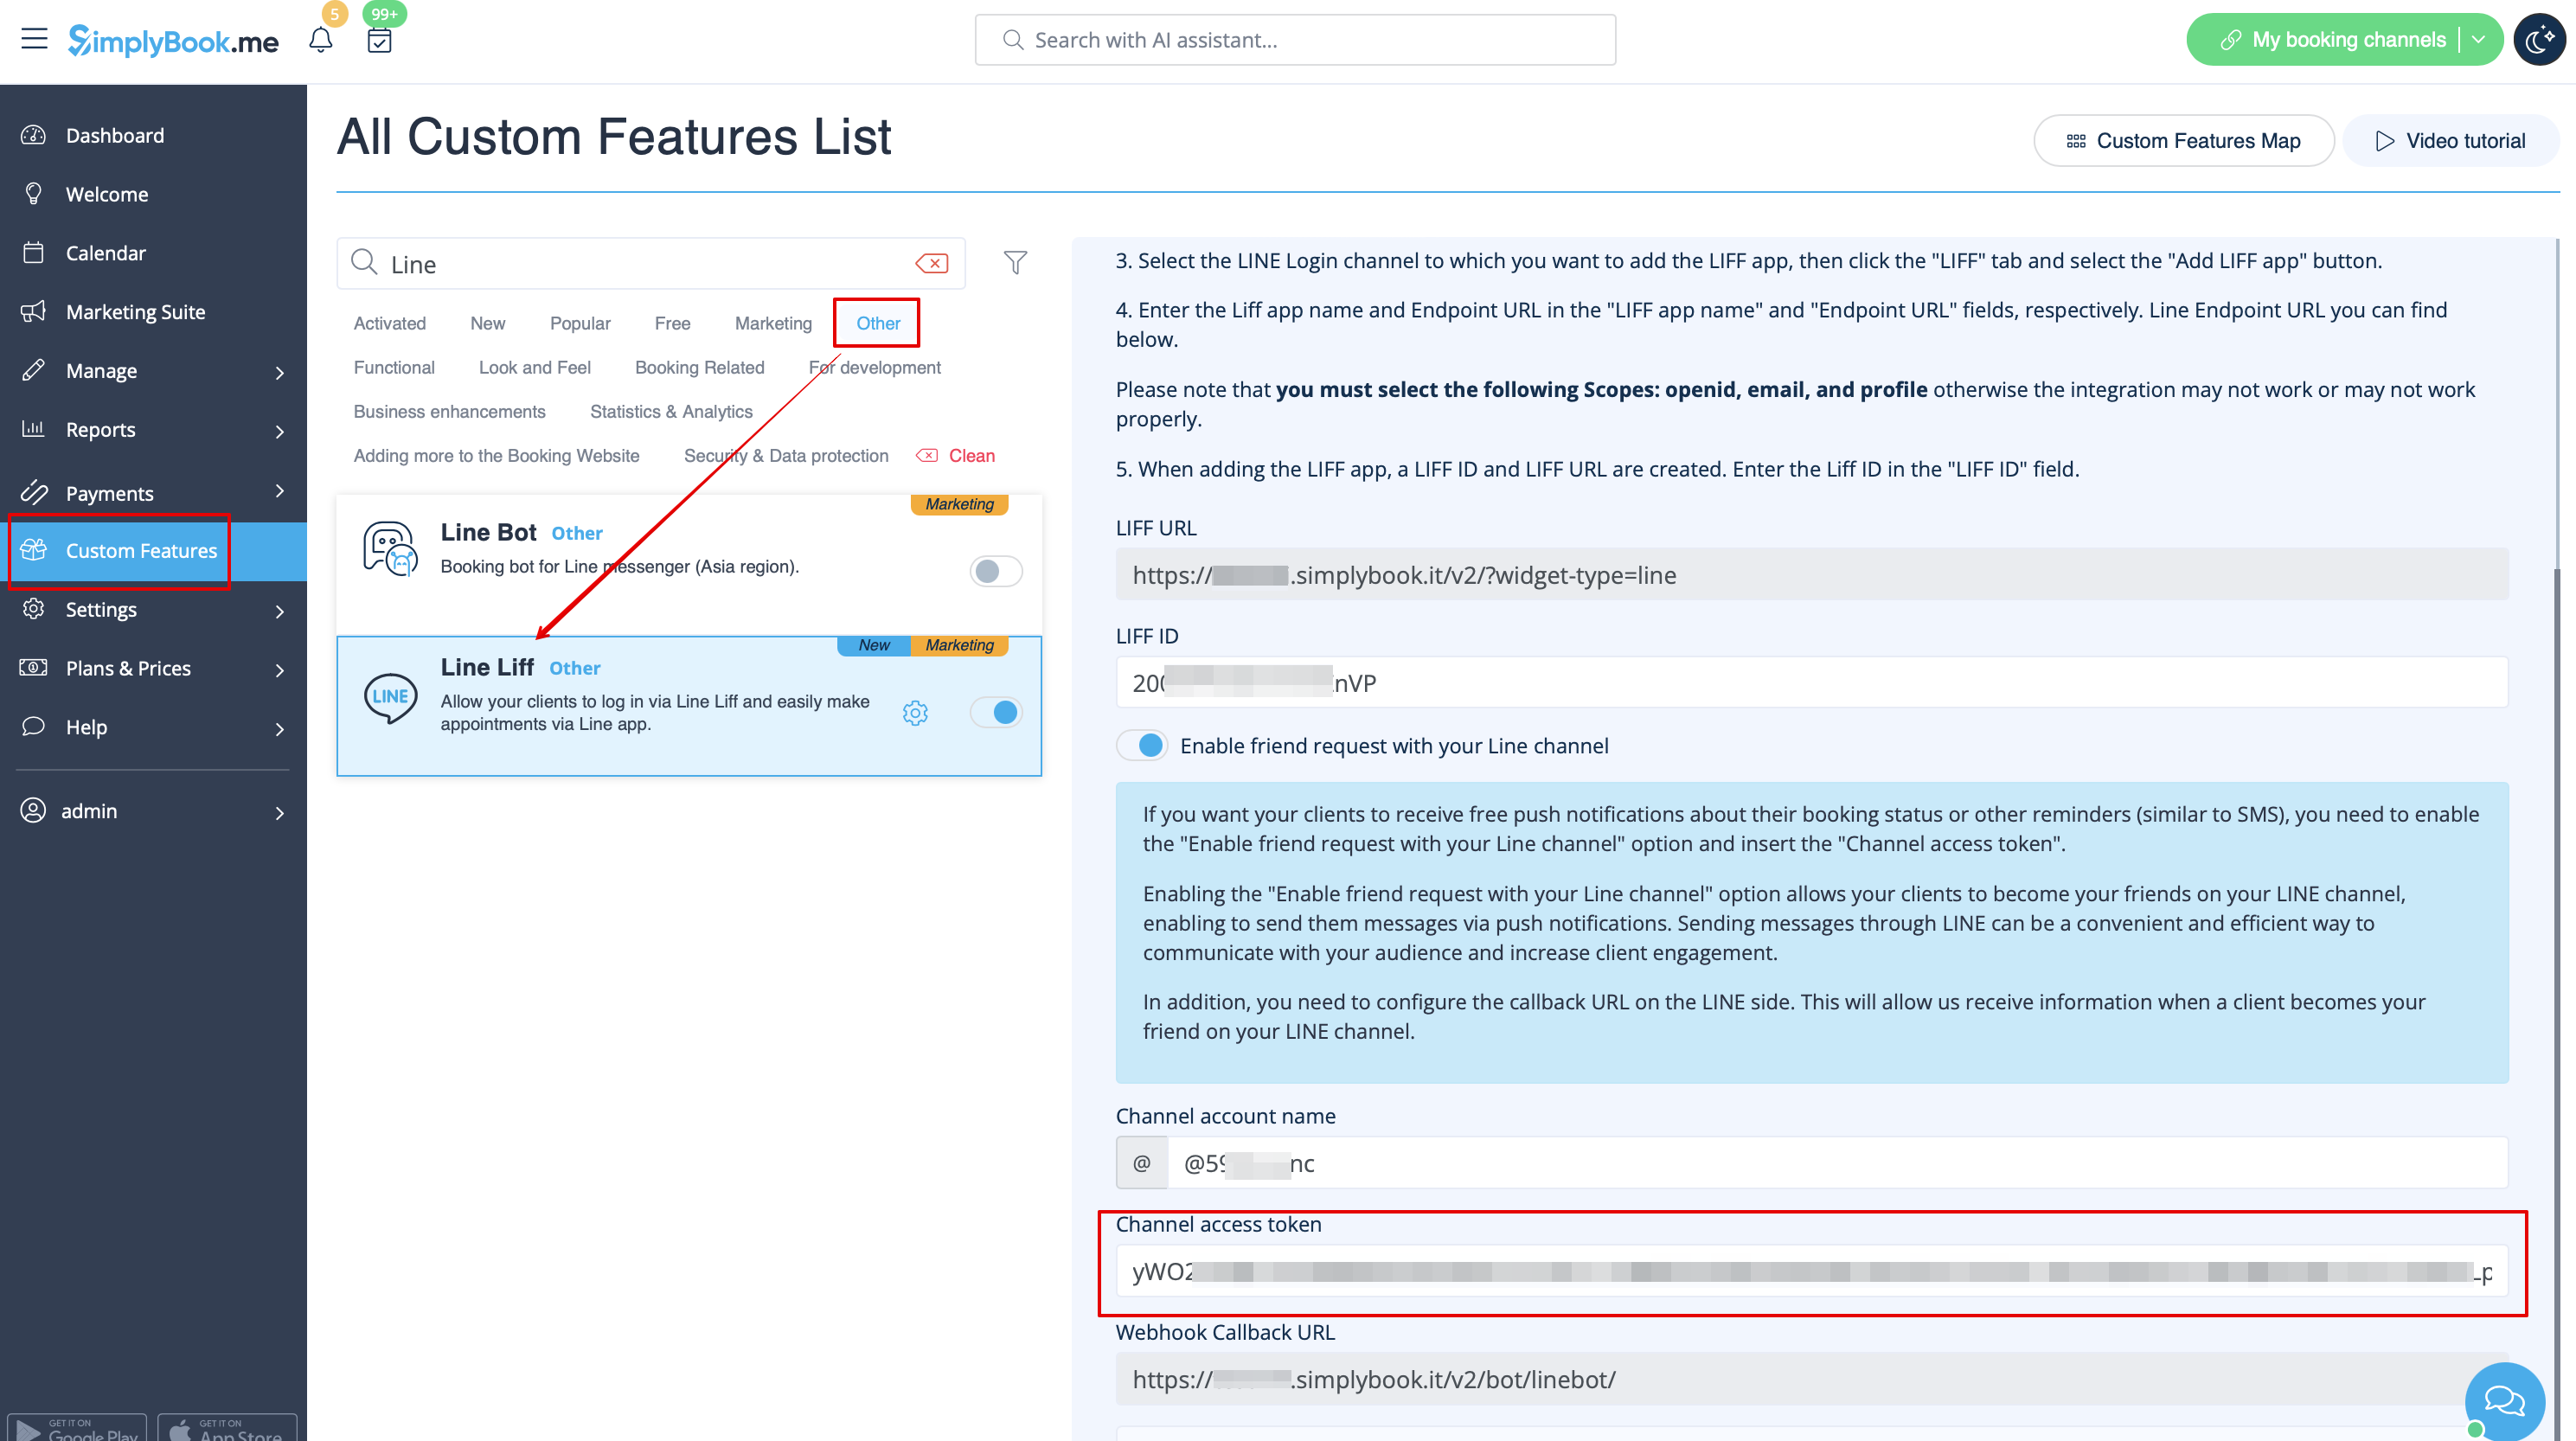
- 8. Hvis du ønsker, at dine kunder skal modtage push-notifikationer om deres reservationsstatus eller andre påmindelser (svarende til SMS), kan du aktivere indstillingen "Aktiver venneanmodning med din LINE-kanal" i Simplybook LINE LIFF Custom Feature og indsætte "Kanaladgangstoken".
- (oplysninger om, hvordan du får Channel access token, findes længere nede i vejledningen)

- Derudover skal du konfigurere Callback URL på LINE-siden. Dette giver os mulighed for at modtage oplysninger, når en klient bliver din ven på din LINE-kanal.
- For at gøre dette skal du gå til din LINE LIFF Developers-konsol, vælge den tidligere tilføjede udbyderkonto og oprette en ny kanal kaldet "Messaging API"
- (begge kanaler skal være under samme udbyder for at alle forbindelser kan fungere)
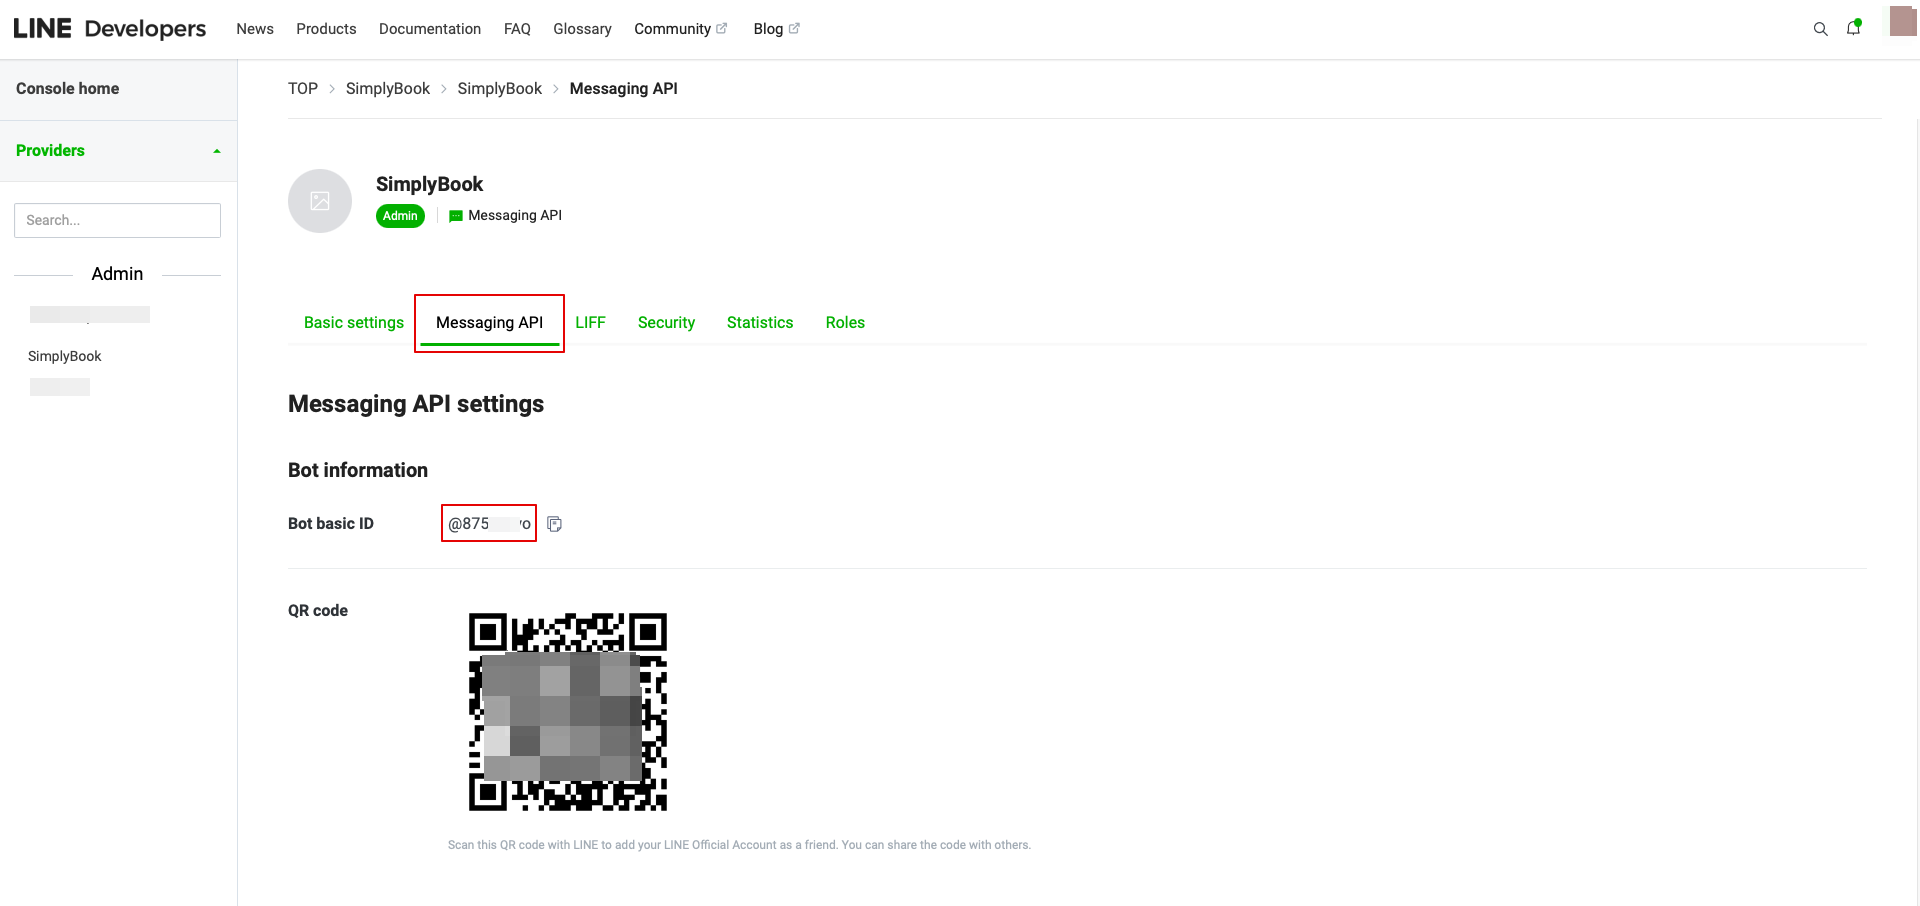
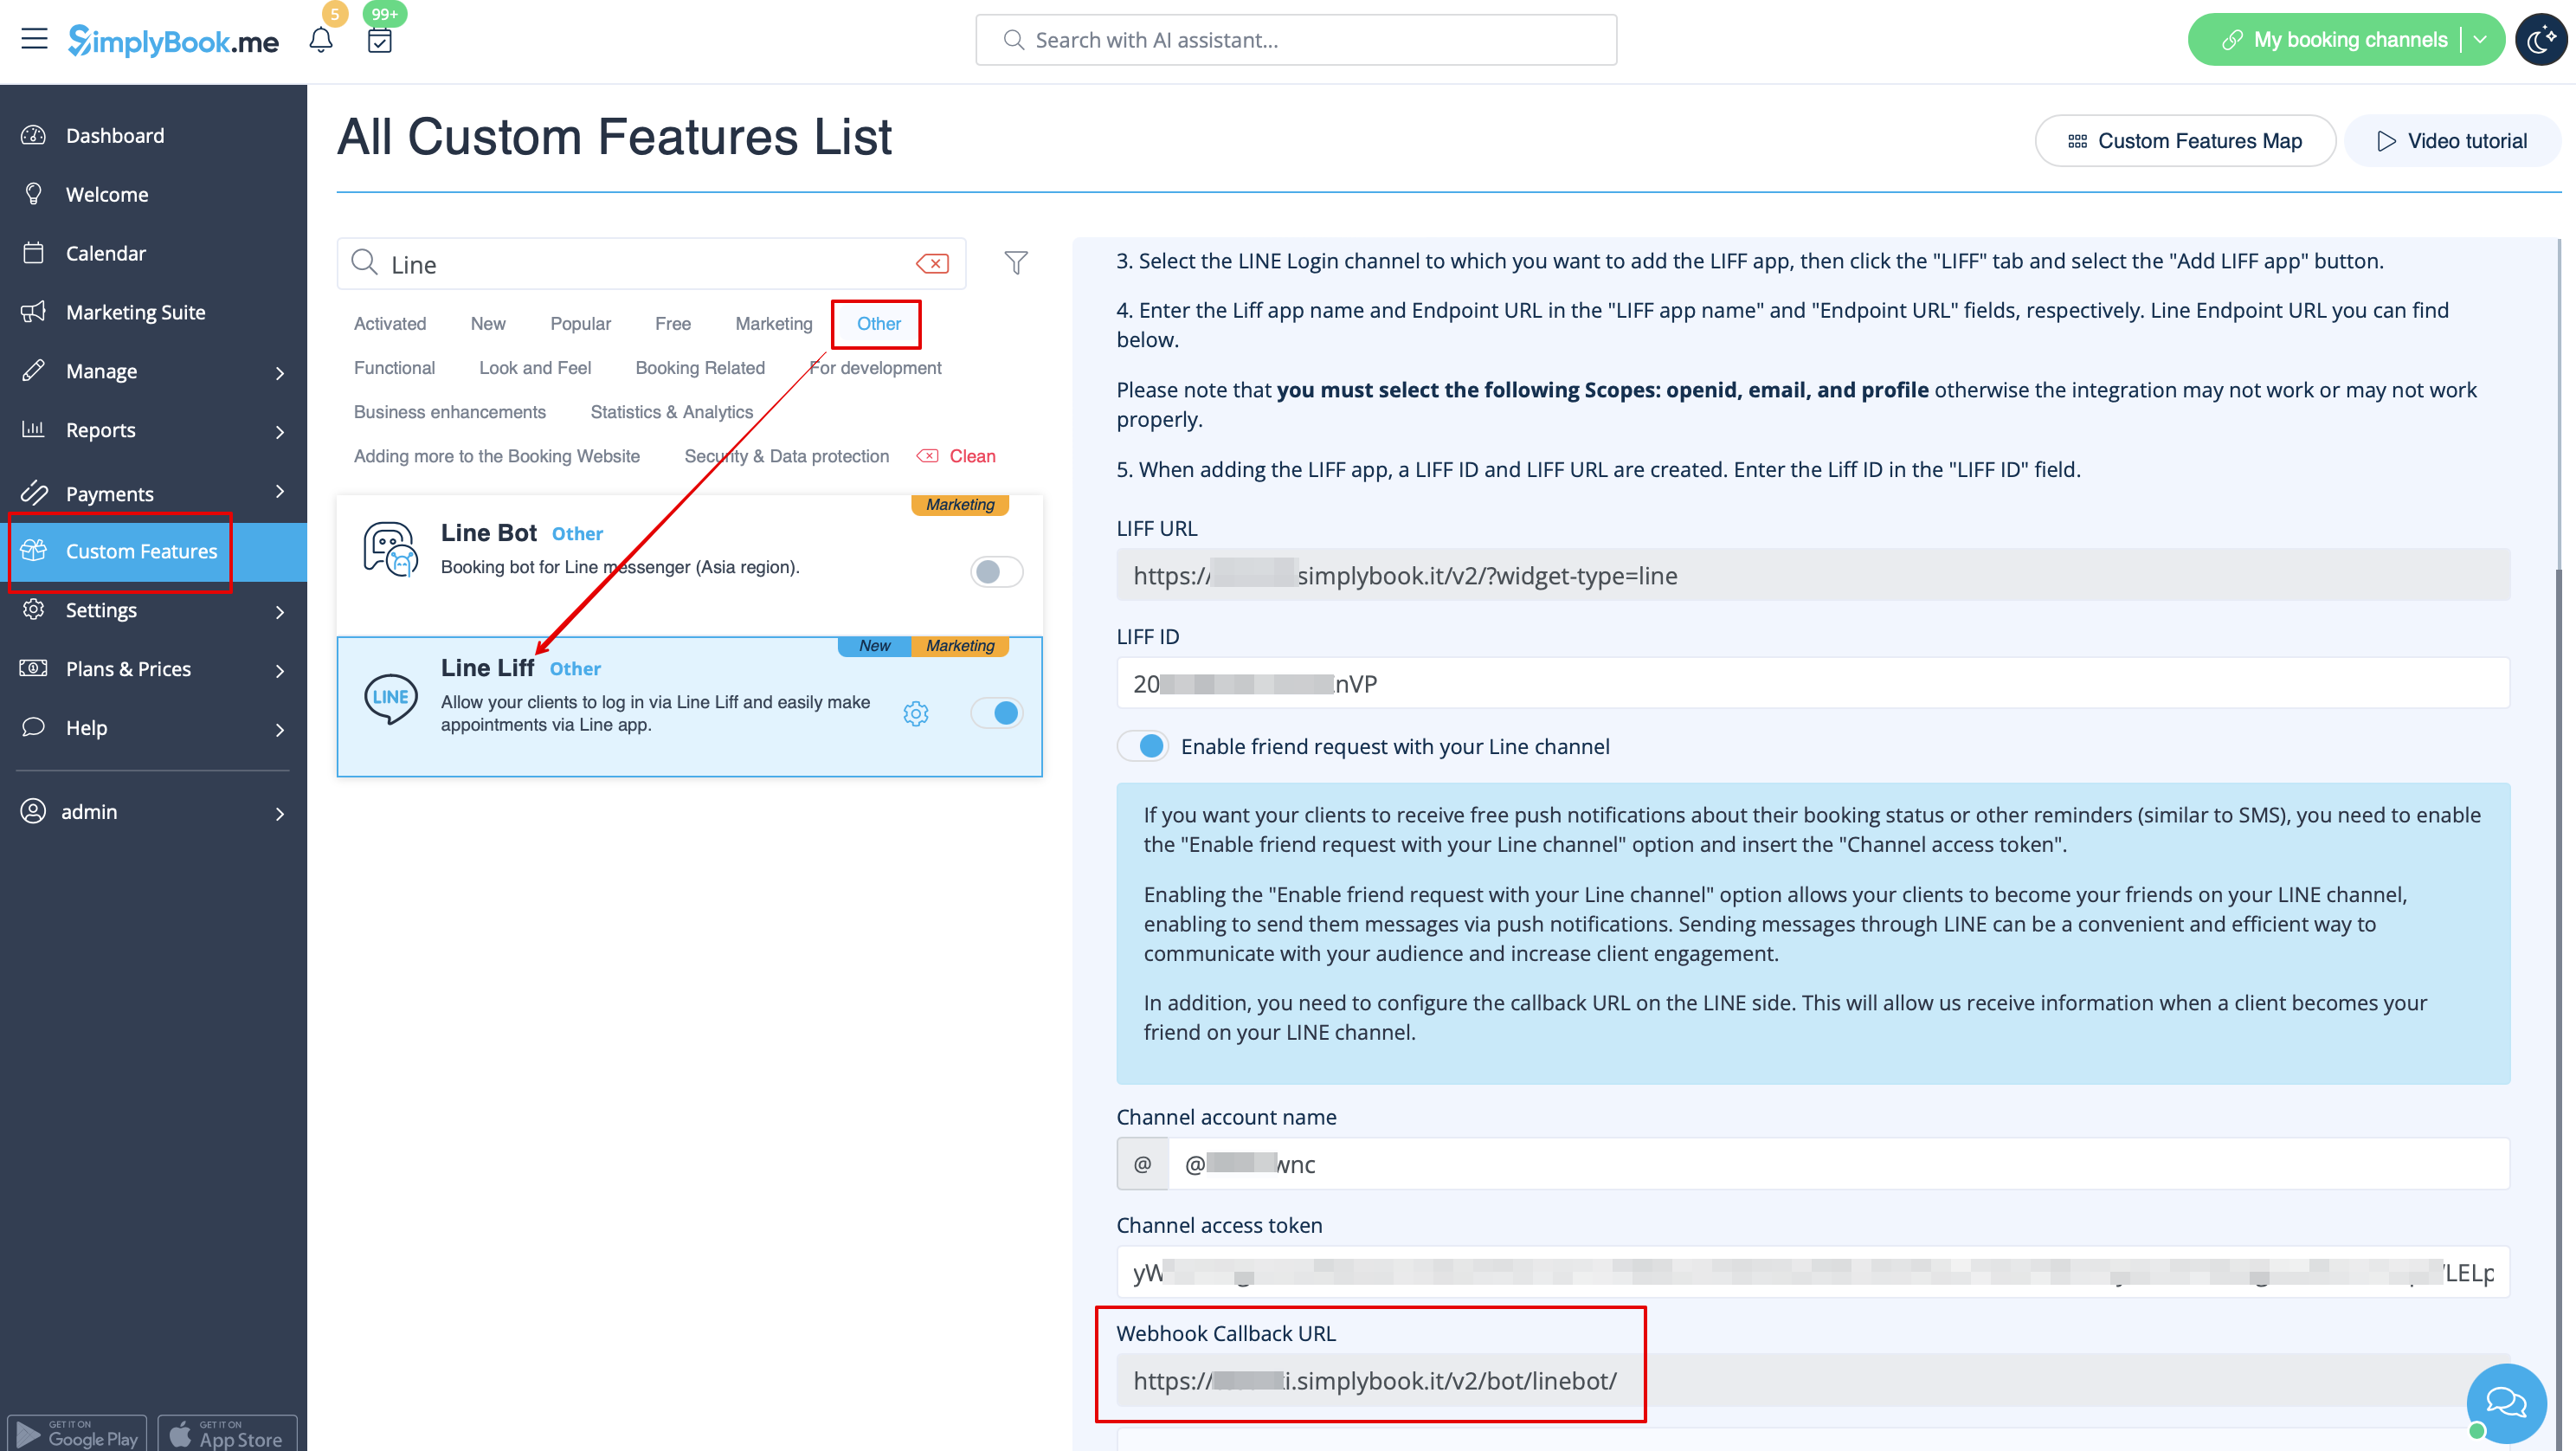
- 9. Når du har foretaget disse indstillinger, skal du vælge fanen Message API for at få Bot Basic ID. Kopier og indsæt Bot ID i feltet Channel account name i SimplyBook.me LINE LIFF Custom Feature.
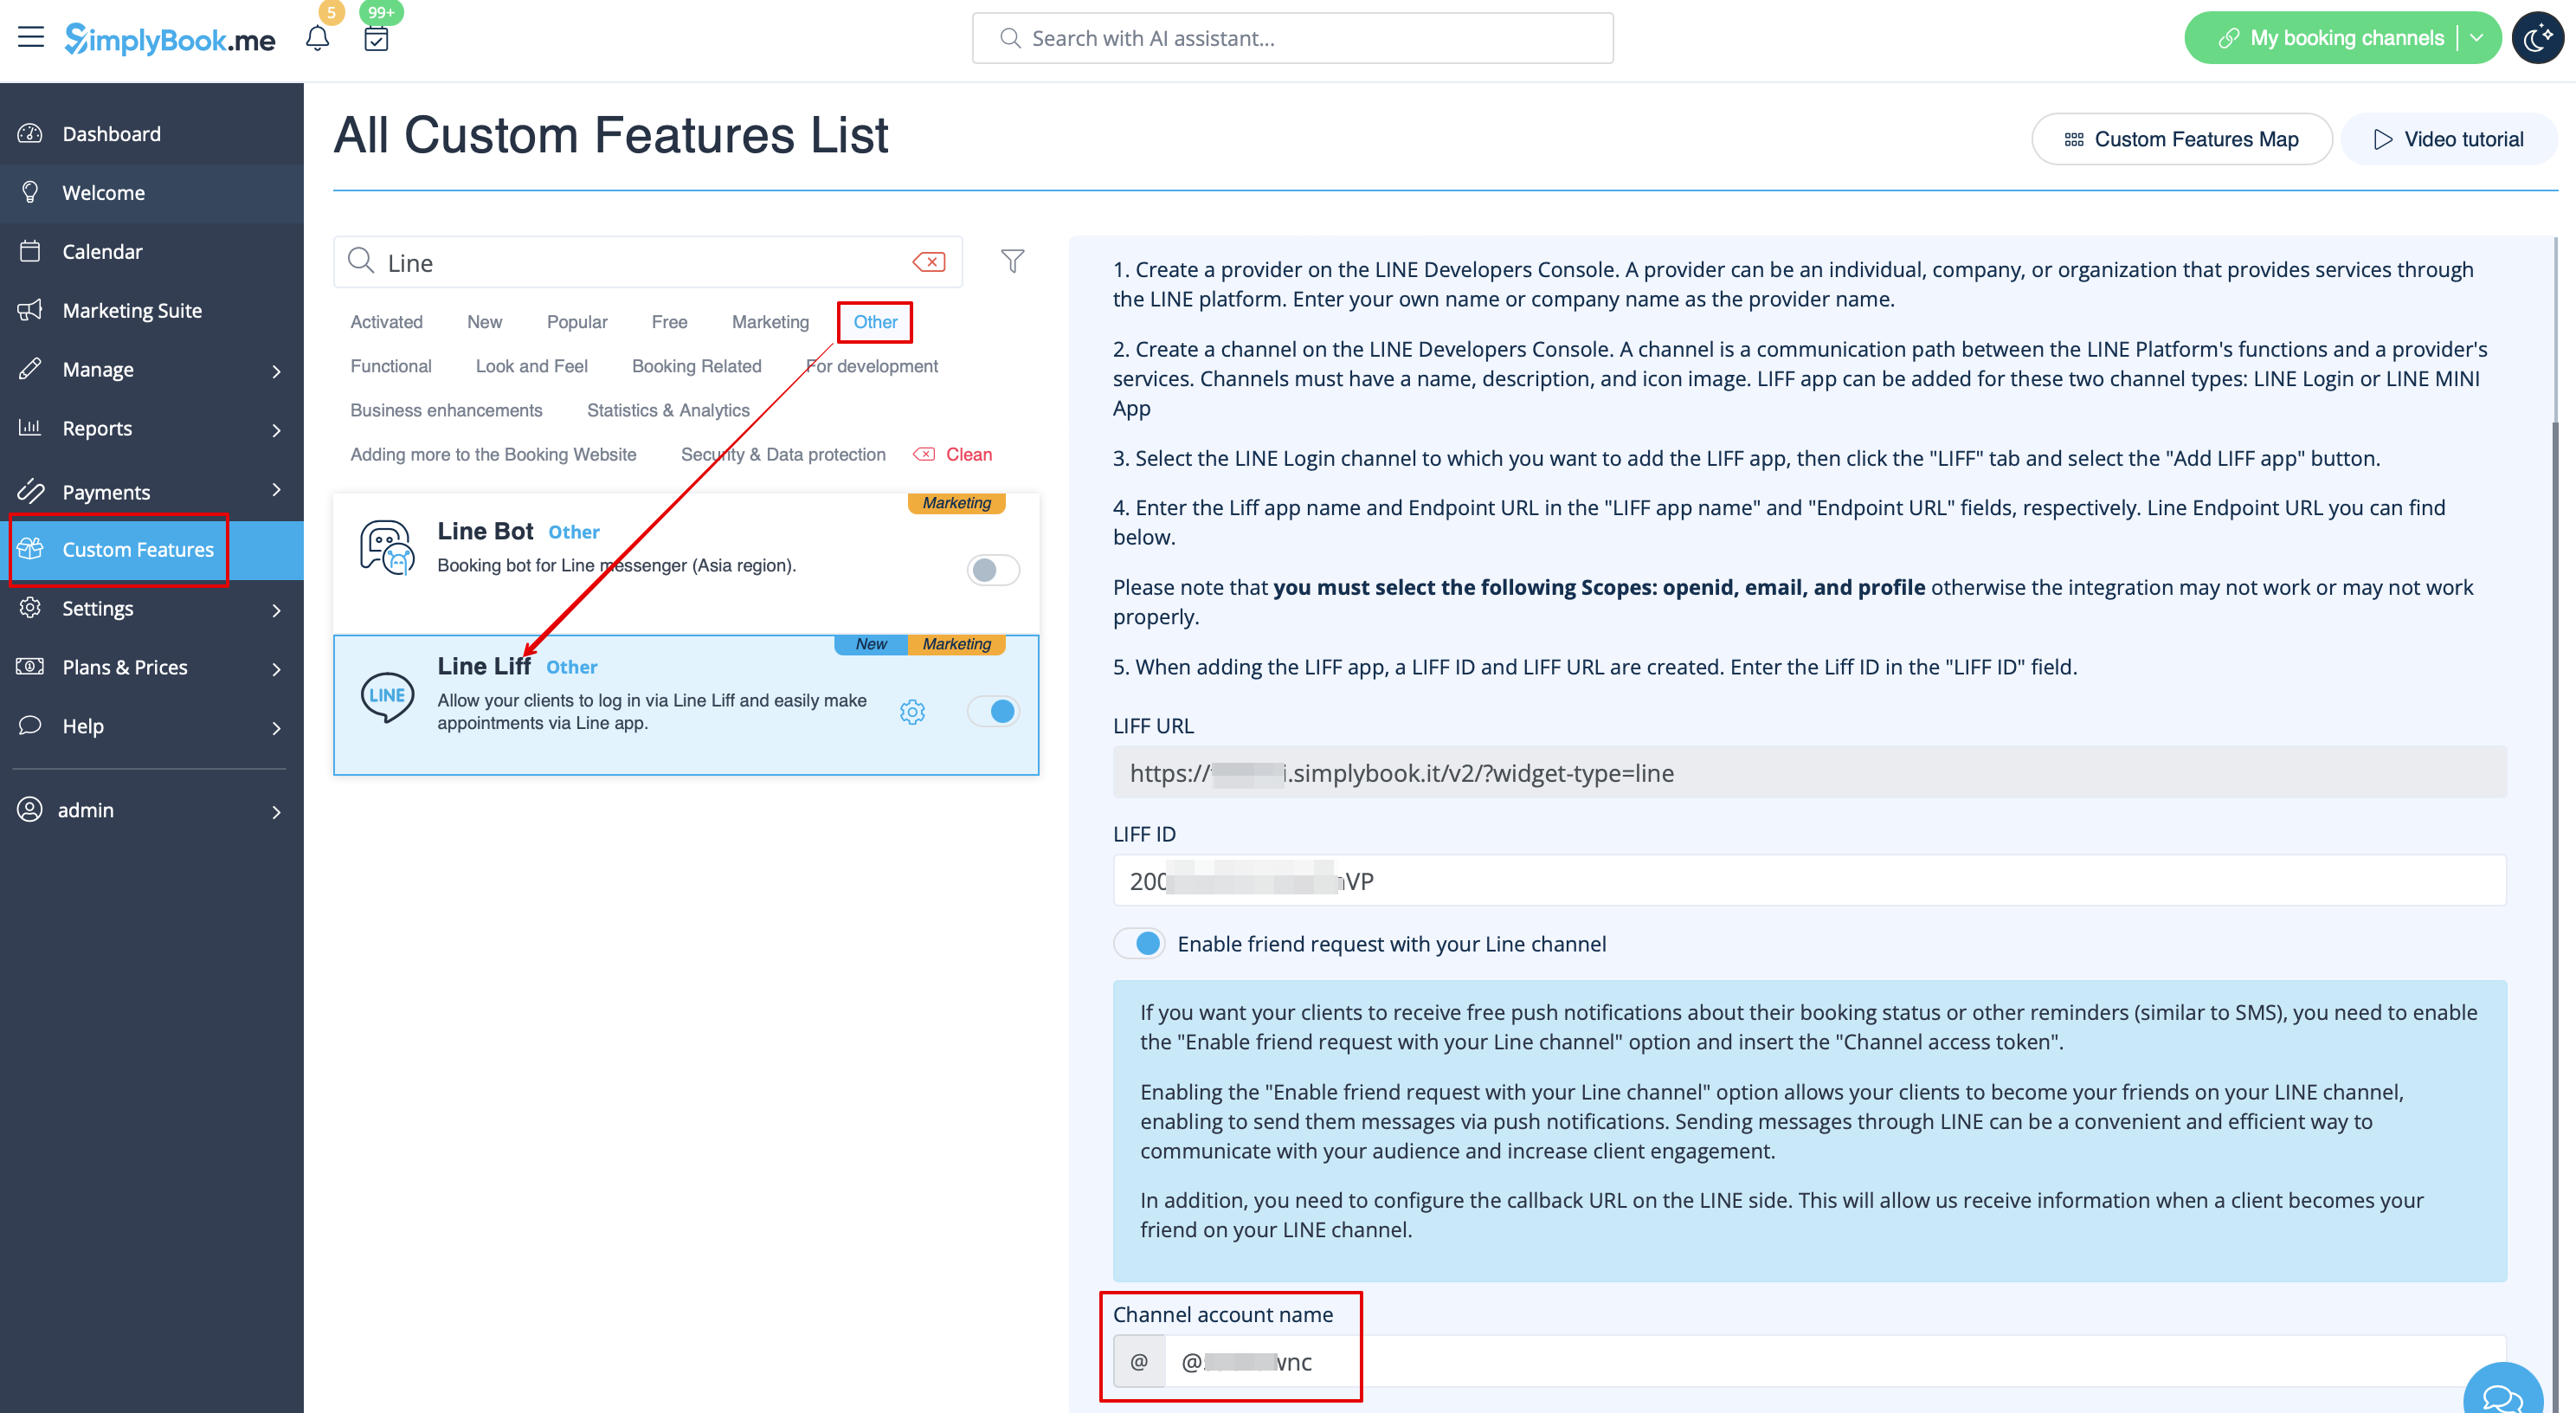
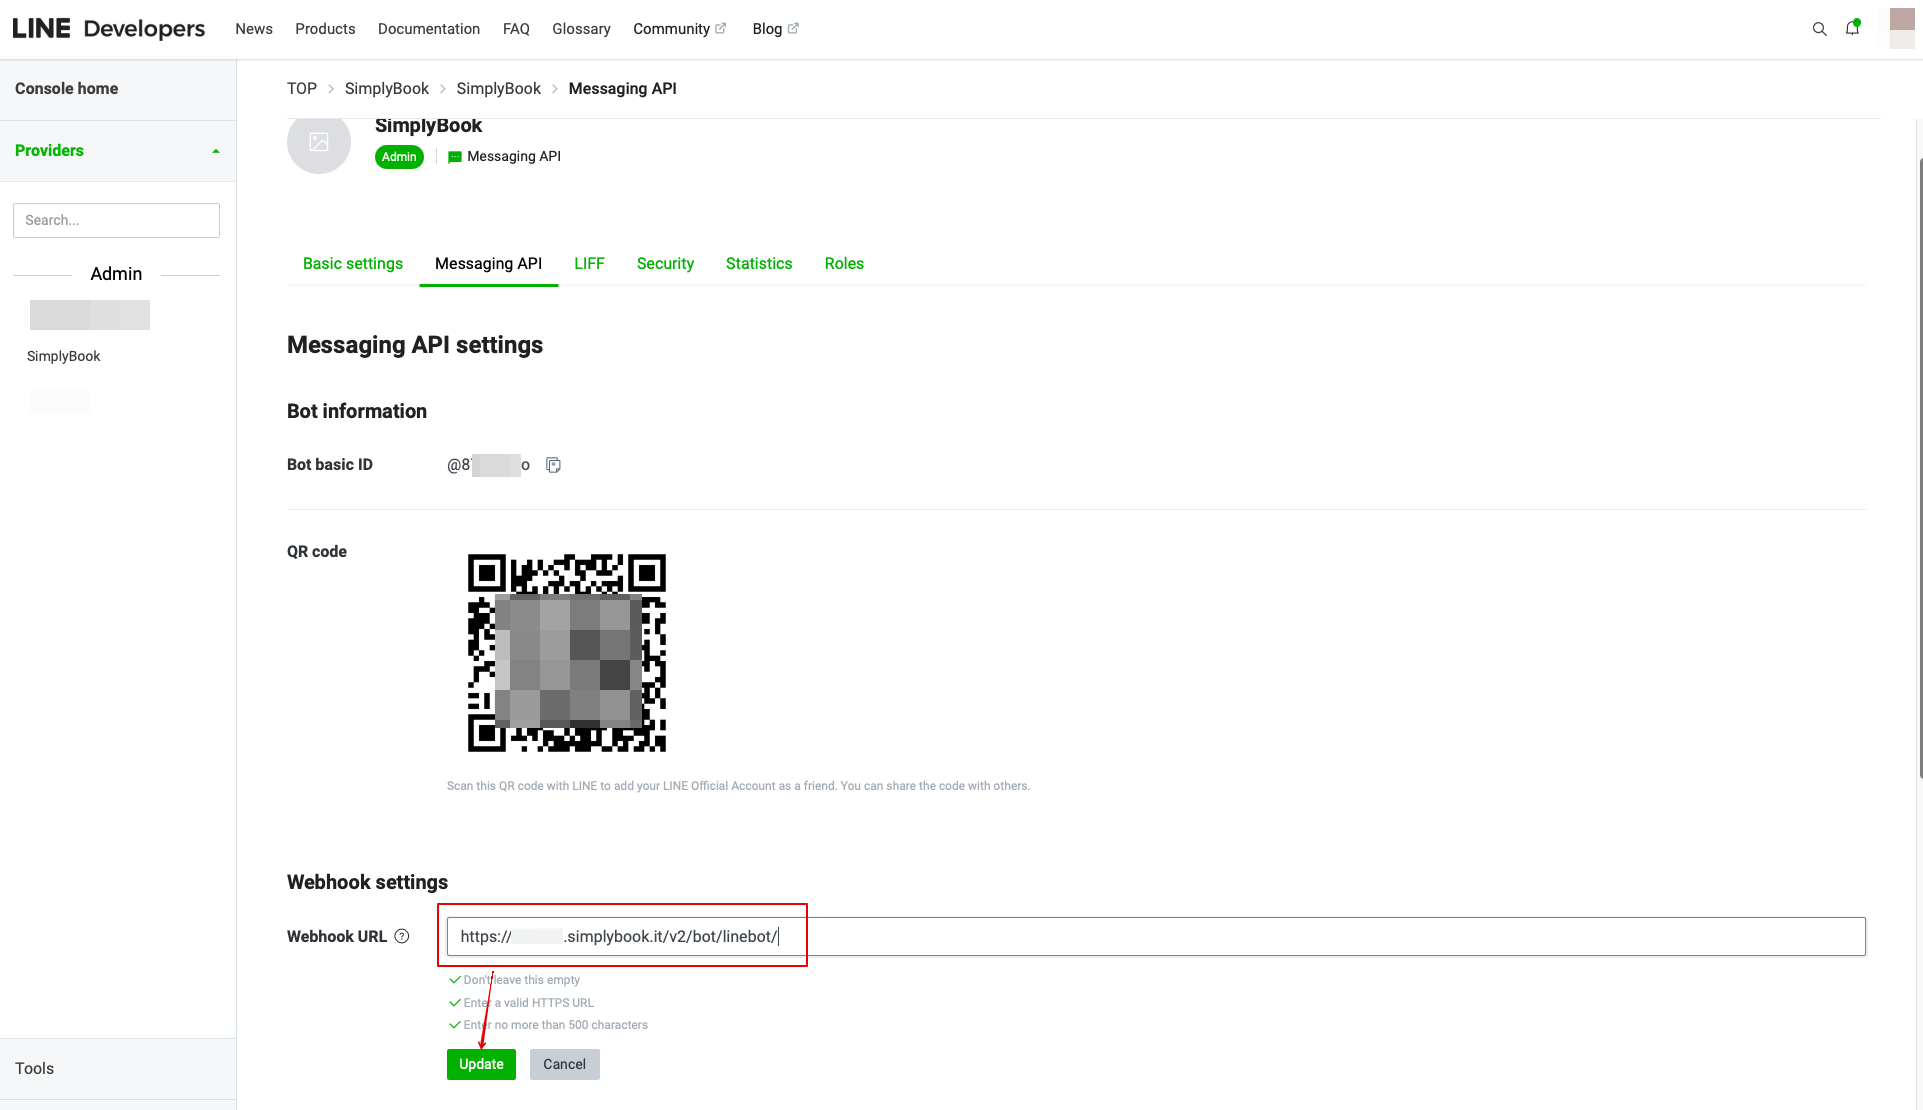
- I indstillingen Brugerdefinerede funktioner kan du også se URL'en til webhook-tilbagekald. Kopier den og indsæt den i feltet Webhook-URL på siden Line//Messaging API.
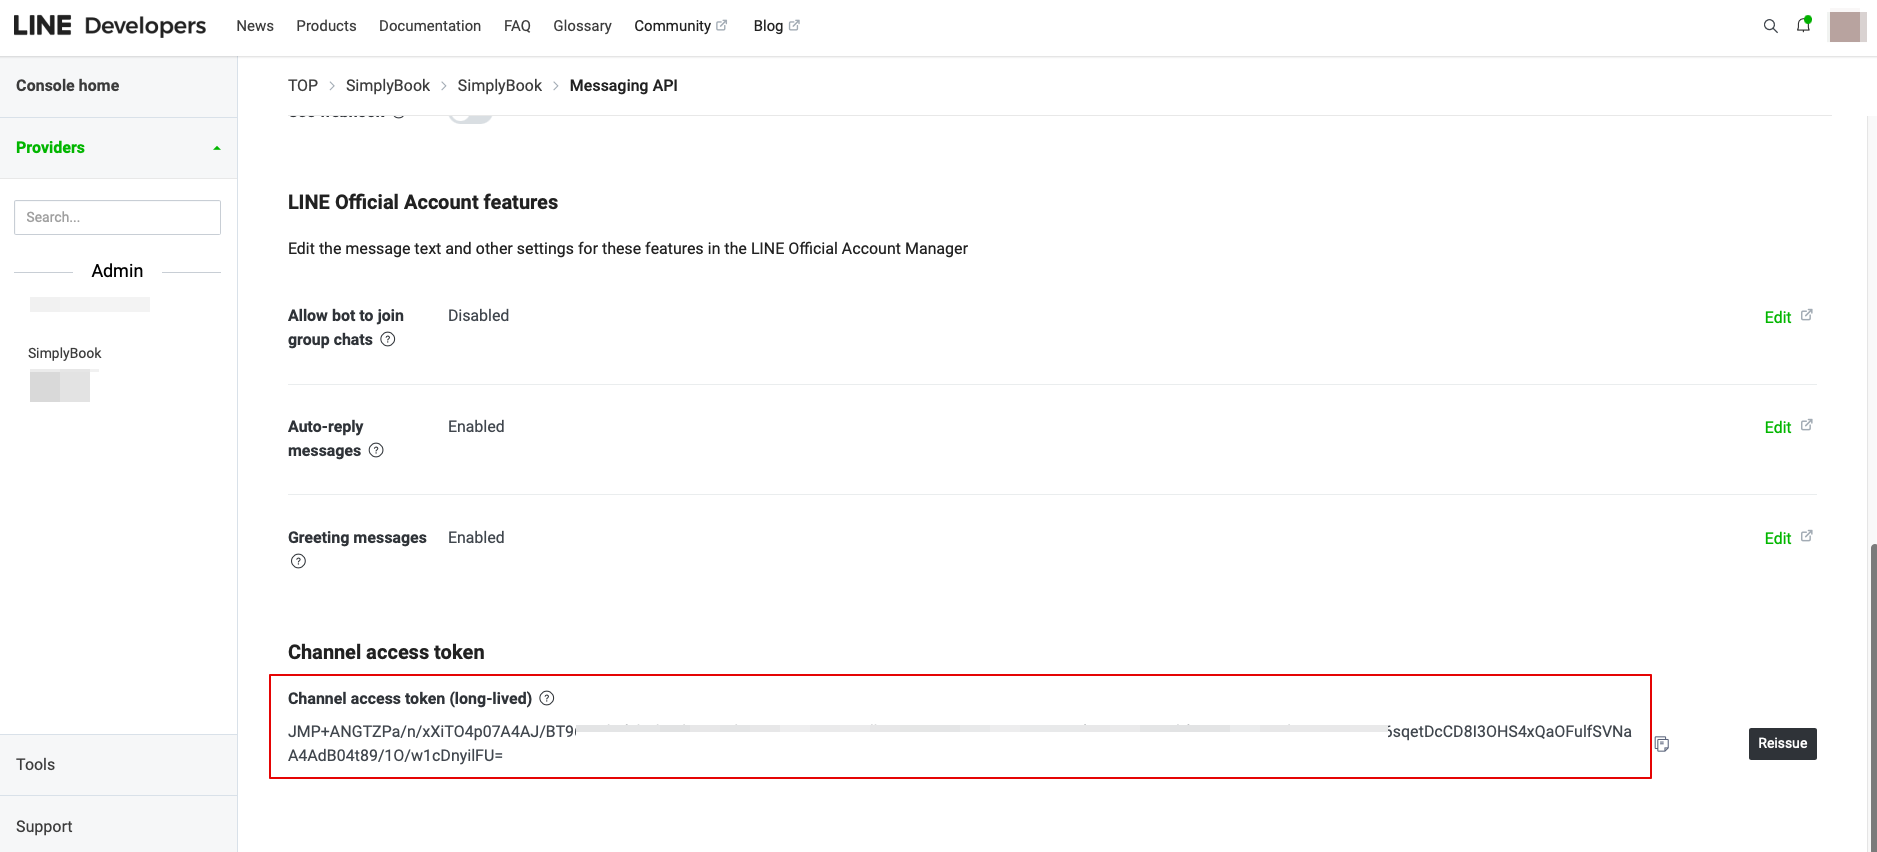
- 10. I Messaging API på LINE-siden skal du rulle ned til Channel access token, udstede det, kopiere resultatværdien og indsætte den i Simplybook.me LINE LIFF-indstillingerne.
11. Gå tilbage til LINE Login-kanalen, klik på Developing status under kanalnavnet, og ændr det til Publish.
- 12. Når oversættelsen er offentliggjort, skal du logge ind på Line Official Account med samme LINE-konto som Developers Console.
- Når du åbner siden, skal du klikke på Rich Menu i navigationsmenuen og derefter på Create a Rich Menu.
- 13. Udfyld de obligatoriske felter.
- I menuen Indhold skal du vælge skabelonen og tilføje billedet.
- Vælg "Link" i blokken Handlinger, og tilføj LIFF-URL'en fra udviklerkonsollen//LINE Login-kanalen.
- 14. For at forbinde LINE Official-kontoen med LINE Developers-kontoen skal du gå til Developer Console og klikke på LINE Login-kanalen. I Linked OA skal du vælge Official-kontoen for at forbinde de to dele.
- 15. Når kunderne har åbnet den officielle LINE-kontoside i LINE-appen, kan de klikke på menuen for at starte bookingprocessen. Under processen kan de vælge de tjenester, dato og tidspunkt, de ønsker at reservere, logge ind med deres LINE-konto og bekræfte reservationen.
- Integrationen giver også kunderne mulighed for nemt at se deres bookinger i denne widget i appen.
Hvordan tilpasser jeg LINE Official Account-meddelelser?
Gå til SimplyBook.me-administrationspanelet, vælg Indstillinger → E-mail- og SMS-indstillinger. Teksterne i LINE-bookingnotifikationerne vil være i overensstemmelse med indholdet af SMS-notifikationerne. Hvis du vil justere de inkluderede oplysninger, kan du redigere de tilsvarende skabeloner der.
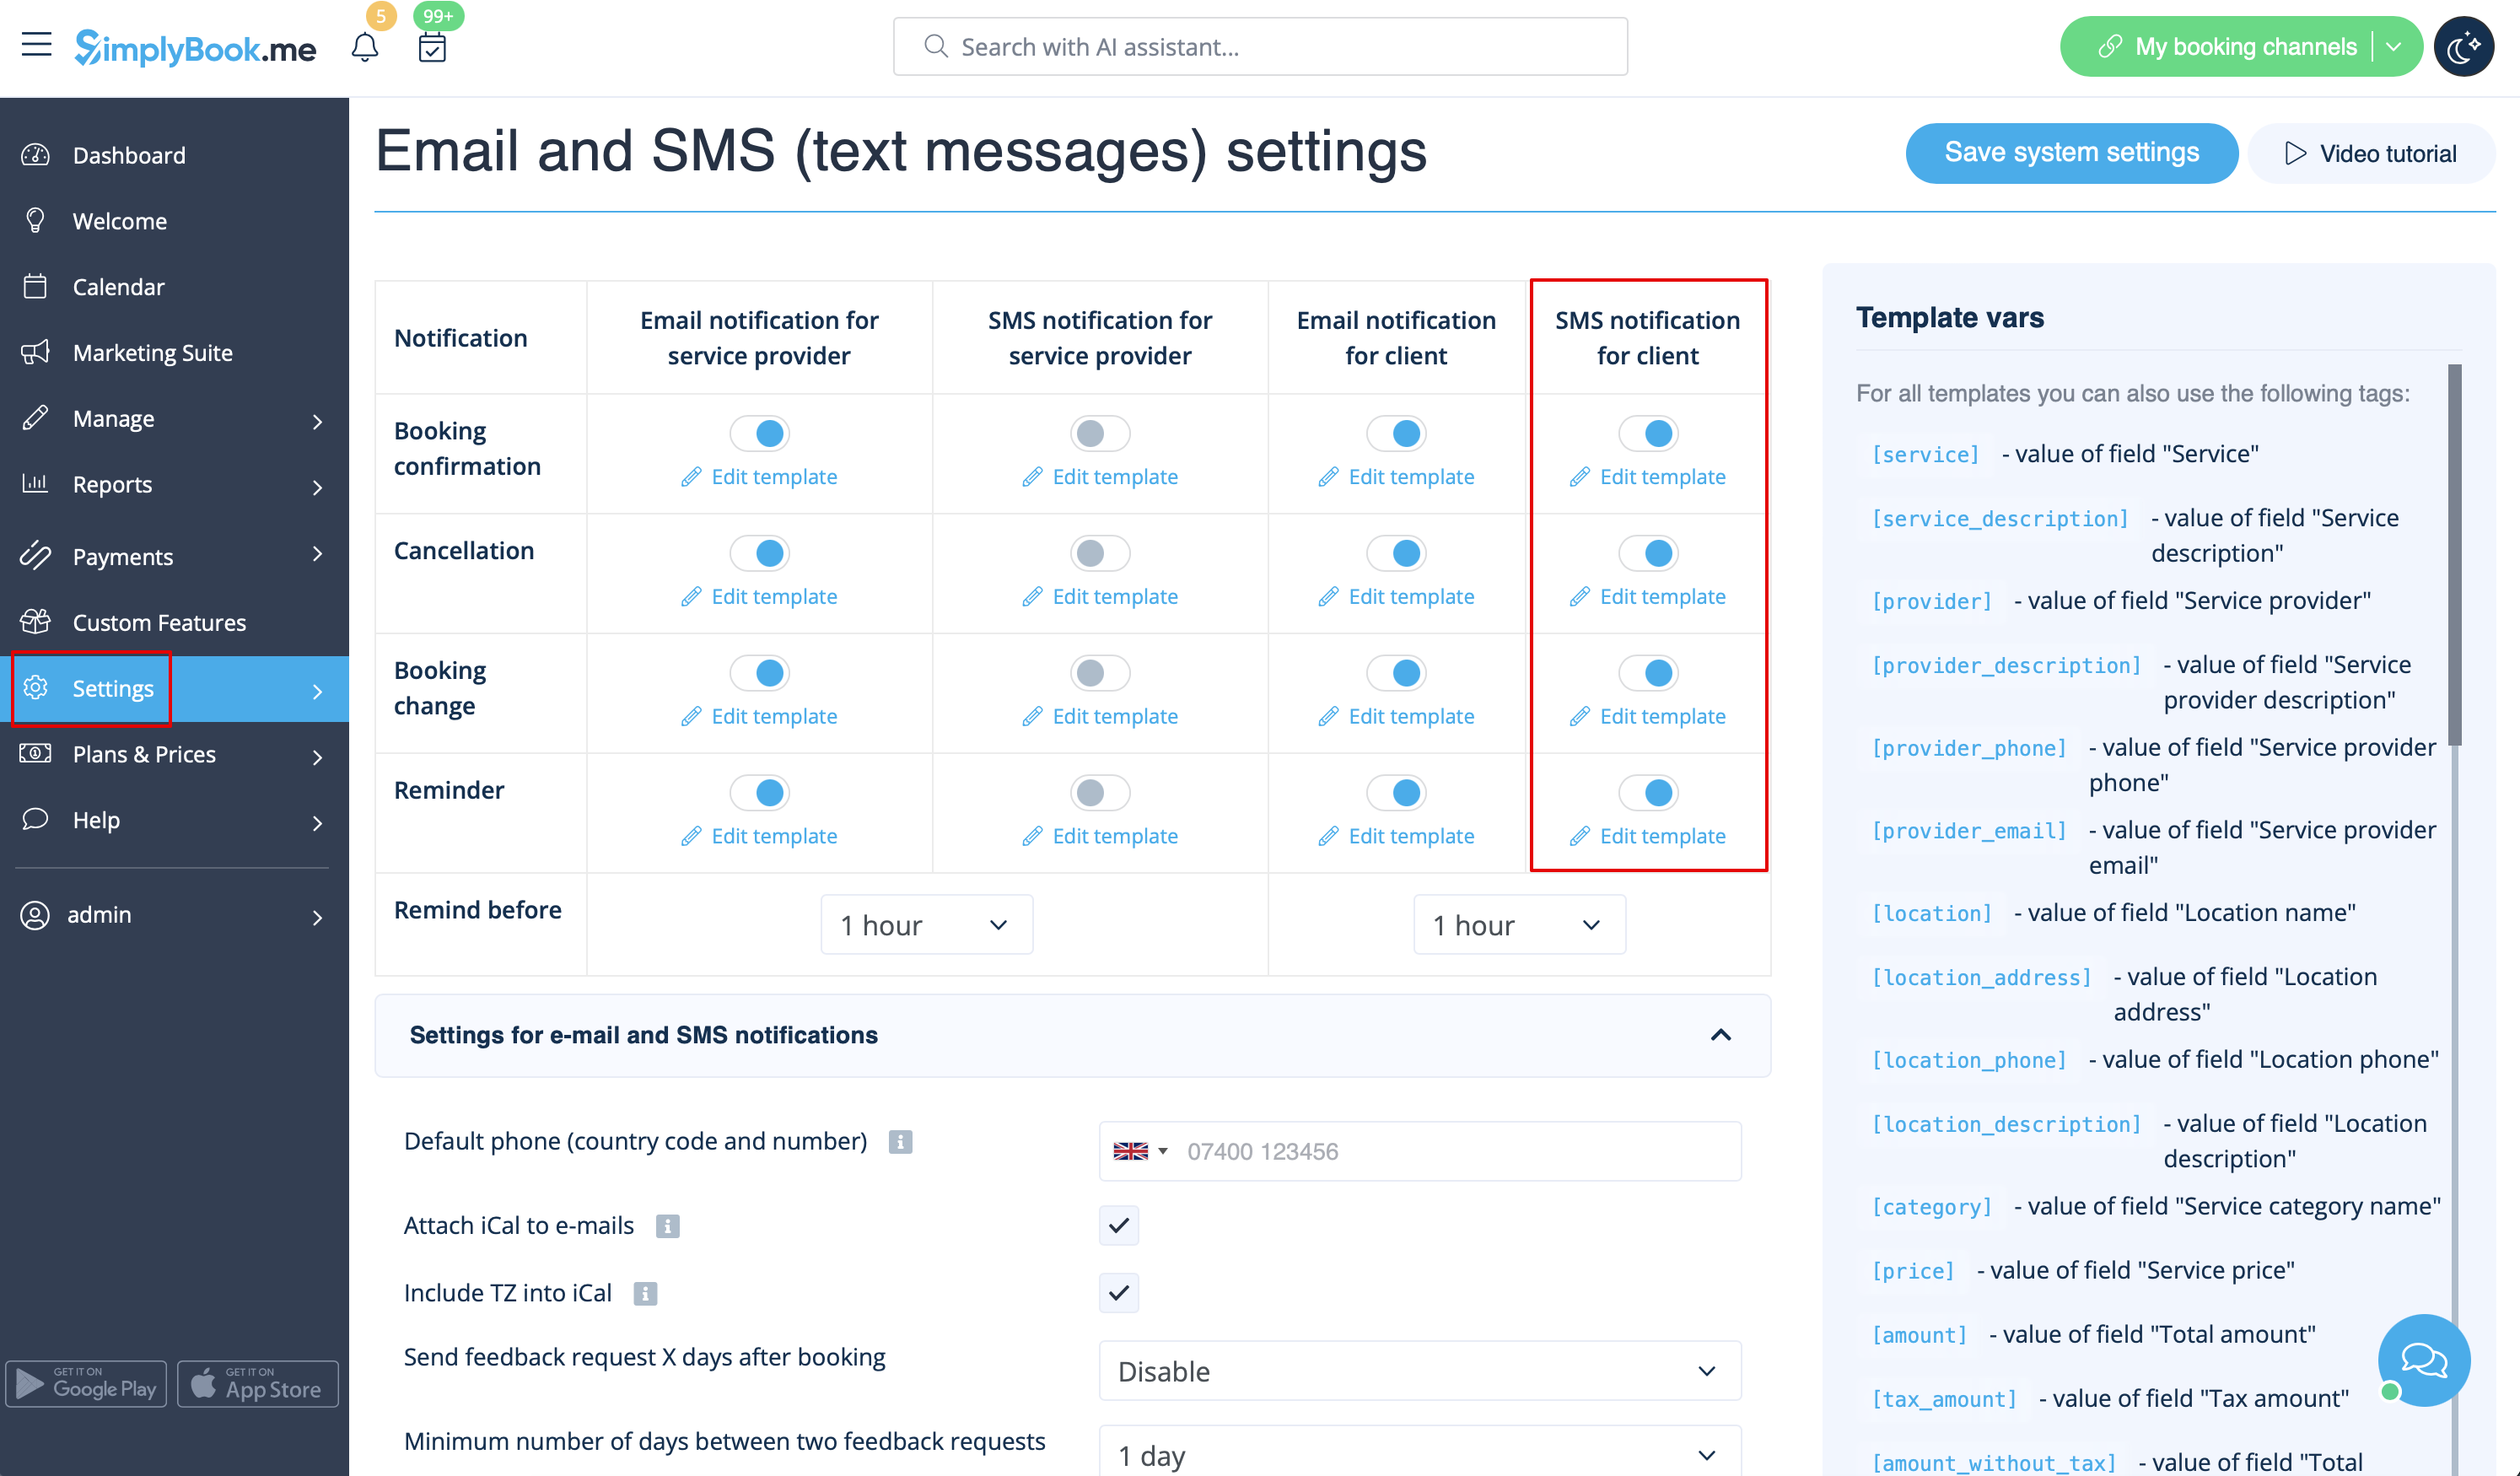
Bemærk: Hvis du ikke markerer afkrydsningsfelterne for SMS-beskeder til klienter i Indstillinger → E-mail- og SMS-indstillinger, sender systemet stadig automatisk aftalepåmindelser og andre aftalebeskeder via LINE.