Translations:Tips Custom Feature/6/fr: Difference between revisions

From SimplyBook.me
Created page with "comment utiliser l' 1. Pour activer cette fonctionnalité, accédez à la section <span style="background-color:#d4f8e5; padding:5px; border-radius:5px;">Fonctionnalités personnalisées</span> à l'aide du menu de gauche de votre interface d'administration, recherchez <span style="background-color:#d4f8e5; padding:5px; border-radius:5px;">« Pourboires</span> » et cliquez sur le bouton <span style="background-color:#d4f8e5; padding:5px; border-radius:5px;">« Activer</..."
 
(No difference)

Latest revision as of 15:59, 19 May 2025

Information about message (contribute)
This message has no documentation. If you know where or how this message is used, you can help other translators by adding documentation to this message.
Message definition (Tips Custom Feature)
;How to use
1. To enable this feature, go to the <span style="background-color:#d4f8e5; padding:5px; border-radius:5px;">Custom Features</span> section using the left-side menu of your admin interface, find <span style="background-color:#d4f8e5; padding:5px; border-radius:5px;">Tips</span>, and click on <span style="background-color:#d4f8e5; padding:5px; border-radius:5px;">Enable</span> button or use the switcher.
[[File:Tips enable path redesigned.png|1200px|border|center|link=https://help.simplybook.me/images/6/6e/Tips_enable_path_redesigned.png]]
<br><br>
2. Once enabled, you can select if some tax should be added to tips or not. Use the drop-down menu to choose from the previously created sales taxes or leave it with “No tax” if taxes should not be applied. 
[[File:Taxes on tips redesigned.png|1200px|border|center|link=https://help.simplybook.me/images/9/99/Taxes_on_tips_redesigned.png]]
<br><br>
3. There are 2 tipping options for your clients:<br>
:''Option A'': Tipping when making payment upon booking. 
When clients make a booking, they will see 4 tipping options at the Payment step. The amount of the tip depends on the price of your service and is equal to 5%, 10%, and 15% of the service price. The 4th option is “Custom” - the clients can choose to enter the custom amount of their tip.
[[File:Tips client side.png|1200px|border|center|link=https://help.simplybook.me/images/6/64/Tips_client_side.png]]
<br><br>
<span style="background-color:#ffe9e9; padding:5px; border-radius:5px;">'''Please note!''': If the service price is set to 0 (service is provided for free), the option of adding a tip will not be available.</span><br>
:''Option B'': Tipping after the appointment is finished. (Pay Later chosen upon booking)
If you are using the <span style="background-color:#d4f8e5; padding:5px; border-radius:5px;">Pay Later</span> payment option you can send the payment links from the admin side to your customers. <br>
It can be done in <span style="background-color:#d4f8e5; padding:5px; border-radius:5px;">Reports</span> -> <span style="background-color:#d4f8e5; padding:5px; border-radius:5px;">Payment Transactions</span> -> <span style="background-color:#d4f8e5; padding:5px; border-radius:5px;">3 dots menu</span> per necessary row -> <span style="background-color:#d4f8e5; padding:5px; border-radius:5px;">Receive payment</span>  -> <span style="background-color:#d4f8e5; padding:5px; border-radius:5px;">Send Email/SMS.</span><br>
<span style="background-color:#ffe9e9; padding:5px; border-radius:5px;">'''Please note!''' Sending payment links is available only with <span style="background-color:#cdeffc; padding:5px; border-radius:5px;">[https://sbpay.me SBPay.me PRO]</span> integration.</span>
[[File:Send payment links for tips.jpg|1200px|border|center|link=https://help.simplybook.me/images/d/d4/Send_payment_links_for_tips.jpg]]
<br><br>       
Your clients can also scan the <span style="background-color:#d4f8e5; padding:5px; border-radius:5px;">QR code</span> and will be redirected to the payment step where they can leave tip. 
[[File:Show qr for tips.png|1200px|border|center|link=https://help.simplybook.me/images/1/19/Show_qr_for_tips.png]]
<br><br><br><br>
;How to use Tips Custom Feature with Accept Deposits Custom Feature
<br>

comment utiliser l' 
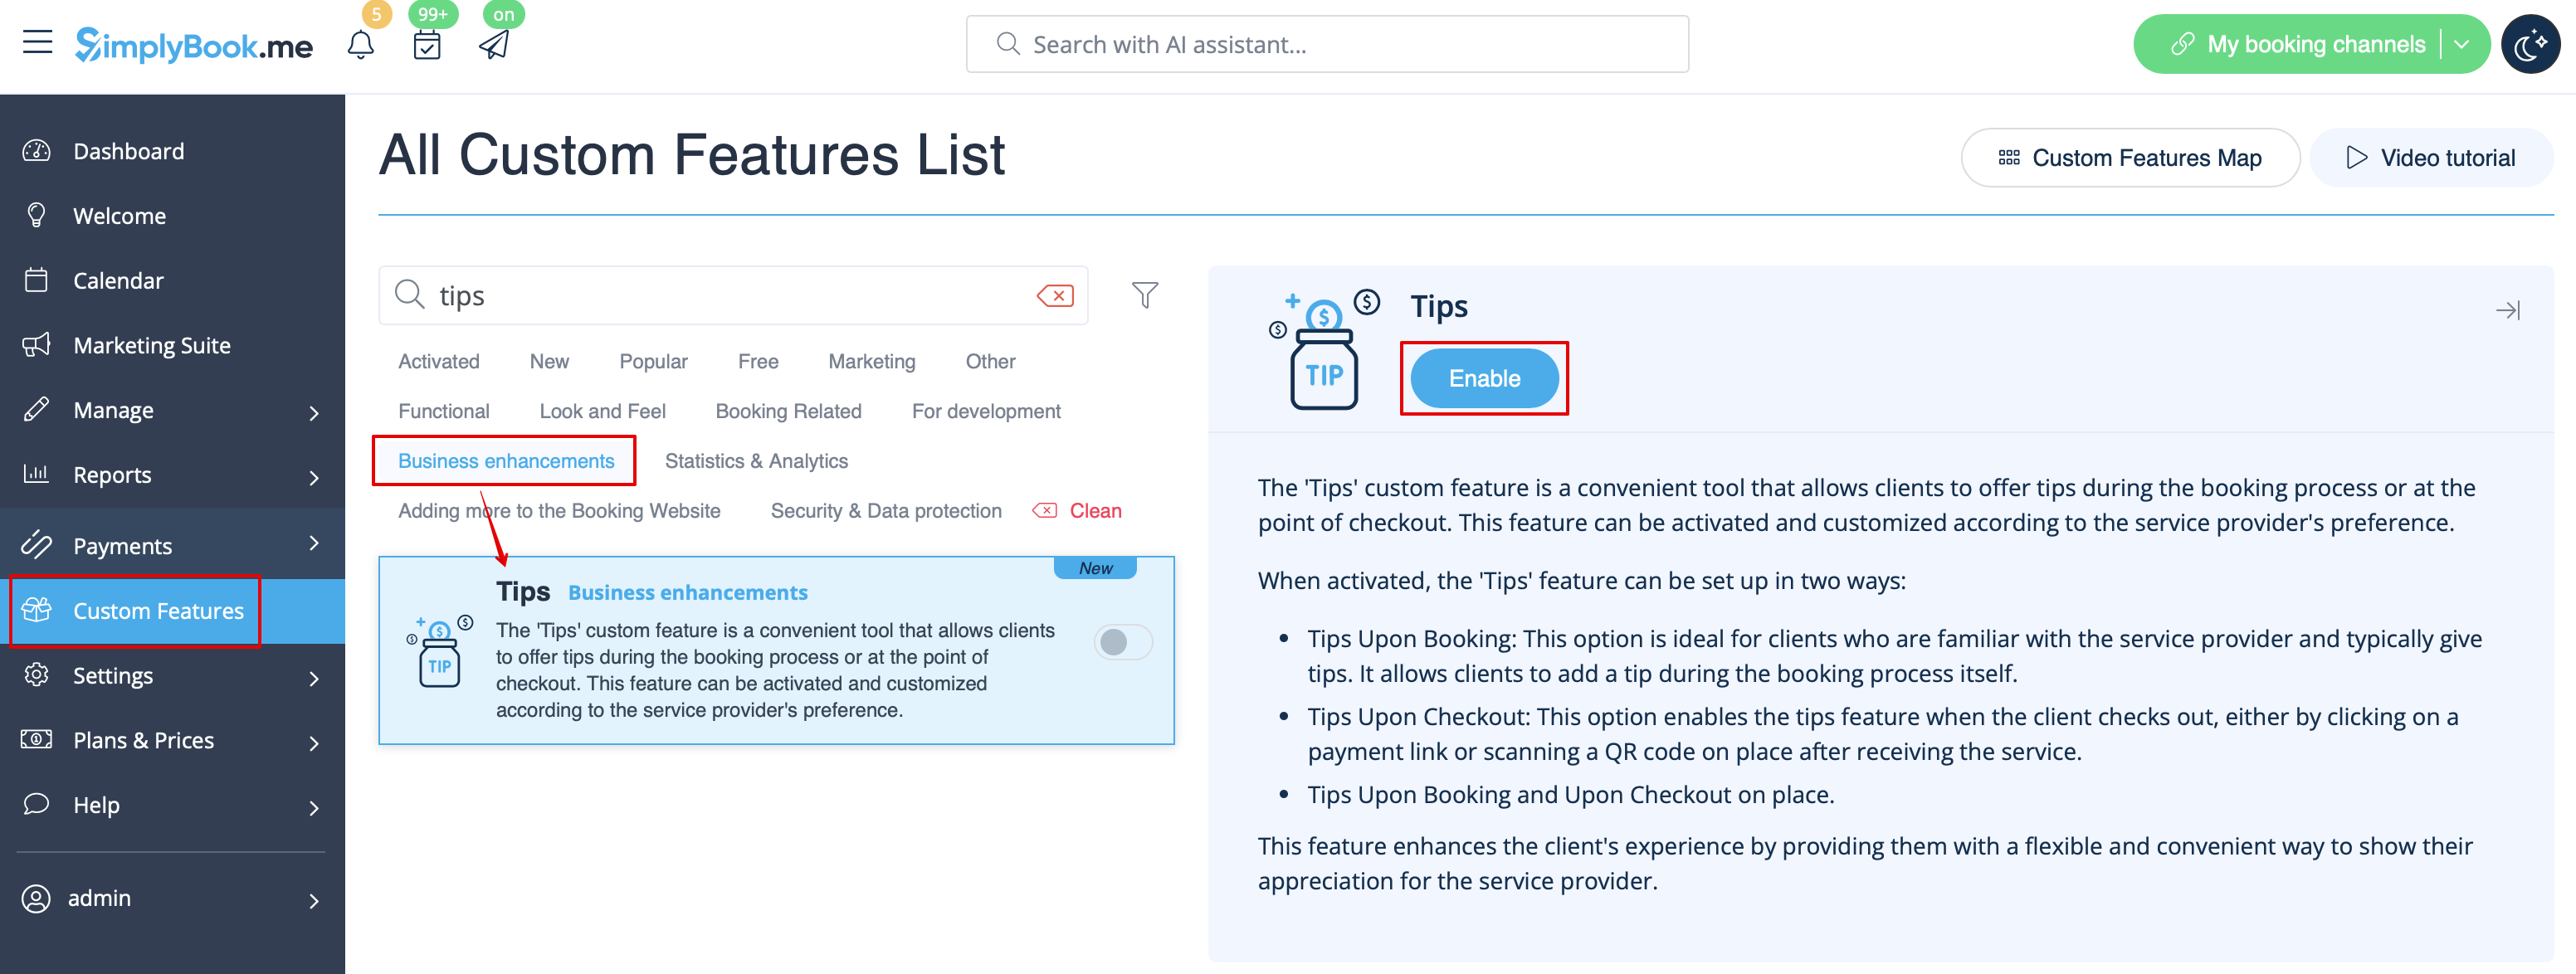
1. Pour activer cette fonctionnalité, accédez à la section Fonctionnalités personnalisées à l'aide du menu de gauche de votre interface d'administration, recherchez « Pourboires » et cliquez sur le bouton « Activer » ou utilisez le commutateur.


2. Une fois activée, vous pouvez choisir d'ajouter ou non une taxe aux pourboires. Utilisez le menu déroulant pour choisir parmi les taxes de vente précédemment créées ou laissez « Aucune taxe » si aucune taxe ne doit être appliquée.


3. Deux options de pourboire sont proposées à vos clients :

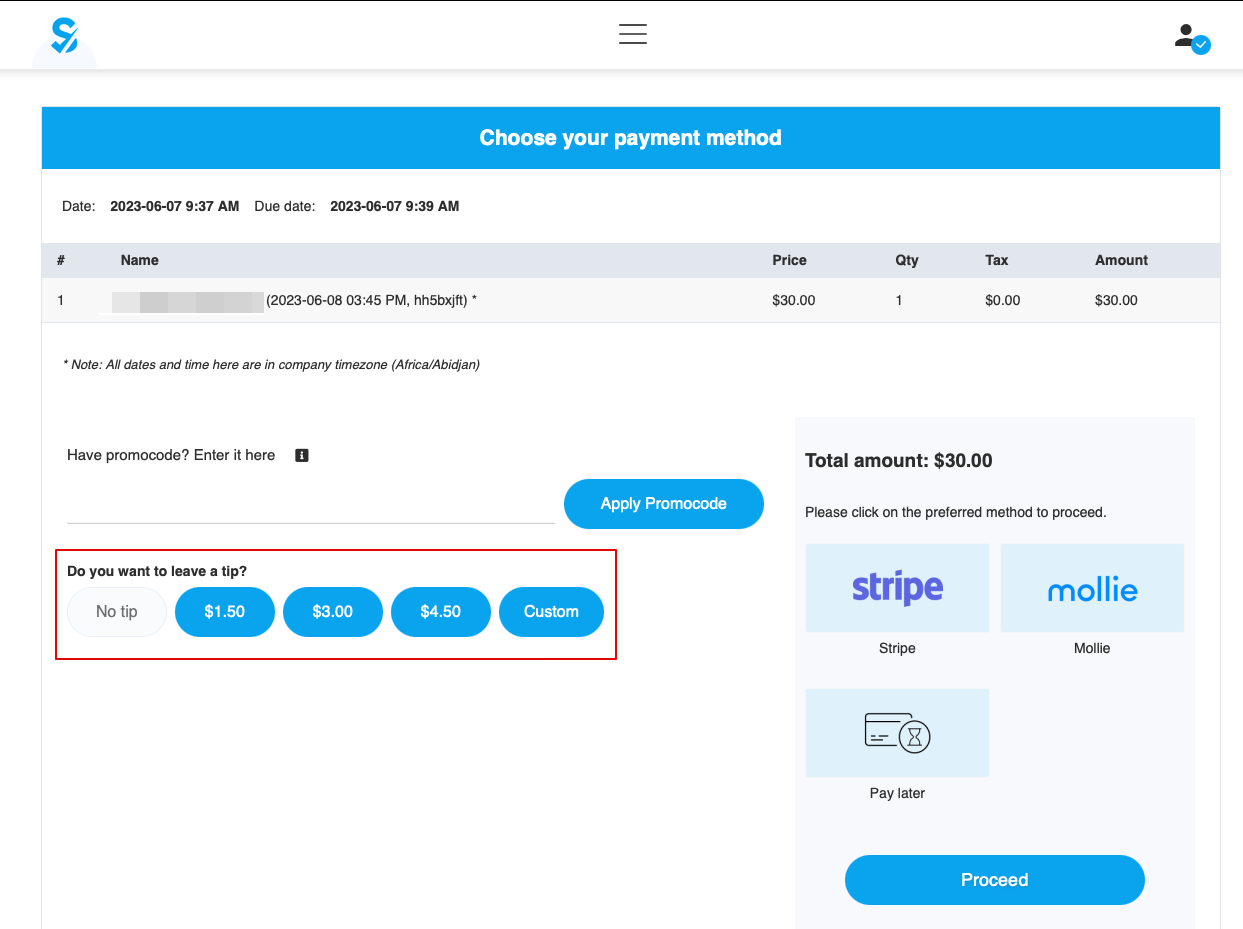
Option A: pourboire lors du paiement à la réservation.

Lorsque les clients effectuent une réservation, ils voient 4 options de pourboire à l'étape Paiement. Le montant du pourboire dépend du prix de votre service et correspond à 5 %, 10 % ou 15 % du prix du service. La quatrième option est « Personnalisé » : les clients peuvent choisir de saisir le montant de leur pourboire.


Remarque : si le prix du service est fixé à 0 (service gratuit), l'option d'ajouter un pourboire ne sera pas disponible.

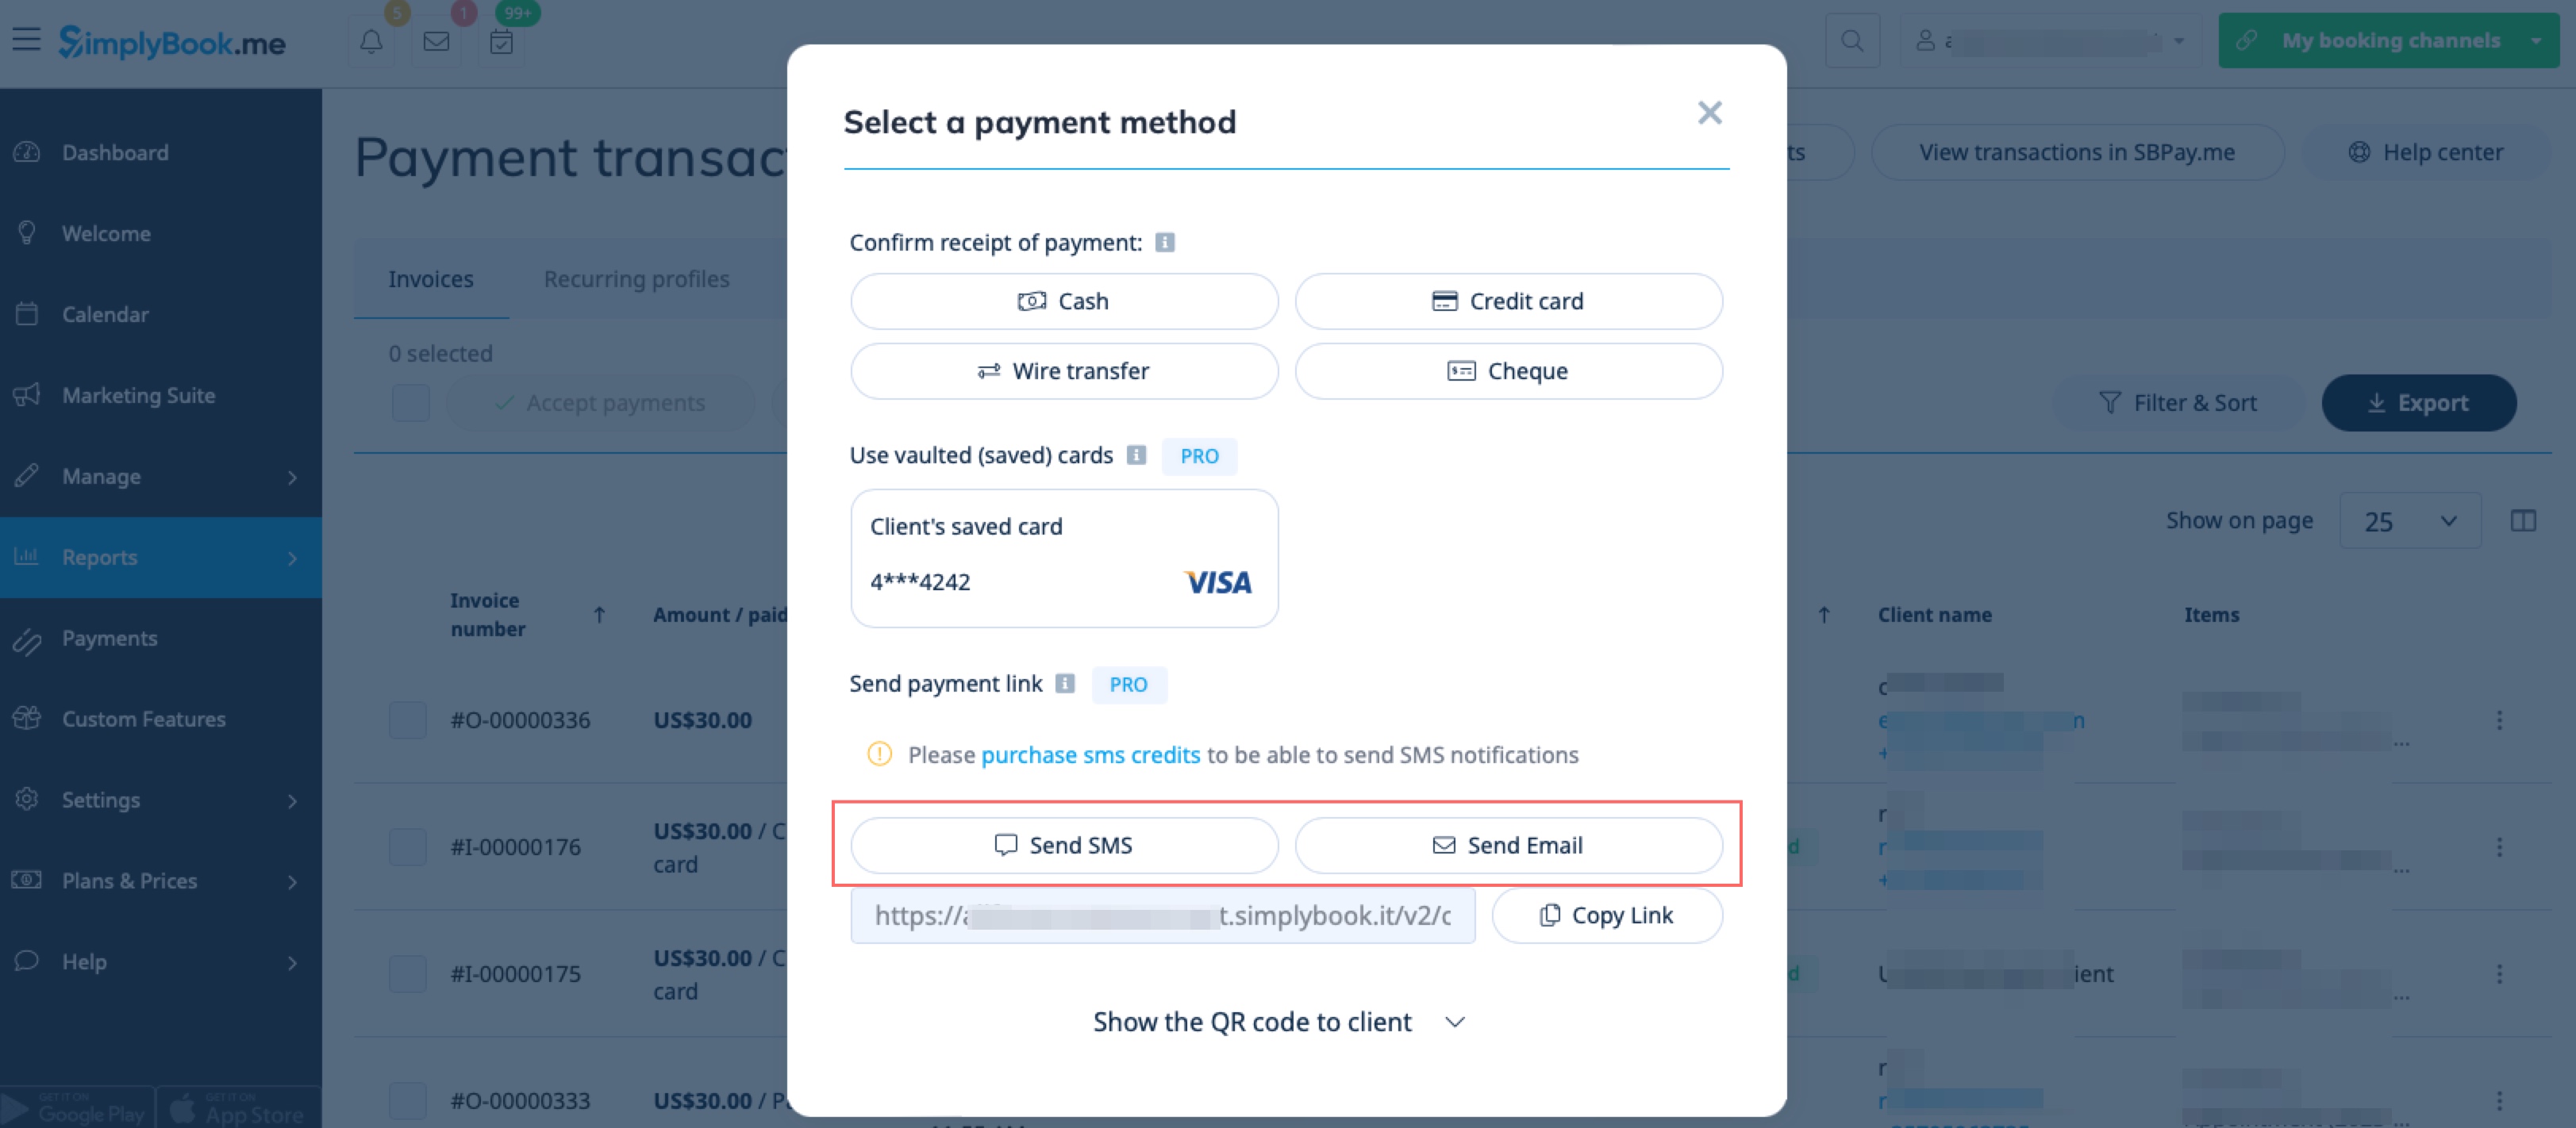
Option B: pourboire après la fin du rendez-vous. (Option « Payer plus tard » sélectionnée lors de la réservation)

Si vous utilisez l'option de paiement « Payer plus tard », vous pouvez envoyer les liens de paiement à vos clients depuis l'interface d'administration.
Cela peut être fait dans Rapports -> Transactions de paiement -> Menu 3 points par ligne nécessaire -> Recevoir le paiement -> Envoyer un e-mail/SMS.
Remarque : l'envoi de liens de paiement n'est disponible qu'avec l'intégration SBPay.me PRO.


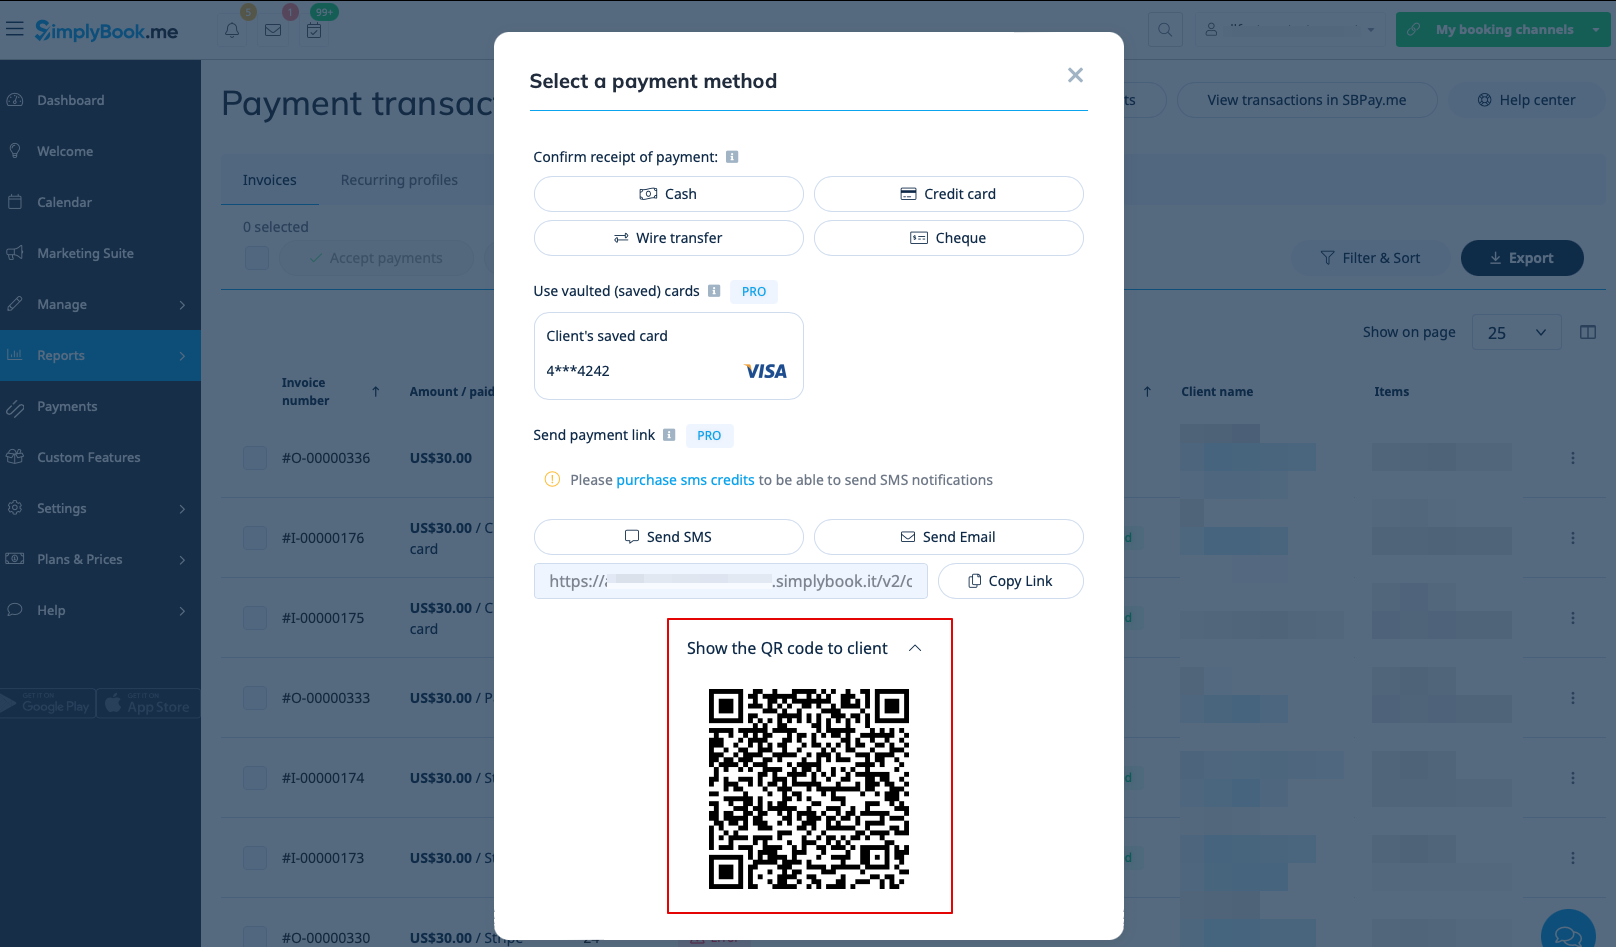
Vos clients peuvent également scanner le code QR et seront redirigés vers l'étape de paiement où ils pourront laisser un pourboire.


Comment utiliser la fonctionnalité personnalisée « Pourboires » avec la fonctionnalité personnalisée « Accepter les acomptes »