Translations:SSO-SAML Custom Feature/8/nl: Difference between revisions

From SimplyBook.me
Created page with "1200px|border|center|link=https://help.simplybook.me/images/e/e6/Base64_certificate_paste_new.png <br><br> :13. Blader <span style="background-color:#d4f8e5; padding:5px; border-radius:5px;">op de MS Azure-pagina</span> naar het blok <span style="background-color:#d4f8e5; padding:5px; border-radius:5px;">'Instellen'</span> en zoek de opties <span style="background-color:#d4f8e5; padding:5px; border-radius:5px;">'Inlog-URL',</span..."
 
(No difference)

Latest revision as of 16:13, 19 May 2025

Information about message (contribute)
This message has no documentation. If you know where or how this message is used, you can help other translators by adding documentation to this message.
Message definition (SSO-SAML Custom Feature)
[[File:Base64 certificate paste new.png|1200px|border|center|link=https://help.simplybook.me/images/e/e6/Base64_certificate_paste_new.png]]
<br><br>
:13. Scroll <span style="background-color:#d4f8e5; padding:5px; border-radius:5px;">MS Azure side</span> page to <span style="background-color:#d4f8e5; padding:5px; border-radius:5px;">Set up</span> block and find <span style="background-color:#d4f8e5; padding:5px; border-radius:5px;">Login URL,</span> <span style="background-color:#d4f8e5; padding:5px; border-radius:5px;">Azure AD/Microsoft Entra Identifier</span> and <span style="background-color:#d4f8e5; padding:5px; border-radius:5px;">Logout URL</span> options, Copy each of them and paste to the corresponding boxes on SimplyBook.me side.
[[File:Login logout and azure id new.png|1200px|border|center|link=https://help.simplybook.me/images/4/4c/Login_logout_and_azure_id_new.png]]
<br><br>
:14. Go to <span style="background-color:#d4f8e5; padding:5px; border-radius:5px;">User attributes and claims</span> block on MS Azure side and click on <span style="background-color:#d4f8e5; padding:5px; border-radius:5px;">Pen</span> icon to edit it.
[[File:Ms azure user attributes and claims.png|border|center]]
<br><br>
:15. For <span style="background-color:#d4f8e5; padding:5px; border-radius:5px;">Unique User Identifier</span>(click on it to edit) please set <span style="background-color:#d4f8e5; padding:5px; border-radius:5px;">user.mail</span> variable as <span style="background-color:#d4f8e5; padding:5px; border-radius:5px;">Source Attribute.</span> It is the parameter that will allow us to differentiate between different user logins.
[[File:Ms azure user attributes and claims identifier.png|border|center]]
<br><br>
[[File:Ms azure user attributes and claims identifier mail.png|border|center]]
<br><br>
:16. For additional claims please add <span style="background-color:#d4f8e5; padding:5px; border-radius:5px;">Groups</span> option using <span style="background-color:#d4f8e5; padding:5px; border-radius:5px;">Add group claim</span> and <span style="background-color:#d4f8e5; padding:5px; border-radius:5px;">Email</span> and <span style="background-color:#d4f8e5; padding:5px; border-radius:5px;">Name</span> with <span style="background-color:#d4f8e5; padding:5px; border-radius:5px;">Add new claim</span> buttons correspondingly.<br>
:You can also add phone and last name if you need. See claims setup example below.
[[File:Setup claims new.png|1200px|border|center|link=https://help.simplybook.me/images/8/81/Setup_claims_new.png]]
<br><br>


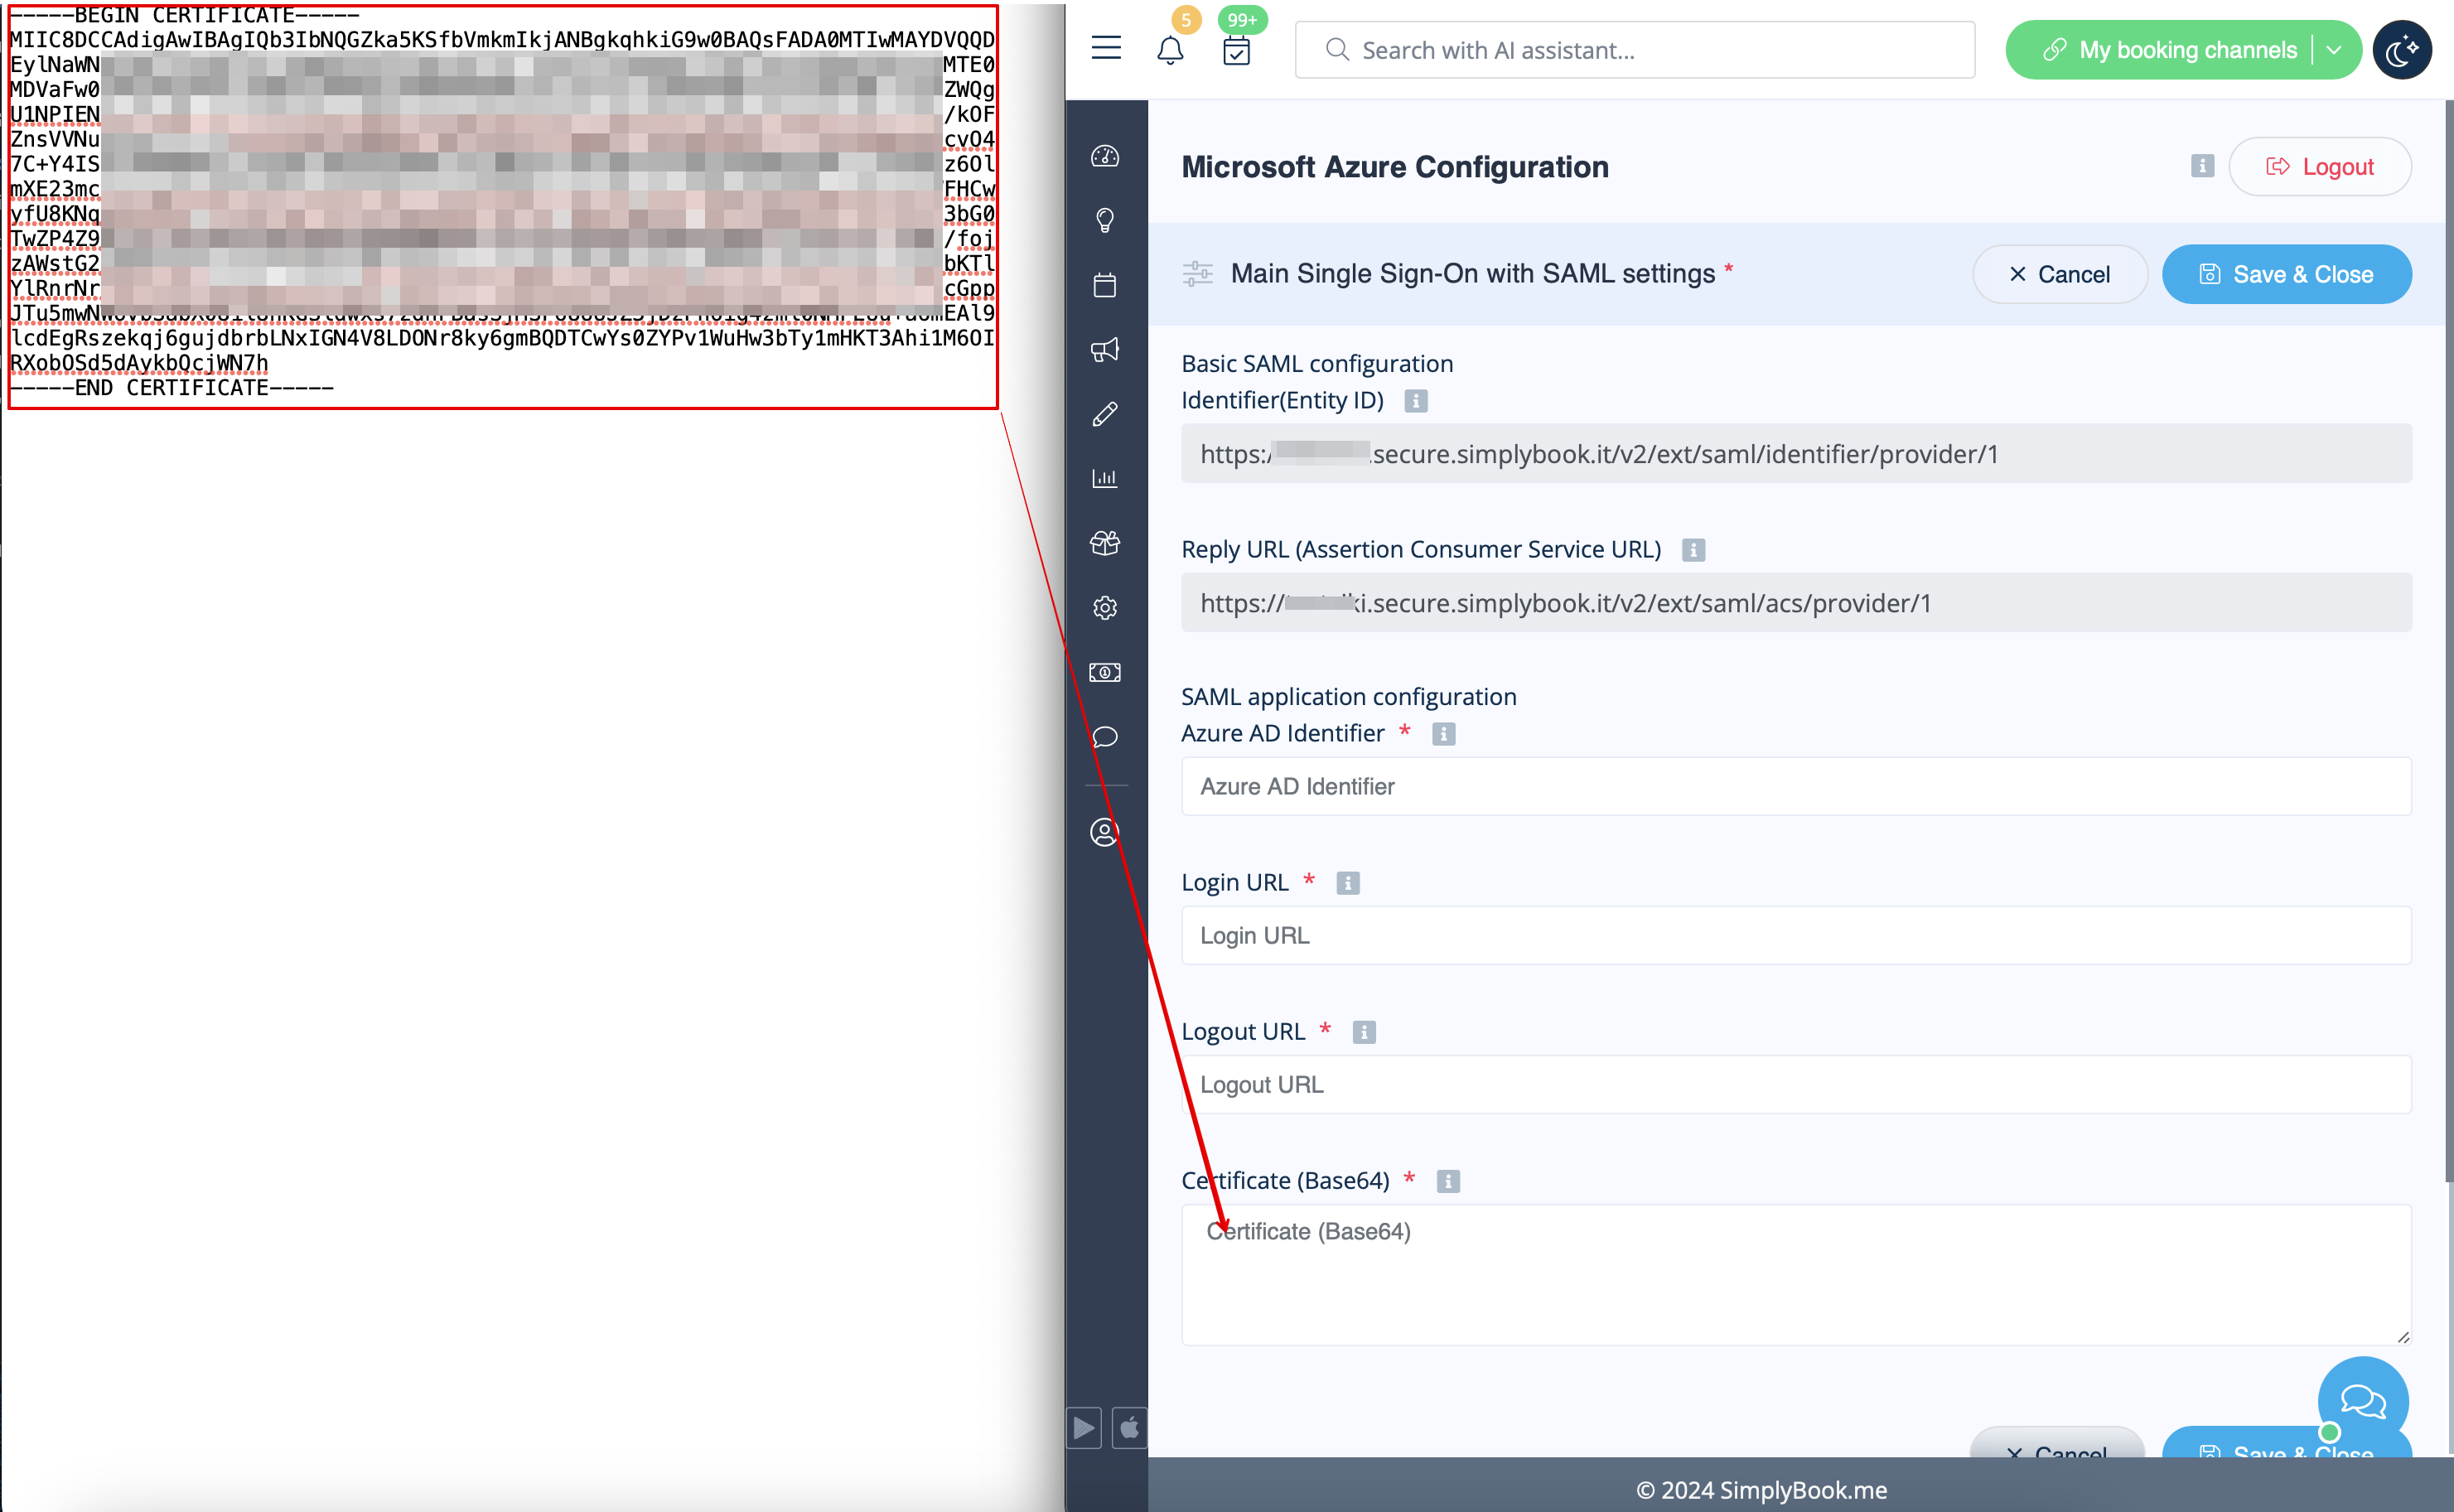
13. Blader op de MS Azure-pagina naar het blok 'Instellen' en zoek de opties 'Inlog-URL', 'Azure AD/Microsoft Entra-ID ' en 'Uitlog-URL '. Kopieer deze en plak ze in de overeenkomstige vakken aan de kant van SimplyBook.me.


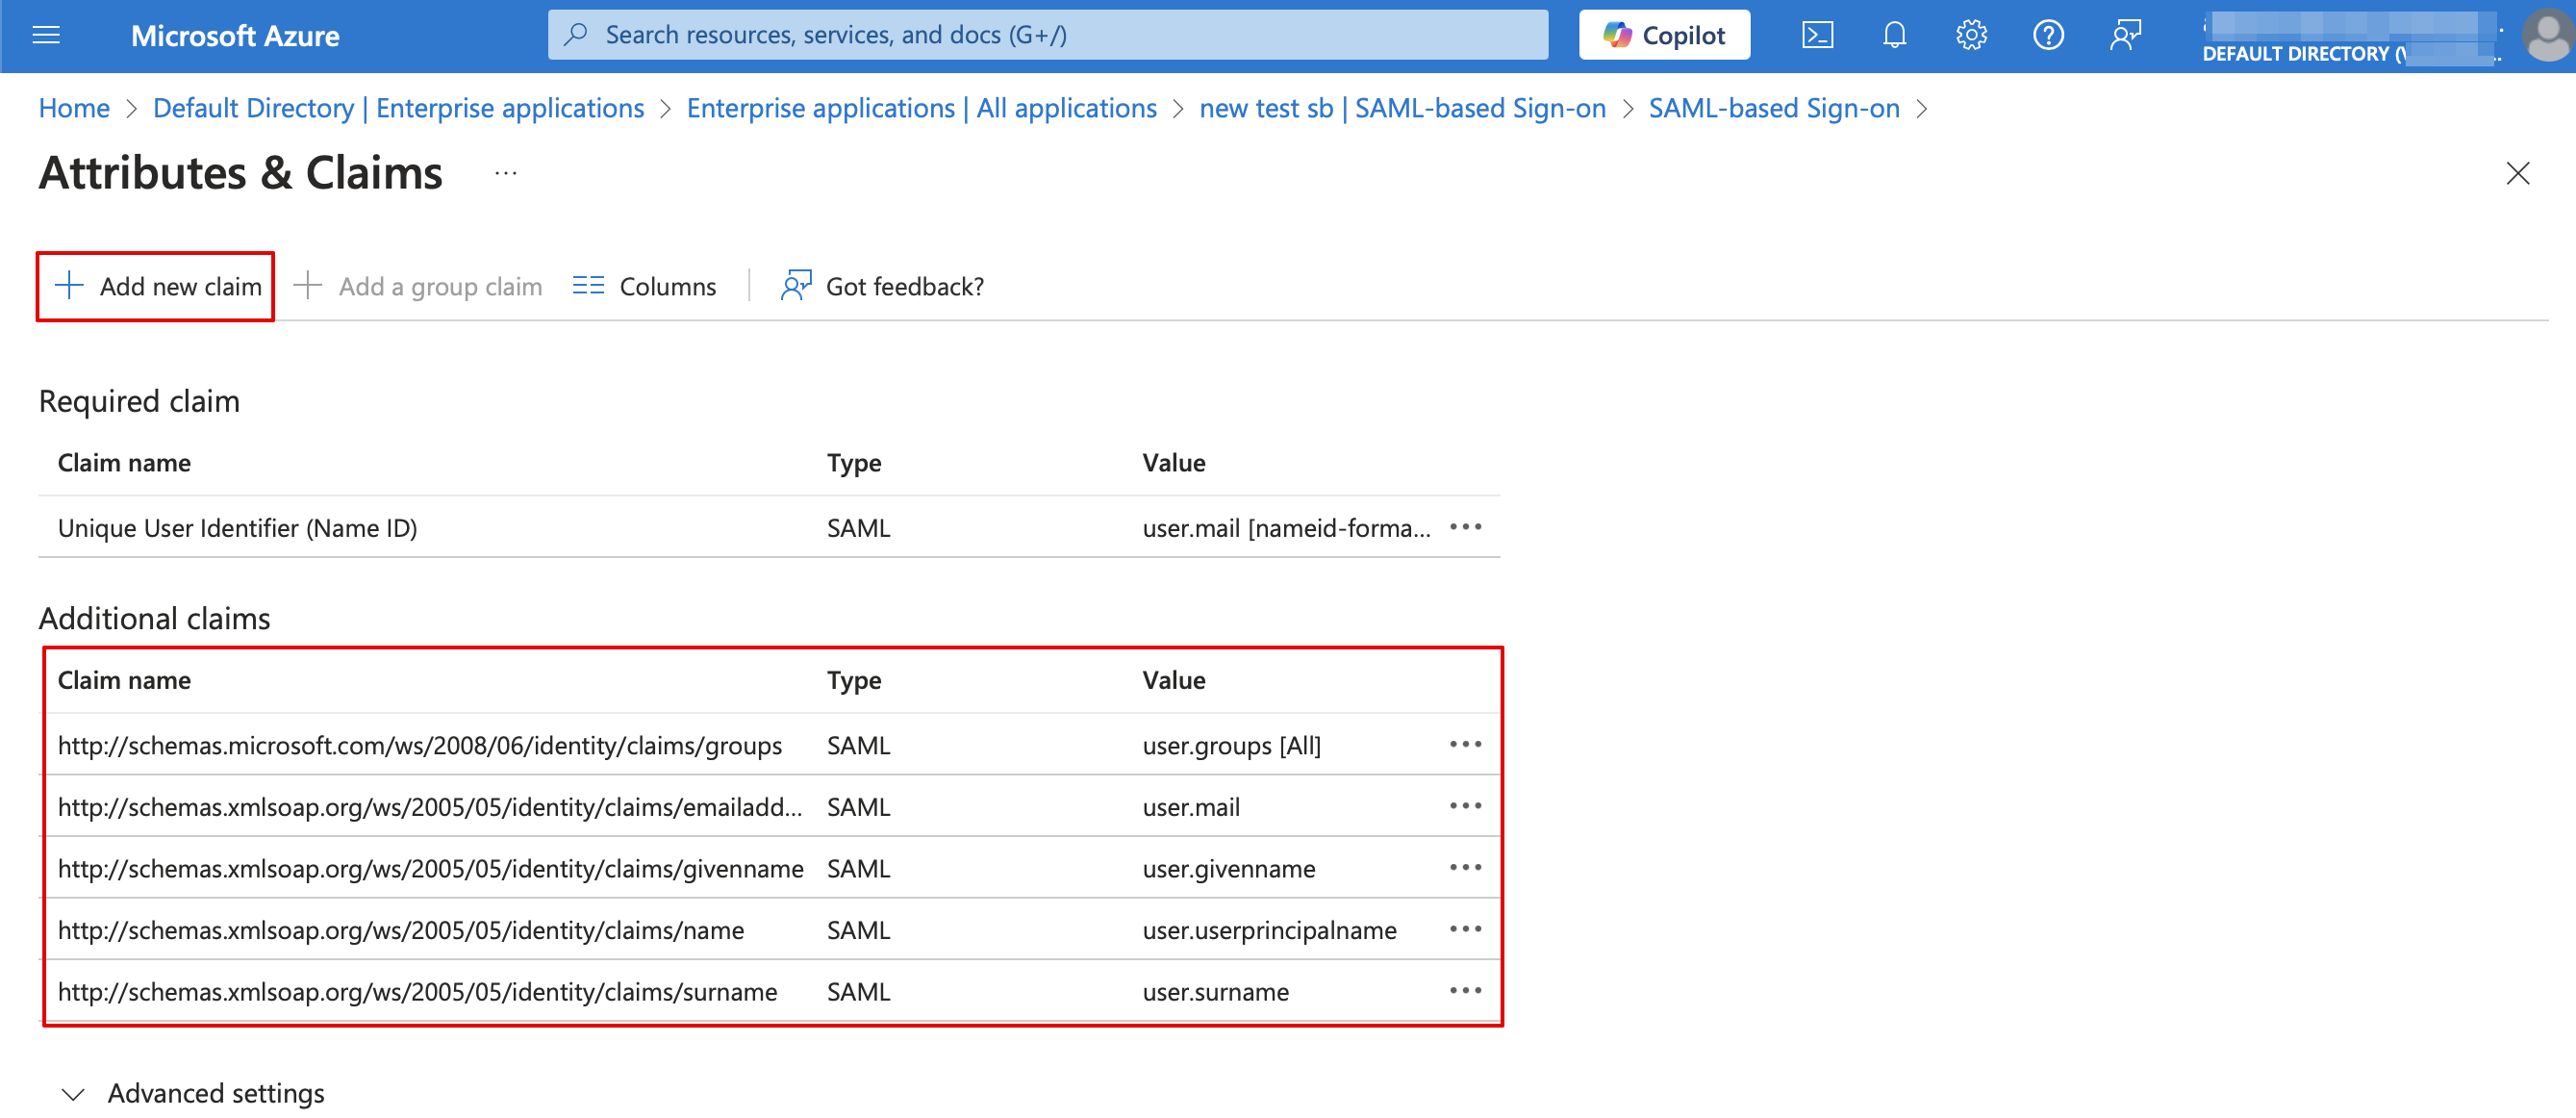
14. Ga naar het blok Gebruikerskenmerken en claims aan de MS Azure-zijde en klik op het potloodpictogram om het te bewerken.


15. Voor Unieke gebruikers-ID(klik erop om te bewerken) stelt u de variabele user.mail in als Bronattribuut. Dit is de parameter waarmee we verschillende gebruikersaanmeldingen kunnen onderscheiden.


16. Voor extra claims voegt u de optie Groepen toe met de knop Groepsclaim toevoegen en E-mail en Naam met de knop Nieuwe claim toevoegen.
U kunt ook telefoonnummer en achternaam toevoegen indien nodig. Zie het voorbeeld voor het instellen van claims hieronder.