Translations:Creating a Private Service/Event with a Direct Link/2/uk: Difference between revisions

From SimplyBook.me
Created page with "<br><br> Буває, що вам потрібно створити послугу/подію, яка має бути видимою тільки для вас/ваших співробітників або певних клієнтів. Ми маємо невеликий обхідний шлях, щоб організувати таку конфігурацію, в результаті чого ви отримаєте послугу/подію, доступну тіл..."
(No difference)

Revision as of 07:33, 1 July 2025

Information about message (contribute)
This message has no documentation. If you know where or how this message is used, you can help other translators by adding documentation to this message.
Message definition (Creating a Private Service/Event with a Direct Link)
<br><br>
It happens that you need to create a service/event which should be visible for you/your staff or specific clients only. 
We have a small workaround to arrange such a set up so as a result you receive a service/event which is available only for the people you share the special direct link with. 
<br><br>
;Please follow step by step instructions below:
<br>
''Step 1: Enable Service Categories custom feature''
<br>
*In the <span style="background-color:#d4f8e5; padding:5px; border-radius:5px;">Custom Features</span> section of your admin panel, enable the <span style="background-color:#cdeffc; padding:5px; border-radius:5px;">[[Service Categories custom feature|Service Categories]]</span> custom feature. This can be found under <span style="background-color:#d4f8e5; padding:5px; border-radius:5px;">Adding more to your Booking Website</span> section.
[[File:Service caterories enable path redesigned.png|1200px|center|link=https://help.simplybook.me/images/b/b2/Service_caterories_enable_path_redesigned.png]]
<br><br>
''Step 2: Set Up Hidden and Visible Categories''
<br>
*Using the guidance provided for the <span style="background-color:#cdeffc; padding:5px; border-radius:5px;">[[Service Categories custom feature|Service Categories]]</span> custom feature, create the category on <span style="background-color:#d4f8e5; padding:5px; border-radius:5px;">Manage</span> -> <span style="background-color:#d4f8e5; padding:5px; border-radius:5px;">Services</span> page.<br>
*Assign the necessary service to this category and then hide it by using the "eye" button next to the category or by selecting it and clicking the "Hide" button.
*Create another category that will include all your currently visible services. 
*As a result you will receive such a <span style="background-color:#d4f8e5; padding:5px; border-radius:5px;">Manage</span> -> <span style="background-color:#d4f8e5; padding:5px; border-radius:5px;">Services</span> page appearance as shown below.
[[File:Hide category redesigned.png|1200px|center|link=https://help.simplybook.me/images/5/54/Hide_category_redesigned.png]]
<br><br>
The front-end (client view) of your booking page remains unchanged and no categories will be shown if you leave only 1 visible Category as by this instruction.
<br><br>
''Step 3: How to share a direct link to your hidden service?''
<br>
1. Go to <span style="background-color:#d4f8e5; padding:5px; border-radius:5px;">Manage</span> -> <span style="background-color:#d4f8e5; padding:5px; border-radius:5px;">Services</span>.<br>
2. Locate your service/event under the hidden Category and click on it to open editing mode.<br>
3. Scroll down to <span style="background-color:#d4f8e5; padding:5px; border-radius:5px;">Direct link to service</span> option.<br>
4. Click the button [[File:Copy link icon.png]] to copy the direct link.
[[File:Direct link to service redesigned.png|1200px|center|link=https://help.simplybook.me/images/d/d2/Direct_link_to_service_redesigned.png]]
<br><br>
Done!<br>
Now, you can share the link with your clients. When they follow it, they will be redirected to your booking page with the hidden service already chosen.
[[File:Private event client side.png|1200px|center|link=https://help.simplybook.me/images/0/07/Private_event_client_side.png]]
<br><br>
'''Additional Note:''' if you are always booking manually as admin:
<br>
In case you wish to manually arrange a booking from the admin page (<span style="background-color:#cdeffc; padding:5px; border-radius:5px;">[[How to manage bookings|Calendar]]</span> or <span style="background-color:#cdeffc; padding:5px; border-radius:5px;">[[Point of Sale custom feature|POS]]</span>) simply hide your service using the same <span style="background-color:#d4f8e5; padding:5px; border-radius:5px;">eye</span> button near it or <span style="background-color:#d4f8e5; padding:5px; border-radius:5px;">Hide</span> option. This ensures the service is available from admin side only to create a booking.
<br><br>


Буває, що вам потрібно створити послугу/подію, яка має бути видимою тільки для вас/ваших співробітників або певних клієнтів. Ми маємо невеликий обхідний шлях, щоб організувати таку конфігурацію, в результаті чого ви отримаєте послугу/подію, доступну тільки для тих людей, з якими ви поділилися спеціальним прямим посиланням.

Будь ласка, дотримуйтесь покрокових інструкцій нижче


Крок 1: Увімкніть спеціальну функцію «Категорії послуг»

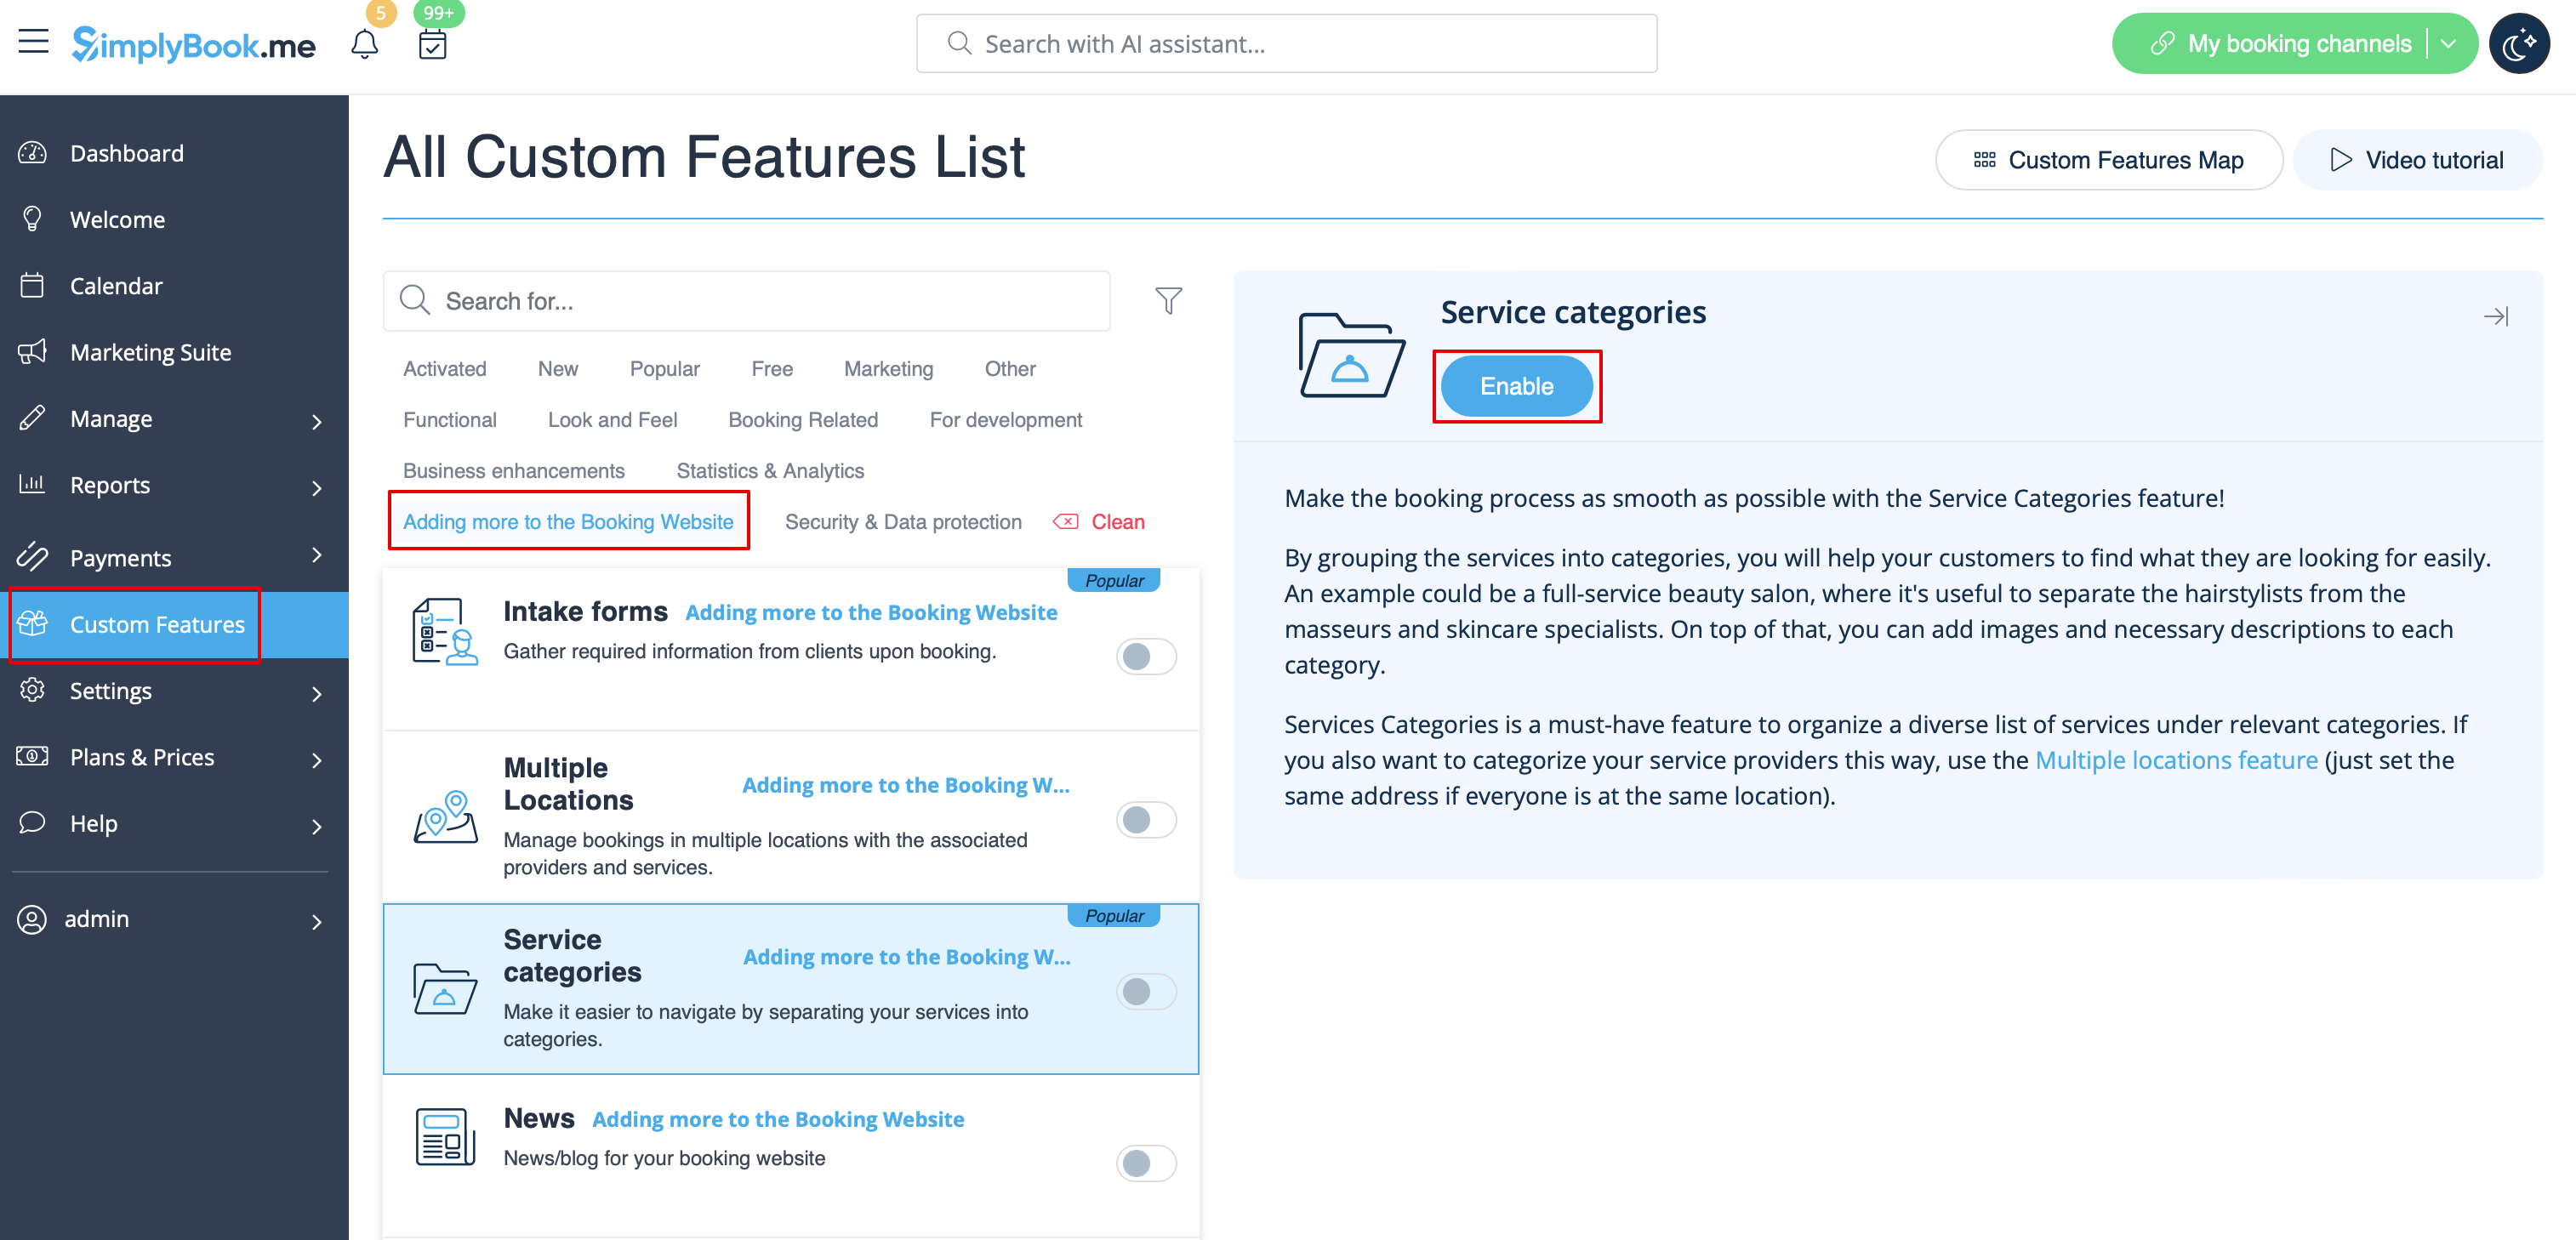
  • У розділі «Спеціальні функції» панелі адміністратора увімкніть спеціальну функцію «Категорії послуг ». Її можна знайти в розділі «Додати більше до вашого веб-сайту бронювання ».


Крок 2: Налаштуйте приховані та видимі категорії

  • Користуючись інструкціями для спеціальної функції «Категорії послуг», створіть категорію на сторінці «Управління» -> «Послуги ».
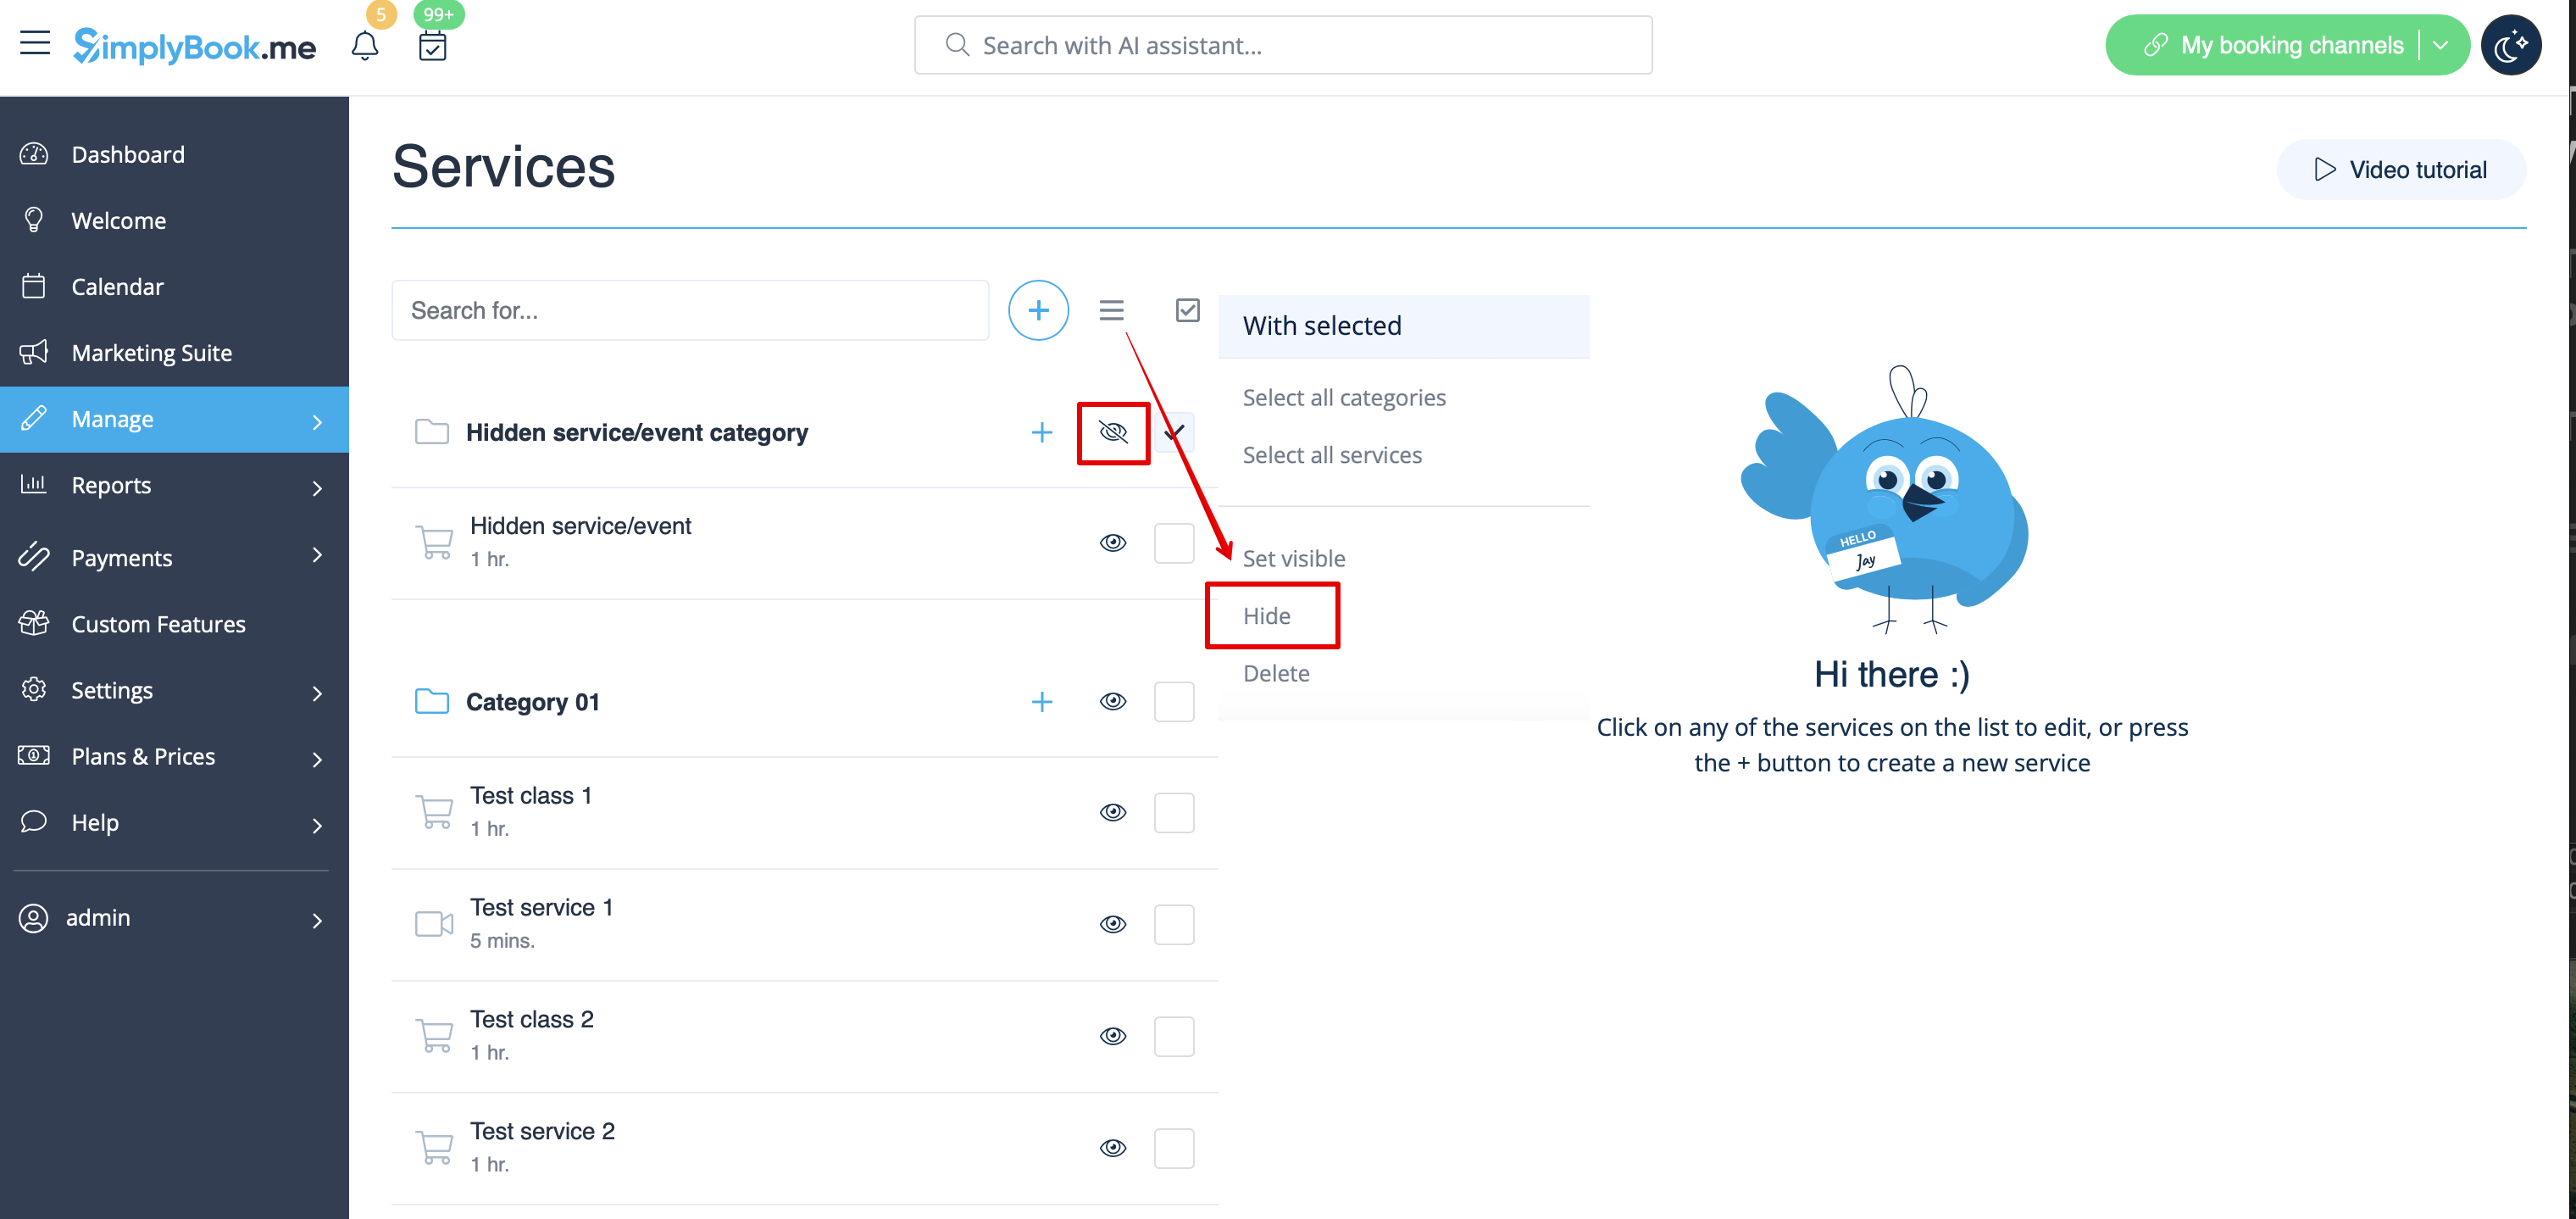
  • Призначте необхідну послугу цій категорії, а потім приховайте її за допомогою кнопки «око» поруч із категорією або вибравши її та натиснувши кнопку «Приховати».
  • Створіть іншу категорію, яка буде містити всі ваші поточні видимі послуги.
  • В результаті ви отримаєте таку сторінку «Управління» -> «Послуги», як показано нижче.


Інтерфейс (вигляд для клієнта) вашої сторінки бронювання залишиться незмінним, і категорії не будуть відображатися, якщо ви залишите лише 1 видиму категорію, як зазначено в цій інструкції.

Крок 3: Як поділитися прямим посиланням на вашу приховану послугу?
1. Перейдіть до «Управління» -> «Послуги».
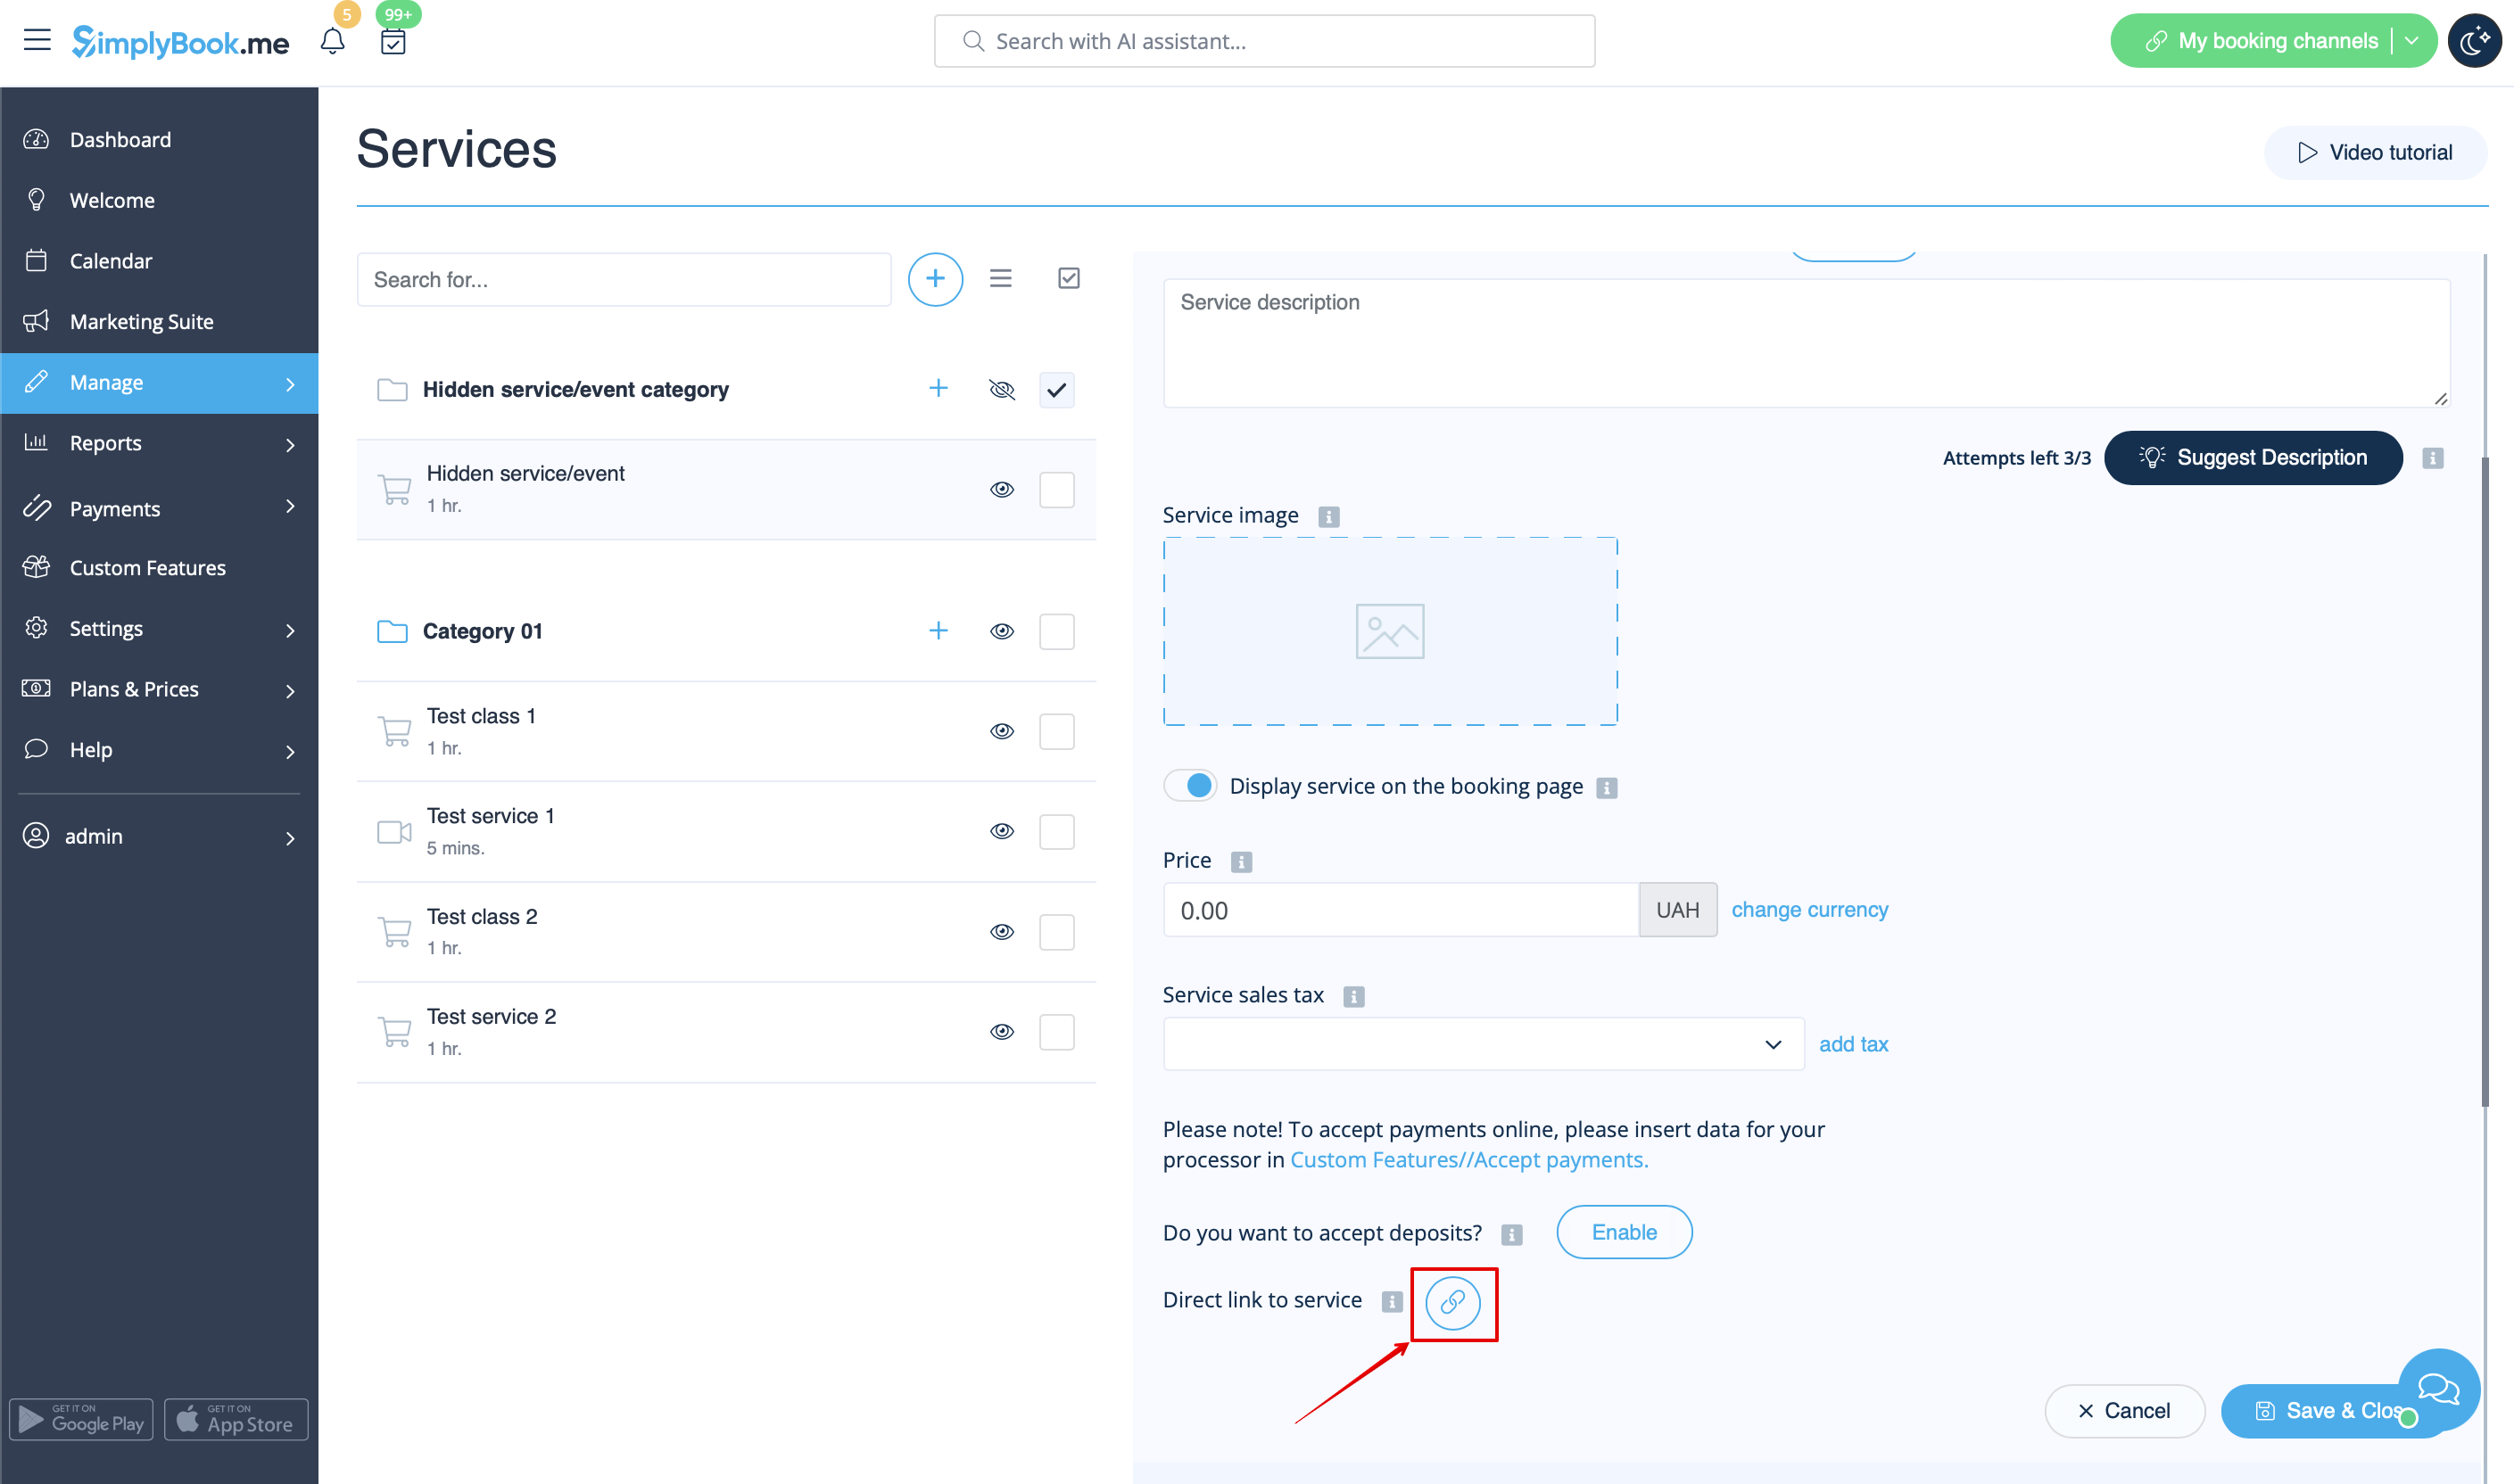
2. Знайдіть свою послугу/подію в прихованій категорії та натисніть на неї, щоб відкрити режим редагування.
3. Прокрутіть вниз до опції Пряме посилання на послугу.
4. Натисніть кнопку [[File:Copy link icon.png|]], щоб скопіювати пряме посилання.


Готово!
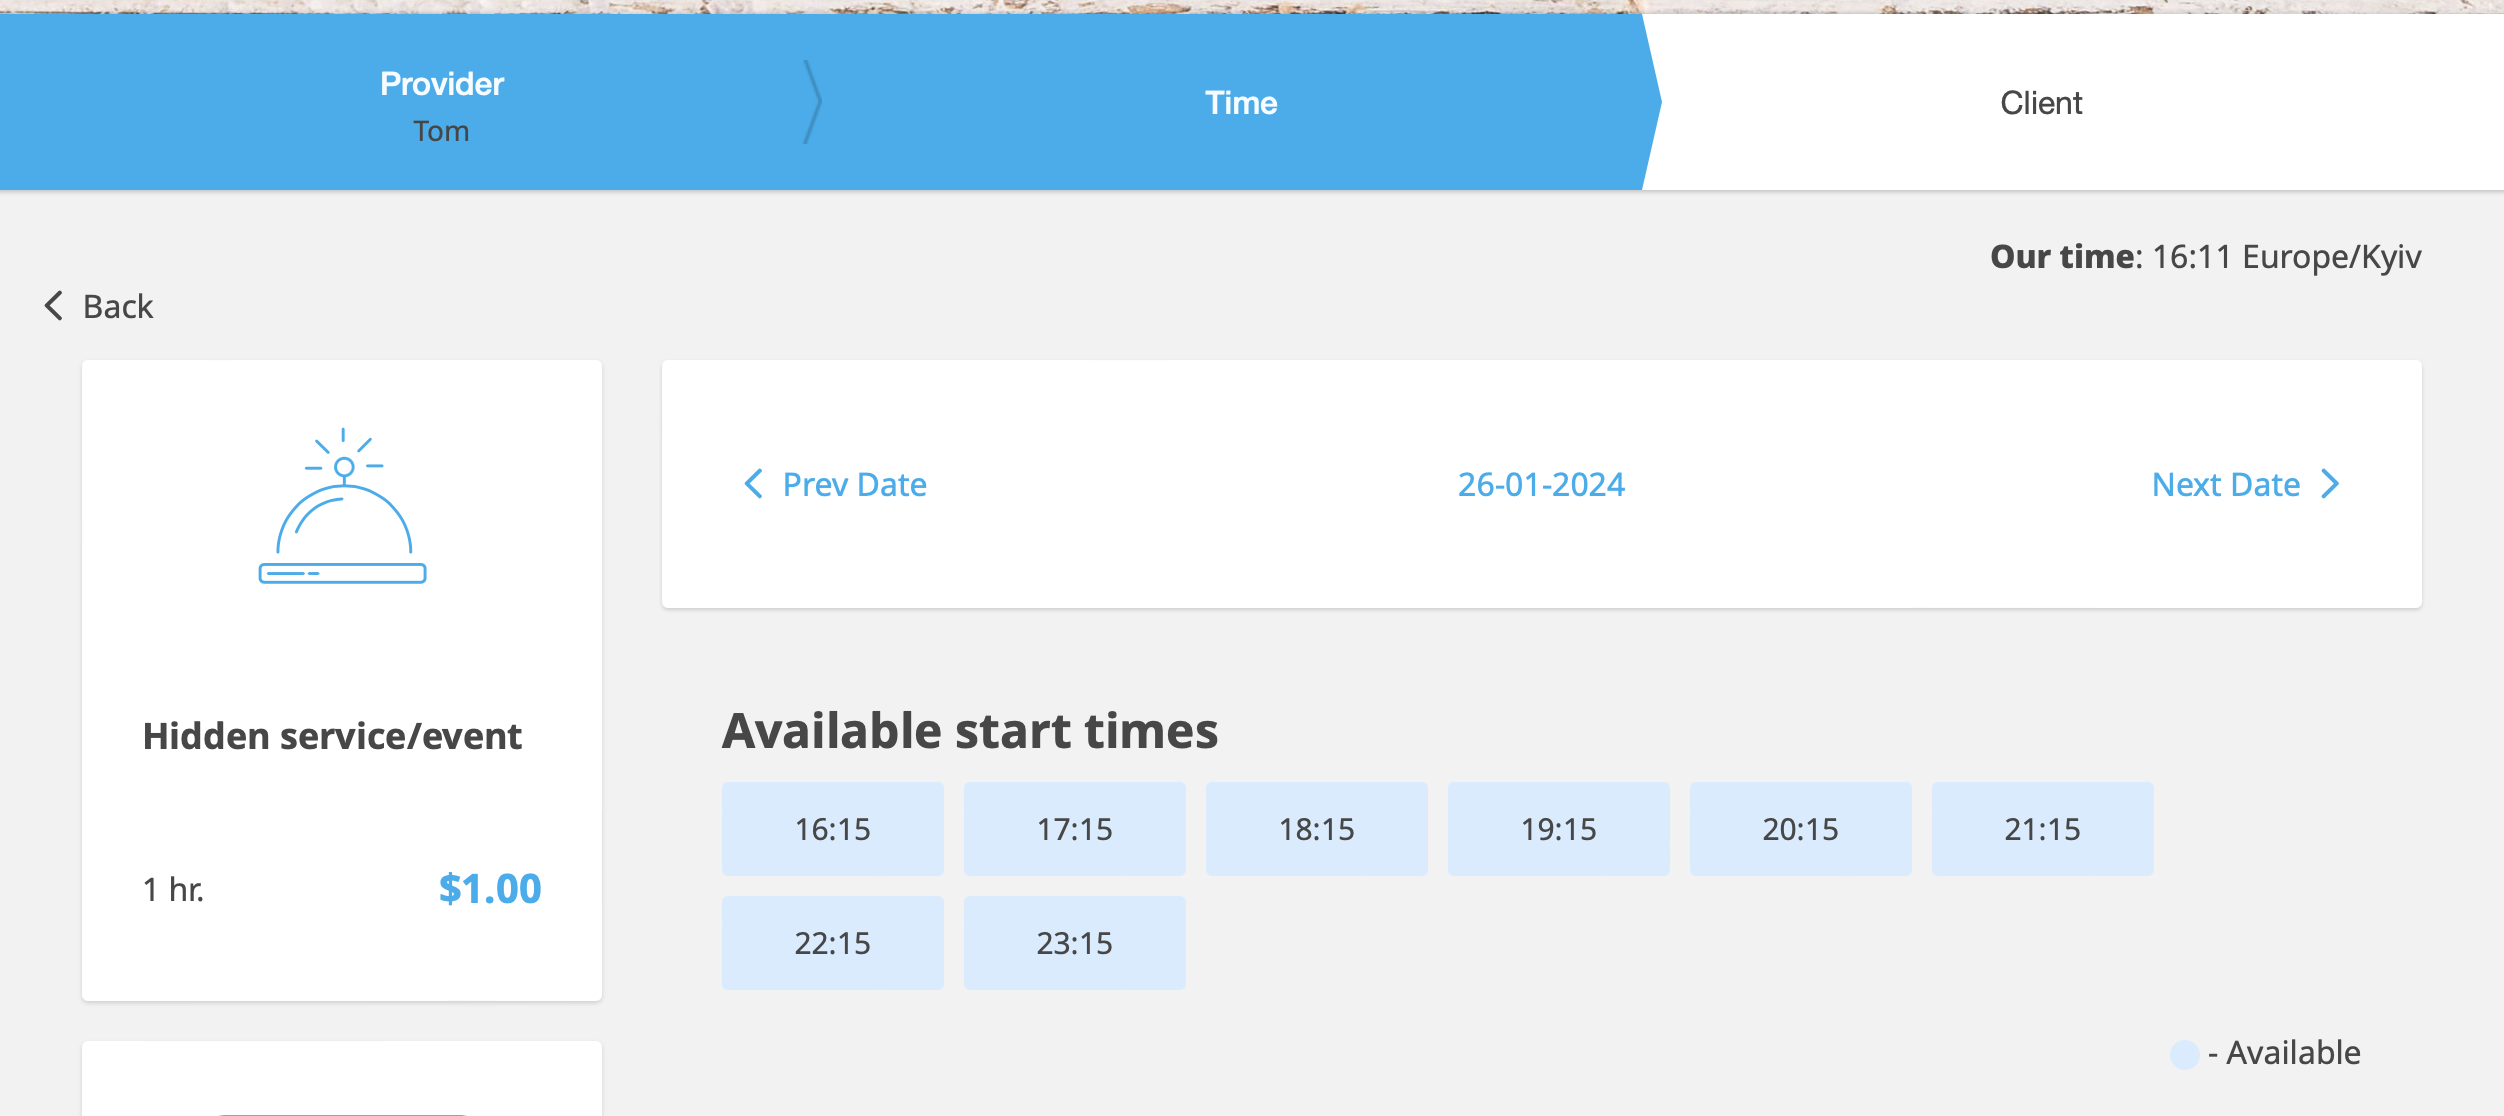
Тепер ви можете поділитися посиланням зі своїми клієнтами. Коли вони перейдуть за ним, вони будуть перенаправлені на вашу сторінку бронювання з уже обраною прихованою послугою.


Додаткова примітка: якщо ви завжди бронюєте вручну як адміністратор:
Якщо ви хочете вручну організувати бронювання з адміністративної сторінки (Календар або POS), просто приховайте свою послугу за допомогою тієї ж кнопки-очка поруч з нею або опції «Приховати ». Це гарантує, що послуга буде доступна з адміністративної сторони тільки для створення бронювання.