No edit summary |
Created page with "<br><br> ;Sådan fjerner du''integrations'' ''Fra Simplybook.me-siden'' *Gå til siden <span style="background-color:#d4f8e5; padding:5px; border-radius:5px;">Brugerdefinerede funktioner</span> i din Simplybook.me-administrationsgrænseflade, og klik på Brugerdefineret funktion for onlinevideomøder for at åbne indstillingerne.<br> *Find Zoom i funktionsindstillingerne, og klik på <span style="background-color:#d4f8e5; padding:5px; border-radius:5px;">Log ud.</span><b..." |
||
| (3 intermediate revisions by the same user not shown) | |||
| Line 14: | Line 14: | ||
[[File:Online meetings enable path redesigned.png|1200px|center|link=https://help.simplybook.me/images/a/a1/Online_meetings_enable_path_redesigned.png]] | [[File:Online meetings enable path redesigned.png|1200px|center|link=https://help.simplybook.me/images/a/a1/Online_meetings_enable_path_redesigned.png]] | ||
<br><br> | <br><br> | ||
2. I funktionsindstillingerne skal du klikke på knappen <span style="background-color:#d4f8e5; padding:5px; border-radius:5px;">Autorisation</span> ved siden af Zoom-indstillingen for at forbinde din Zoom-konto. | |||
2. | |||
[[File:Online meetings zoom connect redesigned.png|1200px|center|link=https://help.simplybook.me/images/4/4c/Online_meetings_zoom_connect_redesigned.png]] | [[File:Online meetings zoom connect redesigned.png|1200px|center|link=https://help.simplybook.me/images/4/4c/Online_meetings_zoom_connect_redesigned.png]] | ||
<br><br> | <br><br> | ||
3. | 3. Indtast dine loginoplysninger for at logge ind på Zoom, eller klik på SSO, Google eller Facebook for at logge ind via disse tjenester.<br> | ||
Du kan forbinde én Zoom-konto pr. virksomhed ELLER forbinde alle Zoom-brugere, der er tilføjet til din konto, ved at markere afkrydsningsfeltet <span style="background-color:#d4f8e5; padding:5px; border-radius:5px;">Tillad denne app at bruge mine delte adgangstilladelser</span> | |||
[[File:Zoom permissions step.png|500px|center|link=https://help.simplybook.me/images/d/d8/Zoom_permissions_step.png]] | [[File:Zoom permissions step.png|500px|center|link=https://help.simplybook.me/images/d/d8/Zoom_permissions_step.png]] | ||
<br><br> | <br><br> | ||
4. | 4. Når Zoom er godkendt, skal du klikke på <span style="background-color:#d4f8e5; padding:5px; border-radius:5px;">Mødeudbydere og mødetjenester</span> og vælge de udbydere, der skal forbindes til Zoom, ved at vælge Zoom-indstillingen i den respektive rullemenu. I den næste rullemenu skal du vælge den Zoom-bruger (hvis du har flere brugere under din Zoom-konto), der skal forbindes til den pågældende udbyder. | ||
[[File:Zoom select account per provider redesigned.png|1200px|center|link=https://help.simplybook.me/images/3/36/Zoom_select_account_per_provider_redesigned.png]] | [[File:Zoom select account per provider redesigned.png|1200px|center|link=https://help.simplybook.me/images/3/36/Zoom_select_account_per_provider_redesigned.png]] | ||
<br><br> | <br><br> | ||
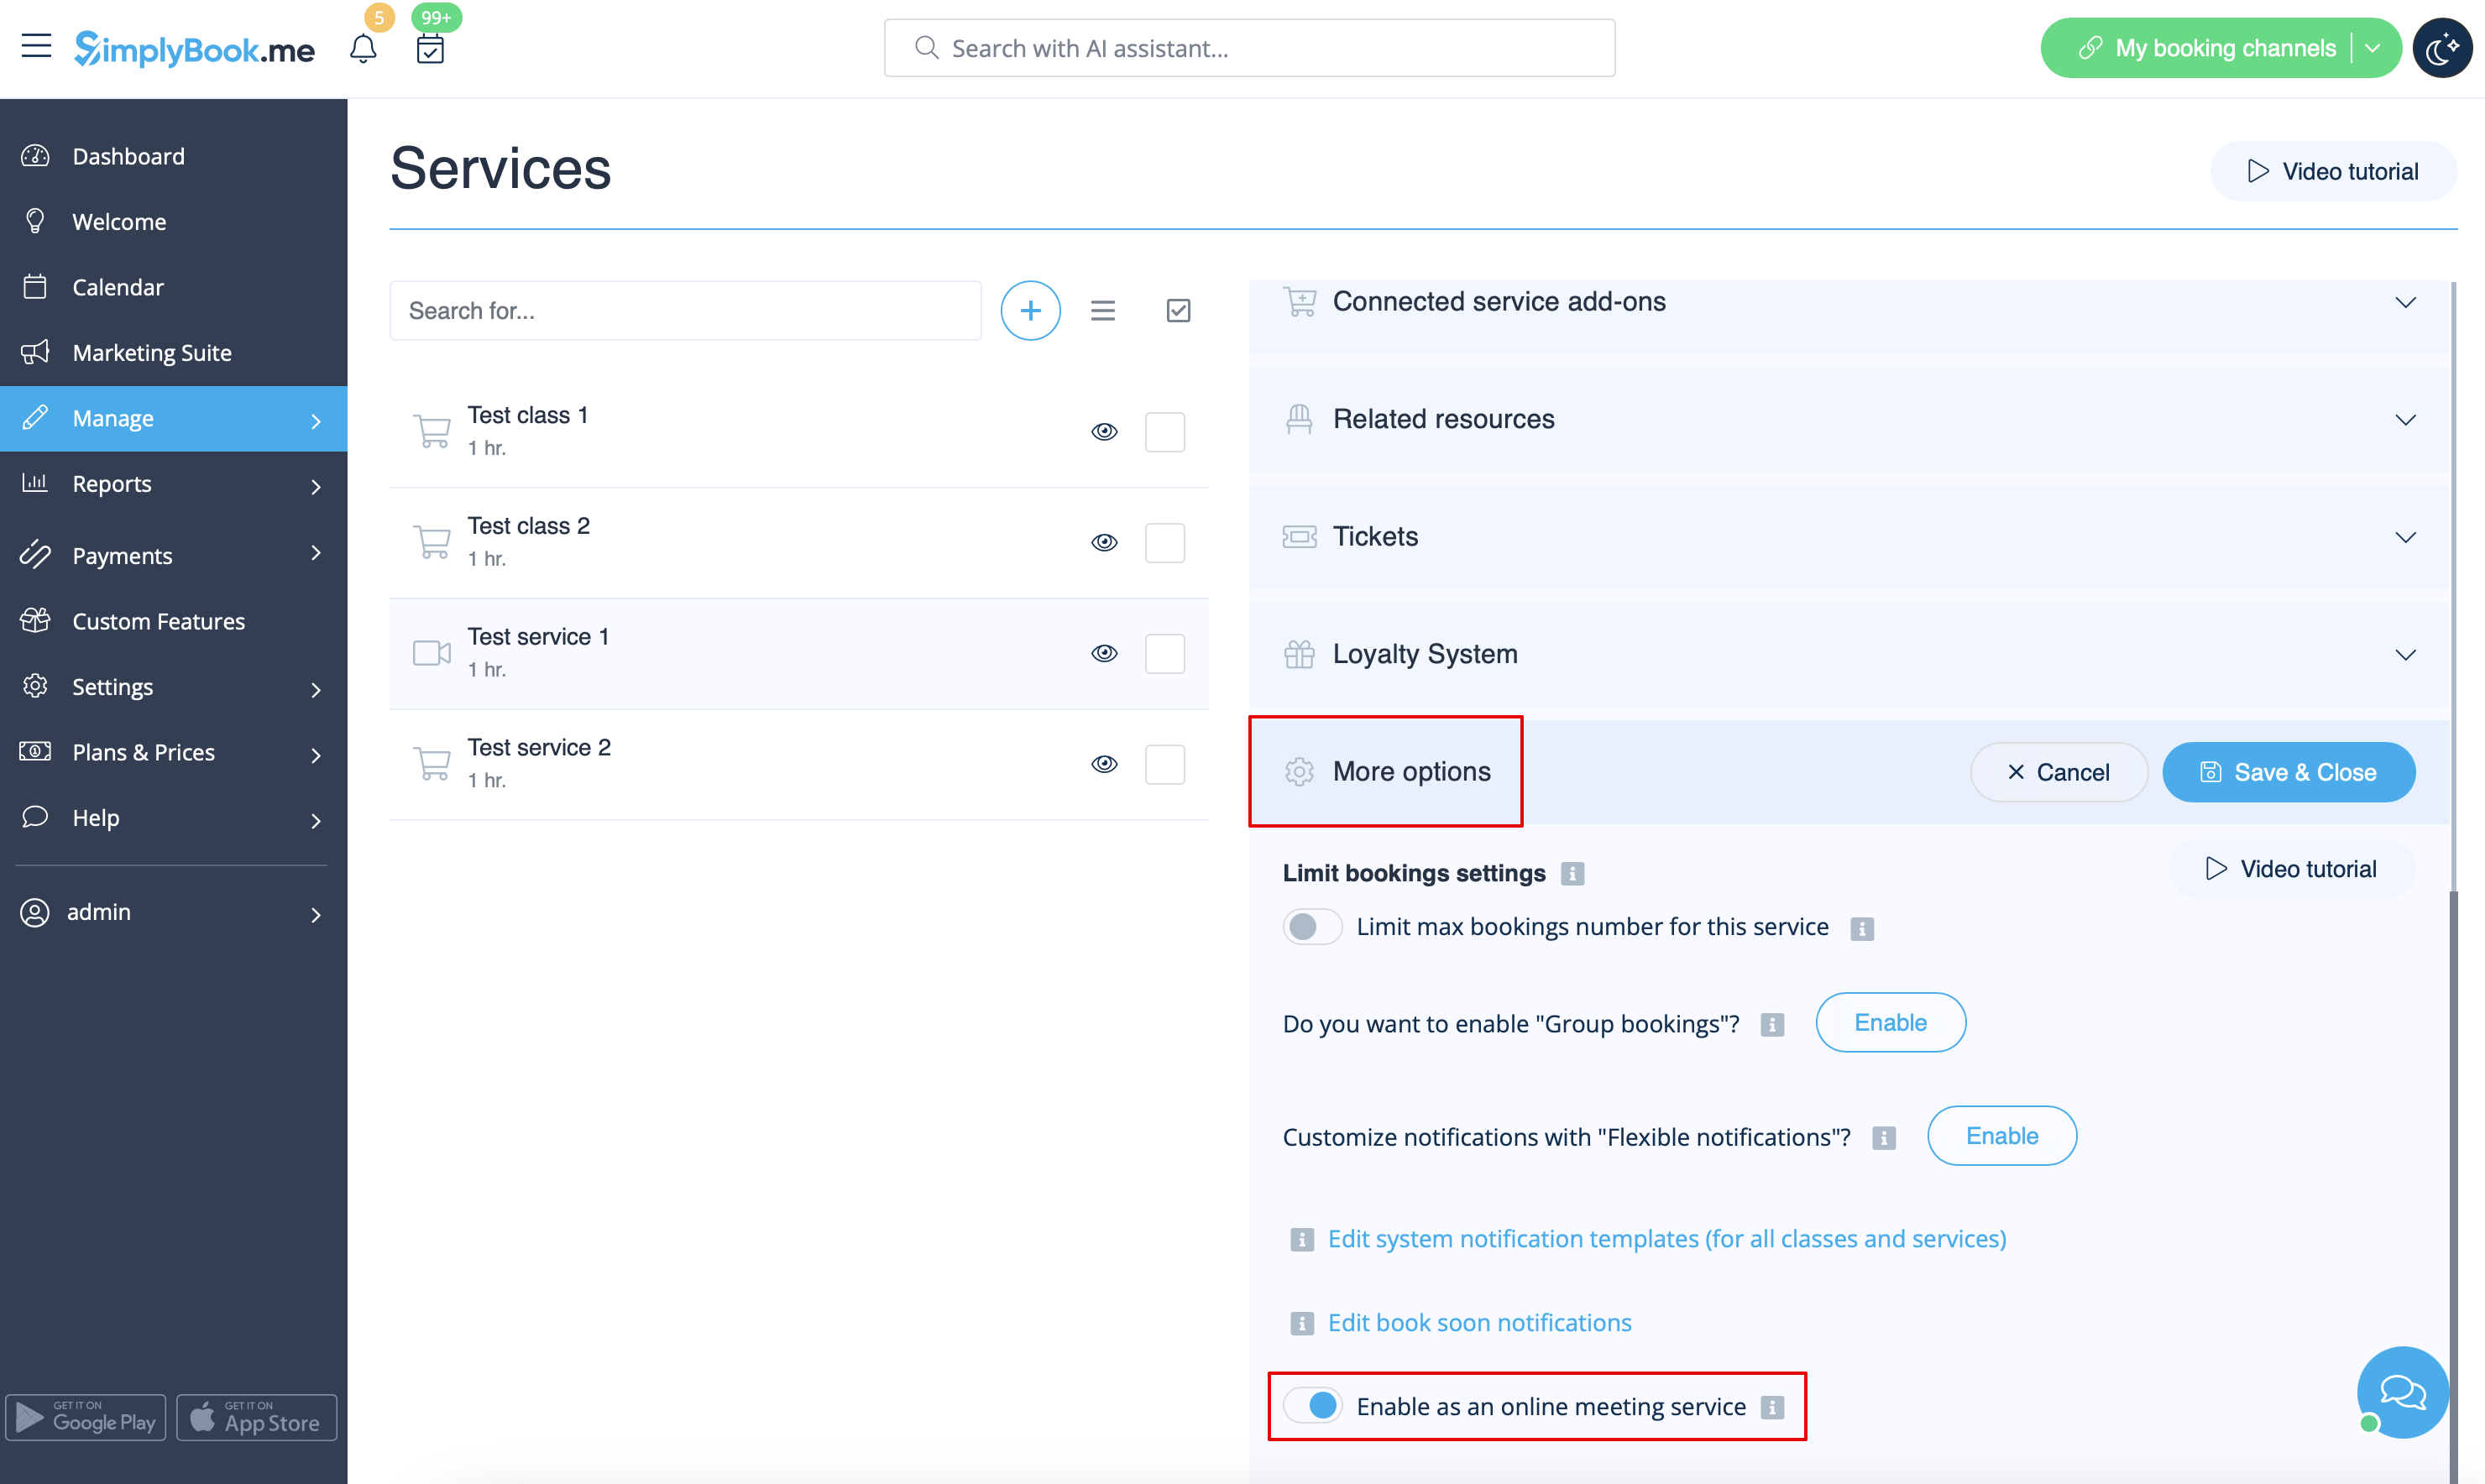
5. Når din Zoom-forbindelse er oprettet, skal du blot aktivere online-mødeindstillingen for dine tjenester. Det gør du ved at gå til <span style="background-color:#d4f8e5; padding:5px; border-radius:5px;">Administrer</span> -> <span style="background-color:#d4f8e5; padding:5px; border-radius:5px;">Tjenester</span> -> klikke på det ønskede tjenestenavn -> rulle ned til <span style="background-color:#d4f8e5; padding:5px; border-radius:5px;">Flere indstillinger.</span> | |||
(i <span style="background-color:#d4f8e5; padding:5px; border-radius:5px;">Administrer</span> -> <span style="background-color:#d4f8e5; padding:5px; border-radius:5px;">[[Classes custom feature|Klasser]]</span> -> klik på klassens navn -> <span style="background-color:#d4f8e5; padding:5px; border-radius:5px;">Flere indstillinger</span>, hvis du bruger [[Classes custom feature|klassefunktionen]] ) og aktivere indstillingen Aktivér som online[[Classes custom feature|mødetjeneste/klasse]]. | |||
5. | |||
( | |||
[[File:Enable service as online meeting redesigned.png|1200px|center|link=https://help.simplybook.me/images/e/ec/Enable_service_as_online_meeting_redesigned.png]] | [[File:Enable service as online meeting redesigned.png|1200px|center|link=https://help.simplybook.me/images/e/ec/Enable_service_as_online_meeting_redesigned.png]] | ||
<br><br> | <br><br> | ||
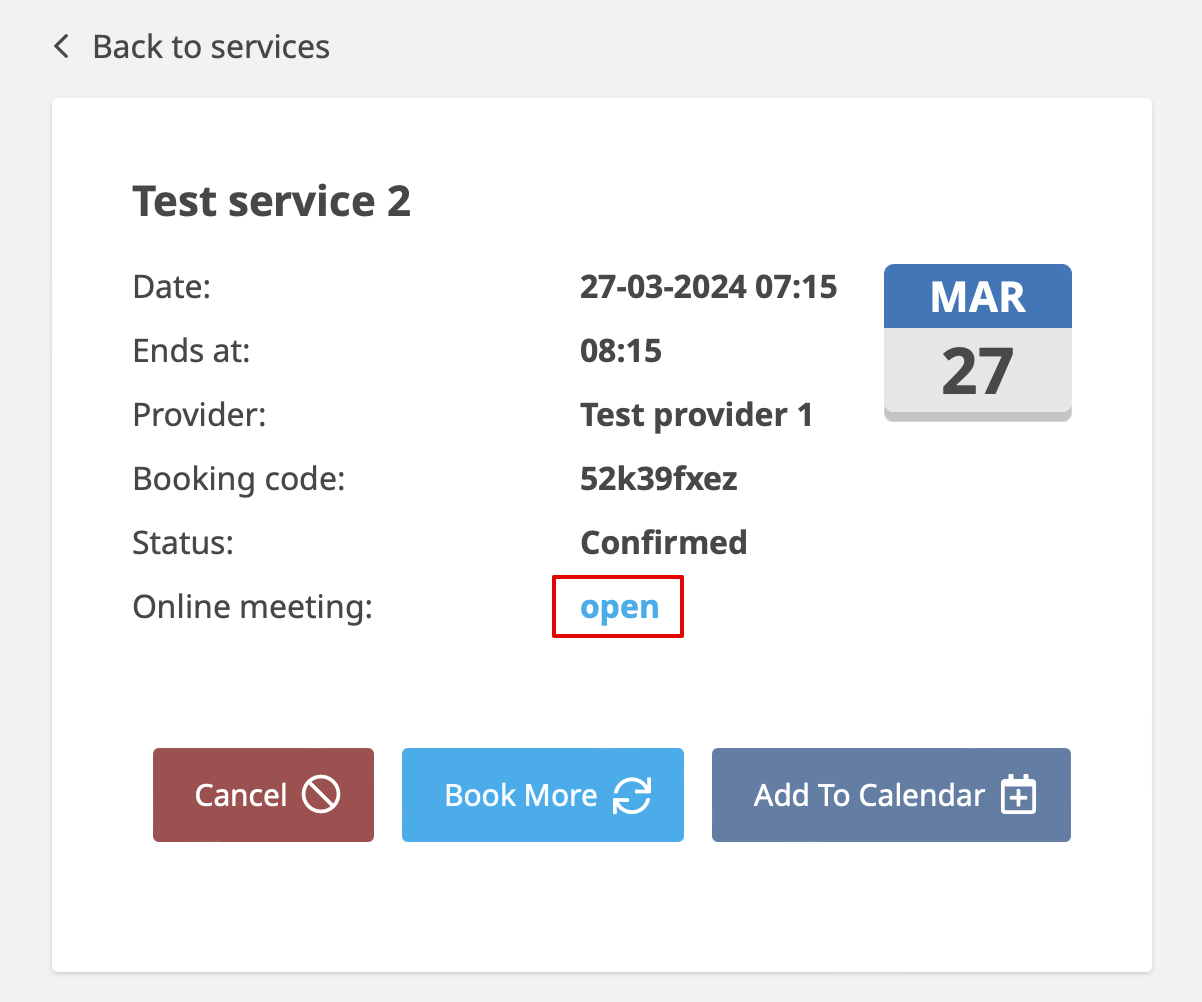
6. Når kunderne booker en sådan[[Classes custom feature|service/klasse]], vil der være et link til online-mødet på siden Mine bookinger for den tilknyttede booking. Når aftaletidspunktet nærmer sig, kan kunderne følge linket for at få adgang til mødet. | |||
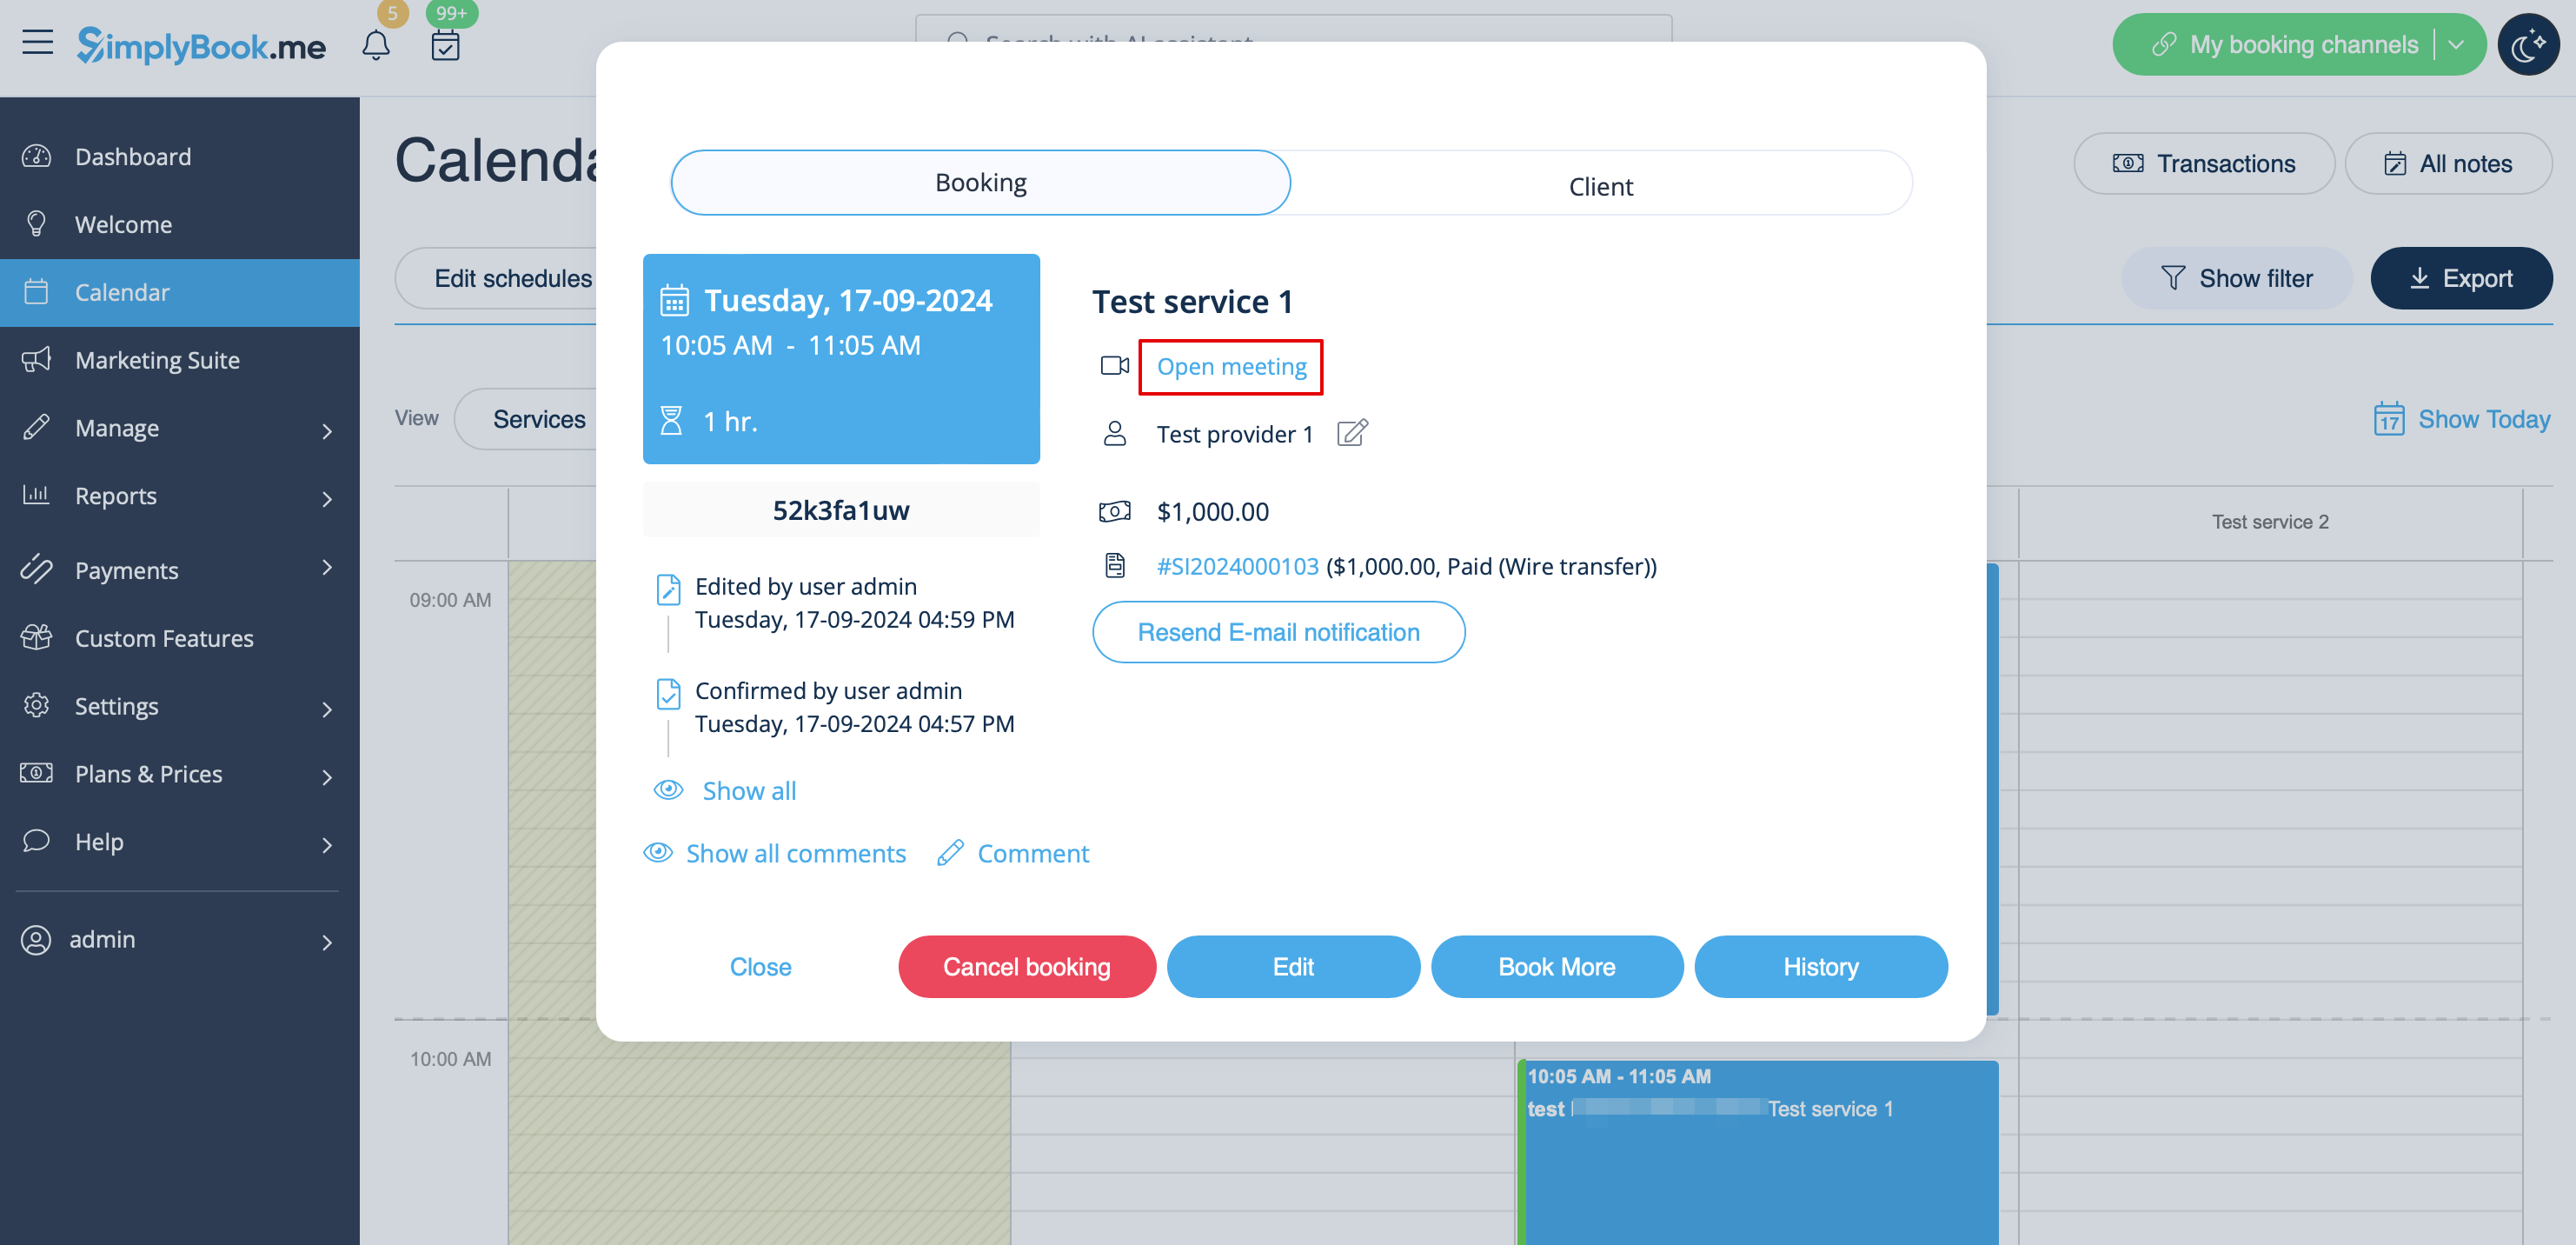
For administratoren vil det være muligt at følge linket fra pop op-vinduet med bookingoplysninger i <span style="background-color:#d4f8e5; padding:5px; border-radius:5px;">Kalenderen</span> eller i <span style="background-color:#d4f8e5; padding:5px; border-radius:5px;">Rapporter</span> -> <span style="background-color:#d4f8e5; padding:5px; border-radius:5px;">Bookingdetaljer</span> eller i <span style="background-color:#d4f8e5; padding:5px; border-radius:5px;">Rapporter</span> -> <span style="background-color:#d4f8e5; padding:5px; border-radius:5px;">Online videomøder</span>. | |||
6. | |||
For | |||
<br><br> | <br><br> | ||
7. (valgfrit) Du kan også tilføje et link til online møder til skabeloner til leverandør- og klientnotifikationer, så begge parter modtager dem sammen med bookingoplysningerne. | |||
*For at gøre dette for dine klientnotifikationer skal du navigere til <span style="background-color:#d4f8e5; padding:5px; border-radius:5px;">Indstillinger</span> -> <span style="background-color:#d4f8e5; padding:5px; border-radius:5px;">E-mail- og SMS-indstillinger</span> (eller <span style="background-color:#d4f8e5; padding:5px; border-radius:5px;">Tilpassede funktioner</span> -> <span style="background-color:#d4f8e5; padding:5px; border-radius:5px;">[[Flexible Notifications custom feature|Fleksible notifikationer]]</span> -> <span style="background-color:#d4f8e5; padding:5px; border-radius:5px;">Administrer</span>, hvis du har tilpasset notifikationer pr. service og/eller udbyder) og redigere din <span style="background-color:#d4f8e5; padding:5px; border-radius:5px;">klients reservationsbekræftelsesskabelon</span> for at tilføje variablen ''[online_meeting_link]'' for at sende Zoom-links til dine klienter. | |||
7. ( | For at få det hele til at fungere skal du blot indsætte variablen ''[online_meeting_link]'' på det ønskede sted i din "Kundens reservationsbekræftelsesskabelon", så når en kunde reserverer en service, genereres der automatisk et Zoom-møde-link på det sted, hvor variablen er indsat. | ||
* | |||
<br><br> | <br><br> | ||
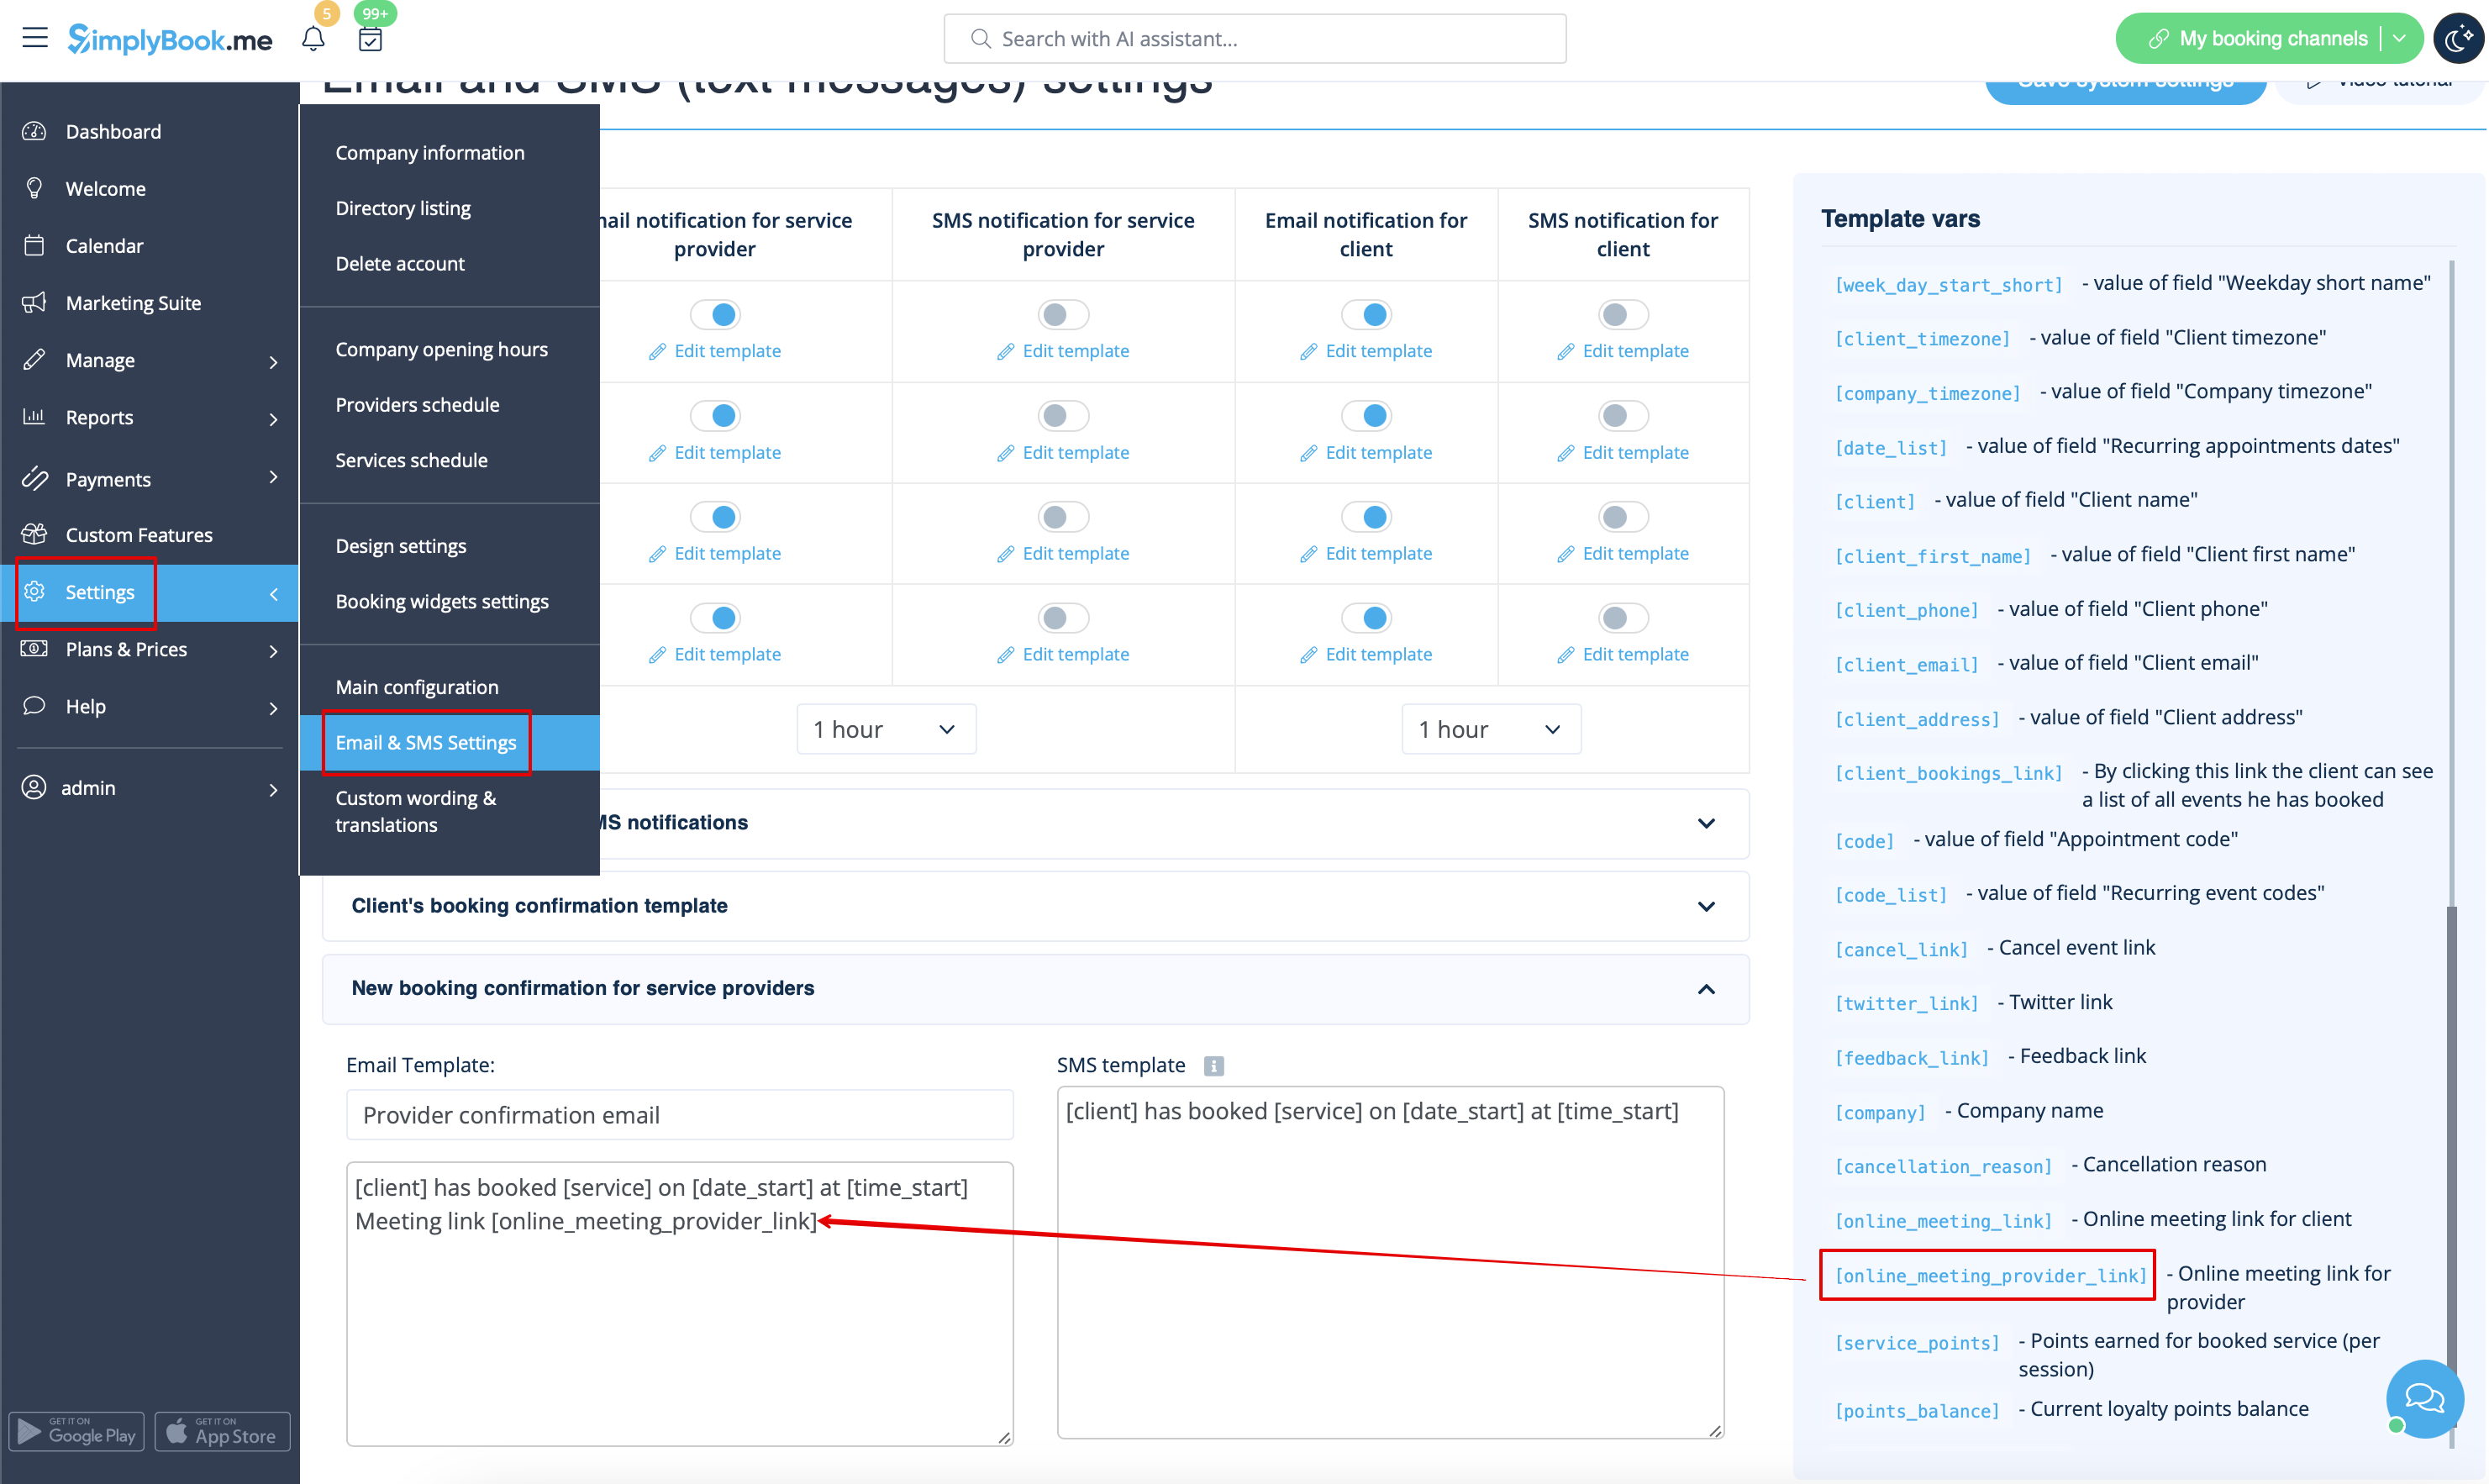
* | *For at give dine tjenesteudbydere mulighed for at modtage Zoom-links i deres bekræftelser skal du tilføje variablen ''[online_meeting_provider_link]'' til din <span style="background-color:#d4f8e5; padding:5px; border-radius:5px;">nye reservationsbekræftelse for tjenesteudbydere</span> i <span style="background-color:#d4f8e5; padding:5px; border-radius:5px;">Indstillinger</span> -> <span style="background-color:#d4f8e5; padding:5px; border-radius:5px;">E-mail- og sms-indstillinger</span> (eller <span style="background-color:#d4f8e5; padding:5px; border-radius:5px;">Tilpassede funktioner</span> -> <span style="background-color:#d4f8e5; padding:5px; border-radius:5px;">[[Flexible Notifications custom feature|Fleksible meddelelser]]</span> -> <span style="background-color:#d4f8e5; padding:5px; border-radius:5px;">Administrer</span>, hvis du har tilpasset meddelelser pr. tjeneste og/eller udbyder). | ||
[[File:Add meeting link to provider confirmation redesigned.png|1200px|border|center|link=https://help.simplybook.me/images/6/6c/Add_meeting_link_to_provider_confirmation_redesigned.png]] | [[File:Add meeting link to provider confirmation redesigned.png|1200px|border|center|link=https://help.simplybook.me/images/6/6c/Add_meeting_link_to_provider_confirmation_redesigned.png]] | ||
<br><br> | <br><br> | ||
;Sådan fungerer mødeprocessen | ;Sådan fungerer mødeprocessen | ||
| Line 58: | Line 49: | ||
4. Når mødetidspunktet er nået, omdirigeres både udbyder og kunde til Zoom-onlinemødesiden. | 4. Når mødetidspunktet er nået, omdirigeres både udbyder og kunde til Zoom-onlinemødesiden. | ||
<br><br> | <br><br> | ||
;Sådan fjerner du | ;Sådan fjerner du''integrations'' | ||
''Fra Simplybook.me-siden'' | ''Fra Simplybook.me-siden'' | ||
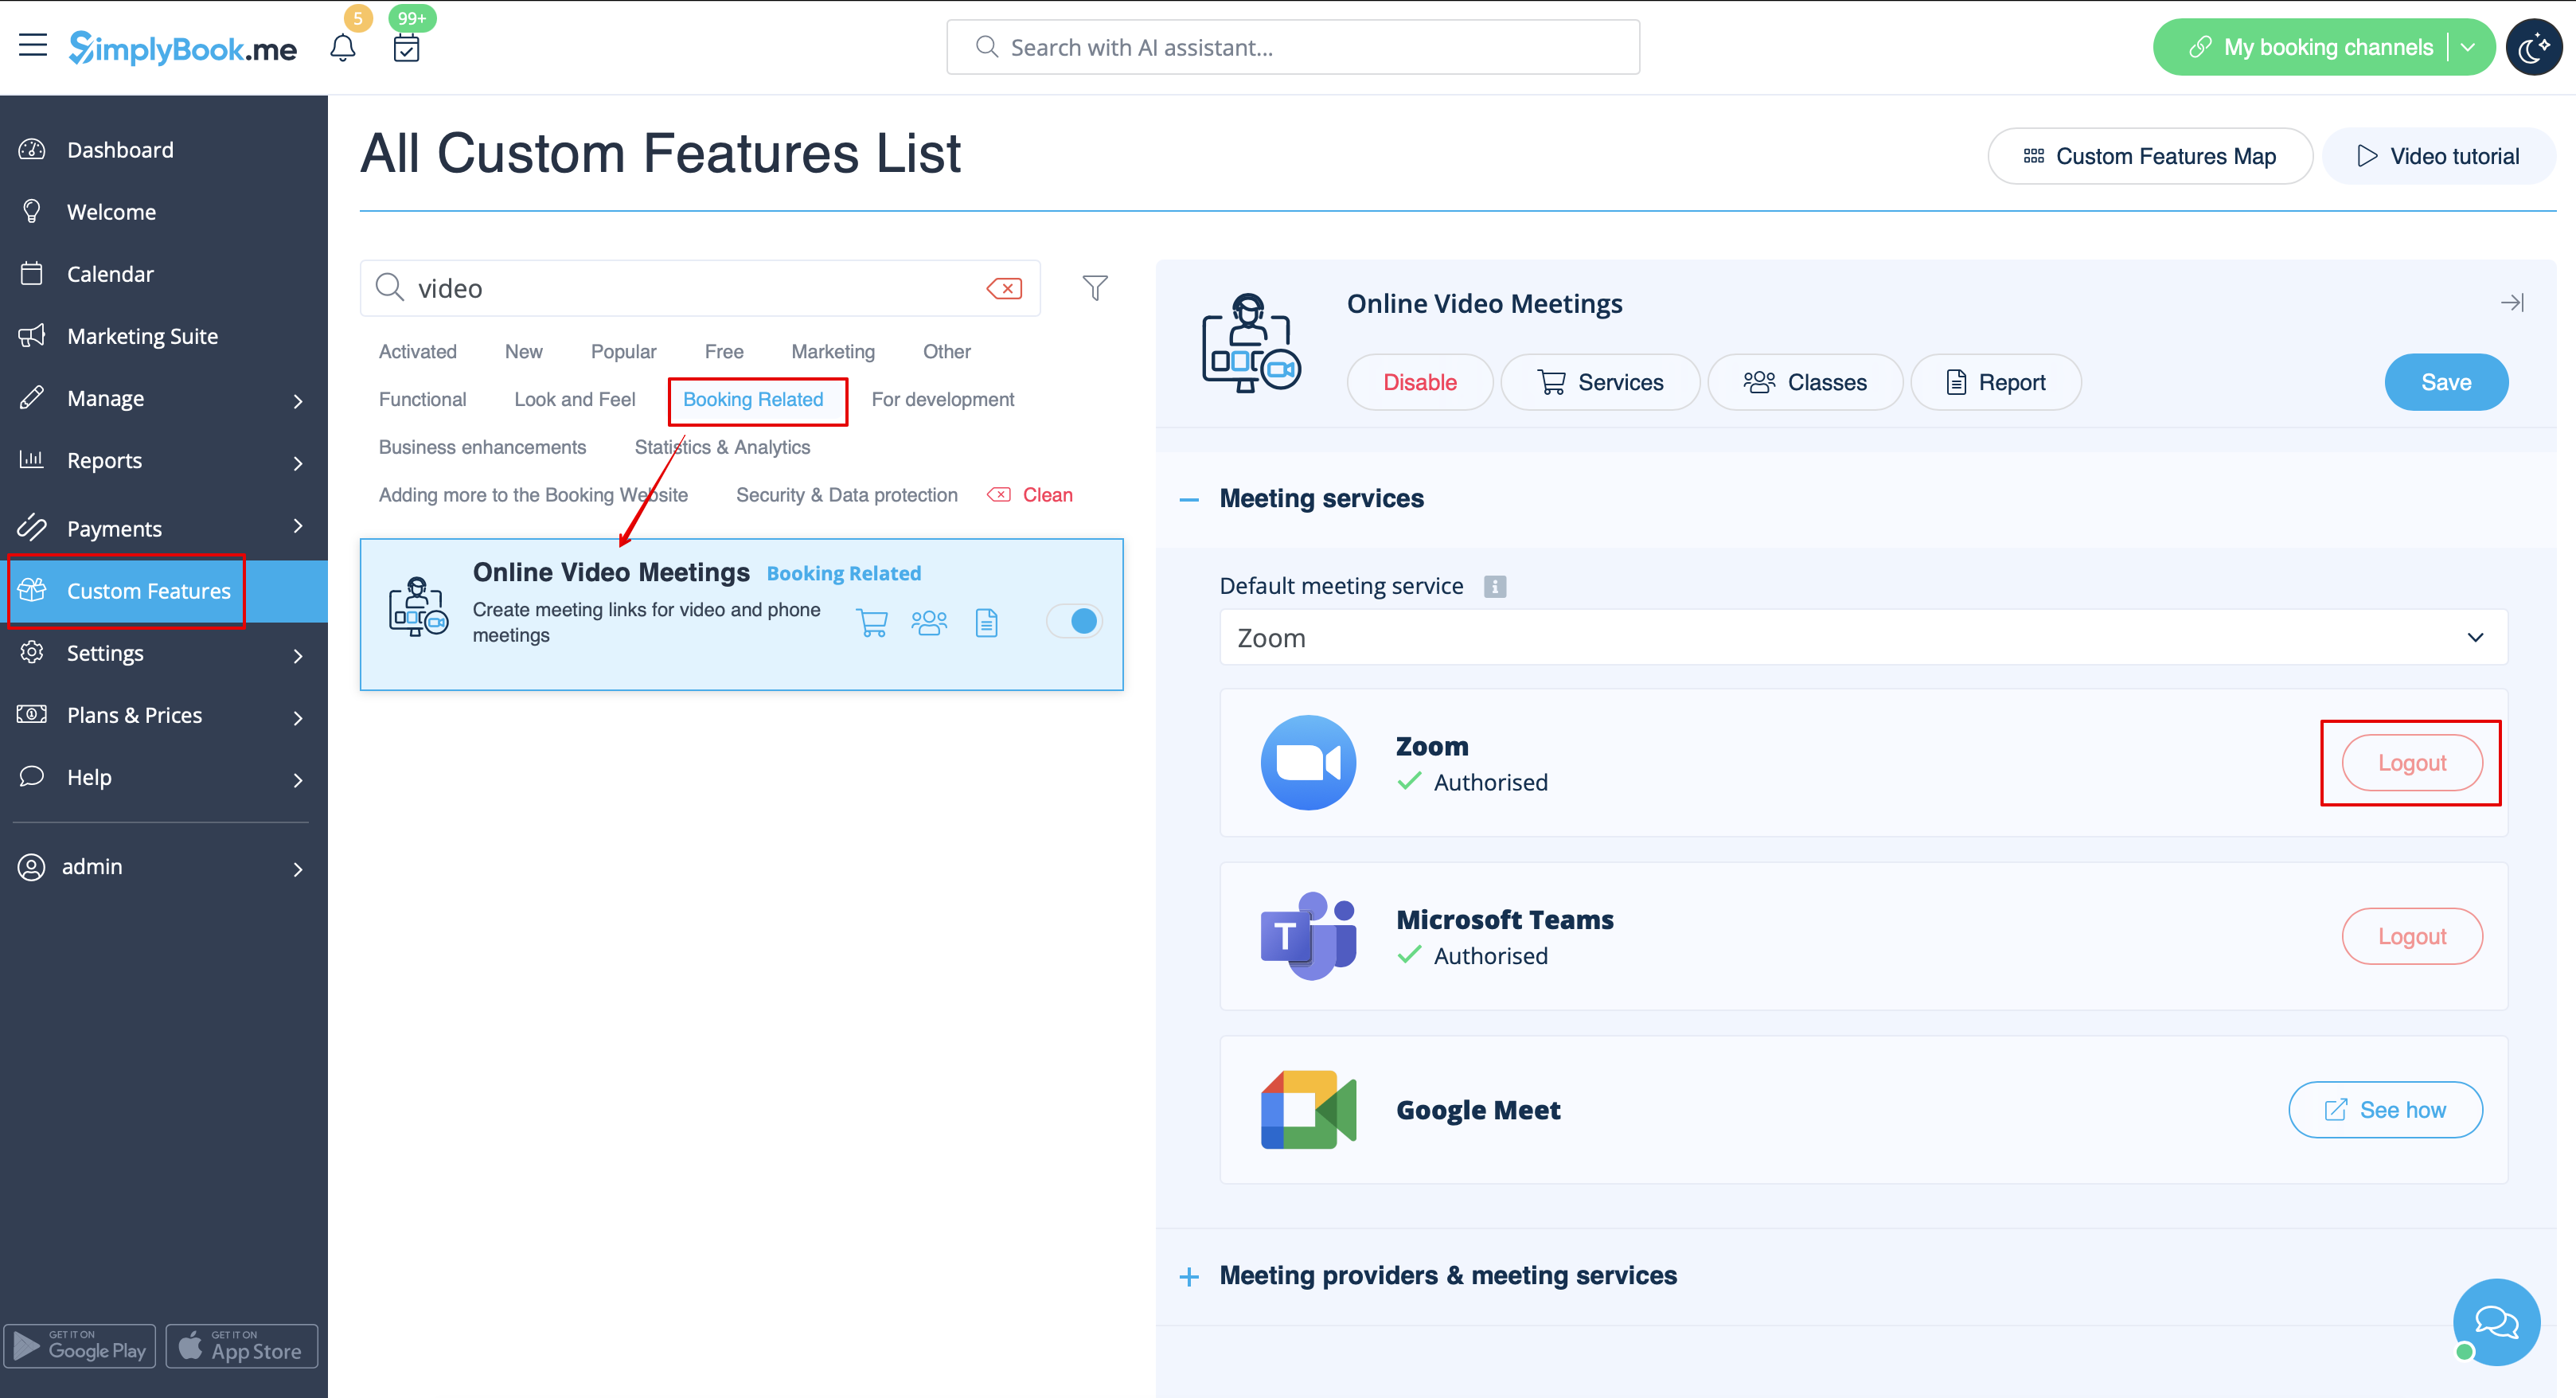
*Gå til siden <span style="background-color:#d4f8e5; padding:5px; border-radius:5px;"> | *Gå til siden <span style="background-color:#d4f8e5; padding:5px; border-radius:5px;">Brugerdefinerede funktioner</span> i din Simplybook.me-administrationsgrænseflade, og klik på Brugerdefineret funktion for onlinevideomøder for at åbne indstillingerne.<br> | ||
*Find Zoom i funktionsindstillingerne, og klik på <span style="background-color:#d4f8e5; padding:5px; border-radius:5px;">Log ud.</span><br> | *Find Zoom i funktionsindstillingerne, og klik på <span style="background-color:#d4f8e5; padding:5px; border-radius:5px;">Log ud.</span><br> | ||
*Derefter | *Derefter fjernes Zoom-integrationen fra din Simplybook.me-konto. | ||
[[File:Zoom disconnect path redesigned.png|1200px|center|link=https://help.simplybook.me/images/5/5a/Zoom_disconnect_path_redesigned.png]] | [[File:Zoom disconnect path redesigned.png|1200px|center|link=https://help.simplybook.me/images/5/5a/Zoom_disconnect_path_redesigned.png]] | ||
<br><br> | <br><br> | ||
''Fra Zoom-siden''<br> | ''Fra Zoom-siden''<br> | ||
<span style="background-color:#ffe9e9; padding:5px; border-radius:5px;">'''Bemærk!''' Hvis du ikke har markeret afkrydsningsfeltet "Tillad denne app at bruge mine delte adgangstilladelser" ELLER hvis du vil skifte den tilsluttede Zoom-konto til en anden, er det ikke muligt at gøre dette fra Simplybook.me på grund af tekniske begrænsninger.</span><br> | <span style="background-color:#ffe9e9; padding:5px; border-radius:5px;">'''Bemærk!''' Hvis du ikke har markeret afkrydsningsfeltet "Tillad denne app at bruge mine delte adgangstilladelser" ELLER hvis du vil skifte den tilsluttede Zoom-konto til en anden, er det ikke muligt at gøre dette fra Simplybook.me på grund af tekniske begrænsninger.</span><br> | ||
<span style="background-color:#ffe9e9; padding:5px; border-radius:5px;">For at gøre | <span style="background-color:#ffe9e9; padding:5px; border-radius:5px;">For at gøre det skal du afbryde Simplybook.me direkte fra Zoom, hvorefter du vil kunne oprette en ny konto på Simplybook.me.</span> | ||
<br><br> | <br><br> | ||
*For at afbryde integrationen fra Zoom skal du følge [https://marketplace.zoom.us/user/installed dette link].<br> | *For at afbryde integrationen fra Zoom skal du følge [https://marketplace.zoom.us/user/installed dette link].<br> | ||
| Line 75: | Line 66: | ||
[[File:Zoom disconnect from zoom side.png|1200px|center|link=https://help.simplybook.me/images/a/a4/Zoom_disconnect_from_zoom_side.png]] | [[File:Zoom disconnect from zoom side.png|1200px|center|link=https://help.simplybook.me/images/a/a4/Zoom_disconnect_from_zoom_side.png]] | ||
<br><br><br><br> | <br><br><br><br> | ||
Latest revision as of 08:04, 1 July 2025
For at oprette forbindelse til Zoom skal du have en Zoom-konto. Alle bidragydere med administratorrettigheder til planlægning kan oprette forbindelse mellem Simplybook.me og Zoom.
SimplyBook.me kan kun oprette forbindelse til en enkelt Zoom-konto.
Bemærk:
- Zoom-bookinger tilføjes ikke til din Zoom-mødeoversigt i Zoom. For at se online-møder skal du bruge filtre pr. service i Simplybook.me-administrationskalenderen for kun at se bookinger for den nødvendige service.
- Selv efter at Zoom-kontoen er oprettet forbindelse, er videokonferencer som standard deaktiveret for nye services. For at tilføje videokonference til en ny tjeneste skal du i Administrer ->Tjenester/Klasser gå til Flere muligheder pr.tjeneste/klasse og aktivere det som en online mødetjeneste.
- Kunder,der deltager i en gruppeklasse, modtager unikke Zoom-links, men disse links fører alle til det samme Zoom-møde.
- Sådan indstilles
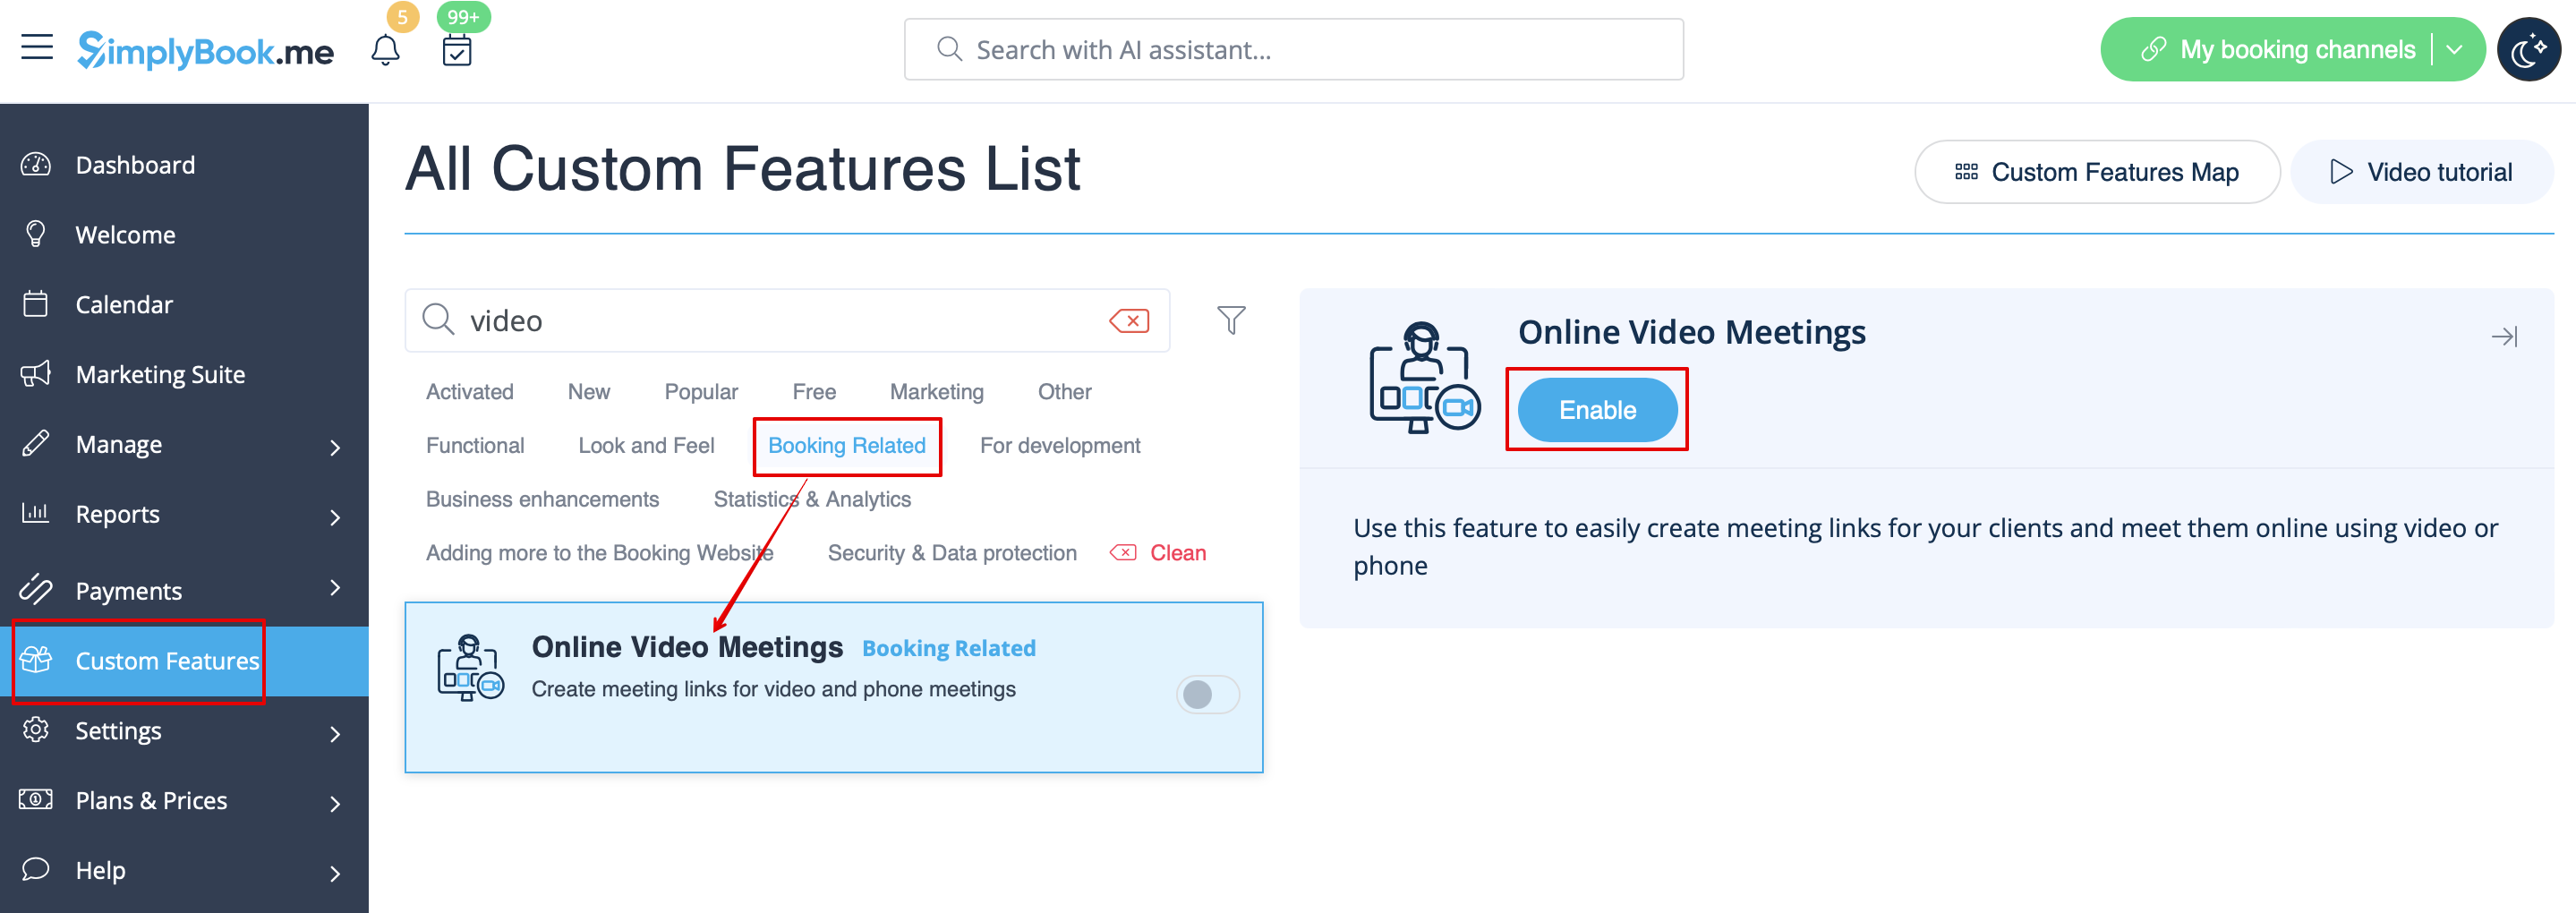
1. Aktivér den tilpassede funktion Online møder i din SimplyBook.me-konto ved at gå til siden Tilpassede funktioner i din Simplybook.me-administrationsgrænseflade og klikke på knappen Aktivér ud for den tilpassede funktion Online videomøder.
2. I funktionsindstillingerne skal du klikke på knappen Autorisation ved siden af Zoom-indstillingen for at forbinde din Zoom-konto.

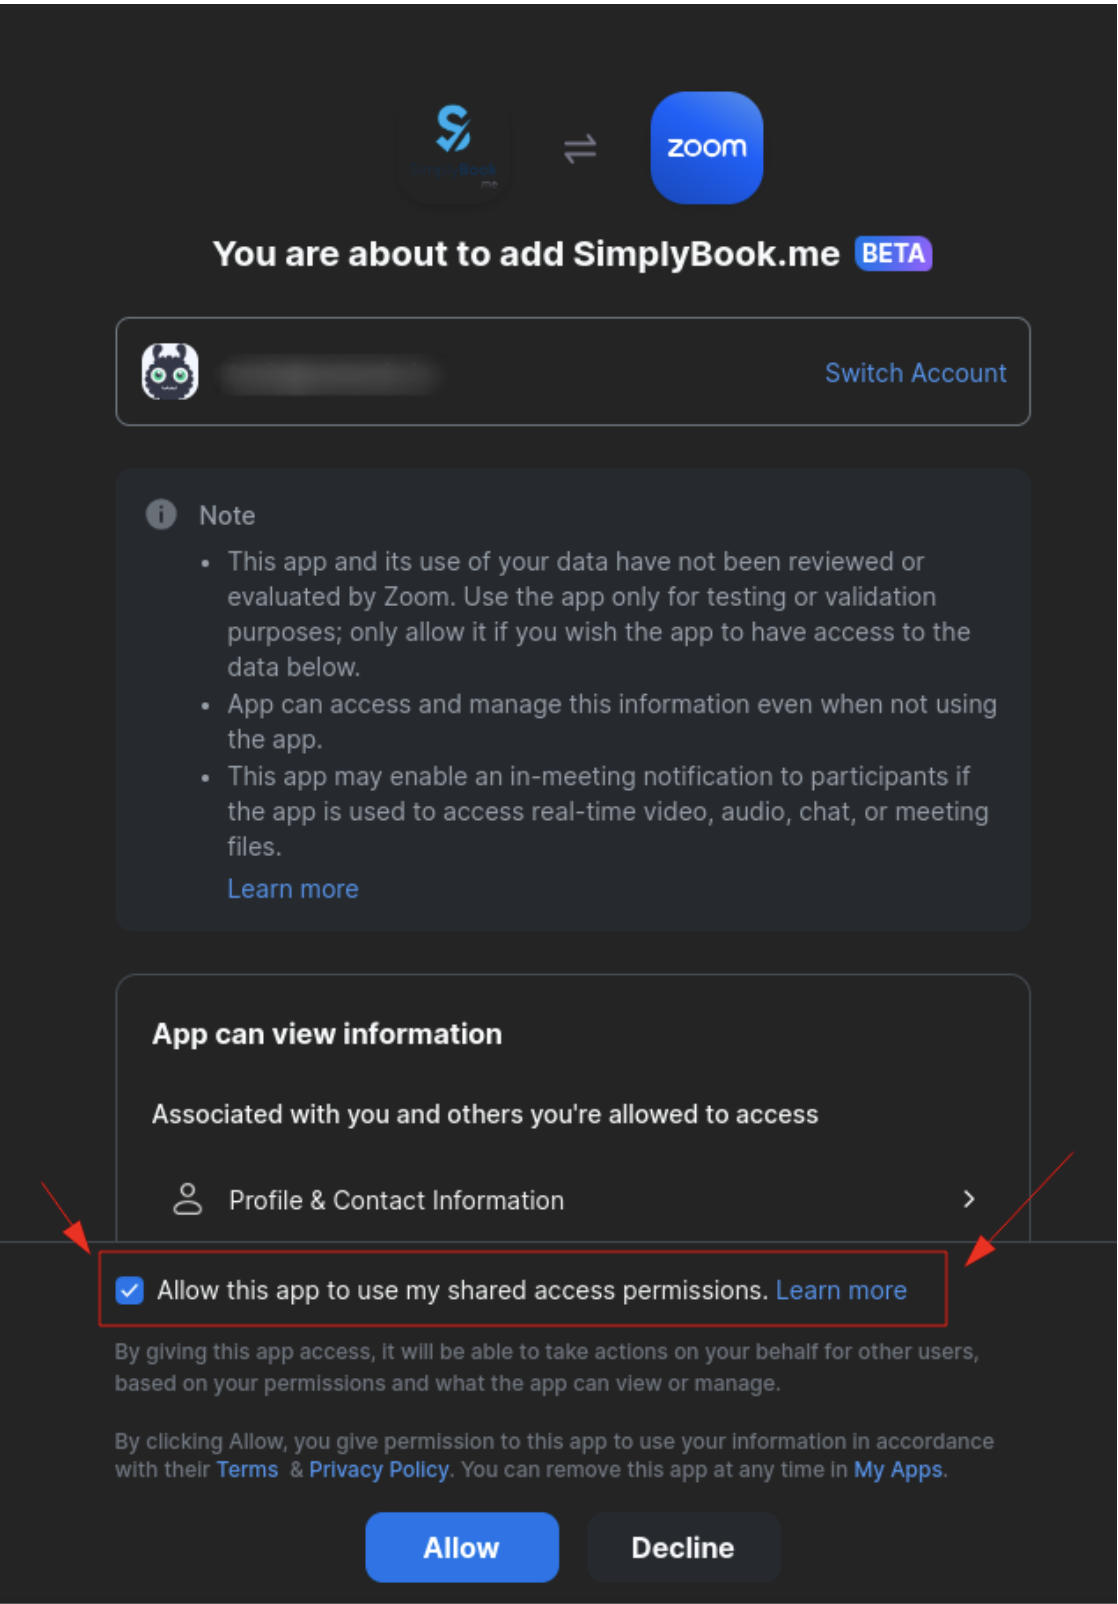
3. Indtast dine loginoplysninger for at logge ind på Zoom, eller klik på SSO, Google eller Facebook for at logge ind via disse tjenester.
Du kan forbinde én Zoom-konto pr. virksomhed ELLER forbinde alle Zoom-brugere, der er tilføjet til din konto, ved at markere afkrydsningsfeltet Tillad denne app at bruge mine delte adgangstilladelser
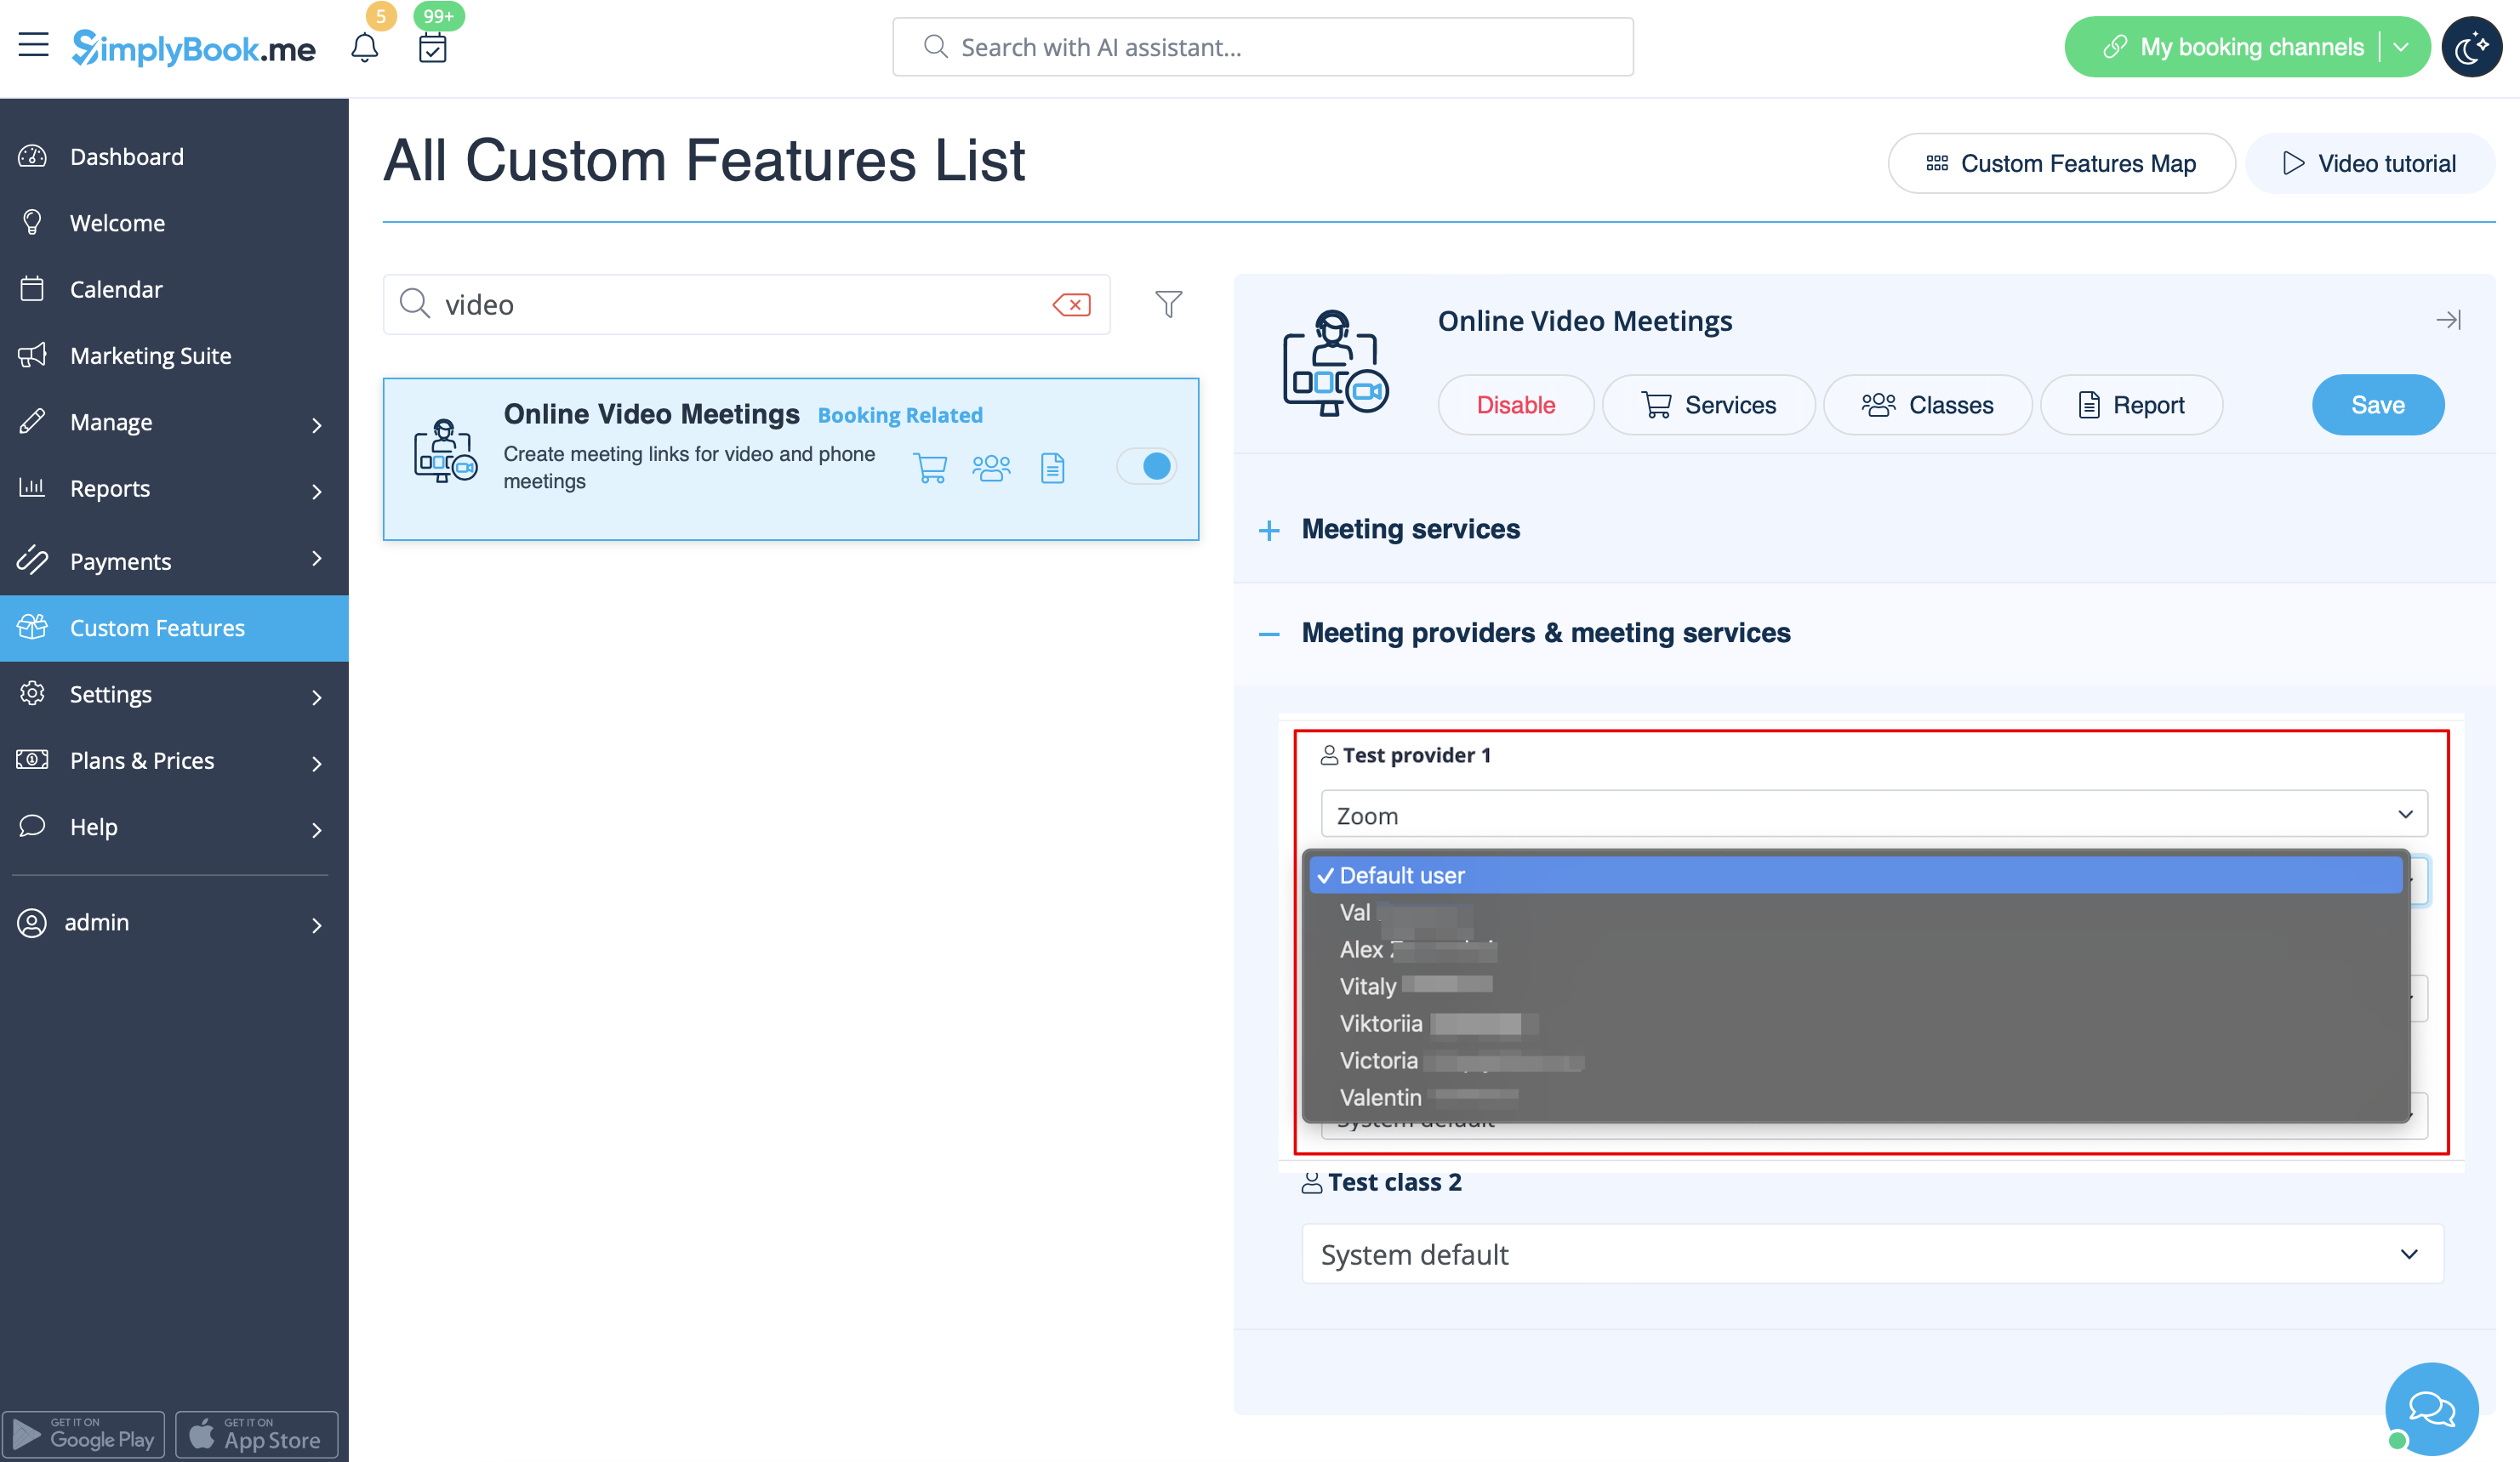
4. Når Zoom er godkendt, skal du klikke på Mødeudbydere og mødetjenester og vælge de udbydere, der skal forbindes til Zoom, ved at vælge Zoom-indstillingen i den respektive rullemenu. I den næste rullemenu skal du vælge den Zoom-bruger (hvis du har flere brugere under din Zoom-konto), der skal forbindes til den pågældende udbyder.
5. Når din Zoom-forbindelse er oprettet, skal du blot aktivere online-mødeindstillingen for dine tjenester. Det gør du ved at gå til Administrer -> Tjenester -> klikke på det ønskede tjenestenavn -> rulle ned til Flere indstillinger.
(i Administrer -> Klasser -> klik på klassens navn -> Flere indstillinger, hvis du bruger klassefunktionen ) og aktivere indstillingen Aktivér som onlinemødetjeneste/klasse.
6. Når kunderne booker en sådanservice/klasse, vil der være et link til online-mødet på siden Mine bookinger for den tilknyttede booking. Når aftaletidspunktet nærmer sig, kan kunderne følge linket for at få adgang til mødet.
For administratoren vil det være muligt at følge linket fra pop op-vinduet med bookingoplysninger i Kalenderen eller i Rapporter -> Bookingdetaljer eller i Rapporter -> Online videomøder.
7. (valgfrit) Du kan også tilføje et link til online møder til skabeloner til leverandør- og klientnotifikationer, så begge parter modtager dem sammen med bookingoplysningerne.
- For at gøre dette for dine klientnotifikationer skal du navigere til Indstillinger -> E-mail- og SMS-indstillinger (eller Tilpassede funktioner -> Fleksible notifikationer -> Administrer, hvis du har tilpasset notifikationer pr. service og/eller udbyder) og redigere din klients reservationsbekræftelsesskabelon for at tilføje variablen [online_meeting_link] for at sende Zoom-links til dine klienter.
For at få det hele til at fungere skal du blot indsætte variablen [online_meeting_link] på det ønskede sted i din "Kundens reservationsbekræftelsesskabelon", så når en kunde reserverer en service, genereres der automatisk et Zoom-møde-link på det sted, hvor variablen er indsat.
- For at give dine tjenesteudbydere mulighed for at modtage Zoom-links i deres bekræftelser skal du tilføje variablen [online_meeting_provider_link] til din nye reservationsbekræftelse for tjenesteudbydere i Indstillinger -> E-mail- og sms-indstillinger (eller Tilpassede funktioner -> Fleksible meddelelser -> Administrer, hvis du har tilpasset meddelelser pr. tjeneste og/eller udbyder).
- Sådan fungerer mødeprocessen
1. Når alt er klar, og kunden har booket den online møderelateredeservice/klasse, modtager både kunden og udbyderen (eller virksomheden, afhængigt af dine indstillinger) linkene til mødet.
2. I admin-enden kan udbyderen gå til mødesiden direkte fra bookingen i "Kalender" ved at klikke på linket "Åbn møde" i pop op-vinduet med bookingdetaljer.
3. Kunder kan åbne mødelinket fra bookingdetaljerne på siden "Mine bookinger" på bookingsiden.
4. Når mødetidspunktet er nået, omdirigeres både udbyder og kunde til Zoom-onlinemødesiden.
- Sådan fjerner duintegrations
Fra Simplybook.me-siden
- Gå til siden Brugerdefinerede funktioner i din Simplybook.me-administrationsgrænseflade, og klik på Brugerdefineret funktion for onlinevideomøder for at åbne indstillingerne.
- Find Zoom i funktionsindstillingerne, og klik på Log ud.
- Derefter fjernes Zoom-integrationen fra din Simplybook.me-konto.
Fra Zoom-siden
Bemærk! Hvis du ikke har markeret afkrydsningsfeltet "Tillad denne app at bruge mine delte adgangstilladelser" ELLER hvis du vil skifte den tilsluttede Zoom-konto til en anden, er det ikke muligt at gøre dette fra Simplybook.me på grund af tekniske begrænsninger.
For at gøre det skal du afbryde Simplybook.me direkte fra Zoom, hvorefter du vil kunne oprette en ny konto på Simplybook.me.
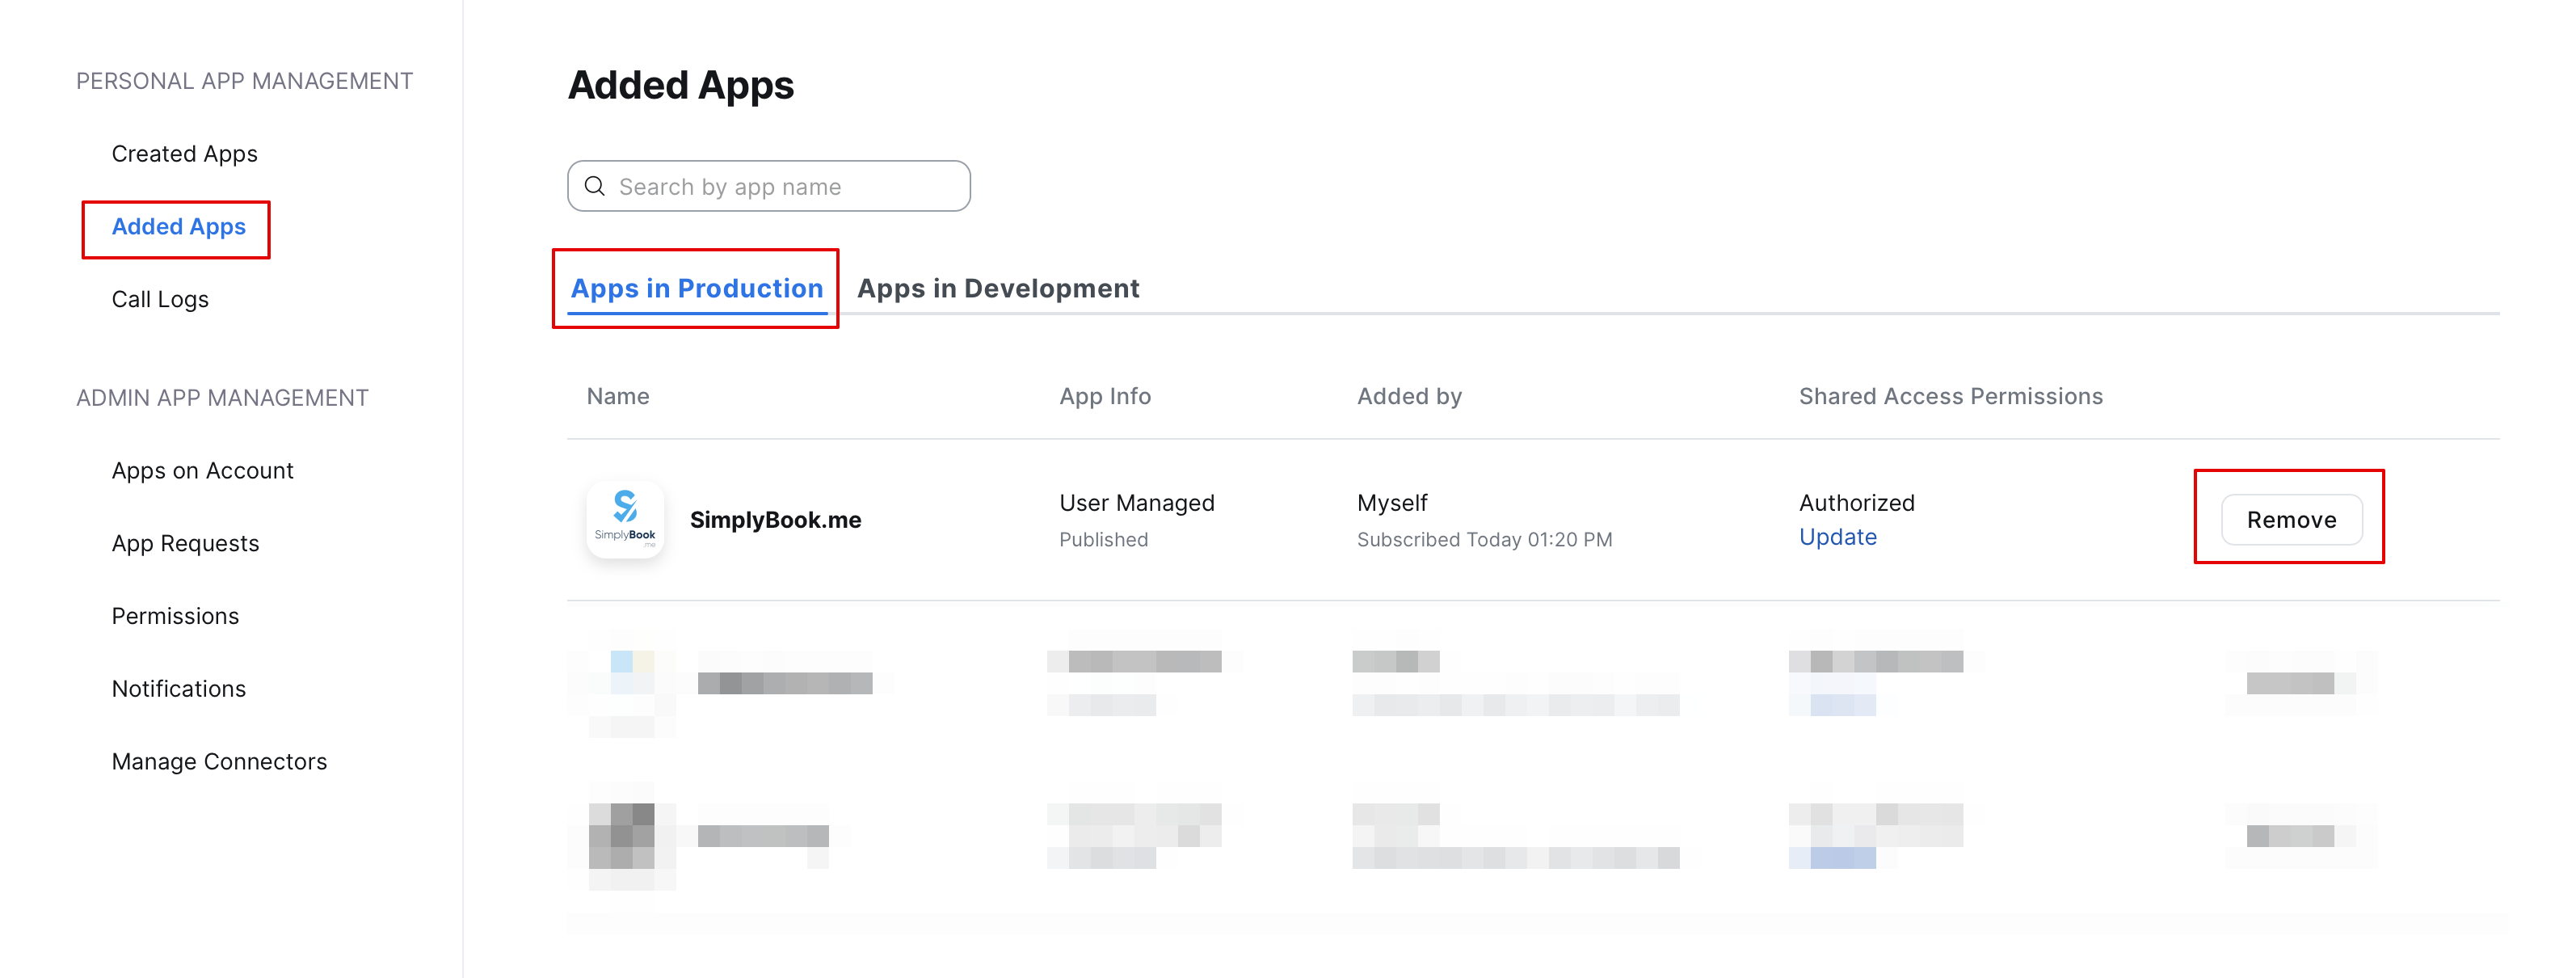
- For at afbryde integrationen fra Zoom skal du følge dette link.
- Find Simplybook.me på listen over tilknyttede apps (du kan bruge søgefunktionen, hvis det er nødvendigt).
- Klik på knappen Fjern for at afbryde forbindelsen.
- Nu er integrationen fjernet, og du kan forbinde en anden konto, hvis det er nødvendigt.