From SimplyBook.me
Updating to match new version of source page Tags: Mobile edit Mobile web edit |
Created page with ":7. Kopieer de volledige code uit het pop-upvenster en plak deze in <span style="background-color:#d4f8e5; padding:5px; border-radius:5px;">het HTML-</span> veld aan de Shopify-kant. Pas indien nodig de breedte van de container aan. <span style="background-color:#d4f8e5; padding:5px; border-radius:5px;">Sla</span> de wijzigingen <span style="background-color:#d4f8e5; padding:5px; border-radius:5px;">op.</span> border|center <br><b..." |
||
| (2 intermediate revisions by the same user not shown) | |||
| Line 7: | Line 7: | ||
;Hoe instellen | ;Hoe instellen | ||
:1. Ga naar <span style="background-color:#d4f8e5; padding:5px; border-radius:5px;">Online Store</span> -> <span style="background-color:#d4f8e5; padding:5px; border-radius:5px;">Themes</span> -> <span style="background-color:#d4f8e5; padding:5px; border-radius:5px;">Customize</span> in uw <span style="background-color:#d4f8e5; padding:5px; border-radius:5px;">Shopify-account.</span> | :1. Ga naar <span style="background-color:#d4f8e5; padding:5px; border-radius:5px;">Online Store</span> -> <span style="background-color:#d4f8e5; padding:5px; border-radius:5px;">Themes</span> -> <span style="background-color:#d4f8e5; padding:5px; border-radius:5px;">Customize</span> in uw <span style="background-color:#d4f8e5; padding:5px; border-radius:5px;">Shopify-account.</span> | ||
[[File:Shopify customize theme.png|border|center]] | [[File:Shopify customize theme.png|border|center]] | ||
| Line 17: | Line 16: | ||
[[File:Shopify select custom content.png|border|center]] | [[File:Shopify select custom content.png|border|center]] | ||
<br><br> | <br><br> | ||
:4. Klik op <span style="background-color:#d4f8e5; padding:5px; border-radius:5px;">' | :4. Klik op <span style="background-color:#d4f8e5; padding:5px; border-radius:5px;">'Inhoud toevoegen'</span> en selecteer <span style="background-color:#d4f8e5; padding:5px; border-radius:5px;">'Aangepaste HTML'</span> | ||
[[File:Select html.png|border|center]] | [[File:Select html.png|border|center]] | ||
<br><br> | <br><br> | ||
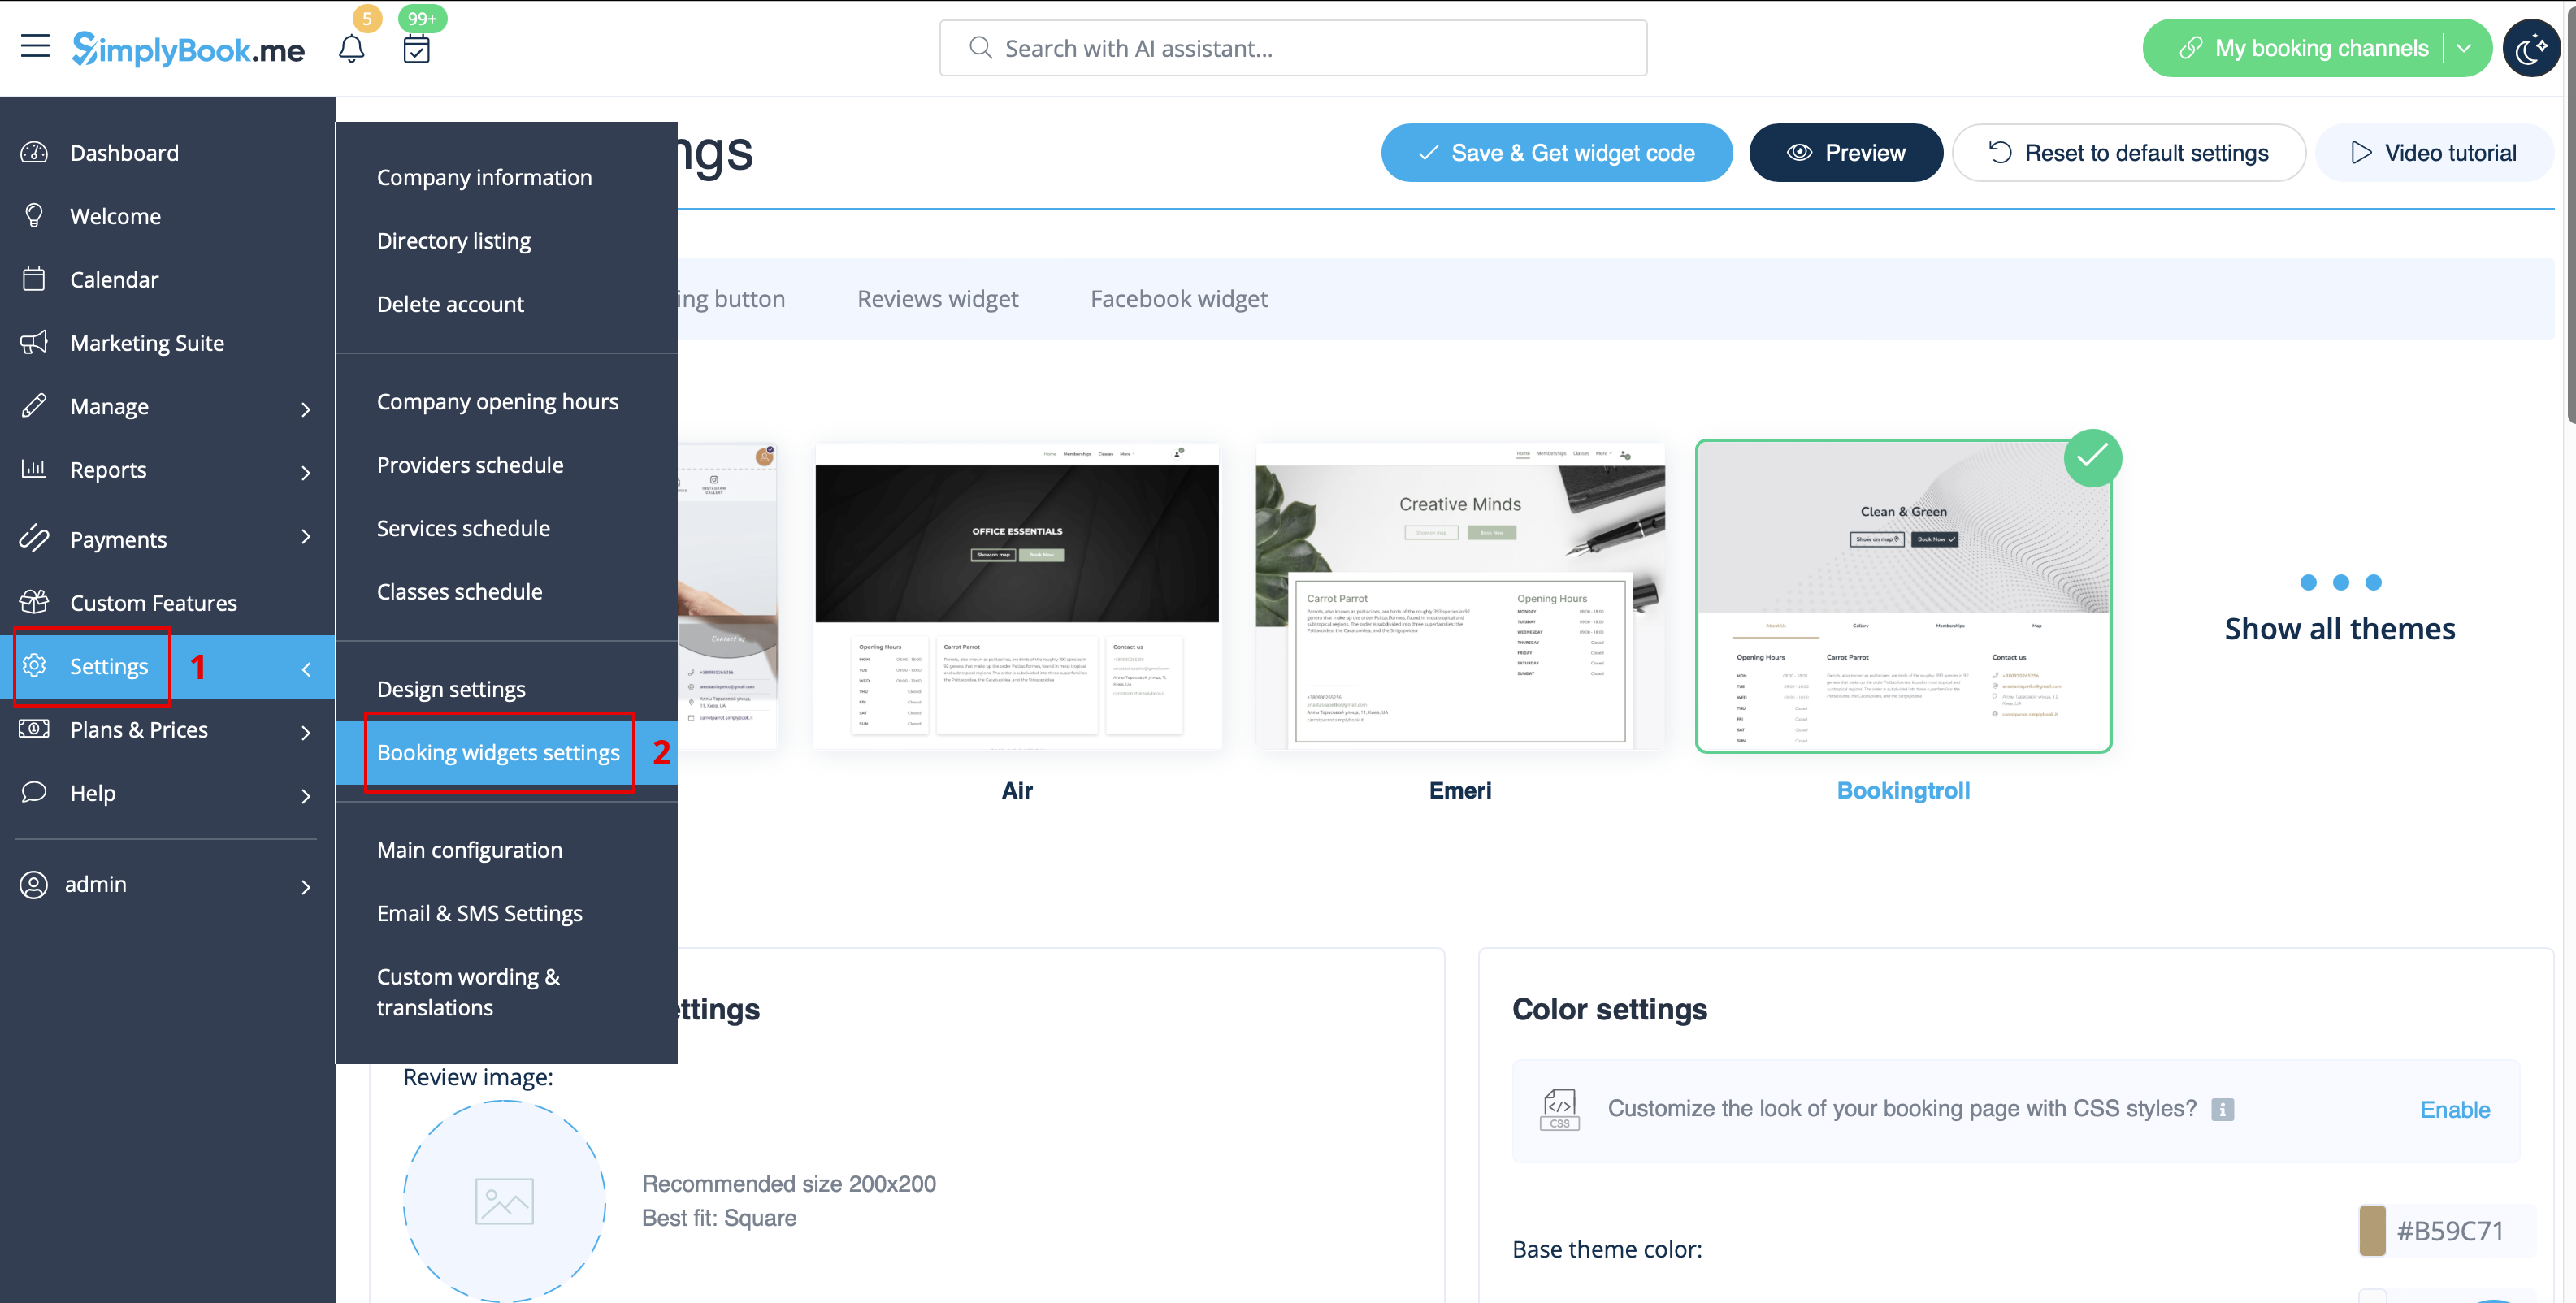
:5. Ga naar uw <span style="background-color:#d4f8e5; padding:5px; border-radius:5px;">SimplyBook.me-account</span> -> <span style="background-color:#d4f8e5; padding:5px; border-radius:5px;"> | :5. Ga naar uw <span style="background-color:#d4f8e5; padding:5px; border-radius:5px;">SimplyBook.me-account</span> -> <span style="background-color:#d4f8e5; padding:5px; border-radius:5px;">Instellingen</span> -> <span style="background-color:#d4f8e5; padding:5px; border-radius:5px;">Instellingen voor boekingswidgets</span> -> <span style="background-color:#d4f8e5; padding:5px; border-radius:5px;">iFrame-widget</span> | ||
[[File:Booking widget path redesigned.png|1200px|border|center|link=https://help.simplybook.me/images/6/68/Booking_widget_path_redesigned.png]] | [[File:Booking widget path redesigned.png|1200px|border|center|link=https://help.simplybook.me/images/6/68/Booking_widget_path_redesigned.png]] | ||
<br><br> | <br><br> | ||
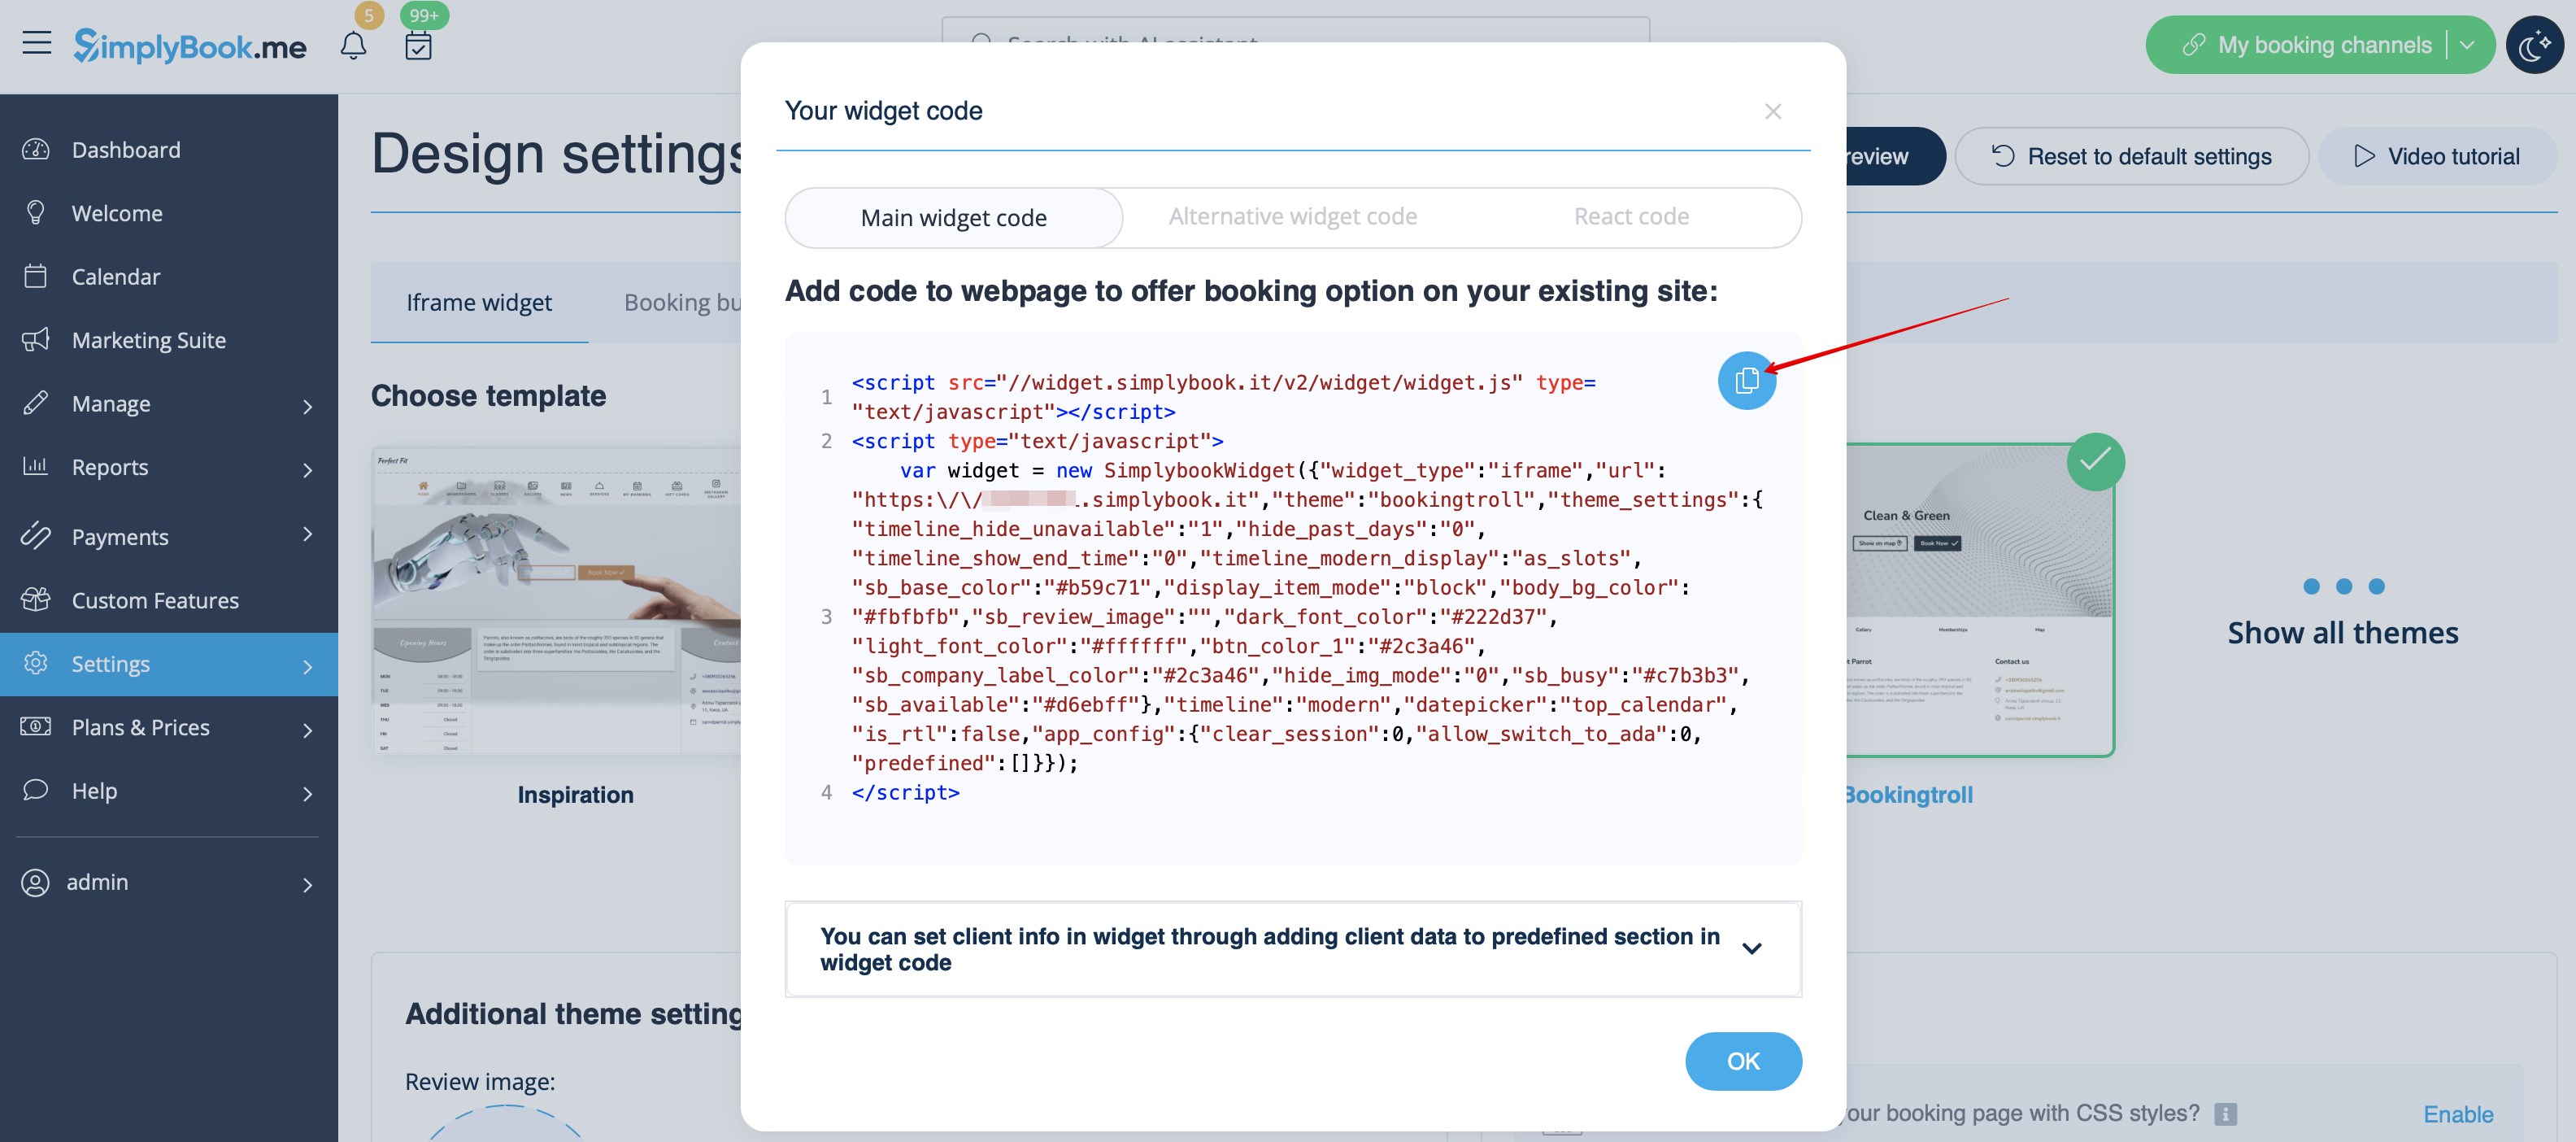
:6. Pas het ontwerp aan uw smaak en behoeften aan en <span style="background-color:#d4f8e5; padding:5px; border-radius:5px;"> | :6. Pas het ontwerp aan uw smaak en behoeften aan en <span style="background-color:#d4f8e5; padding:5px; border-radius:5px;">haal de widgetcode op.</span> | ||
[[File:Copy widget code redesigned.png|1200px|border|center|link=https://help.simplybook.me/images/b/b4/Copy_widget_code_redesigned.png]] | [[File:Copy widget code redesigned.png|1200px|border|center|link=https://help.simplybook.me/images/b/b4/Copy_widget_code_redesigned.png]] | ||
<br><br> | <br><br> | ||
:7. Kopieer de volledige code uit het pop-upvenster en plak deze in <span style="background-color:#d4f8e5; padding:5px; border-radius:5px;">het HTML- | :7. Kopieer de volledige code uit het pop-upvenster en plak deze in <span style="background-color:#d4f8e5; padding:5px; border-radius:5px;">het HTML-</span> veld aan de Shopify-kant. Pas indien nodig de breedte van de container aan. <span style="background-color:#d4f8e5; padding:5px; border-radius:5px;">Sla</span> de wijzigingen <span style="background-color:#d4f8e5; padding:5px; border-radius:5px;">op.</span> | ||
[[File:Insert html to shopify side.png|border|center]] | [[File:Insert html to shopify side.png|border|center]] | ||
<br><br> | <br><br> | ||
| Line 32: | Line 31: | ||
[[File:Shopify widget result.png|border|center]] | [[File:Shopify widget result.png|border|center]] | ||
<br><br><br><br> | <br><br><br><br> | ||
Latest revision as of 08:08, 1 July 2025
Als u Shopify gebruikt en de mogelijkheid om te boeken aan uw website wilt toevoegen, hebben wij de juiste oplossing voor u!
Met onze iFrame-widget kunt u de Shopify-website koppelen aan SimplyBook.com, zodat uw klanten rechtstreeks vanaf de website kunnen boeken, zowel vanaf hun pc als vanaf hun mobiele apparaten. Deze oplossing maakt uw boekingsproces gemakkelijker en overzichtelijker.
- Hoe instellen
- 1. Ga naar Online Store -> Themes -> Customize in uw Shopify-account.

- 2. Selecteer de sectie die u wilt bewerken aan de linkerkant of voeg een nieuwe toe.

- 3. Kies voor Custom content toevoegen .

- 4. Klik op 'Inhoud toevoegen' en selecteer 'Aangepaste HTML'

- 5. Ga naar uw SimplyBook.me-account -> Instellingen -> Instellingen voor boekingswidgets -> iFrame-widget
- 6. Pas het ontwerp aan uw smaak en behoeften aan en haal de widgetcode op.
- 7. Kopieer de volledige code uit het pop-upvenster en plak deze in het HTML- veld aan de Shopify-kant. Pas indien nodig de breedte van de container aan. Sla de wijzigingen op.

- 8. Het resultaat is dat u meteen kunt zien hoe de boekingswidget eruitziet.
