Created page with "FreshBooks-integration" Tags: Mobile edit Mobile web edit |
No edit summary |
||
| (4 intermediate revisions by 2 users not shown) | |||
| Line 5: | Line 5: | ||
[[File:Freshbooks-logo.png|left]] | [[File:Freshbooks-logo.png|left]] | ||
Integrationen mellem [https://sbpay.me/en/ SBPay.me] og [https://www.freshbooks.com FreshBooks] strømliner din faktureringsproces ved automatisk at generere fakturaer eller andre indbetalinger i FreshBooks for hver afsluttet ordre. Det hjælper dig med at optimere dine økonomiske arbejdsgange og sikre nøjagtig registrering af dine ordrer. | |||
< | Video-vejledning <p><youtube>Cr-OPRJFviw</youtube></p> | ||
</ | |||
<span style="background-color:#ffe9e9; padding:5px; border-radius:5px;">'''Bemærk!'''</span> | |||
<span style="background-color:#ffe9e9; padding:5px; border-radius:5px;">''' | *<span style="background-color:#ffe9e9; padding:5px; border-radius:5px;">Fakturaer oprettet via FreshBooks-integration viser kun det samlede beløb uden detaljer om skatter og rabatter. SBpay.me-fakturaer indeholder derimod omfattende oplysninger, såsom varepriser, eventuelle skatter eller rabatter og det samlede beløb.</span> | ||
* <span style="background-color:#ffe9e9; padding:5px; border-radius:5px;"> | *<span style="background-color:#ffe9e9; padding:5px; border-radius:5px;">Det er ikke muligt automatisk at oprette en refusionskvittering i FreshBooks, når en refusion behandles på SBPay.me-siden.</span> | ||
* <span style="background-color:#ffe9e9; padding:5px; border-radius:5px;"> | |||
;Sådan indstilles og bruges | |||
; | |||
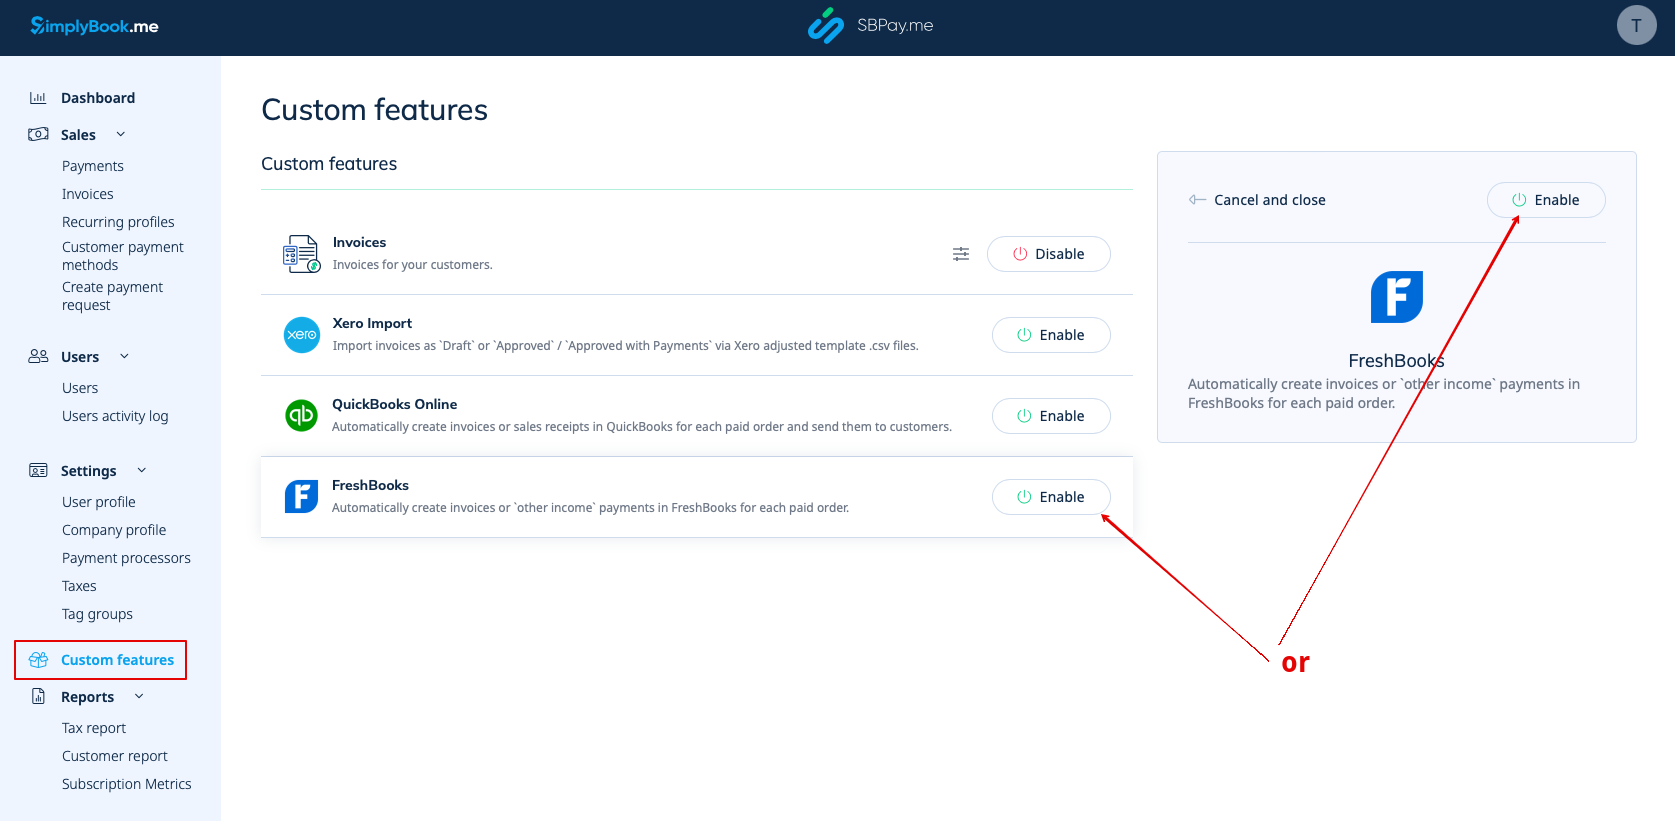
1. Gå til siden <span style="background-color:#d4f8e5; padding:5px; border-radius:5px;">Custom Features</span> (Tilpassede funktioner) i din SBPay.me-grænseflade, og klik på knappen <span style="background-color:#d4f8e5; padding:5px; border-radius:5px;">Enable (Aktiver</span> ) ud for Freshbooks. | |||
1. | |||
[[File:Freshbooks enable path.png|1200px|center|link=https://help.simplybook.me/images/d/d4/Freshbooks_enable_path.png]] | [[File:Freshbooks enable path.png|1200px|center|link=https://help.simplybook.me/images/d/d4/Freshbooks_enable_path.png]] | ||
2. Når funktionen er aktiveret, skal du klikke på knappen <span style="background-color:#d4f8e5; padding:5px; border-radius:5px;">Connect</span> for at fortsætte med opsætningen. | |||
2. | |||
[[File:Freshbooks connect path.png|1200px|center|link=https://help.simplybook.me/images/7/70/Freshbooks_connect_path.png]] | [[File:Freshbooks connect path.png|1200px|center|link=https://help.simplybook.me/images/7/70/Freshbooks_connect_path.png]] | ||
3. Du bliver bedt om at logge ind på din FreshBooks-konto for at oprette forbindelsen. Hvis du allerede er logget ind på FreshBooks i samme browser, oprettes forbindelsen automatisk, når du klikker på knappen <span style="background-color:#d4f8e5; padding:5px; border-radius:5px;">Tillad</span>.<br> | |||
3. | Hvis det er nødvendigt, finder du SBPay.me i FreshBooks <span style="background-color:#d4f8e5; padding:5px; border-radius:5px;">Apps</span> -> <span style="background-color:#d4f8e5; padding:5px; border-radius:5px;">Connected Apps</span>. | ||
4. Når systemerne er forbundet, får du adgang til integrationsindstillingerne i SBPay.me-grænsefladen. | |||
4. | |||
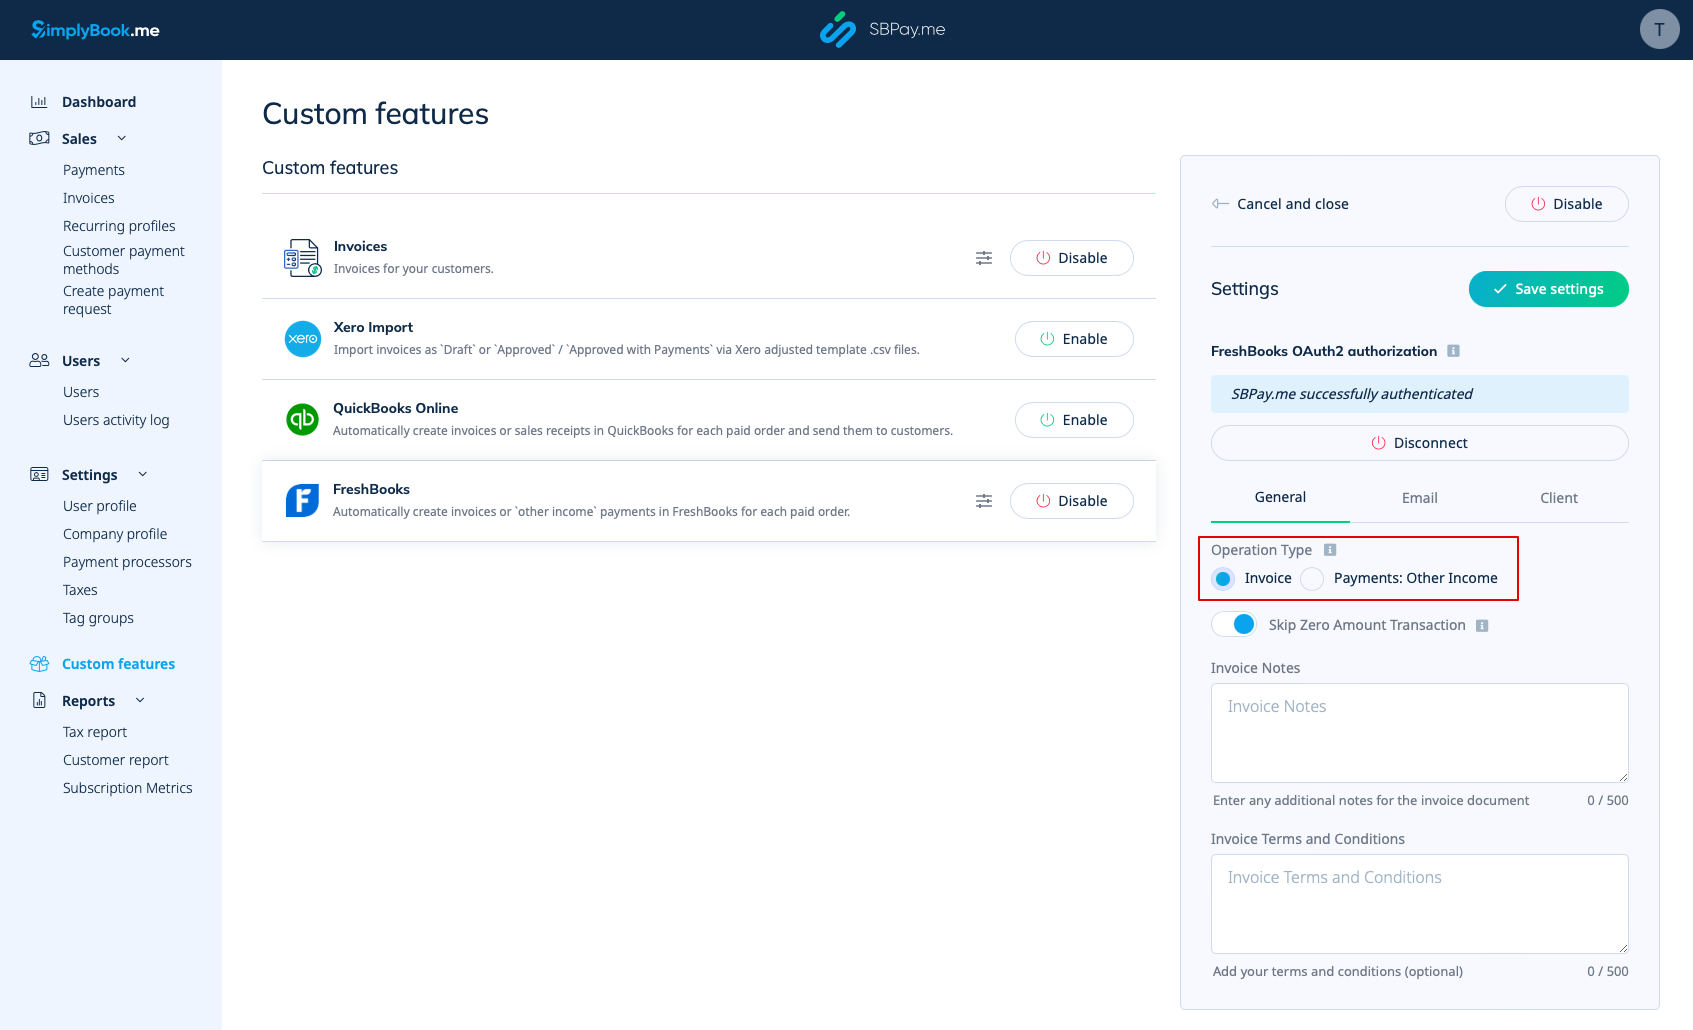
5. Vælg operationstypen. Der er to muligheder: <span style="background-color:#d4f8e5; padding:5px; border-radius:5px;">Faktura</span> og <span style="background-color:#d4f8e5; padding:5px; border-radius:5px;">betalinger: Anden indtægt</span>.<br> | |||
5. | Hvis du vælger Faktura, genereres der både en faktura og den tilhørende betaling i FreshBooks for hver betalt ordre. Hvis du vælger "Betalinger: Anden indtægt", oprettes der kun en post under "Anden indtægt" i FreshBooks, når ordren er betalt. | ||
[[File:Freshbooks operation type.png|1200px|center|link=https://help.simplybook.me/images/d/dc/Freshbooks_operation_type.png]] | [[File:Freshbooks operation type.png|1200px|center|link=https://help.simplybook.me/images/d/dc/Freshbooks_operation_type.png]] | ||
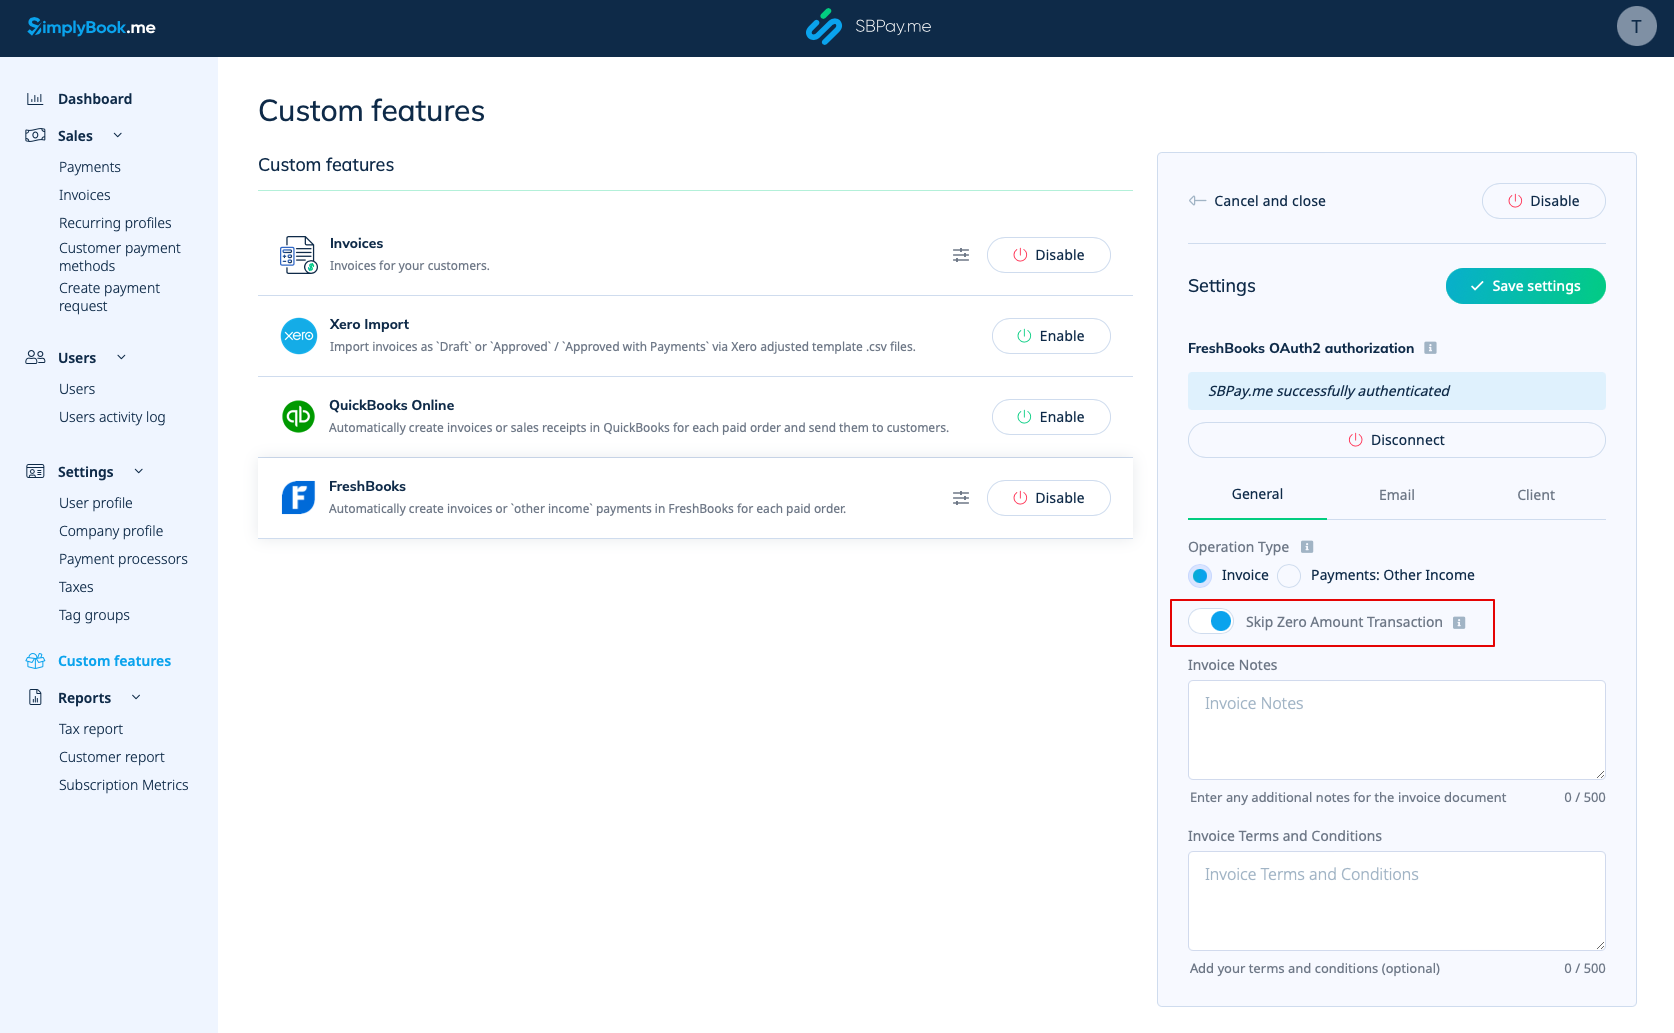
6. Som standard er systemet indstillet til <span style="background-color:#d4f8e5; padding:5px; border-radius:5px;">at springe transaktioner med nul beløb over</span>, så de ikke sendes til FreshBooks. For eksempel transaktioner, hvor der er givet rabat, og det samlede beløb derfor er 0. Du kan beholde denne indstilling, hvis du ikke har brug for disse poster i FreshBooks. Hvis det imidlertid er afgørende for din bogføring, kan du deaktivere denne funktion for at inkludere sådanne transaktioner. | |||
6. | |||
[[File:Freshbooks skip zero amount.png|1200px|center|link=https://help.simplybook.me/images/b/be/Freshbooks_skip_zero_amount.png]] | [[File:Freshbooks skip zero amount.png|1200px|center|link=https://help.simplybook.me/images/b/be/Freshbooks_skip_zero_amount.png]] | ||
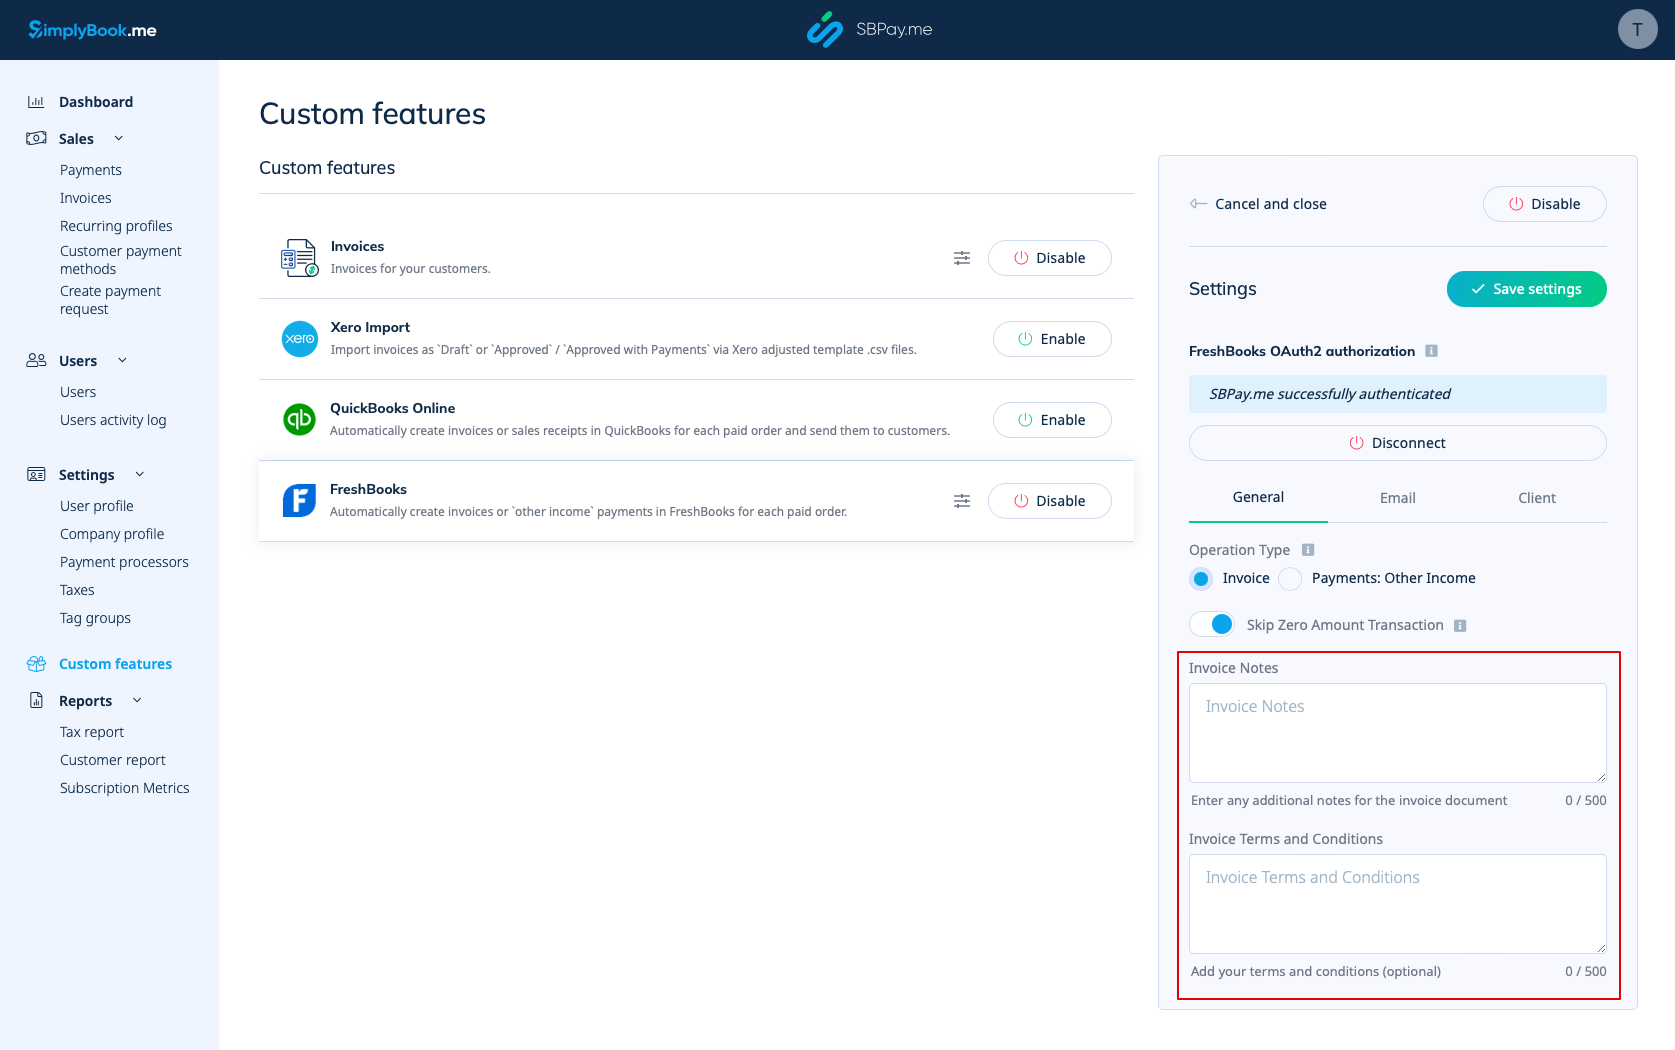
7. Du kan også medtage <span style="background-color:#d4f8e5; padding:5px; border-radius:5px;">fakturabemærkninger</span> og <span style="background-color:#d4f8e5; padding:5px; border-radius:5px;">fakturavilkår</span> i fakturadokumentet. | |||
7. | |||
[[File:Freshbooks invoice notes and terms.png|1200px|center|link=https://help.simplybook.me/images/a/ac/Freshbooks_invoice_notes_and_terms.png]] | [[File:Freshbooks invoice notes and terms.png|1200px|center|link=https://help.simplybook.me/images/a/ac/Freshbooks_invoice_notes_and_terms.png]] | ||
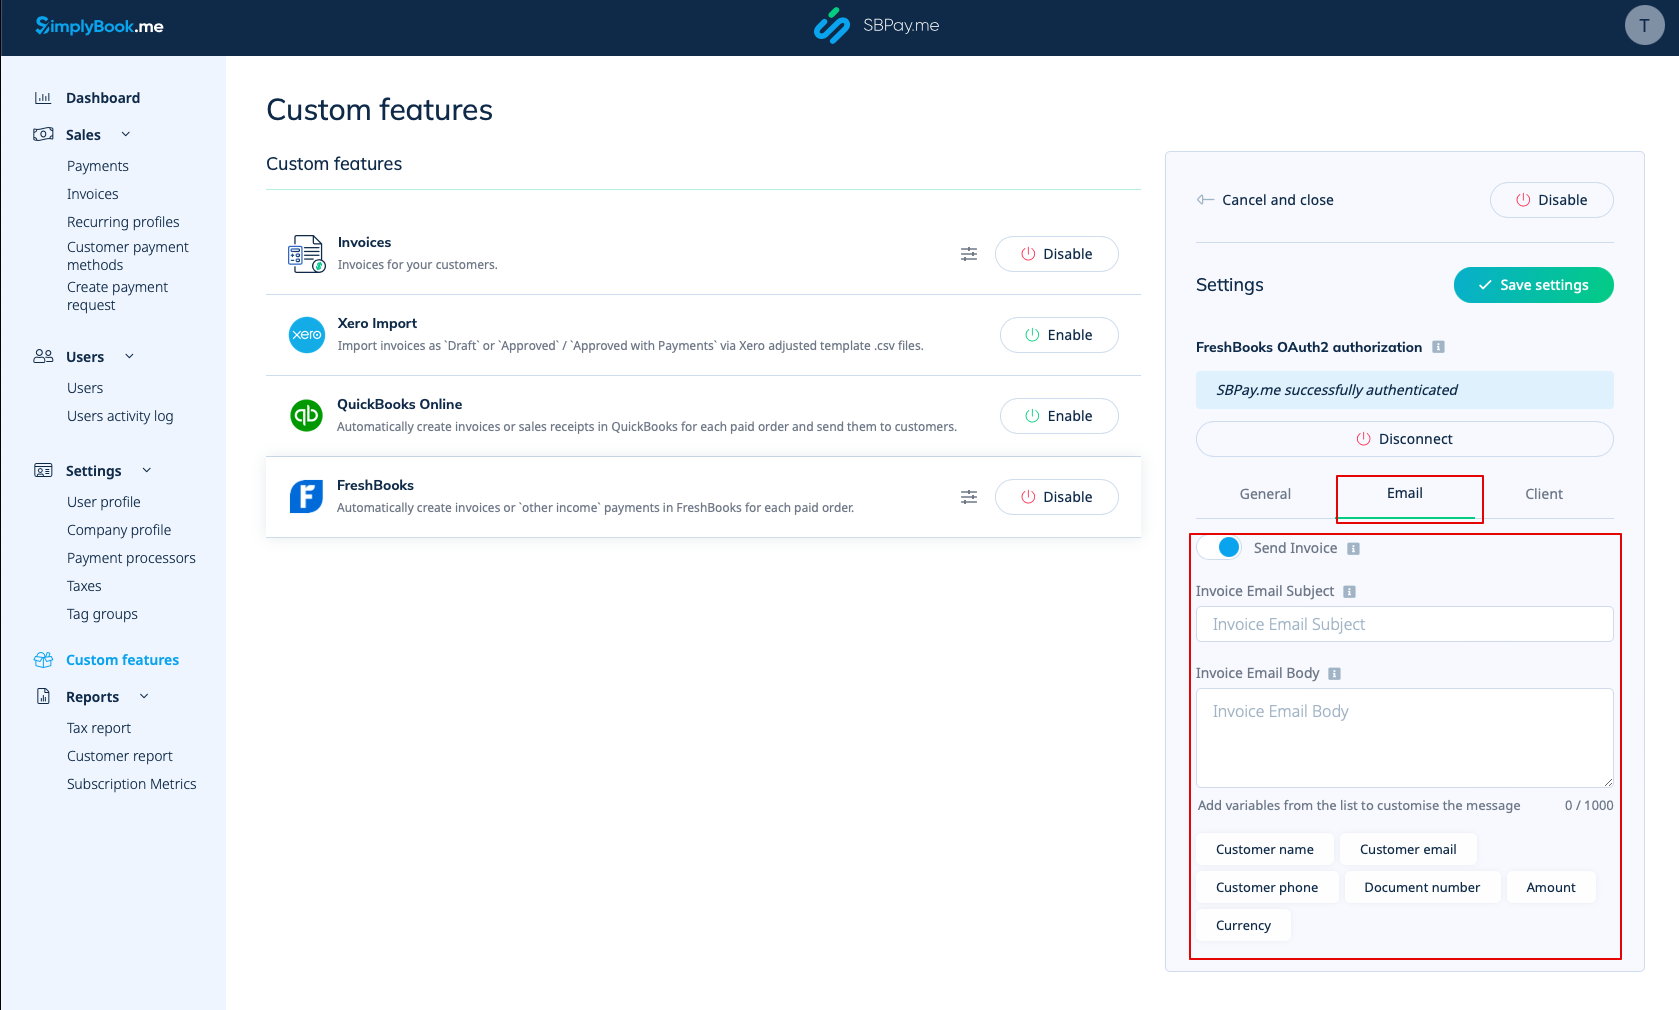
8. I afsnittet <span style="background-color:#d4f8e5; padding:5px; border-radius:5px;">E-mail</span> kan du deaktivere eller lade indstillingen <span style="background-color:#d4f8e5; padding:5px; border-radius:5px;">Send faktura</span> <span style="background-color:#d4f8e5; padding:5px; border-radius:5px;">være aktiveret</span>. Hvis den er aktiveret, kan du angive <span style="background-color:#d4f8e5; padding:5px; border-radius:5px;">emnet for faktura-e-mailen</span> samt <span style="background-color:#d4f8e5; padding:5px; border-radius:5px;">faktura-e-mailens brødtekst.</span> Det er muligt at tilføje de understøttede variabler til e-mailens brødtekst, som vil blive erstattet med de faktiske oplysninger, når e-mailen sendes til kunderne. Hvis emnet eller brødteksten for e-mailen ikke er angivet, vil standardskabelonen fra FreshBooks blive brugt. | |||
8. | |||
[[File:Freshbooks invoice template.png|1200px|center|link=https://help.simplybook.me/images/3/30/Freshbooks_invoice_template.png]] | [[File:Freshbooks invoice template.png|1200px|center|link=https://help.simplybook.me/images/3/30/Freshbooks_invoice_template.png]] | ||
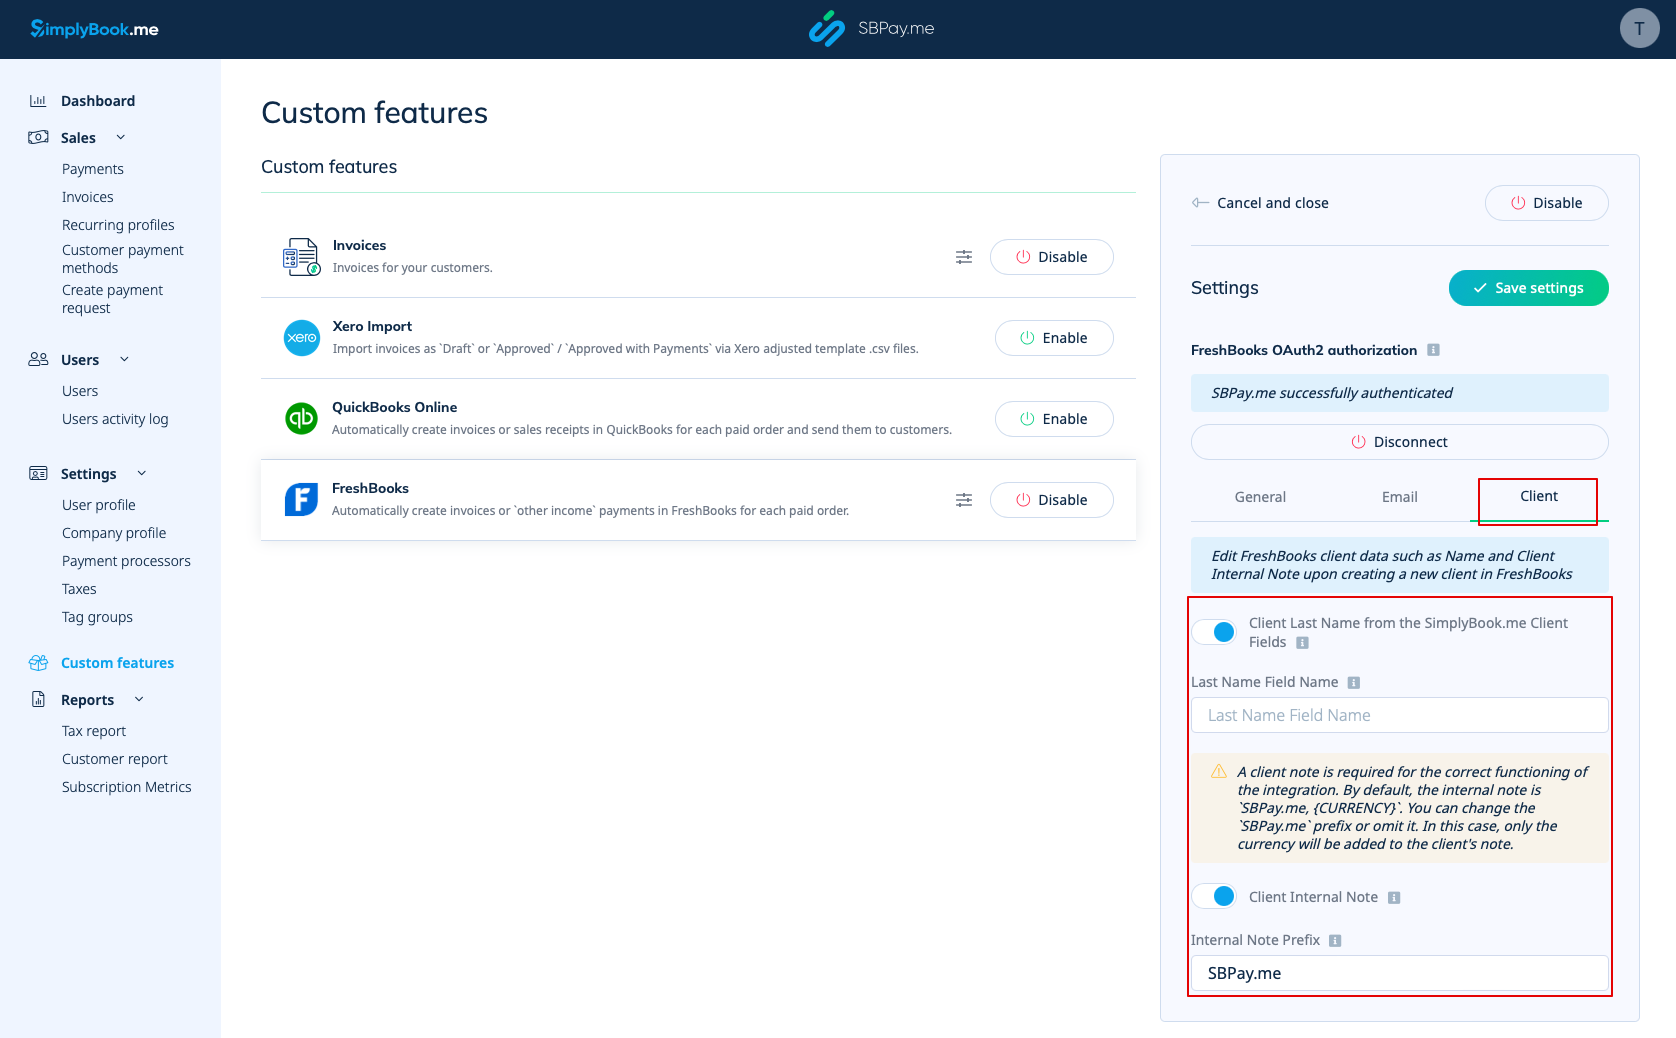
9. I afsnittet <span style="background-color:#d4f8e5; padding:5px; border-radius:5px;">Klient</span> kan du justere klientoplysninger såsom <span style="background-color:#d4f8e5; padding:5px; border-radius:5px;">Efternavn</span> og <span style="background-color:#d4f8e5; padding:5px; border-radius:5px;">Intern klientnote</span>, når du opretter en ny klient i FreshBooks. | |||
9. | |||
:- Du har mulighed for at aktivere <span style="background-color:#d4f8e5; padding:5px; border-radius:5px;">klientens efternavn</span> fra <span style="background-color:#cdeffc; padding:5px; border-radius:5px;">[[Client_Fields_Custom_Feature|SimplyBook.me-klientfelter]].</span> Denne funktion er nyttig, hvis du har den tilsvarende brugerdefinerede funktion aktiveret i SimplyBook.me-kontoen og indstillet den til at hente dine klienters efternavn.<br> | |||
:- | :Sørg for, at du indtaster det nøjagtige feltnavn, der matcher det, der bruges i SimplyBook.me's tilpassede funktion for klientfelter til efternavnet. | ||
: | |||
:- Med indstillingen " <span style="background-color:#d4f8e5; padding:5px; border-radius:5px;">Kundens interne note</span> " kan du tilføje et personligt præfiks til en kundes interne note i FreshBooks. Det er vigtigt at bemærke, at ændring af præfikset ikke påvirker eksisterende FreshBooks-kunder. Kun nye kunder oprettes i FreshBooks med den opdaterede note. En kundes note er afgørende for, at integrationen fungerer korrekt. Som standard indeholder den interne note '''SBPay.me, {CURRENCY}.'''<br> | |||
:Du har mulighed for at ændre '''SBPay.me-præfikset''' eller udelade det. Hvis det udelades, tilføjes kun valutaen til kundens note. | |||
: | |||
[[File:Freshbooks client data settings.png|1200px|center|link=https://help.simplybook.me/images/f/f9/Freshbooks_client_data_settings.png]] | [[File:Freshbooks client data settings.png|1200px|center|link=https://help.simplybook.me/images/f/f9/Freshbooks_client_data_settings.png]] | ||
Latest revision as of 13:08, 13 October 2025
Integrationen mellem SBPay.me og FreshBooks strømliner din faktureringsproces ved automatisk at generere fakturaer eller andre indbetalinger i FreshBooks for hver afsluttet ordre. Det hjælper dig med at optimere dine økonomiske arbejdsgange og sikre nøjagtig registrering af dine ordrer.
Video-vejledning
Bemærk!
- Fakturaer oprettet via FreshBooks-integration viser kun det samlede beløb uden detaljer om skatter og rabatter. SBpay.me-fakturaer indeholder derimod omfattende oplysninger, såsom varepriser, eventuelle skatter eller rabatter og det samlede beløb.
- Det er ikke muligt automatisk at oprette en refusionskvittering i FreshBooks, når en refusion behandles på SBPay.me-siden.
- Sådan indstilles og bruges
1. Gå til siden Custom Features (Tilpassede funktioner) i din SBPay.me-grænseflade, og klik på knappen Enable (Aktiver ) ud for Freshbooks.
2. Når funktionen er aktiveret, skal du klikke på knappen Connect for at fortsætte med opsætningen.
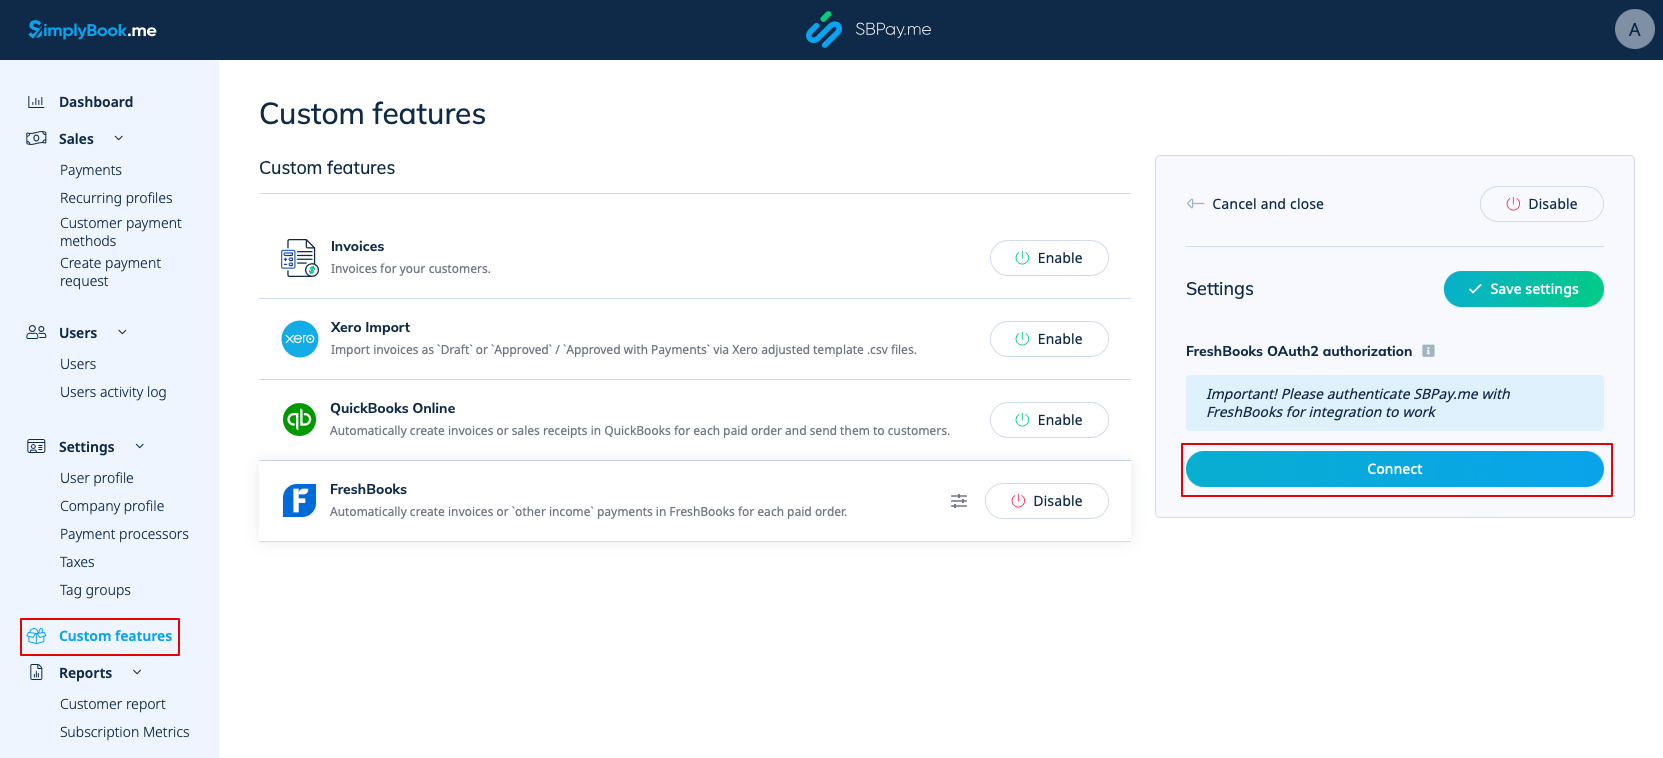
3. Du bliver bedt om at logge ind på din FreshBooks-konto for at oprette forbindelsen. Hvis du allerede er logget ind på FreshBooks i samme browser, oprettes forbindelsen automatisk, når du klikker på knappen Tillad.
Hvis det er nødvendigt, finder du SBPay.me i FreshBooks Apps -> Connected Apps.
4. Når systemerne er forbundet, får du adgang til integrationsindstillingerne i SBPay.me-grænsefladen.
5. Vælg operationstypen. Der er to muligheder: Faktura og betalinger: Anden indtægt.
Hvis du vælger Faktura, genereres der både en faktura og den tilhørende betaling i FreshBooks for hver betalt ordre. Hvis du vælger "Betalinger: Anden indtægt", oprettes der kun en post under "Anden indtægt" i FreshBooks, når ordren er betalt.
6. Som standard er systemet indstillet til at springe transaktioner med nul beløb over, så de ikke sendes til FreshBooks. For eksempel transaktioner, hvor der er givet rabat, og det samlede beløb derfor er 0. Du kan beholde denne indstilling, hvis du ikke har brug for disse poster i FreshBooks. Hvis det imidlertid er afgørende for din bogføring, kan du deaktivere denne funktion for at inkludere sådanne transaktioner.
7. Du kan også medtage fakturabemærkninger og fakturavilkår i fakturadokumentet.
8. I afsnittet E-mail kan du deaktivere eller lade indstillingen Send faktura være aktiveret. Hvis den er aktiveret, kan du angive emnet for faktura-e-mailen samt faktura-e-mailens brødtekst. Det er muligt at tilføje de understøttede variabler til e-mailens brødtekst, som vil blive erstattet med de faktiske oplysninger, når e-mailen sendes til kunderne. Hvis emnet eller brødteksten for e-mailen ikke er angivet, vil standardskabelonen fra FreshBooks blive brugt.
9. I afsnittet Klient kan du justere klientoplysninger såsom Efternavn og Intern klientnote, når du opretter en ny klient i FreshBooks.
- - Du har mulighed for at aktivere klientens efternavn fra SimplyBook.me-klientfelter. Denne funktion er nyttig, hvis du har den tilsvarende brugerdefinerede funktion aktiveret i SimplyBook.me-kontoen og indstillet den til at hente dine klienters efternavn.
- Sørg for, at du indtaster det nøjagtige feltnavn, der matcher det, der bruges i SimplyBook.me's tilpassede funktion for klientfelter til efternavnet.
- - Med indstillingen " Kundens interne note " kan du tilføje et personligt præfiks til en kundes interne note i FreshBooks. Det er vigtigt at bemærke, at ændring af præfikset ikke påvirker eksisterende FreshBooks-kunder. Kun nye kunder oprettes i FreshBooks med den opdaterede note. En kundes note er afgørende for, at integrationen fungerer korrekt. Som standard indeholder den interne note SBPay.me, {CURRENCY}.
- Du har mulighed for at ændre SBPay.me-præfikset eller udelade det. Hvis det udelades, tilføjes kun valutaen til kundens note.