From SimplyBook.me
Created page with "Squarespace" |
No edit summary Tags: Mobile edit Mobile web edit |
||
| (5 intermediate revisions by 2 users not shown) | |||
| Line 1: | Line 1: | ||
<languages/> | <languages/> | ||
{{#seo: |title=Squarespace - SimplyBook.me |description=Integreer SimplyBook.me met Squarespace voor naadloze online boekingen. Volg de handleiding om uw website vandaag nog te koppelen! |titlemode=toevoegen |keywords=faq, veelgestelde vragen, boekingssoftware, vragen over het afspraken systeem, online afspraken, kalendersoftware, boekingssysteem, boekingskalender, planningssoftware, online afspraken plannen, online planning, plug-ins, aangepaste functies, aangepaste boekingspagina link, domeinnaam, aangepaste domeinnaam, aangepaste url }}__FORCETOC__ | |||
{{#seo: | |||
|title=Squarespace - SimplyBook.me | |||
|description= | |||
|titlemode= | |||
|keywords=faq, | |||
}} | |||
__FORCETOC__ | |||
= iFrame-widget = | |||
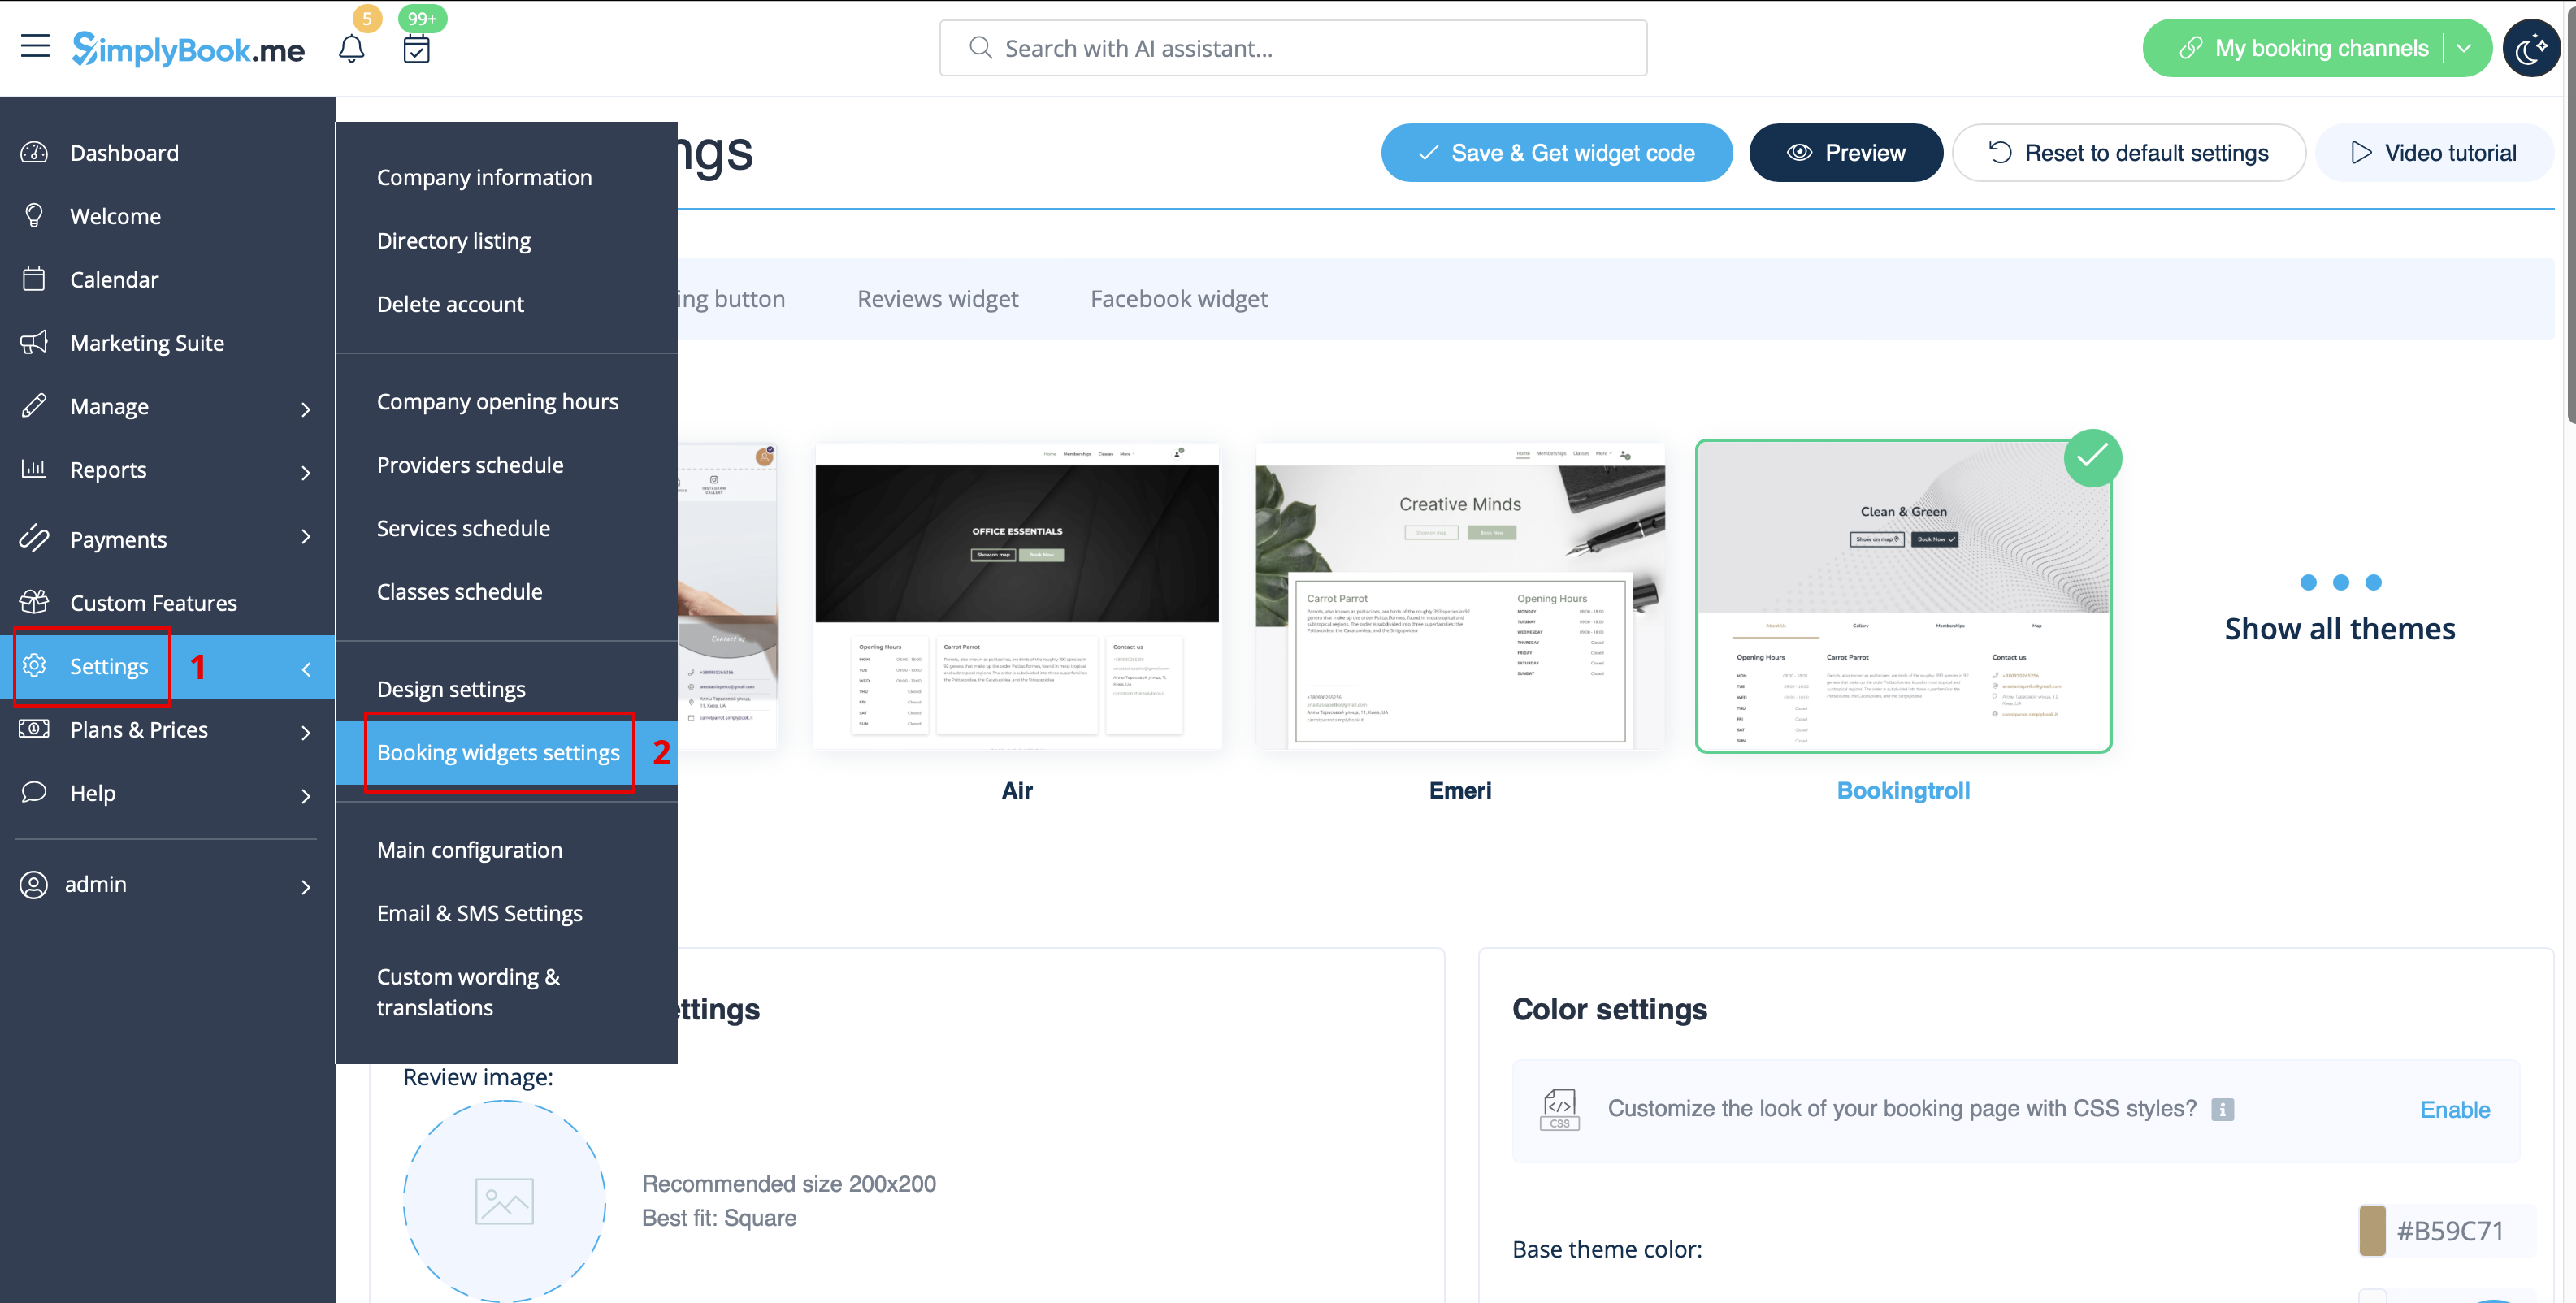
:1. Ga in uw [https://simplybook.me/ Simplybook-beheerderspagina] naar <span style="background-color:#d4f8e5; padding:5px; border-radius:5px;">Instellingen</span> -> <span style="background-color:#d4f8e5; padding:5px; border-radius:5px;">Instellingen voor boekingswidgets</span> -> <span style="background-color:#d4f8e5; padding:5px; border-radius:5px;">iFrame-widget</span> | |||
:1. | |||
[[File:Booking widget path redesigned.png|1200px | center|link=https://help.simplybook.me/images/6/68/Booking_widget_path_redesigned.png]] | [[File:Booking widget path redesigned.png|1200px | center|link=https://help.simplybook.me/images/6/68/Booking_widget_path_redesigned.png]] | ||
<br><br> | <br><br> | ||
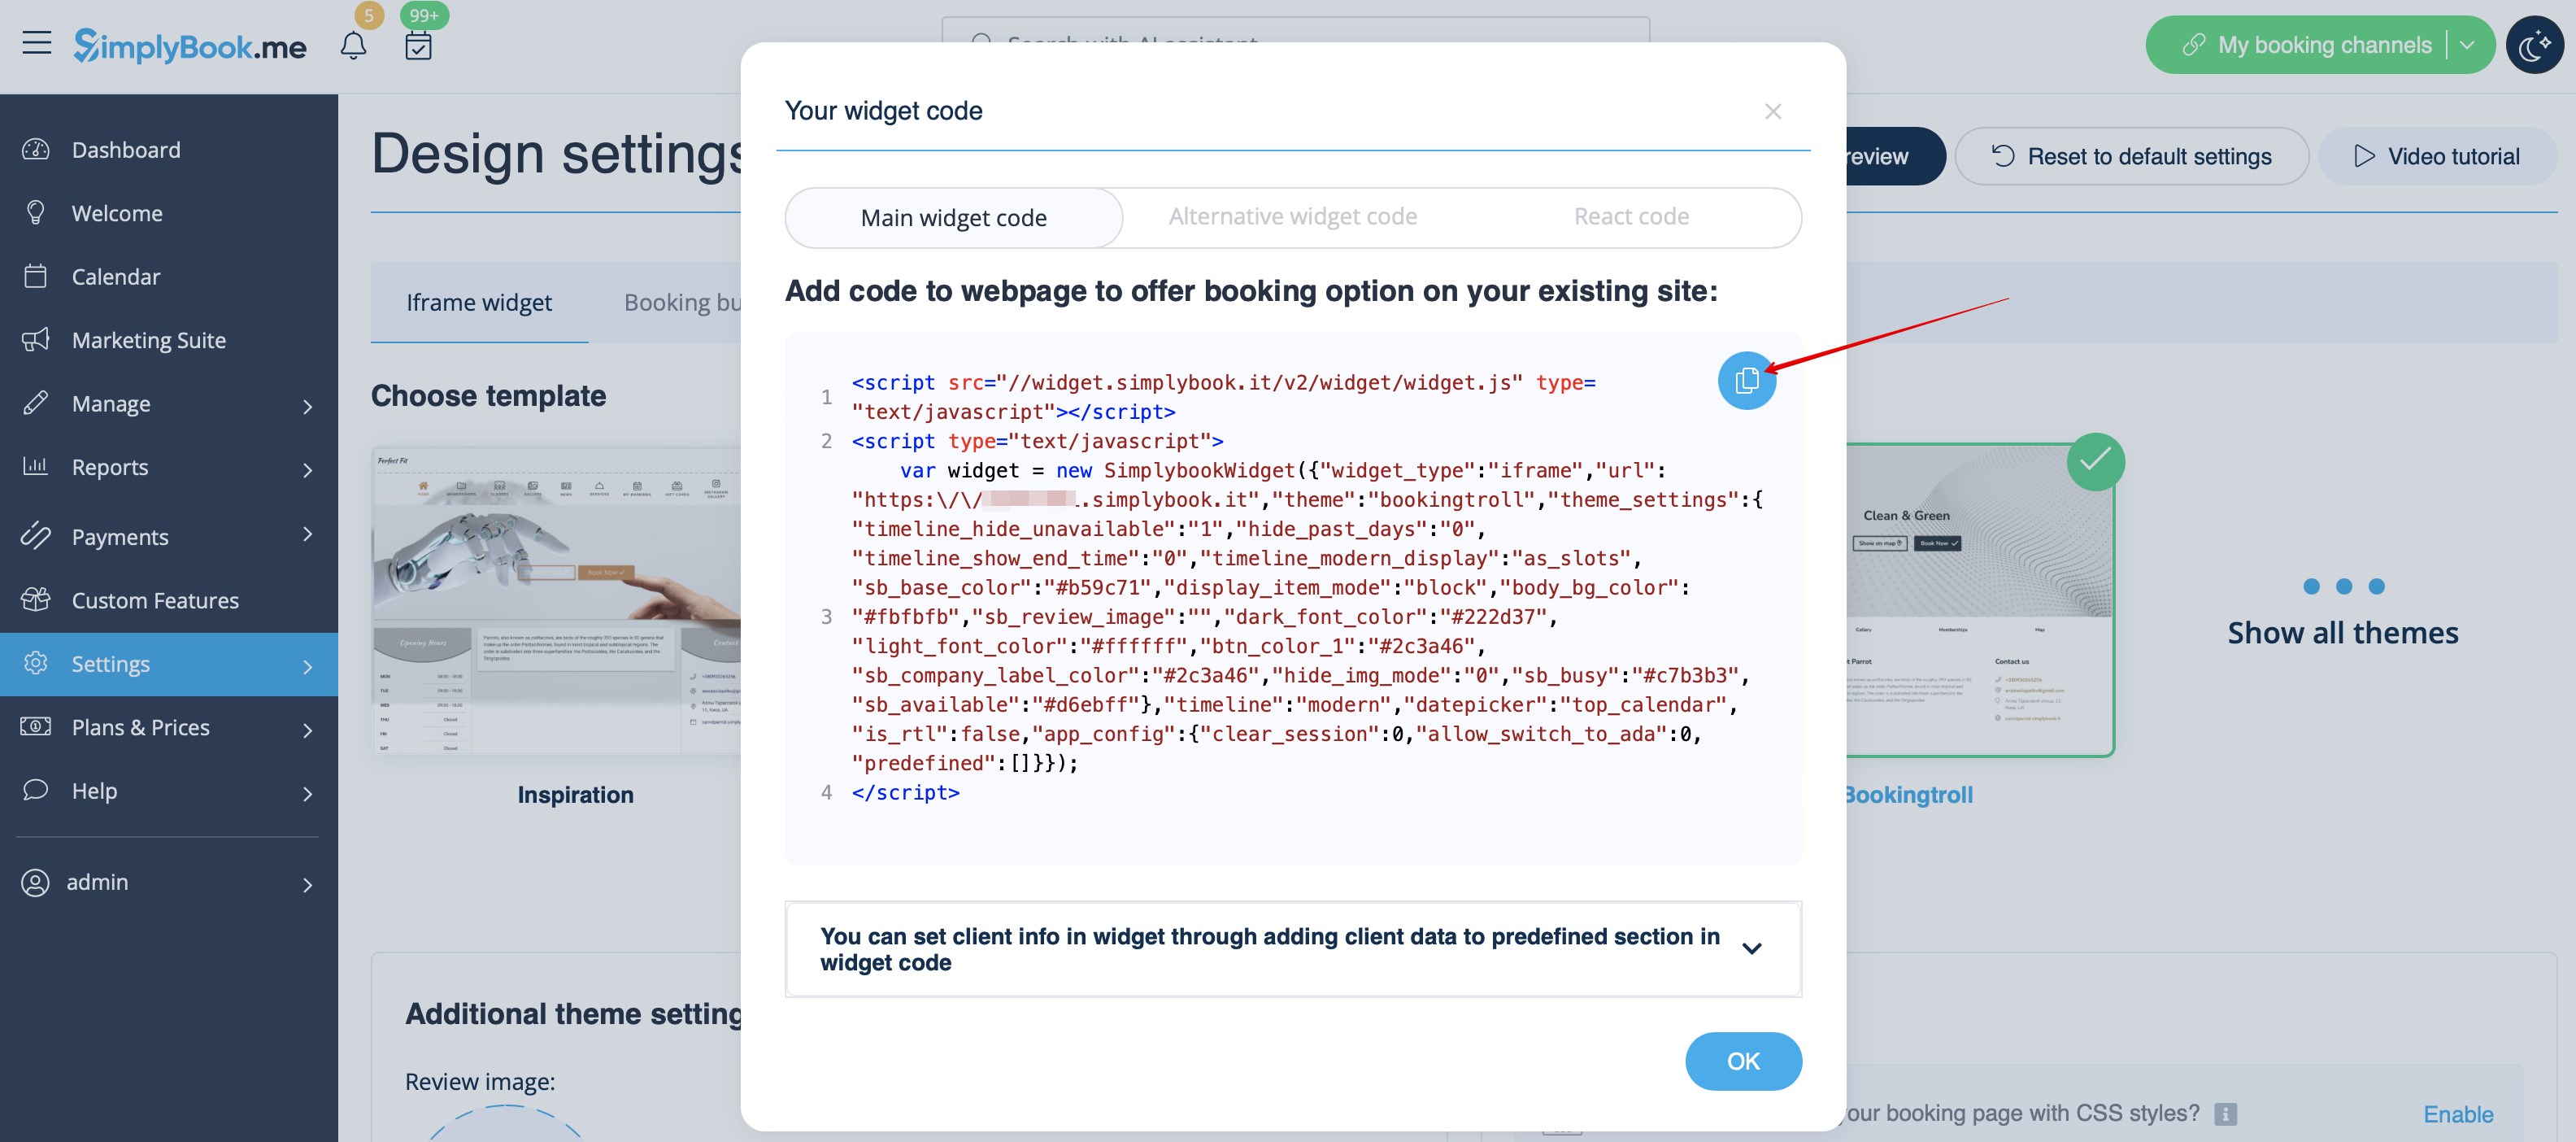
[[File:Copy widget code redesigned.png|1200px | center|link=https://help.simplybook.me/images/b/b4/Copy_widget_code_redesigned.png]] | [[File:Copy widget code redesigned.png|1200px | center|link=https://help.simplybook.me/images/b/b4/Copy_widget_code_redesigned.png]] | ||
<br><br> | <br><br> | ||
:2. | :2. Kies in uw Squarespace-account de pagina waar u uw boekingskalender wilt invoegen. We raden u aan een nieuwe pagina in de hoofdnavigatie te gebruiken die speciaal is ontworpen voor online boekingen. | ||
: | :U kunt deze pagina 'Nu boeken', 'Online boeken' of 'Kalender' noemen. | ||
[[File:Squarespace add new page.png | center]] | [[File:Squarespace add new page.png|center]] | ||
<br><br> | <br><br> | ||
:3. Open | :3. Open de pagina-editor. Verwijder het standaard boekingsblok. | ||
<br><br> | <br><br> | ||
:4. | :4. Klik op '+' in de rechterbovenhoek en selecteer '''Code''' in het blokmenu. | ||
[[File:Squarespace add new block.png | center]] | [[File:Squarespace add new block.png|center]] | ||
<br><br> | <br><br> | ||
[[File:Squarespace select code block.png | center]] | [[File:Squarespace select code block.png|center]] | ||
<br><br> | <br><br> | ||
:5. | :5. Voeg de code die u op [https://simplybook.me/ de Simplybook-] beheerderspagina hebt ontvangen in het HTML-codevak in en klik op 'Toepassen'. | ||
[[File:Squarespace add code.png | center]] | [[File:Squarespace add code.png|center]] | ||
<br><br> | <br><br> | ||
:6. | :6. Mogelijk krijgt u een bericht dat ingesloten scripts zijn uitgeschakeld. Dit is om veiligheidsredenen gedaan door Squarespace, maar u kunt op 'Preview' klikken om te zien of de widget werkt. | ||
[[File:Squarespace preview.png | center]] | [[File:Squarespace preview.png|center]] | ||
<br><br> | <br><br> | ||
:7. | :7. U kunt ook de website publiceren en deze als klant openen om het resultaat te bekijken. | ||
[[File:Squarespace website look.png | center]] | [[File:Squarespace website look.png|center]] | ||
<br><br> | <br><br> | ||
= Widget voor boekingsknop = | |||
:1. Ga in uw [https://simplybook.me/ Simplybook-] beheerderspagina naar <span style="background-color:#d4f8e5; padding:5px; border-radius:5px;">Instellingen</span> -> <span style="background-color:#d4f8e5; padding:5px; border-radius:5px;">Instellingen voor boekingswidgets</span> -> <span style="background-color:#d4f8e5; padding:5px; border-radius:5px;">Boekingsknop</span> | |||
:1. | |||
[[File:Booking widget path redesigned.png|1200px | center|link=https://help.simplybook.me/images/6/68/Booking_widget_path_redesigned.png]] | [[File:Booking widget path redesigned.png|1200px | center|link=https://help.simplybook.me/images/6/68/Booking_widget_path_redesigned.png]] | ||
<br><br> | <br><br> | ||
:2. | :2. Ga in uw Squarespace-account naar de pagina waaraan u de code wilt toevoegen, schakel over naar de bewerkingsmodus en selecteer "Code" blok toevoegen. | ||
[[File:Squarespace add new block.png | center]] | [[File:Squarespace add new block.png|center]] | ||
<br><br> | <br><br> | ||
[[File:Squarespace select code block.png | center]] | [[File:Squarespace select code block.png|center]] | ||
<br><br> | <br><br> | ||
:3. | :3. Voeg de code die u in de [https://simplybook.me/ Simplybook-be] heerderspagina hebt ontvangen, in uw Squarespace-pagina in. | ||
[[File:Squarespace add code.png | center]] | [[File:Squarespace add code.png|center]] | ||
<br><br> | <br><br> | ||
:4. | :4. Sla de pagina op en controleer het resultaat. | ||
[[File:Squarespace booking button widget new.png | center]] | [[File:Squarespace booking button widget new.png|center]] | ||
<br><br> | <br><br> | ||
Latest revision as of 11:07, 14 October 2025
iFrame-widget
- 1. Ga in uw Simplybook-beheerderspagina naar Instellingen -> Instellingen voor boekingswidgets -> iFrame-widget
- 2. Kies in uw Squarespace-account de pagina waar u uw boekingskalender wilt invoegen. We raden u aan een nieuwe pagina in de hoofdnavigatie te gebruiken die speciaal is ontworpen voor online boekingen.
- U kunt deze pagina 'Nu boeken', 'Online boeken' of 'Kalender' noemen.

- 3. Open de pagina-editor. Verwijder het standaard boekingsblok.
- 4. Klik op '+' in de rechterbovenhoek en selecteer Code in het blokmenu.


- 5. Voeg de code die u op de Simplybook- beheerderspagina hebt ontvangen in het HTML-codevak in en klik op 'Toepassen'.

- 6. Mogelijk krijgt u een bericht dat ingesloten scripts zijn uitgeschakeld. Dit is om veiligheidsredenen gedaan door Squarespace, maar u kunt op 'Preview' klikken om te zien of de widget werkt.

- 7. U kunt ook de website publiceren en deze als klant openen om het resultaat te bekijken.

Widget voor boekingsknop
- 1. Ga in uw Simplybook- beheerderspagina naar Instellingen -> Instellingen voor boekingswidgets -> Boekingsknop
- 2. Ga in uw Squarespace-account naar de pagina waaraan u de code wilt toevoegen, schakel over naar de bewerkingsmodus en selecteer "Code" blok toevoegen.
- 3. Voeg de code die u in de Simplybook-be heerderspagina hebt ontvangen, in uw Squarespace-pagina in.
- 4. Sla de pagina op en controleer het resultaat.
