From SimplyBook.me
No edit summary |
No edit summary |
||
| (23 intermediate revisions by the same user not shown) | |||
| Line 1: | Line 1: | ||
<languages/> | |||
<translate> | |||
<!--T:1--> | |||
{{#seo: | |||
|title=WordPress plugin - SimplyBook.me | |||
|description=Integrate SimplyBook.me with WordPress for effortless online bookings. Set it up easily with our comprehensive guide! | |||
|titlemode=append | |||
|keywords=faq, frequently asked questions, booking software, appointment system questions, appointments online, calendar software, booking system, booking calendar, scheduling software, online appointment scheduling, online scheduling, plugin, wordpress integration, widget, website widget, wordpress plugin | |||
}} | |||
</translate> | |||
<translate> | |||
<!--T:2--> | |||
__FORCETOC__ | __FORCETOC__ | ||
<!--T:3--> | |||
==With the help of WordPress plugin== | |||
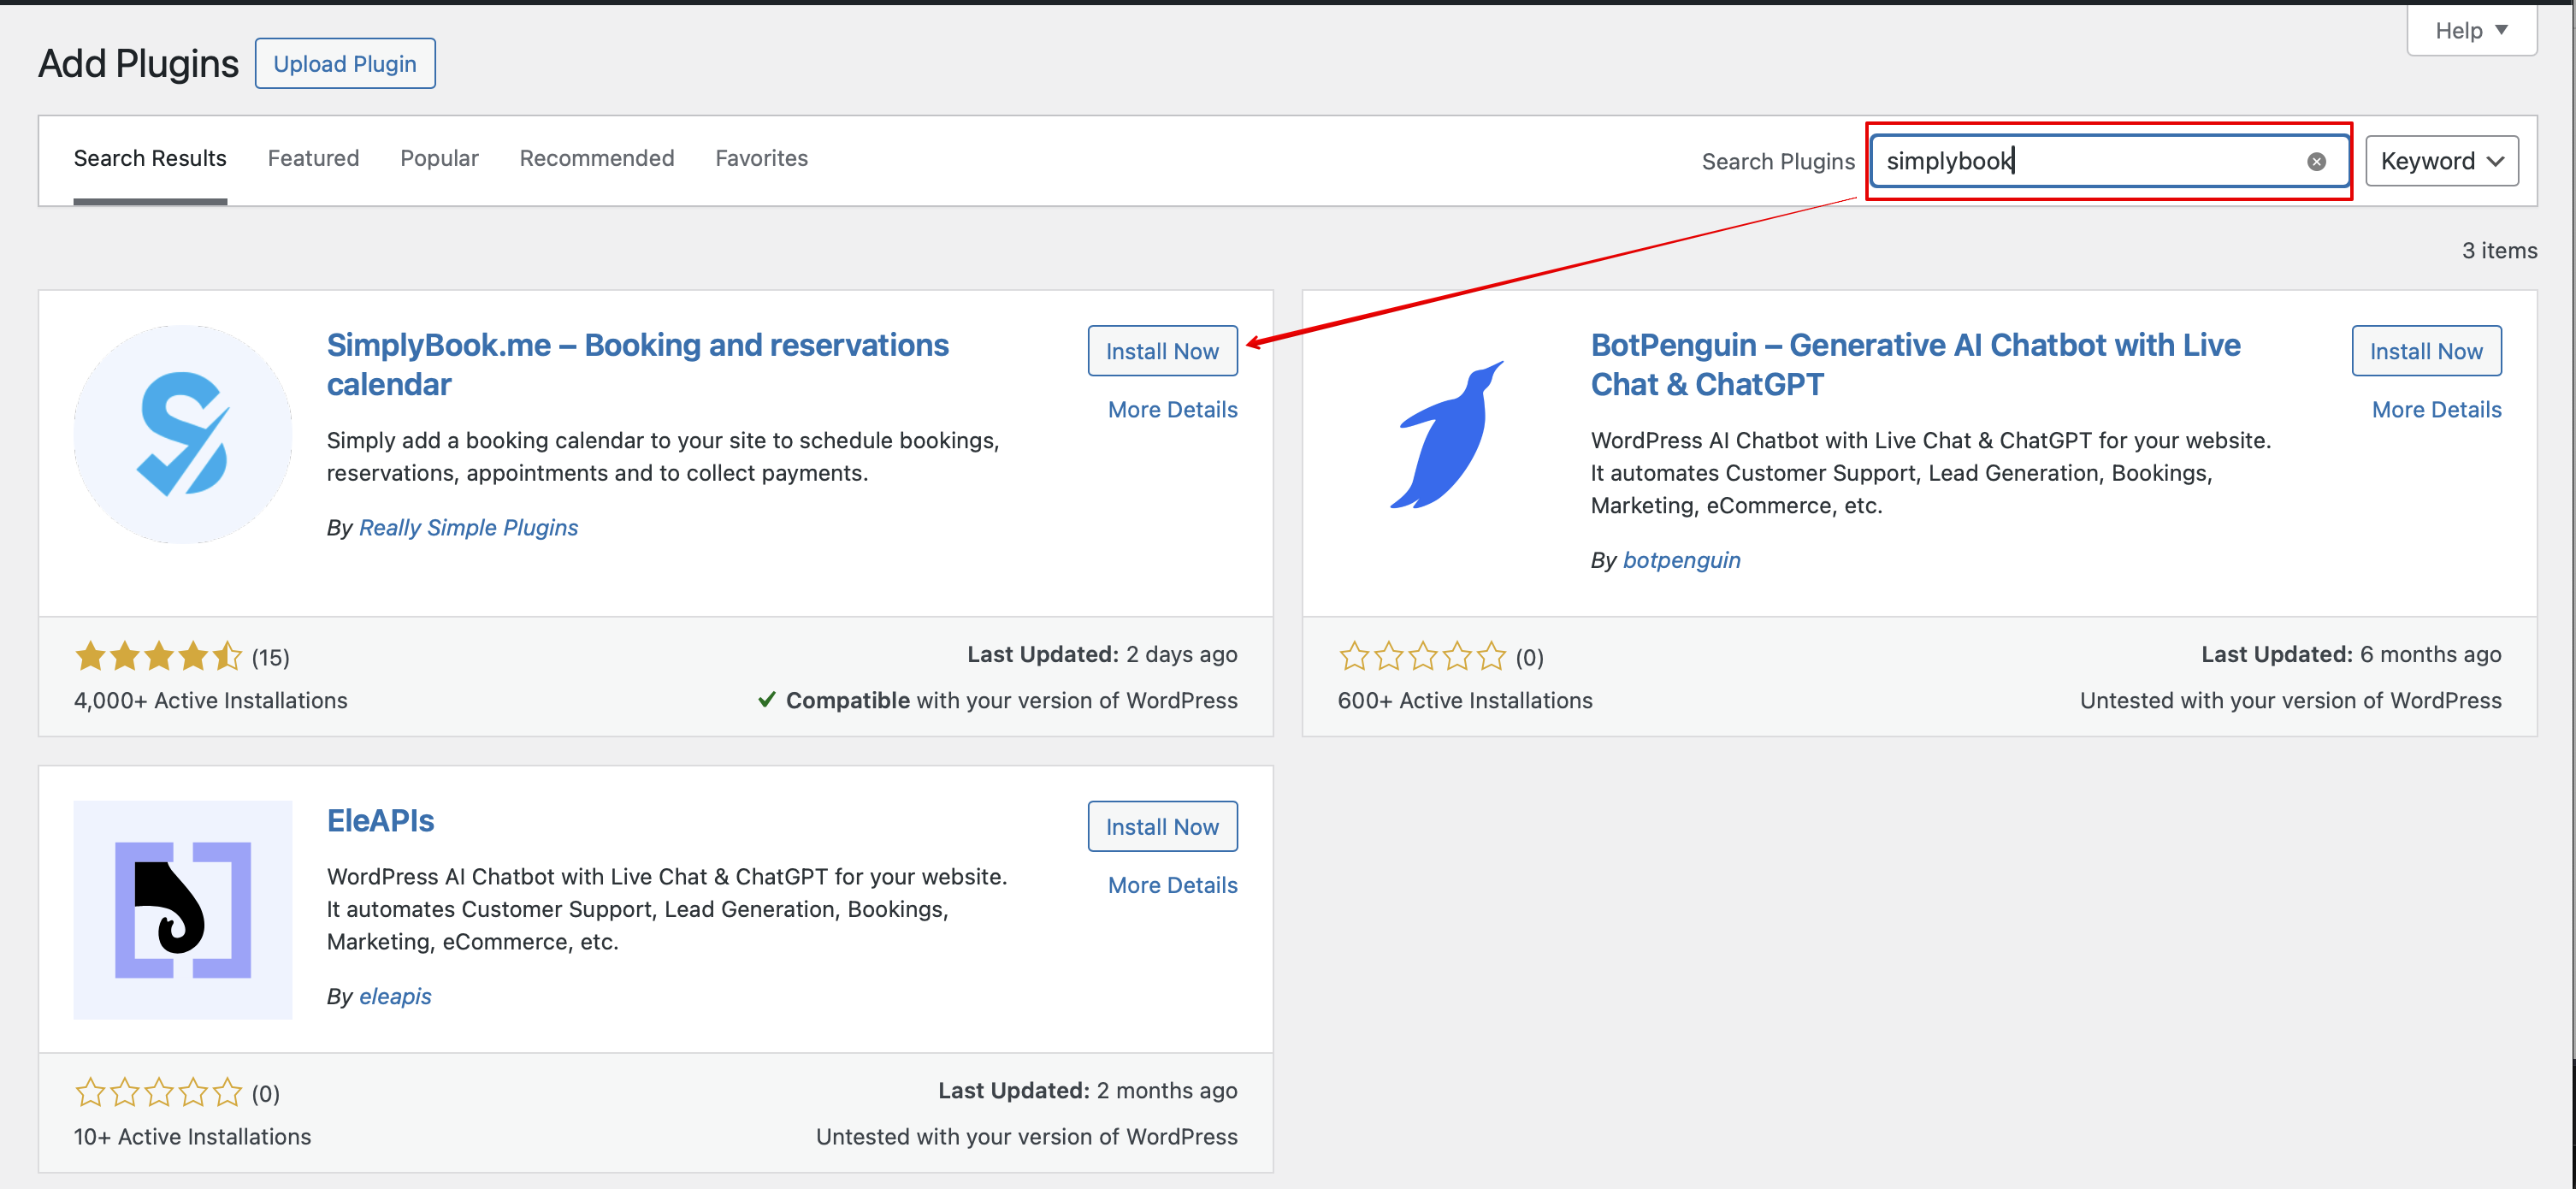
: | :1. In your WordPress admin interface navigate to <span style="background-color:#d4f8e5; padding:5px; border-radius:5px;">Plugins</span> -> <span style="background-color:#d4f8e5; padding:5px; border-radius:5px;">Add new Plugin</span> and search for '''Simplybook'''.<br> | ||
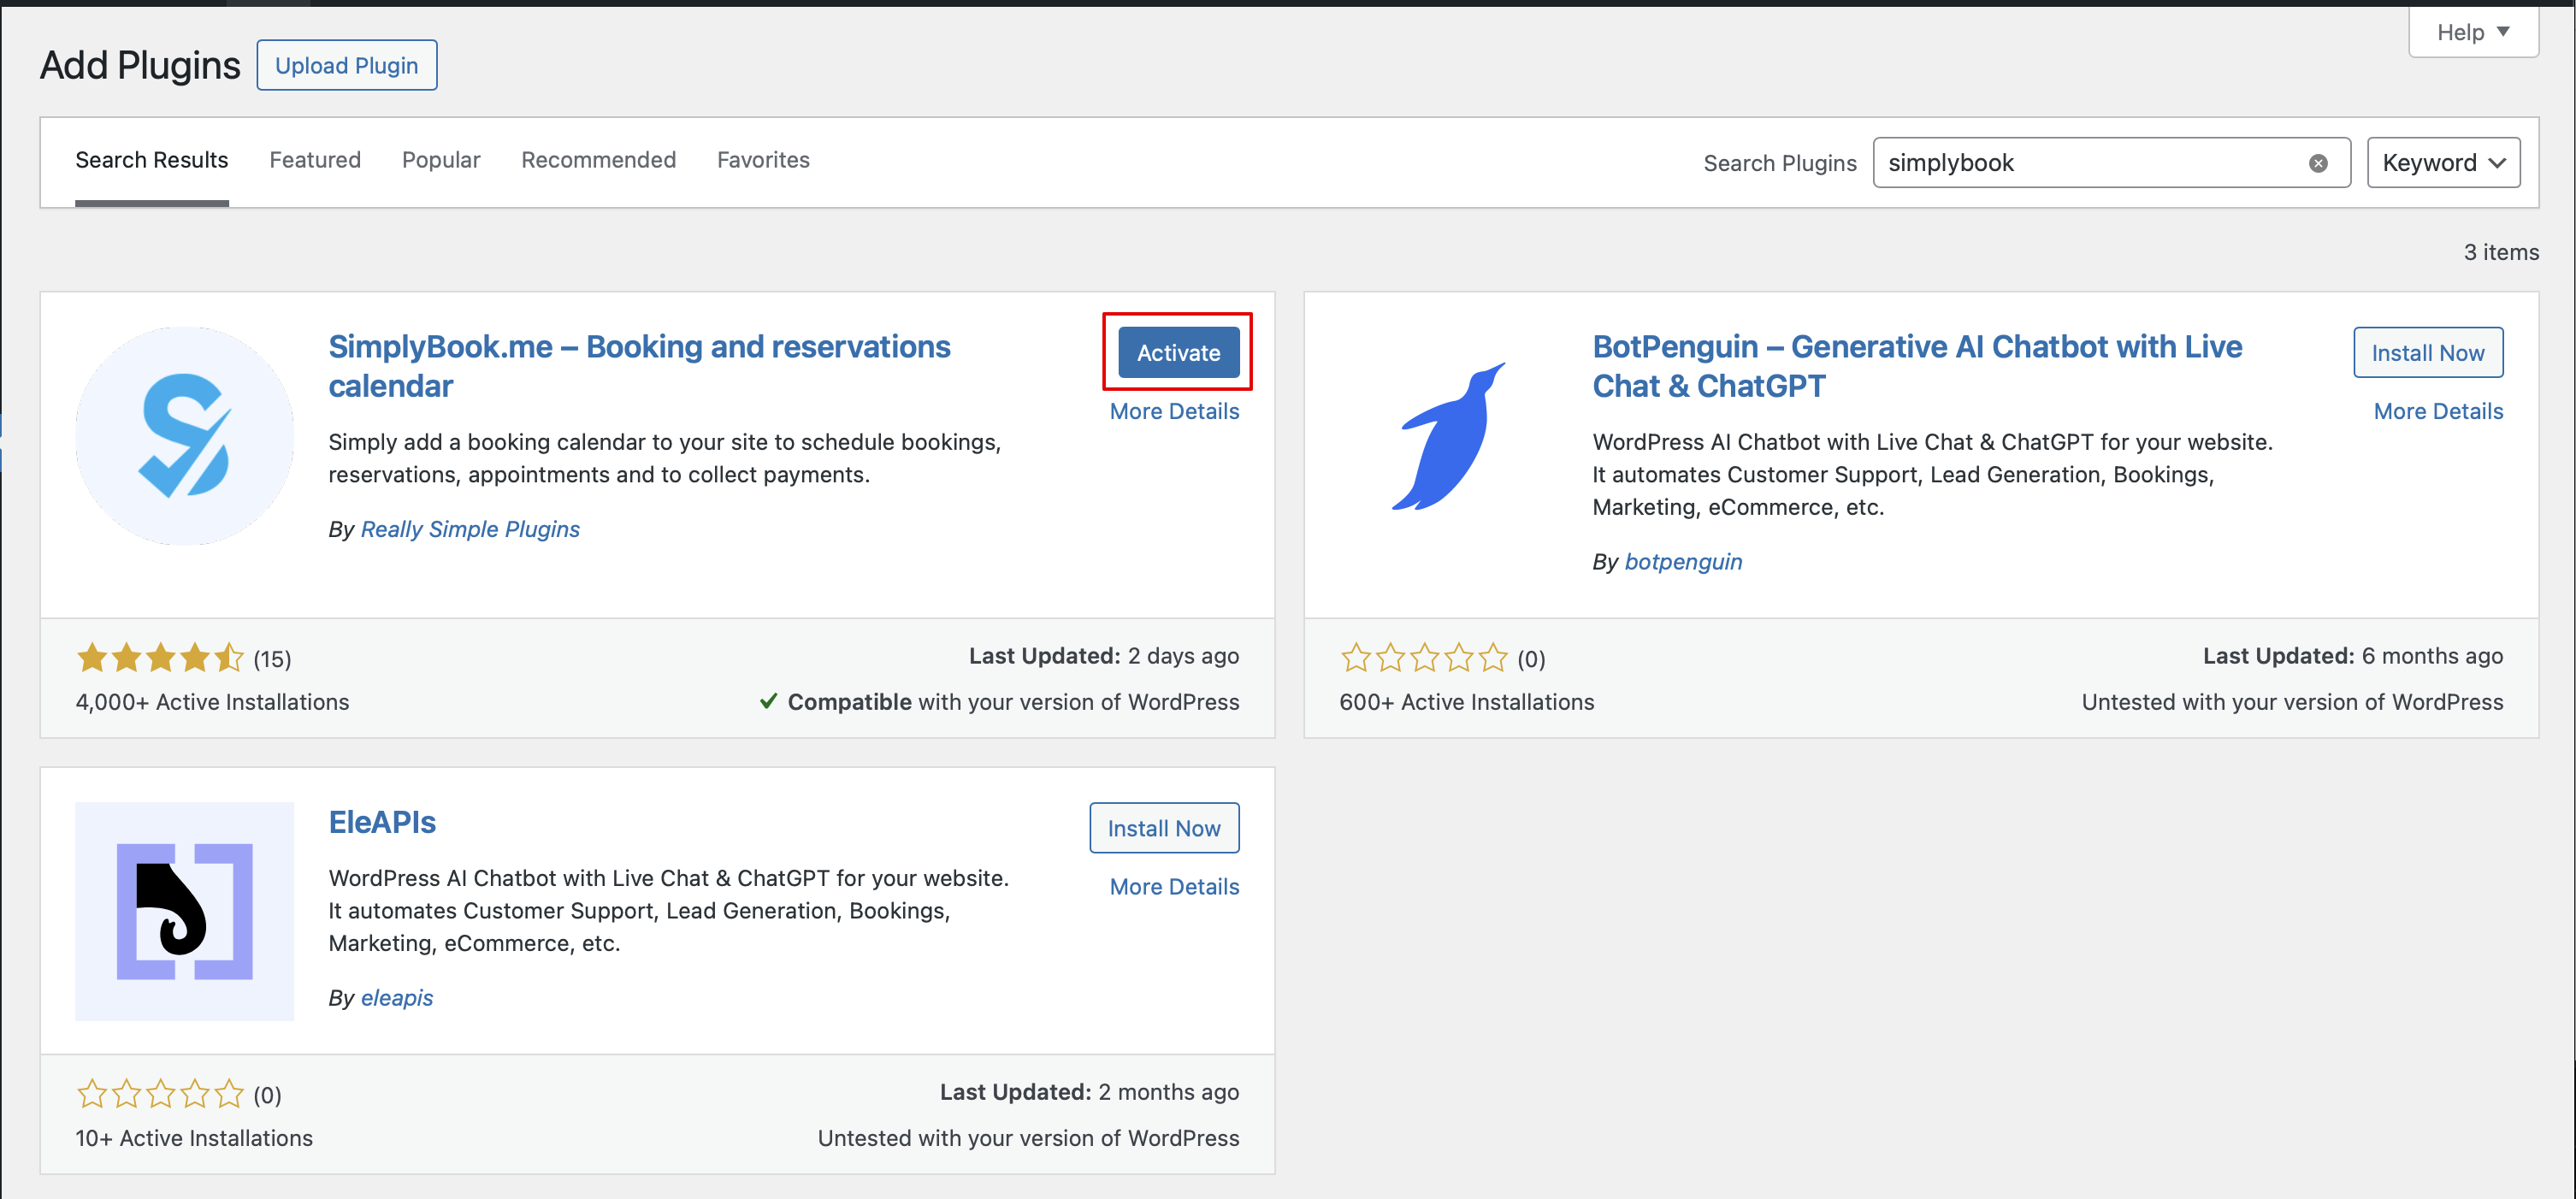
:Install it and Activate. | |||
[[File: | [[File:Add simplybook to wp new.png|1200px|center|link=https://help.simplybook.me/images/4/47/Add_simplybook_to_wp_new.png]] | ||
<br><br> | |||
[[File:Activate new wp plugin.png|1200px|center|link=https://help.simplybook.me/images/3/32/Activate_new_wp_plugin.png]] | |||
<br><br> | <br><br> | ||
:2. Navigate to plugin <span style="background-color:#d4f8e5; padding:5px; border-radius:5px;">Settings.</span> | |||
:2. | |||
<br><br> | <br><br> | ||
</translate> | |||
:3. | <translate> | ||
<!--T:4--> | |||
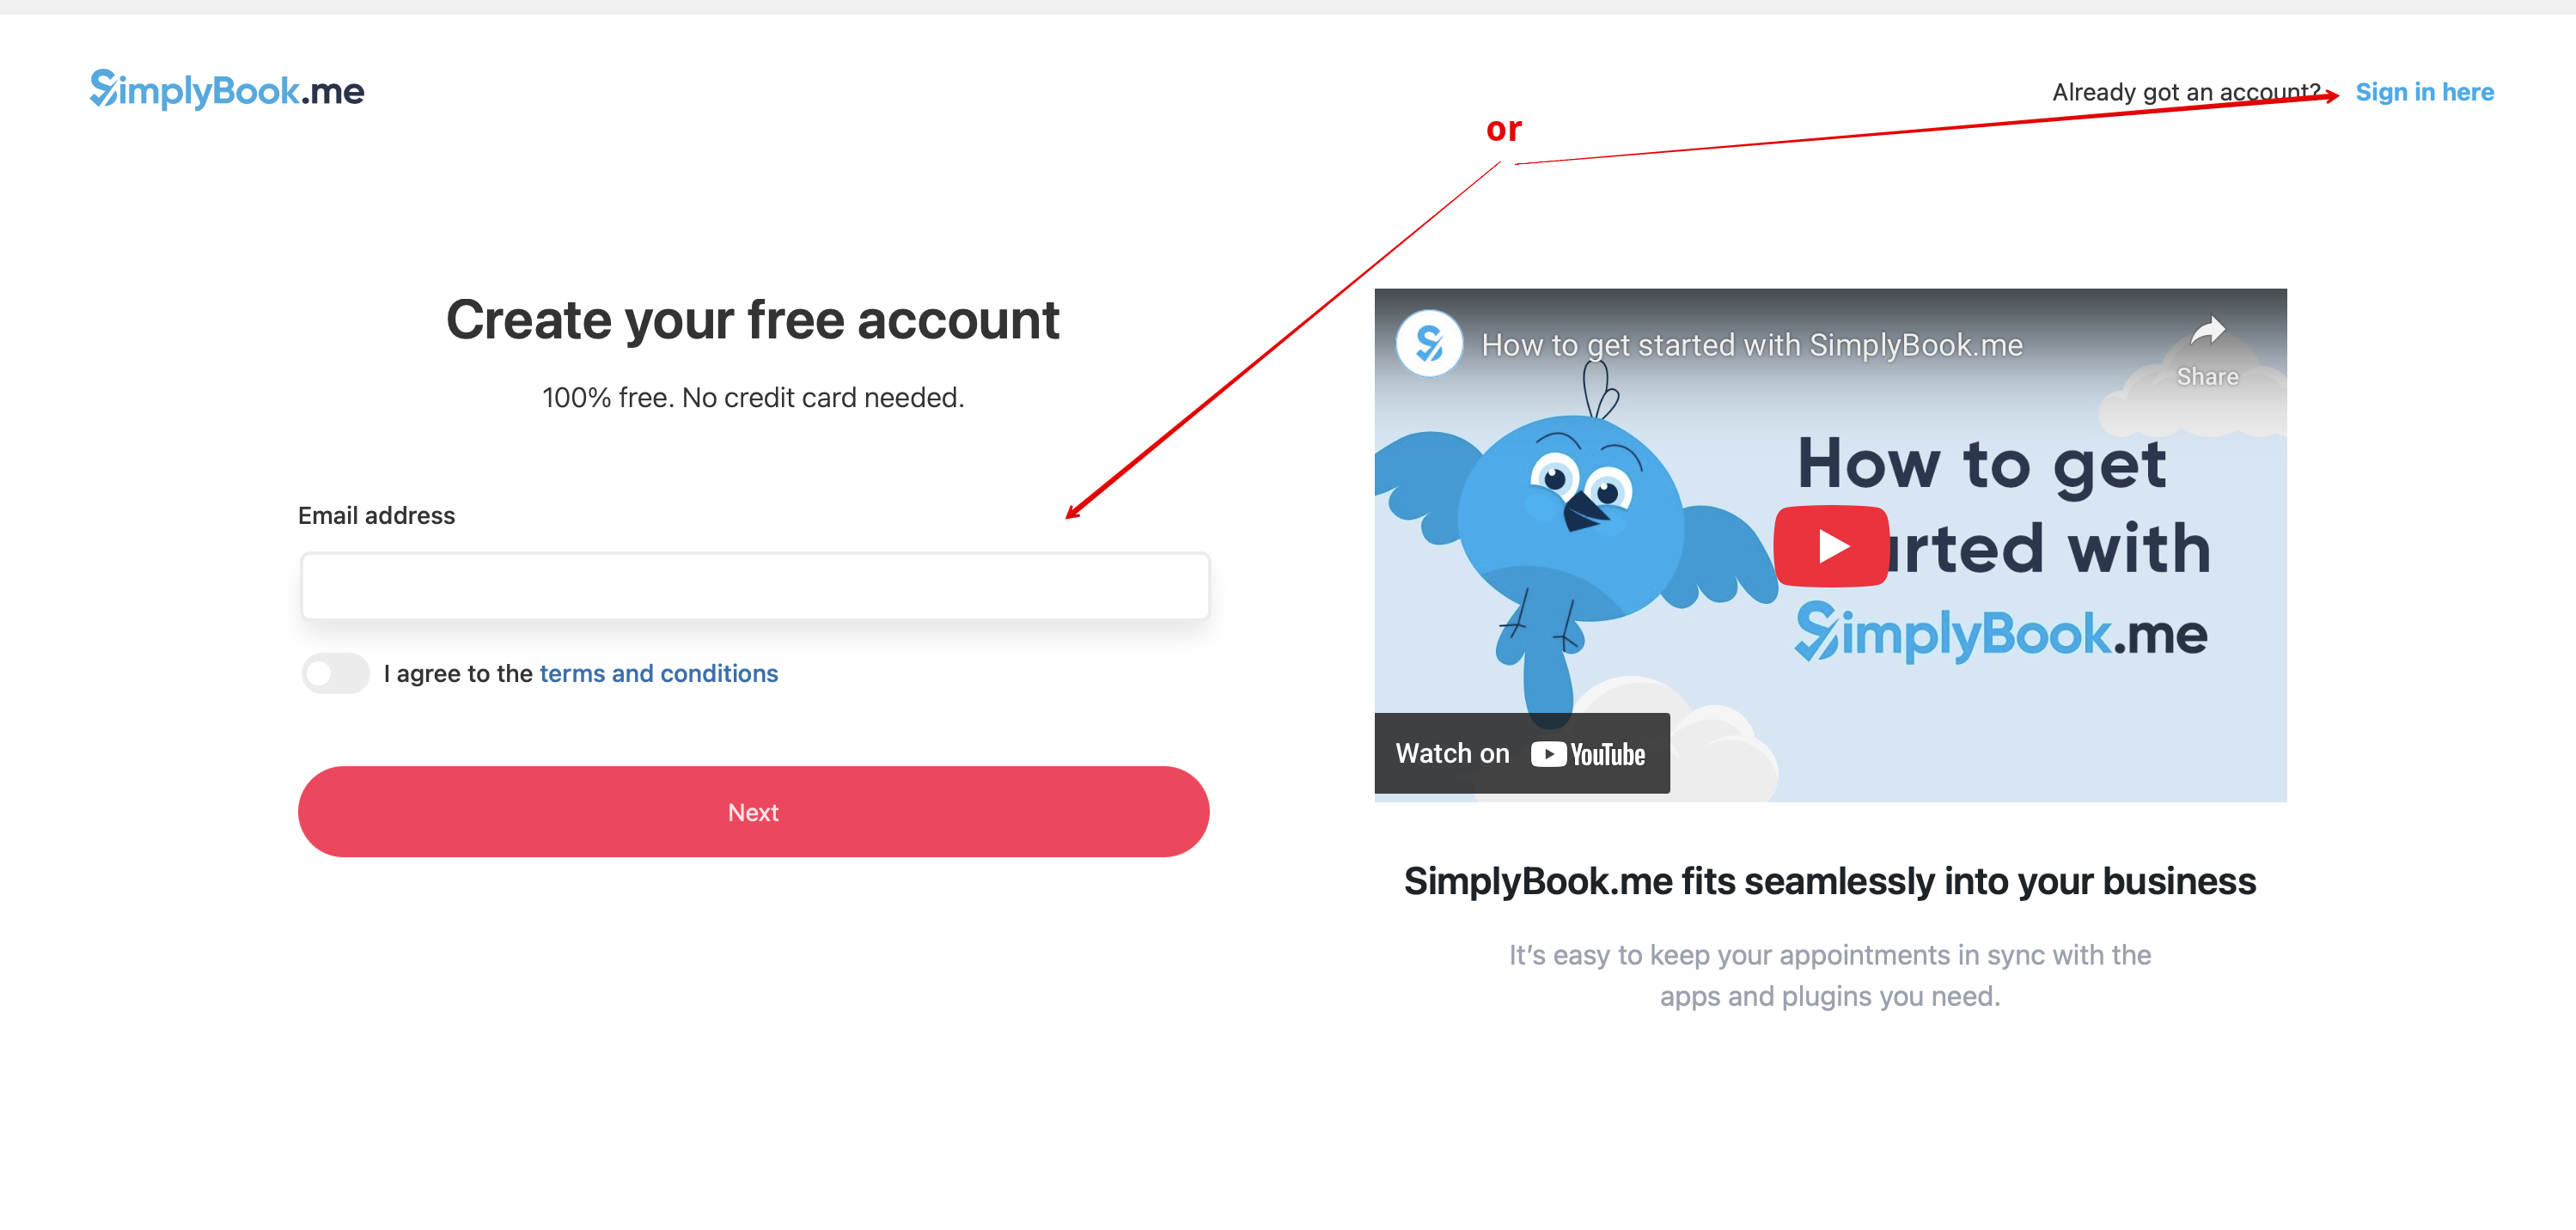
[[File: | :3. If you already have an account with SimplyBook.me please choose the <span style="background-color:#d4f8e5; padding:5px; border-radius:5px;">Sign in here</span> option there.<br> | ||
:If you have not created it yet, simply follow the <span style="background-color:#d4f8e5; padding:5px; border-radius:5px;">Create free account</span> steps. | |||
[[File:Create account or sign up in wp.png|1200px|center|link=https://help.simplybook.me/images/2/2f/Create_account_or_sign_up_in_wp.png]] | |||
<br><br> | <br><br> | ||
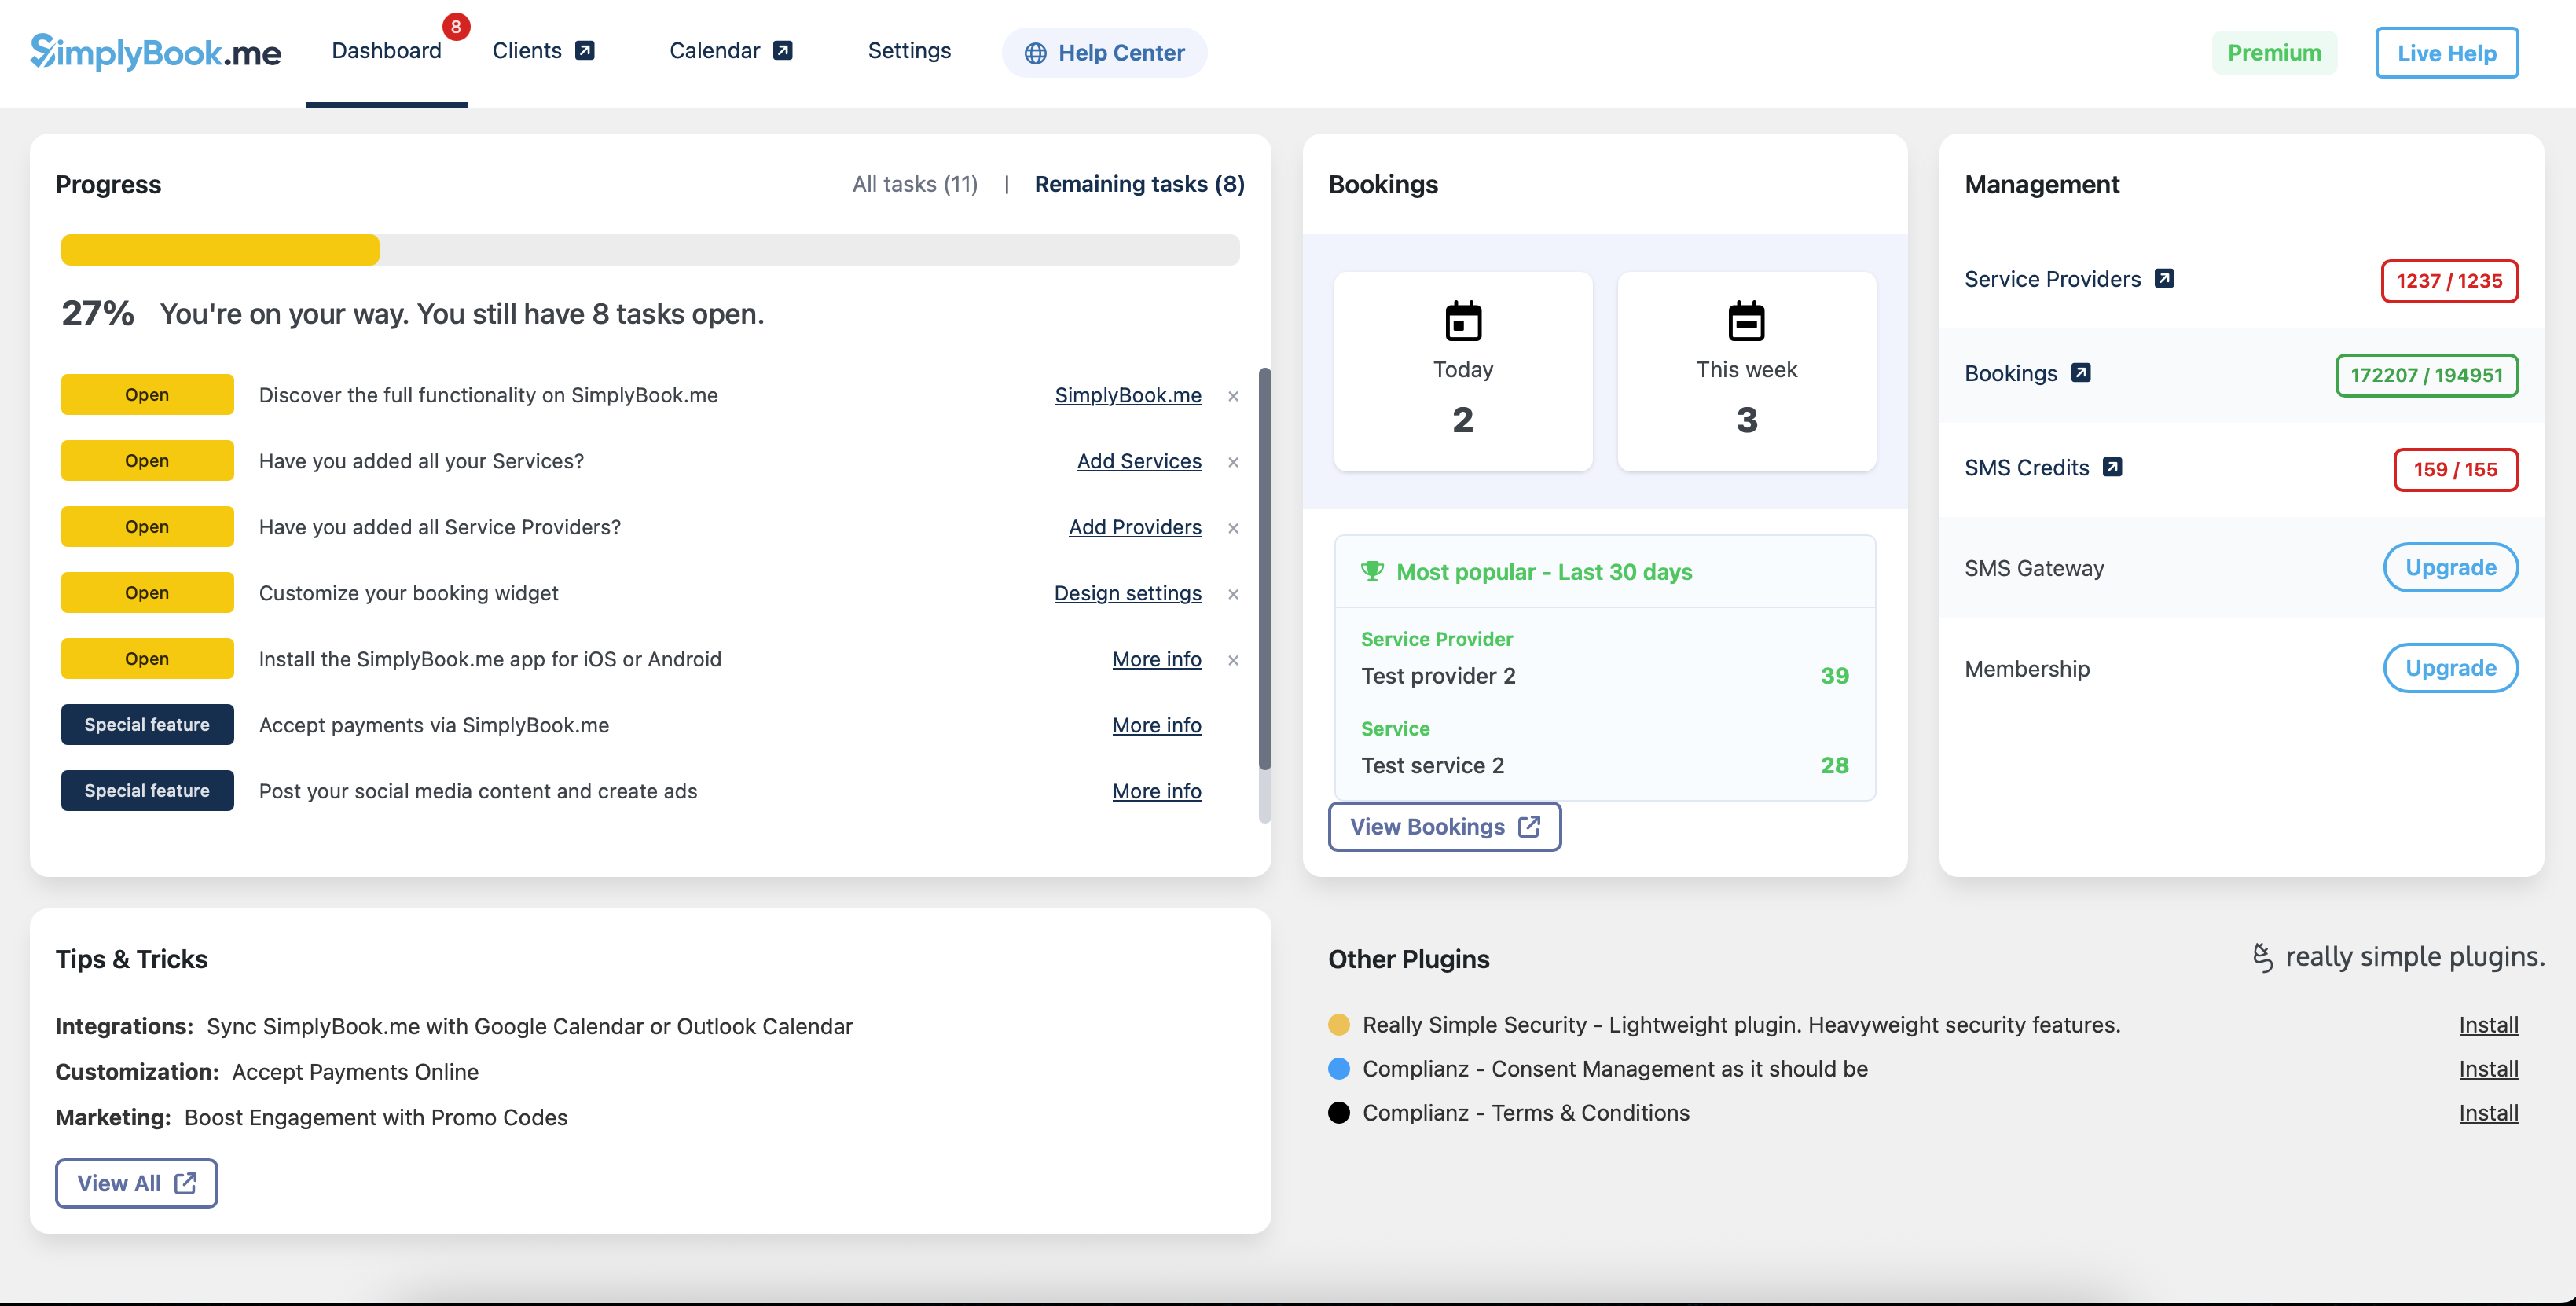
:4. After short registration/login process you will get to your <span style="background-color:#d4f8e5; padding:5px; border-radius:5px;">Dashboard</span> overview. | |||
After you | [[File:Wp new dashboard overview.png|1200px|center|link=https://help.simplybook.me/images/a/ab/Wp_new_dashboard_overview.png]] | ||
[[File: | |||
<br><br> | <br><br> | ||
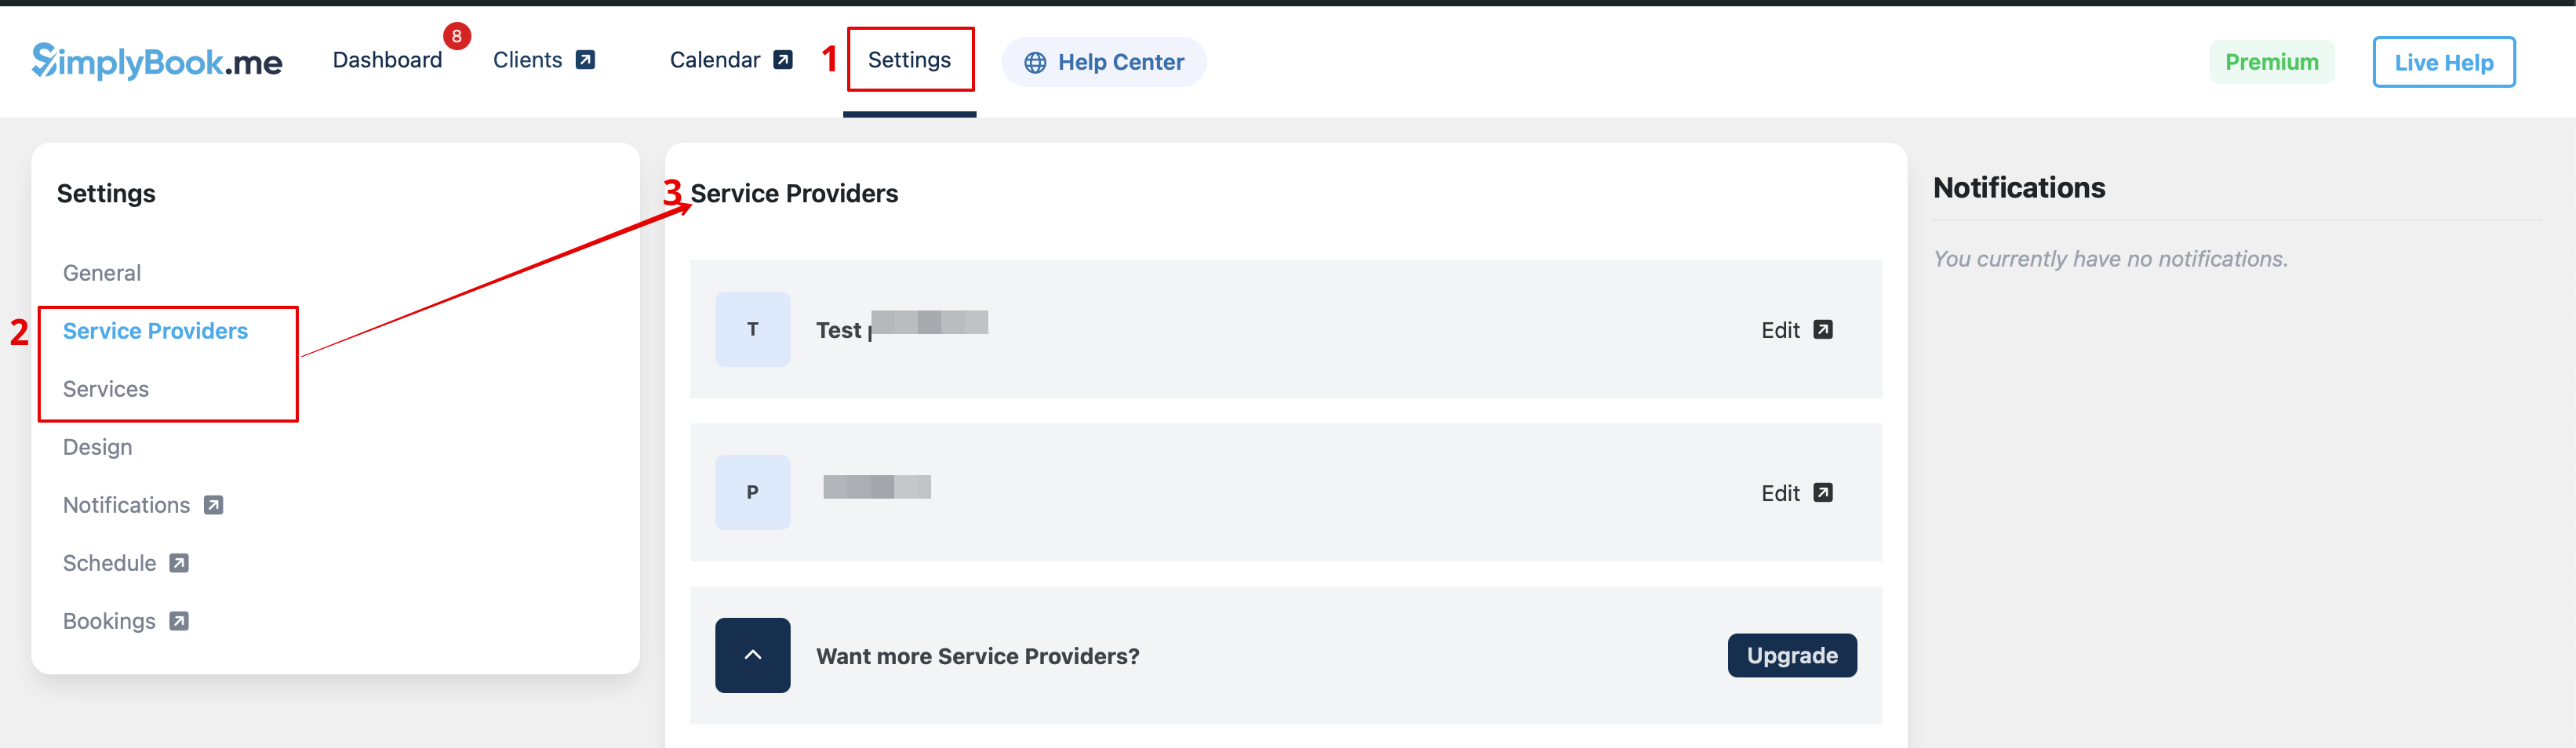
:5. Navigate to <span style="background-color:#d4f8e5; padding:5px; border-radius:5px;">Settings</span> tab and choose "Services" or "Providers" tab to see the list of existing ones in your account and easily navigate to manage them or add more. | |||
[[File:Wp new see the list of services and providers.png|1200px|center|link=https://help.simplybook.me/images/9/97/Wp_new_see_the_list_of_services_and_providers.png]] | |||
</translate> | |||
<translate> | |||
[[File: | <!--T:5--> | ||
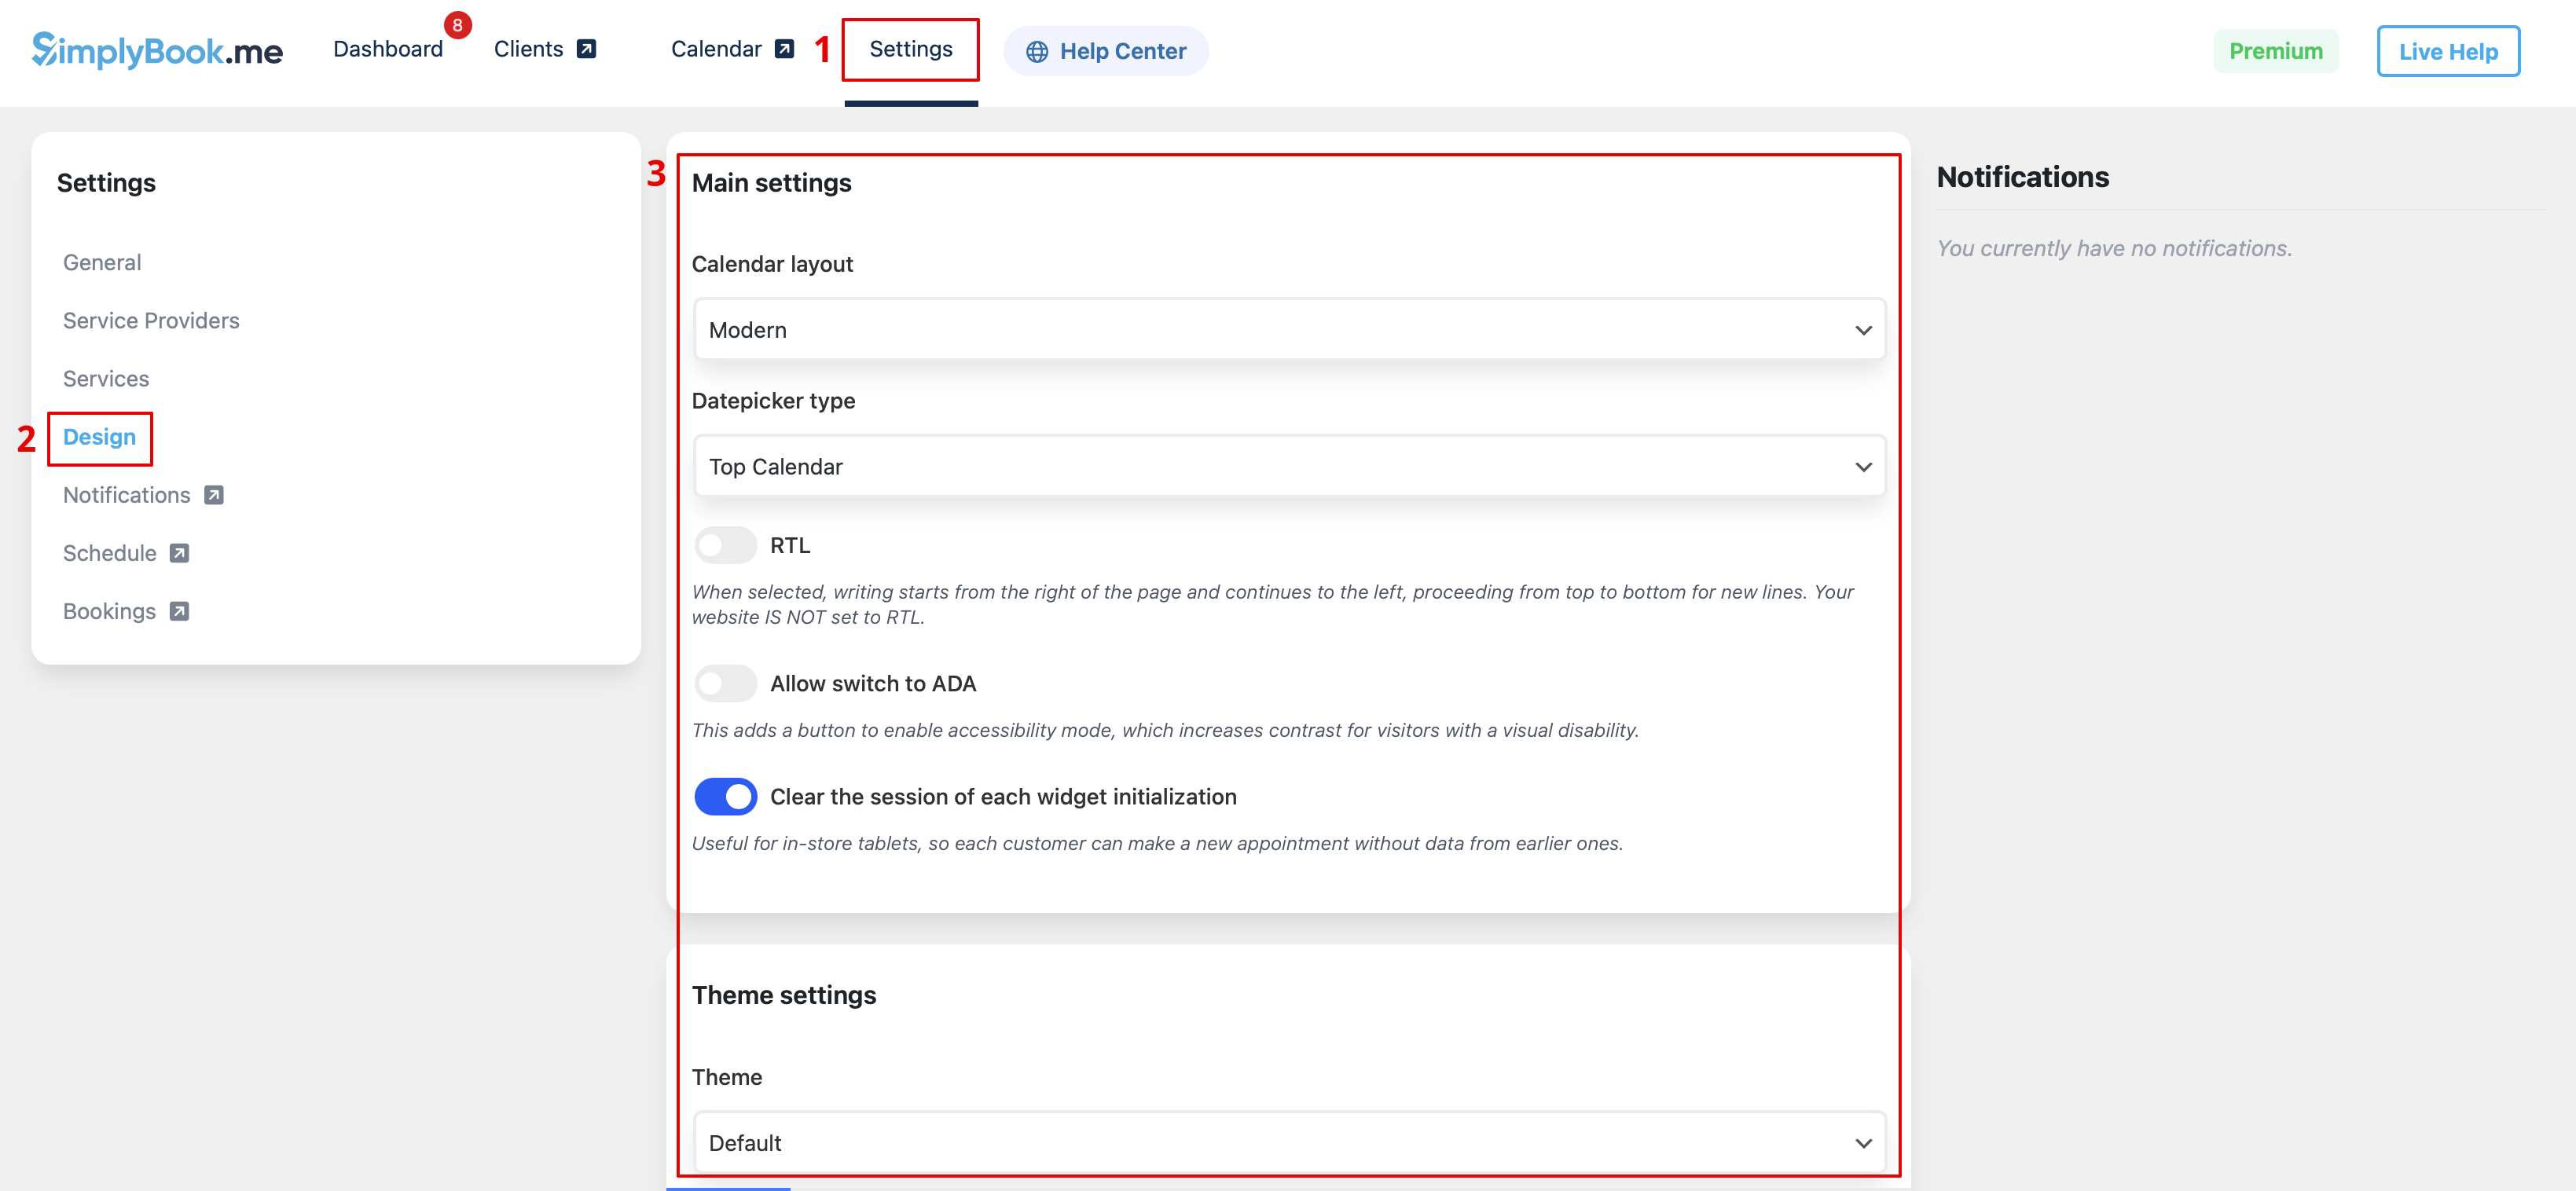
:6. Switch to <span style="background-color:#d4f8e5; padding:5px; border-radius:5px;">Design</span> tab.<br> | |||
:Adjust the look for your widget.<br> | |||
:You can select the preferable calendar layout, adjust the colors and much more. | |||
[[File:Wp new design settings path.png|1200px|center|link=https://help.simplybook.me/images/b/ba/Wp_new_design_settings_path.png]] | |||
<br><br> | <br><br> | ||
:7. Save your settings and navigate to <span style="background-color:#d4f8e5; padding:5px; border-radius:5px;">Pages</span> tab of the WordPress interface.<br> | |||
:Open the page you would like to add the booking functionality to or add a new one. | |||
: | :Click on "+" button there and look for '''Simplybook''' option. Click on it to add to the page. Save the page. | ||
: | :After the website is published the clients will be able to book your services. | ||
[[File:Wp new add plugin to page.png|1200px|center|link=https://help.simplybook.me/images/7/7e/Wp_new_add_plugin_to_page.png]] | |||
[[File:Wp plugin | |||
<br><br> | <br><br> | ||
</translate> | |||
<translate> | |||
:6. | <!--T:6--> | ||
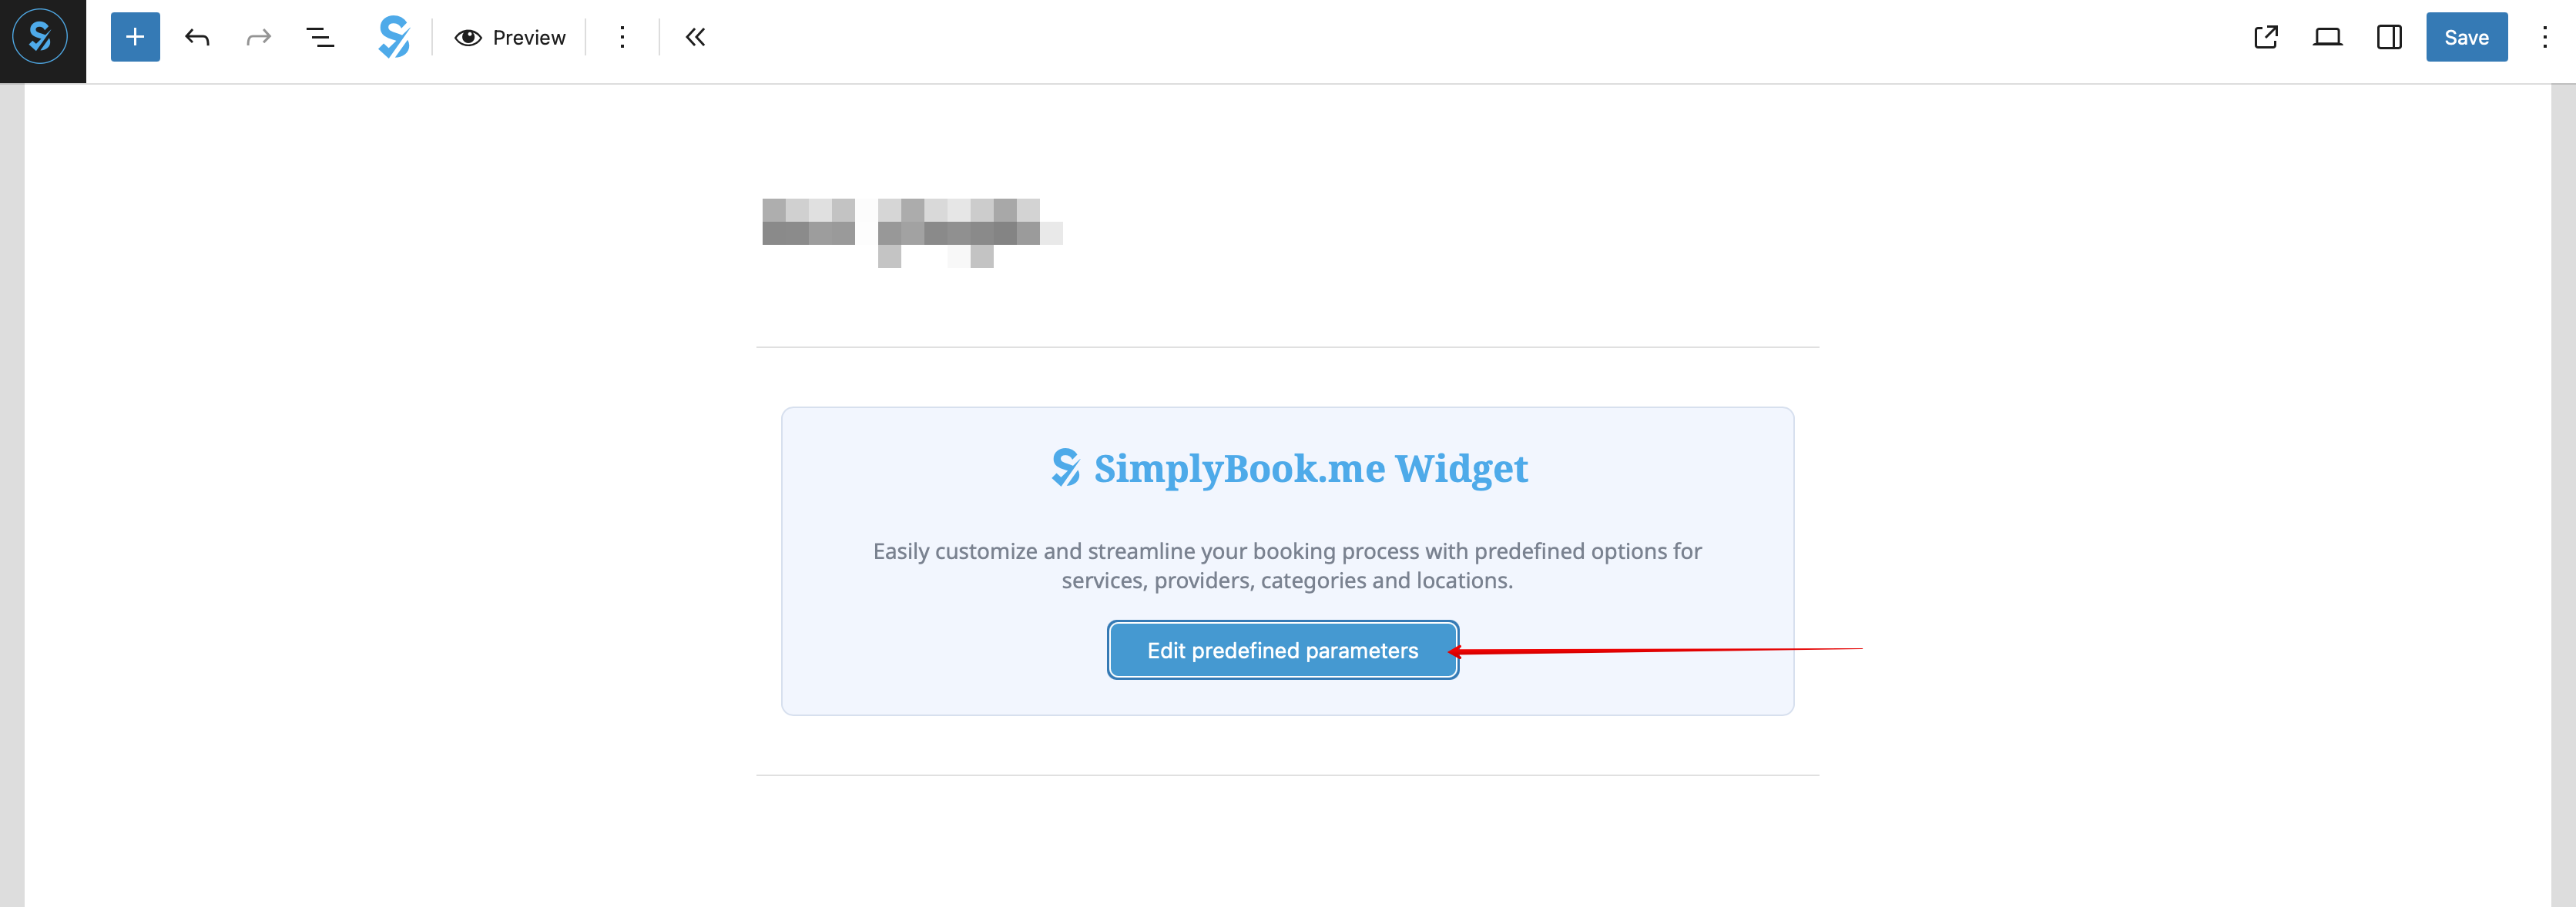
:8. (optional) If you need to have the booking functionality only for some service/provider/location/category you can use <span style="background-color:#d4f8e5; padding:5px; border-radius:5px;">Edit predefined parameters</span> option there. | |||
[[File:Wp edit predefined path.png|1200px|center|link=https://help.simplybook.me/images/d/d7/Wp_edit_predefined_path.png]] | |||
[[File: | |||
<br><br> | <br><br> | ||
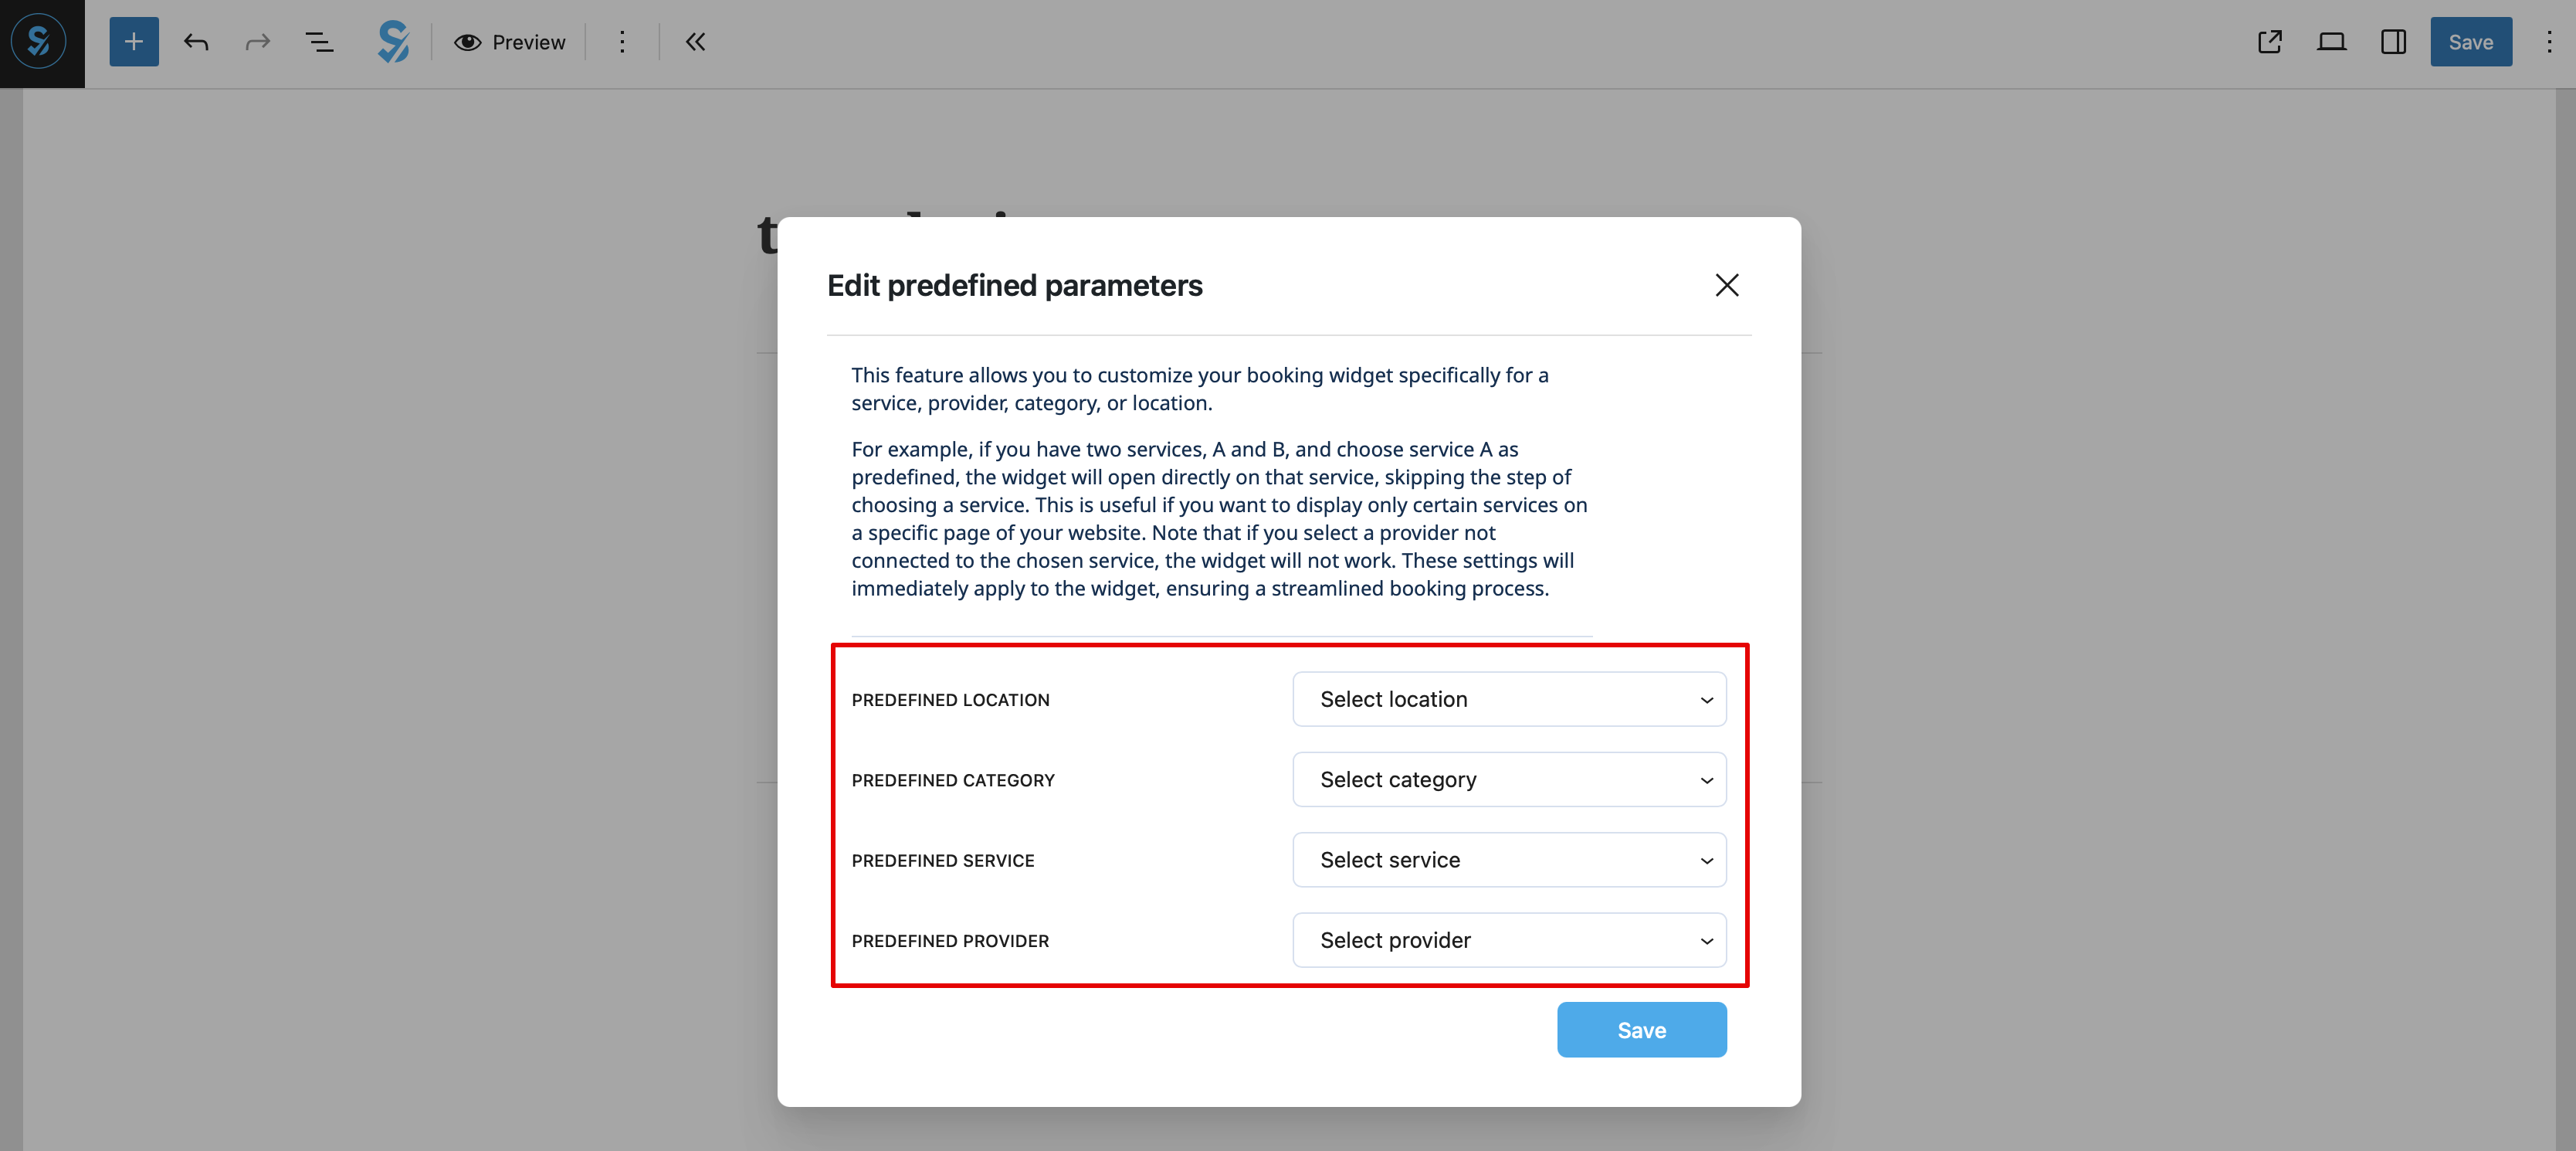
: | :And select the necessary one(s) in the popup that appears. | ||
[[File:Wp new predefined options.png|1200px|center|link=https://help.simplybook.me/images/7/70/Wp_new_predefined_options.png]] | |||
[[File: | |||
<br><br> | <br><br> | ||
:9. As alternative way to add the functionality to the page you can use the shortcode. | |||
:Copy the calendar shortcode from the plugin <span style="background-color:#d4f8e5; padding:5px; border-radius:5px;">Settings</span> page. | |||
[[File: | [[File:Wp new shortcode for widget.png|1200px|center|link=https://help.simplybook.me/images/e/e5/Wp_new_shortcode_for_widget.png]] | ||
<br><br> | <br><br> | ||
:And simply paste it to the HTML part on the desired page | |||
[[File:Wp new paste shortcode.png|1200px|center|link=https://help.simplybook.me/images/0/0a/Wp_new_paste_shortcode.png]] | |||
[[File: | |||
<br><br> | <br><br> | ||
</translate> | |||
<translate> | |||
<!--T:7--> | |||
==As a Widget== | |||
:1. Please copy the code from <span style="background-color:#d4f8e5; padding:5px; border-radius:5px;">Settings</span> -> <span style="background-color:#d4f8e5; padding:5px; border-radius:5px;">Booking widgets settings</span> -> <span style="background-color:#d4f8e5; padding:5px; border-radius:5px;">iFrame widget</span> -> <span style="background-color:#d4f8e5; padding:5px; border-radius:5px;">Get widget code.</span> | |||
[[File: | <!--T:8--> | ||
[[File:Booking widget path redesigned.png|1200px | center|link=https://help.simplybook.me/images/6/68/Booking_widget_path_redesigned.png]] | |||
<br><br> | <br><br> | ||
[[File:Booking widget design path redesigned.png|1200px | center|link=https://help.simplybook.me/images/3/37/Booking_widget_design_path_redesigned.png]] | |||
<br><br> | <br><br> | ||
= | [[File:Copy widget code redesigned.png|1200px | center|link=https://help.simplybook.me/images/b/b4/Copy_widget_code_redesigned.png ]] | ||
<br><br> | <br><br> | ||
:2. Go to your WordPress admn side and create a new page or navigate to already created one, where you plan to add the widget. Click on <span style="background-color:#d4f8e5; padding:5px; border-radius:5px;">+</span> icon. | |||
[[File: | [[File:Creating new page wp.png | center]] | ||
<br><br> | |||
:3. Search for <span style="background-color:#d4f8e5; padding:5px; border-radius:5px;">HTML</span> option. | |||
[[File:Add html editor.png | center]] | |||
<br><br> | <br><br> | ||
:4. Paste the previously copied code. | |||
[[File: | [[File:Paste the code.png | center]] | ||
<br><br> | <br><br> | ||
:5. Publish your changes. | |||
<br><br> | <br><br> | ||
</translate> | |||
<translate> | |||
<!--T:9--> | |||
:<span style="background-color:#fef3de; padding:5px; border-radius:5px;">Example</span> (may look different depending on your WP theme and [https://simplybook.me/ SimplyBook.me] theme and settings). | |||
[[File:Wp | <!--T:10--> | ||
[[File:Wp select location.png| center]] | |||
<br><br> | <br><br> | ||
<br><br> | <br><br> | ||
==AI Voice Booking== | |||
With the AI Voice Booking widget, you can easily place an interactive AI widget button anywhere on your client’s website. Simply enable your feature on SimplyBook.me side, insert the widget code into an HTML section in your website builder and visitors will be able to book appointments just by messaging or speaking to the AI directly on the site. Please, check the [[Special:MyLanguage/AI Voice Booking|tutorial]] to setup the integration. | |||
</translate> | |||
Latest revision as of 08:33, 3 December 2025
With the help of WordPress plugin
- 1. In your WordPress admin interface navigate to Plugins -> Add new Plugin and search for Simplybook.
- Install it and Activate.
- 2. Navigate to plugin Settings.
- 3. If you already have an account with SimplyBook.me please choose the Sign in here option there.
- If you have not created it yet, simply follow the Create free account steps.
- 4. After short registration/login process you will get to your Dashboard overview.
- 5. Navigate to Settings tab and choose "Services" or "Providers" tab to see the list of existing ones in your account and easily navigate to manage them or add more.
- 6. Switch to Design tab.
- Adjust the look for your widget.
- You can select the preferable calendar layout, adjust the colors and much more.
- 7. Save your settings and navigate to Pages tab of the WordPress interface.
- Open the page you would like to add the booking functionality to or add a new one.
- Click on "+" button there and look for Simplybook option. Click on it to add to the page. Save the page.
- After the website is published the clients will be able to book your services.

- 8. (optional) If you need to have the booking functionality only for some service/provider/location/category you can use Edit predefined parameters option there.
- And select the necessary one(s) in the popup that appears.
- 9. As alternative way to add the functionality to the page you can use the shortcode.
- Copy the calendar shortcode from the plugin Settings page.
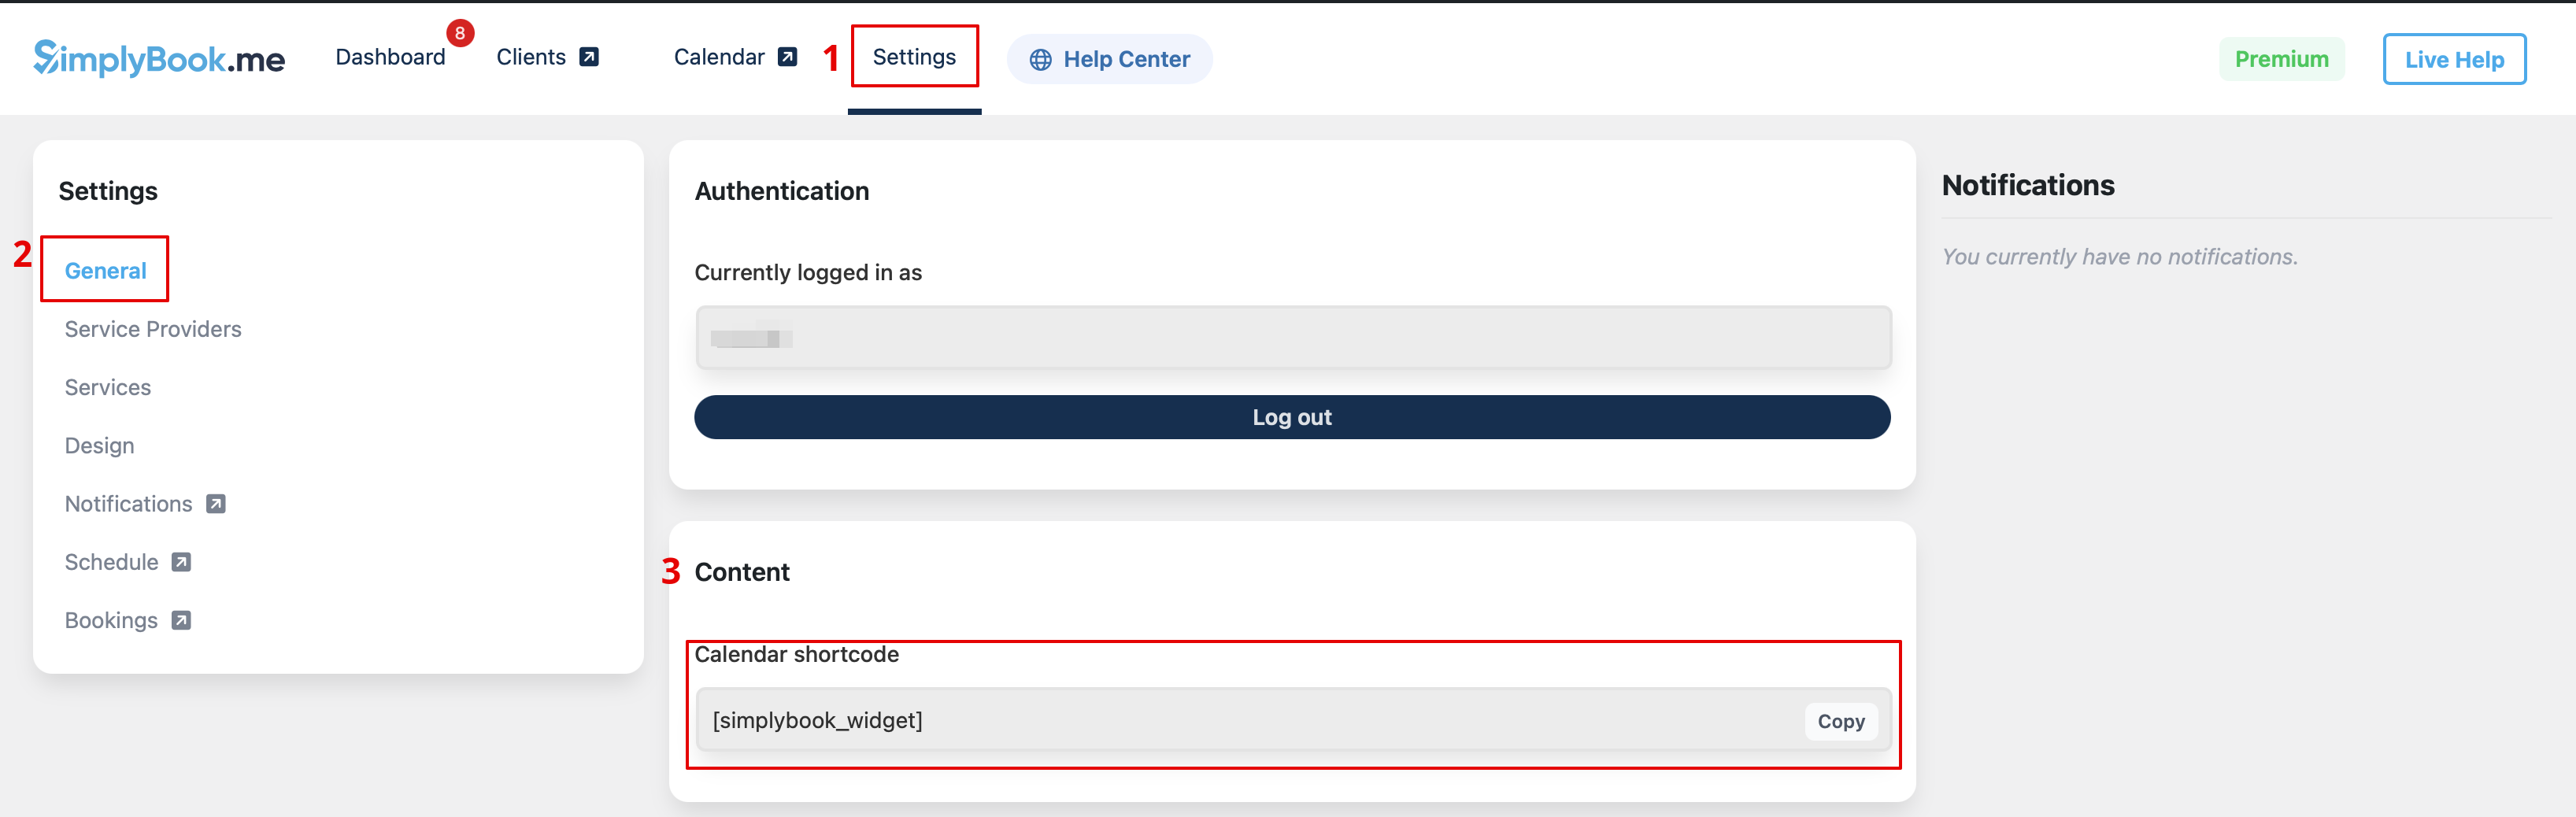
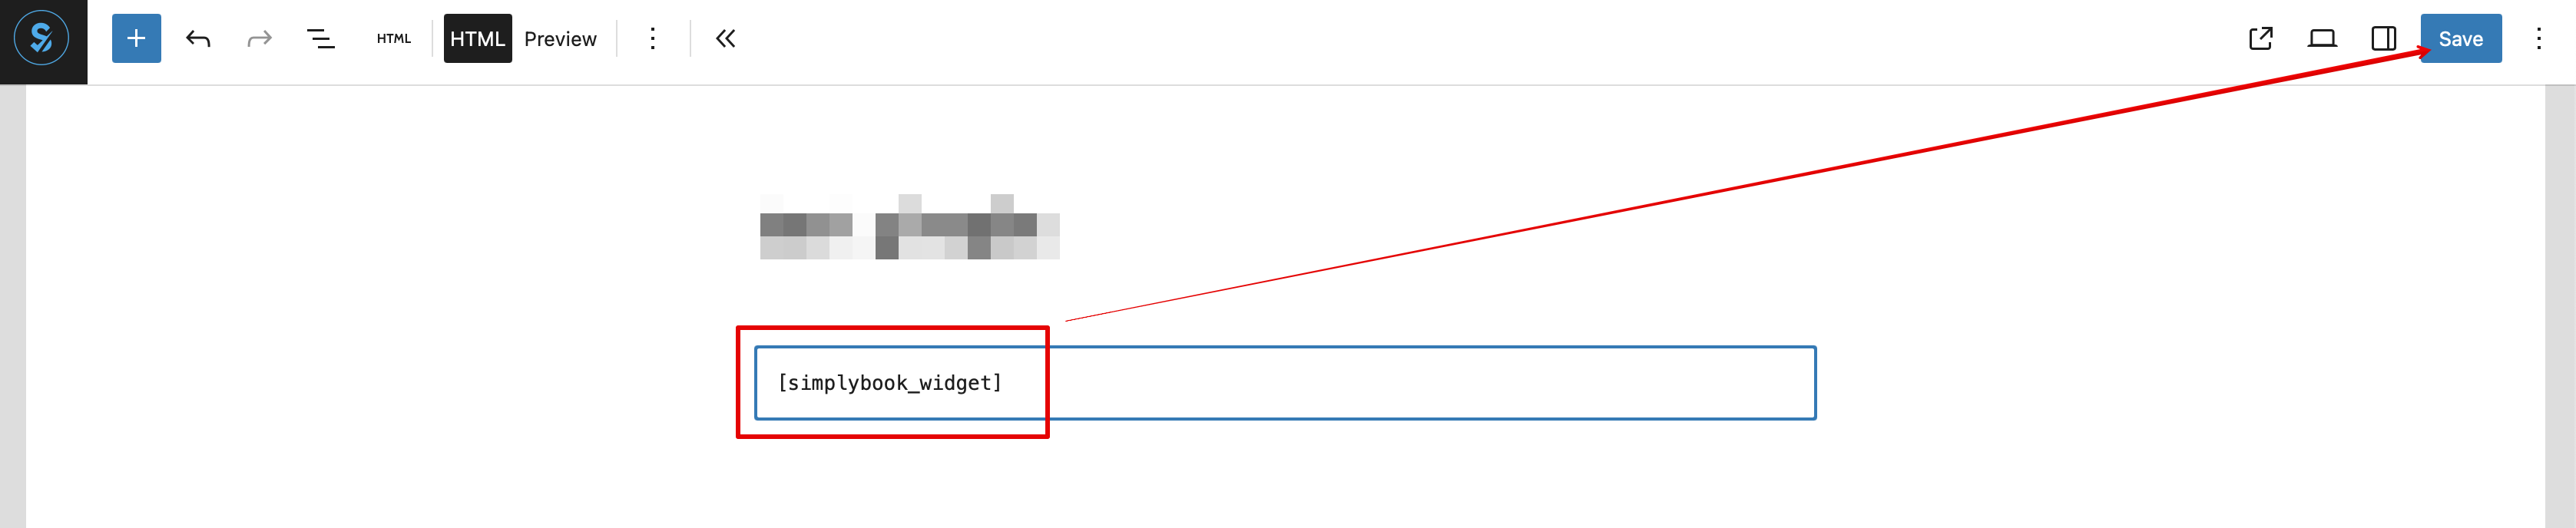
- And simply paste it to the HTML part on the desired page
As a Widget
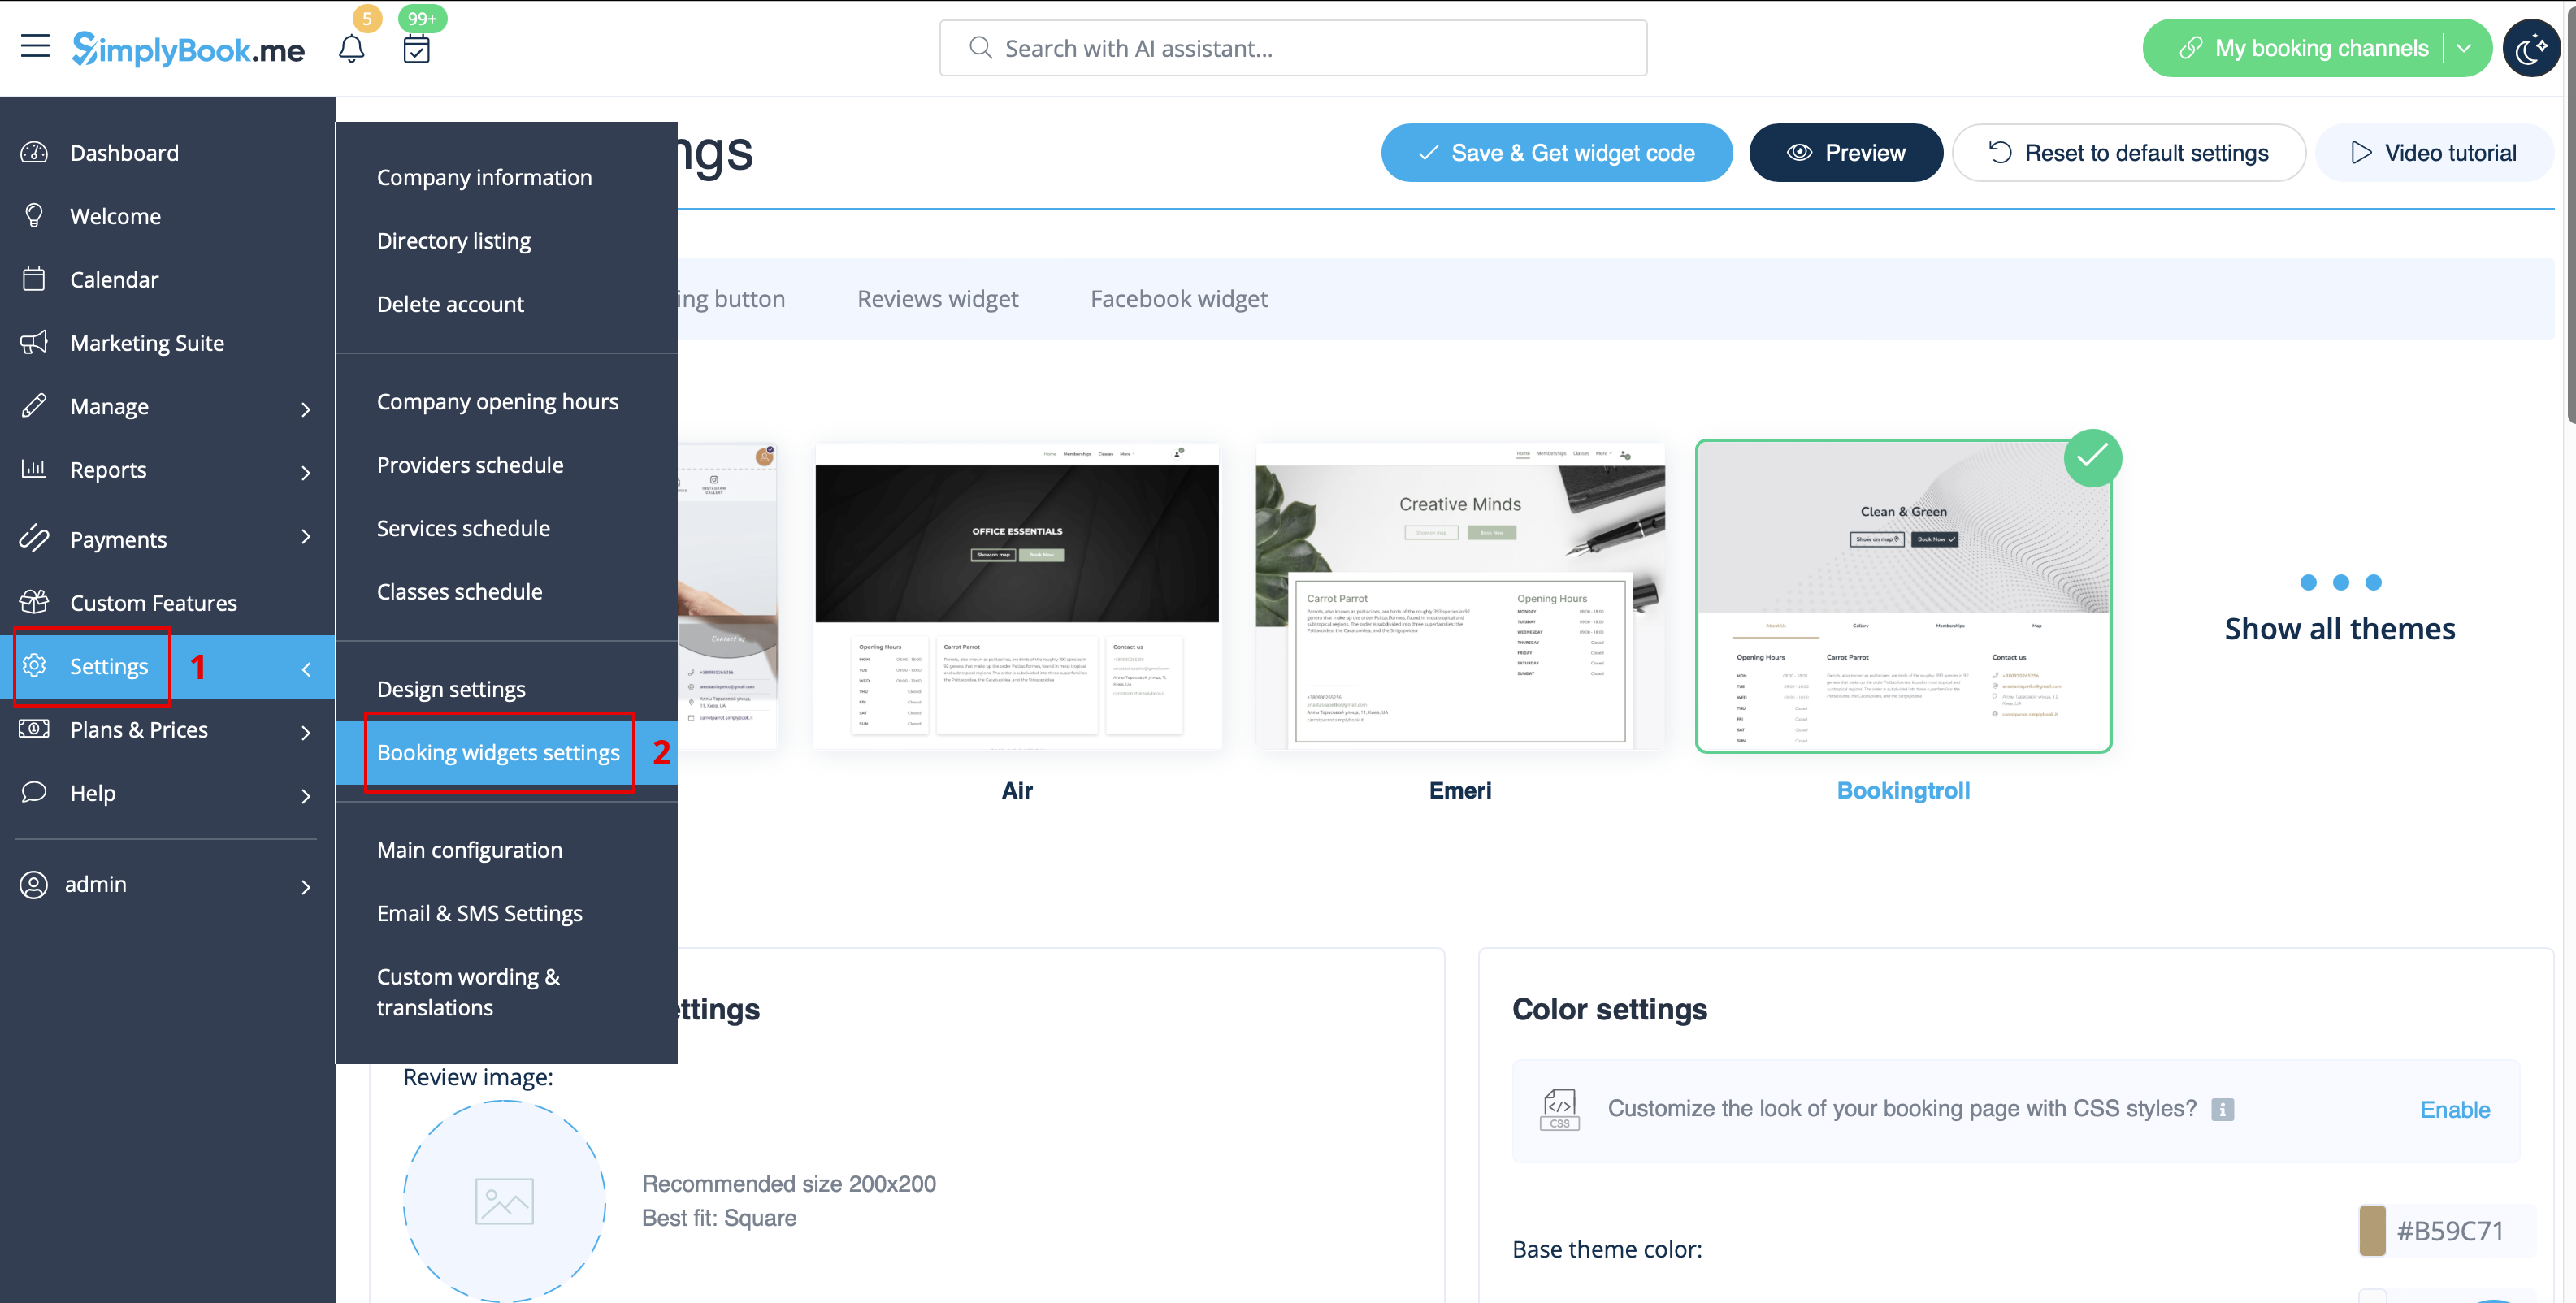
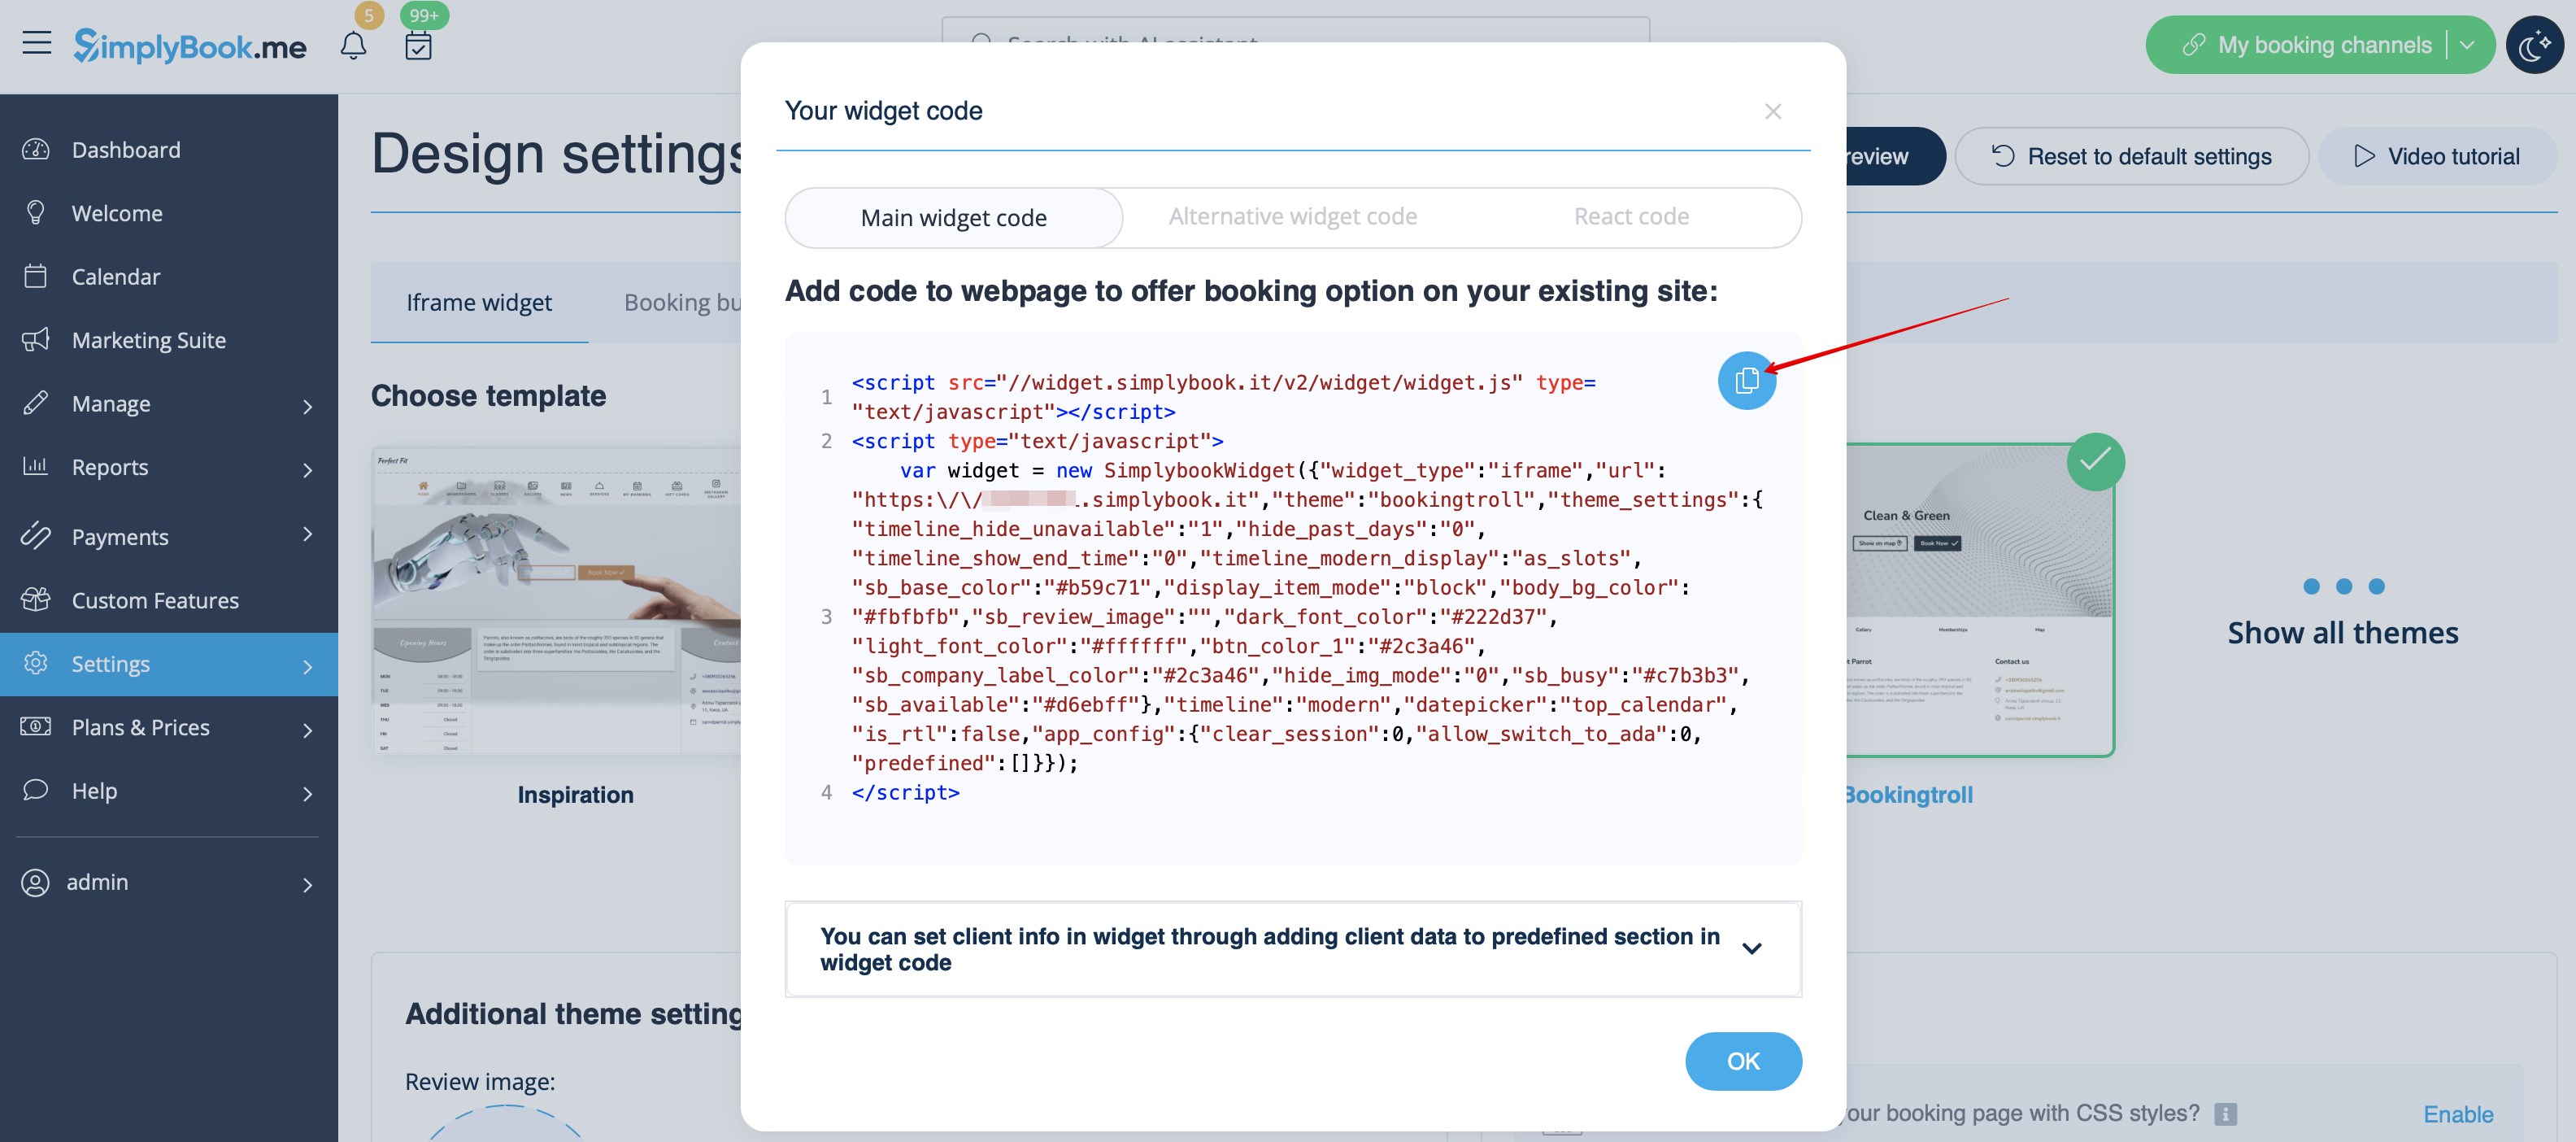
- 1. Please copy the code from Settings -> Booking widgets settings -> iFrame widget -> Get widget code.

- 2. Go to your WordPress admn side and create a new page or navigate to already created one, where you plan to add the widget. Click on + icon.

- 3. Search for HTML option.

- 4. Paste the previously copied code.

- 5. Publish your changes.
- Example (may look different depending on your WP theme and SimplyBook.me theme and settings).

AI Voice Booking
With the AI Voice Booking widget, you can easily place an interactive AI widget button anywhere on your client’s website. Simply enable your feature on SimplyBook.me side, insert the widget code into an HTML section in your website builder and visitors will be able to book appointments just by messaging or speaking to the AI directly on the site. Please, check the tutorial to setup the integration.