Created page with "{{#seo: |title=Ajouter des éléments à la page de réservation - SimplyBook.me |description=Personnalisez votre page de réservation en y ajoutant des éléments clés. Améliorez l'expérience de réservation de vos clients. Cliquez ici pour apprendre comment ! |titlemode=ajouter |keywords=faq, questions fréquemment posées, logiciel de réservation, questions sur le système de rendez-vous, rendez-vous en ligne, logiciel de calendrier, système de réservation, cale..." Tags: Mobile edit Mobile web edit |
No edit summary Tags: Mobile edit Mobile web edit |
||
| (4 intermediate revisions by 2 users not shown) | |||
| Line 1: | Line 1: | ||
<languages/> | <languages/> | ||
{{#seo: |title=Ajouter des éléments à la page de réservation - SimplyBook.me |description=Personnalisez | {{#seo: |title=Ajouter des éléments à la page de réservation - SimplyBook.me |description=Personnalisez le site de réservation avec des éléments supplémentaires. Ajoutez des actualités, des avis, des pages personnalisées et des galeries photo. Enrichissez le site de réservation avec du contenu et des fonctionnalités supplémentaires.|titlemode=ajouter |keywords=faq, questions fréquemment posées, logiciel de réservation, questions sur le système de rendez-vous, rendez-vous en ligne, logiciel de calendrier, système de réservation, calendrier de réservation, logiciel de planification, prise de rendez-vous en ligne, planification en ligne, configuration, aide à la configuration, support, contenu de l'aide, logo, bannière, arrière-plan, images, images, conditions générales, nouvelles, galerie, descriptions, contacts, formatage html, }} | ||
| Line 10: | Line 10: | ||
<span style="background-color:#d4f8e5; padding:5px; border-radius:5px;"> | <span style="background-color:#d4f8e5; padding:5px; border-radius:5px;"> | ||
Paramètres | Paramètres | ||
</span> | </span> -> <span style="background-color:#d4f8e5; padding:5px; border-radius:5px;"> | ||
<span style="background-color:#d4f8e5; padding:5px; border-radius:5px;"> | |||
Paramètres de conception | Paramètres de conception | ||
</span> | </span> -> <span style="background-color:#d4f8e5; padding:5px; border-radius:5px;"> | ||
<span style="background-color:#d4f8e5; padding:5px; border-radius:5px;"> | |||
Paramètres de thème supplémentaires | Paramètres de thème supplémentaires | ||
</span> | </span> | ||
| Line 25: | Line 21: | ||
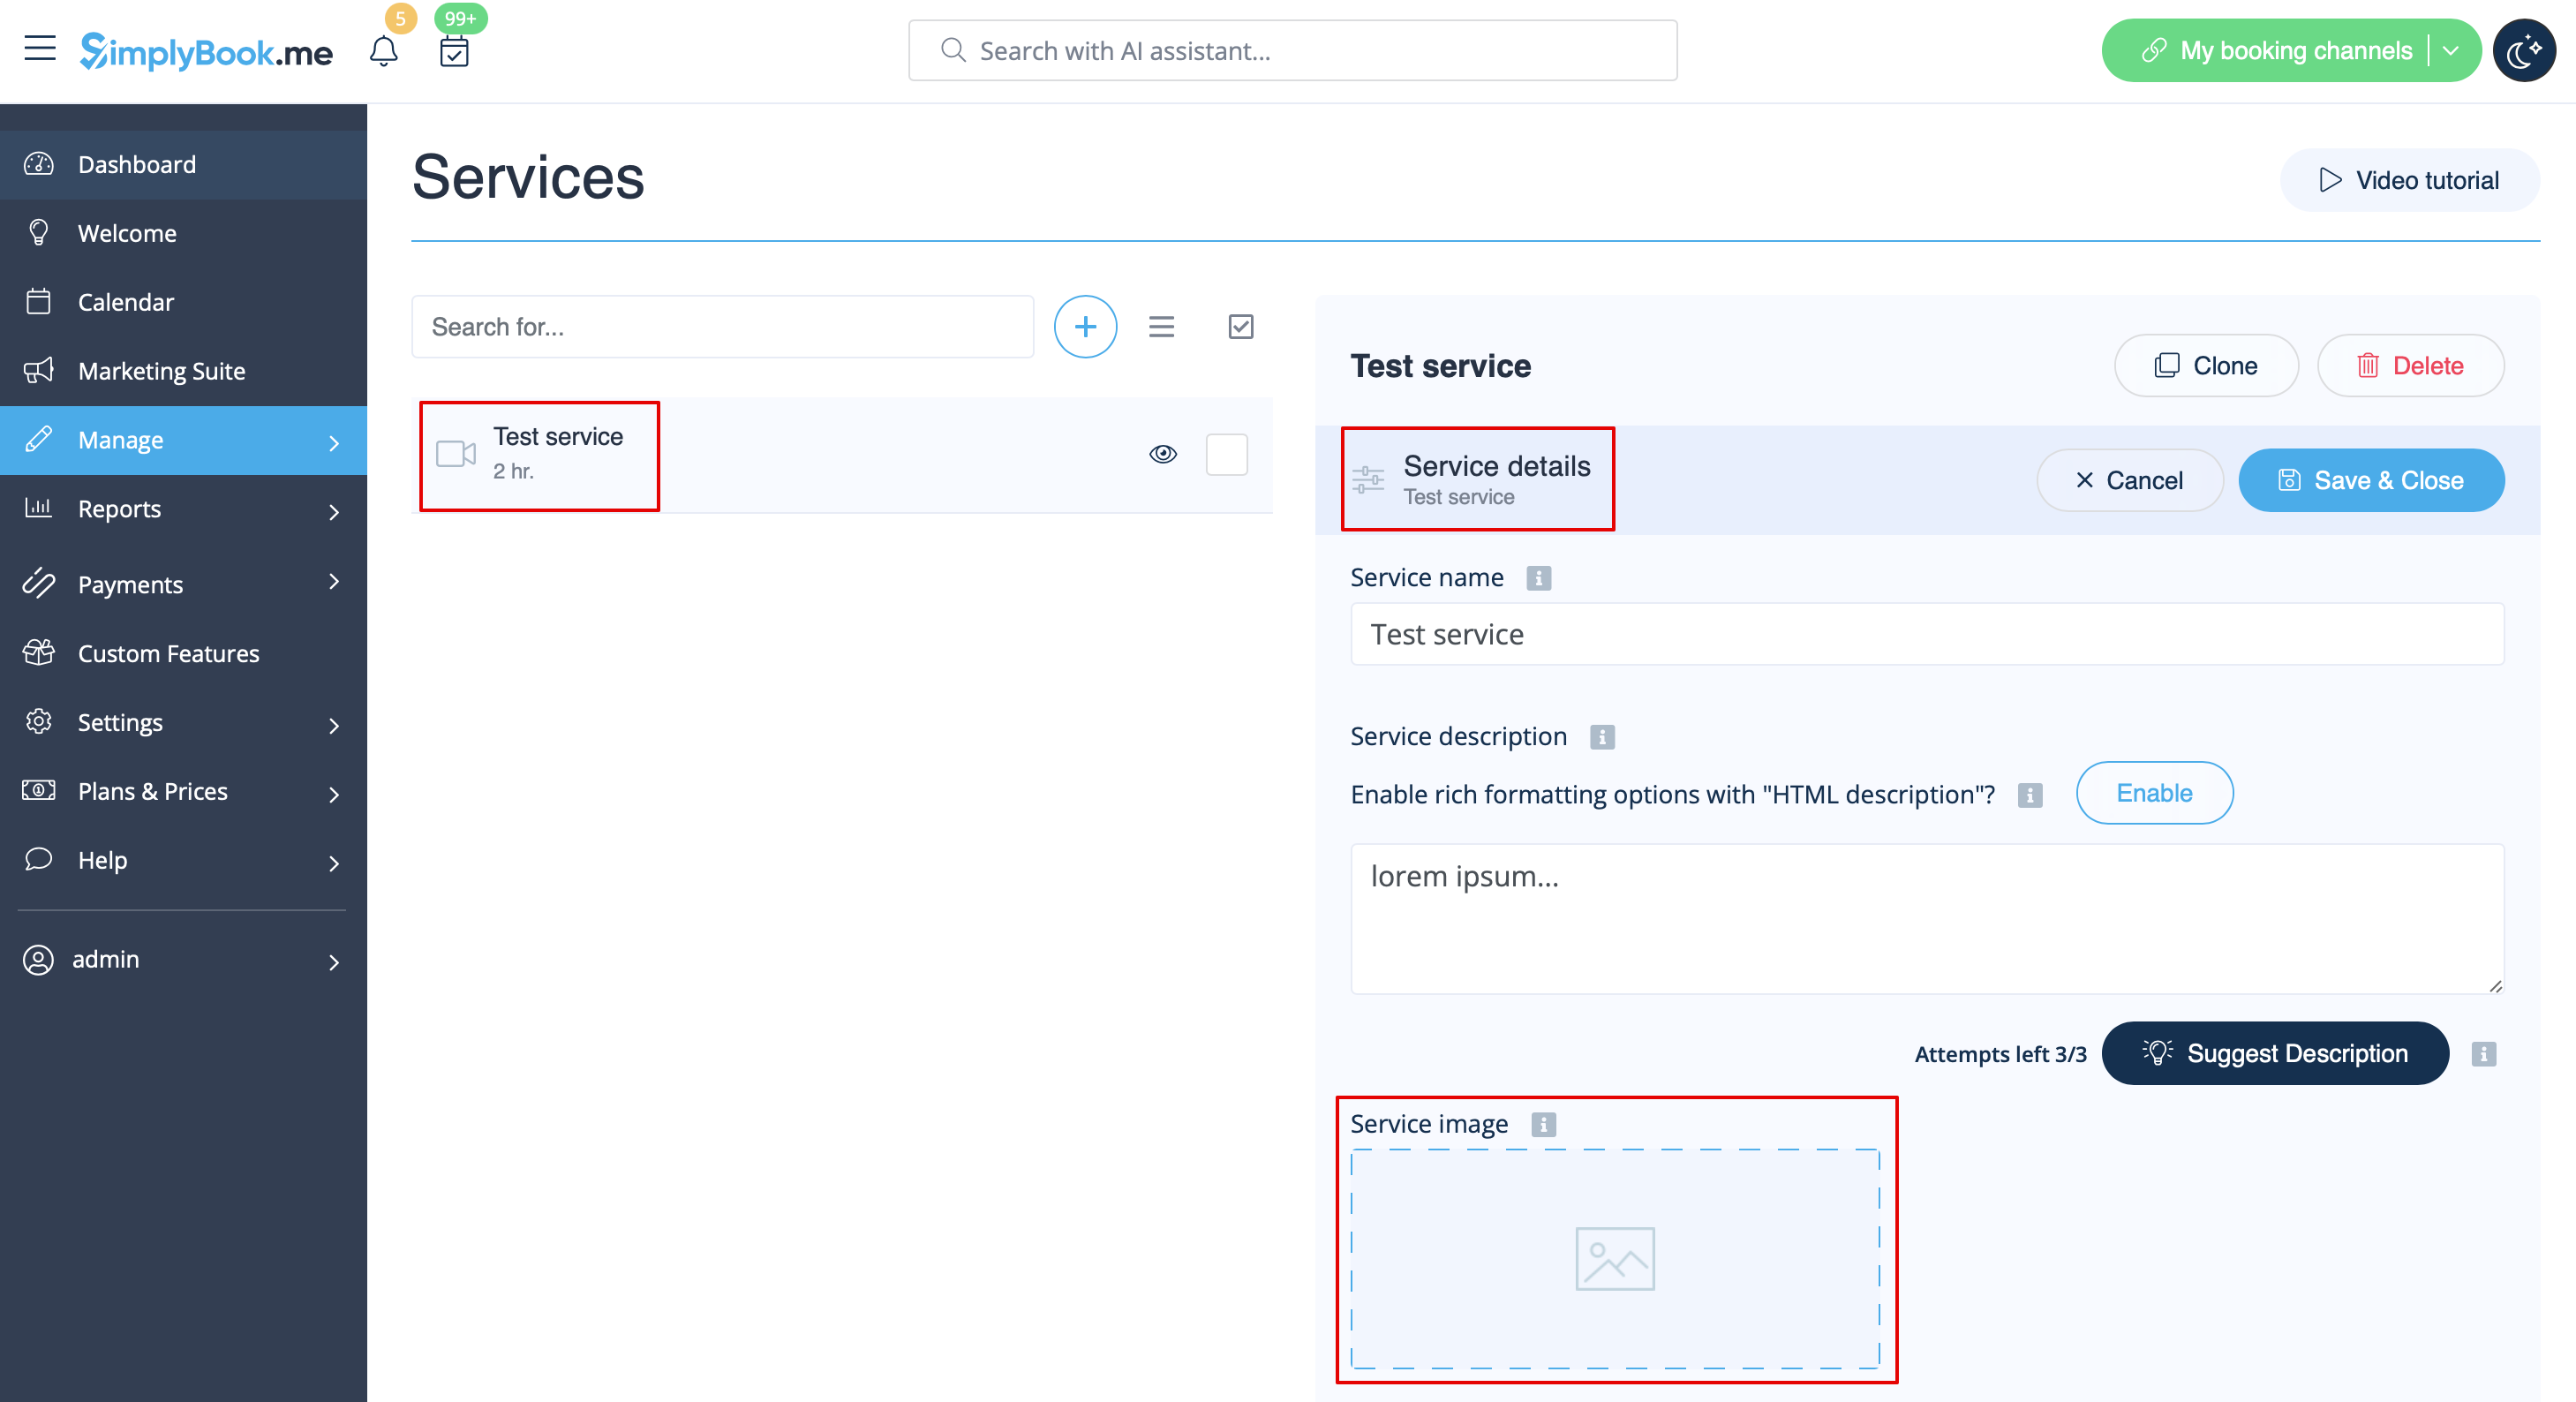
= Images = | |||
<br><br> | <br><br> | ||
Vous pouvez ajouter des images à vos services, fournisseurs, catégories et lieux, etc. dans <span style="background-color:#d4f8e5; padding:5px; border-radius:5px;">Manage</span> -> <span style="background-color:#d4f8e5; padding:5px; border-radius:5px;">Services/Service Providers</span> -> <span style="background-color:#d4f8e5; padding:5px; border-radius:5px;">Service details</span> ou <span style="background-color:#d4f8e5; padding:5px; border-radius:5px;">Service provider details</span> tab -> click on the photo icon in <span style="background-color:#d4f8e5; padding:5px; border-radius:5px;">Service image</span> or <span style="background-color:#d4f8e5; padding:5px; border-radius:5px;">Service provider image</span> box and browse the photo.<br/> | |||
[[File:Service image path redesigned.png|1200px | border|center|link=https://help.simplybook.me/images/d/de/Service_image_path_redesigned.png]] | [[File:Service image path redesigned.png|1200px | border|center|link=https://help.simplybook.me/images/d/de/Service_image_path_redesigned.png]] | ||
<br><br> | <br><br> | ||
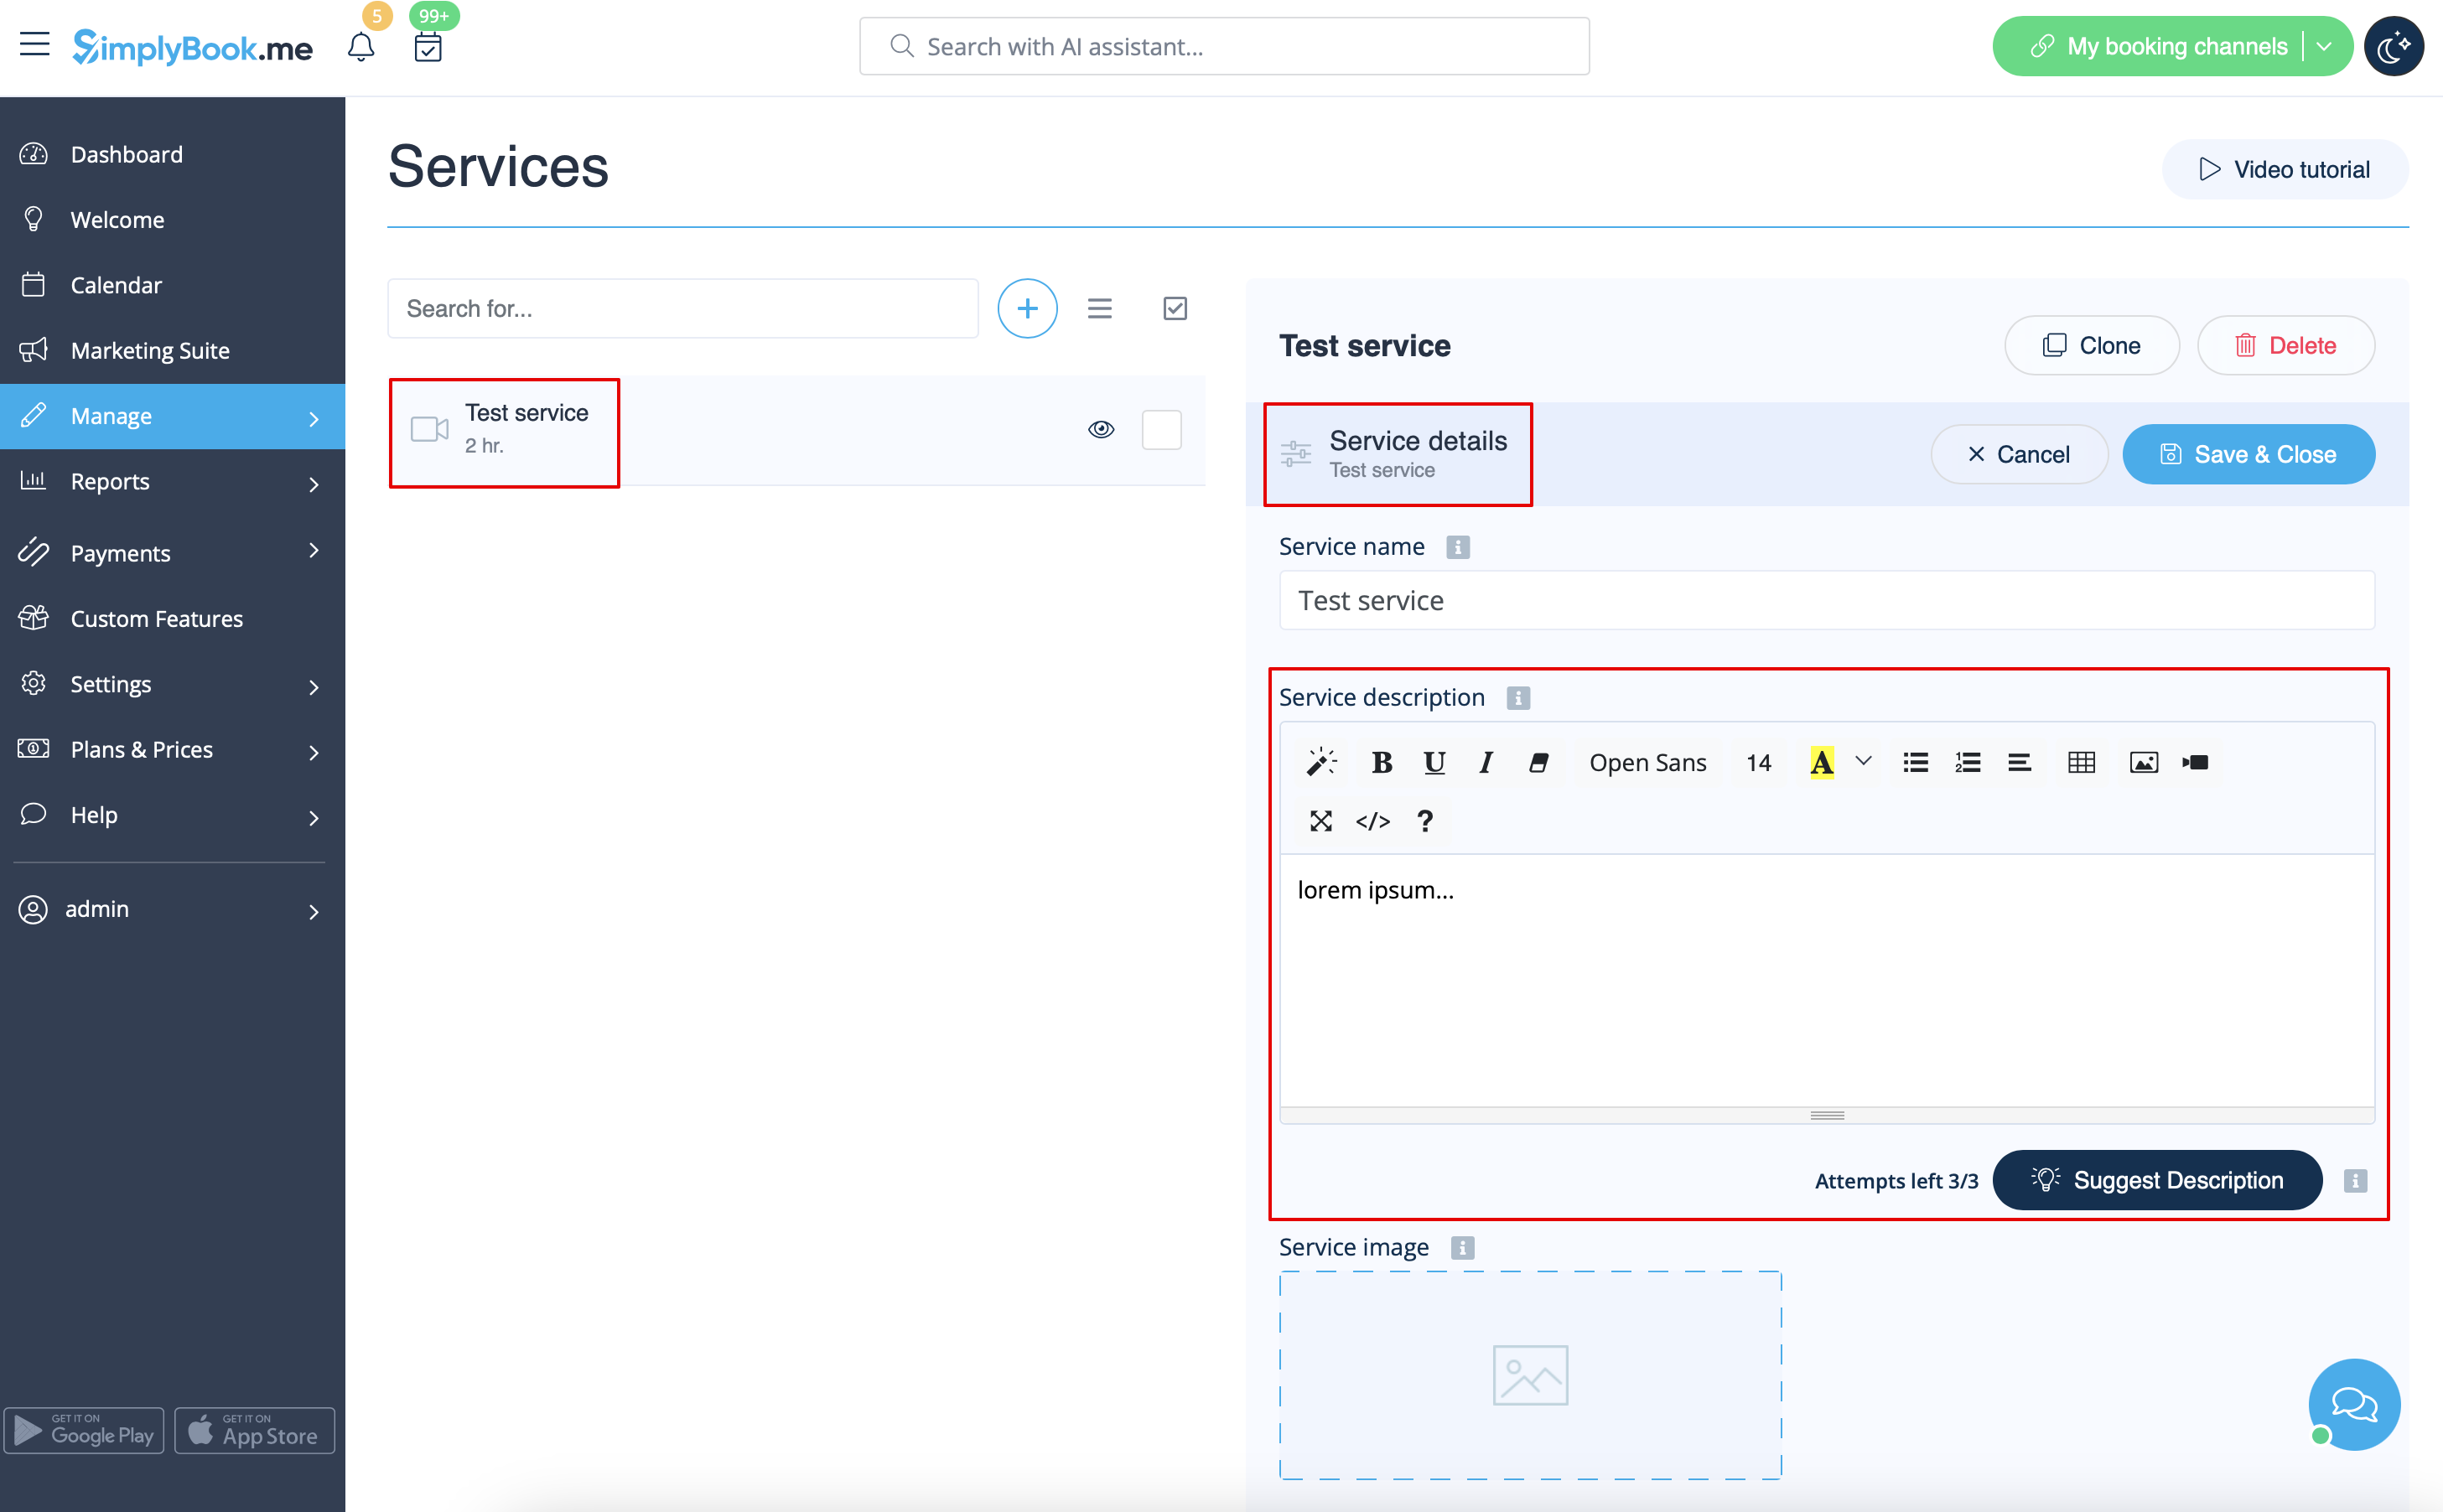
= Descriptions = | |||
=Descriptions= | |||
<br><br> | <br><br> | ||
Vous souhaitez fournir plus d'informations sur vos services et/ou vos employés ? <br> | |||
Vous pouvez le faire dans <span style="background-color:#d4f8e5; padding:5px; border-radius:5px;">Manage</span> -> <span style="background-color:#d4f8e5; padding:5px; border-radius:5px;">Services/Service Providers</span> -> <span style="background-color:#d4f8e5; padding:5px; border-radius:5px;">Service details</span> ou <span style="background-color:#d4f8e5; padding:5px; border-radius:5px;">Service provider details</span> tab -> <span style="background-color:#d4f8e5; padding:5px; border-radius:5px;">Service description</span> ou <span style="background-color:#d4f8e5; padding:5px; border-radius:5px;">Service provider description</span> | |||
[[File:Service description path redesigned.png|1200px| border|center|link=https://help.simplybook.me/images/6/6d/Service_description_path_redesigned.png]] | [[File:Service description path redesigned.png|1200px| border|center|link=https://help.simplybook.me/images/6/6d/Service_description_path_redesigned.png]] | ||
<br><br> | <br><br> | ||
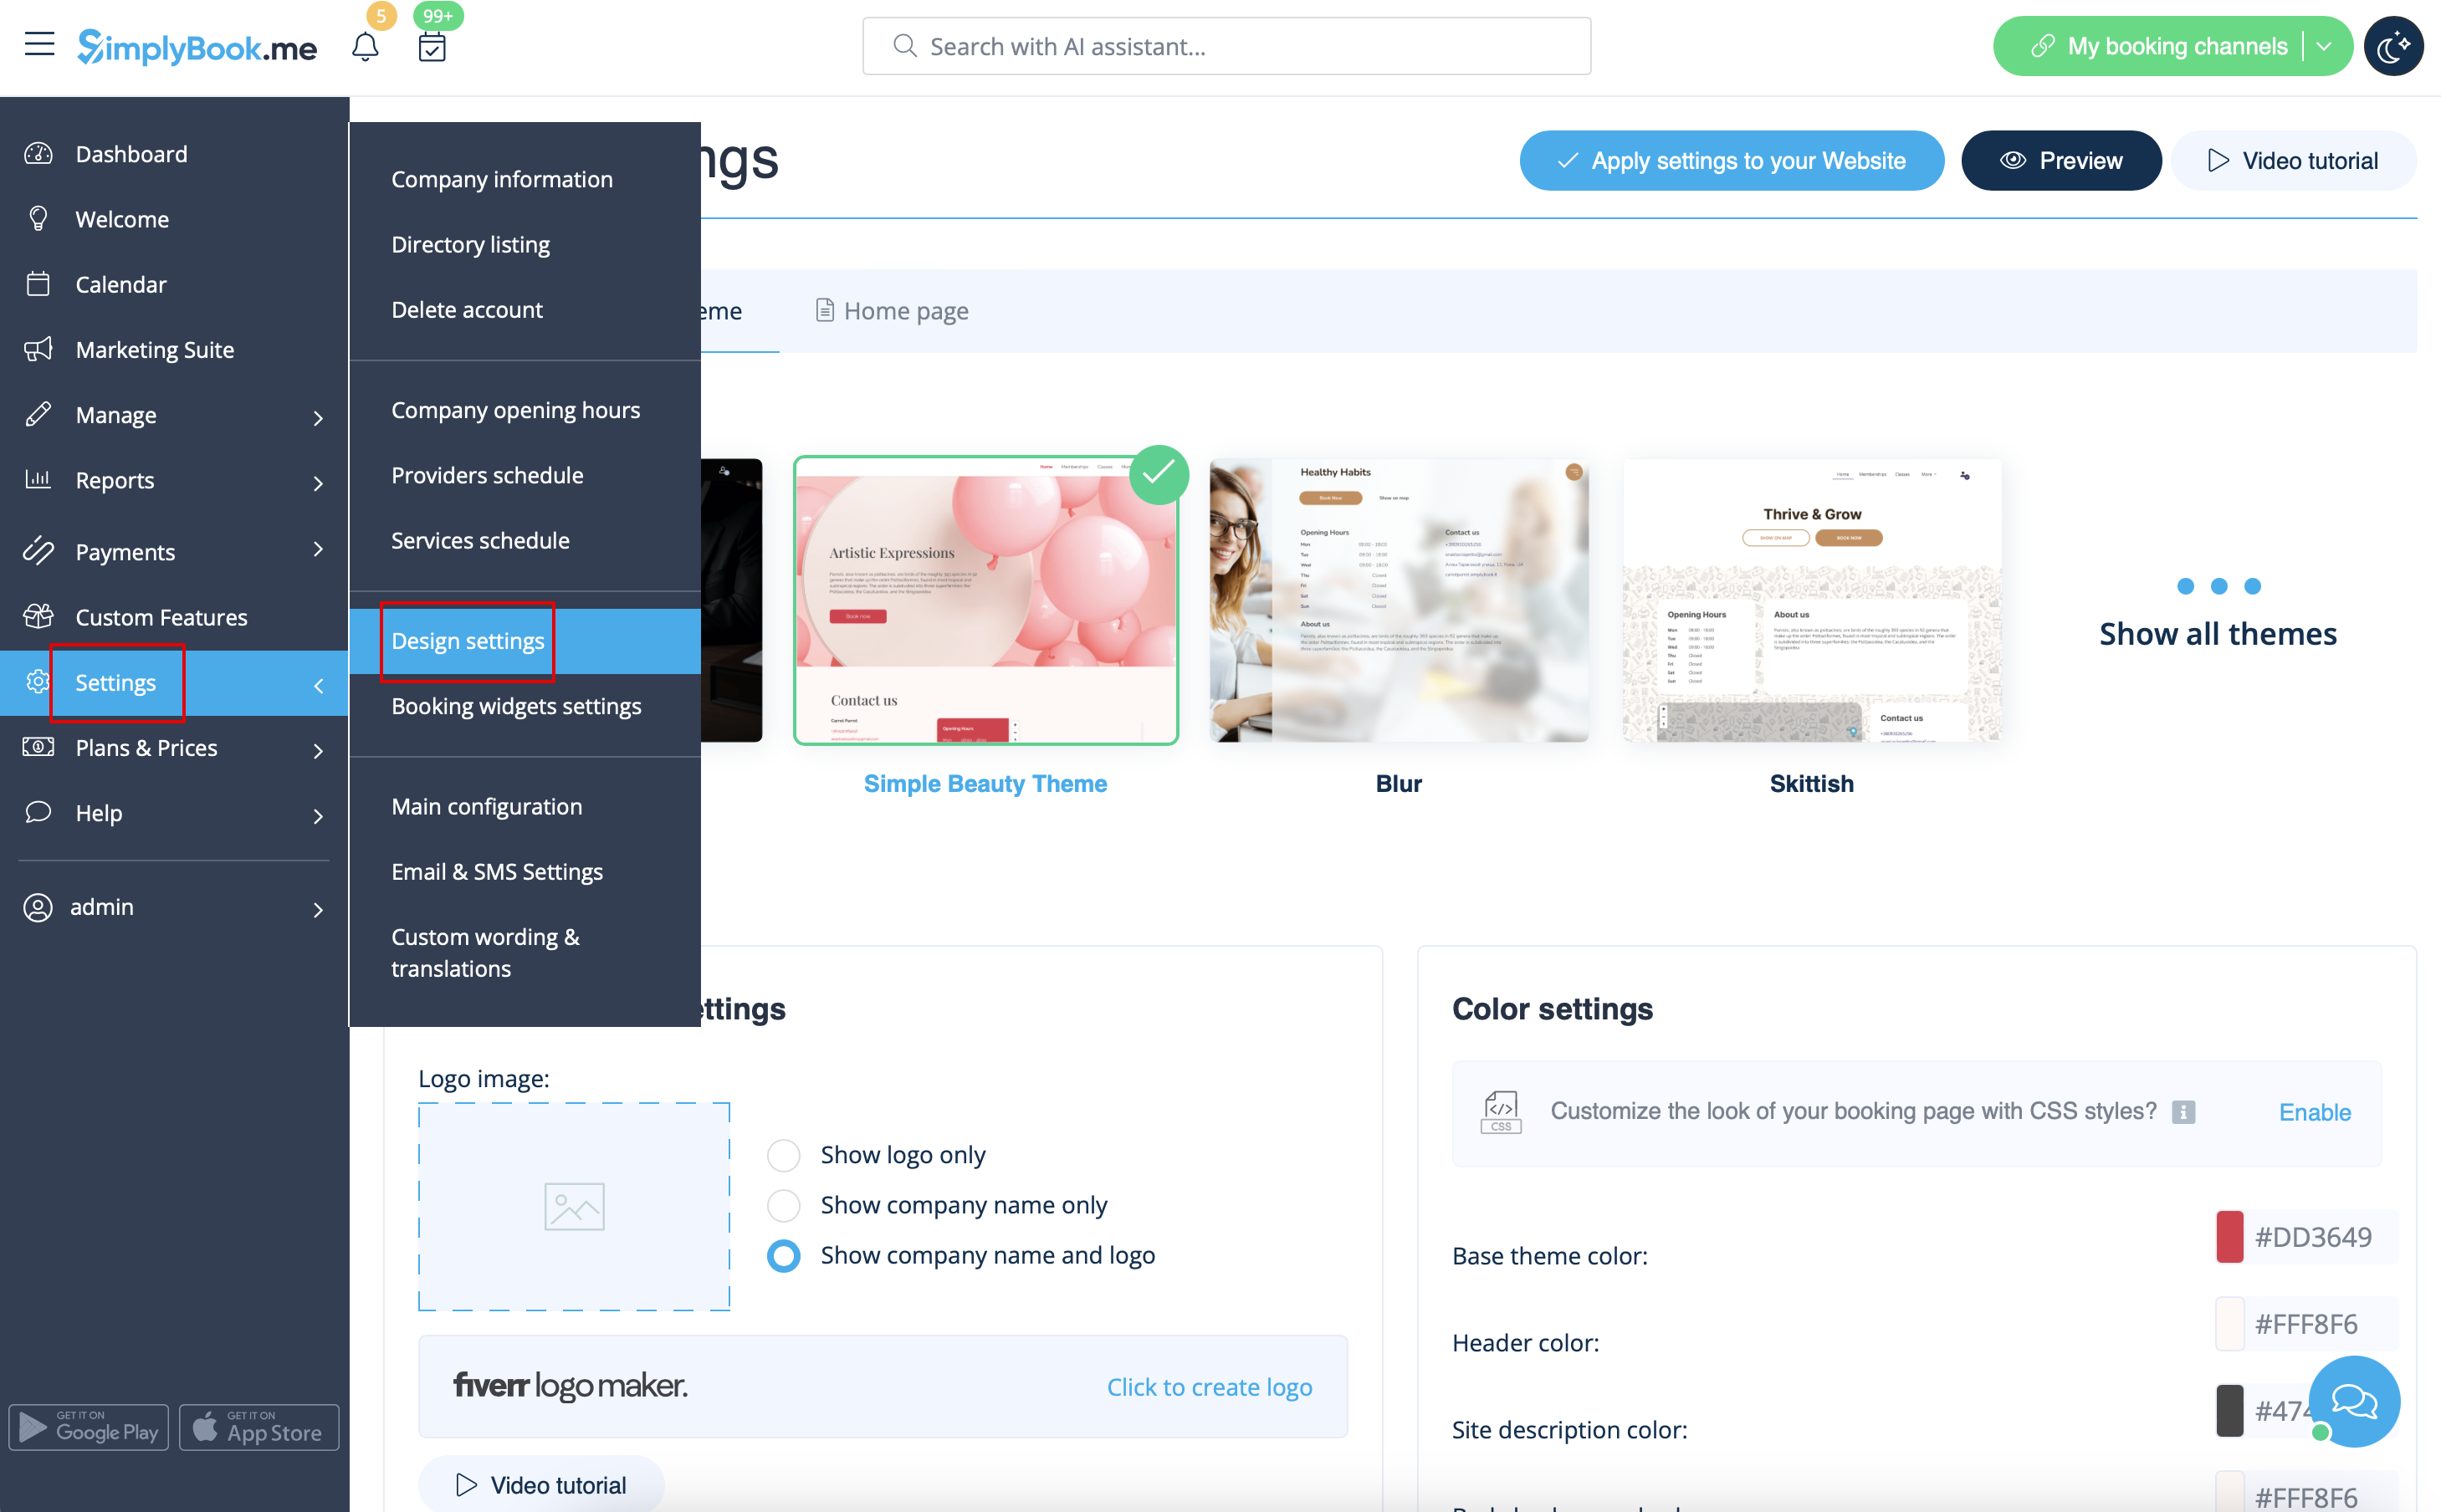
= Section "À propos = | |||
<br><br> | <br><br> | ||
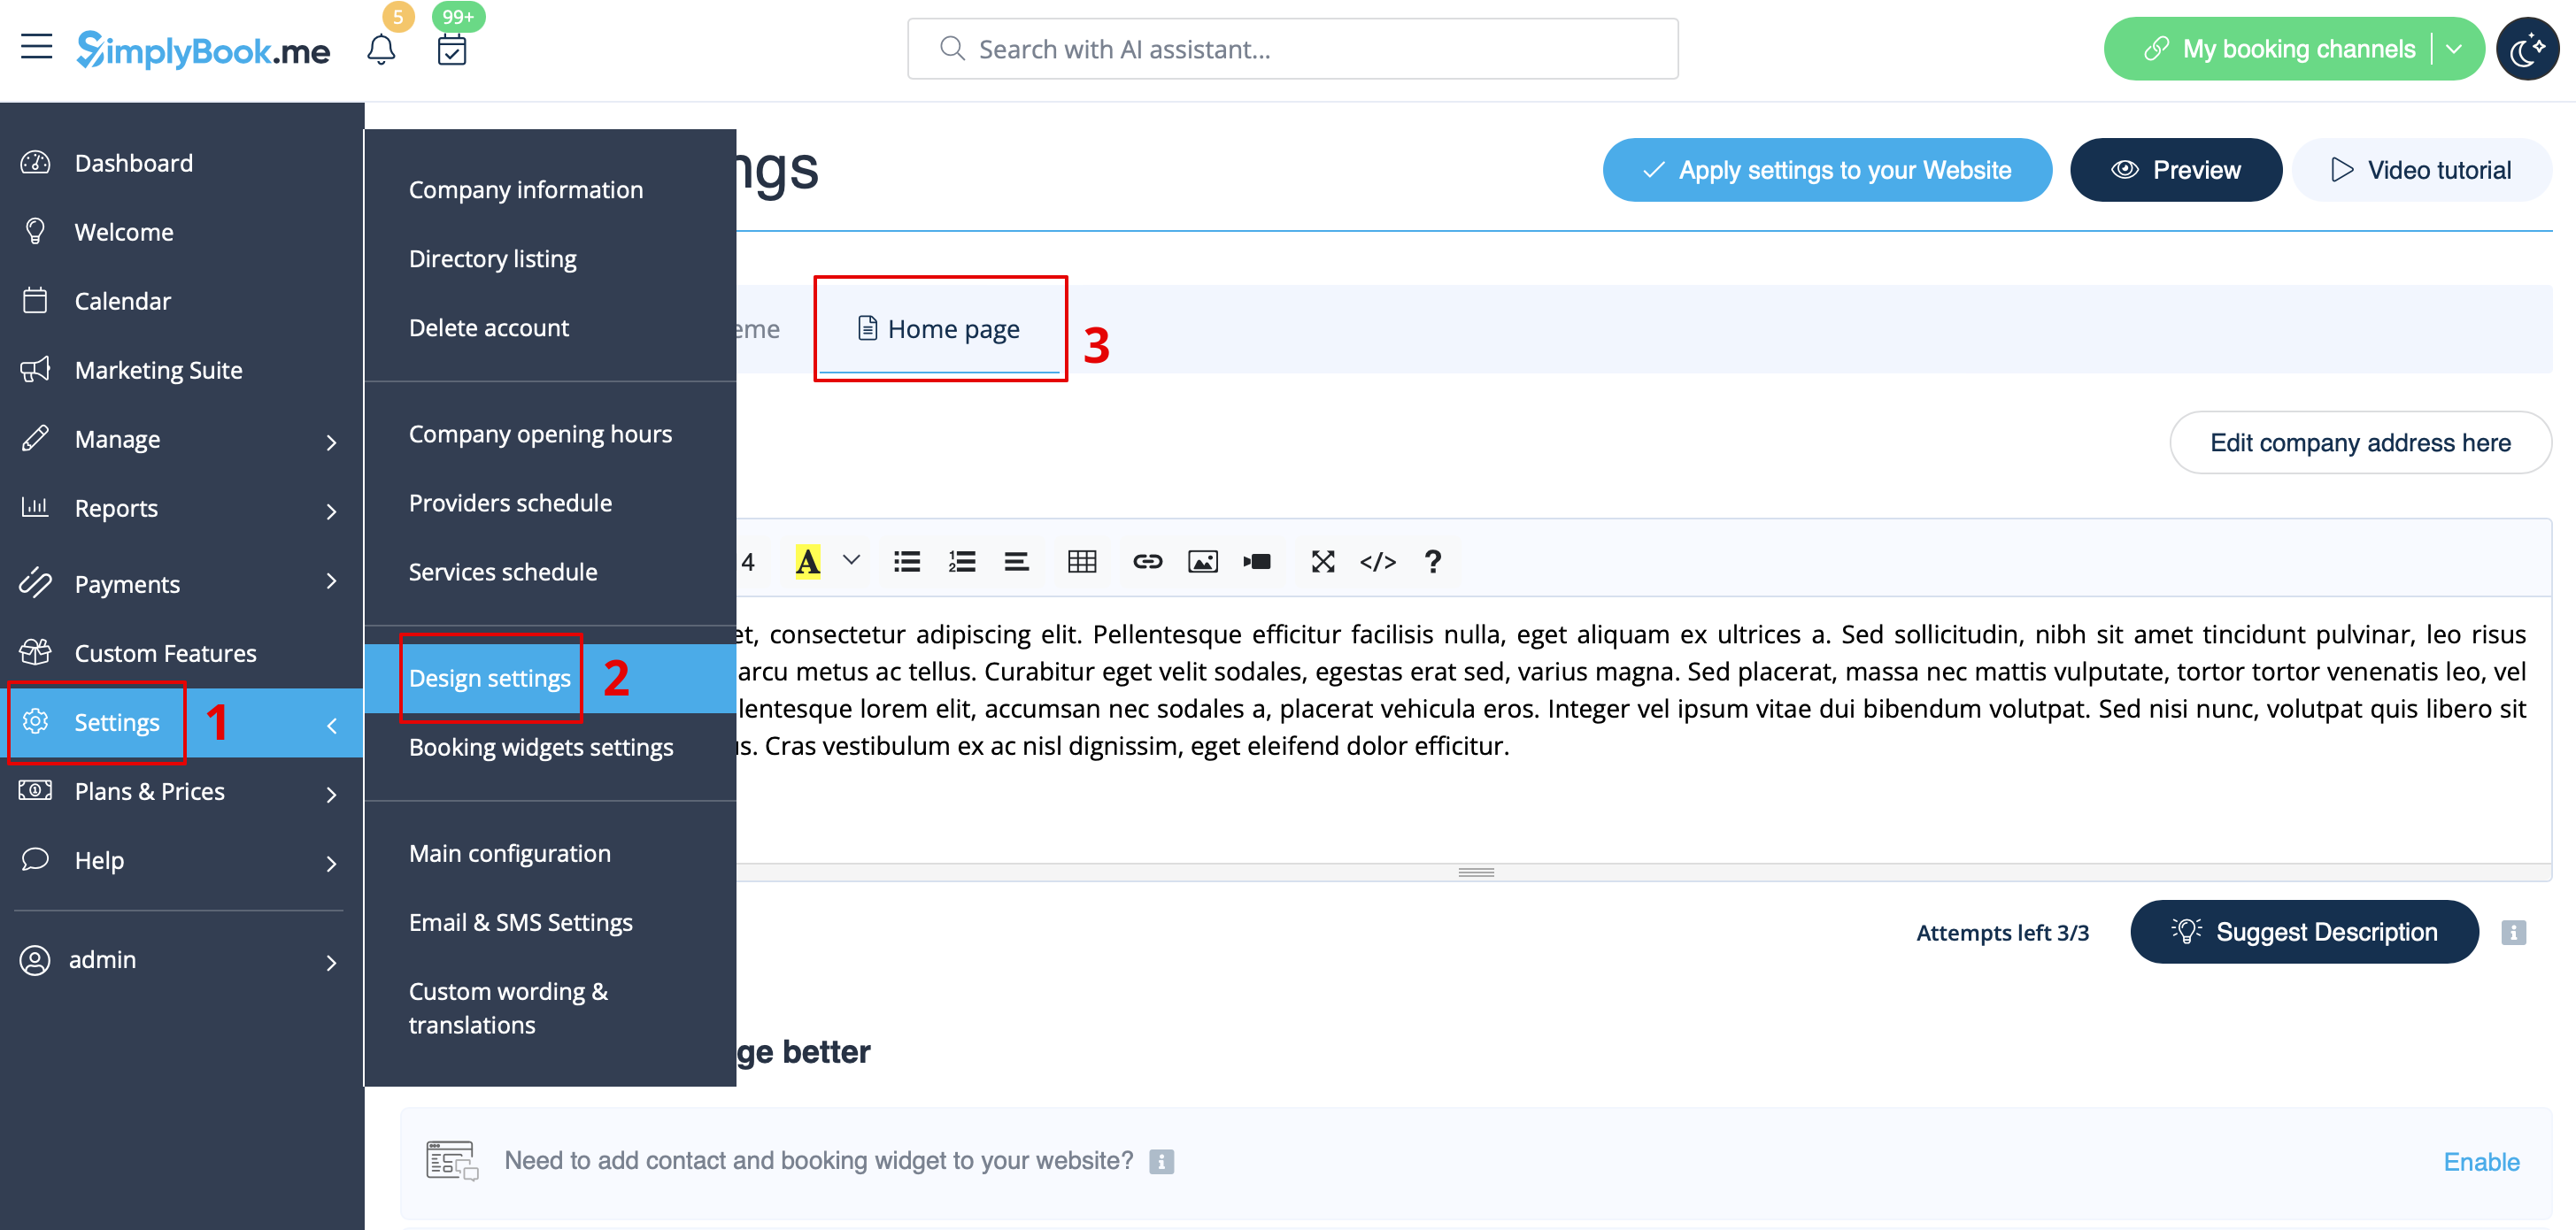
Dans <span style="background-color:#d4f8e5; padding:5px; border-radius:5px;">Paramètres</span> -> <span style="background-color:#d4f8e5; padding:5px; border-radius:5px;">Paramètres de conception</span> -> <span style="background-color:#d4f8e5; padding:5px; border-radius:5px;">Page d'accueil</span>, vous pouvez ajouter une description de l'entreprise et d'autres informations importantes que vous souhaitez afficher sur votre page d'accueil.<br/> | |||
[[File:Home page content path redesigned.png|1200px|center|link=https://help.simplybook.me/images/a/a4/Home_page_content_path_redesigned.png]] | [[File:Home page content path redesigned.png|1200px|center|link=https://help.simplybook.me/images/a/a4/Home_page_content_path_redesigned.png]] | ||
<br><br> | <br><br> | ||
= Contacts = | |||
=Contacts= | |||
<br><br> | <br><br> | ||
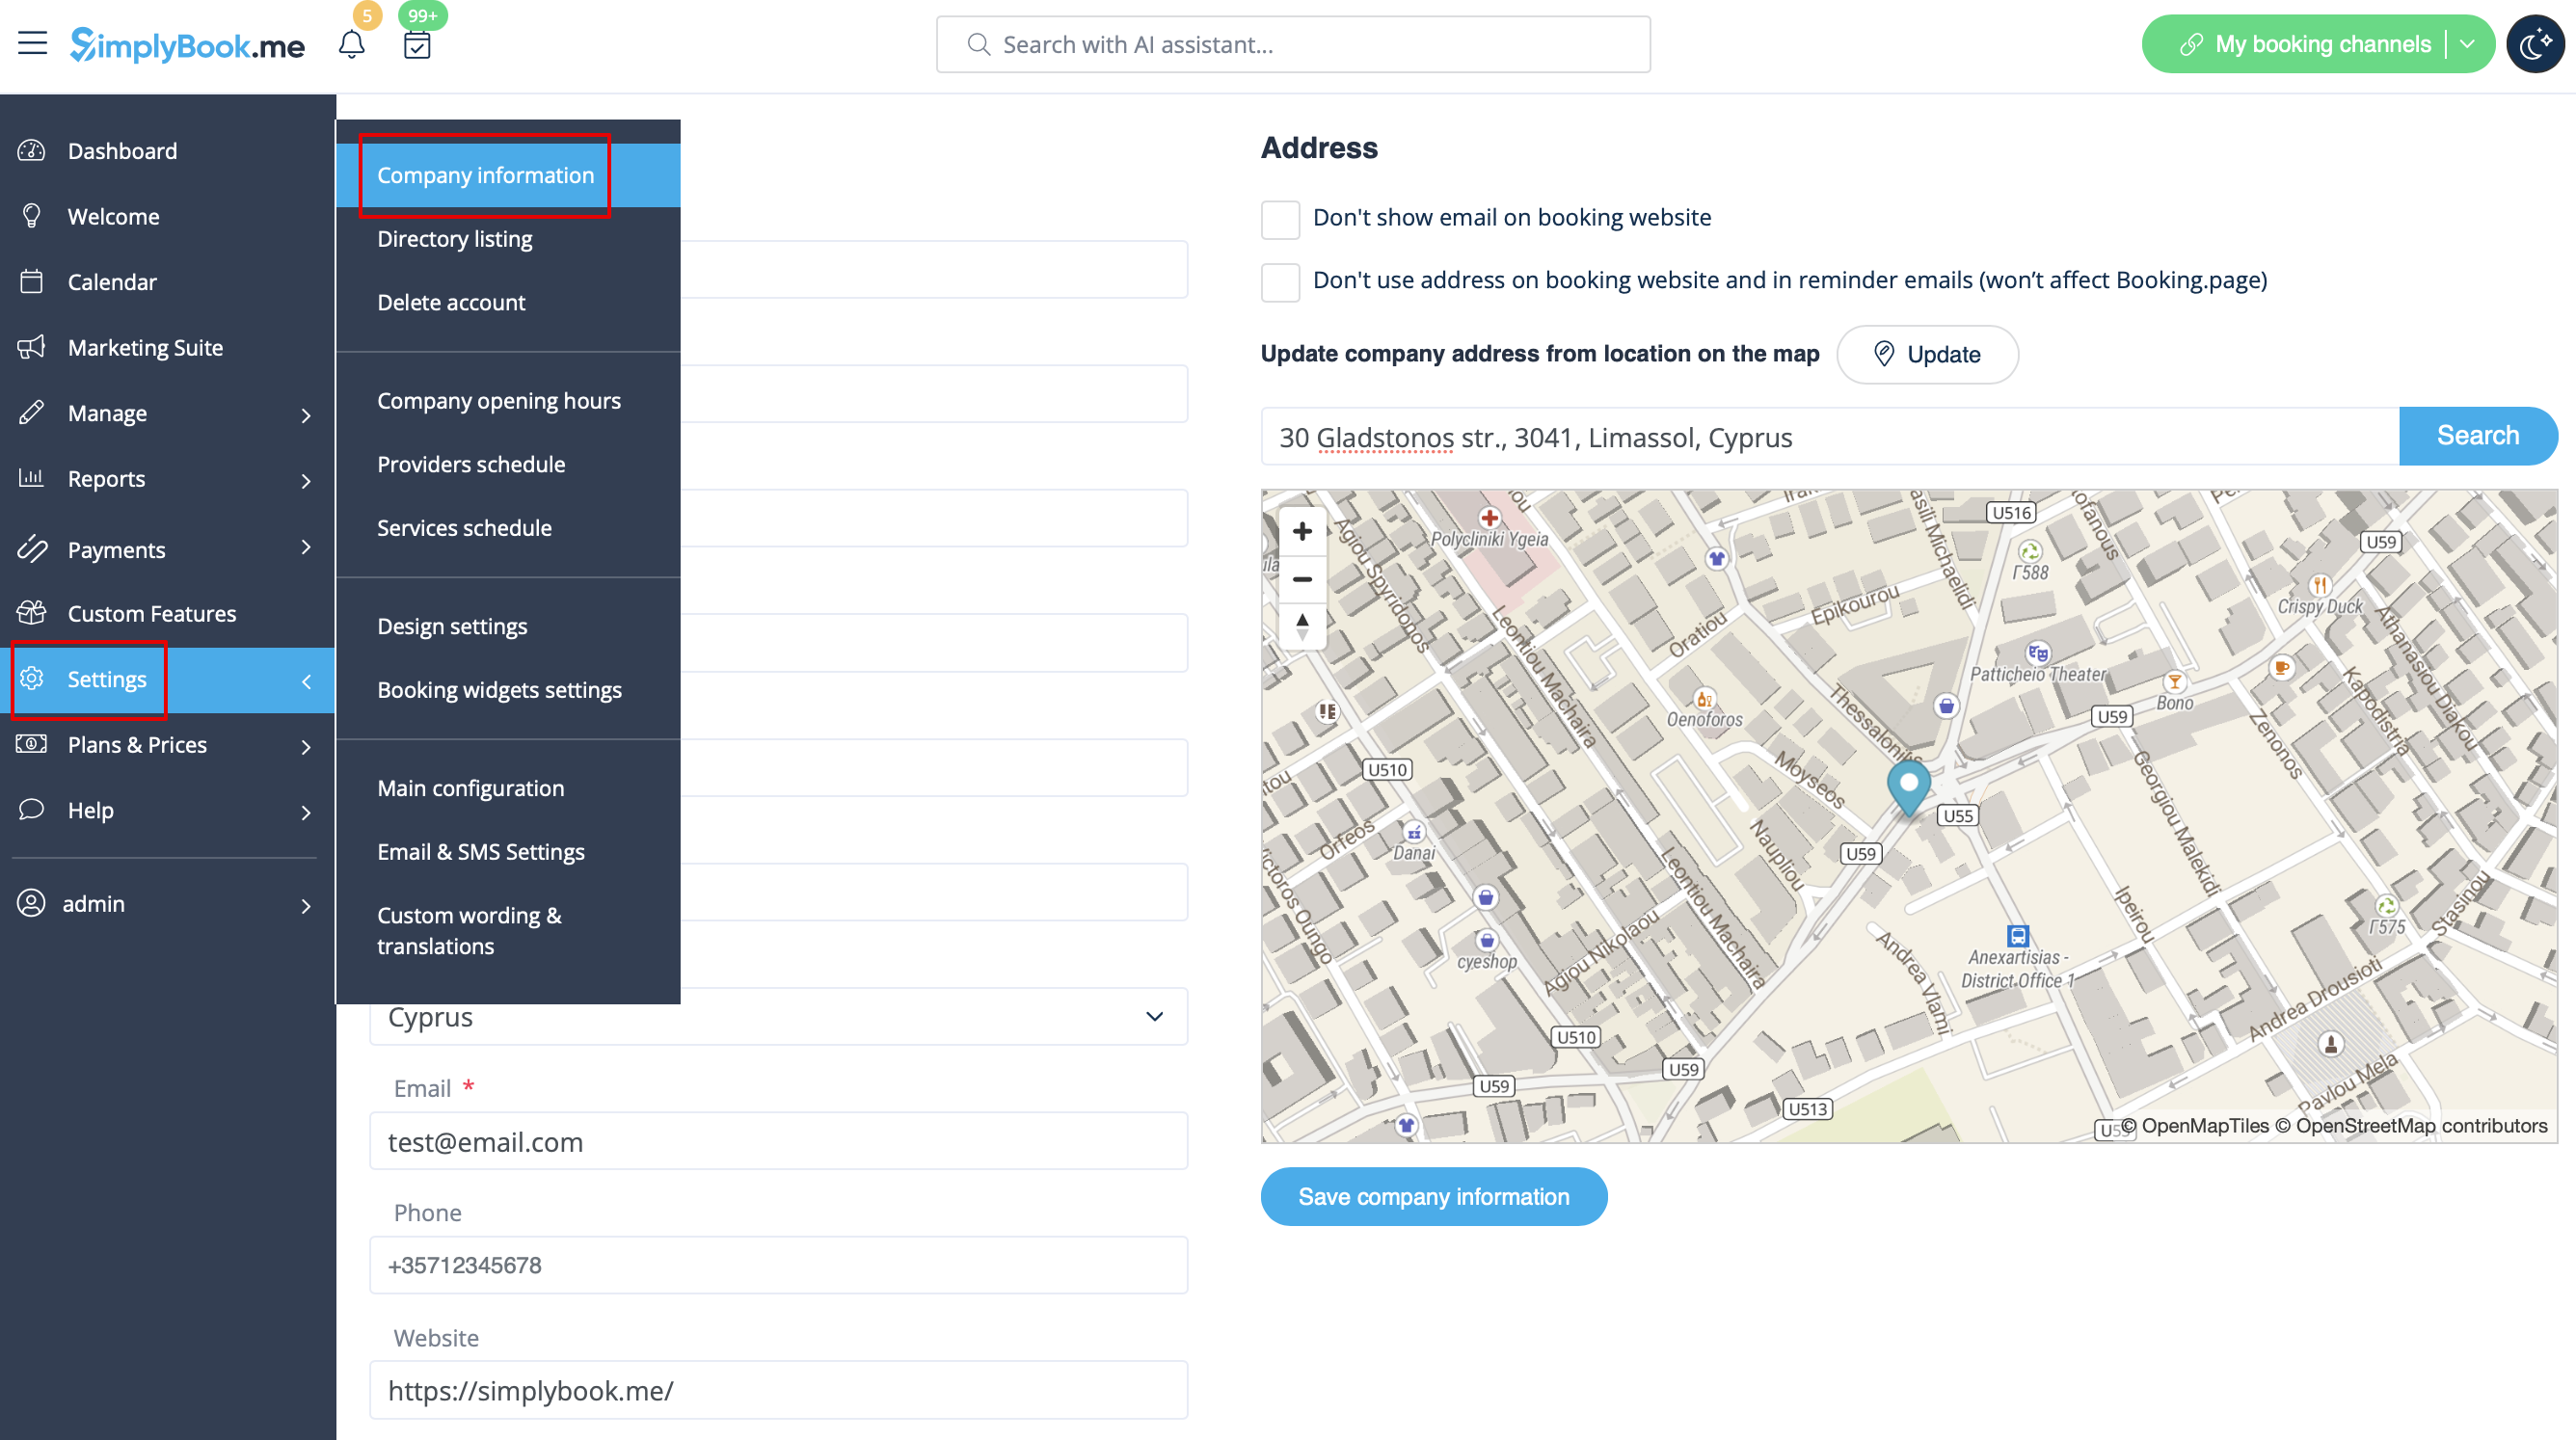
Vous souhaitez montrer vos coordonnées à vos clients ? Ajoutez-les dans <span style="background-color:#d4f8e5; padding:5px; border-radius:5px;">Paramètres</span> -> <span style="background-color:#d4f8e5; padding:5px; border-radius:5px;">Informations sur l'entreprise</span><br> | |||
[[File:Company information path redesigned.png|1200px|center|link=https://help.simplybook.me/images/d/da/Company_information_path_redesigned.png]] | [[File:Company information path redesigned.png|1200px|center|link=https://help.simplybook.me/images/d/da/Company_information_path_redesigned.png]] | ||
<br><br> | <br><br> | ||
Vous pouvez y ajouter les détails suivants : | |||
* | * Adresse électronique | ||
* | * Numéro de téléphone | ||
* | * Adresse du site web | ||
* WhatsApp | * Téléphone WhatsApp | ||
* Facebook | * URL du profil Facebook | ||
* X.com (Twitter) | * Lien de la page X.com (Twitter) | ||
* Instagram | * URL de la page Instagram | ||
* LinkedIn | * Page LinkedIn | ||
<br><br> | <br><br> | ||
Un exemple de l'aspect côté client. | |||
[[File:Contact us client side new.png|1200px|center|link=https://help.simplybook.me/images/4/44/Contact_us_client_side_new.png]] | [[File:Contact us client side new.png|1200px|center|link=https://help.simplybook.me/images/4/44/Contact_us_client_side_new.png]] | ||
<br><br> | <br><br> | ||
Les clients pourront, par exemple, cliquer sur le numéro WhatsApp et être redirigés vers la messagerie WhatsApp pour vous contacter facilement. | |||
<br><br><br><br> | <br><br><br><br> | ||
= Galerie = | |||
<br><br> | <br><br> | ||
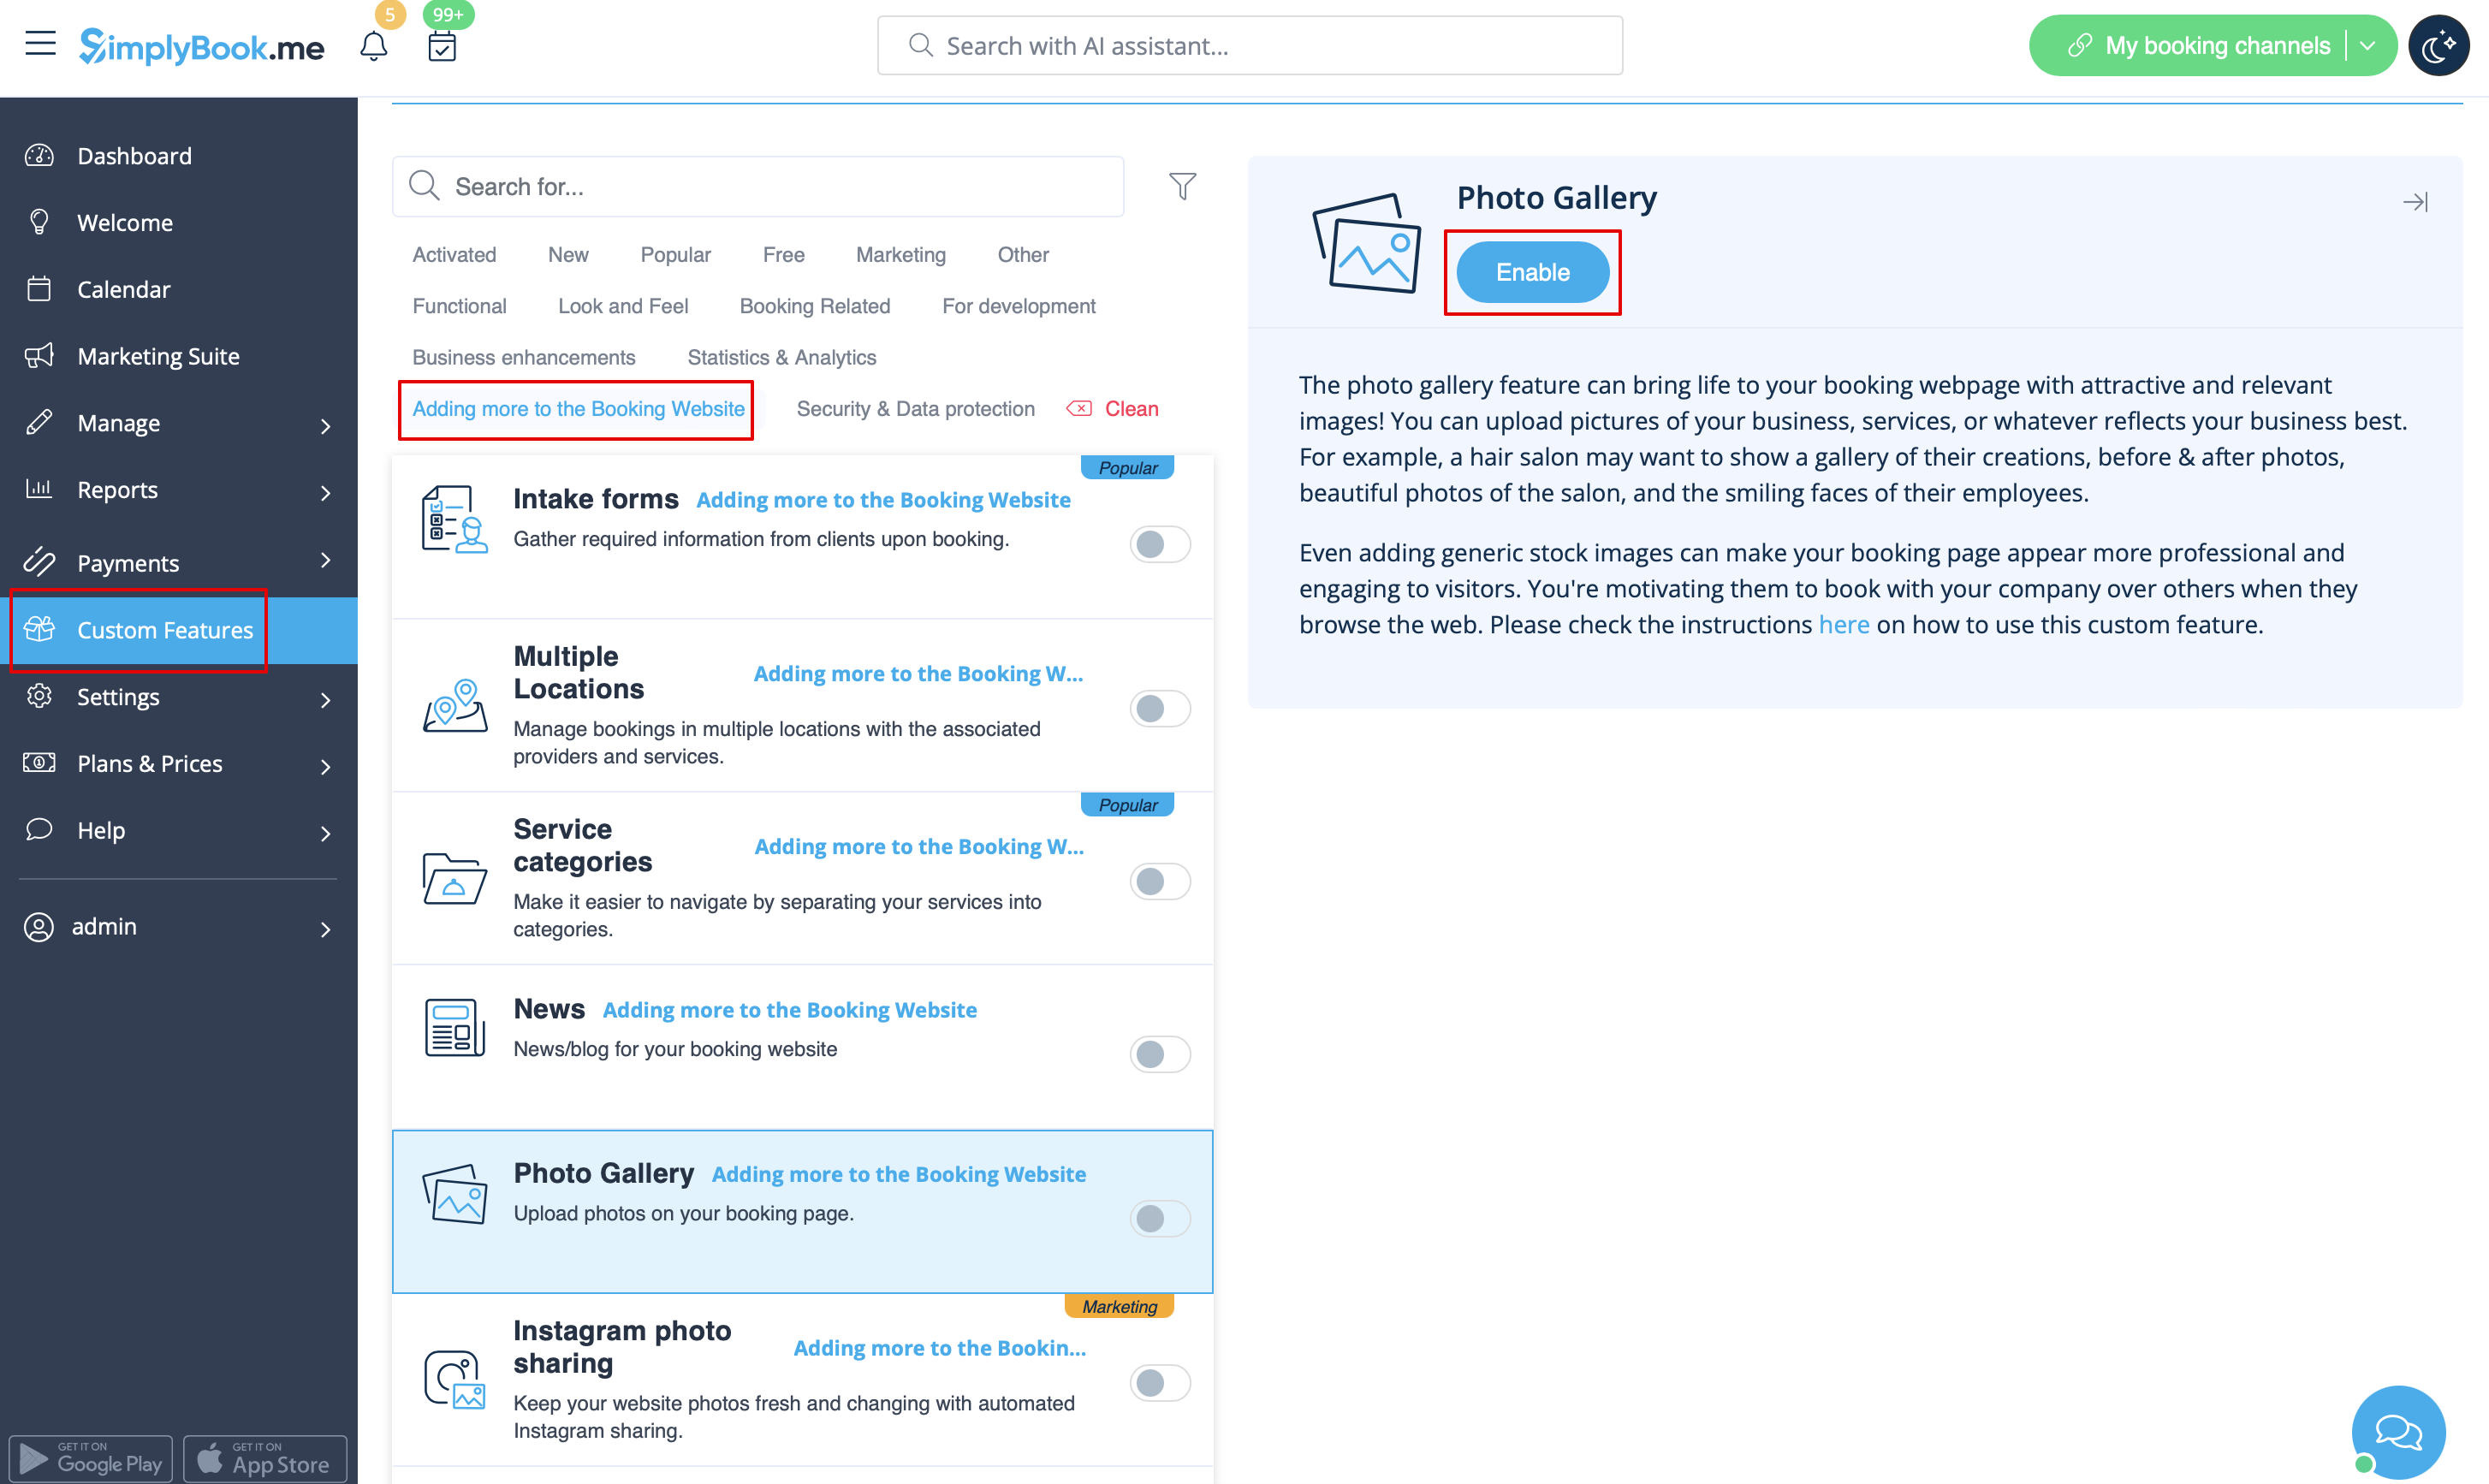
Rendez votre page de réservation plus attrayante en montrant les photos de vos services grâce à la fonction personnalisée <span style="background-color:#cdeffc; padding:5px; border-radius:5px;">[[Custom_Features#Photo_Gallery| Galerie de photos]]</span>. | |||
Pour l'activer, allez dans <span style="background-color:#d4f8e5; padding:5px; border-radius:5px;">Fonctions personnalisées</span> -> <span style="background-color:#d4f8e5; padding:5px; border-radius:5px;">Ajouter plus au site de réservation</span> -> <span style="background-color:#cdeffc; padding:5px; border-radius:5px;">[[Custom_Features#Photo_Gallery| Galerie de photos]]</span> -> <span style="background-color:#d4f8e5; padding:5px; border-radius:5px;">Activer</span> | |||
[[File:Photo gallery enable path redesigned.png|1200px | border|center|link=https://help.simplybook.me/images/7/79/Photo_gallery_enable_path_redesigned.png]] | [[File:Photo gallery enable path redesigned.png|1200px | border|center|link=https://help.simplybook.me/images/7/79/Photo_gallery_enable_path_redesigned.png]] | ||
<br><br> | <br><br> | ||
=Actualités= | |||
<br><br> | <br><br> | ||
Cette option permet d’ajouter des actualités à votre site de réservation. | |||
Pour l’activer, veuillez aller dans <span style="background-color:#d4f8e5; padding:5px; border-radius:5px;">Fonctionnalités personnalisées</span> -> <span style="background-color:#d4f8e5; padding:5px; border-radius:5px;">Ajouts pour le site de réservation</span> -> <span style="background-color:#cdeffc; padding:5px; border-radius:5px;">[[Custom_Features#News| Actualités ]]</span> -> <span style="background-color:#d4f8e5; padding:5px; border-radius:5px;">Activer</span> | |||
[[File:News enable path redesigned.png|1200px| border|center|link=https://help.simplybook.me/images/5/5c/News_enable_path_redesigned.png]] | [[File:News enable path redesigned.png|1200px| border|center|link=https://help.simplybook.me/images/5/5c/News_enable_path_redesigned.png]] | ||
<br><br> | <br><br> | ||
Une fois activée dans <span style="background-color:#d4f8e5; padding:5px; border-radius:5px;">Fonctionnalités personnalisées</span> -> <span style="background-color:#d4f8e5; padding:5px; border-radius:5px;">Actualités</span> -> <span style="background-color:#d4f8e5; padding:5px; border-radius:5px;">Paramètres</span>, vous pouvez créer des articles d’actualité qui s’afficheront dans un onglet séparé sur votre site de réservation. | |||
[[File:Create new news post redesigned.png|1200px | border|center|link=https://help.simplybook.me/images/2/2c/Create_new_news_post_redesigned.png]] | [[File:Create new news post redesigned.png|1200px | border|center|link=https://help.simplybook.me/images/2/2c/Create_new_news_post_redesigned.png]] | ||
<br><br> | <br><br> | ||
= Conditions générales d'utilisation = | |||
<br><br> | <br><br> | ||
Votre entreprise doit être à l'épreuve des balles ? Vous pouvez ajouter vos propres conditions <span style="background-color:#cdeffc; padding:5px; border-radius:5px;">[[Custom_Features#Terms_and_Conditions| générales]]</span> en activant la fonction personnalisée correspondante dans <span style="background-color:#d4f8e5; padding:5px; border-radius:5px;">Fonctions personnalisées</span> -> <span style="background-color:#d4f8e5; padding:5px; border-radius:5px;">Sécurité et protection des données</span> et en ajoutant le texte de vos conditions générales dans ses paramètres. | |||
[[File:T & C enable path redesigned.png|1200px| border|center|link=https://help.simplybook.me/images/2/21/T_%26_C_enable_path_redesigned.png]] | T[[File:T & C enable path redesigned.png|1200px| border|center|link=https://help.simplybook.me/images/2/21/T_%26_C_enable_path_redesigned.png]] | ||
<br><br> | <br><br> | ||
= Politique d'annulation = | |||
<br><br> | <br><br> | ||
Vous souhaitez limiter la période pendant laquelle les réservations peuvent être annulées par les clients ? Allez dans <span style="background-color:#d4f8e5; padding:5px; border-radius:5px;">Fonctions personnalisées</span> -> <span style="background-color:#d4f8e5; padding:5px; border-radius:5px;">Protection des données</span> -> <span style="background-color:#cdeffc; padding:5px; border-radius:5px;">[[Custom_Features#Cancellation_Policy| Politique d'annulation]]</span> -> <span style="background-color:#d4f8e5; padding:5px; border-radius:5px;">Activer</span> et définissez-la en fonction de vos besoins. | |||
[[File:Cancellation policy enable path redesigned.png|1200px|border| center|link=https://help.simplybook.me/images/e/ec/Cancellation_policy_enable_path_redesigned.png]] | [[File:Cancellation policy enable path redesigned.png|1200px|border| center|link=https://help.simplybook.me/images/e/ec/Cancellation_policy_enable_path_redesigned.png]] | ||
<br><br> | <br><br> | ||
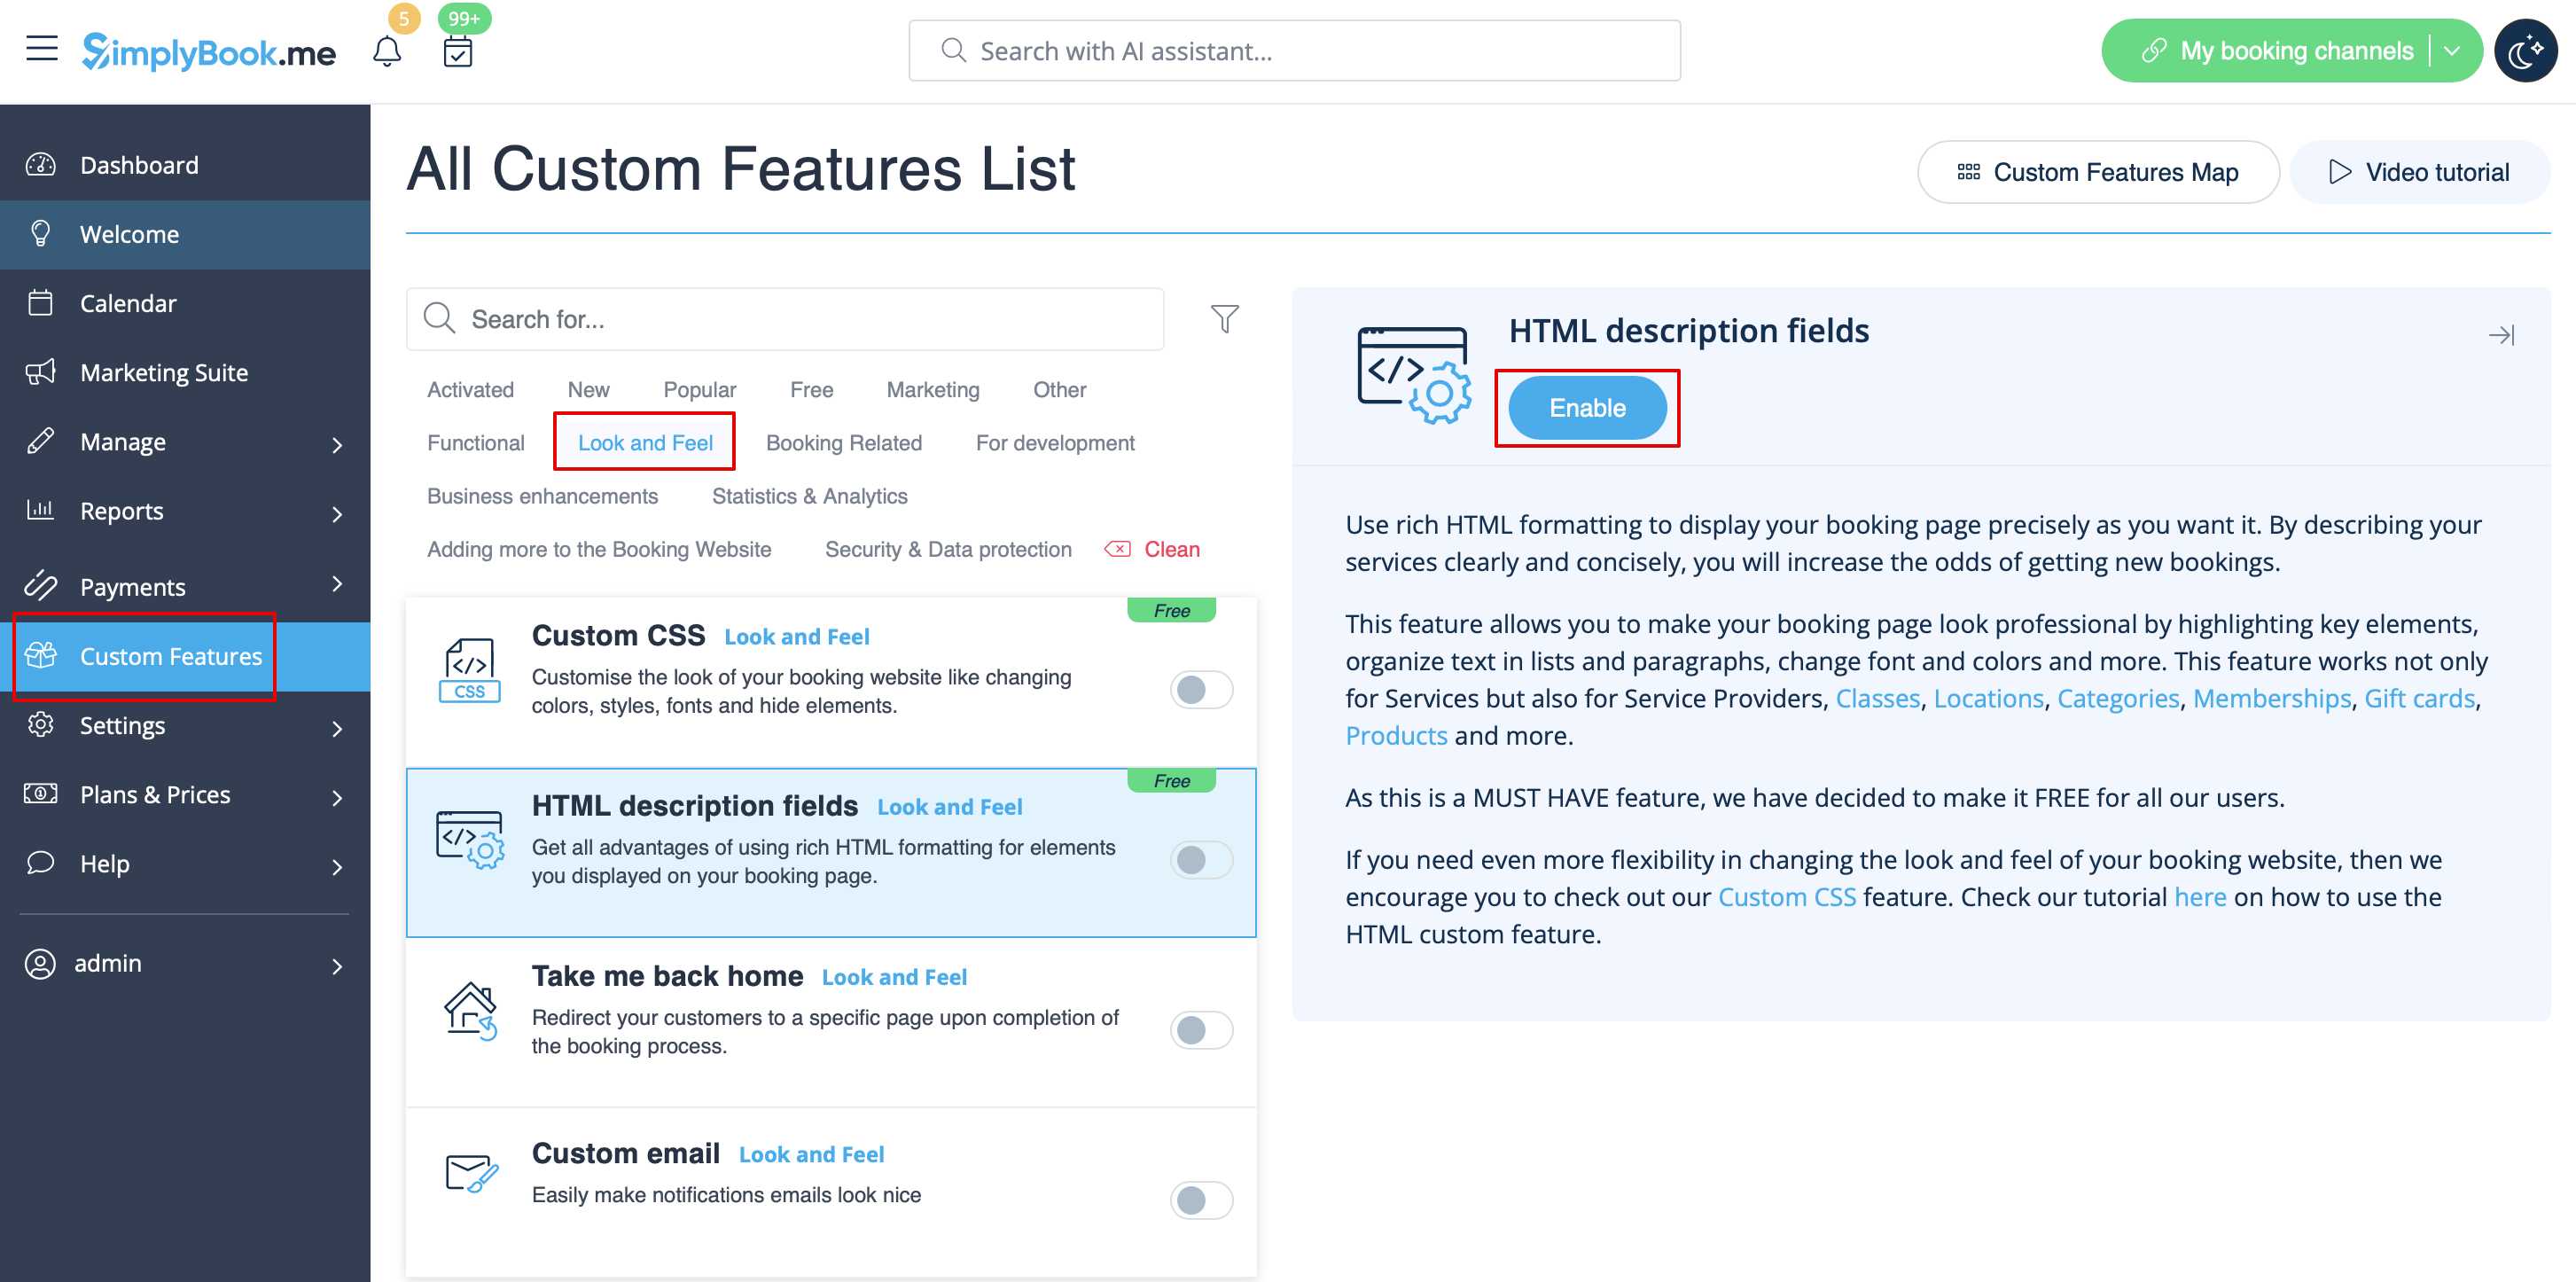
= Formatage HTML pour les champs de description = | |||
<br><br> | <br><br> | ||
Cette fonctionnalité permet de rendre les descriptions plus attrayantes grâce à l'utilisation du formatage HTML. | |||
Veuillez vous rendre dans <span style="background-color:#d4f8e5; padding:5px; border-radius:5px;">Fonctions personnalisées</span> -> <span style="background-color:#d4f8e5; padding:5px; border-radius:5px;">Look and Feel</span> -> <span style="background-color:#cdeffc; padding:5px; border-radius:5px;">[[Custom_Features#HTML_Description_Field_for_Events| Champs de description HTML]]</span> -> <span style="background-color:#d4f8e5; padding:5px; border-radius:5px;">Activer</span> et modifier les descriptions pour les services, les fournisseurs, les lieux et les catégories dans la section <span style="background-color:#d4f8e5; padding:5px; border-radius:5px;">Gérer</span> correspondante. | |||
[[File:Html description enable path redesigned.png|1200px| border|center|link=https://help.simplybook.me/images/1/1f/Html_description_enable_path_redesigned.png]] | Html[[File:Html description enable path redesigned.png|1200px| border|center|link=https://help.simplybook.me/images/1/1f/Html_description_enable_path_redesigned.png]] | ||
<br><br> | <br><br> | ||
Latest revision as of 13:26, 3 February 2026
Logo et arrière-plan
Vous pouvez ajouter le logo de votre entreprise et une belle bannière, ainsi qu'un logo distinct pour la page "Critiques" à
Paramètres
->
Paramètres de conception
->
Paramètres de thème supplémentaires
Images
Vous pouvez ajouter des images à vos services, fournisseurs, catégories et lieux, etc. dans Manage -> Services/Service Providers -> Service details ou Service provider details tab -> click on the photo icon in Service image or Service provider image box and browse the photo.
Descriptions
Vous souhaitez fournir plus d'informations sur vos services et/ou vos employés ?
Vous pouvez le faire dans Manage -> Services/Service Providers -> Service details ou Service provider details tab -> Service description ou Service provider description
Section "À propos
Dans Paramètres -> Paramètres de conception -> Page d'accueil, vous pouvez ajouter une description de l'entreprise et d'autres informations importantes que vous souhaitez afficher sur votre page d'accueil.
Contacts
Vous souhaitez montrer vos coordonnées à vos clients ? Ajoutez-les dans Paramètres -> Informations sur l'entreprise
Vous pouvez y ajouter les détails suivants :
- Adresse électronique
- Numéro de téléphone
- Adresse du site web
- Téléphone WhatsApp
- URL du profil Facebook
- Lien de la page X.com (Twitter)
- URL de la page Instagram
- Page LinkedIn
Un exemple de l'aspect côté client.
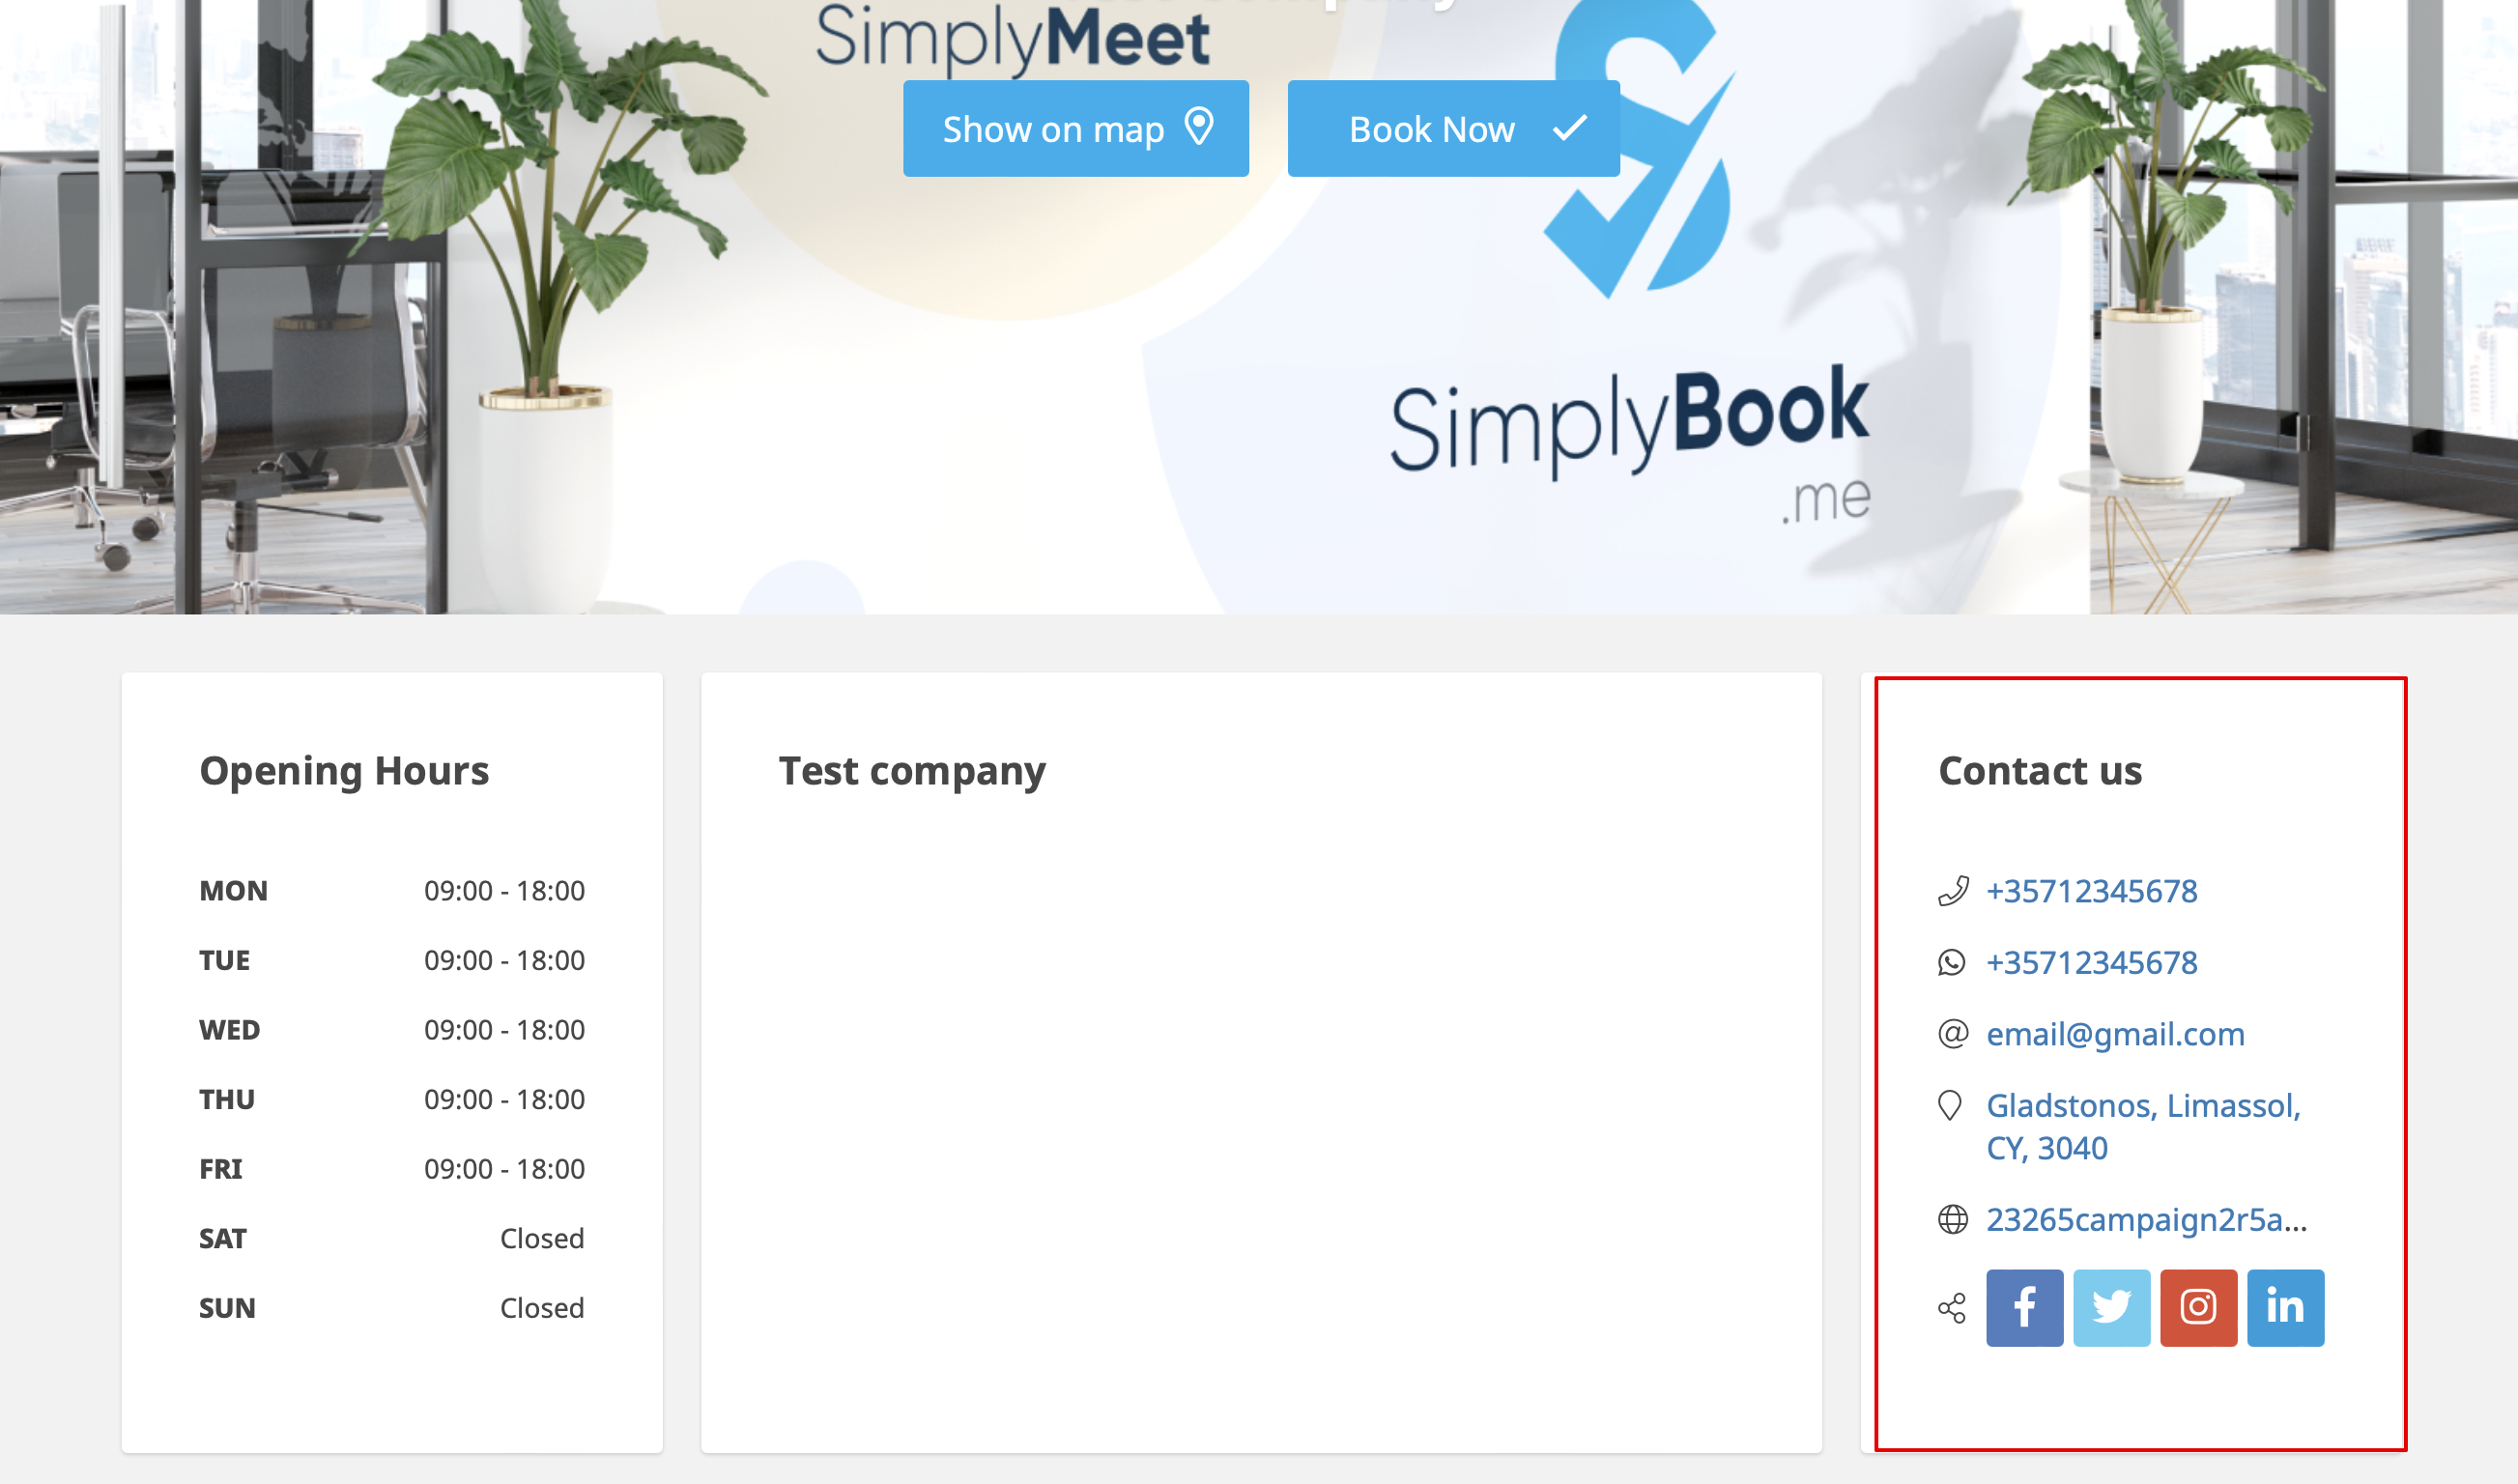
Les clients pourront, par exemple, cliquer sur le numéro WhatsApp et être redirigés vers la messagerie WhatsApp pour vous contacter facilement.
Galerie
Rendez votre page de réservation plus attrayante en montrant les photos de vos services grâce à la fonction personnalisée Galerie de photos.
Pour l'activer, allez dans Fonctions personnalisées -> Ajouter plus au site de réservation -> Galerie de photos -> Activer
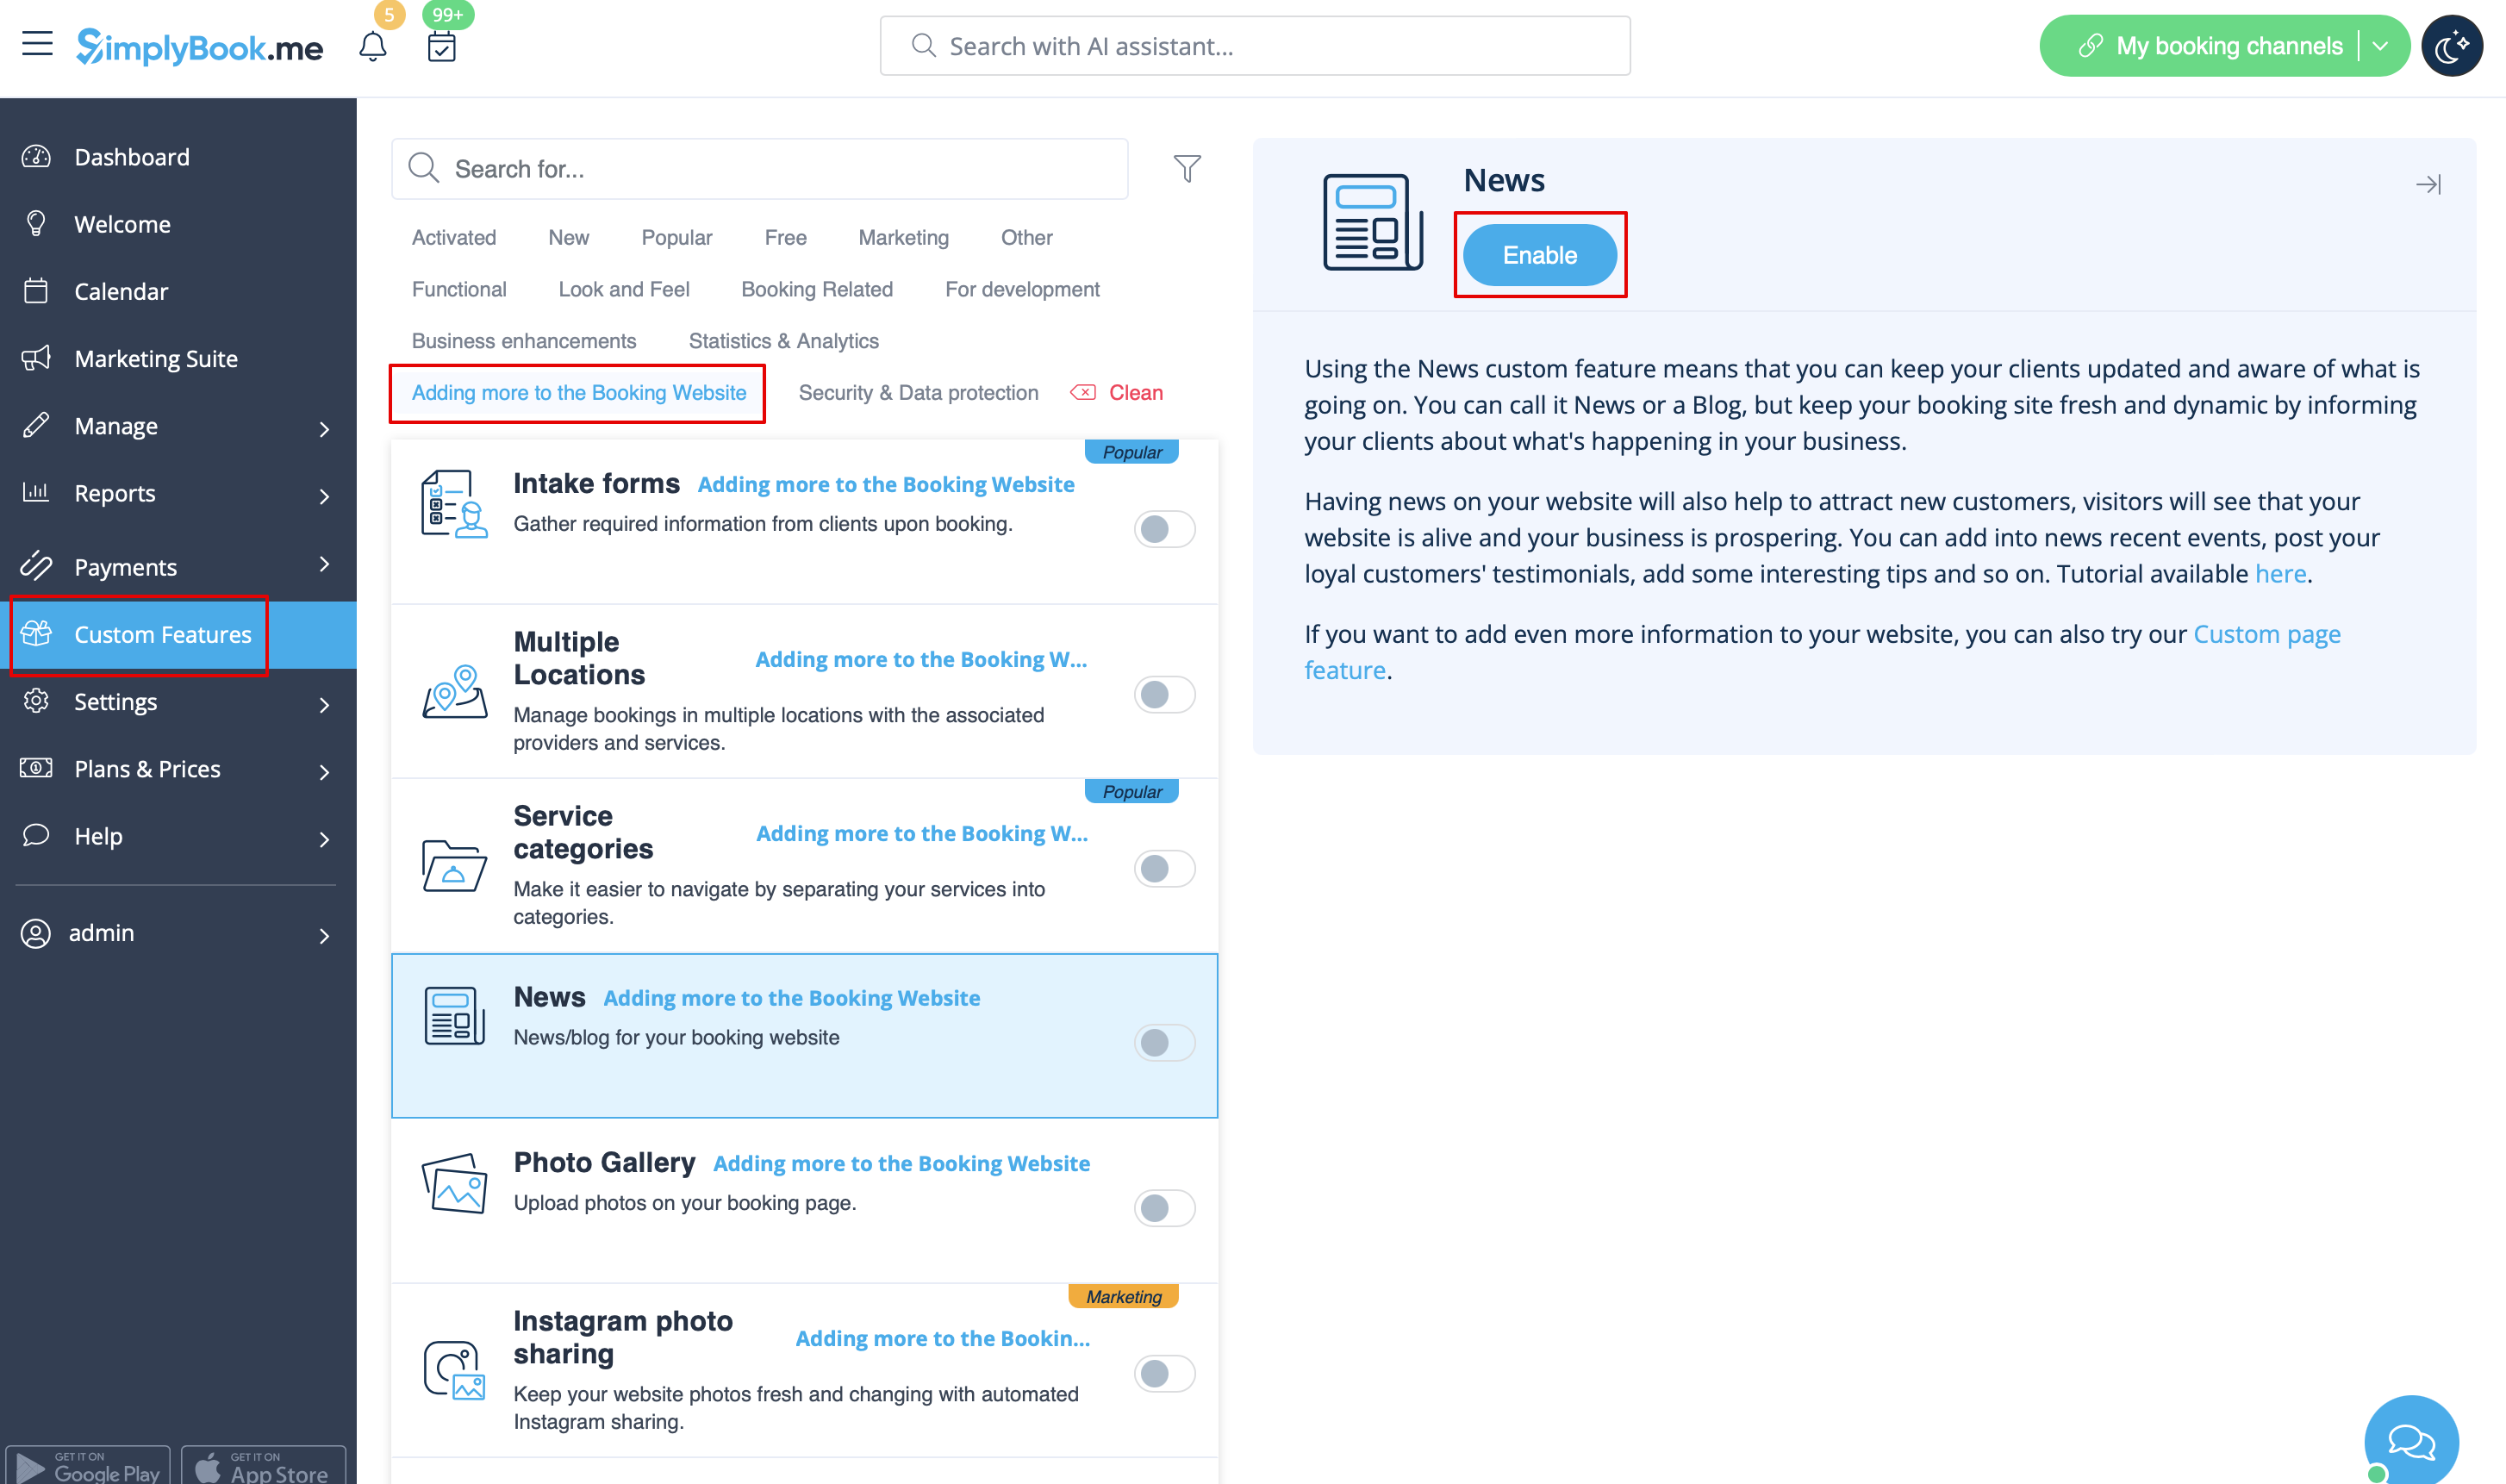
Actualités
Cette option permet d’ajouter des actualités à votre site de réservation.
Pour l’activer, veuillez aller dans Fonctionnalités personnalisées -> Ajouts pour le site de réservation -> Actualités -> Activer
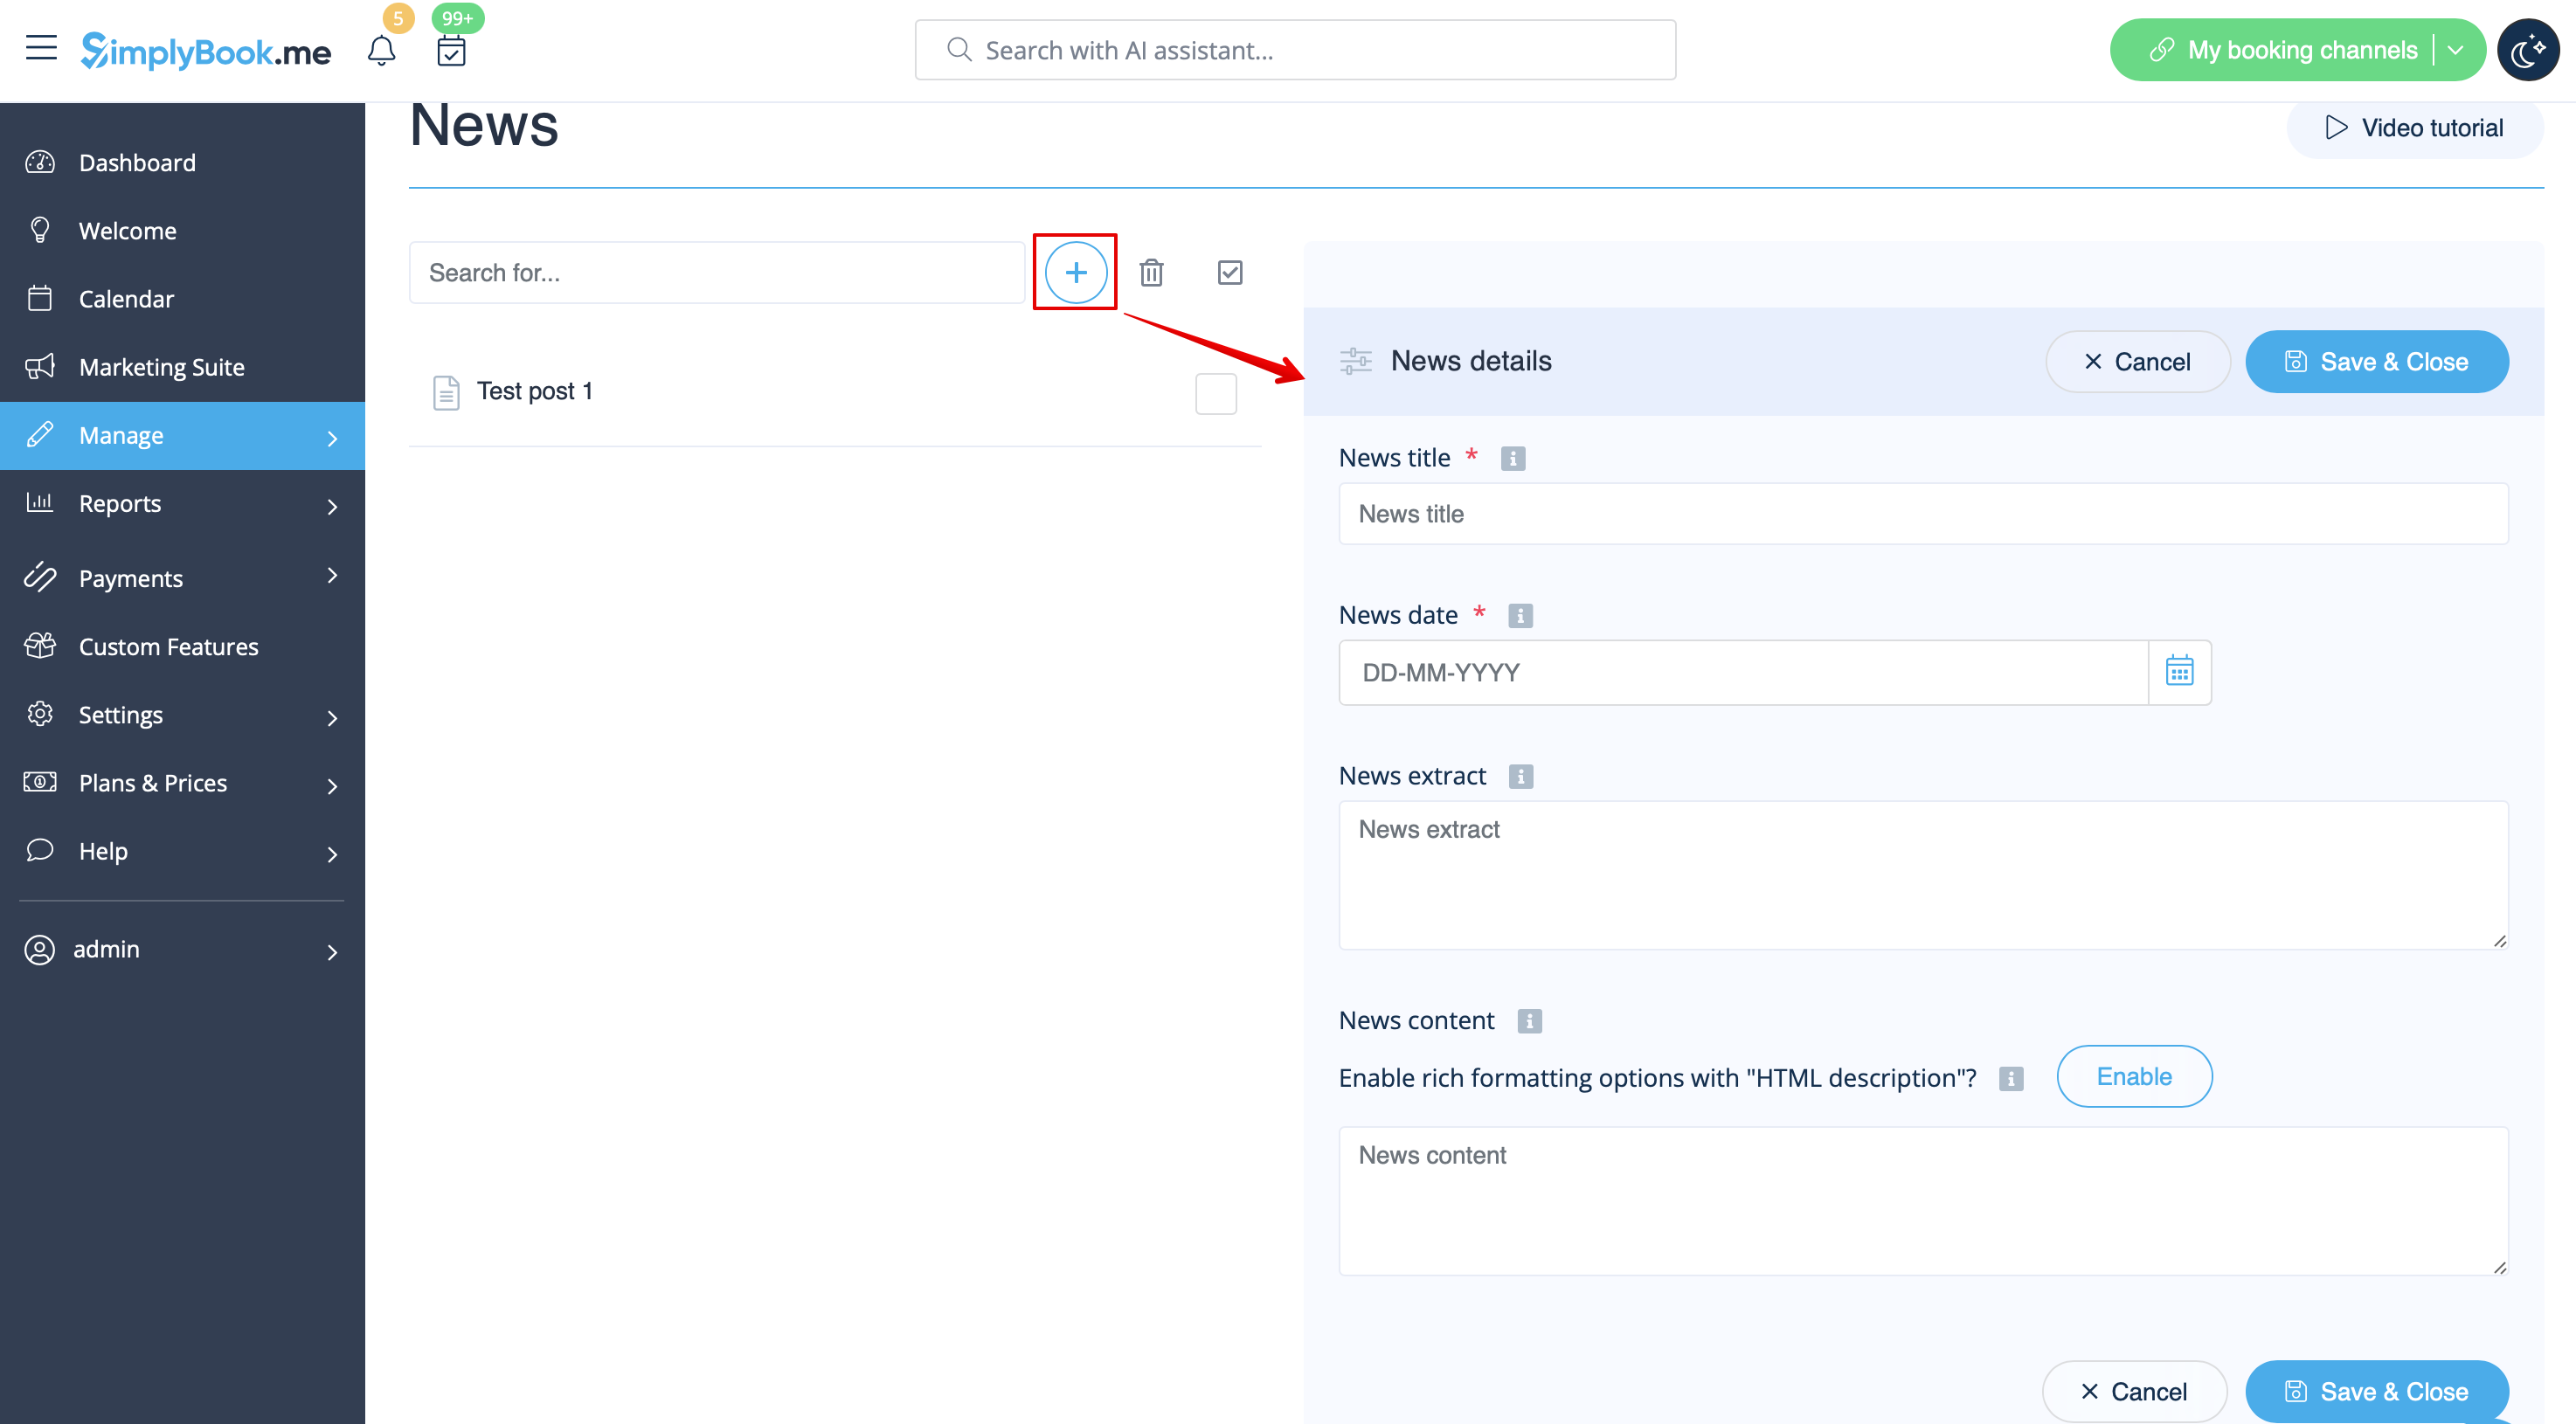
Une fois activée dans Fonctionnalités personnalisées -> Actualités -> Paramètres, vous pouvez créer des articles d’actualité qui s’afficheront dans un onglet séparé sur votre site de réservation.
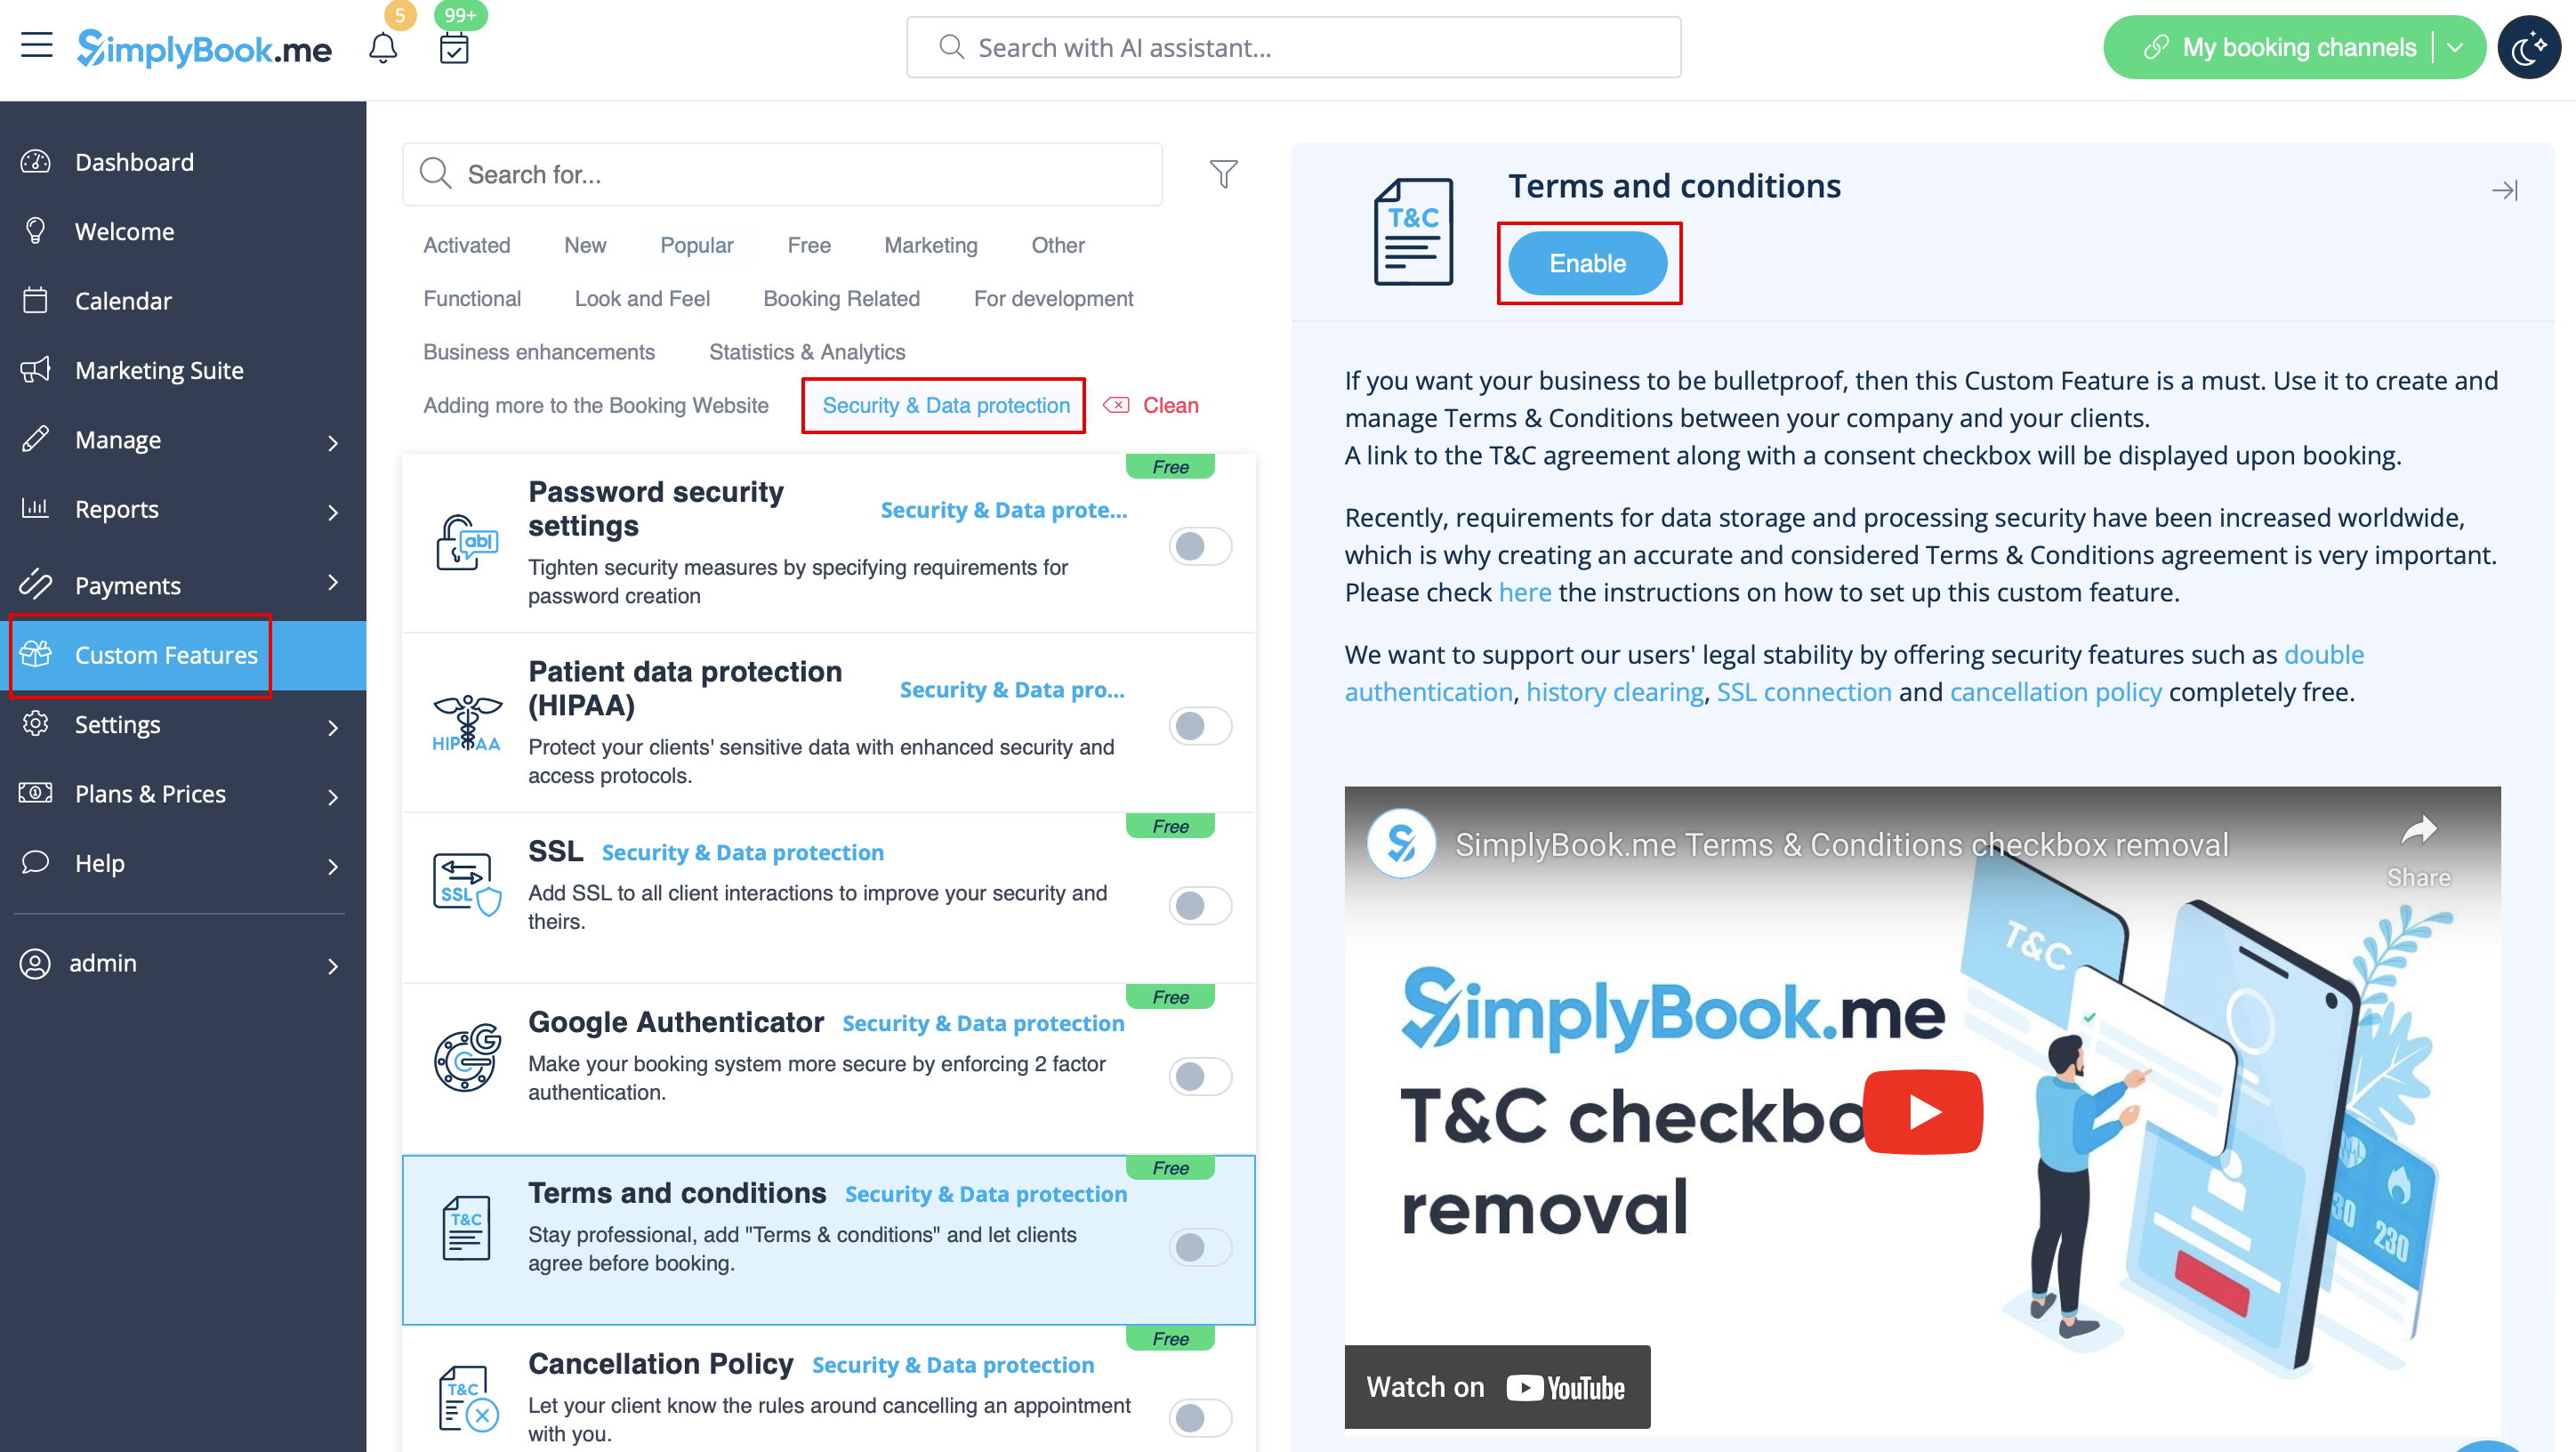
Conditions générales d'utilisation
Votre entreprise doit être à l'épreuve des balles ? Vous pouvez ajouter vos propres conditions générales en activant la fonction personnalisée correspondante dans Fonctions personnalisées -> Sécurité et protection des données et en ajoutant le texte de vos conditions générales dans ses paramètres.
T
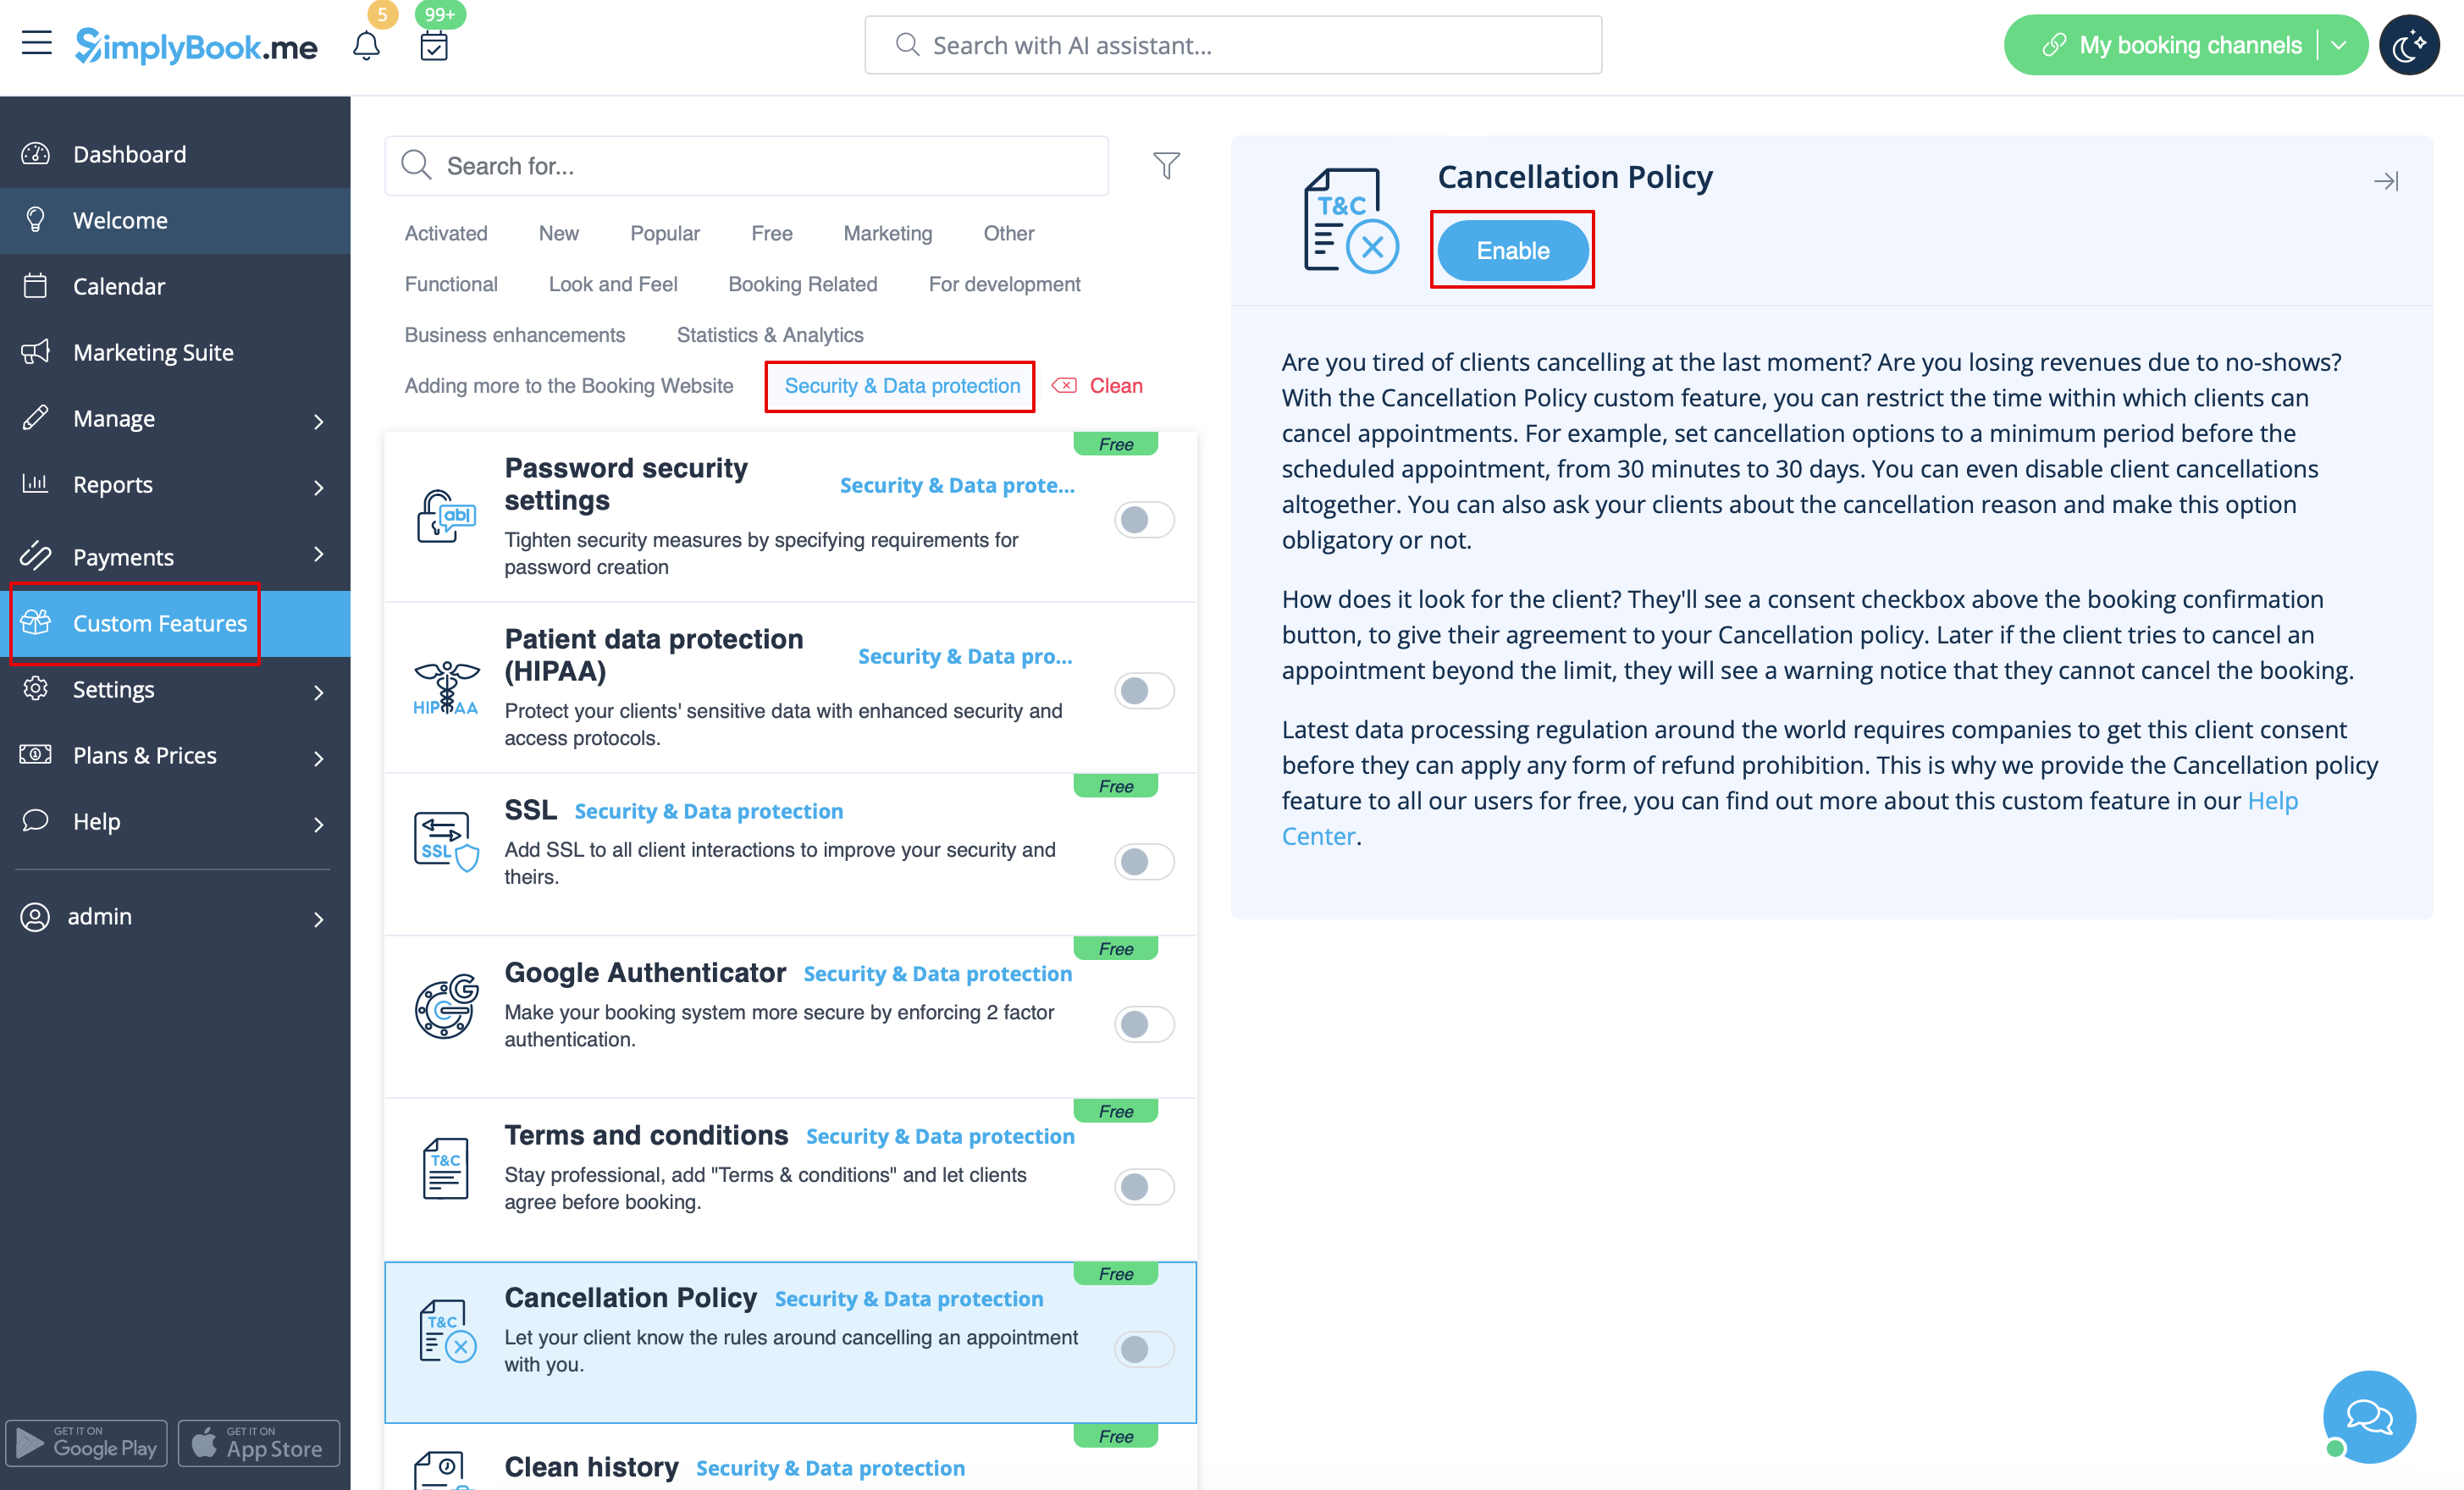
Politique d'annulation
Vous souhaitez limiter la période pendant laquelle les réservations peuvent être annulées par les clients ? Allez dans Fonctions personnalisées -> Protection des données -> Politique d'annulation -> Activer et définissez-la en fonction de vos besoins.
Formatage HTML pour les champs de description
Cette fonctionnalité permet de rendre les descriptions plus attrayantes grâce à l'utilisation du formatage HTML.
Veuillez vous rendre dans Fonctions personnalisées -> Look and Feel -> Champs de description HTML -> Activer et modifier les descriptions pour les services, les fournisseurs, les lieux et les catégories dans la section Gérer correspondante.
Html