From SimplyBook.me
No edit summary |
No edit summary |
||
| (7 intermediate revisions by the same user not shown) | |||
| Line 1: | Line 1: | ||
<languages/> | |||
<translate> | |||
<!--T:1--> | |||
{{#seo: | {{#seo: | ||
|title=SSO-SAML Custom Feature - SimplyBook.me | |title=SSO-SAML Custom Feature - SimplyBook.me | ||
|description=Single Sign-On with MS Azure/Okta for admin and user login. Setup SAML authentication, manage user groups, enable seamless access from identity provider. | |||
|titlemode=append | |titlemode=append | ||
|keywords=faq, frequently asked questions, booking software, appointment system questions, appointments online, calendar software, booking system, booking calendar, scheduling software, online appointment scheduling, online scheduling, plugins, custom features, additional functionality, sso, saml, single sign-on, system login, system access, access to the account | |keywords=faq, frequently asked questions, booking software, appointment system questions, appointments online, calendar software, booking system, booking calendar, scheduling software, online appointment scheduling, online scheduling, plugins, custom features, additional functionality, sso, saml, single sign-on, system login, system access, access to the account | ||
}} | }} | ||
</translate> | |||
<translate> | |||
[[File:Saml icon.png| left]] <br>This custom feature allows to setup Single Sign-On process for you as the system admin and your account users thus enabling login to SimplyBook.me system from MS Azure applications panel. You can create users in MS Azure within the desired access level groups and the corresponding user types will be added in your SimplyBook.me system on the first login. | <!--T:2--> | ||
[[File:Saml icon.png| left]] <br>This custom feature allows to setup Single Sign-On process for you as the system admin and your account users thus enabling login to SimplyBook.me system from MS Azure or Okta applications panel. You can create users in MS Azure/Okta within the desired access level groups and the corresponding user types will be added in your SimplyBook.me system on the first login. | |||
<br><br> | <br><br> | ||
<br><br> | <br><br> | ||
<span style="background-color:#ffe9e9; padding:5px; border-radius:5px;">'''Please note!'''</span><br> | <span style="background-color:#ffe9e9; padding:5px; border-radius:5px;">'''Please note!'''</span><br> | ||
<span style="background-color:#ffe9e9; padding:5px; border-radius:5px;">Currently SSO is available with <span style="background-color:#cdeffc; padding:5px; border-radius:5px;">[https://portal.azure.com/#home Microsoft Azure(Microsoft Entra ID)]</span> only.</span> | <span style="background-color:#ffe9e9; padding:5px; border-radius:5px;">Currently SSO is available with <span style="background-color:#cdeffc; padding:5px; border-radius:5px;">[https://portal.azure.com/#home Microsoft Azure(Microsoft Entra ID)]</span> & <span style="background-color:#cdeffc; padding:5px; border-radius:5px;">[https://www.okta.com Okta SSO]</span> only.</span> | ||
</translate> | |||
<translate> | |||
<!--T:3--> | |||
__FORCETOC__ | |||
<!--T:4--> | |||
==How to set & use Microsoft Azure== | |||
<br> | <br> | ||
:1. Create account at <span style="background-color:#cdeffc; padding:5px; border-radius:5px;">[https://portal.azure.com/#home Microsoft Azure]</span> if you do not have one yet. | :1. Create account at <span style="background-color:#cdeffc; padding:5px; border-radius:5px;">[https://portal.azure.com/#home Microsoft Azure]</span> if you do not have one yet. | ||
<br> | <br> | ||
:2. Enable <span style="background-color:#d4f8e5; padding:5px; border-radius:5px;">SSO: SAML</span> Custom feature on your <span style="background-color:#d4f8e5; padding:5px; border-radius:5px;">Custom features</span> page . | :2. Enable <span style="background-color:#d4f8e5; padding:5px; border-radius:5px;">SSO: SAML</span> Custom feature on your <span style="background-color:#d4f8e5; padding:5px; border-radius:5px;">Custom features</span> page . | ||
[[File:Sso enable path.png|border|center]] | [[File:Sso enable path redesigned.png|1200px|border|center|link=https://help.simplybook.me/images/b/ba/Sso_enable_path_redesigned.png]] | ||
<br><br> | <br><br> | ||
:3. Navigate to <span style="background-color:#d4f8e5; padding:5px; border-radius:5px;">Manage</span> to edit the connection settings. | :3. Navigate to <span style="background-color:#d4f8e5; padding:5px; border-radius:5px;">Manage</span> to edit the connection settings. | ||
[[File:Sso settings path.png|border|center]] | [[File:Sso settings path redesigned.png|1200px|border|center|link=https://help.simplybook.me/images/9/9a/Sso_settings_path_redesigned.png]] | ||
<br><br> | <br><br> | ||
</translate> | |||
<translate> | |||
<!--T:5--> | |||
:4. Click on <span style="background-color:#d4f8e5; padding:5px; border-radius:5px;">Microsoft Azure Configuration</span> on the left and log in to your <span style="background-color:#d4f8e5; padding:5px; border-radius:5px;">MS Azure account</span> there to start connection setup. | :4. Click on <span style="background-color:#d4f8e5; padding:5px; border-radius:5px;">Microsoft Azure Configuration</span> on the left and log in to your <span style="background-color:#d4f8e5; padding:5px; border-radius:5px;">MS Azure account</span> there to start connection setup. | ||
:<span style="background-color:#ffe9e9; padding:5px; border-radius:5px;">'''Please note!''' You need to have administrator access in MS Azure as well to be able to connect applications.</span> | :<span style="background-color:#ffe9e9; padding:5px; border-radius:5px;">'''Please note!''' You need to have administrator access in MS Azure as well to be able to connect applications.</span> | ||
[[File:Sso | [[File:Sso azure login path redesigned.png|1200px|border|center|link=https://help.simplybook.me/images/e/e6/Sso_azure_login_path_redesigned.png]] | ||
<br><br> | <br><br> | ||
:5. After successful login you will see the first block with basic options on SimplyBook.me side. | :5. After successful login you will see the first block with basic options on SimplyBook.me side. | ||
[[File:Sso | [[File:Sso connected first block redesigned.png|1200px|border|center|link=https://help.simplybook.me/images/c/cf/Sso_connected_first_block_redesigned.png]] | ||
<br><br> | <br><br> | ||
:6. In MS Azure please navigate to <span style="background-color:#d4f8e5; padding:5px; border-radius:5px;">Active Directory.</span> | </translate> | ||
[[File: | <translate> | ||
<!--T:6--> | |||
:6. In MS Azure please navigate to <span style="background-color:#d4f8e5; padding:5px; border-radius:5px;">Active Directory(Entra ID).</span> | |||
[[File:Manage ms entra id new path.png|1200px|border|center|link=]] | |||
<br><br> | <br><br> | ||
:7. Select <span style="background-color:#d4f8e5; padding:5px; border-radius:5px;">Enterprise applications</span> in the left-side menu and <span style="background-color:#d4f8e5; padding:5px; border-radius:5px;">add new application.</span><br> | :7. Select <span style="background-color:#d4f8e5; padding:5px; border-radius:5px;">Enterprise applications</span> in the left-side menu and <span style="background-color:#d4f8e5; padding:5px; border-radius:5px;">add new application.</span><br> | ||
</translate> | |||
<translate> | |||
<!--T:7--> | |||
:(you may need paid MS Azure or Premium trial subscription there to add applications) | :(you may need paid MS Azure or Premium trial subscription there to add applications) | ||
[[File: | [[File:Enterprise applications ms new.png|1200px|border|center|link=https://help.simplybook.me/images/8/8d/Enterprise_applications_ms_new.png]] | ||
<br><br> | <br><br> | ||
[[File: | [[File:Azure add new application path new.png|1200px|border|center|link=https://help.simplybook.me/images/9/99/Azure_add_new_application_path_new.png]] | ||
<br><br> | <br><br> | ||
:8. Choose <span style="background-color:#d4f8e5; padding:5px; border-radius:5px;">non-gallery</span> type. Add its name and save. | :8. Choose <span style="background-color:#d4f8e5; padding:5px; border-radius:5px;">non-gallery</span> type. Add its name and save. | ||
<br><br> | <br><br> | ||
:9. On the next page click on <span style="background-color:#d4f8e5; padding:5px; border-radius:5px;">Set up single sign on</span> and select <span style="background-color:#d4f8e5; padding:5px; border-radius:5px;">SAML.</span> | :9. On the next page click on <span style="background-color:#d4f8e5; padding:5px; border-radius:5px;">Set up single sign on</span> and select <span style="background-color:#d4f8e5; padding:5px; border-radius:5px;">SAML.</span> | ||
[[File: | [[File:Azure single sign on type.png|1200px|border|center|link=https://help.simplybook.me/images/0/01/Azure_single_sign_on_type.png]] | ||
<br><br> | <br><br> | ||
[[File:Ms azure select single sign on saml.png|border|center]] | [[File:Ms azure select single sign on saml.png|border|center]] | ||
| Line 49: | Line 69: | ||
<br><br> | <br><br> | ||
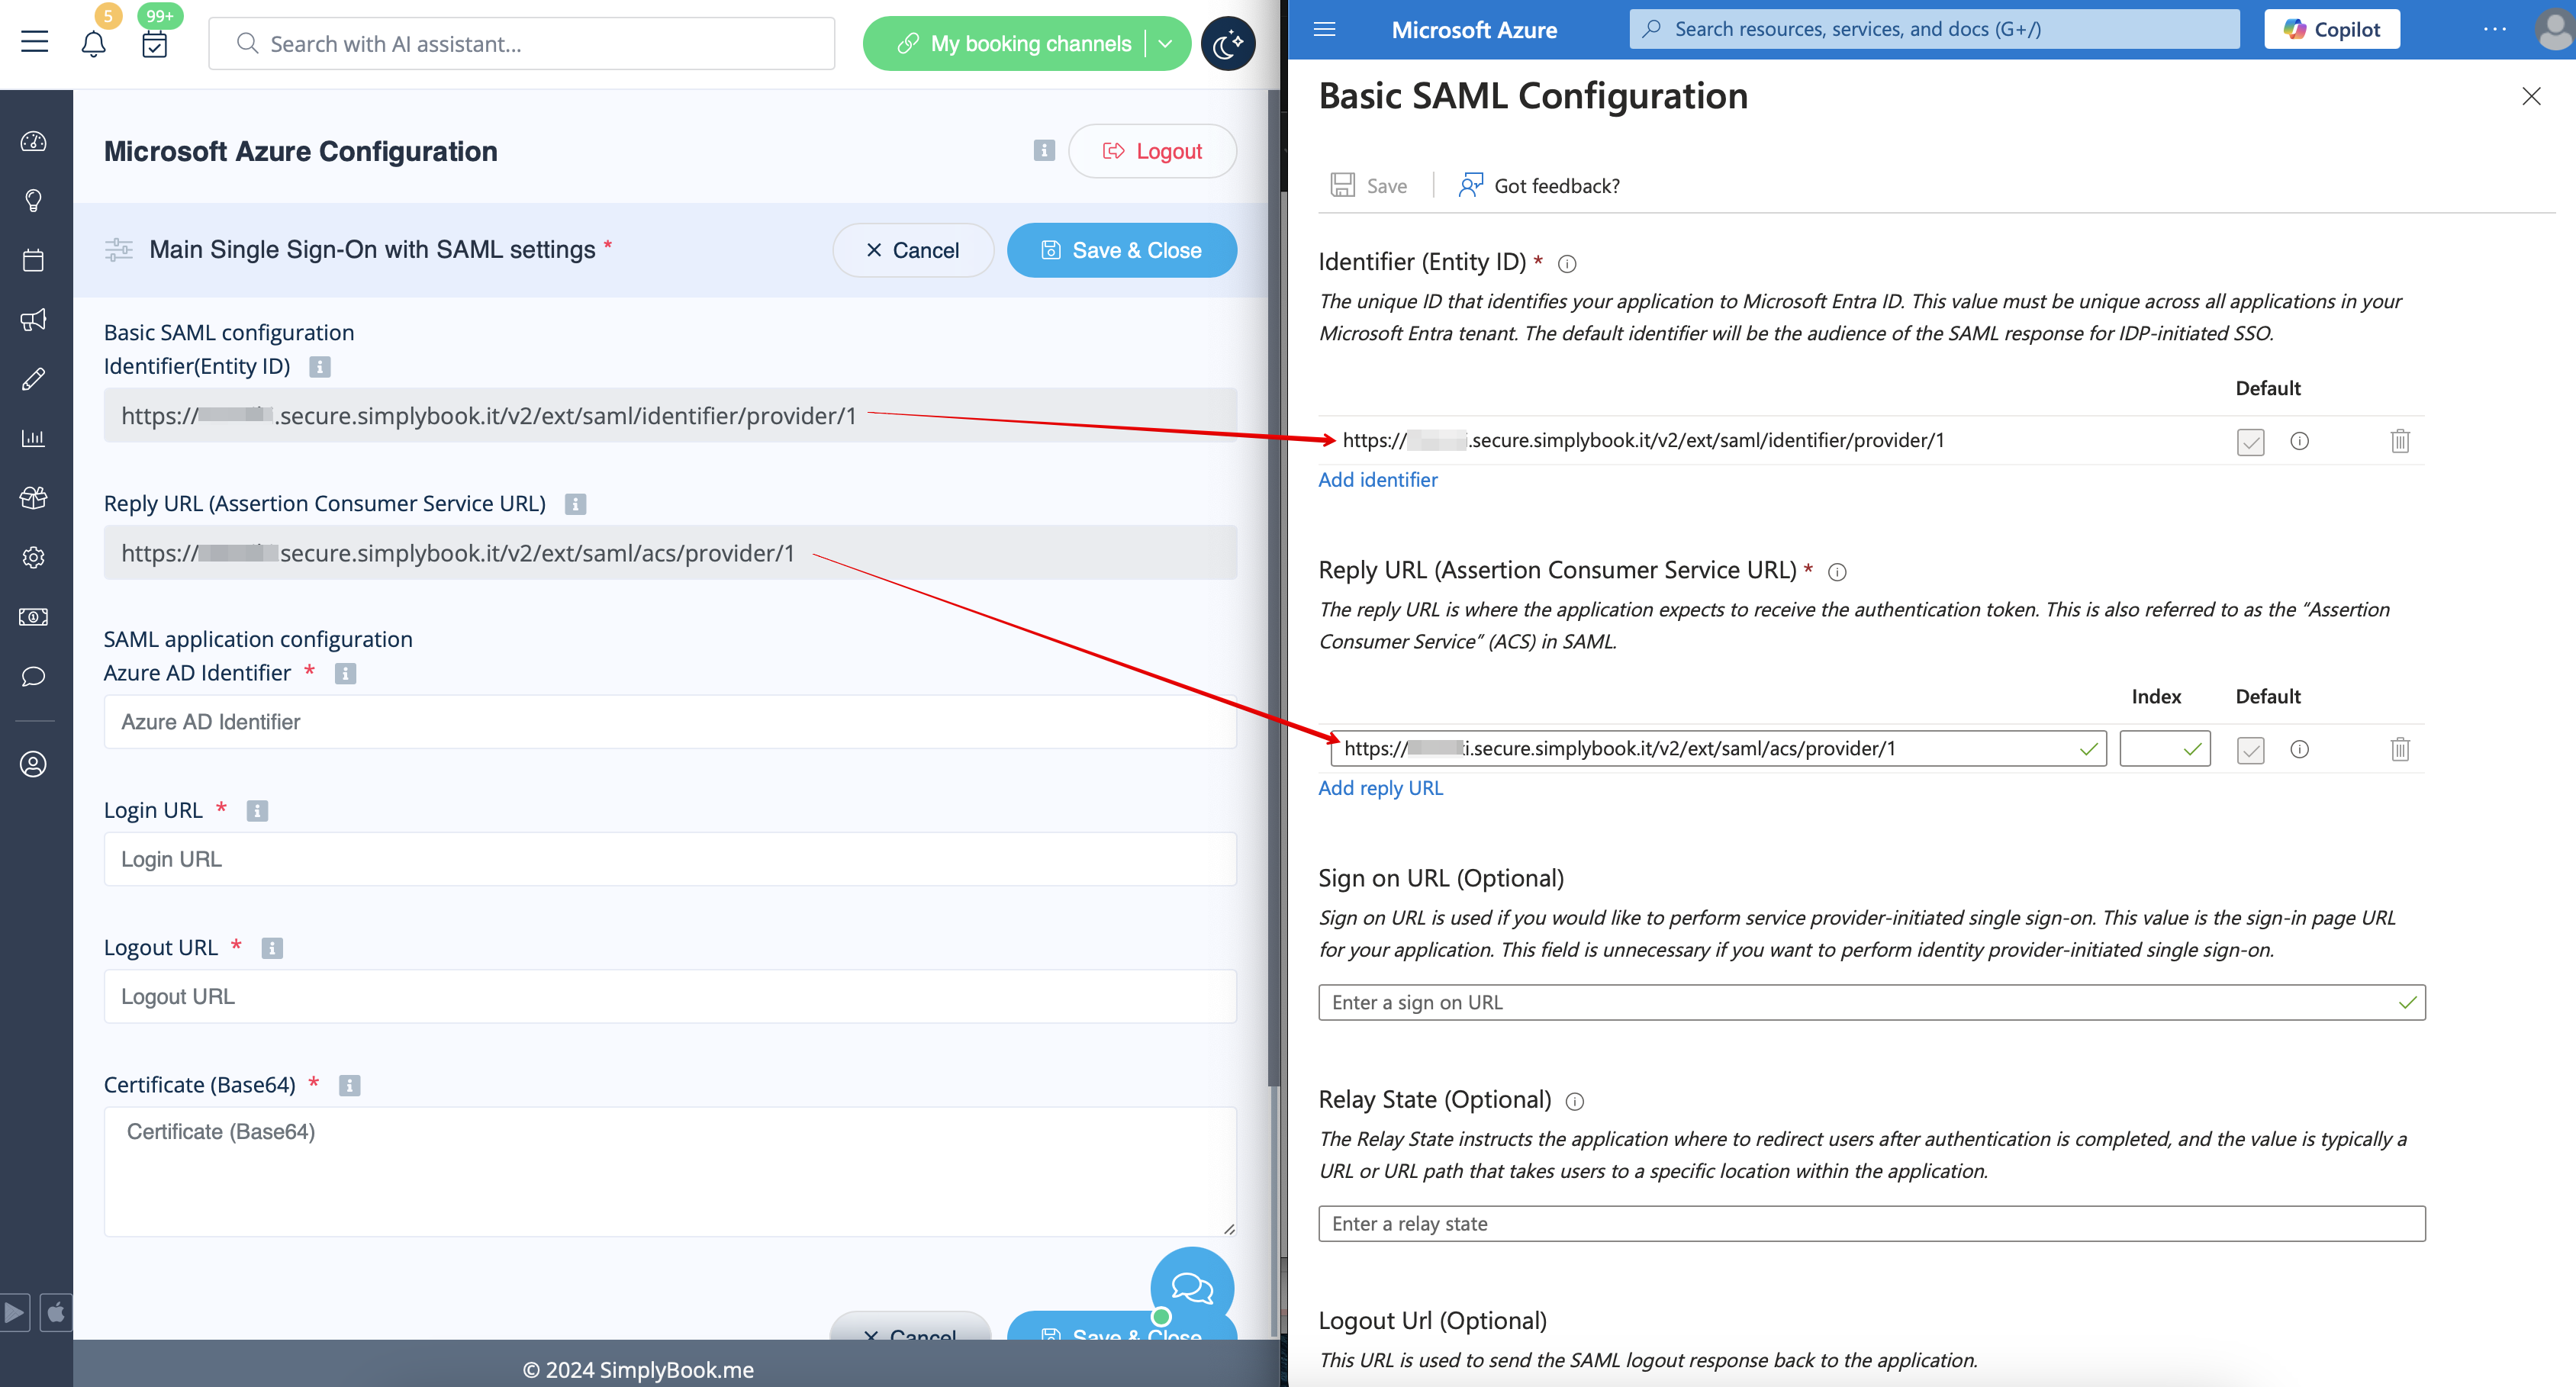
:11. Copy the urls from <span style="background-color:#d4f8e5; padding:5px; border-radius:5px;">SimplyBook.me SSO: SAML feature</span> to the corresponding boxes on <span style="background-color:#d4f8e5; padding:5px; border-radius:5px;">MS Azure side.</span> Save. | :11. Copy the urls from <span style="background-color:#d4f8e5; padding:5px; border-radius:5px;">SimplyBook.me SSO: SAML feature</span> to the corresponding boxes on <span style="background-color:#d4f8e5; padding:5px; border-radius:5px;">MS Azure side.</span> Save. | ||
[[File: | [[File:Entity is and reply url azure copy new.png|1200px|border|center|link=https://help.simplybook.me/images/8/84/Entity_is_and_reply_url_azure_copy_new.png]] | ||
<br><br> | <br><br> | ||
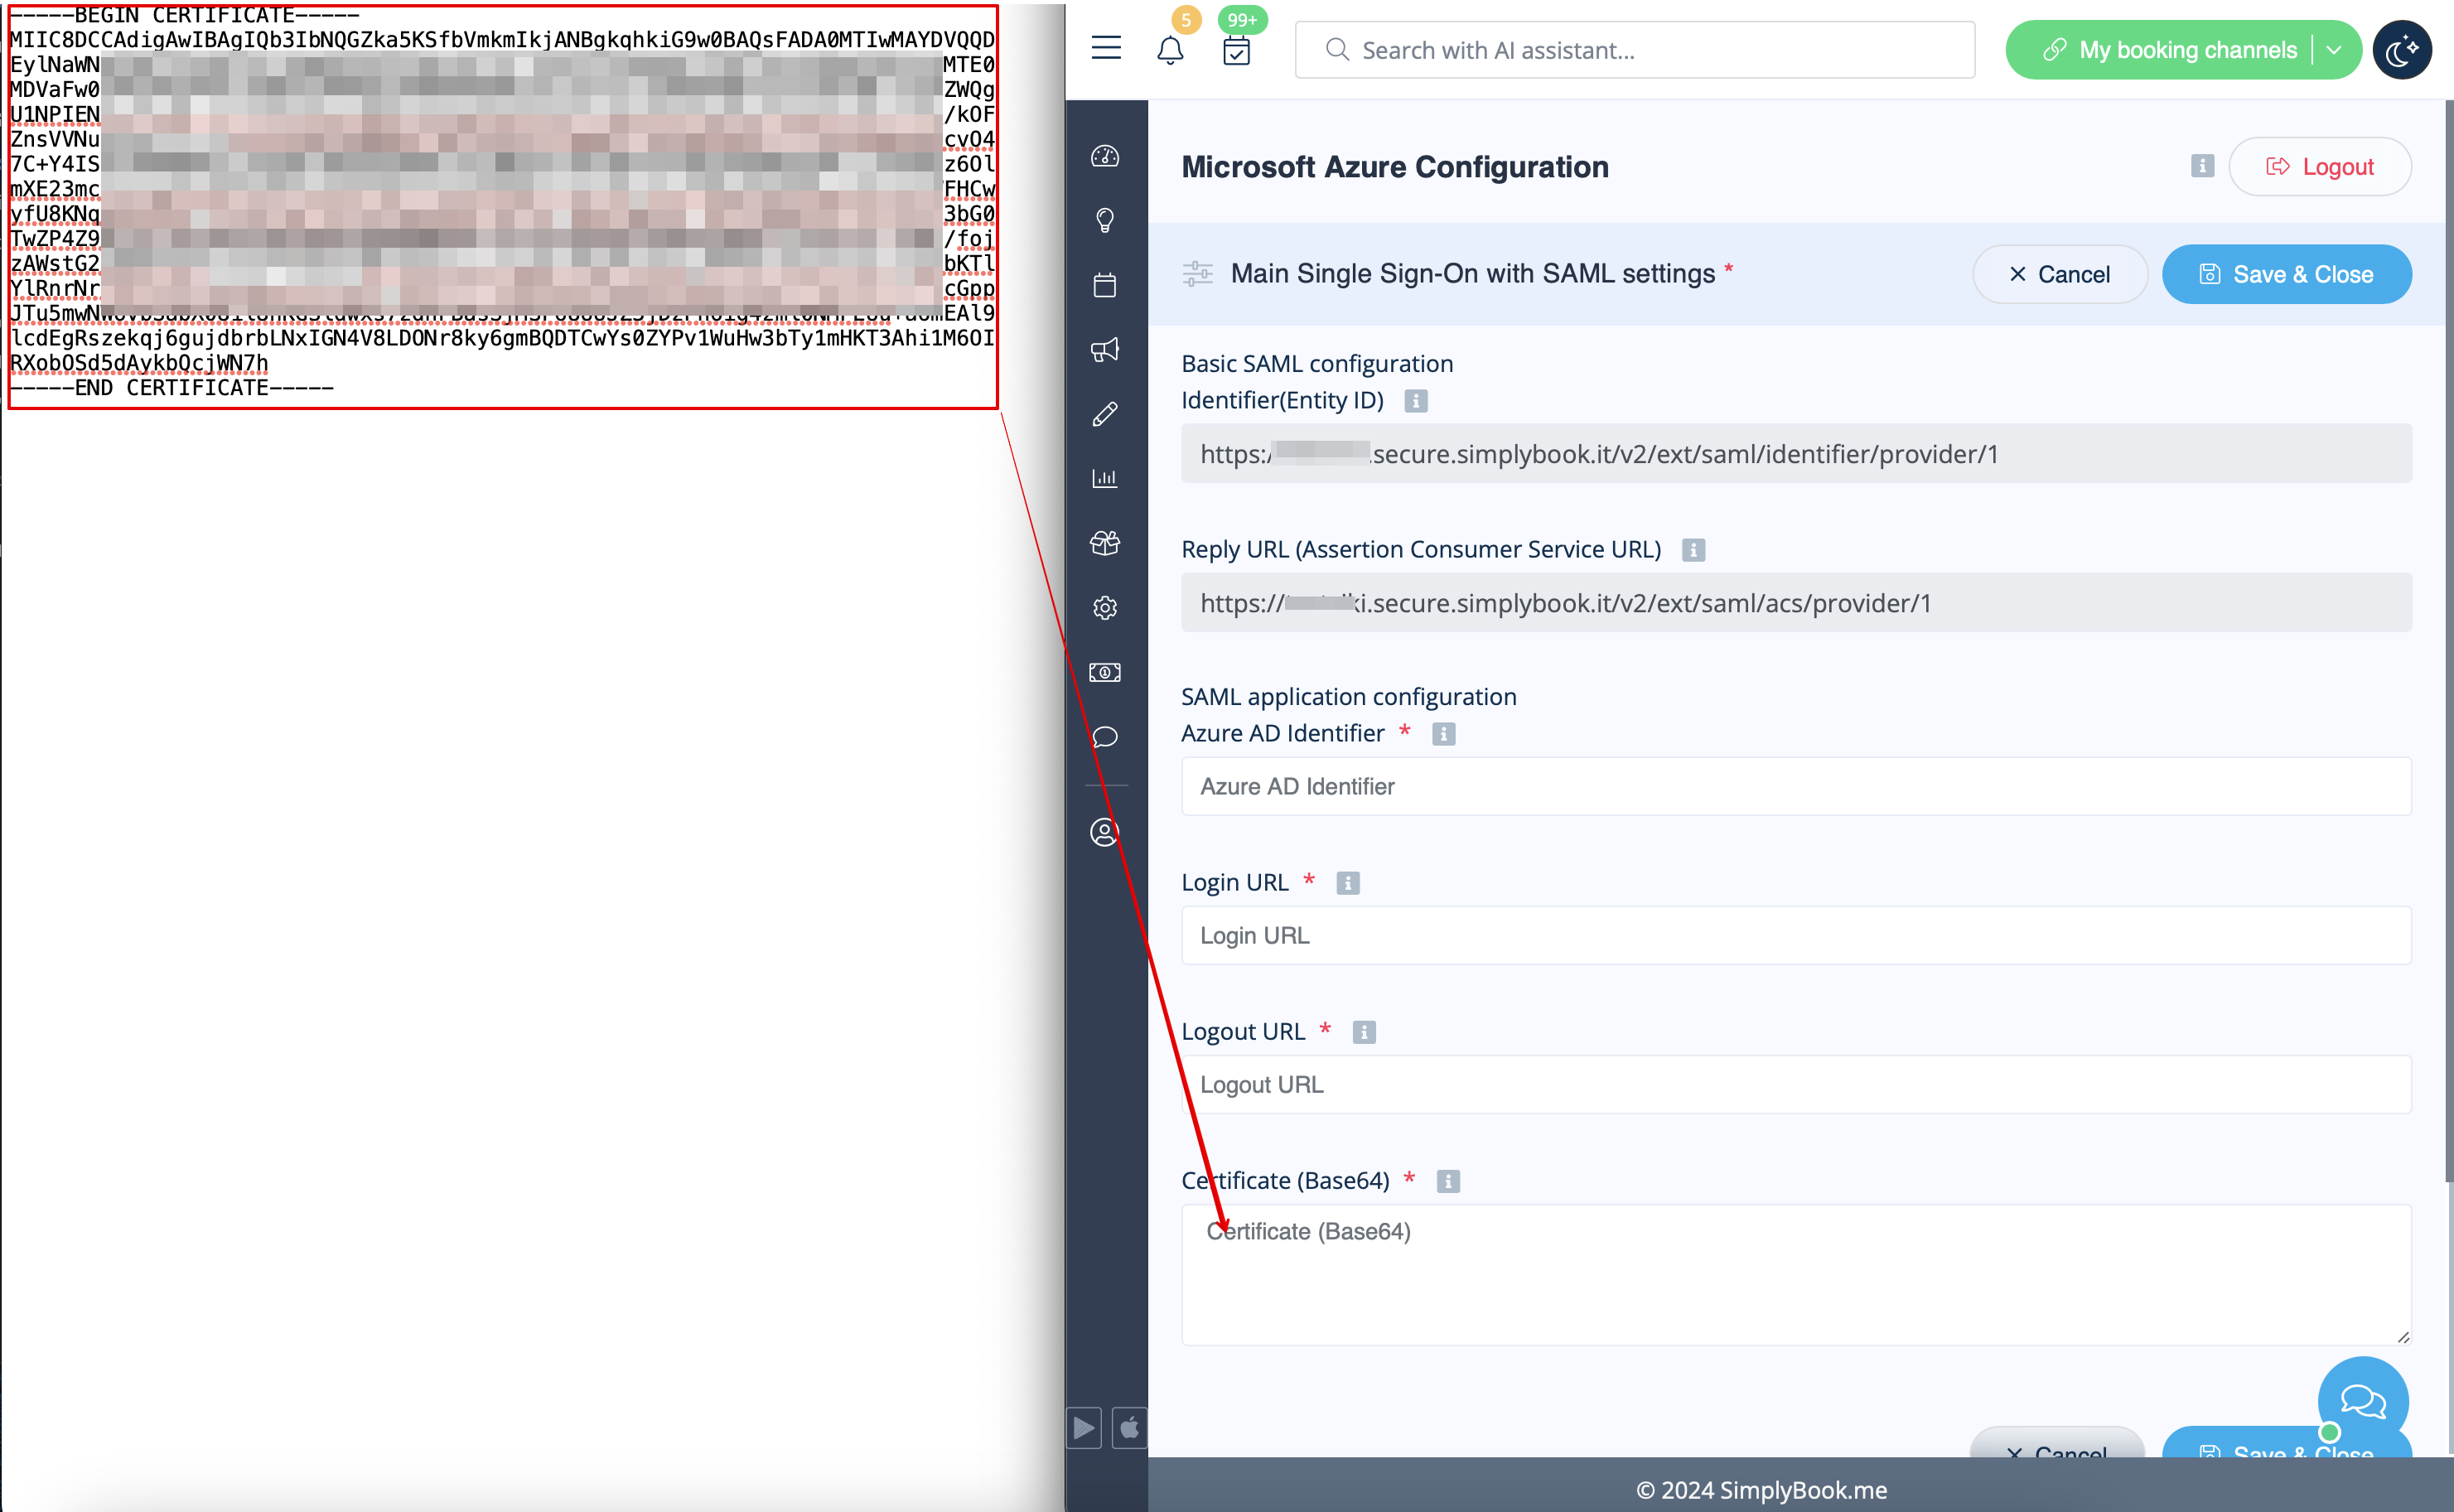
:12. On <span style="background-color:#d4f8e5; padding:5px; border-radius:5px;">MS Azure side</span> scroll to <span style="background-color:#d4f8e5; padding:5px; border-radius:5px;">SAML Signing Certificate</span> part and download <span style="background-color:#d4f8e5; padding:5px; border-radius:5px;">Certificate(Base64).</span> Open it with notepad or similar text editor, copy the certificate code and paste it to the corresponding box into <span style="background-color:#d4f8e5; padding:5px; border-radius:5px;">SSO: SAML Custom Feature.</span> | :12. On <span style="background-color:#d4f8e5; padding:5px; border-radius:5px;">MS Azure side</span> scroll to <span style="background-color:#d4f8e5; padding:5px; border-radius:5px;">SAML Signing Certificate</span> part and download <span style="background-color:#d4f8e5; padding:5px; border-radius:5px;">Certificate(Base64).</span> Open it with notepad or similar text editor, copy the certificate code and paste it to the corresponding box into <span style="background-color:#d4f8e5; padding:5px; border-radius:5px;">SSO: SAML Custom Feature.</span> | ||
[[File:Sbm saml download cetrificate.png|border|center]] | [[File:Sbm saml download cetrificate.png|border|center]] | ||
<br><br> | <br><br> | ||
[[File: | </translate> | ||
<translate> | |||
<!--T:8--> | |||
[[File:Base64 certificate paste new.png|1200px|border|center|link=https://help.simplybook.me/images/e/e6/Base64_certificate_paste_new.png]] | |||
<br><br> | <br><br> | ||
:13. Scroll <span style="background-color:#d4f8e5; padding:5px; border-radius:5px;">MS Azure side</span> page to <span style="background-color:#d4f8e5; padding:5px; border-radius:5px;">Set up | :13. Scroll <span style="background-color:#d4f8e5; padding:5px; border-radius:5px;">MS Azure side</span> page to <span style="background-color:#d4f8e5; padding:5px; border-radius:5px;">Set up</span> block and find <span style="background-color:#d4f8e5; padding:5px; border-radius:5px;">Login URL,</span> <span style="background-color:#d4f8e5; padding:5px; border-radius:5px;">Azure AD/Microsoft Entra Identifier</span> and <span style="background-color:#d4f8e5; padding:5px; border-radius:5px;">Logout URL</span> options, Copy each of them and paste to the corresponding boxes on SimplyBook.me side. | ||
[[File: | [[File:Login logout and azure id new.png|1200px|border|center|link=https://help.simplybook.me/images/4/4c/Login_logout_and_azure_id_new.png]] | ||
<br><br> | <br><br> | ||
:14. Go to <span style="background-color:#d4f8e5; padding:5px; border-radius:5px;">User attributes and claims</span> block on MS Azure side and click on <span style="background-color:#d4f8e5; padding:5px; border-radius:5px;">Pen</span> icon to edit it. | :14. Go to <span style="background-color:#d4f8e5; padding:5px; border-radius:5px;">User attributes and claims</span> block on MS Azure side and click on <span style="background-color:#d4f8e5; padding:5px; border-radius:5px;">Pen</span> icon to edit it. | ||
| Line 69: | Line 92: | ||
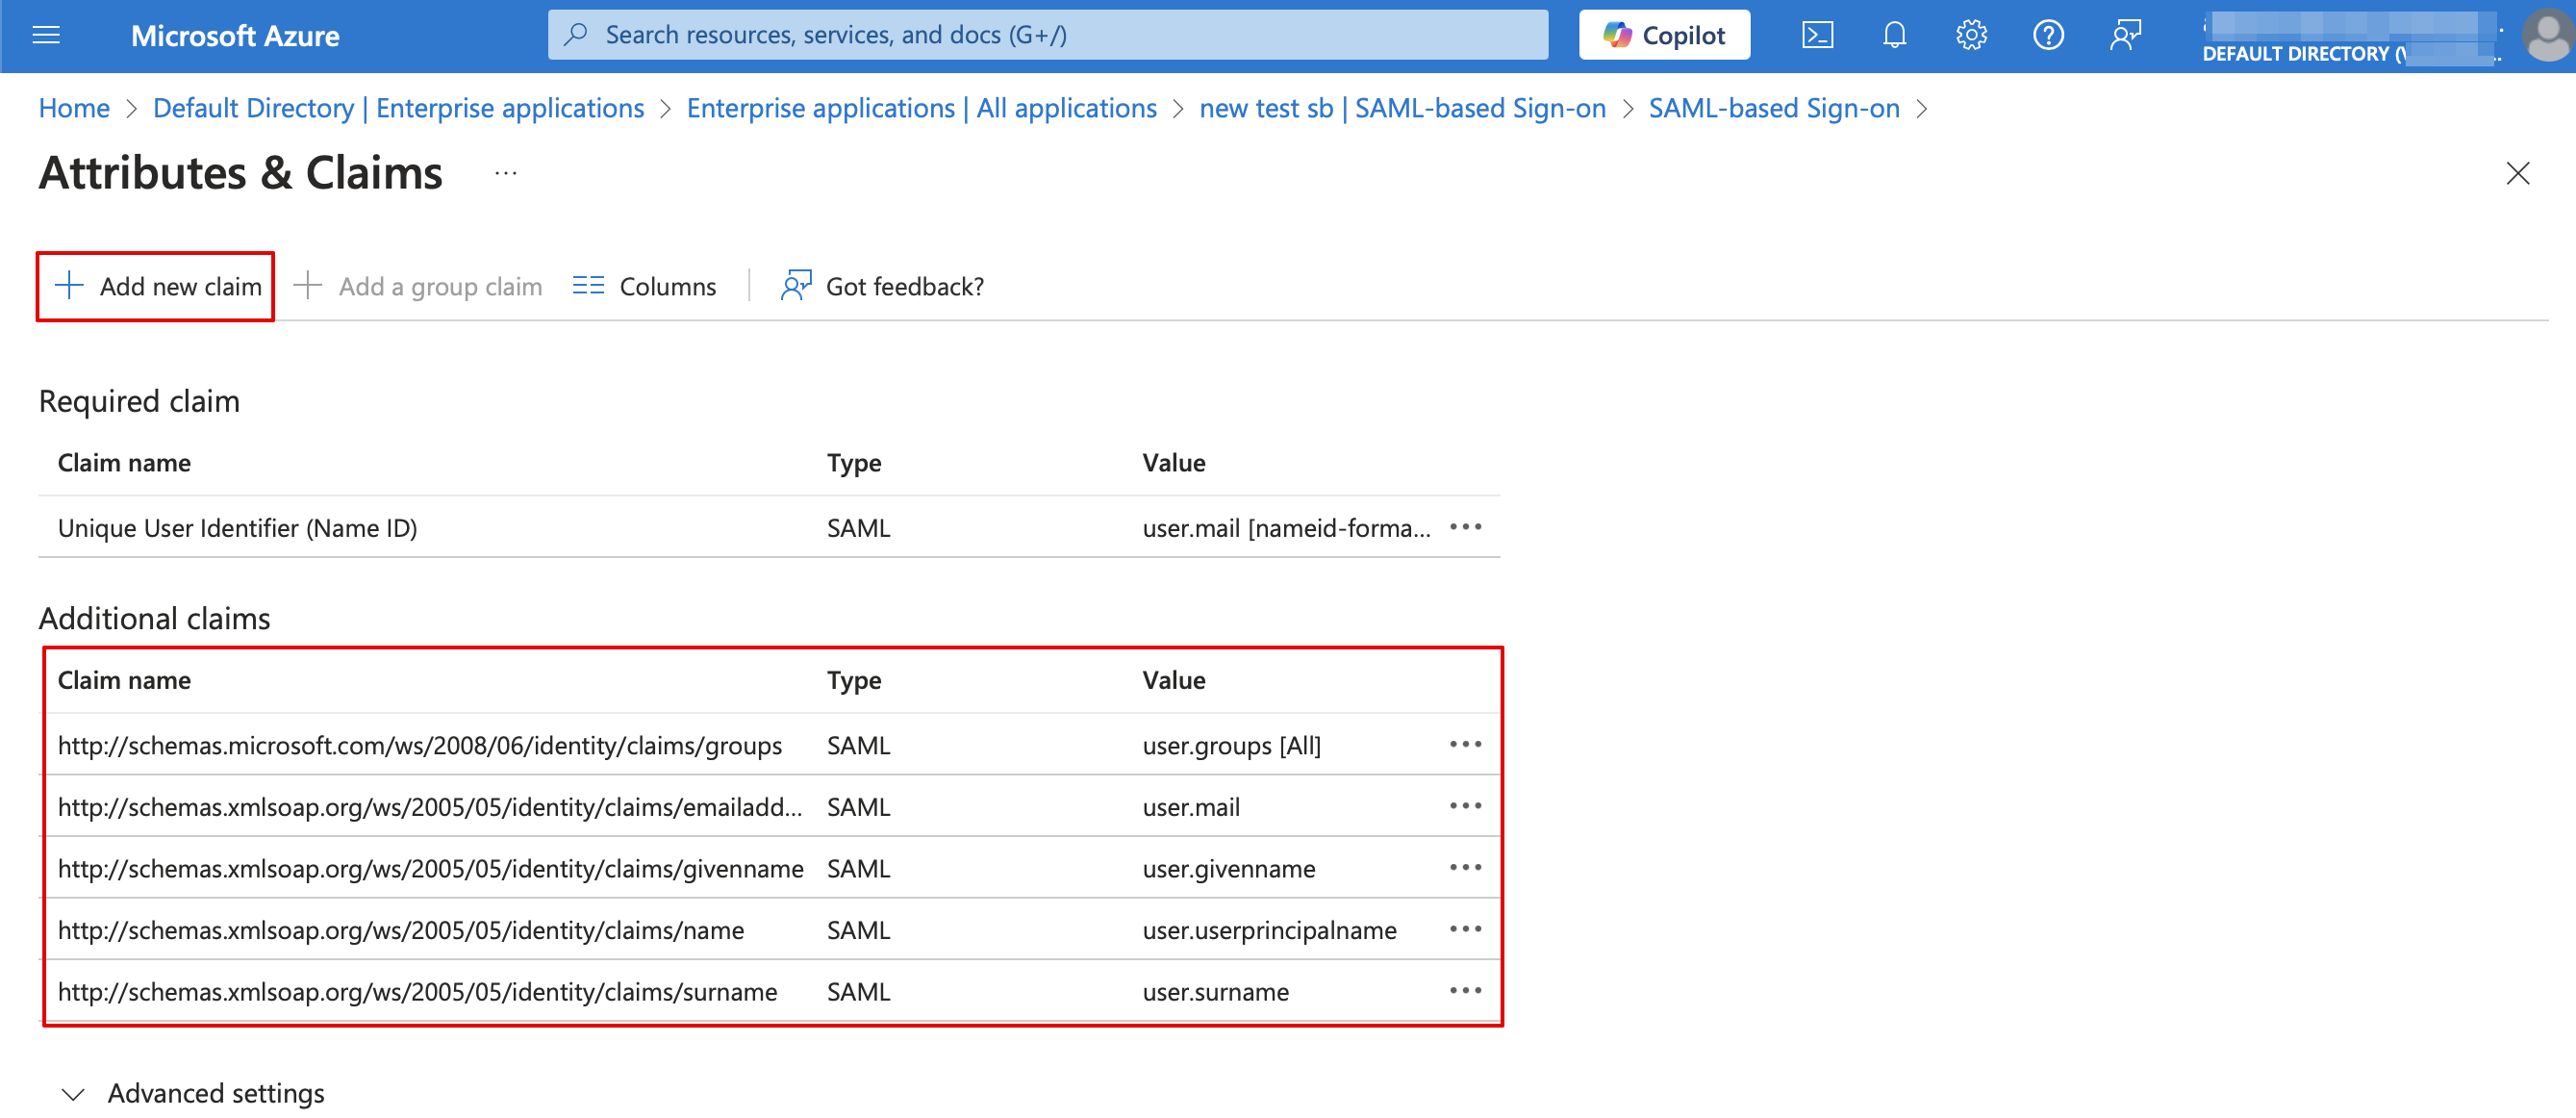
:16. For additional claims please add <span style="background-color:#d4f8e5; padding:5px; border-radius:5px;">Groups</span> option using <span style="background-color:#d4f8e5; padding:5px; border-radius:5px;">Add group claim</span> and <span style="background-color:#d4f8e5; padding:5px; border-radius:5px;">Email</span> and <span style="background-color:#d4f8e5; padding:5px; border-radius:5px;">Name</span> with <span style="background-color:#d4f8e5; padding:5px; border-radius:5px;">Add new claim</span> buttons correspondingly.<br> | :16. For additional claims please add <span style="background-color:#d4f8e5; padding:5px; border-radius:5px;">Groups</span> option using <span style="background-color:#d4f8e5; padding:5px; border-radius:5px;">Add group claim</span> and <span style="background-color:#d4f8e5; padding:5px; border-radius:5px;">Email</span> and <span style="background-color:#d4f8e5; padding:5px; border-radius:5px;">Name</span> with <span style="background-color:#d4f8e5; padding:5px; border-radius:5px;">Add new claim</span> buttons correspondingly.<br> | ||
:You can also add phone and last name if you need. See claims setup example below. | :You can also add phone and last name if you need. See claims setup example below. | ||
[[File: | [[File:Setup claims new.png|1200px|border|center|link=https://help.simplybook.me/images/8/81/Setup_claims_new.png]] | ||
<br><br> | <br><br> | ||
</translate> | |||
<translate> | |||
<!--T:9--> | |||
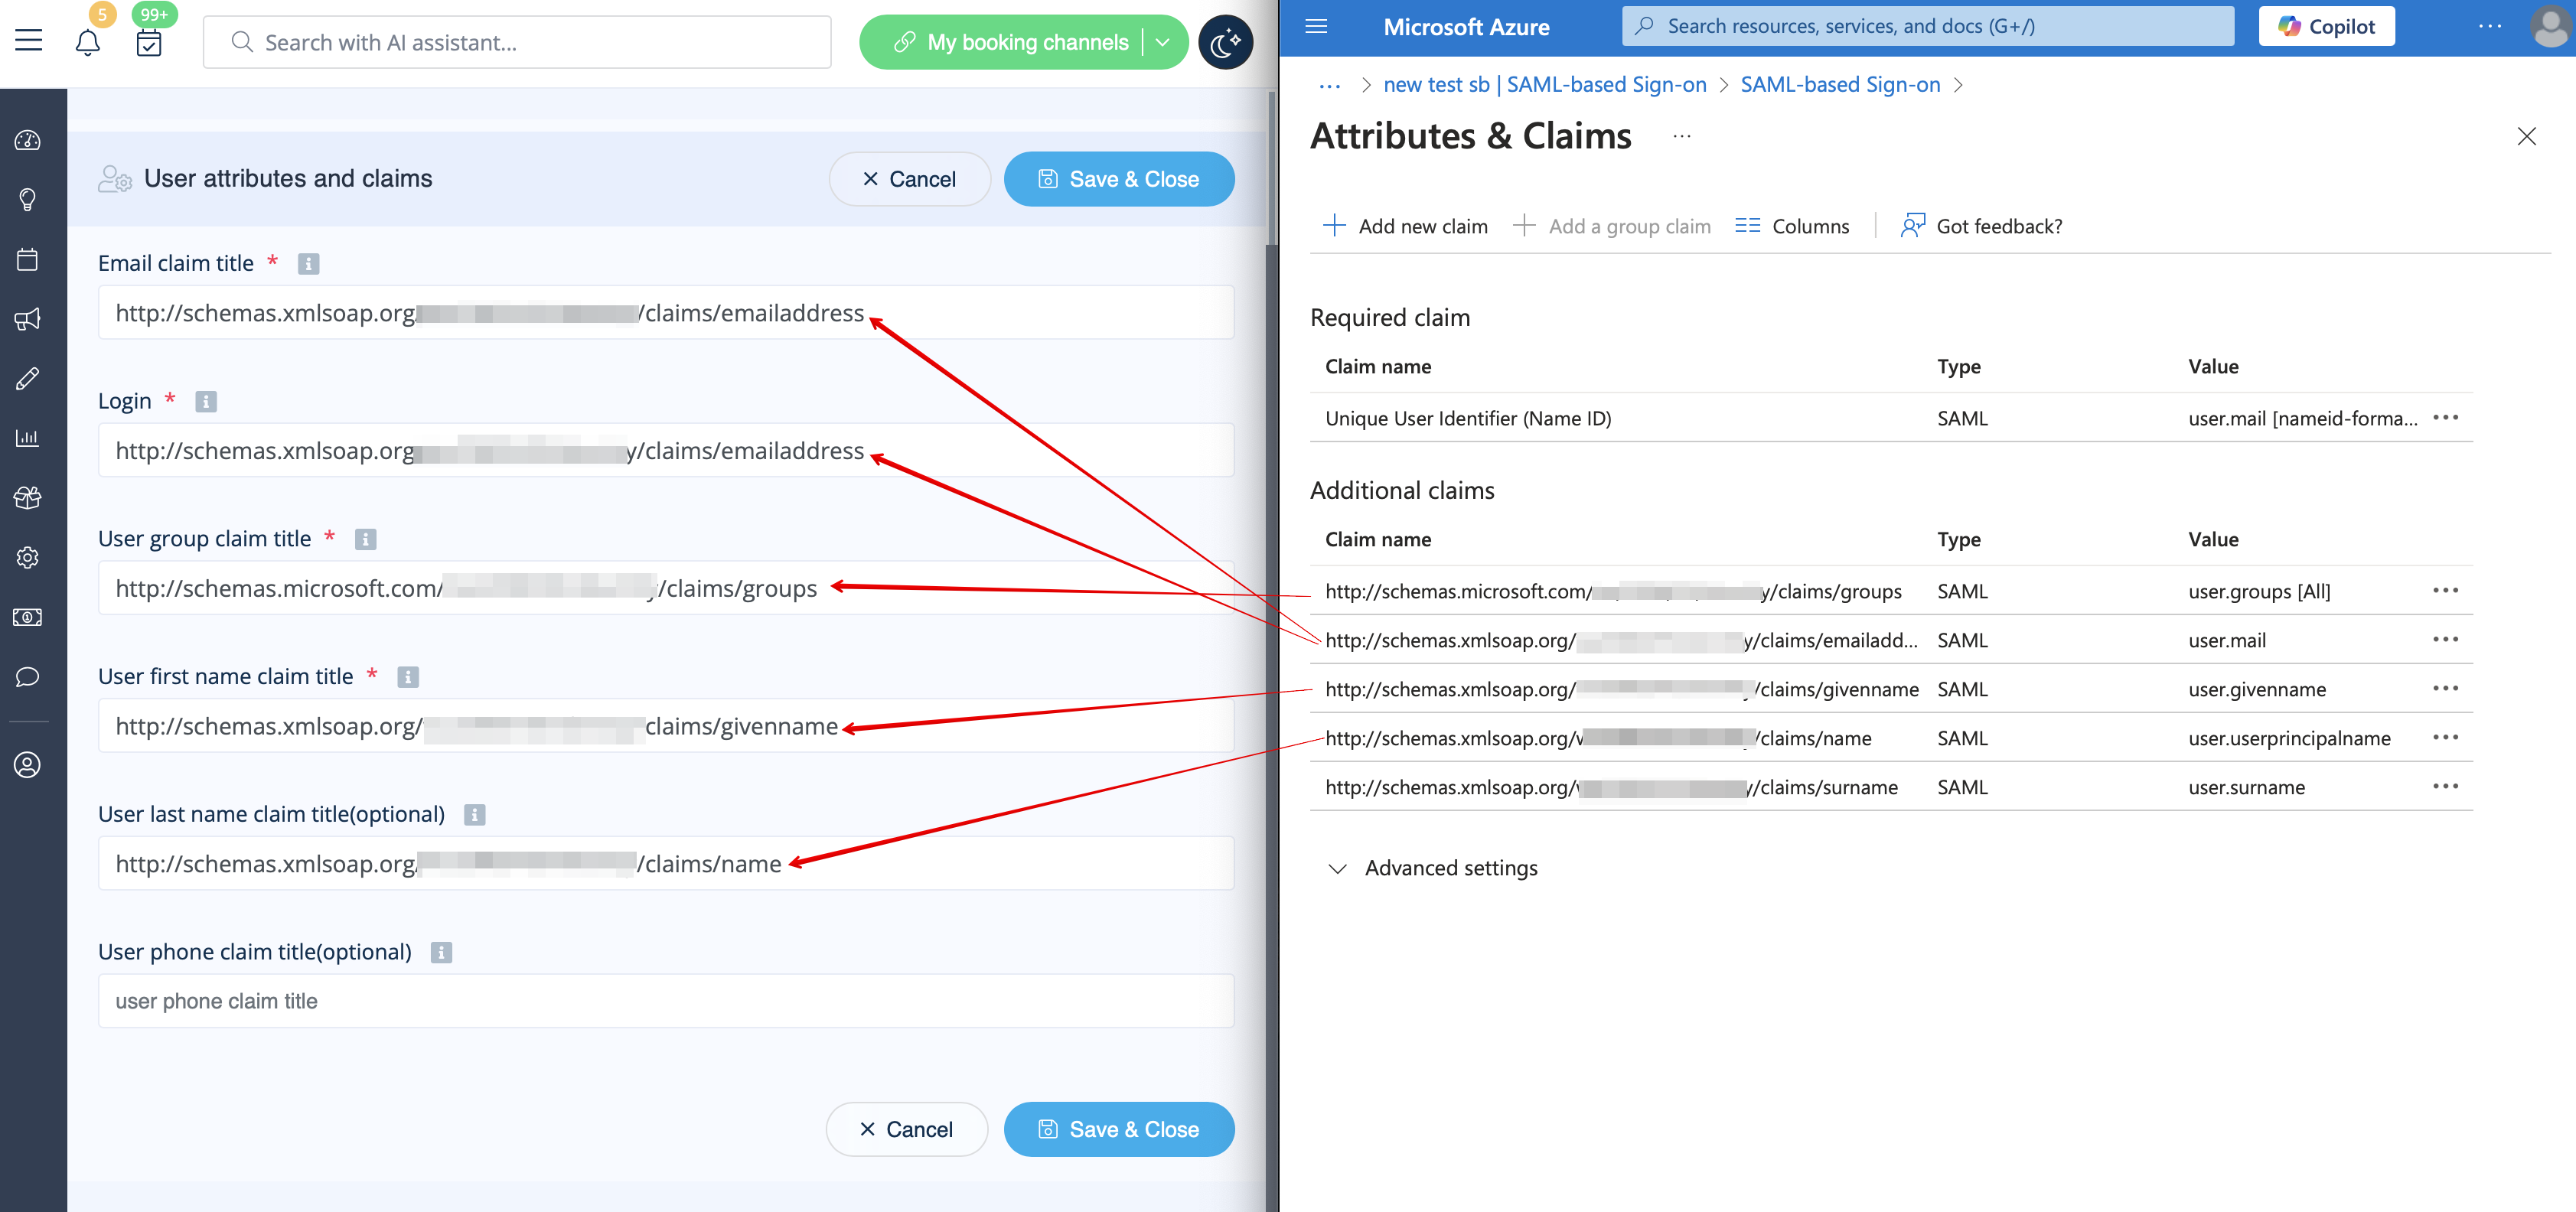
:17. Copy the claims titles to the corresponding boxes on <span style="background-color:#d4f8e5; padding:5px; border-radius:5px;">SimplyBook.me side.</span> | :17. Copy the claims titles to the corresponding boxes on <span style="background-color:#d4f8e5; padding:5px; border-radius:5px;">SimplyBook.me side.</span> | ||
[[File: | [[File:Copy claims new.png|1200px|border|center|link=https://help.simplybook.me/images/9/9b/Copy_claims_new.png]] | ||
<br><br> | <br><br> | ||
:18. Navigate to <span style="background-color:#d4f8e5; padding:5px; border-radius:5px;">Azure Active Directory homepage</span> and go to Users section, <span style="background-color:#d4f8e5; padding:5px; border-radius:5px;">create all users</span> that you would like to access the system if they are not created yet. | :18. Navigate to <span style="background-color:#d4f8e5; padding:5px; border-radius:5px;">Azure Active Directory/Entra ID homepage</span> and go to Users section, <span style="background-color:#d4f8e5; padding:5px; border-radius:5px;">create all users</span> that you would like to access the system if they are not created yet. | ||
[[File:Ms azure add users path.png|border|center]] | [[File:Ms azure add users path.png|border|center]] | ||
<br><br> | <br><br> | ||
| Line 84: | Line 110: | ||
[[File:Ms azure add groups users.png|border|center]] | [[File:Ms azure add groups users.png|border|center]] | ||
<br><br> | <br><br> | ||
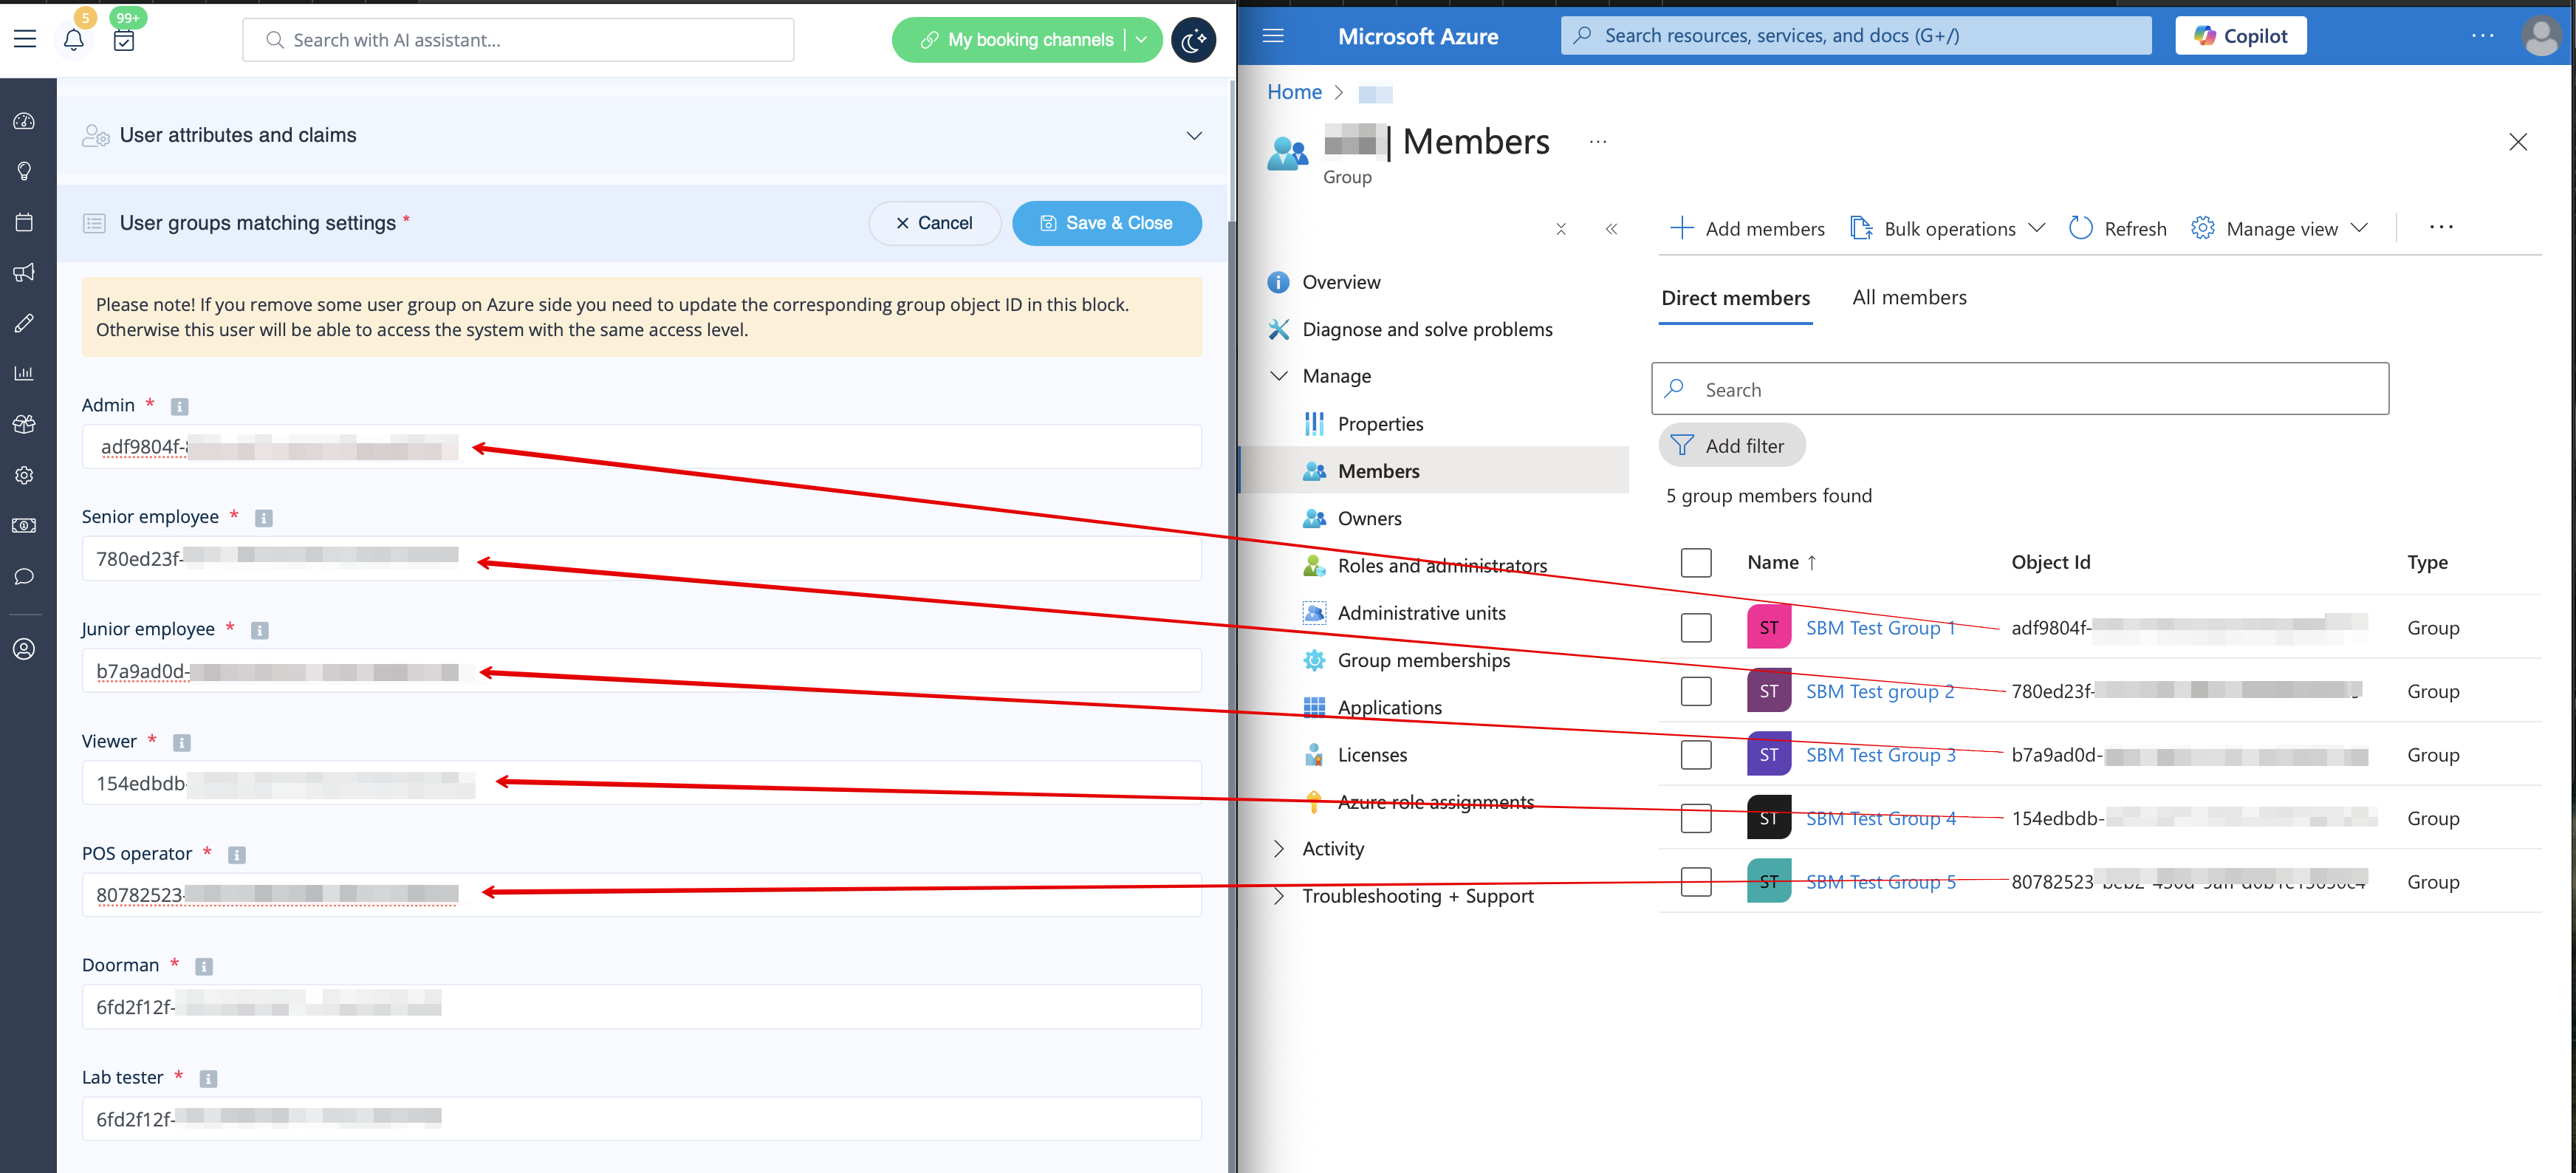
:21 | :21. Copy each group <span style="background-color:#d4f8e5; padding:5px; border-radius:5px;">Object ID</span> to the corresponding box in <span style="background-color:#d4f8e5; padding:5px; border-radius:5px;">User Group matching</span> settings on SimplyBook.me side. | ||
:(If you have only one group for admins insert same object ID everywhere in that block). Save settings. | :(If you have only one group for admins insert same object ID everywhere in that block). Save settings. | ||
[[File: | [[File:Add groups object ids new.png|1200px|border|center|link=https://help.simplybook.me/images/e/e9/Add_groups_object_ids_new.png]] | ||
<br><br> | <br><br> | ||
: | :22. Once the users are given the access to <span style="background-color:#cdeffc; padding:5px; border-radius:5px;">[https://account.activedirectory.windowsazure.com/r#/applications Applications dashboard]</span> they can log in to SimplyBook.me with their access level by a click on the <span style="background-color:#d4f8e5; padding:5px; border-radius:5px;">SimplyBook.me application icon.</span> | ||
[[File:Application panel to login with saml.png|border|center]] | [[File:Application panel to login with saml.png|border|center]] | ||
<br><br> | <br><br> | ||
| Line 98: | Line 121: | ||
:<span style="background-color:#ffe9e9; padding:5px; border-radius:5px;">'''Please note!'''</span><br> | :<span style="background-color:#ffe9e9; padding:5px; border-radius:5px;">'''Please note!'''</span><br> | ||
*<span style="background-color:#ffe9e9; padding:5px; border-radius:5px;">It is not possible to connect existing SimplyBook.me side users to MS Azure users.</span> | *<span style="background-color:#ffe9e9; padding:5px; border-radius:5px;">It is not possible to connect existing SimplyBook.me side users to MS Azure users.</span> | ||
*<span style="background-color:#ffe9e9; padding:5px; border-radius:5px;">For such users it is not possible to reset SimplyBook.me passwords, edit access level, username | *<span style="background-color:#ffe9e9; padding:5px; border-radius:5px;">For such users it is not possible to reset SimplyBook.me passwords, edit access level, username.</span><br> | ||
:<span style="background-color:#ffe9e9; padding:5px; border-radius:5px;">They need to contact MS Azure administrator if they loose access to applications page or contact SimplyBook.me default admin to request personal data report.</span><br> | :<span style="background-color:#ffe9e9; padding:5px; border-radius:5px;">They need to contact MS Azure administrator if they loose access to applications page or contact SimplyBook.me default admin to request personal data report.</span><br> | ||
*<span style="background-color:#ffe9e9; padding:5px; border-radius:5px;">If you need to restrict access for such users you can remove or block them on MS Azure side.</span><br> | *<span style="background-color:#ffe9e9; padding:5px; border-radius:5px;">If you need to restrict access for such users you can remove or block them on MS Azure side.</span><br> | ||
*<span style="background-color:#ffe9e9; padding:5px; border-radius:5px;">If you change the group the user is included to on MS Azure side or remove the user there the access level will be updated on SimplyBook.me side within several minutes or the user will be logged out.</span> | *<span style="background-color:#ffe9e9; padding:5px; border-radius:5px;">If you change the group the user is included to on MS Azure side or remove the user there the access level will be updated on SimplyBook.me side within several minutes or the user will be logged out.</span> | ||
<br><br><br><br> | |||
</translate> | |||
<translate> | |||
<!--T:10--> | |||
==How to set & use Okta== | |||
:1. Create account at [https://www.okta.com Okta]. | |||
<br><br> | |||
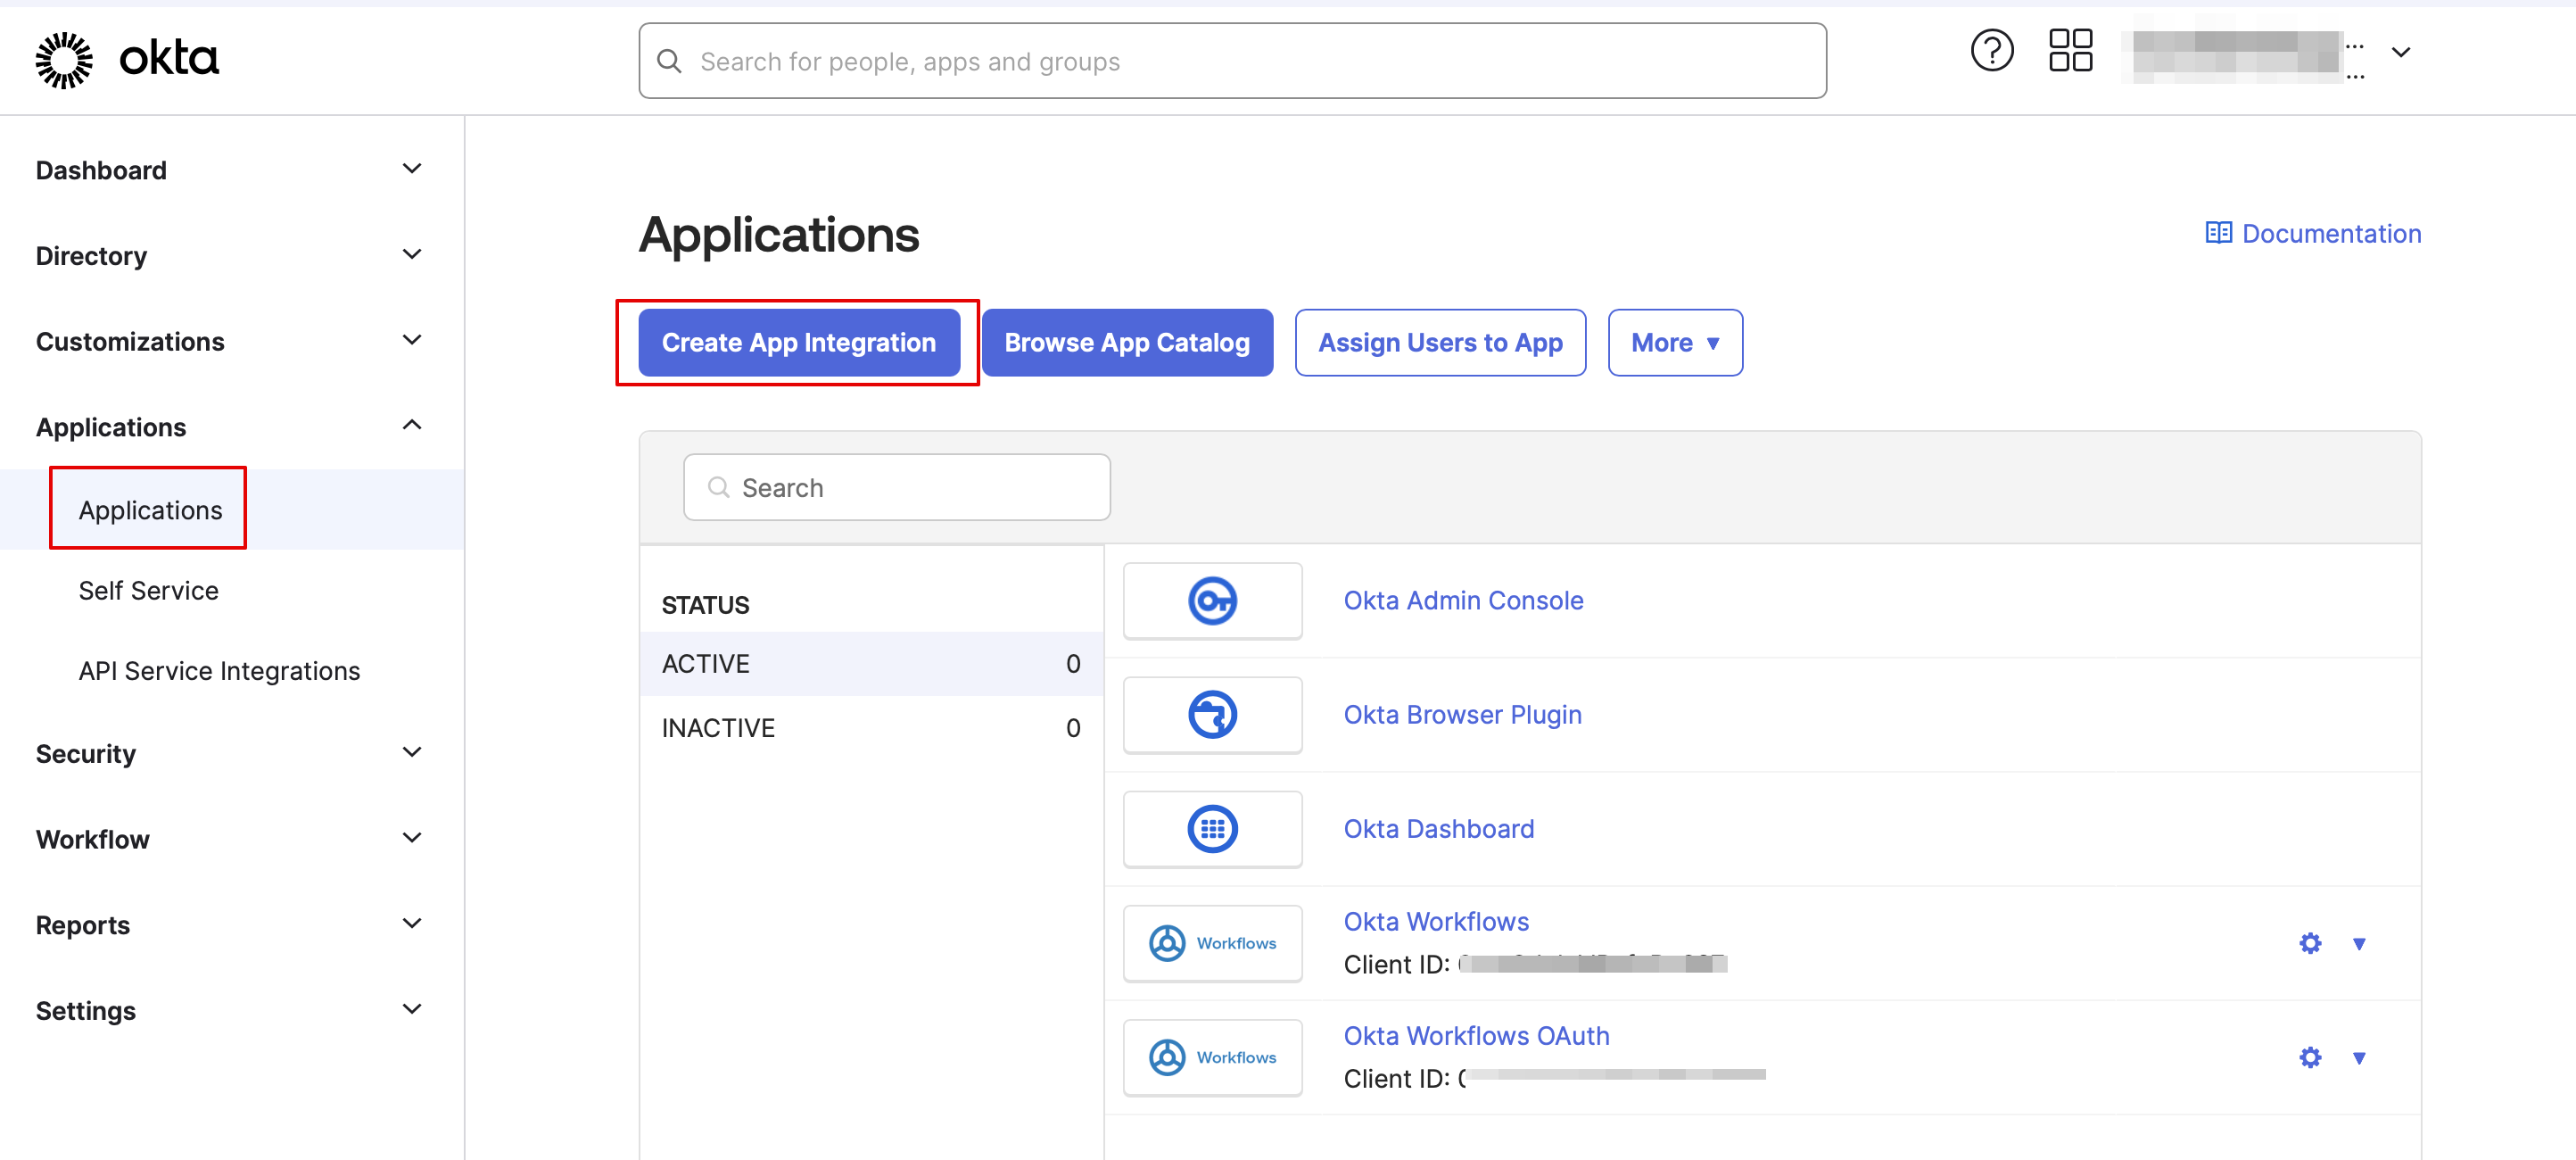
:2. Navigate to '''Applications''' in Okta admin panel and click to create a new app there. | |||
[[File:Okta create app integration path.png|1200px|center|link=https://help.simplybook.me/images/c/c7/Okta_create_app_integration_path.png]] | |||
<br><br> | |||
:3. Add the desirable name and upload a logo. | |||
[[File:Okta app add name & logo.png|1200px|center|link=https://help.simplybook.me/images/0/0a/Okta_app_add_name_%26_logo.png]] | |||
<br><br> | |||
:4. Select '''SAML''' method. | |||
[[File:Okta app saml select.png|1200px|center|link=https://help.simplybook.me/images/4/4b/Okta_app_saml_select.png]] | |||
<br><br> | |||
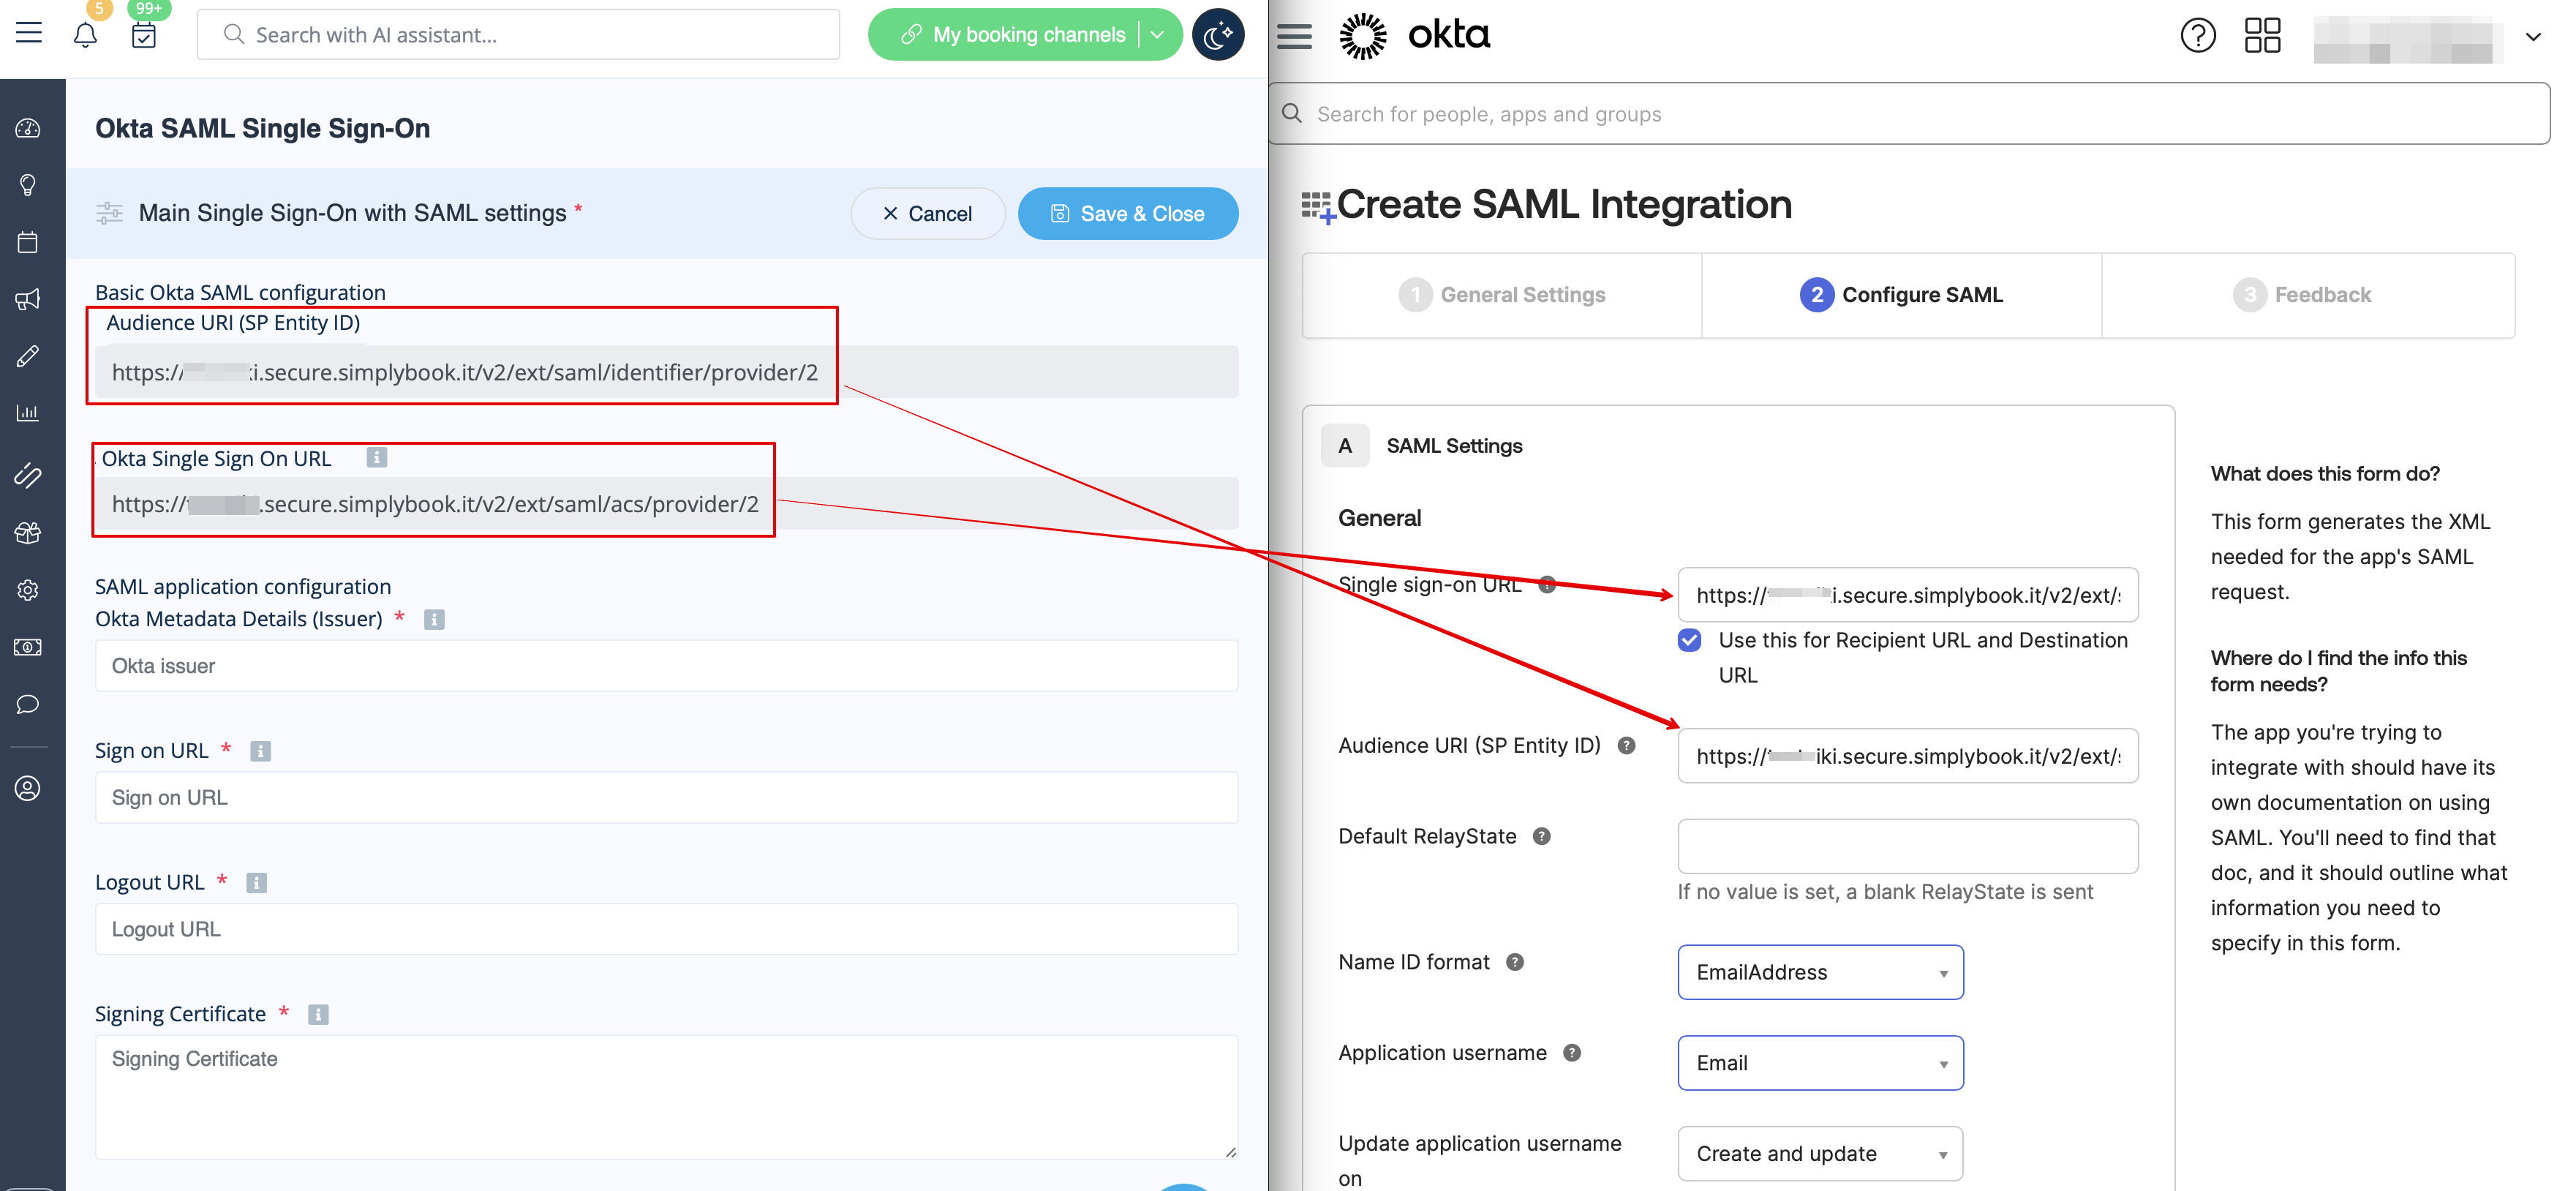
:5. On the SAML settings step please copy the '''Audience URI''' and '''Okta Single Sign-On URL''' from SimplyBook.me SSO-SAML custom feature -> Manage -> Okta SAML Single Sign-On and paste to the corresponding fields on the Okta side. | |||
[[File:Create saml integration step 1.png|1200px|center|link=https://help.simplybook.me/images/3/37/Create_saml_integration_step_1.png]] | |||
<br><br> | |||
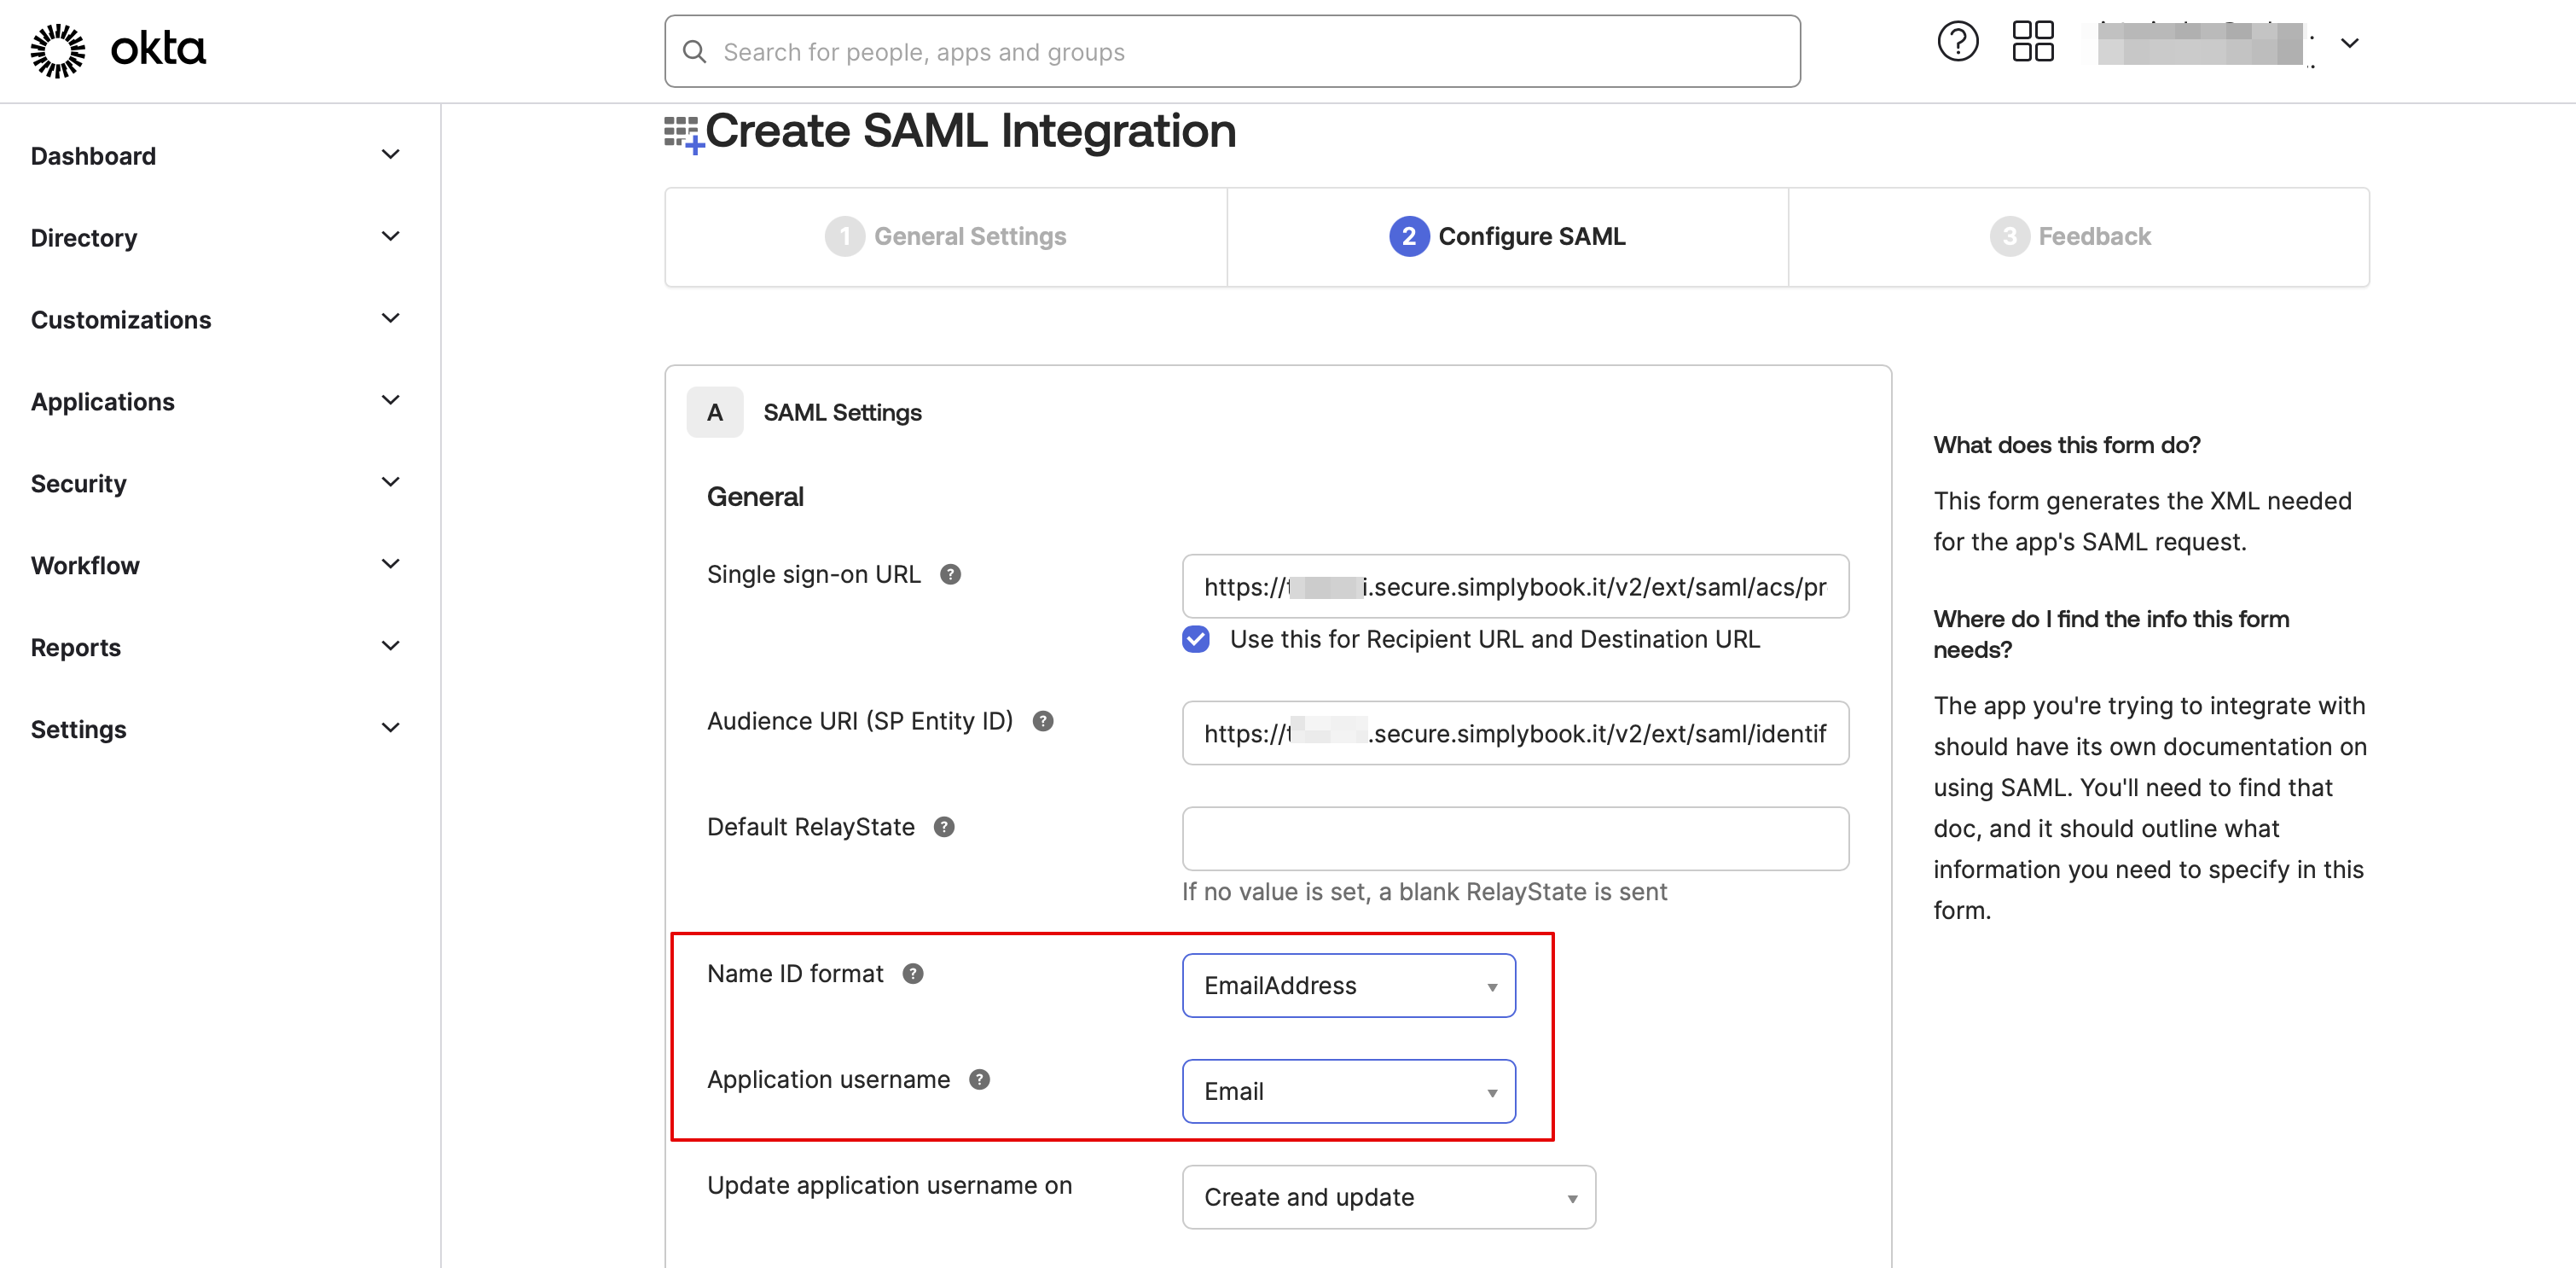
:6. Set '''Name ID''' and '''Application username''' as in the image below. | |||
[[File:Create saml integrattion 2.png|1200px|center|link=https://help.simplybook.me/images/3/32/Create_saml_integrattion_2.png]] | |||
<br><br> | |||
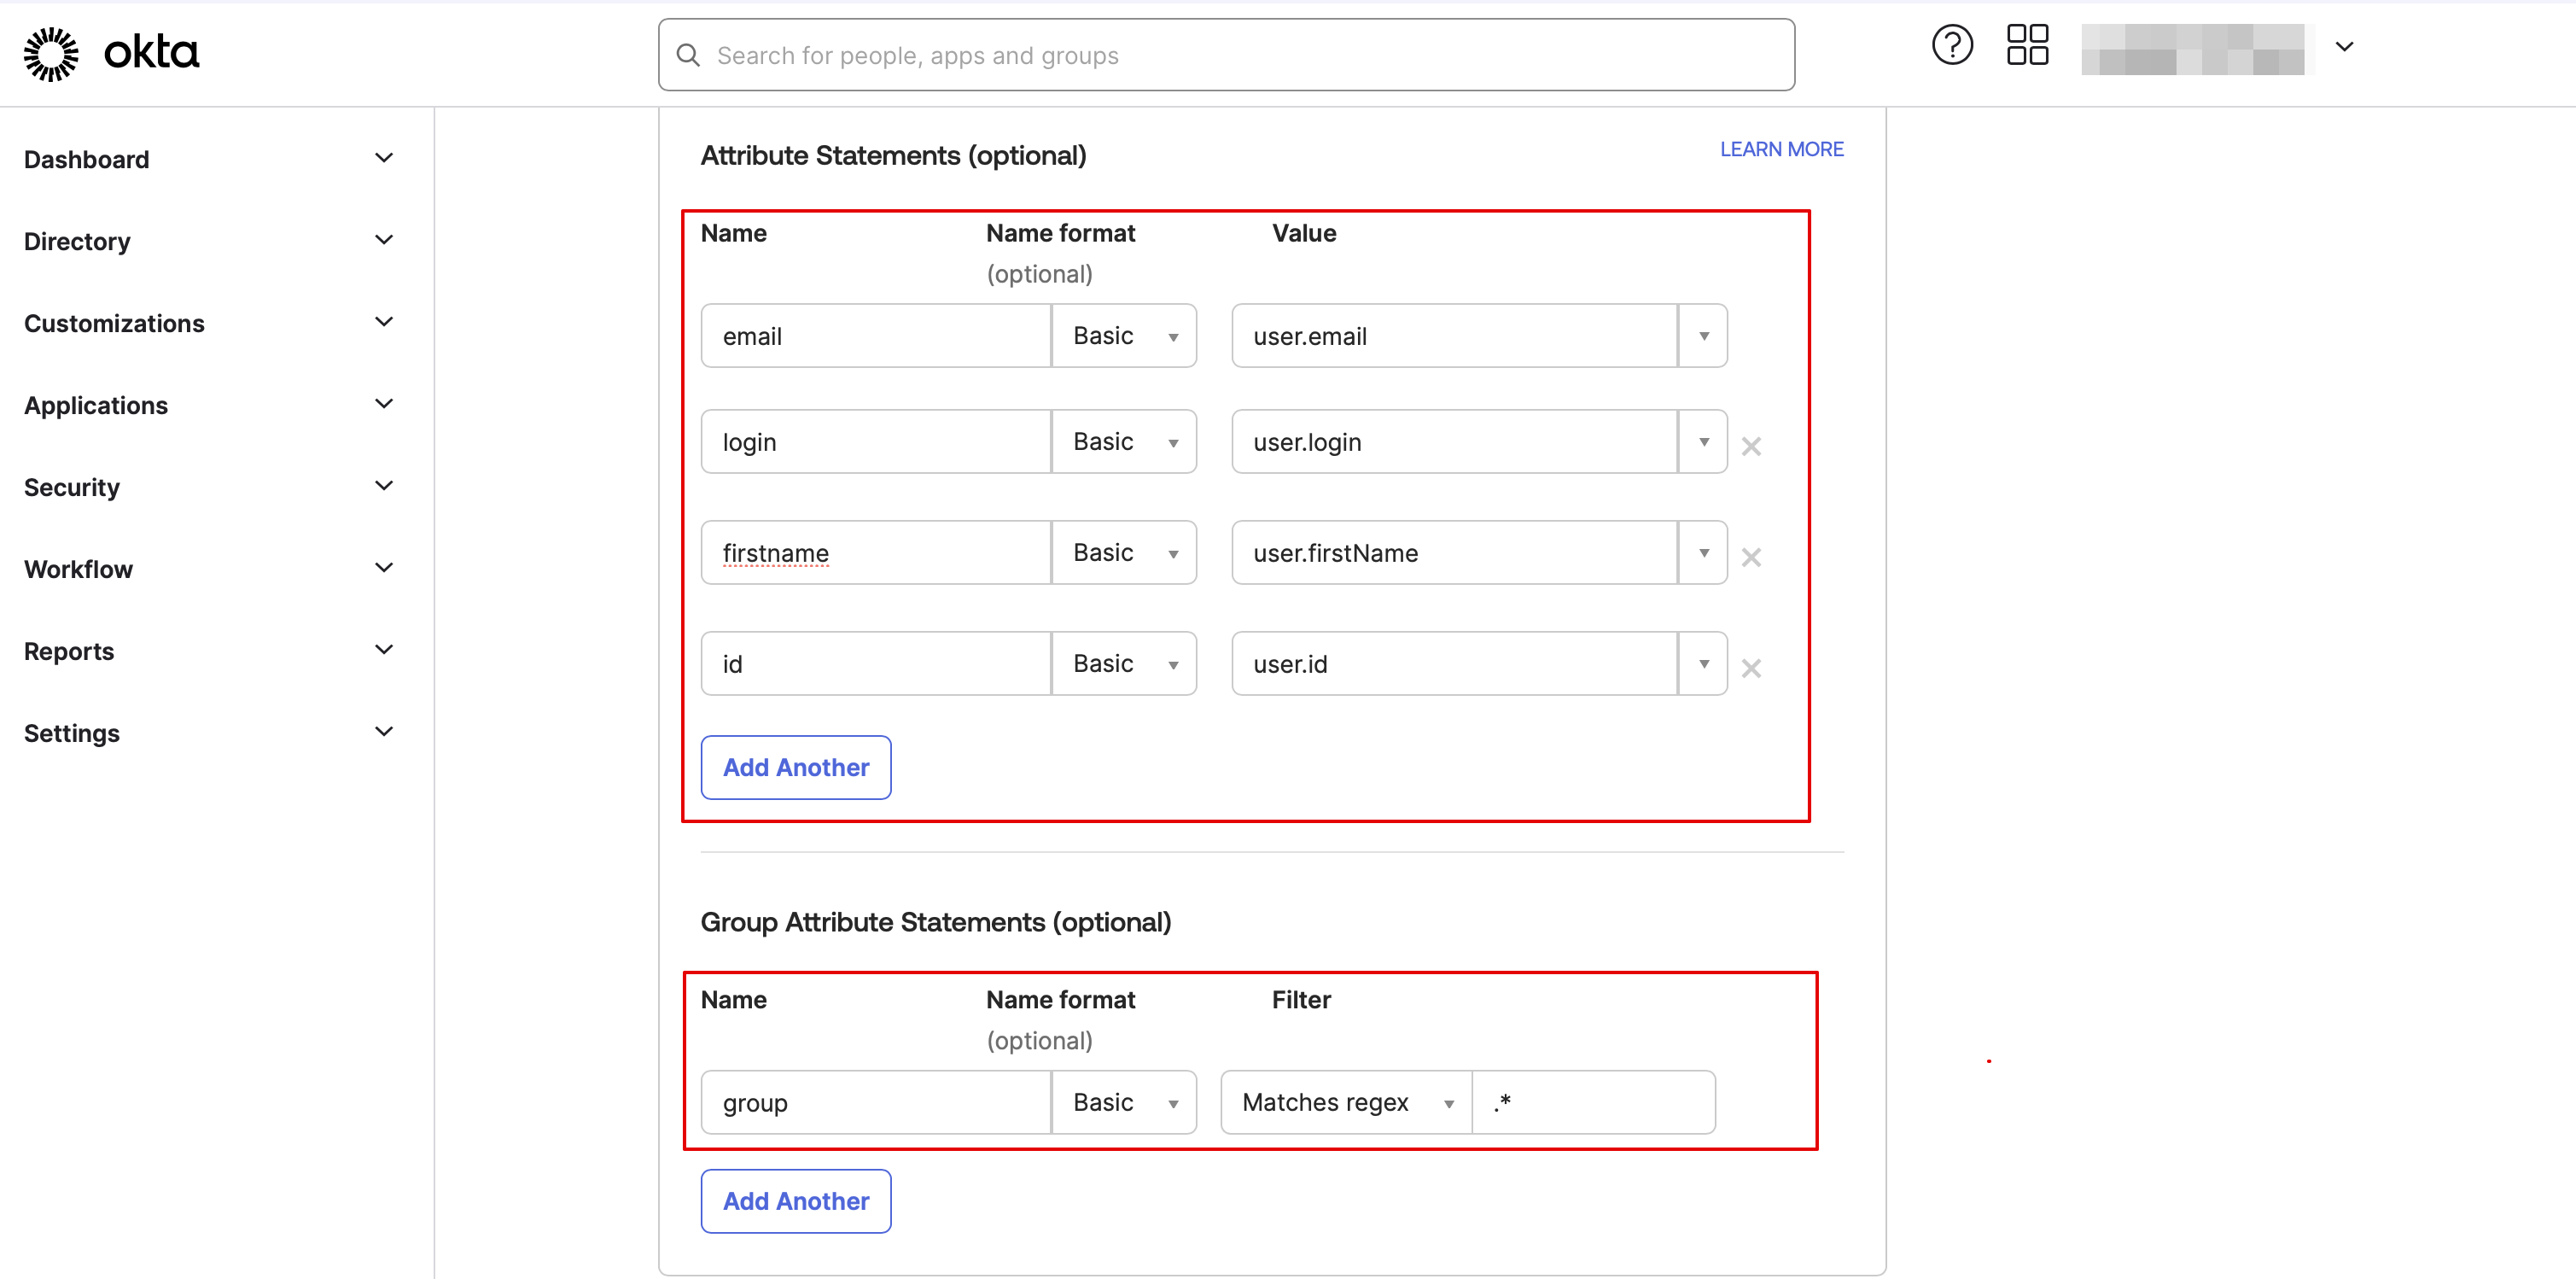
:7. Scroll the page to '''Attribute settings''' and add the attributes for name, email, id and firstname as in the example.<br> | |||
:And separately '''group''' attribute in the corresponding block.<br> | |||
[[File:Saml add attribite statements.png|1200px|center|link=https://help.simplybook.me/images/8/8c/Saml_add_attribite_statements.png]] | |||
<br><br> | |||
:On the SimplyBook.me side please make sure the same attributes are indicated in the '''User attributes and claims''' tab. | |||
<br><br> | |||
:8. Proceed to the next step. | |||
[[File:Saml proceed to the next.png|1200px|center|link=https://help.simplybook.me/images/0/03/Saml_proceed_to_the_next.png]] | |||
<br><br> | |||
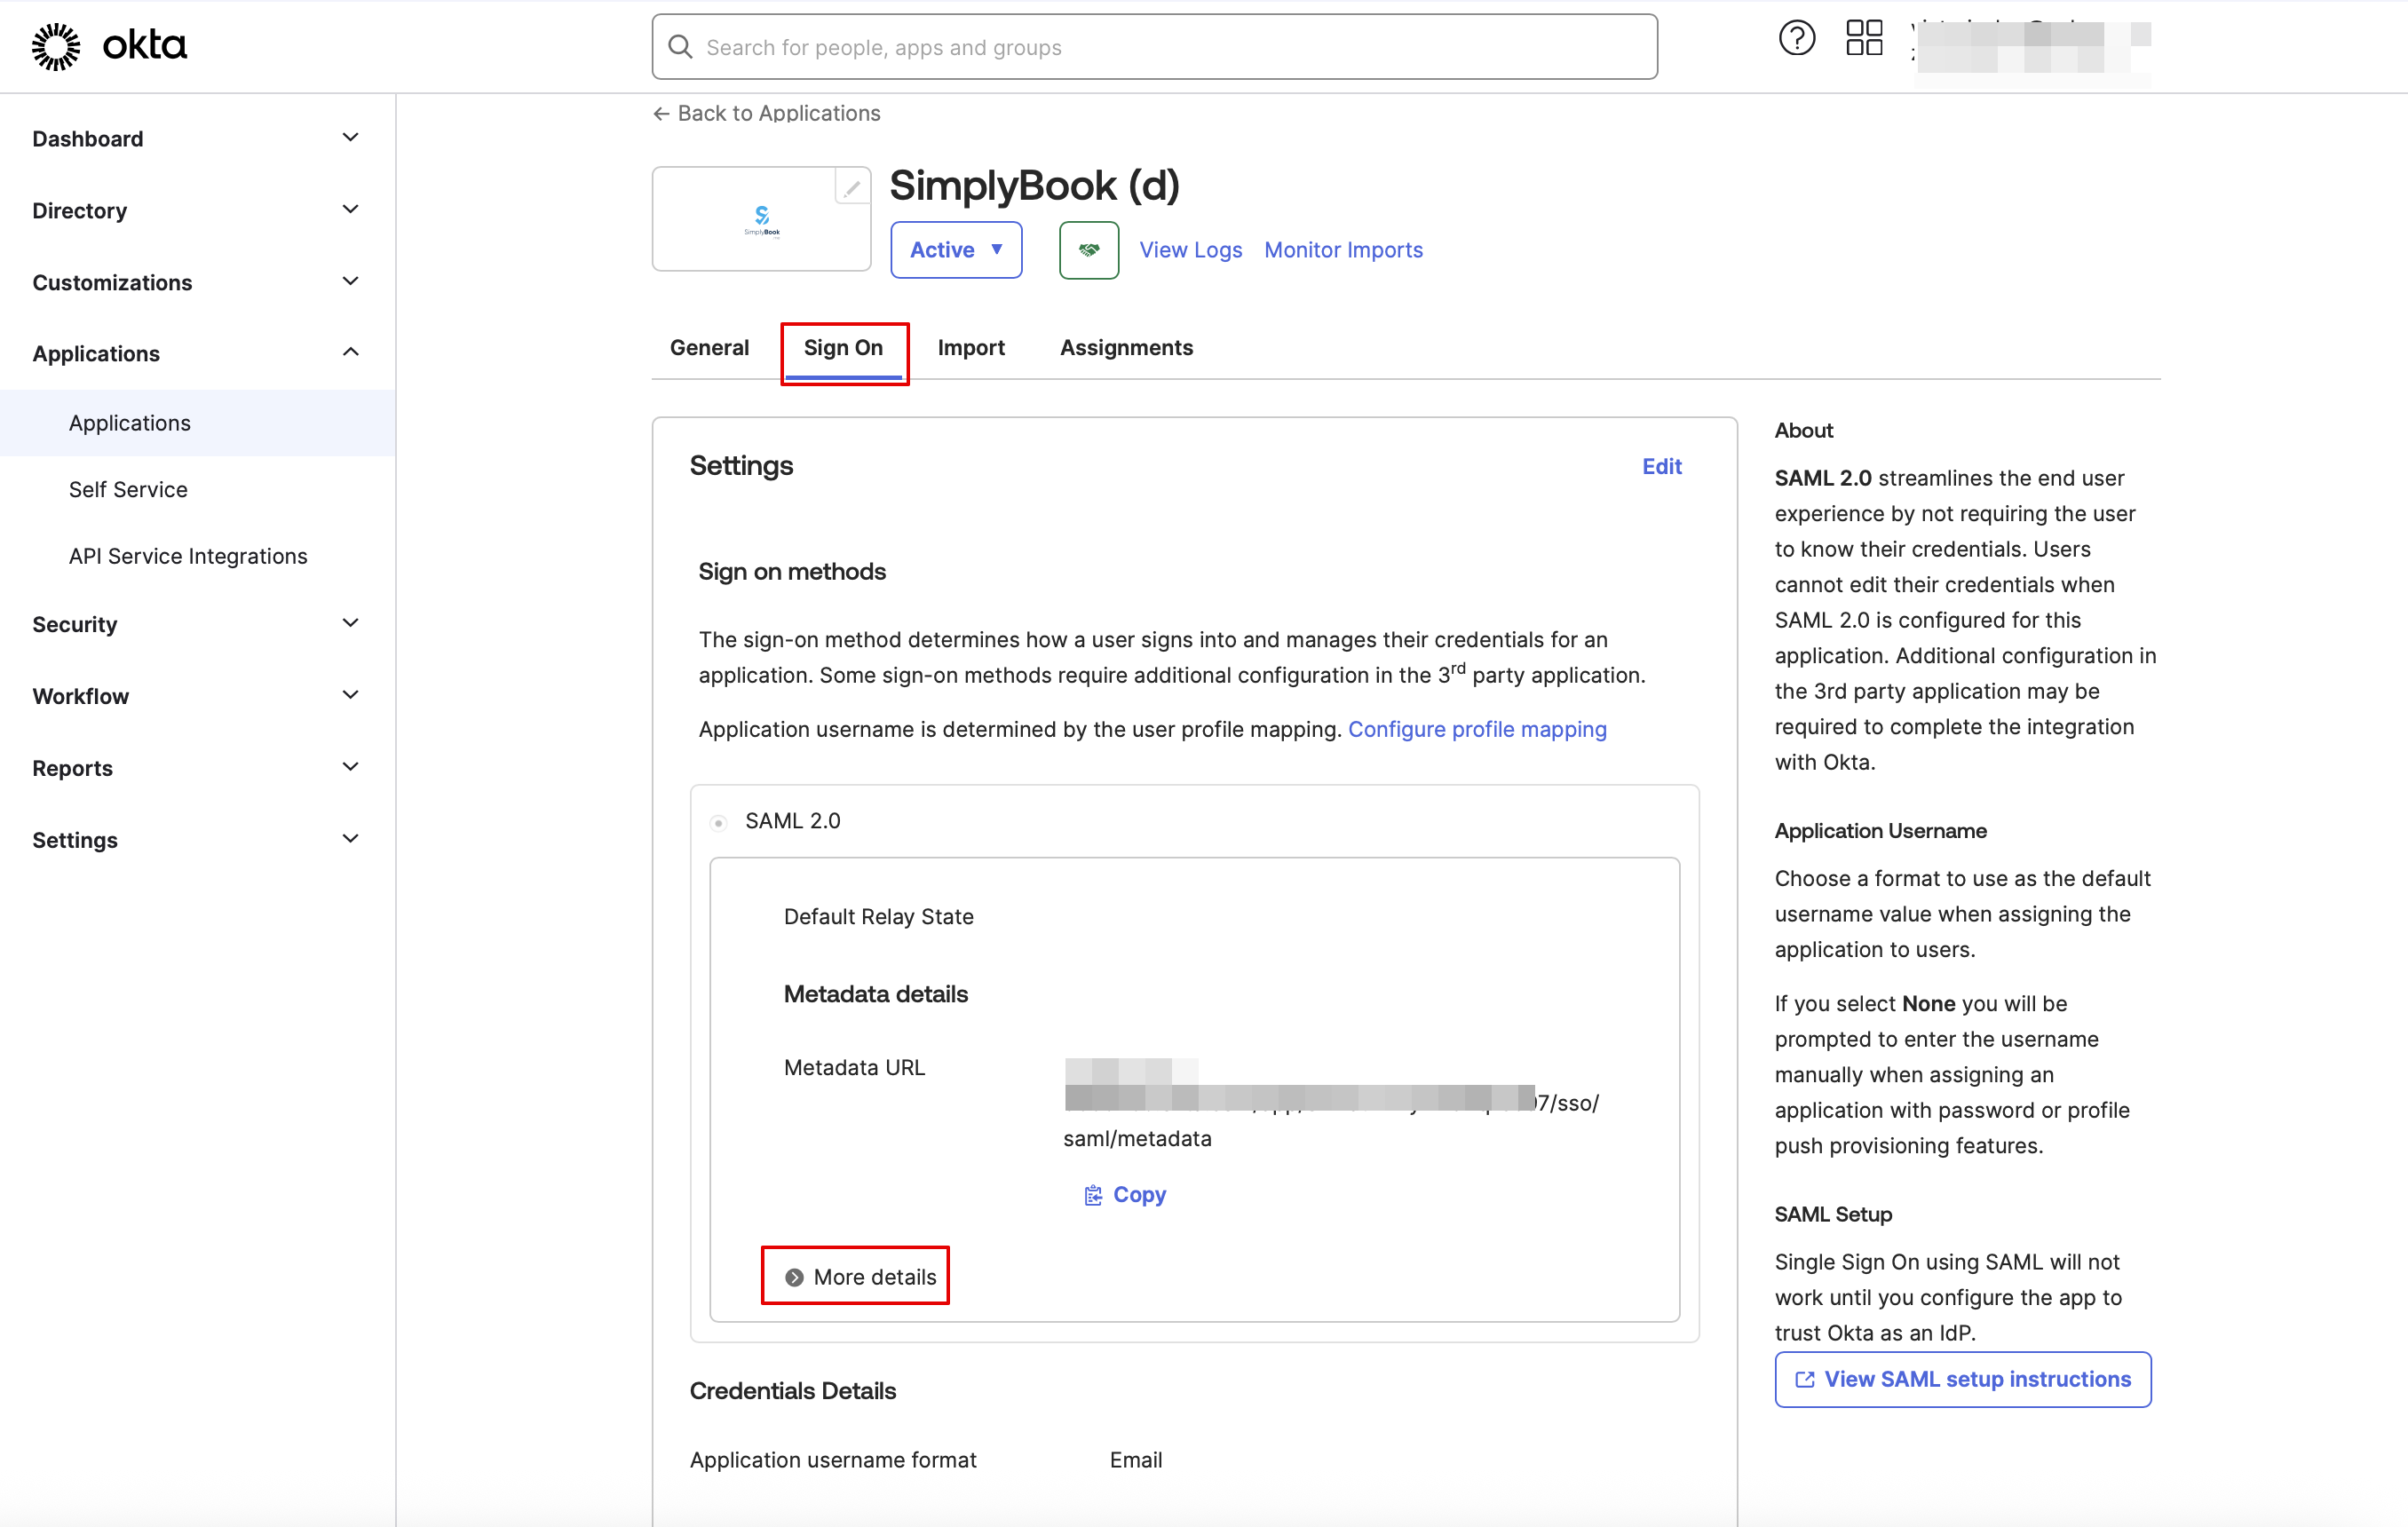
:9. The app is now saved. Please open '''Sign on''' tab and click on ''' on '''More details''' there. | |||
[[File:Saml sign on more details.png|1200px|center|link=https://help.simplybook.me/images/4/4c/Saml_sign_on_more_details.png]] | |||
<br><br> | |||
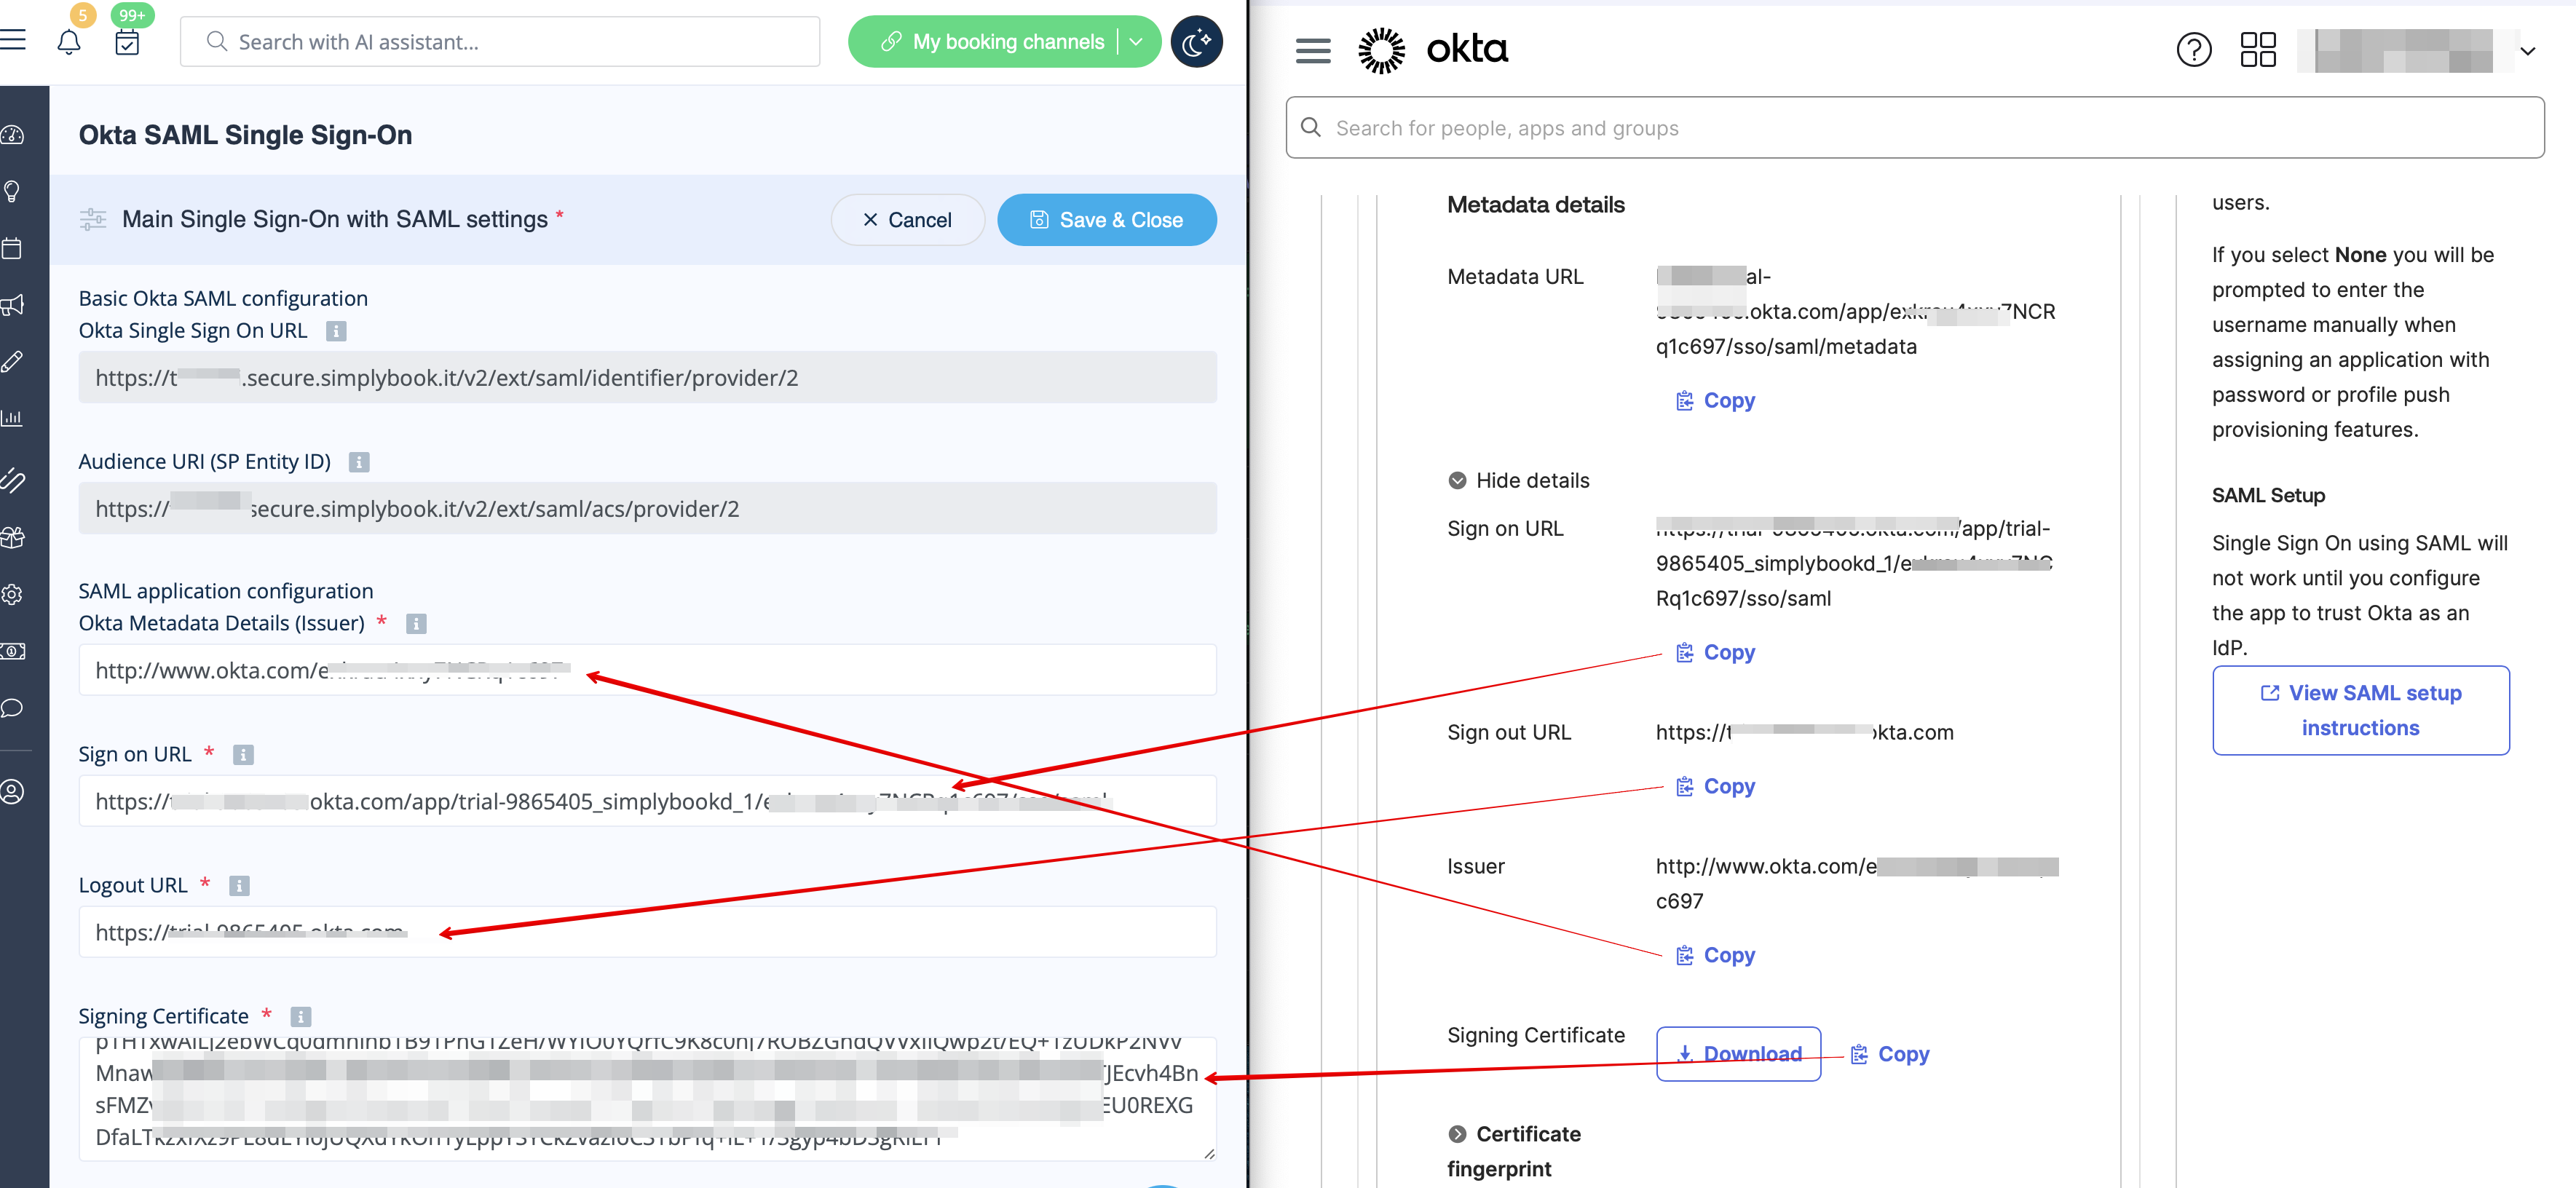
:10. Copy '''Sign on URL''', '''Sign out URL''', '''Issuer''' and '''Signing certificate''' in Okta and paste them to the corresponding fields in SimplyBook.me SSO-SAML custom feature -> Manage -> Okta SAML Single Sign-On | |||
[[File:Saml copy urls from okta.png|1200px|center|link=https://help.simplybook.me/images/3/38/Saml_copy_urls_from_okta.png]] | |||
<br><br> | |||
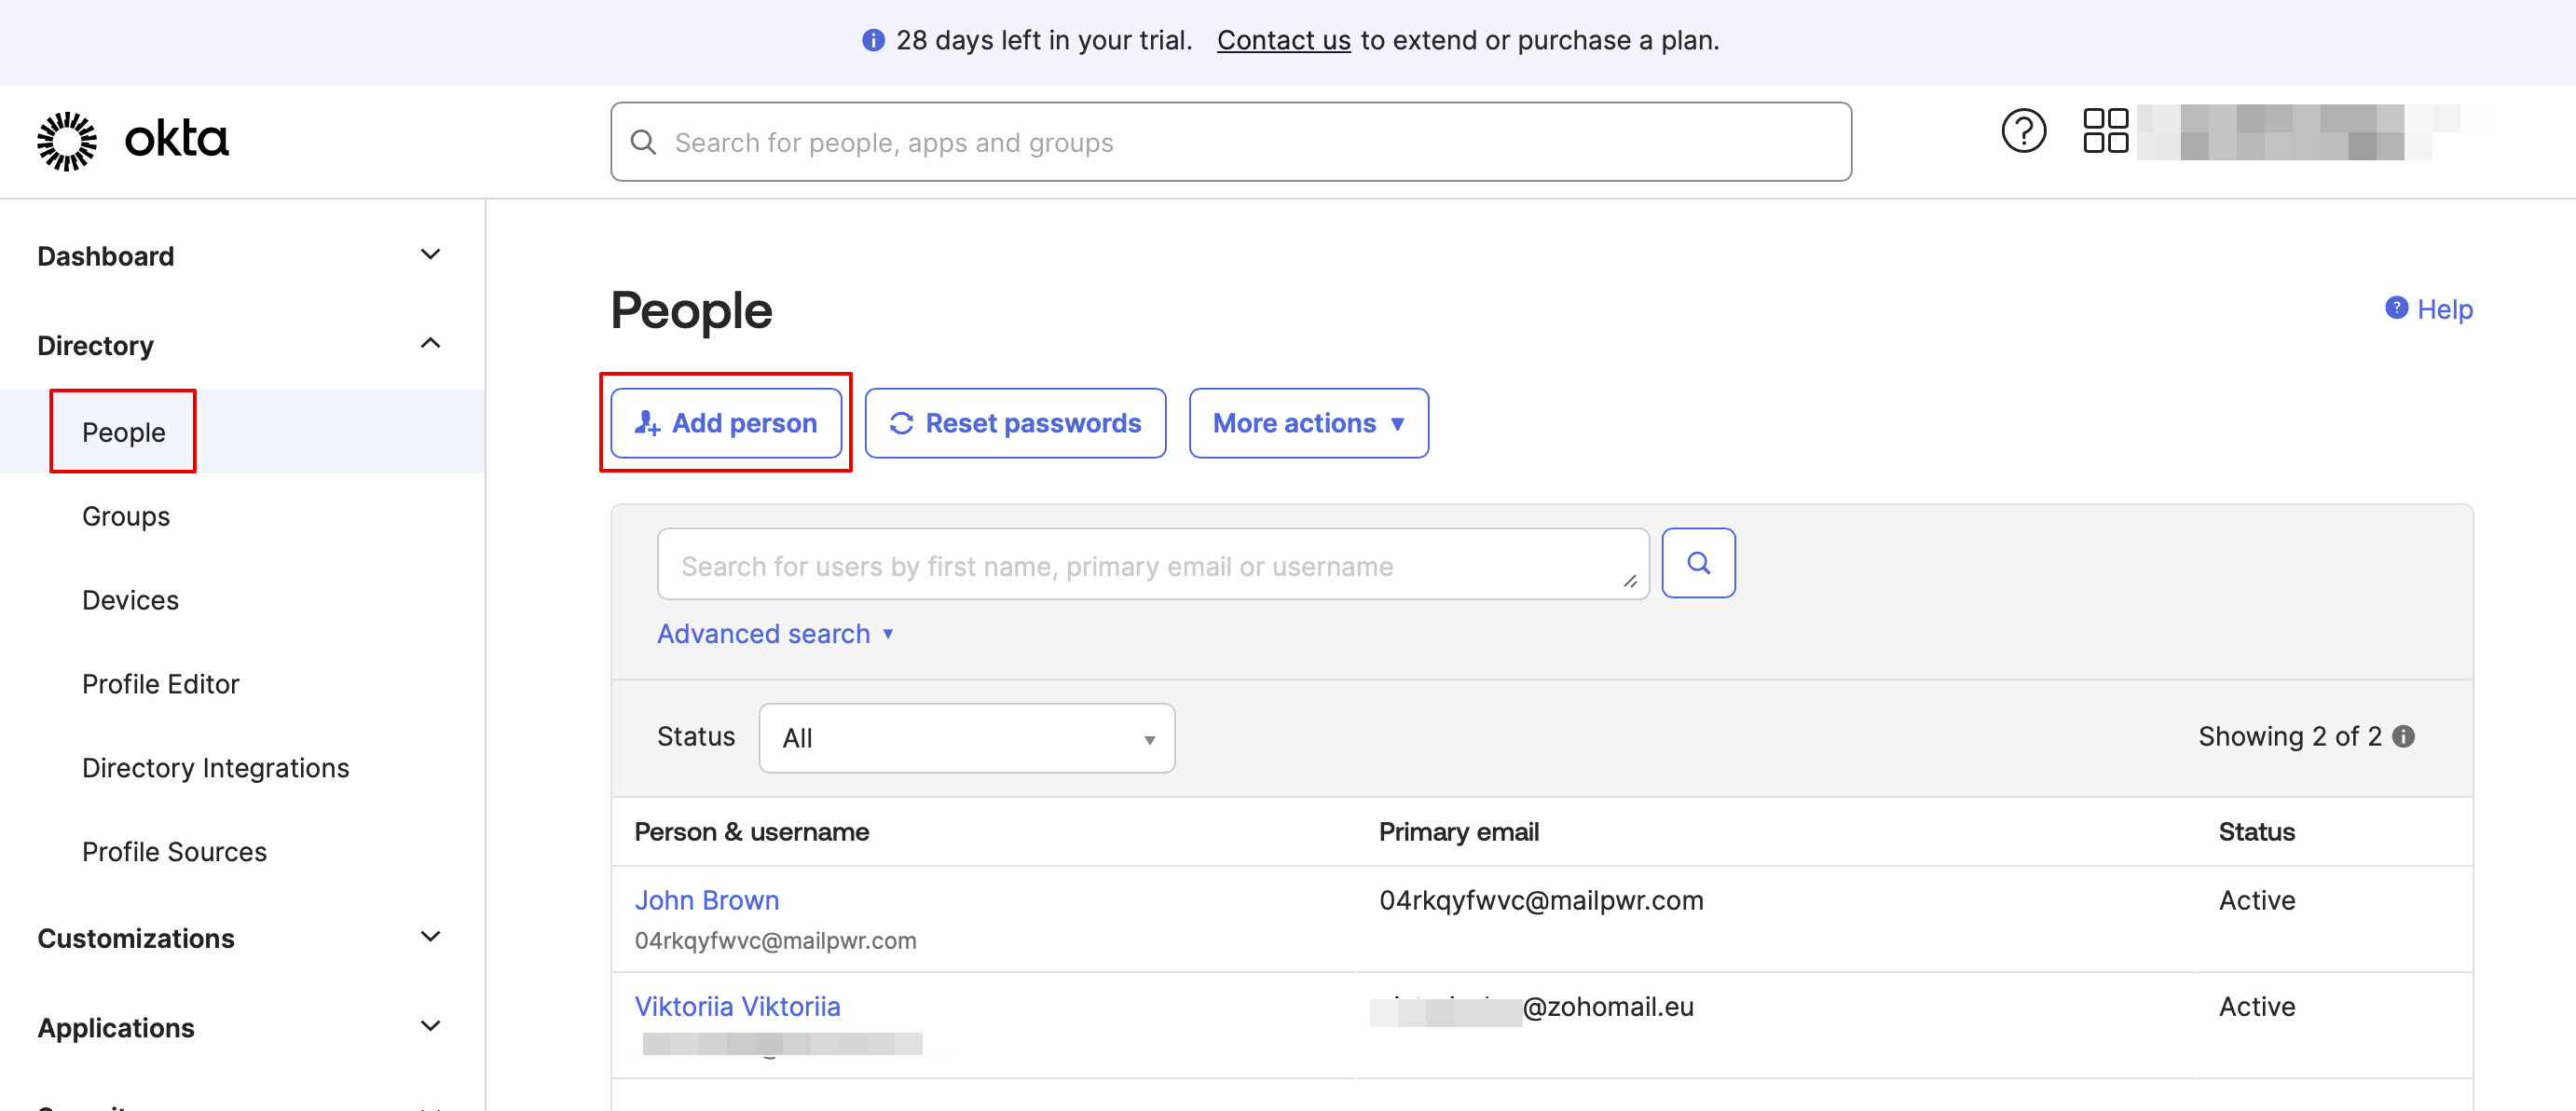
:11. Now in Okta interface make sure all necessary employees are added to the system in '''People''' tab. | |||
[[File:Add people okta.png|1200px|center|link=https://help.simplybook.me/images/b/b7/Add_people_okta.png]] | |||
<br><br> | |||
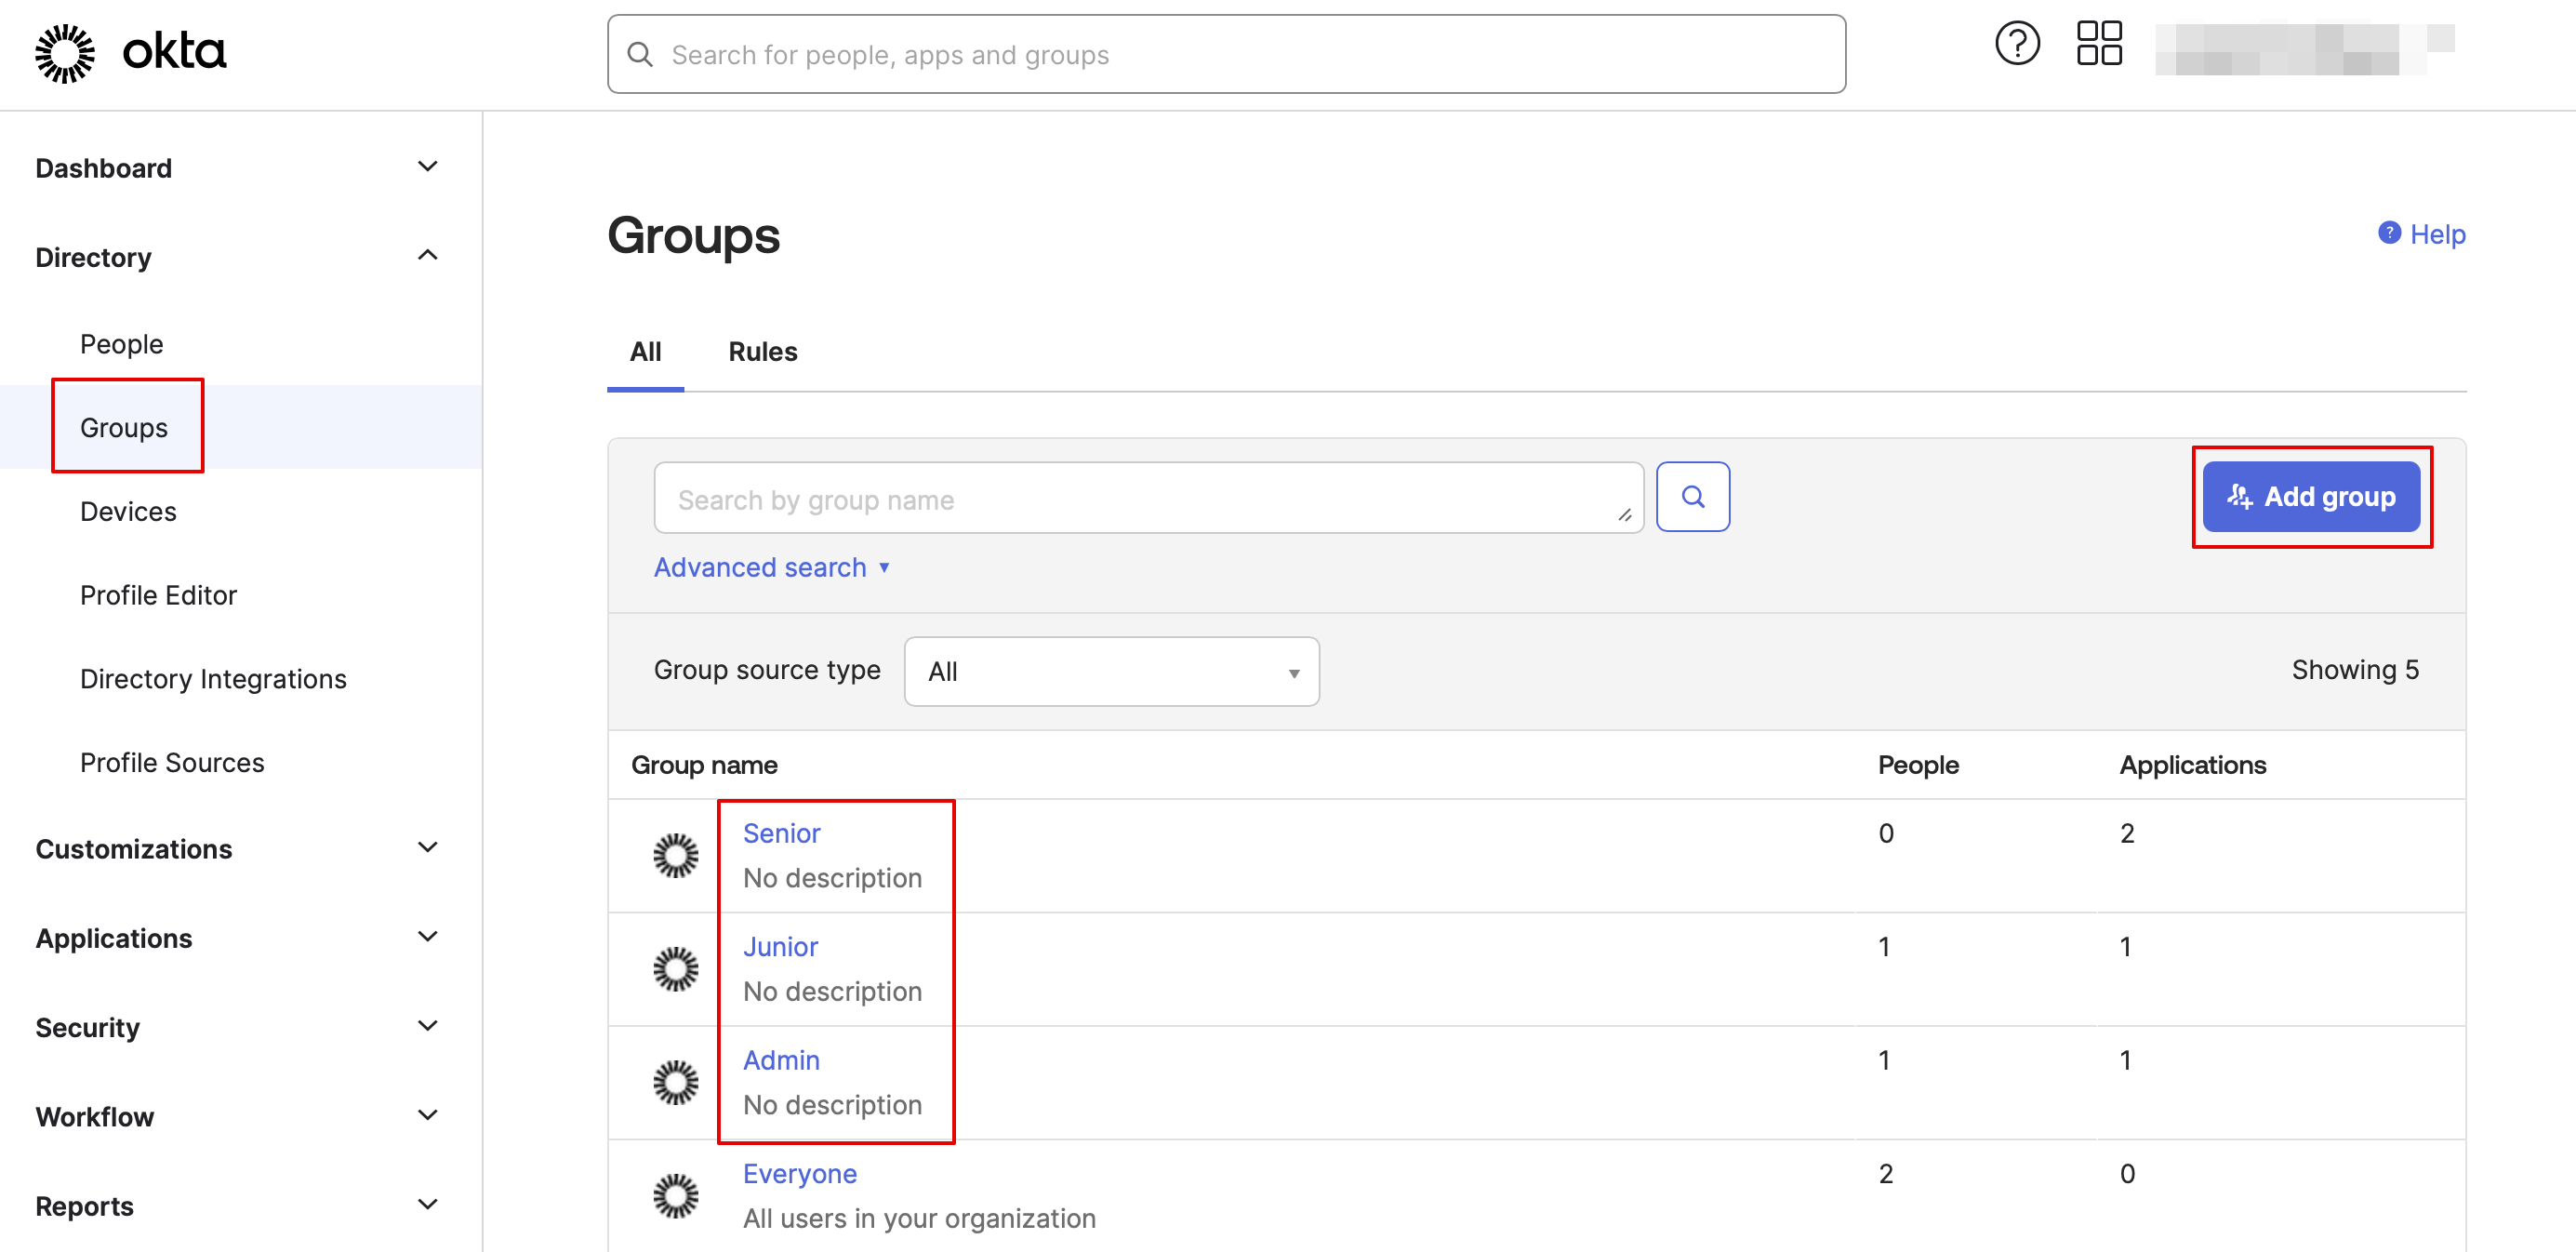
:12. In '''Groups''' tab - create the groups matching the SimplyBook.me access levels. Assign the employees to these groups. | |||
[[File:Create groups okta.png|1200px|center|link=https://help.simplybook.me/images/c/c0/Create_groups_okta.png]] | |||
[[File:Assign people to groups okta.png|1200px|center|link=https://help.simplybook.me/images/0/07/Assign_people_to_groups_okta.png]] | |||
<br><br> | |||
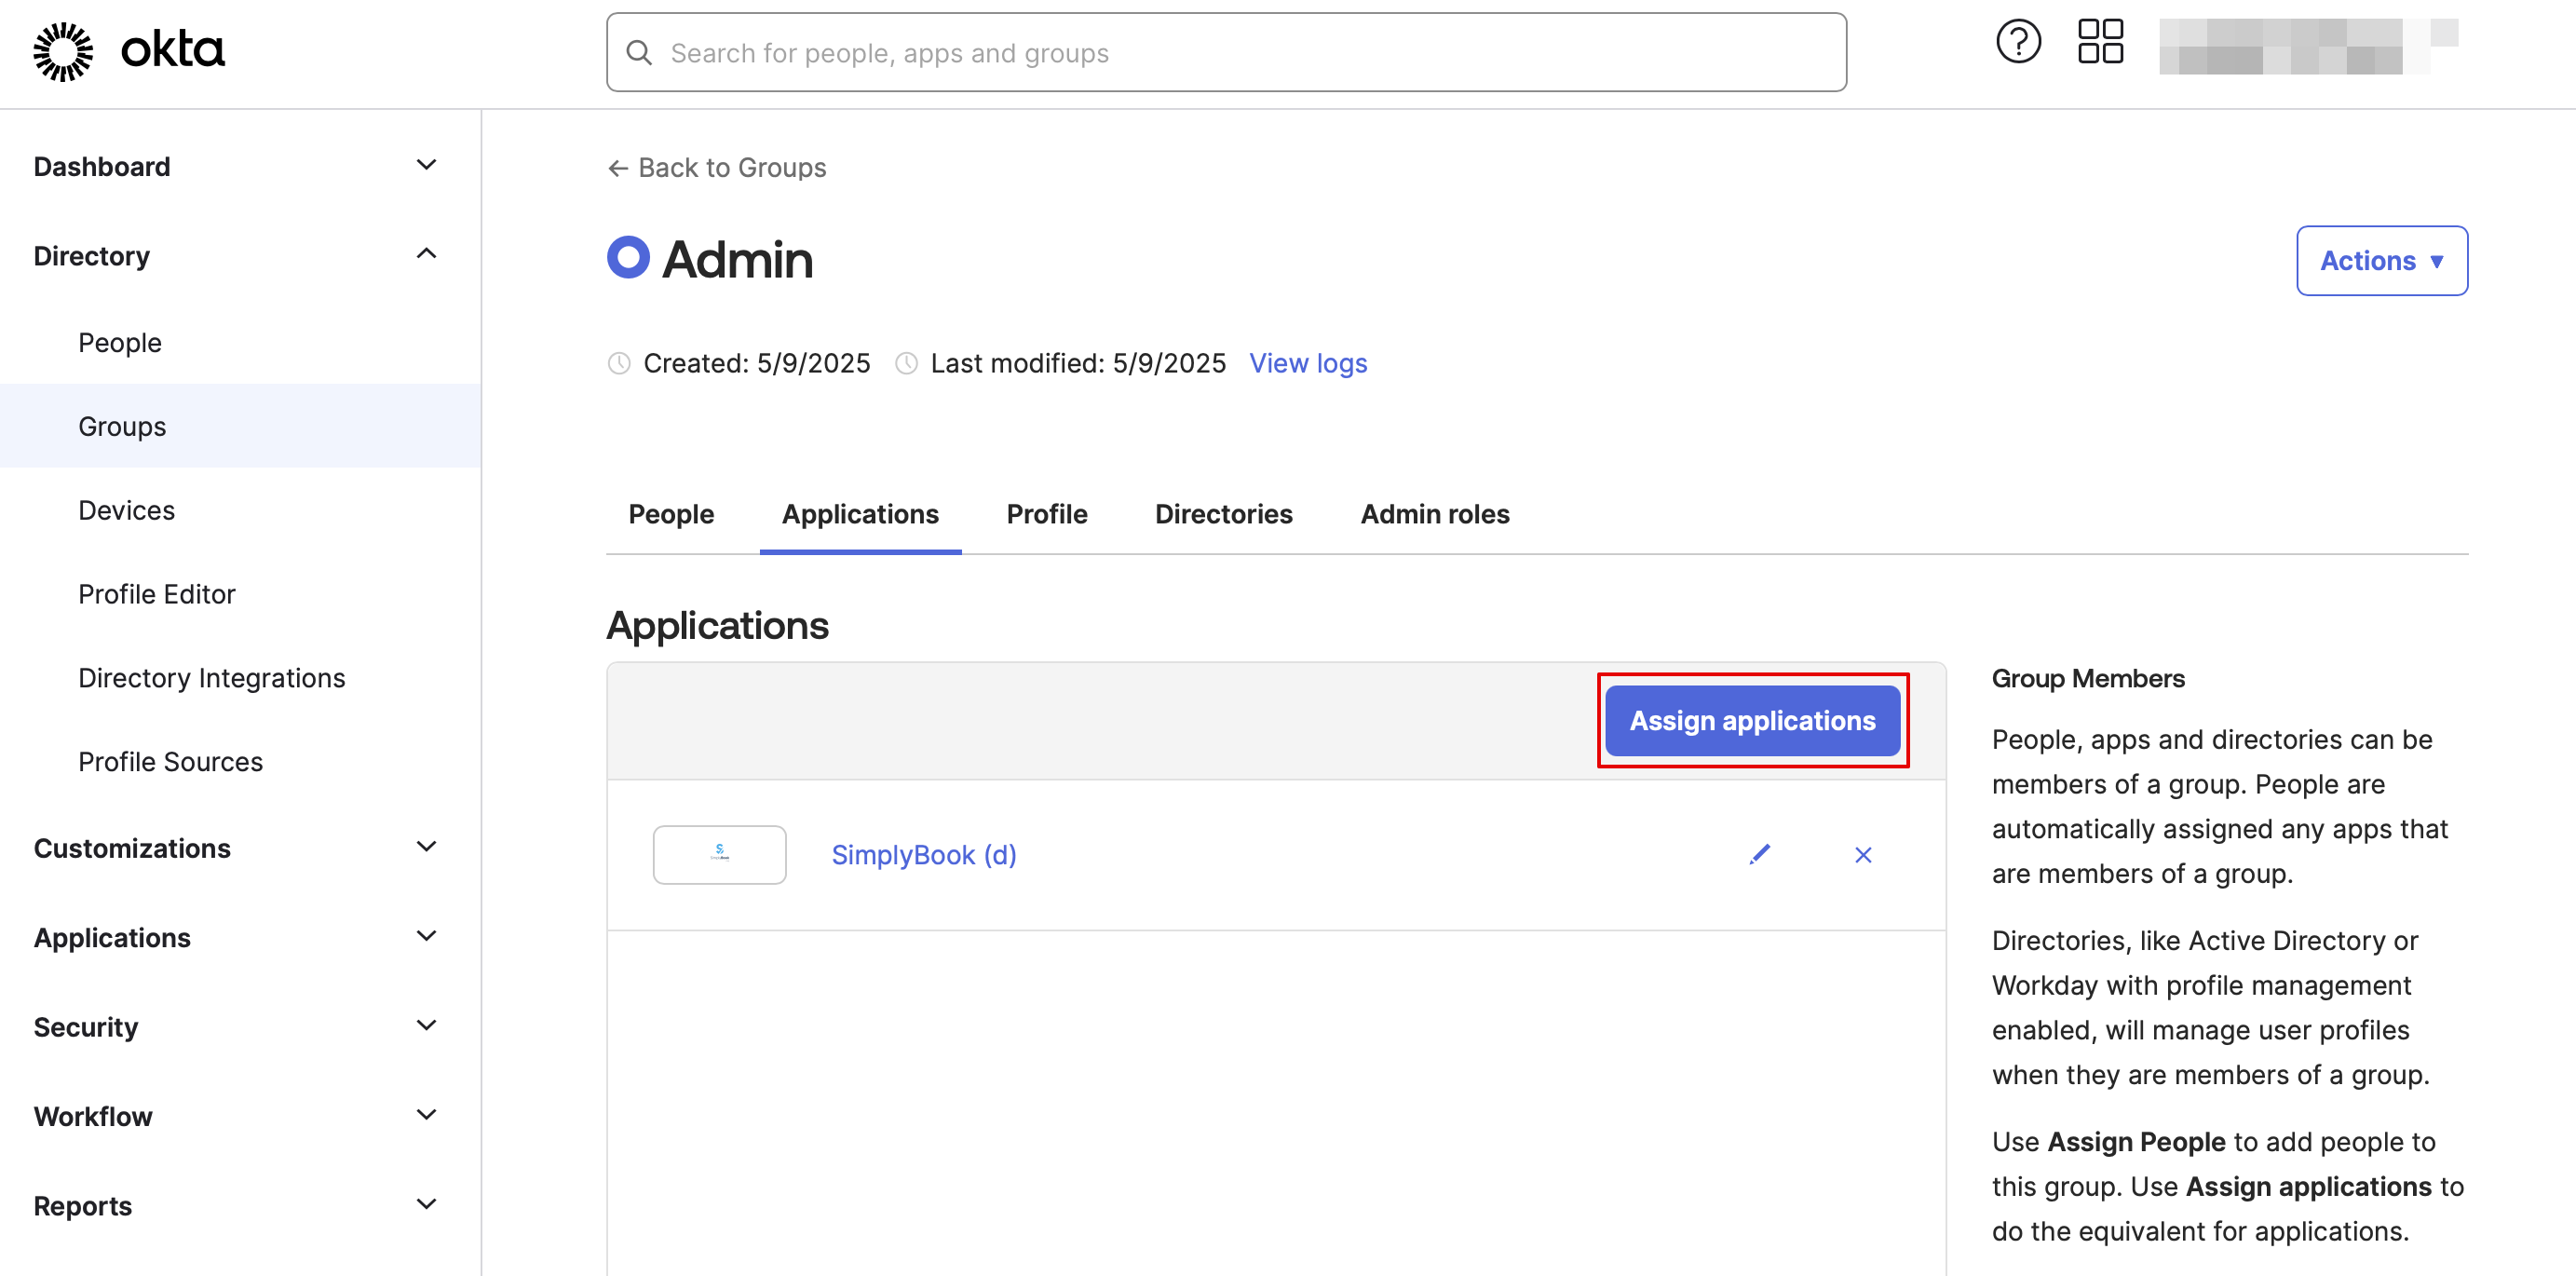
:13. Assign the groups and people to the application that you've created. | |||
[[File:Assign applications to groups.png|1200px|center|link=https://help.simplybook.me/images/7/78/Assign_applications_to_groups.png]] | |||
<br><br> | |||
:14. In the SimplyBook.me side please indicate the groups names in the '''User groups matching settings''' tab. Save settings. | |||
<br><br> | |||
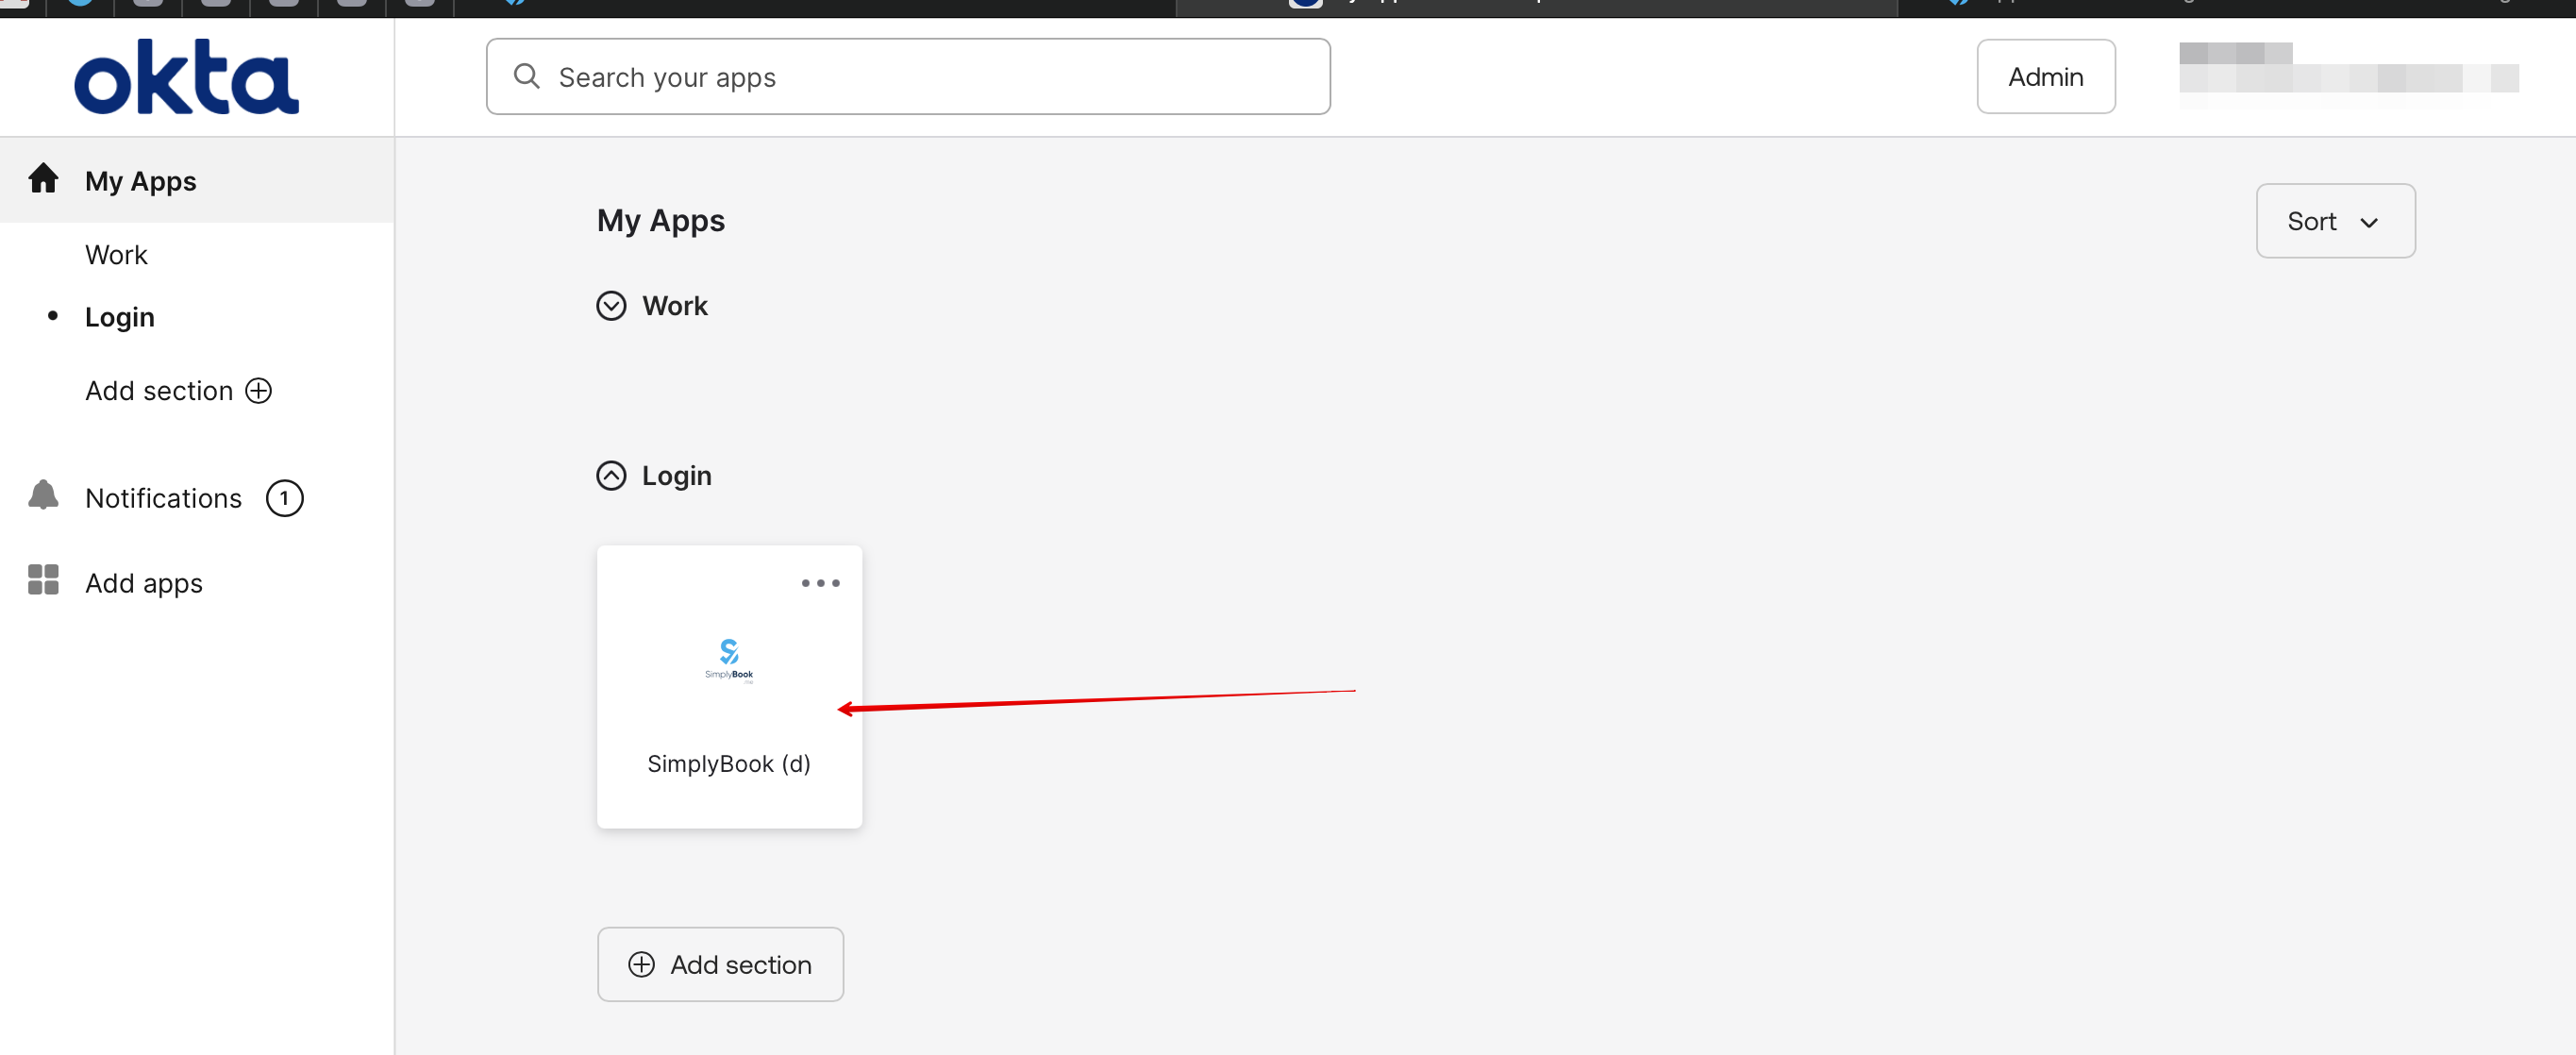
:15. Everything is ready now. Your employees an now log in to your company account at SimplyBook.me with one single click on the Okta panel (the user in SimplyBook.me will be automatically create on the first login with the corresponding rights) | |||
[[File:Login screen okta.png|1200px|center|link=https://help.simplybook.me/images/0/06/Login_screen_okta.png]] | |||
<br><br> | <br><br> | ||
<br><br> | <br><br> | ||
</translate> | |||
Latest revision as of 19:01, 2 February 2026
This custom feature allows to setup Single Sign-On process for you as the system admin and your account users thus enabling login to SimplyBook.me system from MS Azure or Okta applications panel. You can create users in MS Azure/Okta within the desired access level groups and the corresponding user types will be added in your SimplyBook.me system on the first login.
Please note!
Currently SSO is available with Microsoft Azure(Microsoft Entra ID) & Okta SSO only.
How to set & use Microsoft Azure
- 1. Create account at Microsoft Azure if you do not have one yet.
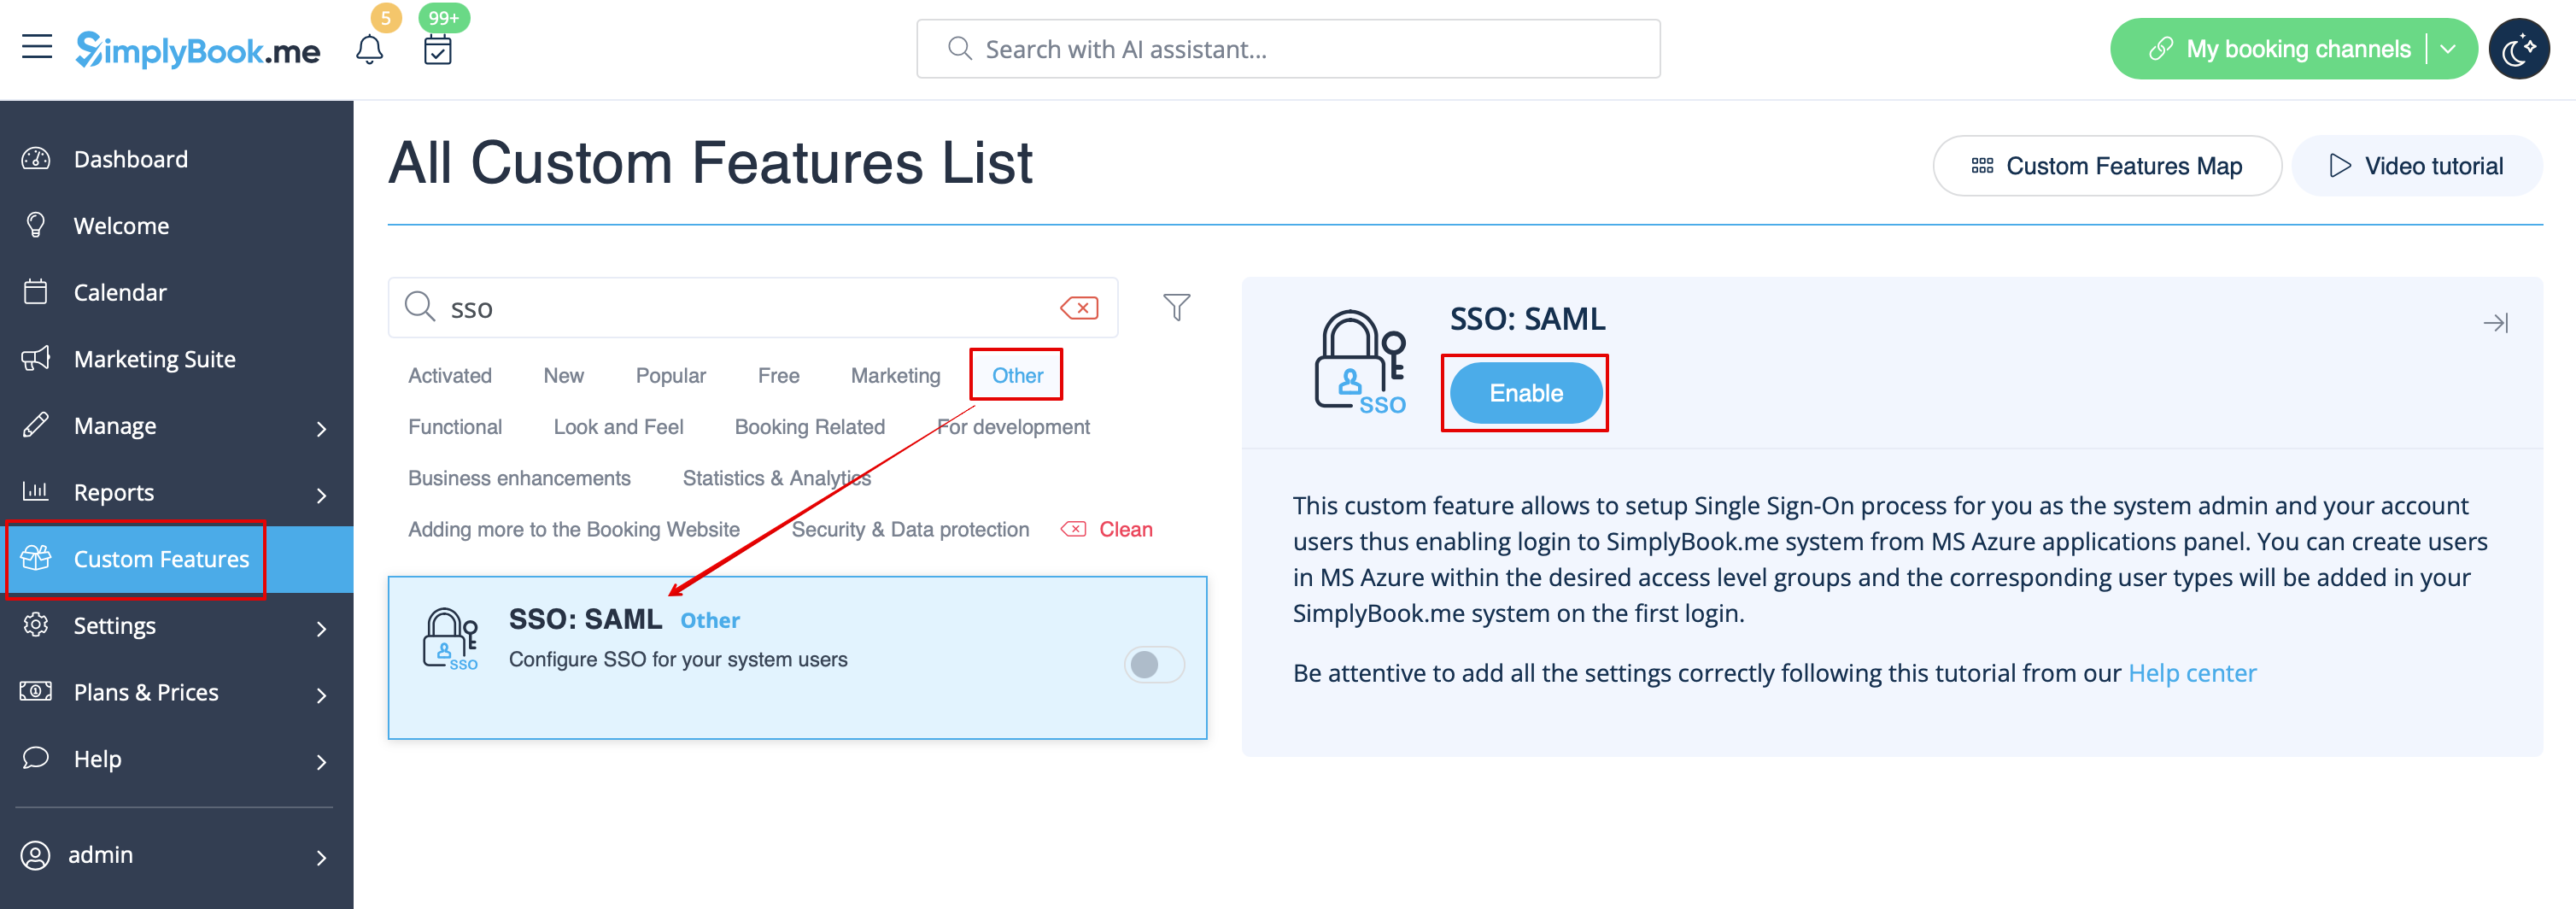
- 2. Enable SSO: SAML Custom feature on your Custom features page .
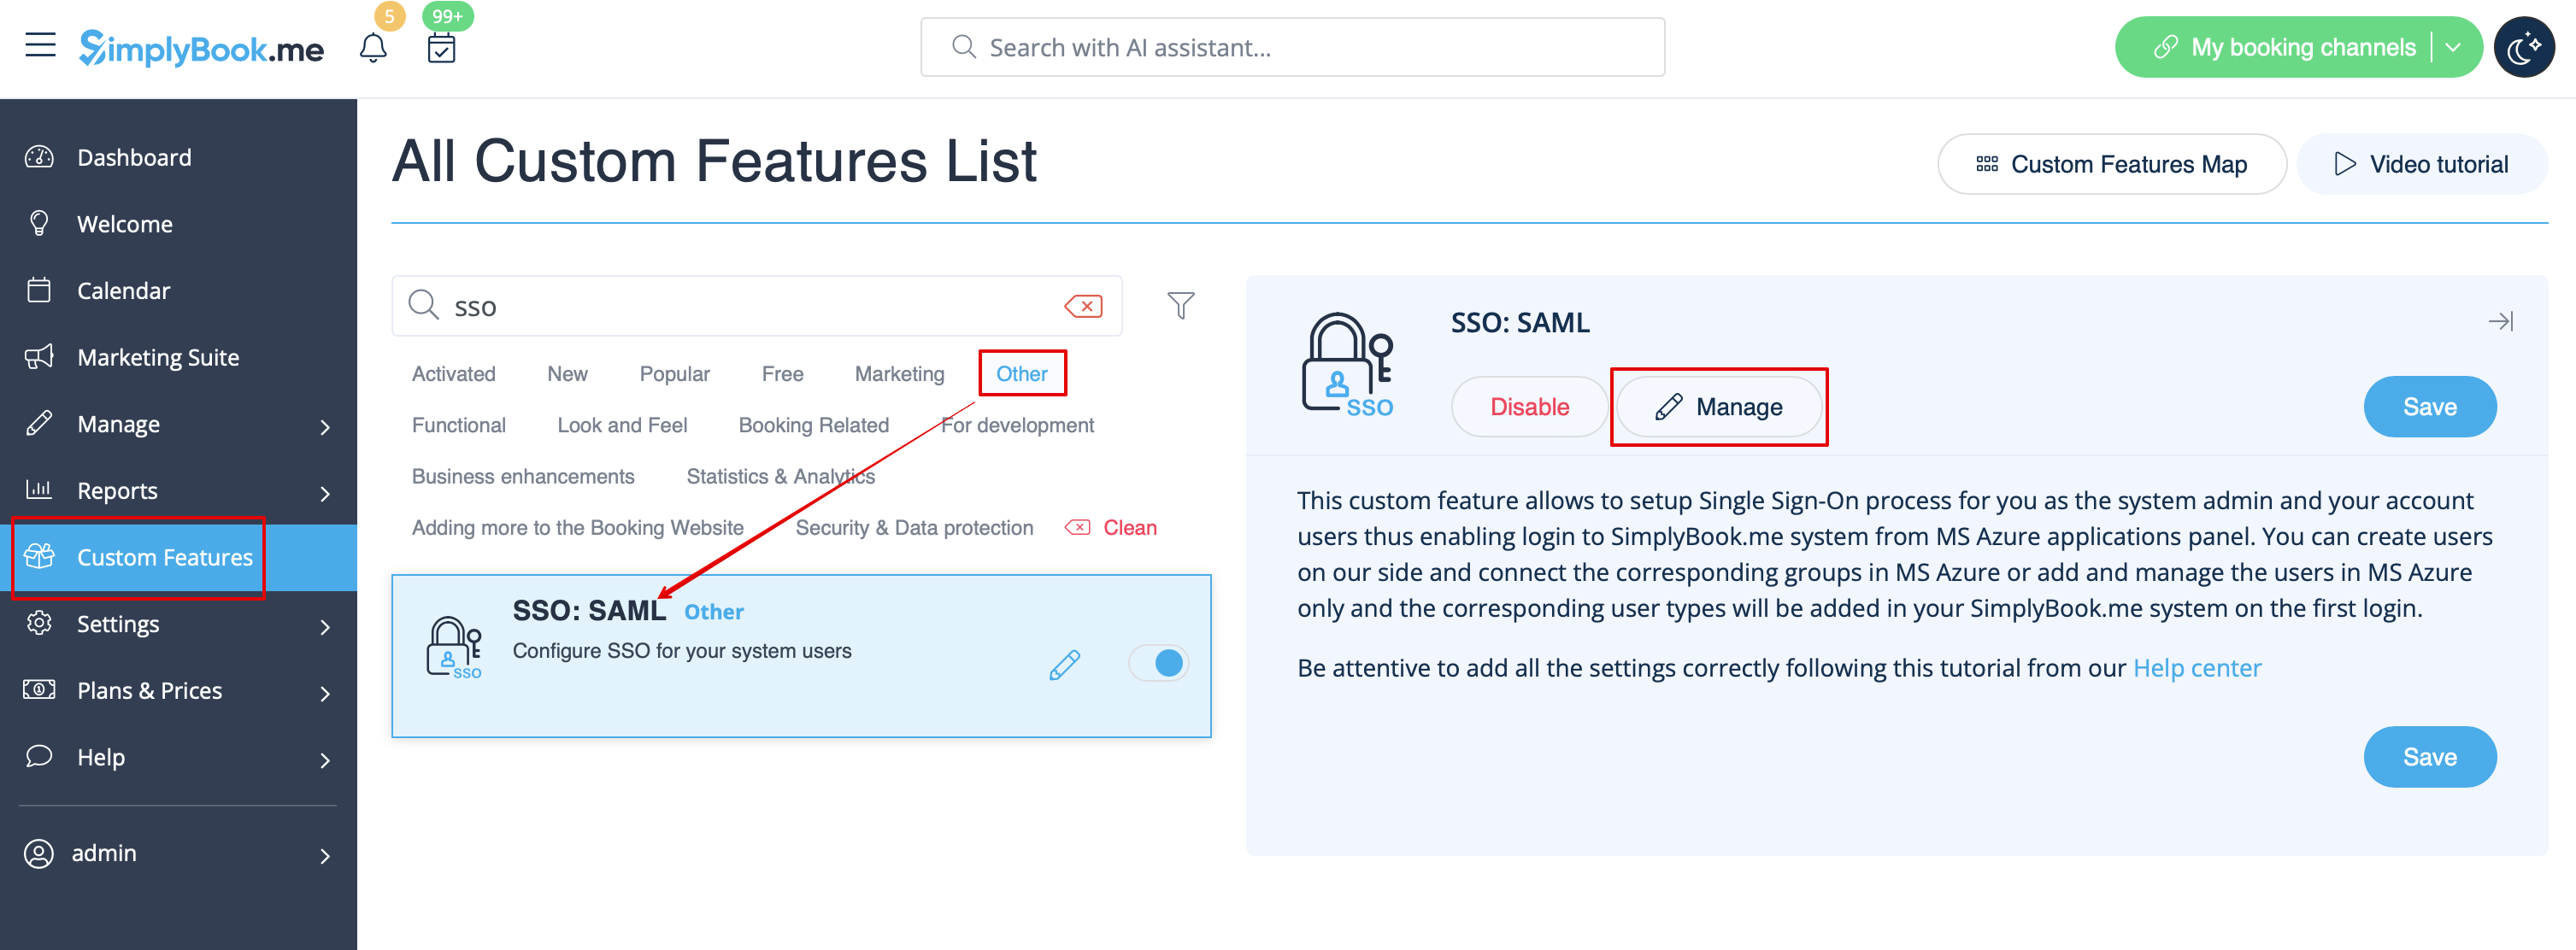
- 3. Navigate to Manage to edit the connection settings.
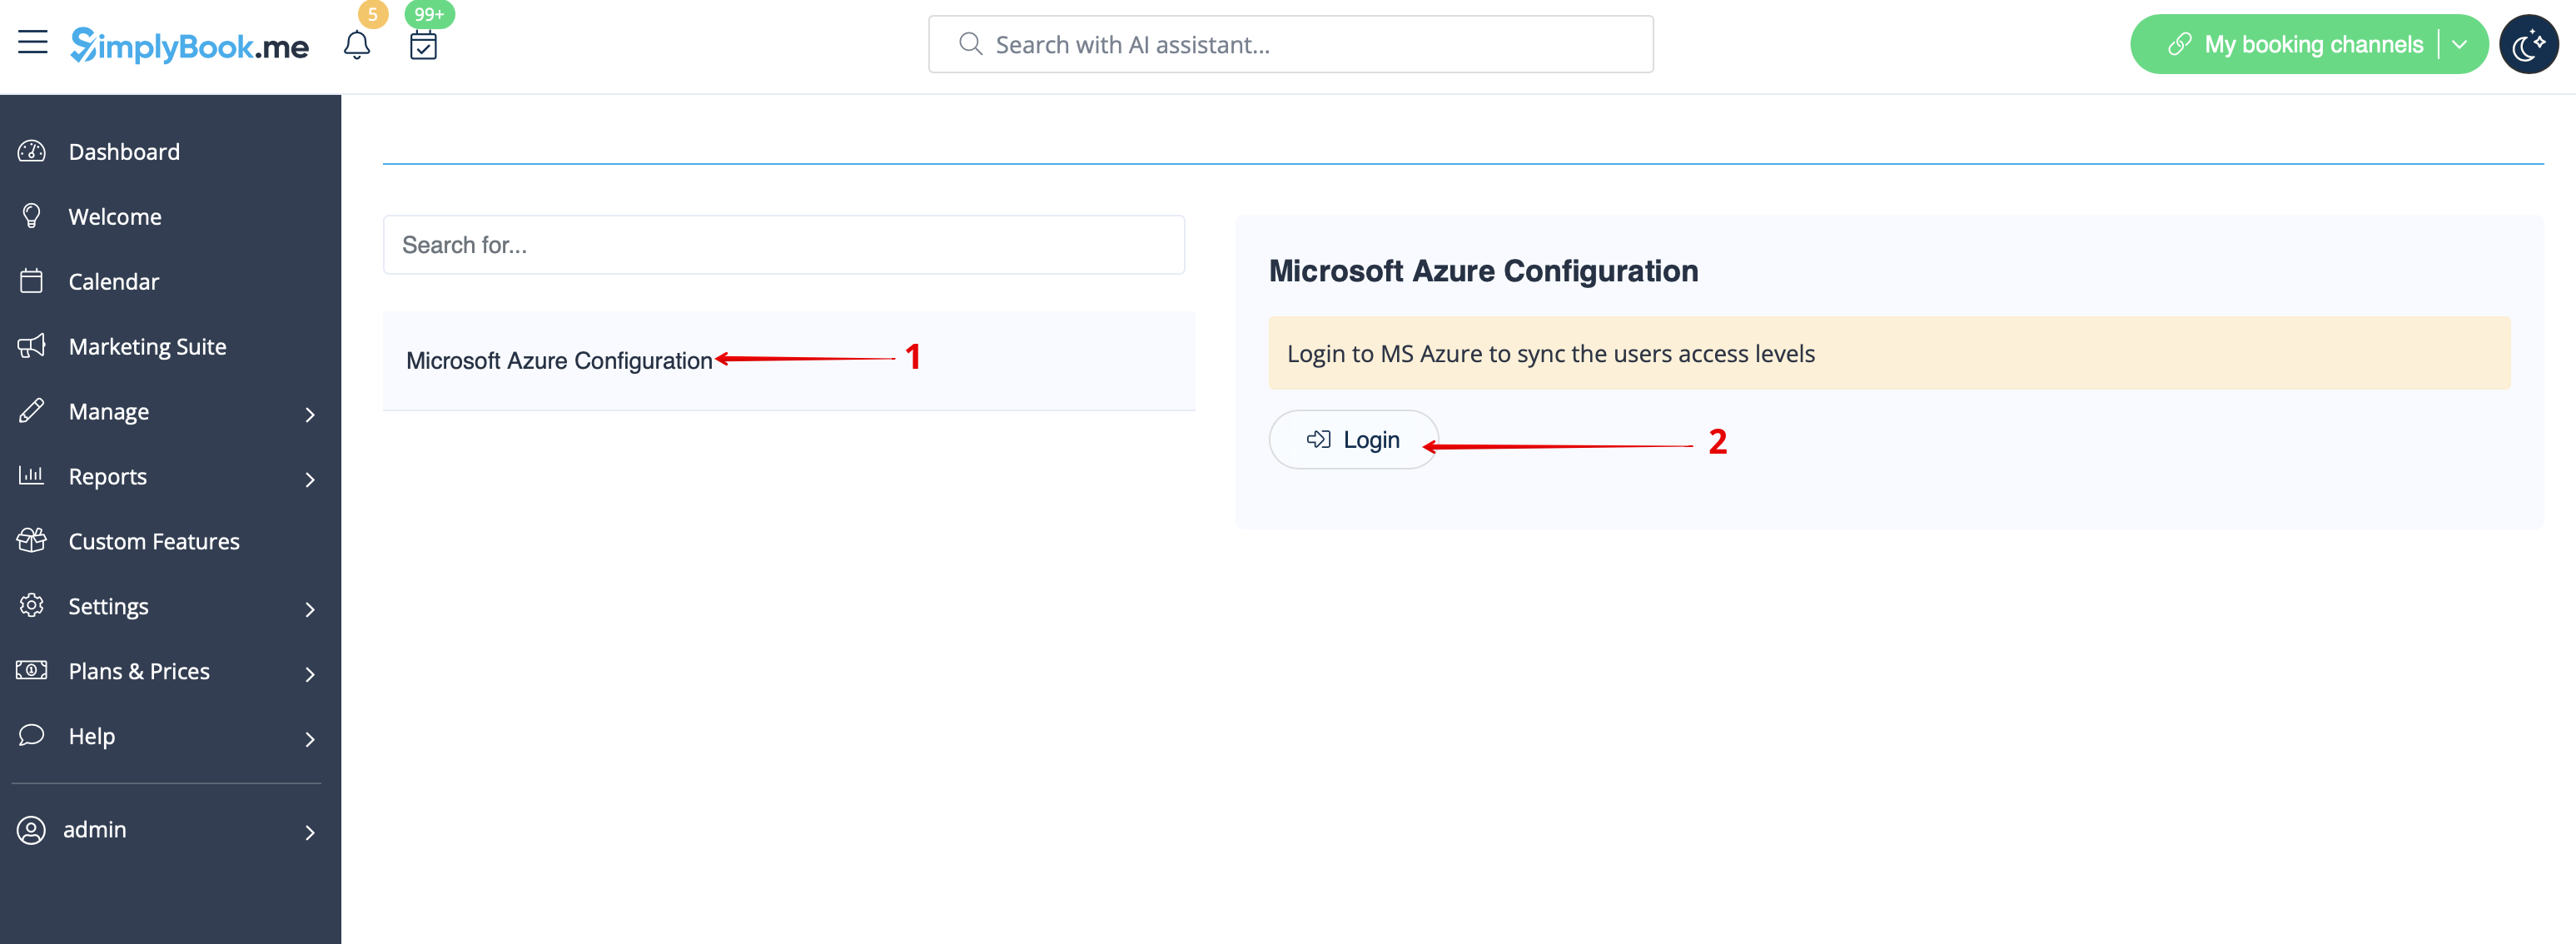
- 4. Click on Microsoft Azure Configuration on the left and log in to your MS Azure account there to start connection setup.
- Please note! You need to have administrator access in MS Azure as well to be able to connect applications.
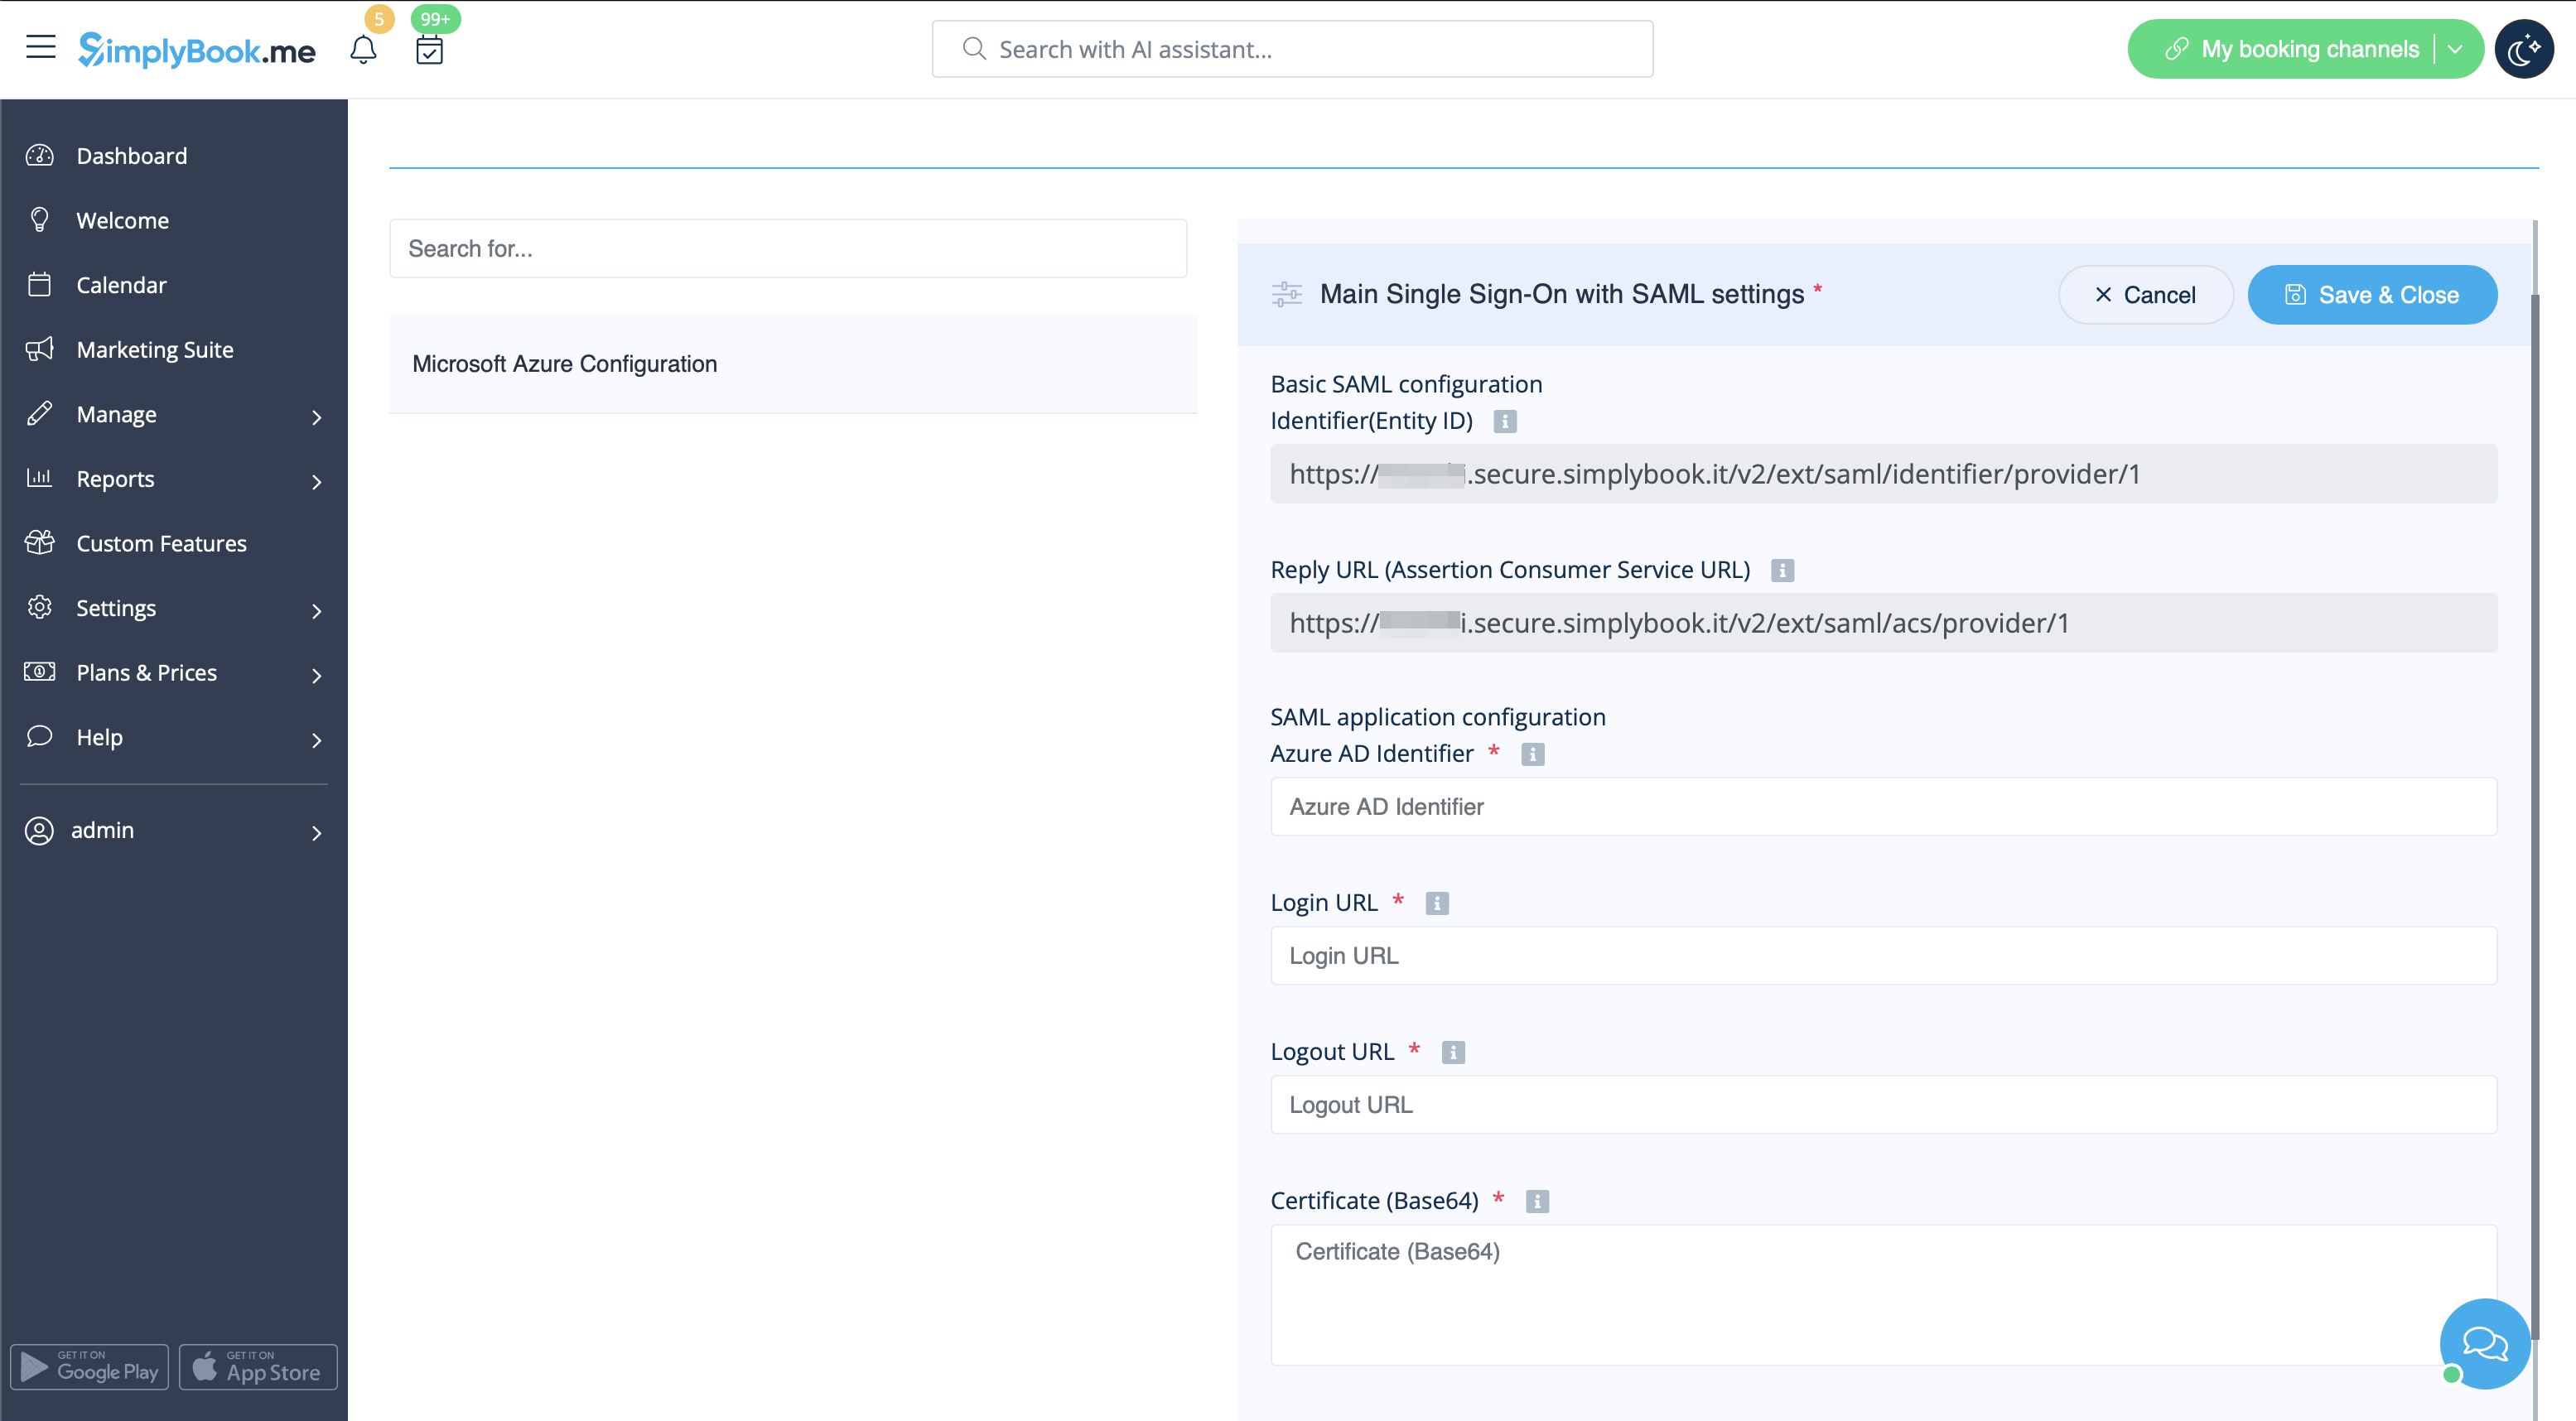
- 5. After successful login you will see the first block with basic options on SimplyBook.me side.
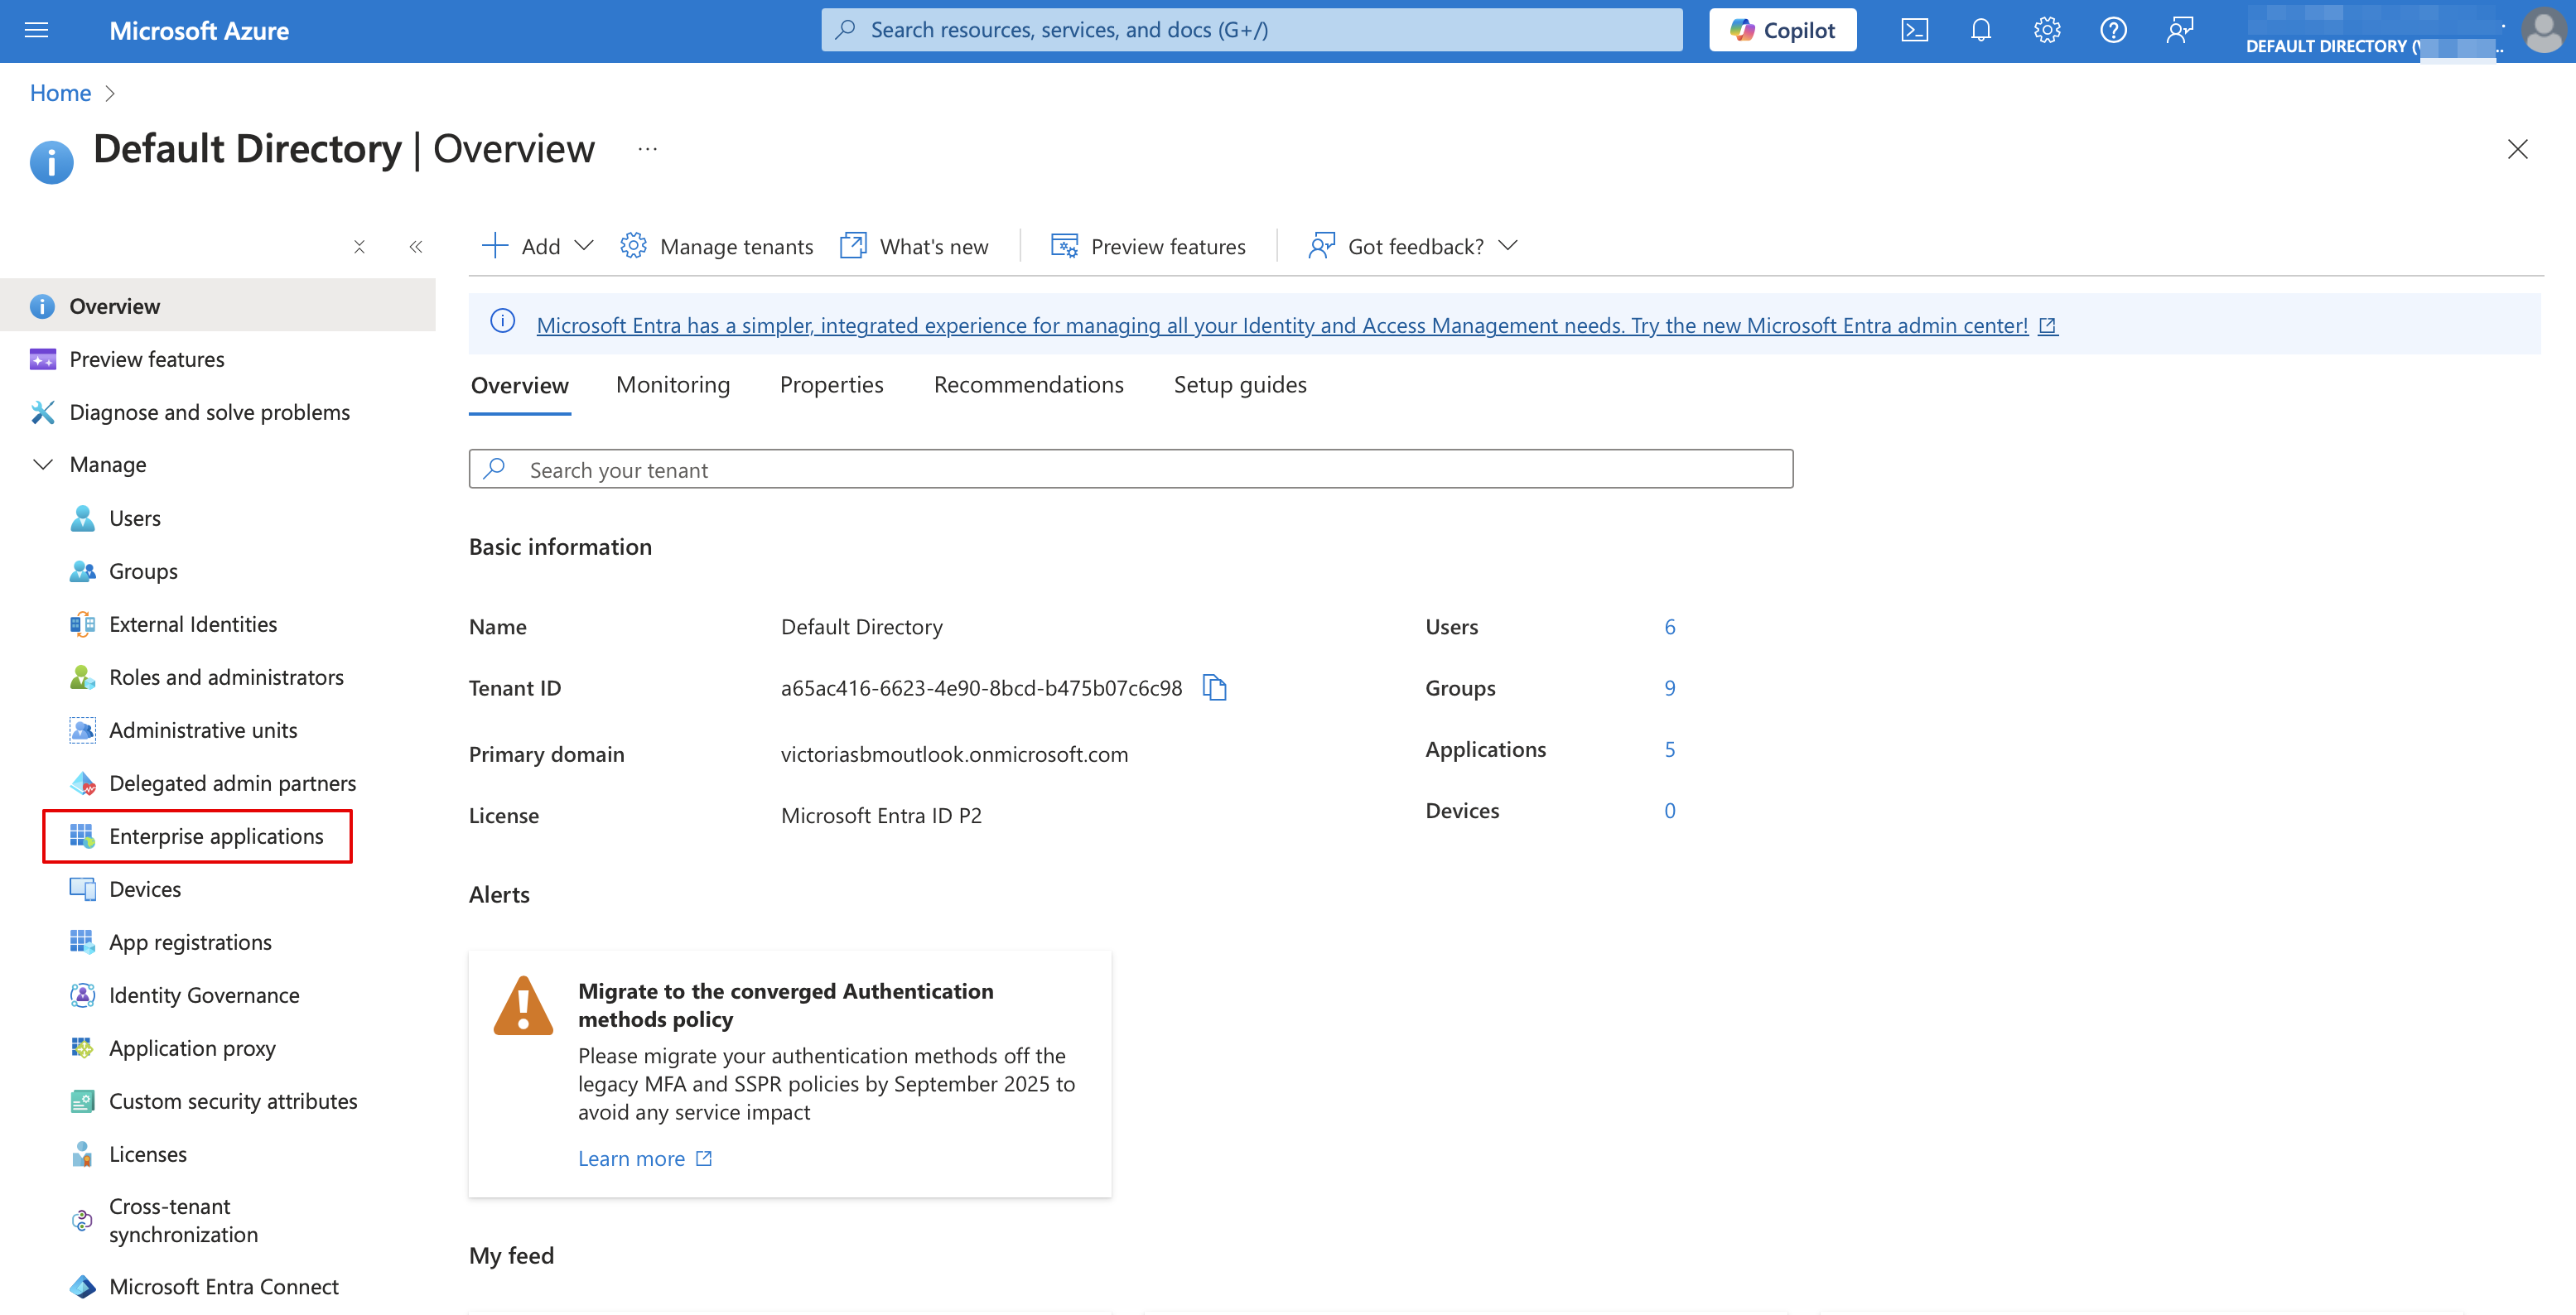
- 6. In MS Azure please navigate to Active Directory(Entra ID).

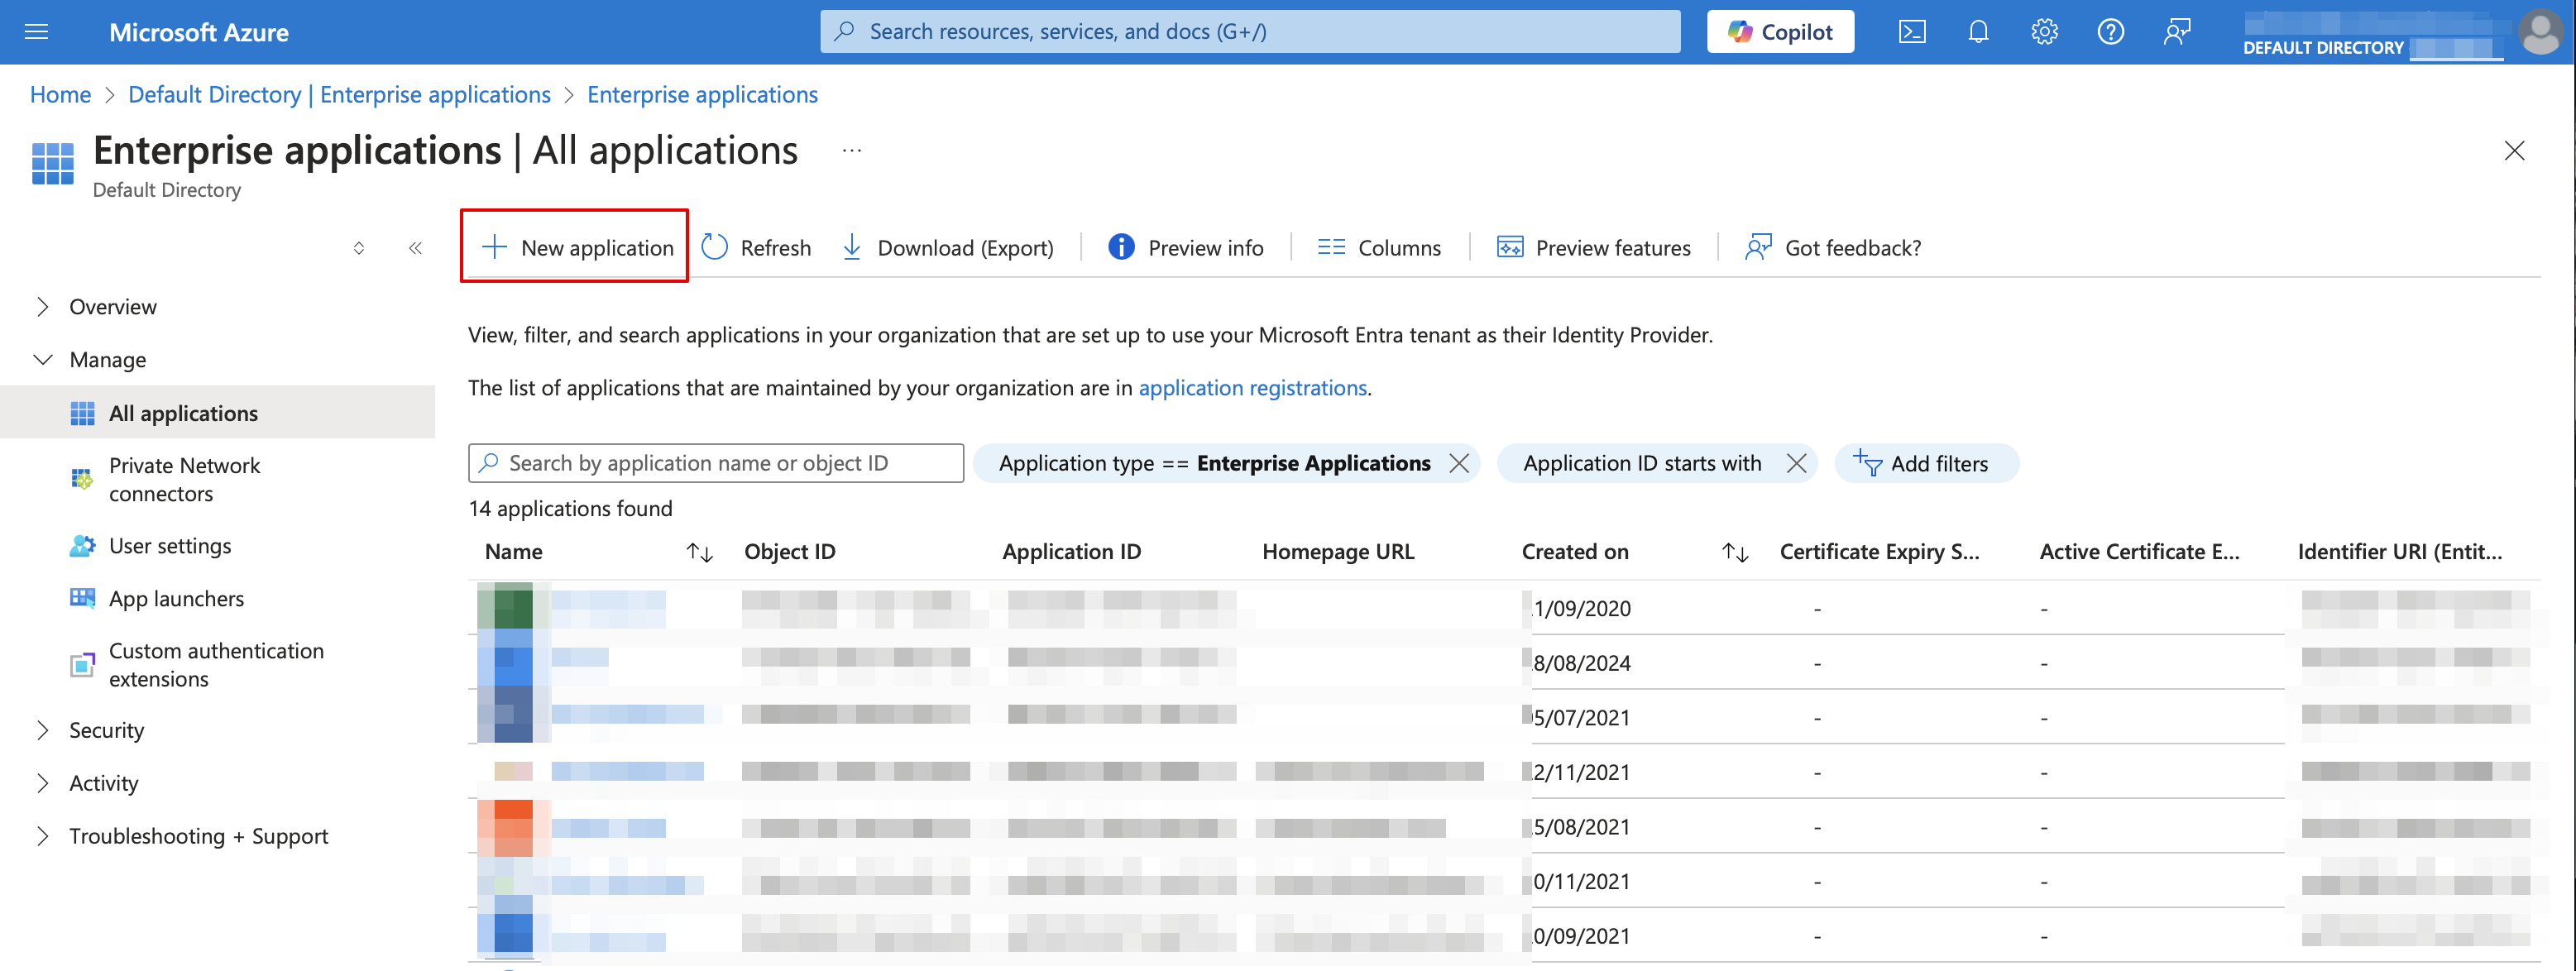
- 7. Select Enterprise applications in the left-side menu and add new application.
- (you may need paid MS Azure or Premium trial subscription there to add applications)
- 8. Choose non-gallery type. Add its name and save.
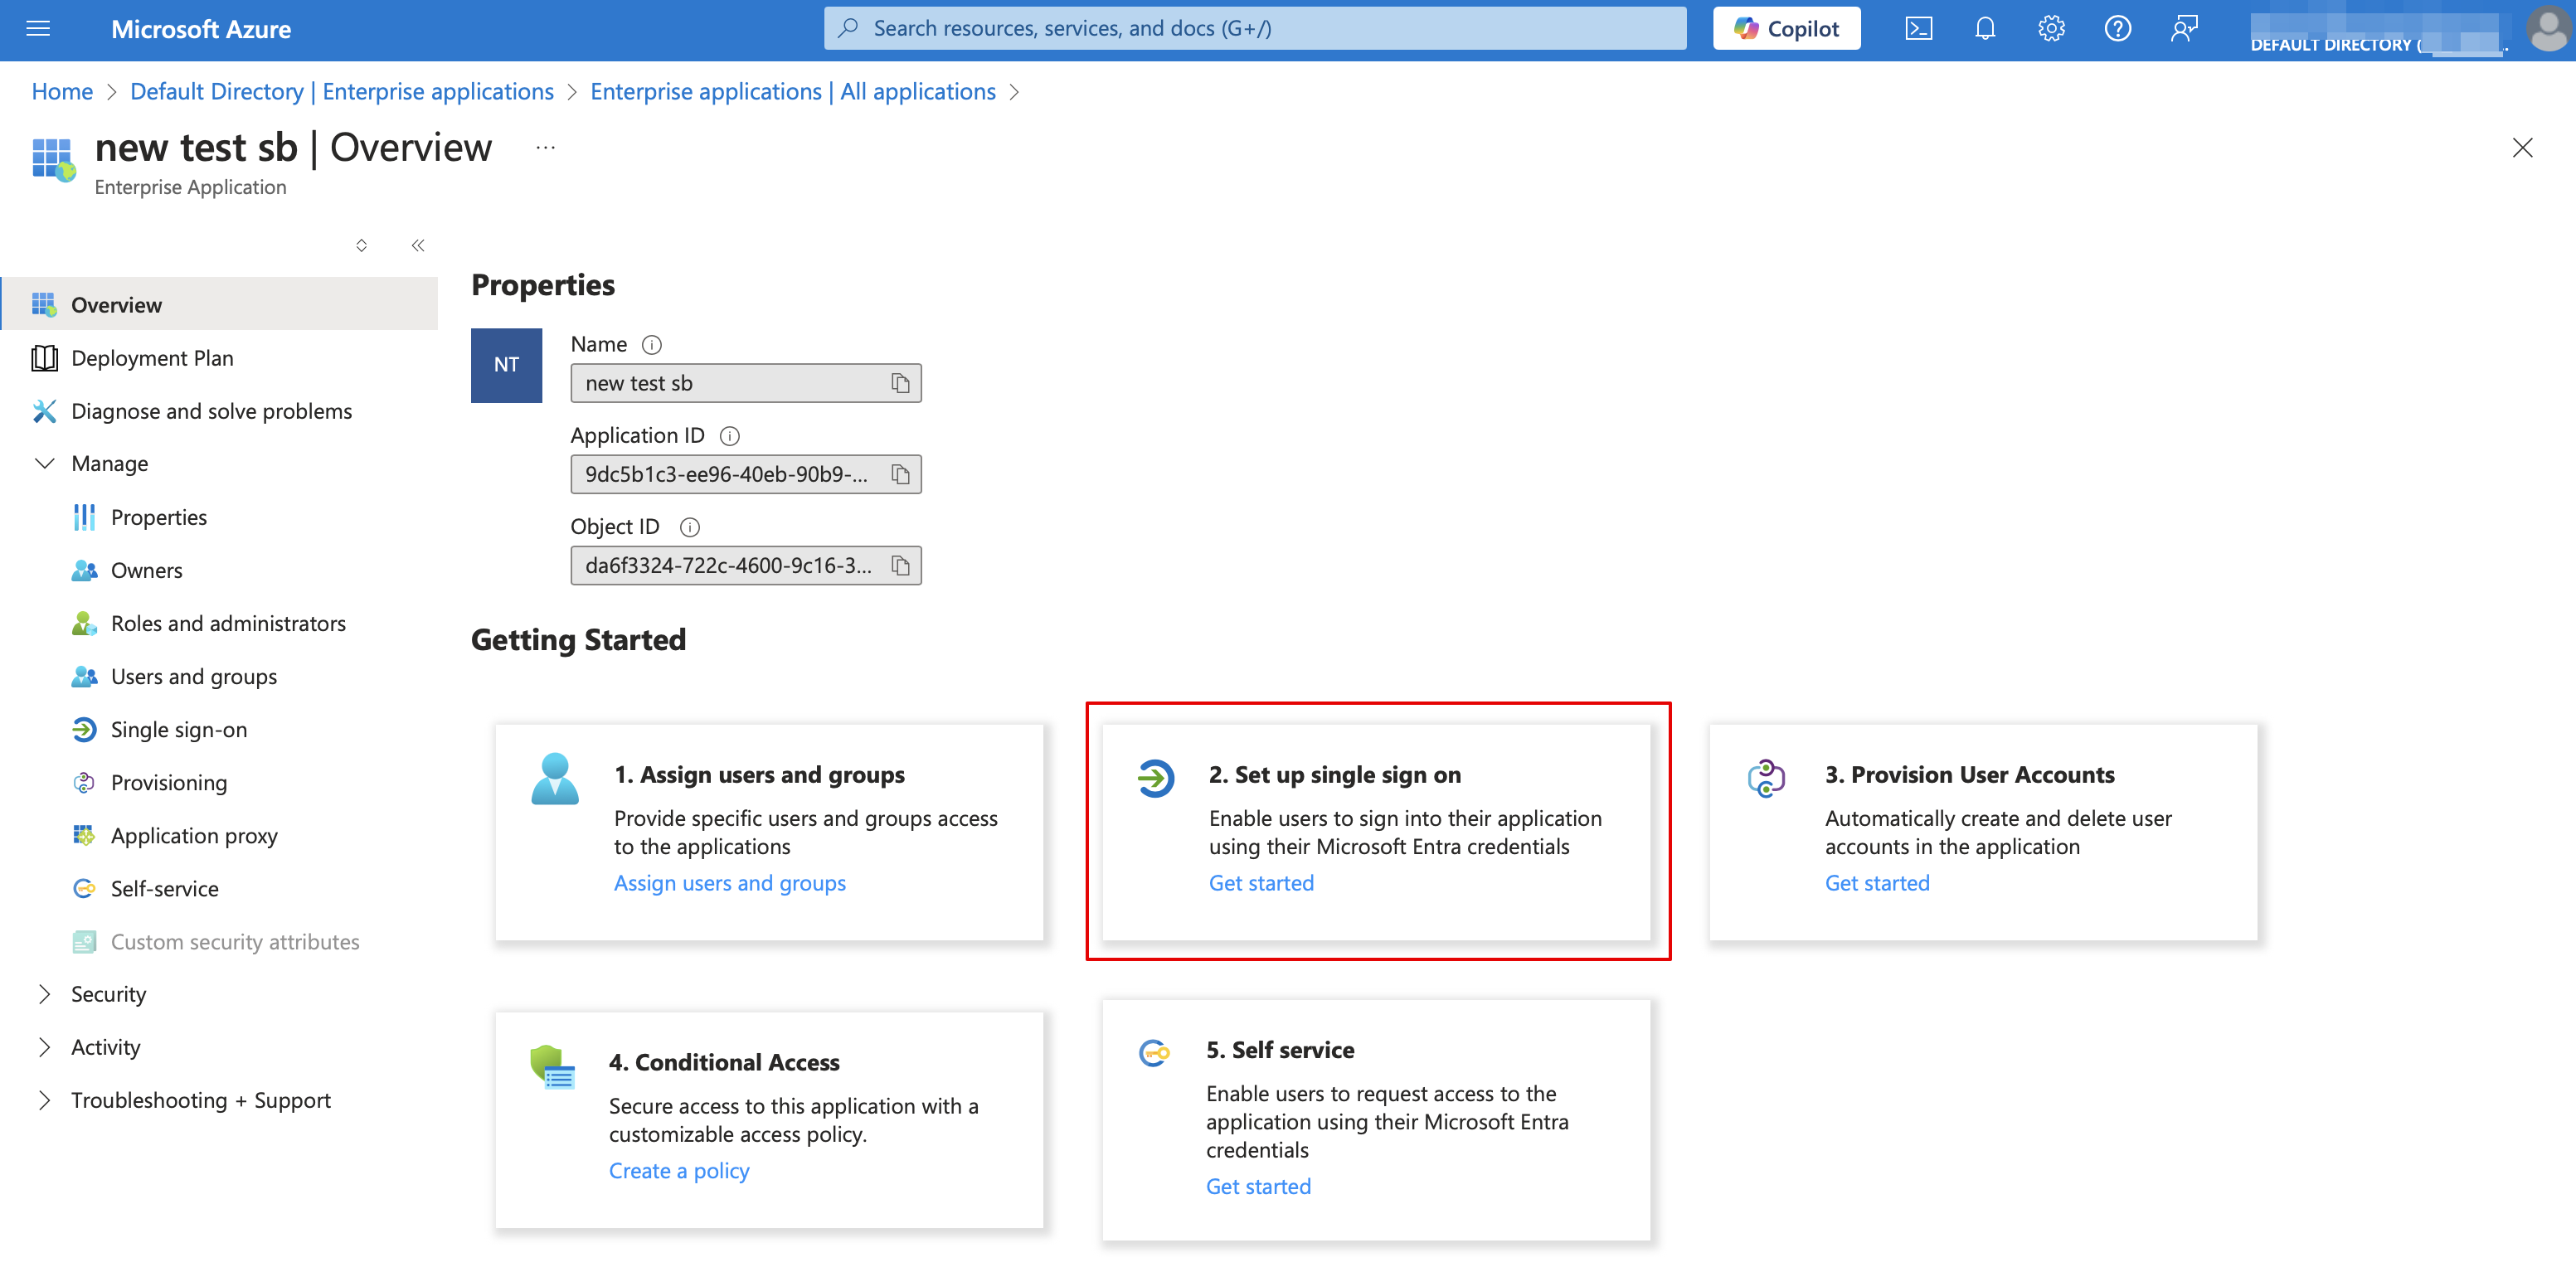
- 9. On the next page click on Set up single sign on and select SAML.

- 10. Use Pen icon in Basic SAML Configuration block to edit.

- 11. Copy the urls from SimplyBook.me SSO: SAML feature to the corresponding boxes on MS Azure side. Save.
- 12. On MS Azure side scroll to SAML Signing Certificate part and download Certificate(Base64). Open it with notepad or similar text editor, copy the certificate code and paste it to the corresponding box into SSO: SAML Custom Feature.

- 13. Scroll MS Azure side page to Set up block and find Login URL, Azure AD/Microsoft Entra Identifier and Logout URL options, Copy each of them and paste to the corresponding boxes on SimplyBook.me side.

- 14. Go to User attributes and claims block on MS Azure side and click on Pen icon to edit it.

- 15. For Unique User Identifier(click on it to edit) please set user.mail variable as Source Attribute. It is the parameter that will allow us to differentiate between different user logins.


- 16. For additional claims please add Groups option using Add group claim and Email and Name with Add new claim buttons correspondingly.
- You can also add phone and last name if you need. See claims setup example below.
- 17. Copy the claims titles to the corresponding boxes on SimplyBook.me side.
- 18. Navigate to Azure Active Directory/Entra ID homepage and go to Users section, create all users that you would like to access the system if they are not created yet.

- 19. In Groups create groups that will correspond to SimplyBook.me user types. For example, Admins for admin level users, Senior Employees for Senior Employee access, etc.
- You can create only one group if all your users have admin access, for example.

- 20. Add users to the corresponding groups.

- 21. Copy each group Object ID to the corresponding box in User Group matching settings on SimplyBook.me side.
- (If you have only one group for admins insert same object ID everywhere in that block). Save settings.
- 22. Once the users are given the access to Applications dashboard they can log in to SimplyBook.me with their access level by a click on the SimplyBook.me application icon.

- The corresponding user types will be added automatically to your SimplyBook.me account with the data passed according to your settings.
- Please note!
- It is not possible to connect existing SimplyBook.me side users to MS Azure users.
- For such users it is not possible to reset SimplyBook.me passwords, edit access level, username.
- They need to contact MS Azure administrator if they loose access to applications page or contact SimplyBook.me default admin to request personal data report.
- If you need to restrict access for such users you can remove or block them on MS Azure side.
- If you change the group the user is included to on MS Azure side or remove the user there the access level will be updated on SimplyBook.me side within several minutes or the user will be logged out.
How to set & use Okta
- 1. Create account at Okta.
- 2. Navigate to Applications in Okta admin panel and click to create a new app there.
- 3. Add the desirable name and upload a logo.
- 4. Select SAML method.

- 5. On the SAML settings step please copy the Audience URI and Okta Single Sign-On URL from SimplyBook.me SSO-SAML custom feature -> Manage -> Okta SAML Single Sign-On and paste to the corresponding fields on the Okta side.
- 6. Set Name ID and Application username as in the image below.
- 7. Scroll the page to Attribute settings and add the attributes for name, email, id and firstname as in the example.
- And separately group attribute in the corresponding block.
- On the SimplyBook.me side please make sure the same attributes are indicated in the User attributes and claims tab.
- 8. Proceed to the next step.

- 9. The app is now saved. Please open Sign on tab and click on on More details there.
- 10. Copy Sign on URL, Sign out URL, Issuer and Signing certificate in Okta and paste them to the corresponding fields in SimplyBook.me SSO-SAML custom feature -> Manage -> Okta SAML Single Sign-On
- 11. Now in Okta interface make sure all necessary employees are added to the system in People tab.
- 12. In Groups tab - create the groups matching the SimplyBook.me access levels. Assign the employees to these groups.

- 13. Assign the groups and people to the application that you've created.
- 14. In the SimplyBook.me side please indicate the groups names in the User groups matching settings tab. Save settings.
- 15. Everything is ready now. Your employees an now log in to your company account at SimplyBook.me with one single click on the Okta panel (the user in SimplyBook.me will be automatically create on the first login with the corresponding rights)