From SimplyBook.me
No edit summary |
Marked this version for translation |
||
| (6 intermediate revisions by the same user not shown) | |||
| Line 1: | Line 1: | ||
<languages/> | |||
<translate> | |||
<!--T:1--> | |||
{{#seo: | |||
|title=Frequently Asked Questions about the Popular Appointment Booking System Scheduler SimplyBook.me | |title=Frequently Asked Questions about the Popular Appointment Booking System Scheduler SimplyBook.me | ||
|description=Connect SimplyBook.me with your SITE123 website to streamline bookings. Follow our guide to set up this integration today! | |||
|titlemode=append | |titlemode=append | ||
|keywords=faq, frequently asked questions, booking software, appointment system questions, appointments online, calendar software, booking system, booking calendar, scheduling software, online appointment scheduling, online scheduling | |keywords=faq, frequently asked questions, booking software, appointment system questions, appointments online, calendar software, booking system, booking calendar, scheduling software, online appointment scheduling, online scheduling | ||
}} | }} | ||
</translate><translate> | |||
<!--T:2--> | |||
<br><br> | |||
Use SimplyBook.me at your SITE123 website to allow your customers to schedule an appointment on your website. <br> | Use SimplyBook.me at your SITE123 website to allow your customers to schedule an appointment on your website. <br> | ||
<br><br> | |||
'''How to set it up''' | |||
''' | </translate><translate> | ||
<br> | <!--T:3--> | ||
: | <br><br> | ||
1. If you have not created account with [https://simplybook.me/ SimplyBook.me] you can use [https://simplybook.it/default/registration this link] to create account for your company. | :1. If you have not created account with [https://simplybook.me/ SimplyBook.me] you can use [https://simplybook.it/default/registration this link] to create account for your company.<br><br> | ||
:2. Go to [https://www.site123.com/ SITE123.com] and click on “START HERE” to sign up or login to your account if you already have one(you can also skip steps 3-5 in this case). | |||
<br> <br> | |||
: | |||
2. Go to [https://www.site123.com/ SITE123.com] and click on “START HERE” to sign up. | |||
[[File:Site123.png | center]] | [[File:Site123.png | center]] | ||
<br> <br> | <br> <br> | ||
3. Choose the category of website you want to create. | :3. Choose the category of website you want to create. | ||
[[File:Site123 categories.png | center]] | [[File:Site123 categories.png | center]] | ||
<br> <br> | <br> <br> | ||
4. Enter the name of your website. | :4. Enter the name of your website. | ||
[[File:Website name.png | center]] | [[File:Website name.png | center]] | ||
<br> <br> | <br> <br> | ||
5. Complete the sign up process by entering your full name, email and password or by using Facebook or Google to log in. | :5. Complete the sign up process by entering your full name, email and password or by using Facebook or Google to log in. | ||
[[File:Sign up.png | center]] | [[File:Sign up.png | center]] | ||
<br> <br> | <br> <br> | ||
6. After your account at SITE123 is created open the website editor, go to “Pages” and click on “Add new page” | :6. After your account at SITE123 is created open the website editor, go to “Pages” and click on “Add new page” | ||
[[File: | [[File:Site123 add new page.png | center]] | ||
<br> <br> | <br> <br></translate><translate> | ||
<!--T:4--> | |||
:7. Choose "Text" type and select the template to your taste. | |||
< | [[File:Site123 create new page.png | center]] | ||
[[File: | |||
<br> <br> | <br> <br> | ||
:8. On the Pages menu, you will see newly created page. Click on “Edit”. | |||
[[File: | [[File:Site123 edit new page.png | center]] | ||
<br> <br> | <br> <br> | ||
:9. Then enter the text that will be the link to your booking site, highlight it and click on "Link" icon in the menu | |||
[[File:Site123 add link text.png | center]] | |||
<br><br> | |||
:10. Add link to your booking site to the corresponding field. You can set it to automatically open in the new tab | |||
[[File:Site123 add link.png | center]] | |||
<br><br> | |||
:11. Click "Insert" and save your page. As the result you will have the page with the link to your booking site and your customers will be able to easily book from there. | |||
[[File:Site123 integration result.png | border| center]] | |||
<br><br> | |||
:'''Please note!''' Site123 has also plugin integration option developed by themselves, but it works with old themes only, that are no longer supported by us and does not have any new functionality. | |||
<br><br> | |||
</translate> | |||
Latest revision as of 08:54, 18 June 2025
Use SimplyBook.me at your SITE123 website to allow your customers to schedule an appointment on your website.
How to set it up
- 1. If you have not created account with SimplyBook.me you can use this link to create account for your company.
- 2. Go to SITE123.com and click on “START HERE” to sign up or login to your account if you already have one(you can also skip steps 3-5 in this case).

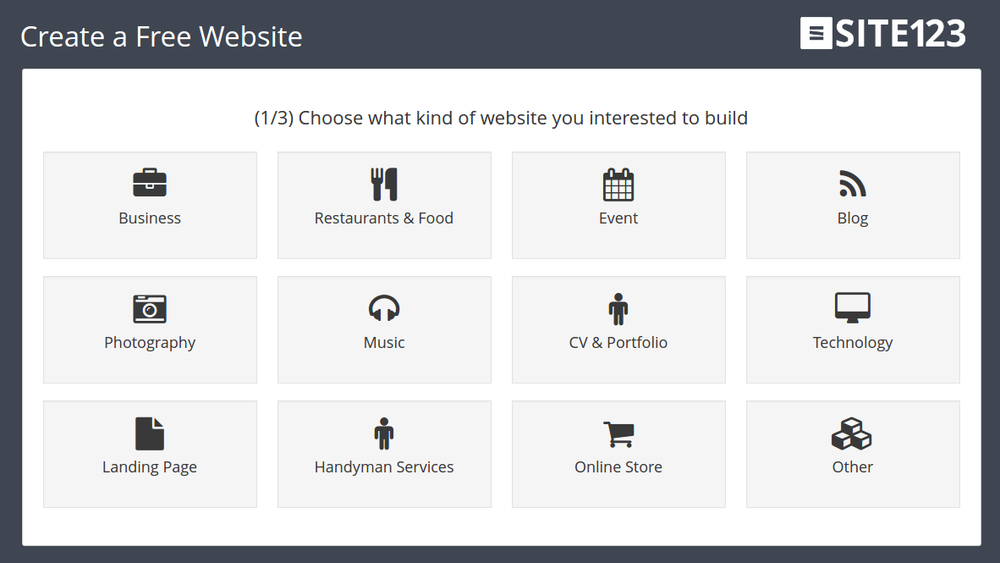
- 3. Choose the category of website you want to create.
- 4. Enter the name of your website.

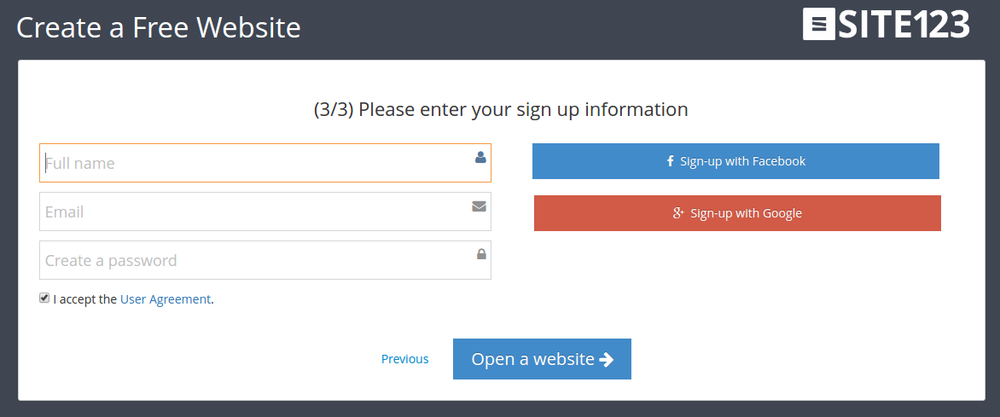
- 5. Complete the sign up process by entering your full name, email and password or by using Facebook or Google to log in.
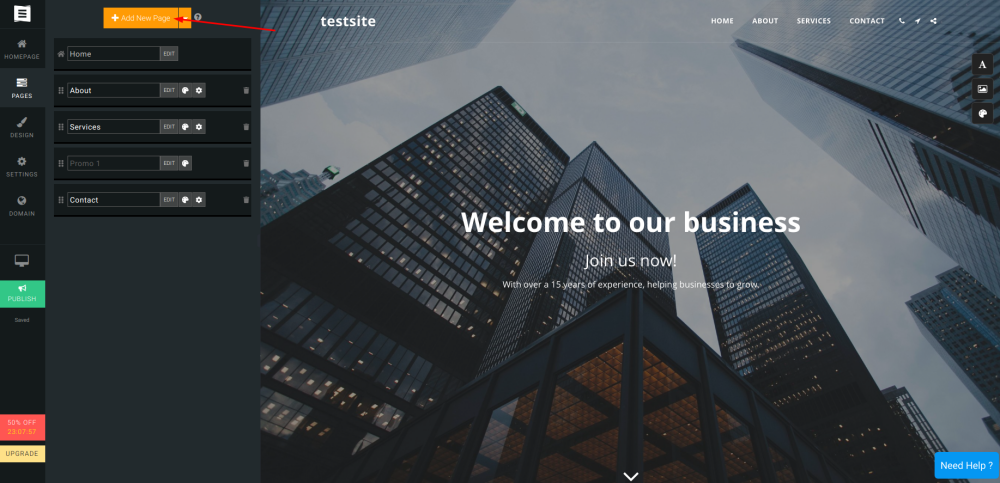
- 6. After your account at SITE123 is created open the website editor, go to “Pages” and click on “Add new page”
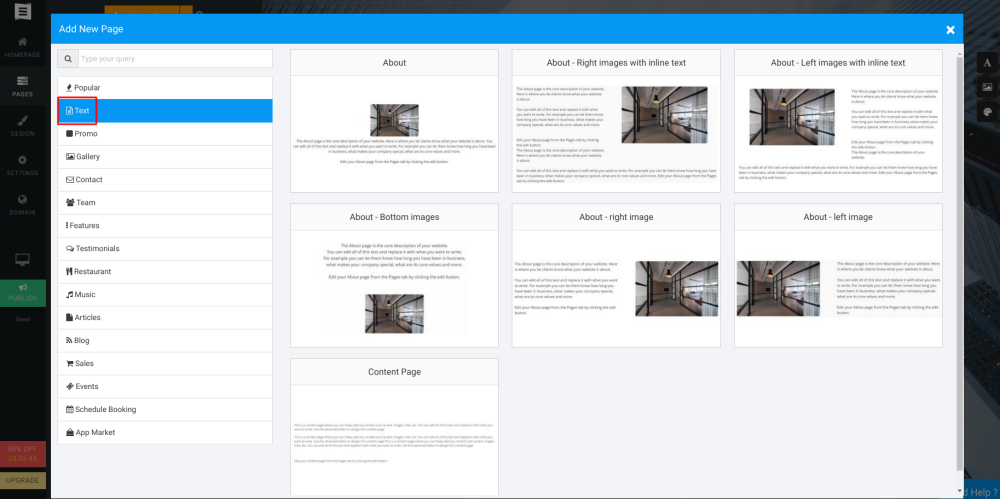
:7. Choose "Text" type and select the template to your taste.
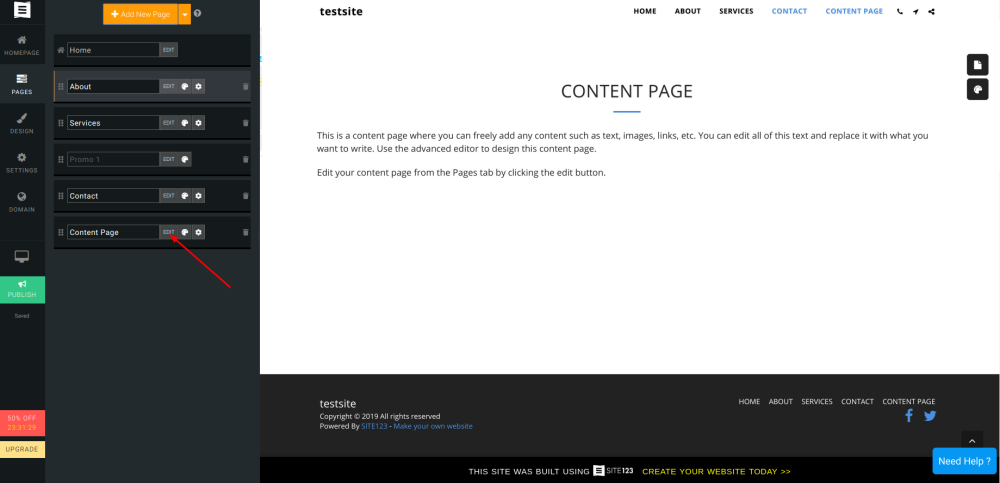
- 8. On the Pages menu, you will see newly created page. Click on “Edit”.
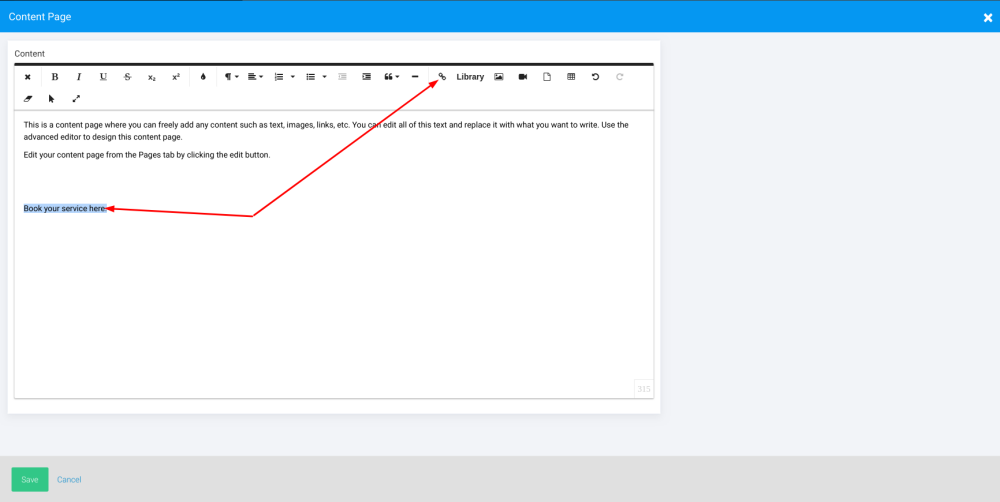
- 9. Then enter the text that will be the link to your booking site, highlight it and click on "Link" icon in the menu
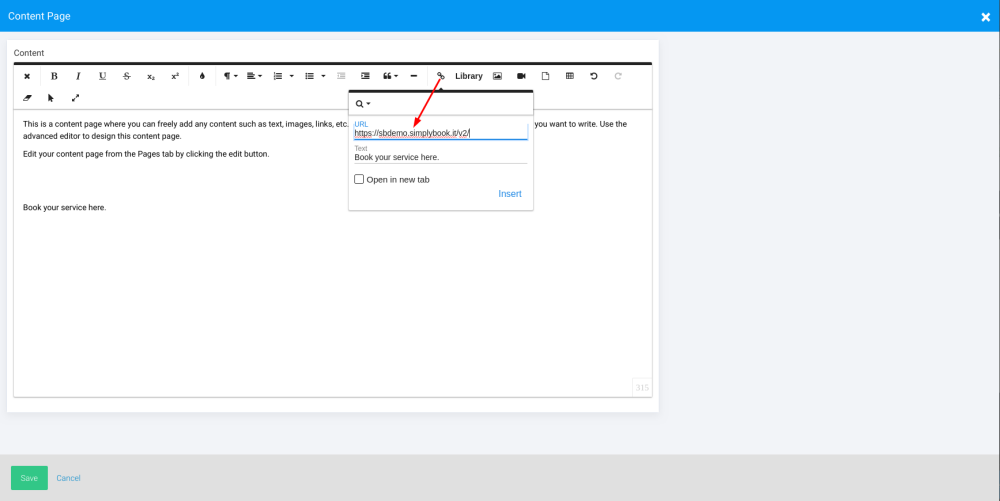
- 10. Add link to your booking site to the corresponding field. You can set it to automatically open in the new tab
- 11. Click "Insert" and save your page. As the result you will have the page with the link to your booking site and your customers will be able to easily book from there.

- Please note! Site123 has also plugin integration option developed by themselves, but it works with old themes only, that are no longer supported by us and does not have any new functionality.