Created page with "AI Voice Booking" |
No edit summary |
||
| (6 intermediate revisions by 2 users not shown) | |||
| Line 1: | Line 1: | ||
<languages/> | <languages/> | ||
[[File:Ai icon.png|left]] | [[File:Ai icon.png|left]] | ||
Lägg till en AI-driven bokningsupplevelse på din webbplats och i dina meddelandekanaler. Assistenten samlar in bokningsuppgifter, kontrollerar tillgänglighet och skapar bokningar automatiskt. | |||
Allt-i-ett AI-bokningsmodul som kopplar din assistent till din webbplats och dina meddelandekanaler för att ta emot bokningar och skicka bekräftelser och påminnelser. Konfigurera integrationer (Facebook Messenger, WhatsApp, webbwidget) och grundläggande inställningar, och börja sedan ta emot bokningar automatiskt. | |||
<br><br> | <br><br> | ||
; | <span style="background-color:#ffe9e9; padding:5px; border-radius:5px;">'''Observera!''' För närvarande är det möjligt att boka dolda tjänster från kundsidan.</span> | ||
1. | <br><br> | ||
;Hur man använder: | |||
1. Aktivera funktionen på sidan Anpassade funktioner -> Övrigt -> AI Voice booking.<br> | |||
[[File:Ai voice booking enable path.png|1200px|center|link=https://help.simplybook.me/images/1/17/Ai_voice_booking_enable_path.png]] | [[File:Ai voice booking enable path.png|1200px|center|link=https://help.simplybook.me/images/1/17/Ai_voice_booking_enable_path.png]] | ||
<br><br> | <br><br> | ||
2. | 2. Få gratis testkrediter där eller köp fler AI-bokningskrediter på sidan Planer & Priser -> Tilläggsartiklar <br> | ||
<br><br> | <br><br> | ||
3. | 3. Du kan se antalet återstående krediter på Kontrollpanelen eller i Kontoinformation.<br> | ||
[[File:Ai credits balance.png|1200px|center|link=https://help.simplybook.me/images/8/8c/Ai_credits_balance.png]] | [[File:Ai credits balance.png|1200px|center|link=https://help.simplybook.me/images/8/8c/Ai_credits_balance.png]] | ||
<br><br> | <br><br> | ||
4. | 4. Gå tillbaka till Anpassade funktioner -> Övrigt -> AI Voice booking för att justera inställningar för AI-röst, modell och text för e-postverifiering.<br> | ||
[[File:Ai main configuration.png|1200px|center|link=https://help.simplybook.me/images/4/47/Ai_main_configuration.png]] | [[File:Ai main configuration.png|1200px|center|link=https://help.simplybook.me/images/4/47/Ai_main_configuration.png]] | ||
<br><br> | <br><br> | ||
5. | 5. Välj nu alternativet där AI-bokning ska vara tillgänglig för dina kunder. | ||
<br><br><br><br> | <br><br><br><br> | ||
==Widget/ | ==Widget/Bokningswebbplats== | ||
1. | 1. När krediterna har köpts läggs AI-chattwidgeten till på din bokningswebbplats som standard. Kunderna kan skicka text- eller röstmeddelanden för att gå igenom bokningsprocessen med hjälp av AI. | ||
<br><br> | <br><br> | ||
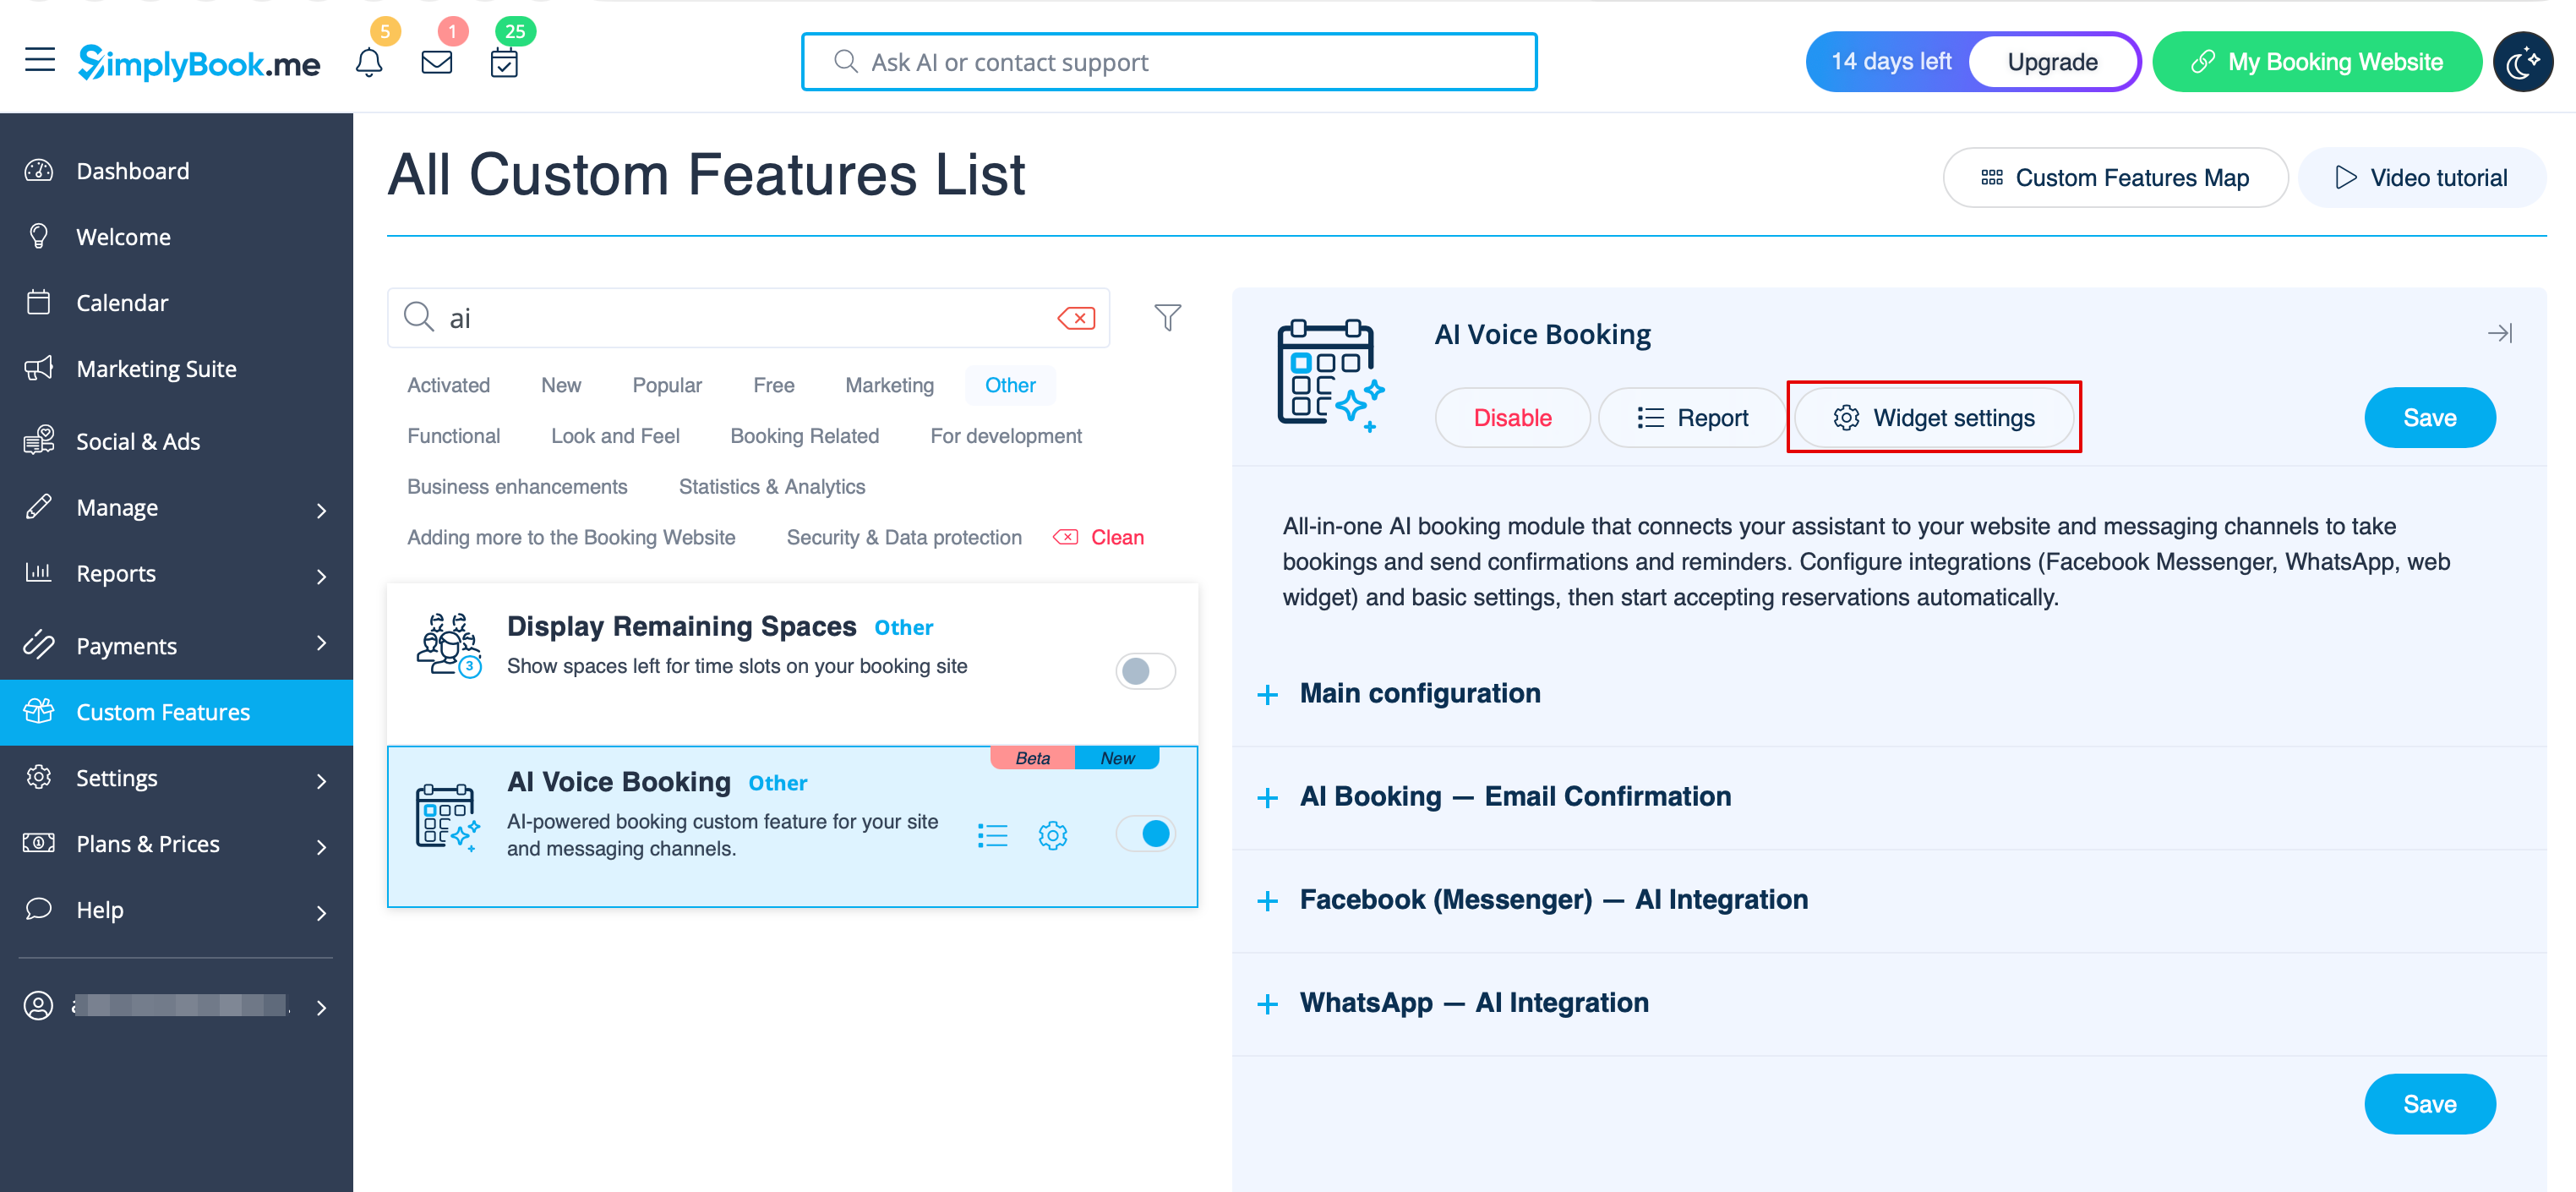
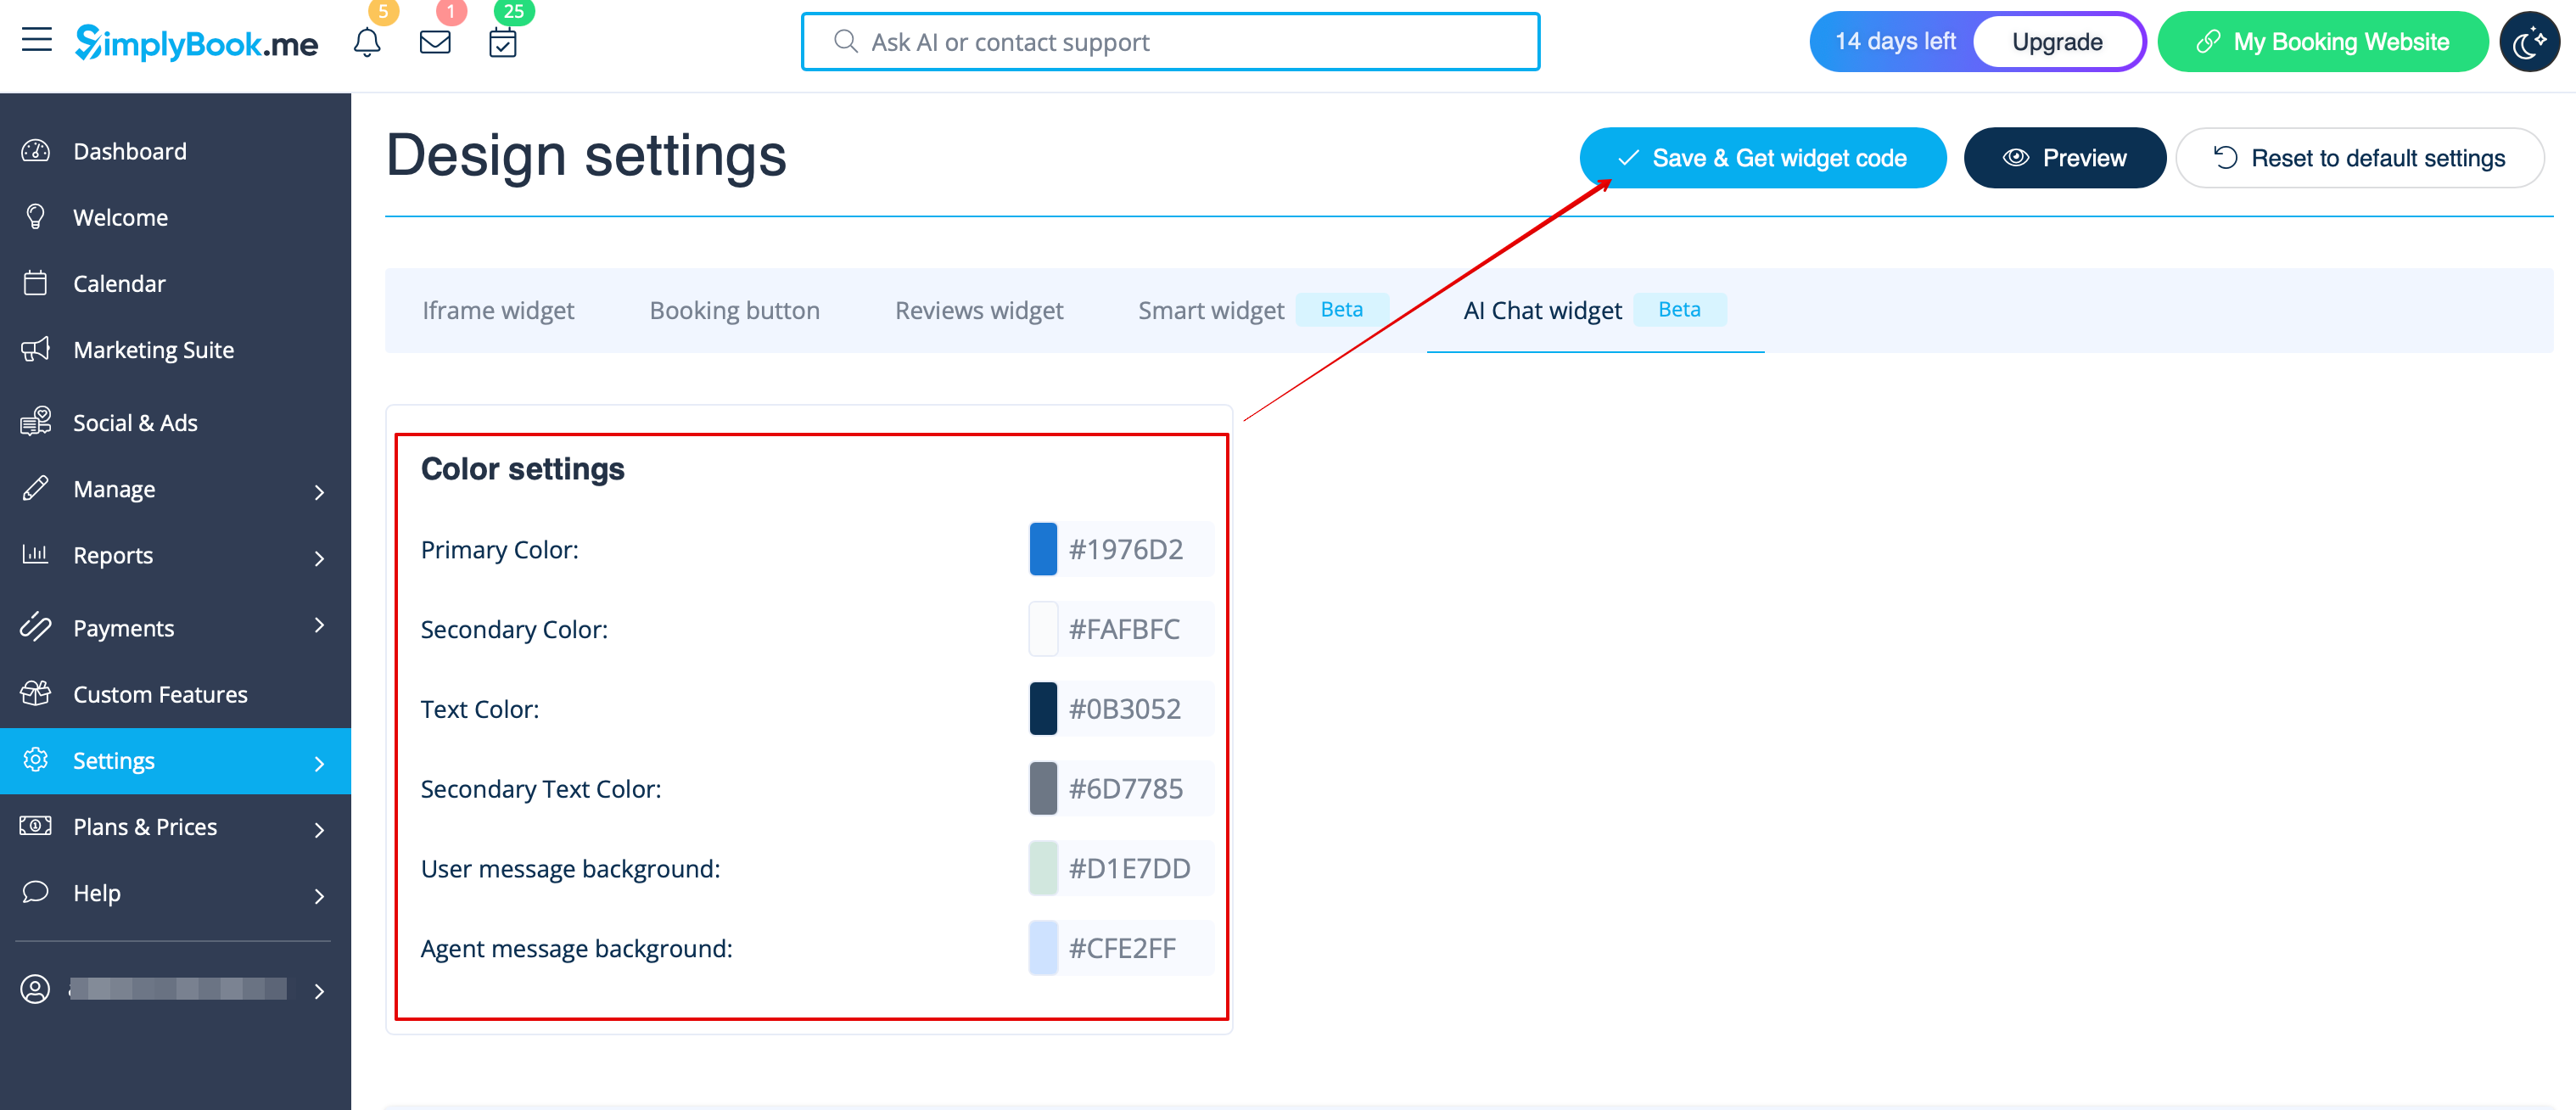
2. | 2. Om du har en egen webbplats kan du lägga till AI-bokningswidgeten där. Gå helt enkelt till ‘’’Widgetinställningar’’’, välj önskade färger och klicka på ”Spara & hämta widgetfärg” för att generera widgetkoden. | ||
[[File:Ai widget settings path.png|1200px|center|link=https://help.simplybook.me/images/d/d4/Ai_widget_settings_path.png]] | [[File:Ai widget settings path.png|1200px|center|link=https://help.simplybook.me/images/d/d4/Ai_widget_settings_path.png]] | ||
[[File:Ai widget settings view & get code.png|1200px|center|link=https://help.simplybook.me/images/4/43/Ai_widget_settings_view_%26_get_code.png]] | [[File:Ai widget settings view & get code.png|1200px|center|link=https://help.simplybook.me/images/4/43/Ai_widget_settings_view_%26_get_code.png]] | ||
<br><br> | <br><br> | ||
3. | 3. Gå till din webbplatsredigerare och klistra in koden på den sida där du vill att AI-bokningswidgeten ska vara tillgänglig. Klart. | ||
<br><br><br><br> | <br><br><br><br> | ||
==WhatsApp AI | ==WhatsApp AI-bokning== | ||
1. | 1. Öppna [https://developers.facebook.com/apps/ Facebook-utvecklare] och klicka på ”Create App”: | ||
[[File:Create sb app step 1.png|1200px|center|link=https://help.simplybook.me/images/9/9c/Create_sb_app_step_1.png]] | [[File:Create sb app step 1.png|1200px|center|link=https://help.simplybook.me/images/9/9c/Create_sb_app_step_1.png]] | ||
<br><br> | <br><br> | ||
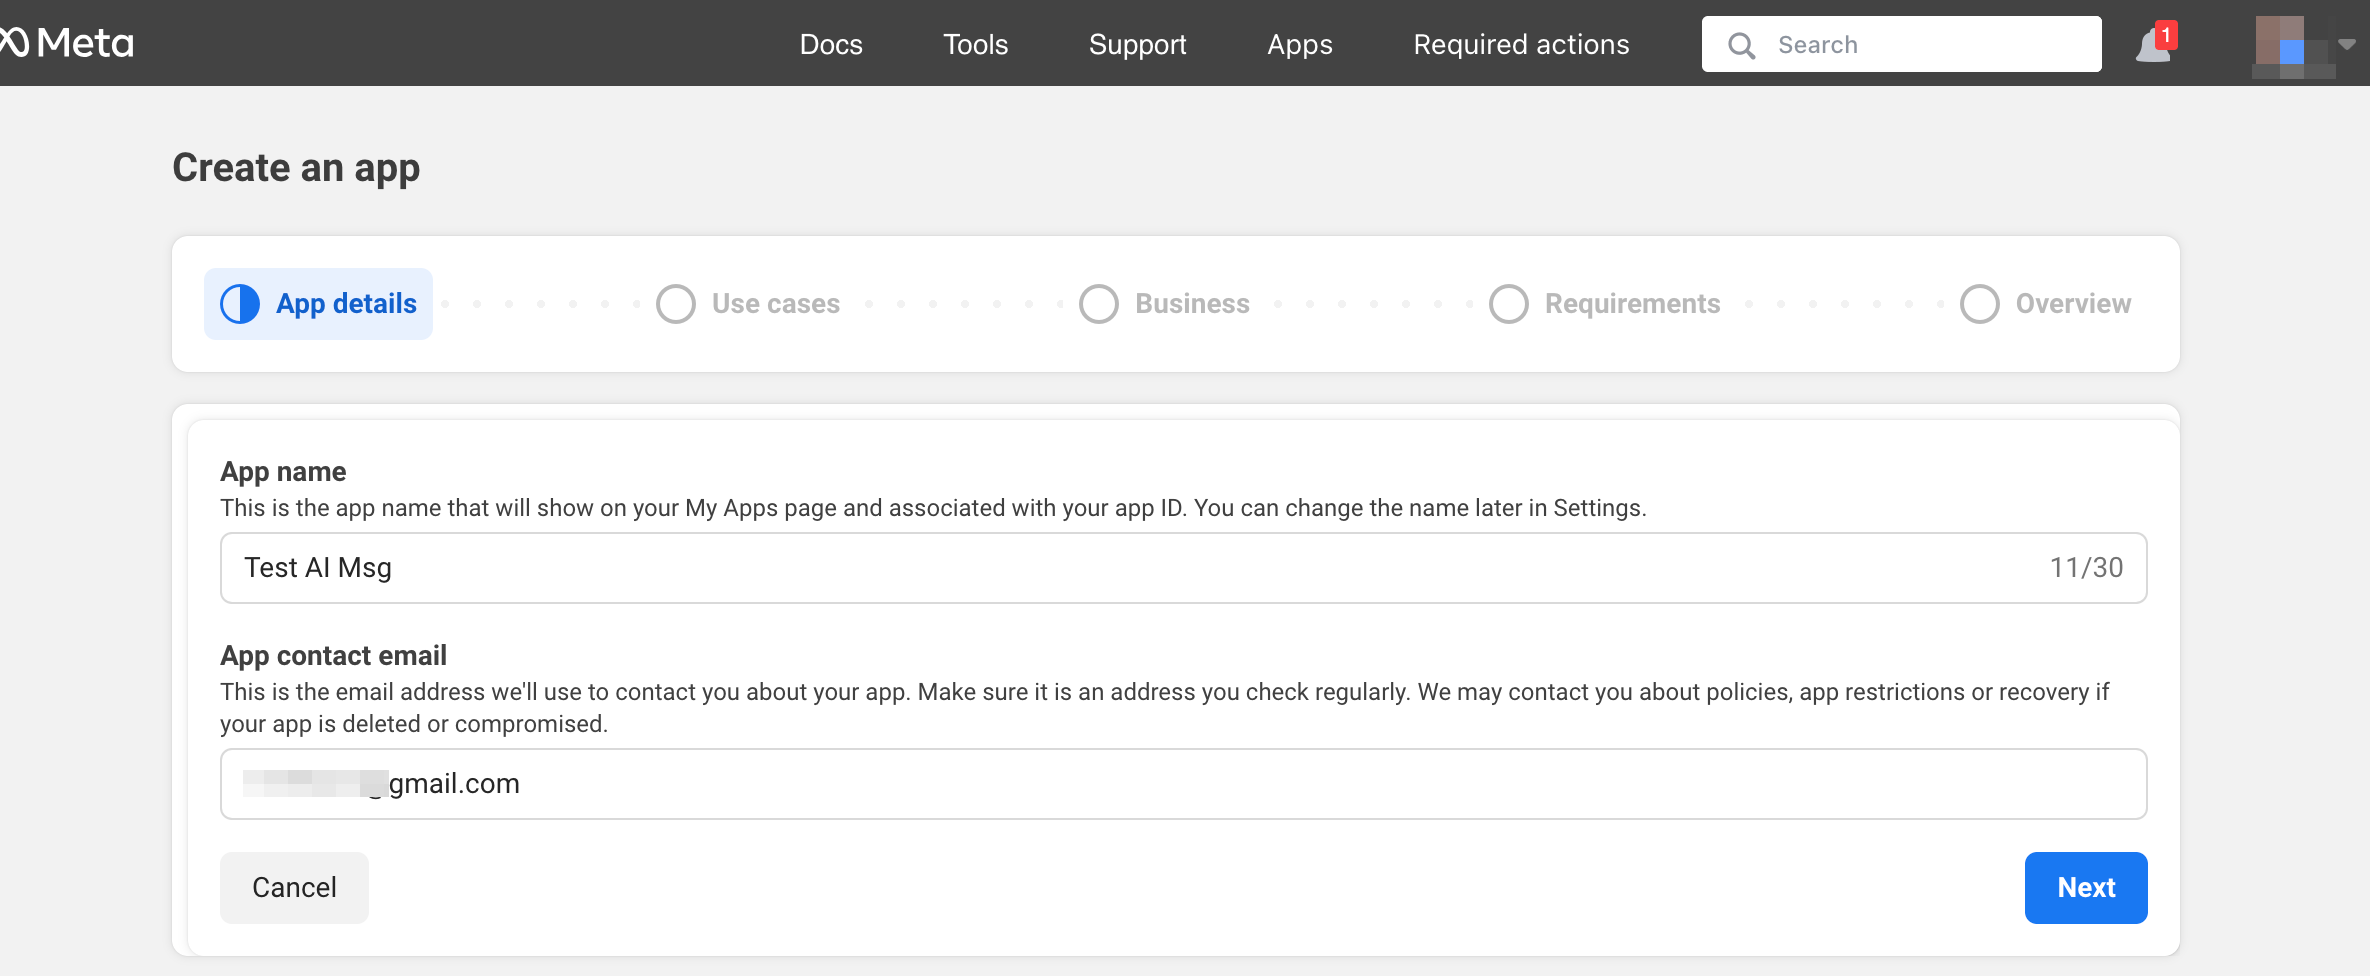
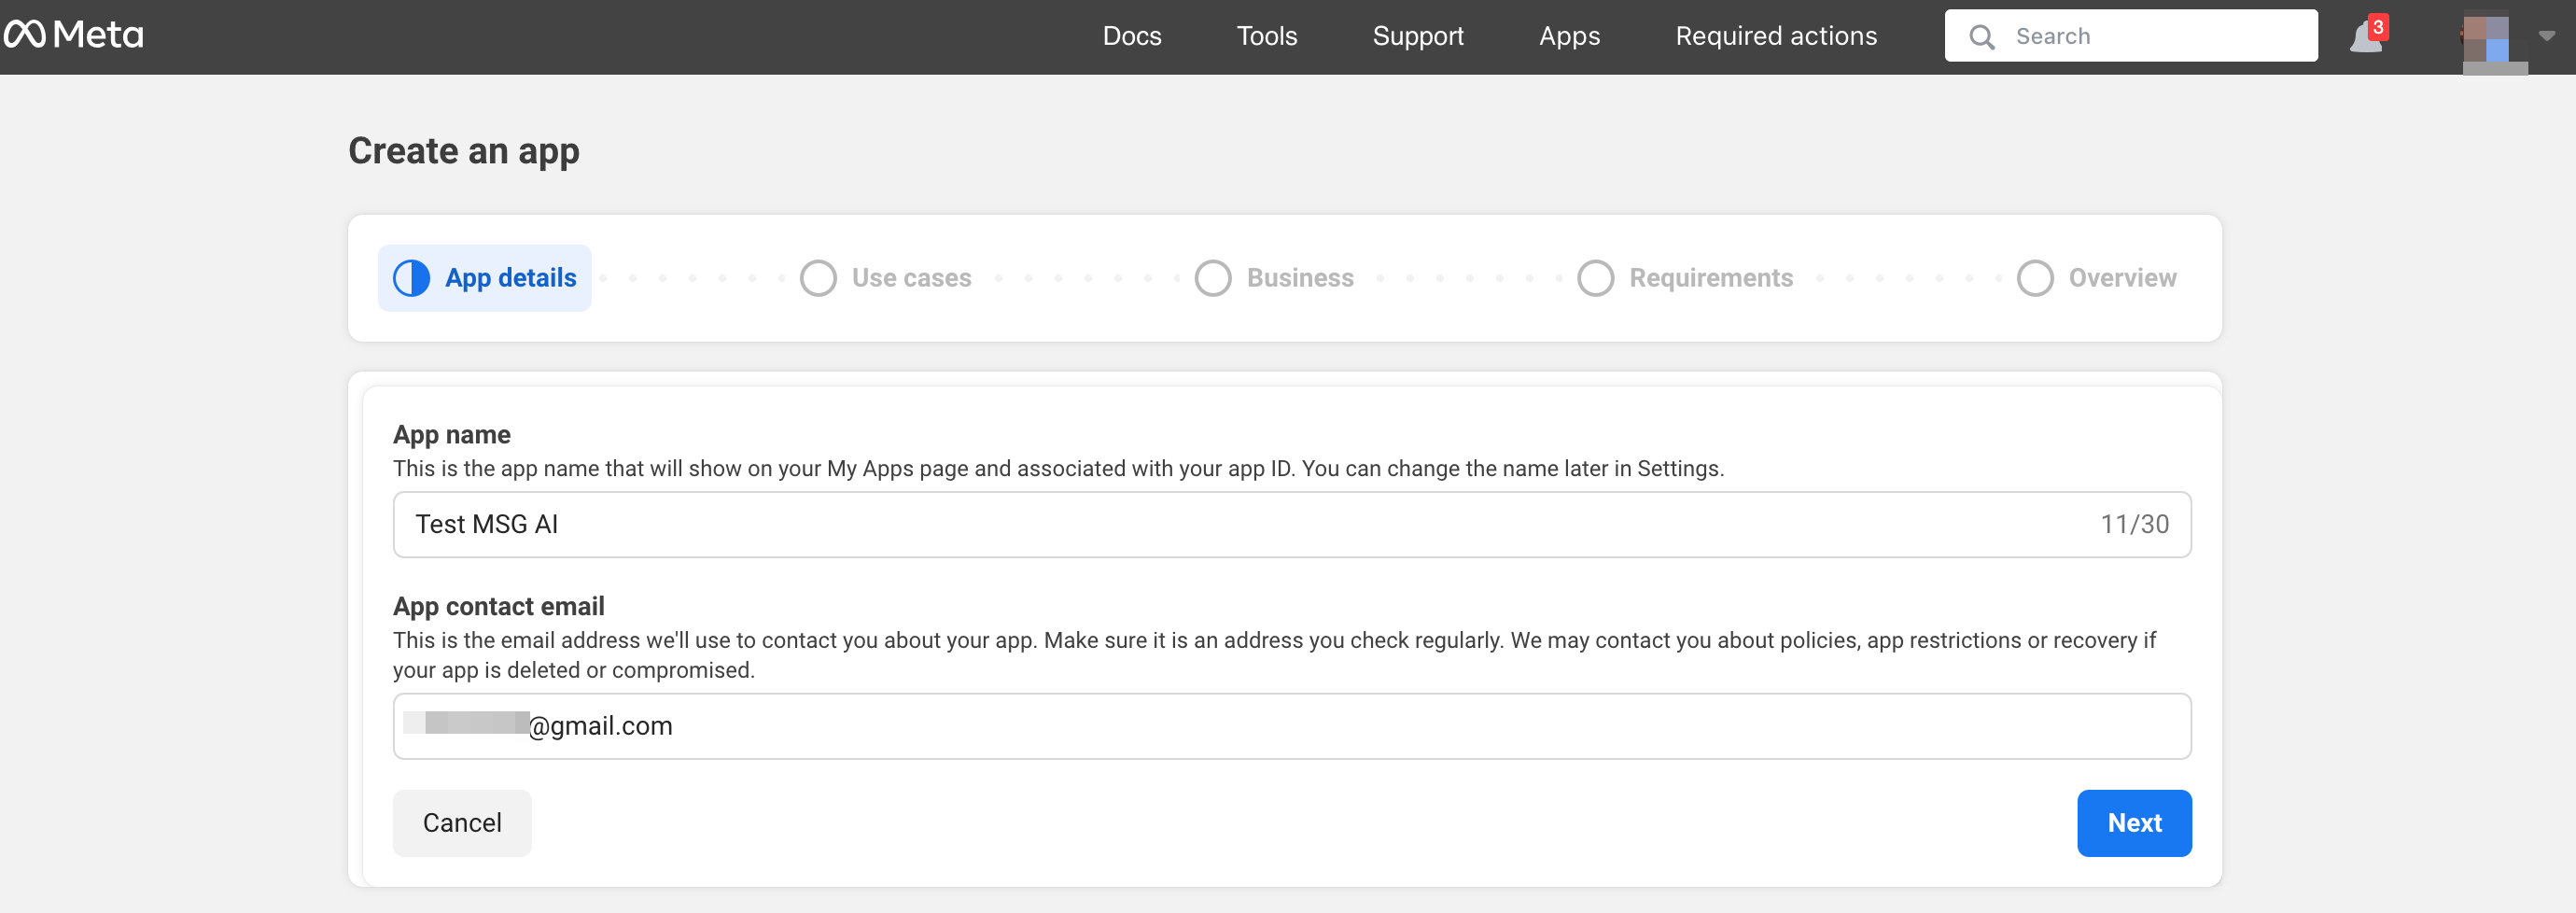
2. | 2. Ange önskade appuppgifter: | ||
[[File:Add app name step2.png|1200px|center|link=https://help.simplybook.me/images/d/db/Add_app_name_step2.png]] | [[File:Add app name step2.png|1200px|center|link=https://help.simplybook.me/images/d/db/Add_app_name_step2.png]] | ||
<br><br> | <br><br> | ||
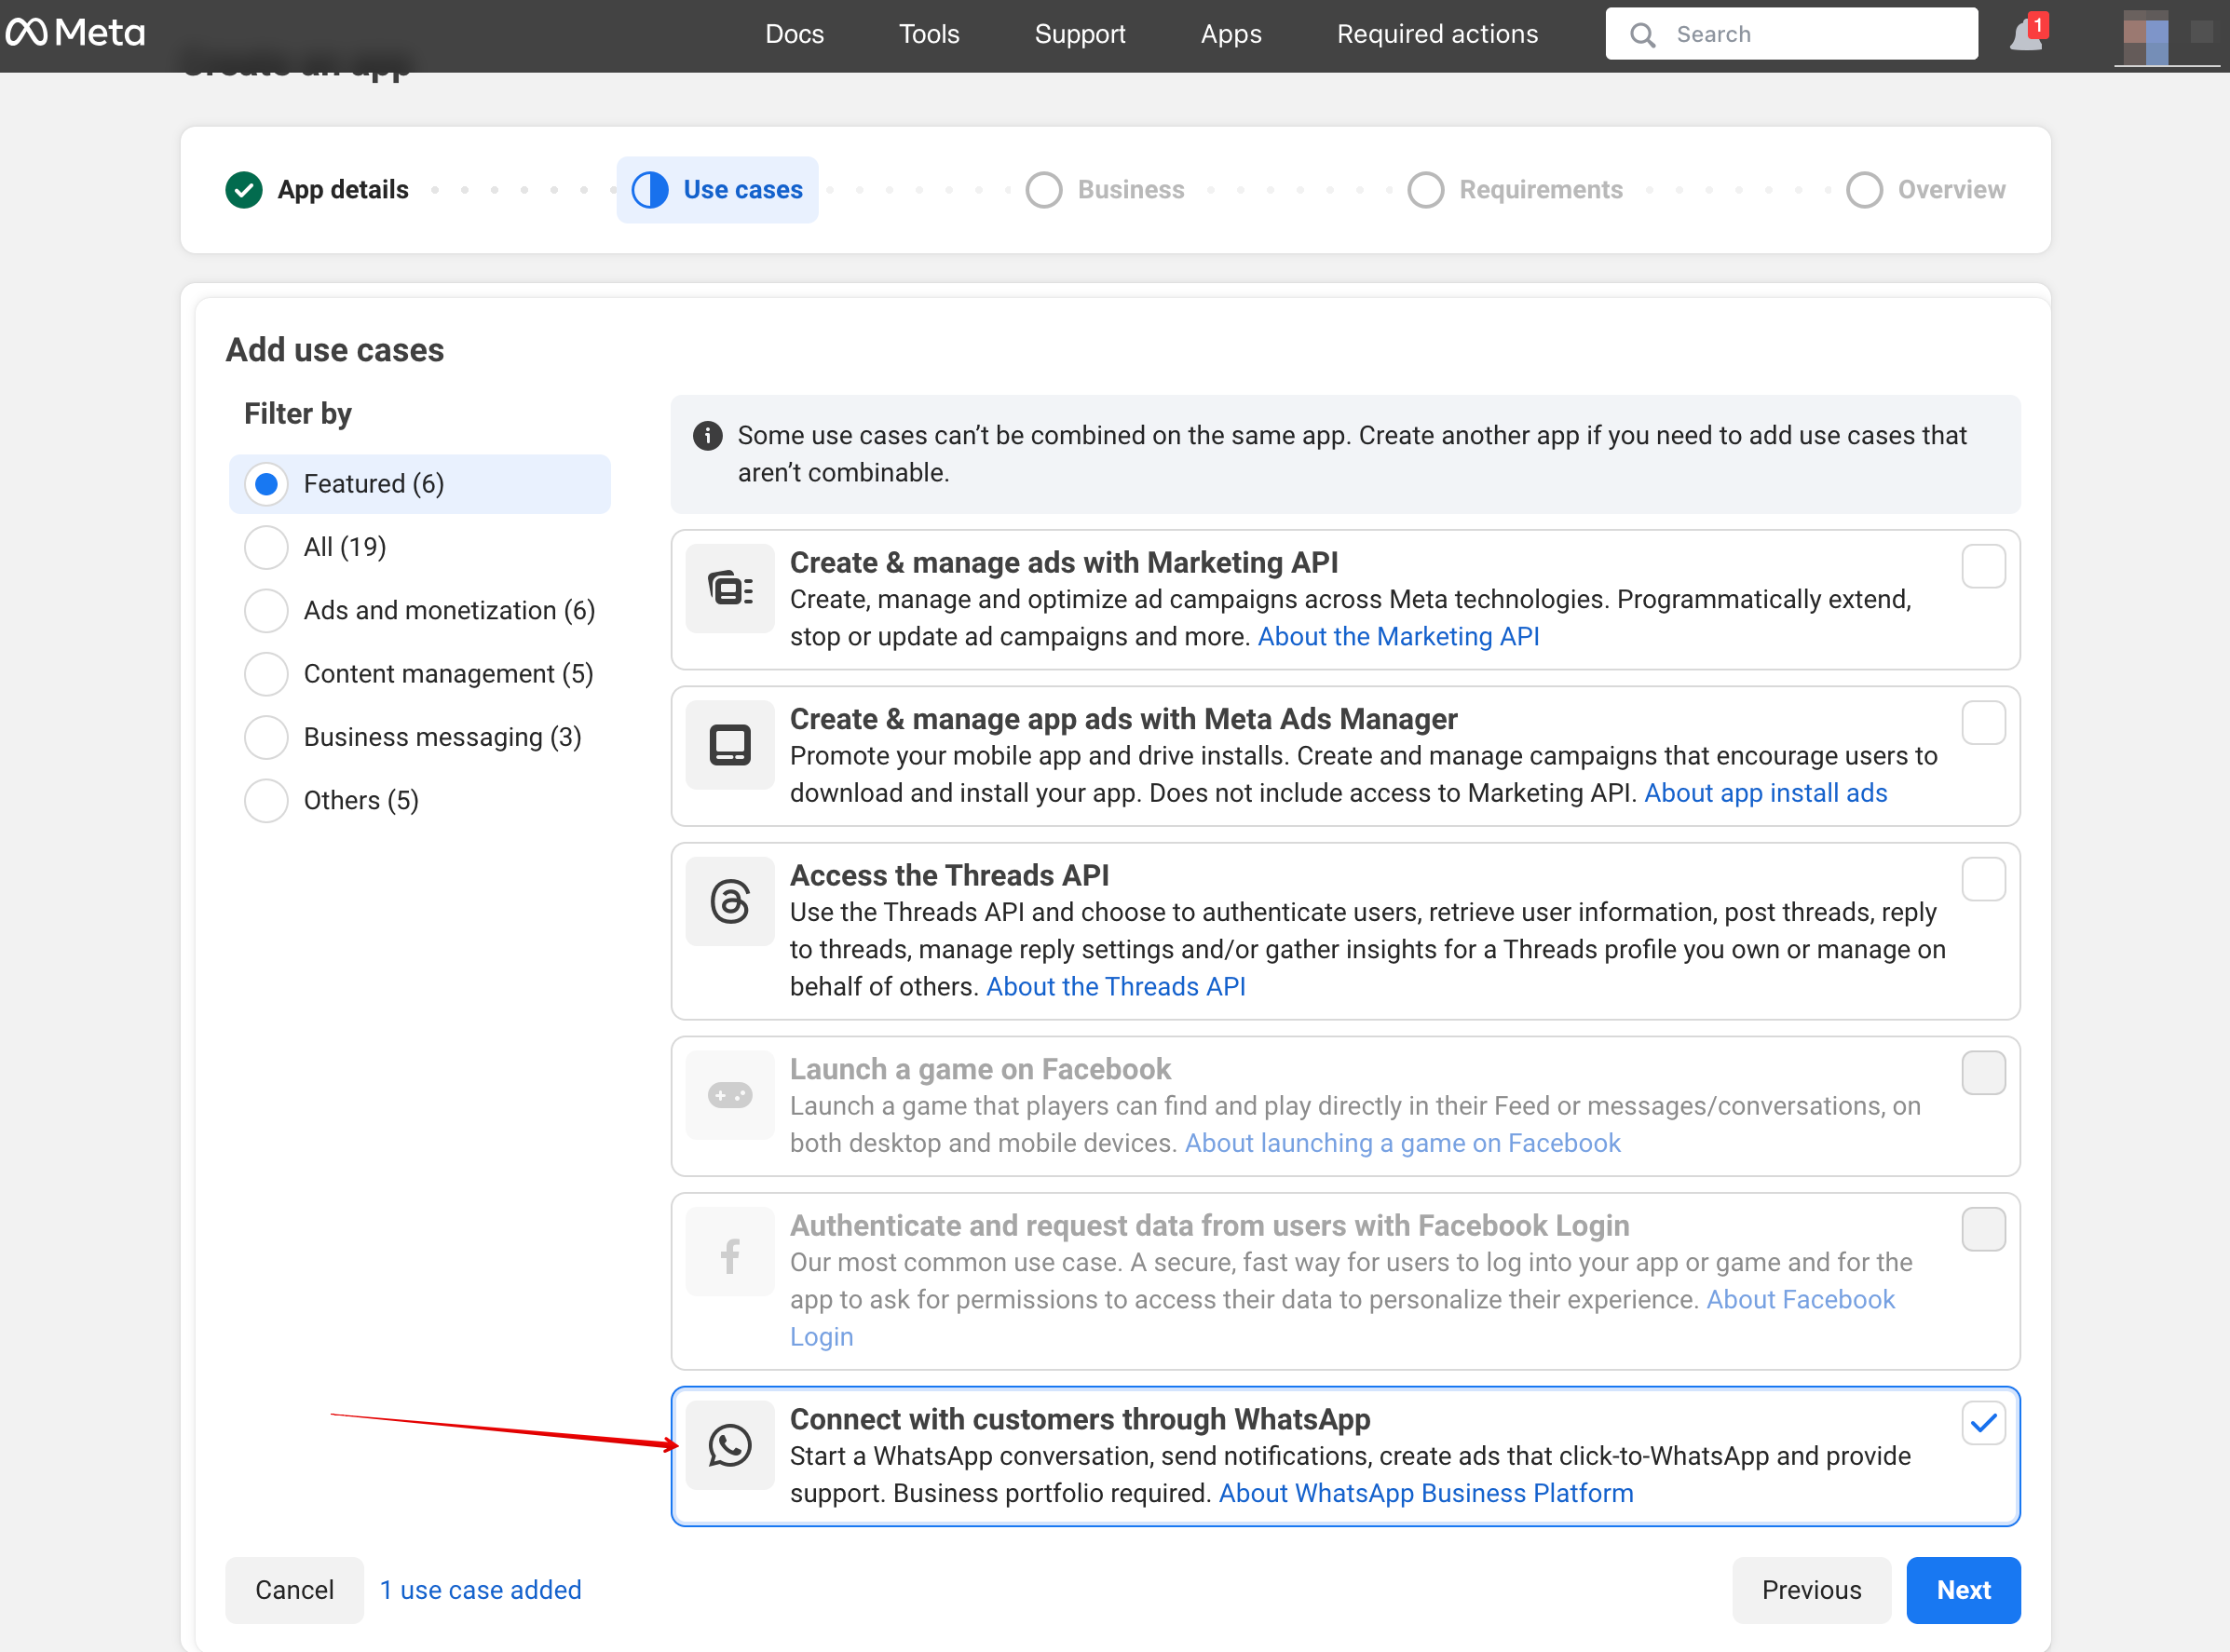
3. | 3. Välj användningsfallet WhatsApp: | ||
[[File:Connect through whatsapp step3.png|1200px|center|link=https://help.simplybook.me/images/8/8a/Connect_through_whatsapp_step3.png]] | [[File:Connect through whatsapp step3.png|1200px|center|link=https://help.simplybook.me/images/8/8a/Connect_through_whatsapp_step3.png]] | ||
<br><br> | <br><br> | ||
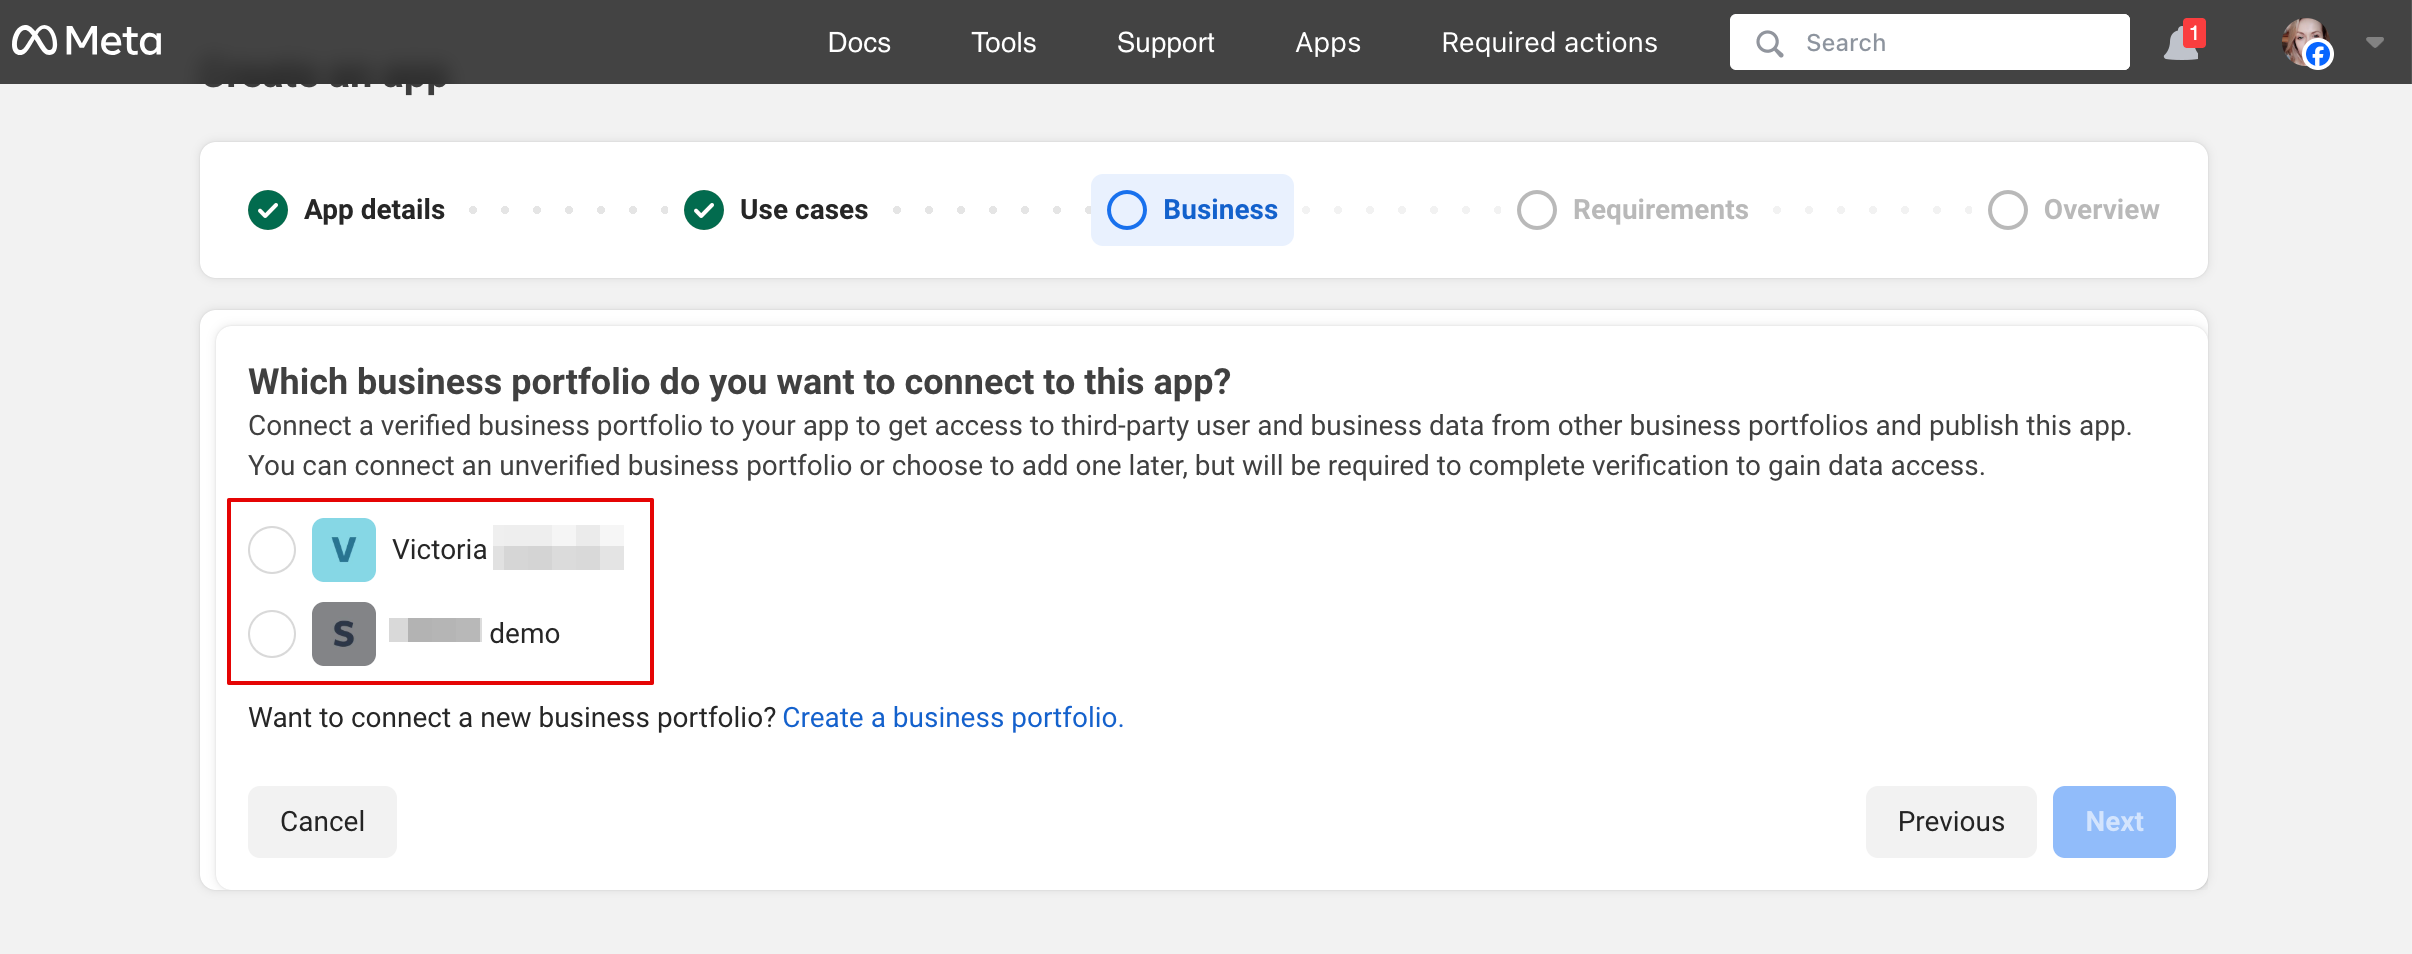
4. | 4. Välj företagsprofil eller skapa en ny. | ||
[[File:Select or create business step 5.png|1200px|center|link=https://help.simplybook.me/images/1/18/Select_or_create_business_step_5.png]] | [[File:Select or create business step 5.png|1200px|center|link=https://help.simplybook.me/images/1/18/Select_or_create_business_step_5.png]] | ||
<br><br> | <br><br> | ||
5. | 5. Klicka på ”Next” för att fortsätta: | ||
<br><br> | <br><br> | ||
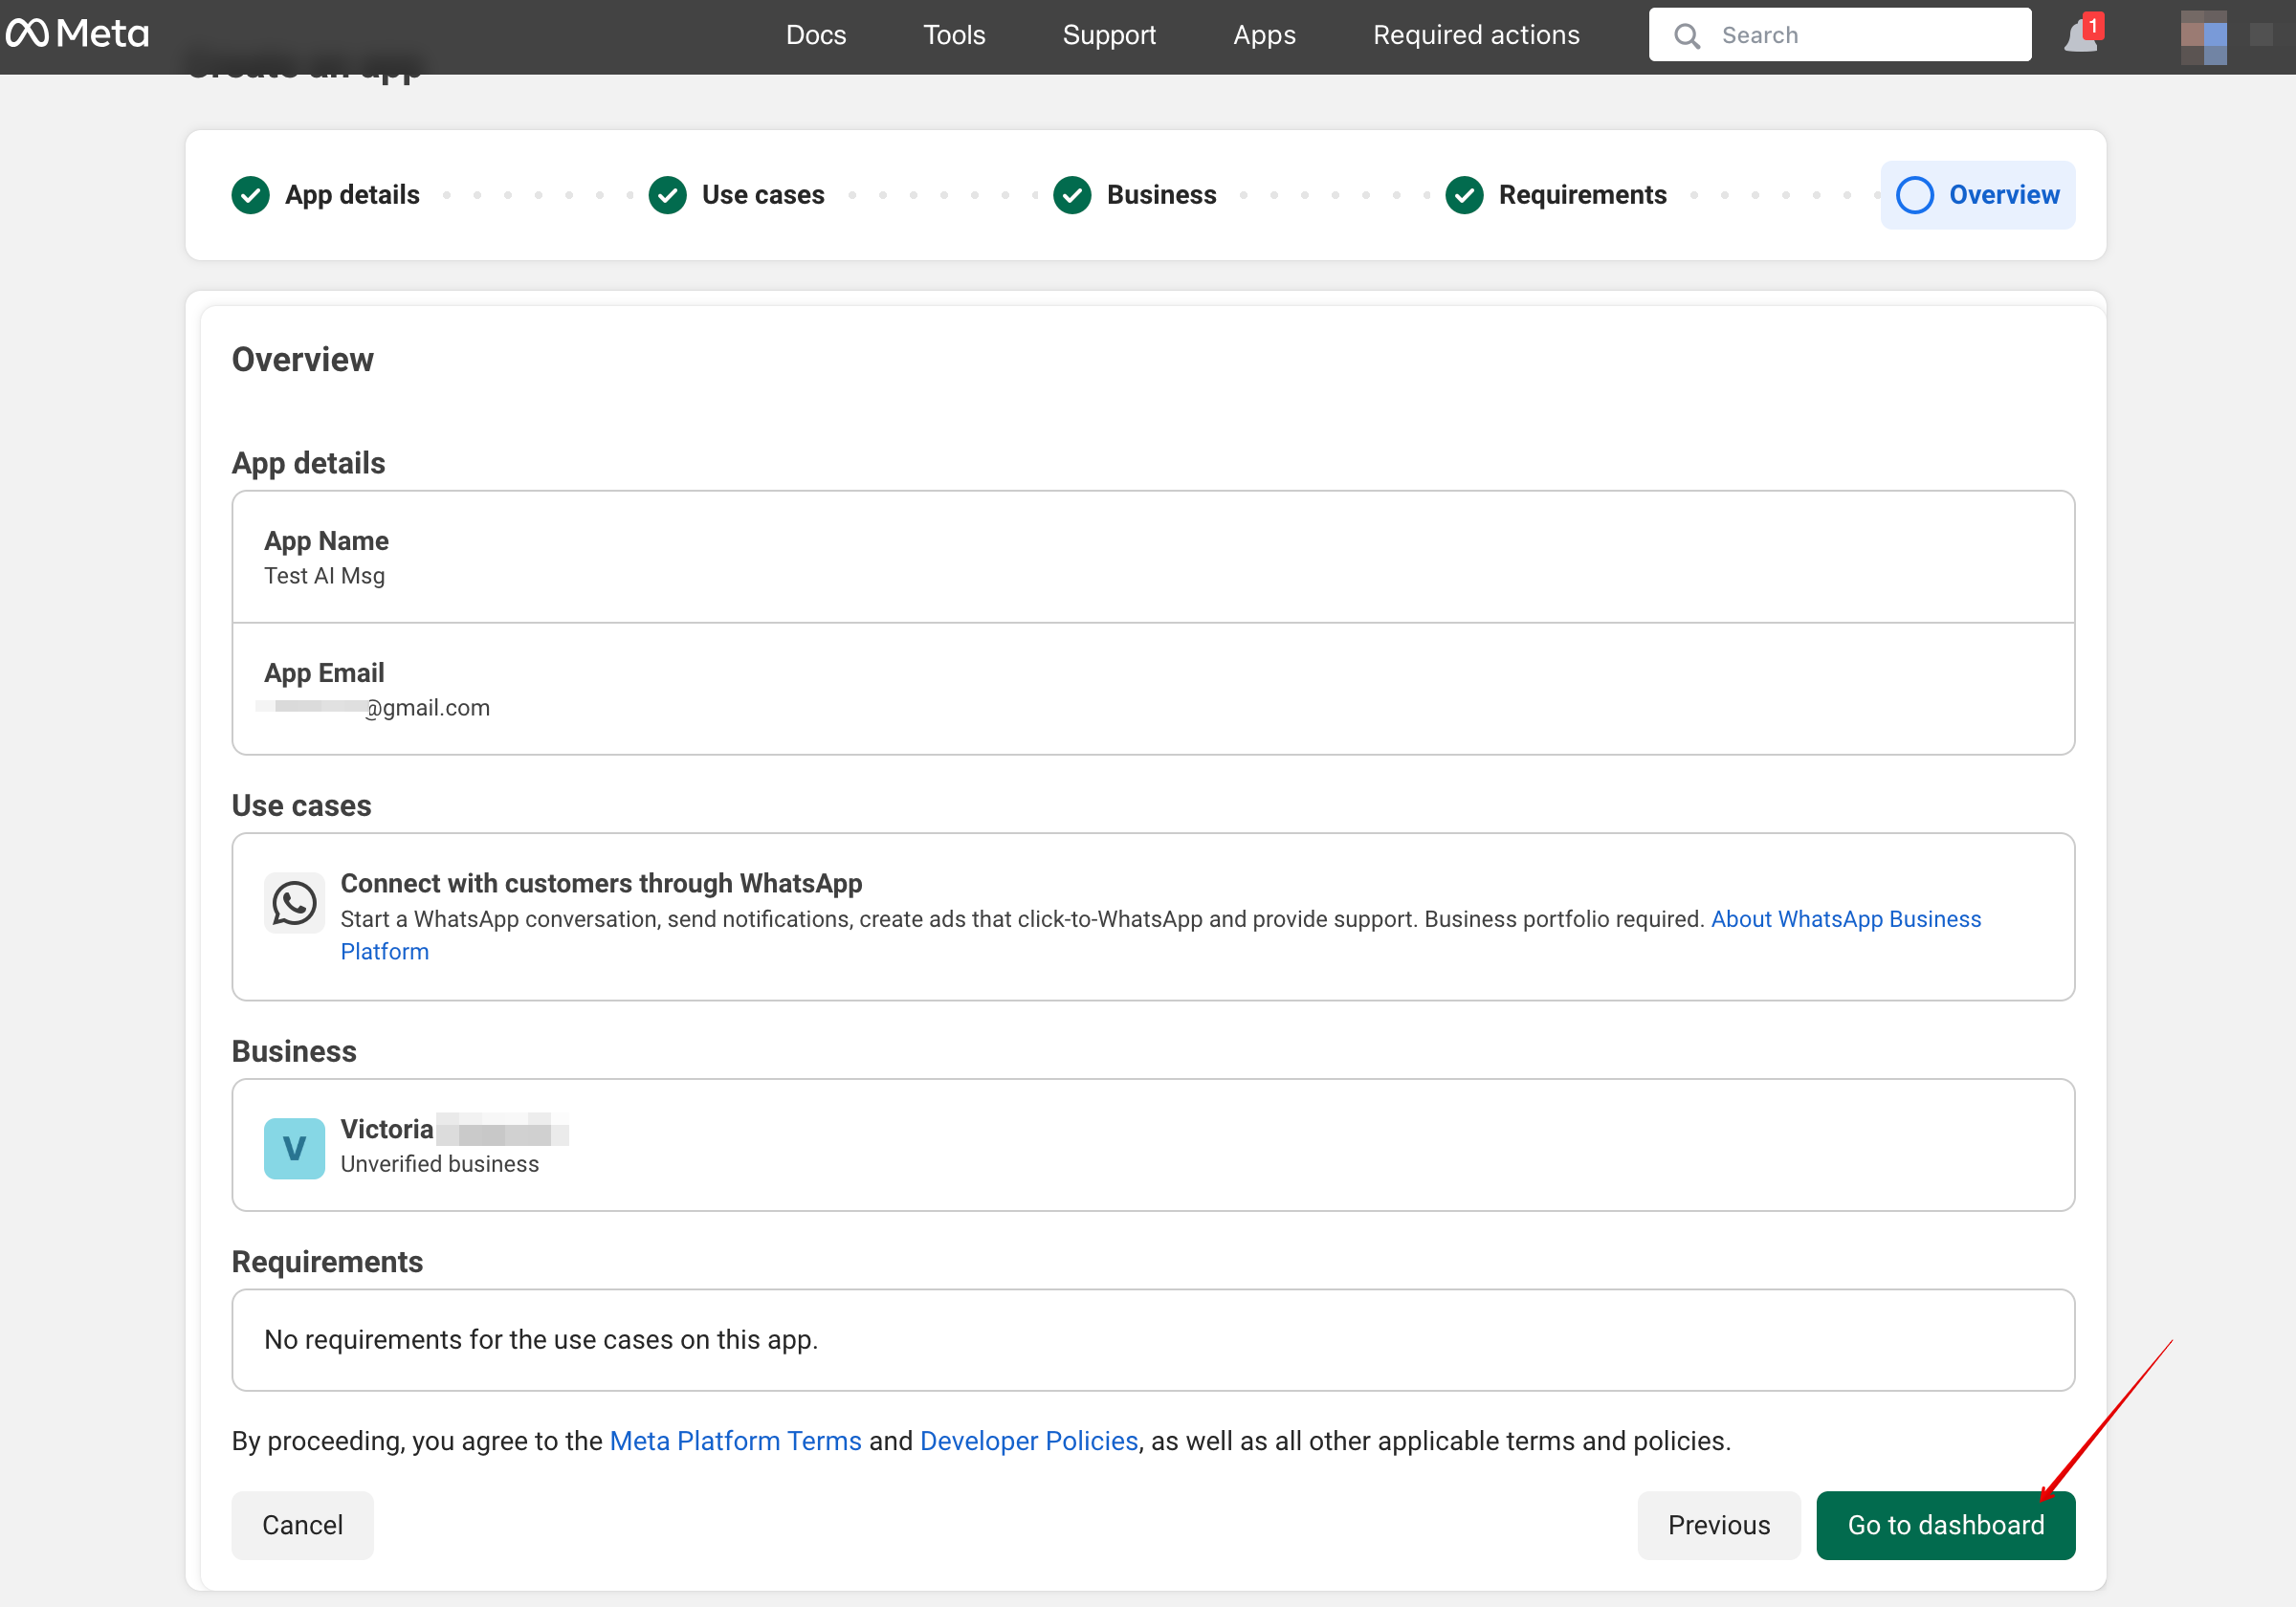
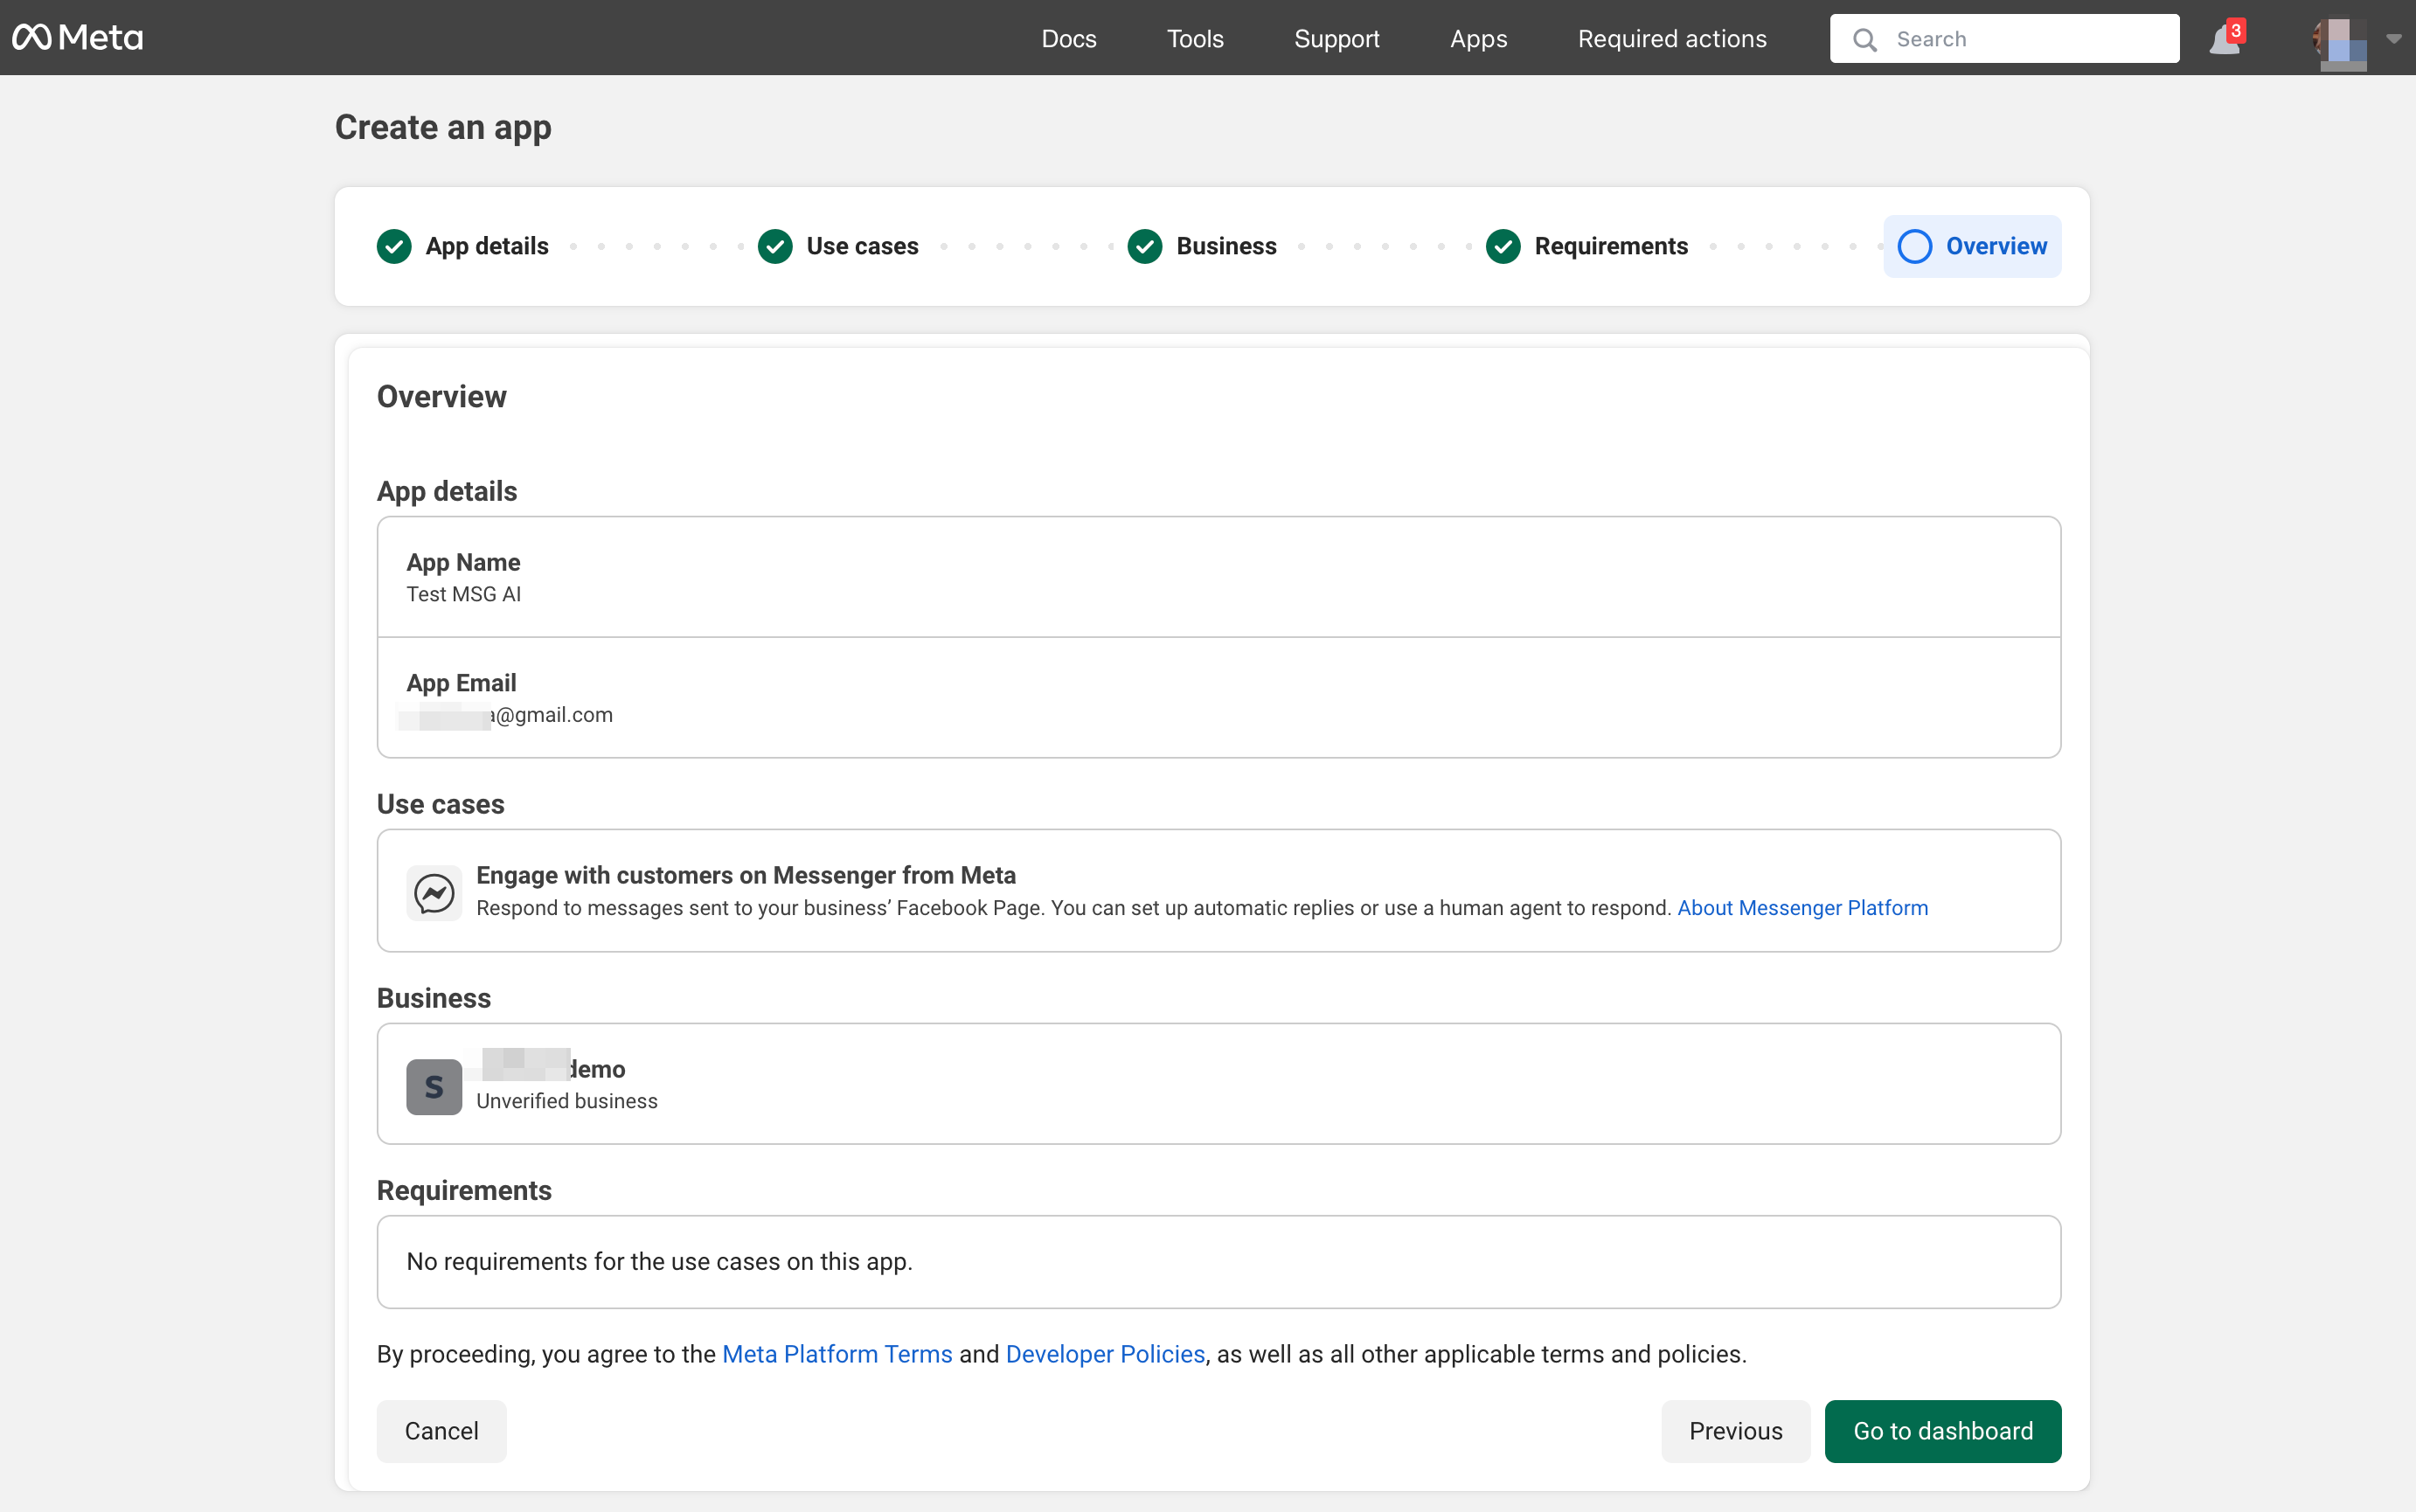
6. | 6. Granska uppgifterna och klicka på ”Go to dashboard”: | ||
[[File:Go to dashboard step 6.png|1200px|center|link=https://help.simplybook.me/images/f/fc/Go_to_dashboard_step_6.png]] | [[File:Go to dashboard step 6.png|1200px|center|link=https://help.simplybook.me/images/f/fc/Go_to_dashboard_step_6.png]] | ||
<br><br> | <br><br> | ||
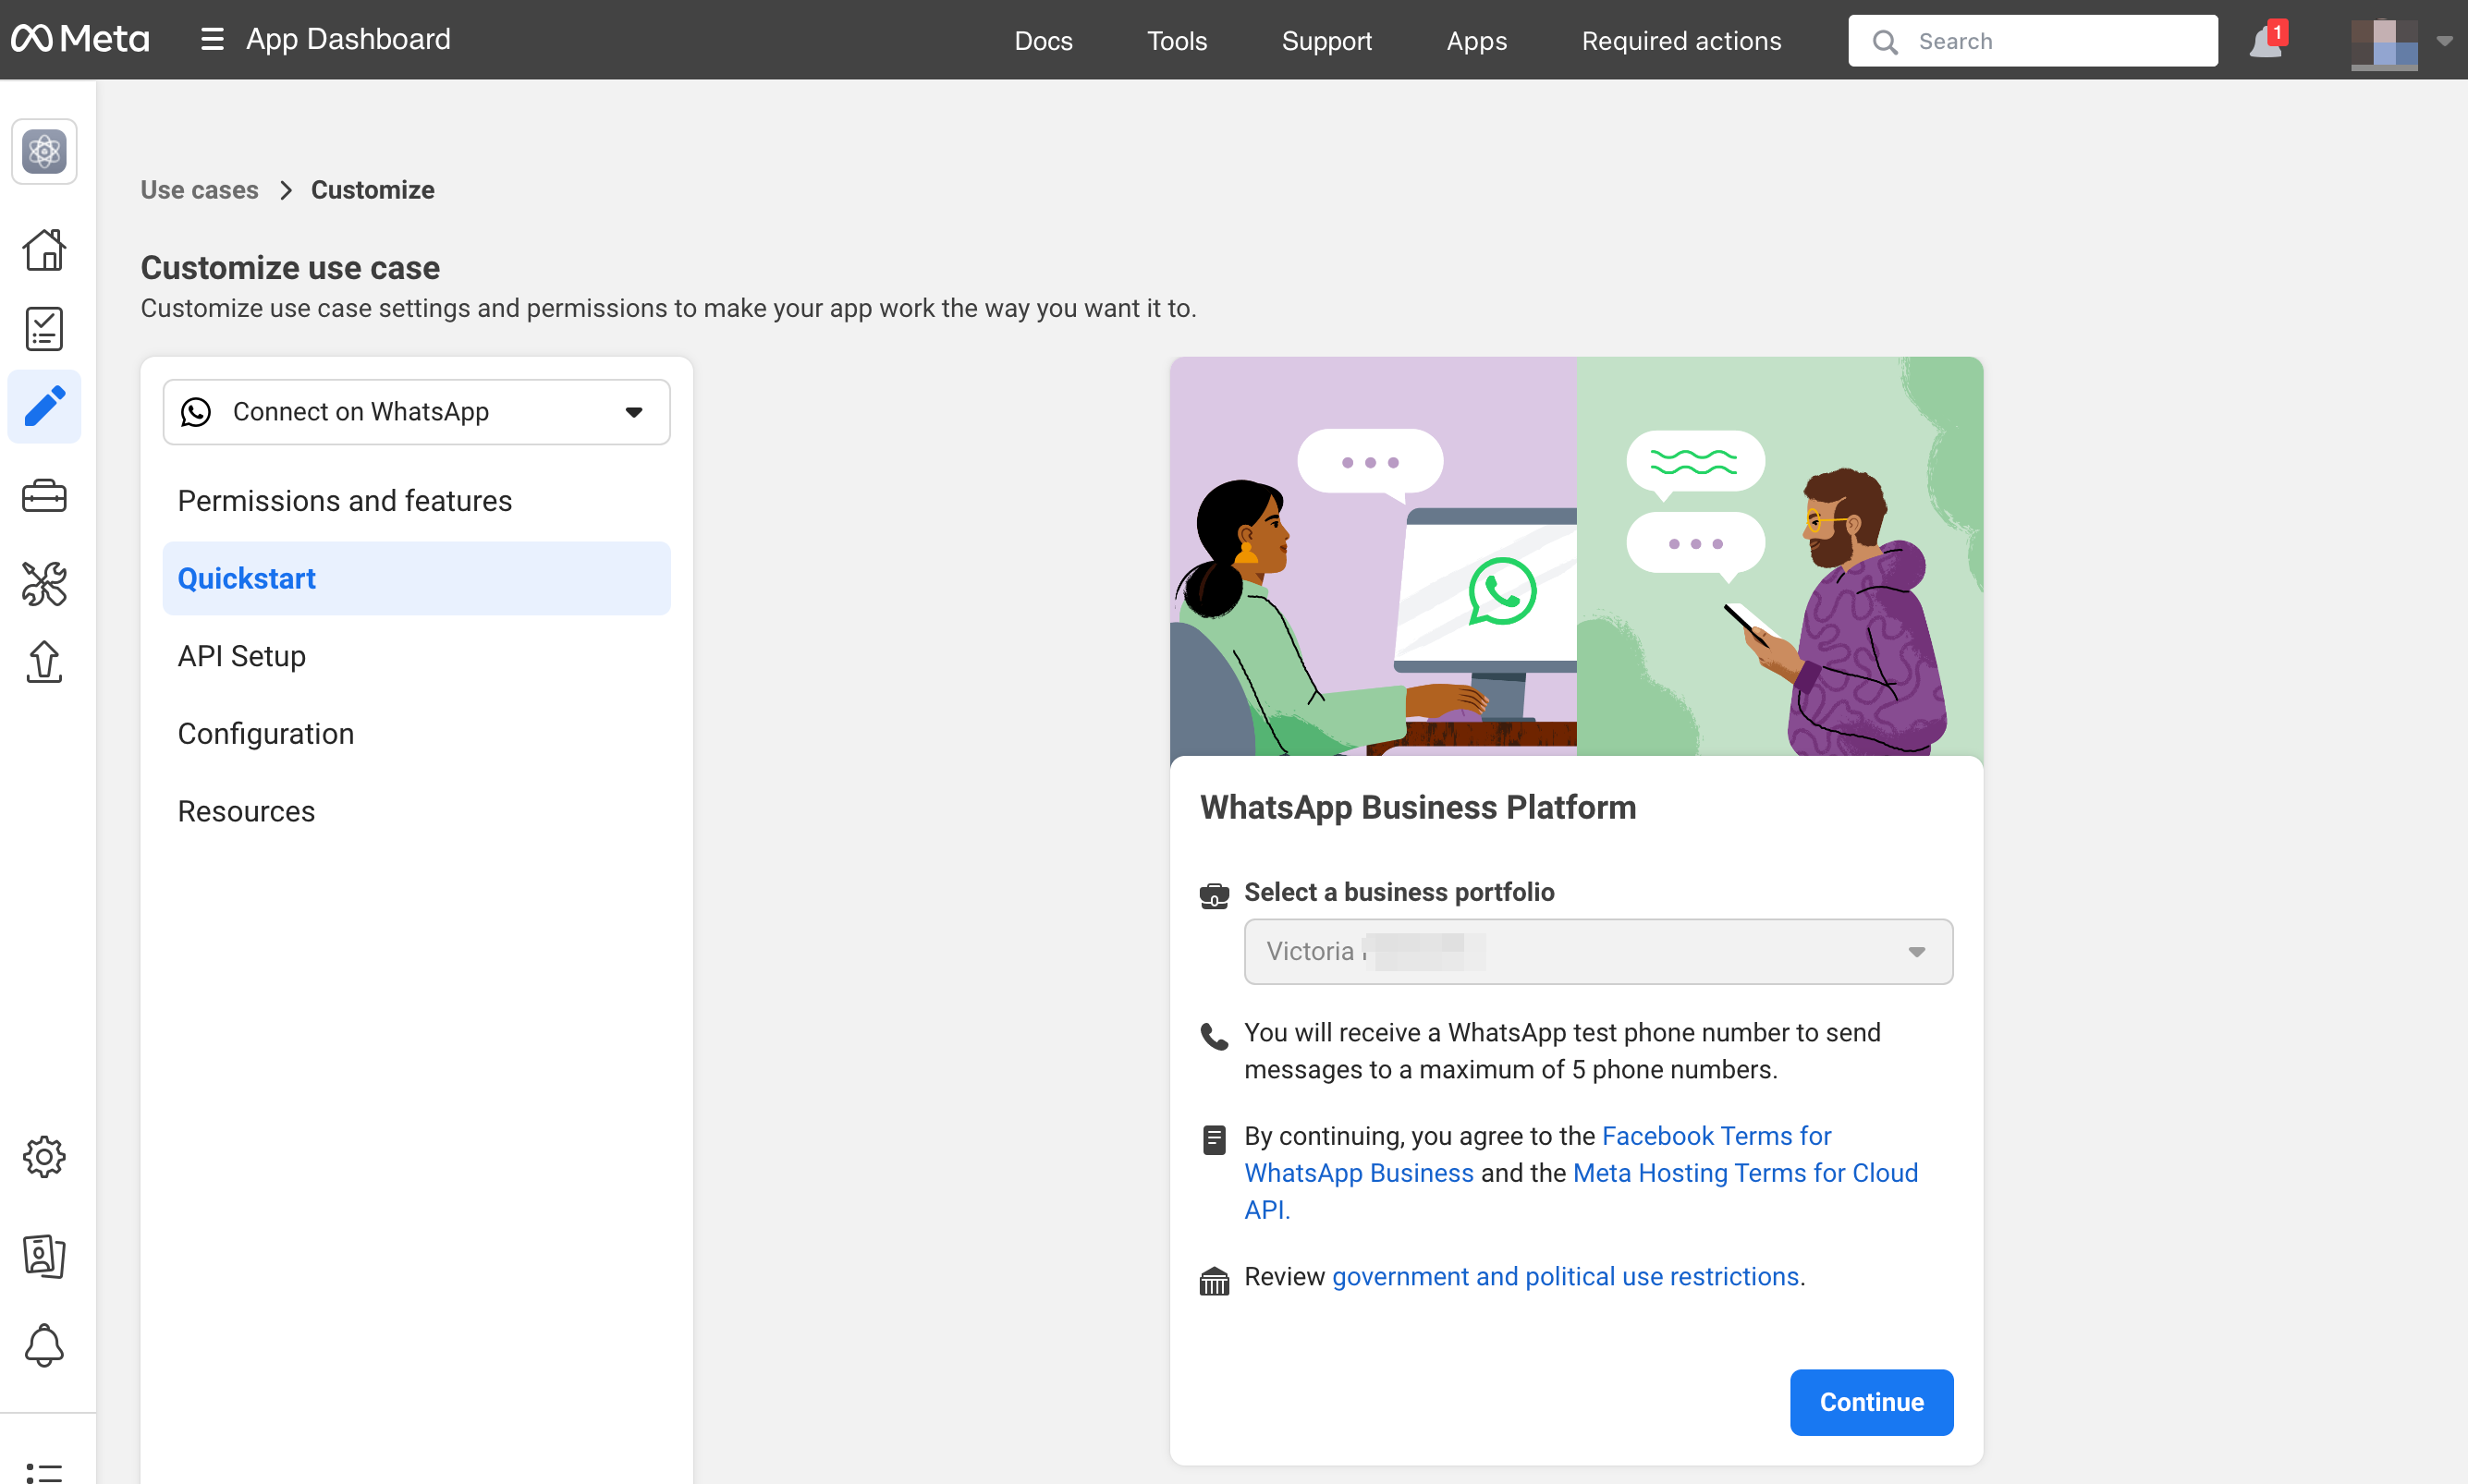
7. | 7. Välj fliken ”Use cases” och klicka på knappen ”Customize”: | ||
[[File:User cases customize.png|1200px|center|link=https://help.simplybook.me/images/a/a7/User_cases_customize.png]] | [[File:User cases customize.png|1200px|center|link=https://help.simplybook.me/images/a/a7/User_cases_customize.png]] | ||
<br><br> | <br><br> | ||
8. | 8. Acceptera användarvillkoren och bekräfta företagsprofilen: | ||
[[File:Accept the terms and confirm profile.png|1200px|center|link=https://help.simplybook.me/images/8/8c/Accept_the_terms_and_confirm_profile.png]] | [[File:Accept the terms and confirm profile.png|1200px|center|link=https://help.simplybook.me/images/8/8c/Accept_the_terms_and_confirm_profile.png]] | ||
<br><br> | <br><br> | ||
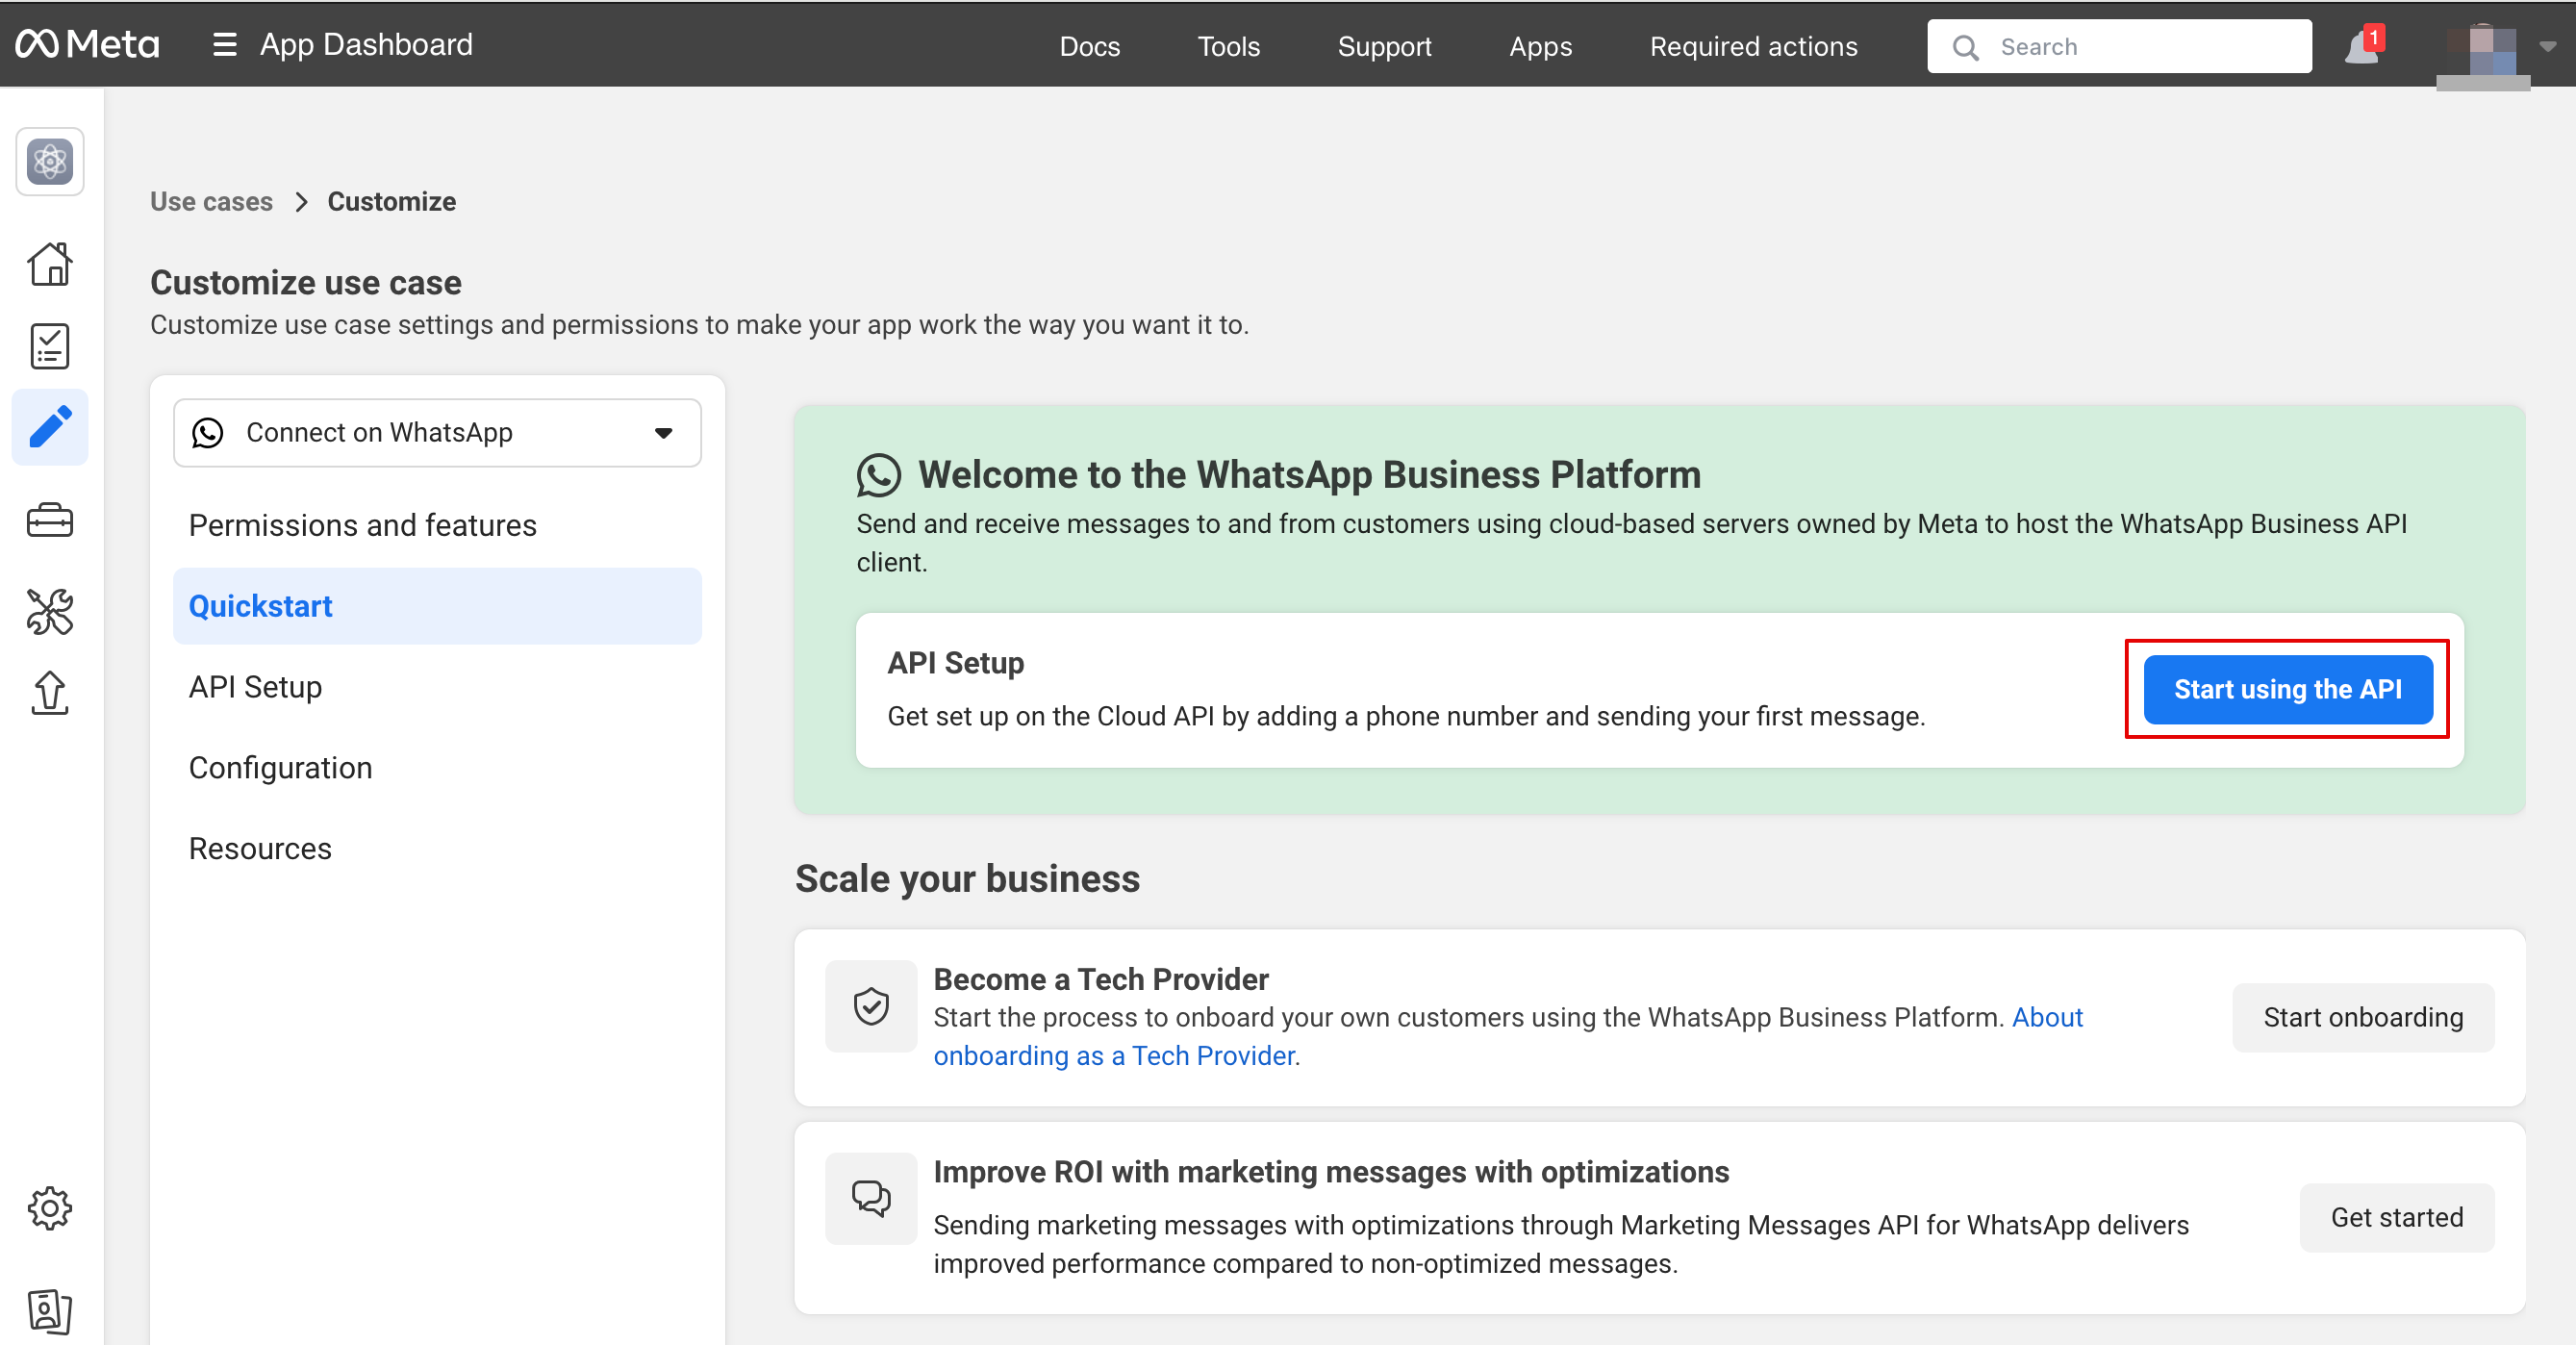
9. | 9. Välj ”Start using the API”: | ||
[[File:Start using the api.png|1200px|center|link=https://help.simplybook.me/images/1/11/Start_using_the_api.png]] | [[File:Start using the api.png|1200px|center|link=https://help.simplybook.me/images/1/11/Start_using_the_api.png]] | ||
<br><br> | <br><br> | ||
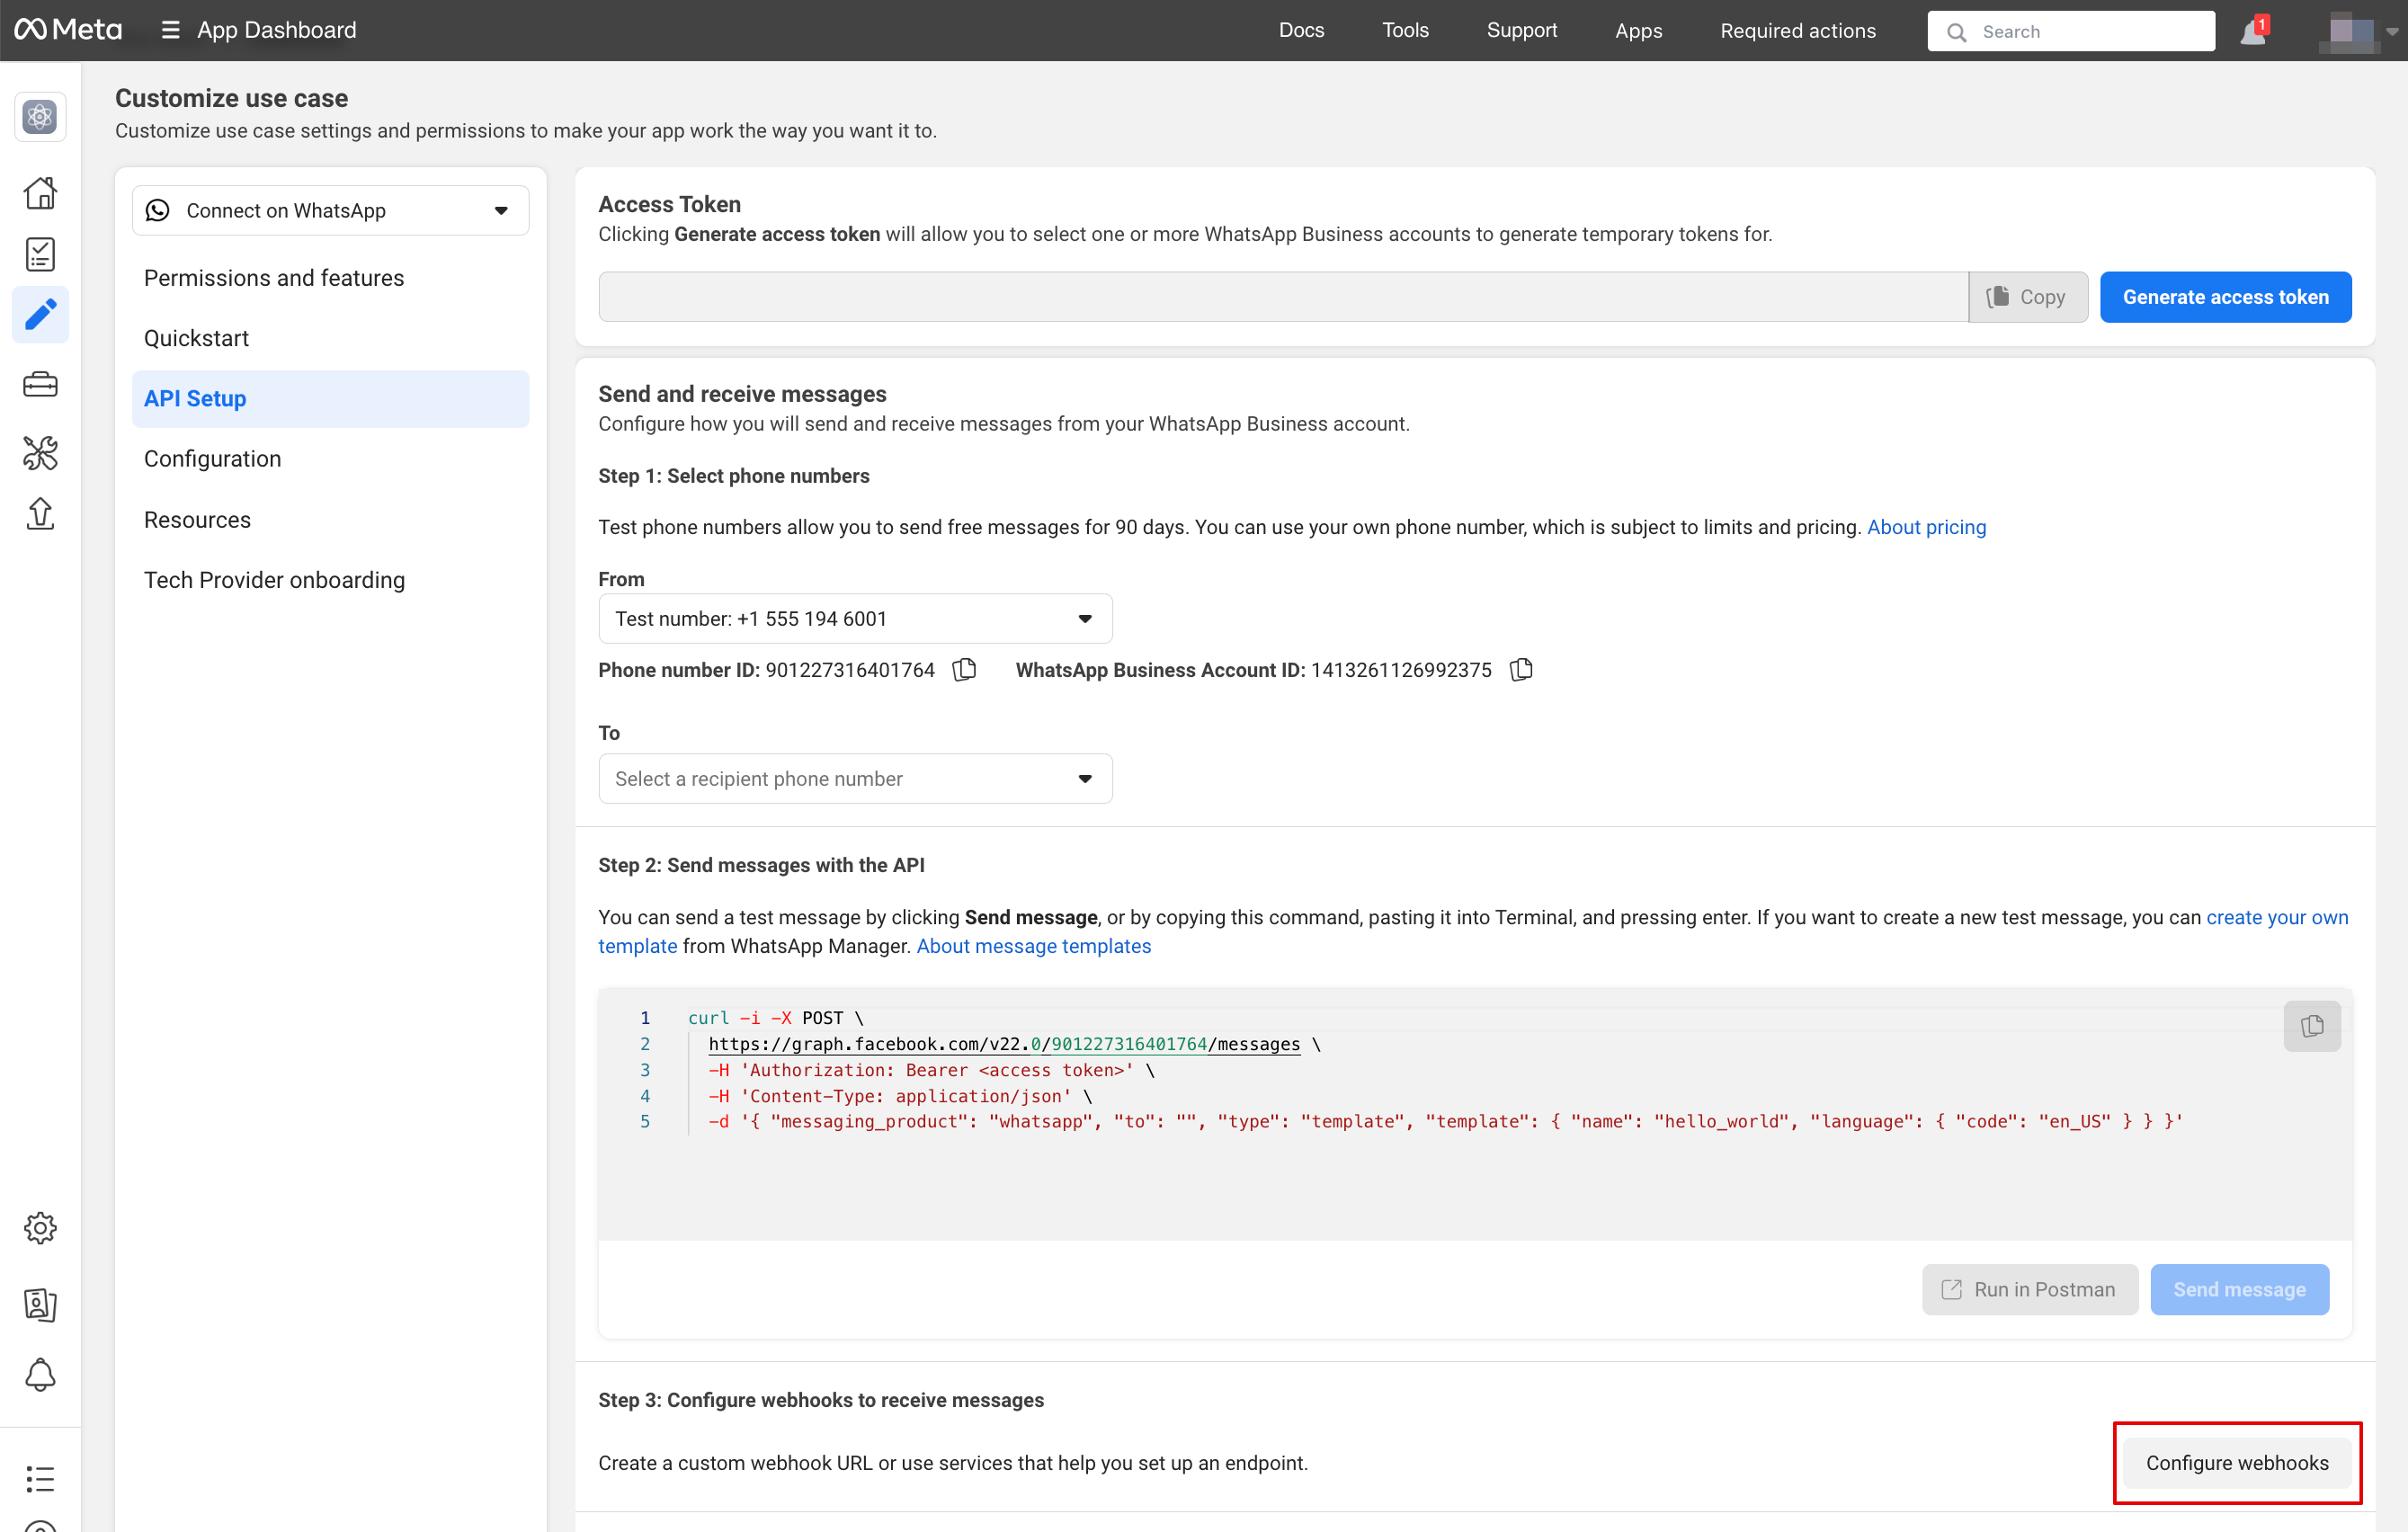
10. | 10. Gå sedan till ”Configure webhooks”: | ||
[[File:Configure webhooks.png|1200px|center|link=https://help.simplybook.me/images/b/bc/Configure_webhooks.png]] | [[File:Configure webhooks.png|1200px|center|link=https://help.simplybook.me/images/b/bc/Configure_webhooks.png]] | ||
<br><br> | <br><br> | ||
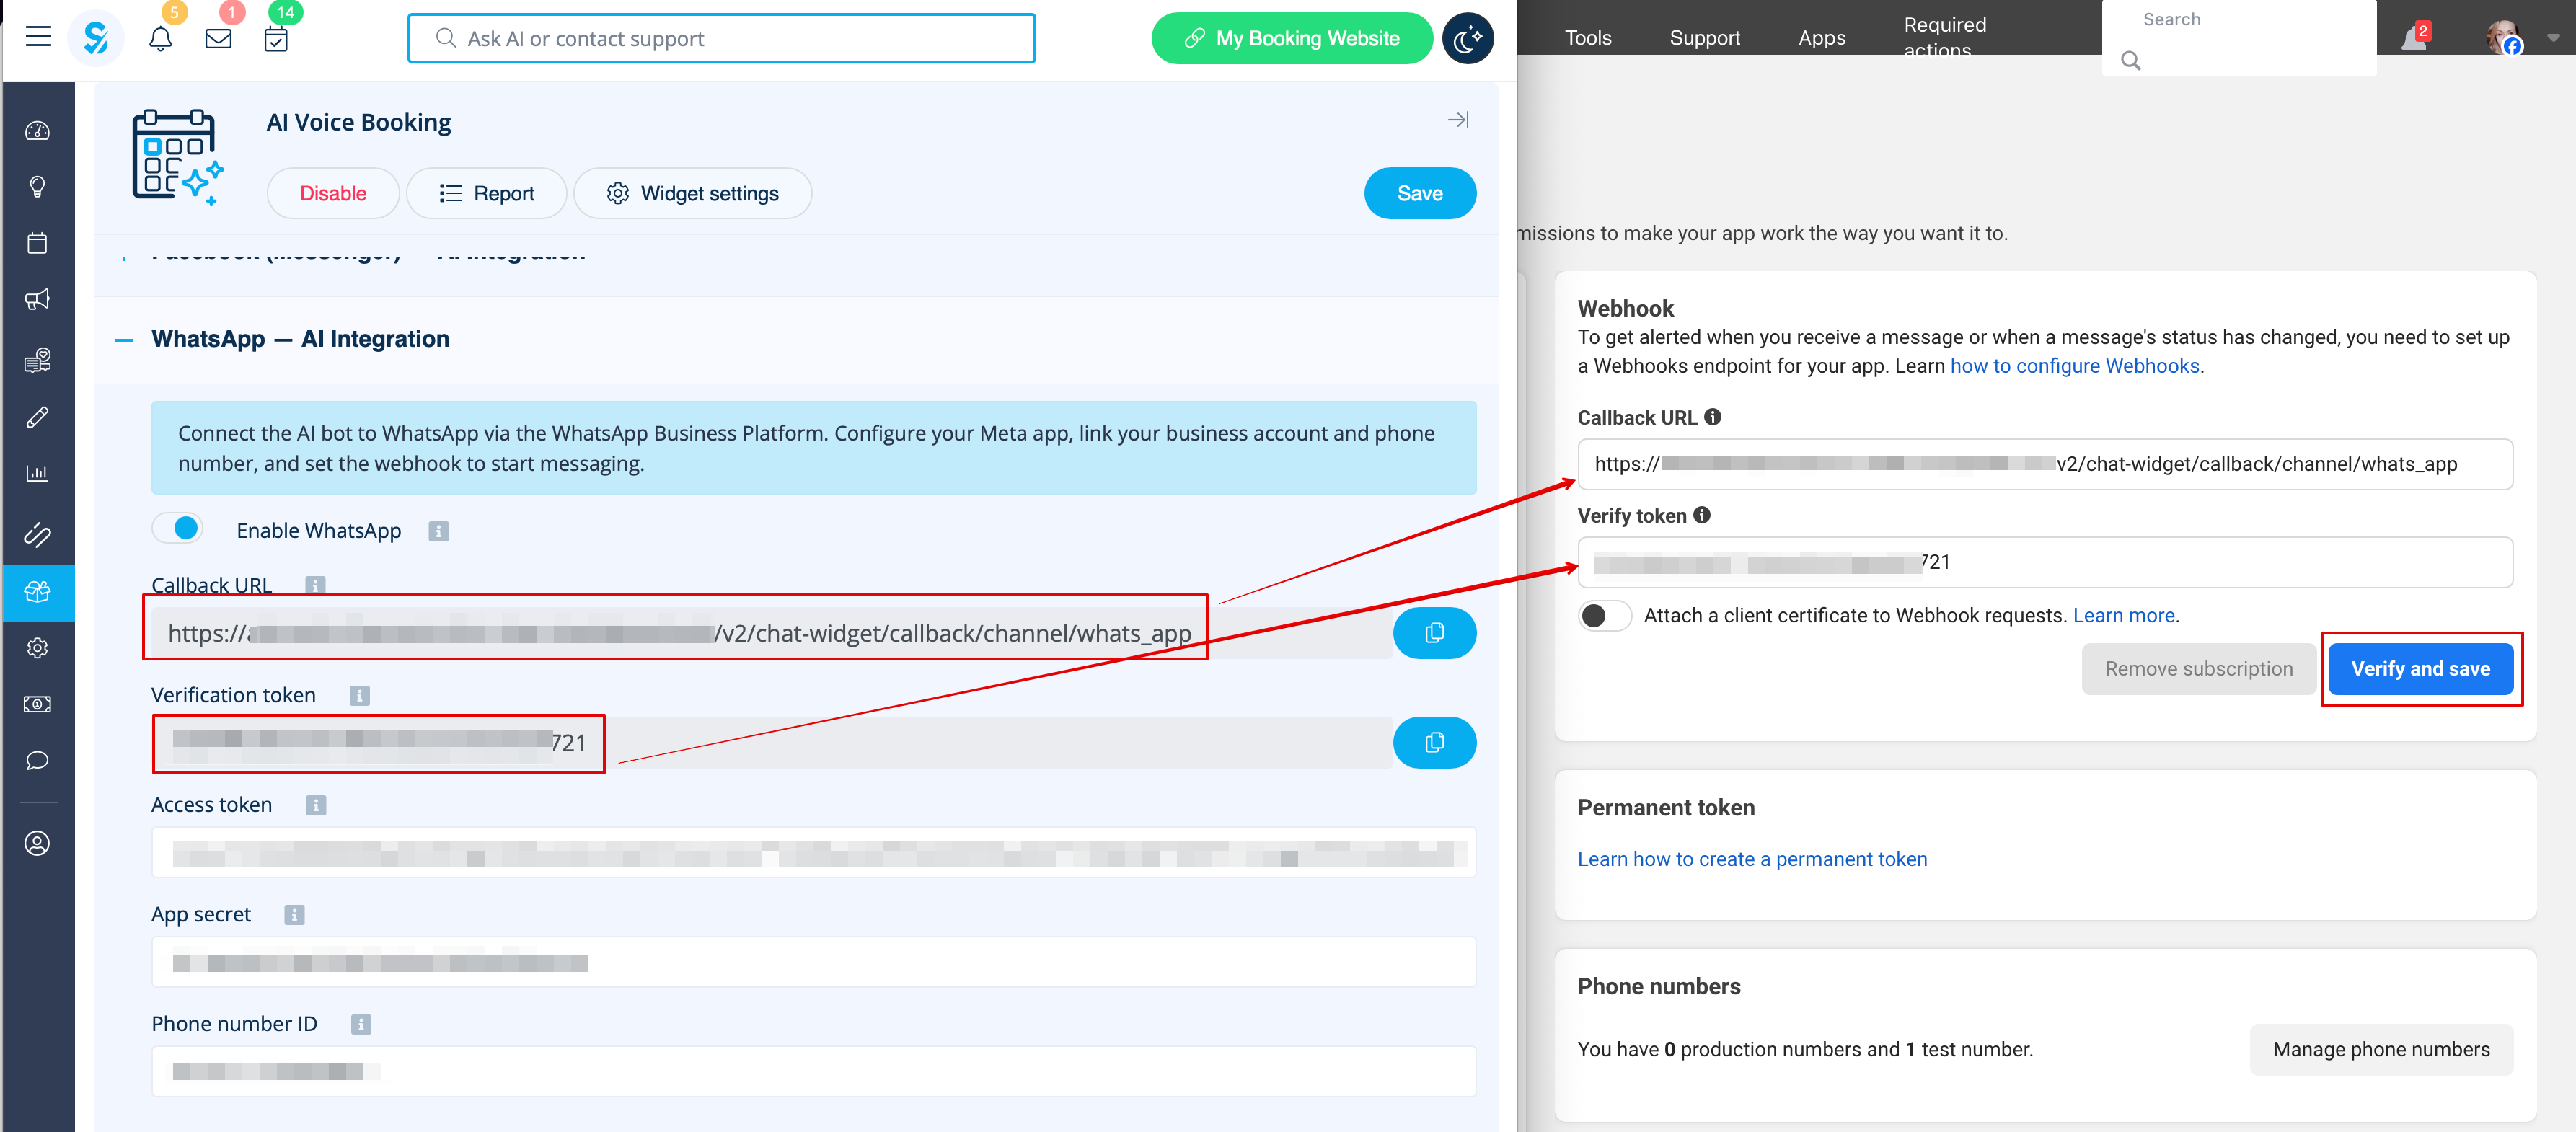
11. | 11. Kopiera ”Callback url” och ”Verification token” från ditt SimplyBook.me-konto -> Anpassade funktioner -> AI Voice booking och klistra in dem i motsvarande fält i appen. Verifiera och spara: | ||
[[File:Callback and token.png|1200px|center|link=https://help.simplybook.me/images/f/f6/Callback_and_token.png]] | [[File:Callback and token.png|1200px|center|link=https://help.simplybook.me/images/f/f6/Callback_and_token.png]] | ||
<br><br> | <br><br> | ||
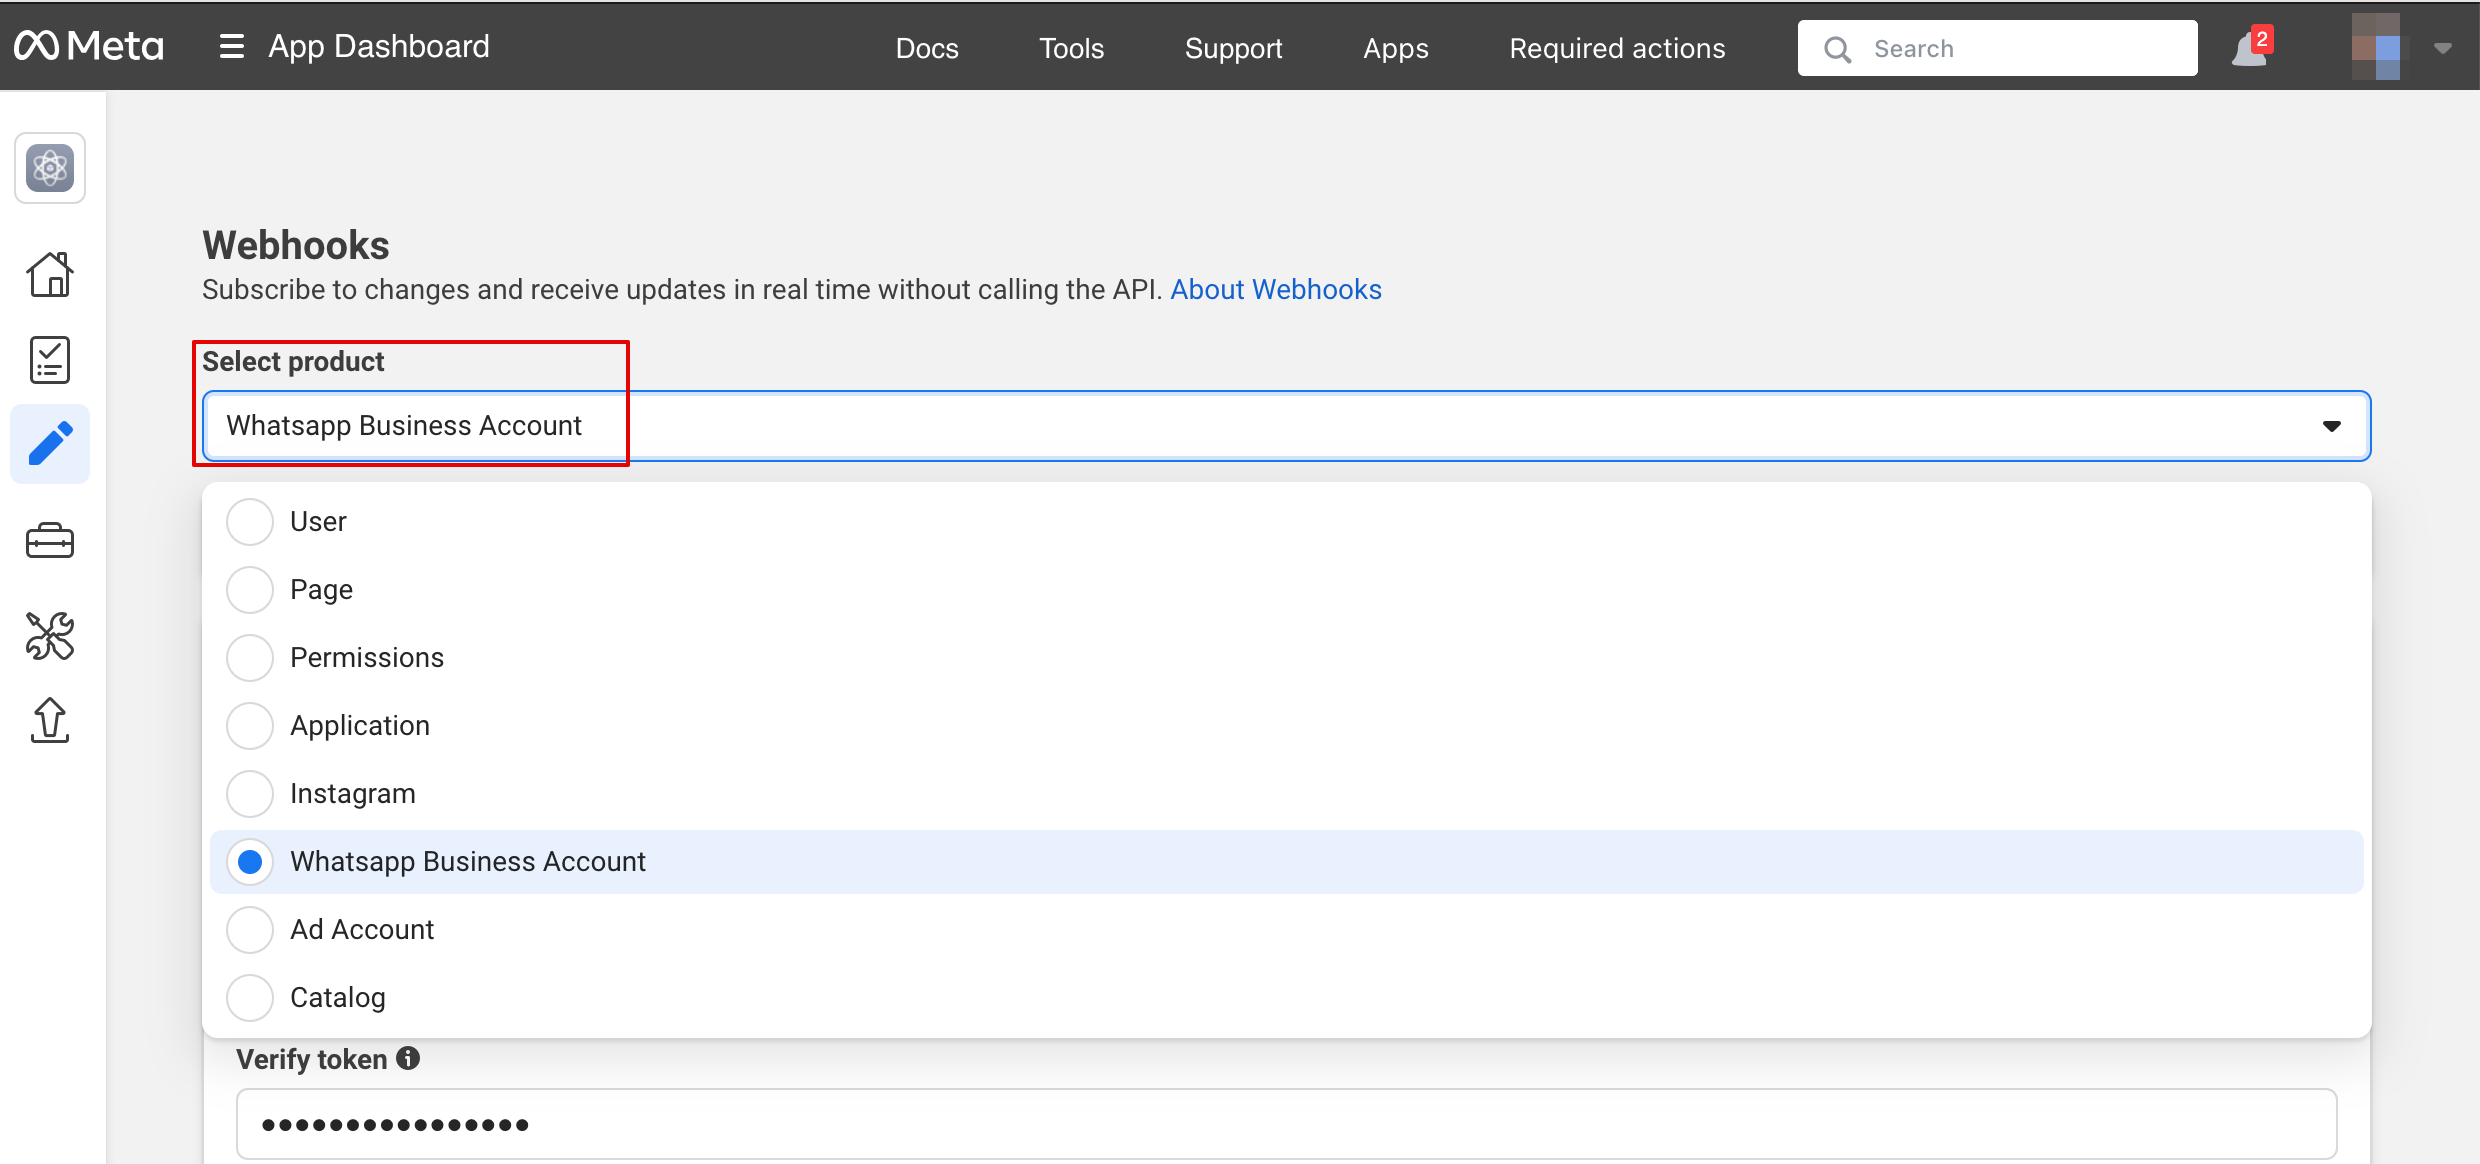
12. | 12. I nästa steg under ”Select product”, välj ”WhatsApp Business Account”: | ||
[[File:Select product.png|1200px|center|link=https://help.simplybook.me/images/6/66/Select_product.png]] | [[File:Select product.png|1200px|center|link=https://help.simplybook.me/images/6/66/Select_product.png]] | ||
<br><br> | <br><br> | ||
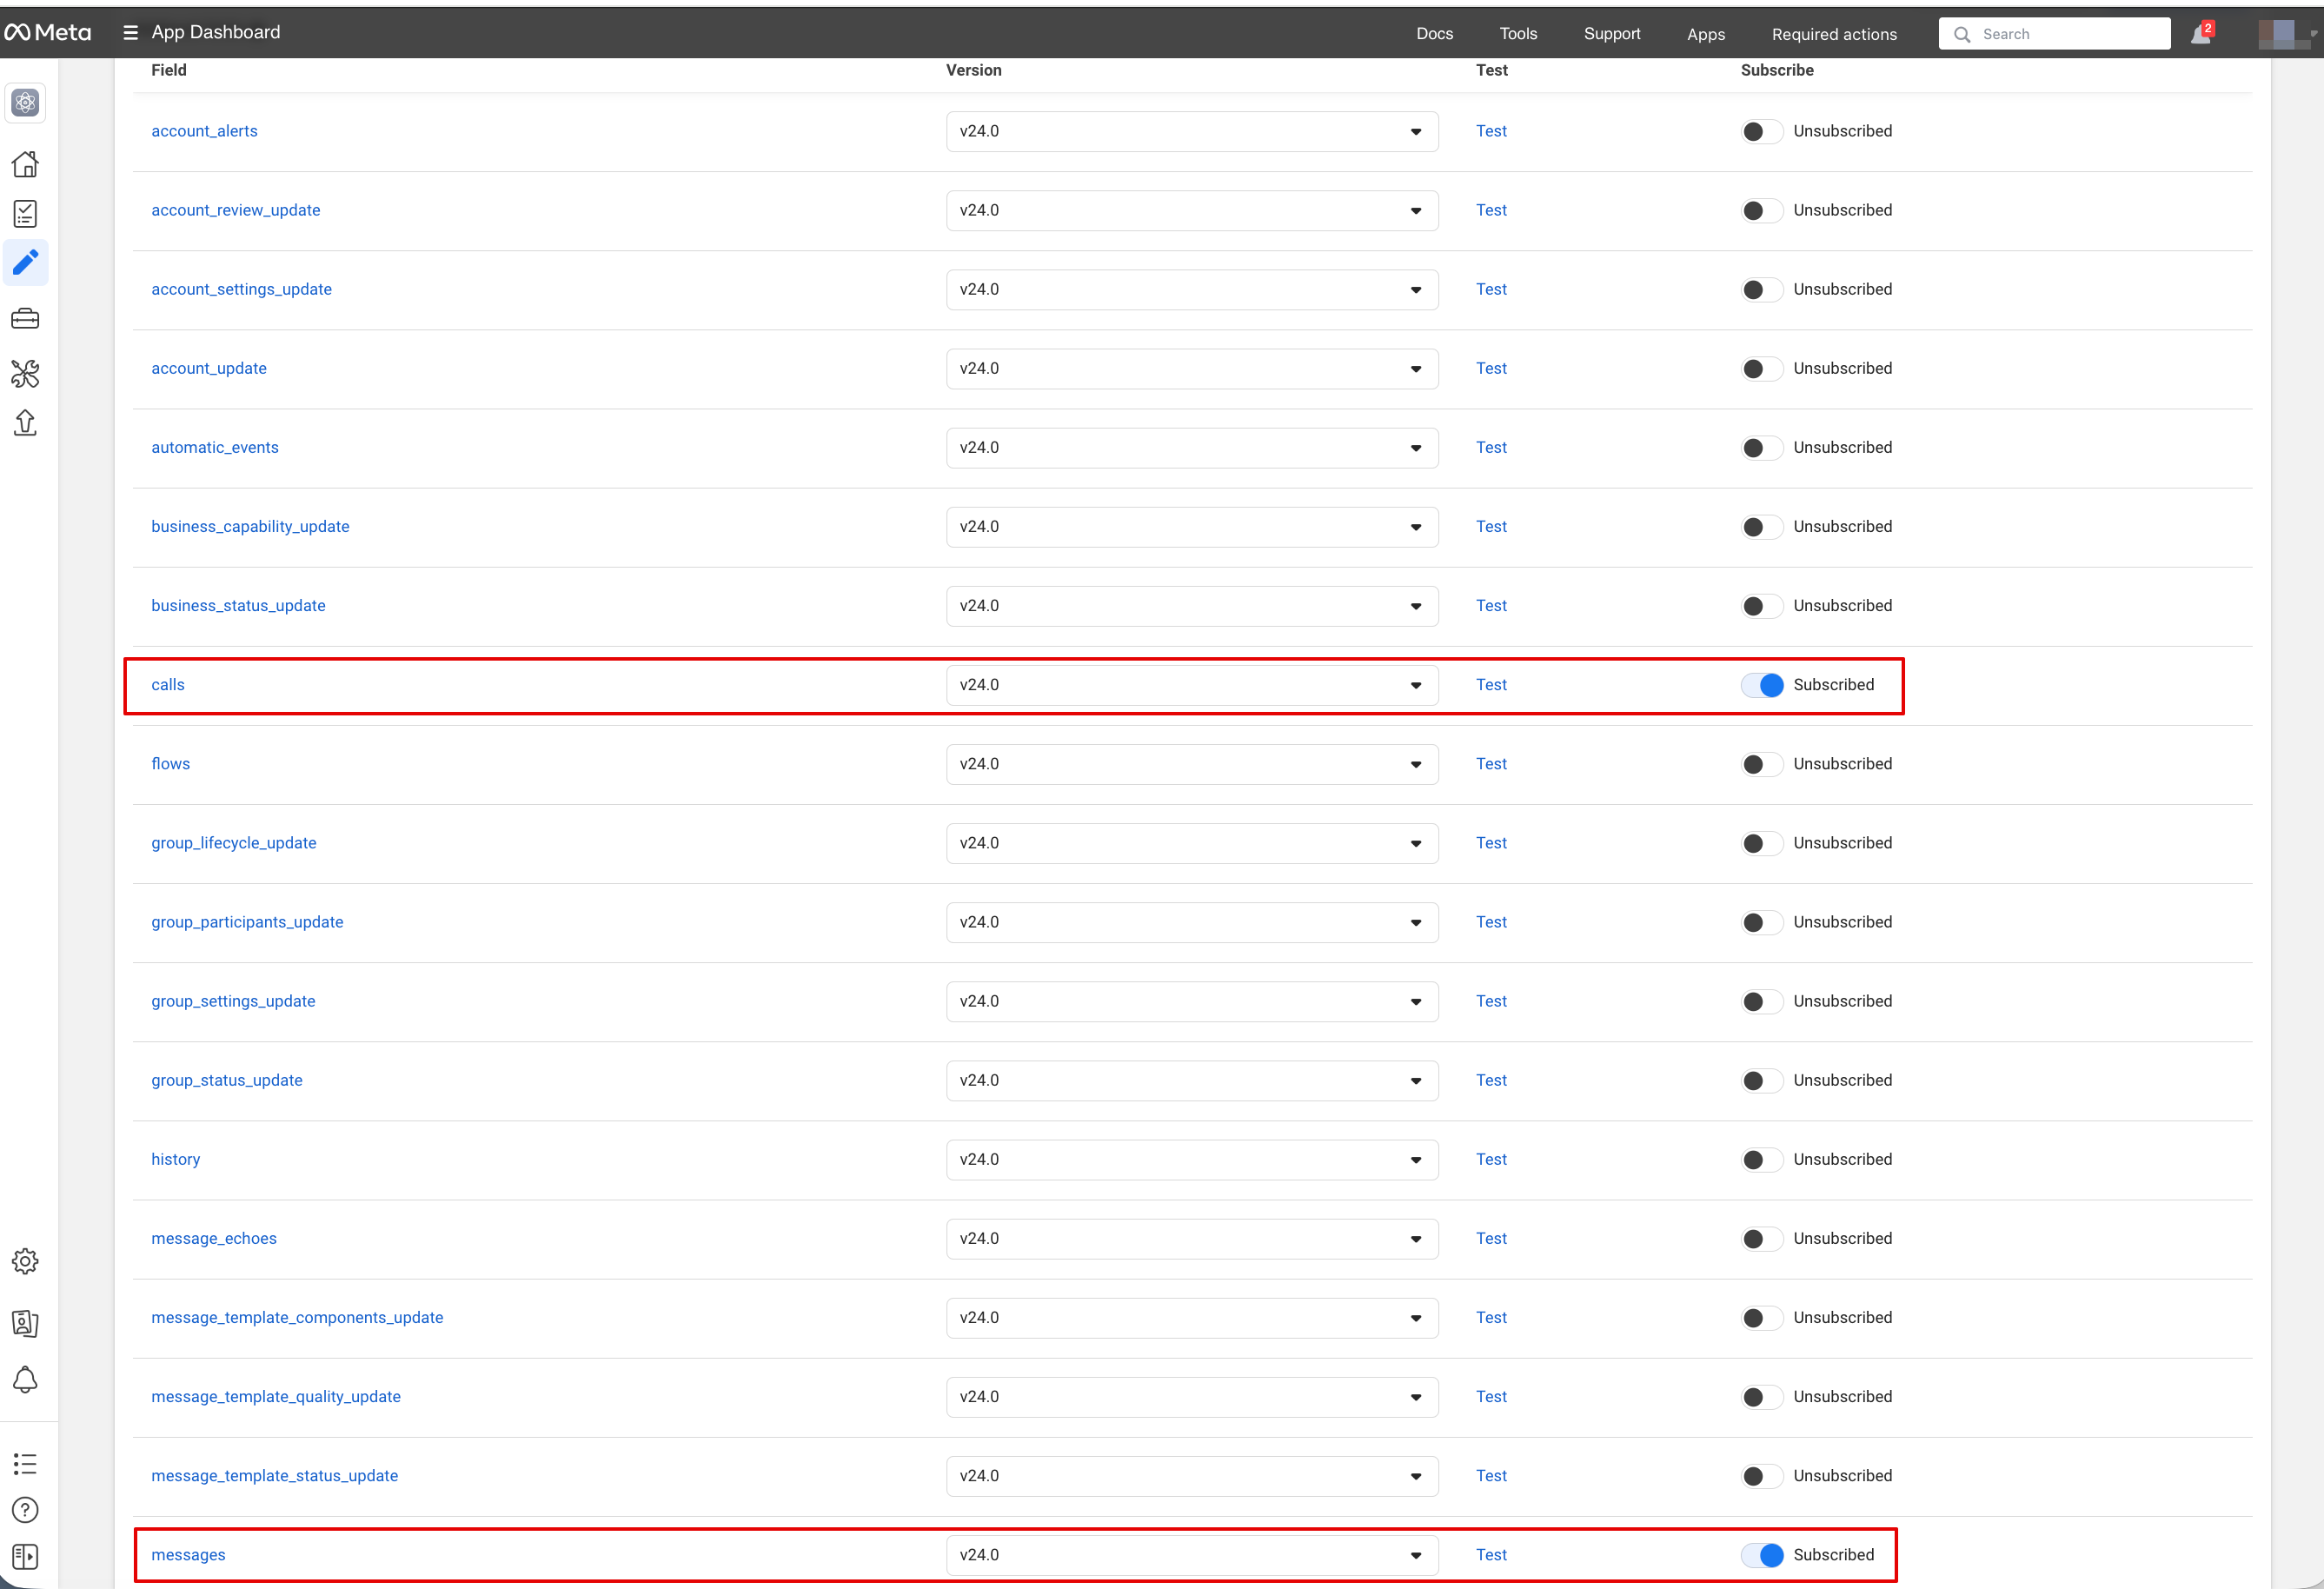
13. | 13. Aktivera sedan nödvändiga webhooks: messages och calls (om du vill ta emot samtal): | ||
[[File:Calls and msg subscriptions.png|1200px|center|link=https://help.simplybook.me/images/5/5d/Calls_and_msg_subscriptions.png]] | [[File:Calls and msg subscriptions.png|1200px|center|link=https://help.simplybook.me/images/5/5d/Calls_and_msg_subscriptions.png]] | ||
<br><br> | <br><br> | ||
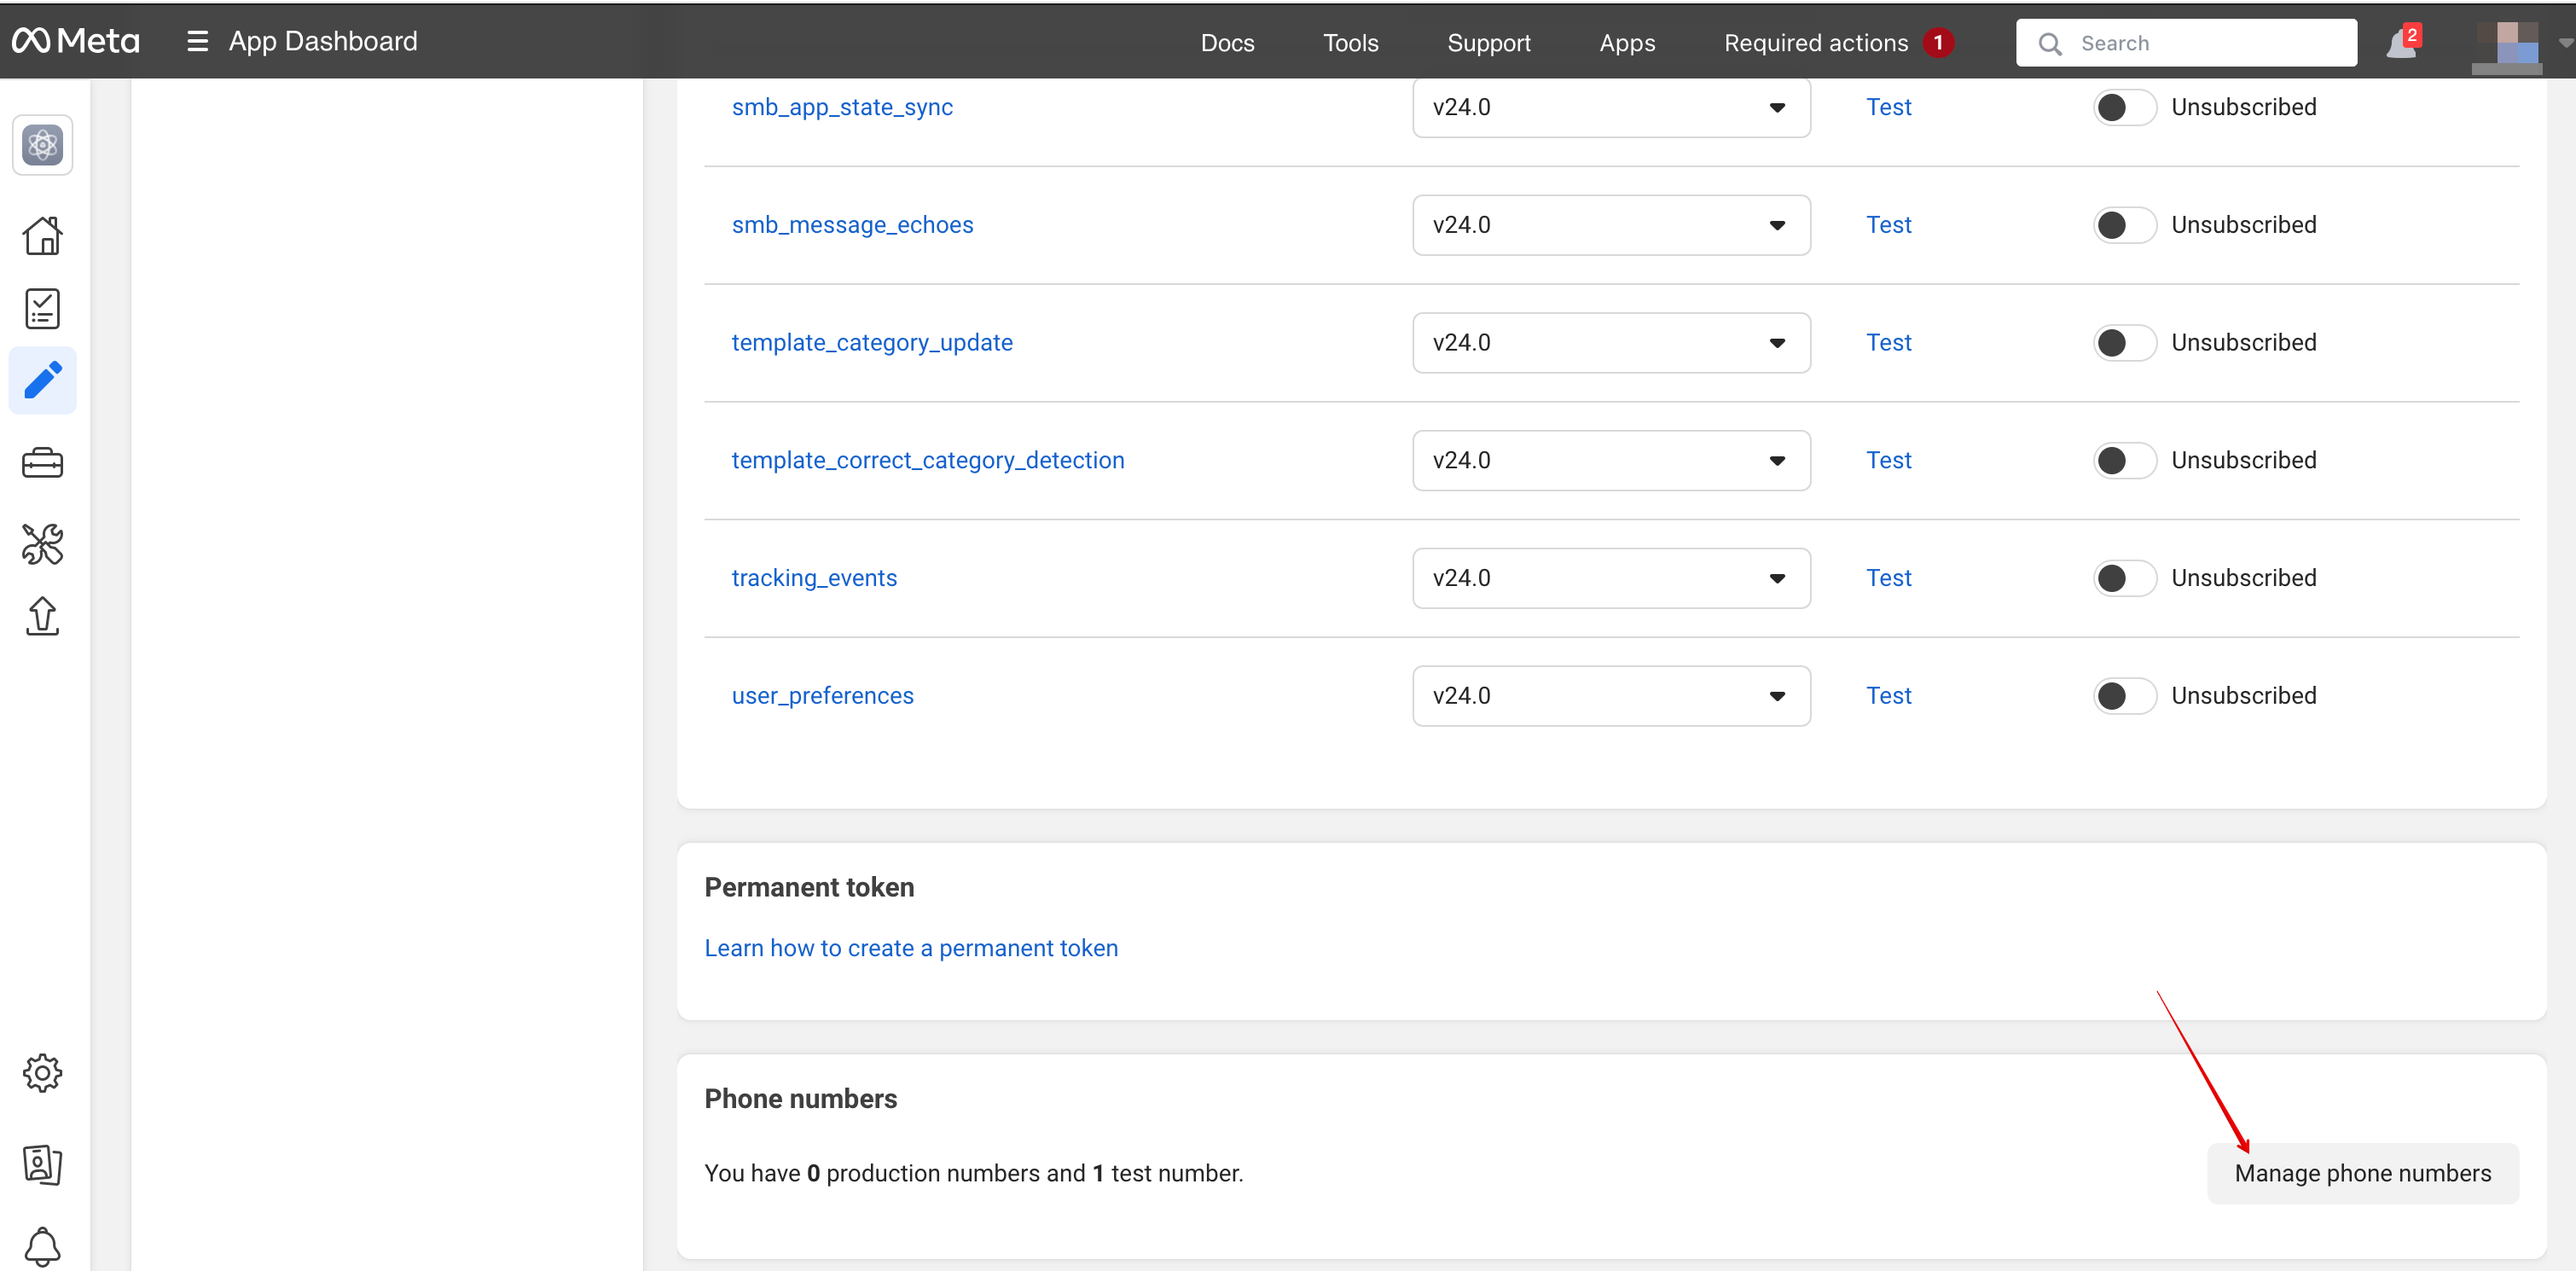
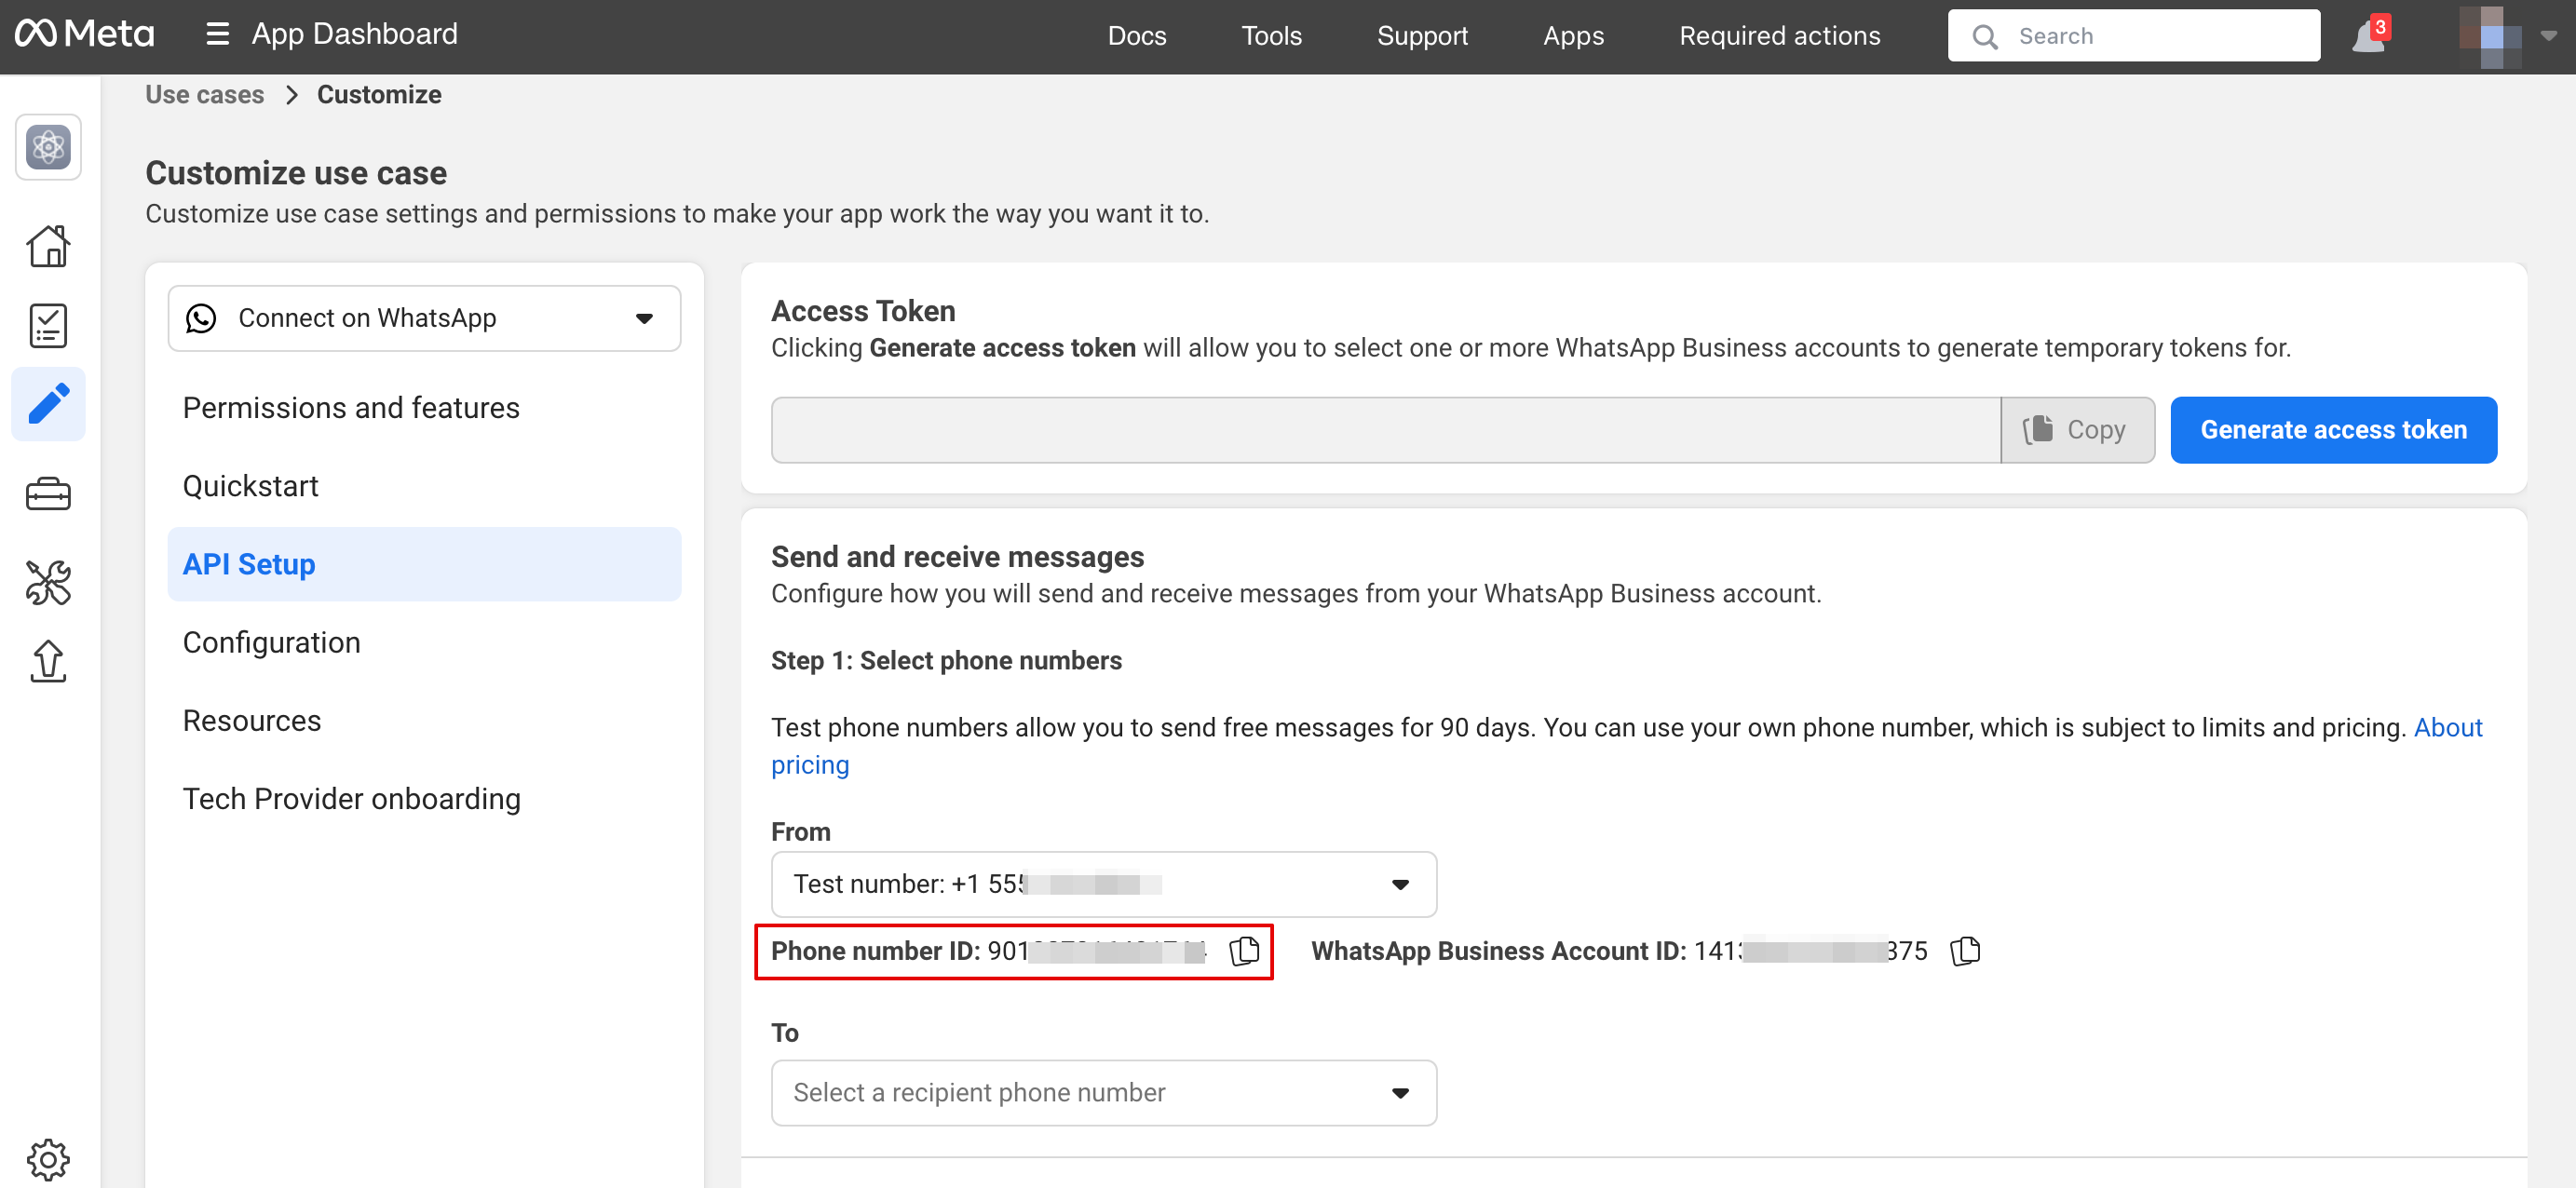
14. | 14. Nu kan du lägga till telefonnummer och betalningsmetod (eftersom Facebook debiterar för meddelanden). | ||
Kopiera telefonnummer-ID från Facebook och klistra in det i motsvarande formulär i ditt SimplyBook.me-konto. | |||
[[File:Manage phone numbers.png|1200px|center|link=https://help.simplybook.me/images/b/b1/Manage_phone_numbers.png]] | [[File:Manage phone numbers.png|1200px|center|link=https://help.simplybook.me/images/b/b1/Manage_phone_numbers.png]] | ||
[[File:Copy phone number id.png|1200px|center|link=https://help.simplybook.me/images/9/91/Copy_phone_number_id.png]] | [[File:Copy phone number id.png|1200px|center|link=https://help.simplybook.me/images/9/91/Copy_phone_number_id.png]] | ||
<br><br> | <br><br> | ||
15. | 15. Nu behöver du skapa en systemanvändare. Gå till [https://business.facebook.com/latest/settings/ Facebook Business-profilen] och öppna fliken System users: | ||
[[File:Add user facebook.png|1200px|center|link=https://help.simplybook.me/images/b/b7/Add_user_facebook.png]] | [[File:Add user facebook.png|1200px|center|link=https://help.simplybook.me/images/b/b7/Add_user_facebook.png]] | ||
<br><br> | <br><br> | ||
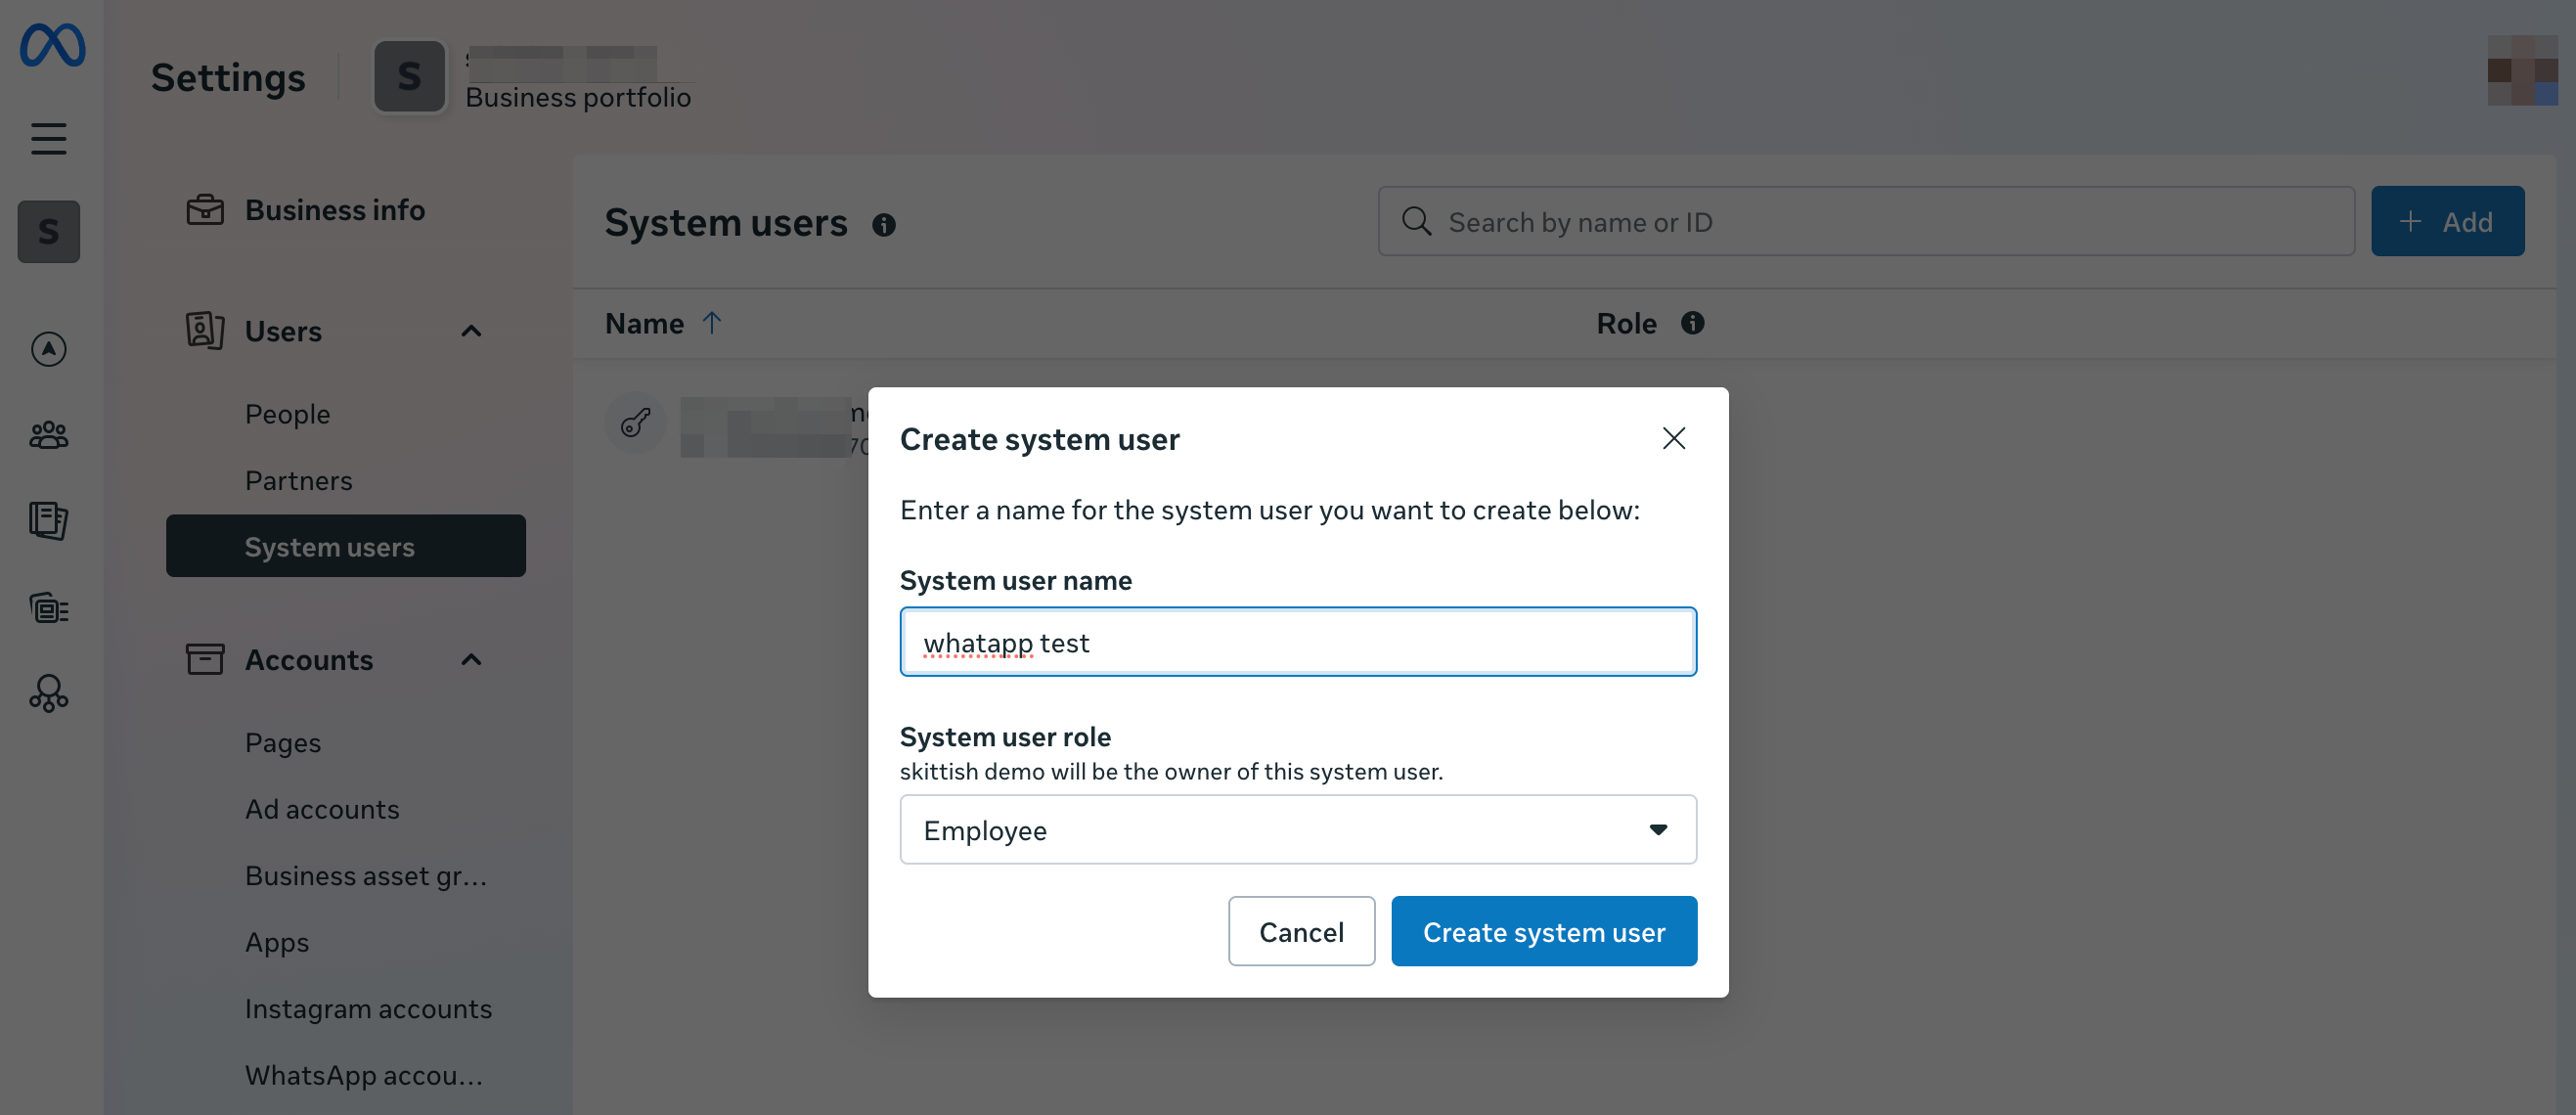
16. | 16. Klicka på Add new user och fyll i användaruppgifterna: | ||
[[File:Create user facebook step 2.png|1200px|center|link=https://help.simplybook.me/images/1/1b/Create_user_facebook_step_2.png]] | [[File:Create user facebook step 2.png|1200px|center|link=https://help.simplybook.me/images/1/1b/Create_user_facebook_step_2.png]] | ||
<br><br> | <br><br> | ||
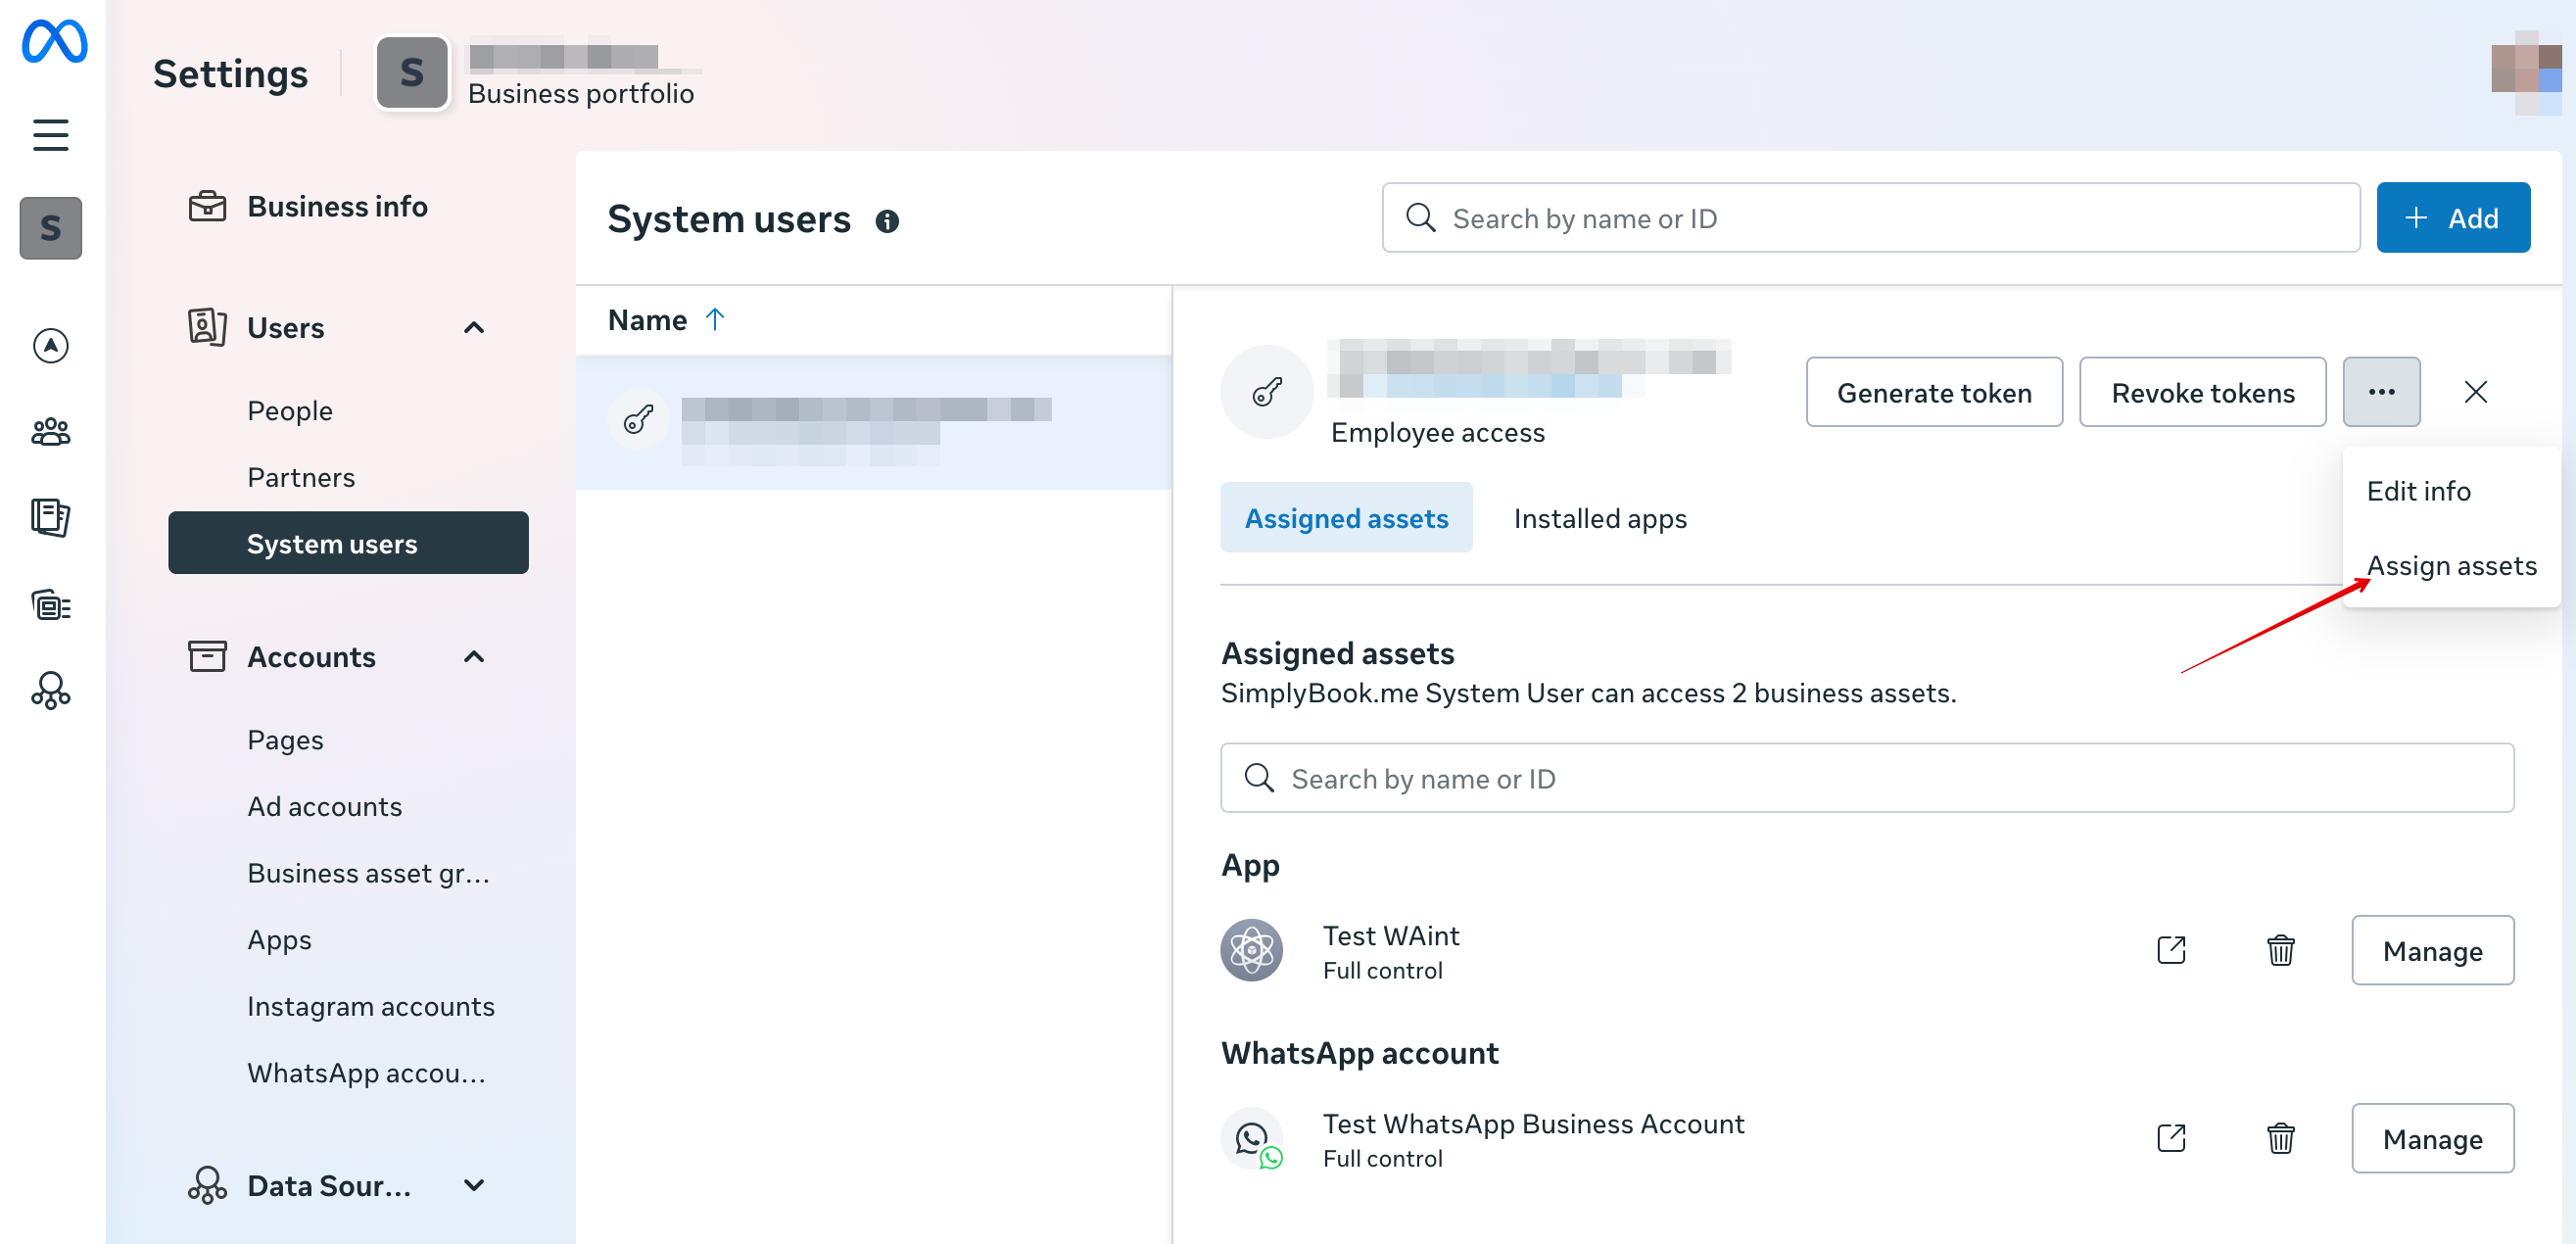
17. | 17. Gå sedan till Assign Assets: | ||
[[File:Assign assets path.png|1200px|center|link=https://help.simplybook.me/images/9/9e/Assign_assets_path.png]] | [[File:Assign assets path.png|1200px|center|link=https://help.simplybook.me/images/9/9e/Assign_assets_path.png]] | ||
<br><br> | <br><br> | ||
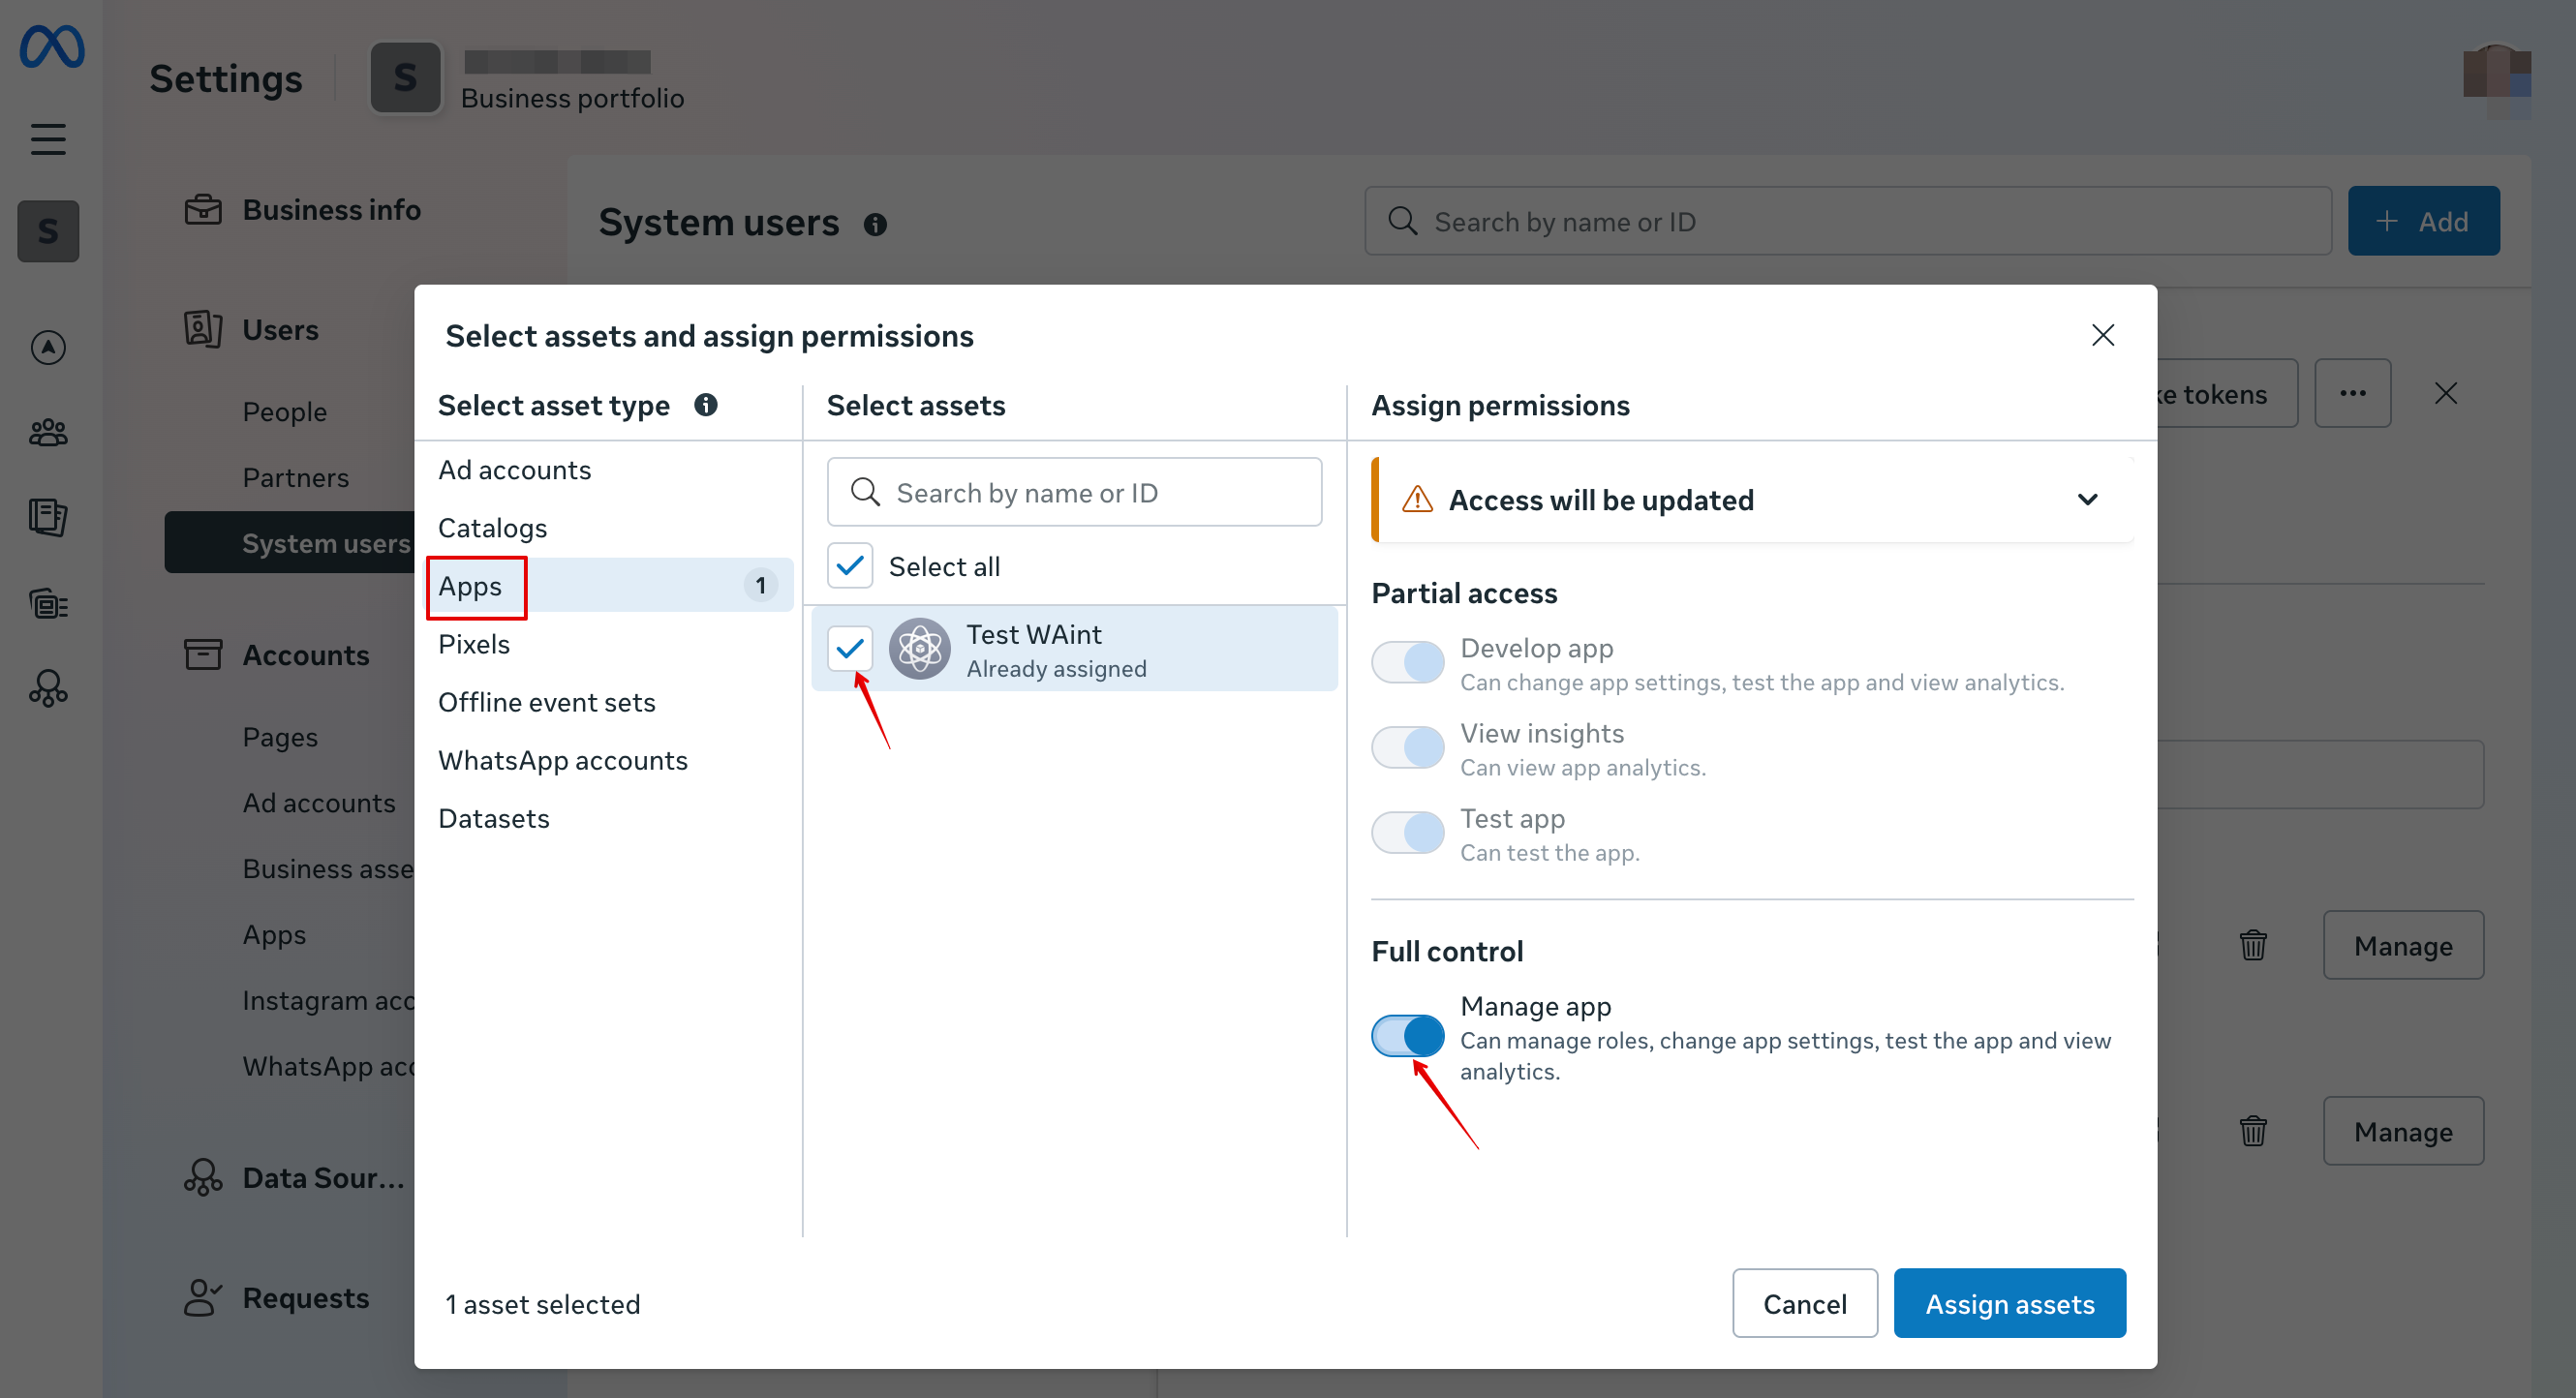
18. | 18. På fliken Apps väljer du din app och aktiverar behörigheten ”Manage app”: | ||
[[File:Add manage app permission.png|1200px|center|link=https://help.simplybook.me/images/f/f3/Add_manage_app_permission.png]] | [[File:Add manage app permission.png|1200px|center|link=https://help.simplybook.me/images/f/f3/Add_manage_app_permission.png]] | ||
<br><br> | <br><br> | ||
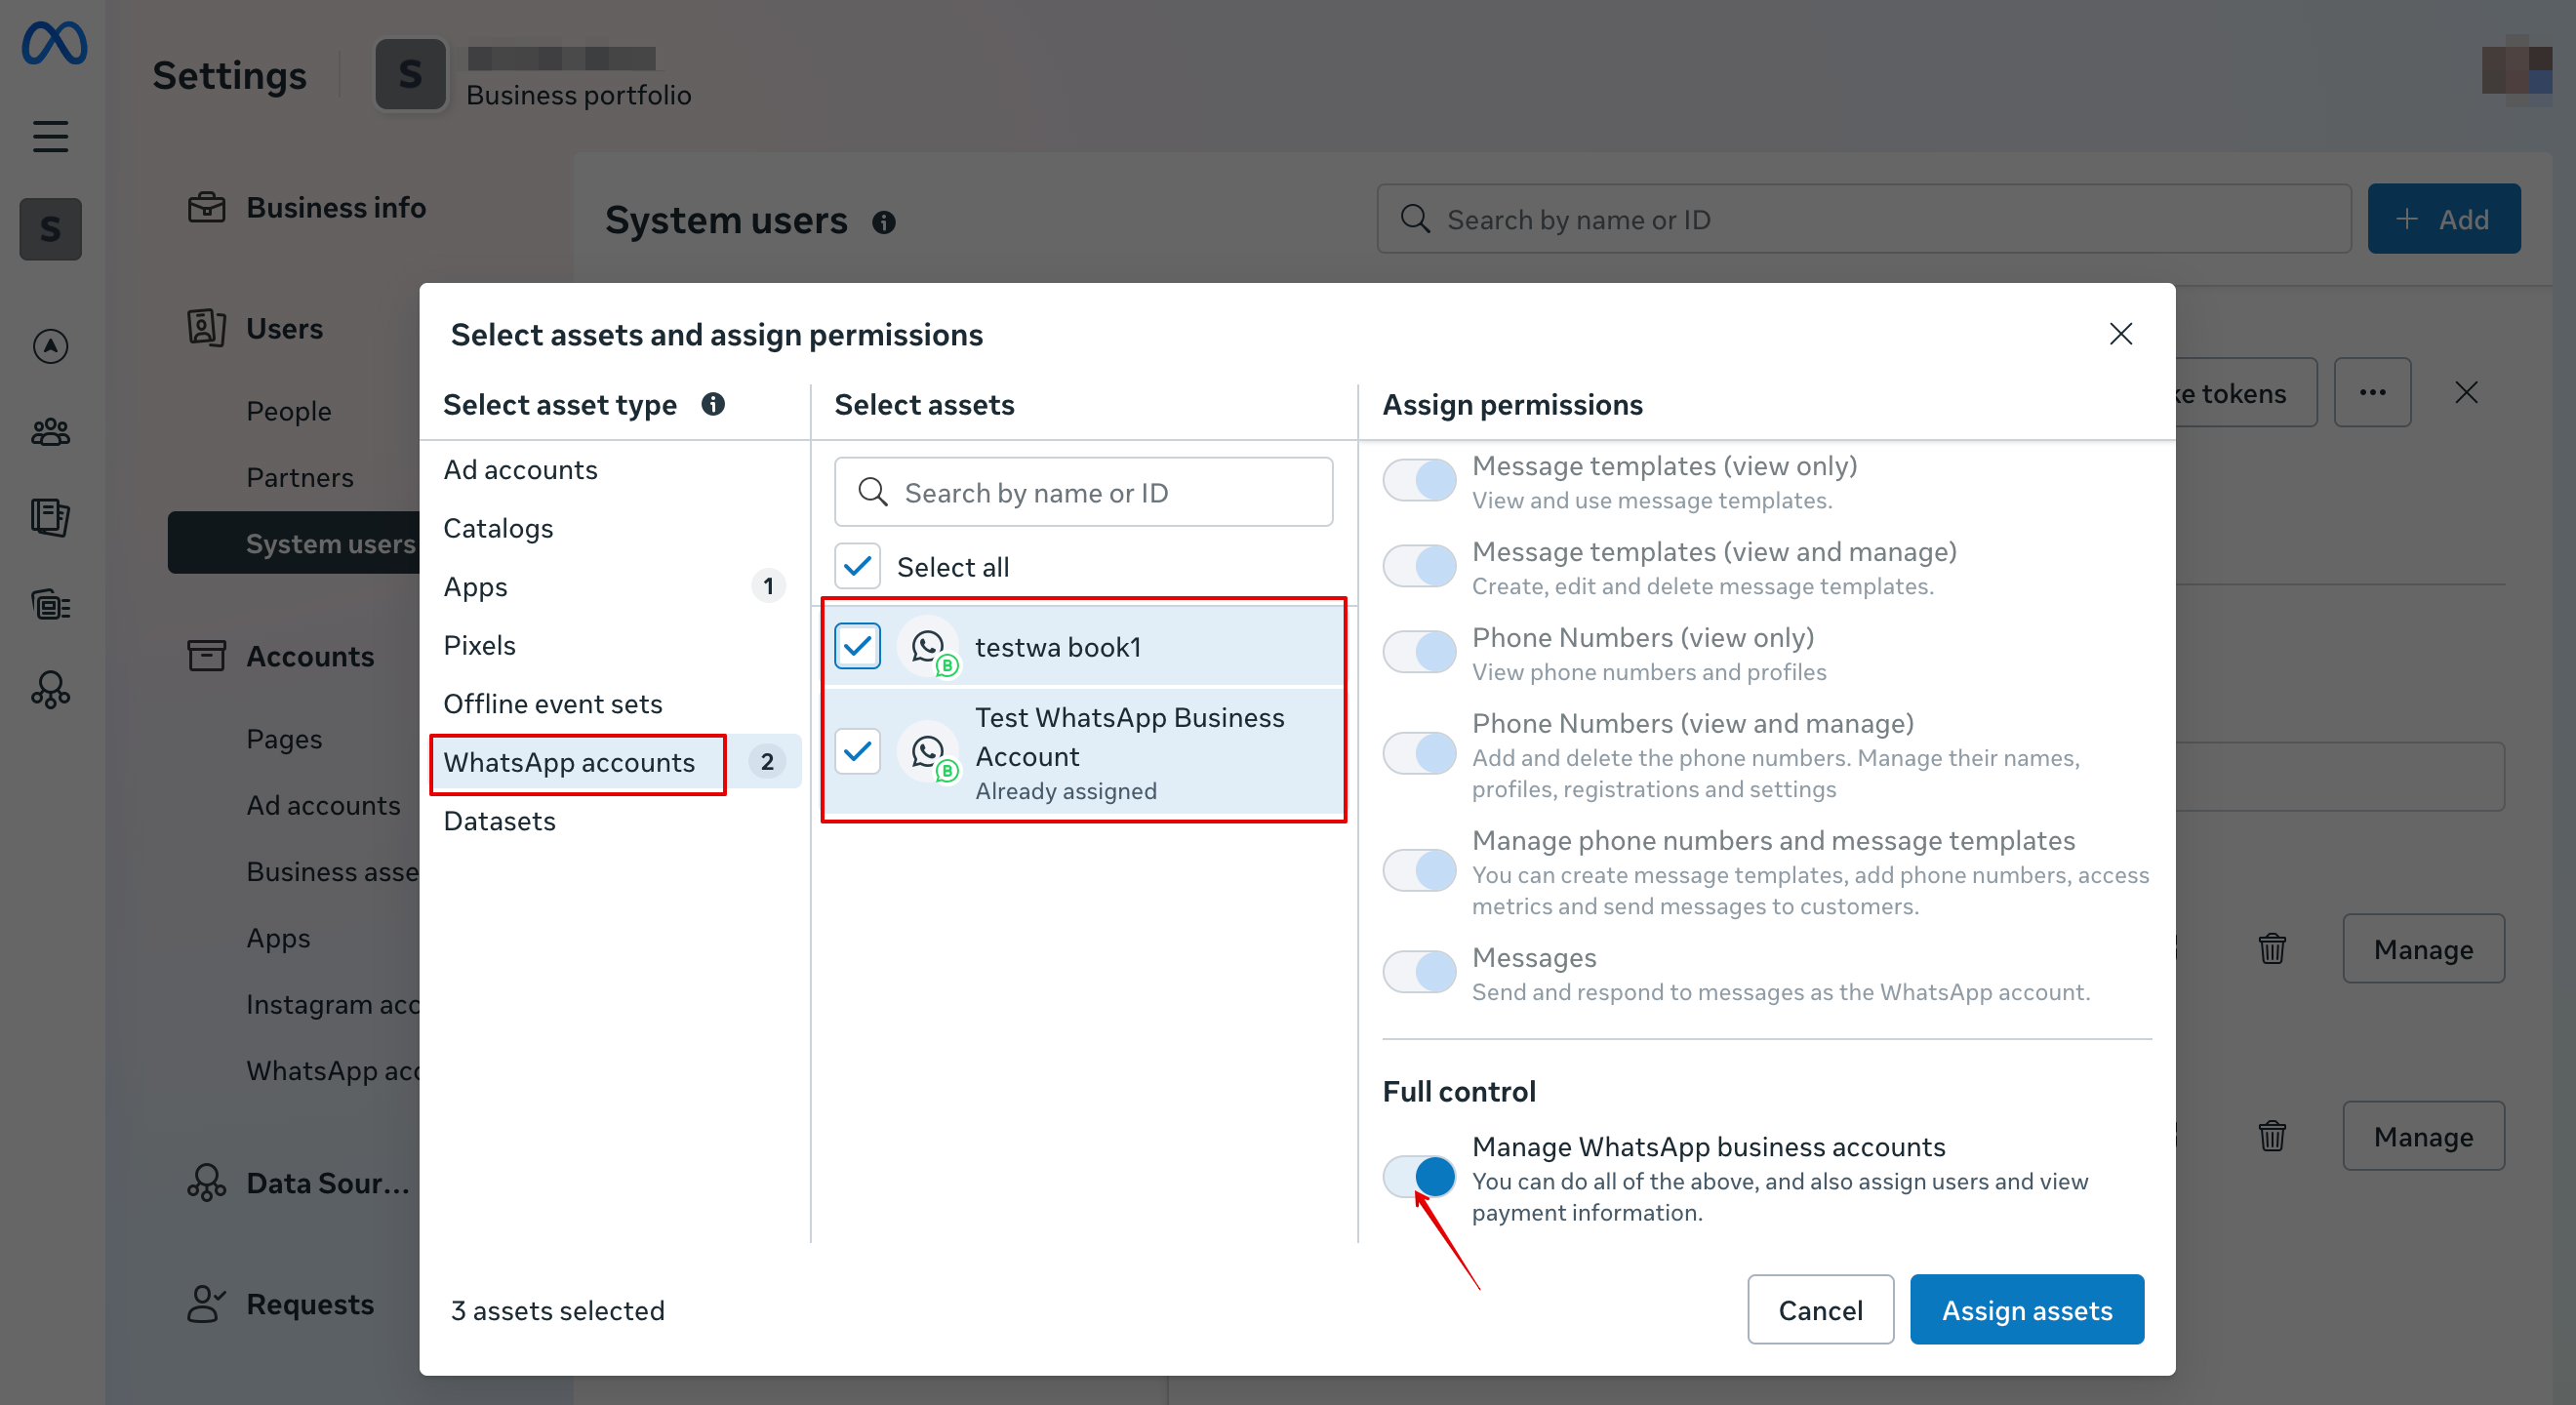
19. | 19. På fliken WhatsApp accounts väljer du dina WhatsApp-konton och aktiverar behörigheten Manage WhatsApp business accounts: | ||
[[File:Whatsapp acc permissions add.png|1200px|center|link=https://help.simplybook.me/images/1/17/Whatsapp_acc_permissions_add.png]] | [[File:Whatsapp acc permissions add.png|1200px|center|link=https://help.simplybook.me/images/1/17/Whatsapp_acc_permissions_add.png]] | ||
<br><br> | <br><br> | ||
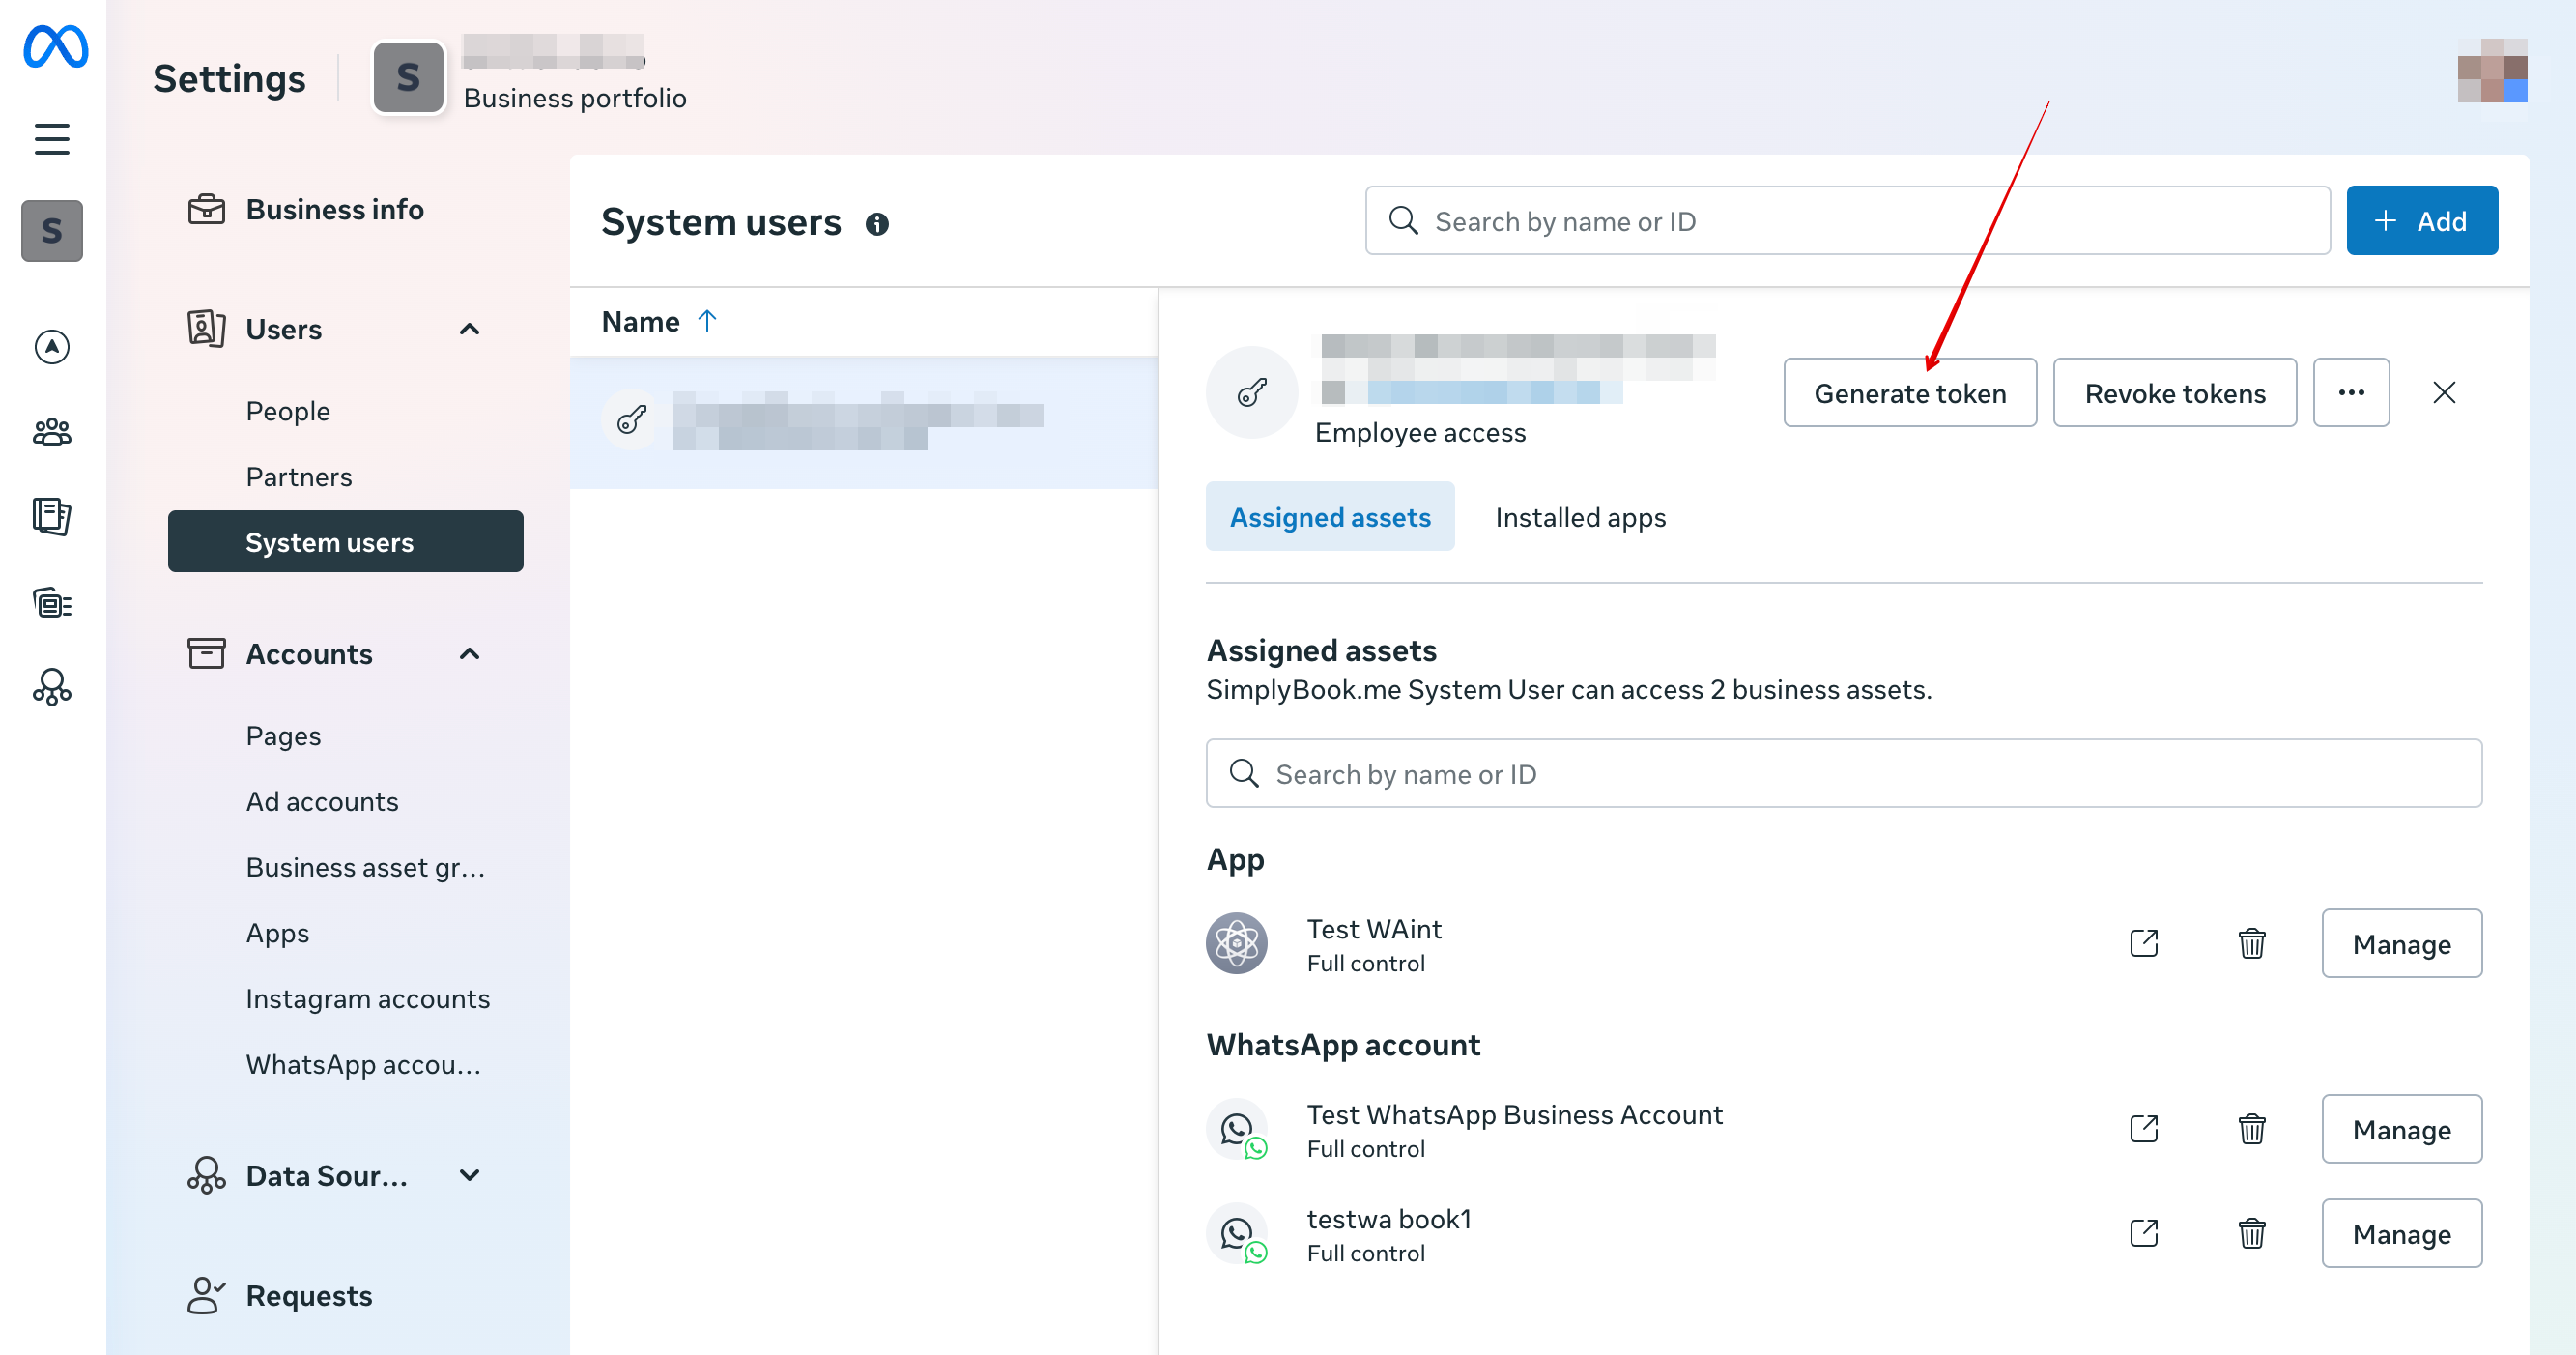
20. | 20. När tillgångar har tilldelats, klicka på Generate Token: | ||
[[File:Generate token path.png|1200px|center|link=https://help.simplybook.me/images/d/dd/Generate_token_path.png]] | [[File:Generate token path.png|1200px|center|link=https://help.simplybook.me/images/d/dd/Generate_token_path.png]] | ||
<br><br> | <br><br> | ||
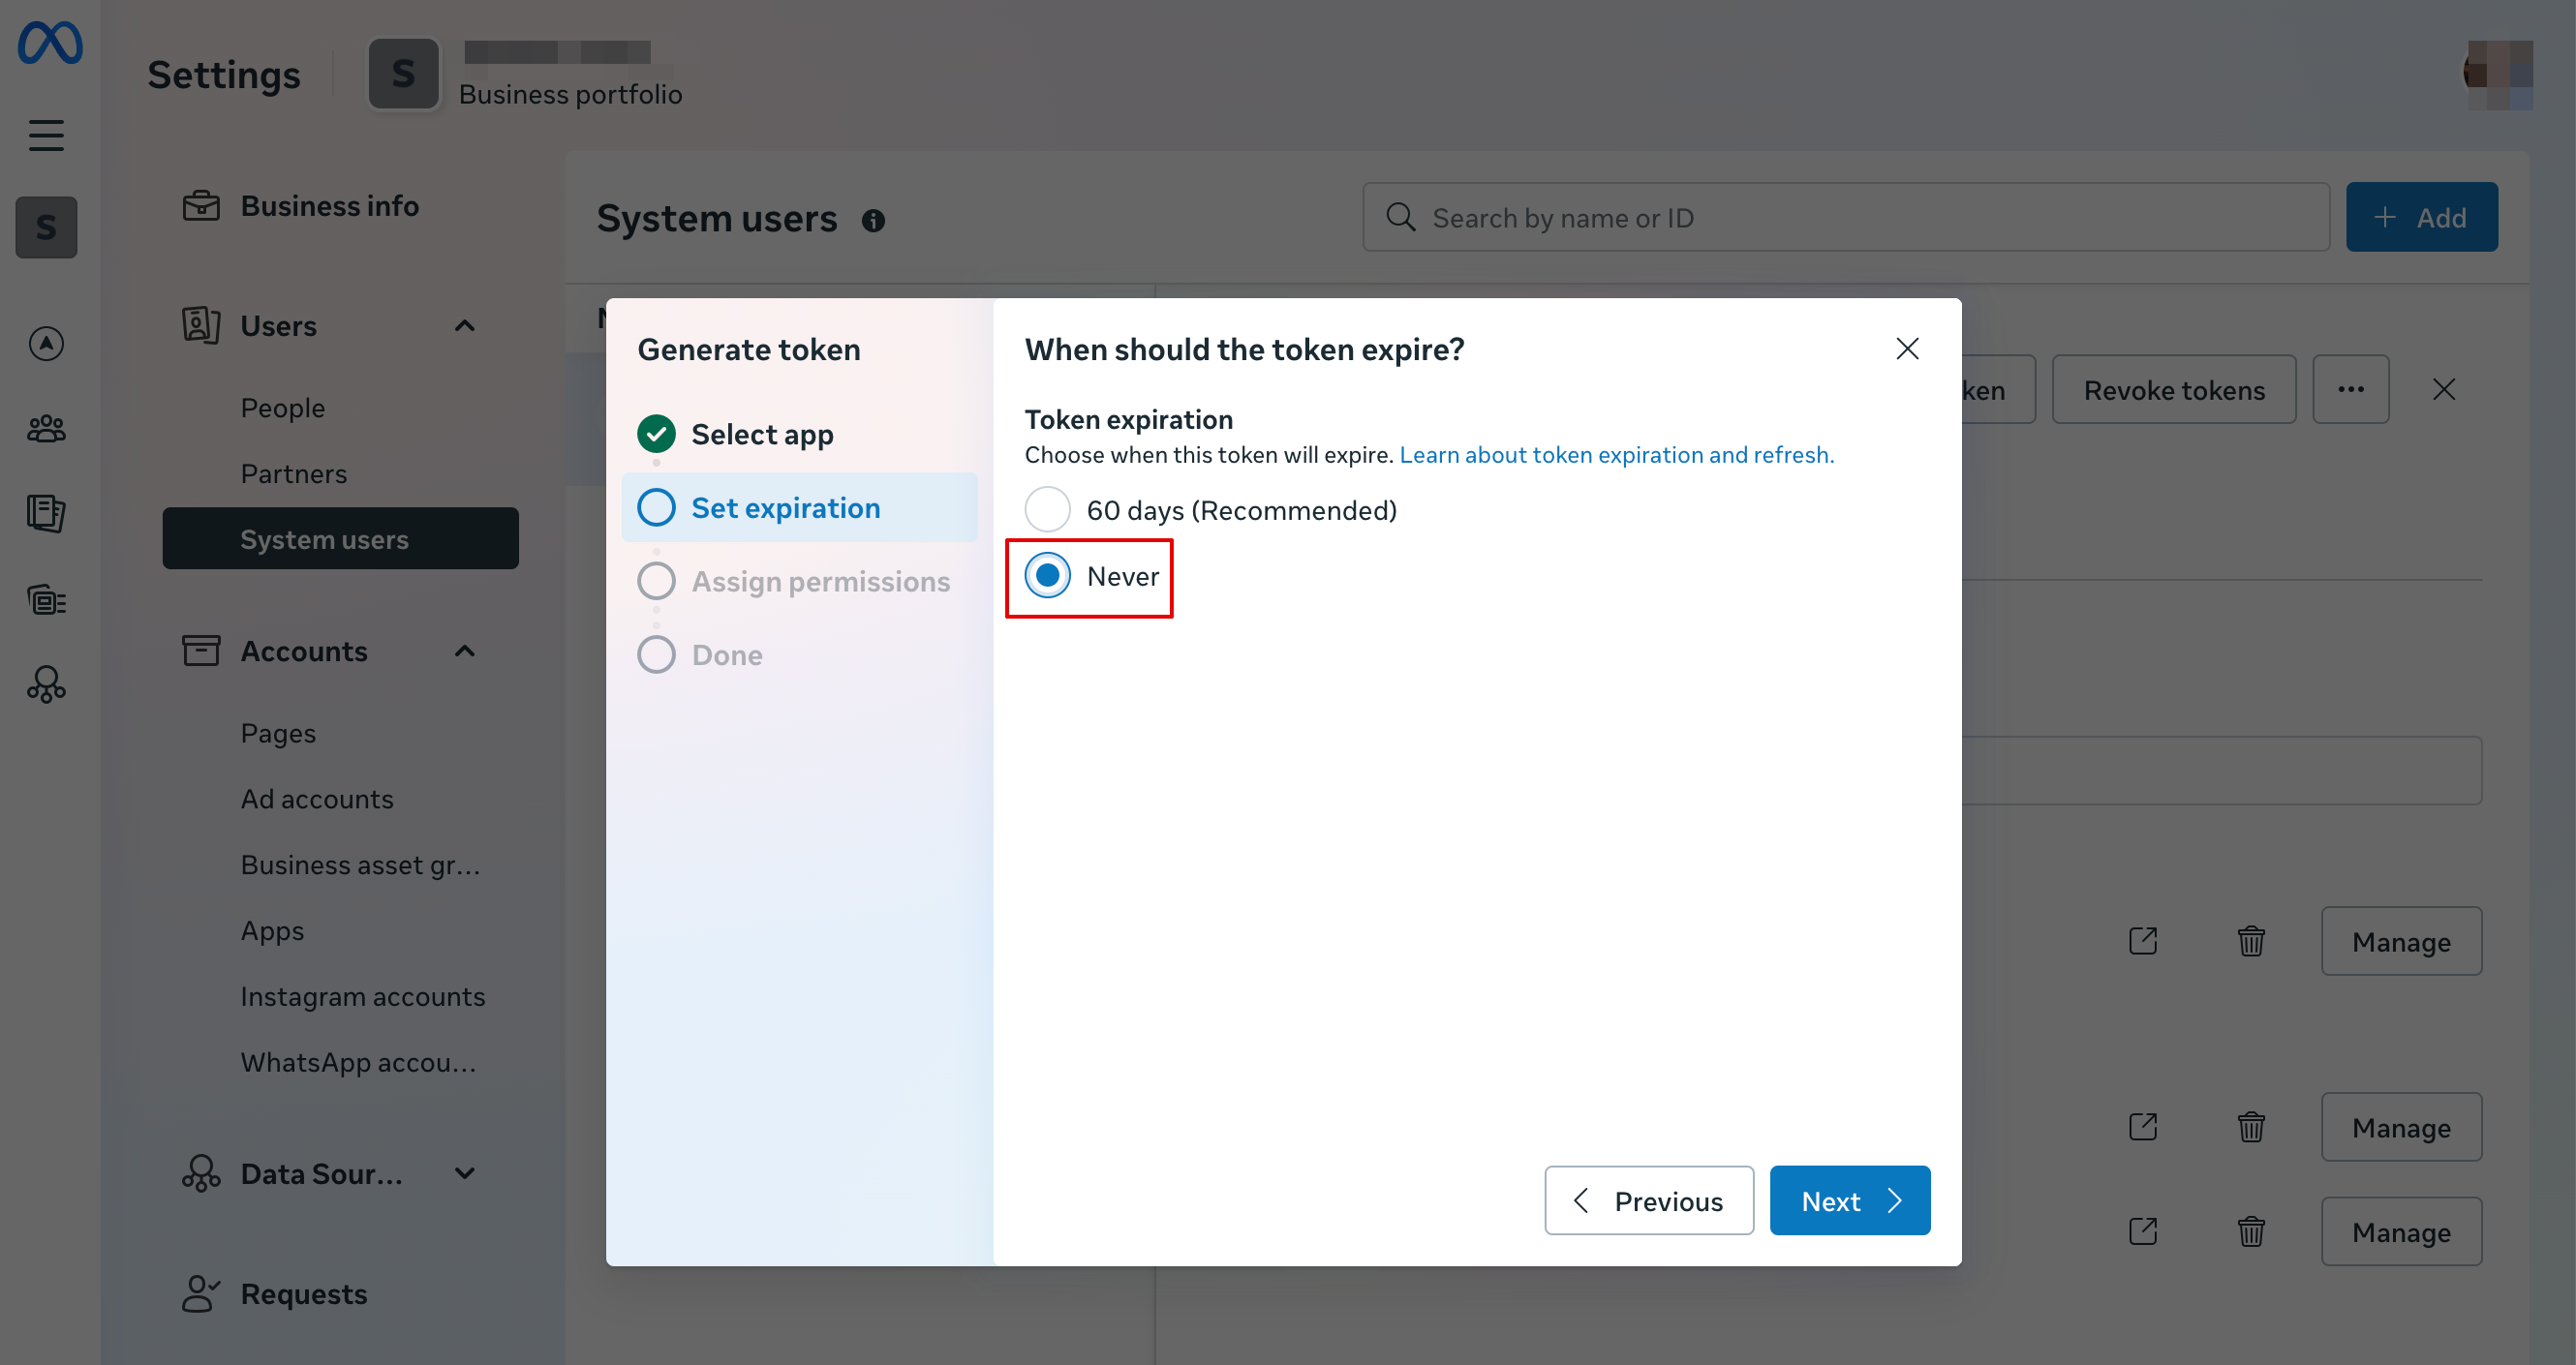
21. | 21. Välj din app från rullgardinsmenyn och ställ in token-giltighet till ”never”: | ||
[[File:Token never expire.png|1200px|center|link=https://help.simplybook.me/images/2/2a/Token_never_expire.png]] | [[File:Token never expire.png|1200px|center|link=https://help.simplybook.me/images/2/2a/Token_never_expire.png]] | ||
<br><br> | <br><br> | ||
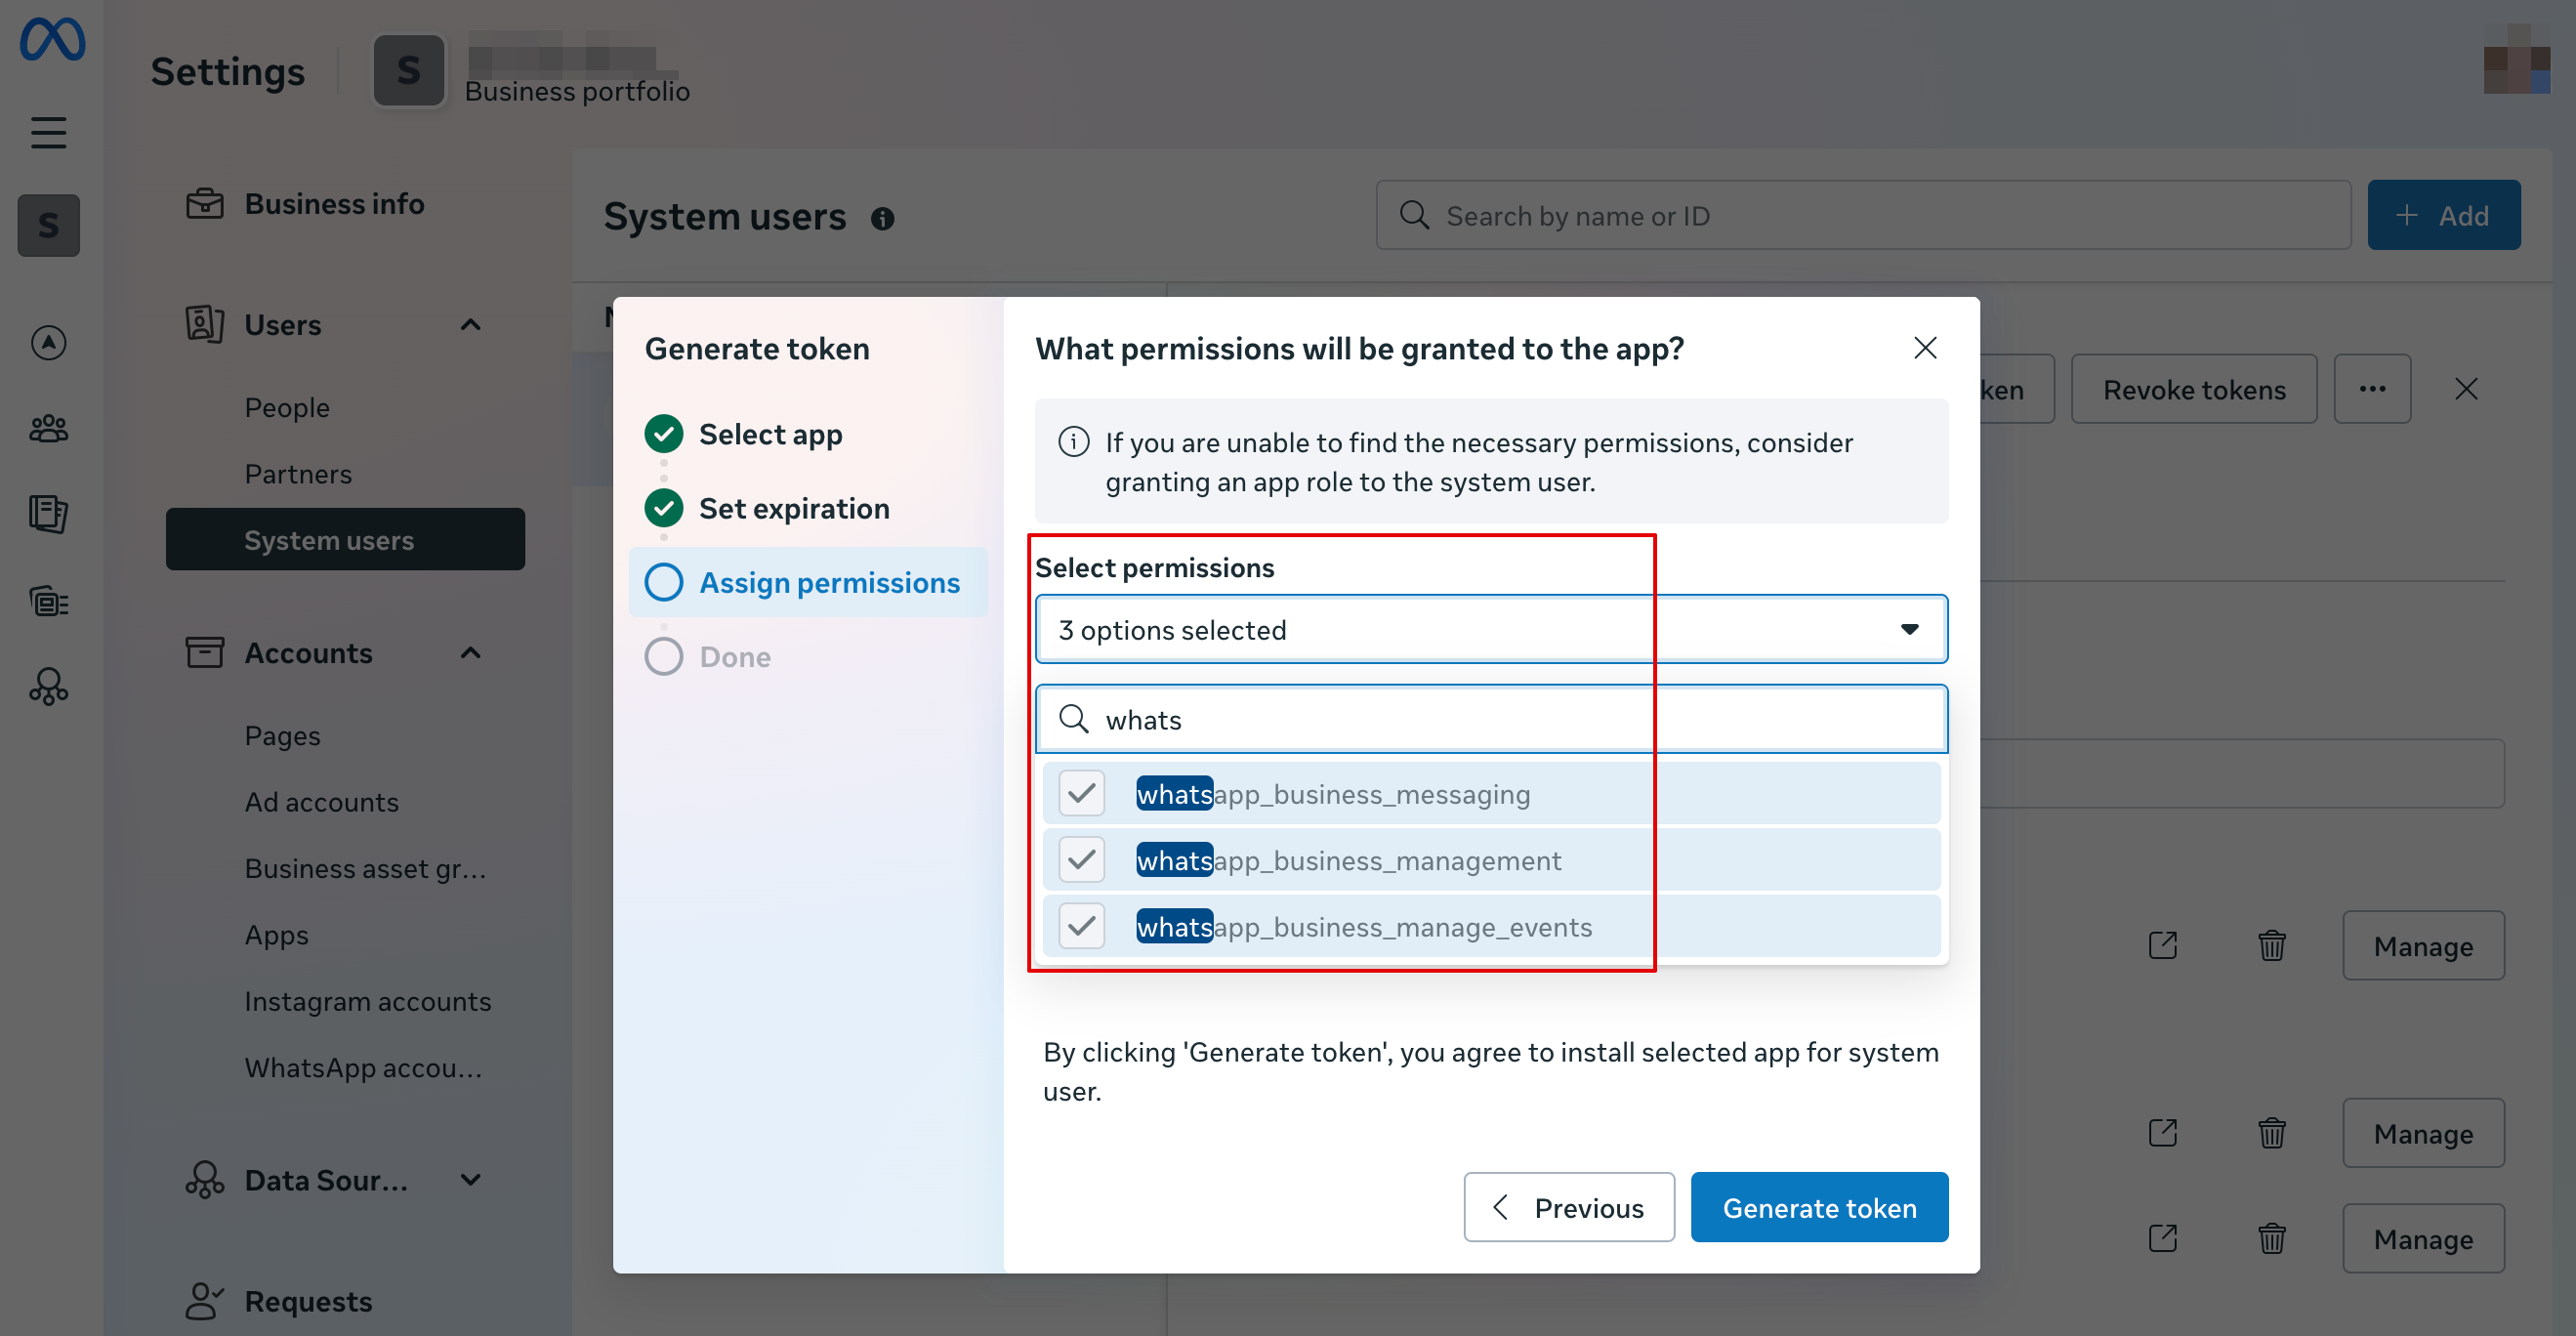
22. | 22. Välj följande behörigheter: | ||
[[File:Whatapp permissions.png|1200px|center|link=https://help.simplybook.me/images/9/97/Whatapp_permissions.png]] | [[File:Whatapp permissions.png|1200px|center|link=https://help.simplybook.me/images/9/97/Whatapp_permissions.png]] | ||
<br><br> | <br><br> | ||
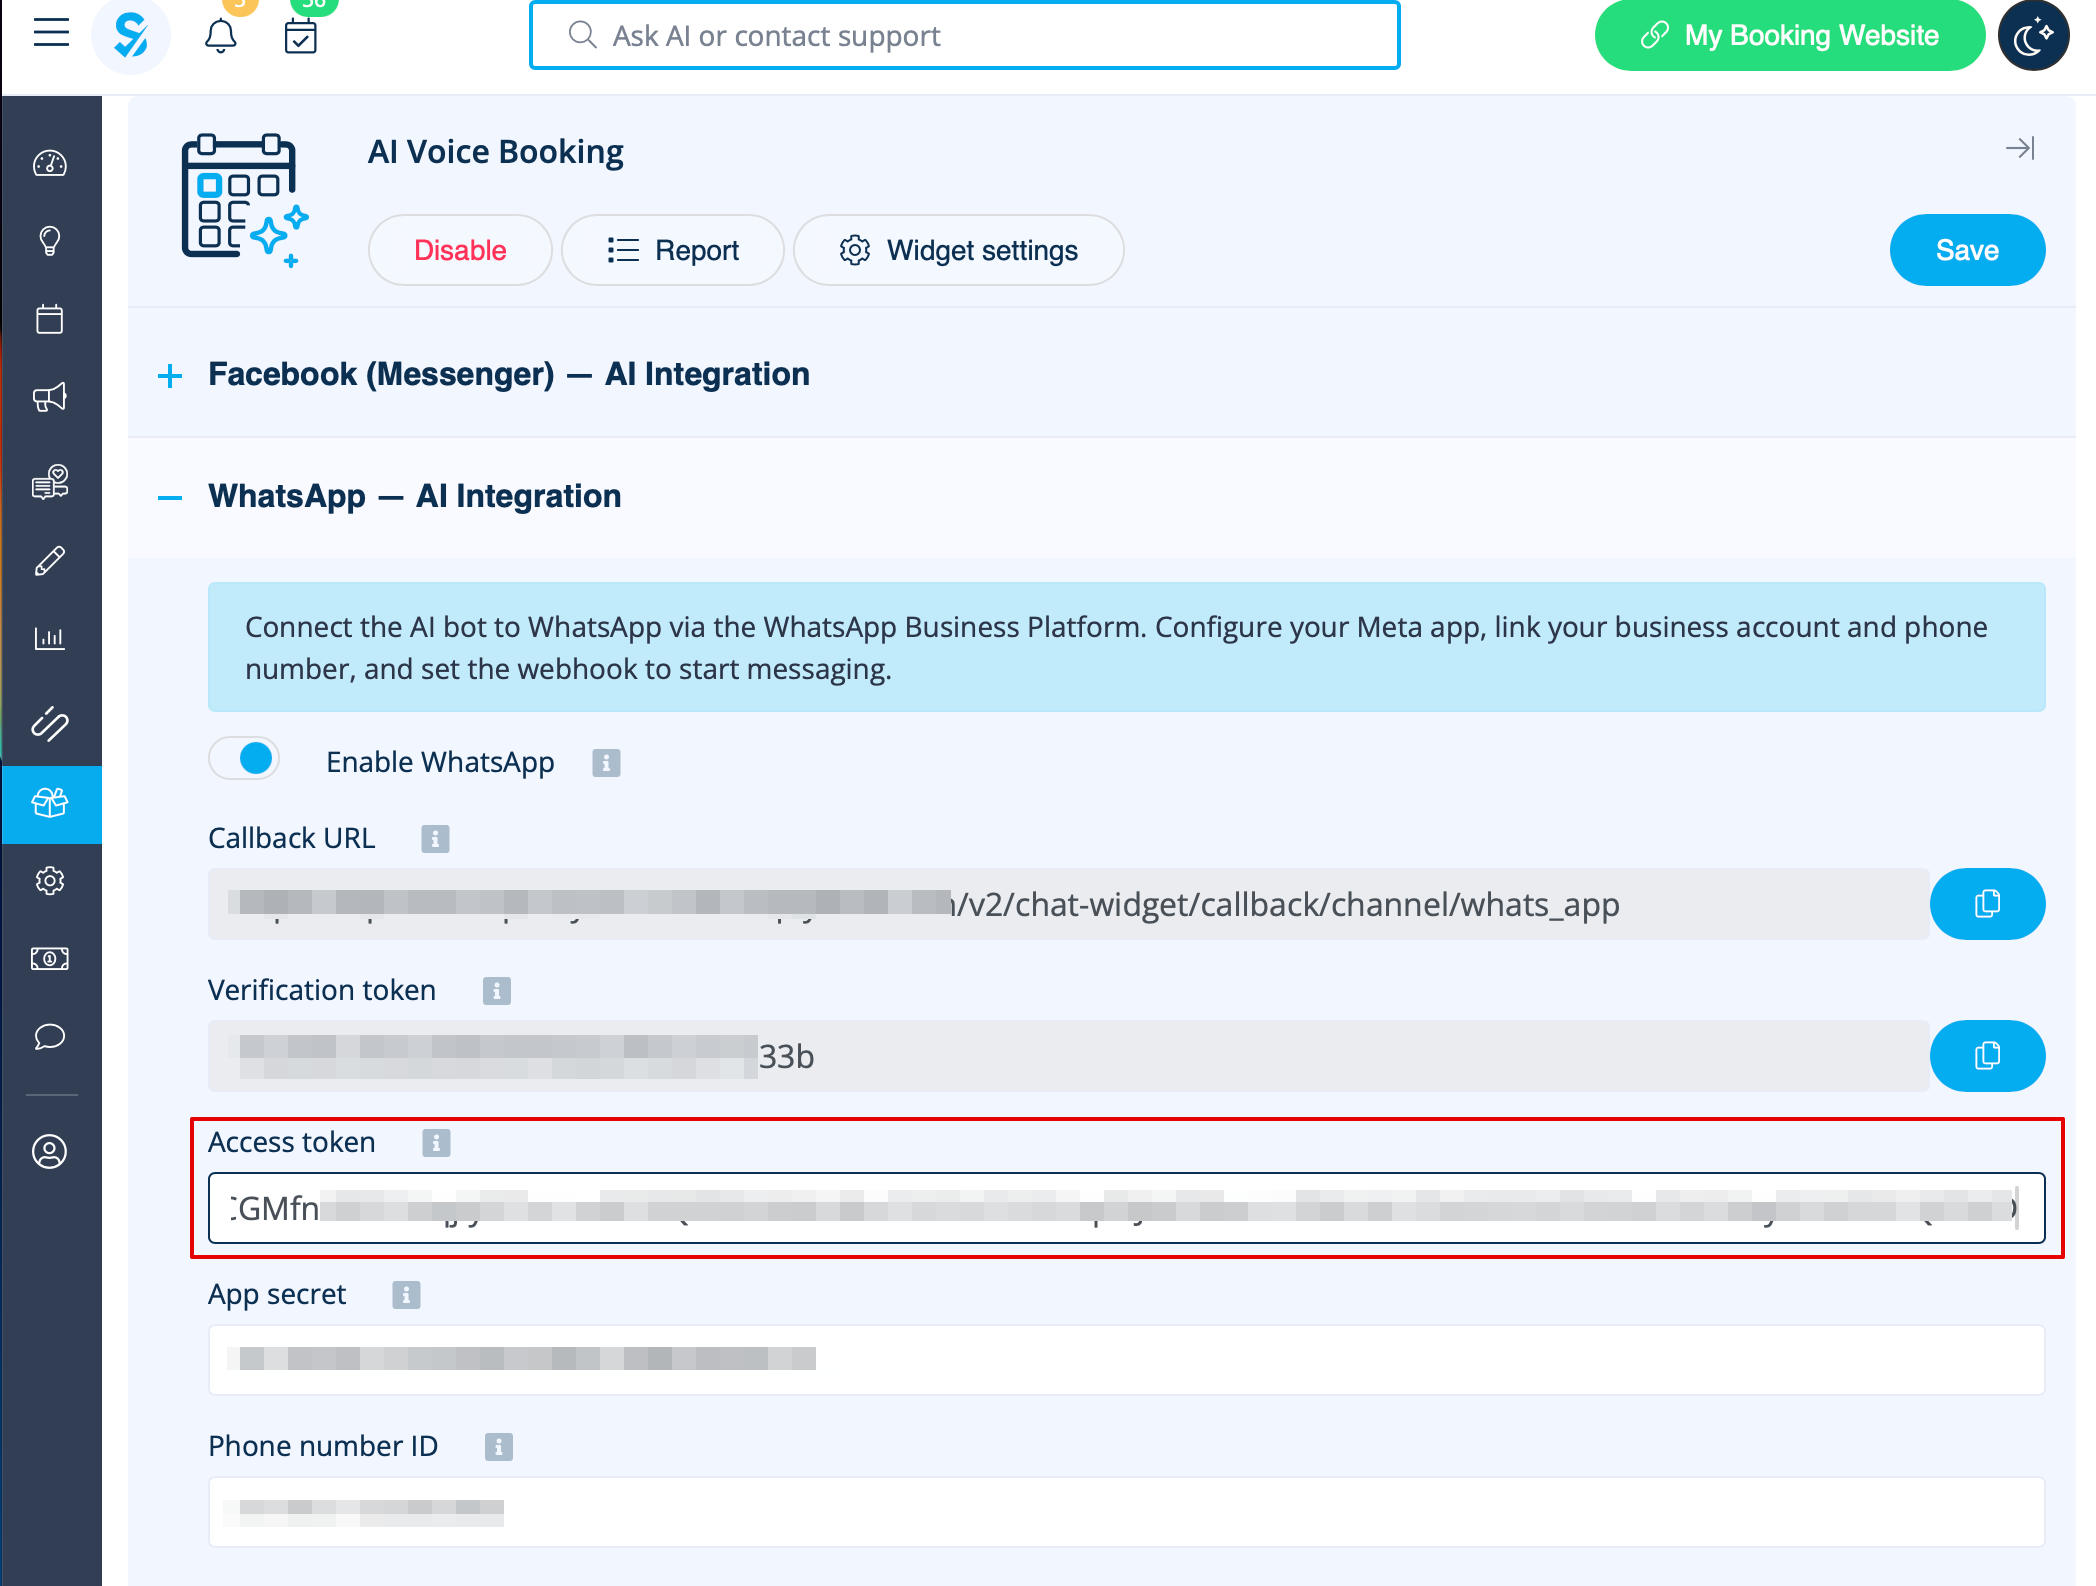
23. | 23. Kopiera token och klistra in den i SB och spara inställningarna.<br> | ||
[[File:Paste token to sbm.png|1200px|center|link=https://help.simplybook.me/images/e/e7/Paste_token_to_sbm.png]] | [[File:Paste token to sbm.png|1200px|center|link=https://help.simplybook.me/images/e/e7/Paste_token_to_sbm.png]] | ||
<br><br> | <br><br> | ||
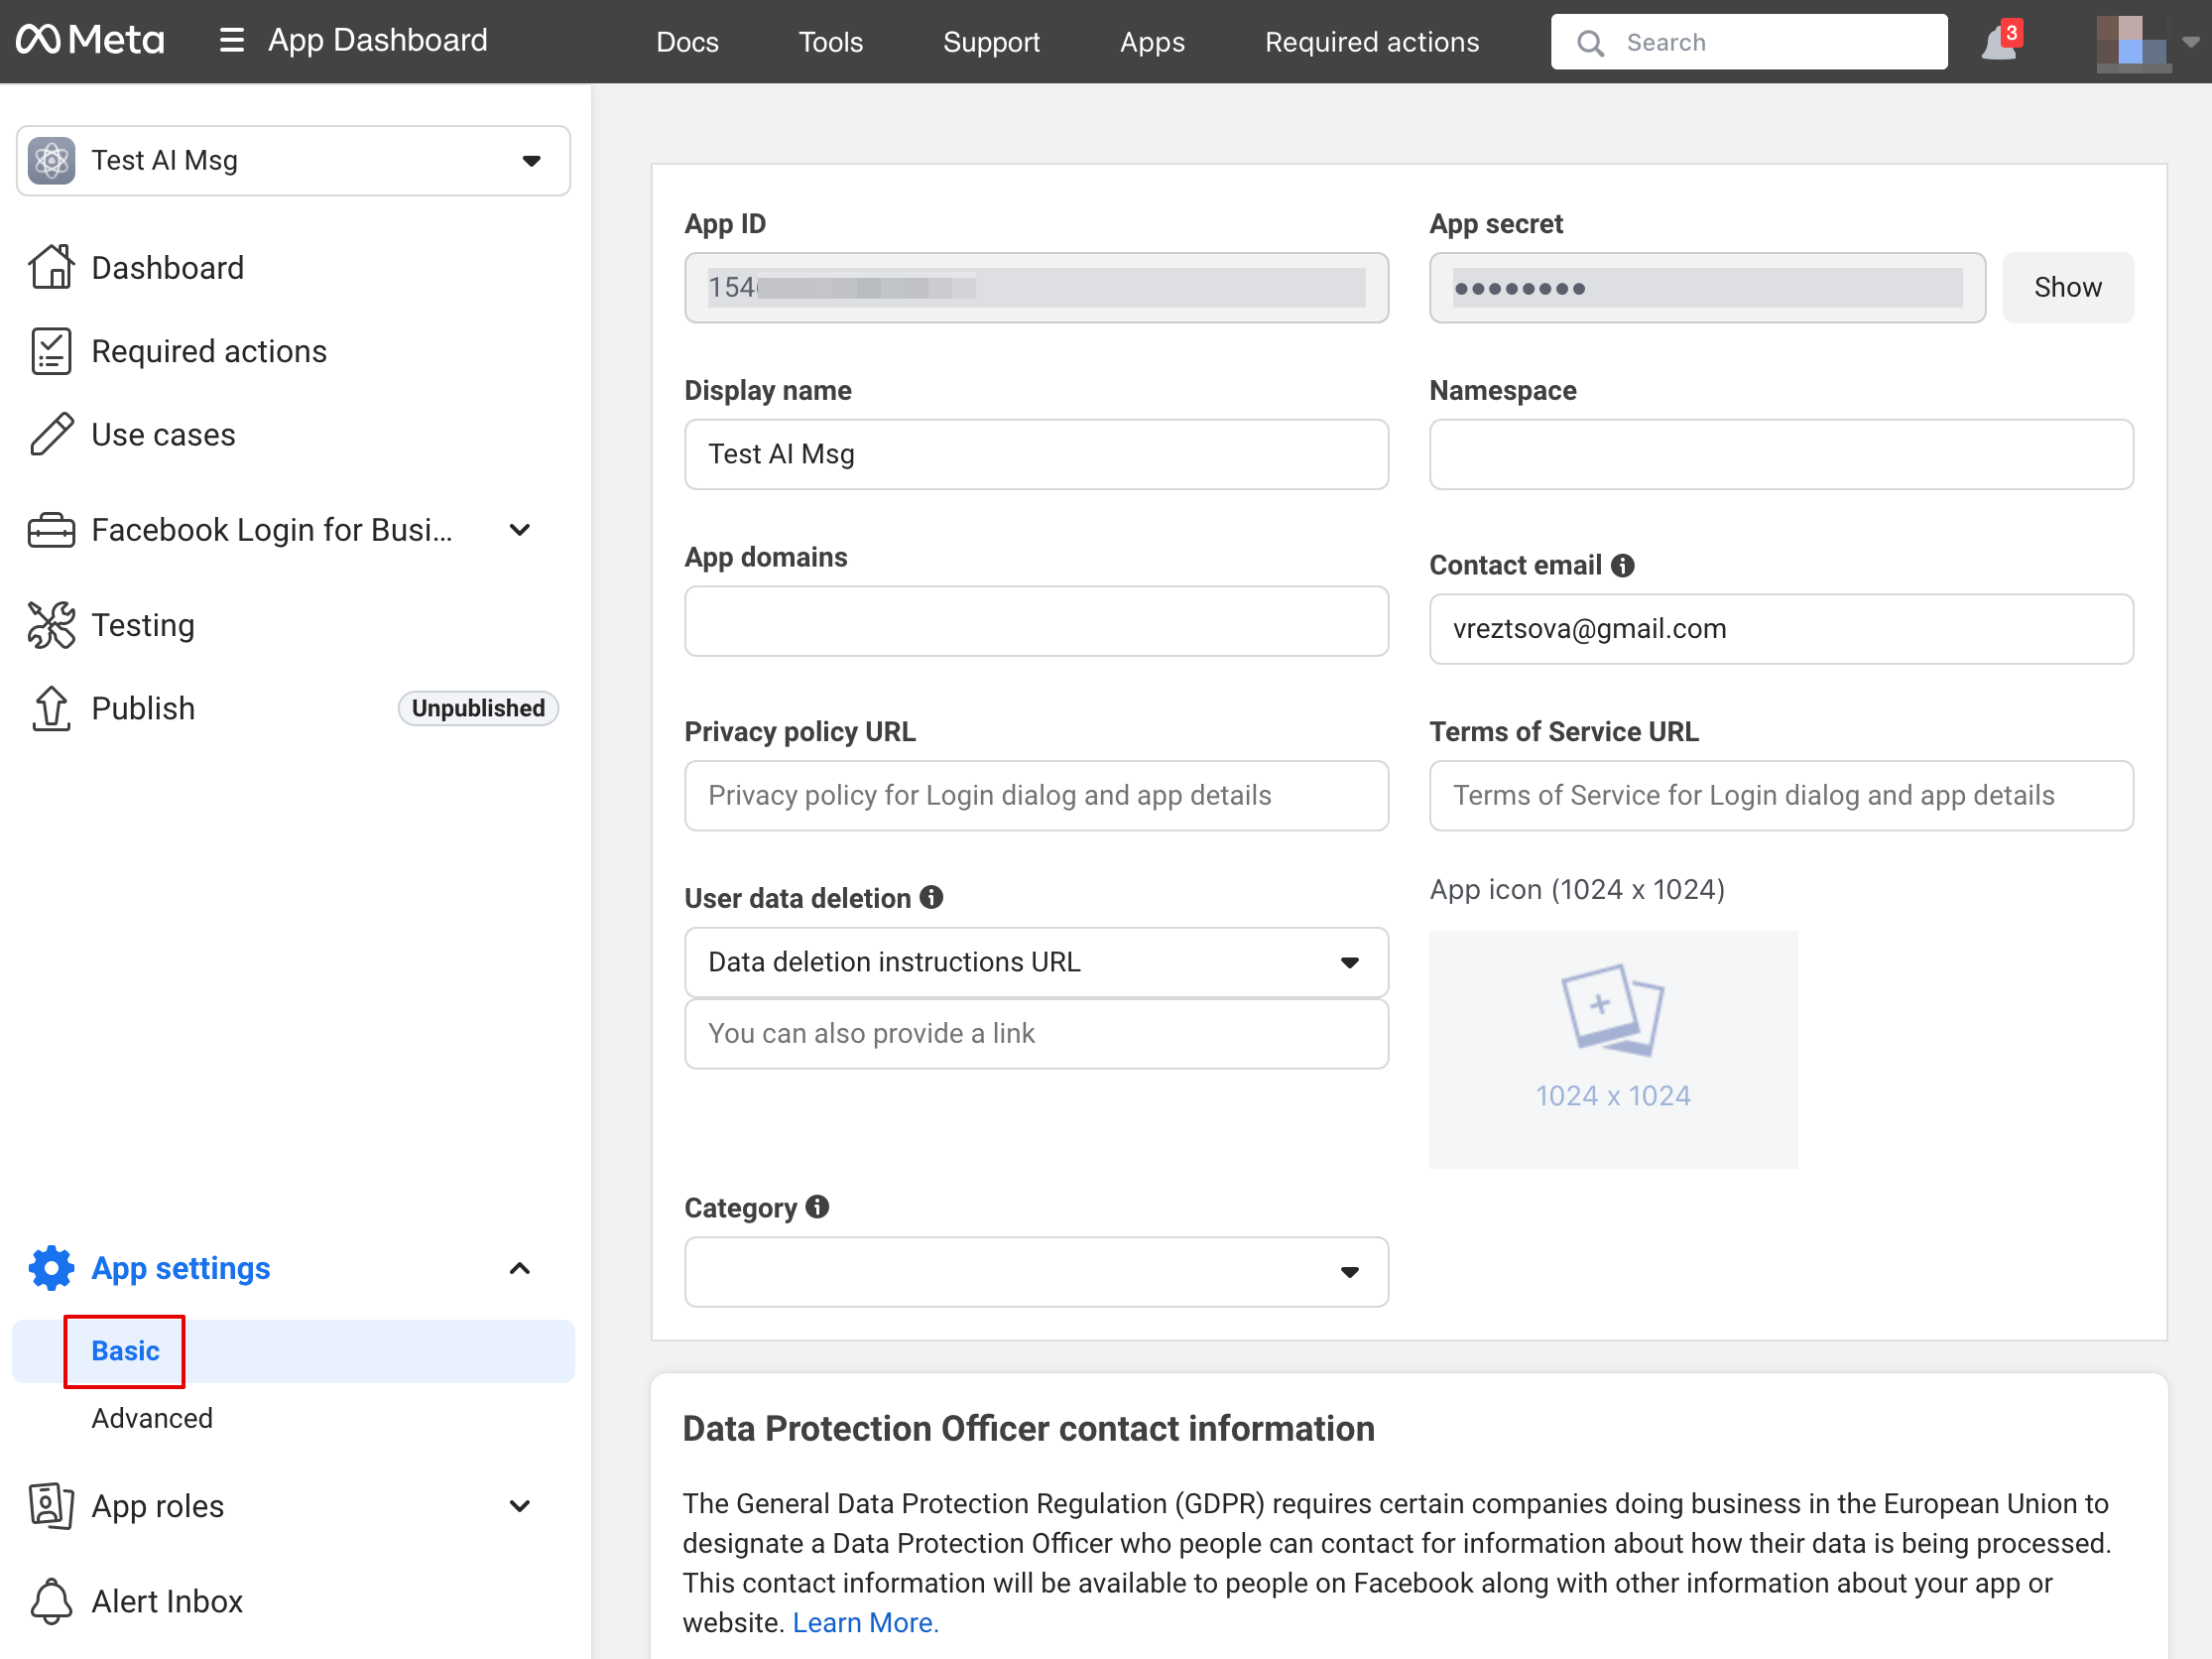
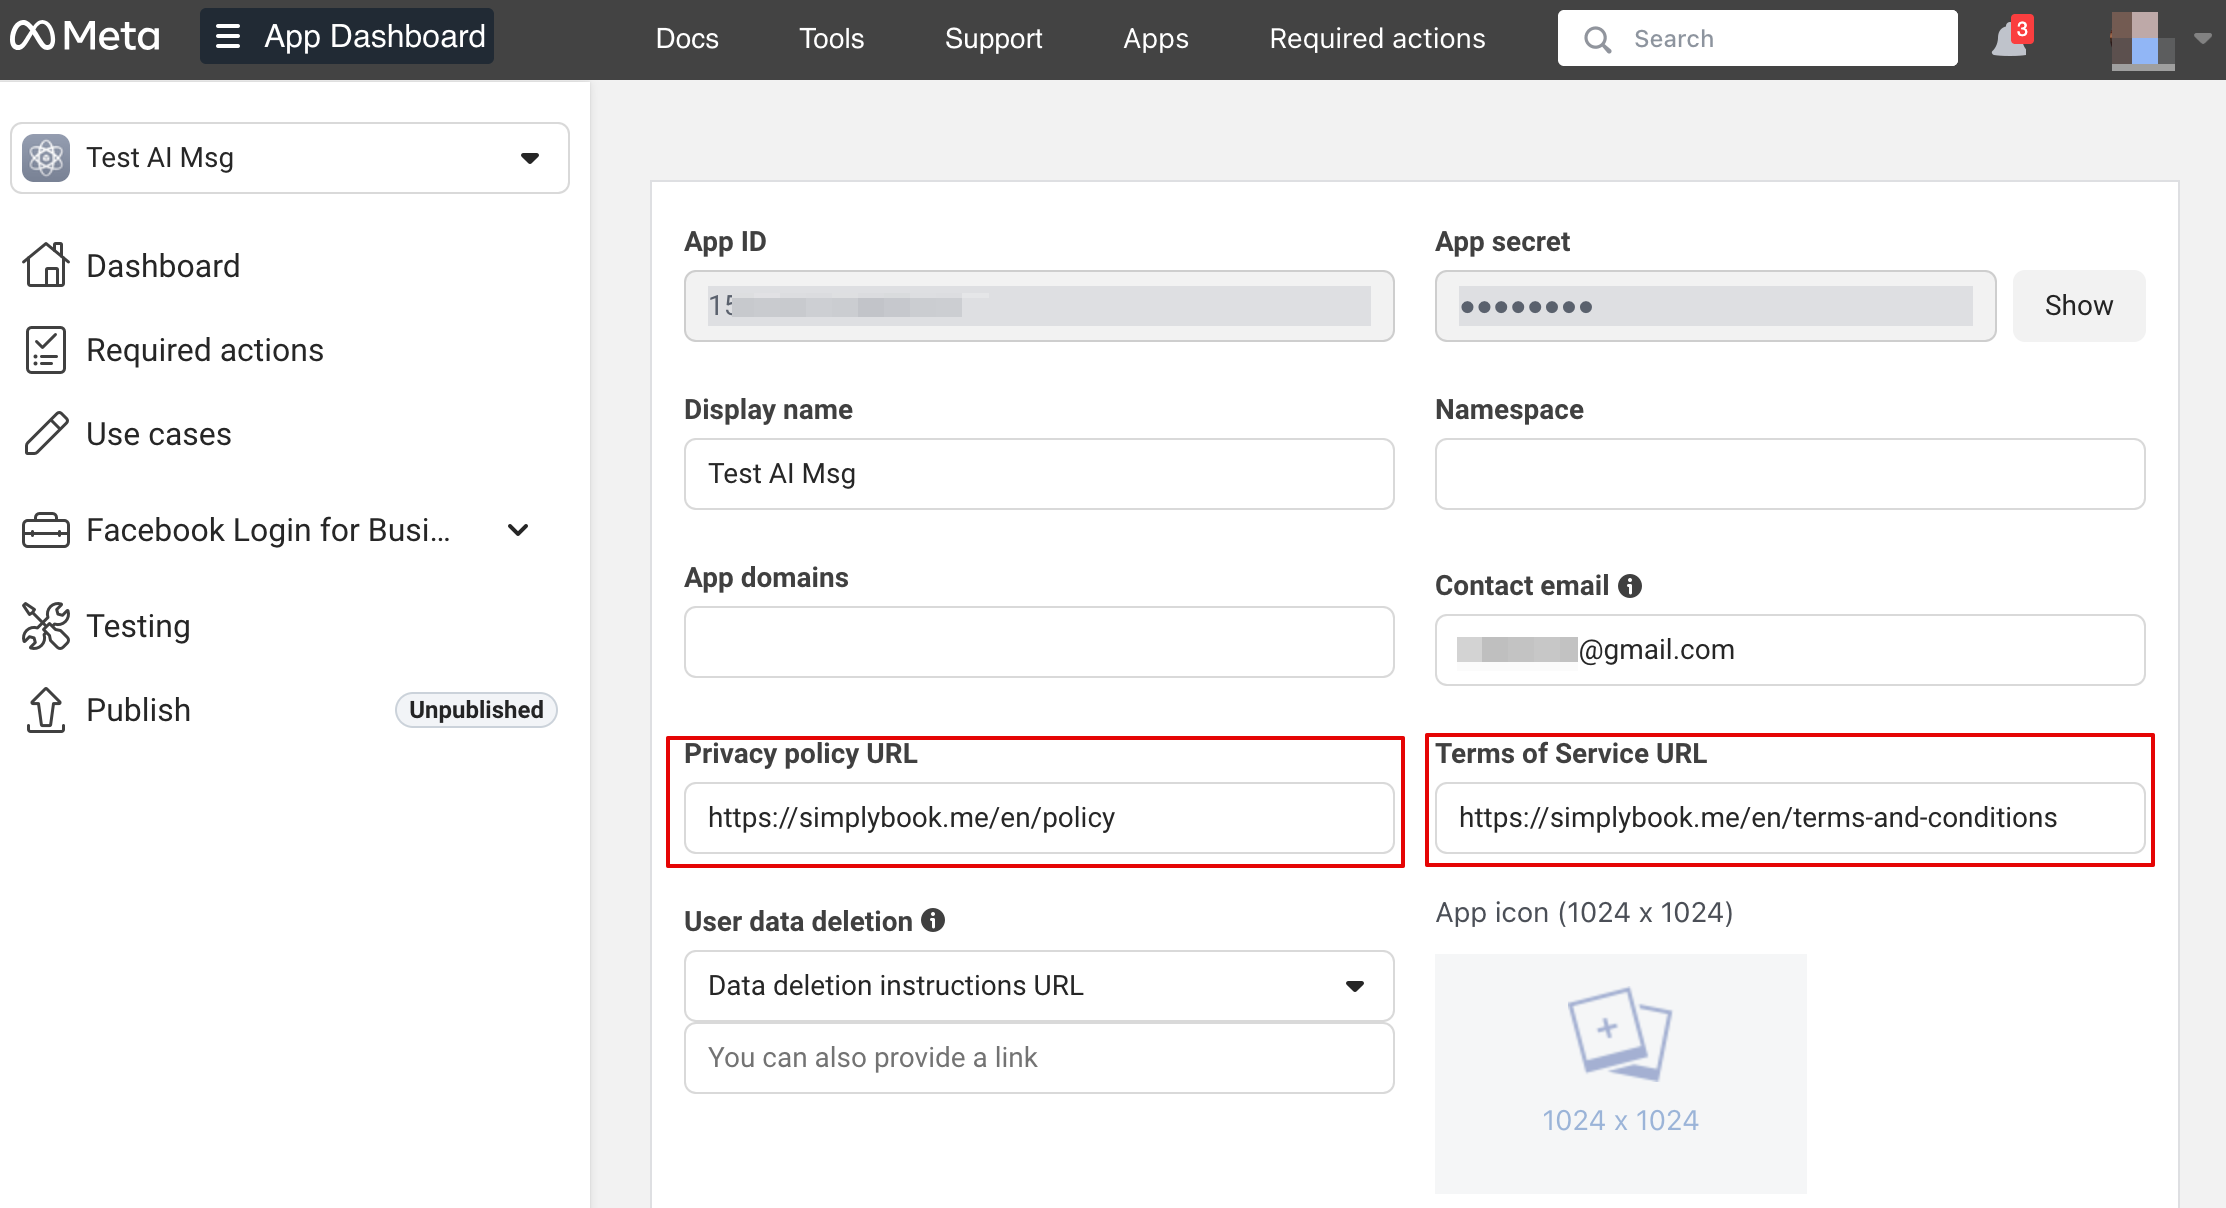
24. | 24. Gå nu tillbaka till [https://developers.facebook.com/apps/ Facebook-utvecklare], välj din app och klicka på Settings -> Basic. Ange URL:er för Integritetspolicy och Användarvillkor. | ||
[[File:App settings basic path.png|1200px|center|link=https://help.simplybook.me/images/7/70/App_settings_basic_path.png]] | [[File:App settings basic path.png|1200px|center|link=https://help.simplybook.me/images/7/70/App_settings_basic_path.png]] | ||
[[File:Insert your terms and privacy policy links upd.png|1200px|center|link=https://help.simplybook.me/images/9/92/Insert_your_terms_and_privacy_policy_links_upd.png]] | [[File:Insert your terms and privacy policy links upd.png|1200px|center|link=https://help.simplybook.me/images/9/92/Insert_your_terms_and_privacy_policy_links_upd.png]] | ||
<br><br> | <br><br> | ||
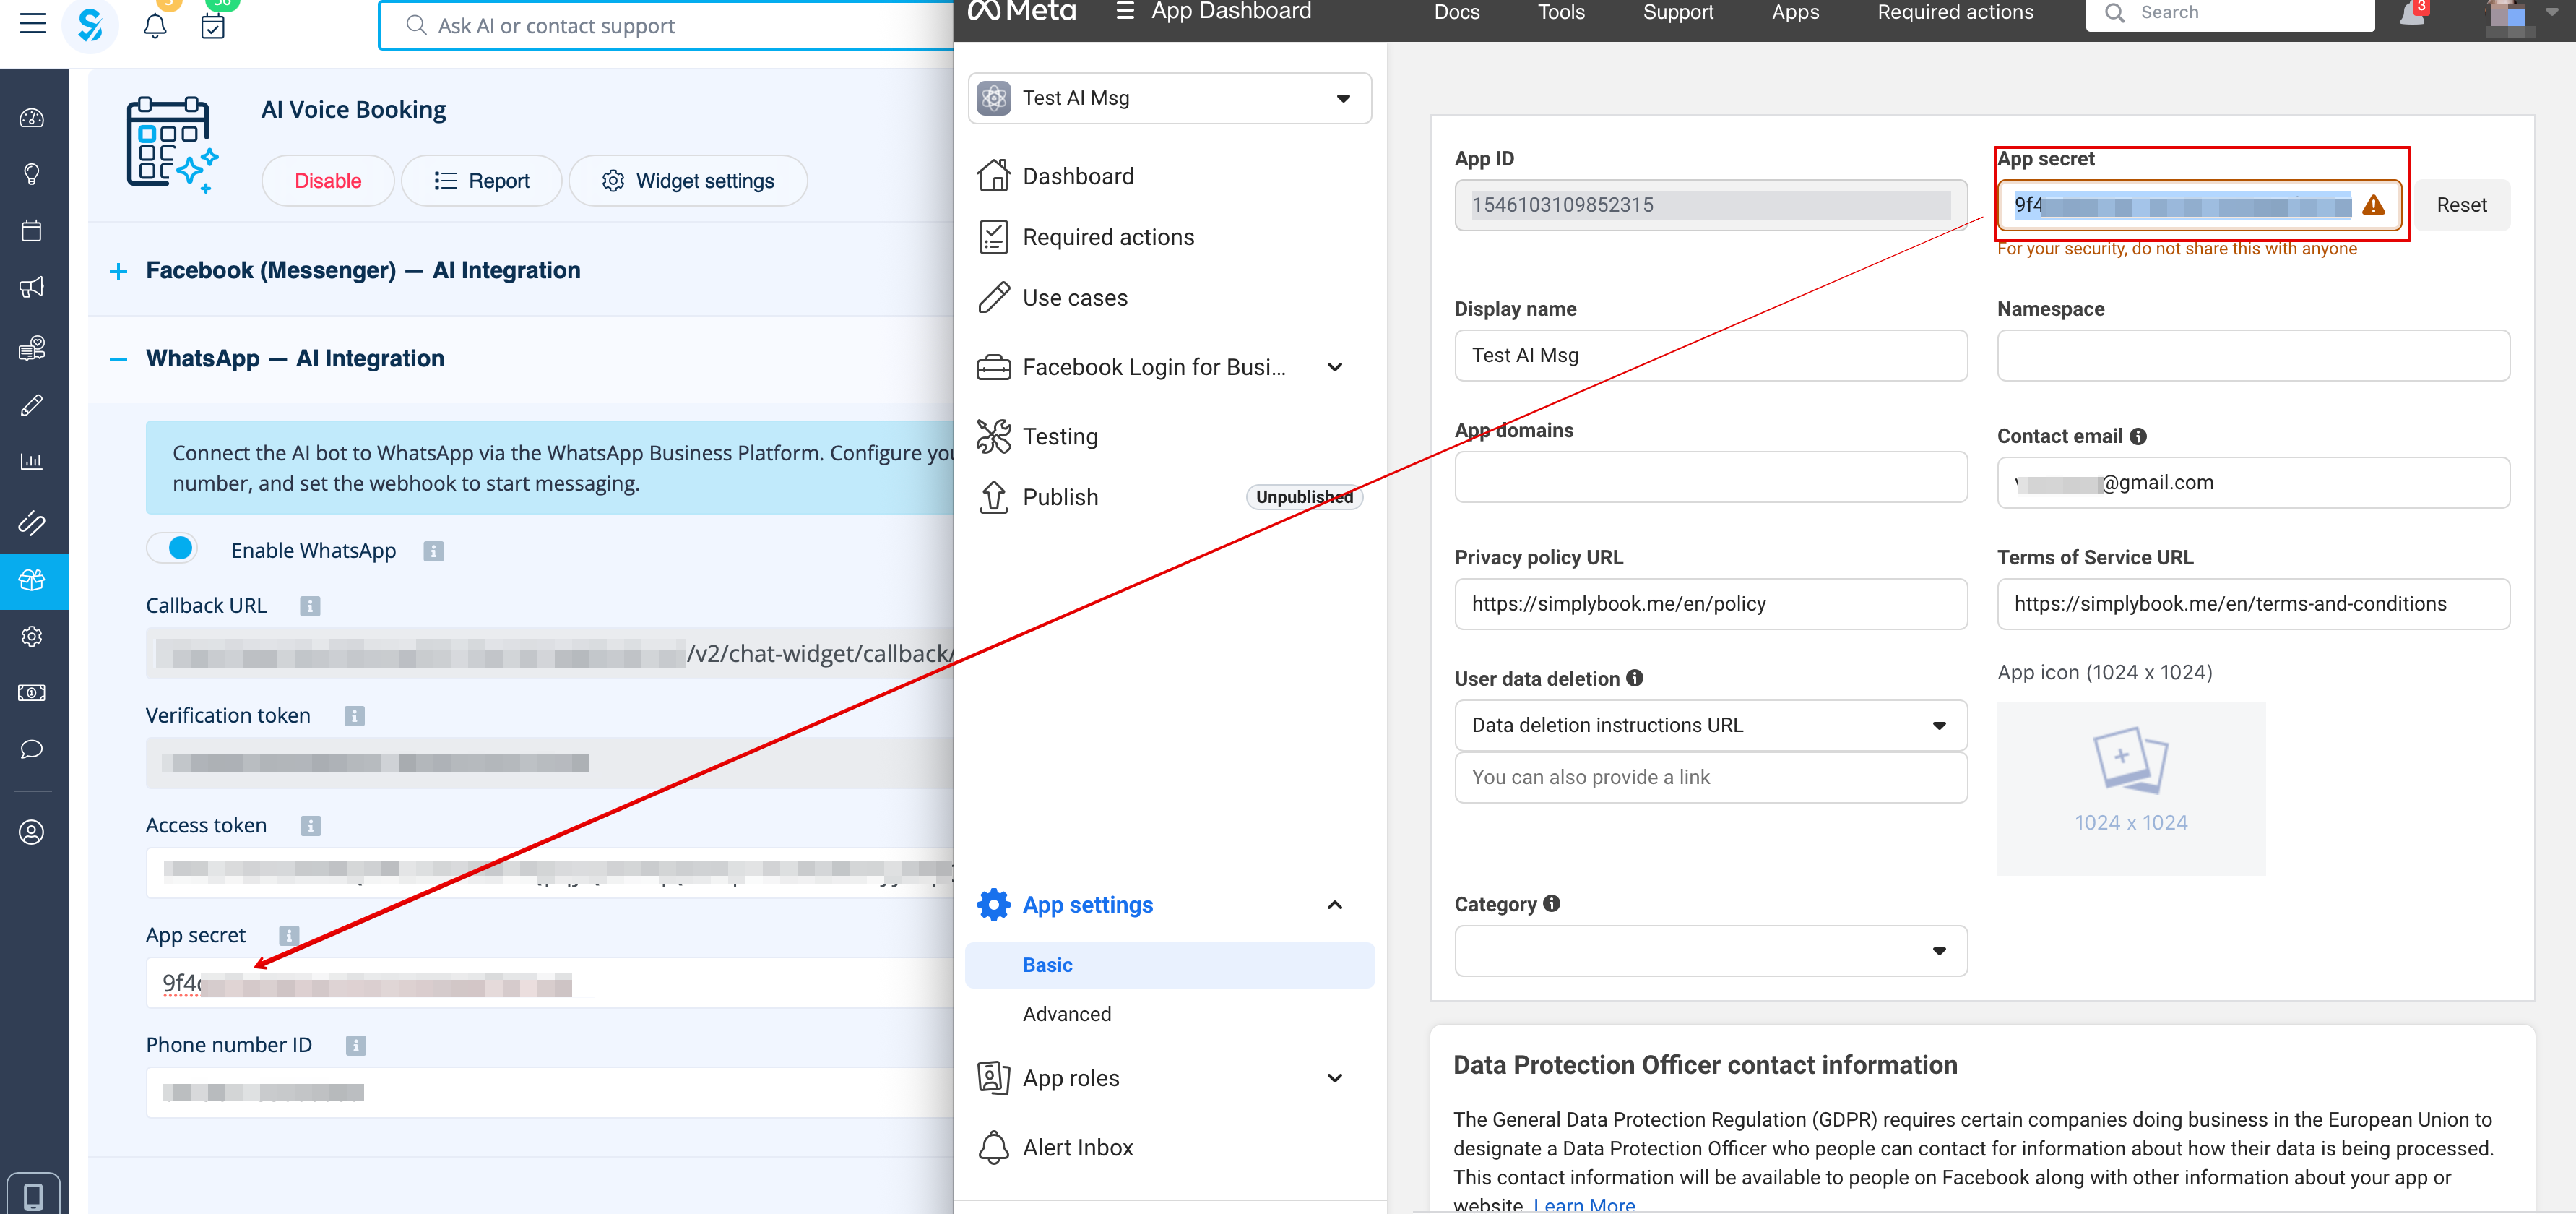
25. | 25. Kopiera App Secret och klistra in den i SB. | ||
[[File:Paste app secret to sbm.png|1200px|center|link=https://help.simplybook.me/images/2/20/Paste_app_secret_to_sbm.png]] | [[File:Paste app secret to sbm.png|1200px|center|link=https://help.simplybook.me/images/2/20/Paste_app_secret_to_sbm.png]] | ||
<br><br> | <br><br> | ||
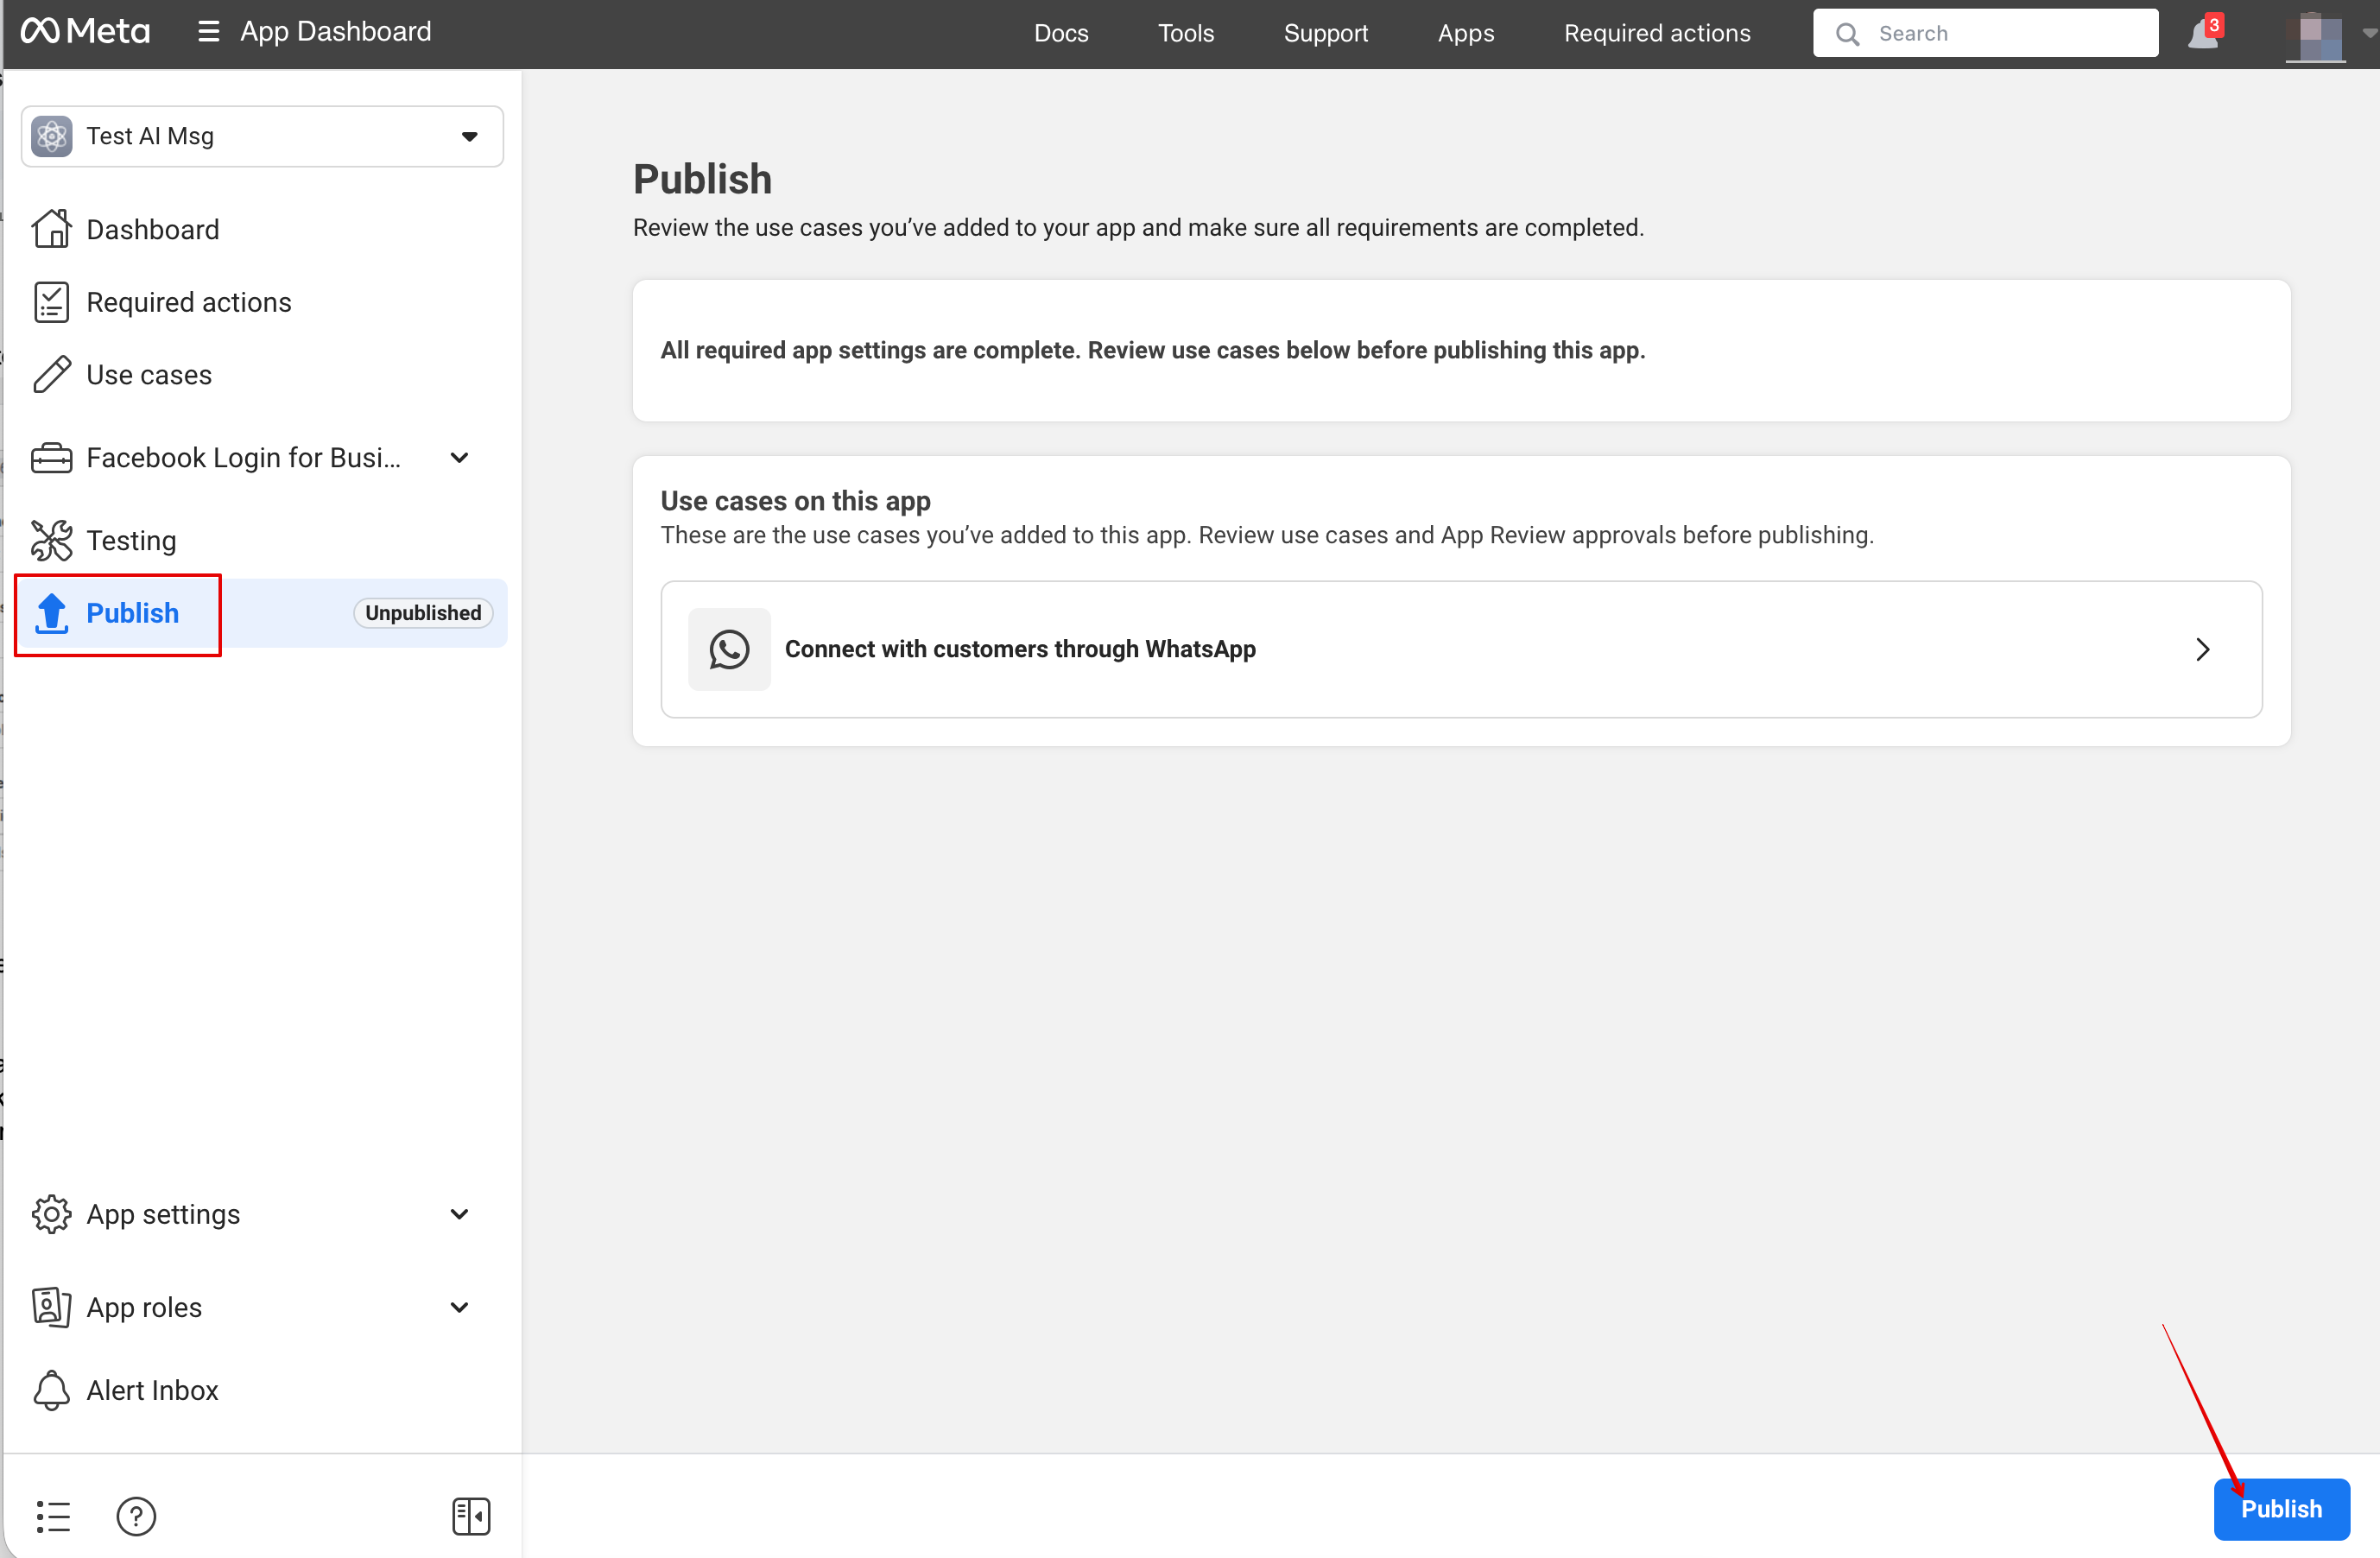
26. Nu kan du publicera appen, ge dina kunder ditt WhatsApp Business-nummer och låta dem boka tjänster med hjälp av AI. | |||
[[File:Publish wa app.png|1200px|center|link=https://help.simplybook.me/ | [[File:Publish wa app.png|1200px|center|link=https://help.simplybook.me/images/5/55/Publish_wa_app.png]] | ||
<br><br><br><br> | <br><br><br><br> | ||
== | ==Konfigurera Facebook Messenger== | ||
1. | 1. Öppna [https://developers.facebook.com/apps/ Facebook-utvecklare] och klicka på ”Create App”: | ||
[[File:Create sb app step 1.png|1200px|center|link=https://help.simplybook.me/images/9/9c/Create_sb_app_step_1.png]] | [[File:Create sb app step 1.png|1200px|center|link=https://help.simplybook.me/images/9/9c/Create_sb_app_step_1.png]] | ||
<br><br> | <br><br> | ||
2. | 2. Ange önskade appuppgifter: | ||
[[File:Test messenger app create step 1.png|1200px|center|link=https://help.simplybook.me/images/c/ce/Test_messenger_app_create_step_1.png]] | [[File:Test messenger app create step 1.png|1200px|center|link=https://help.simplybook.me/images/c/ce/Test_messenger_app_create_step_1.png]] | ||
<br><br> | <br><br> | ||
3. | 3. Välj användningsfallet Messenger från listan: | ||
[[File:Select messenger ai.png|1200px|center|link=https://help.simplybook.me/images/7/75/Select_messenger_ai.png]] | [[File:Select messenger ai.png|1200px|center|link=https://help.simplybook.me/images/7/75/Select_messenger_ai.png]] | ||
<br><br> | <br><br> | ||
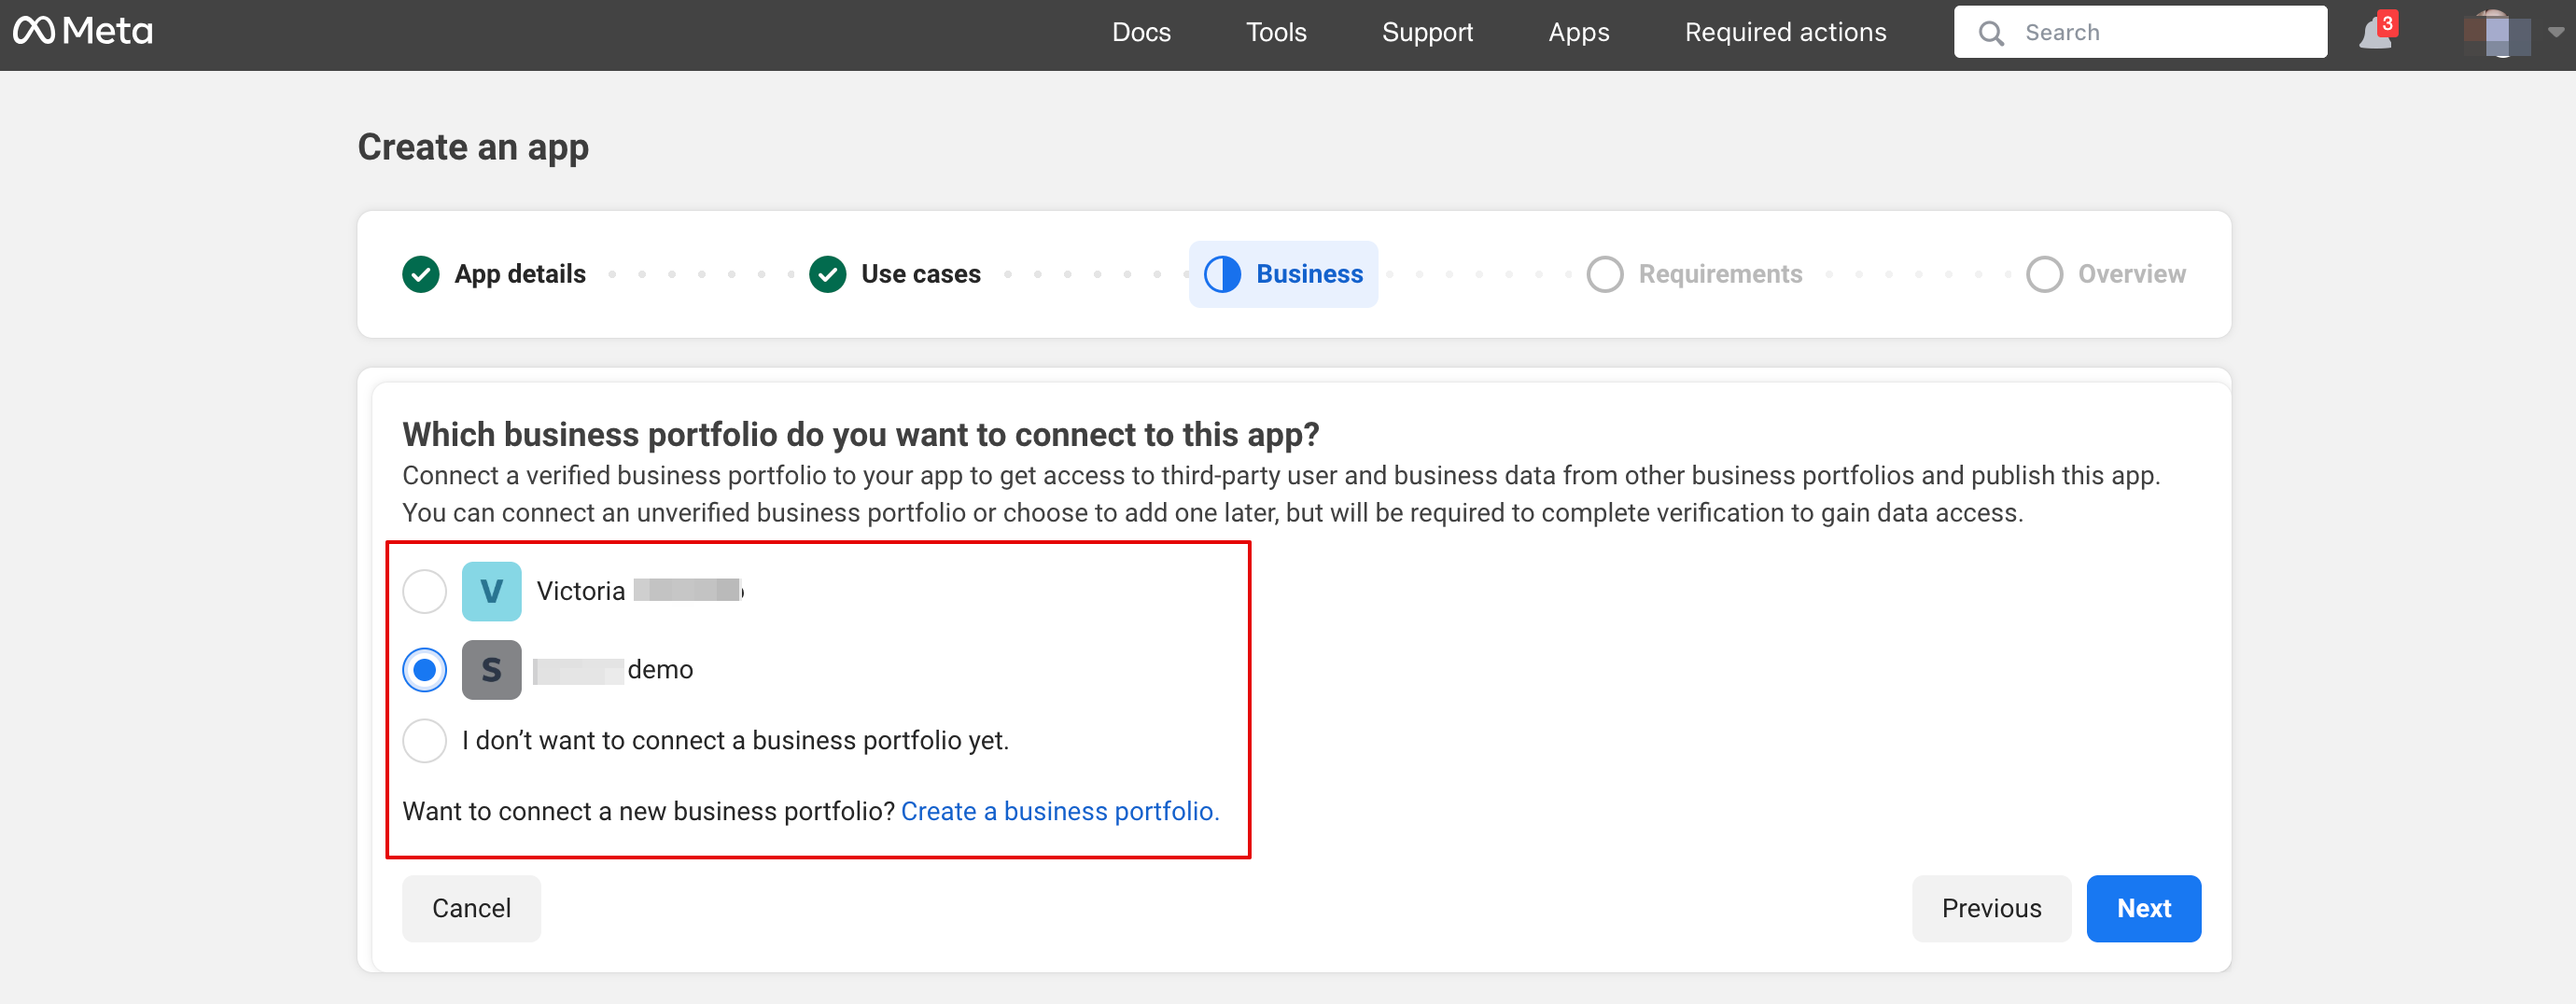
4. | 4. Välj företagsprofil eller skapa en ny. | ||
[[File:Connect msg app to business.png|1200px|center|link=https://help.simplybook.me/images/f/f8/Connect_msg_app_to_business.png]] | [[File:Connect msg app to business.png|1200px|center|link=https://help.simplybook.me/images/f/f8/Connect_msg_app_to_business.png]] | ||
<br><br> | <br><br> | ||
5. | 5. Gå vidare till appens Dashboard efter att ha granskat uppgifterna | ||
[[File:App overview step.png|1200px|center|link=https://help.simplybook.me/images/9/96/App_overview_step.png]] | [[File:App overview step.png|1200px|center|link=https://help.simplybook.me/images/9/96/App_overview_step.png]] | ||
<br><br> | <br><br> | ||
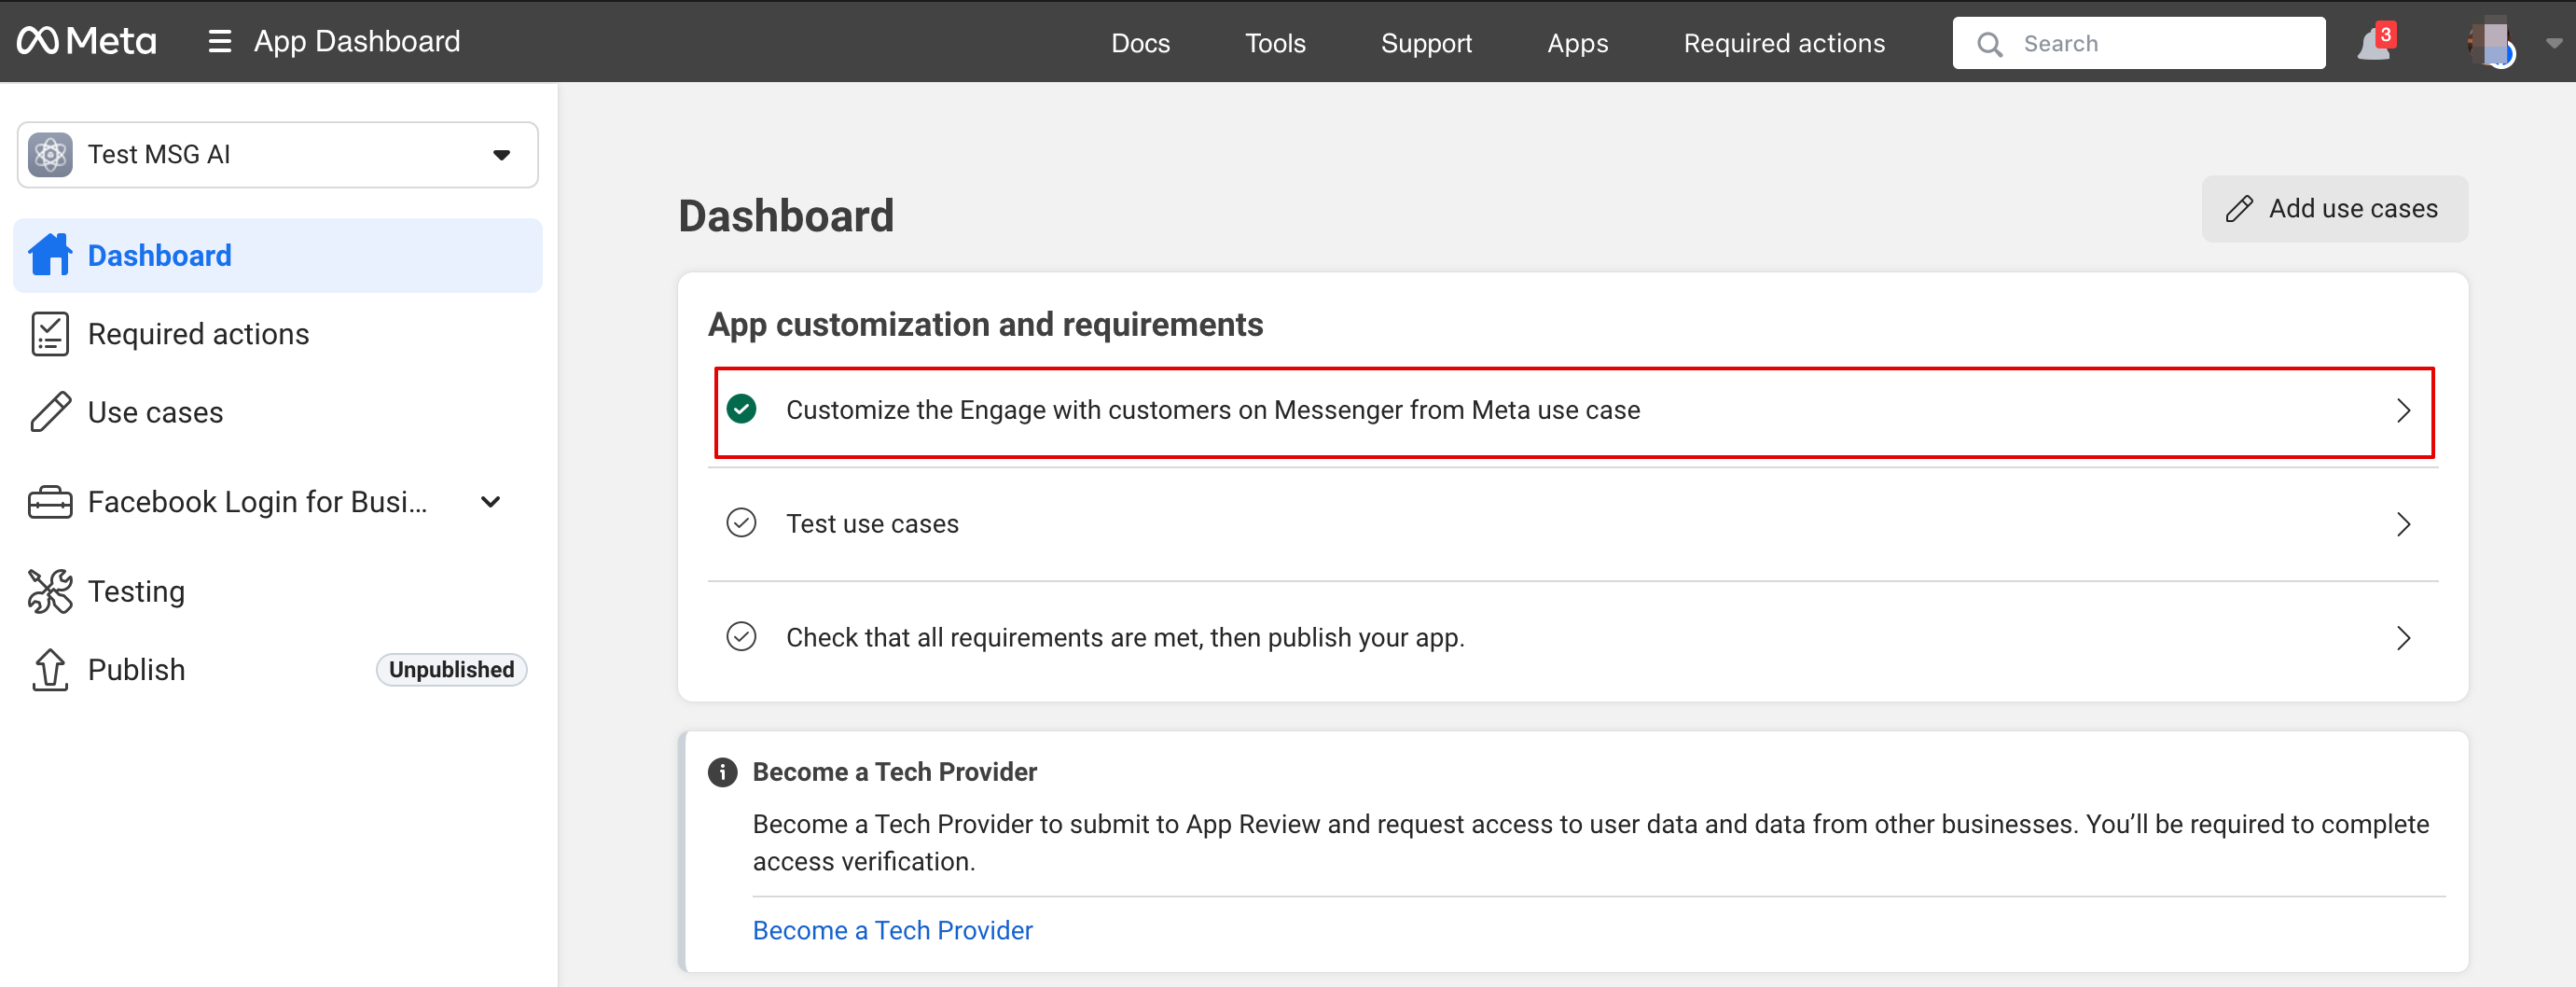
6. | 6. Klicka på Customize use case: | ||
[[File:Msg customize use case.png|1200px|center|link=https://help.simplybook.me/images/a/a5/Msg_customize_use_case.png]] | [[File:Msg customize use case.png|1200px|center|link=https://help.simplybook.me/images/a/a5/Msg_customize_use_case.png]] | ||
<br><br> | <br><br> | ||
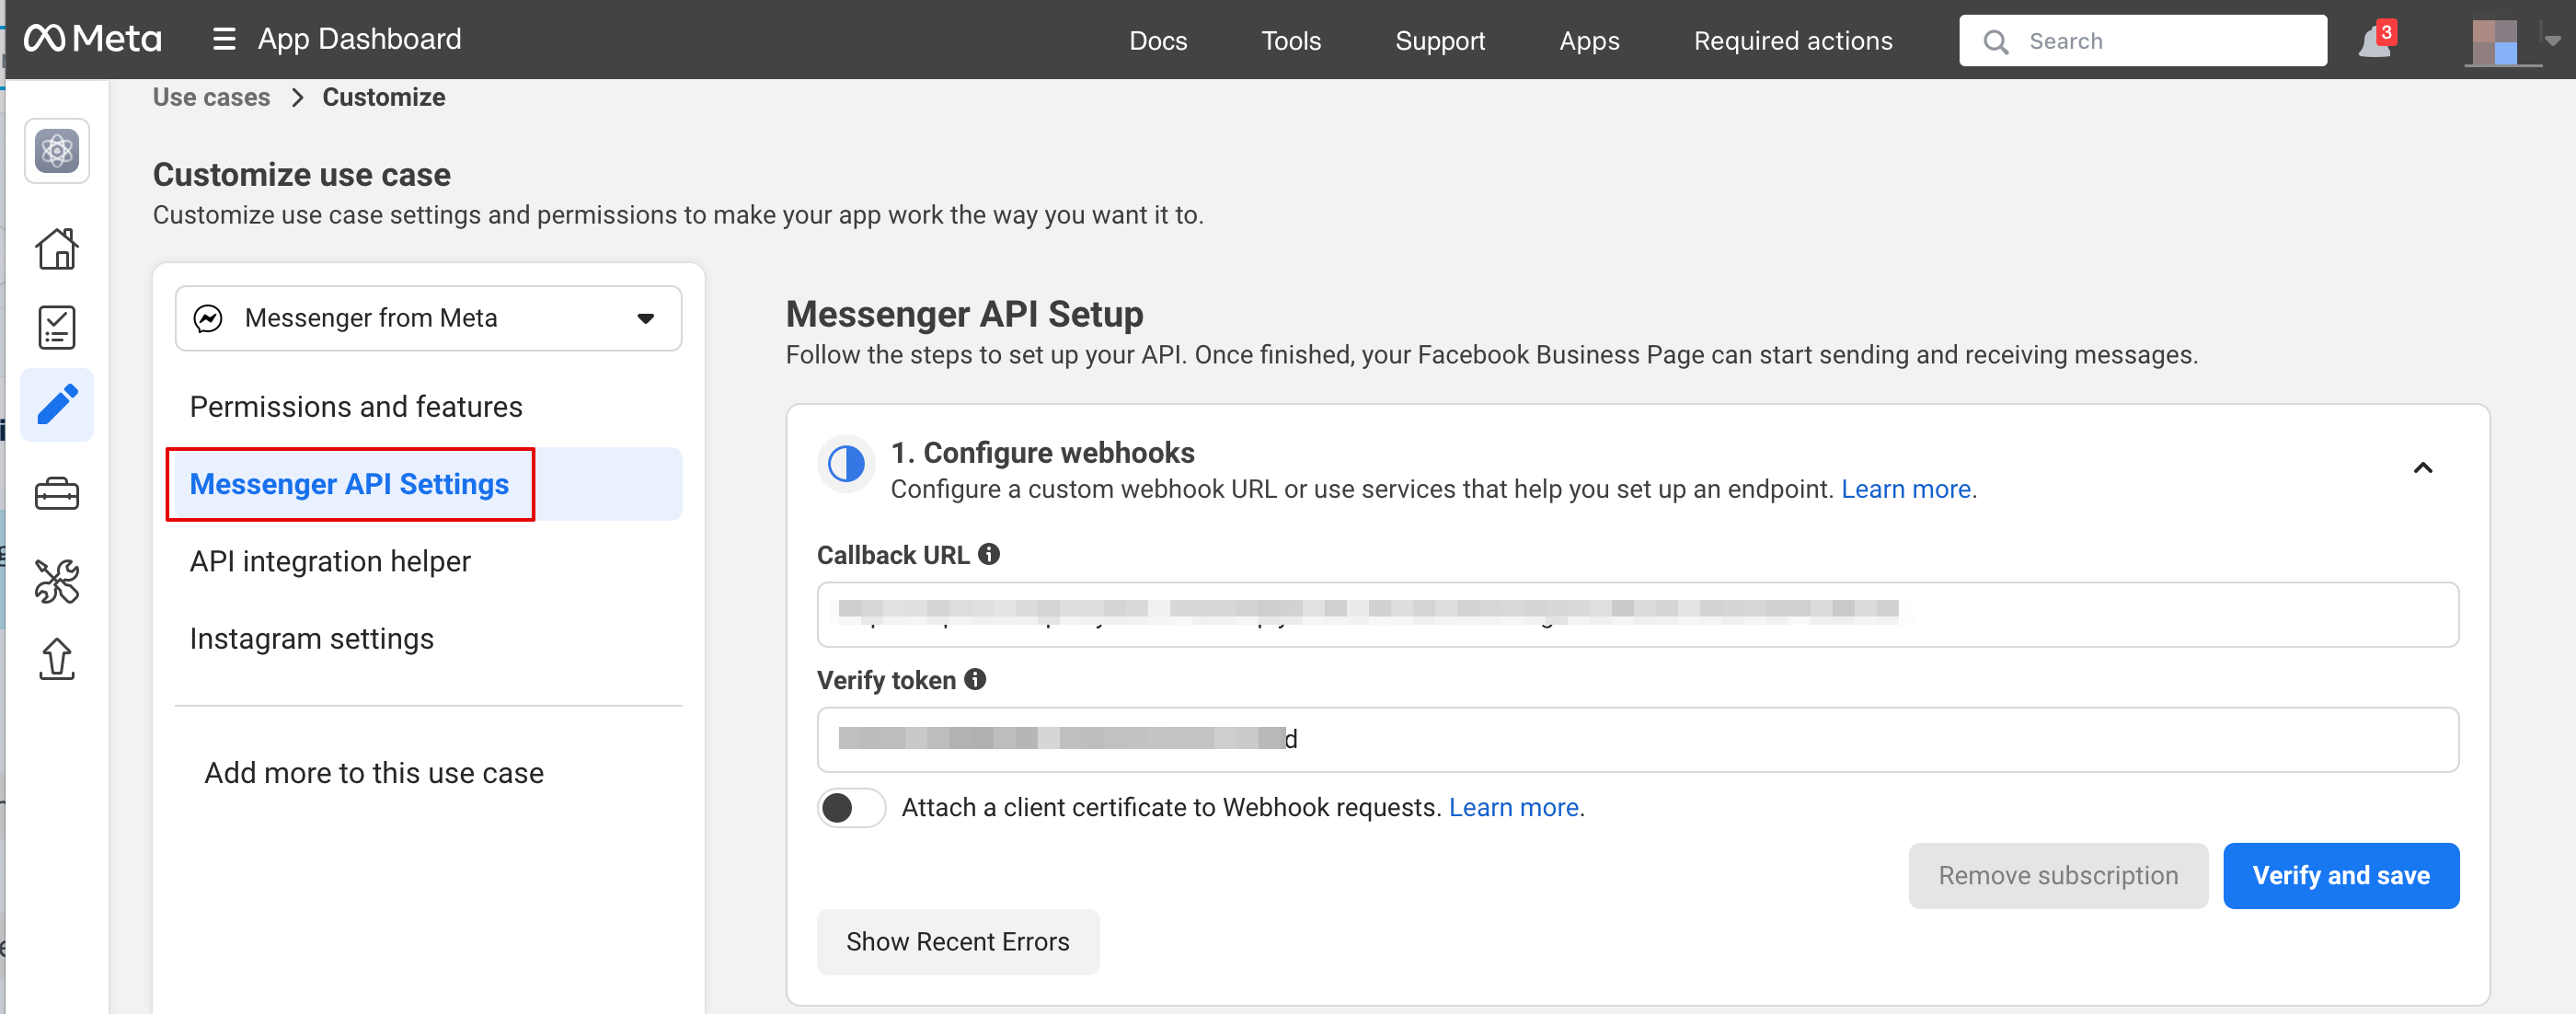
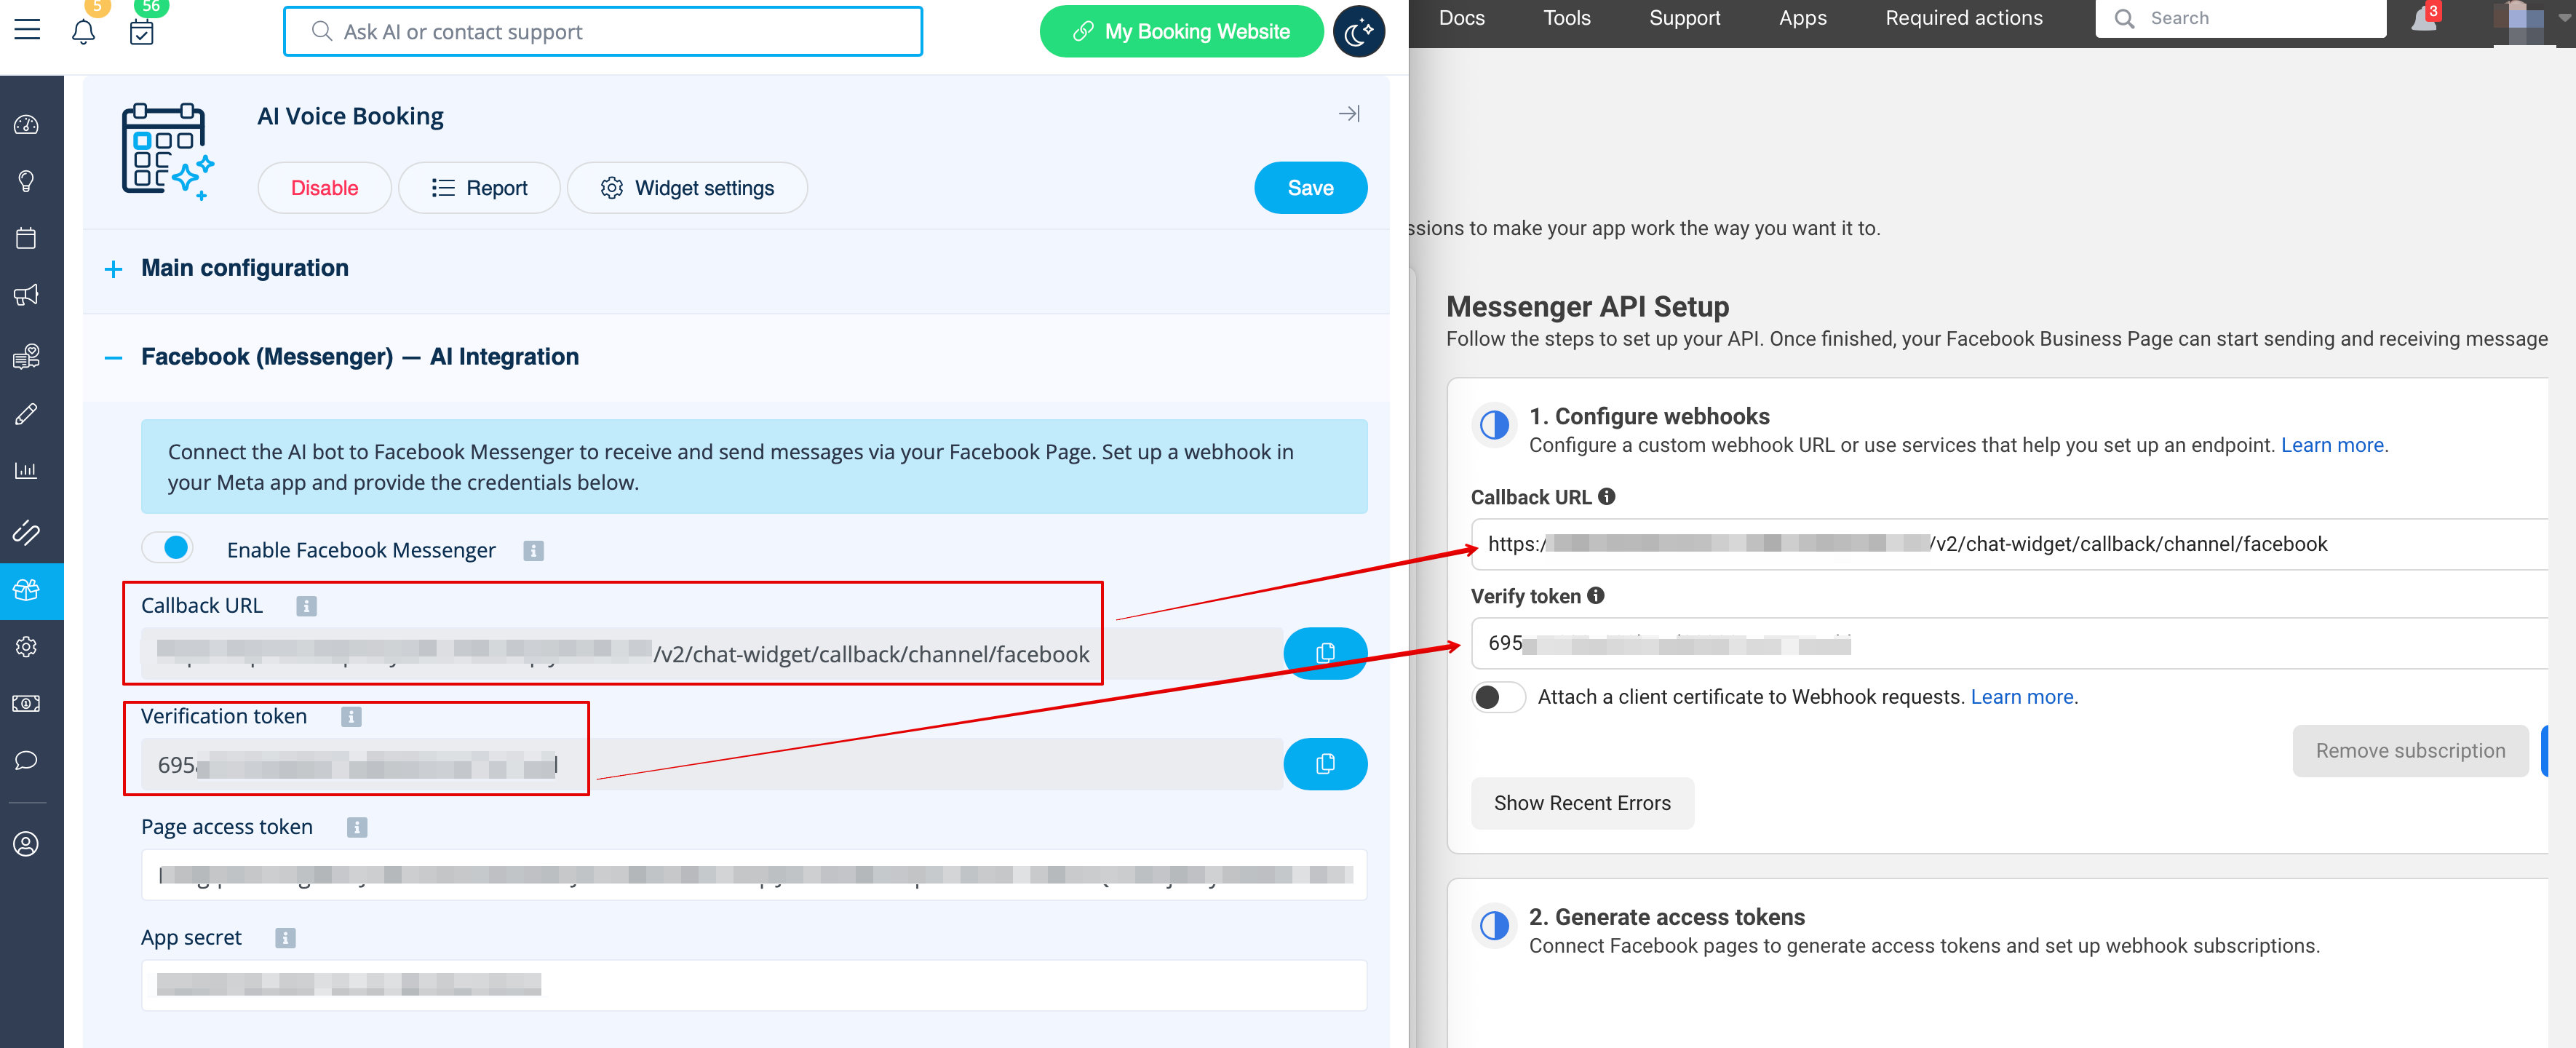
7. | 7. I Messenger API-inställningarna, ange webhook-URL och verifieringstoken från SB och klicka på Verify and save: | ||
[[File:Msg api settings path.png|1200px|center|link=https://help.simplybook.me/images/9/94/Msg_api_settings_path.png]] | [[File:Msg api settings path.png|1200px|center|link=https://help.simplybook.me/images/9/94/Msg_api_settings_path.png]] | ||
[[File:Msg callback url and verification token.png|1200px|center|link=https://help.simplybook.me/images/7/7e/Msg_callback_url_and_verification_token.png]] | [[File:Msg callback url and verification token.png|1200px|center|link=https://help.simplybook.me/images/7/7e/Msg_callback_url_and_verification_token.png]] | ||
<br><br> | <br><br> | ||
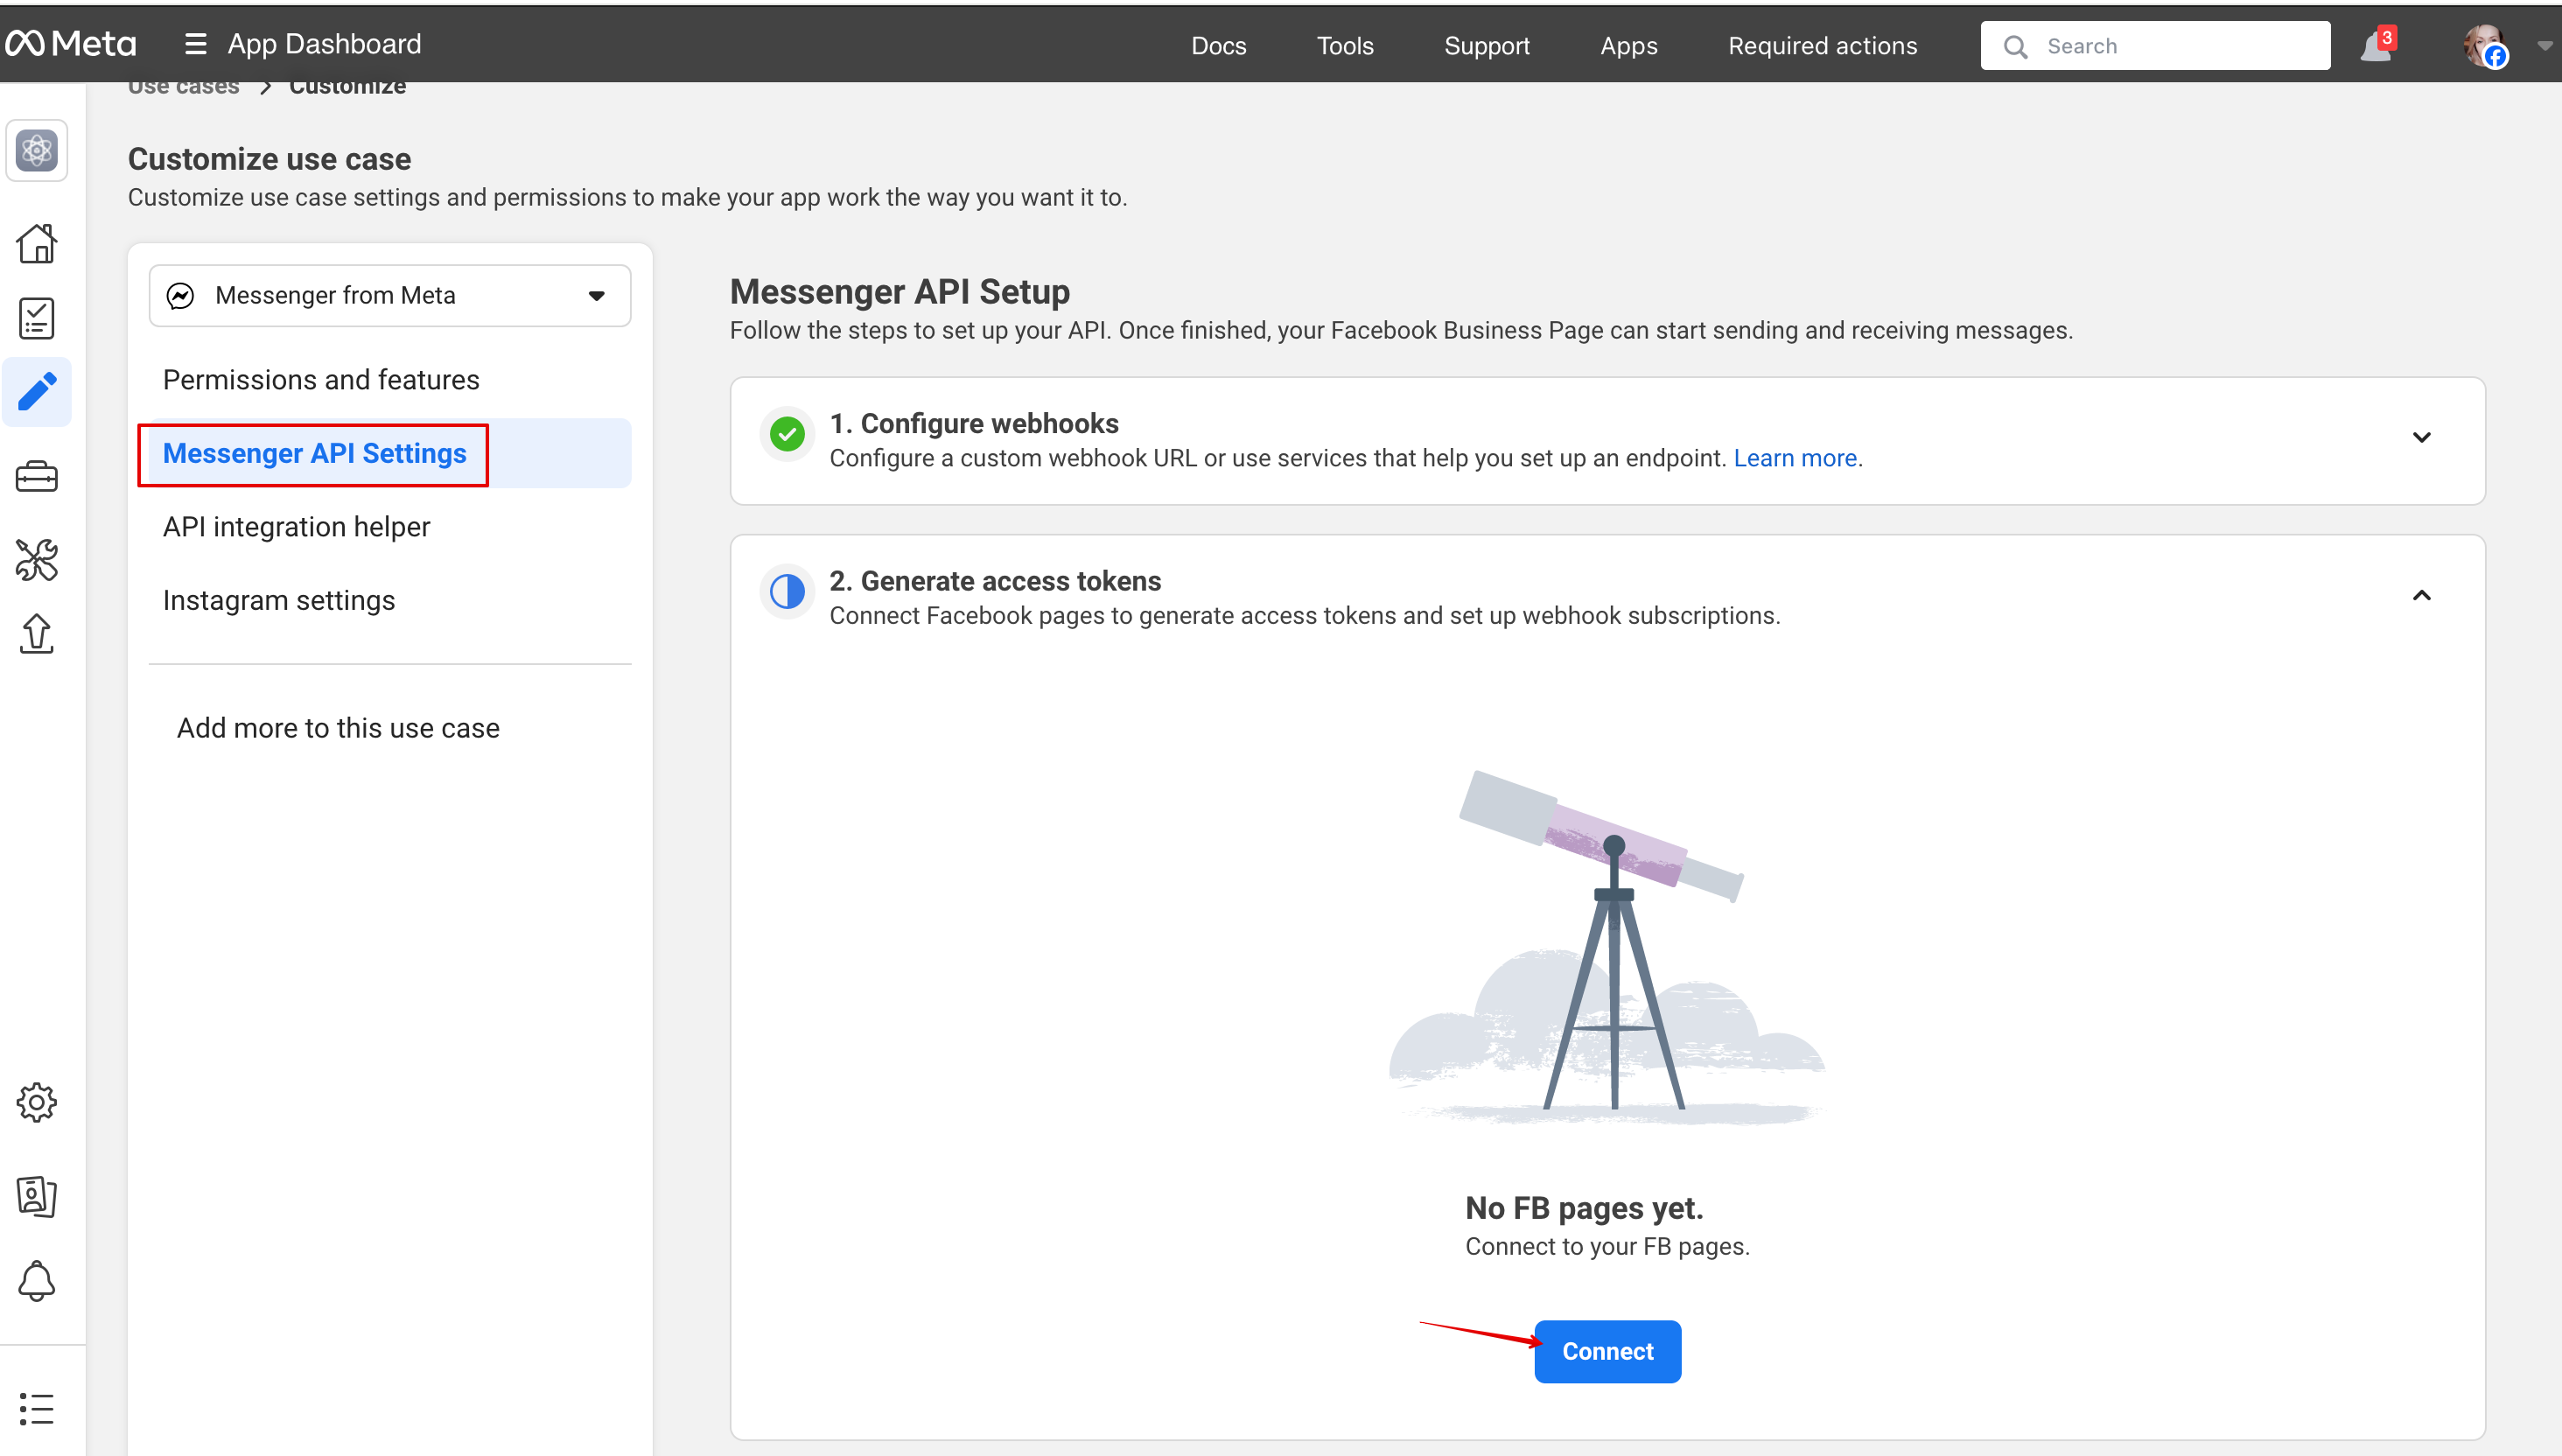
8. | 8. Gå tillbaka till Messenger API-inställningarna för att ansluta Facebook-sidan där AI-alternativet ska läggas till och generera en token. Klicka på connect och välj sidan: | ||
[[File:Msg api connect to page.png|1200px|center|link=https://help.simplybook.me/images/1/19/Msg_api_connect_to_page.png]] | [[File:Msg api connect to page.png|1200px|center|link=https://help.simplybook.me/images/1/19/Msg_api_connect_to_page.png]] | ||
<br><br> | <br><br> | ||
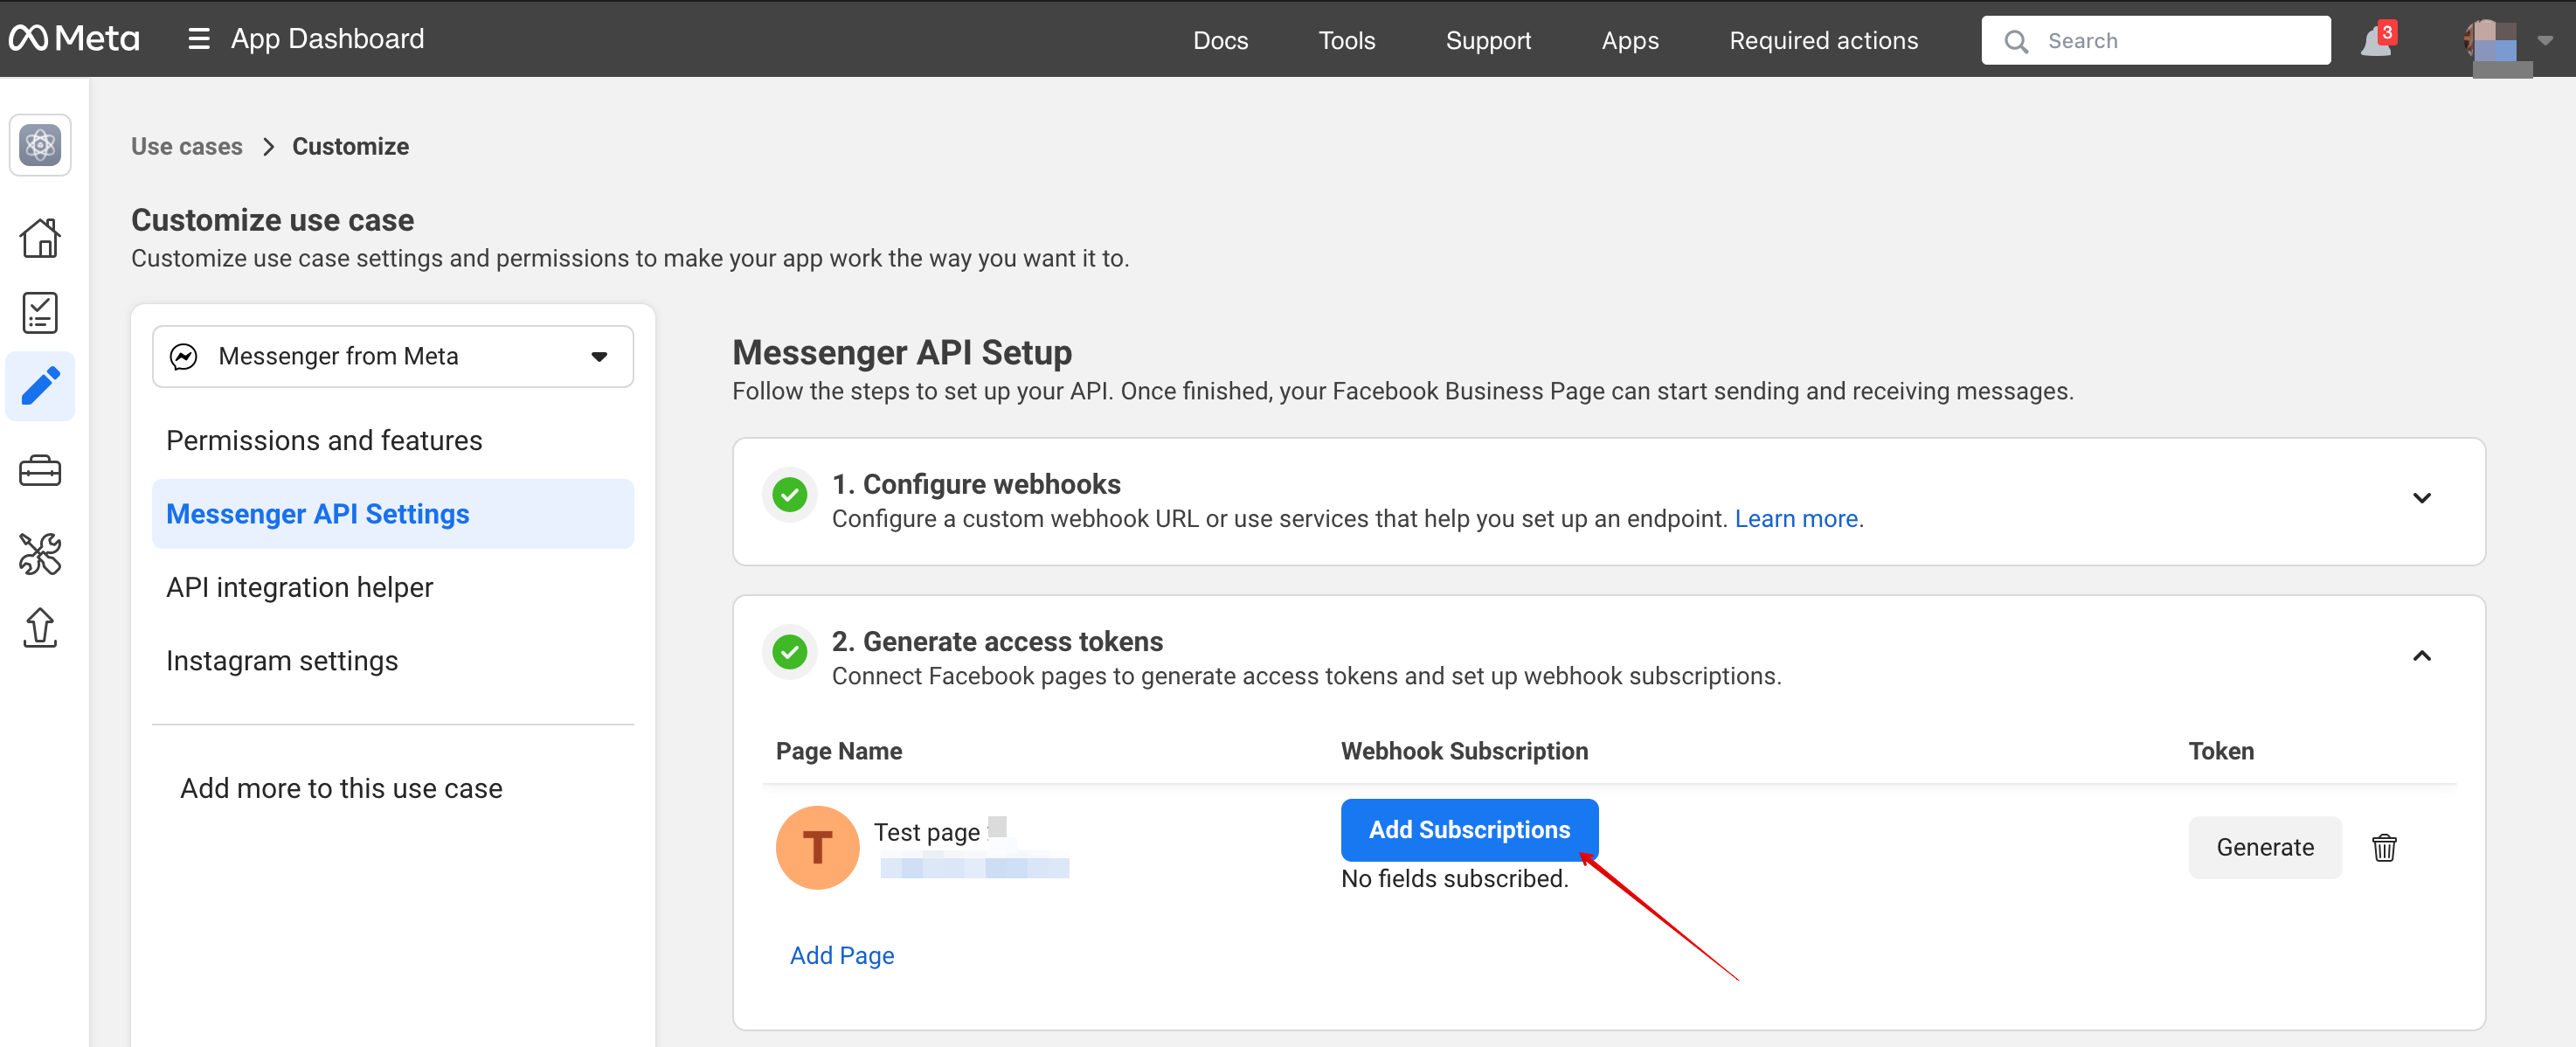
9. | 9. Klicka på Add subscription: | ||
[[File:Msg add subscription.png|1200px|center|link=https://help.simplybook.me/images/0/0c/Msg_add_subscription.png]] | [[File:Msg add subscription.png|1200px|center|link=https://help.simplybook.me/images/0/0c/Msg_add_subscription.png]] | ||
<br><br> | <br><br> | ||
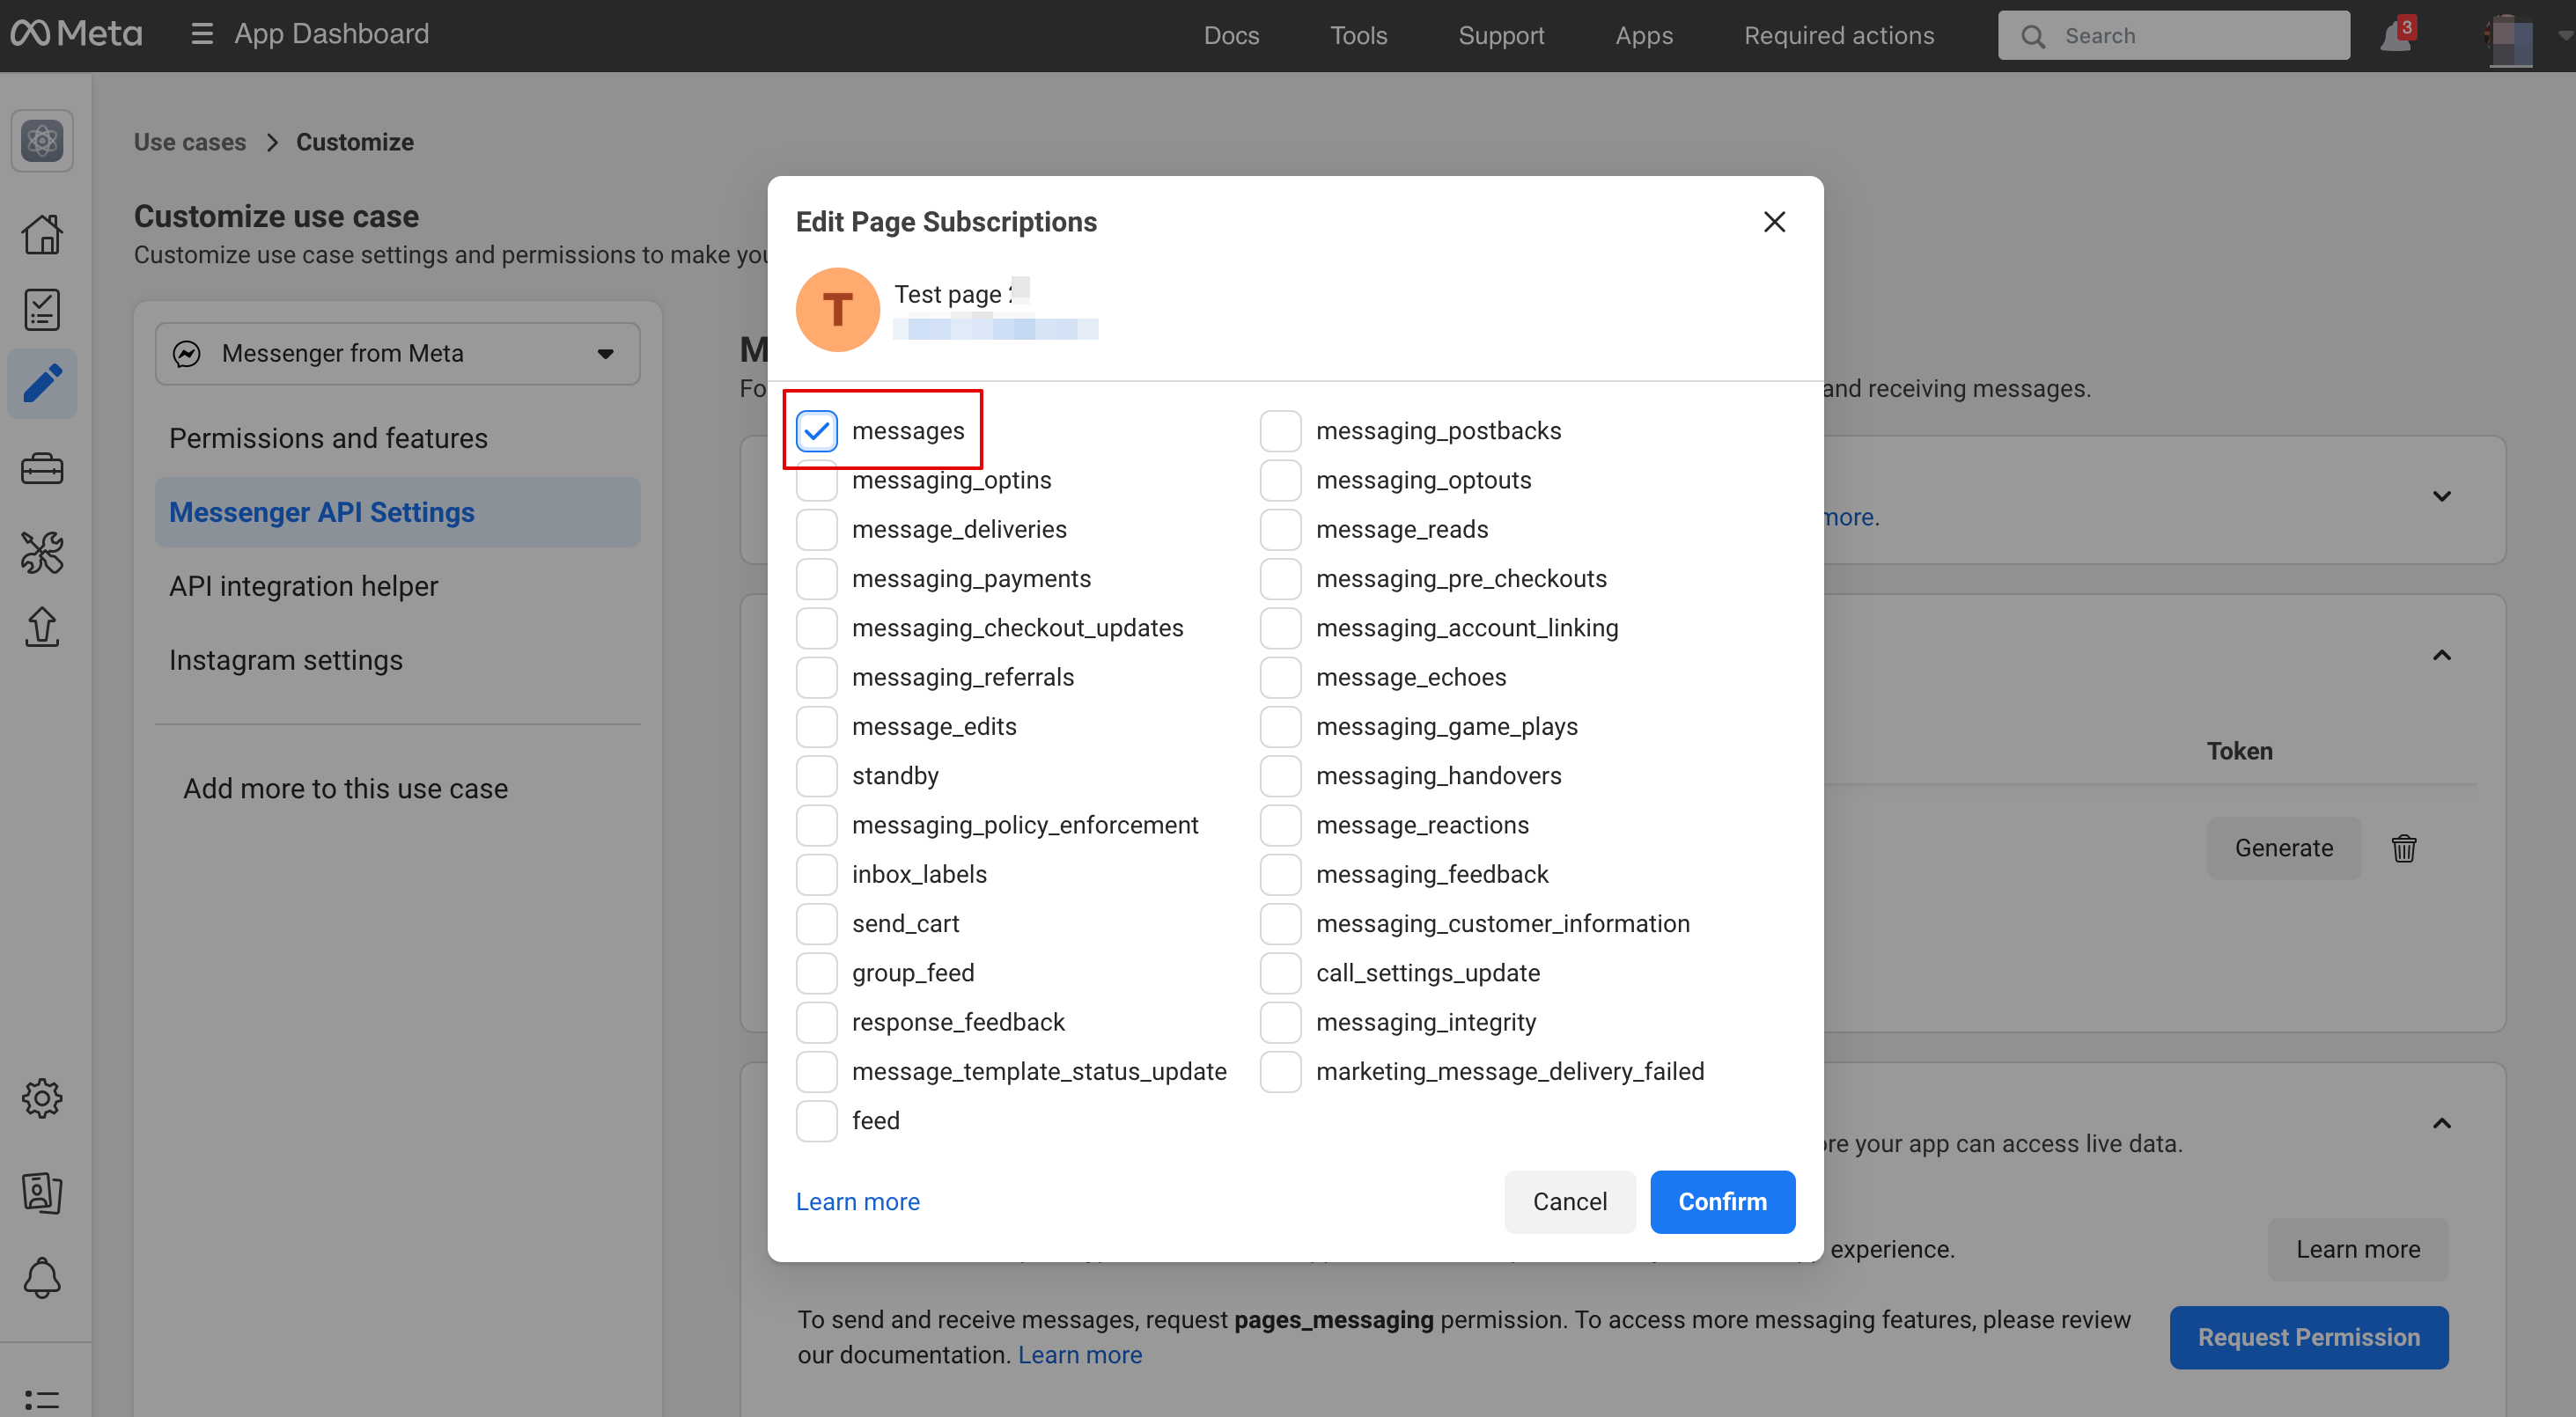
10. | 10. Välj messages: | ||
[[File:Add messages subscription.png|1200px|center|link=https://help.simplybook.me/images/6/6d/Add_messages_subscription.png]] | [[File:Add messages subscription.png|1200px|center|link=https://help.simplybook.me/images/6/6d/Add_messages_subscription.png]] | ||
<br><br> | <br><br> | ||
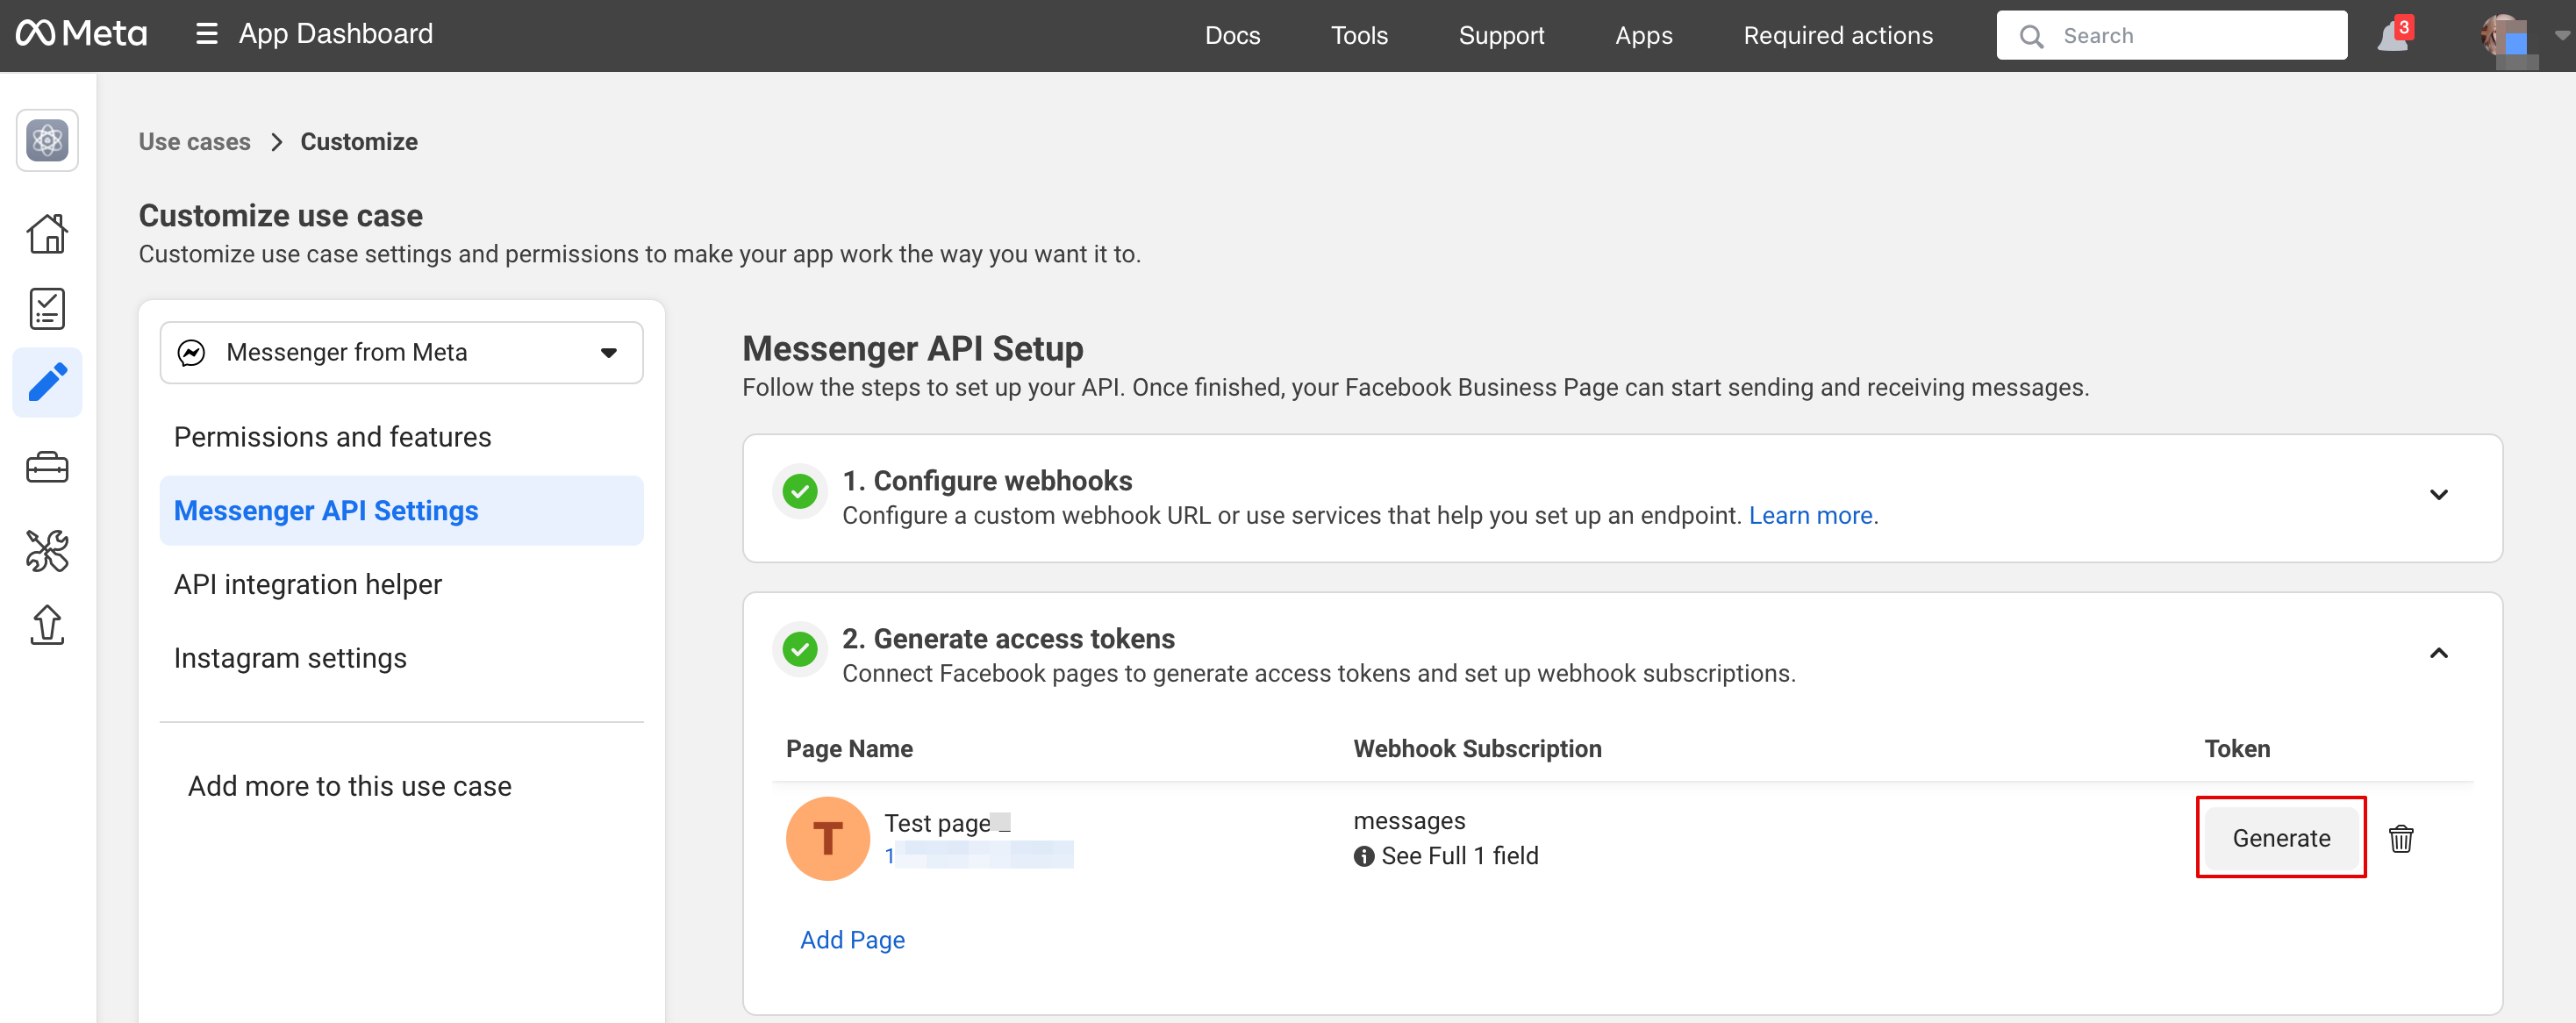
11. | 11. Klicka på Generate token, kopiera token och klistra in den i SB: | ||
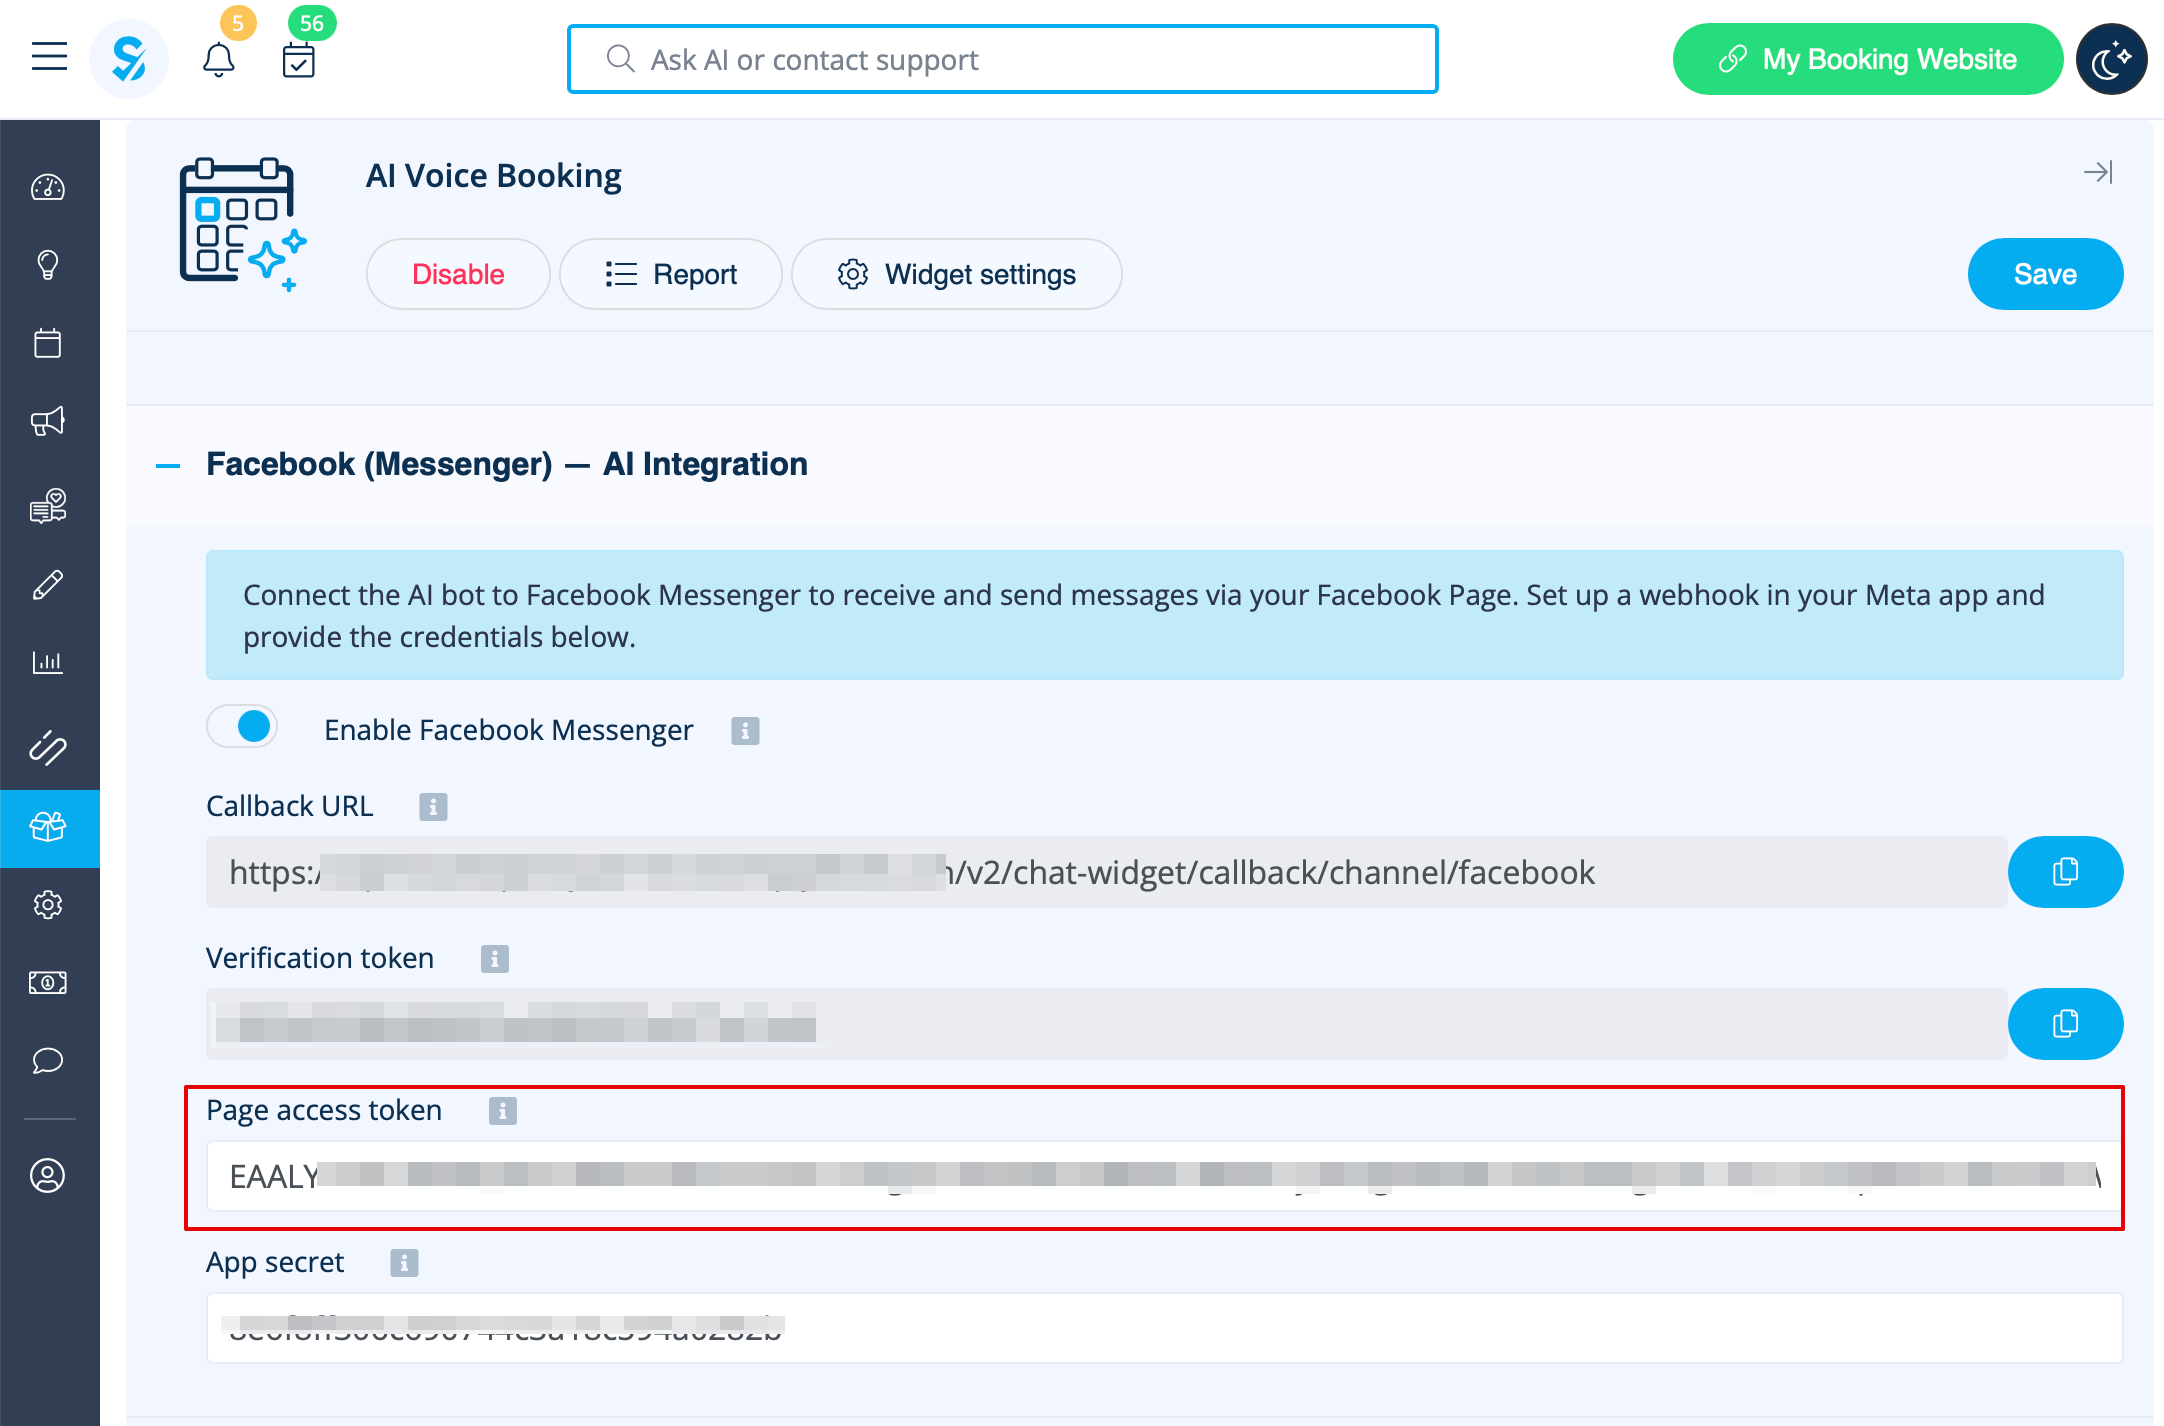
[[File:Msg generate token path.png|1200px|center|link=https://help.simplybook.me/images/5/5c/Msg_generate_token_path.png]] | [[File:Msg generate token path.png|1200px|center|link=https://help.simplybook.me/images/5/5c/Msg_generate_token_path.png]] | ||
[[File:Paste msg token to sbm.png|1200px|center|link=https://help.simplybook.me/images/c/ce/Paste_msg_token_to_sbm.png]] | [[File:Paste msg token to sbm.png|1200px|center|link=https://help.simplybook.me/images/c/ce/Paste_msg_token_to_sbm.png]] | ||
<br><br> | <br><br> | ||
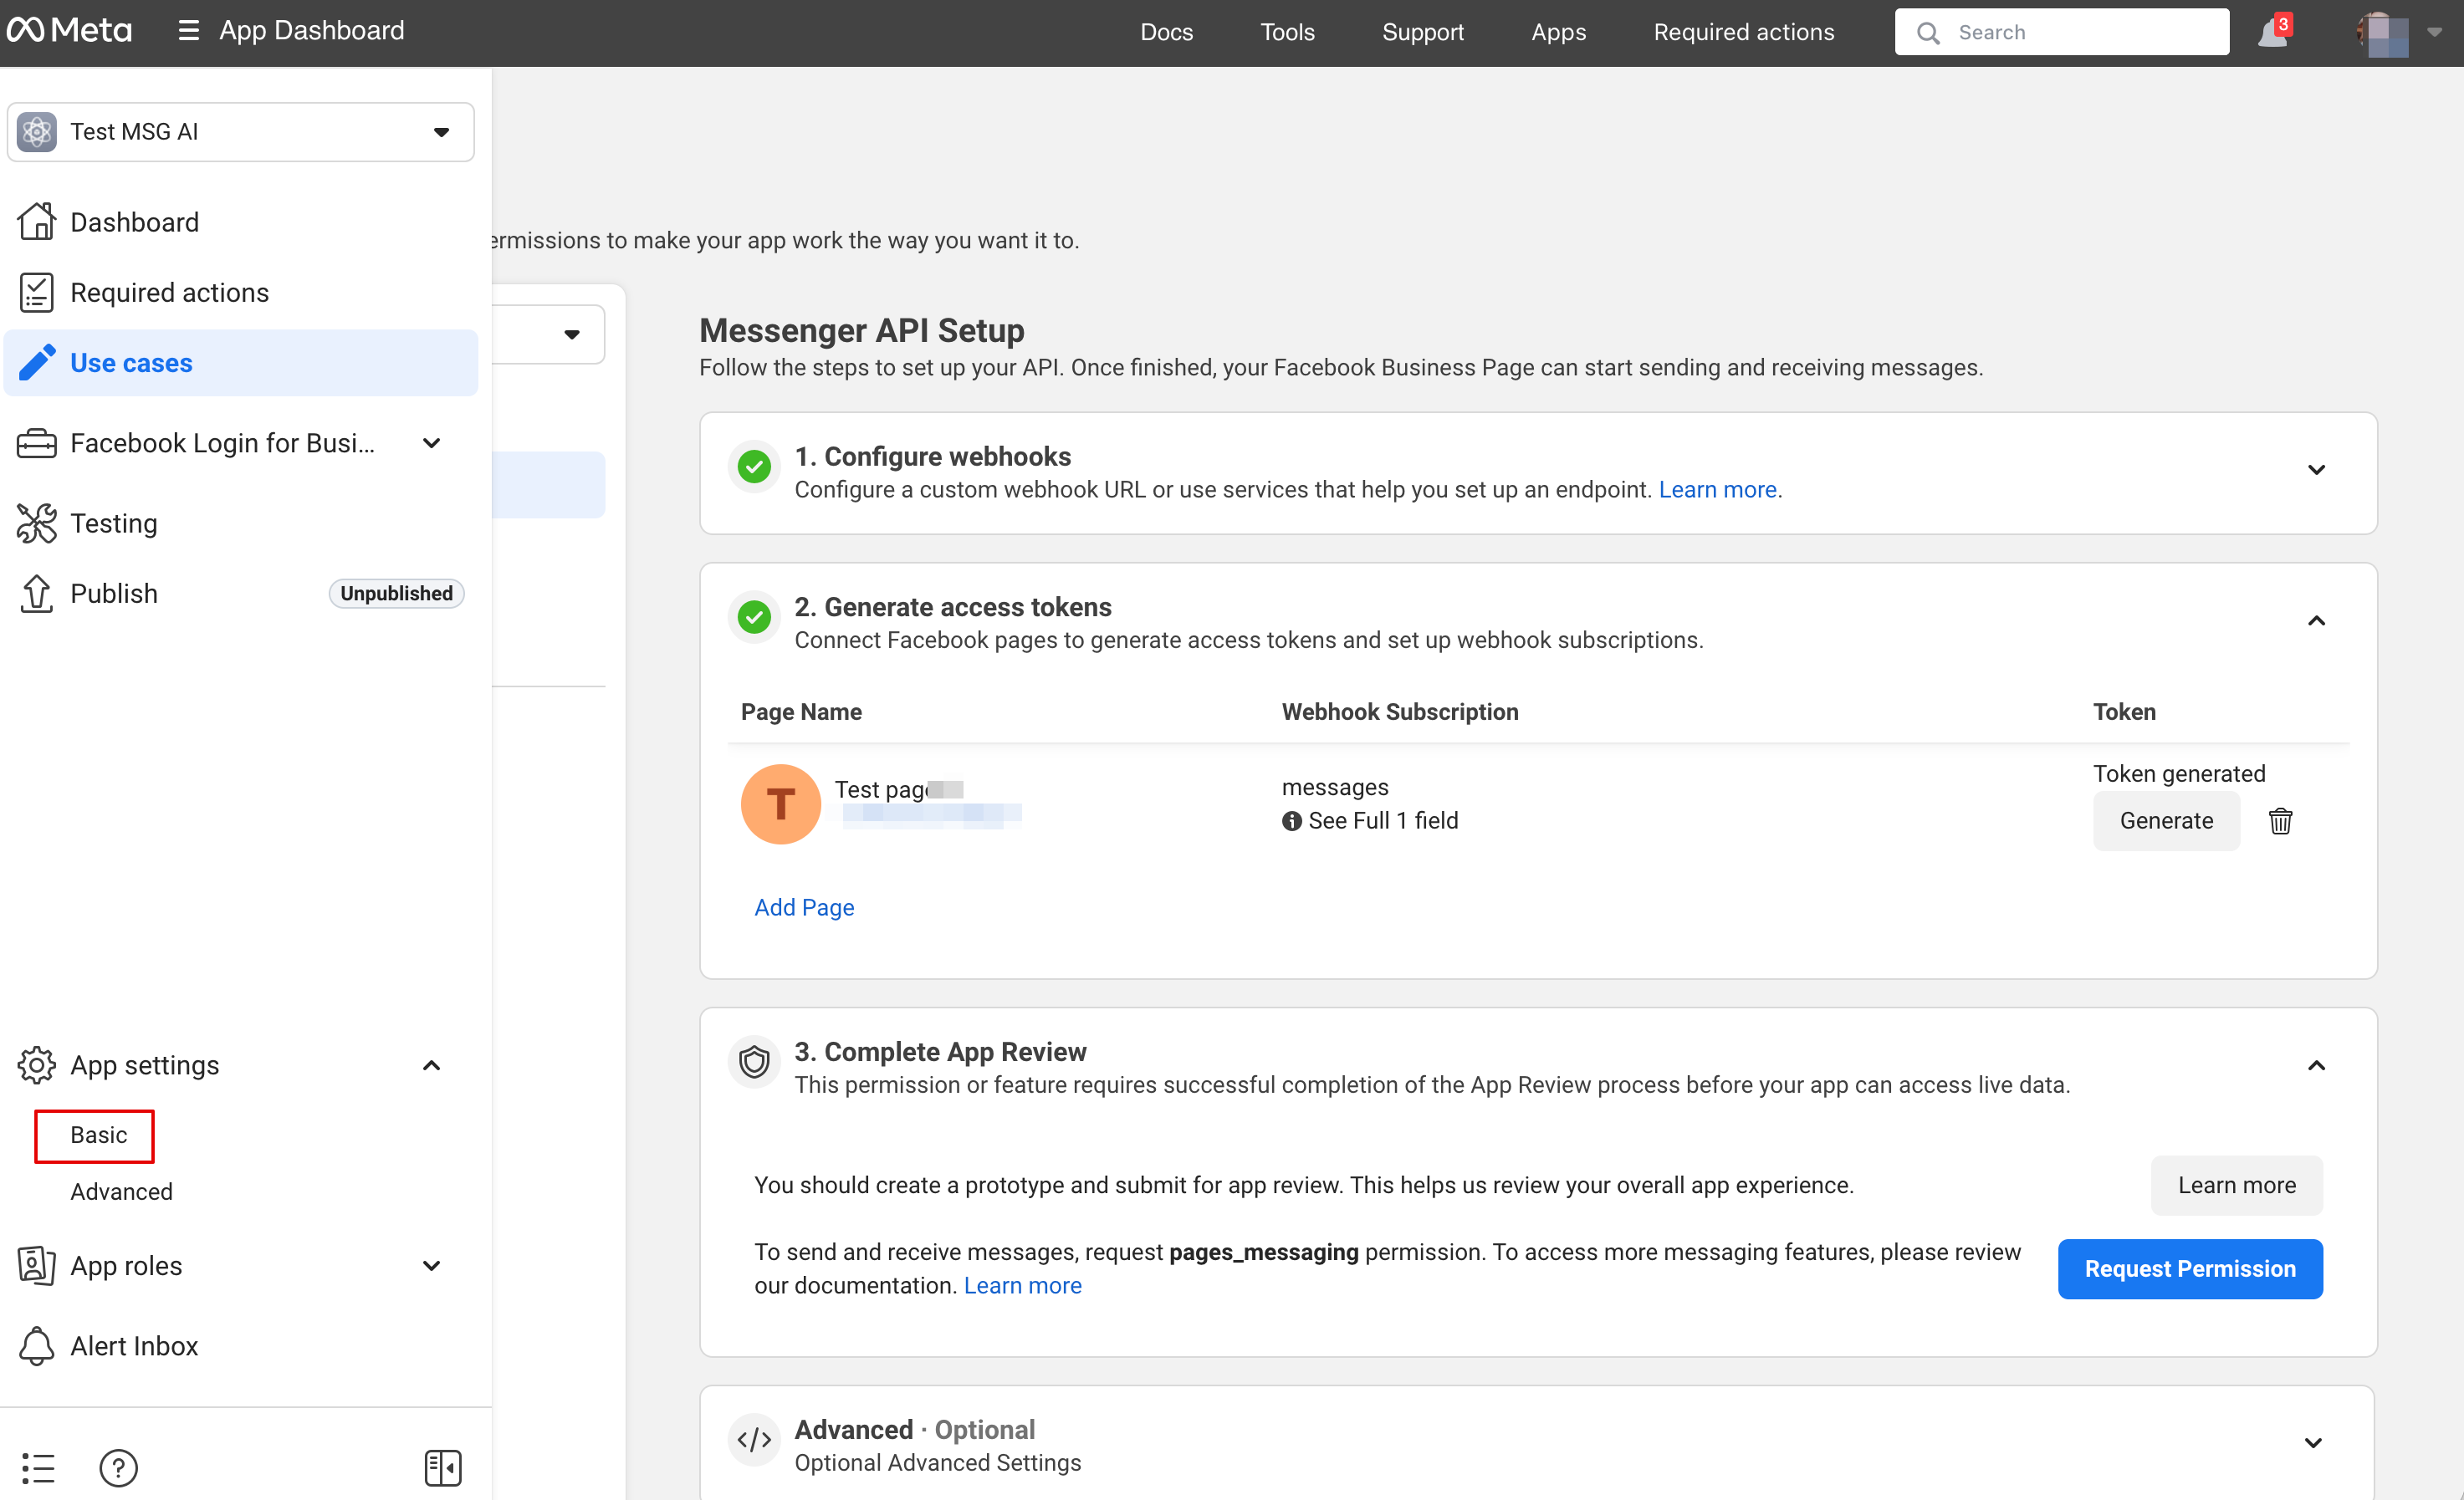
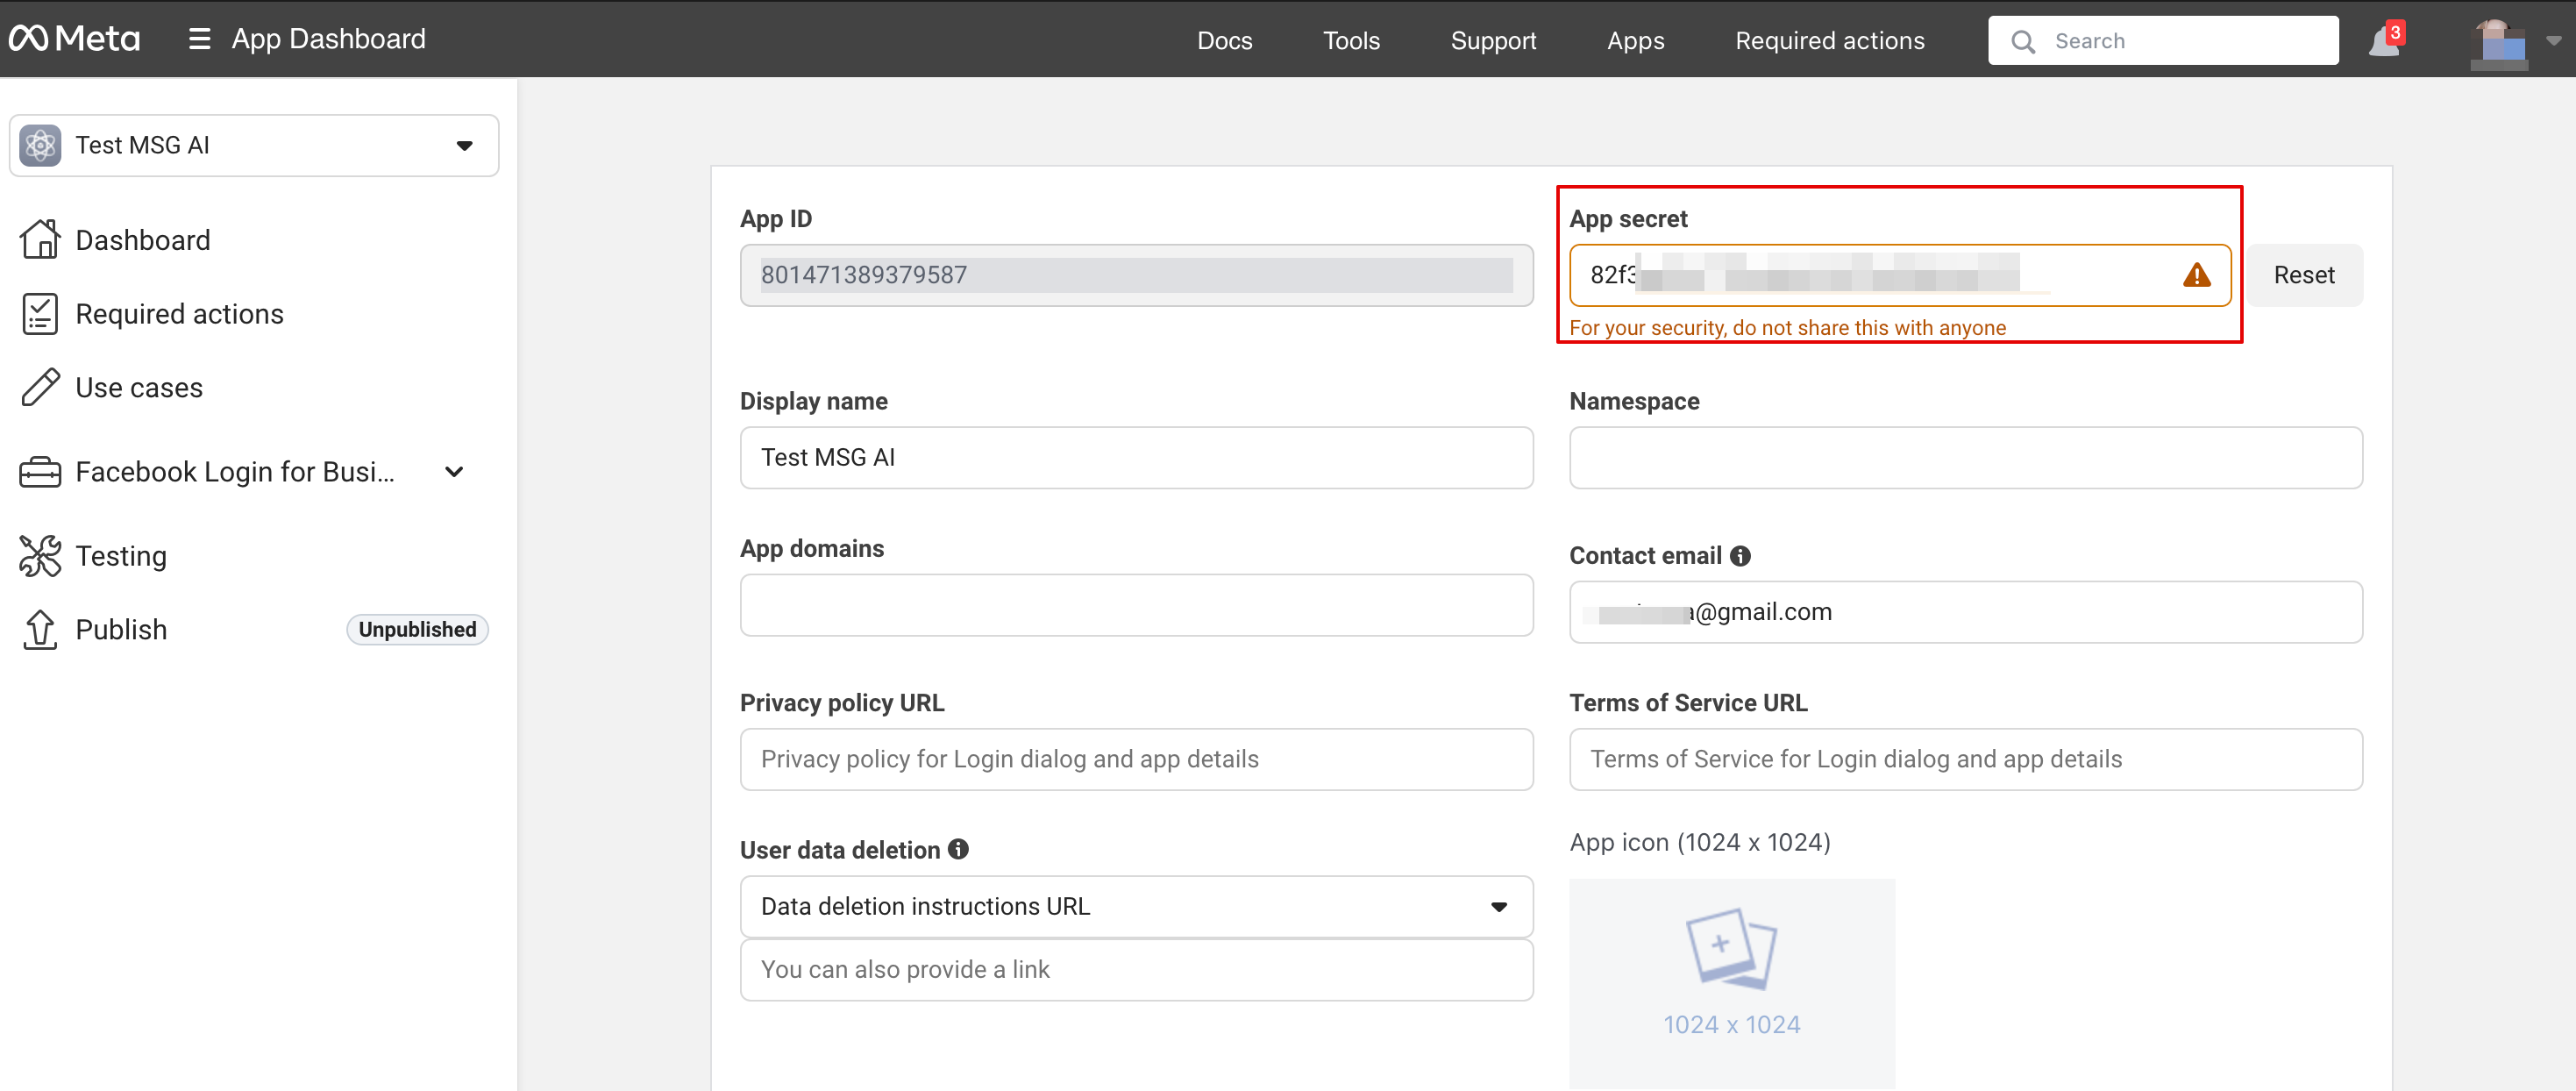
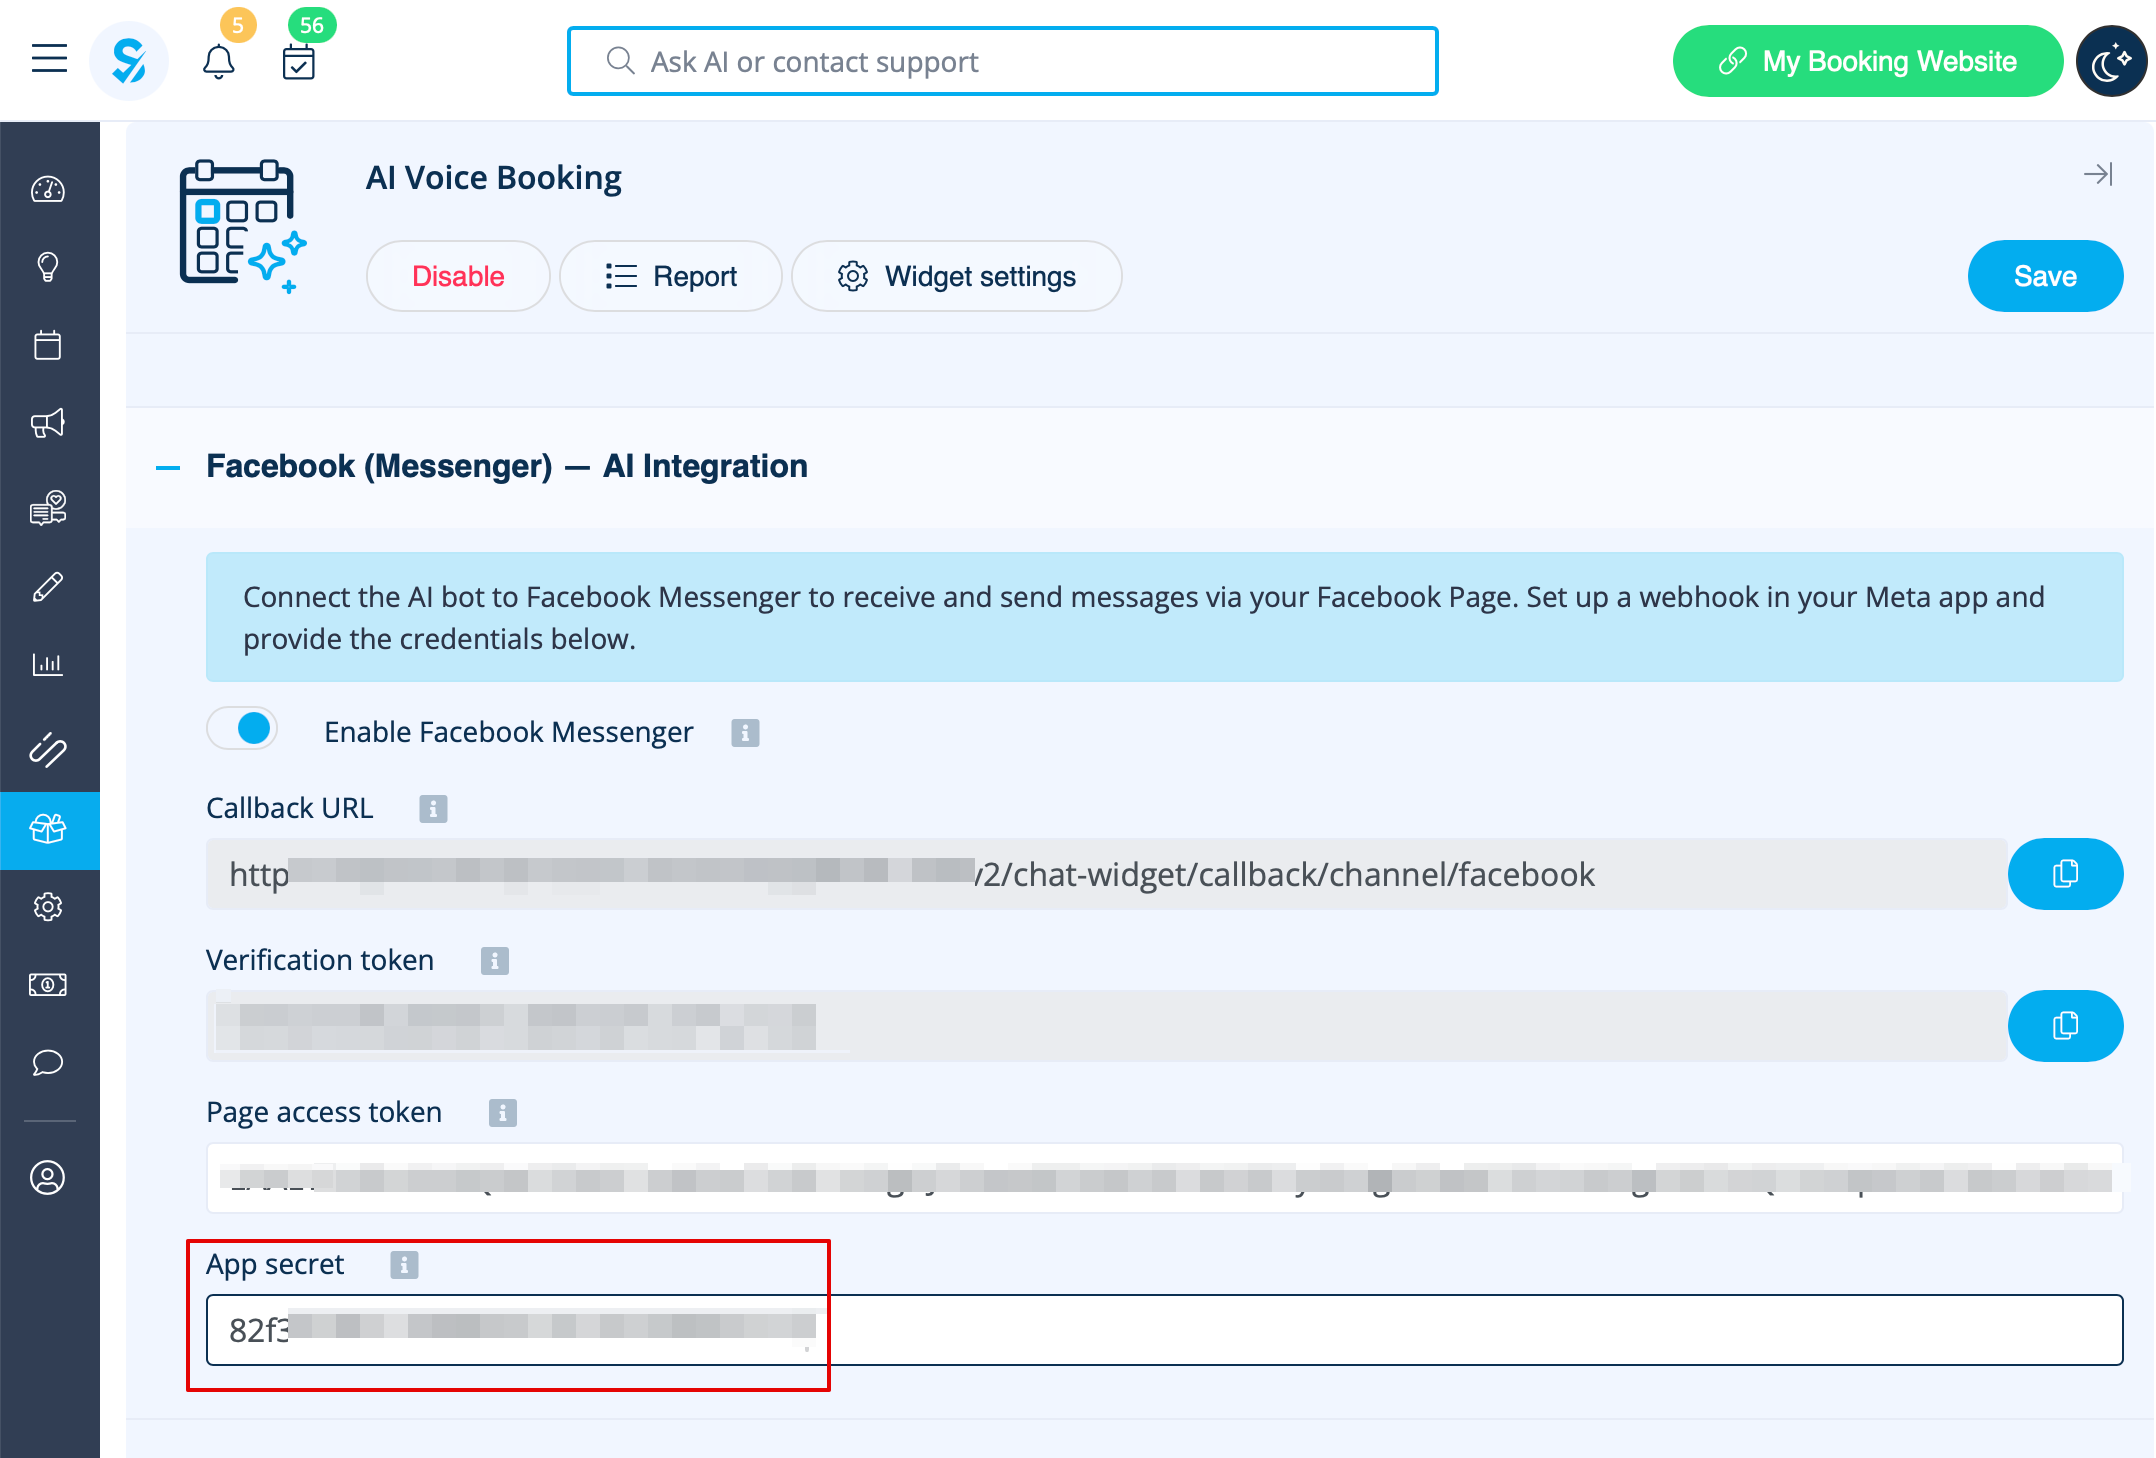
12. | 12. I grundläggande applikationsinställningar, kopiera App Secret och klistra in den i SB: | ||
[[File:Basic setting path msg.png|1200px|center|link=https://help.simplybook.me/images/8/88/Basic_setting_path_msg.png]] | [[File:Basic setting path msg.png|1200px|center|link=https://help.simplybook.me/images/8/88/Basic_setting_path_msg.png]] | ||
[[File:Copy msg app secret.png|1200px|center|link=https://help.simplybook.me/images/6/6d/Copy_msg_app_secret.png]] | [[File:Copy msg app secret.png|1200px|center|link=https://help.simplybook.me/images/6/6d/Copy_msg_app_secret.png]] | ||
[[File:Msg insert app secret to sbm.png|1200px|center|link=https://help.simplybook.me/images/e/e8/Msg_insert_app_secret_to_sbm.png]] | [[File:Msg insert app secret to sbm.png|1200px|center|link=https://help.simplybook.me/images/e/e8/Msg_insert_app_secret_to_sbm.png]] | ||
<br><br> | <br><br> | ||
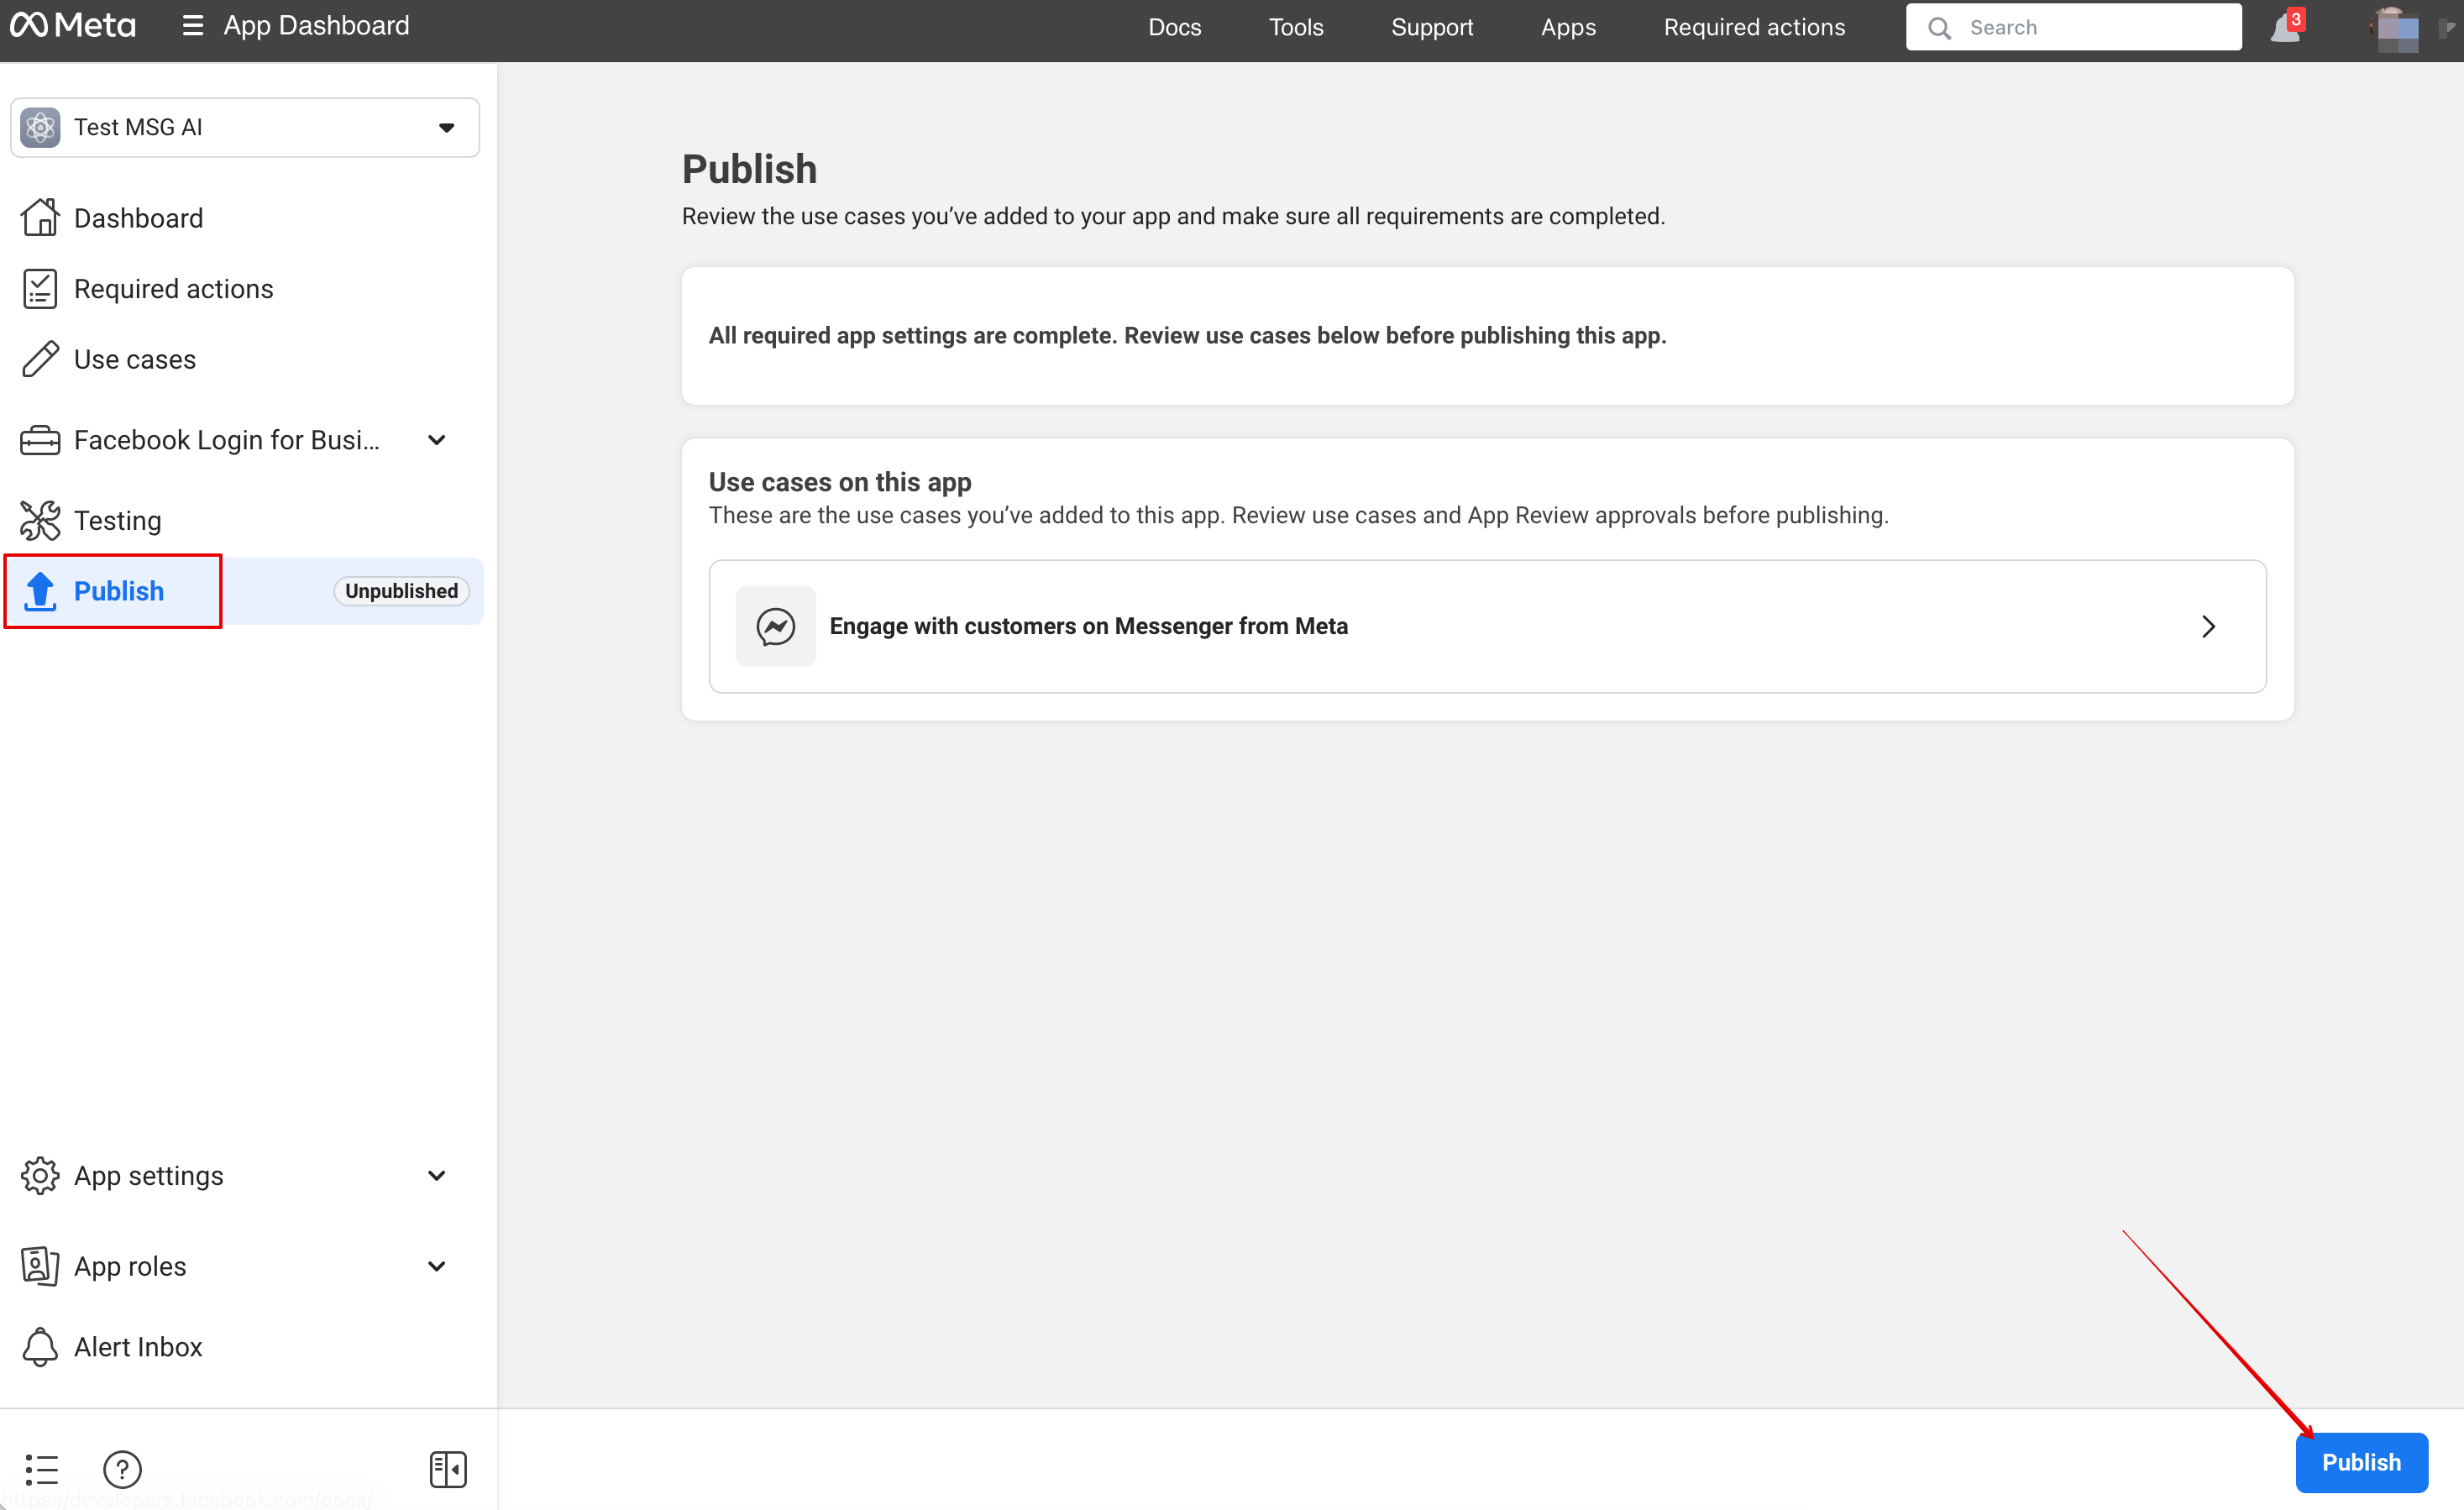
13. | 13. Nu är du redo att publicera applikationen. Dina besökare kan nu chatta med boten på din sida. | ||
[[File:Msg publish the app.png|1200px|center|link=https://help.simplybook.me/images/d/df/Msg_publish_the_app.png]] | [[File:Msg publish the app.png|1200px|center|link=https://help.simplybook.me/images/d/df/Msg_publish_the_app.png]] | ||
<br><br><br><br> | <br><br><br><br> | ||
== | ==Rapport== | ||
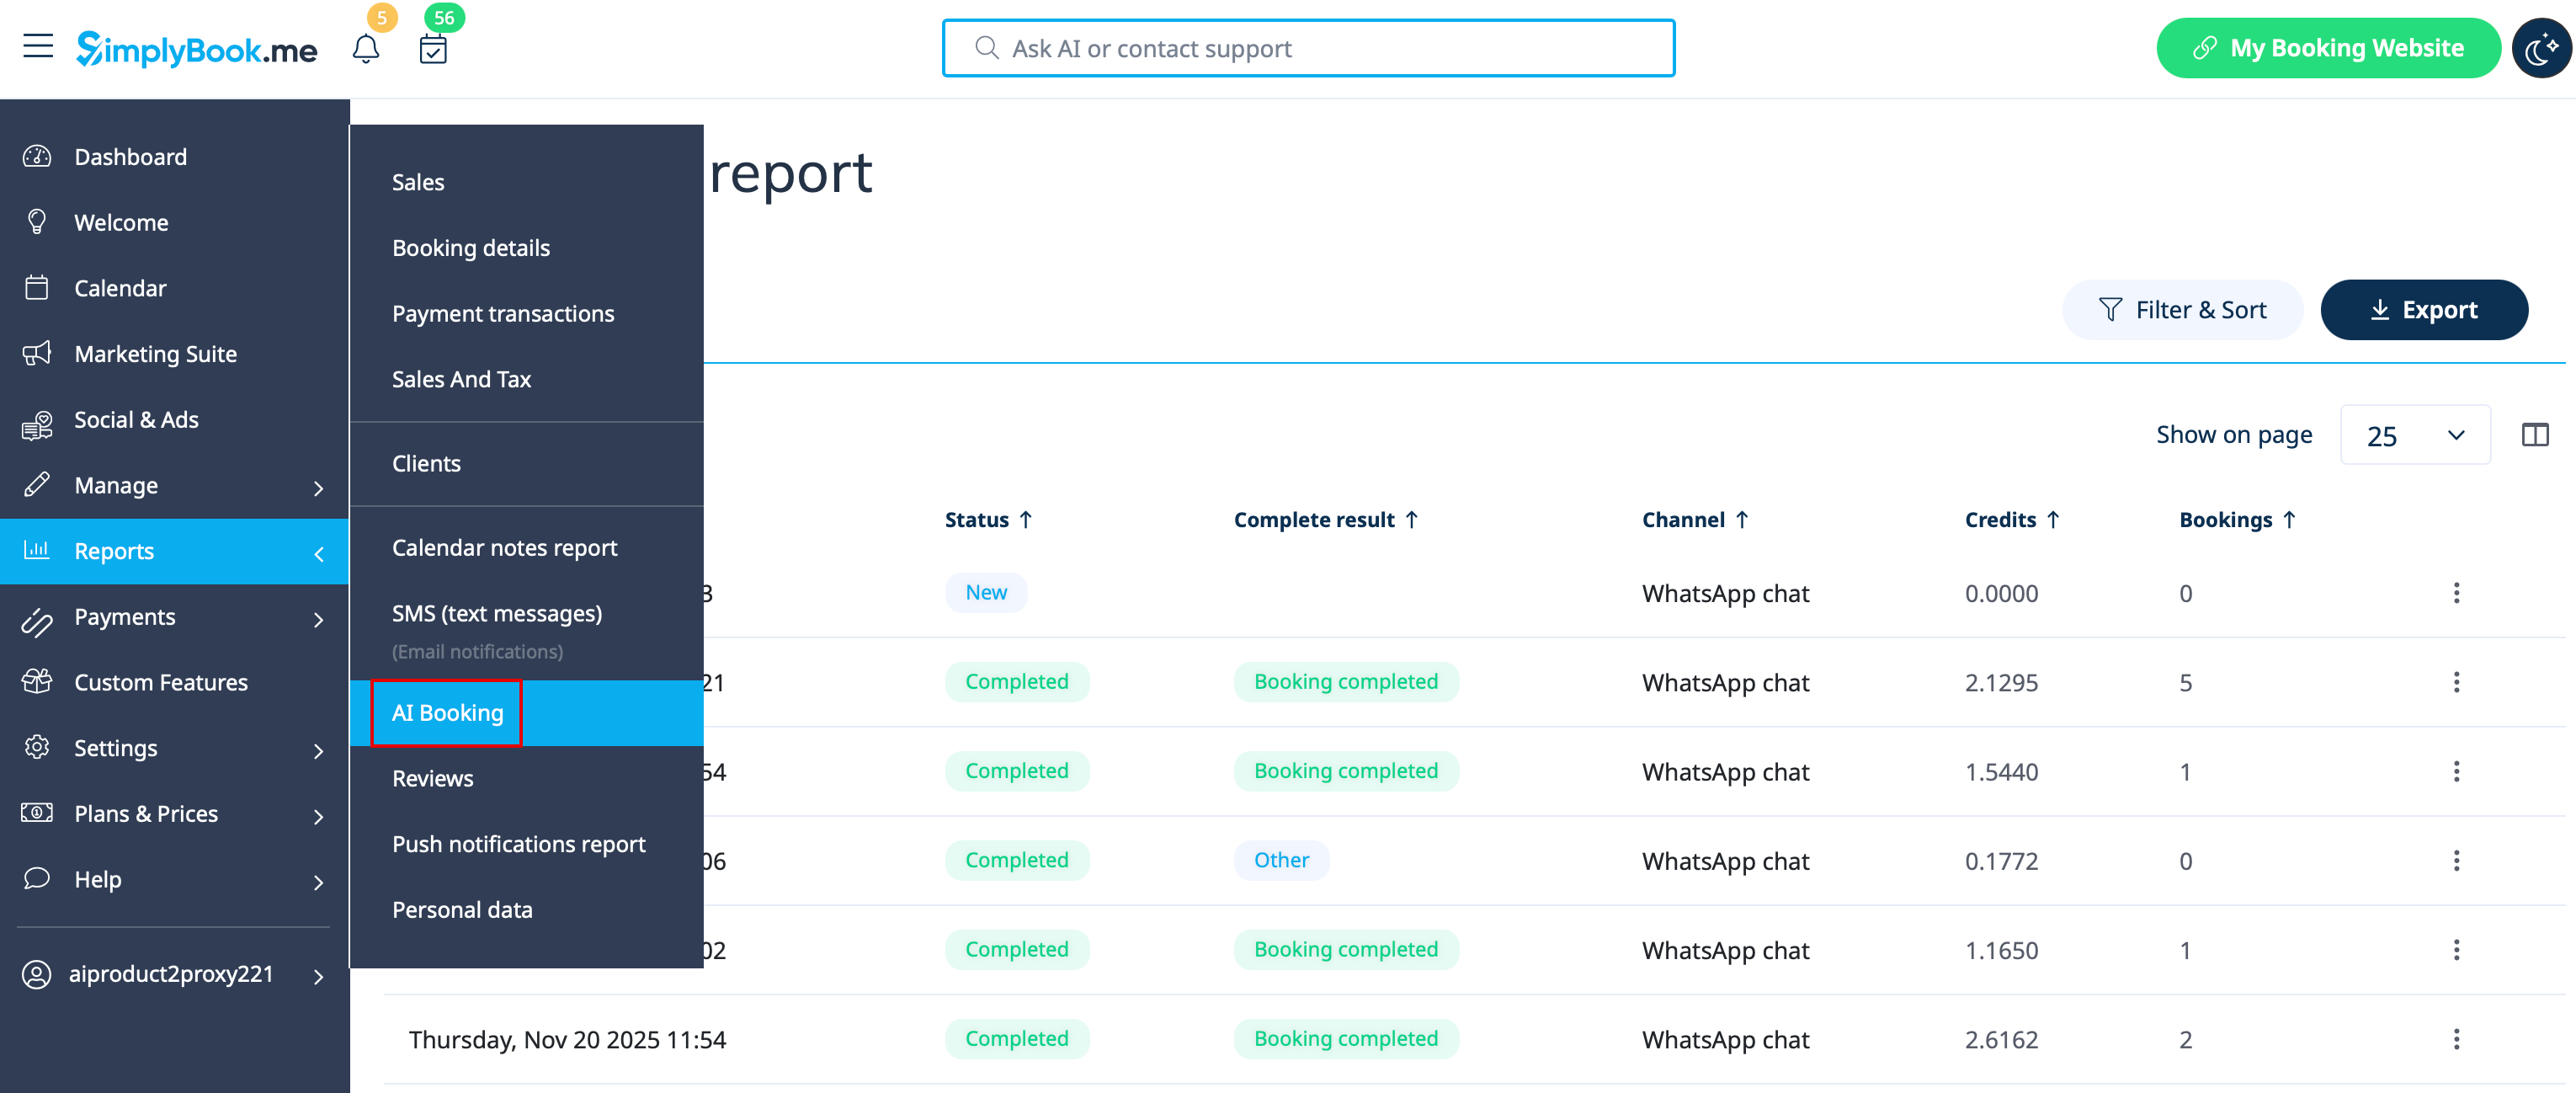
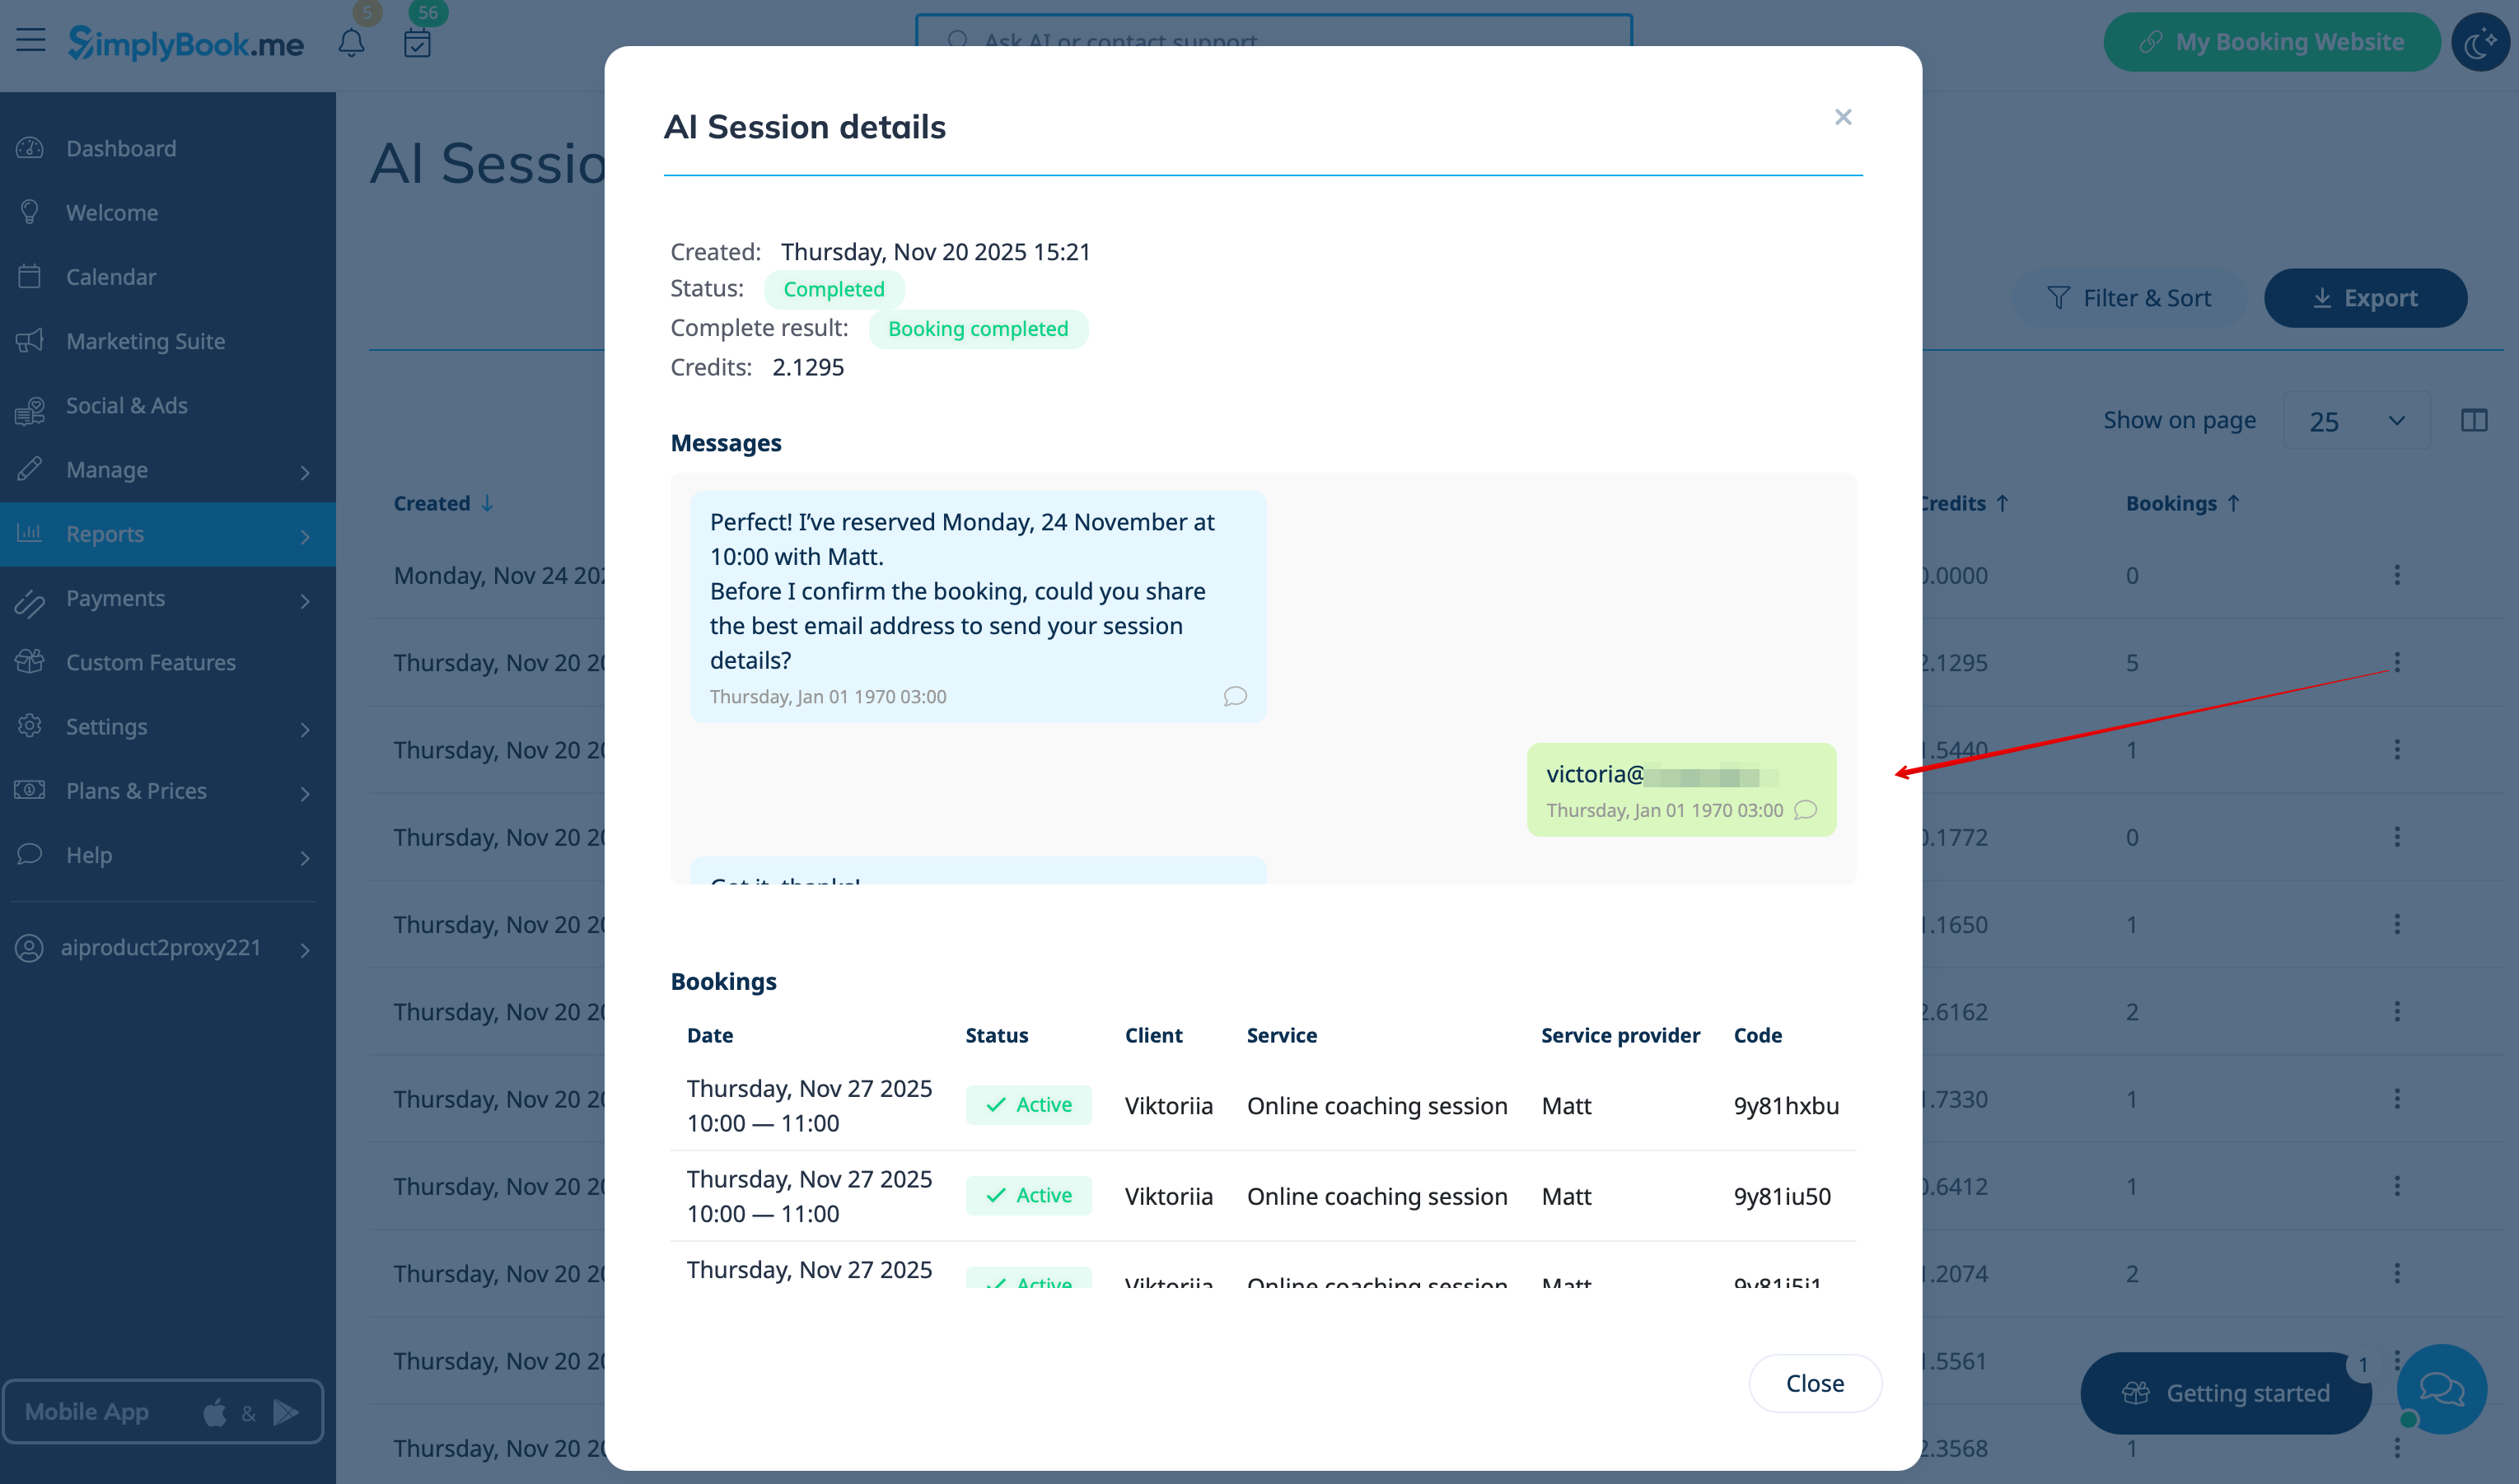
Du kan se chattar, antalet använda krediter samt visa sessionsdetaljer med tillhörande bokningsinformation om bokningsprocessen lyckades i Rapporter -> AI-bokning | |||
[[File:Ai report path.png|1200px|center|link=https://help.simplybook.me/images/4/41/Ai_report_path.png]] | [[File:Ai report path.png|1200px|center|link=https://help.simplybook.me/images/4/41/Ai_report_path.png]] | ||
[[File:Ai report view session details.png|1200px|center|link=https://help.simplybook.me/images/c/ca/Ai_report_view_session_details.png]] | [[File:Ai report view session details.png|1200px|center|link=https://help.simplybook.me/images/c/ca/Ai_report_view_session_details.png]] | ||
<br><br><br><br> | <br><br><br><br> | ||
Latest revision as of 15:01, 5 April 2026
Lägg till en AI-driven bokningsupplevelse på din webbplats och i dina meddelandekanaler. Assistenten samlar in bokningsuppgifter, kontrollerar tillgänglighet och skapar bokningar automatiskt.
Allt-i-ett AI-bokningsmodul som kopplar din assistent till din webbplats och dina meddelandekanaler för att ta emot bokningar och skicka bekräftelser och påminnelser. Konfigurera integrationer (Facebook Messenger, WhatsApp, webbwidget) och grundläggande inställningar, och börja sedan ta emot bokningar automatiskt.
Observera! För närvarande är det möjligt att boka dolda tjänster från kundsidan.
- Hur man använder
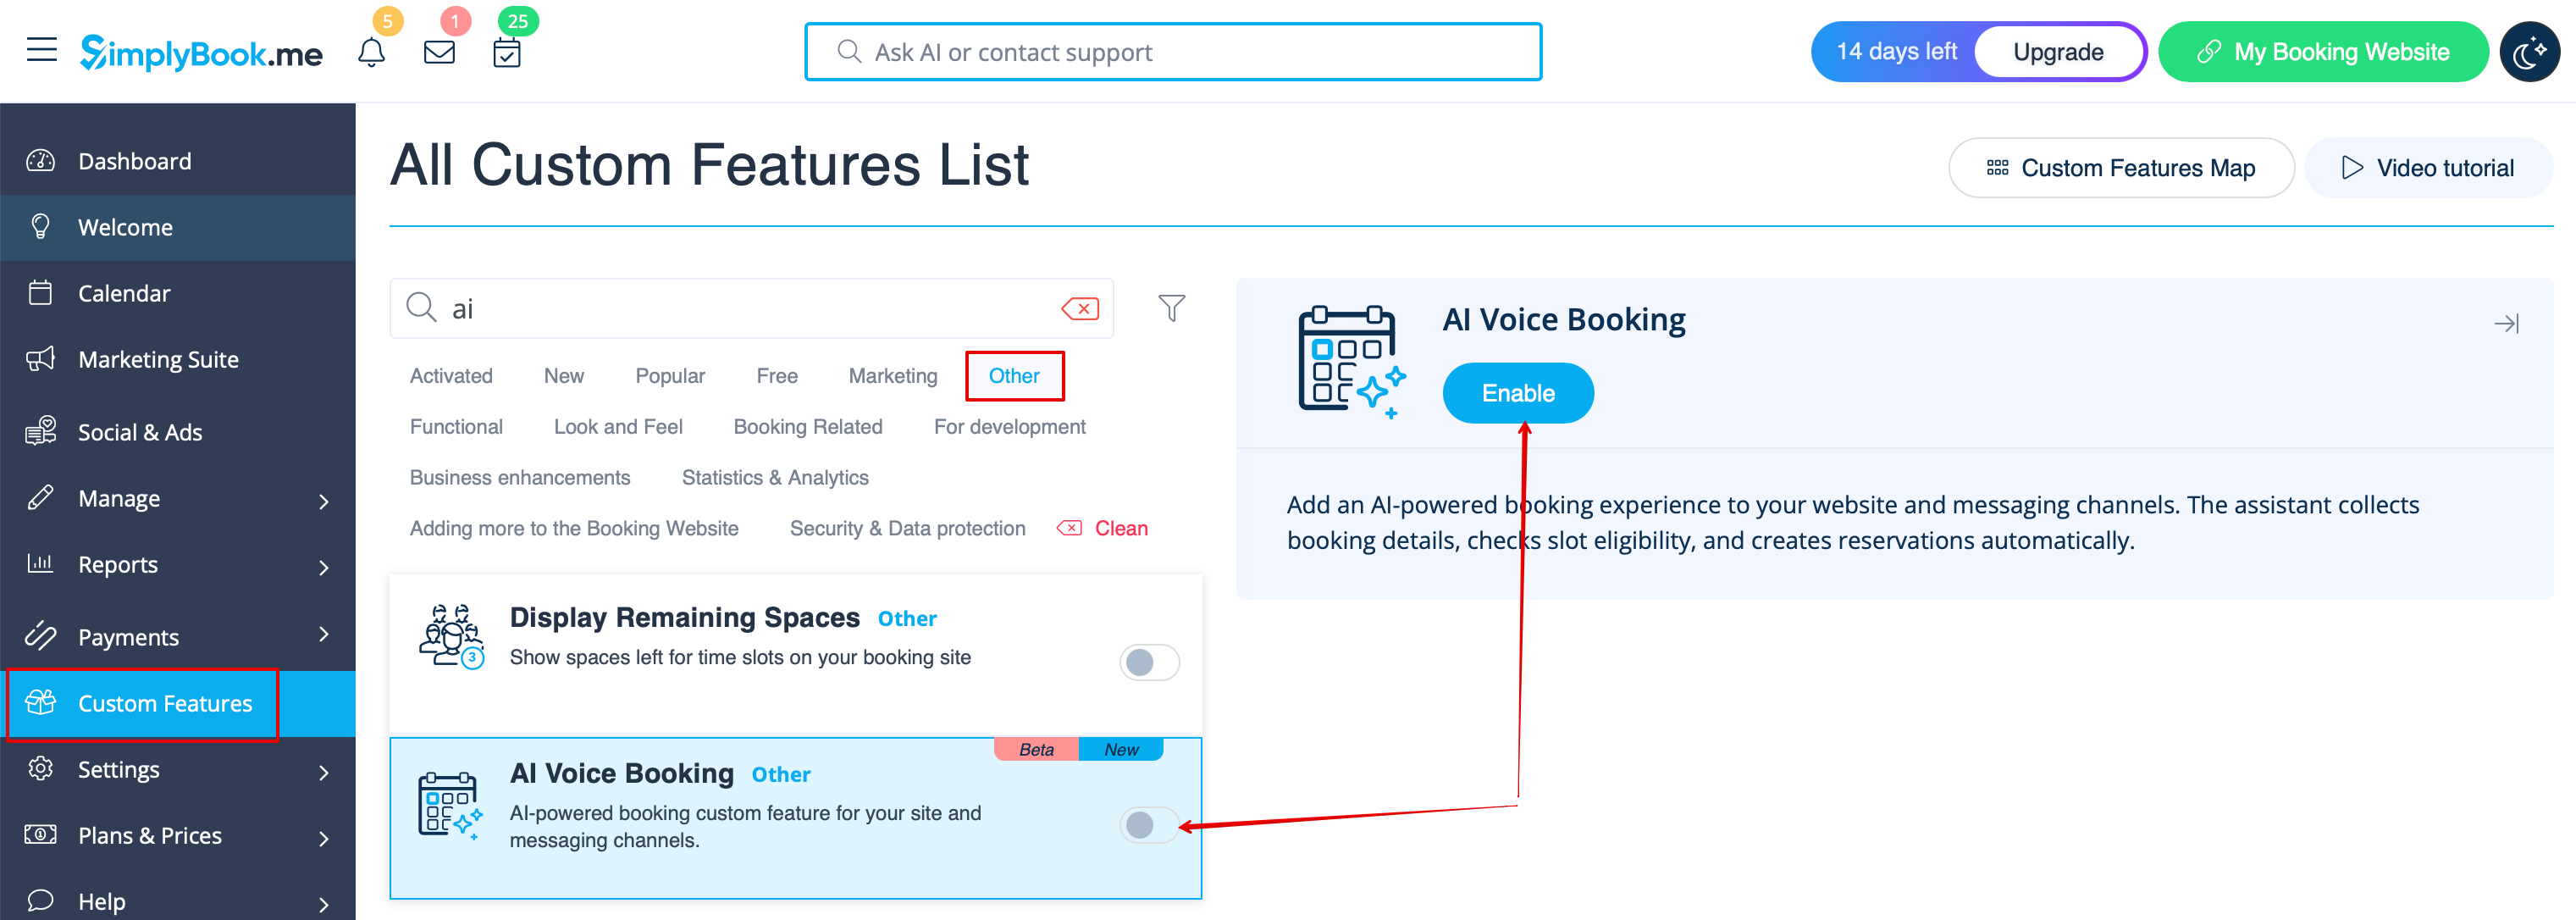
1. Aktivera funktionen på sidan Anpassade funktioner -> Övrigt -> AI Voice booking.
2. Få gratis testkrediter där eller köp fler AI-bokningskrediter på sidan Planer & Priser -> Tilläggsartiklar
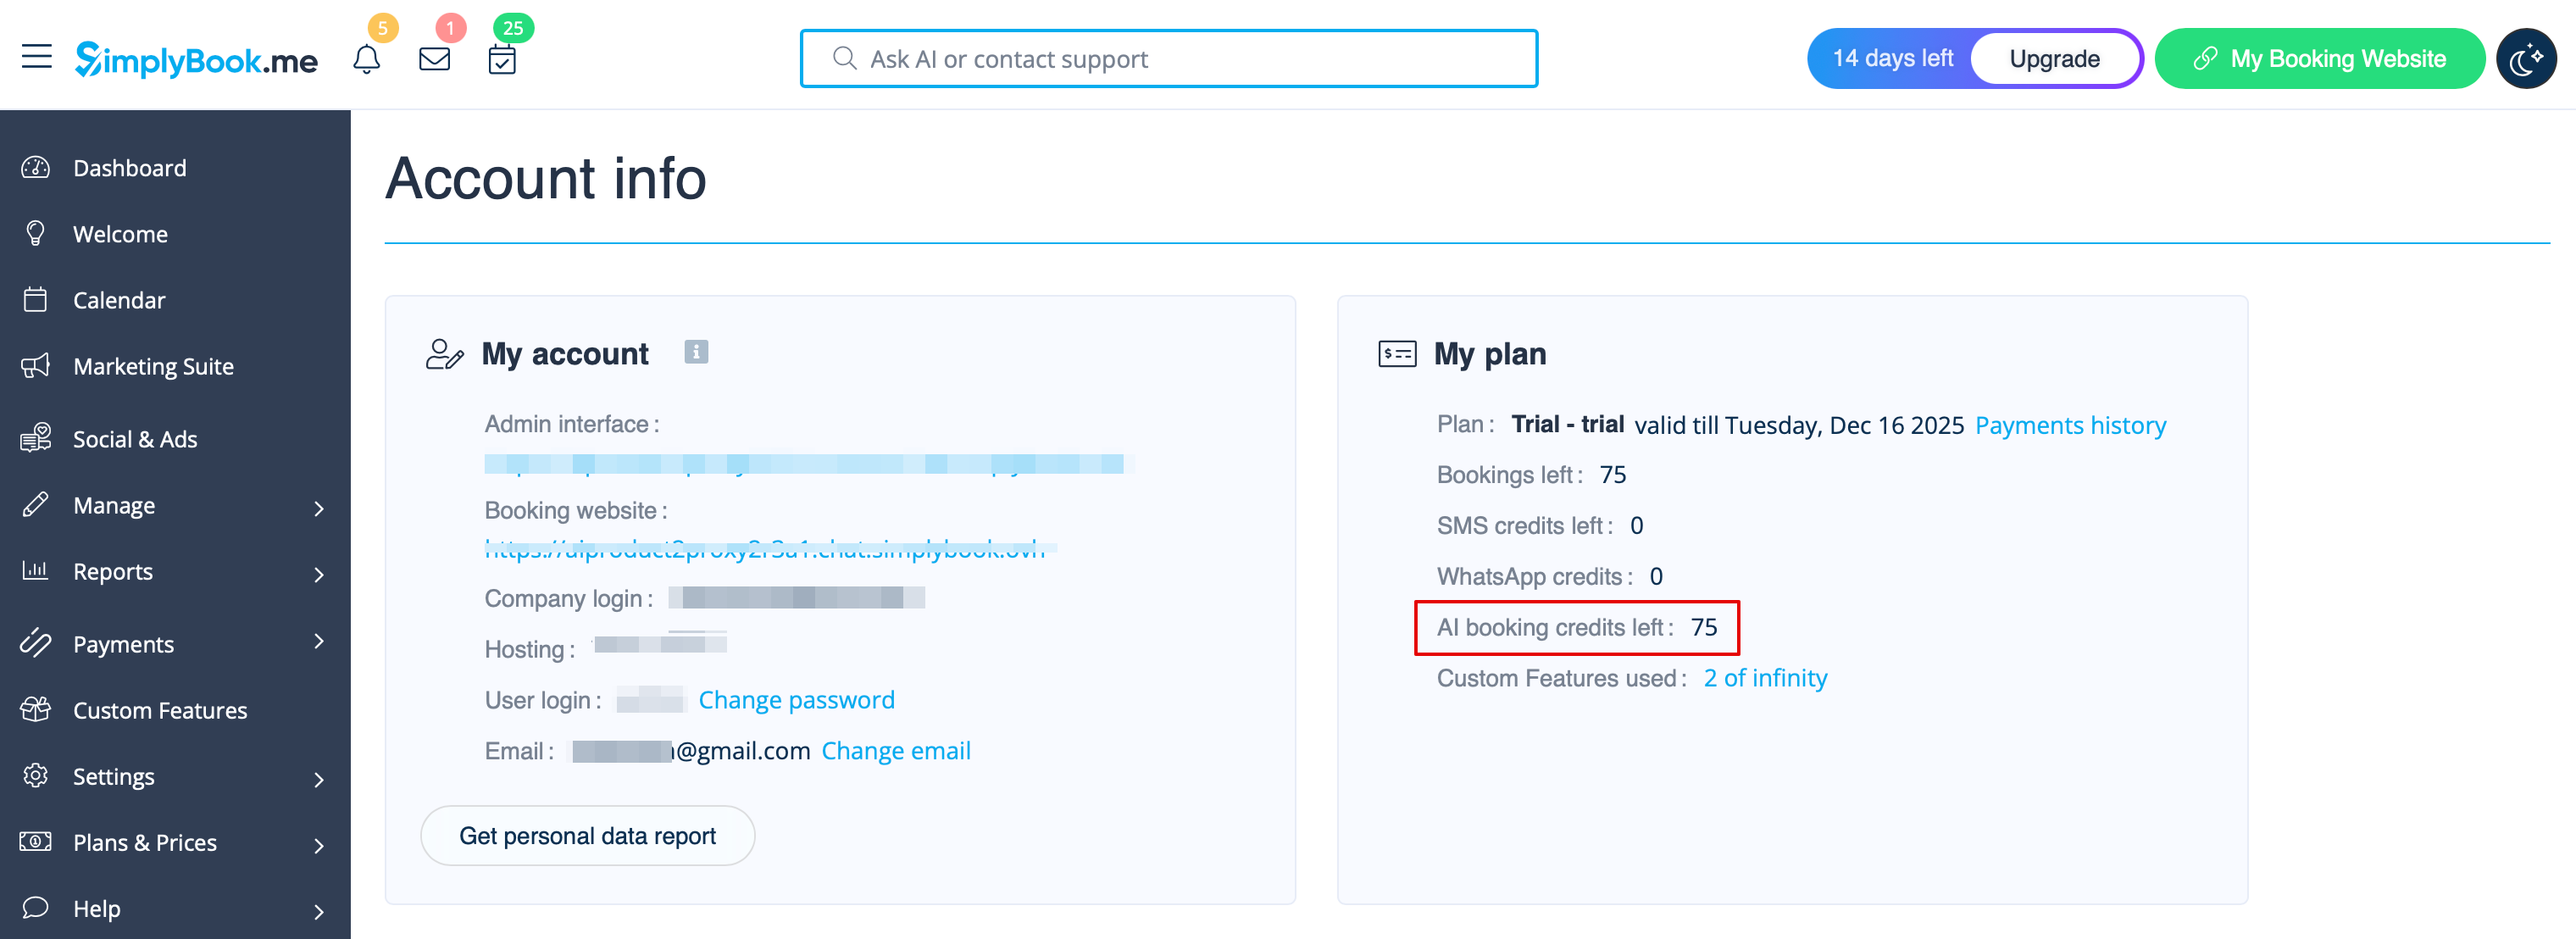
3. Du kan se antalet återstående krediter på Kontrollpanelen eller i Kontoinformation.
4. Gå tillbaka till Anpassade funktioner -> Övrigt -> AI Voice booking för att justera inställningar för AI-röst, modell och text för e-postverifiering.
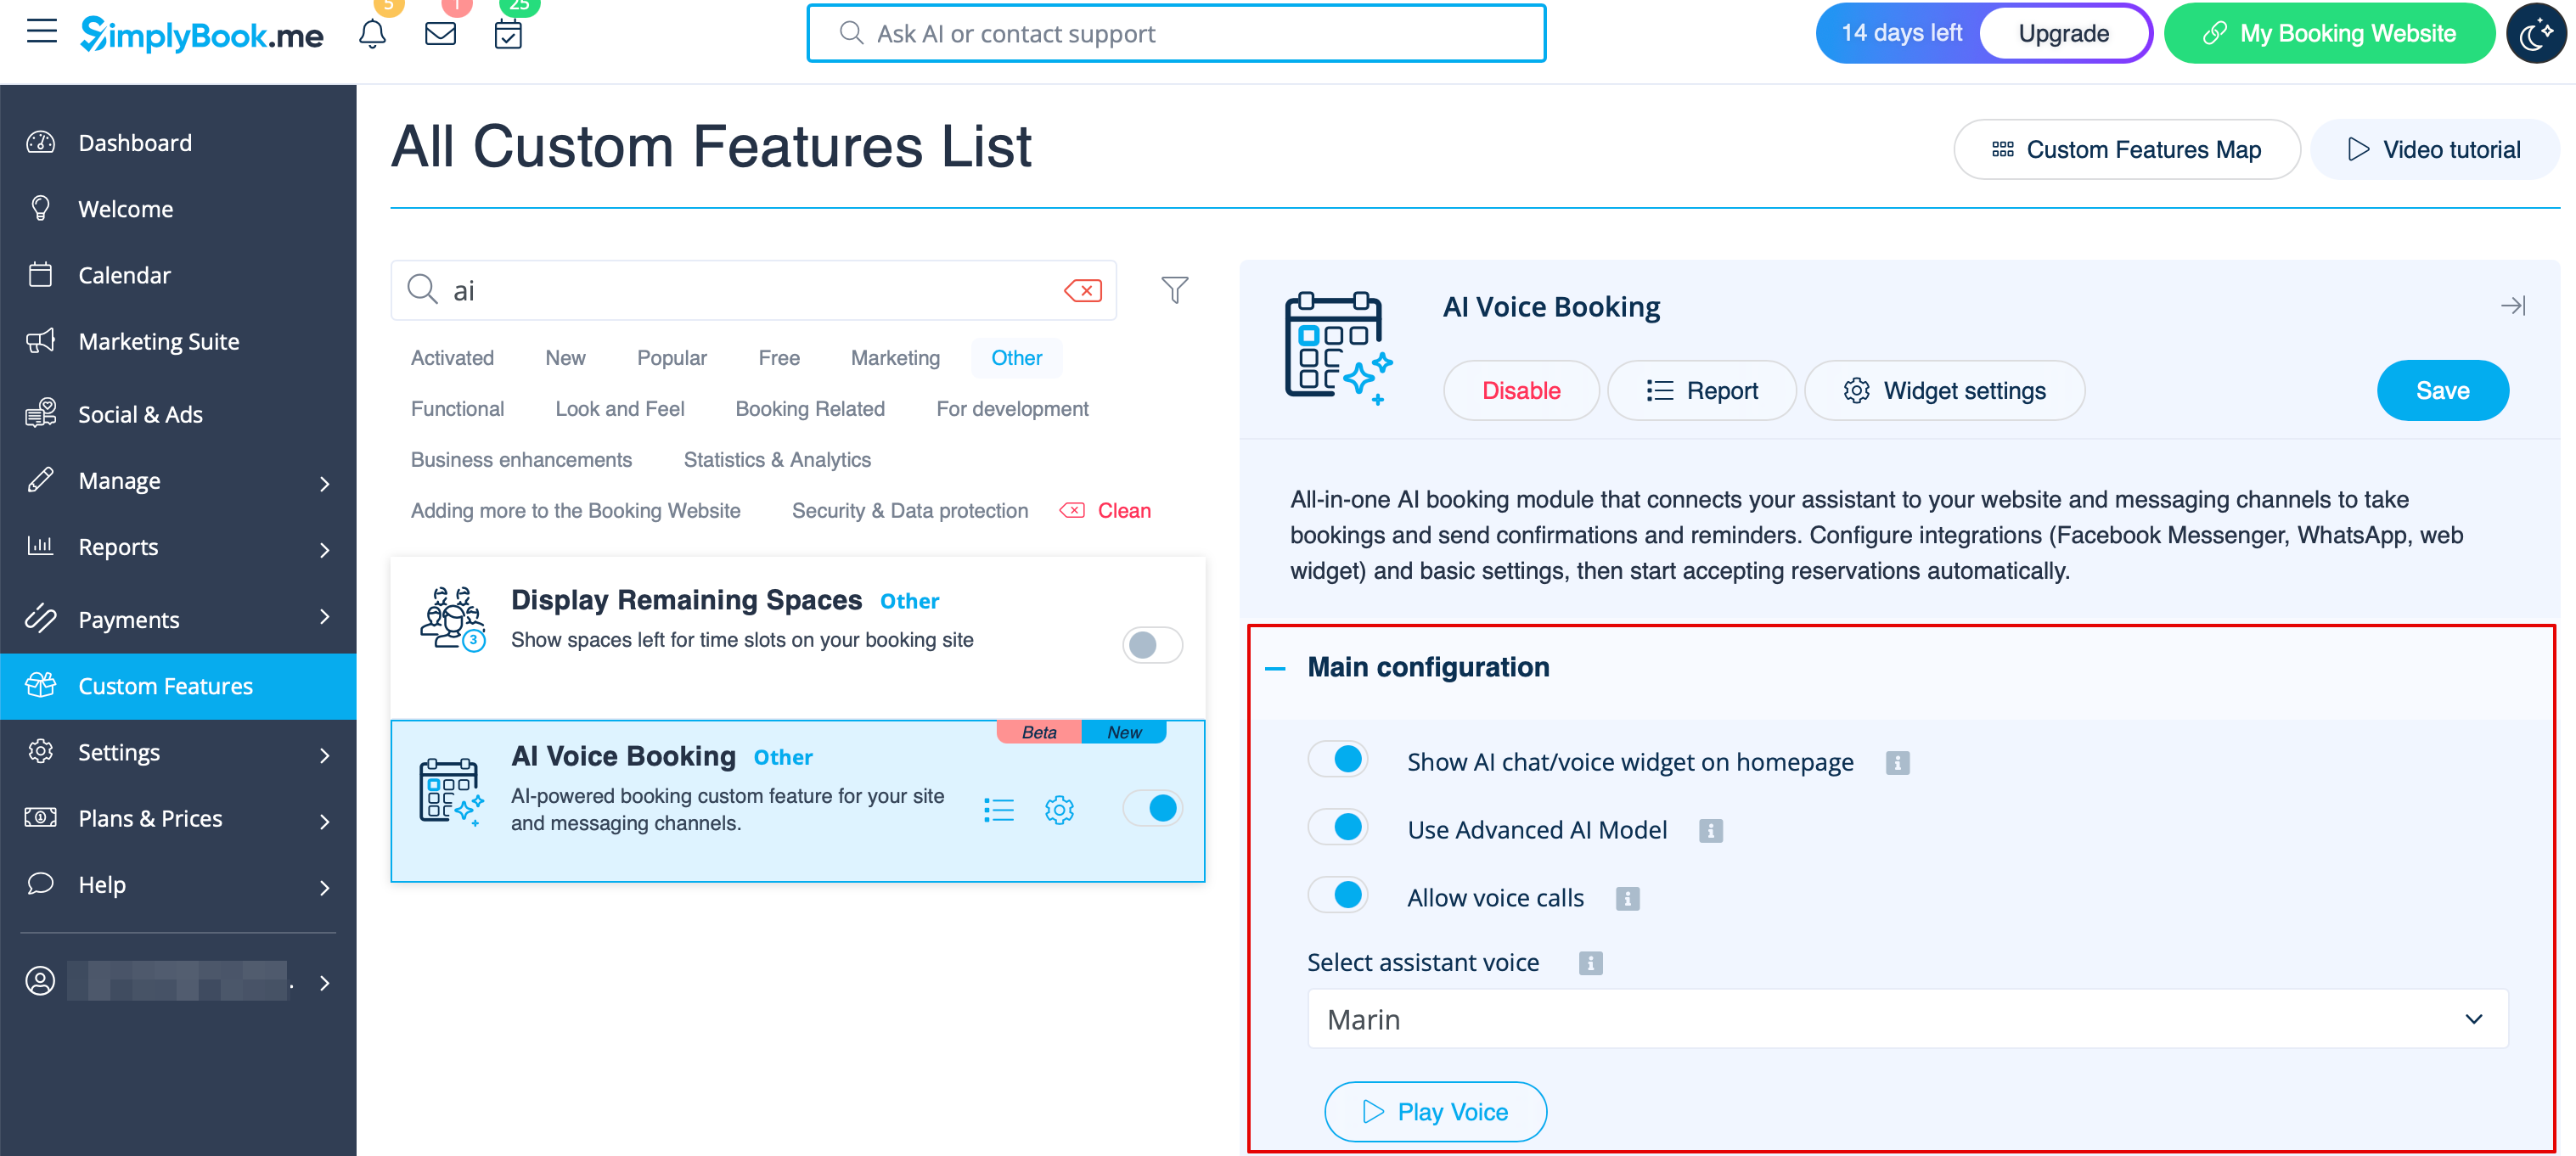
5. Välj nu alternativet där AI-bokning ska vara tillgänglig för dina kunder.
Widget/Bokningswebbplats
1. När krediterna har köpts läggs AI-chattwidgeten till på din bokningswebbplats som standard. Kunderna kan skicka text- eller röstmeddelanden för att gå igenom bokningsprocessen med hjälp av AI.
2. Om du har en egen webbplats kan du lägga till AI-bokningswidgeten där. Gå helt enkelt till ‘’’Widgetinställningar’’’, välj önskade färger och klicka på ”Spara & hämta widgetfärg” för att generera widgetkoden.
3. Gå till din webbplatsredigerare och klistra in koden på den sida där du vill att AI-bokningswidgeten ska vara tillgänglig. Klart.
WhatsApp AI-bokning
1. Öppna Facebook-utvecklare och klicka på ”Create App”:

2. Ange önskade appuppgifter:
3. Välj användningsfallet WhatsApp:
4. Välj företagsprofil eller skapa en ny.
5. Klicka på ”Next” för att fortsätta:
6. Granska uppgifterna och klicka på ”Go to dashboard”:
7. Välj fliken ”Use cases” och klicka på knappen ”Customize”:

8. Acceptera användarvillkoren och bekräfta företagsprofilen:
9. Välj ”Start using the API”:
10. Gå sedan till ”Configure webhooks”:
11. Kopiera ”Callback url” och ”Verification token” från ditt SimplyBook.me-konto -> Anpassade funktioner -> AI Voice booking och klistra in dem i motsvarande fält i appen. Verifiera och spara:
12. I nästa steg under ”Select product”, välj ”WhatsApp Business Account”:
13. Aktivera sedan nödvändiga webhooks: messages och calls (om du vill ta emot samtal):
14. Nu kan du lägga till telefonnummer och betalningsmetod (eftersom Facebook debiterar för meddelanden).
Kopiera telefonnummer-ID från Facebook och klistra in det i motsvarande formulär i ditt SimplyBook.me-konto.
15. Nu behöver du skapa en systemanvändare. Gå till Facebook Business-profilen och öppna fliken System users:

16. Klicka på Add new user och fyll i användaruppgifterna:
17. Gå sedan till Assign Assets:
18. På fliken Apps väljer du din app och aktiverar behörigheten ”Manage app”:
19. På fliken WhatsApp accounts väljer du dina WhatsApp-konton och aktiverar behörigheten Manage WhatsApp business accounts:
20. När tillgångar har tilldelats, klicka på Generate Token:
21. Välj din app från rullgardinsmenyn och ställ in token-giltighet till ”never”:
22. Välj följande behörigheter:
23. Kopiera token och klistra in den i SB och spara inställningarna.
24. Gå nu tillbaka till Facebook-utvecklare, välj din app och klicka på Settings -> Basic. Ange URL:er för Integritetspolicy och Användarvillkor.
25. Kopiera App Secret och klistra in den i SB.
26. Nu kan du publicera appen, ge dina kunder ditt WhatsApp Business-nummer och låta dem boka tjänster med hjälp av AI.
Konfigurera Facebook Messenger
1. Öppna Facebook-utvecklare och klicka på ”Create App”:
2. Ange önskade appuppgifter:
3. Välj användningsfallet Messenger från listan:

4. Välj företagsprofil eller skapa en ny.
5. Gå vidare till appens Dashboard efter att ha granskat uppgifterna
6. Klicka på Customize use case:
7. I Messenger API-inställningarna, ange webhook-URL och verifieringstoken från SB och klicka på Verify and save:
8. Gå tillbaka till Messenger API-inställningarna för att ansluta Facebook-sidan där AI-alternativet ska läggas till och generera en token. Klicka på connect och välj sidan:
9. Klicka på Add subscription:
10. Välj messages:
11. Klicka på Generate token, kopiera token och klistra in den i SB:
12. I grundläggande applikationsinställningar, kopiera App Secret och klistra in den i SB:
13. Nu är du redo att publicera applikationen. Dina besökare kan nu chatta med boten på din sida.
Rapport
Du kan se chattar, antalet använda krediter samt visa sessionsdetaljer med tillhörande bokningsinformation om bokningsprocessen lyckades i Rapporter -> AI-bokning