From SimplyBook.me
Created page with "|description=使用自定義域名進行預約網站。使用自己的URL進行白標品牌。專業外觀,刪除SimplyBook品牌。" |
Created page with "實用連結: *Cookie 橫幅:基本知識與移除技巧 <br><br>" |
||
| (3 intermediate revisions by 2 users not shown) | |||
| Line 1: | Line 1: | ||
<languages/> | |||
{{#seo: | {{#seo: | ||
|title=Own domain to SimplyBook.me | |title=Own domain to SimplyBook.me | ||
|description=使用自定義域名進行預約網站。使用自己的URL進行白標品牌。專業外觀,刪除SimplyBook品牌。 | |description=使用自定義域名進行預約網站。使用自己的URL進行白標品牌。專業外觀,刪除SimplyBook品牌。 | ||
|titlemode=append | |titlemode=append | ||
| Line 6: | Line 8: | ||
}} | }} | ||
< | __FORCETOC__ | ||
< | ==如果您已有網域名稱,該如何使用== | ||
:1. 在「自訂功能」頁面透過一次性付款啟用此功能(您將在帳戶中看到確切價格)。 | |||
[[File:Custom domain enable path redesigned.png|1200px | center|link=https://help.simplybook.me/images/a/a3/Custom_domain_enable_path_redesigned.png]] | |||
<br><br> | |||
:2. 點選頁面右側的對應選項,進入「設定」。 | |||
[[File:Custom domain settings path redesigned.png|1200px| center|link=https://help.simplybook.me/images/e/ef/Custom_domain_settings_path_redesigned.png]] | |||
<br><br> | |||
:3. 在您的網域控制台中,找到設定 DNS 記錄的位置,並將 A 記錄設定為此功能設定中所提示的 IP 位址。 | |||
:'''請注意!''' 不得設定 AAAA 記錄(IPv6),否則將無法核發 SSL 憑證。 | |||
[[File:Custom domain settings overview redesigned.png|1200px | center|link=https://help.simplybook.me/images/5/5b/Custom_domain_settings_overview_redesigned.png]] | |||
<br><br> | |||
:設定 A 記錄後,在設定中輸入您想使用的網域名稱並儲存。<br> | |||
:之後我們將自動收到請求並在我們這端套用設定(這可能需要一些時間——通常約 24 至 48 小時)。 | |||
:設定套用後,您的網域名稱即可開始用於預約網站。<br><br> | |||
:''若您希望將自訂網域名稱更改為與先前設定不同的名稱,由於需要建立新的 SSL 憑證,將需要支付額外費用。 | |||
:''此自訂功能的設定中將會出現一個按鈕,讓您在需要時進行變更。 | |||
:''如需更多資訊,請聯絡客服支援。'' | |||
<br><br> | <br><br> | ||
:1. | ==如何使用 Simply.com 設定網域== | ||
[[File:Custom domain enable path redesigned.png| 1200px| center|link=https://help.simplybook.me/images/a/a3/Custom_domain_enable_path_redesigned.png]] | :1. 在「自訂功能」頁面透過一次性付款啟用「自訂網域」功能(您將在帳戶中看到確切價格)。 | ||
[[File:Custom domain enable path redesigned.png|1200px | center|link=https://help.simplybook.me/images/a/a3/Custom_domain_enable_path_redesigned.png]] | |||
<br><br> | <br><br> | ||
:2. | :2. 點選頁面右側的對應選項,進入「設定」。 | ||
[[File:Custom domain settings path redesigned.png|1200px| center|link=https://help.simplybook.me/images/e/ef/Custom_domain_settings_path_redesigned.png]] | [[File:Custom domain settings path redesigned.png|1200px| center|link=https://help.simplybook.me/images/e/ef/Custom_domain_settings_path_redesigned.png]] | ||
<br><br> | <br><br> | ||
:3. | :3. 點擊「購買網域」。<br> | ||
: | :這將在新的瀏覽器分頁中開啟 Simply.com,並預先載入您的工作階段。 | ||
[[File: | [[File:Simply.com domain purchase path.png|1200px| center|link=https://help.simplybook.me/images/d/d1/Simply.com_domain_purchase_path.png]] | ||
<br><br> | <br><br> | ||
: | :4. 在 Simply.com 上選擇並購買您的網域: | ||
* 搜尋您想要的網域名稱 | |||
* 選擇合適的選項並在 Simply.com 上完成結帳 | |||
<br> | <br> | ||
: | :5. 等待自動設定完成。 | ||
:購買後,Simply.com 會將 DNS 指向我們的伺服器並傳送確認通知給我們。 | |||
:預設設定無需手動操作。 | |||
<br><br> | <br><br> | ||
: | :6. 返回「自訂網域」設定頁面。 | ||
:狀態應變更為「已連線」。 | |||
:連線後不久將自動核發 SSL 憑證。 | |||
<br><br> | |||
實用連結: | |||
*[[Special:MyLanguage/Cookie Banners: Essentials and Tips for Removal|Cookie 橫幅:基本知識與移除技巧]] | |||
<br><br> | <br><br> | ||
Latest revision as of 09:51, 1 June 2026
如果您已有網域名稱,該如何使用
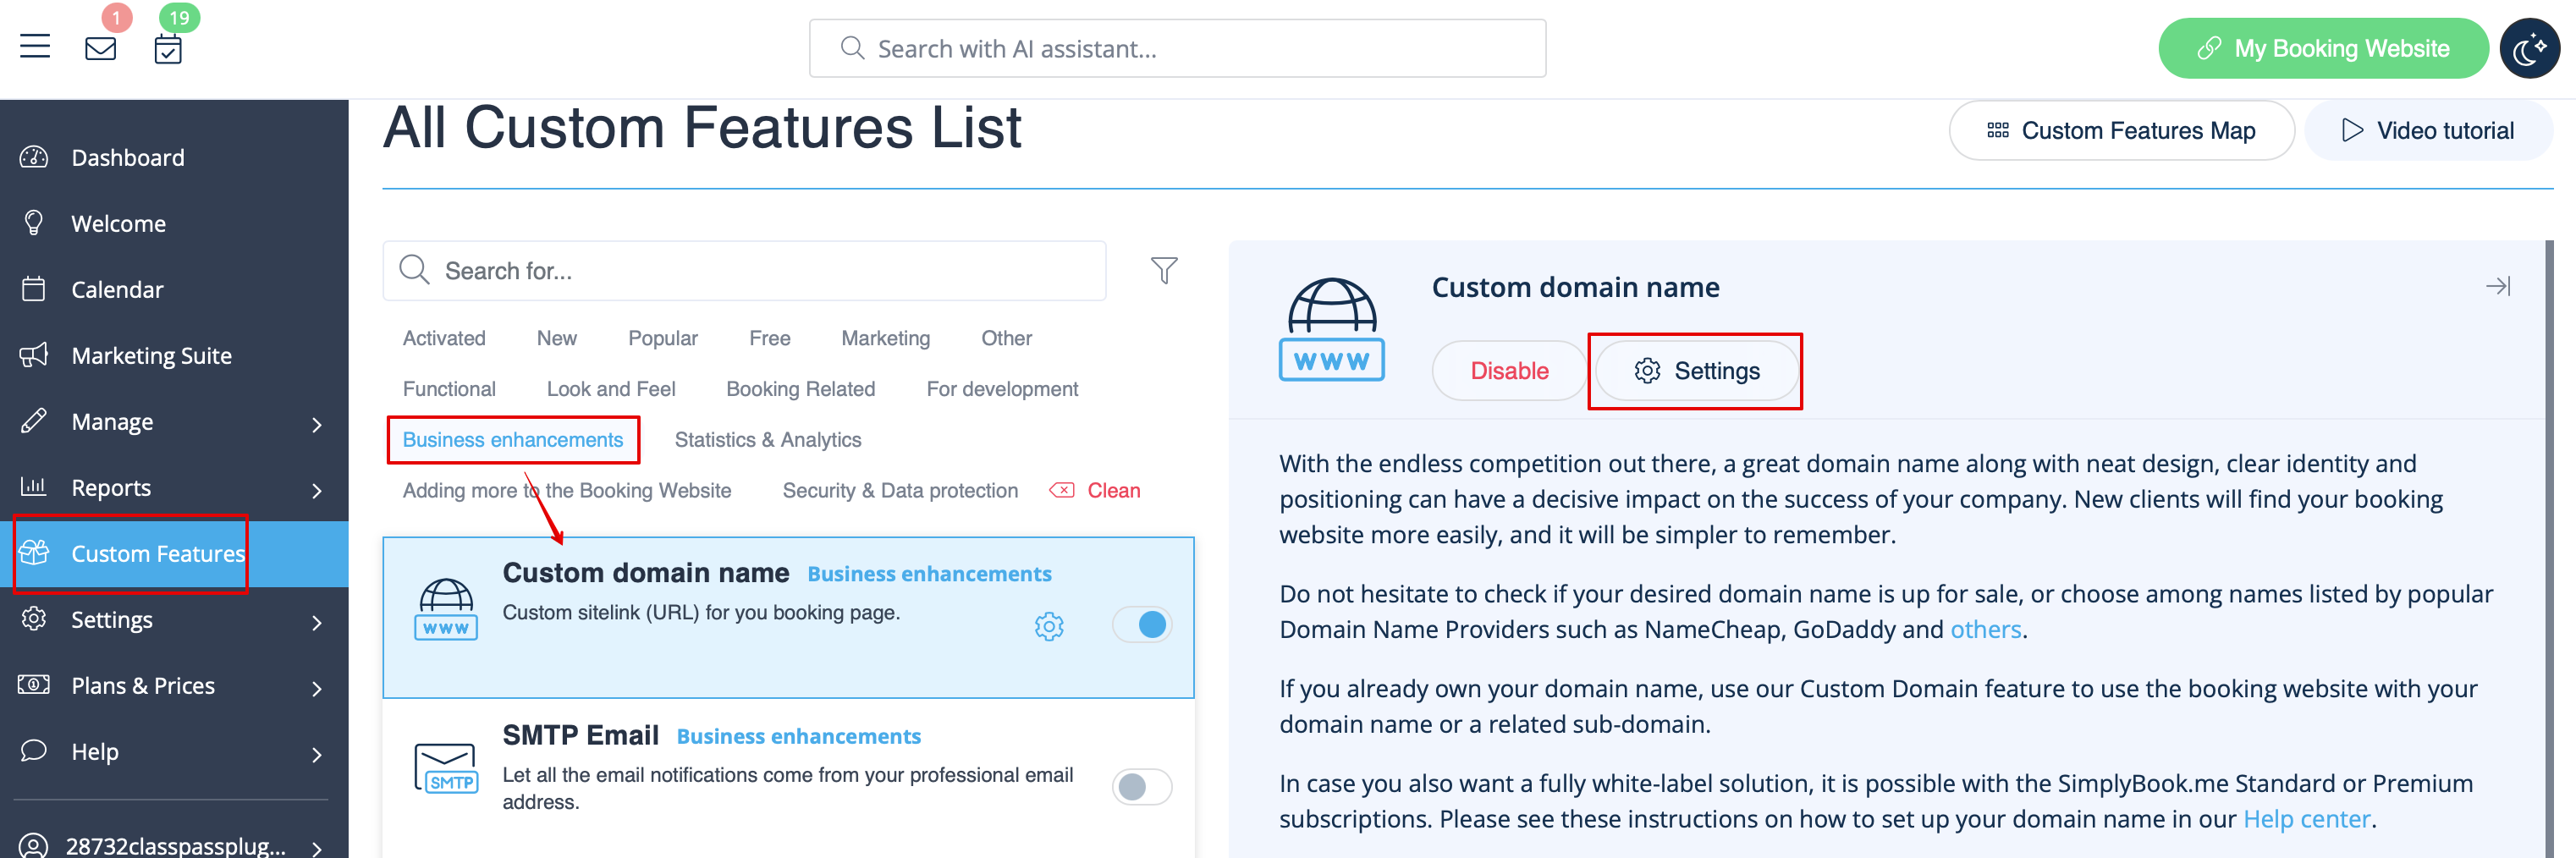
- 1. 在「自訂功能」頁面透過一次性付款啟用此功能(您將在帳戶中看到確切價格)。

- 2. 點選頁面右側的對應選項,進入「設定」。
- 3. 在您的網域控制台中,找到設定 DNS 記錄的位置,並將 A 記錄設定為此功能設定中所提示的 IP 位址。
- 請注意! 不得設定 AAAA 記錄(IPv6),否則將無法核發 SSL 憑證。
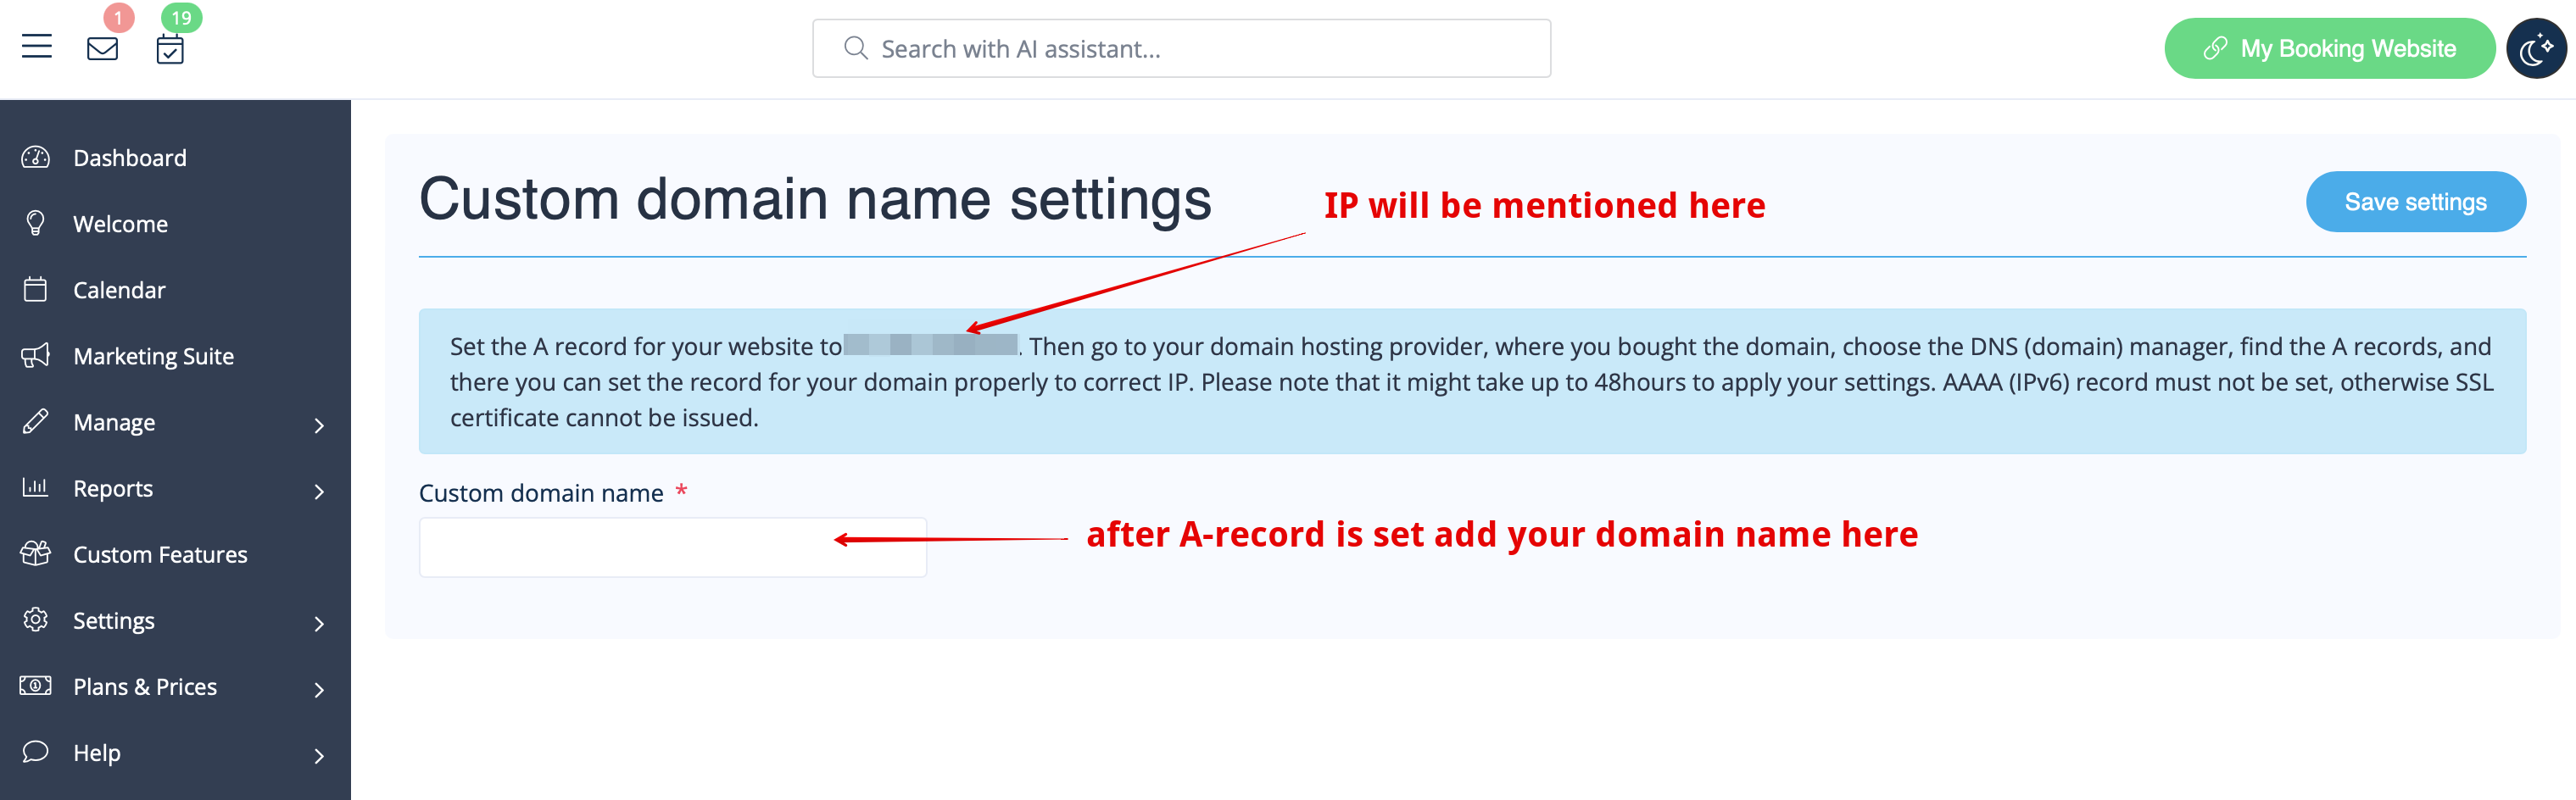
- 設定 A 記錄後,在設定中輸入您想使用的網域名稱並儲存。
- 之後我們將自動收到請求並在我們這端套用設定(這可能需要一些時間——通常約 24 至 48 小時)。
- 設定套用後,您的網域名稱即可開始用於預約網站。
- 若您希望將自訂網域名稱更改為與先前設定不同的名稱,由於需要建立新的 SSL 憑證,將需要支付額外費用。
- 此自訂功能的設定中將會出現一個按鈕,讓您在需要時進行變更。
- 如需更多資訊,請聯絡客服支援。
如何使用 Simply.com 設定網域
- 1. 在「自訂功能」頁面透過一次性付款啟用「自訂網域」功能(您將在帳戶中看到確切價格)。
- 2. 點選頁面右側的對應選項,進入「設定」。
- 3. 點擊「購買網域」。
- 這將在新的瀏覽器分頁中開啟 Simply.com,並預先載入您的工作階段。
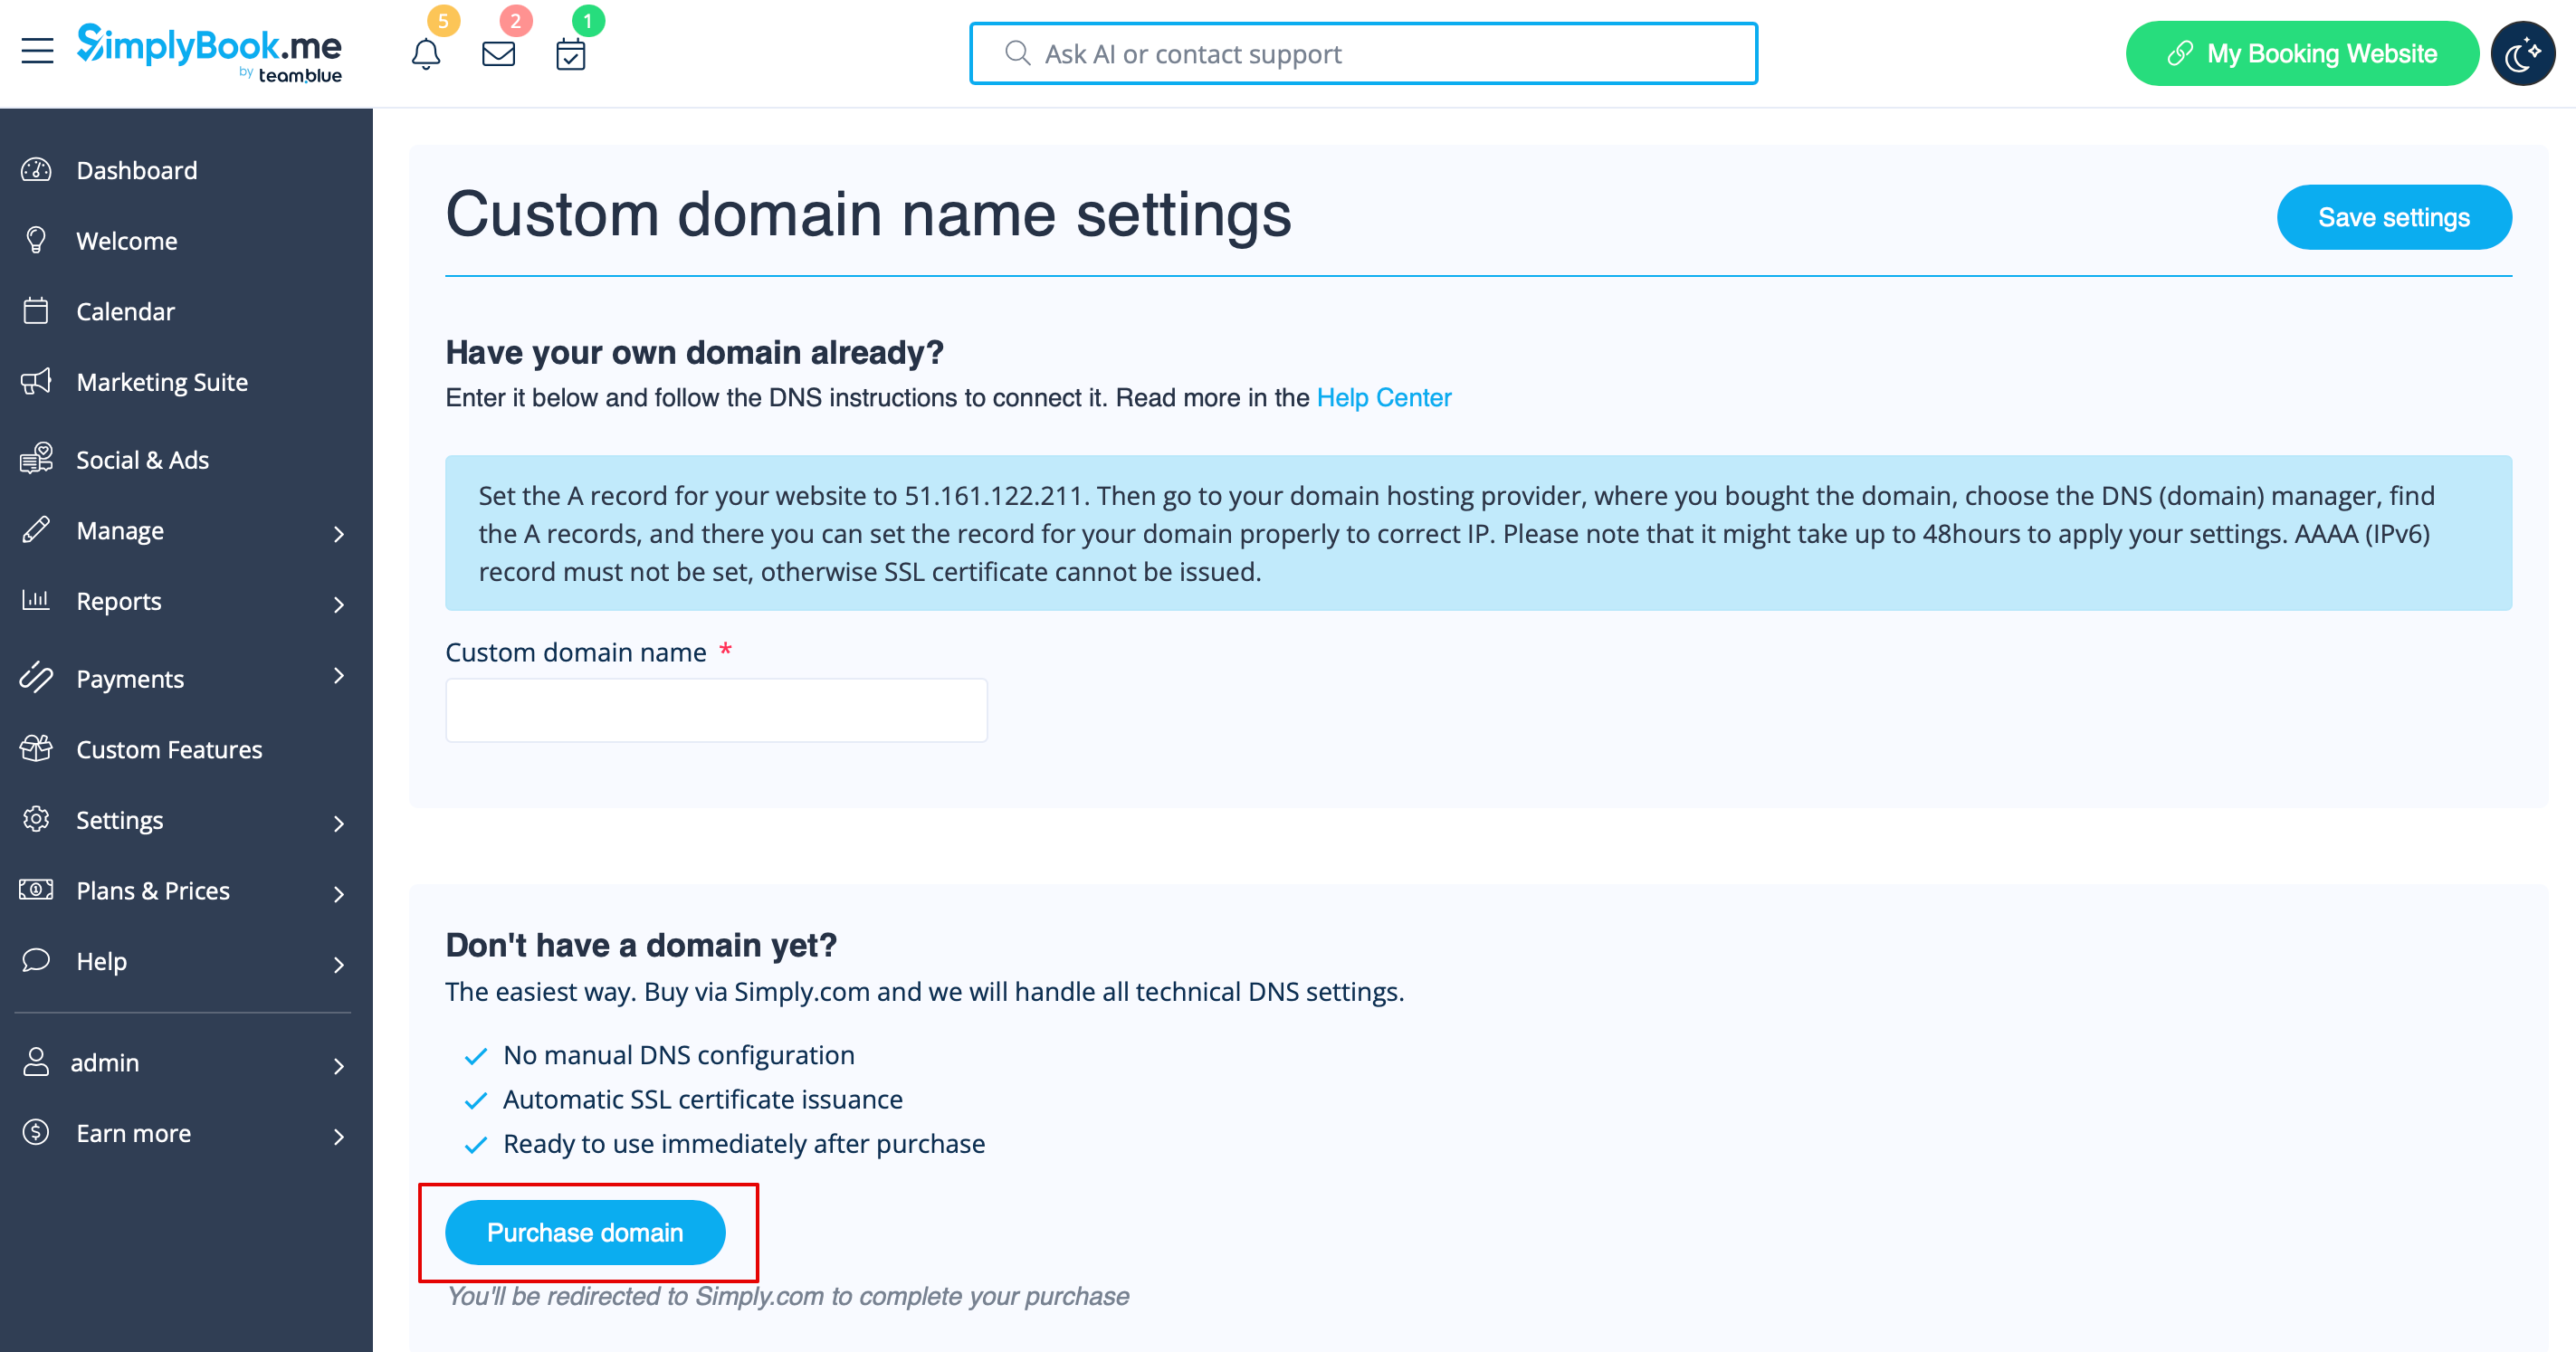
- 4. 在 Simply.com 上選擇並購買您的網域:
- 搜尋您想要的網域名稱
- 選擇合適的選項並在 Simply.com 上完成結帳
- 5. 等待自動設定完成。
- 購買後,Simply.com 會將 DNS 指向我們的伺服器並傳送確認通知給我們。
- 預設設定無需手動操作。
- 6. 返回「自訂網域」設定頁面。
- 狀態應變更為「已連線」。
- 連線後不久將自動核發 SSL 憑證。
實用連結: