From SimplyBook.me
Created page with "Utiliser Zapier.com" |
No edit summary |
||
| (5 intermediate revisions by 2 users not shown) | |||
| Line 1: | Line 1: | ||
<languages/> | <languages/> | ||
{{#seo: | {{#seo: | ||
|title= | |title= Utilisation de Zapier et du planificateur du système de réservation - SimplyBook.me | ||
|titlemode=append | |titlemode=append | ||
|keywords=faq, | |keywords=faq, questions fréquentes, logiciel de réservation, questions sur le système de rendez-vous, rendez-vous en ligne, logiciel de calendrier, système de réservation | ||
}} | }} | ||
<br><br> | <br><br> | ||
===Zap | ===Tutoriel Zap pour la connexion SimplyBook et Gmail=== | ||
On nous demande souvent comment envoyer un e-mail de confirmation à plusieurs adresses e-mail. Cela peut être nécessaire si le client a un agent ou si d’autres personnes doivent recevoir les e-mails de confirmation pour les clients. Cette option est désormais disponible avec notre application sur Zapier ! | |||
;Comment l’utiliser | |||
; | |||
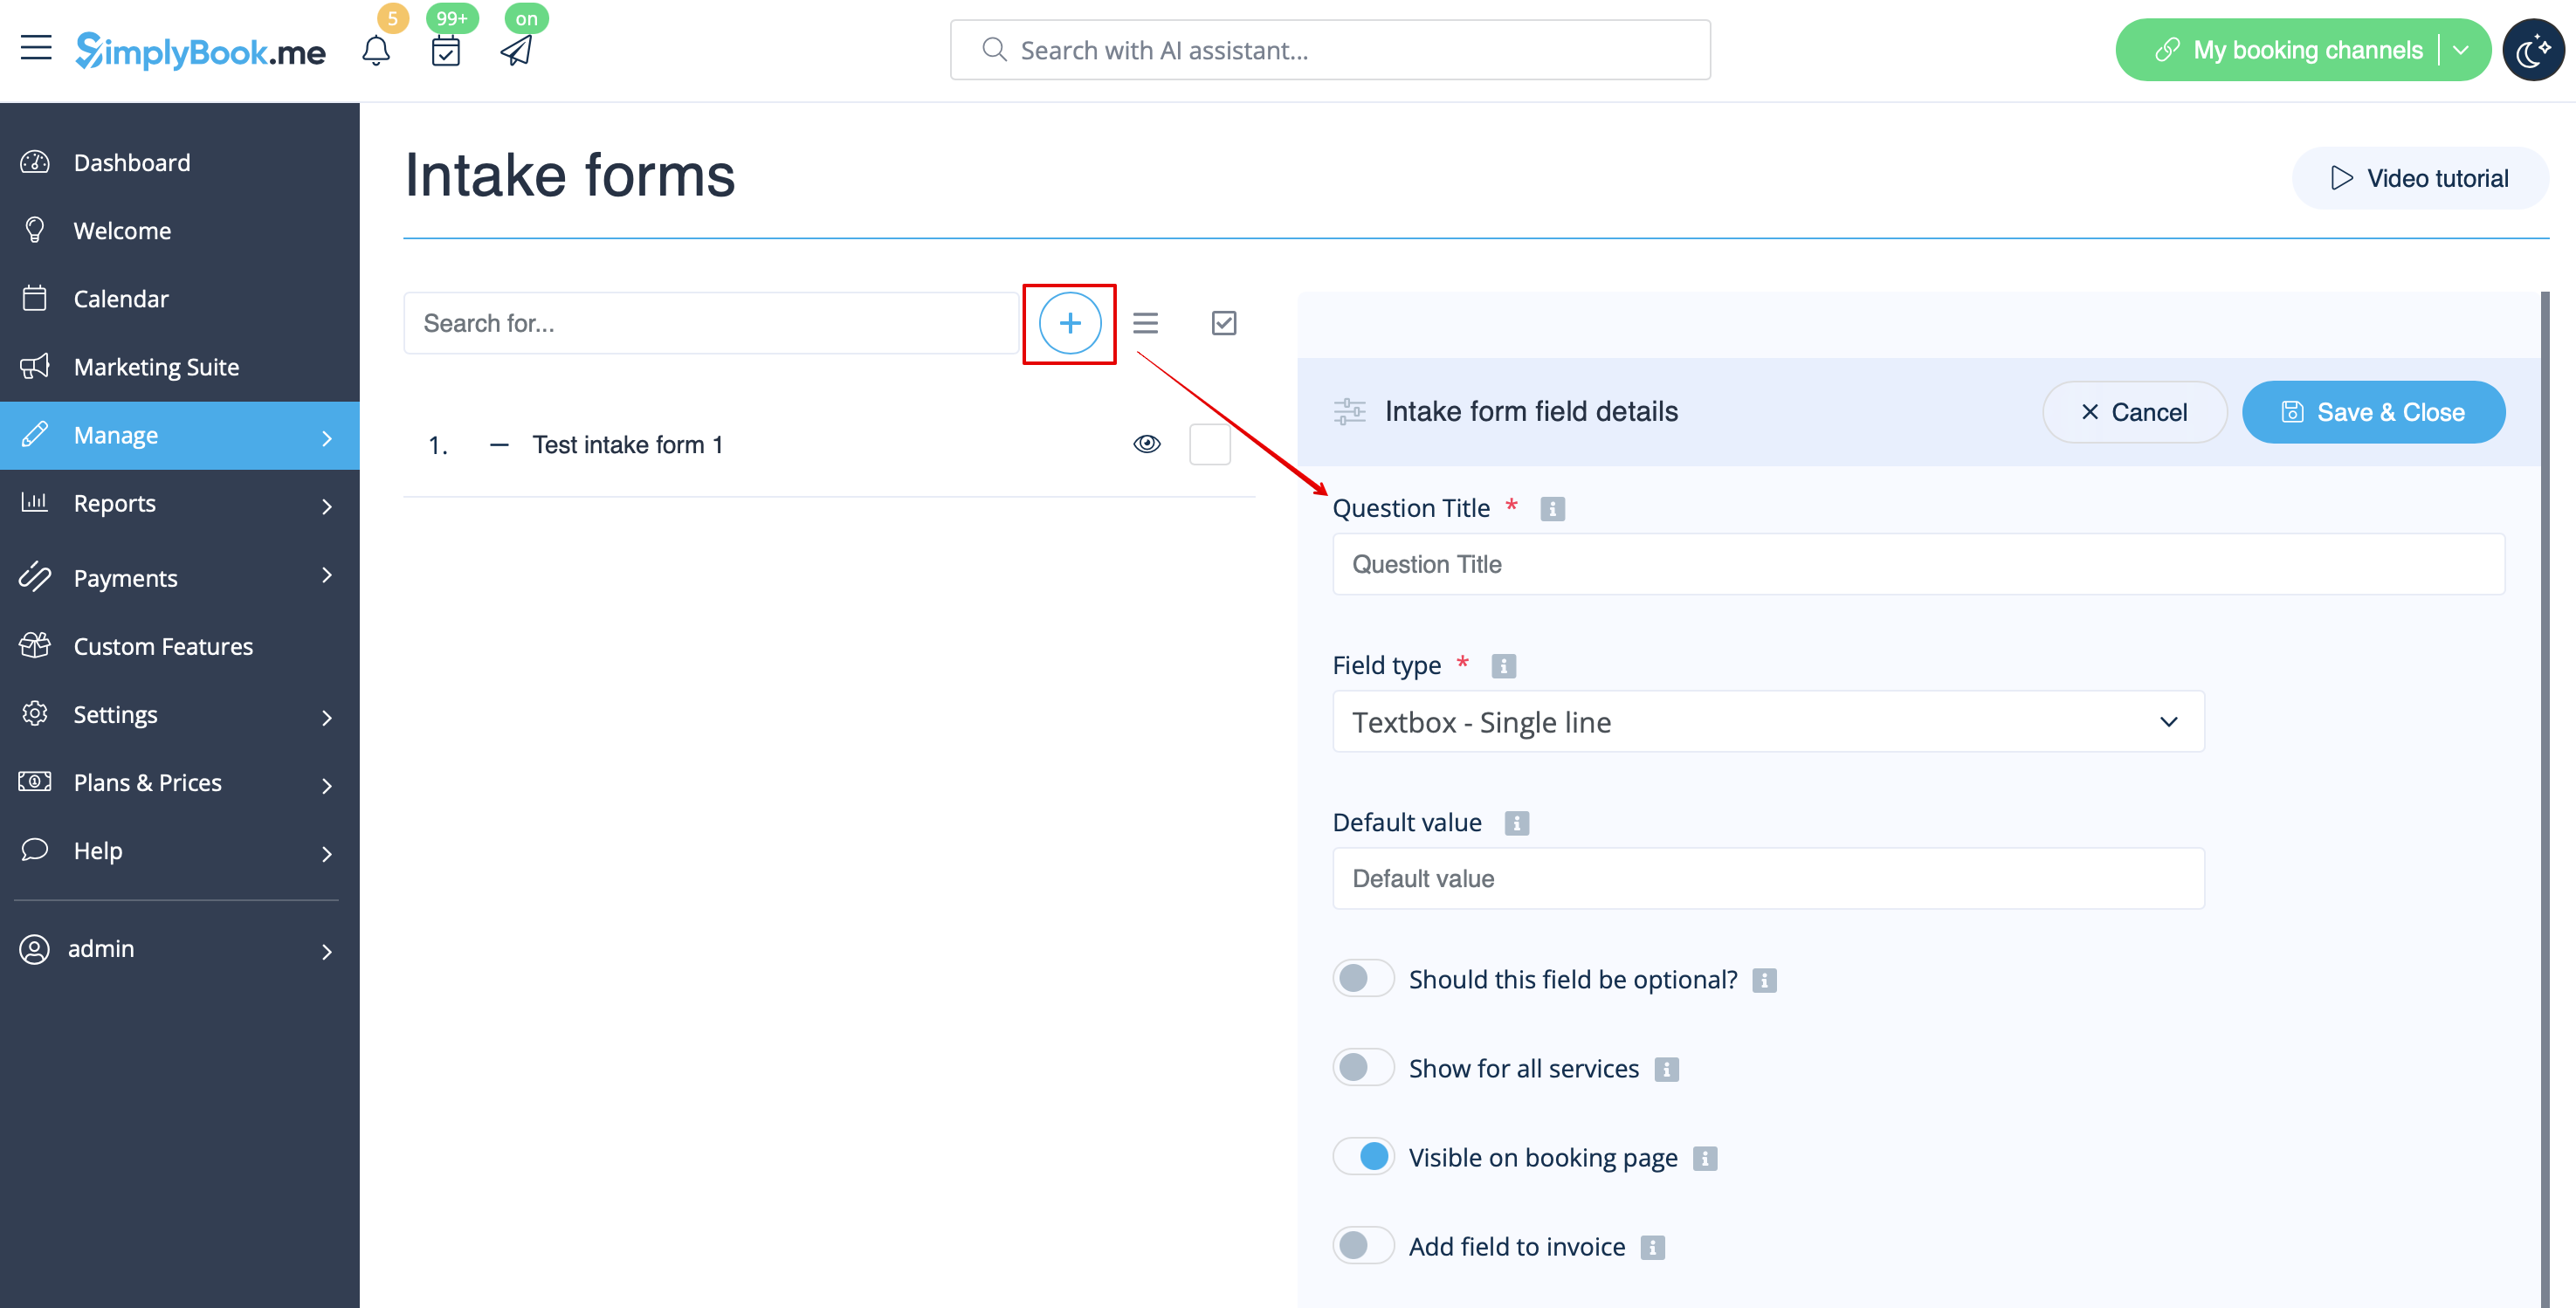
< | :1. Créez un formulaire d'admission pour le deuxième destinataire dans l'application admin [https://simplybook.me/ Simplybook] à l'aide de la [[Custom_Features#Intake_Forms | Fonctionnalité personnalisée Formulaires d'admission]]. | ||
: | [[File:Create new single line form redesigned.png|1200px| center|link=https://help.simplybook.me/images/b/b1/Create_new_single_line_form_redesigned.png]] | ||
<br><br> | |||
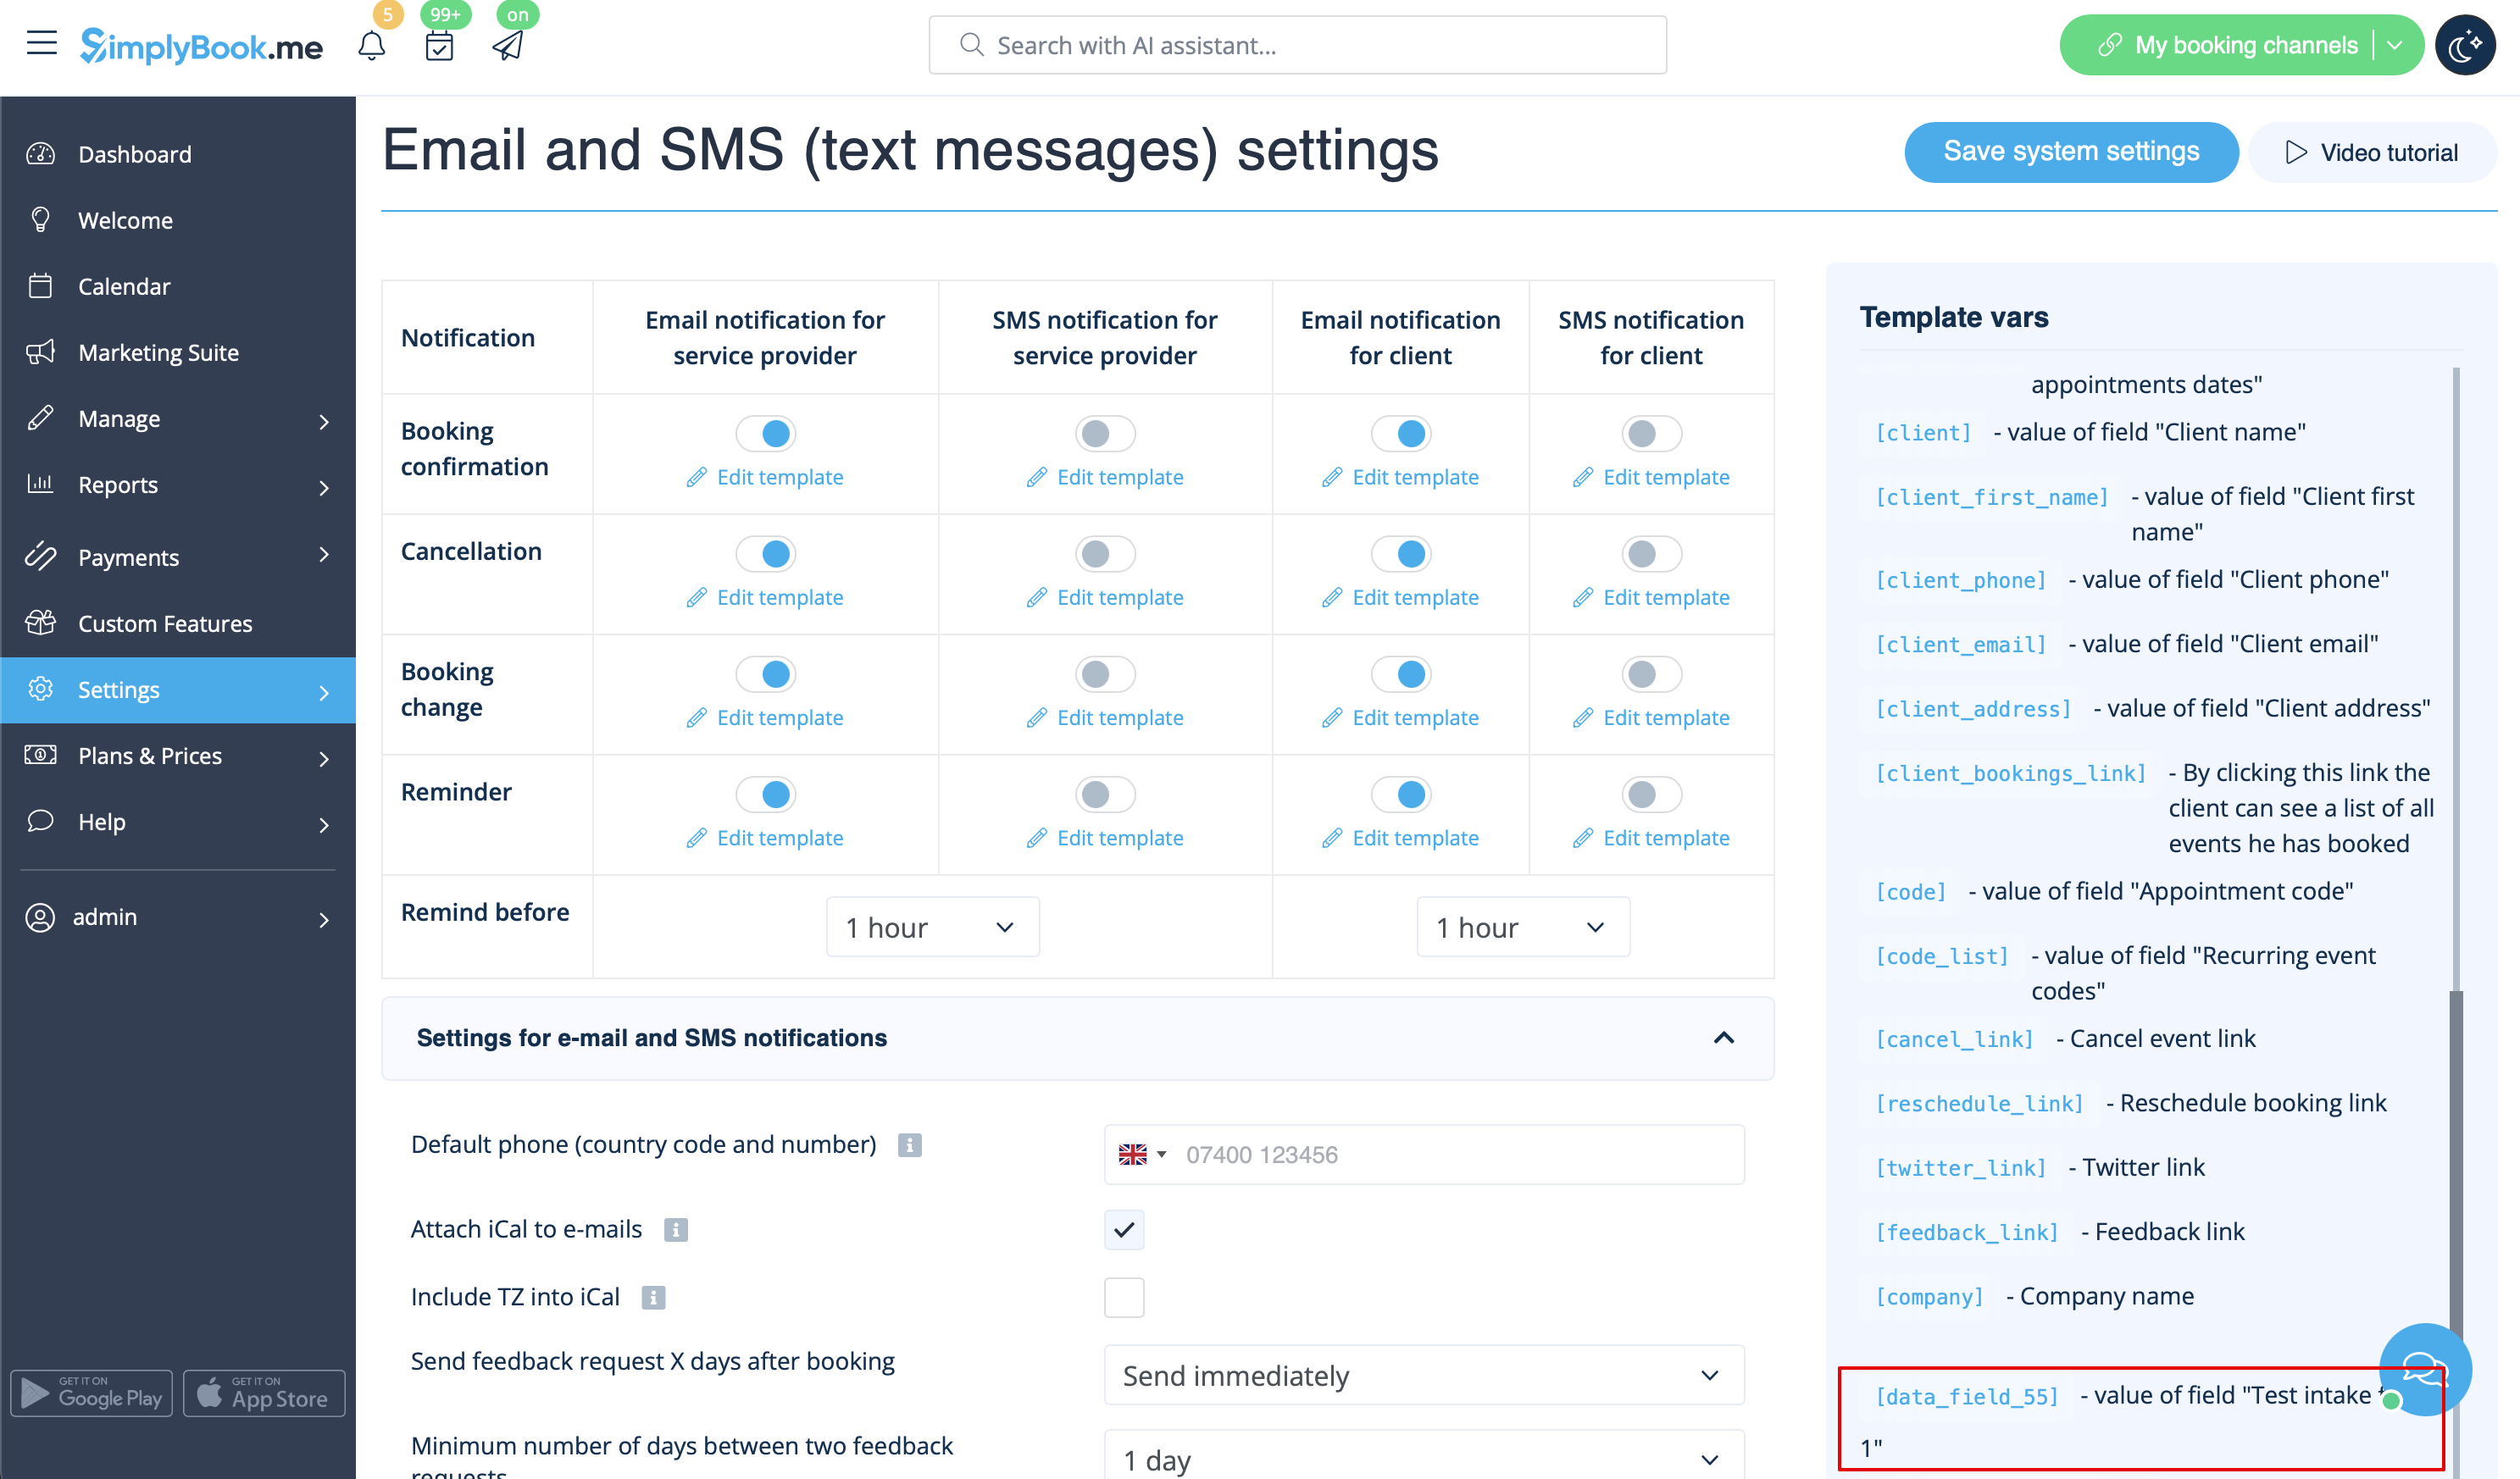
:2. Après avoir créé un formulaire d'admission, vous verrez le nom de la variable au bas de la liste des variables dans Paramètres//Paramètres e-mail et SMS | |||
[[File:Intake form variable redesigned.png|1200px | center|link=https://help.simplybook.me/images/a/a3/Intake_form_variable_redesigned.png]] | |||
<br><br> | |||
:3. Dans cette image, il s'agit de [data_field_30] (mais il peut aussi s'agir de data_field_2, data_field_3, etc.). Cette variable contiendra l'adresse e-mail alternative nécessaire pour la synchronisation avec Gmail.<br><br> | |||
:4. Créez ensuite une réservation test sur votre page de réservation [https://simplybook.me/ Simplybook]. Cela est nécessaire pour informer le système que le nouveau formulaire a été créé dans le système et est prêt pour une utilisation ultérieure. <br><br> | |||
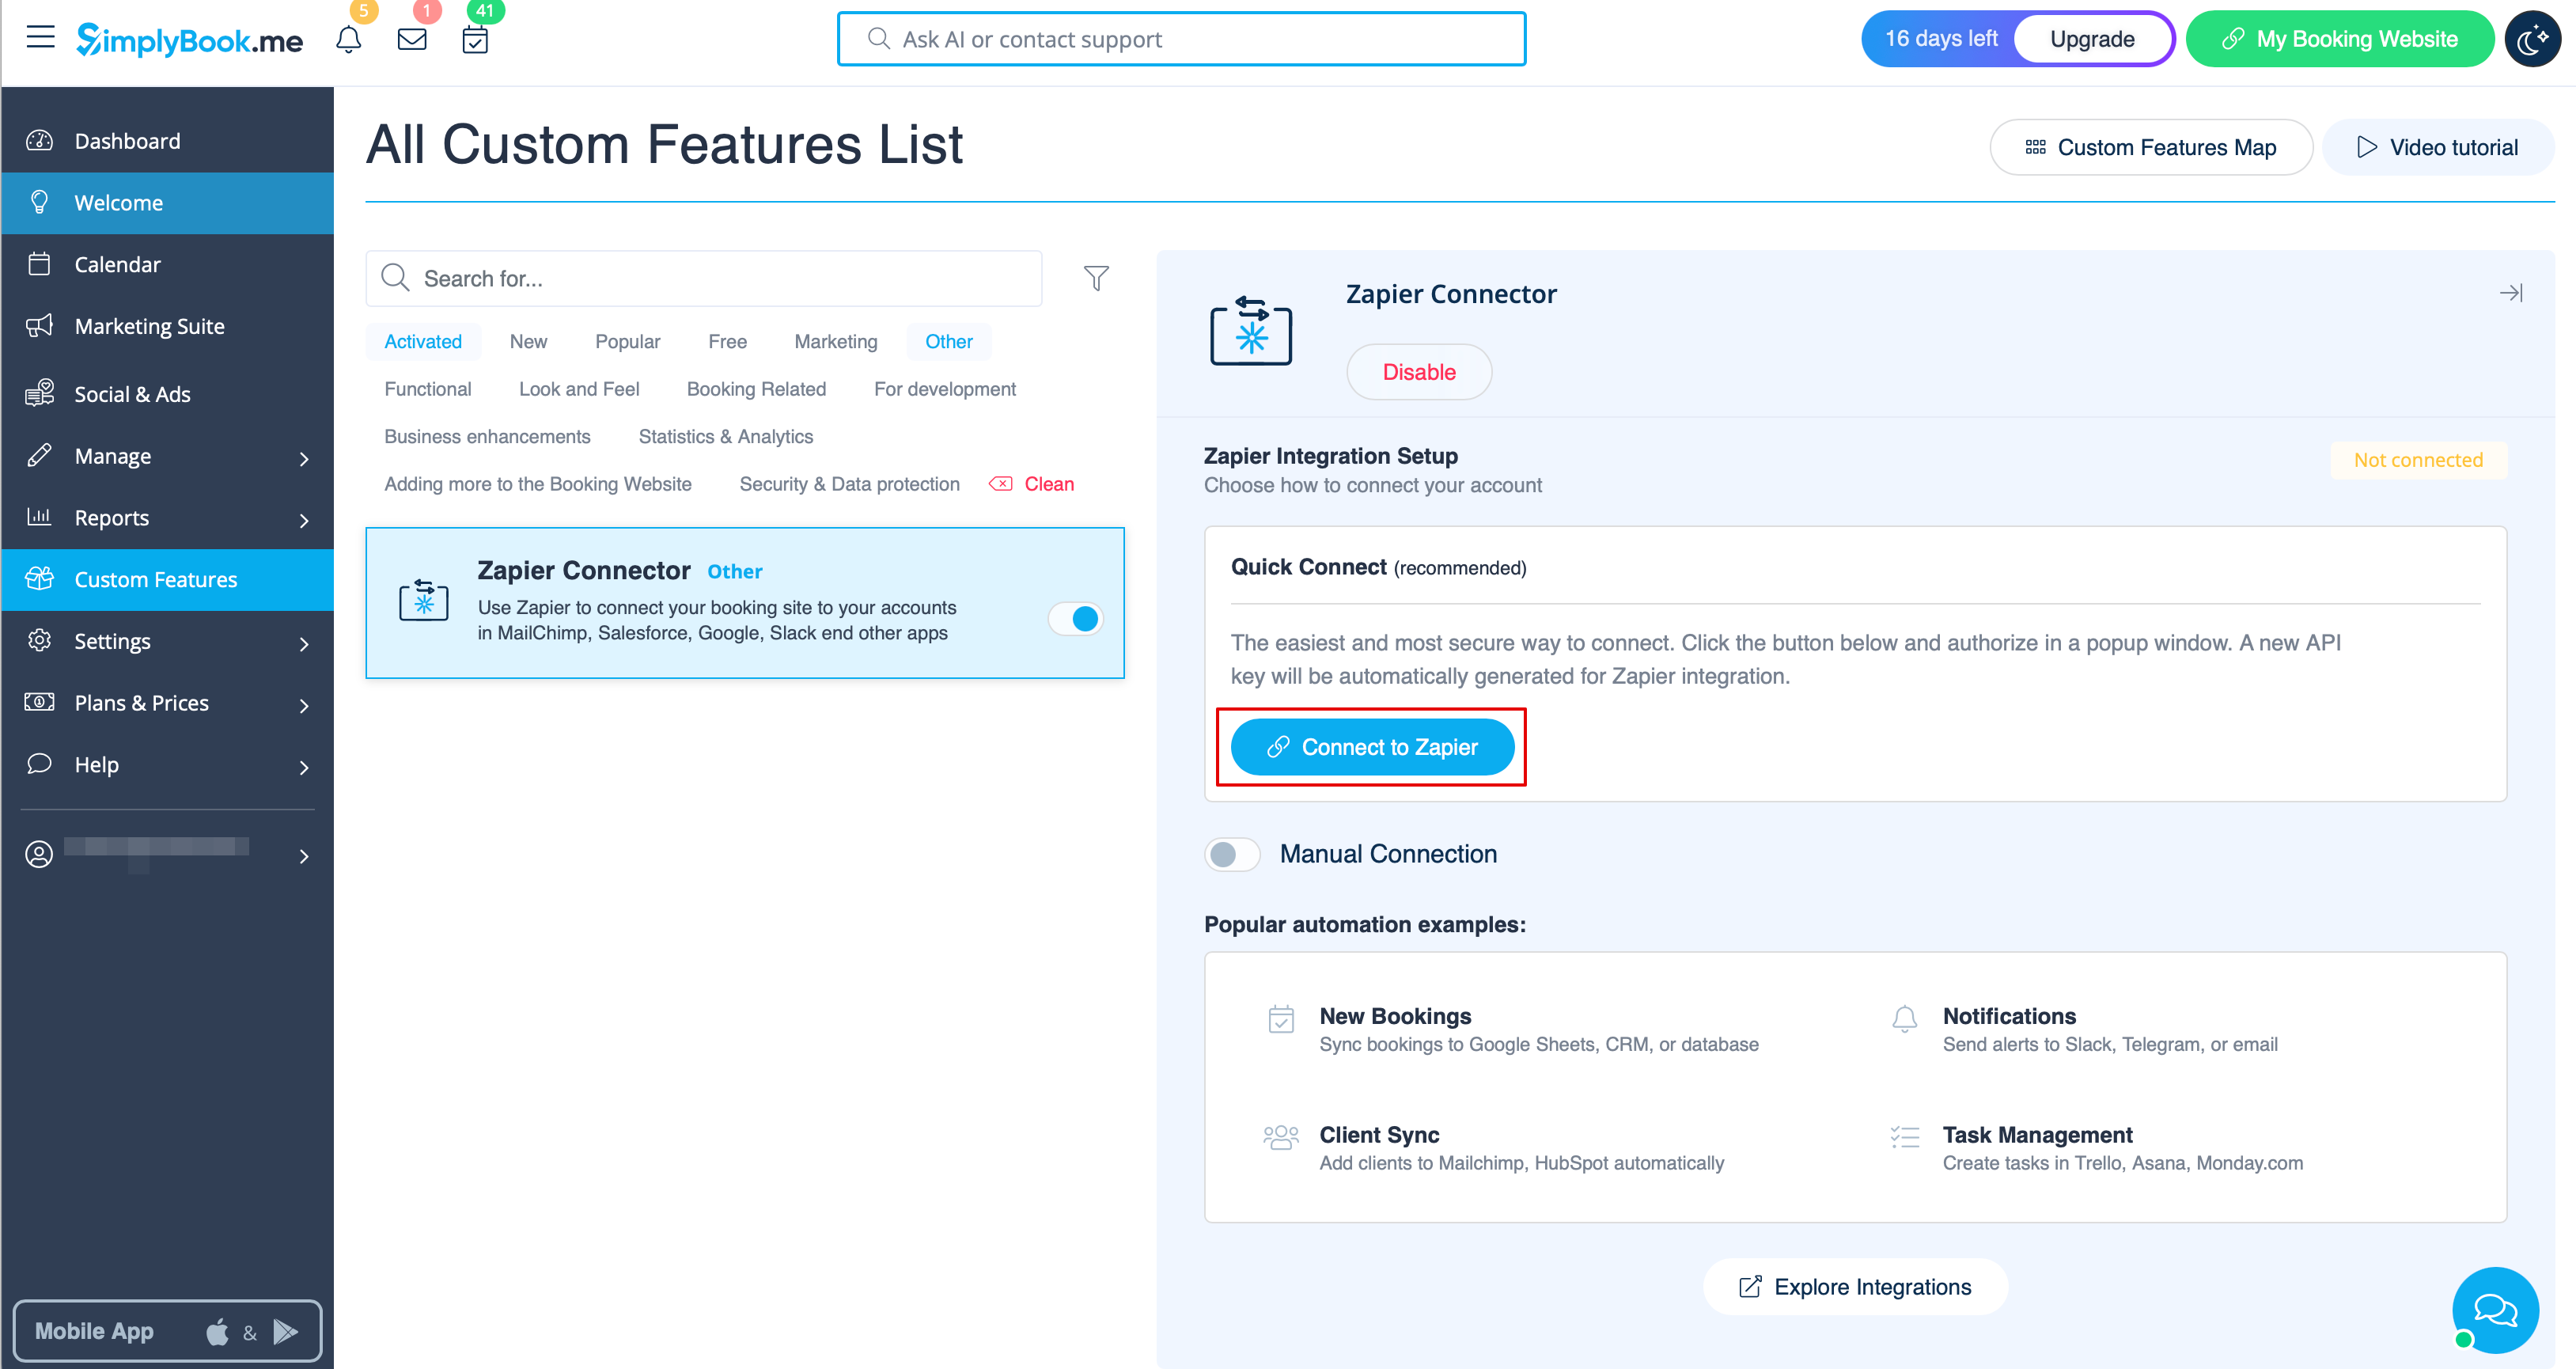
:5. Activez la fonctionnalité personnalisée <span style="background-color:#d4f8e5; padding:5px; border-radius:5px;">Connecteur Zapier</span> sur votre page <span style="background-color:#d4f8e5; padding:5px; border-radius:5px;">Fonctionnalités personnalisées</span>. | |||
[[File:Zapier enable path redesigned.png|1200px| center|link=https://help.simplybook.me/images/b/b9/Zapier_enable_path_redesigned.png]] | [[File:Zapier enable path redesigned.png|1200px| center|link=https://help.simplybook.me/images/b/b9/Zapier_enable_path_redesigned.png]] | ||
<br><br> | <br><br> | ||
: | :6. Connectez-vous à votre compte Zapier en utilisant l'option '''Connexion rapide''' | ||
[[File:Quick connect zapier.png|1200px|border | center|link=https://help.simplybook.me/images/8/84/Quick_connect_zapier.png]] | [[File:Quick connect zapier.png|1200px|border | center|link=https://help.simplybook.me/images/8/84/Quick_connect_zapier.png]] | ||
<br><br> | <br><br> | ||
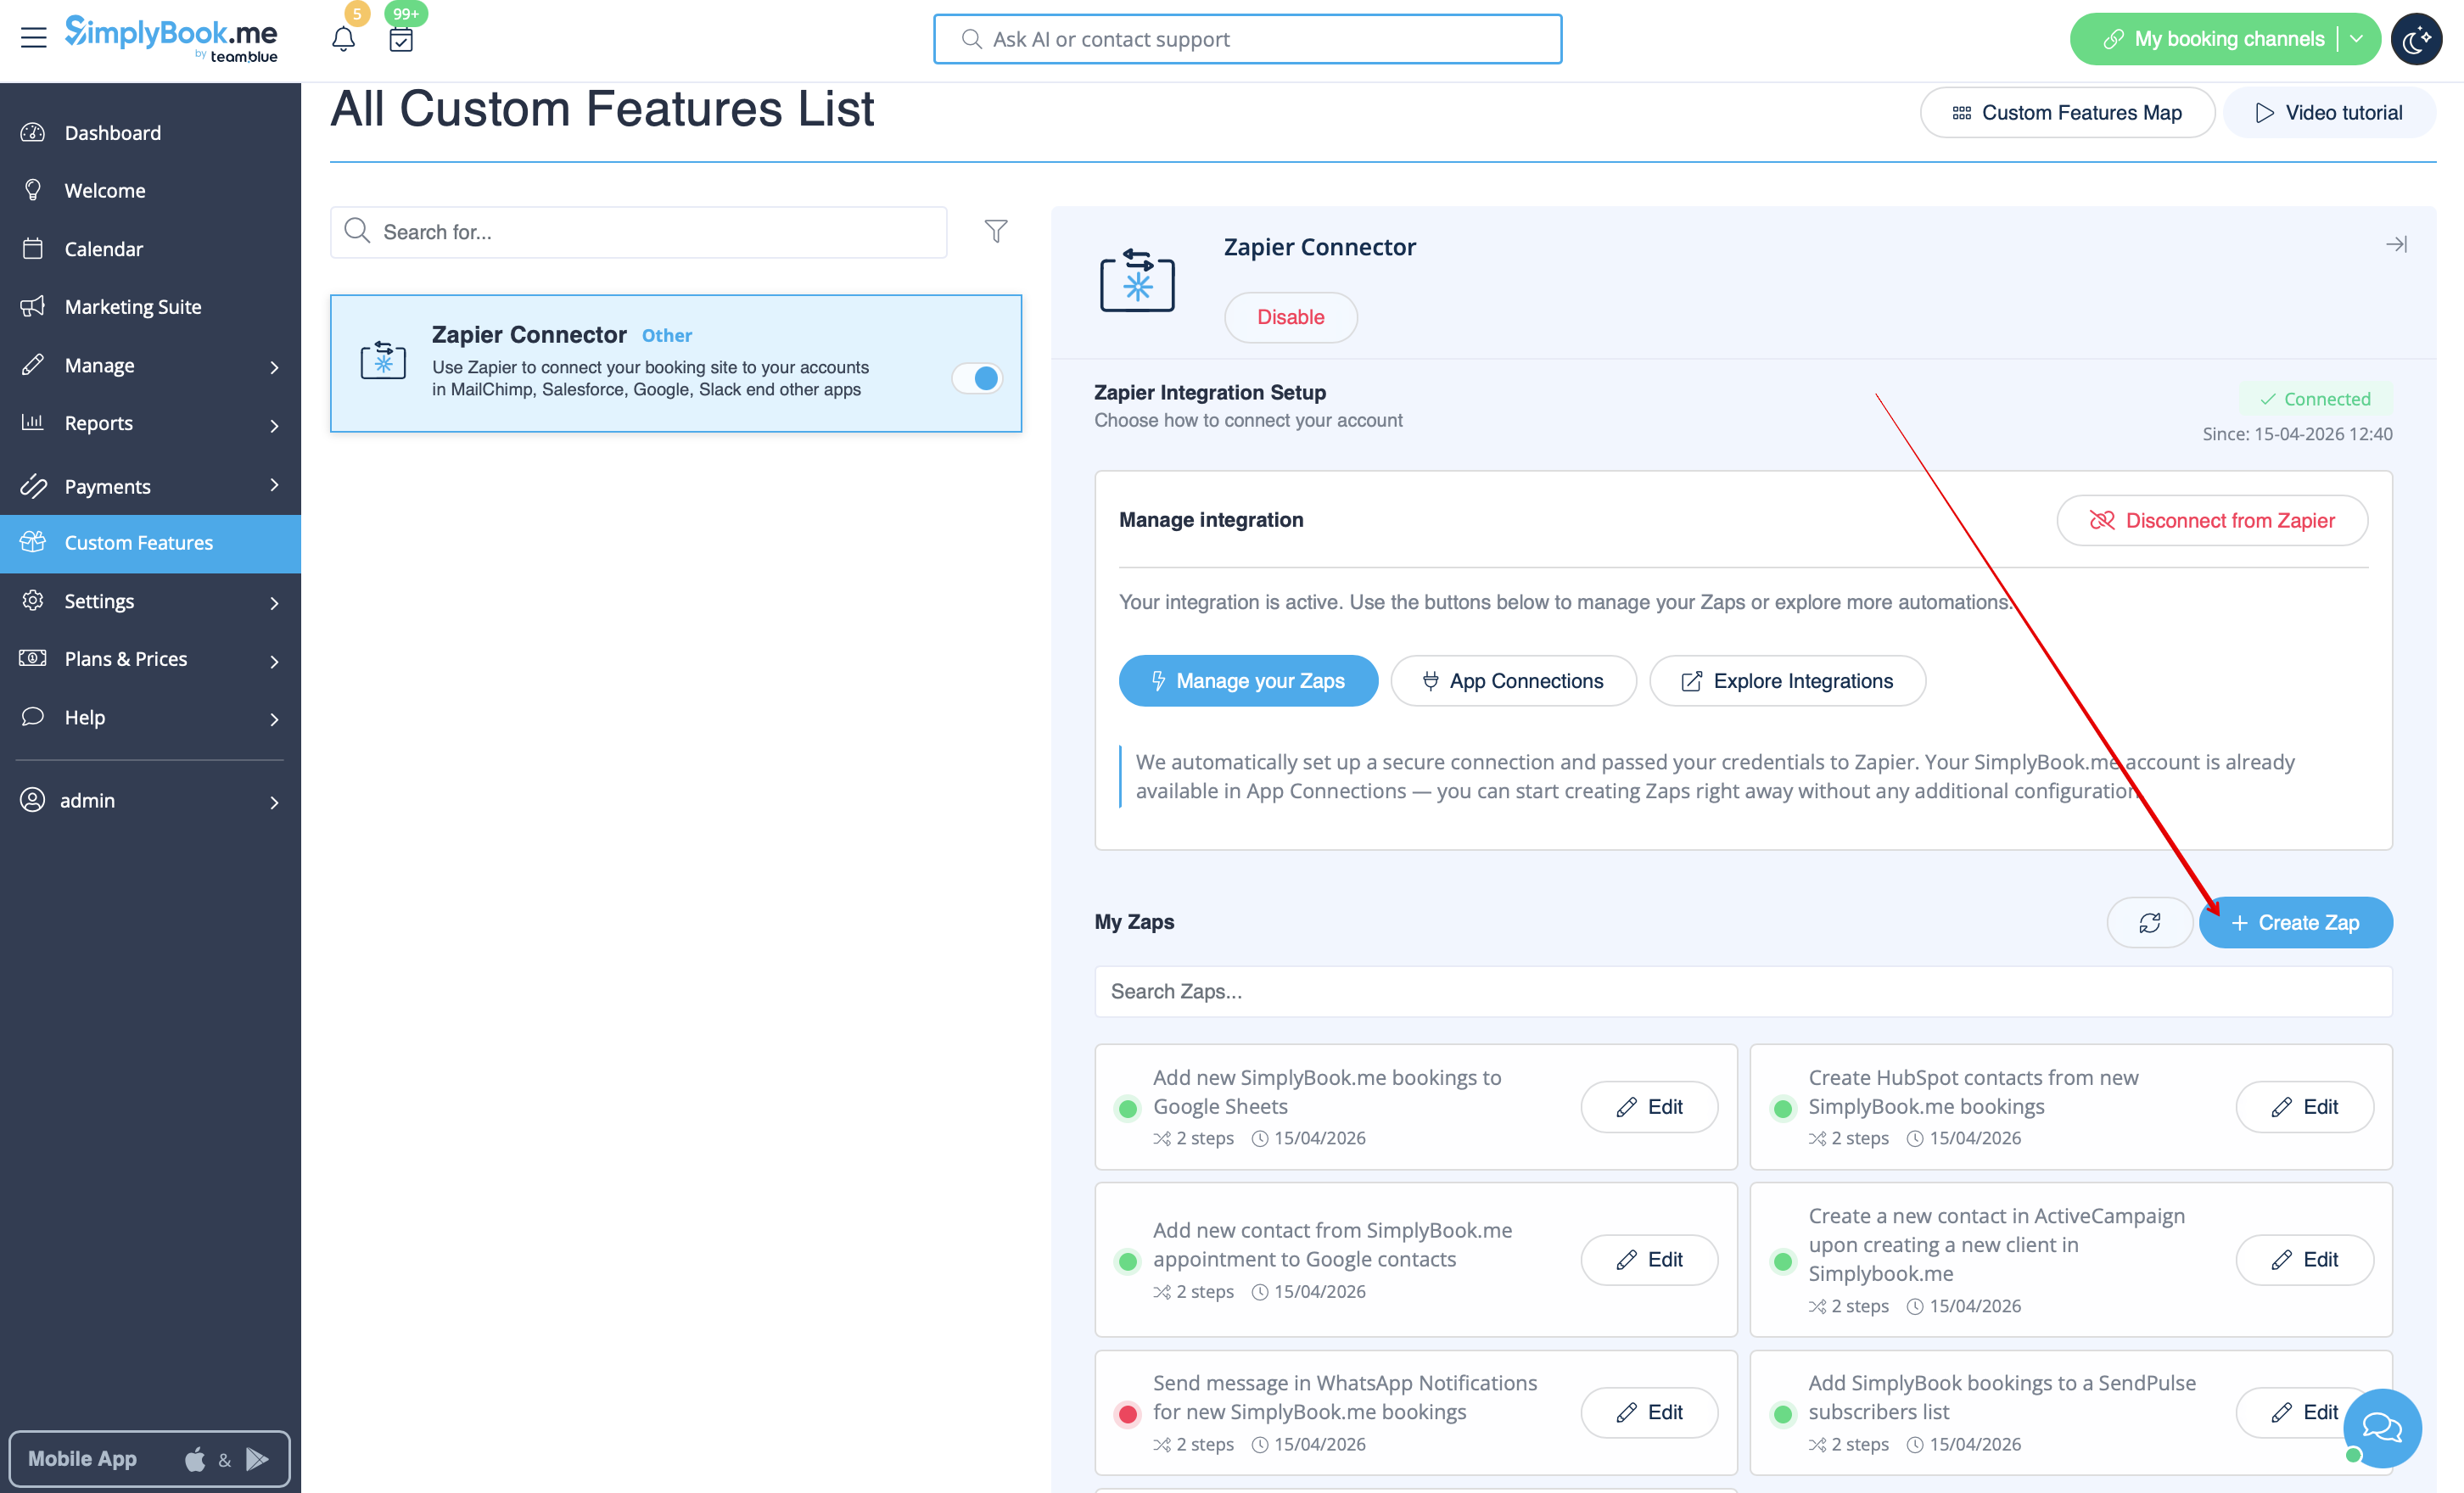
: | :7. Cliquez sur le bouton '''+ Créer un Zap'''. | ||
[[File:Create zap path.png|1200px|border | center|link=https://help.simplybook.me/images/2/24/Create_zap_path.png]] | |||
[[File: | |||
<br><br> | <br><br> | ||
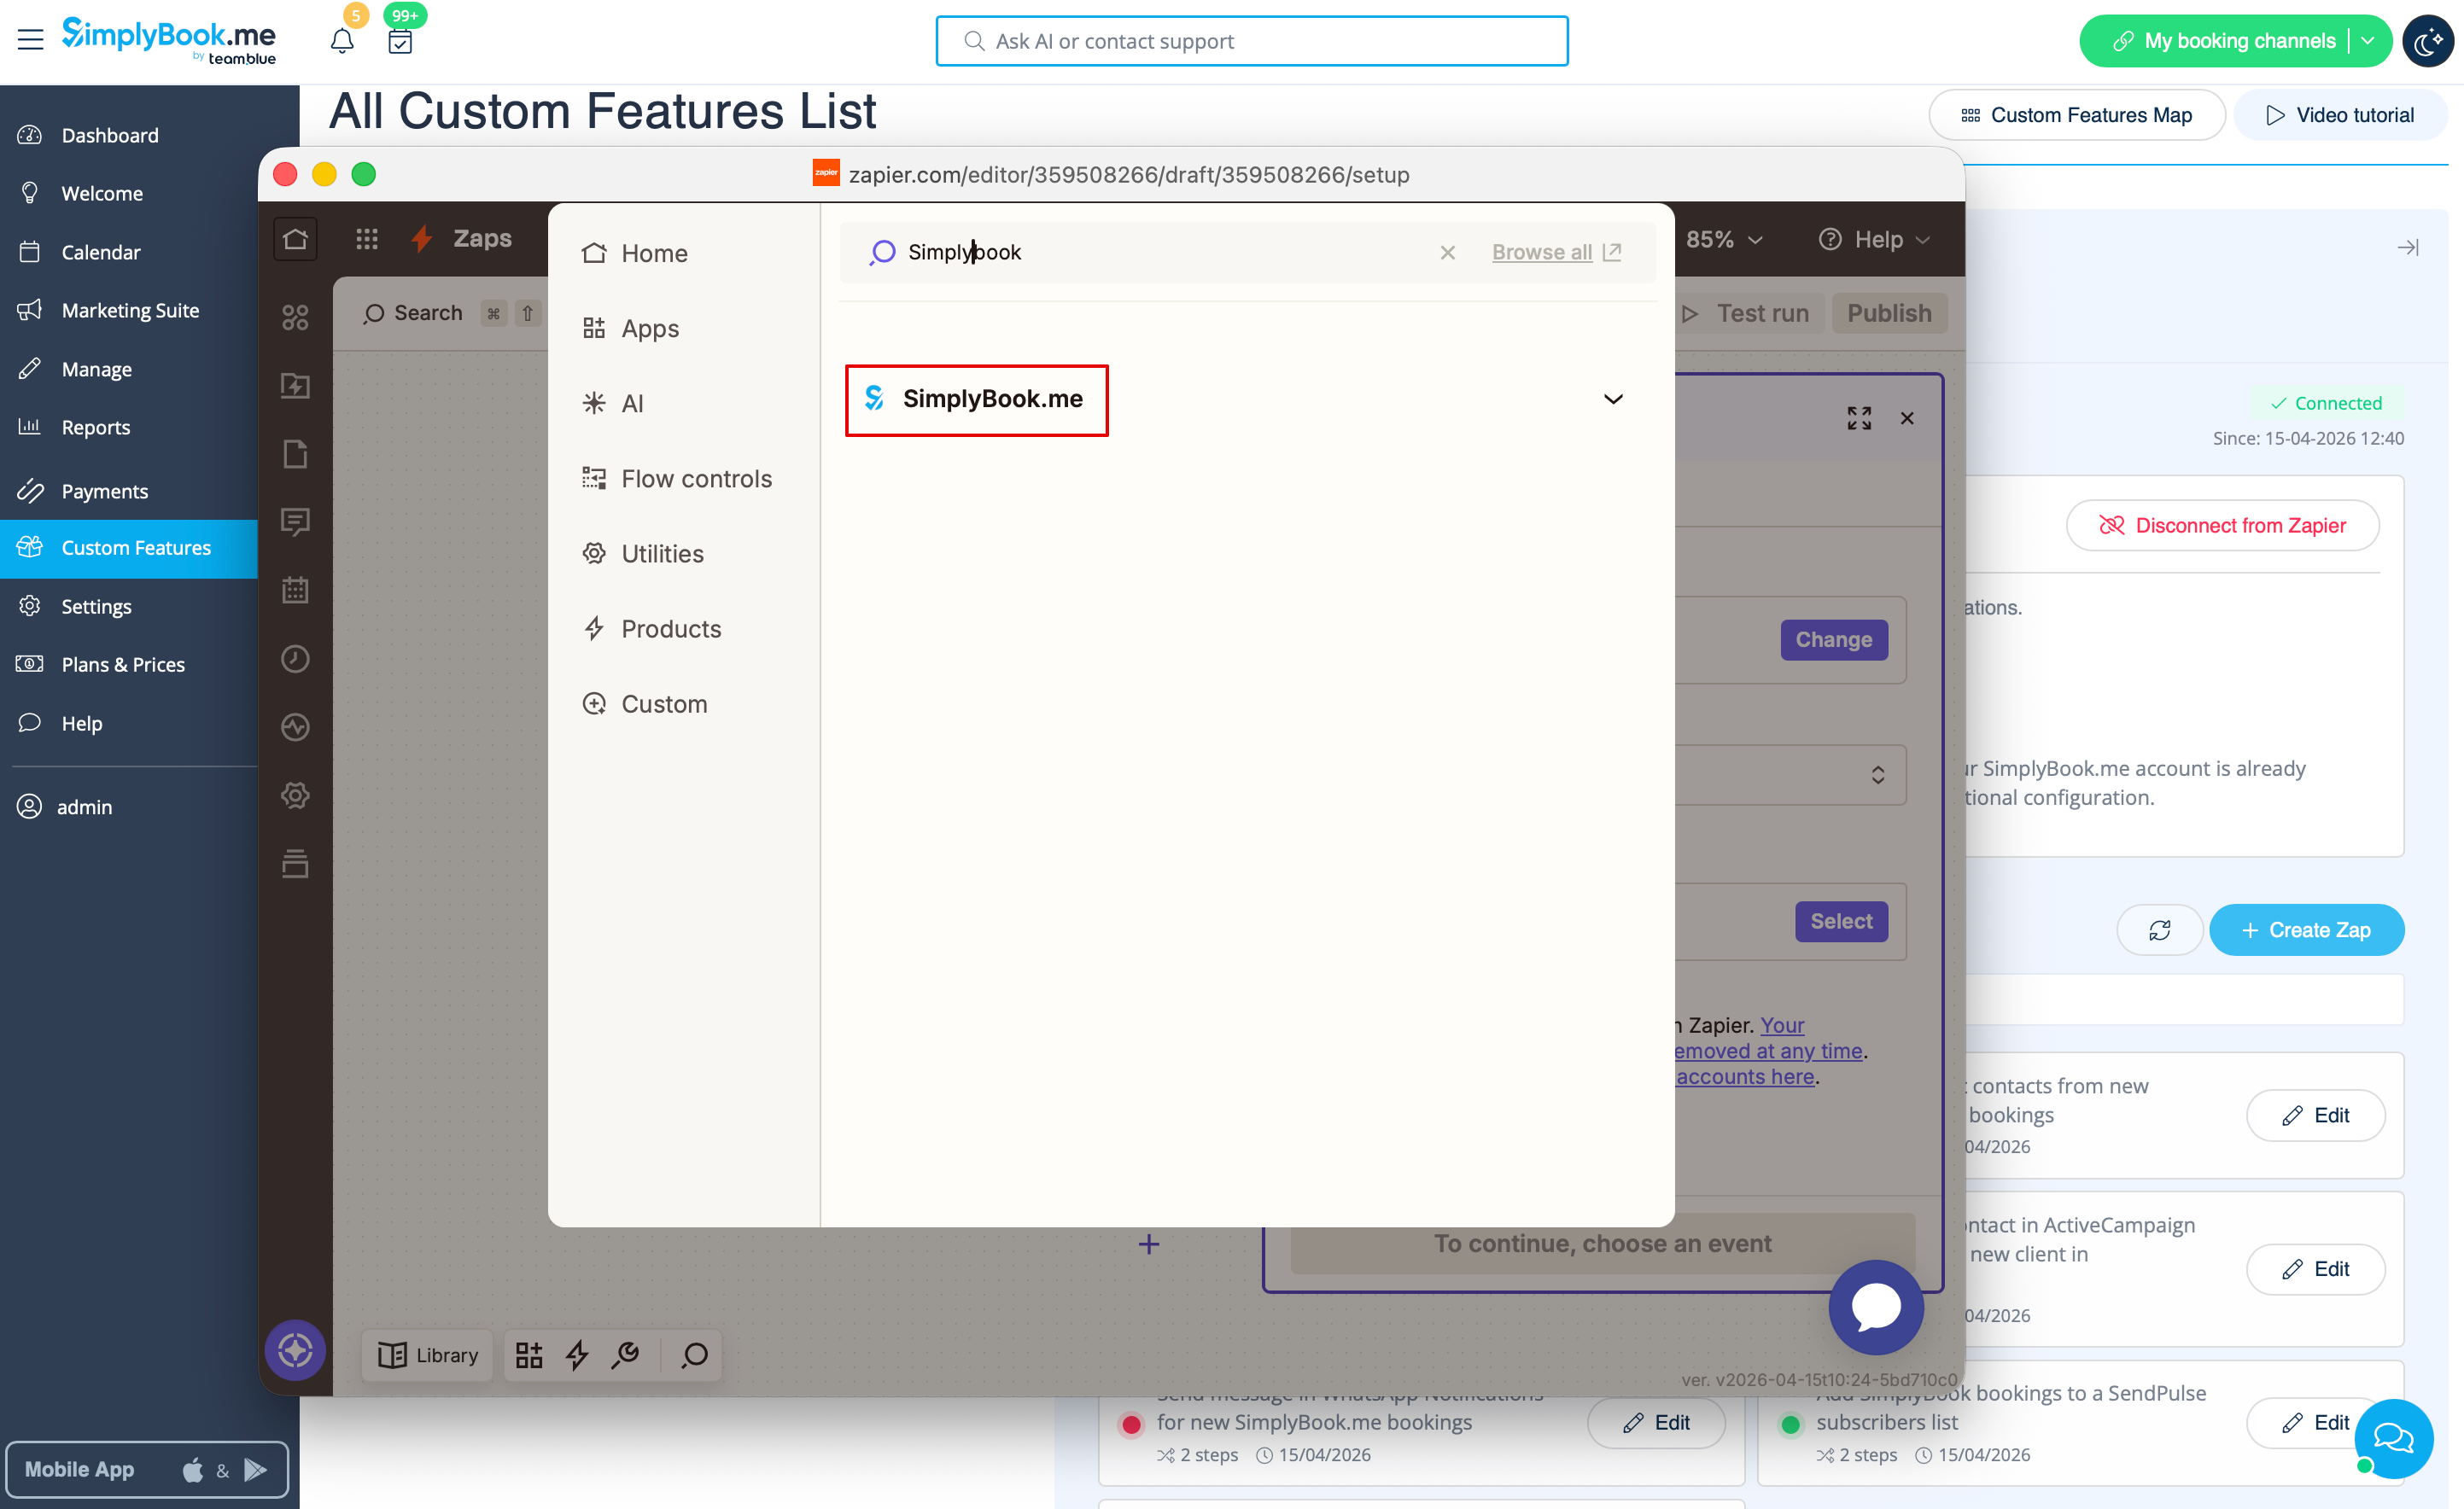
: | :8. Dans la fenêtre contextuelle qui apparaît, recherchez SimplyBook.me dans la liste des applications à connecter. | ||
[[File:Zapier | [[File:Zapier new sb as trigger.png|1200px|border | center|link=https://help.simplybook.me/images/1/13/Zapier_new_sb_as_trigger.png]] | ||
<br><br> | <br><br> | ||
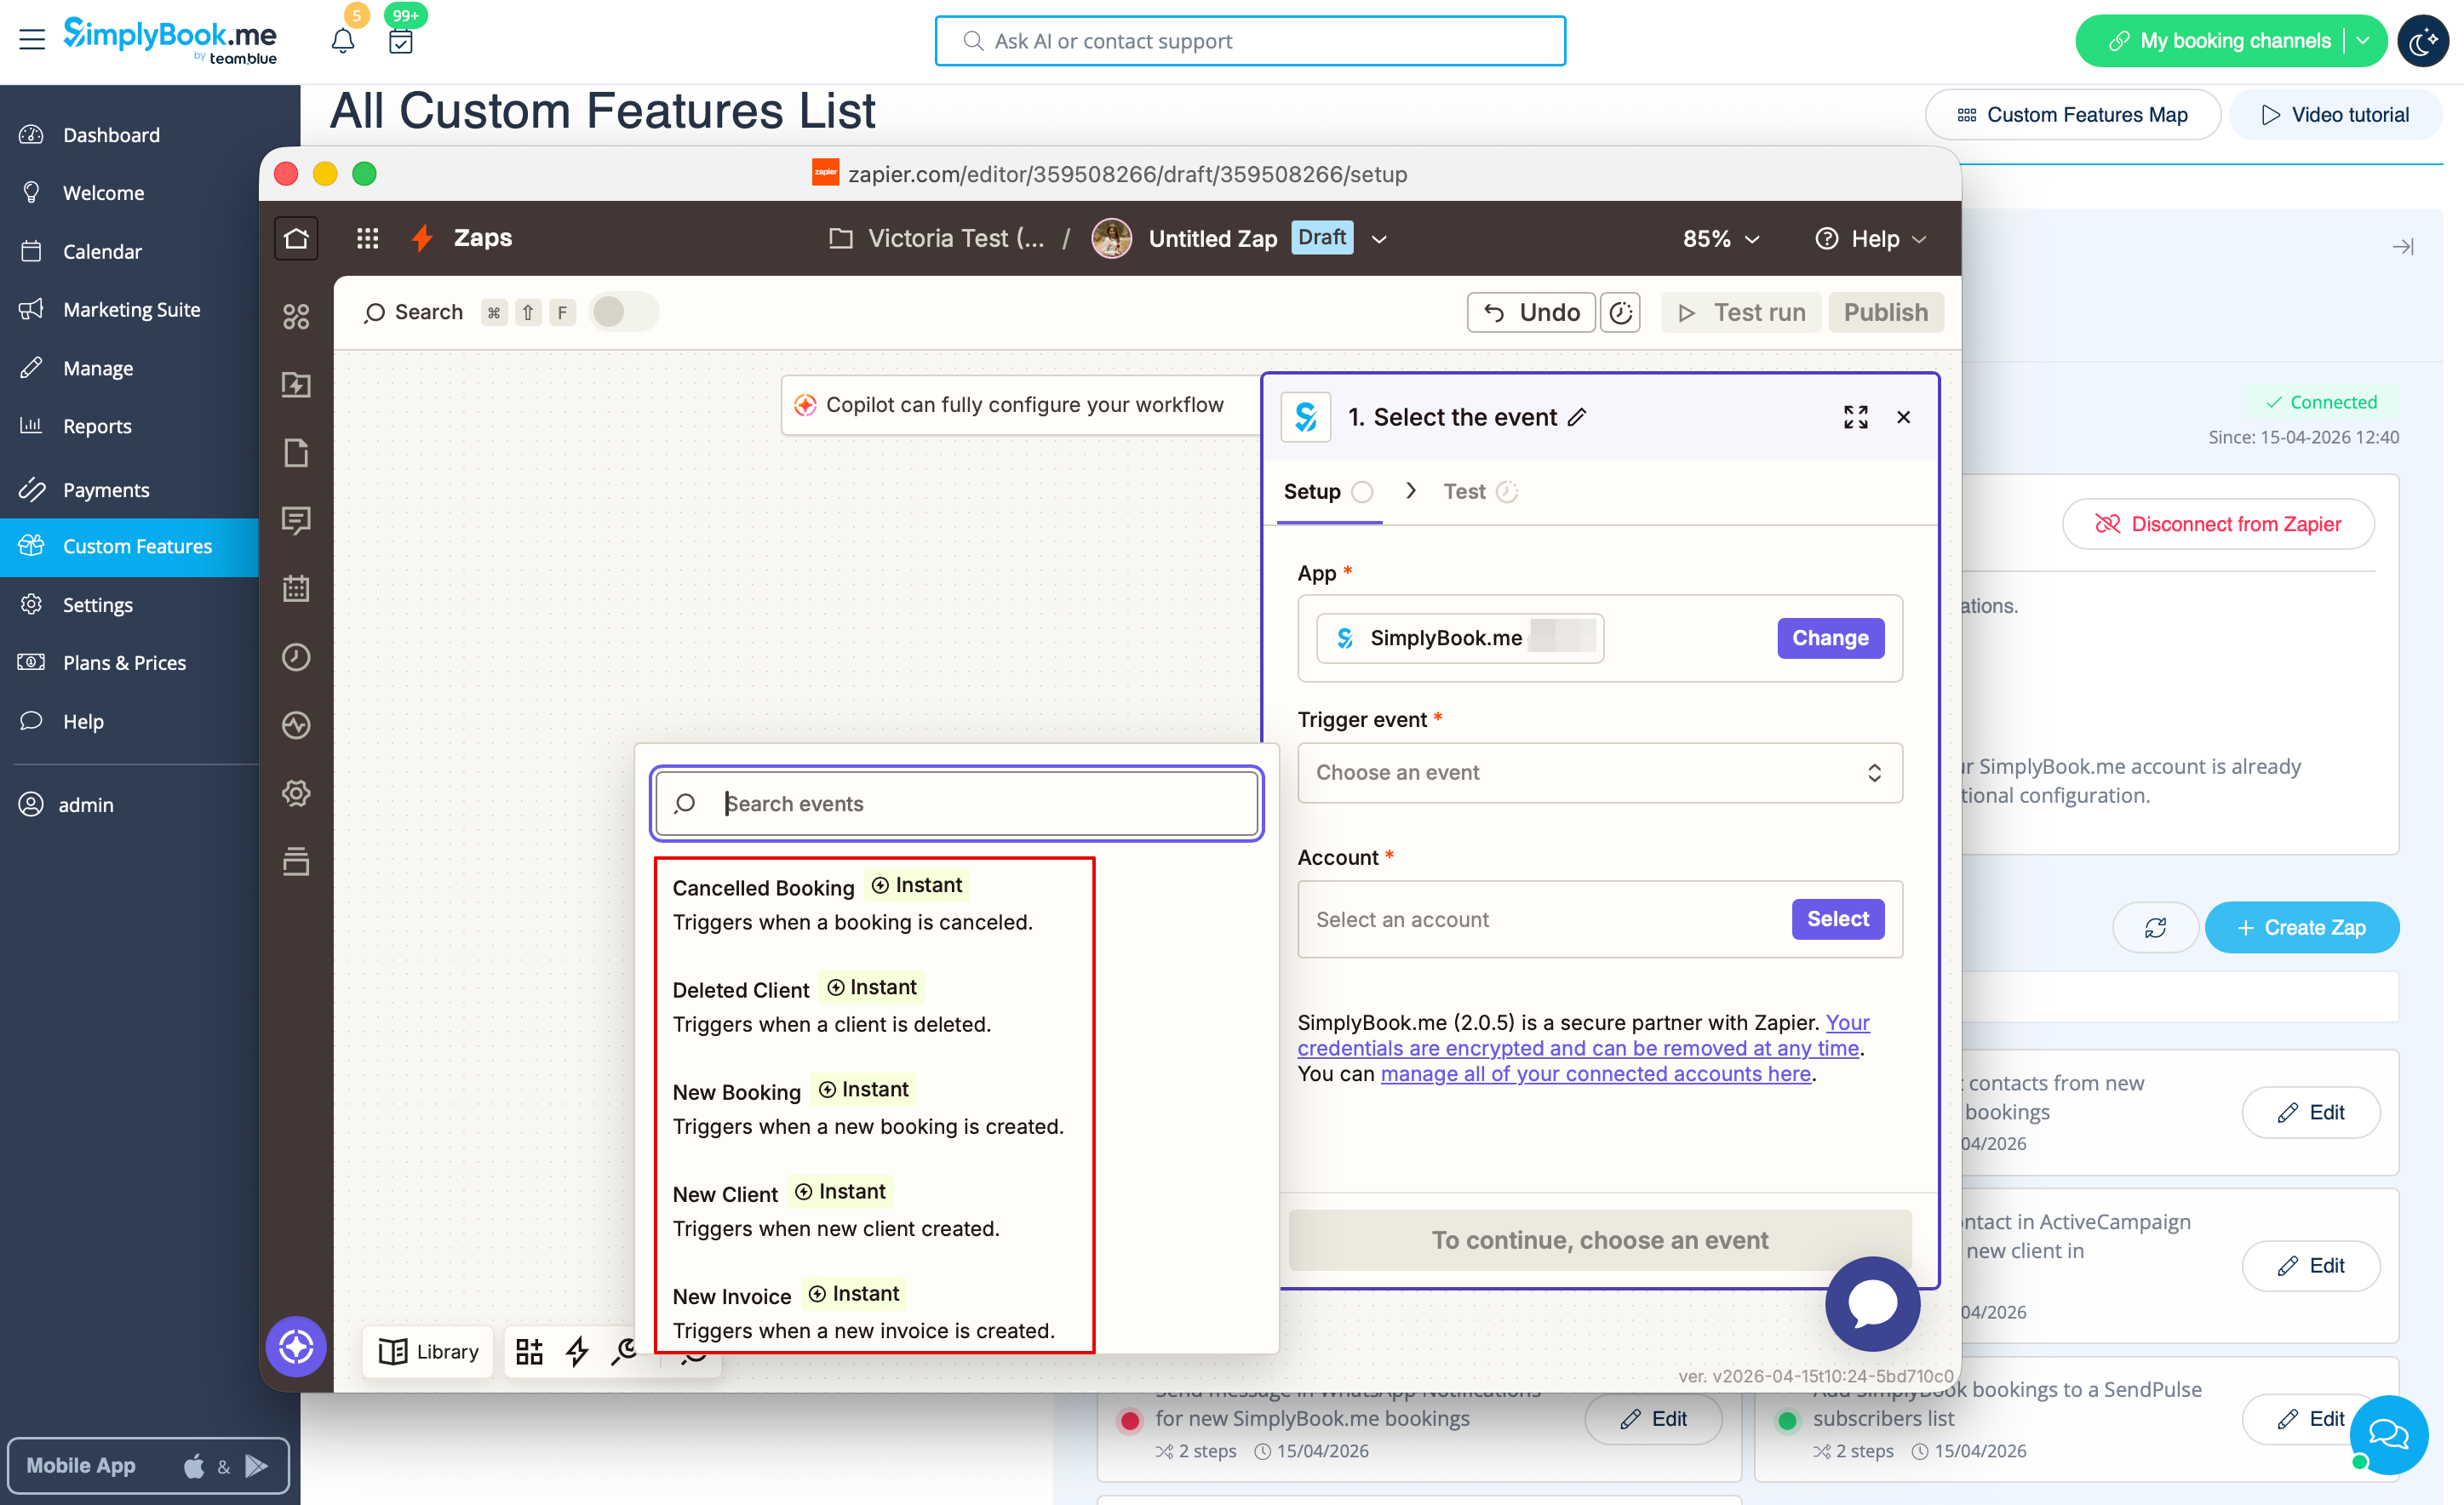
: | :9. Choisissez "Nouvelle réservation" comme déclencheur et le compte que vous avez précédemment connecté. Cliquez sur "Continuer". | ||
[[File:Zapier new choose trigger event.png|1200px|border | center|link=https://help.simplybook.me/images/4/45/Zapier_new_choose_trigger_event.png]] | |||
<br><br> | <br><br> | ||
: | :10. Testez votre déclencheur, sélectionnez l'enregistrement exemple et passez à l'étape d'action. | ||
<br><br> | <br><br> | ||
: | :11. Passez à "l'étape d'action" – connectez et vérifiez votre compte Gmail. Configurez l'action pour envoyer un e-mail lorsque la réservation se déclenche. | ||
[[File:Zapier redesigned gmail as action app.png|1200px | center|link=https://help.simplybook.me/images/0/01/Zapier_redesigned_gmail_as_action_app.png]] | [[File:Zapier redesigned gmail as action app.png|1200px | center|link=https://help.simplybook.me/images/0/01/Zapier_redesigned_gmail_as_action_app.png]] | ||
<br><br> | <br><br> | ||
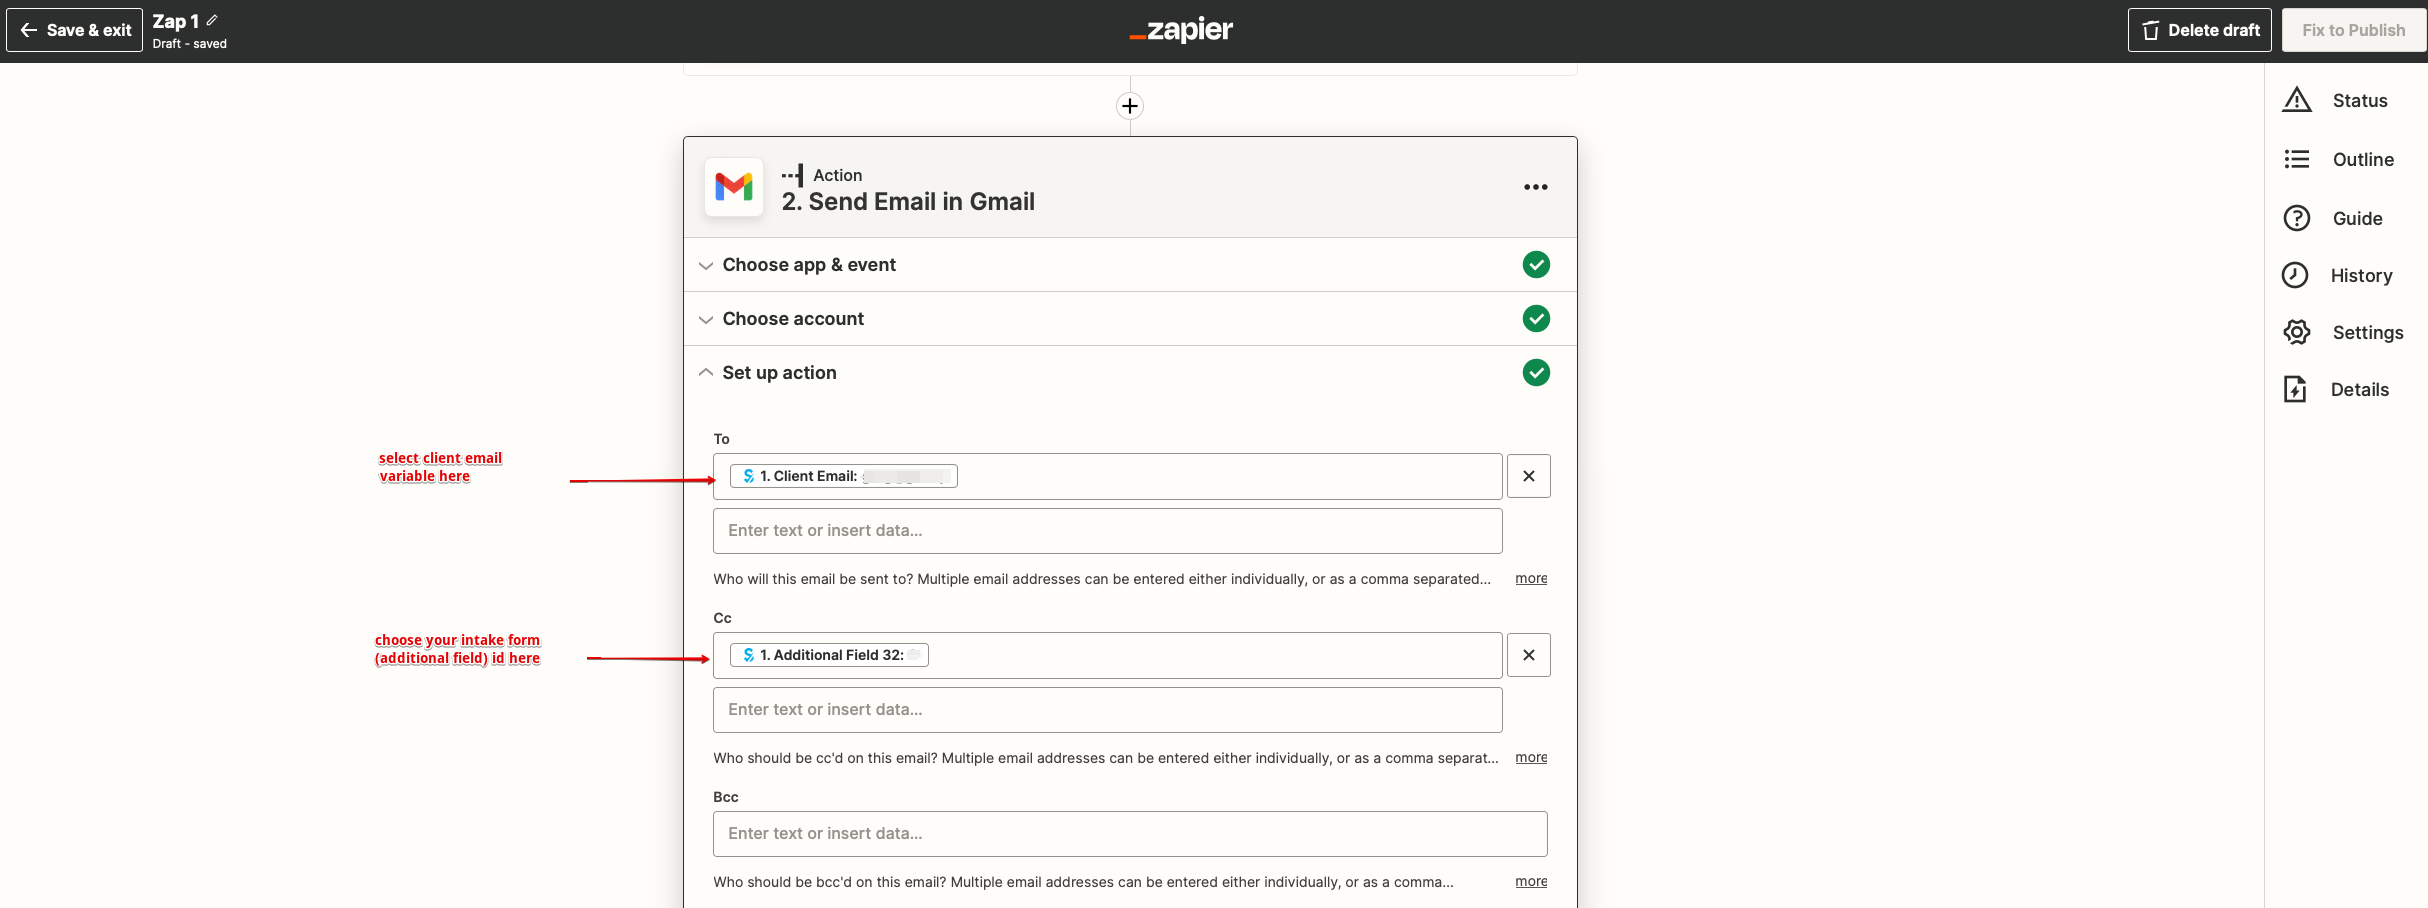
: | :12. Ajoutez des destinataires d'e-mail dans les champs "À :" et "Cc :". Veuillez utiliser les variables pour un fonctionnement correct du Zap (sélectionnez la variable de votre formulaire d'admission récemment créé). | ||
[[File:Zapier redesigned email setup variables selection.png|1200px | center|link=https://help.simplybook.me/images/5/5e/Zapier_redesigned_email_setup_variables_selection.png]] | [[File:Zapier redesigned email setup variables selection.png|1200px | center|link=https://help.simplybook.me/images/5/5e/Zapier_redesigned_email_setup_variables_selection.png]] | ||
<br><br> | <br><br> | ||
:''' | :'''Veuillez noter''' que votre client recevra 2 notifications par e-mail, une de [https://simplybook.me/ Simplybook] (envoyée immédiatement) et une de Zapier (envoyée 5 minutes après la réservation). Vous pouvez désactiver les notifications par e-mail pour les clients dans les paramètres [https://simplybook.me/ Simplybook]//Paramètres e-mail et SMS en décochant les cases correspondantes.<br><br> | ||
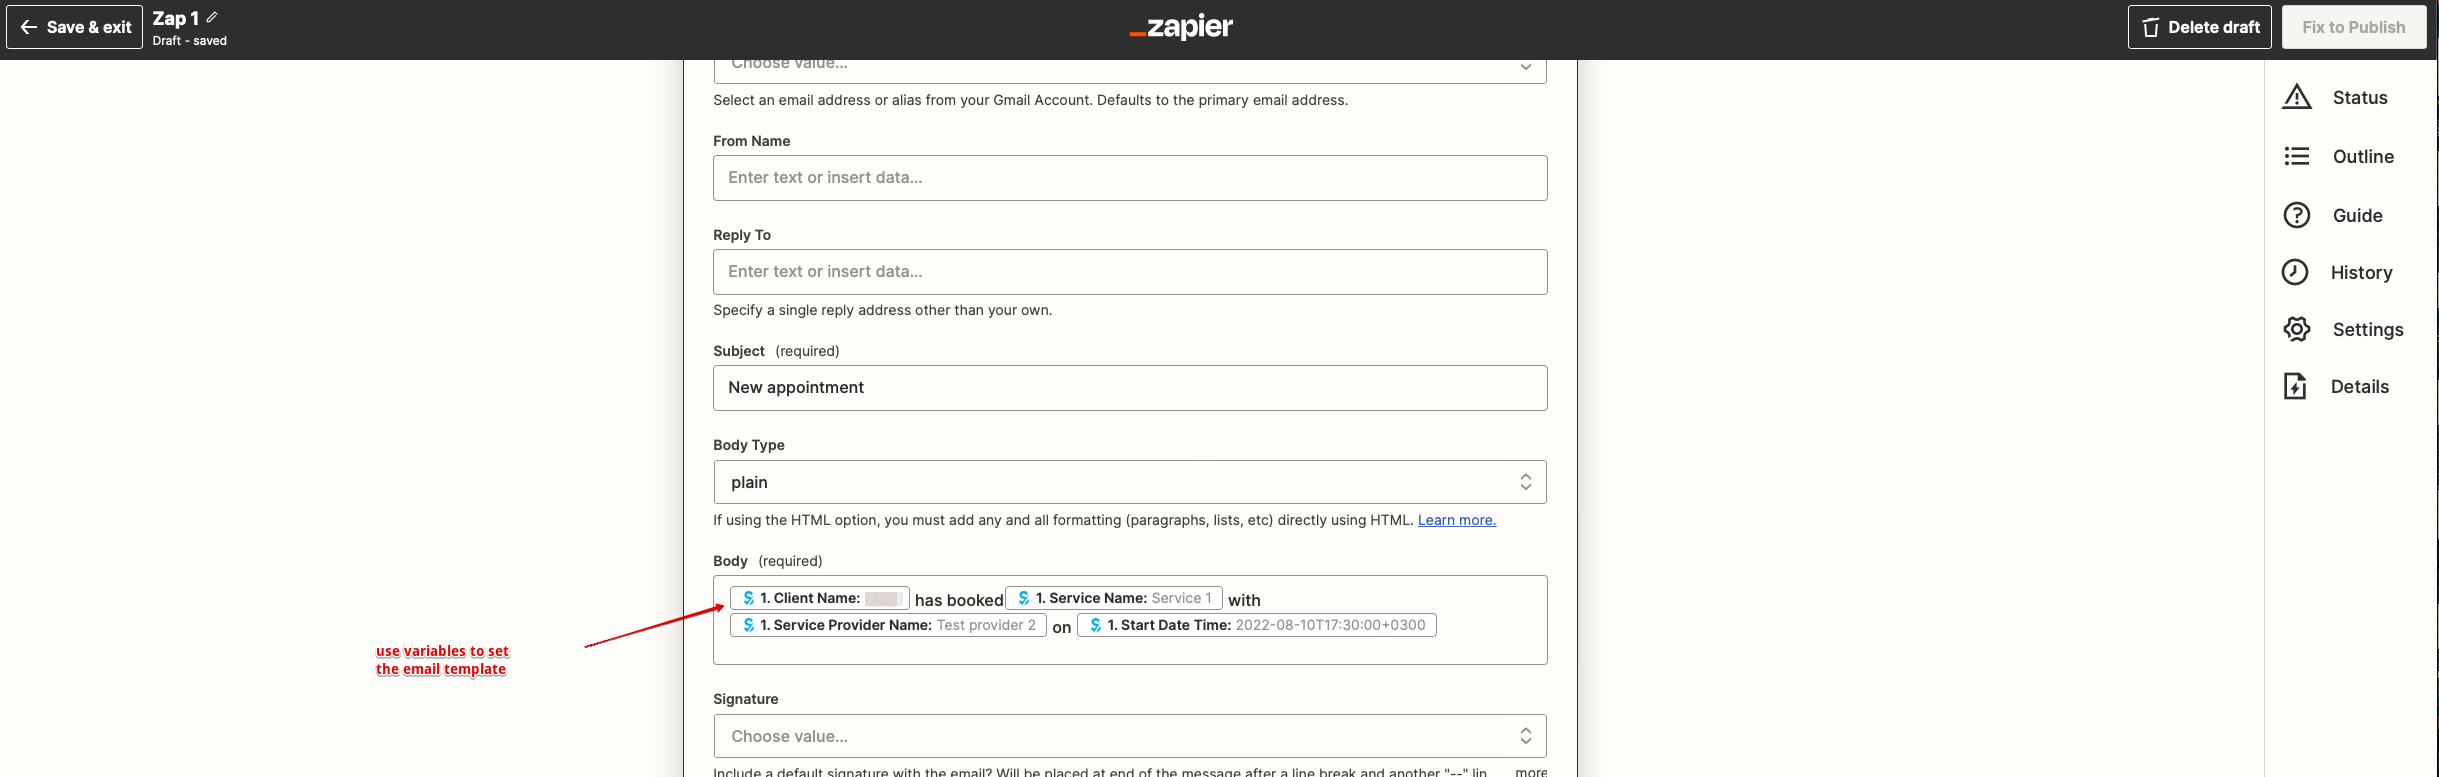
: | :13. Configurez ensuite le texte du modèle d'e-mail. Ajoutez également les variables nécessaires qui seront remplacées par les informations de réservation dans l'e-mail réel. Vous pouvez créer une notification plus détaillée et plus riche que celle de l'exemple. | ||
[[File:Zapier redesigned email template setup.png|1200px | center|link=https://help.simplybook.me/images/1/1d/Zapier_redesigned_email_template_setup.png]] | [[File:Zapier redesigned email template setup.png|1200px | center|link=https://help.simplybook.me/images/1/1d/Zapier_redesigned_email_template_setup.png]] | ||
<br><br> | <br><br> | ||
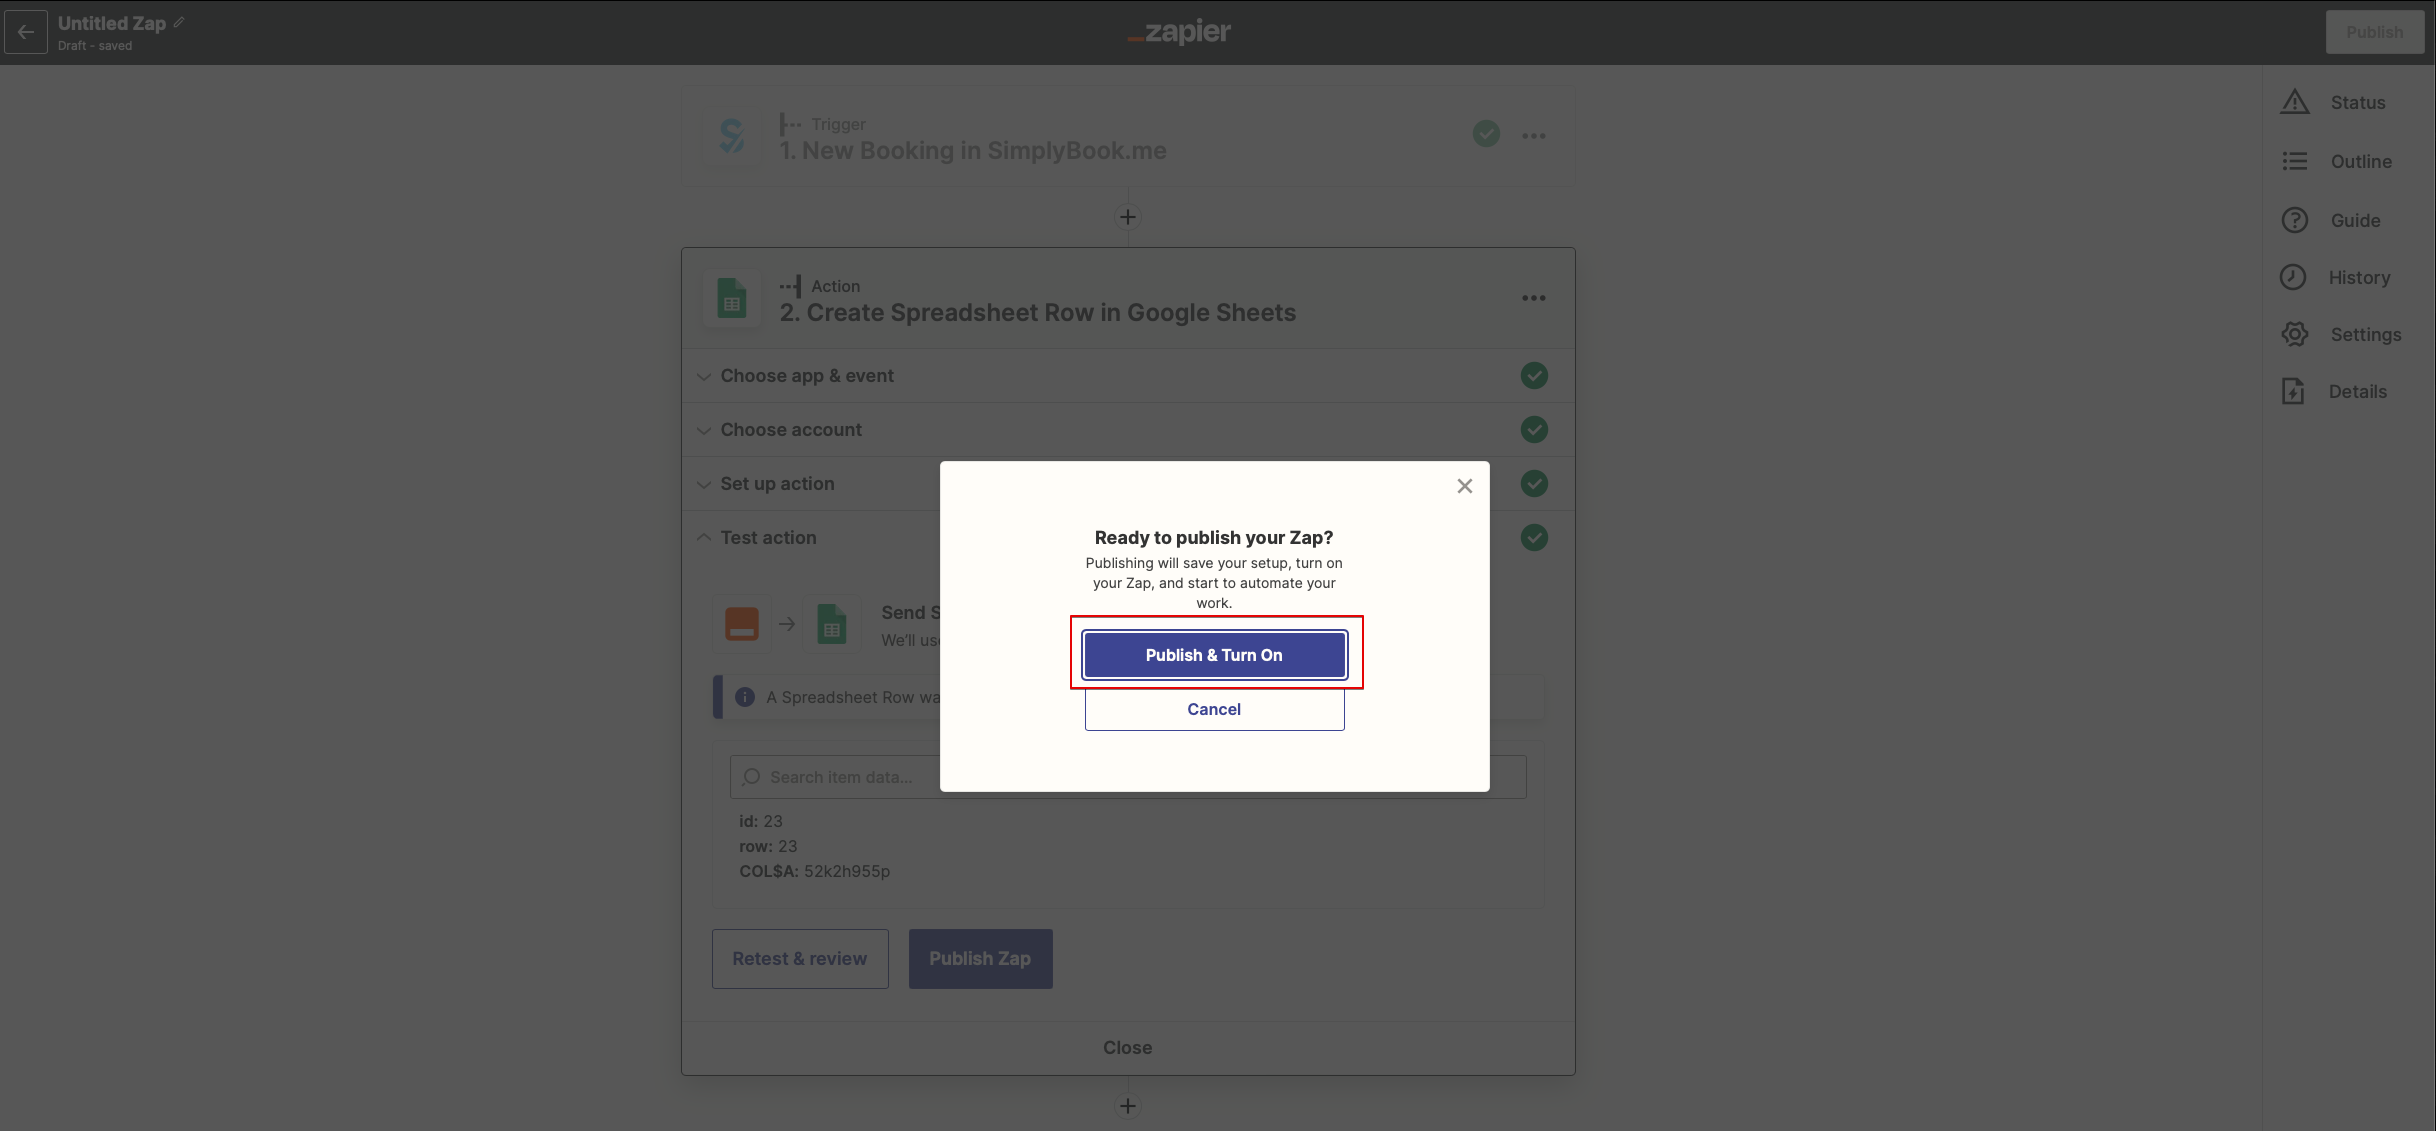
: | :14. Testez votre Zap nouvellement créé et activez-le. | ||
[[File:Zapier redesigned enable zap.png|1200px | center|link=https://help.simplybook.me/images/9/9b/Zapier_redesigned_enable_zap.png]] | [[File:Zapier redesigned enable zap.png|1200px | center|link=https://help.simplybook.me/images/9/9b/Zapier_redesigned_enable_zap.png]] | ||
<br><br> | <br><br> | ||
Félicitations, vous avez créé une nouvelle connexion qui enverra des copies des e-mails de confirmation à différents destinataires ! | |||
<br><br> | <br><br> | ||
Latest revision as of 15:22, 17 April 2026
Tutoriel Zap pour la connexion SimplyBook et Gmail
On nous demande souvent comment envoyer un e-mail de confirmation à plusieurs adresses e-mail. Cela peut être nécessaire si le client a un agent ou si d’autres personnes doivent recevoir les e-mails de confirmation pour les clients. Cette option est désormais disponible avec notre application sur Zapier !
- Comment l’utiliser
- 1. Créez un formulaire d'admission pour le deuxième destinataire dans l'application admin Simplybook à l'aide de la Fonctionnalité personnalisée Formulaires d'admission.
- 2. Après avoir créé un formulaire d'admission, vous verrez le nom de la variable au bas de la liste des variables dans Paramètres//Paramètres e-mail et SMS
- 3. Dans cette image, il s'agit de [data_field_30] (mais il peut aussi s'agir de data_field_2, data_field_3, etc.). Cette variable contiendra l'adresse e-mail alternative nécessaire pour la synchronisation avec Gmail.
- 4. Créez ensuite une réservation test sur votre page de réservation Simplybook. Cela est nécessaire pour informer le système que le nouveau formulaire a été créé dans le système et est prêt pour une utilisation ultérieure.
- 5. Activez la fonctionnalité personnalisée Connecteur Zapier sur votre page Fonctionnalités personnalisées.

- 6. Connectez-vous à votre compte Zapier en utilisant l'option Connexion rapide
- 7. Cliquez sur le bouton + Créer un Zap.
- 8. Dans la fenêtre contextuelle qui apparaît, recherchez SimplyBook.me dans la liste des applications à connecter.
- 9. Choisissez "Nouvelle réservation" comme déclencheur et le compte que vous avez précédemment connecté. Cliquez sur "Continuer".
- 10. Testez votre déclencheur, sélectionnez l'enregistrement exemple et passez à l'étape d'action.
- 11. Passez à "l'étape d'action" – connectez et vérifiez votre compte Gmail. Configurez l'action pour envoyer un e-mail lorsque la réservation se déclenche.

- 12. Ajoutez des destinataires d'e-mail dans les champs "À :" et "Cc :". Veuillez utiliser les variables pour un fonctionnement correct du Zap (sélectionnez la variable de votre formulaire d'admission récemment créé).
- Veuillez noter que votre client recevra 2 notifications par e-mail, une de Simplybook (envoyée immédiatement) et une de Zapier (envoyée 5 minutes après la réservation). Vous pouvez désactiver les notifications par e-mail pour les clients dans les paramètres Simplybook//Paramètres e-mail et SMS en décochant les cases correspondantes.
- 13. Configurez ensuite le texte du modèle d'e-mail. Ajoutez également les variables nécessaires qui seront remplacées par les informations de réservation dans l'e-mail réel. Vous pouvez créer une notification plus détaillée et plus riche que celle de l'exemple.
- 14. Testez votre Zap nouvellement créé et activez-le.
Félicitations, vous avez créé une nouvelle connexion qui enverra des copies des e-mails de confirmation à différents destinataires !