From SimplyBook.me
Created page with ";Як користуватися" |
No edit summary |
||
| (2 intermediate revisions by 2 users not shown) | |||
| Line 11: | Line 11: | ||
;Як користуватися | ;Як користуватися | ||
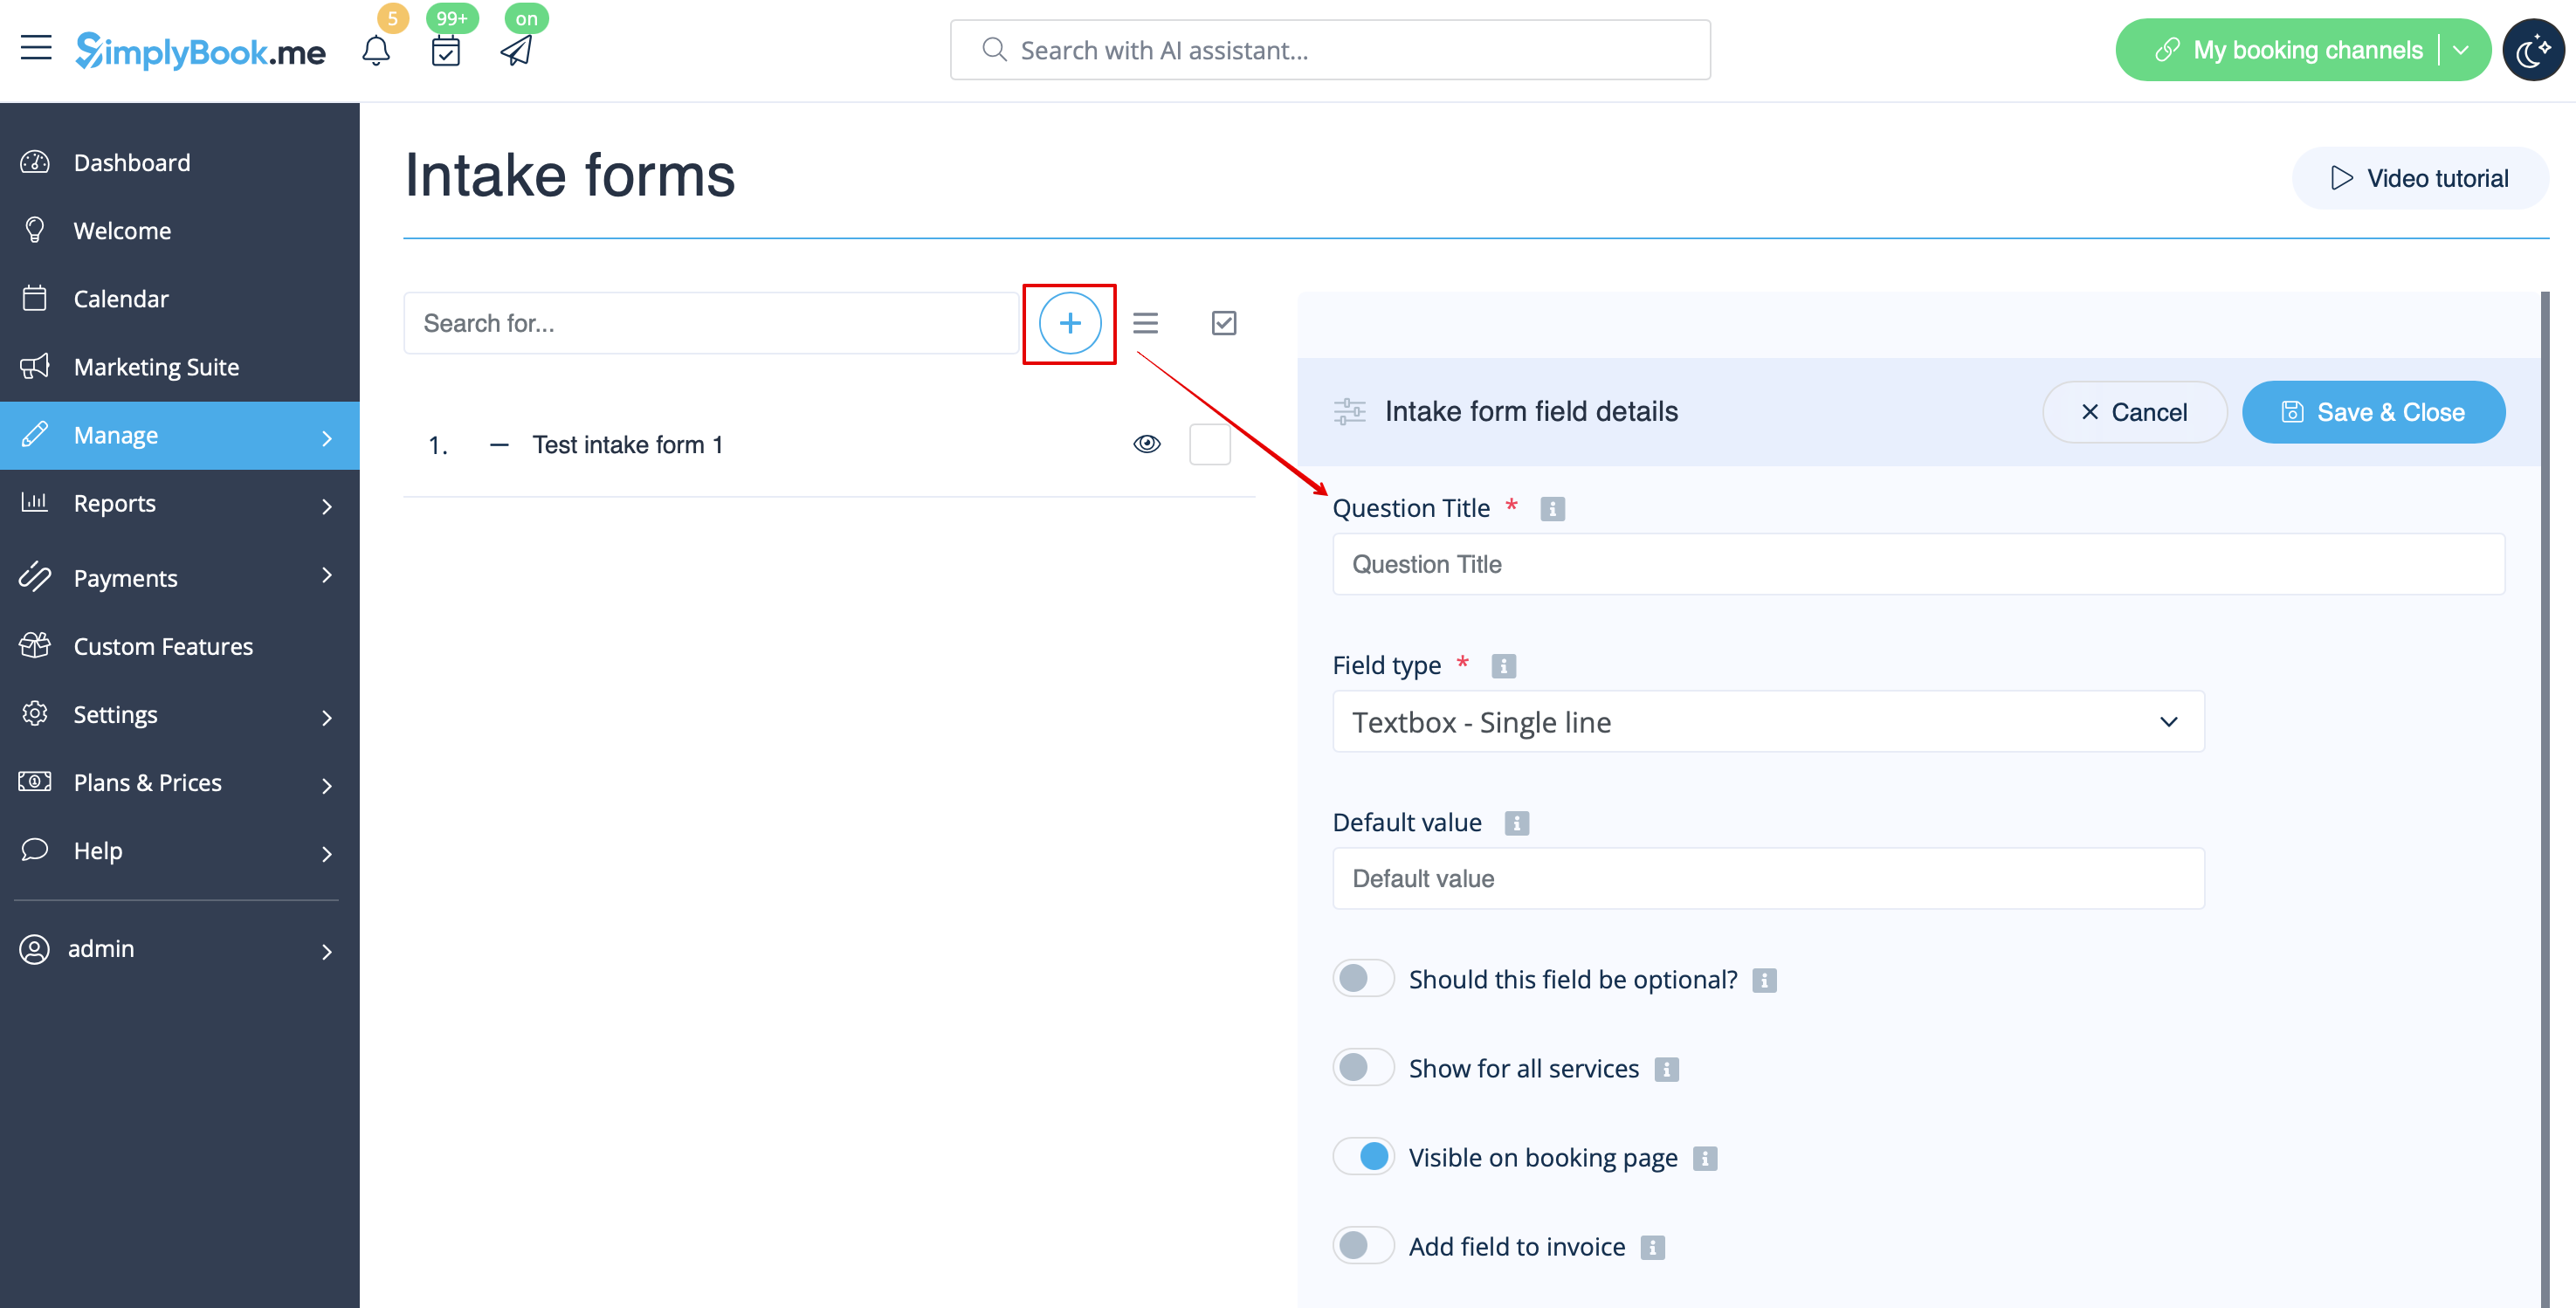
< | :1. Створіть форму прийому для другого одержувача в адмін-додатку [https://simplybook.me/ Simplybook] за допомогою [[Custom_Features#Intake_Forms | Спеціальної функції форм прийому]]. | ||
: | [[File:Create new single line form redesigned.png|1200px| center|link=https://help.simplybook.me/images/b/b1/Create_new_single_line_form_redesigned.png]] | ||
<br><br> | |||
:2. Після створення форми прийому ви побачите назву змінної внизу списку змінних у розділі Налаштування//Налаштування електронної пошти та SMS | |||
[[File:Intake form variable redesigned.png|1200px | center|link=https://help.simplybook.me/images/a/a3/Intake_form_variable_redesigned.png]] | |||
<br><br> | |||
:3. На цьому зображенні це [data_field_30] (але це також може бути data_field_2, data_field_3 тощо). Ця змінна міститиме альтернативну адресу електронної пошти, необхідну для синхронізації з Gmail.<br><br> | |||
:4. Потім створіть тестове бронювання на сторінці бронювання [https://simplybook.me/ Simplybook]. Це необхідно для того, щоб повідомити систему про те, що нова форма була створена в системі та готова до подальшого використання. <br><br> | |||
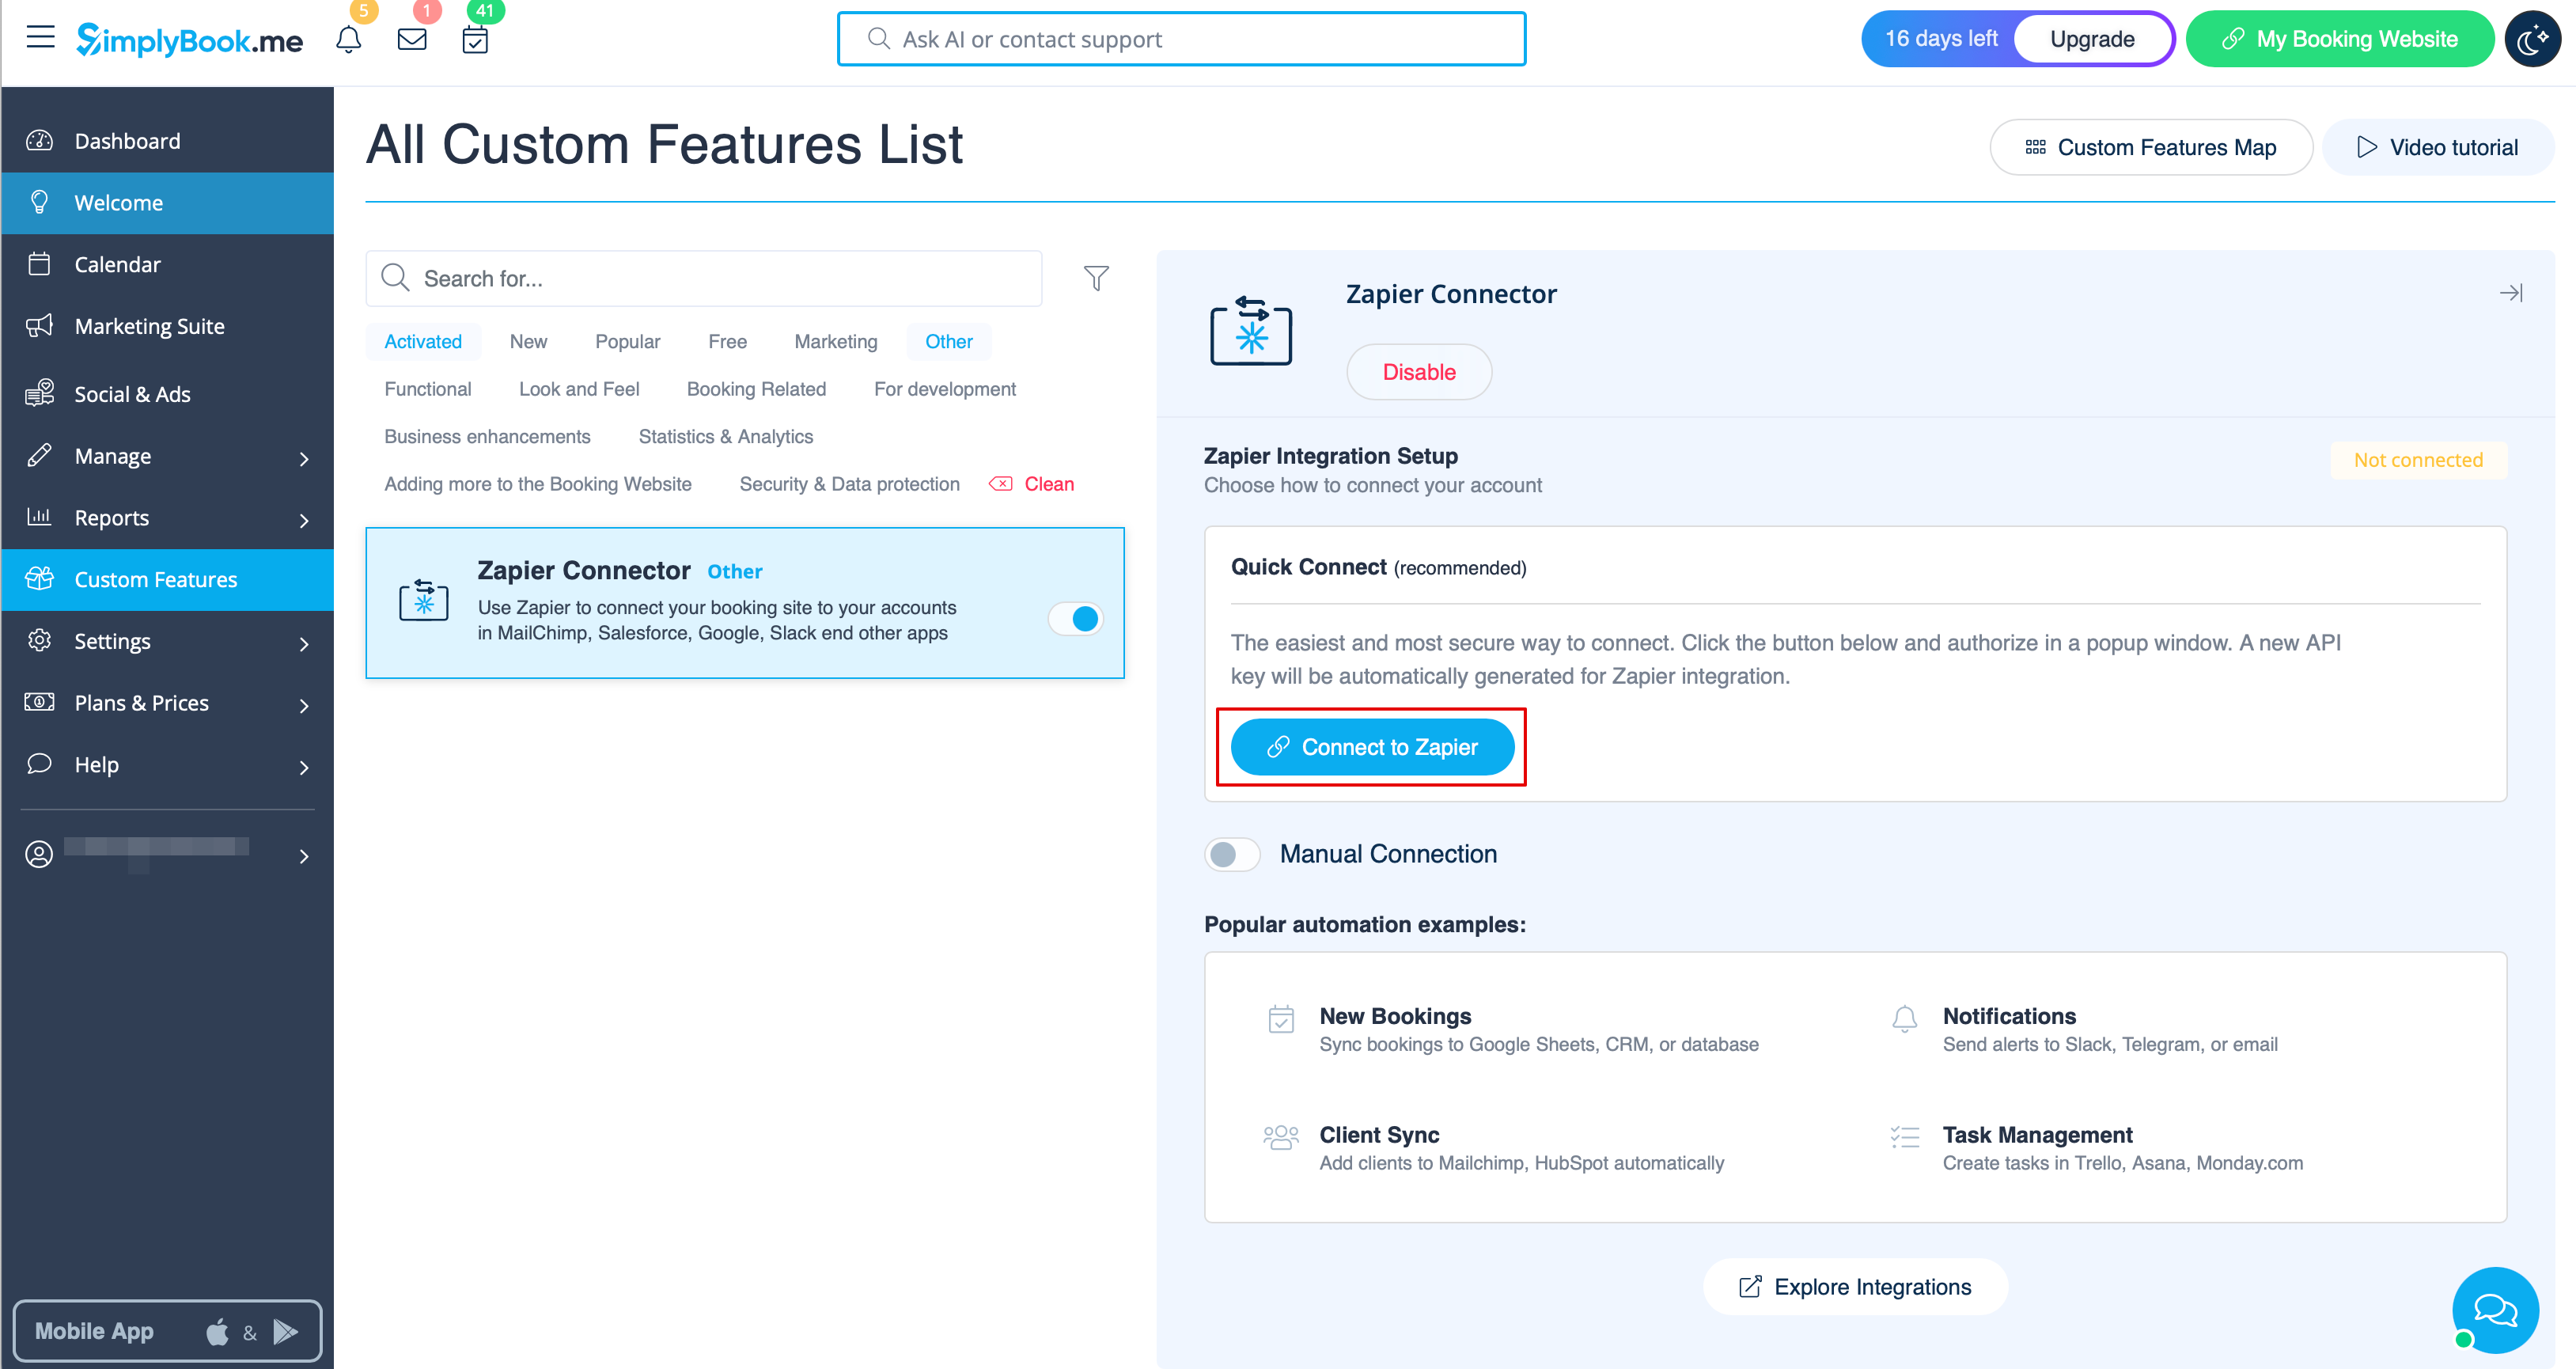
:5. Увімкніть спеціальну функцію <span style="background-color:#d4f8e5; padding:5px; border-radius:5px;">Конектор Zapier</span> на сторінці <span style="background-color:#d4f8e5; padding:5px; border-radius:5px;">Спеціальні функції</span>. | |||
[[File:Zapier enable path redesigned.png|1200px| center|link=https://help.simplybook.me/images/b/b9/Zapier_enable_path_redesigned.png]] | [[File:Zapier enable path redesigned.png|1200px| center|link=https://help.simplybook.me/images/b/b9/Zapier_enable_path_redesigned.png]] | ||
<br><br> | <br><br> | ||
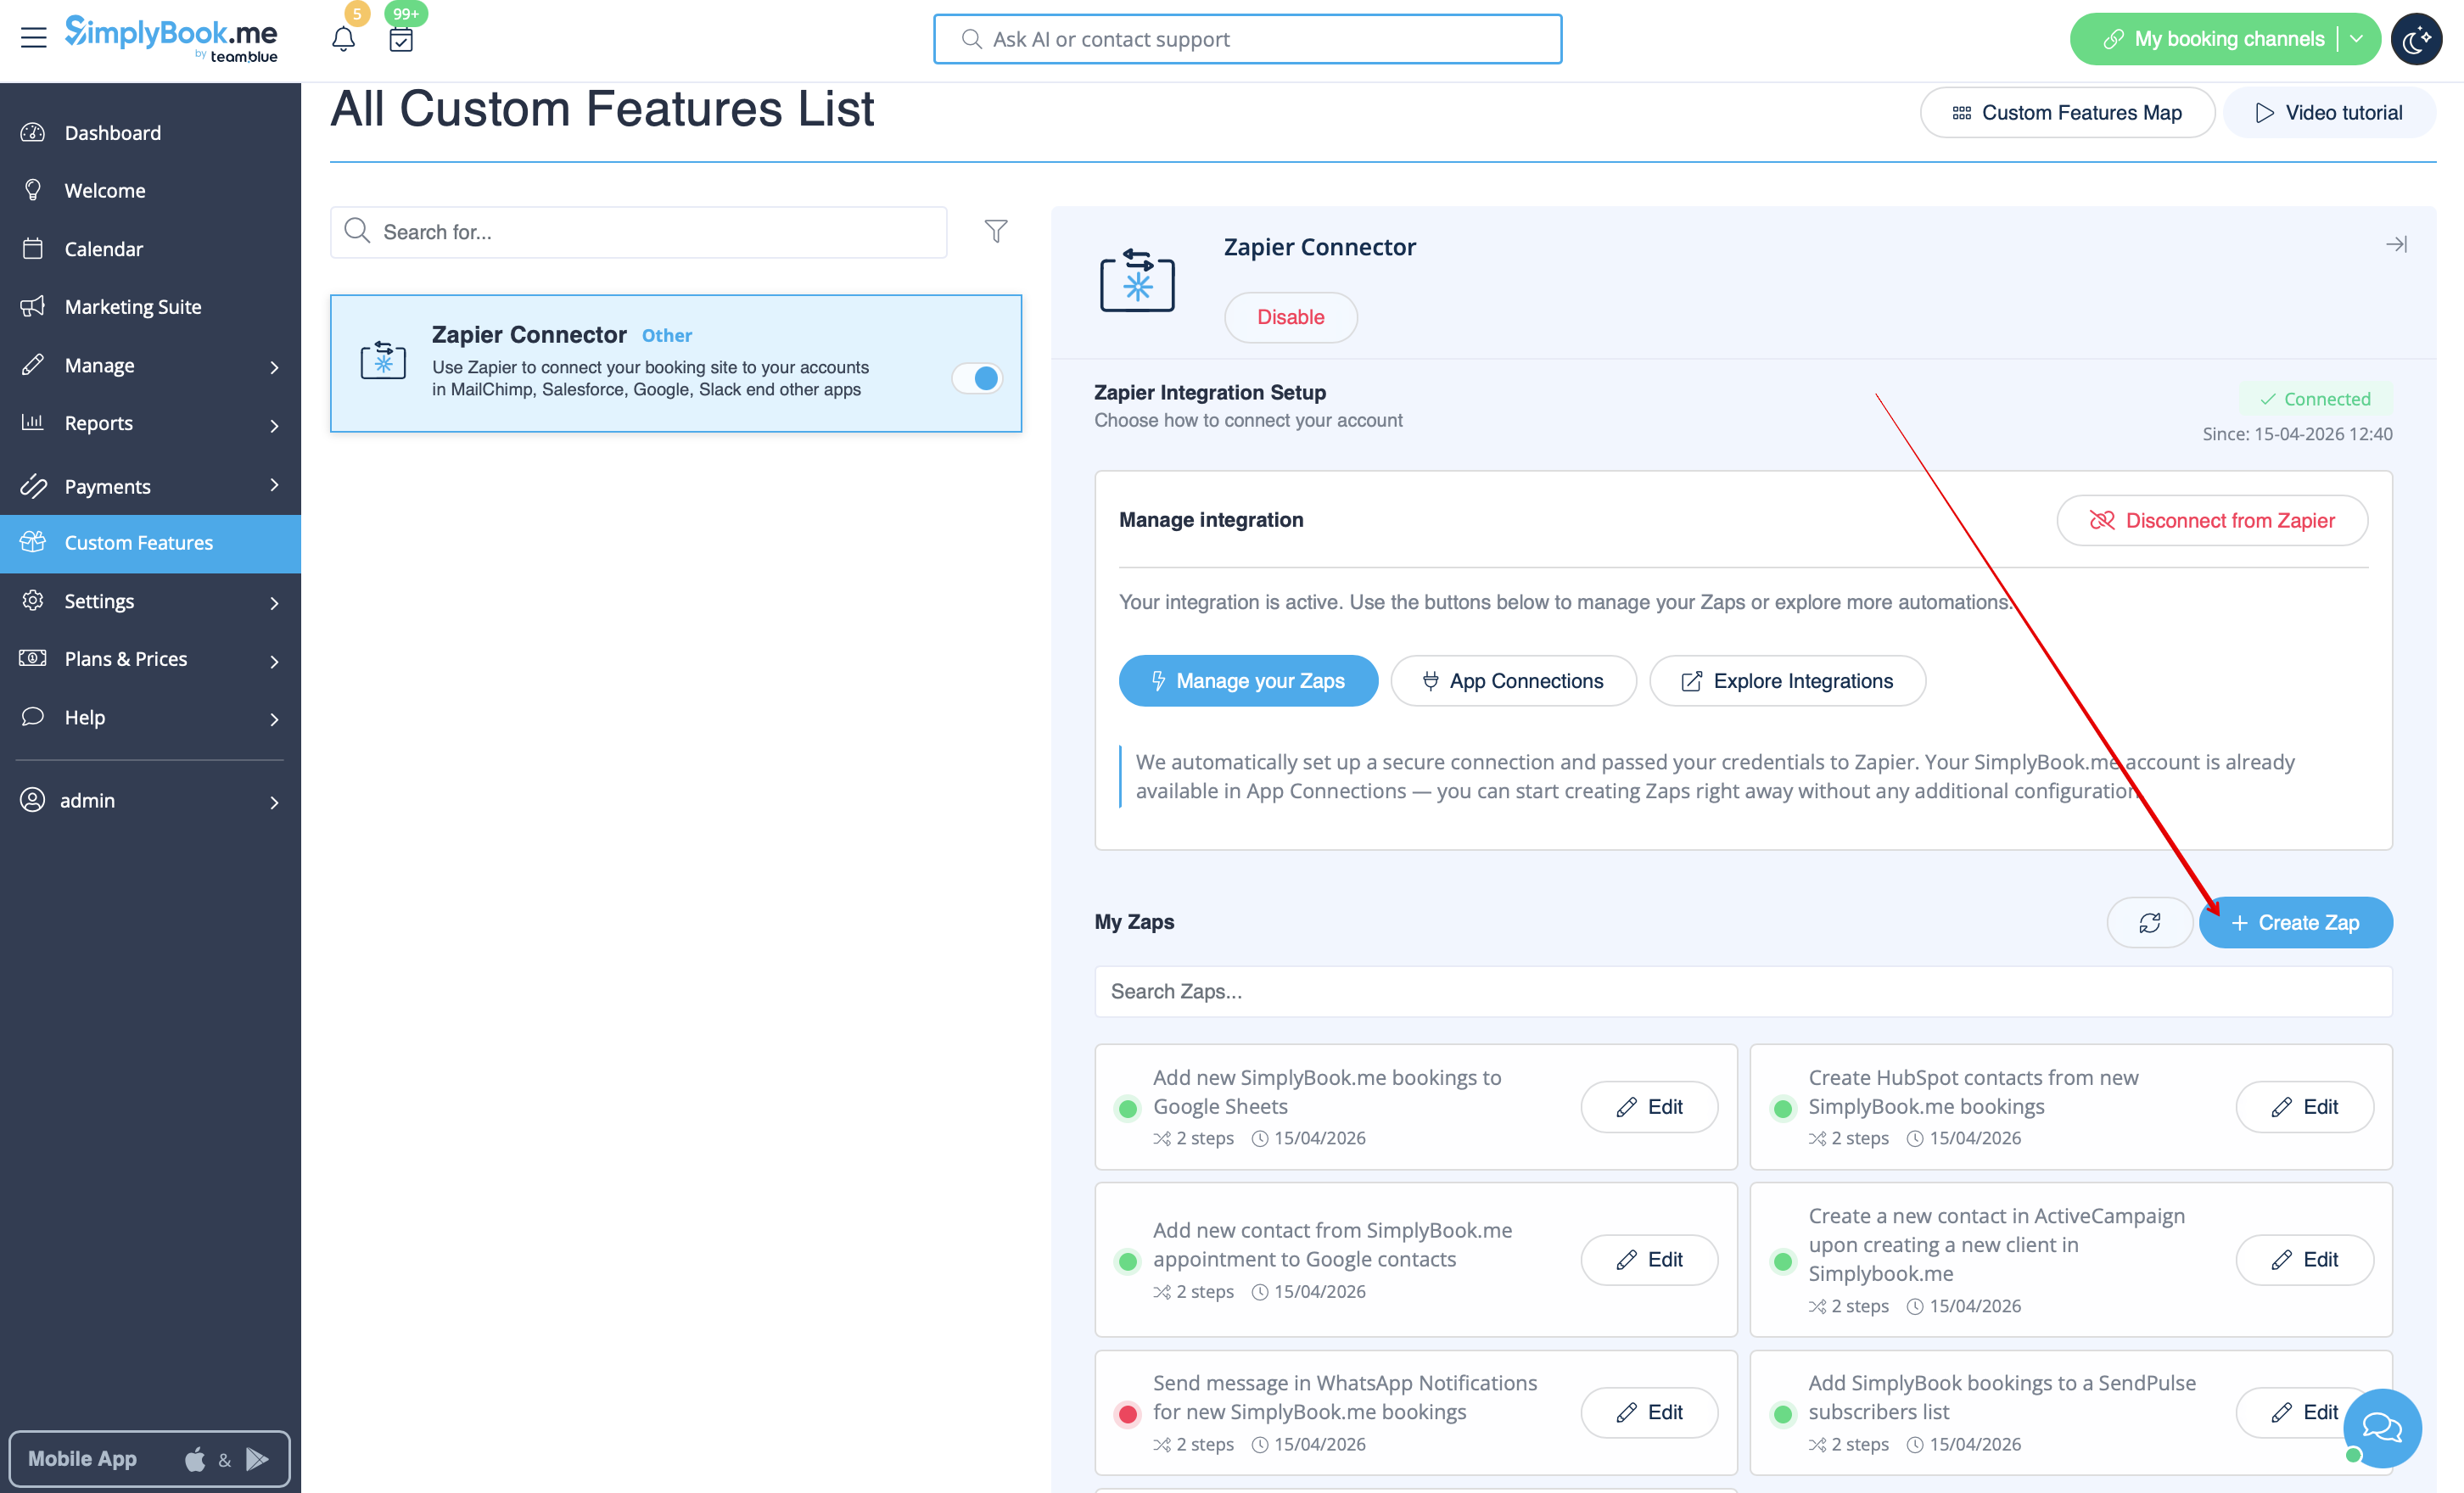
: | :6. Підключіться до свого облікового запису Zapier за допомогою опції '''Швидке підключення''' | ||
[[File:Quick connect zapier.png|1200px|border | center|link=https://help.simplybook.me/images/8/84/Quick_connect_zapier.png]] | [[File:Quick connect zapier.png|1200px|border | center|link=https://help.simplybook.me/images/8/84/Quick_connect_zapier.png]] | ||
<br><br> | <br><br> | ||
: | :7. Натисніть кнопку '''+ Створити Zap'''. | ||
[[File:Create zap path.png|1200px|border | center|link=https://help.simplybook.me/images/2/24/Create_zap_path.png]] | |||
[[File: | |||
<br><br> | <br><br> | ||
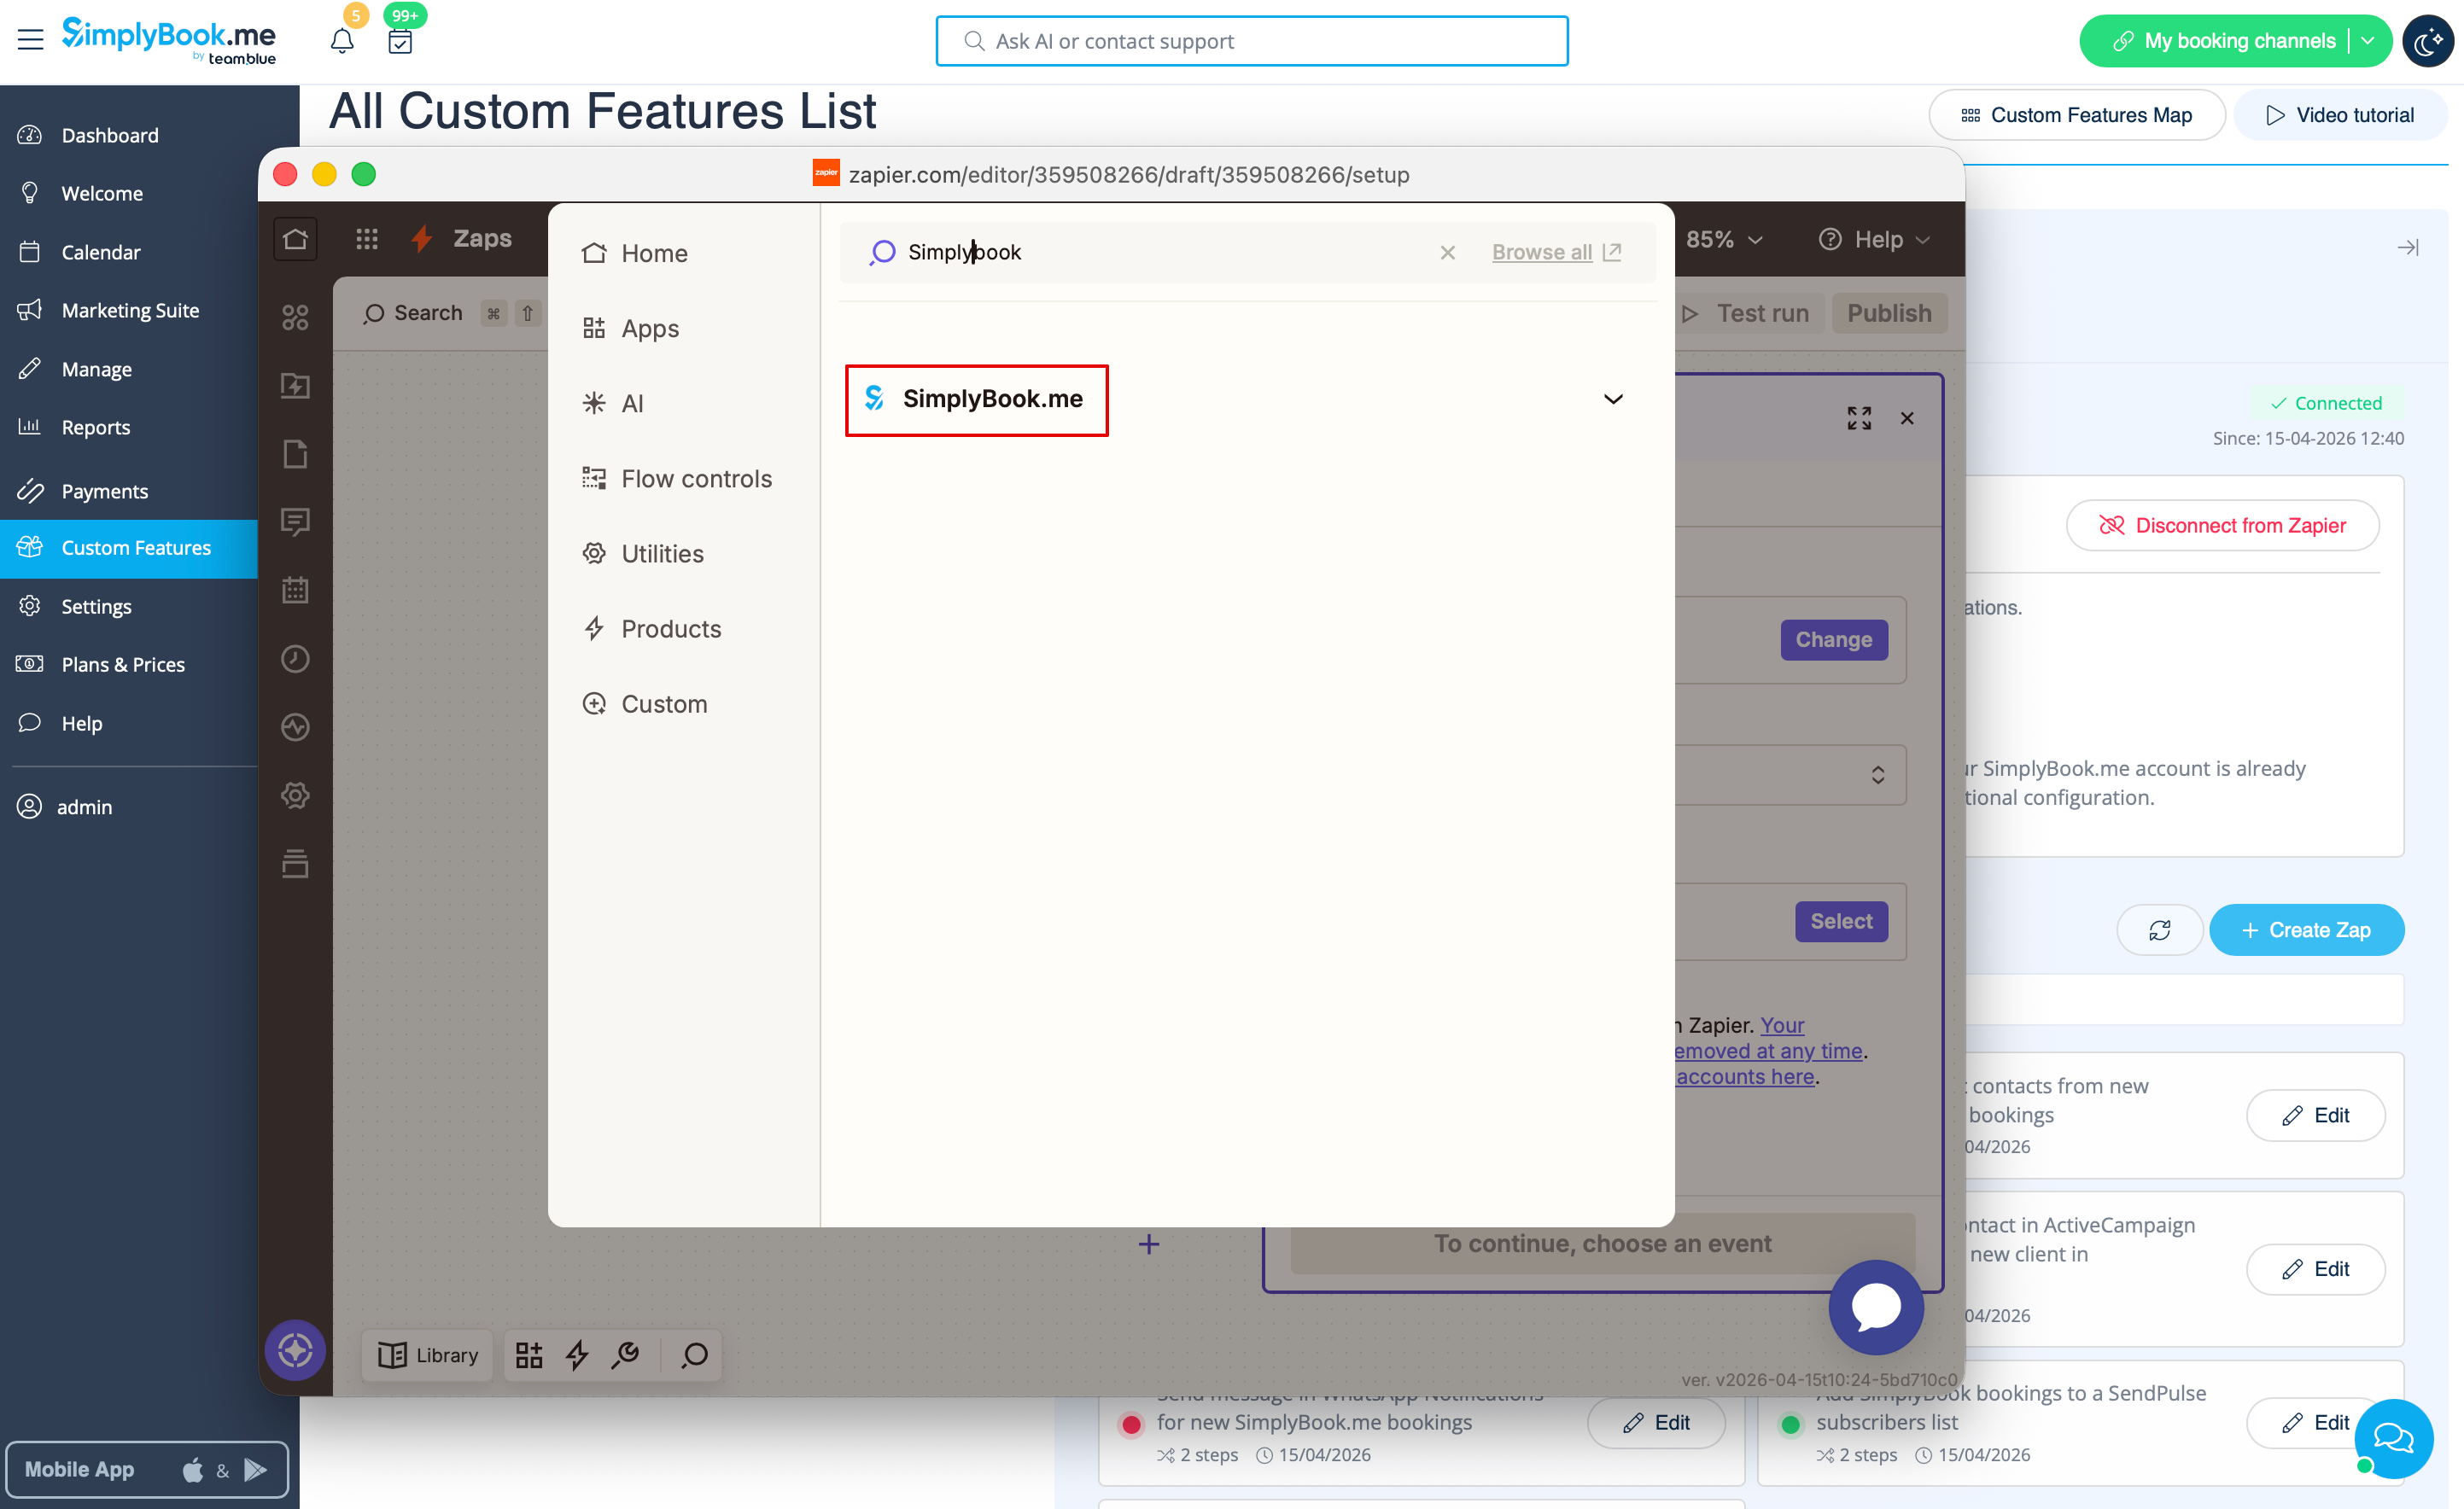
: | :8. У спливаючому вікні знайдіть SimplyBook.me у списку додатків для підключення. | ||
[[File:Zapier | [[File:Zapier new sb as trigger.png|1200px|border | center|link=https://help.simplybook.me/images/1/13/Zapier_new_sb_as_trigger.png]] | ||
<br><br> | <br><br> | ||
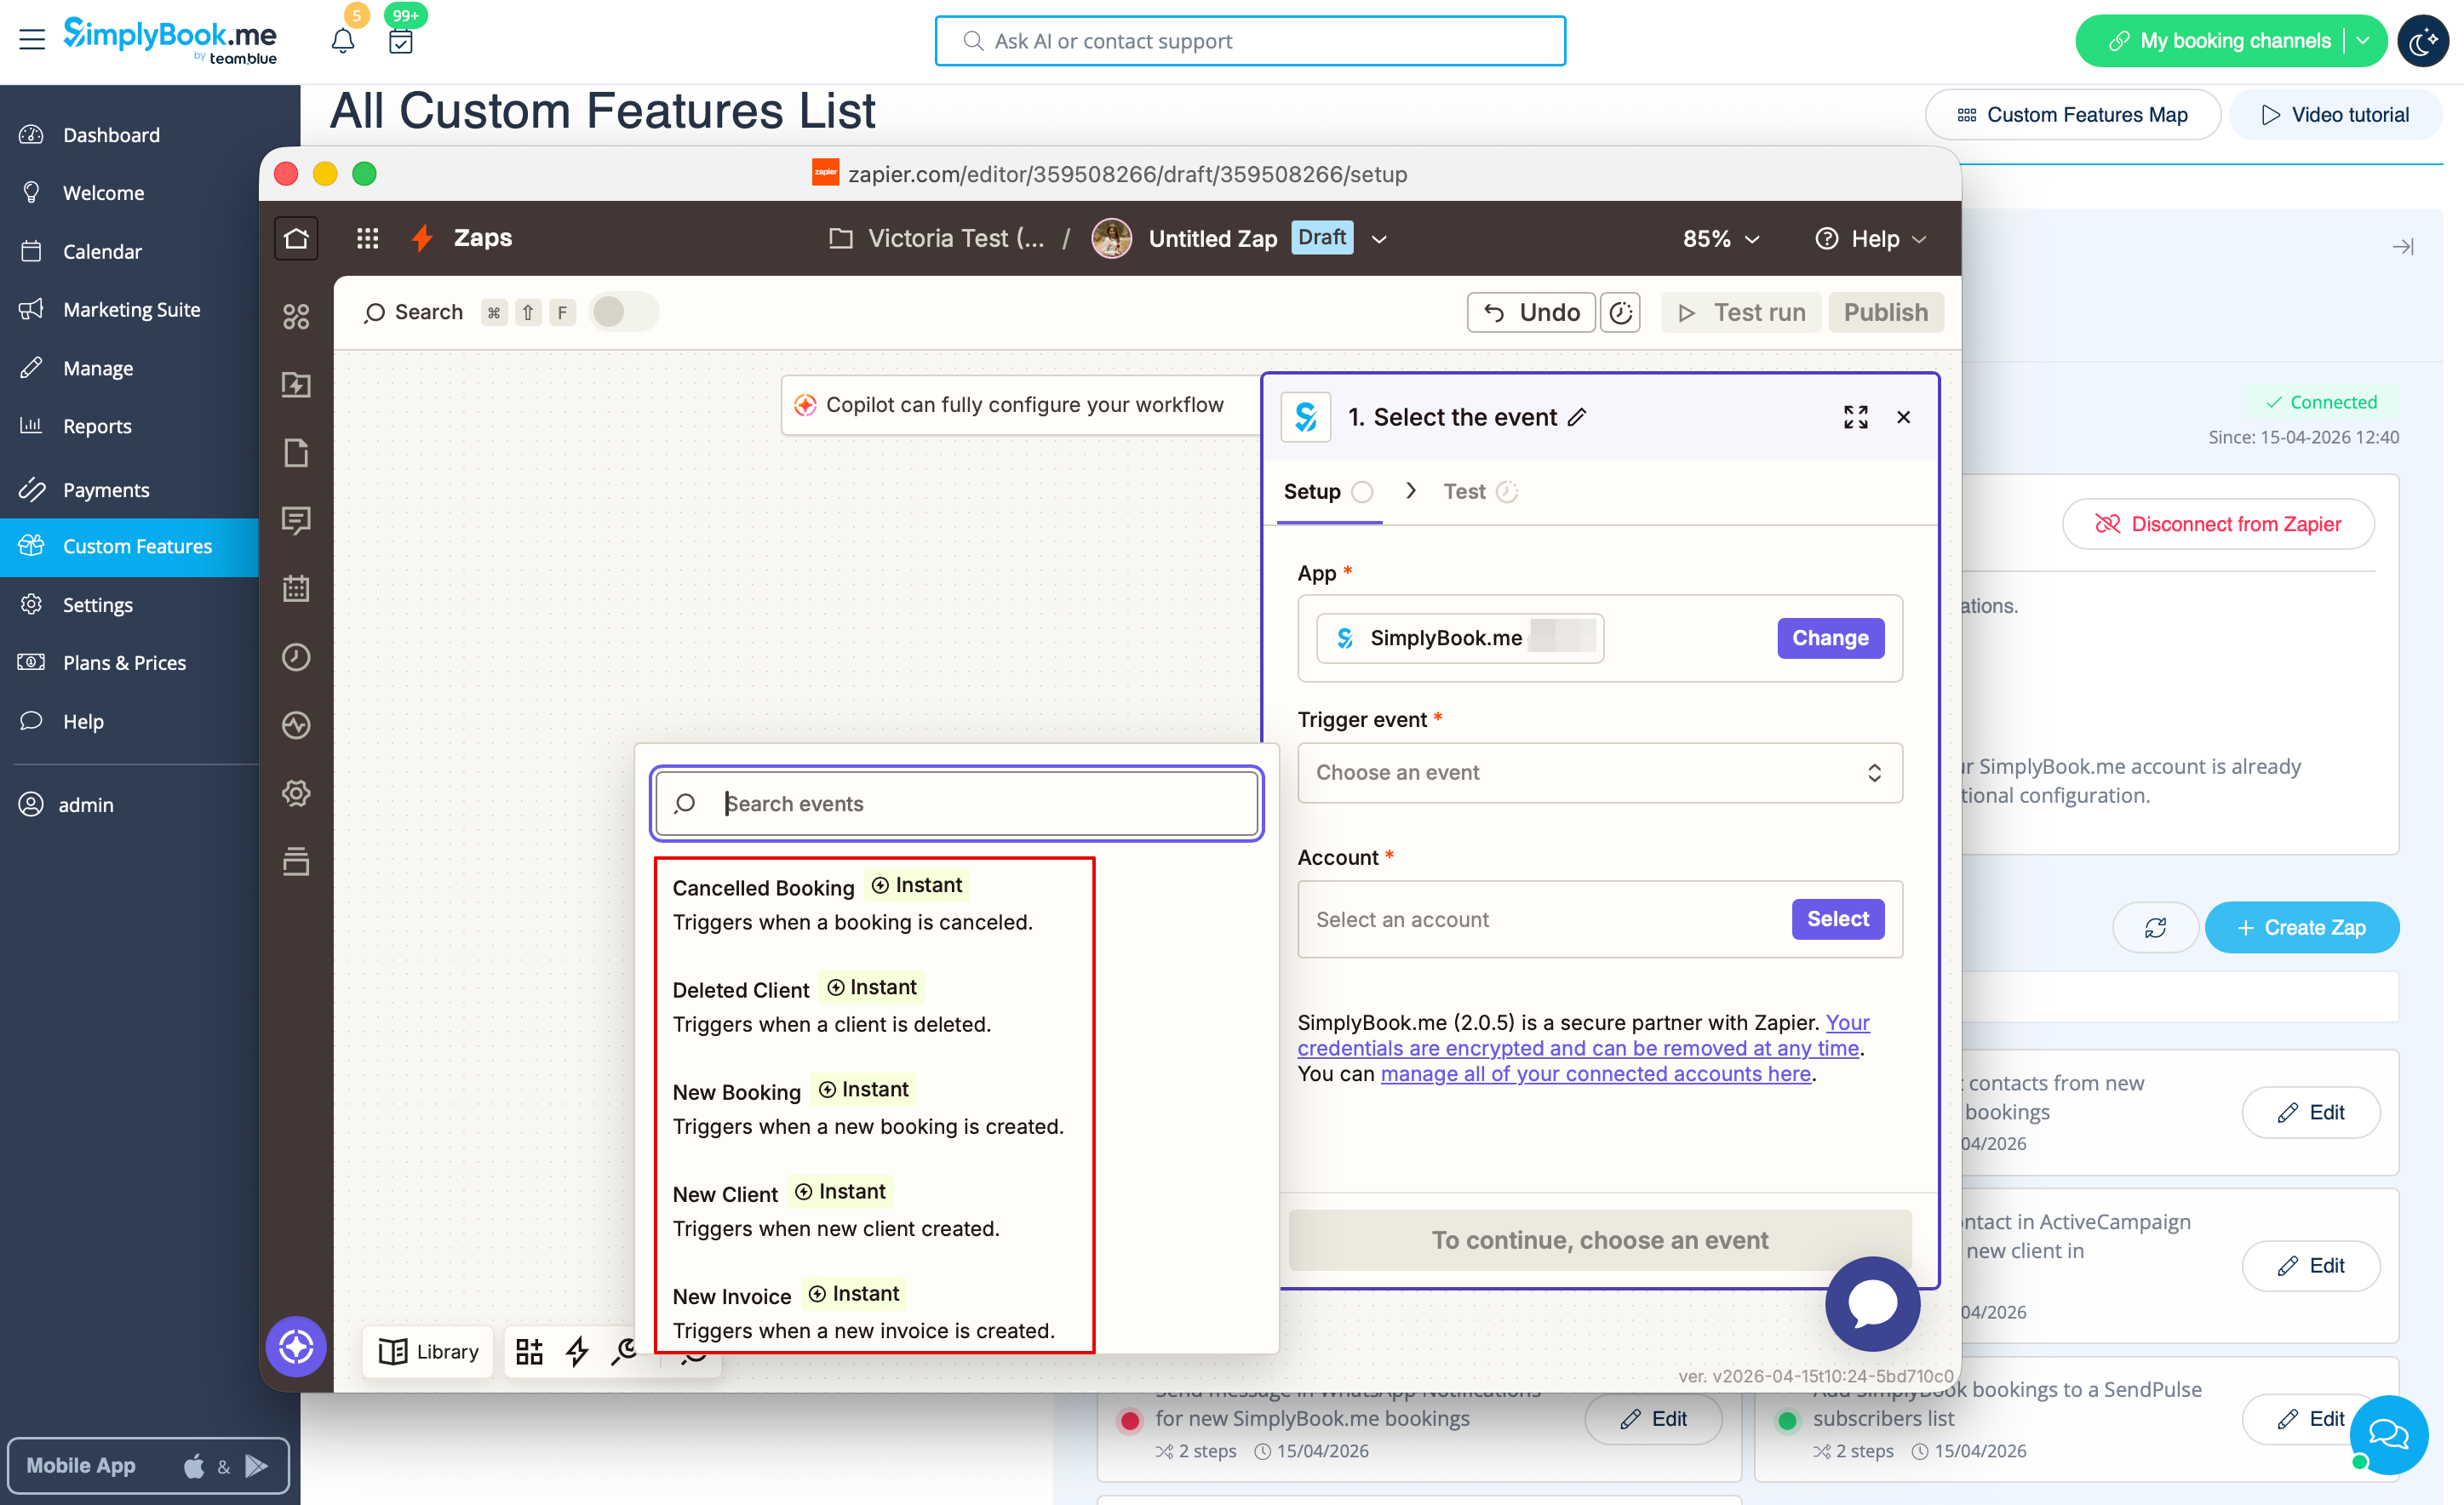
: | :9. Виберіть "Нове бронювання" як тригер і обліковий запис, який ви раніше підключили. Натисніть "Продовжити". | ||
[[File:Zapier new choose trigger event.png|1200px|border | center|link=https://help.simplybook.me/images/4/45/Zapier_new_choose_trigger_event.png]] | |||
<br><br> | <br><br> | ||
: | :10. Перевірте свій тригер, виберіть зразок запису та перейдіть до кроку дії. | ||
<br><br> | <br><br> | ||
: | :11. Перейдіть до "Кроку дії" – підключіть і підтвердьте свій обліковий запис Gmail. Налаштуйте дію для надсилання електронного листа, коли спрацьовує бронювання. | ||
[[File:Zapier redesigned gmail as action app.png|1200px | center|link=https://help.simplybook.me/images/0/01/Zapier_redesigned_gmail_as_action_app.png]] | [[File:Zapier redesigned gmail as action app.png|1200px | center|link=https://help.simplybook.me/images/0/01/Zapier_redesigned_gmail_as_action_app.png]] | ||
<br><br> | <br><br> | ||
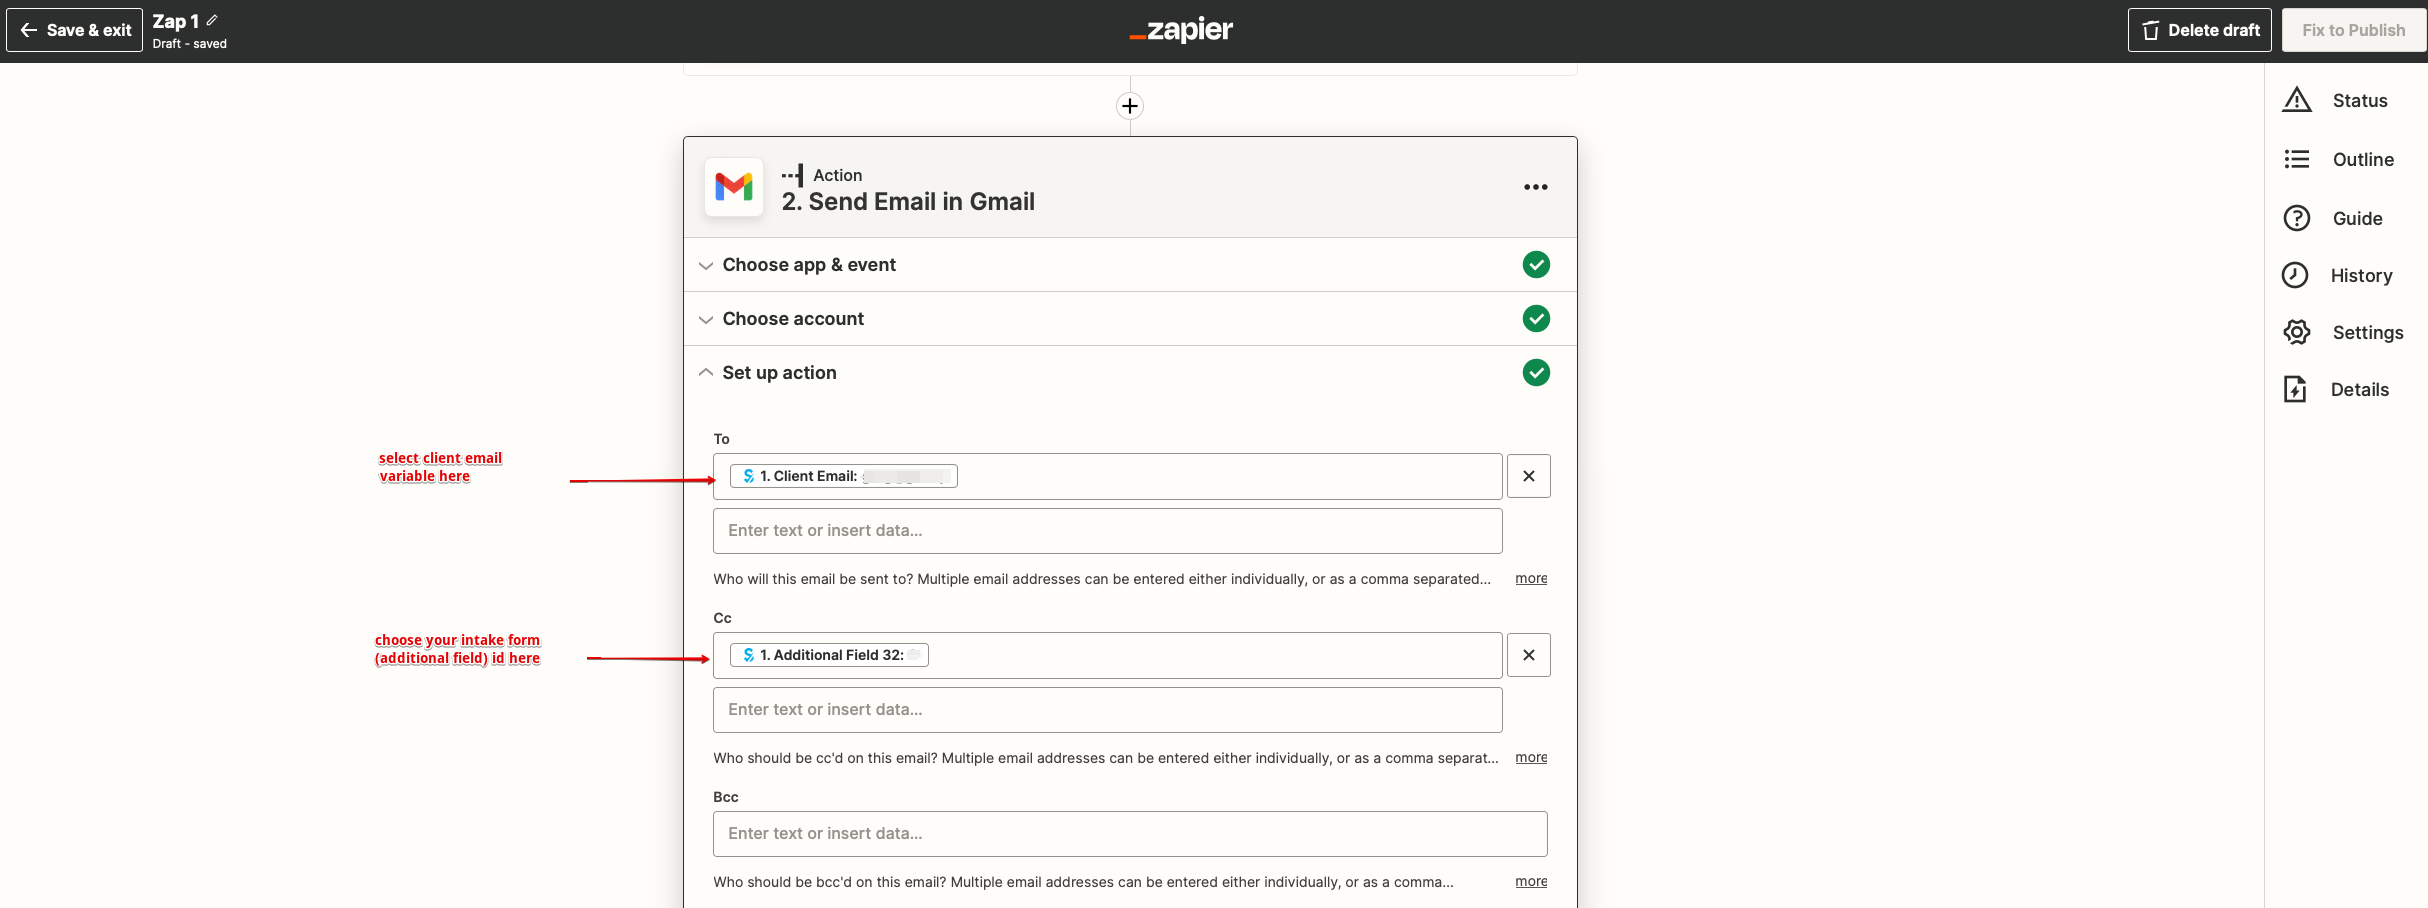
: | :12. Додайте одержувачів електронної пошти у поля "Кому:" та "Копія:". Будь ласка, використовуйте змінні для правильної роботи Zap (виберіть змінну вашої нещодавно створеної форми прийому). | ||
[[File:Zapier redesigned email setup variables selection.png|1200px | center|link=https://help.simplybook.me/images/5/5e/Zapier_redesigned_email_setup_variables_selection.png]] | [[File:Zapier redesigned email setup variables selection.png|1200px | center|link=https://help.simplybook.me/images/5/5e/Zapier_redesigned_email_setup_variables_selection.png]] | ||
<br><br> | <br><br> | ||
:''' | :'''Зверніть увагу''', що ваш клієнт отримає 2 сповіщення електронною поштою: одне від [https://simplybook.me/ Simplybook] (надіслане негайно) і одне від Zapier (надсилається через 5 хвилин після бронювання). Ви можете вимкнути сповіщення електронною поштою для клієнтів у налаштуваннях [https://simplybook.me/ Simplybook]//Налаштування електронної пошти та SMS, знявши відповідні прапорці.<br><br> | ||
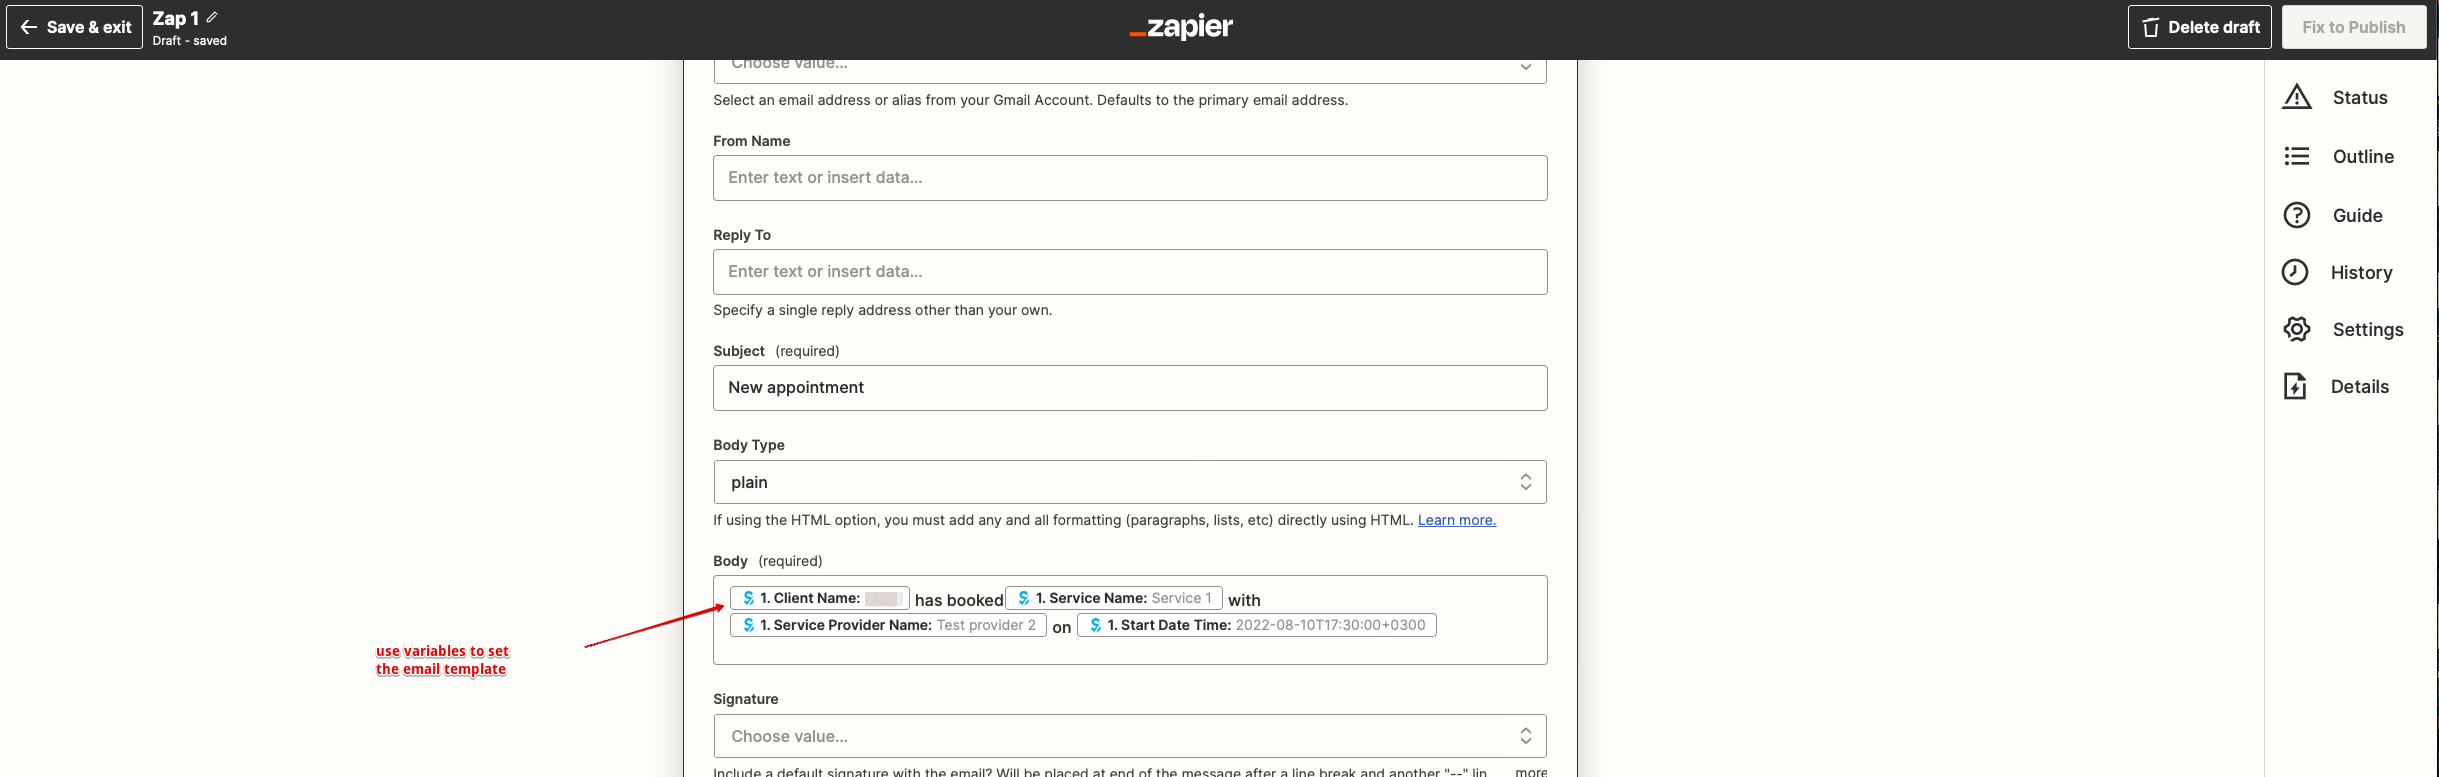
: | :13. Потім налаштуйте текст шаблону електронного листа. Також додайте необхідні змінні, які будуть замінені інформацією про бронювання в реальному електронному листі. Ви можете створити більш детальне та змістовне сповіщення, ніж те, що наведено у прикладі. | ||
[[File:Zapier redesigned email template setup.png|1200px | center|link=https://help.simplybook.me/images/1/1d/Zapier_redesigned_email_template_setup.png]] | [[File:Zapier redesigned email template setup.png|1200px | center|link=https://help.simplybook.me/images/1/1d/Zapier_redesigned_email_template_setup.png]] | ||
<br><br> | <br><br> | ||
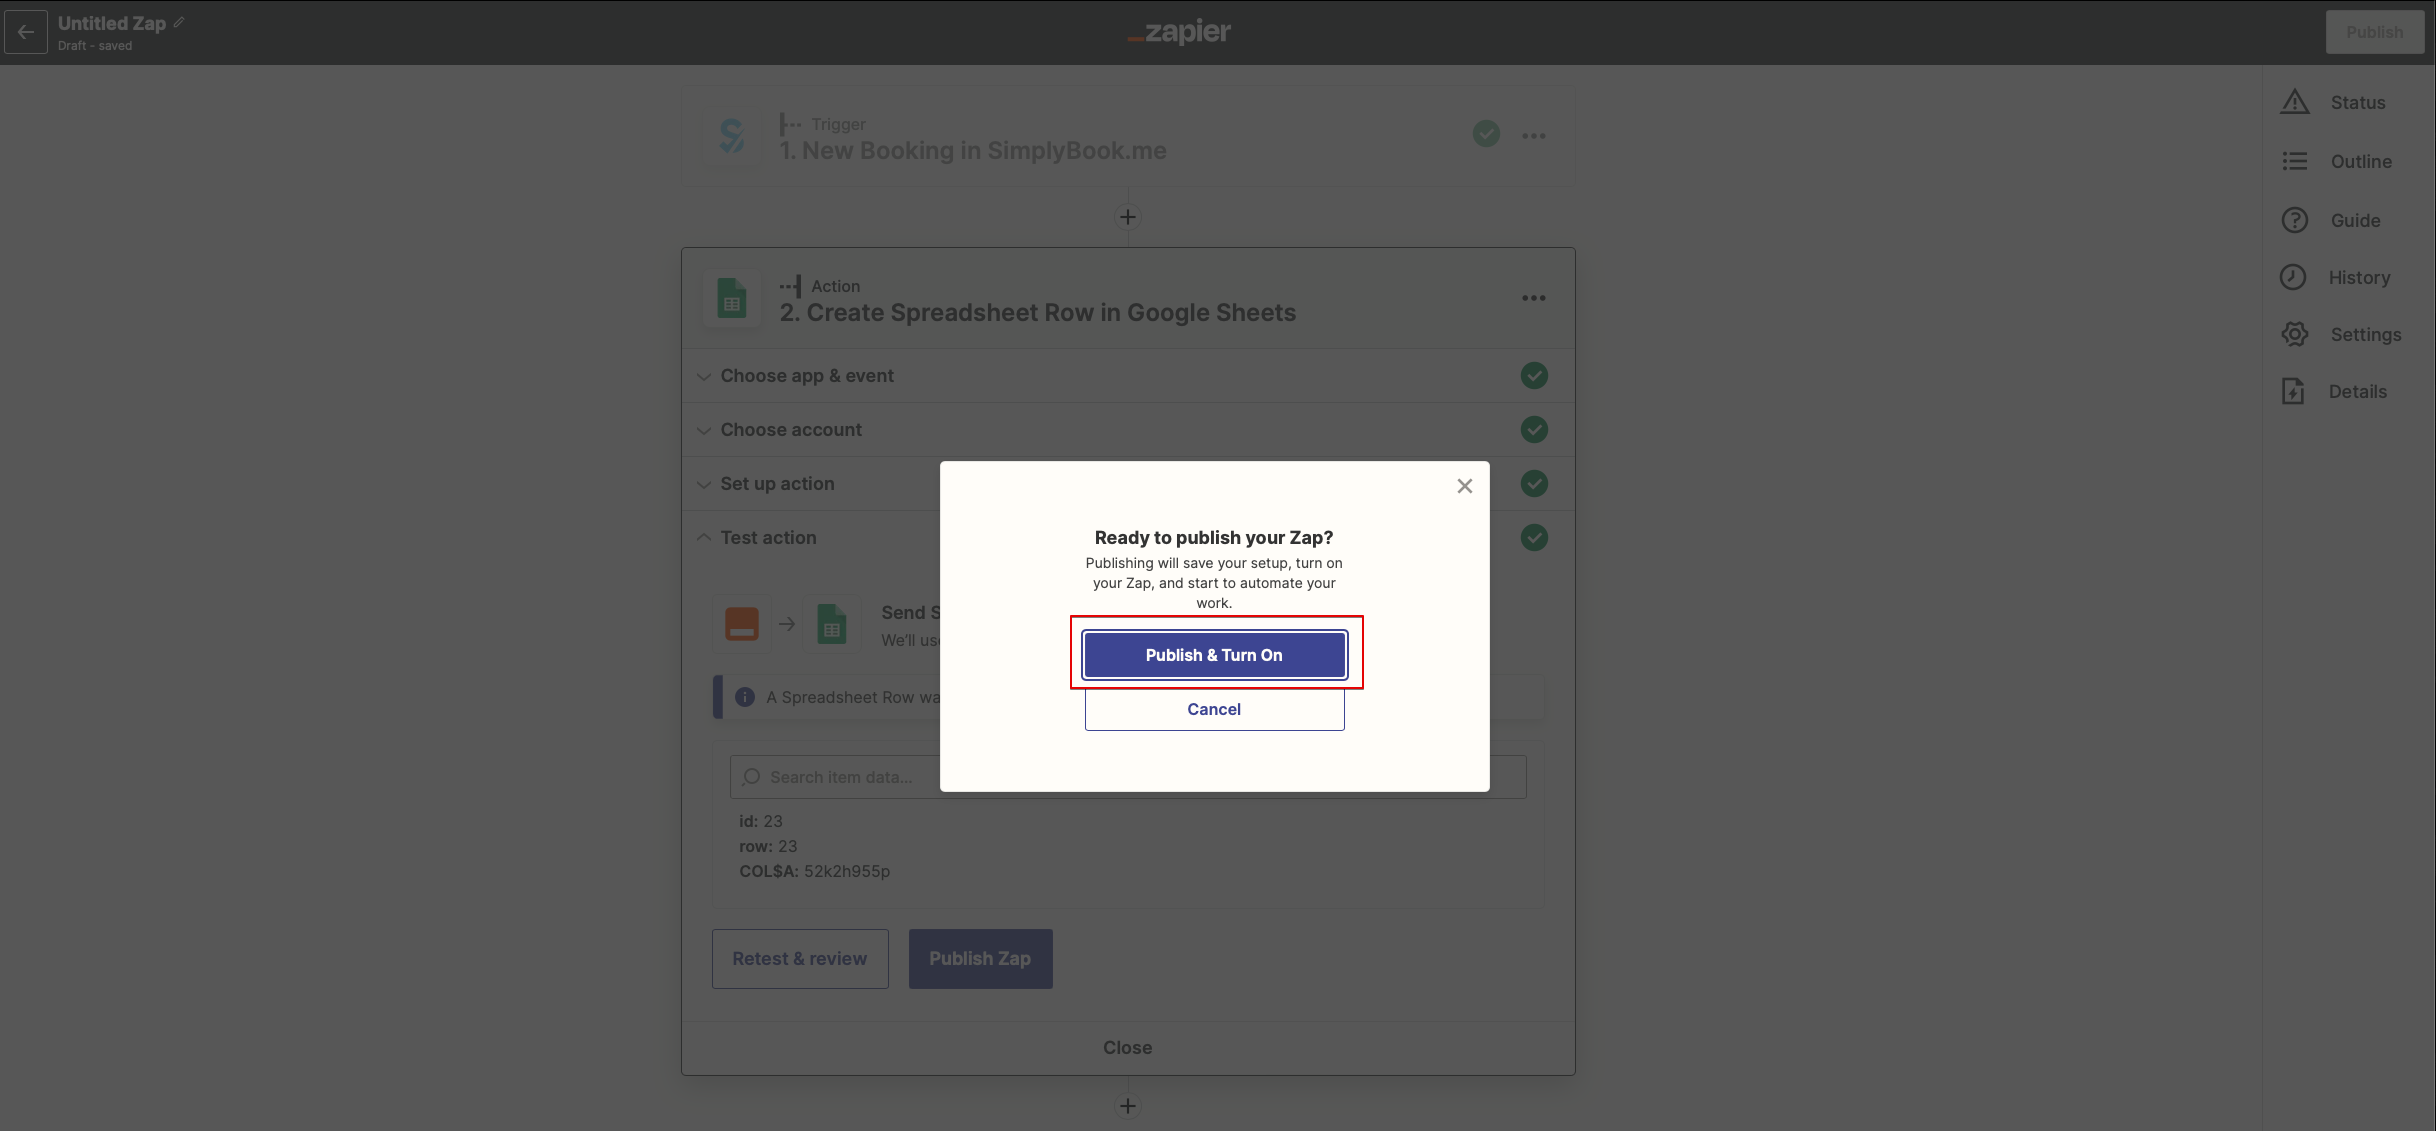
: | :14. Перевірте свій щойно створений Zap і ввімкніть його. | ||
[[File:Zapier redesigned enable zap.png|1200px | center|link=https://help.simplybook.me/images/9/9b/Zapier_redesigned_enable_zap.png]] | [[File:Zapier redesigned enable zap.png|1200px | center|link=https://help.simplybook.me/images/9/9b/Zapier_redesigned_enable_zap.png]] | ||
<br><br> | <br><br> | ||
Вітаємо, ви створили нове підключення, яке надсилатиме копії підтверджувальних листів різним одержувачам! | |||
<br><br> | <br><br> | ||
Latest revision as of 15:23, 17 April 2026
Посібник Zap для підключення SimplyBook та Gmail
Нас часто запитують, як надіслати лист-підтвердження на більше ніж одну електронну адресу. Це може знадобитися, якщо у клієнта є агент або якщо інші особи повинні отримувати підтвердження для клієнтів. Тепер ця опція доступна через наш додаток на Zapier!
- Як користуватися
- 1. Створіть форму прийому для другого одержувача в адмін-додатку Simplybook за допомогою Спеціальної функції форм прийому.
- 2. Після створення форми прийому ви побачите назву змінної внизу списку змінних у розділі Налаштування//Налаштування електронної пошти та SMS
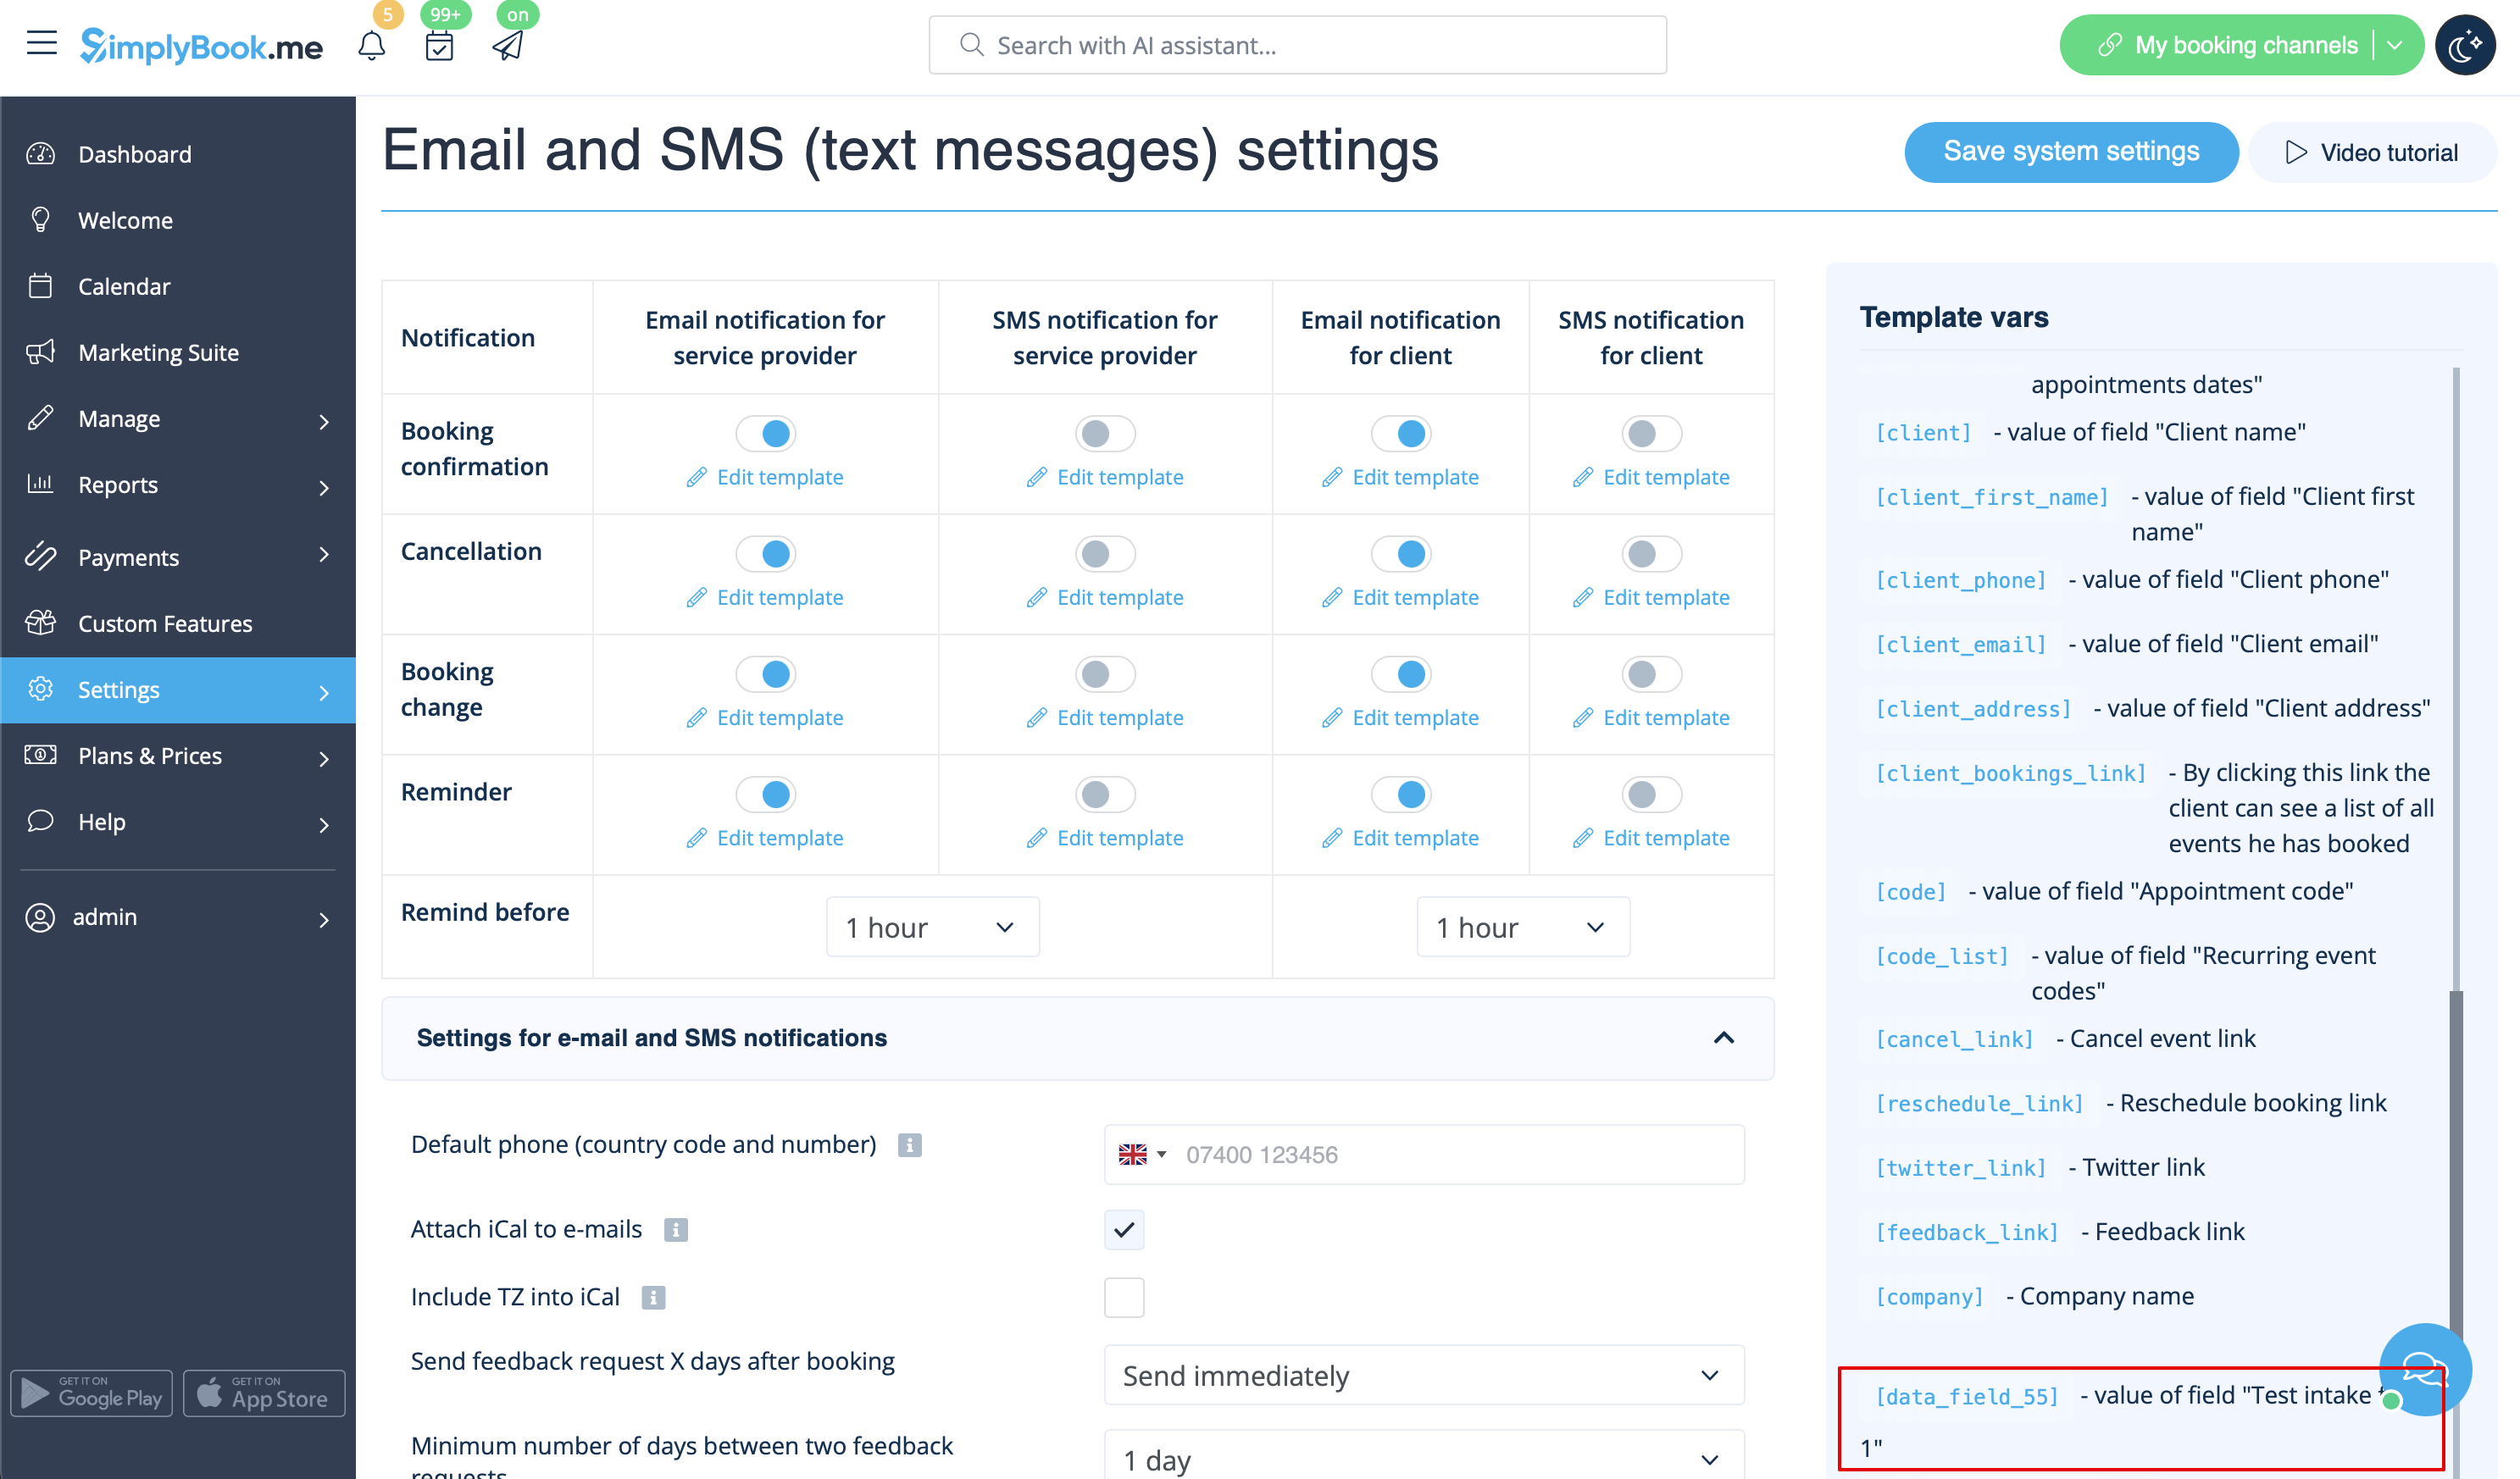
- 3. На цьому зображенні це [data_field_30] (але це також може бути data_field_2, data_field_3 тощо). Ця змінна міститиме альтернативну адресу електронної пошти, необхідну для синхронізації з Gmail.
- 4. Потім створіть тестове бронювання на сторінці бронювання Simplybook. Це необхідно для того, щоб повідомити систему про те, що нова форма була створена в системі та готова до подальшого використання.
- 5. Увімкніть спеціальну функцію Конектор Zapier на сторінці Спеціальні функції.

- 6. Підключіться до свого облікового запису Zapier за допомогою опції Швидке підключення
- 7. Натисніть кнопку + Створити Zap.
- 8. У спливаючому вікні знайдіть SimplyBook.me у списку додатків для підключення.
- 9. Виберіть "Нове бронювання" як тригер і обліковий запис, який ви раніше підключили. Натисніть "Продовжити".
- 10. Перевірте свій тригер, виберіть зразок запису та перейдіть до кроку дії.
- 11. Перейдіть до "Кроку дії" – підключіть і підтвердьте свій обліковий запис Gmail. Налаштуйте дію для надсилання електронного листа, коли спрацьовує бронювання.

- 12. Додайте одержувачів електронної пошти у поля "Кому:" та "Копія:". Будь ласка, використовуйте змінні для правильної роботи Zap (виберіть змінну вашої нещодавно створеної форми прийому).
- Зверніть увагу, що ваш клієнт отримає 2 сповіщення електронною поштою: одне від Simplybook (надіслане негайно) і одне від Zapier (надсилається через 5 хвилин після бронювання). Ви можете вимкнути сповіщення електронною поштою для клієнтів у налаштуваннях Simplybook//Налаштування електронної пошти та SMS, знявши відповідні прапорці.
- 13. Потім налаштуйте текст шаблону електронного листа. Також додайте необхідні змінні, які будуть замінені інформацією про бронювання в реальному електронному листі. Ви можете створити більш детальне та змістовне сповіщення, ніж те, що наведено у прикладі.
- 14. Перевірте свій щойно створений Zap і ввімкніть його.
Вітаємо, ви створили нове підключення, яке надсилатиме копії підтверджувальних листів різним одержувачам!