From SimplyBook.me
No edit summary |
Marked this version for translation |
||
| (9 intermediate revisions by the same user not shown) | |||
| Line 1: | Line 1: | ||
<languages/> | |||
{{#seo: | {{#seo: | ||
|title=Google Authenticator custom feature - SimplyBook.me | |title=Google Authenticator custom feature - SimplyBook.me | ||
<translate> | |||
<!--T:6--> | |||
|description=Enable two-factor authentication for admin login. Use Google Authenticator or compatible TOTP apps for 6-digit codes. Enhances account security. Free feature. | |||
</translate> | |||
|titlemode=append | |titlemode=append | ||
|keywords=faq, frequently asked questions, booking software, appointment system questions, appointments online, calendar software, booking system, booking calendar, scheduling software, online appointment scheduling, online scheduling, plugins, custom features, 2-step authentication, 2-step auth, account access, secure access | |keywords=faq, frequently asked questions, booking software, appointment system questions, appointments online, calendar software, booking system, booking calendar, scheduling software, online appointment scheduling, online scheduling, plugins, custom features, 2-step authentication, 2-step auth, account access, secure access | ||
}} | }} | ||
<translate> | |||
<!--T:1--> | |||
<br> | <br> | ||
<!--T:2--> | |||
[[File:Google authenticator.png |left]] <br> Add security to your account. You can use a 2-step authentication when logging into your account preventing unauthorized access. Upon entering password, you'll be asked to insert 6-digit login code from your Google authenticator or a 3rd party app.<br> | [[File:Google authenticator.png |left]] <br> Add security to your account. You can use a 2-step authentication when logging into your account preventing unauthorized access. Upon entering password, you'll be asked to insert 6-digit login code from your Google authenticator or a 3rd party app.<br> | ||
You can use this custom feature with or without HIPAA feature depending on your needs and business requirements. | You can use this custom feature with or without HIPAA feature depending on your needs and business requirements. | ||
<br><br> | <br><br> | ||
:'''Please note!''' In case you have this feature enabled our support agents will not be able to access your account settings. | :'''Please note!''' In case you have this feature enabled our support agents will not be able to access your account settings. | ||
:As well it will not be possible to connect the account to [[Custom_Features#Zapier_Connector | Zapier]]. | :As well it will not be possible to connect the account to [[Special:MyLanguage/Custom_Features#Zapier_Connector | Zapier]]. | ||
<br> | <br> | ||
__TOC__ | __TOC__ | ||
=How to use it as admin user= | =How to use it as admin user= | ||
<br> | <br> | ||
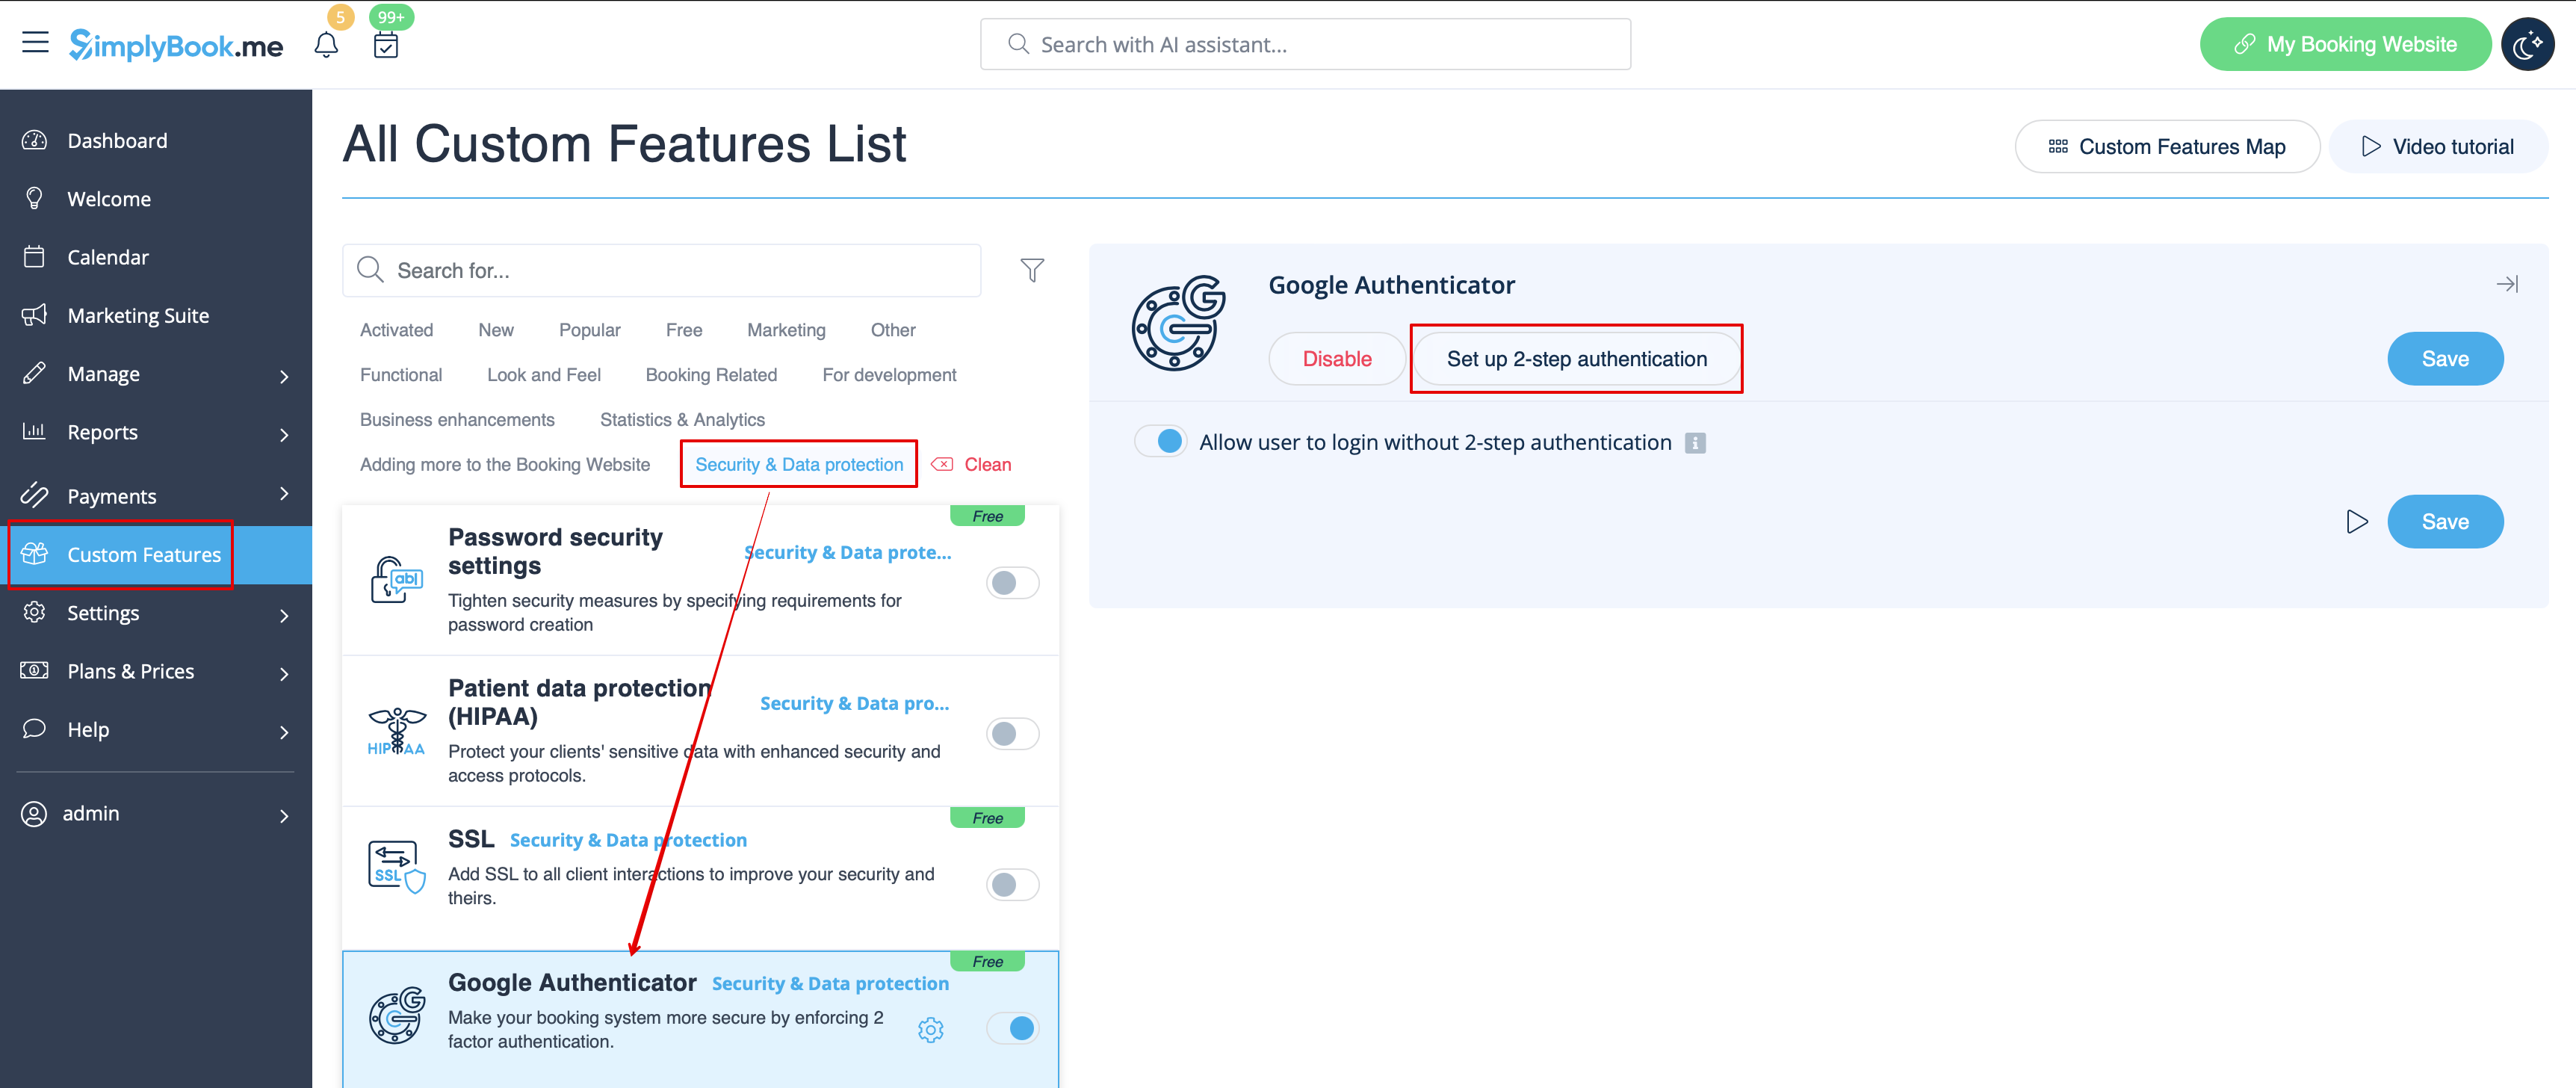
:1. Open “Custom features” page using left-side menu of your admin interface and find | :1. Open “Custom features” page using left-side menu of your admin interface and find “Security & Data Protection” section. Just click on “Enable” near “Google authenticator” | ||
[[File:Google authenticator enable path.png | center]] | [[File:Google authenticator enable path redesigned.png|1200px | center|link=https://help.simplybook.me/images/c/cb/Google_authenticator_enable_path_redesigned.png]] | ||
<br><br> | <br><br> | ||
:2. To set 2-step authentication please go to Manage//Users using left-side menu or click on | :2. To set 2-step authentication please go to Manage//Users using left-side menu or click on ”Set up 2-step authentication” near this custom feature. | ||
[[File:Google | [[File:Google auth setup 2fa path redesigned.png|1200px| center|link=https://help.simplybook.me/images/c/c0/Google_auth_setup_2fa_path_redesigned.png]] | ||
<br><br> | <br><br> | ||
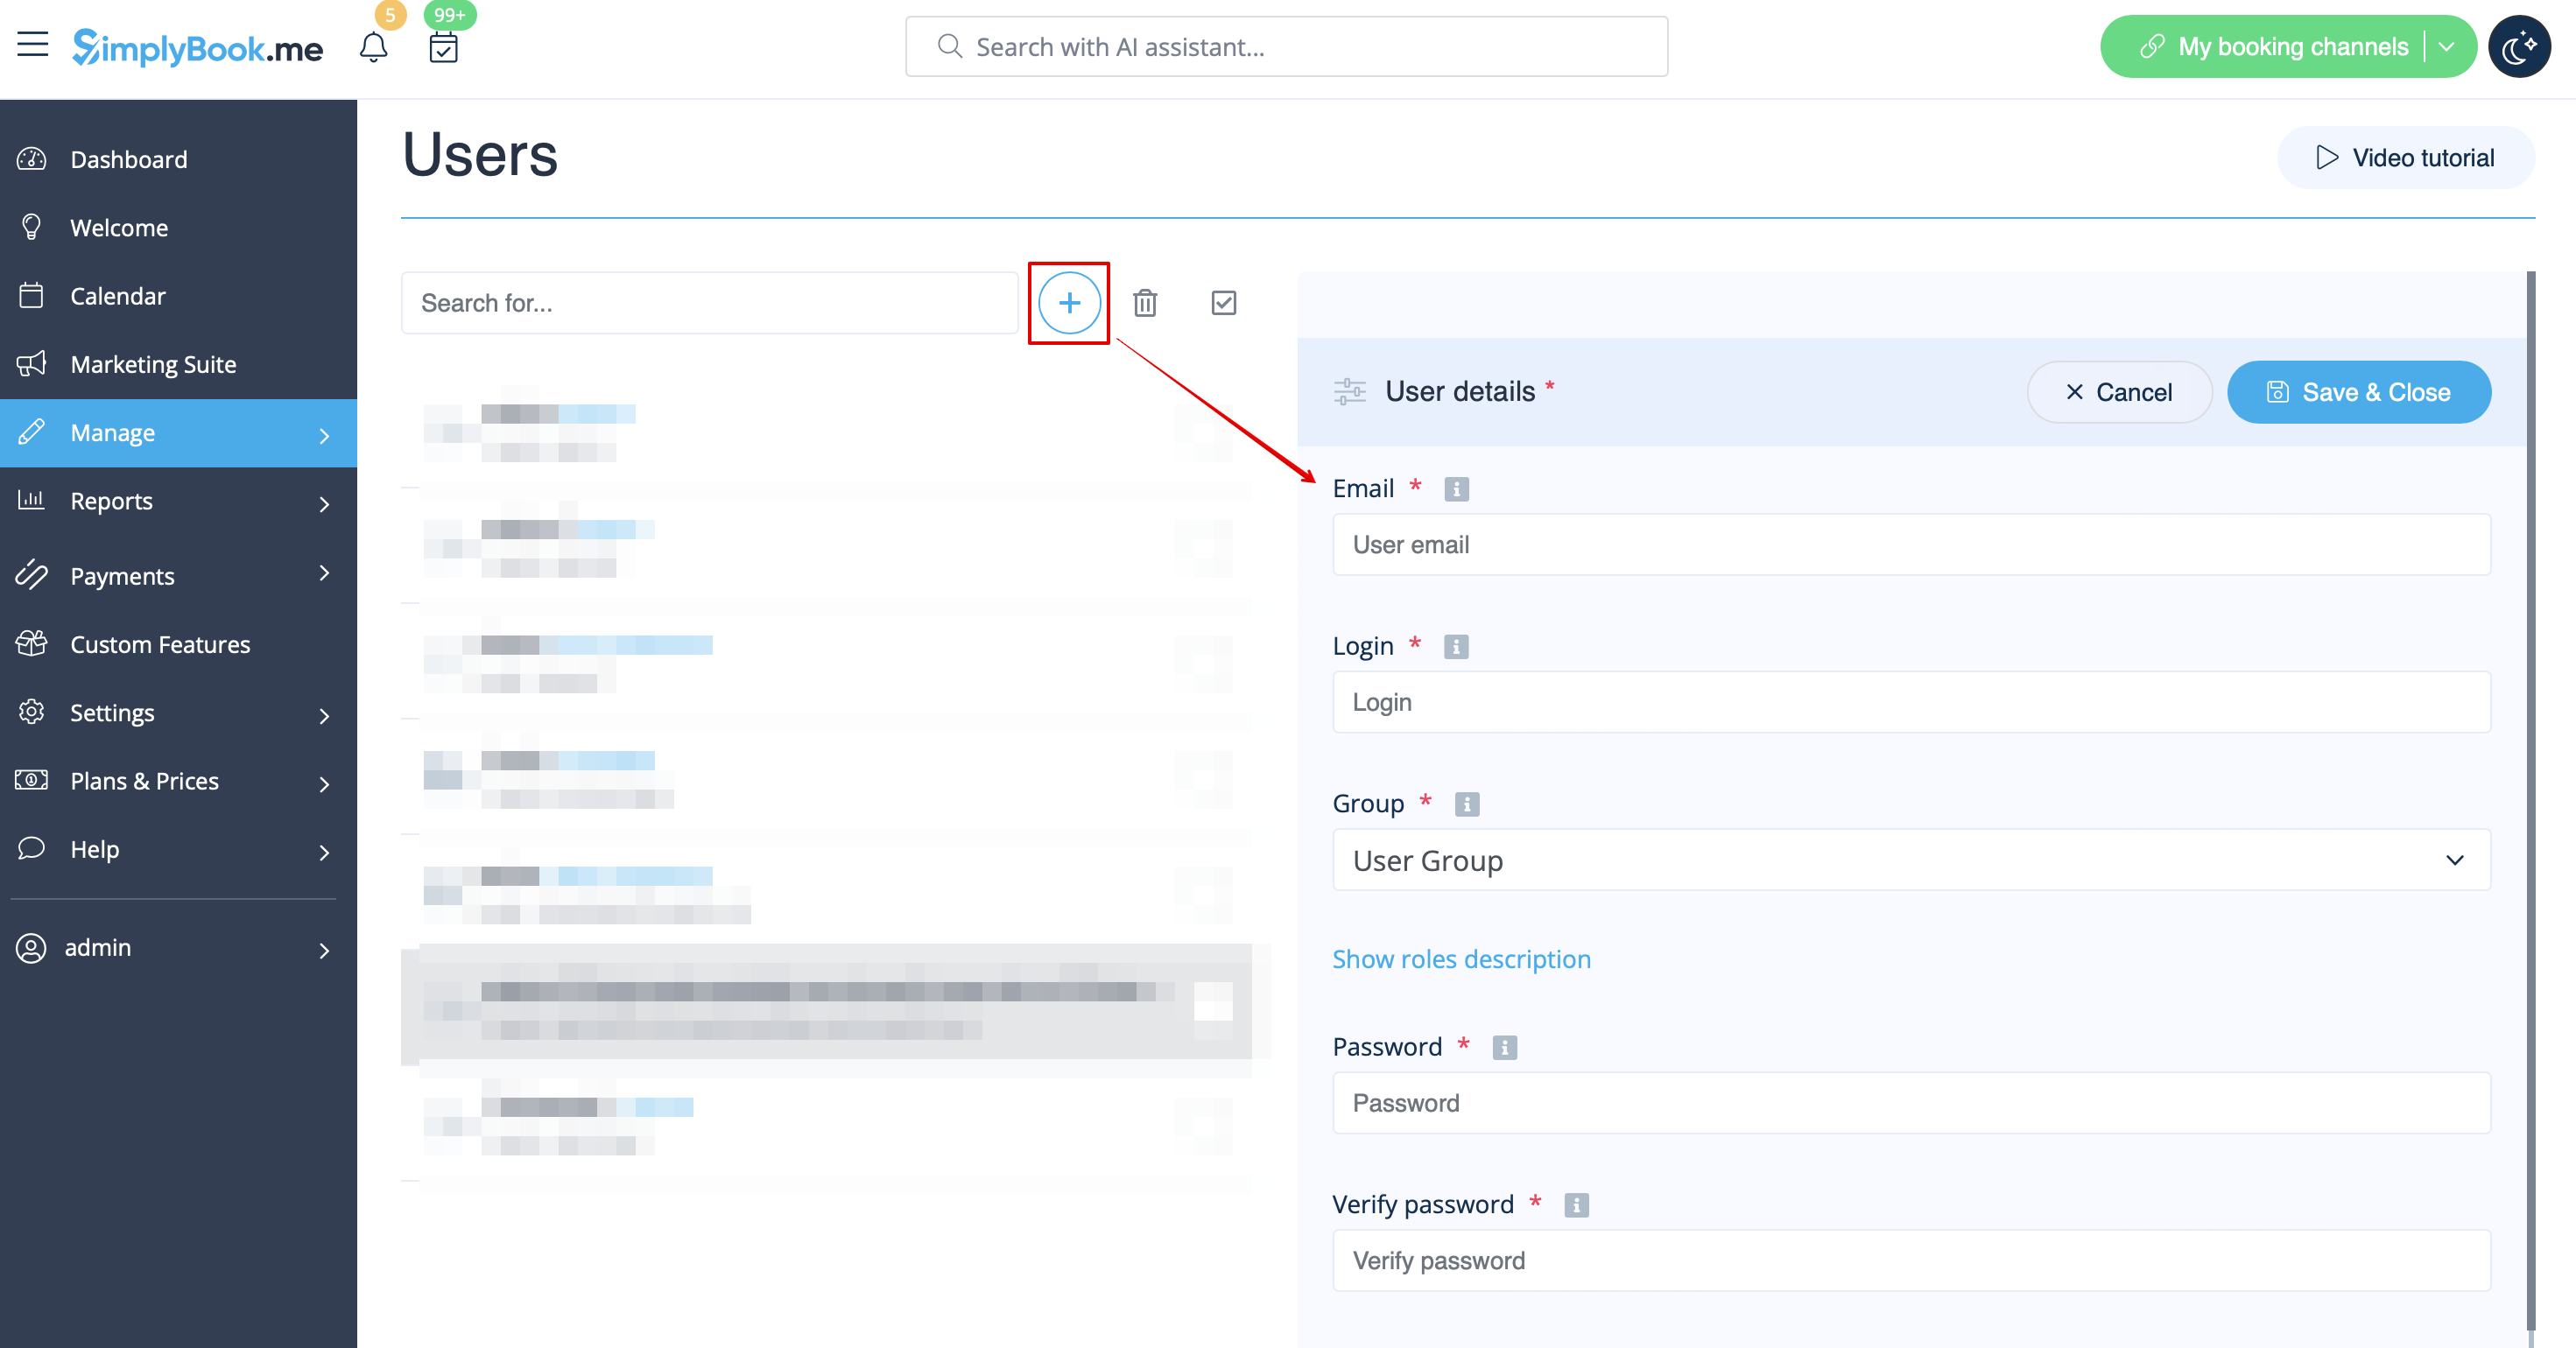
:3. On Manage//Users page click on “+” and create all desired system users to be able to connect each to 2-step authentication. | :3. On Manage//Users page click on “+” and create all desired system users to be able to connect each to 2-step authentication. | ||
[[File:Create | [[File:Create new user path redesigned.png|1200px | center|link=https://help.simplybook.me/images/f/f0/Create_new_user_path_redesigned.png]] | ||
<br><br> | <br><br> | ||
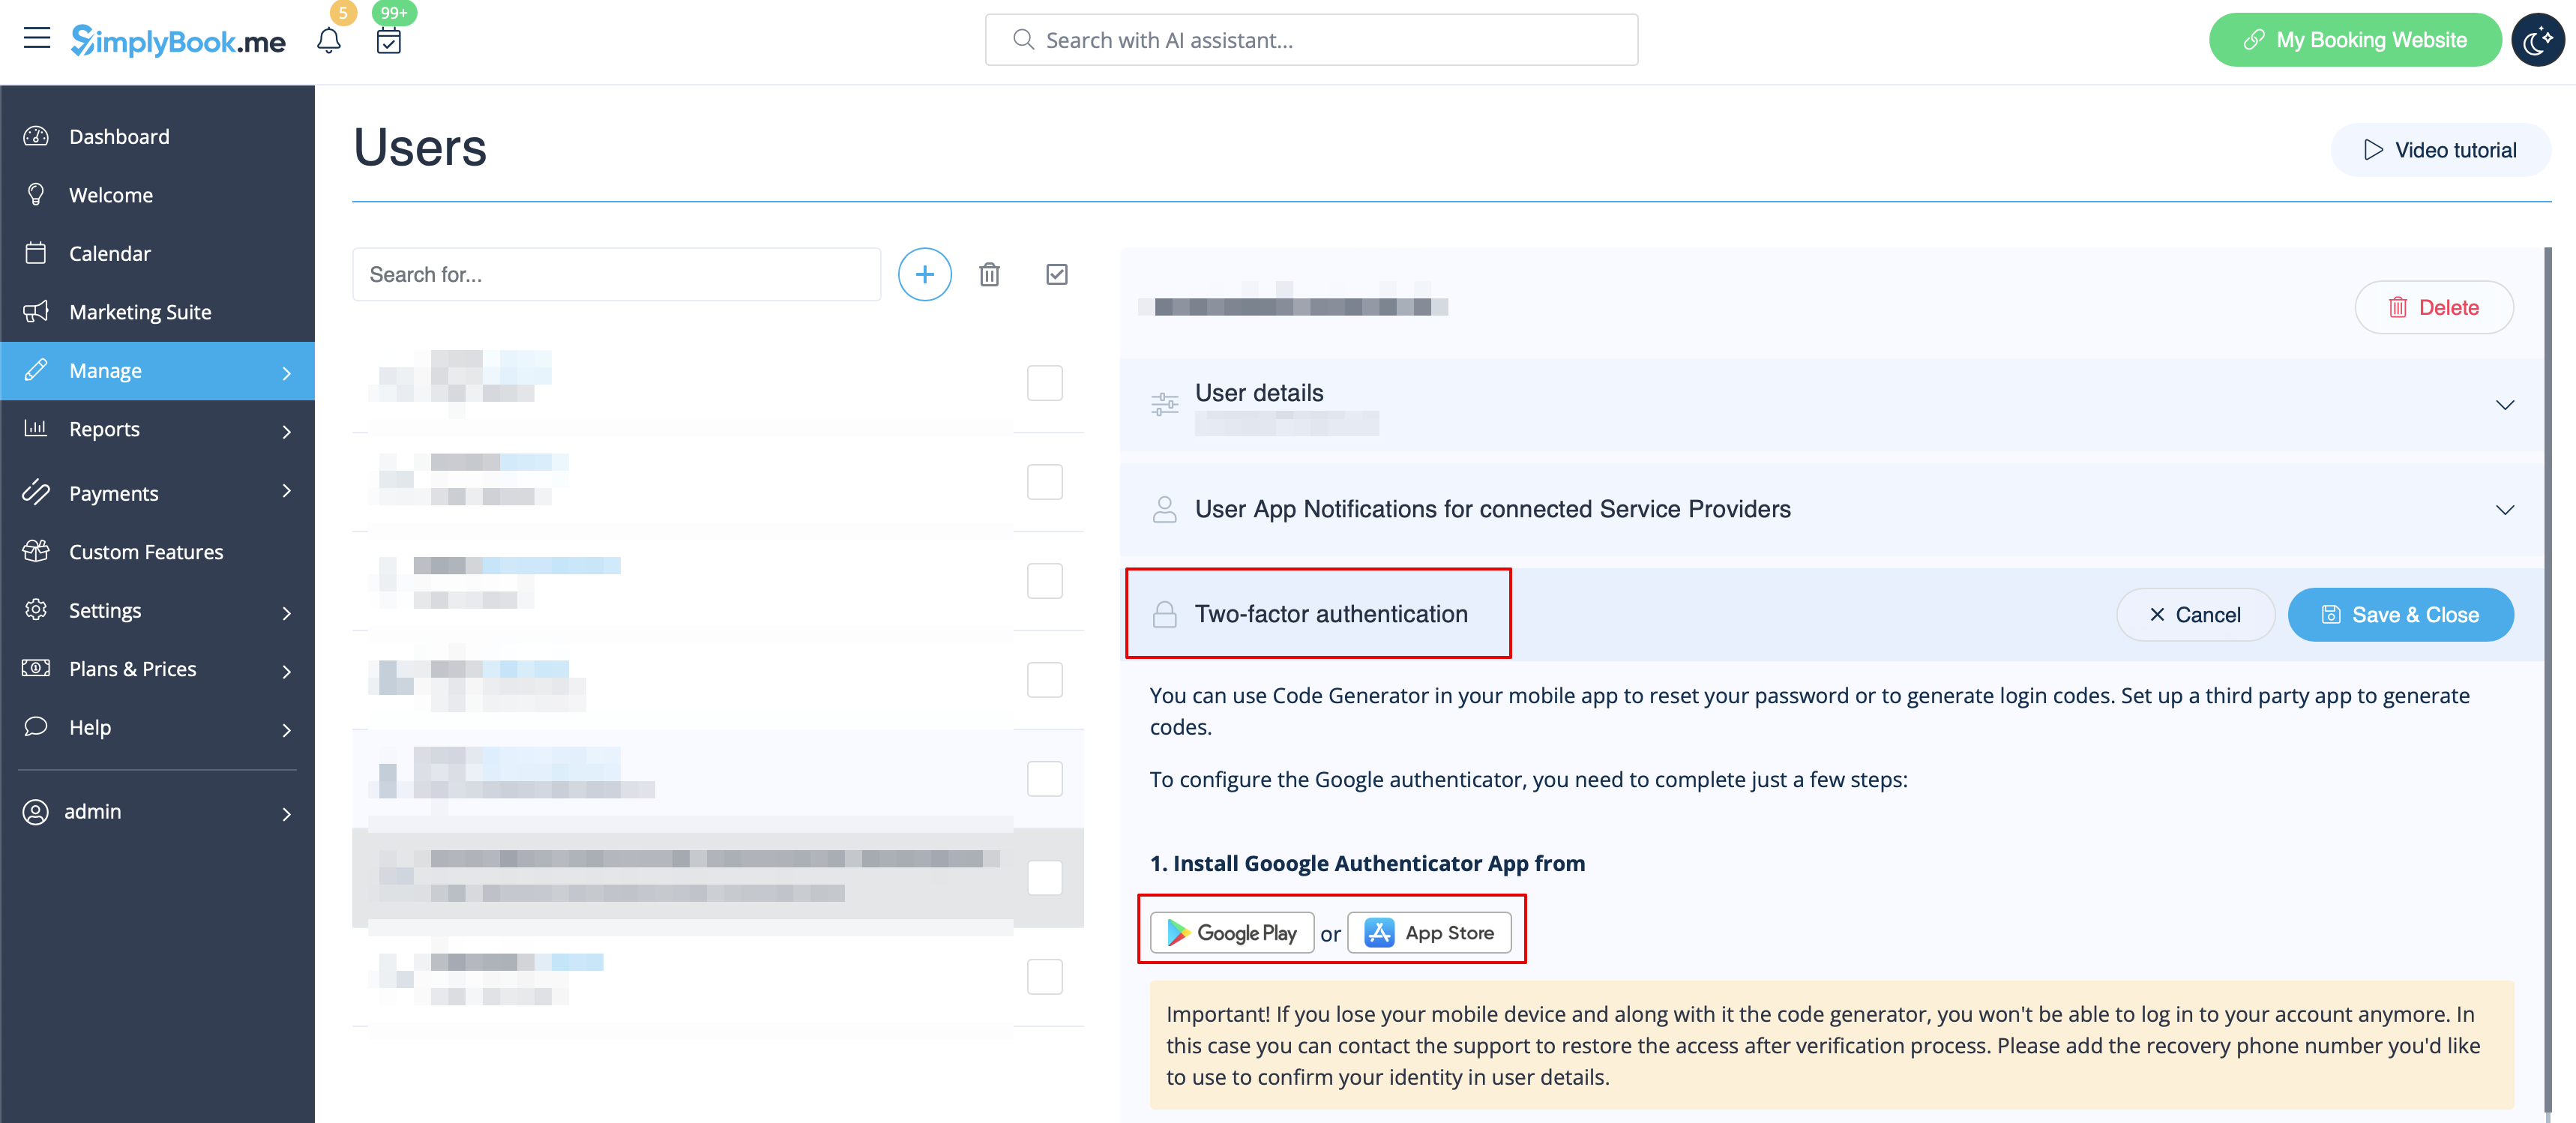
:4. Download “Google Authenticator” application from Google Play or App Store. You can just scan QR-code in Manage//Users//select the user//Google Authenticator and immediately get to application page. | :4. Download “Google Authenticator” application from Google Play or App Store. You can just scan QR-code in Manage//Users//select the user//Google Authenticator and immediately get to application page. | ||
[[File: | [[File:Install google auth app redesigned.png|1200px | center|link=https://help.simplybook.me/images/a/ac/Install_google_auth_app_redesigned.png]] | ||
<br><br> | <br><br> | ||
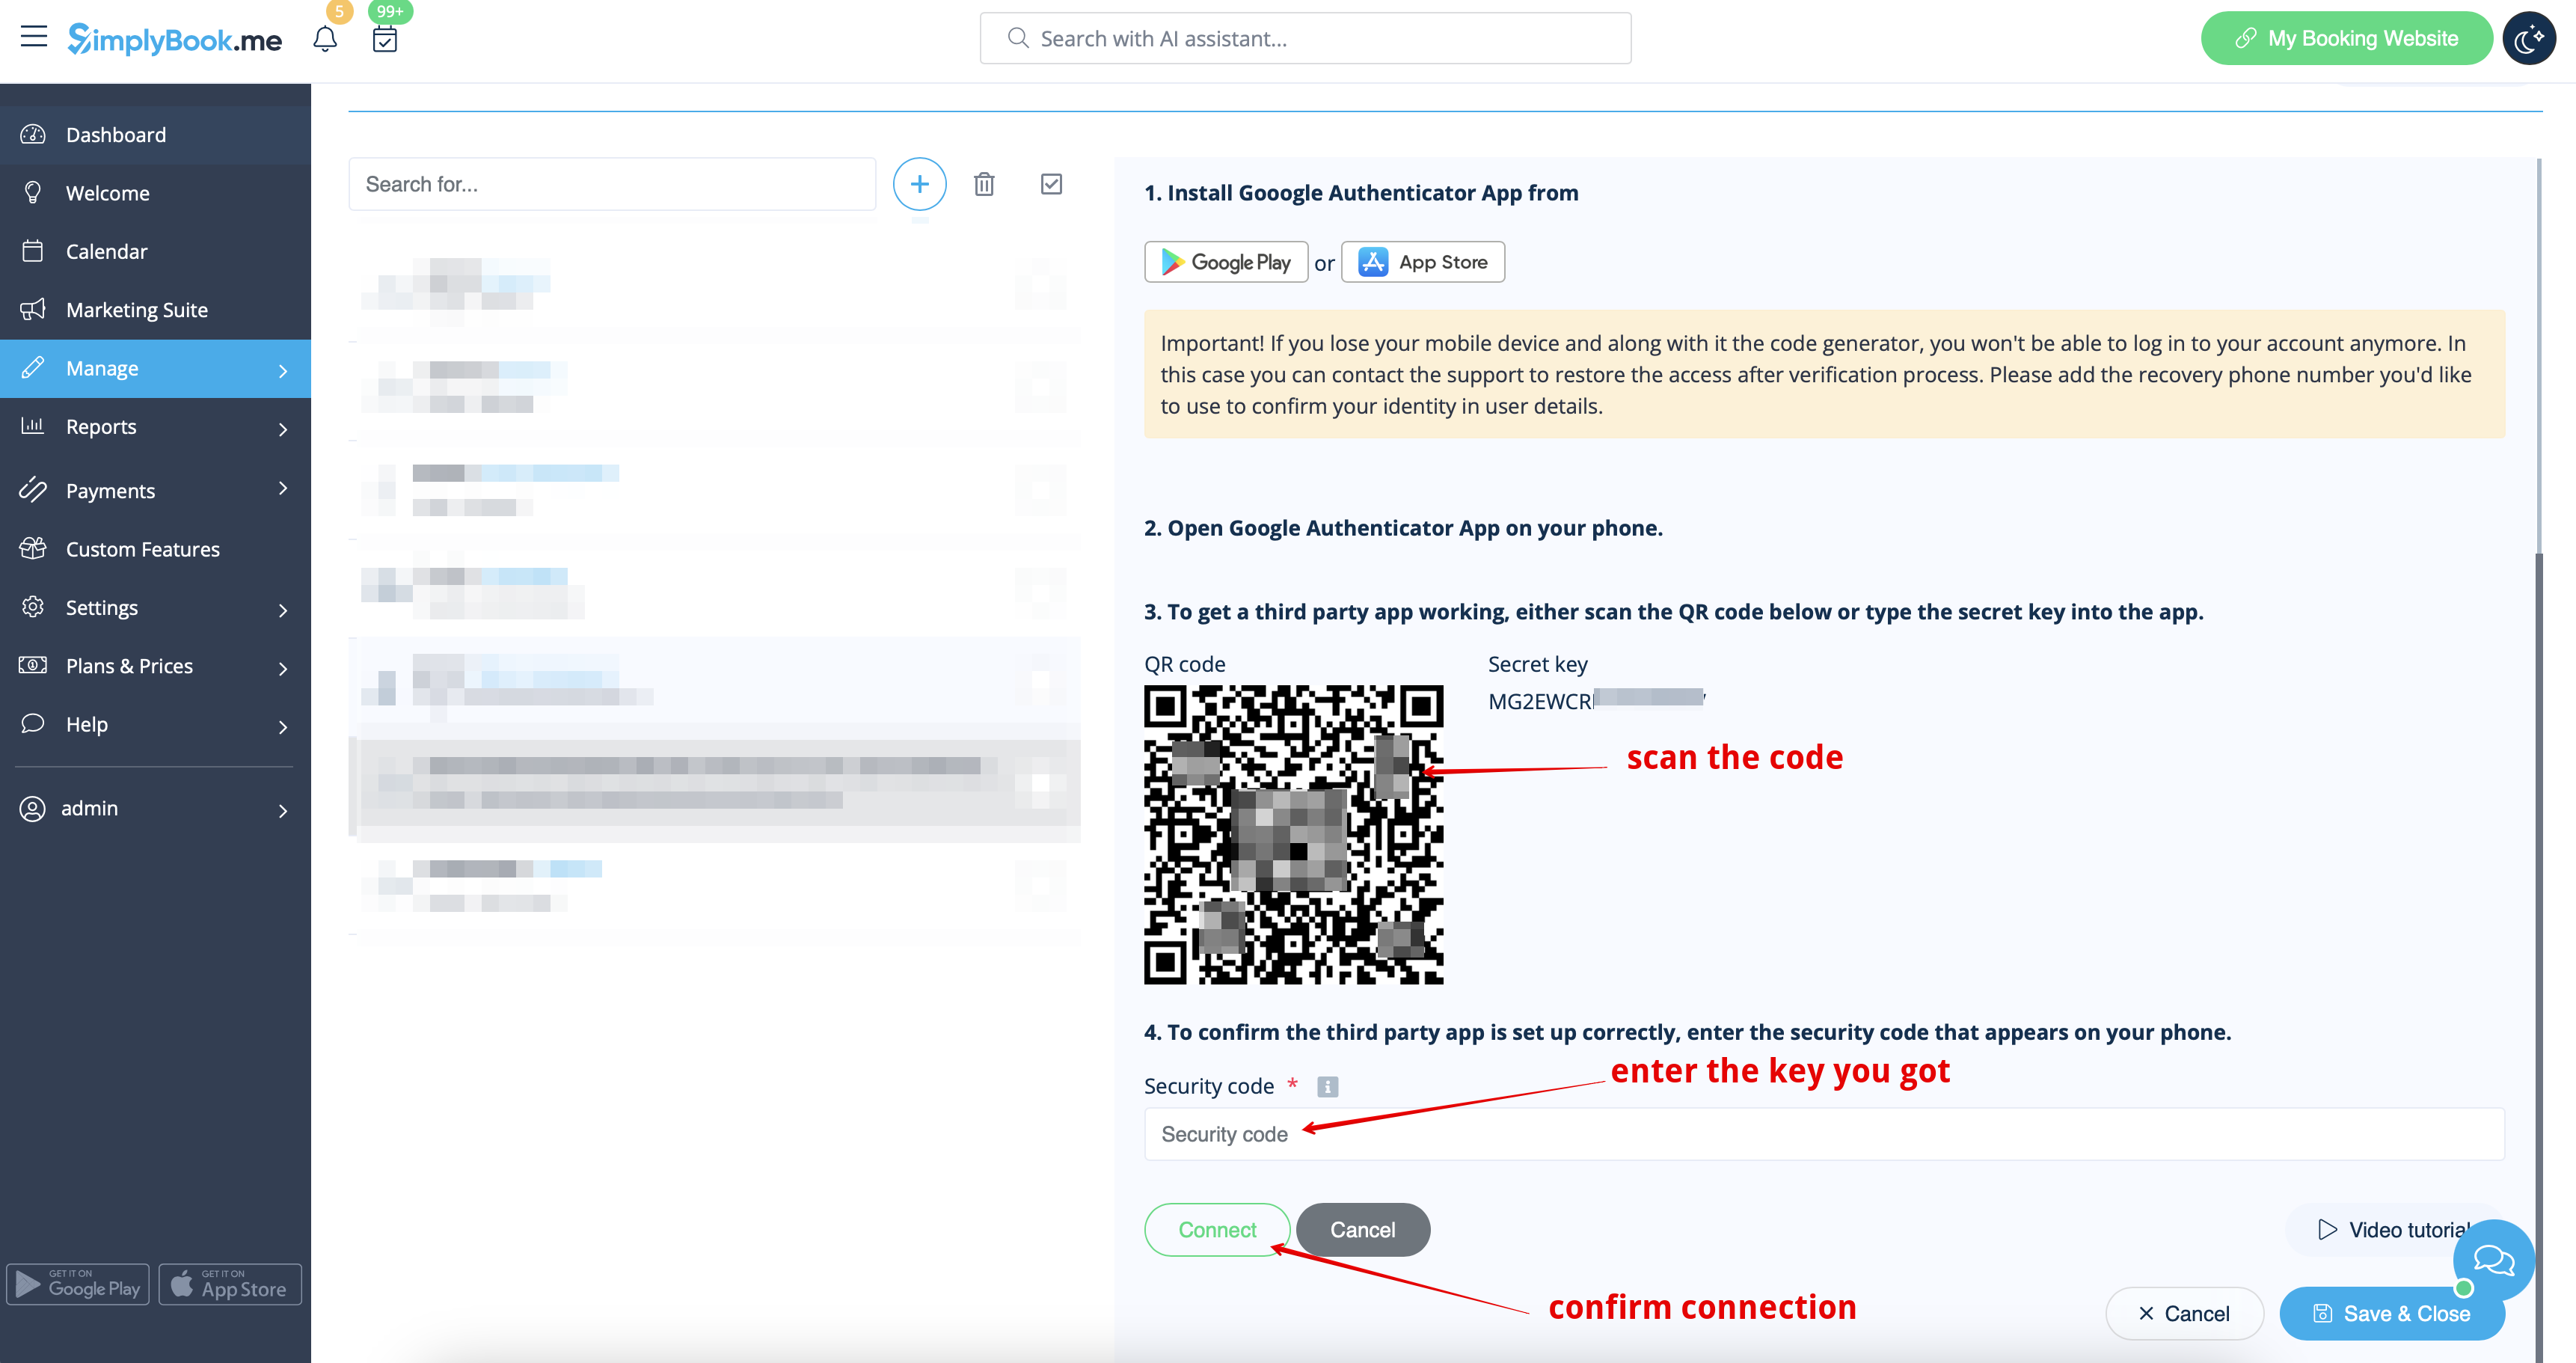
:5. In the same section scan QR-code with Google Authenticator application on your smartphone, enter the code you see in the app and click on "Connect" button. | :5. In the same section scan QR-code with Google Authenticator application on your smartphone, enter the code you see in the app and click on "Connect" button. | ||
[[File:Connect | [[File:Connect google auth steps redesigned.png|1200px | center|link=https://help.simplybook.me/images/3/39/Connect_google_auth_steps_redesigned.png]] | ||
<br><br> | <br><br> | ||
:6. All done! This user can now log in in more secure way! | :6. All done! This user can now log in in more secure way! | ||
| Line 37: | Line 45: | ||
:- fill in all necessary details and password<br> | :- fill in all necessary details and password<br> | ||
:- enter 6-digits code from Google Authenticator feature | :- enter 6-digits code from Google Authenticator feature | ||
[[File: | [[File:Google auth login page redesigned.png|1200px | center|link=https://help.simplybook.me/images/1/1b/Google_auth_login_page_redesigned.png]] | ||
<br><br> | <br><br> | ||
<!--T:3--> | |||
''If you plan to allow your employees to be able to connect themselves please create them as users beforehand and allow them to login without 2-step authentication in Custom features//Google authenticator//Settings//Settings.'' | ''If you plan to allow your employees to be able to connect themselves please create them as users beforehand and allow them to login without 2-step authentication in Custom features//Google authenticator//Settings//Settings.'' | ||
[[File: | [[File:Google auth allow to login without 2fa redesigned.png|1200px | center|link=https://help.simplybook.me/images/e/e4/Google_auth_allow_to_login_without_2fa_redesigned.png]] | ||
<br><br> | <br><br> | ||
<!--T:4--> | |||
=How to connect Google Authenticator if you are a user= | =How to connect Google Authenticator if you are a user= | ||
<br> | <br> | ||
:1. Google Authenticator custom feature should be previously enabled by admin as described above. | :1. Google Authenticator custom feature should be previously enabled by admin as described above. | ||
:2. Open | <!--T:5--> | ||
[[File: | :2. Open “Account info” page by clicking on your username in the left-side menu and follow the links there to download the application if you have not done this before. | ||
[[File:Account infor page download app2.png|1200px | center|link=https://help.simplybook.me/images/e/e4/Account_infor_page_download_app2.png]] | |||
<br><br> | <br><br> | ||
:3. Click on “Connect/Change” link, scan the code, enter the code you get and save settings. | :3. Click on “Connect/Change” link, scan the code, enter the code you get and save settings. | ||
[[File: | [[File:Account info page connect 2fa redesigned2.png|1200px| center|link=https://help.simplybook.me/images/5/53/Account_info_page_connect_2fa_redesigned2.png]] | ||
<br><br> | <br><br> | ||
:4. From now you will login in more secure way! | :4. From now you will login in more secure way! | ||
| Line 63: | Line 74: | ||
:- enter 6-digits code from Google Authenticator feature | :- enter 6-digits code from Google Authenticator feature | ||
<br><br> | <br><br> | ||
</translate> | |||
Latest revision as of 14:56, 2 February 2026

Add security to your account. You can use a 2-step authentication when logging into your account preventing unauthorized access. Upon entering password, you'll be asked to insert 6-digit login code from your Google authenticator or a 3rd party app.
You can use this custom feature with or without HIPAA feature depending on your needs and business requirements.
- Please note! In case you have this feature enabled our support agents will not be able to access your account settings.
- As well it will not be possible to connect the account to Zapier.
How to use it as admin user
- 1. Open “Custom features” page using left-side menu of your admin interface and find “Security & Data Protection” section. Just click on “Enable” near “Google authenticator”

- 2. To set 2-step authentication please go to Manage//Users using left-side menu or click on ”Set up 2-step authentication” near this custom feature.
- 3. On Manage//Users page click on “+” and create all desired system users to be able to connect each to 2-step authentication.
- 4. Download “Google Authenticator” application from Google Play or App Store. You can just scan QR-code in Manage//Users//select the user//Google Authenticator and immediately get to application page.
- 5. In the same section scan QR-code with Google Authenticator application on your smartphone, enter the code you see in the app and click on "Connect" button.
- 6. All done! This user can now log in in more secure way!
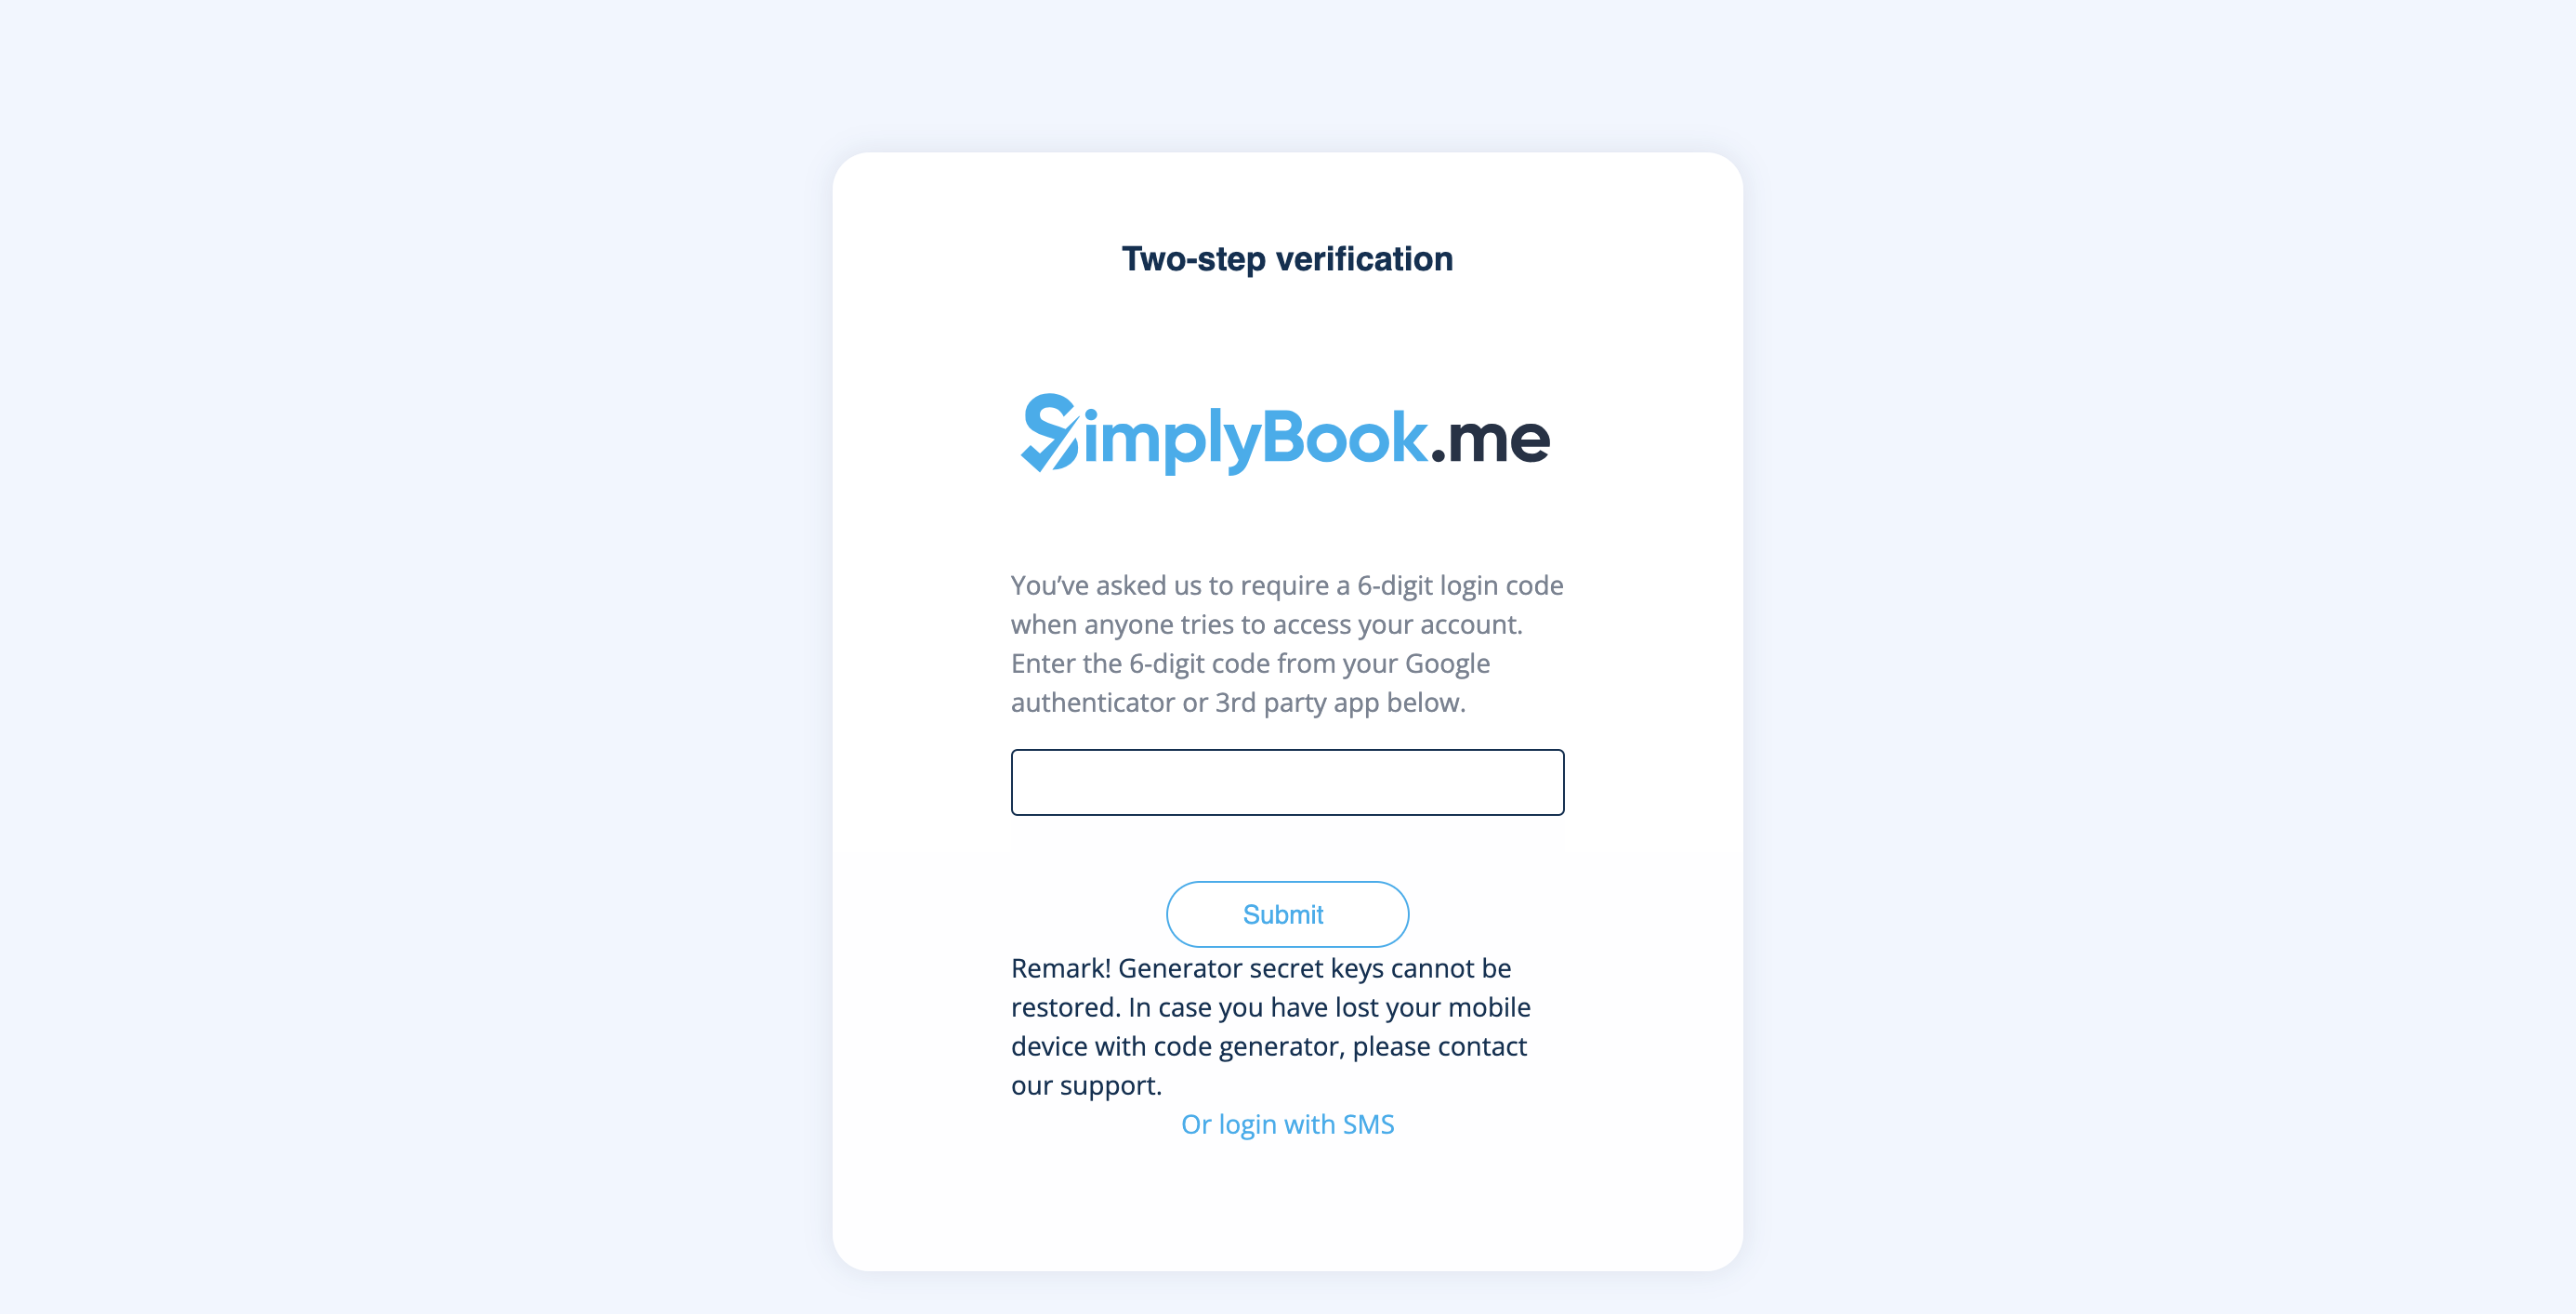
- Login process will look like as follows:
- - open Simplybook.me site or direct link as companyname.simplybook.me
- - fill in all necessary details and password
- - enter 6-digits code from Google Authenticator feature
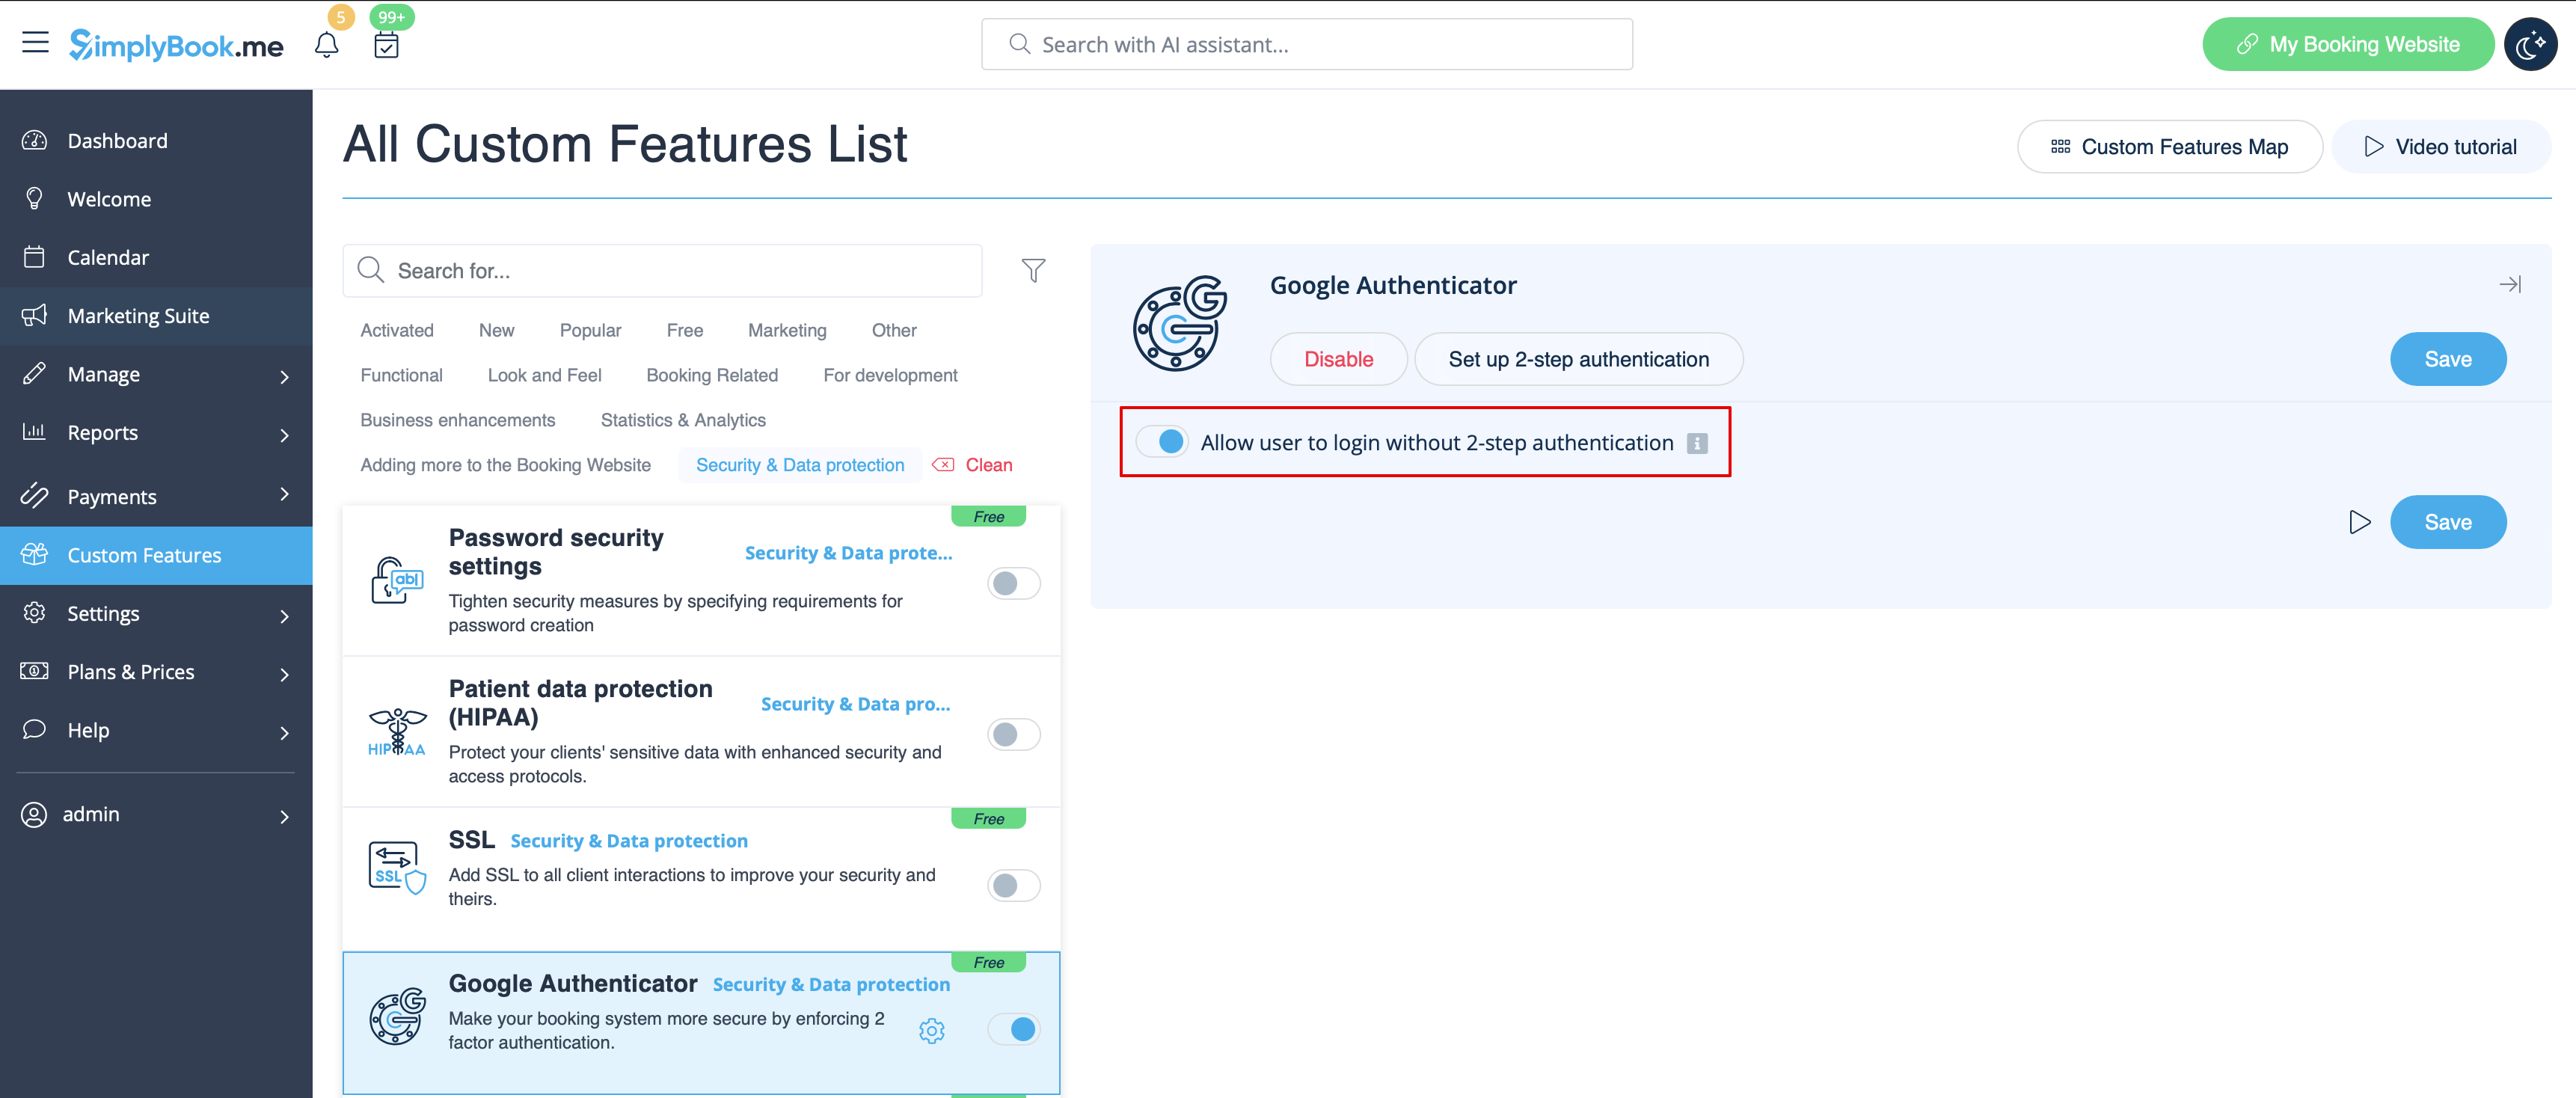
If you plan to allow your employees to be able to connect themselves please create them as users beforehand and allow them to login without 2-step authentication in Custom features//Google authenticator//Settings//Settings.
How to connect Google Authenticator if you are a user
- 1. Google Authenticator custom feature should be previously enabled by admin as described above.
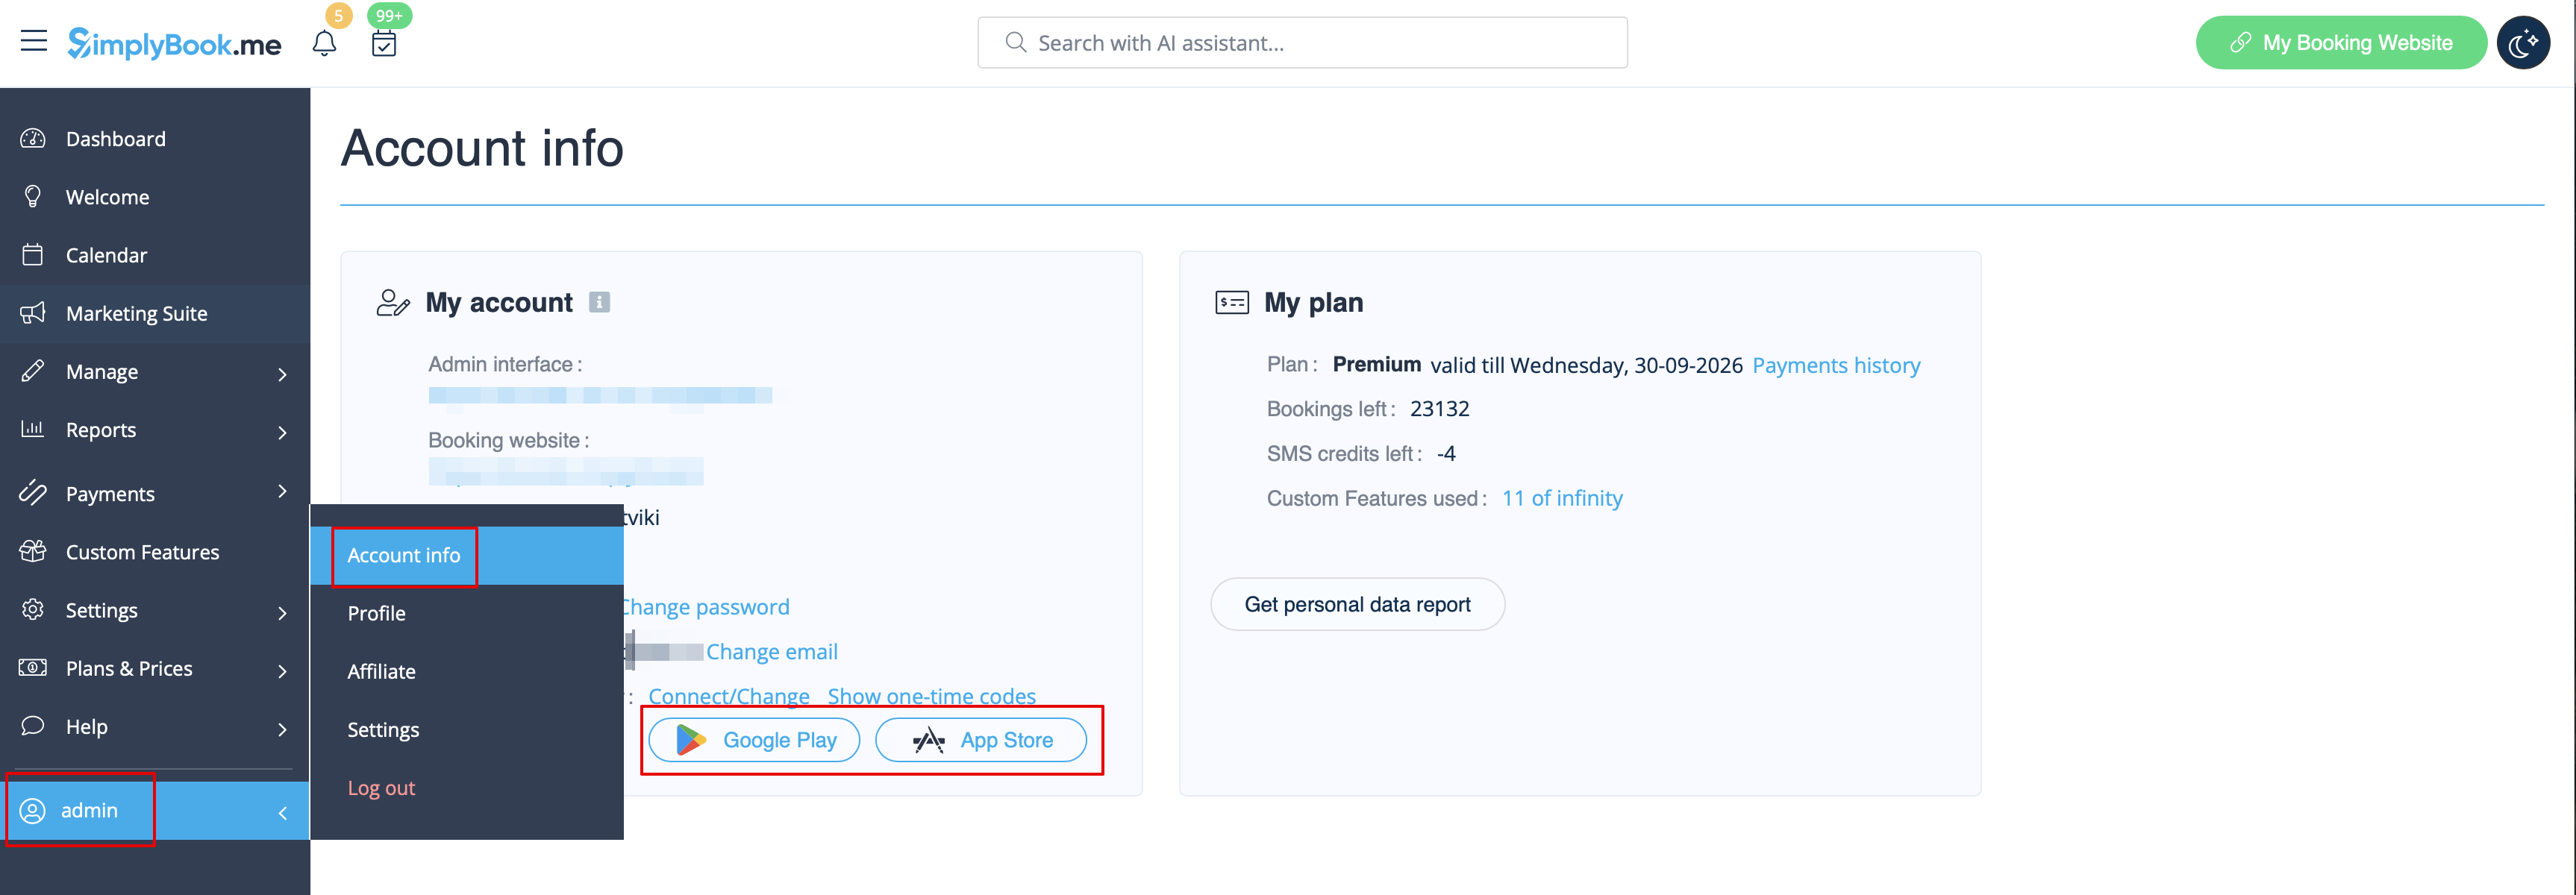
- 2. Open “Account info” page by clicking on your username in the left-side menu and follow the links there to download the application if you have not done this before.
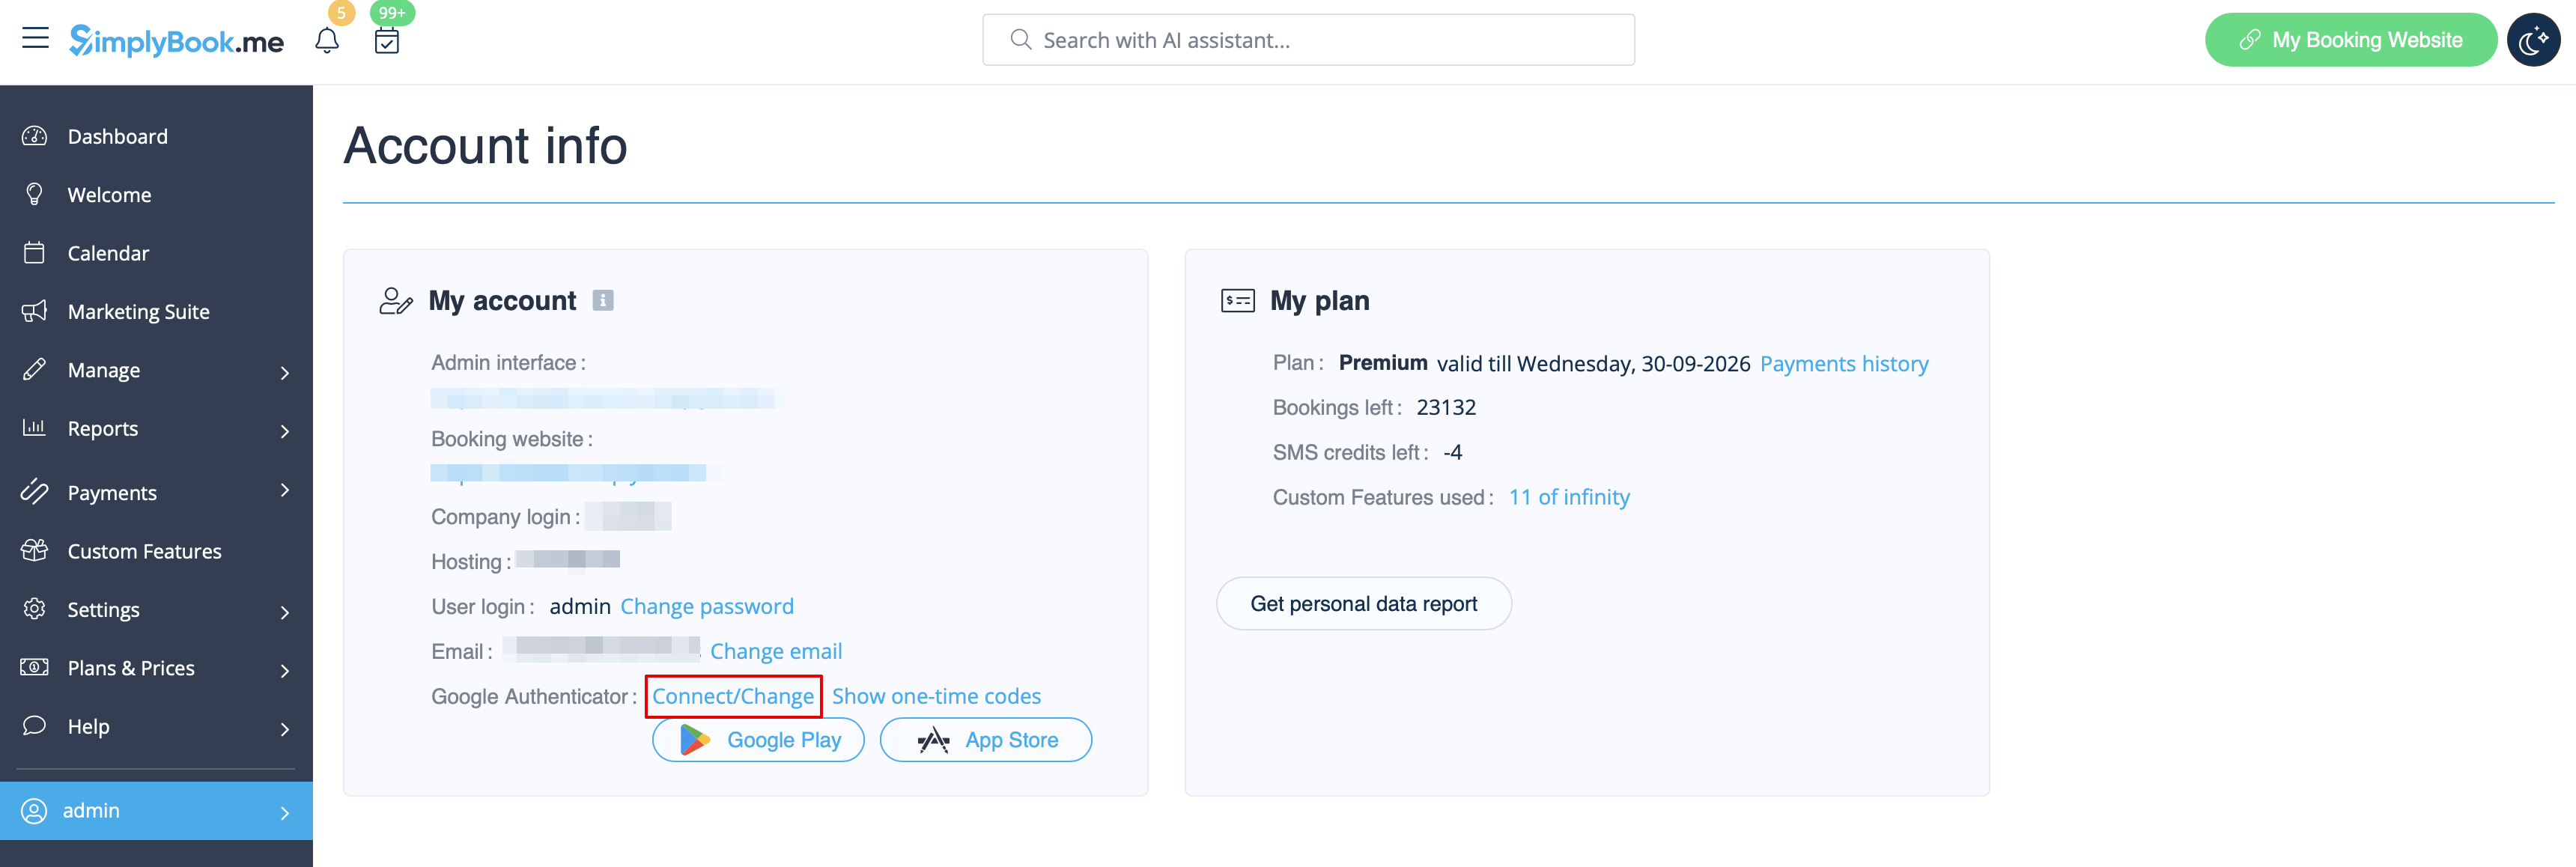
- 3. Click on “Connect/Change” link, scan the code, enter the code you get and save settings.
- 4. From now you will login in more secure way!
- Login process will look like as follows:
- - open Simplybook.me site or direct link as https://companyname.simplybook.me
- - fill in all necessary details and password
- - enter 6-digits code from Google Authenticator feature