No edit summary |
No edit summary |
||
| (10 intermediate revisions by the same user not shown) | |||
| Line 1: | Line 1: | ||
<languages/> | |||
<translate> | |||
<!--T:1--> | |||
{{#seo: | {{#seo: | ||
|title=Custom Features - SimplyBook.me | |title=Custom Features - SimplyBook.me | ||
|description=Schedule online video meetings directly through SimplyBook.me. Enhance your virtual service offerings. Enable this feature now! | |||
|titlemode=append | |titlemode=append | ||
|keywords=faq, frequently asked questions, booking software, appointment system questions, appointments online, calendar software, booking system, booking calendar, scheduling software, online appointment scheduling, online scheduling, plugins, custom features, additional functionality, online meetings, online video meetings, online services, online video sessions | |keywords=faq, frequently asked questions, booking software, appointment system questions, appointments online, calendar software, booking system, booking calendar, scheduling software, online appointment scheduling, online scheduling, plugins, custom features, additional functionality, online meetings, online video meetings, online services, online video sessions | ||
}} | }} | ||
</translate> | |||
<translate> | |||
<!--T:2--> | |||
[[File:Online meeting icon.png|left]]<br><br>Use this feature to easily create meeting links for your clients and meet them online using video or phone | [[File:Online meeting icon.png|left]]<br><br>Use this feature to easily create meeting links for your clients and meet them online using video or phone | ||
<br><br><br><br> | <br><br><br><br> | ||
<span style="background-color:#fef3de; padding:5px; border-radius:5px;">We also recommend enabling Client Login feature for the smooth client experience in joining the meetings as there may be errors if they try to join within a separate browser session.</span> | <span style="background-color:#fef3de; padding:5px; border-radius:5px;">We also recommend enabling Client Login feature for the smooth client experience in joining the meetings as there may be errors if they try to join within a separate browser session.</span> | ||
<br><br> | <br><br> | ||
<span style="background-color:#ffe9e9; padding:5px; border-radius:5px;">'''Please note!''' This feature is not compatible with <span style="background-color:#cdeffc; padding:5px; border-radius:5px;">[[Kiosk_custom_feature|Kiosk]]</span> custom feature.</span> | <span style="background-color:#ffe9e9; padding:5px; border-radius:5px;">'''Please note!''' This feature is not compatible with <span style="background-color:#cdeffc; padding:5px; border-radius:5px;">[[Special:MyLanguage/Kiosk_custom_feature|Kiosk]]</span> custom feature.</span> | ||
<br><br> | <br><br> | ||
Video tutorial available | Video tutorial available <p><youtube>ZBD60slZkE4</youtube></p> | ||
<br><br> | <br><br> | ||
__FORCETOC__ | __FORCETOC__ | ||
<!--T:3--> | |||
=How to set Zoom as a meeting service= | |||
To connect to Zoom, you need a [https://zoom.us Zoom] account. Any contributor with Scheduling Administrator permissions can connect Simplybook.me to Zoom.<br> | |||
SimplyBook.me can only connect to a single Zoom account. | |||
<br><br> | |||
<span style="background-color:#ffe9e9; padding:5px; border-radius:5px;">'''Please note: '''</span> | |||
* <span style="background-color:#ffe9e9; padding:5px; border-radius:5px;">Zoom bookings will not be added to your Zoom meetings page at the Zoom end. To check online meetings please use filters per service in the Simplybook.me admin calendar to see bookings for the necessary service only.</span> | |||
* <span style="background-color:#ffe9e9; padding:5px; border-radius:5px;">Even after Zoom account is connected, new services have video conferencing disabled by default. To add video conferencing to a new service, in Manage -> Services/[[Special:MyLanguage/Classes custom feature|Classes]], go to More options per service/[[Special:MyLanguage/Classes custom feature|class]] and enable it as an online meeting service.</span> | |||
* <span style="background-color:#ffe9e9; padding:5px; border-radius:5px;">Clients attending a group class will receive unique Zoom links, but these links will all lead to the same Zoom meeting.</span> | |||
<br><br> | |||
</translate> | |||
<translate> | |||
<!--T:4--> | |||
;How to set | |||
<!--T:5--> | |||
1. Enable <span style="background-color:#d4f8e5; padding:5px; border-radius:5px;">Online meetings</span> custom feature in your SimplyBook.me account by navigating to the <span style="background-color:#d4f8e5; padding:5px; border-radius:5px;">Custom Features</span> page within your Simplybook.me admin interface and click on the <span style="background-color:#d4f8e5; padding:5px; border-radius:5px;">Enable</span> button next to <span style="background-color:#d4f8e5; padding:5px; border-radius:5px;">Online video meetings</span> custom feature. | |||
[[File:Online meetings enable path redesigned.png|1200px|center|link=https://help.simplybook.me/images/a/a1/Online_meetings_enable_path_redesigned.png]] | |||
<br><br> | |||
2. In the feature settings click on <span style="background-color:#d4f8e5; padding:5px; border-radius:5px;">Authorization</span> button near Zoom option to connect your Zoom account. | |||
[[File:Online meetings zoom connect redesigned.png|1200px|center|link=https://help.simplybook.me/images/4/4c/Online_meetings_zoom_connect_redesigned.png]] | |||
<br><br> | |||
</translate> | |||
<translate> | |||
<!--T:6--> | |||
3. Enter your credentials to log into Zoom, or click SSO, Google, or Facebook to log in through those services.<br> | |||
You can connect one zoom account per company OR connect all zoom users added to your account by checking the checkbox <span style="background-color:#d4f8e5; padding:5px; border-radius:5px;">Allow this app to use my shared access permissions</span> | |||
[[File:Zoom permissions step.png|500px|center|link=https://help.simplybook.me/images/d/d8/Zoom_permissions_step.png]] | |||
<br><br> | |||
4. After Zoom is authorized, click on <span style="background-color:#d4f8e5; padding:5px; border-radius:5px;">Meeting Providers and Meeting Services</span> and choose providers that should be connected to Zoom by selecting Zoom option from the respective drop down. In the next drop-down please select Zoom user (if you have several users under your Zoom account) that should be connected to that provider. | |||
[[File:Zoom select account per provider redesigned.png|1200px|center|link=https://help.simplybook.me/images/3/36/Zoom_select_account_per_provider_redesigned.png]] | |||
<br><br> | |||
5. After your Zoom connection is set, the last thing you need to do is enable online meeting option for your services. To do that please navigate to <span style="background-color:#d4f8e5; padding:5px; border-radius:5px;">Manage</span> -> <span style="background-color:#d4f8e5; padding:5px; border-radius:5px;">Services</span> -> click on needed Service name -> scroll down to <span style="background-color:#d4f8e5; padding:5px; border-radius:5px;">More options.</span> | |||
(in <span style="background-color:#d4f8e5; padding:5px; border-radius:5px;">Manage</span> -> <span style="background-color:#d4f8e5; padding:5px; border-radius:5px;">[[Special:MyLanguage/Classes custom feature|Classes]]</span> -> click on Class name -> <span style="background-color:#d4f8e5; padding:5px; border-radius:5px;">More options</span> if you are using [[Special:MyLanguage/Classes custom feature|Classes]] feature) and switch on the option Enable as online meeting service/[[Special:MyLanguage/Classes custom feature|class]]. | |||
[[File:Enable service as online meeting redesigned.png|1200px|center|link=https://help.simplybook.me/images/e/ec/Enable_service_as_online_meeting_redesigned.png]] | |||
<br><br> | |||
</translate> | |||
<translate> | |||
<!--T:7--> | |||
6. When the clients book such a service/[[Special:MyLanguage/Classes custom feature|class]] there will be online meeting link on My bookings page for the associated booking. When the appointment time comes the clients will be able to follow it to access the meeting. | |||
For admin side it will be possible to follow the link from booking info popup form in <span style="background-color:#d4f8e5; padding:5px; border-radius:5px;">Calendar</span> or in <span style="background-color:#d4f8e5; padding:5px; border-radius:5px;">Reports</span> -> <span style="background-color:#d4f8e5; padding:5px; border-radius:5px;">Booking details</span>, or in <span style="background-color:#d4f8e5; padding:5px; border-radius:5px;">Reports</span> -> <span style="background-color:#d4f8e5; padding:5px; border-radius:5px;">Online video meetings</span>. | |||
<br><br> | |||
7. (optional) As well you can add online meetings link to provider and client notification templates so that both sides receive them with the booking details. | |||
* To do that for your client notifications please navigate to <span style="background-color:#d4f8e5; padding:5px; border-radius:5px;">Settings</span> -> <span style="background-color:#d4f8e5; padding:5px; border-radius:5px;">Email and SMS settings</span> (or <span style="background-color:#d4f8e5; padding:5px; border-radius:5px;">Custom features</span> -> <span style="background-color:#d4f8e5; padding:5px; border-radius:5px;">[[Special:MyLanguage/Flexible Notifications custom feature|Flexible notifications]]</span> -> <span style="background-color:#d4f8e5; padding:5px; border-radius:5px;">Manage</span> if you have customized notifications per service and/or provider) and edit your <span style="background-color:#d4f8e5; padding:5px; border-radius:5px;">Client's booking confirmation</span> template to add ''[online_meeting_link]'' variable to send Zoom links to your clients. | |||
To make everything work simply paste ''[online_meeting_link]'' variable to the desired place in your "Client's booking confirmation template" so when a client books a service, a Zoom meeting link will be automatically generated at the place of a variable. | |||
</translate> | |||
<translate> | |||
<!--T:8--> | |||
<br><br> | |||
* To let your service providers receive Zoom links in their confirmations please add ''[online_meeting_provider_link]'' variable to your <span style="background-color:#d4f8e5; padding:5px; border-radius:5px;">New booking confirmation for service providers</span> in <span style="background-color:#d4f8e5; padding:5px; border-radius:5px;">Settings</span> -> <span style="background-color:#d4f8e5; padding:5px; border-radius:5px;">Email and sms settings</span> (or <span style="background-color:#d4f8e5; padding:5px; border-radius:5px;">Custom features</span> -> <span style="background-color:#d4f8e5; padding:5px; border-radius:5px;">[[Special:MyLanguage/Flexible Notifications custom feature|Flexible notifications]]</span> -> <span style="background-color:#d4f8e5; padding:5px; border-radius:5px;">Manage</span> if you have customized notifications per service and/or provider). | |||
[[File:Add meeting link to notification redesigned.png|1200px|center|link=https://help.simplybook.me/images/b/ba/Add_meeting_link_to_notification_redesigned.png]] | |||
</translate> | |||
<translate> | |||
=How to set= | =How to set Microsoft Teams as a meeting service= <!--T:9--> | ||
<!--T:10--> | |||
:1. Enable <span style="background-color:#d4f8e5; padding:5px; border-radius:5px;">Online meetings</span> custom feature in <span style="background-color:#d4f8e5; padding:5px; border-radius:5px;">your SimplyBook.me account.</span> | :1. Enable <span style="background-color:#d4f8e5; padding:5px; border-radius:5px;">Online meetings</span> custom feature in <span style="background-color:#d4f8e5; padding:5px; border-radius:5px;">your SimplyBook.me account.</span> | ||
[[File:Online meetings enable path.png| | [[File:Online meetings enable path redesigned.png|1200px|center|link=https://help.simplybook.me/images/a/a1/Online_meetings_enable_path_redesigned.png]] | ||
<br><br> | <br><br> | ||
:2. Login to <span style="background-color:#cdeffc; padding:5px; border-radius:5px;">[https://portal.azure.com/ Microsoft Azure portal]</span> and your <span style="background-color:#cdeffc; padding:5px; border-radius:5px;">[https://teams.microsoft.com/ Microsoft Teams account]</span> with the user that is a member of your organization in MS Azure. | :2. Login to <span style="background-color:#cdeffc; padding:5px; border-radius:5px;">[https://portal.azure.com/ Microsoft Azure portal]</span> and your <span style="background-color:#cdeffc; padding:5px; border-radius:5px;">[https://teams.microsoft.com/ Microsoft Teams account]</span> with the user that is a member of your organization in MS Azure. | ||
| Line 27: | Line 87: | ||
:<span style="background-color:#ffe9e9; padding:5px; border-radius:5px;">'''Please note!''' It is not possible to connect personal/private Microsoft Teams account to the system, it should be related to an organization via Microsoft Azure.</span> | :<span style="background-color:#ffe9e9; padding:5px; border-radius:5px;">'''Please note!''' It is not possible to connect personal/private Microsoft Teams account to the system, it should be related to an organization via Microsoft Azure.</span> | ||
<!--T:11--> | |||
<br><br> | <br><br> | ||
</translate> | |||
<translate> | |||
<!--T:12--> | |||
:3. Add <span style="background-color:#d4f8e5; padding:5px; border-radius:5px;">Microsoft Teams</span> in <span style="background-color:#d4f8e5; padding:5px; border-radius:5px;">MS Azure</span> -> <span style="background-color:#d4f8e5; padding:5px; border-radius:5px;">Azure Active Directory</span> -> <span style="background-color:#d4f8e5; padding:5px; border-radius:5px;">Enterprise applications.</span> | :3. Add <span style="background-color:#d4f8e5; padding:5px; border-radius:5px;">Microsoft Teams</span> in <span style="background-color:#d4f8e5; padding:5px; border-radius:5px;">MS Azure</span> -> <span style="background-color:#d4f8e5; padding:5px; border-radius:5px;">Azure Active Directory</span> -> <span style="background-color:#d4f8e5; padding:5px; border-radius:5px;">Enterprise applications.</span> | ||
[[File:Ms azure connect ms teams.png|border|center]] | [[File:Ms azure connect ms teams.png|border|center]] | ||
| Line 36: | Line 100: | ||
:4. On SimplyBook.me side please click on <span style="background-color:#d4f8e5; padding:5px; border-radius:5px;">Meeting services</span> block and choose <span style="background-color:#d4f8e5; padding:5px; border-radius:5px;">Authorization</span> near <span style="background-color:#d4f8e5; padding:5px; border-radius:5px;">Microsoft Teams”.</span> | :4. On SimplyBook.me side please click on <span style="background-color:#d4f8e5; padding:5px; border-radius:5px;">Meeting services</span> block and choose <span style="background-color:#d4f8e5; padding:5px; border-radius:5px;">Authorization</span> near <span style="background-color:#d4f8e5; padding:5px; border-radius:5px;">Microsoft Teams”.</span> | ||
:Connect your Microsoft account. | :Connect your Microsoft account. | ||
[[File:Ms teams | [[File:Ms teams enable for online meetings redesigned.png|1200px|border|center|link=https://help.simplybook.me/images/9/90/Ms_teams_enable_for_online_meetings_redesigned.png]] | ||
<br><br> | <br><br> | ||
:5. For the services/classes you wish to conduct online meetings switch the option <span style="background-color:#d4f8e5; padding:5px; border-radius:5px;">Enable as online meeting service/class</span> on in <span style="background-color:#d4f8e5; padding:5px; border-radius:5px;">Manage</span> -> <span style="background-color:#d4f8e5; padding:5px; border-radius:5px;">Services</span> -> <span style="background-color:#d4f8e5; padding:5px; border-radius:5px;">click on service name</span> -> <span style="background-color:#d4f8e5; padding:5px; border-radius:5px;">More options</span><br>(in <span style="background-color:#d4f8e5; padding:5px; border-radius:5px;">Manage</span> -> <span style="background-color:#d4f8e5; padding:5px; border-radius:5px;">Classes</span> -> <span style="background-color:#d4f8e5; padding:5px; border-radius:5px;">click on class name</span> -> <span style="background-color:#d4f8e5; padding:5px; border-radius:5px;">More options</span> if you are using <span style="background-color:#cdeffc; padding:5px; border-radius:5px;">[[Classes_custom_feature|Classes feature]])</span> | </translate> | ||
[[File: | <translate> | ||
<!--T:13--> | |||
:5. For the services/classes you wish to conduct online meetings switch the option <span style="background-color:#d4f8e5; padding:5px; border-radius:5px;">Enable as online meeting service/class</span> on in <span style="background-color:#d4f8e5; padding:5px; border-radius:5px;">Manage</span> -> <span style="background-color:#d4f8e5; padding:5px; border-radius:5px;">Services</span> -> <span style="background-color:#d4f8e5; padding:5px; border-radius:5px;">click on service name</span> -> <span style="background-color:#d4f8e5; padding:5px; border-radius:5px;">More options</span><br>(in <span style="background-color:#d4f8e5; padding:5px; border-radius:5px;">Manage</span> -> <span style="background-color:#d4f8e5; padding:5px; border-radius:5px;">Classes</span> -> <span style="background-color:#d4f8e5; padding:5px; border-radius:5px;">click on class name</span> -> <span style="background-color:#d4f8e5; padding:5px; border-radius:5px;">More options</span> if you are using <span style="background-color:#cdeffc; padding:5px; border-radius:5px;">[[Special:MyLanguage/Classes_custom_feature|Classes feature]])</span> | |||
[[File:Enable service as online meeting redesigned.png|1200px|center|link=https://help.simplybook.me/images/e/ec/Enable_service_as_online_meeting_redesigned.png]] | |||
<br><br> | <br><br> | ||
:6. When the clients book such a service/class there will be online meeting link on <span style="background-color:#d4f8e5; padding:5px; border-radius:5px;">My bookings page</span> for the associated booking. When the appointment time comes the clients will be able to follow it to access the meeting.<br> | :6. When the clients book such a service/class there will be online meeting link on <span style="background-color:#d4f8e5; padding:5px; border-radius:5px;">My bookings page</span> for the associated booking. When the appointment time comes the clients will be able to follow it to access the meeting.<br> | ||
:For admin side it will be possible to follow the link from booking info popup form in <span style="background-color:#d4f8e5; padding:5px; border-radius:5px;">Calendar</span> or in <span style="background-color:#d4f8e5; padding:5px; border-radius:5px;">Reports</span> -> <span style="background-color:#d4f8e5; padding:5px; border-radius:5px;">Booking details.</span> | :For admin side it will be possible to follow the link from booking info popup form in <span style="background-color:#d4f8e5; padding:5px; border-radius:5px;">Calendar</span> or in <span style="background-color:#d4f8e5; padding:5px; border-radius:5px;">Reports</span> -> <span style="background-color:#d4f8e5; padding:5px; border-radius:5px;">Booking details.</span> | ||
[[File:Ms teams client side link.png|border|center]] | [[File:Ms teams client side link.png|border|center]] | ||
[[File: | [[File:Meeting link in admin calendar redesigned.png|1200px|border|center|link=https://help.simplybook.me/images/a/a6/Meeting_link_in_admin_calendar_redesigned.png]] | ||
<br><br> | |||
</translate> | |||
<translate> | |||
<!--T:14--> | |||
:7. (optonal) You can add online meetings link to provider and client notification templates so that both sides receive them with the booking details.<br>To do that please navigate to <span style="background-color:#d4f8e5; padding:5px; border-radius:5px;">Settings</span> -> <span style="background-color:#d4f8e5; padding:5px; border-radius:5px;">Email and sms settings</span> (or <span style="background-color:#d4f8e5; padding:5px; border-radius:5px;">Custom features</span> -> <span style="background-color:#cdeffc; padding:5px; border-radius:5px;">[[Special:MyLanguage/Flexible_Notifications_custom_feature|Flexible notifications]]</span> -> <span style="background-color:#d4f8e5; padding:5px; border-radius:5px;">Manage</span> if you have customized notifications per service and/or provider). | |||
[[File:Add meeting link to provider confirmation redesigned.png|1200px|border|center|link=https://help.simplybook.me/images/6/6c/Add_meeting_link_to_provider_confirmation_redesigned.png]] | |||
<br><br> | <br><br> | ||
<span style="background-color:#ffe9e9; padding:5px; border-radius:5px;">'''Please note!''' If you have paid services the meeting link will be working only after the payment is made/approved.</span> | |||
<br><br> | <br><br> | ||
==Additional steps for case when you need to allow your Providers to have own MS Teams account connection== | ==Additional steps for case when you need to allow your Providers to have own MS Teams account connection== | ||
<br><br> | <br><br> | ||
:8. By default your MS Teams account that you have connected in <span style="background-color:#d4f8e5; padding:5px; border-radius:5px;">Step#6</span> will be used to generate meetings links and conduct meetings, but if you have several employees in your company, they are added to SimplyBook.me side as providers and users and you wish them to use own MS Teams accounts for their online services/classes please make sure that you have them <span style="background-color:#cdeffc; padding:5px; border-radius:5px;">[https://docs.microsoft.com/en-us/azure/active-directory/fundamentals/add-users-azure-active-directory?context=azure/active-directory/users-groups-roles/context/ugr-context added as users]</span> in <span style="background-color:#d4f8e5; padding:5px; border-radius:5px;">MS Azure</span> with access to this application as well as <span style="background-color:#cdeffc; padding:5px; border-radius:5px;">[https://support.microsoft.com/en-us/office/add-members-to-a-team-in-teams-aff2249d-b456-4bc3-81e7-52327b6b38e9 members]</span> on <span style="background-color:#d4f8e5; padding:5px; border-radius:5px;">MS Teams side.</span> | :8. By default your MS Teams account that you have connected in <span style="background-color:#d4f8e5; padding:5px; border-radius:5px;">Step#6</span> will be used to generate meetings links and conduct meetings, but if you have several employees in your company, they are added to SimplyBook.me side as providers and users and you wish them to use own MS Teams accounts for their online services/classes please make sure that you have them <span style="background-color:#cdeffc; padding:5px; border-radius:5px;">[https://docs.microsoft.com/en-us/azure/active-directory/fundamentals/add-users-azure-active-directory?context=azure/active-directory/users-groups-roles/context/ugr-context added as users]</span> in <span style="background-color:#d4f8e5; padding:5px; border-radius:5px;">MS Azure</span> with access to this application as well as <span style="background-color:#cdeffc; padding:5px; border-radius:5px;">[https://support.microsoft.com/en-us/office/add-members-to-a-team-in-teams-aff2249d-b456-4bc3-81e7-52327b6b38e9 members]</span> on <span style="background-color:#d4f8e5; padding:5px; border-radius:5px;">MS Teams side.</span> | ||
</translate> | |||
<translate> | |||
<!--T:15--> | |||
:(you can add users in MS Azure interface with internal domain or invite using existing email addresses) | :(you can add users in MS Azure interface with internal domain or invite using existing email addresses) | ||
[[File:Ms azure teams users.png|border|center]] | [[File:Ms azure teams users.png|border|center]] | ||
<br><br> | <br><br> | ||
:9. Then they need to <span style="background-color:#d4f8e5; padding:5px; border-radius:5px;">log in to SimplyBook.me system</span> under their credentials and connect their accounts in <span style="background-color:#d4f8e5; padding:5px; border-radius:5px;"> | :9. Then they need to <span style="background-color:#d4f8e5; padding:5px; border-radius:5px;">log in to SimplyBook.me system</span> under their credentials and connect their accounts in <span style="background-color:#d4f8e5; padding:5px; border-radius:5px;">Manage</span> -> <span style="background-color:#d4f8e5; padding:5px; border-radius:5px;">Online video meetings.</span> | ||
[[File: | [[File:Connect online meeting tool per provider redesigned.png|1200px|border|center|link=https://help.simplybook.me/images/8/83/Connect_online_meeting_tool_per_provider_redesigned.png]] | ||
<br><br> | <br><br> | ||
</translate> | |||
<translate> | |||
<!--T:16--> | |||
:10. Once they have connected own accounts you will be able to see this information in <span style="background-color:#d4f8e5; padding:5px; border-radius:5px;">Custom features</span> -> <span style="background-color:#d4f8e5; padding:5px; border-radius:5px;">Online meetings</span> -> <span style="background-color:#d4f8e5; padding:5px; border-radius:5px;">Meeting providers&Meeting services.</span> | :10. Once they have connected own accounts you will be able to see this information in <span style="background-color:#d4f8e5; padding:5px; border-radius:5px;">Custom features</span> -> <span style="background-color:#d4f8e5; padding:5px; border-radius:5px;">Online meetings</span> -> <span style="background-color:#d4f8e5; padding:5px; border-radius:5px;">Meeting providers&Meeting services.</span> | ||
:<span style="background-color:#ffe9e9; padding:5px; border-radius:5px;">'''Please note!''' It is only possible to manually start a meetings for the users that have admin, senior employee or junior employee(connected to specific provider) <span style="background-color:#cdeffc; padding:5px; border-radius:5px;">[[Adding_other_users_to_the_system|rights.]]</span></span> | :<span style="background-color:#ffe9e9; padding:5px; border-radius:5px;">'''Please note!''' It is only possible to manually start a meetings for the users that have admin, senior employee or junior employee(connected to specific provider) <span style="background-color:#cdeffc; padding:5px; border-radius:5px;">[[Special:MyLanguage/Adding_other_users_to_the_system|rights.]]</span></span> | ||
[[File: | [[File:Manually start the meeting redesigned.png|1200px|border|center|link=https://help.simplybook.me/images/2/28/Manually_start_the_meeting_redesigned.png]] | ||
<br><br> | <br><br> | ||
</translate> | |||
<translate> | |||
<!--T:17--> | |||
=How the meeting process works= | =How the meeting process works= | ||
:1. After everything is set up and the client books the online meetings related service/class both the client and the provider (or company, depending on your settings) will get the links to the meeting.<br> | :1. After everything is set up and the client books the online meetings related service/class both the client and the provider (or company, depending on your settings) will get the links to the meeting.<br> | ||
| Line 71: | Line 150: | ||
<br><br> | <br><br> | ||
:Or the provider can get to the meeting page right from the booking on Calendar while the client from "My bookings" tab of the booking site. | :Or the provider can get to the meeting page right from the booking on Calendar while the client from "My bookings" tab of the booking site. | ||
[[File: | [[File:Meeting link in admin calendar redesigned.png|1200px|border|center|link=https://help.simplybook.me/images/a/a6/Meeting_link_in_admin_calendar_redesigned.png]] | ||
<br><br> | <br><br> | ||
[[File:Meeting link on my bookings page.png|border|center]] | [[File:Meeting link on my bookings page.png|border|center]] | ||
| Line 81: | Line 160: | ||
[[File:Provider waiting for meeting.png|border|center]] | [[File:Provider waiting for meeting.png|border|center]] | ||
<br><br> | <br><br> | ||
:4. After this the redirect to Microsoft Teams | :4. After this the redirect to Zoom or Microsoft Teams(depending on your settings) software takes place and all the participants can join. | ||
:(It is not mandatory for the customers to have MS Teams account. To join they will only need to fill in their name after opening the meeting url in their browser) | :(It is not mandatory for the customers to have MS Teams account. To join they will only need to fill in their name after opening the meeting url in their browser) | ||
[[File:Teams page.png|border|center]] | [[File:Teams page.png|border|center]] | ||
<br><br><br><br> | <br><br><br><br> | ||
</translate> | |||
Latest revision as of 13:49, 23 September 2025

Use this feature to easily create meeting links for your clients and meet them online using video or phone
We also recommend enabling Client Login feature for the smooth client experience in joining the meetings as there may be errors if they try to join within a separate browser session.
Please note! This feature is not compatible with Kiosk custom feature.
Video tutorial available
How to set Zoom as a meeting service
To connect to Zoom, you need a Zoom account. Any contributor with Scheduling Administrator permissions can connect Simplybook.me to Zoom.
SimplyBook.me can only connect to a single Zoom account.
Please note:
- Zoom bookings will not be added to your Zoom meetings page at the Zoom end. To check online meetings please use filters per service in the Simplybook.me admin calendar to see bookings for the necessary service only.
- Even after Zoom account is connected, new services have video conferencing disabled by default. To add video conferencing to a new service, in Manage -> Services/Classes, go to More options per service/class and enable it as an online meeting service.
- Clients attending a group class will receive unique Zoom links, but these links will all lead to the same Zoom meeting.
- How to set
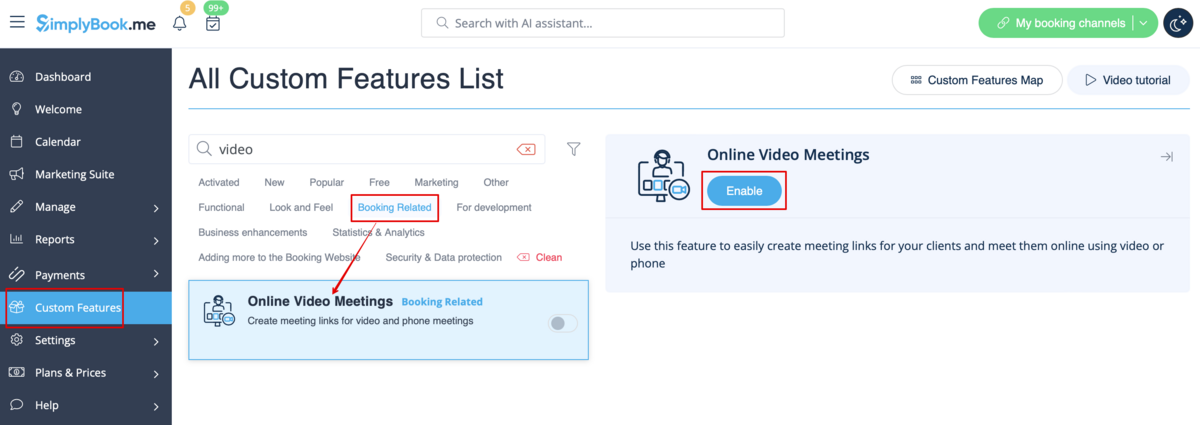
1. Enable Online meetings custom feature in your SimplyBook.me account by navigating to the Custom Features page within your Simplybook.me admin interface and click on the Enable button next to Online video meetings custom feature.
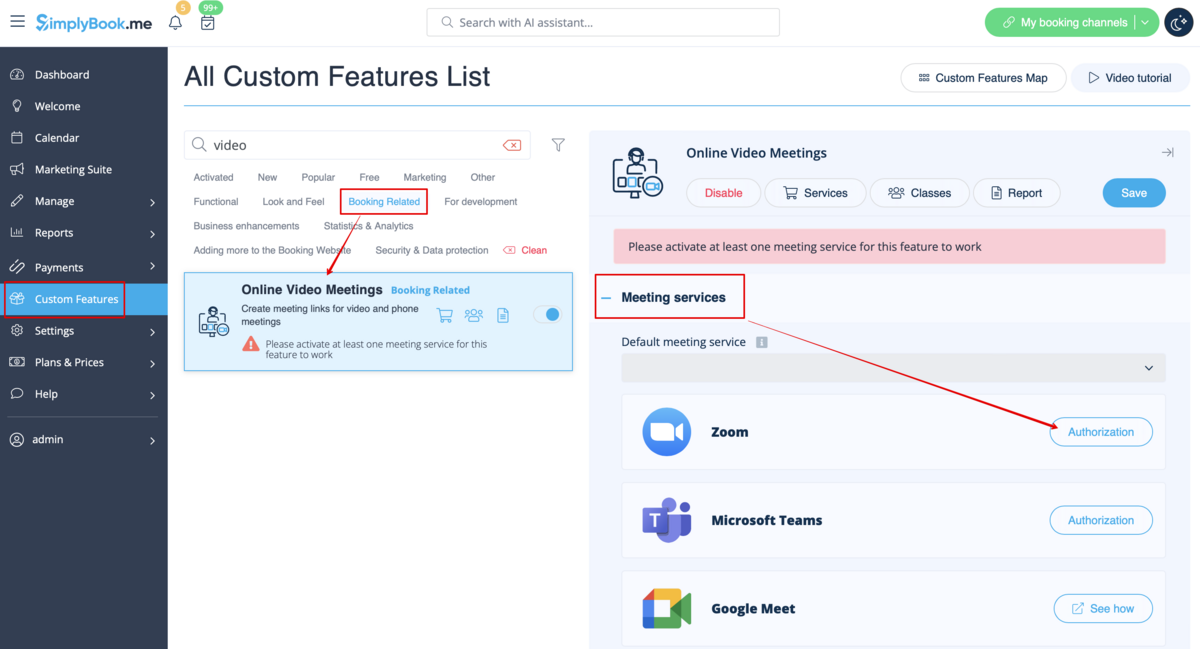
2. In the feature settings click on Authorization button near Zoom option to connect your Zoom account.
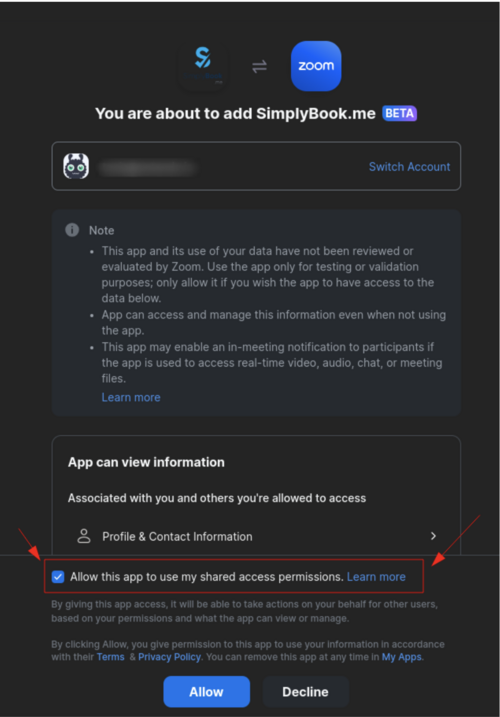
3. Enter your credentials to log into Zoom, or click SSO, Google, or Facebook to log in through those services.
You can connect one zoom account per company OR connect all zoom users added to your account by checking the checkbox Allow this app to use my shared access permissions
4. After Zoom is authorized, click on Meeting Providers and Meeting Services and choose providers that should be connected to Zoom by selecting Zoom option from the respective drop down. In the next drop-down please select Zoom user (if you have several users under your Zoom account) that should be connected to that provider.

5. After your Zoom connection is set, the last thing you need to do is enable online meeting option for your services. To do that please navigate to Manage -> Services -> click on needed Service name -> scroll down to More options.
(in Manage -> Classes -> click on Class name -> More options if you are using Classes feature) and switch on the option Enable as online meeting service/class.

6. When the clients book such a service/class there will be online meeting link on My bookings page for the associated booking. When the appointment time comes the clients will be able to follow it to access the meeting.
For admin side it will be possible to follow the link from booking info popup form in Calendar or in Reports -> Booking details, or in Reports -> Online video meetings.
7. (optional) As well you can add online meetings link to provider and client notification templates so that both sides receive them with the booking details.
- To do that for your client notifications please navigate to Settings -> Email and SMS settings (or Custom features -> Flexible notifications -> Manage if you have customized notifications per service and/or provider) and edit your Client's booking confirmation template to add [online_meeting_link] variable to send Zoom links to your clients.
To make everything work simply paste [online_meeting_link] variable to the desired place in your "Client's booking confirmation template" so when a client books a service, a Zoom meeting link will be automatically generated at the place of a variable.
- To let your service providers receive Zoom links in their confirmations please add [online_meeting_provider_link] variable to your New booking confirmation for service providers in Settings -> Email and sms settings (or Custom features -> Flexible notifications -> Manage if you have customized notifications per service and/or provider).

How to set Microsoft Teams as a meeting service
- 1. Enable Online meetings custom feature in your SimplyBook.me account.

- 2. Login to Microsoft Azure portal and your Microsoft Teams account with the user that is a member of your organization in MS Azure.
- (Or create the accounts there)
- Please note! It is not possible to connect personal/private Microsoft Teams account to the system, it should be related to an organization via Microsoft Azure.
- 3. Add Microsoft Teams in MS Azure -> Azure Active Directory -> Enterprise applications.
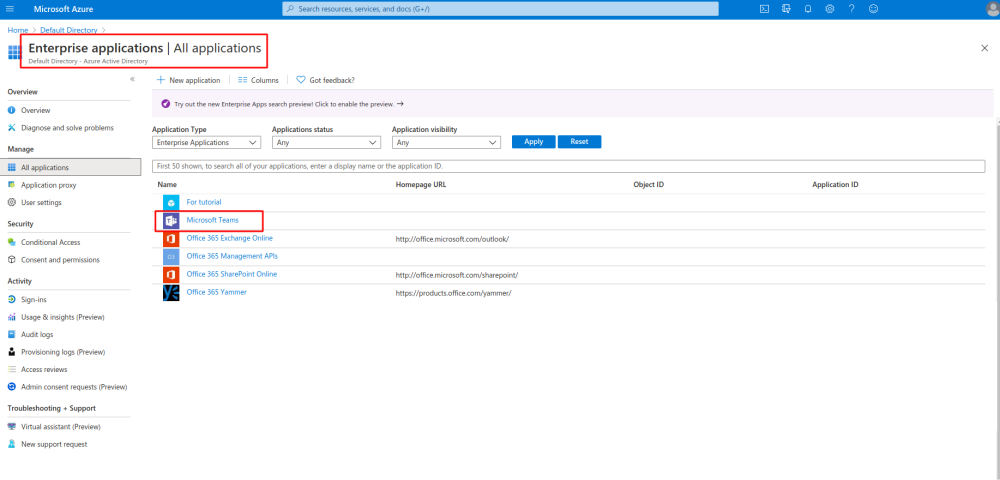
- And add your user(or the desired one that you need to connect to SimplyBook.me) in Enterprise applications -> Microsoft Teams -> Users and Groups on MS Azure side.

- 4. On SimplyBook.me side please click on Meeting services block and choose Authorization near Microsoft Teams”.
- Connect your Microsoft account.

- 5. For the services/classes you wish to conduct online meetings switch the option Enable as online meeting service/class on in Manage -> Services -> click on service name -> More options
(in Manage -> Classes -> click on class name -> More options if you are using Classes feature)

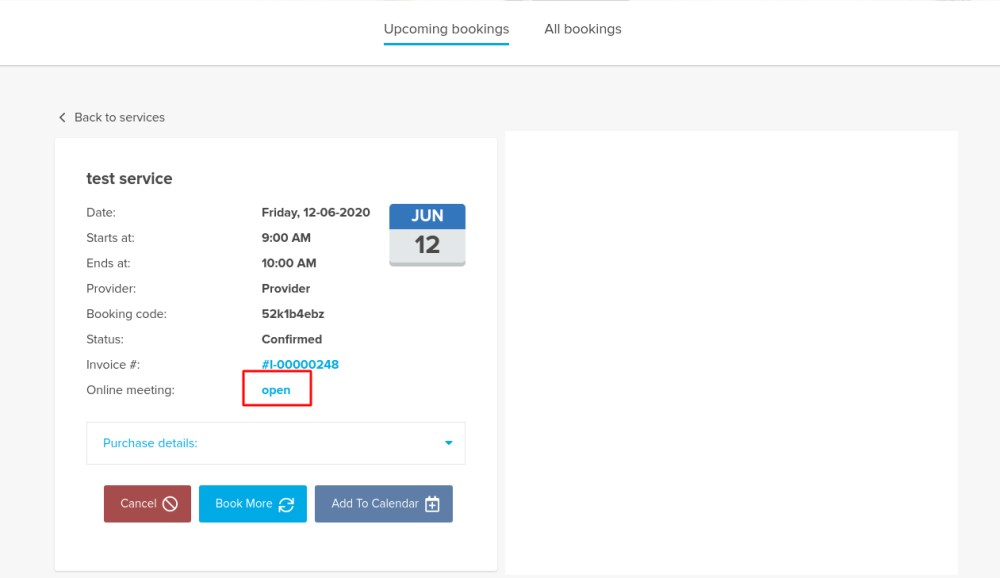
- 6. When the clients book such a service/class there will be online meeting link on My bookings page for the associated booking. When the appointment time comes the clients will be able to follow it to access the meeting.
- For admin side it will be possible to follow the link from booking info popup form in Calendar or in Reports -> Booking details.

- 7. (optonal) You can add online meetings link to provider and client notification templates so that both sides receive them with the booking details.
To do that please navigate to Settings -> Email and sms settings (or Custom features -> Flexible notifications -> Manage if you have customized notifications per service and/or provider).

Please note! If you have paid services the meeting link will be working only after the payment is made/approved.
Additional steps for case when you need to allow your Providers to have own MS Teams account connection
- 8. By default your MS Teams account that you have connected in Step#6 will be used to generate meetings links and conduct meetings, but if you have several employees in your company, they are added to SimplyBook.me side as providers and users and you wish them to use own MS Teams accounts for their online services/classes please make sure that you have them added as users in MS Azure with access to this application as well as members on MS Teams side.
- (you can add users in MS Azure interface with internal domain or invite using existing email addresses)

- 9. Then they need to log in to SimplyBook.me system under their credentials and connect their accounts in Manage -> Online video meetings.

- 10. Once they have connected own accounts you will be able to see this information in Custom features -> Online meetings -> Meeting providers&Meeting services.
- Please note! It is only possible to manually start a meetings for the users that have admin, senior employee or junior employee(connected to specific provider) rights.

How the meeting process works
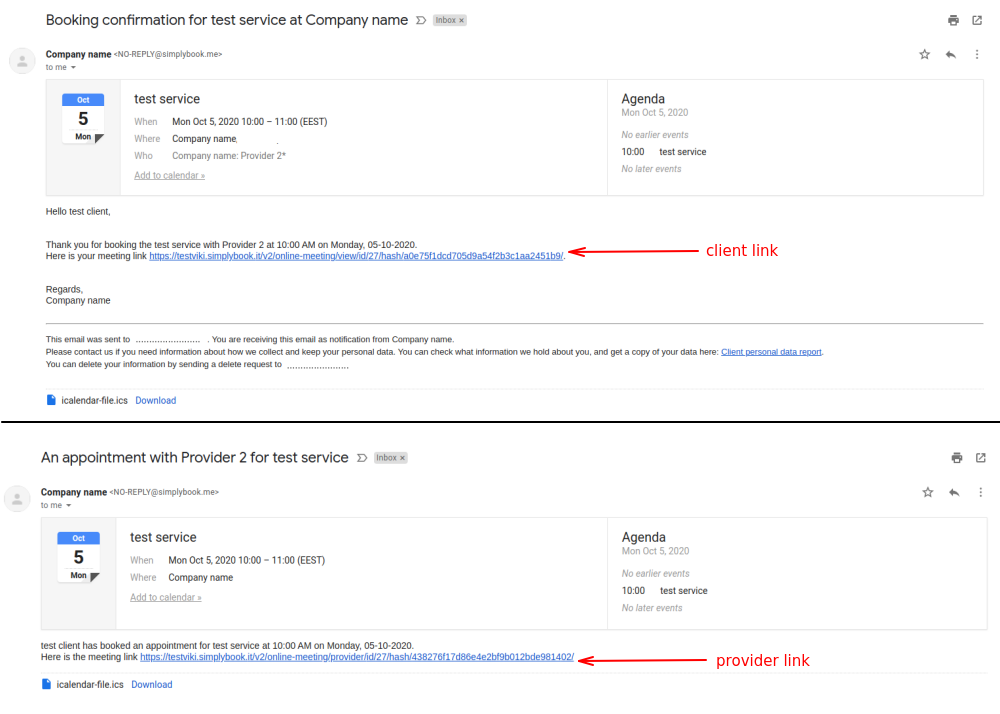
- 1. After everything is set up and the client books the online meetings related service/class both the client and the provider (or company, depending on your settings) will get the links to the meeting.
- Either from email notifications if you have added the corresponding variables to the templates.
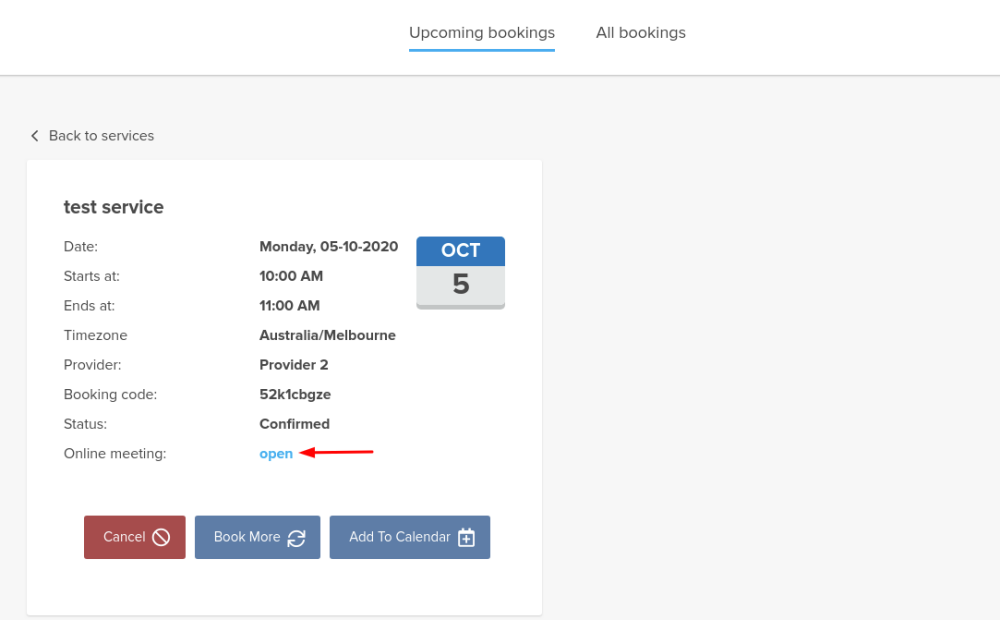
- Or the provider can get to the meeting page right from the booking on Calendar while the client from "My bookings" tab of the booking site.

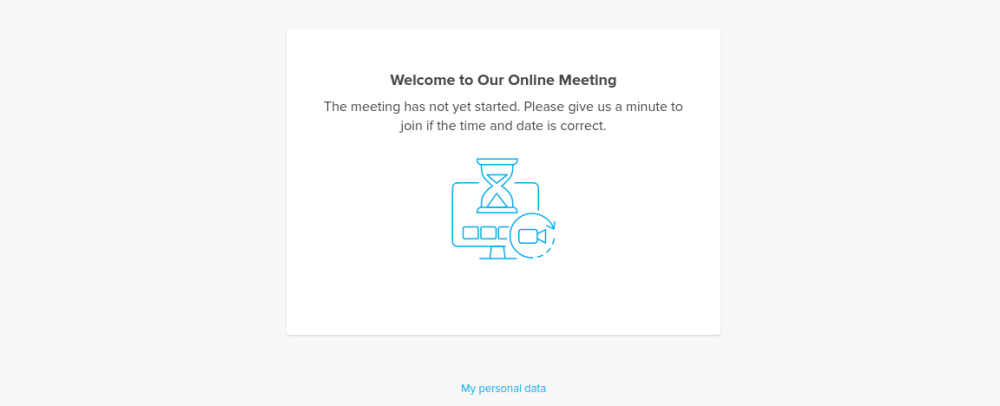
- 2. By default the meeting starts automatically for the both sides when the booked time comes.
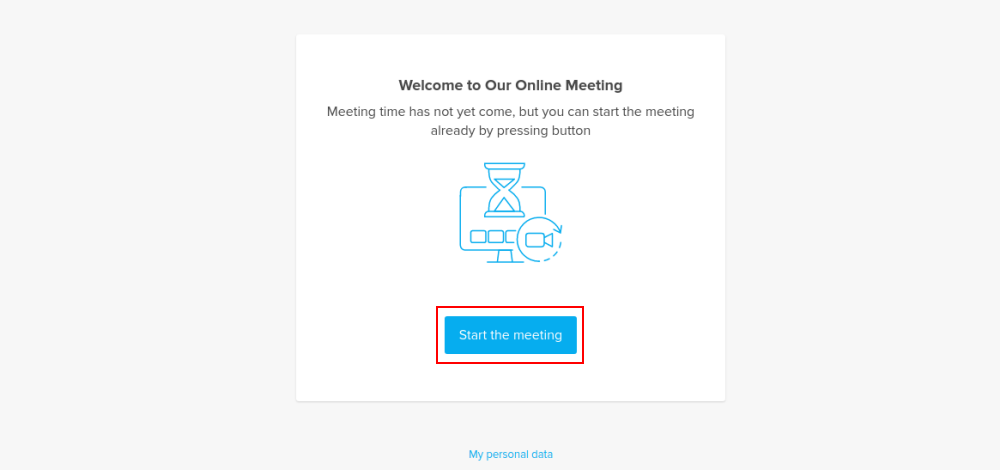
- 3. As well the provider can manually start the meeting if necessary using the corresponding button.
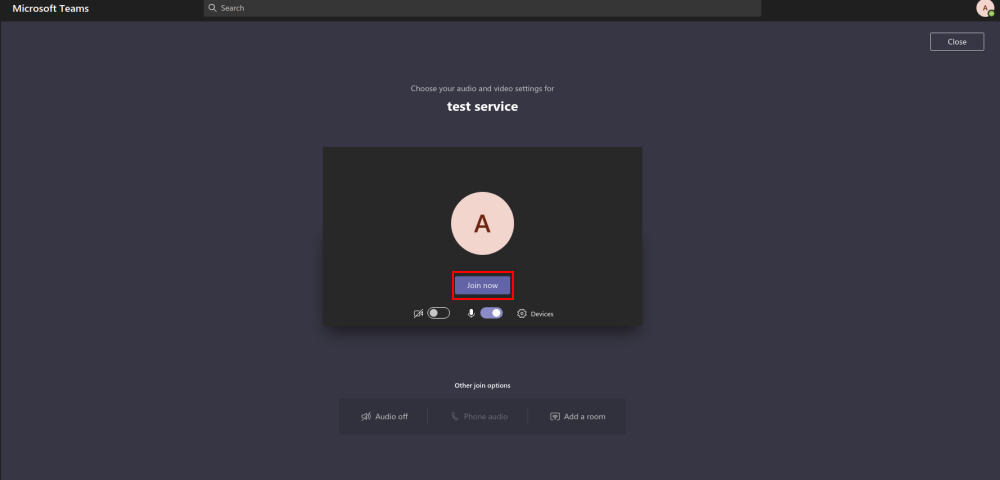
- 4. After this the redirect to Zoom or Microsoft Teams(depending on your settings) software takes place and all the participants can join.
- (It is not mandatory for the customers to have MS Teams account. To join they will only need to fill in their name after opening the meeting url in their browser)
