No edit summary |
No edit summary |
||
| (9 intermediate revisions by 2 users not shown) | |||
| Line 1: | Line 1: | ||
<languages/> | |||
<translate> | |||
<!--T:1--> | |||
{{#seo: | {{#seo: | ||
|title=Adjusting client invoices - SimplyBook.me | |title=Adjusting client invoices - SimplyBook.me | ||
|description=Customize invoice appearance and content. Add company logo, adjust layout, include intake form data. Configure invoice numbering, terms, footer information. | |||
|titlemode=append | |titlemode=append | ||
|keywords=faq, frequently asked questions, booking software, appointment system questions, appointments online, calendar software, booking system, booking calendar, scheduling software, online appointment scheduling, online scheduling, setup, setup help, support, help content | |keywords=faq, frequently asked questions, booking software, appointment system questions, appointments online, calendar software, booking system, booking calendar, scheduling software, online appointment scheduling, online scheduling, setup, setup help, support, help content | ||
}} | }} | ||
</translate> | |||
< | <translate> | ||
<!--T:2--> | |||
It may be necessary to show or hide some data or change the look for the invoices that the system sends to clients after they make a purchase on your booking website.<br> | It may be necessary to show or hide some data or change the look for the invoices that the system sends to clients after they make a purchase on your booking website.<br> | ||
You can adjust the following items: | You can adjust the following items: | ||
<br><br> | <br><br> | ||
</translate> | |||
<translate> | |||
<!--T:3--> | |||
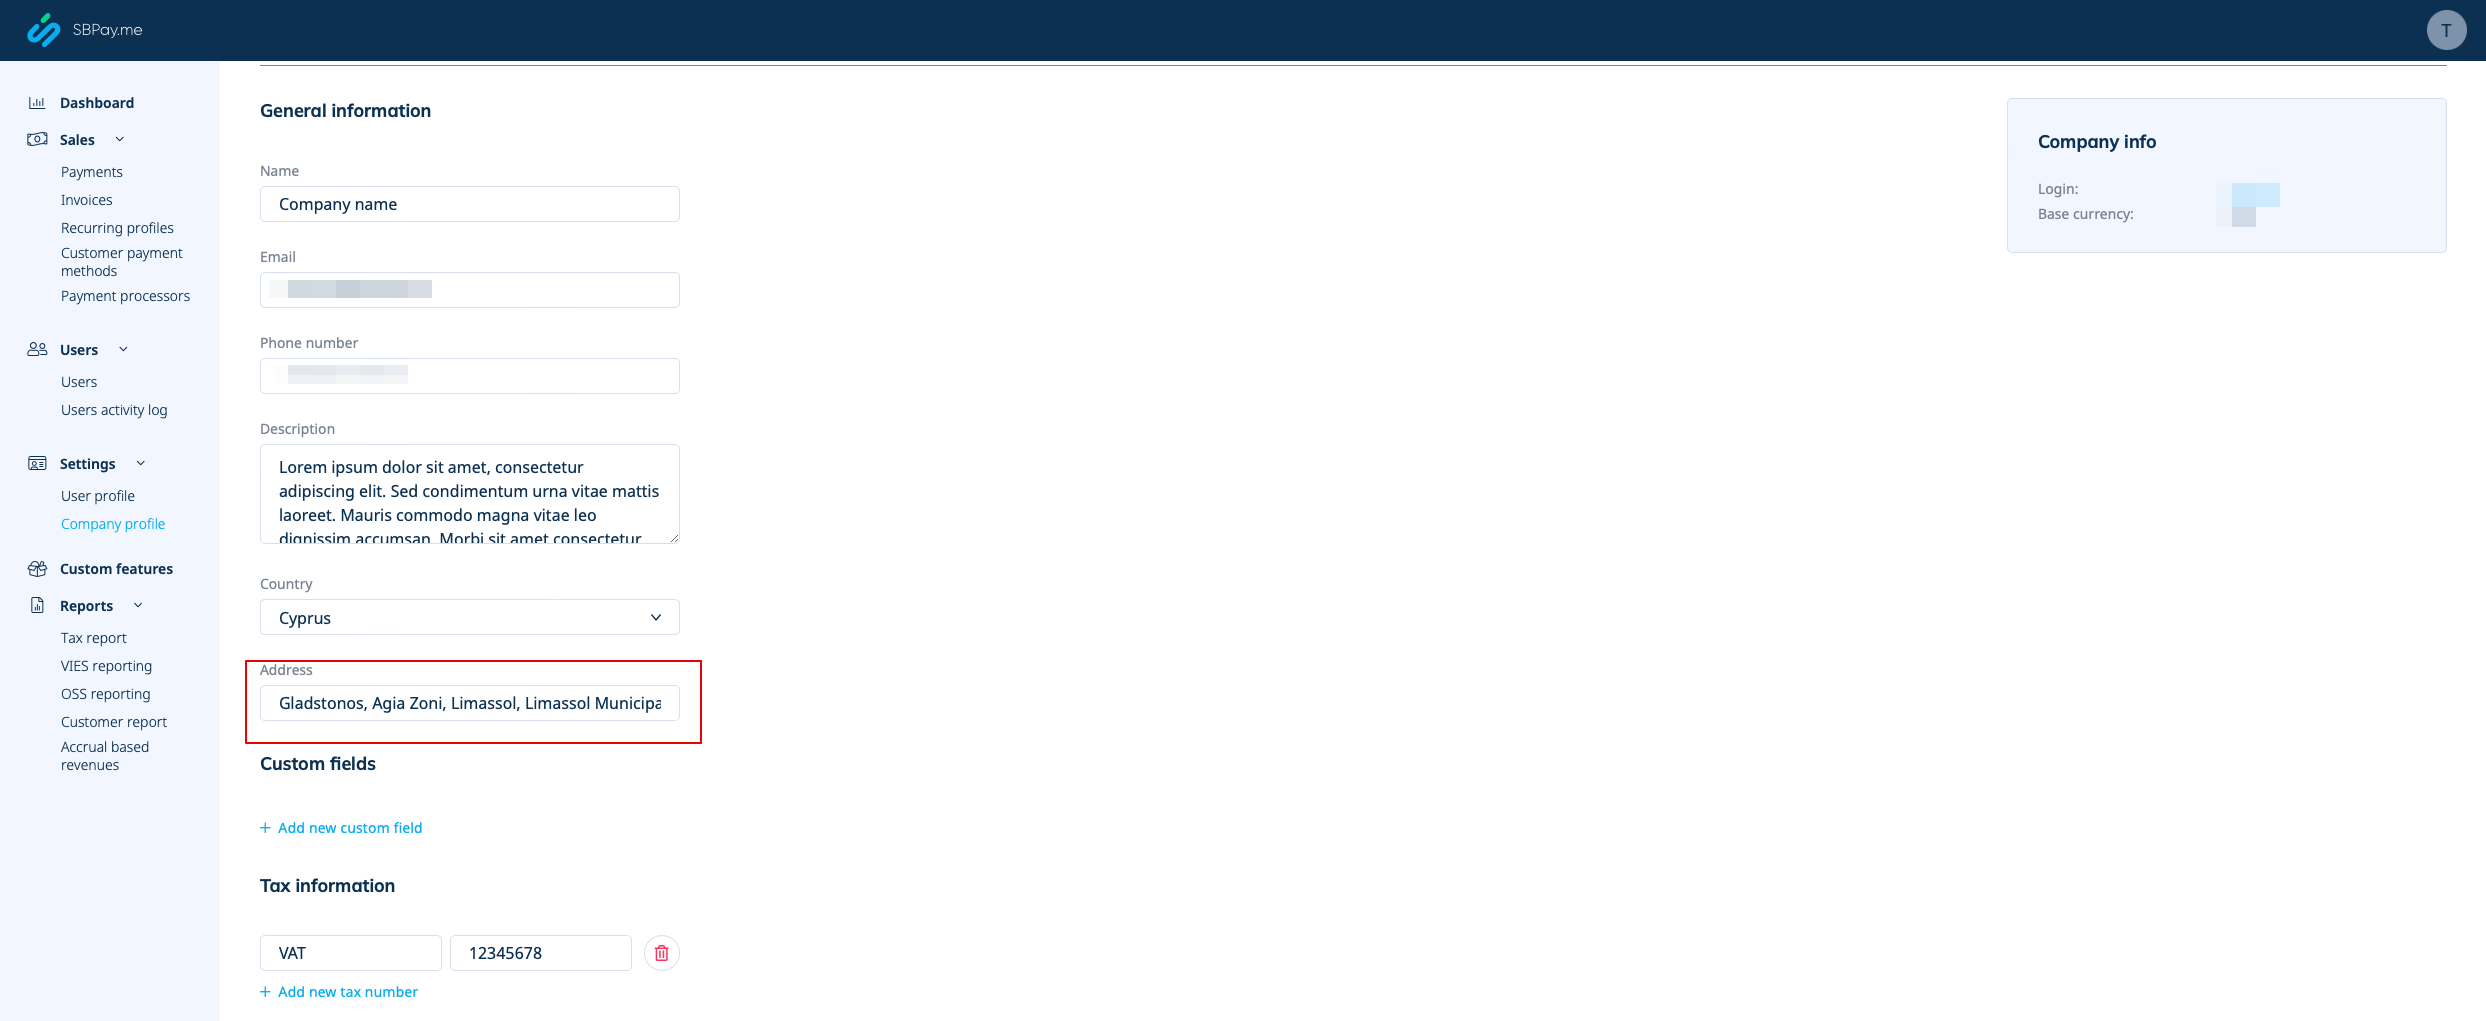
1. '''Company address.'''<br> | 1. '''Company address.'''<br> | ||
The company address added in <span style="background-color:#d4f8e5; padding:5px; border-radius:5px;">Payments(SBPay.me)</span> -> <span style="background-color:#d4f8e5; padding:5px; border-radius:5px;">Payment systems </span> -> <span style="background-color:#d4f8e5; padding:5px; border-radius:5px;">Settings</span> -> <span style="background-color:#d4f8e5; padding:5px; border-radius:5px;">Company profile</span> -> <span style="background-color:#d4f8e5; padding:5px; border-radius:5px;">Address</span> will be reflected in the invoices. | |||
[[File: | [[File:Sbpay company settings page - address.png|1200px|border|center|link=https://help.simplybook.me/images/4/4a/Sbpay_company_settings_page_-_address.png]] | ||
<br><br> | <br><br> | ||
[[File: | </translate> | ||
If you need to hide it simply | <translate> | ||
<!--T:4--> | |||
[[File:Sbpay printed invoice example with company address.png|1200px|border|center|link=https://help.simplybook.me/images/8/84/Sbpay_printed_invoice_example_with_company_address.png]] | |||
If you need to hide it simply remove address from that field and save settings. | |||
<br><br> | <br><br> | ||
</translate> | |||
<translate> | |||
<!--T:5--> | |||
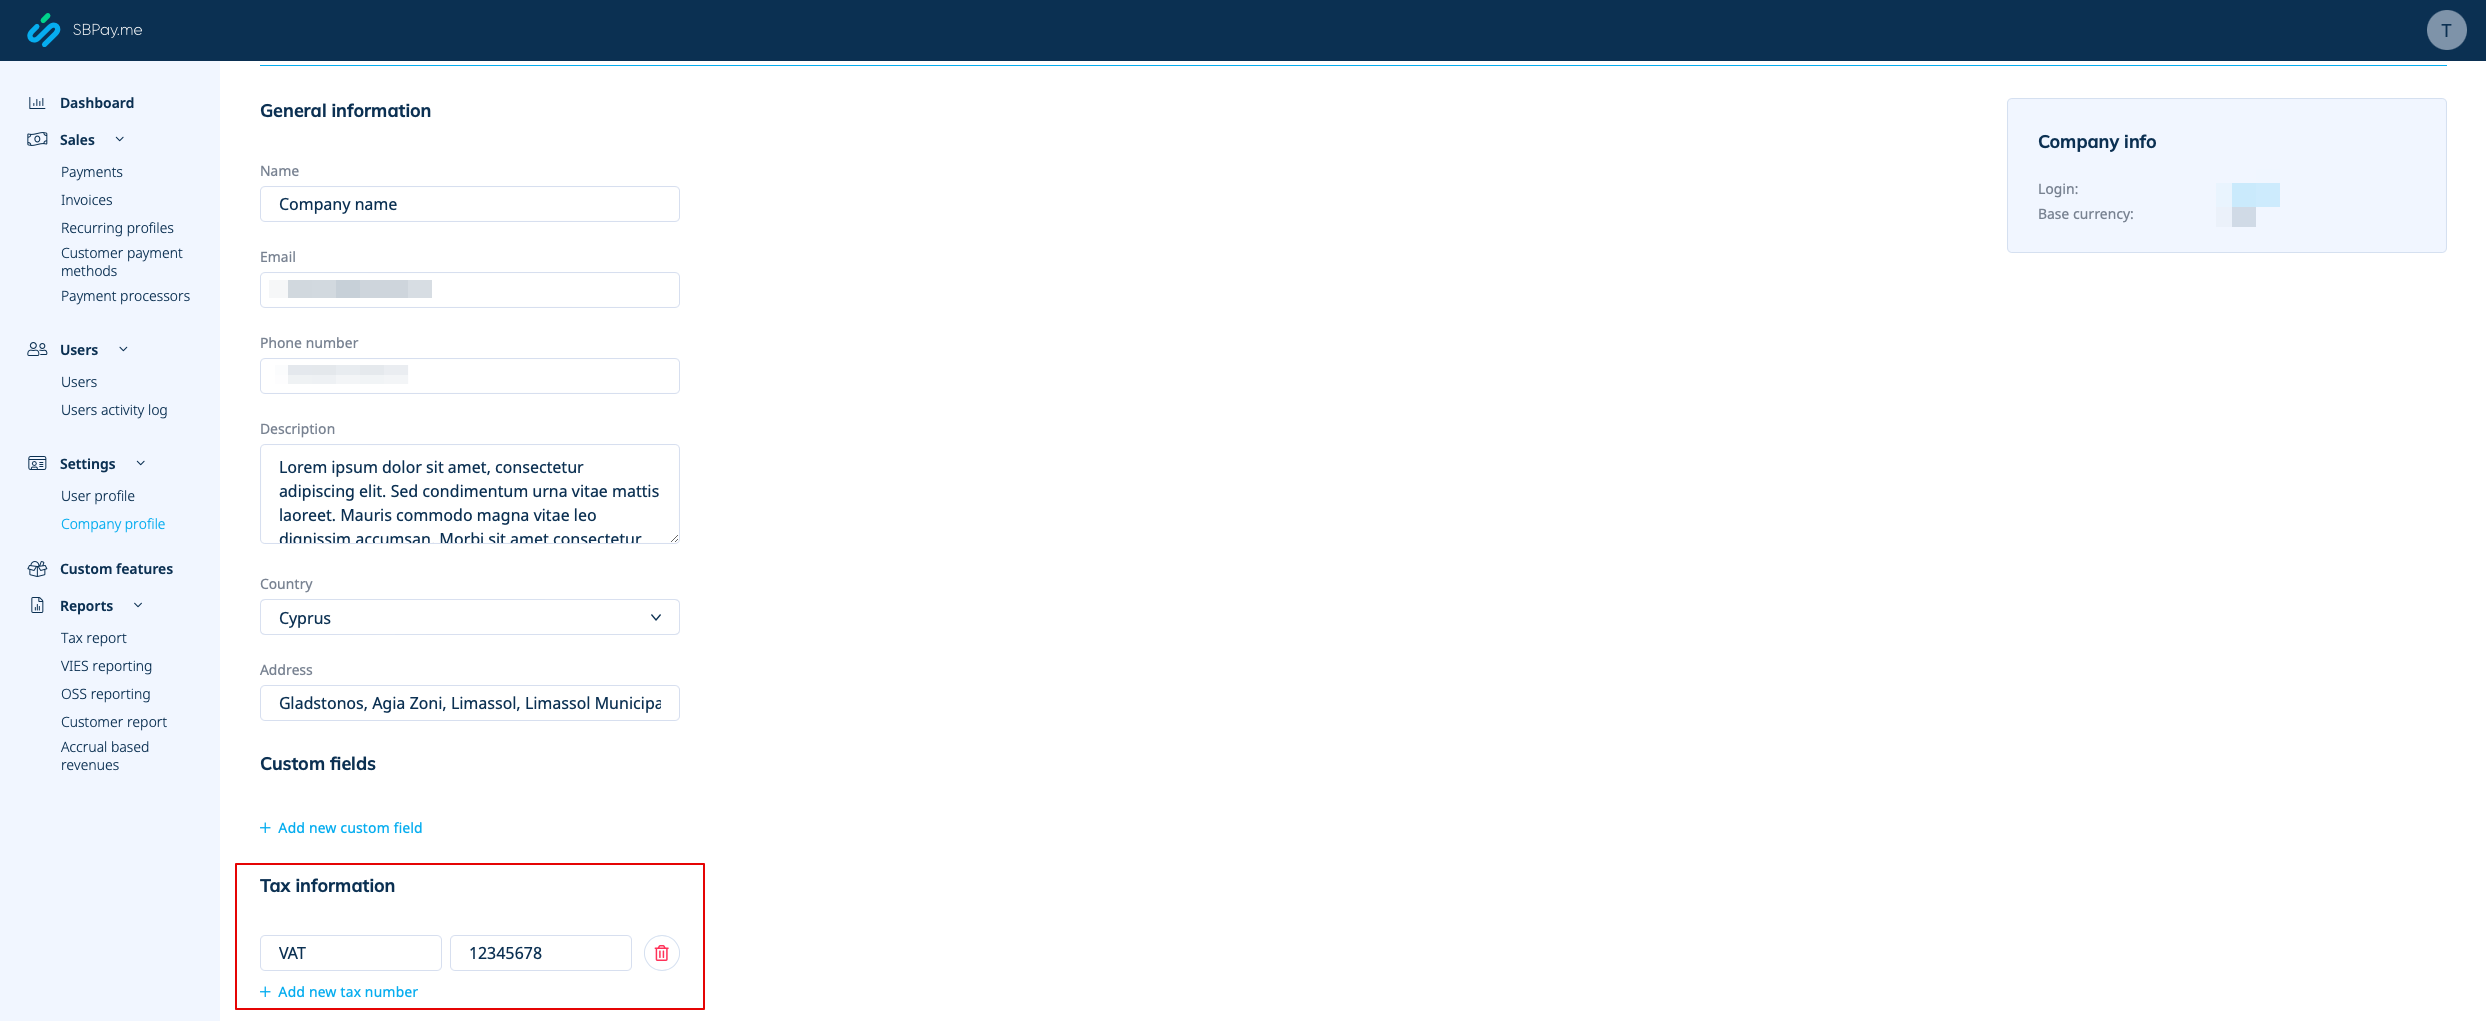
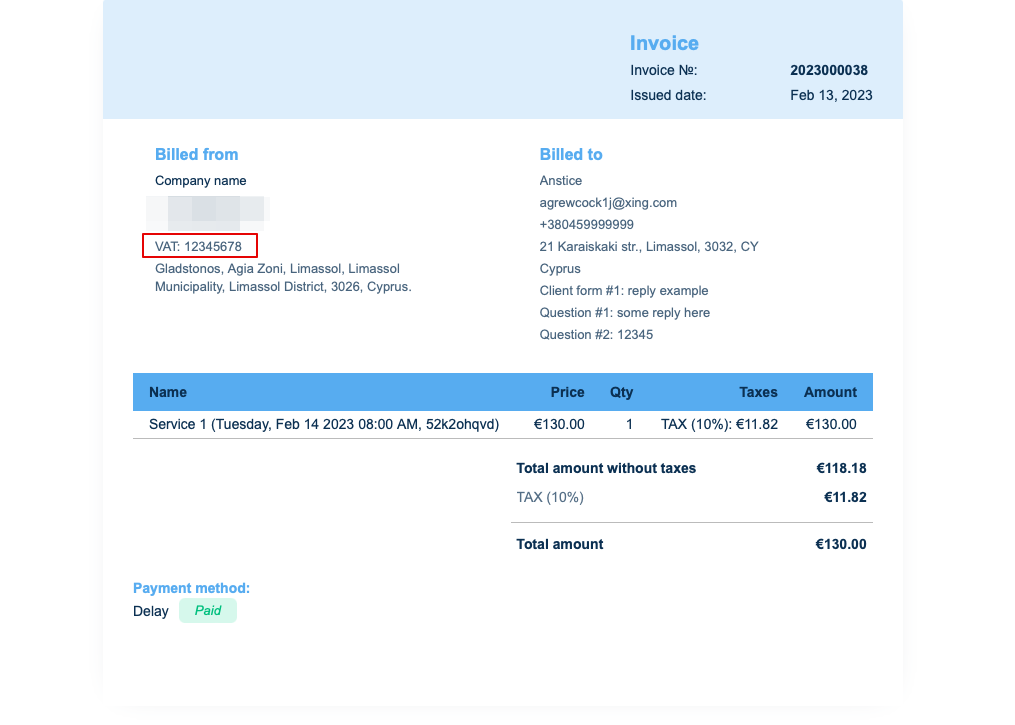
2. '''Company VAT number.'''<br> | 2. '''Company VAT number.'''<br> | ||
If it is added in <span style="background-color:#d4f8e5; padding:5px; border-radius:5px;">Settings</span> -> <span style="background-color:#d4f8e5; padding:5px; border-radius:5px;">Company information</span> it will | If it is added in <span style="background-color:#d4f8e5; padding:5px; border-radius:5px;">Payments(SBPay.me)</span> -> <span style="background-color:#d4f8e5; padding:5px; border-radius:5px;">Payment systems </span> -> <span style="background-color:#d4f8e5; padding:5px; border-radius:5px;">Settings</span> -> <span style="background-color:#d4f8e5; padding:5px; border-radius:5px;">Company profile</span> -> <span style="background-color:#d4f8e5; padding:5px; border-radius:5px;">Tax information</span> it will be included to the invoice header. | ||
[[File: | [[File:Sbpay company settings page - tax info.png|1200px|border|center|link=https://help.simplybook.me/images/8/8e/Sbpay_company_settings_page_-_tax_info.png]] | ||
<br><br> | <br><br> | ||
[[File: | [[File:Sbpay printed invoice example with comoany vat number.png|1200px|border|center|link=https://help.simplybook.me/images/d/d0/Sbpay_printed_invoice_example_with_comoany_vat_number.png]] | ||
<br><br> | <br><br> | ||
</translate> | |||
<translate> | |||
<!--T:6--> | |||
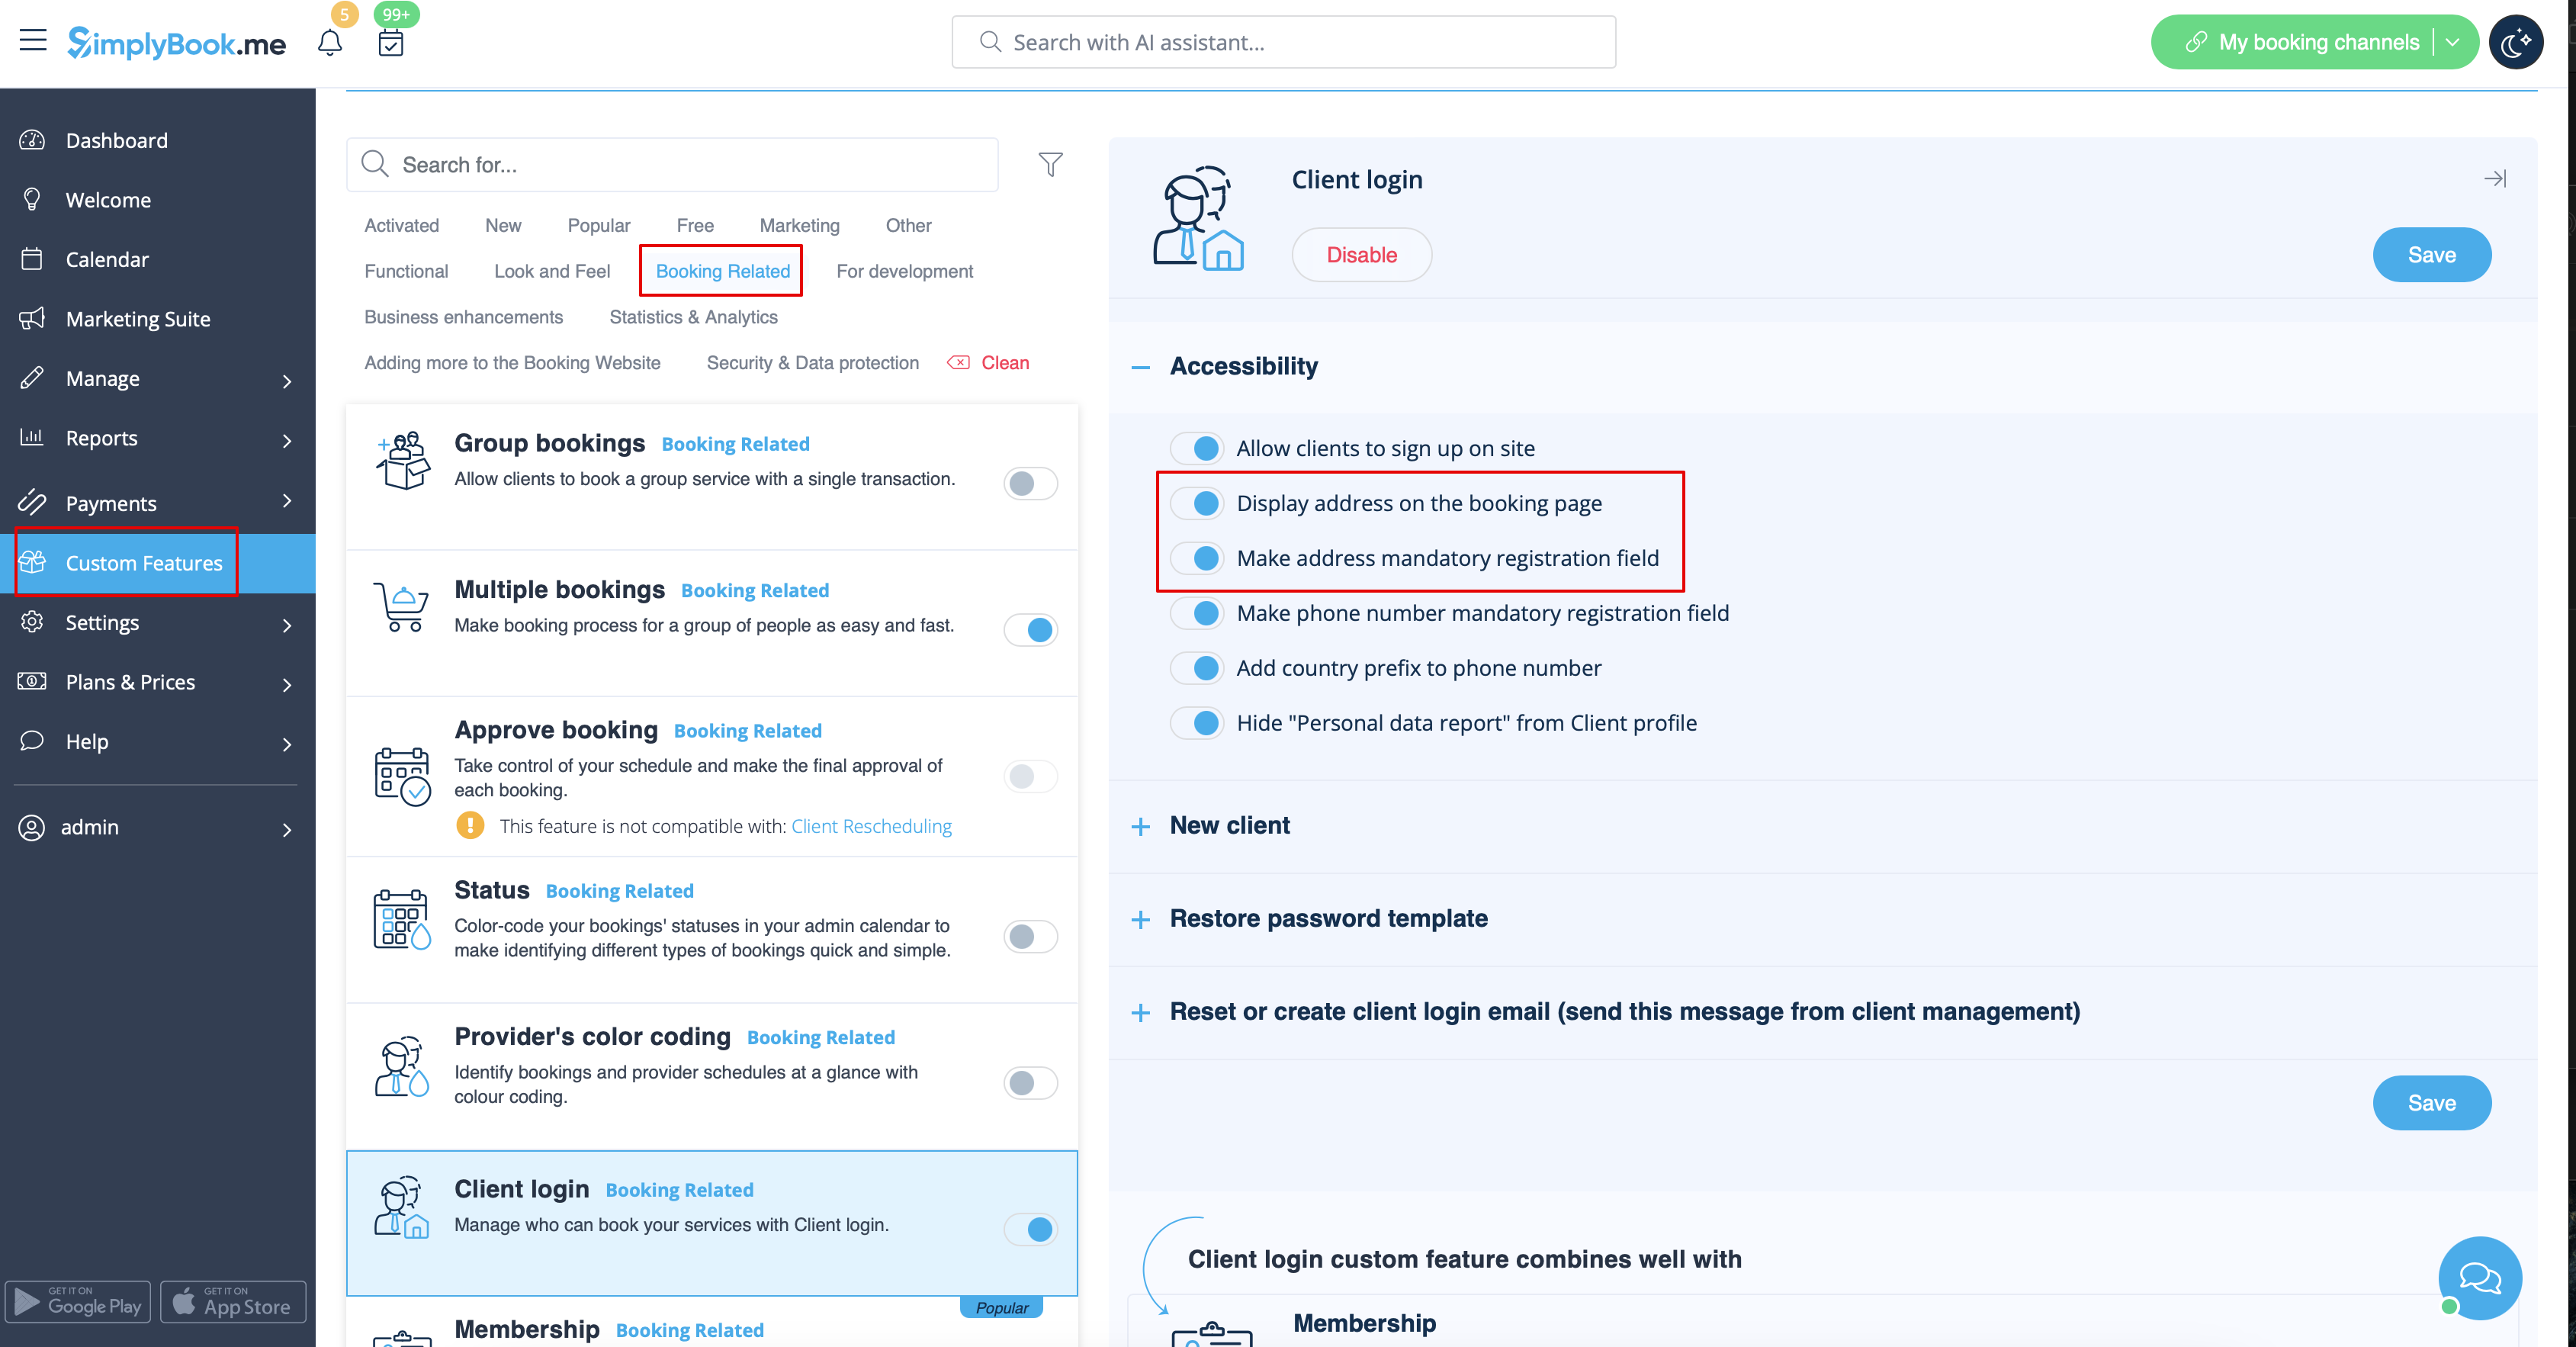
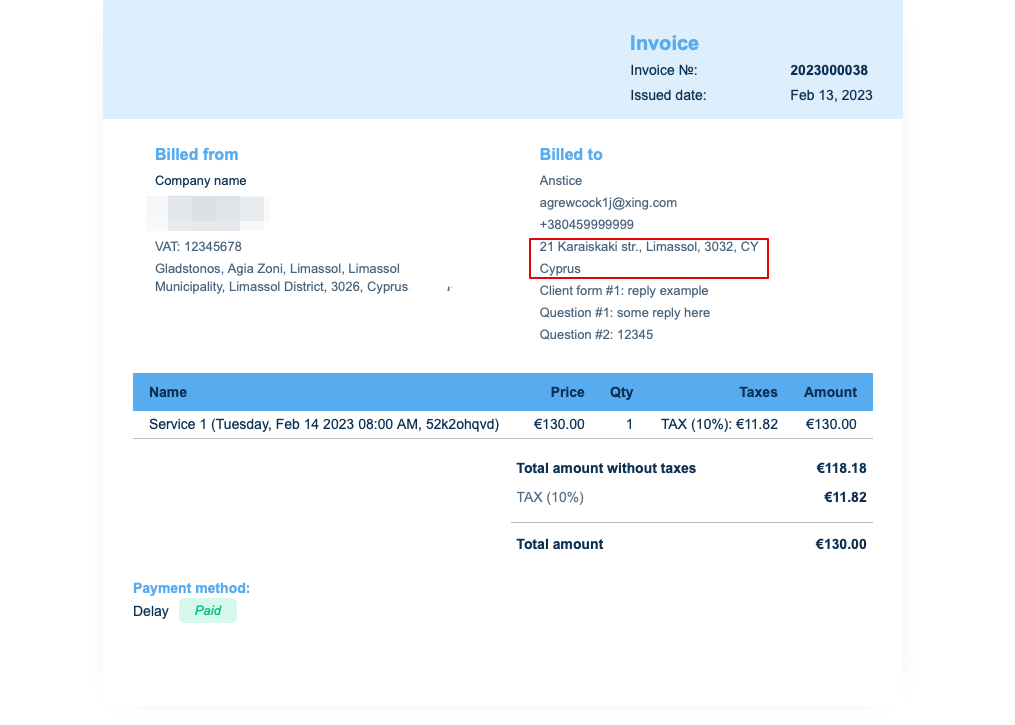
3. '''Client address.'''<br> | 3. '''Client address.'''<br> | ||
For the client address to be displayed please enable [[Client_Login_custom_feature|Client Login]] custom feature, enable both <span style="background-color:#d4f8e5; padding:5px; border-radius:5px;">Display address on the booking page</span> and <span style="background-color:#d4f8e5; padding:5px; border-radius:5px;">Make address mandatory registration field</span> in <span style="background-color:#d4f8e5; padding:5px; border-radius:5px;">Accessibility</span> section. Save settings. | For the client address to be displayed please enable [[Special:MyLanguage/Client_Login_custom_feature|Client Login]] custom feature, enable both <span style="background-color:#d4f8e5; padding:5px; border-radius:5px;">Display address on the booking page</span> and <span style="background-color:#d4f8e5; padding:5px; border-radius:5px;">Make address mandatory registration field</span> in <span style="background-color:#d4f8e5; padding:5px; border-radius:5px;">Accessibility</span> section. Save settings. | ||
[[File: | [[File:Make address mandatory redesigned.png|1200px|border|center|link=https://help.simplybook.me/images/6/68/Make_address_mandatory_redesigned.png]] | ||
<br><br> | <br><br> | ||
[[File: | </translate> | ||
<translate> | |||
<!--T:7--> | |||
[[File:Sbpay printed invoice example with client address.png|1200px|border|center|link=https://help.simplybook.me/images/4/4d/Sbpay_printed_invoice_example_with_client_address.png]] | |||
<br><br> | <br><br> | ||
</translate> | |||
<translate> | |||
<!--T:8--> | |||
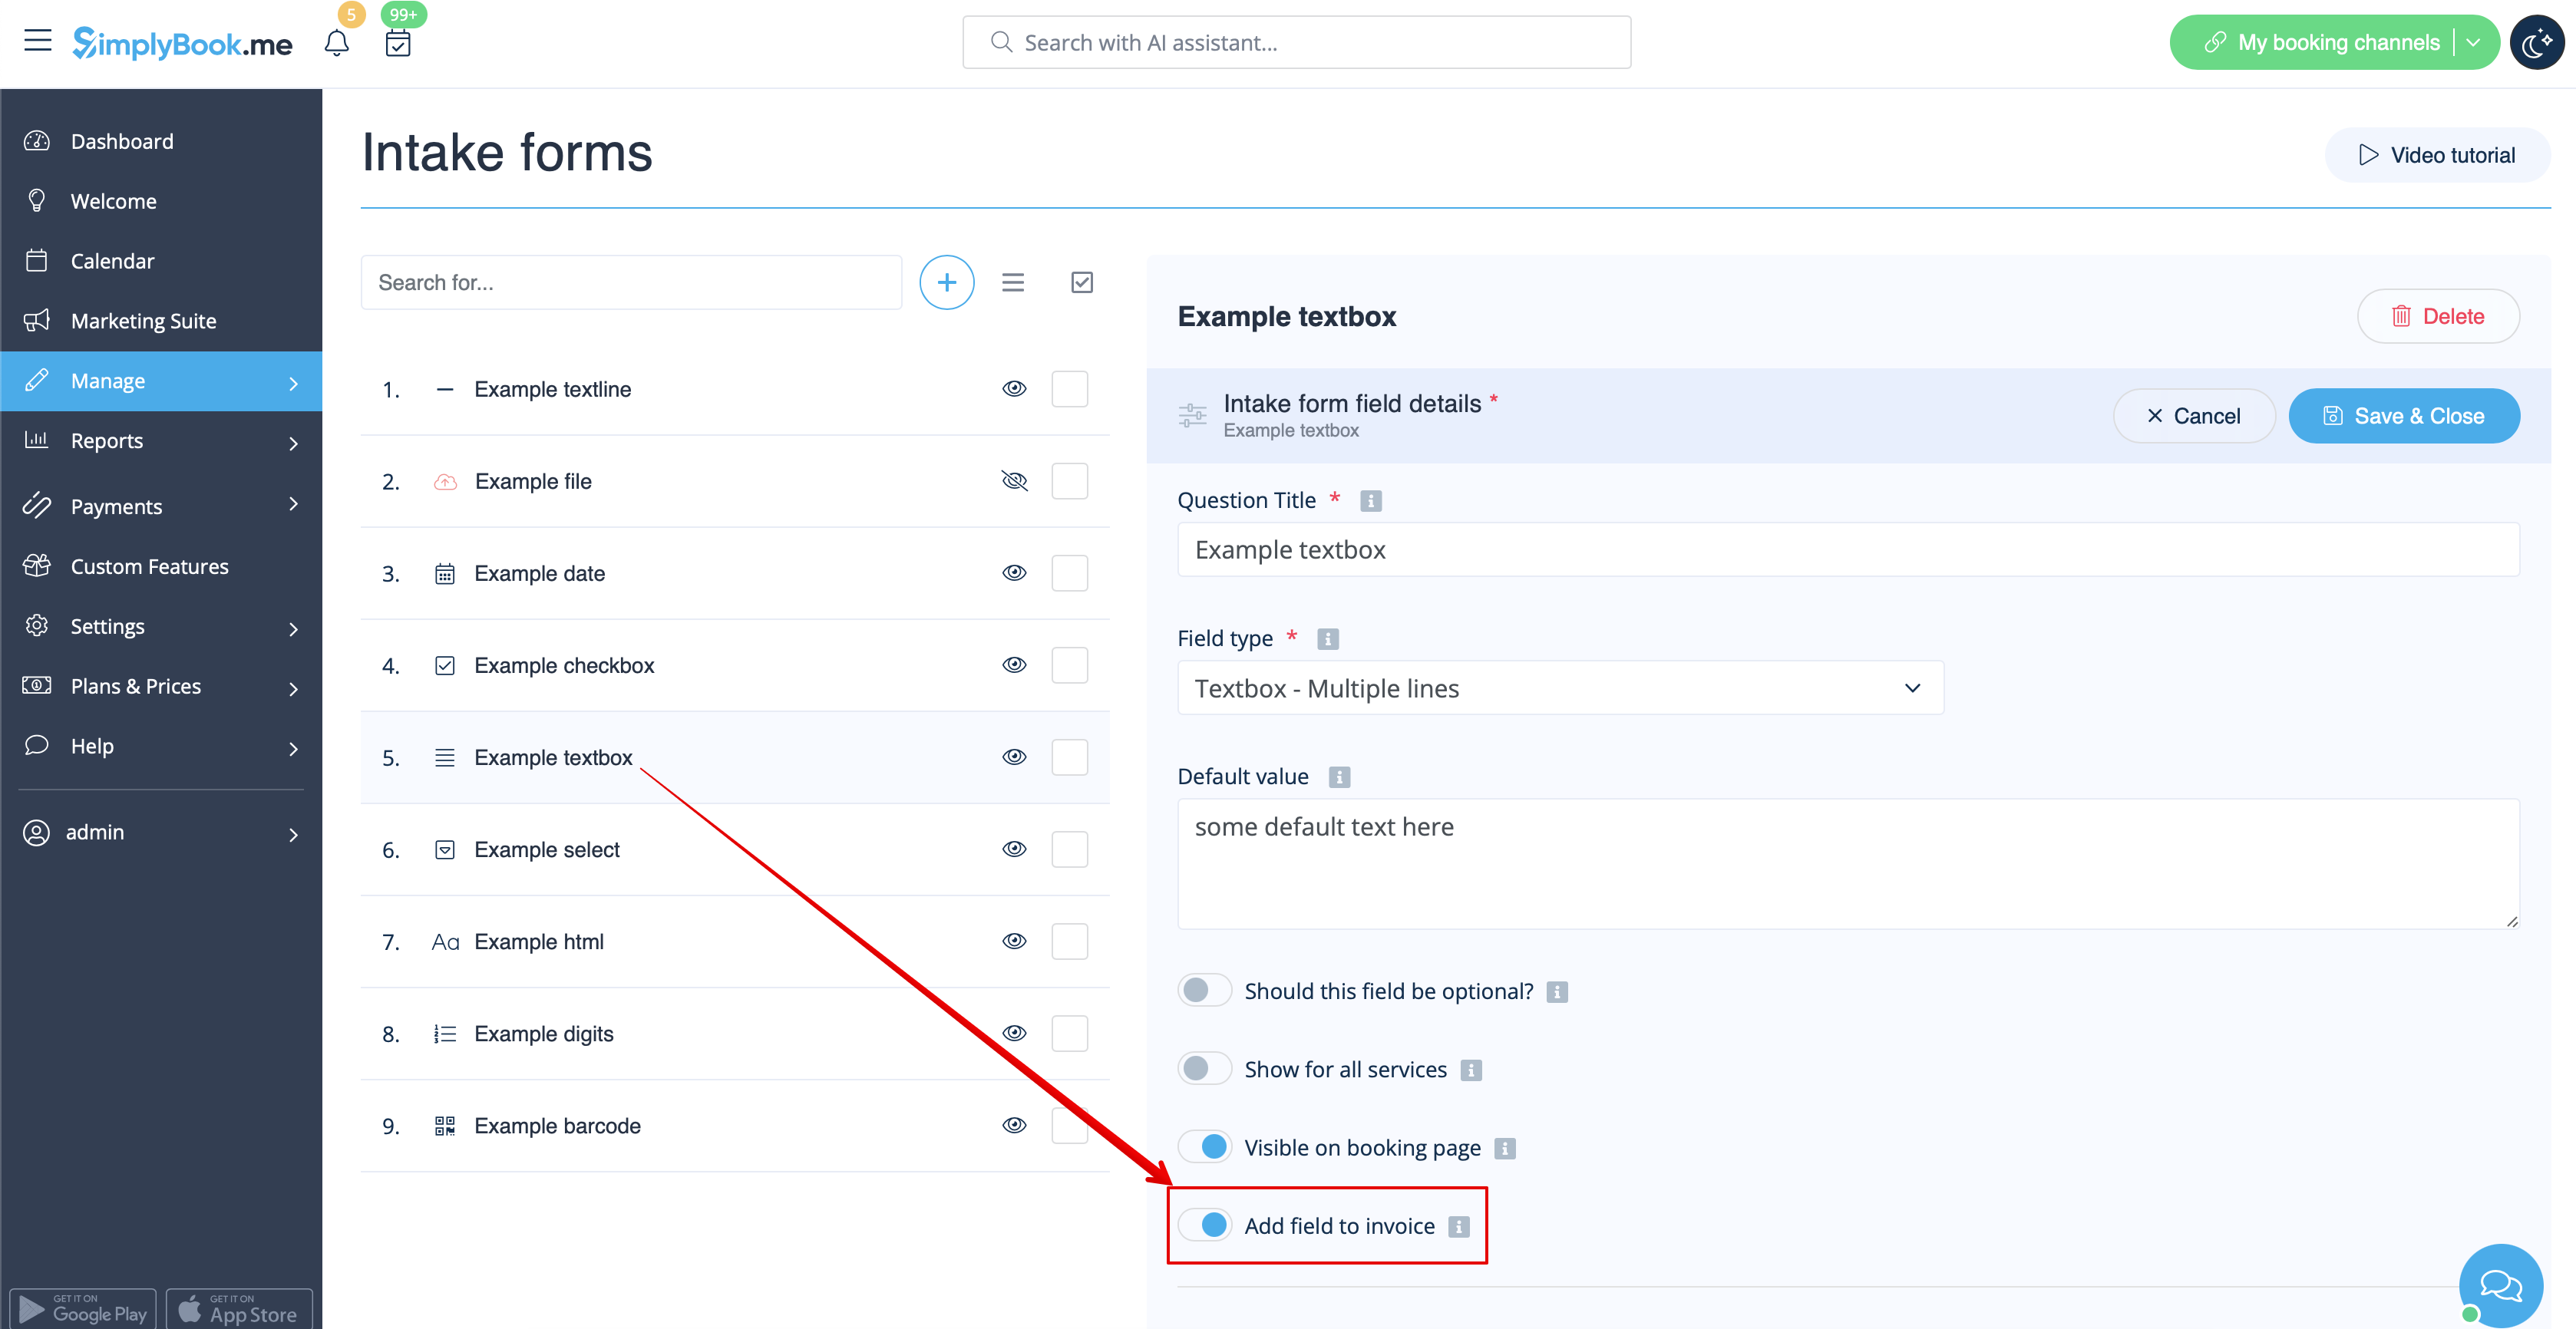
4. '''<span style="background-color:#cdeffc; padding:5px; border-radius:5px;">[[Intake_Forms_custom_feature|Intake forms]]</span> and <span style="background-color:#cdeffc; padding:5px; border-radius:5px;">[[Client_Fields_Custom_Feature|Client Fields]]</span>'''<br> | 4. '''<span style="background-color:#cdeffc; padding:5px; border-radius:5px;">[[Intake_Forms_custom_feature|Intake forms]]</span> and <span style="background-color:#cdeffc; padding:5px; border-radius:5px;">[[Client_Fields_Custom_Feature|Client Fields]]</span>'''<br> | ||
You can add certain forms to be displayed in the client information block.<br> | You can add certain forms to be displayed in the client information block.<br> | ||
If it is an intake form please go to <span style="background-color:#d4f8e5; padding:5px; border-radius:5px;">Manage</span> -> <span style="background-color:#d4f8e5; padding:5px; border-radius:5px;">Intake forms</span> -> click on the necessary form to select -> enable <span style="background-color:#d4f8e5; padding:5px; border-radius:5px;">Add field to invoice,</span> save settings.<br> | If it is an intake form please go to <span style="background-color:#d4f8e5; padding:5px; border-radius:5px;">Manage</span> -> <span style="background-color:#d4f8e5; padding:5px; border-radius:5px;">Intake forms</span> -> click on the necessary form to select -> enable <span style="background-color:#d4f8e5; padding:5px; border-radius:5px;">Add field to invoice,</span> save settings.<br> | ||
[[File: | [[File:Add intake form to invoice redesigned.png|1200px|border|center|link=https://help.simplybook.me/images/1/16/Add_intake_form_to_invoice_redesigned.png]] | ||
<br><br> | <br><br> | ||
</translate> | |||
<translate> | |||
<!--T:9--> | |||
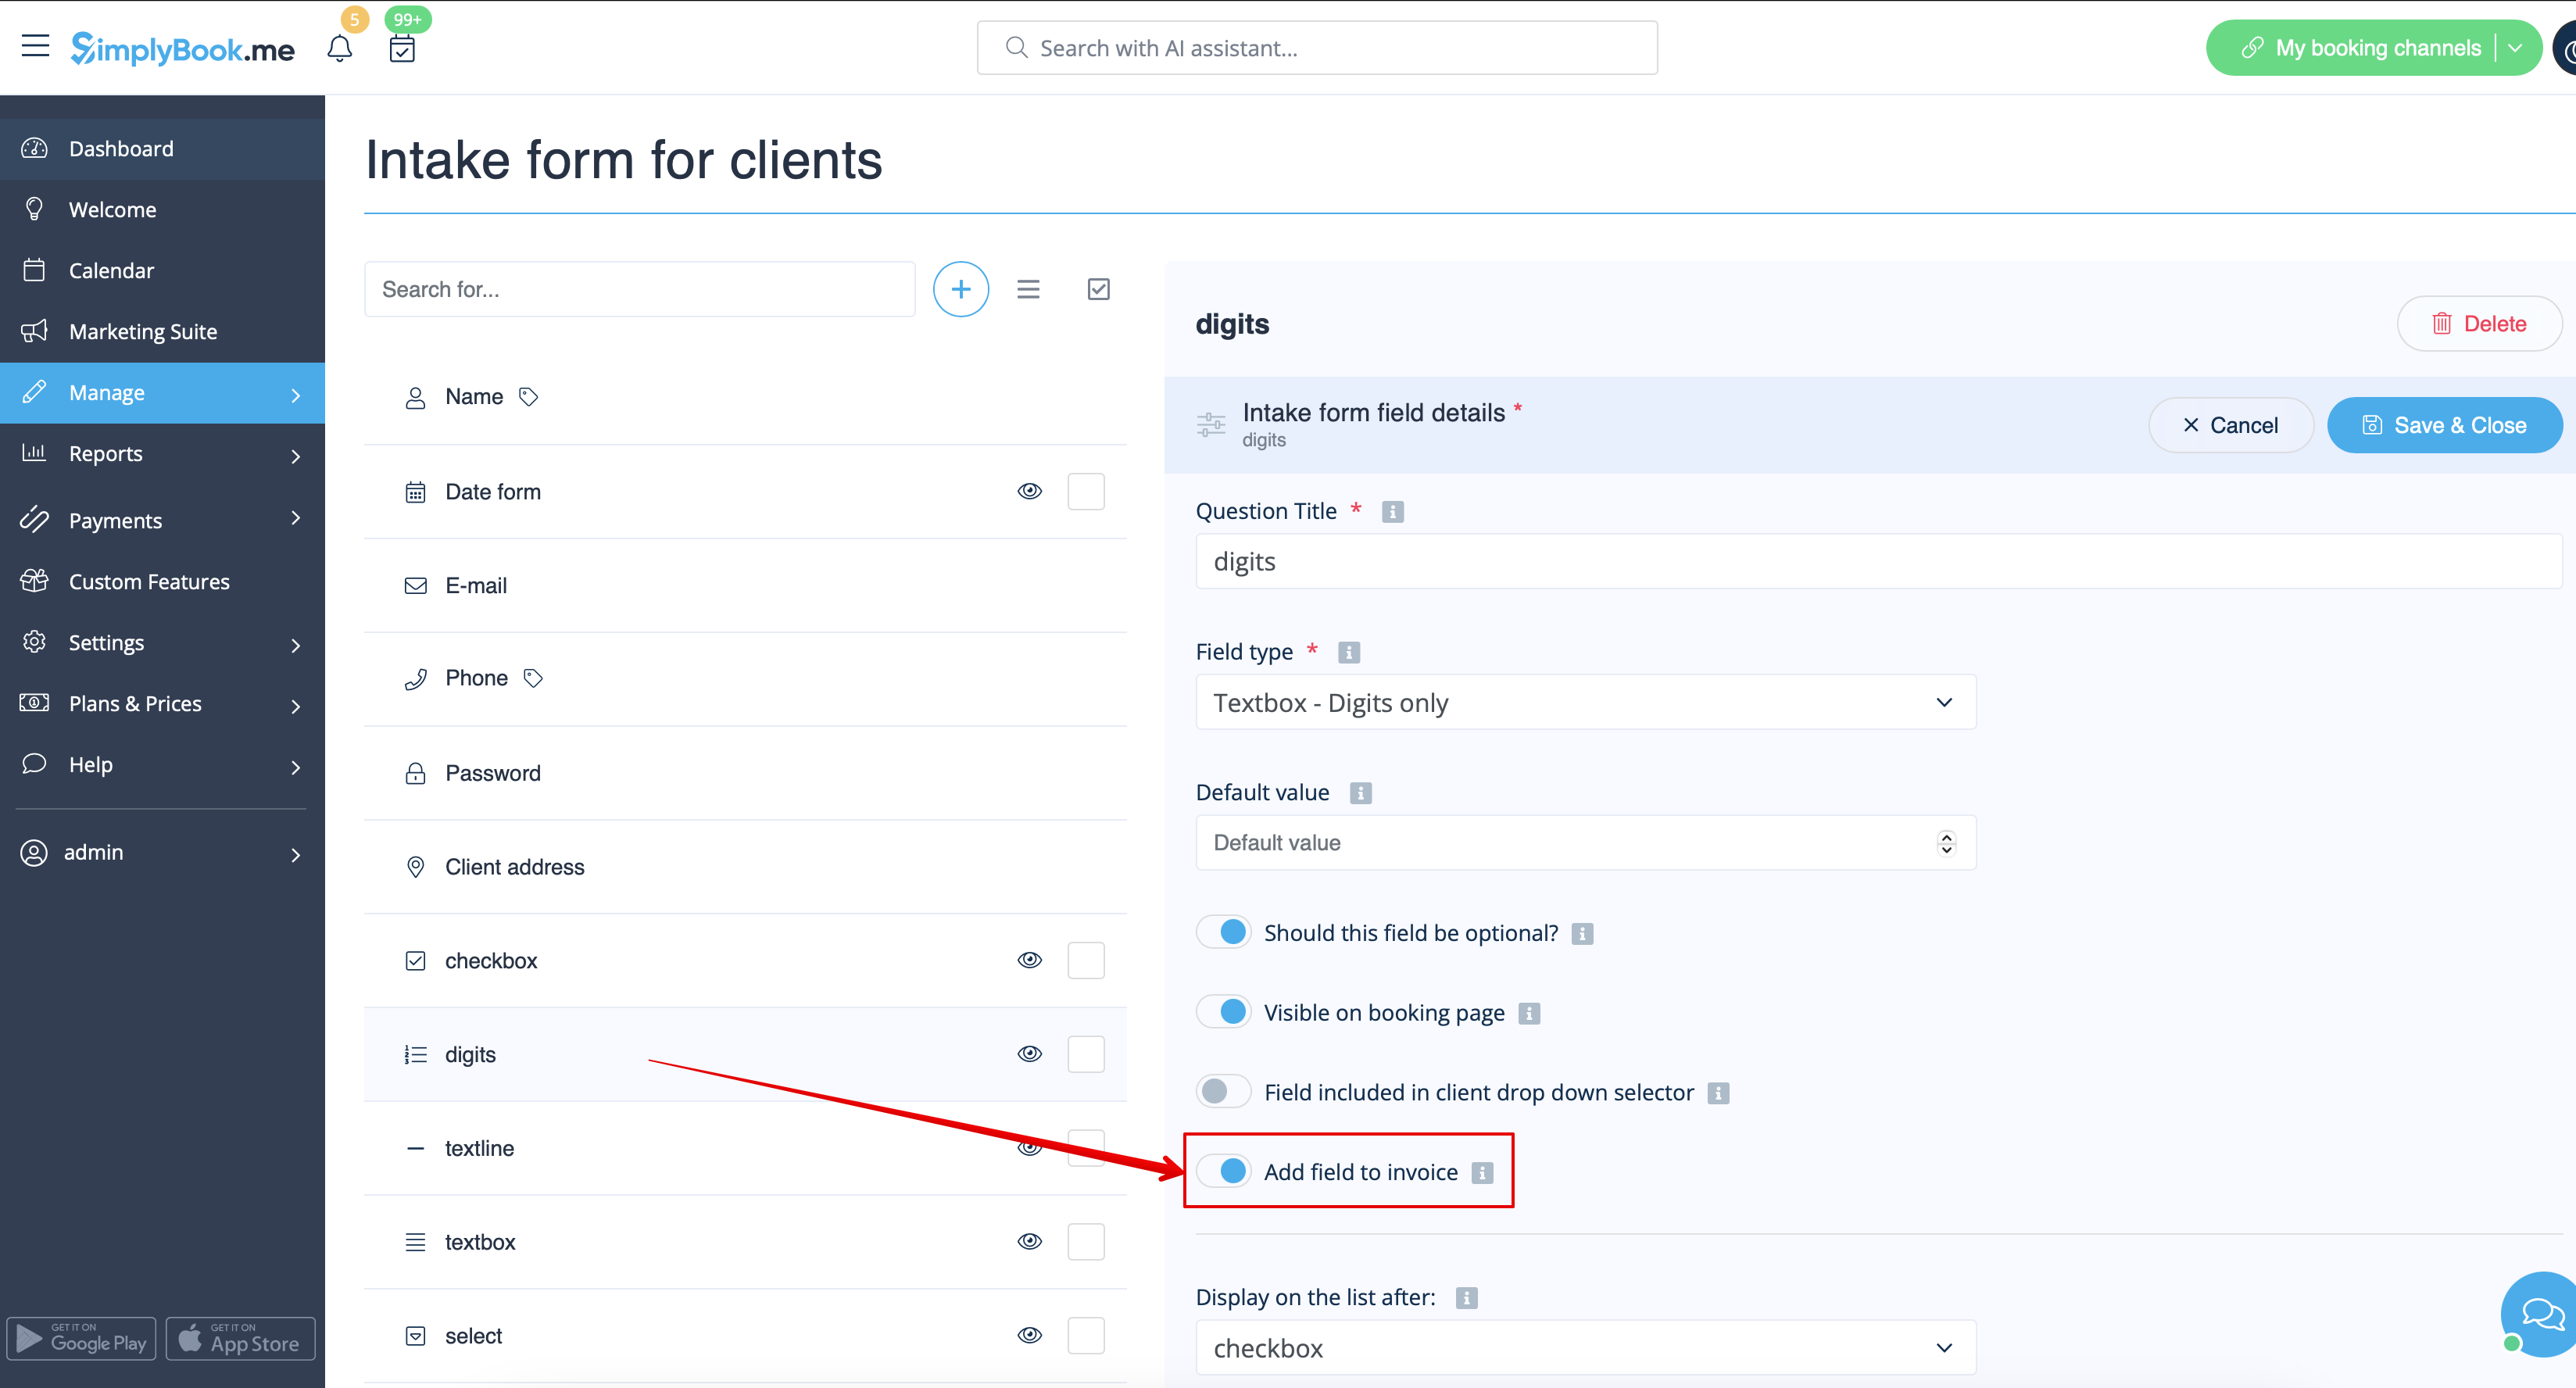
Or if you wish to add a client form then navigate to <span style="background-color:#d4f8e5; padding:5px; border-radius:5px;">Manage</span> -> <span style="background-color:#d4f8e5; padding:5px; border-radius:5px;">Client fields</span> -> click on the desired field to edit it -> enable <span style="background-color:#d4f8e5; padding:5px; border-radius:5px;">Add field to invoice,</span> save.<br> | Or if you wish to add a client form then navigate to <span style="background-color:#d4f8e5; padding:5px; border-radius:5px;">Manage</span> -> <span style="background-color:#d4f8e5; padding:5px; border-radius:5px;">Client fields</span> -> click on the desired field to edit it -> enable <span style="background-color:#d4f8e5; padding:5px; border-radius:5px;">Add field to invoice,</span> save.<br> | ||
[[File: | [[File:Add client form to invoice redesigned.png|1200px|border|center|link=https://help.simplybook.me/images/2/2f/Add_client_form_to_invoice_redesigned.png]] | ||
<br><br> | <br><br> | ||
</translate> | |||
<translate> | |||
<!--T:10--> | |||
As the result both the form title and the client response will be reflected in the invoice. | As the result both the form title and the client response will be reflected in the invoice. | ||
[[File: | [[File:Sbpay printed invoice example with client fields and intake forms.png|1200px|border|center|link=https://help.simplybook.me/images/8/88/Sbpay_printed_invoice_example_with_client_fields_and_intake_forms.png]] | ||
</translate> | |||
<translate> | |||
<!--T:11--> | |||
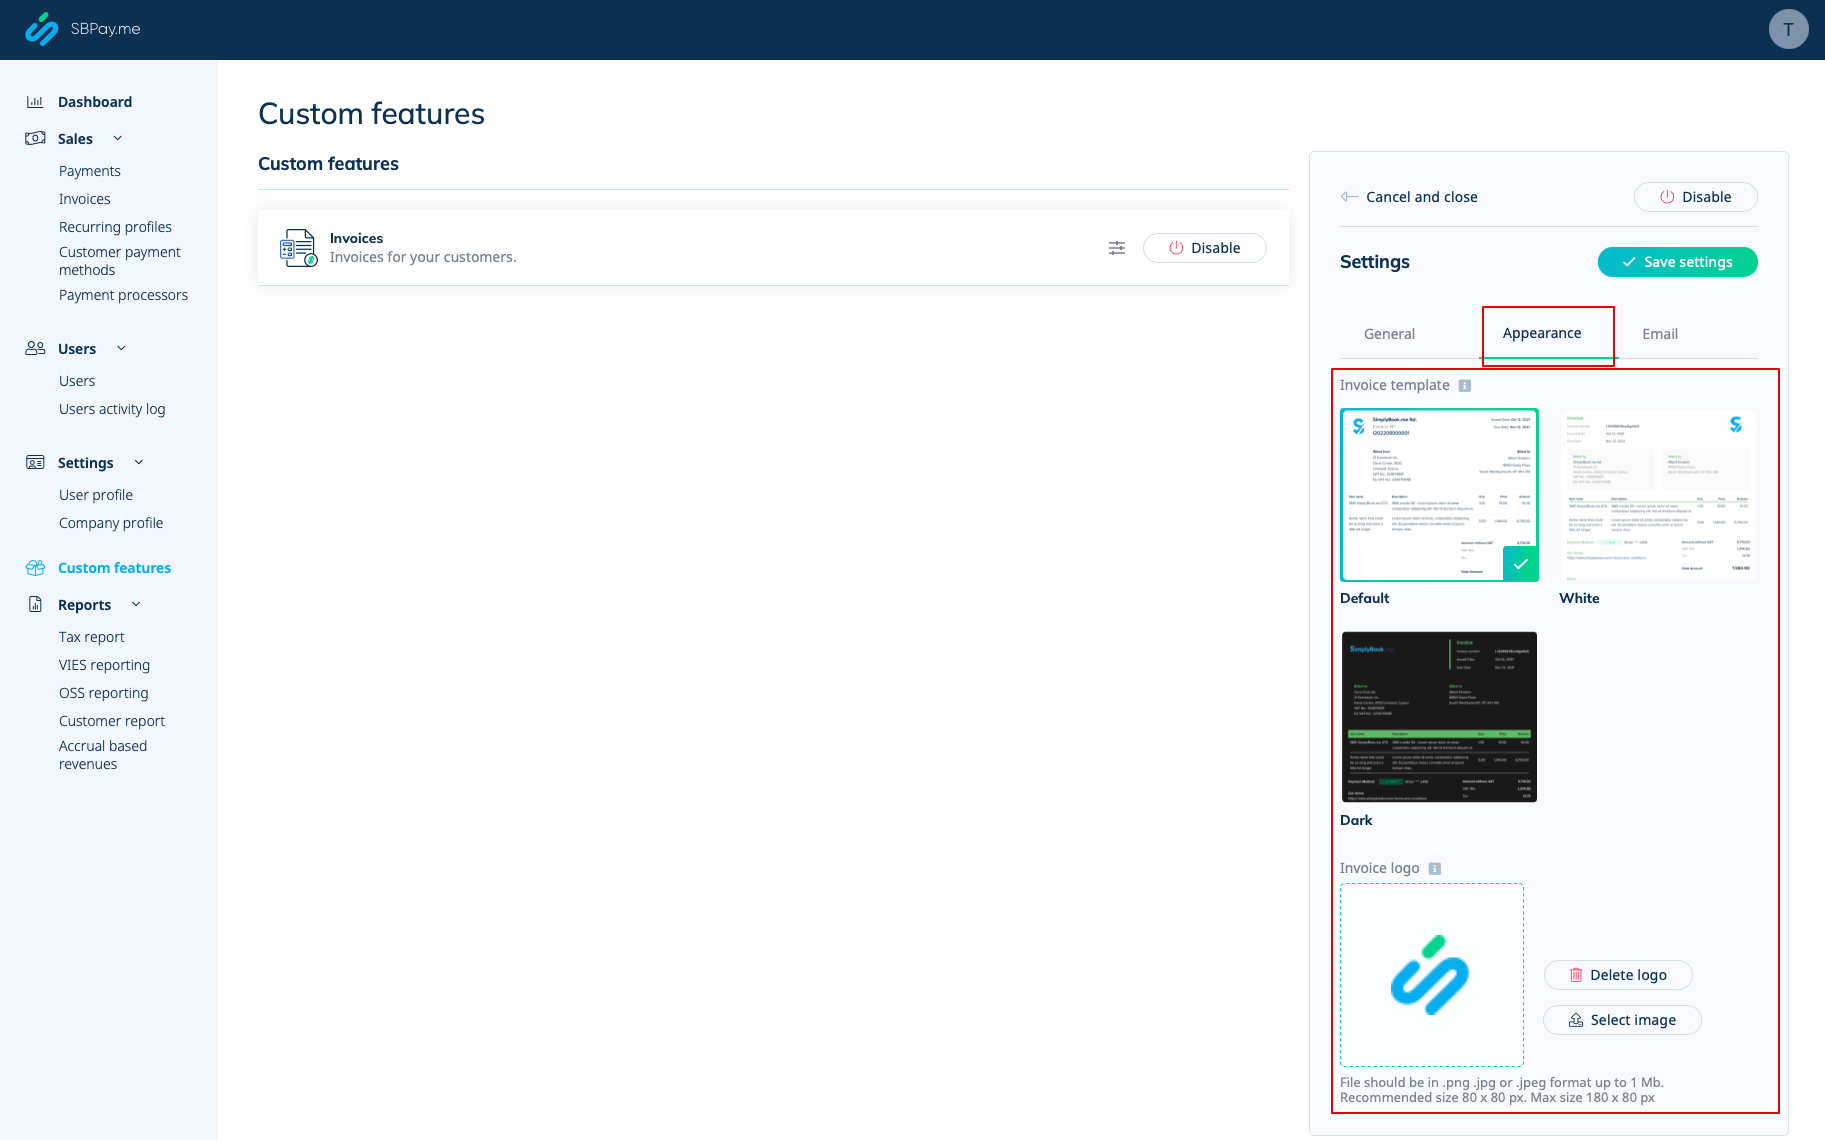
5. '''Invoice design.'''<br> | |||
There are three templates to choose from in <span style="background-color:#d4f8e5; padding:5px; border-radius:5px;">Payments(SBPay.me)</span> -> <span style="background-color:#d4f8e5; padding:5px; border-radius:5px;">Payment systems </span> -> <span style="background-color:#d4f8e5; padding:5px; border-radius:5px;">Custom features</span> -> <span style="background-color:#d4f8e5; padding:5px; border-radius:5px;">Invoices</span> -> <span style="background-color:#d4f8e5; padding:5px; border-radius:5px;">Settings</span> -> <span style="background-color:#d4f8e5; padding:5px; border-radius:5px;">Appearance.</span> | |||
Please cheese the one you like the most, add your comopany logo and save settings. | |||
[[File:Sbpay invoice appearance settings.png|1200px|border|center|link=https://help.simplybook.me/images/f/f3/Sbpay_invoice_appearance_settings.png]] | |||
<br><br> | <br><br> | ||
</translate> | |||
<translate> | |||
<!--T:12--> | |||
<span style="background-color:#ffe9e9; padding:5px; border-radius:5px;">'''Please note!''' Importing invoices from external platforms directly into the system is not supported. However, SimplyBook.me offers integration options with various accounting software, including [[Special:MyLanguage/Xero_integration| Xero]], [[Special:MyLanguage/QuickBooks_integration| QuickBooks]], and [[Special:MyLanguage/FreshBooks_integration| FreshBooks]]. You can efficiently manage your invoices within your preferred accounting system.</span> | |||
[[ | <br><br> | ||
< | |||
</translate> | |||
Latest revision as of 19:49, 2 February 2026
It may be necessary to show or hide some data or change the look for the invoices that the system sends to clients after they make a purchase on your booking website.
You can adjust the following items:
1. Company address.
The company address added in Payments(SBPay.me) -> Payment systems -> Settings -> Company profile -> Address will be reflected in the invoices.
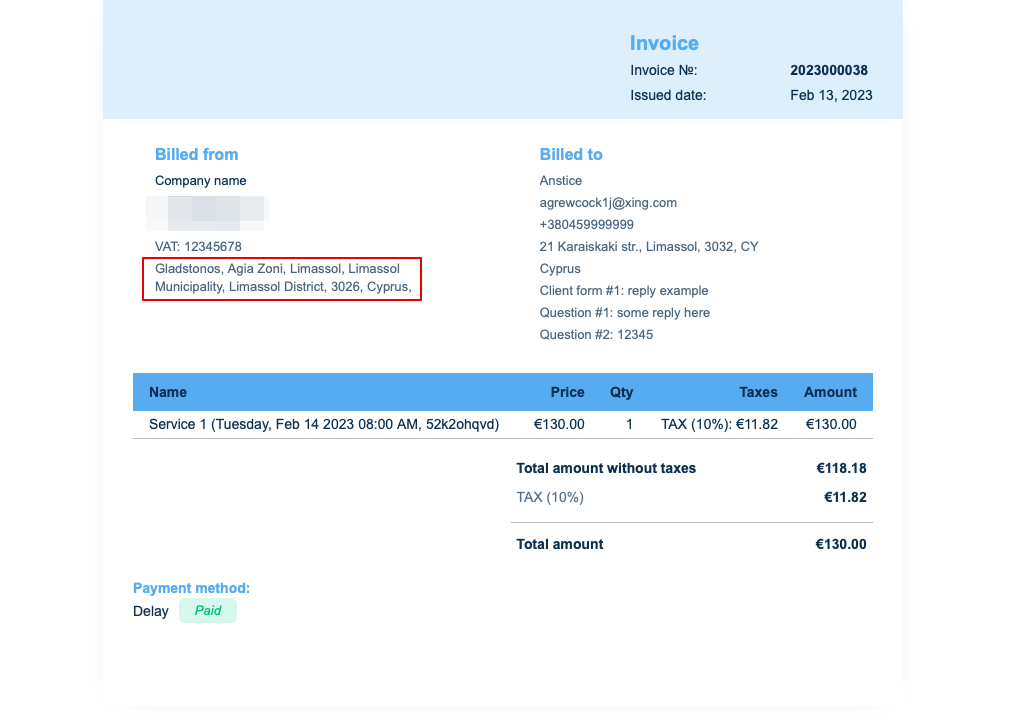
If you need to hide it simply remove address from that field and save settings.
2. Company VAT number.
If it is added in Payments(SBPay.me) -> Payment systems -> Settings -> Company profile -> Tax information it will be included to the invoice header.
3. Client address.
For the client address to be displayed please enable Client Login custom feature, enable both Display address on the booking page and Make address mandatory registration field in Accessibility section. Save settings.
4. Intake forms and Client Fields
You can add certain forms to be displayed in the client information block.
If it is an intake form please go to Manage -> Intake forms -> click on the necessary form to select -> enable Add field to invoice, save settings.
Or if you wish to add a client form then navigate to Manage -> Client fields -> click on the desired field to edit it -> enable Add field to invoice, save.
As the result both the form title and the client response will be reflected in the invoice.

5. Invoice design.
There are three templates to choose from in Payments(SBPay.me) -> Payment systems -> Custom features -> Invoices -> Settings -> Appearance.
Please cheese the one you like the most, add your comopany logo and save settings.
Please note! Importing invoices from external platforms directly into the system is not supported. However, SimplyBook.me offers integration options with various accounting software, including Xero, QuickBooks, and FreshBooks. You can efficiently manage your invoices within your preferred accounting system.