From SimplyBook.me
No edit summary |
No edit summary |
||
| (18 intermediate revisions by the same user not shown) | |||
| Line 1: | Line 1: | ||
<languages/> | |||
{{#seo: | {{#seo: | ||
|title=Packages custom feature - SimplyBook.me | |title=Packages custom feature - SimplyBook.me | ||
<translate> | |||
<!--T:7--> | |||
|description=Sell discounted service bundles to boost revenue. Multi-session packages with flexible booking. Clients track credits, book appointments easily. | |||
</translate> | |||
|titlemode=append | |titlemode=append | ||
|keywords=faq, frequently asked questions, booking software, appointment system questions, appointments online, calendar software, booking system, booking calendar, scheduling software, online appointment scheduling, online scheduling, plugins, custom features, additional functionality, pack, packages, sell items, sell packs, sell packages, sell service packages | |keywords=faq, frequently asked questions, booking software, appointment system questions, appointments online, calendar software, booking system, booking calendar, scheduling software, online appointment scheduling, online scheduling, plugins, custom features, additional functionality, pack, packages, sell items, sell packs, sell packages, sell service packages | ||
}} | }} | ||
<translate> | |||
<!--T:1--> | |||
__FORCETOC__ | __FORCETOC__ | ||
[[File:Packages icon.png | left]] | [[File:Packages icon.png | left]] | ||
With the Packages custom feature you can create a package of multiple services, or, if you also sell additional items, combine services with products, add-ons, and [[ | With the Packages custom feature you can create a package of multiple services, or, if you also sell additional items, combine services with products, add-ons, and [[Special:MyLanguage/Classes custom feature |classes]]. Clients can buy packages on your booking page or with Simplybook.me’s [[Special:MyLanguage/Point of Sale custom feature | POS feature]]. Each package can be defined with some general items limit and any number of services and products, and you can set the validity to any period available. Once clients have purchased a package, they can book a service at any time paying with their package credits. They can always check how many occurrences are left within each package. | ||
<!--T:2--> | |||
:'''Please note''': | :'''Please note''': | ||
*as soon as you turn this custom feature on, [[ | *as soon as you turn this custom feature on, [[Special:MyLanguage/Client Login custom feature | Client login]] and [[Special:MyLanguage/Accept payments custom feature | Accept Payments]] features will be enabled as well. | ||
*if the appointment that was purchased with the package credits | *if the appointment that was purchased with the package credits is then cancelled the credits are not returned to the client's balance by default.<br>To get the service reverted to the package limit of a particular client automatically you can go to Custom features -> Packages and enable "Automatically refund a package credit when a booking is cancelled" option. | ||
*this feature is not compatible with [[Special:MyLanguage/Clean History custom feature|Clean History]] | |||
*if you relate the package with the [[Special:MyLanguage/Recurring services(packs)|recurring service]] and the client uses the package during the checkout process - currently 1 package credit is used for the whole pack of recurring sessions. | |||
<!--T:3--> | |||
<br><br> | <br><br> | ||
Video tutorial available | <!--T:4--> | ||
Video tutorial available <p><youtube>PV-NcGv8kj4</youtube></p> | |||
<br><br> | <br><br> | ||
=How to use= | =How to use= | ||
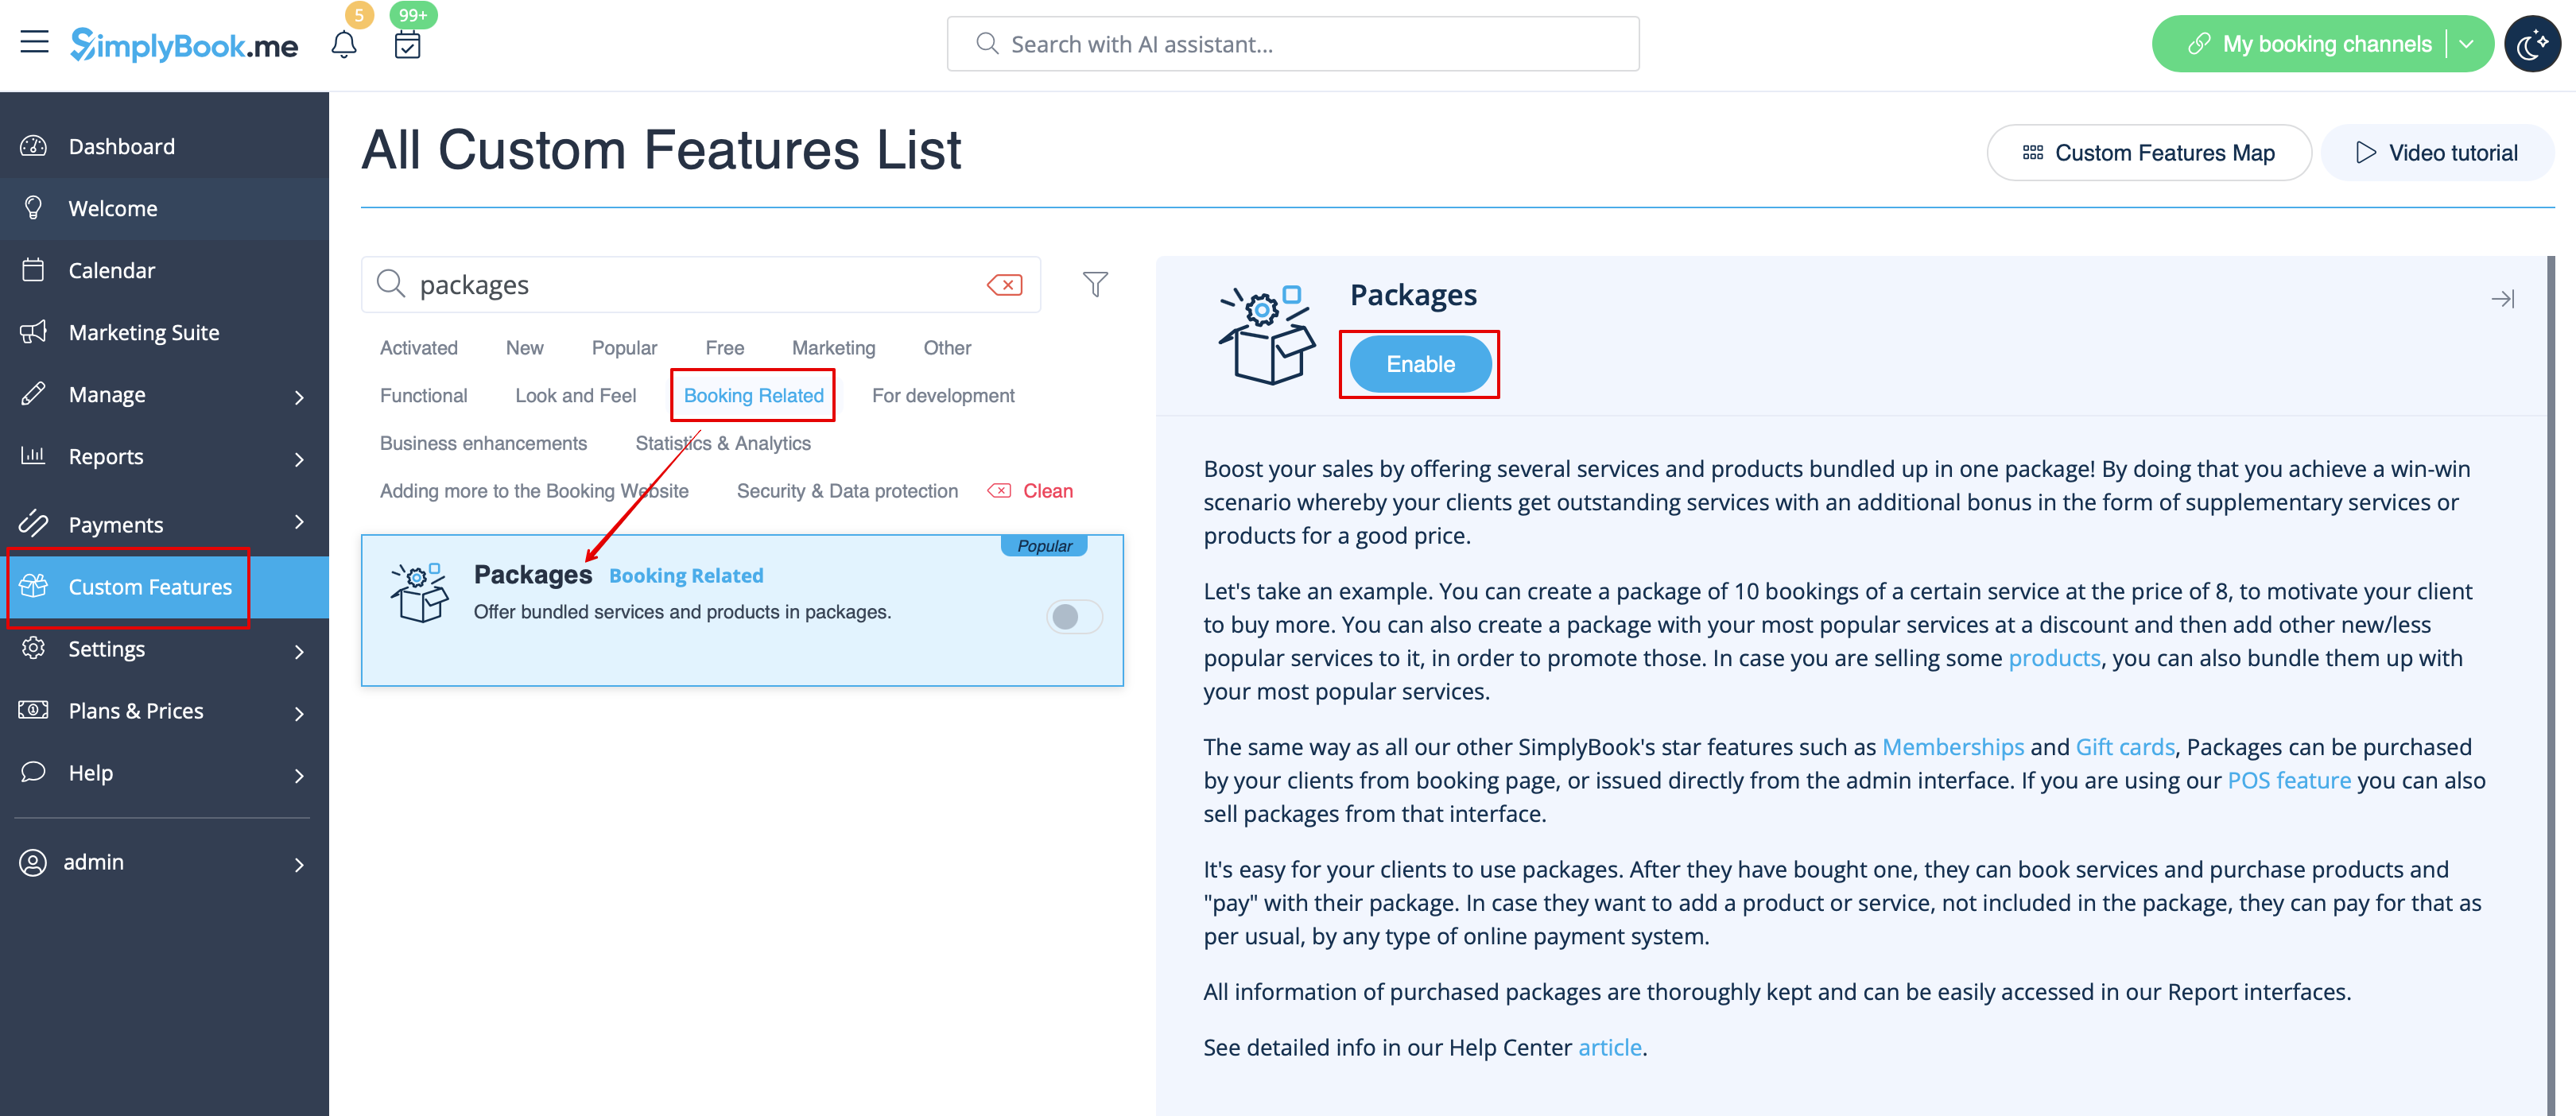
:1. To switch this custom feature on, please navigate to your Custom Features page, go to “Booking related” section and click on “Enable” | :1. To switch this custom feature on, please navigate to your Custom Features page, go to “Booking related” section and click on “Enable” | ||
[[File:Packages enable path redesigned.png|1200px | center|link=https://help.simplybook.me/images/7/78/Packages_enable_path_redesigned.png]] | |||
<br><br> | <br><br> | ||
:2. Then choose “Manage” option either near the custom feature or navigate to Packages in Manage section of the left-side menu. | :2. Then choose “Manage” option either near the custom feature or navigate to Packages in Manage section of the left-side menu. | ||
[[File:Packages settings path redesigned.png|1200px | center|link=https://help.simplybook.me/images/2/2a/Packages_settings_path_redesigned.png]] | |||
<br><br> | <br><br> | ||
:3. Just click on “+” button to create a new package. The form will appear on the right side of the page. | :3. Just click on “+” button to create a new package. The form will appear on the right side of the page. | ||
[[File:Create new package form redesigned.png|1200px | center|link=https://help.simplybook.me/images/0/0e/Create_new_package_form_redesigned.png]] | |||
<br><br> | <br><br> | ||
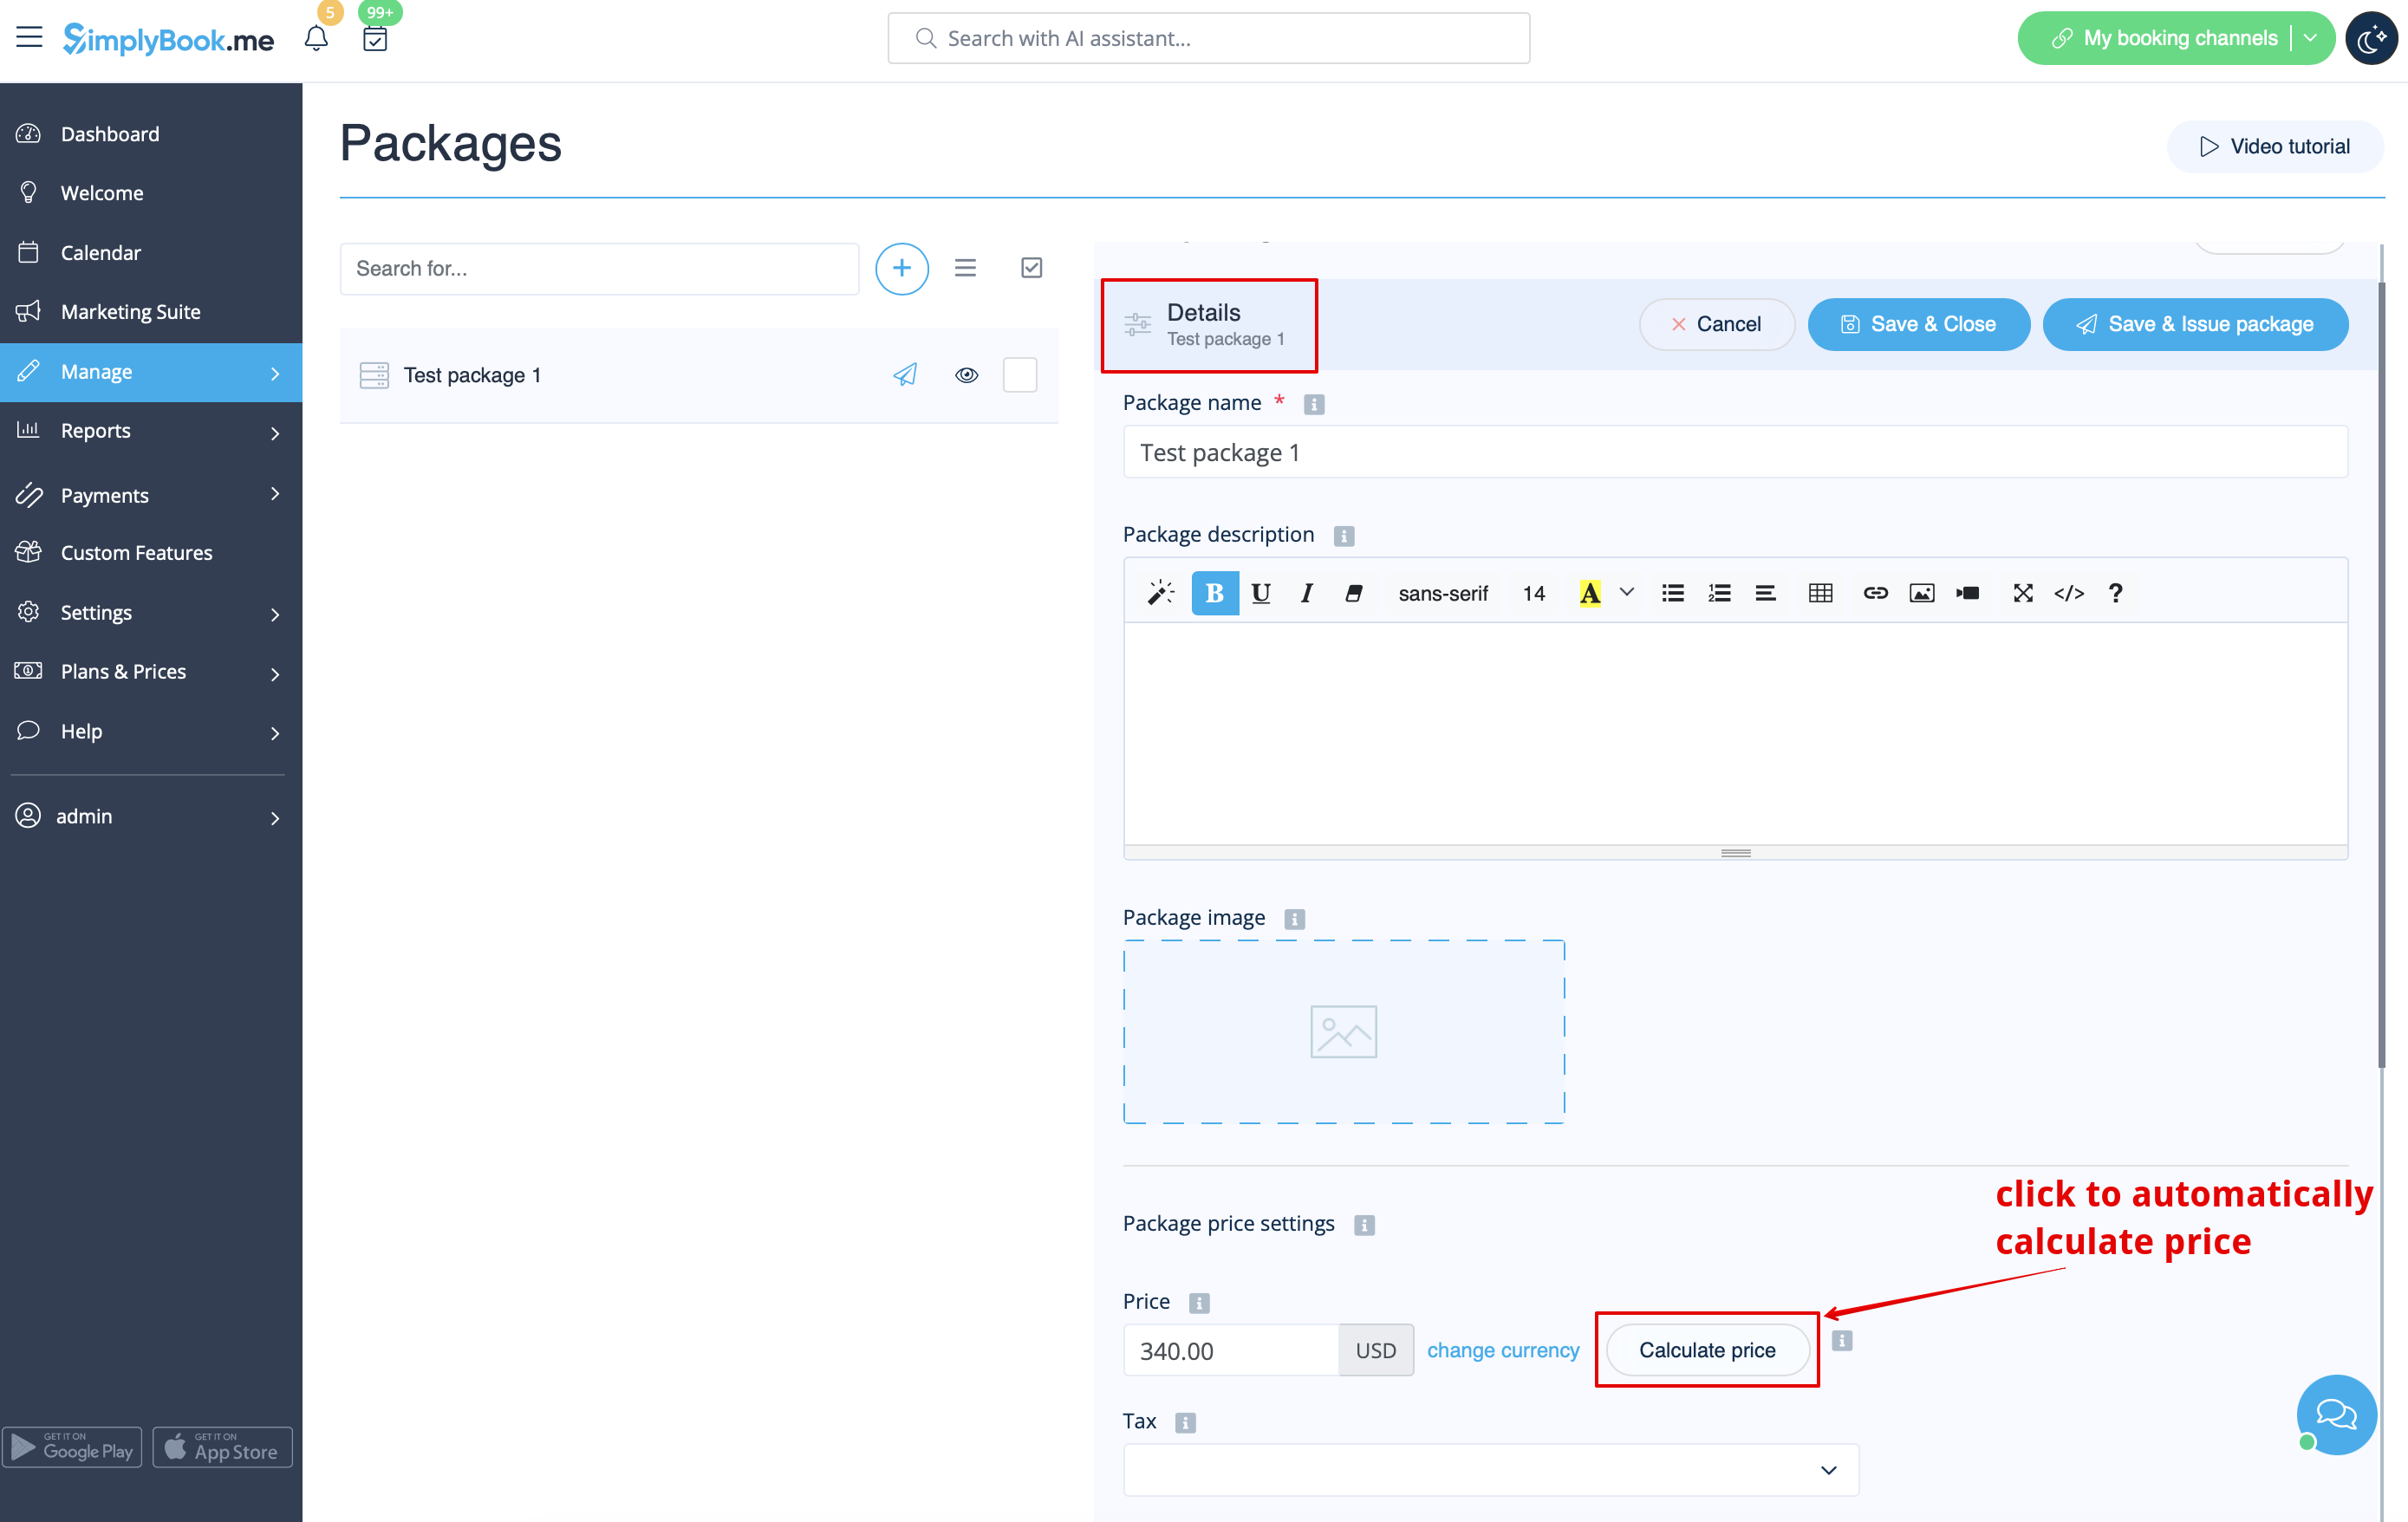
:4. Insert package name, add a description (you can even use HTML formatting for a better look) and image. | :4. Insert package name, add a description (you can even use HTML formatting for a better look) and image. | ||
| Line 35: | Line 46: | ||
:skip price box to later calculate the total amount of all the elements included into the package. | :skip price box to later calculate the total amount of all the elements included into the package. | ||
:'''Please note,''' it is not possible to create a package without a price. | :'''Please note,''' it is not possible to create a package without a price. | ||
[[File:Package details overview redesigned.png|1200px | center|link=https://help.simplybook.me/images/e/e0/Package_details_overview_redesigned.png]] | |||
<br><br> | <br><br> | ||
:5. Define the validity period of the package,<br> | :5. Define the validity period of the package,<br> | ||
:enable and set the general limit for the included items(optional, will be applied to services, add-ons and products connected to the package) | :enable and set the general limit for the included items(optional, will be applied to services, add-ons and products connected to the package) | ||
:and set the number of sets available for sale (unlimited by default). | :and set the number of sets available for sale (unlimited by default). | ||
[[File:Package duration and general limits redesigned.png|1200px |border| center|link=https://help.simplybook.me/images/2/26/Package_duration_and_general_limits_redesigned.png]] | |||
<br><br> | <br><br> | ||
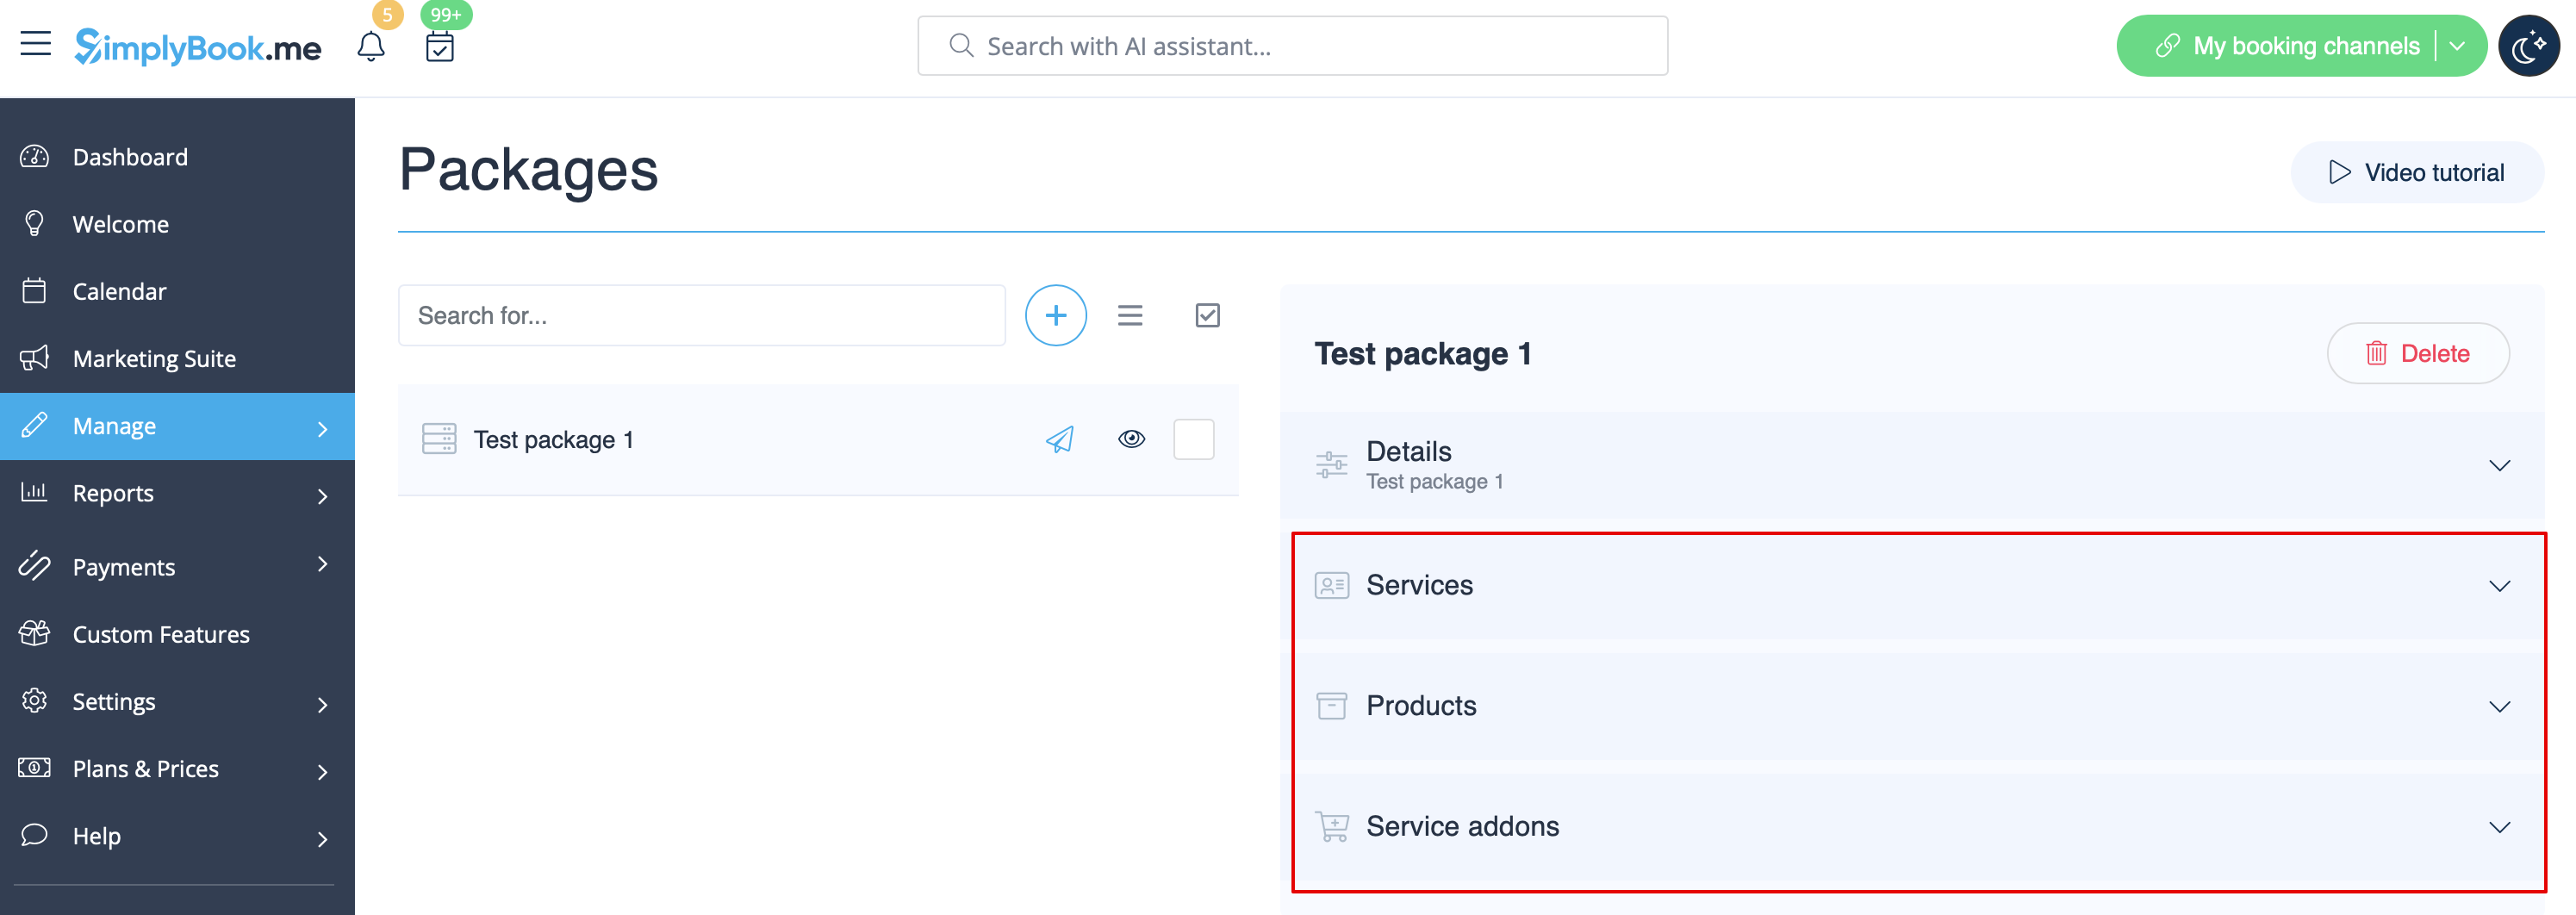
:6. Proceed to adding services, products and add-ons to the package<br> | :6. Proceed to adding services, products and add-ons to the package<br> | ||
:(you still need to set them in addition to the general limit if you use it to include the desired items into the pack, otherwise it will not be possible to use the package during the service/class booking process). | :(you still need to set them in addition to the general limit if you use it to include the desired items into the pack, otherwise it will not be possible to use the package during the service/class booking process). | ||
:You will see three corresponding sections below. | :You will see three corresponding sections below. | ||
[[File:Package items options redesigned.png|1200px | center|link=https://help.simplybook.me/images/2/25/Package_items_options_redesigned.png]] | |||
<br><br> | <br><br> | ||
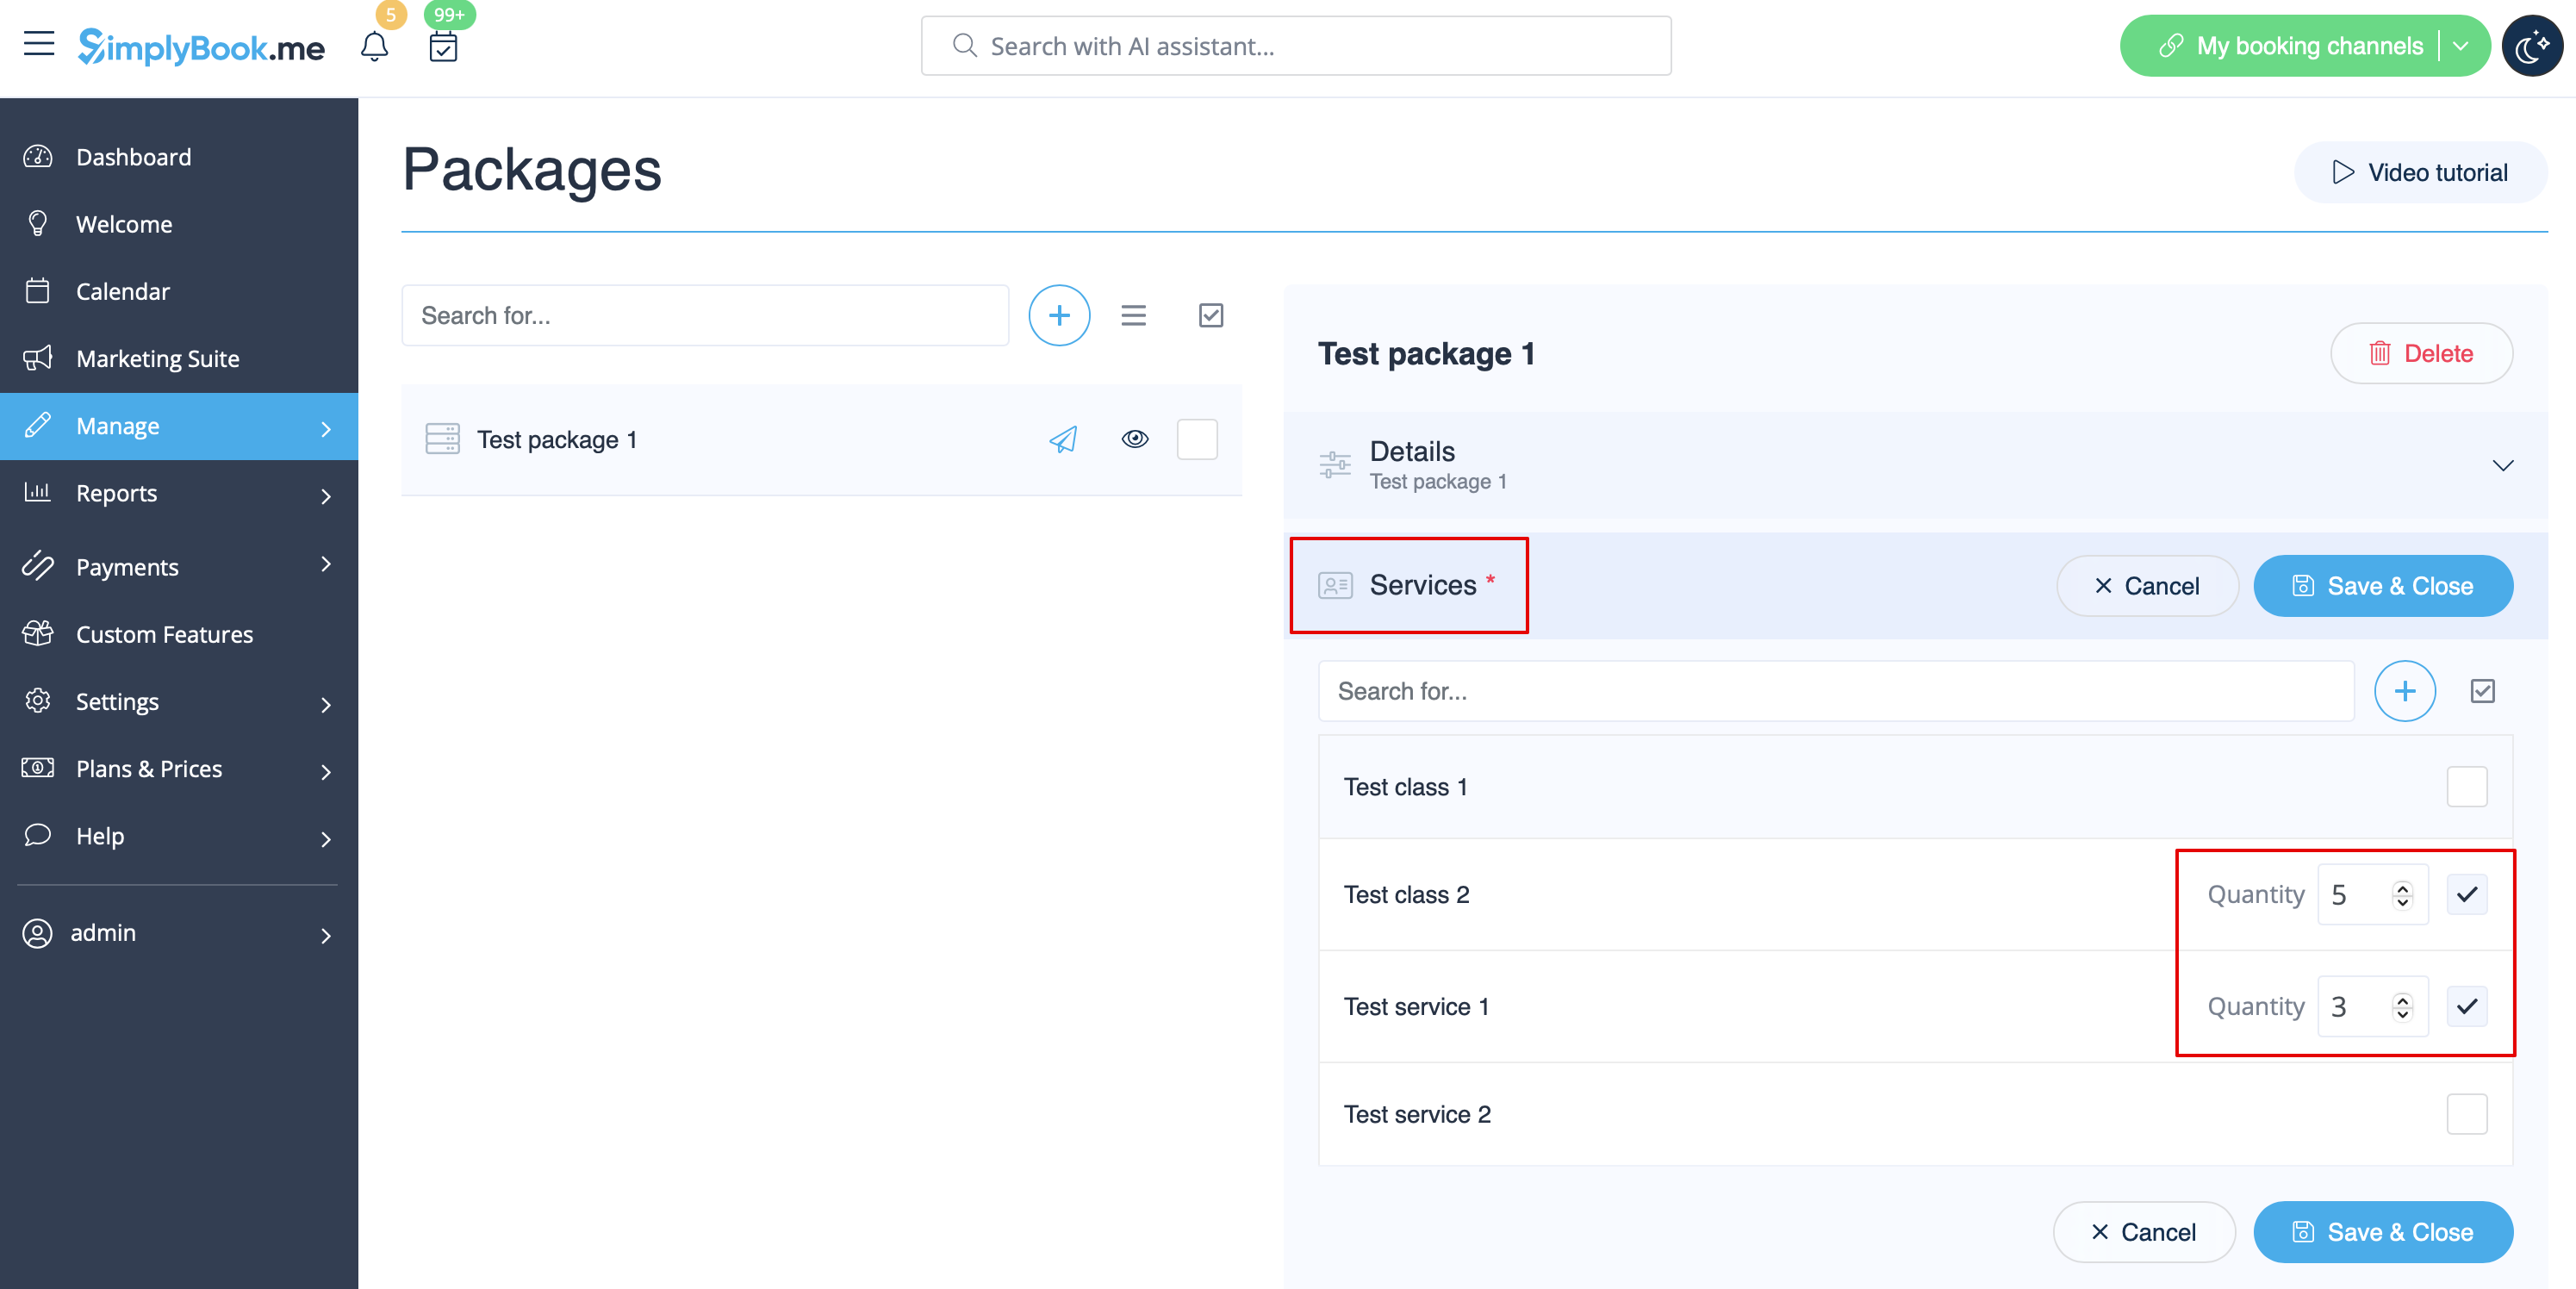
:7. Please select “Services” section, check the boxes with the necessary items and set the quantity that will be available for booking within the package. | :7. Please select “Services” section, check the boxes with the necessary items and set the quantity that will be available for booking within the package. | ||
[[File:Add services to package redesigned.png|1200px | center|link=https://help.simplybook.me/images/1/1c/Add_services_to_package_redesigned.png]] | |||
<br><br> | <br><br> | ||
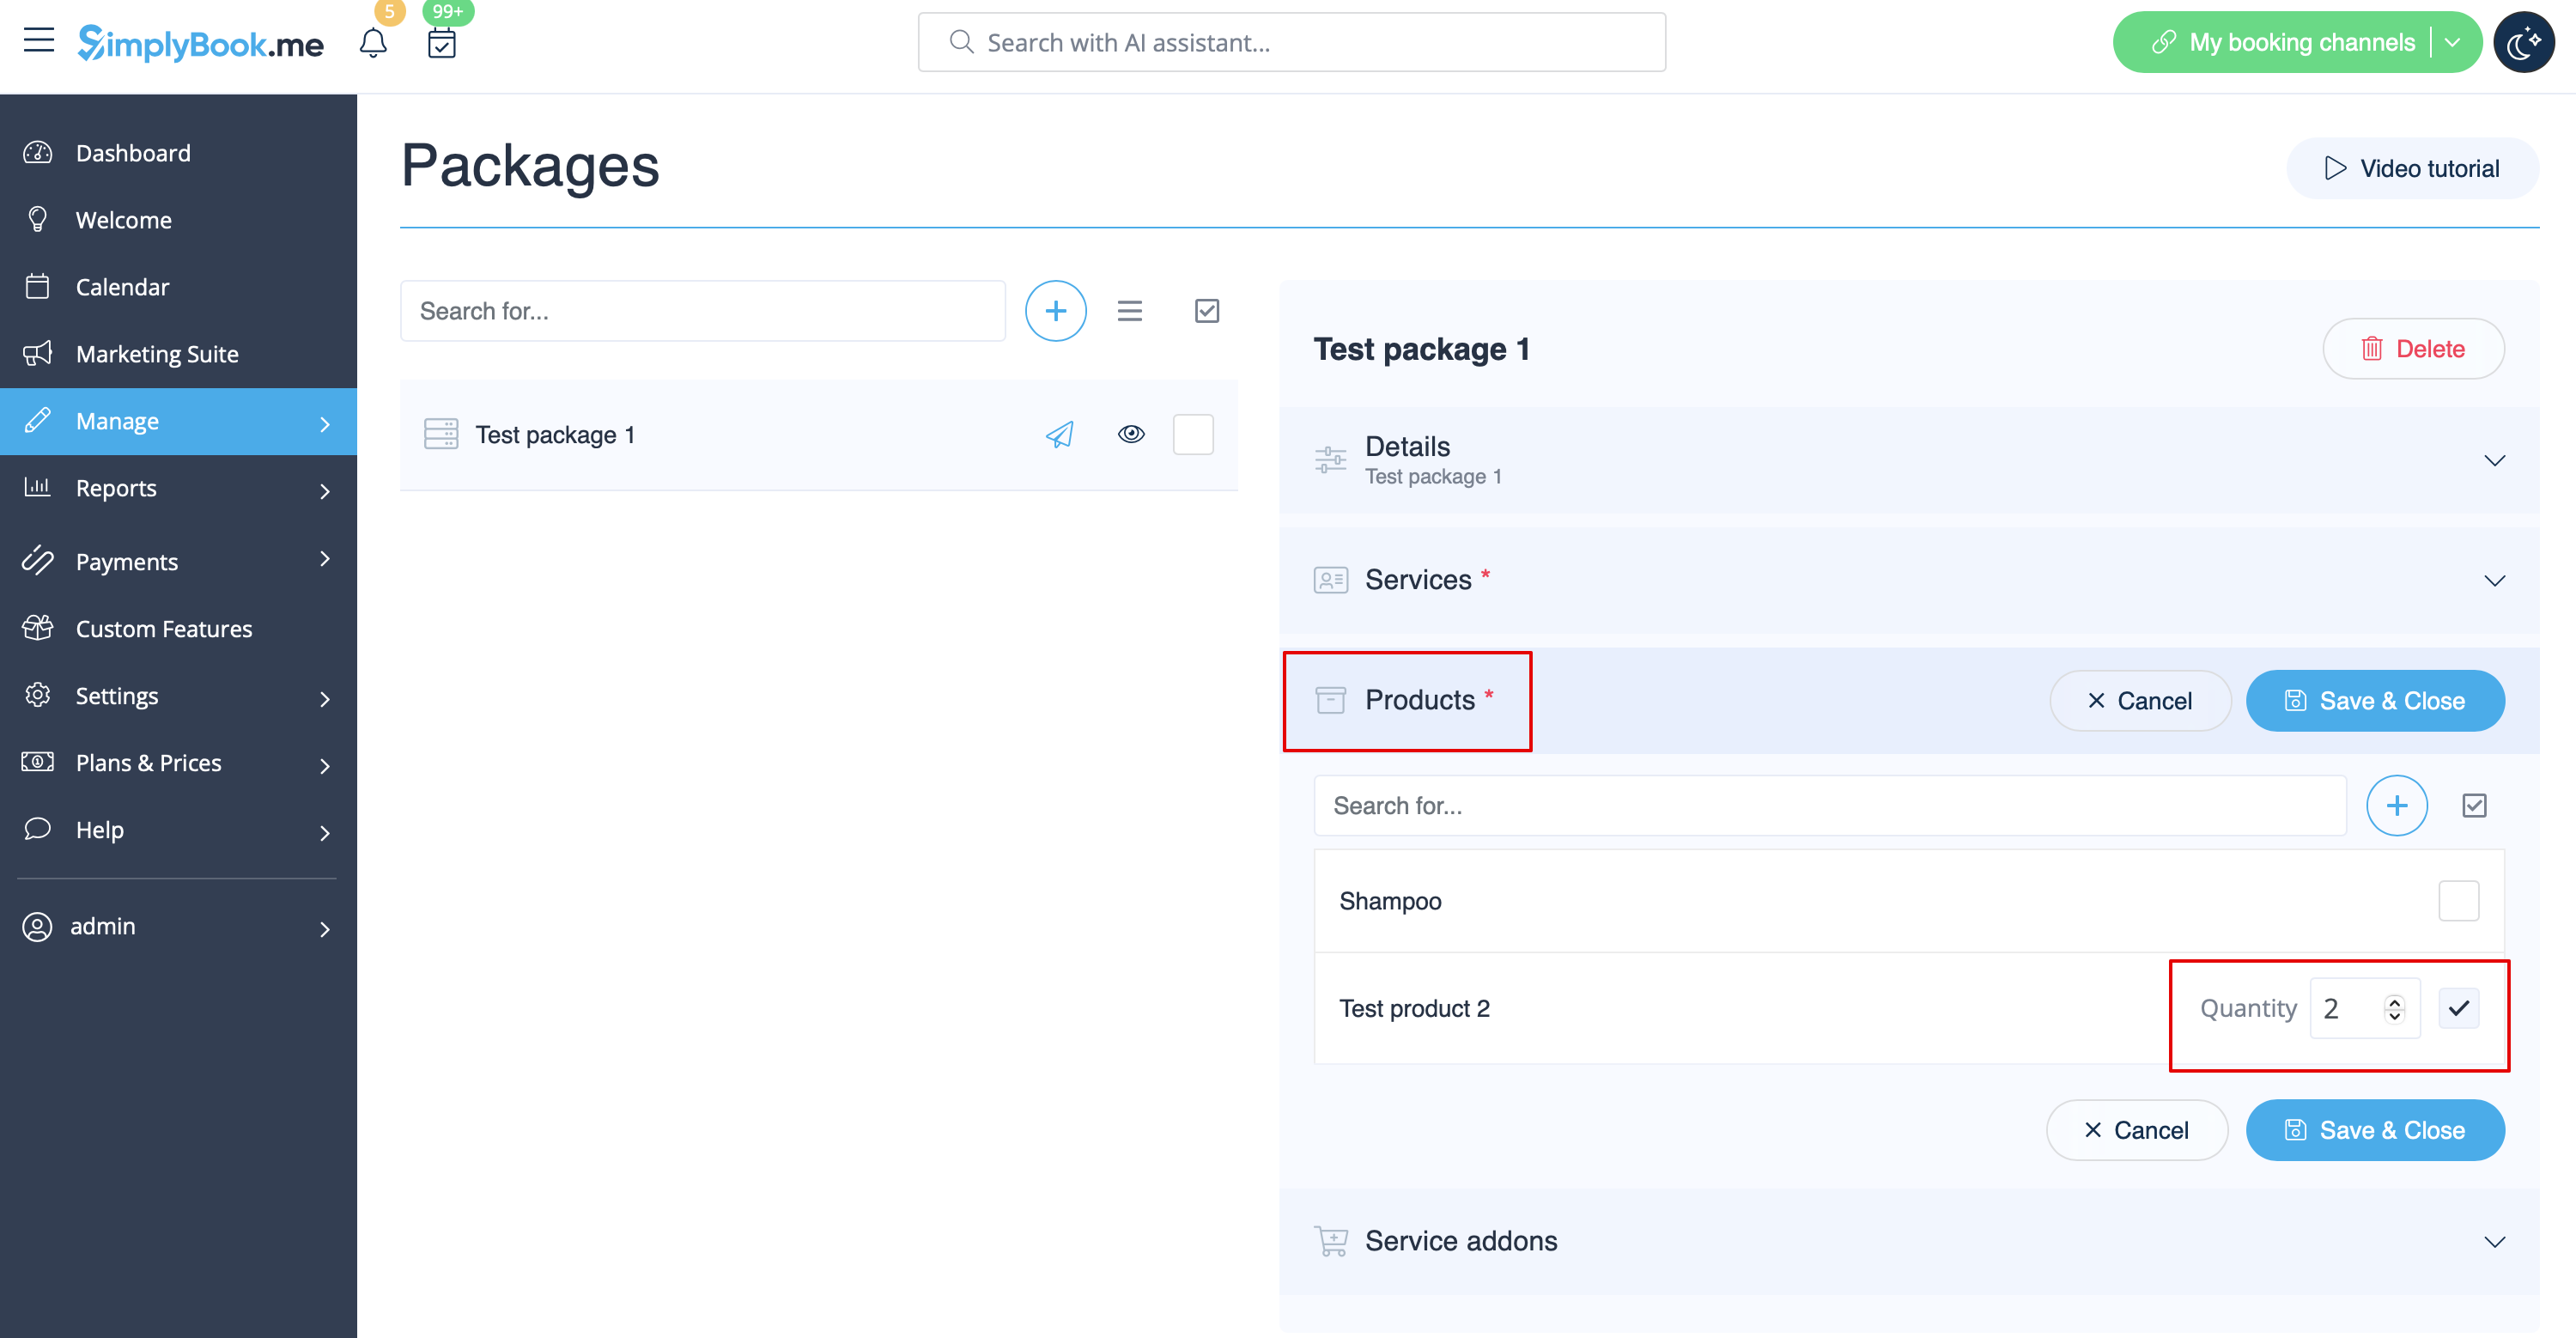
:8. If you are using [[ | :8. If you are using [[Special:MyLanguage/Products for Sale custom feature |Products for sale]] and/or [[Special:MyLanguage/Service Add-Ons custom feature |Service Add-ons]] features simply select the corresponding tabs and add elements the same way. | ||
[[File:Add products to package redesigned.png|1200px | center|link=https://help.simplybook.me/images/0/0f/Add_products_to_package_redesigned.png]] | |||
<br><br> | <br><br> | ||
:9. After you have added all the options and if you have not set a package price yet, get back to the “Details” tab and use “Calculate price” button to make the system automatically sum up all the elements prices for you. | :9. After you have added all the options and if you have not set a package price yet, get back to the “Details” tab and use “Calculate price” button to make the system automatically sum up all the elements prices for you. | ||
[[File:Calculate price for package redesigned.png|1200px | center|link=https://help.simplybook.me/images/4/4e/Calculate_price_for_package_redesigned.png]] | |||
<br><br> | <br><br> | ||
:10. Now you can click on “Save and issue package” to issue it to certain customers or simply save everything and allow your clients to buy this package on your booking site. | :10. Now you can click on “Save and issue package” to issue it to certain customers or simply save everything and allow your clients to buy this package on your booking site. | ||
[[File:Save and issue the package redesigned.png|1200px| center|link=https://help.simplybook.me/images/c/c9/Save_and_issue_the_package_redesigned.png]] | |||
<br><br> | <br><br> | ||
:If you assign a package from admin side or the client buys a package on the booking site he/she will receive package activation notification | :If you assign a package from admin side or the client buys a package on the booking site he/she will receive package activation notification | ||
| Line 71: | Line 76: | ||
:Use filters for more extensive analysis. | :Use filters for more extensive analysis. | ||
:Here you can also cancel the package for the specific client if needed. | :Here you can also cancel the package for the specific client if needed. | ||
[[File:Packages report with filter overview redesigned.png|1200px| center|link=https://help.simplybook.me/images/4/4a/Packages_report_with_filter_overview_redesigned.png]] | |||
<br><br> | <br><br> | ||
<!--T:5--> | |||
=The use of Packages within the POS feature= | =The use of Packages within the POS feature= | ||
:1. Make sure you have enabled POS custom feature. | :1. Make sure you have enabled POS custom feature. | ||
[[File:Pos enable path redesigned.png|1200px | center|link=https://help.simplybook.me/images/2/2b/Pos_enable_path_redesigned.png]] | |||
<br><br> | <br><br> | ||
:2. Go to POS interface, click on “New sale” button. | :2. Go to POS interface, click on “New sale” button. | ||
[[File:Pos new sale.png | center]] | |||
<br><br> | <br><br> | ||
:3. Select the client on the right side of the page to make the "Package" button active. | :3. Select the client on the right side of the page to make the "Package" button active. | ||
[[File:Sell package step1.png | center]] | |||
<br><br> | <br><br> | ||
:4. Pick the item and define the start date. End date will be automatically set based on the package duration after you save the selection. | :4. Pick the item and define the start date. End date will be automatically set based on the package duration after you save the selection. | ||
[[File:Sell package step2.png| center]] | |||
<br><br> | <br><br> | ||
:'''Please note''', if the package is hidden from the booking page it will be still available within POS interface as it is part of admin side visible to POS user. | :'''Please note''', if the package is hidden from the booking page it will be still available within POS interface as it is part of admin side visible to POS user. | ||
<br><br> | <br><br> | ||
:5. Proceed to checkout after you have added all the necessary services/products/add-ons/memberships/gift cards to the cart. | :5. Proceed to checkout after you have added all the necessary services/products/add-ons/memberships/gift cards to the cart. | ||
[[File:Sell_package_step3.png | center]] | |||
<br><br> | <br><br> | ||
:6. You may have a client who has already purchased a package before and wants to use it.<br> | :6. You may have a client who has already purchased a package before and wants to use it.<br> | ||
| Line 105: | Line 106: | ||
<!--T:6--> | |||
=Booking site operation= | =Booking site operation= | ||
:1. The clients will be able to navigate to the “Packages” tab on your booking site. | :1. The clients will be able to navigate to the “Packages” tab on your booking site. | ||
:'''Please note''', the client must be logged in to see his/her purchases. | :'''Please note''', the client must be logged in to see his/her purchases. | ||
[[File:Packages client side new.png | border| center]] | |||
<br><br> | <br><br> | ||
:2. They will find a suitable set, choose a start date and buy the package. | :2. They will find a suitable set, choose a start date and buy the package. | ||
[[File:Packages client side new date select.png | center]] | |||
<br><br> | <br><br> | ||
:(if they select “pay later” option during checkout you will need to approve their purchase from admin side first. Then they will be able to book/buy the items included) | :(if they select “pay later” option during checkout you will need to approve their purchase from admin side first. Then they will be able to book/buy the items included) | ||
<br><br> | <br><br> | ||
:3. When the client has already the purchased package and books the separate services/products/add-ons, he/she will be able to cover those items with his packages’ credits (if included in packages) or pay for them in a regular way. | :3. When the client has already the purchased package and books the separate services/products/add-ons, he/she will be able to cover those items with his packages’ credits (if included in packages) or pay for them in a regular way. | ||
[[File:Packages client side new apply pack.png| center]] | |||
<br><br> | <br><br> | ||
<br><br> | <br><br> | ||
</translate> | |||
Latest revision as of 14:27, 18 February 2026
With the Packages custom feature you can create a package of multiple services, or, if you also sell additional items, combine services with products, add-ons, and classes. Clients can buy packages on your booking page or with Simplybook.me’s POS feature. Each package can be defined with some general items limit and any number of services and products, and you can set the validity to any period available. Once clients have purchased a package, they can book a service at any time paying with their package credits. They can always check how many occurrences are left within each package.
- Please note:
- as soon as you turn this custom feature on, Client login and Accept Payments features will be enabled as well.
- if the appointment that was purchased with the package credits is then cancelled the credits are not returned to the client's balance by default.
To get the service reverted to the package limit of a particular client automatically you can go to Custom features -> Packages and enable "Automatically refund a package credit when a booking is cancelled" option. - this feature is not compatible with Clean History
- if you relate the package with the recurring service and the client uses the package during the checkout process - currently 1 package credit is used for the whole pack of recurring sessions.
Video tutorial available
How to use
- 1. To switch this custom feature on, please navigate to your Custom Features page, go to “Booking related” section and click on “Enable”
- 2. Then choose “Manage” option either near the custom feature or navigate to Packages in Manage section of the left-side menu.

- 3. Just click on “+” button to create a new package. The form will appear on the right side of the page.
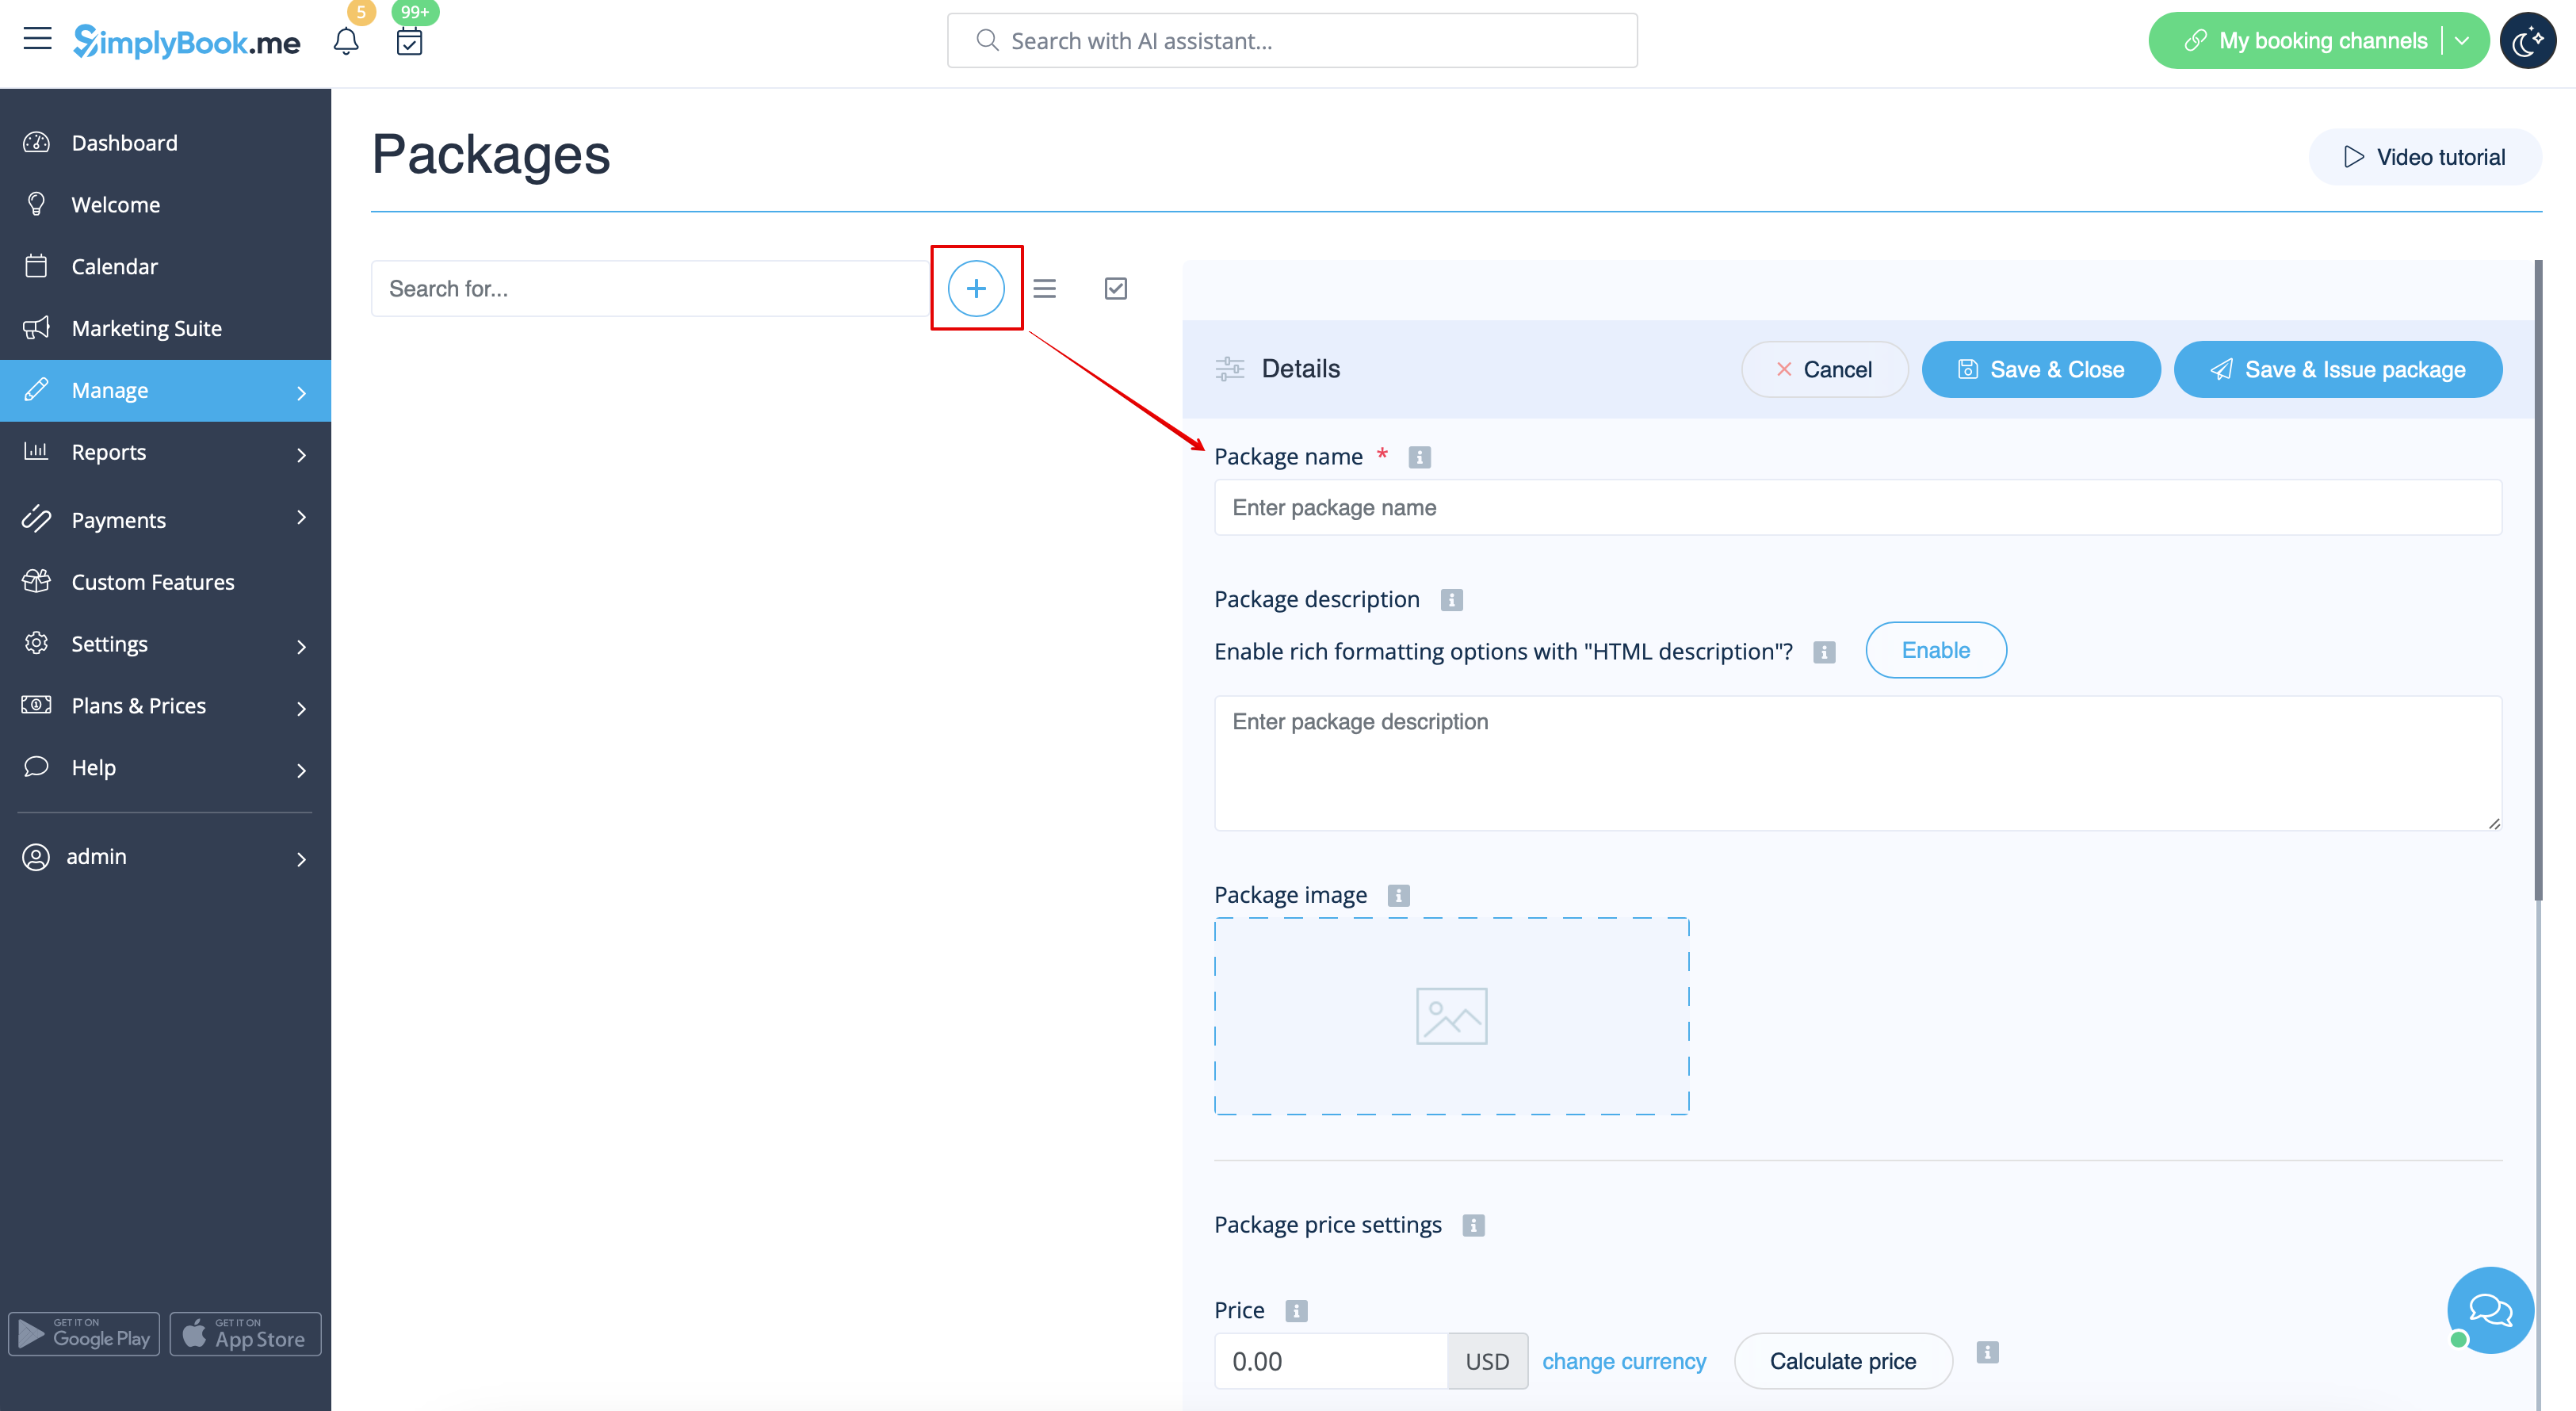
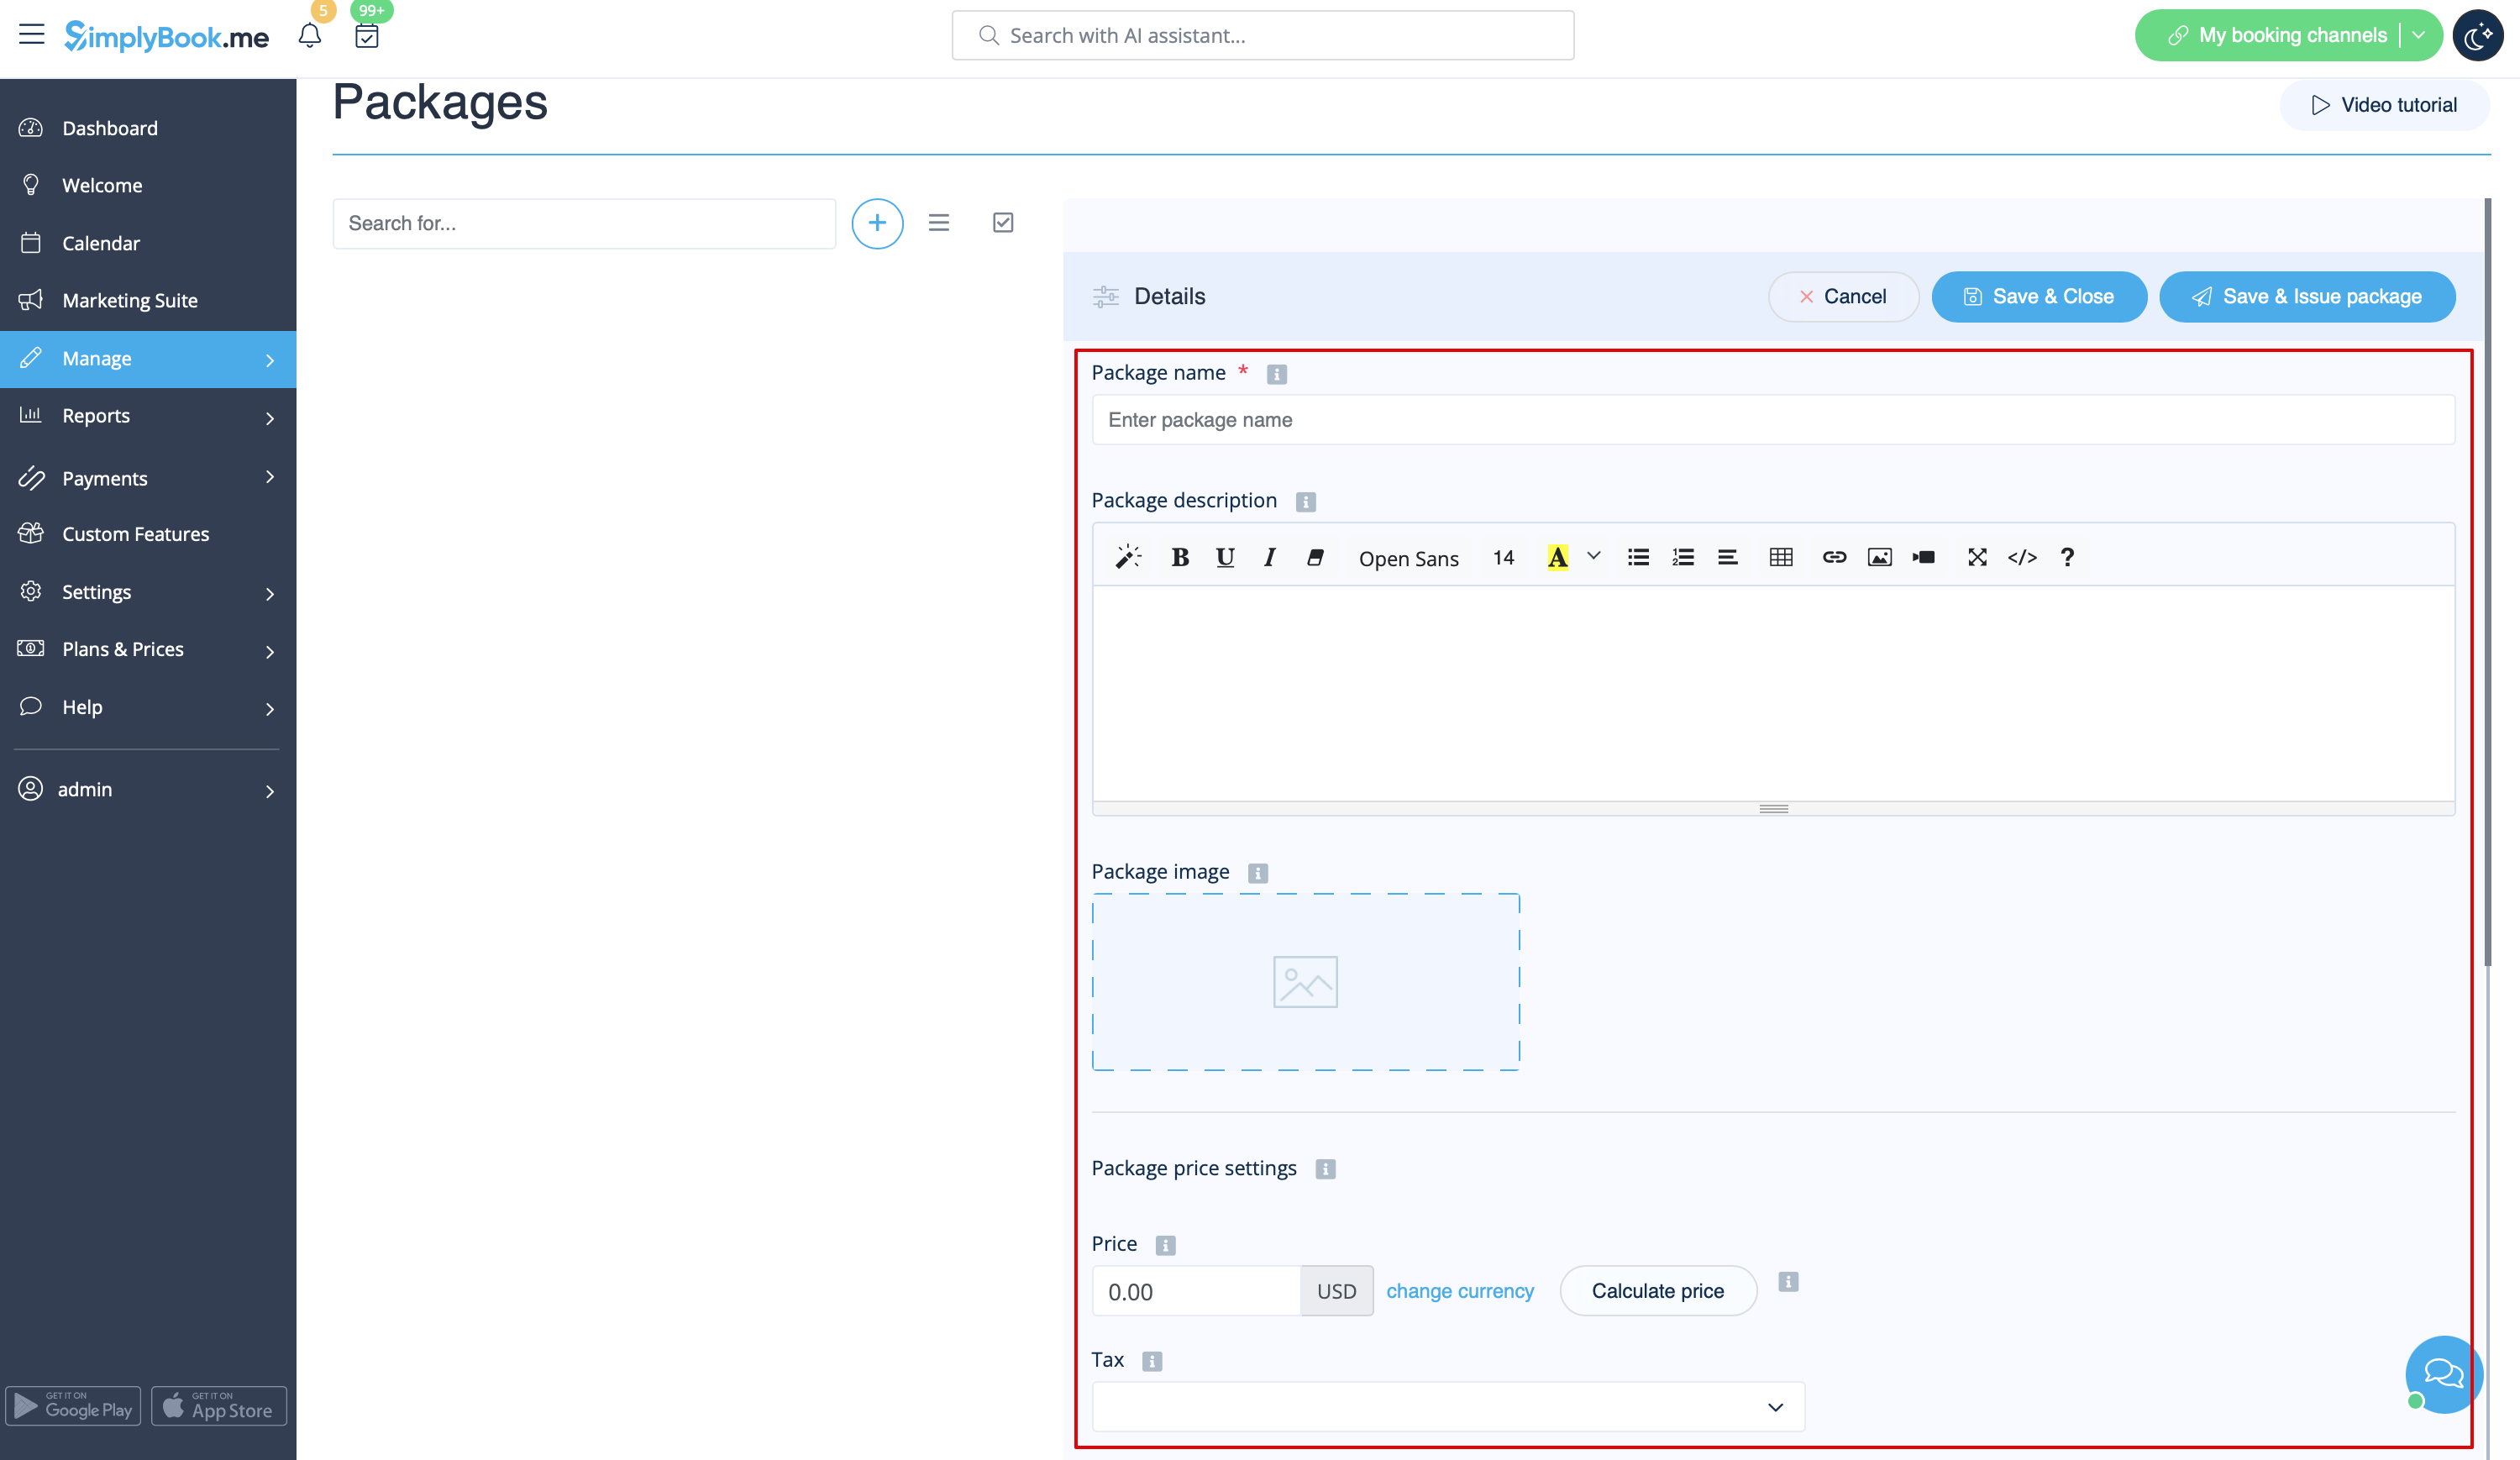
- 4. Insert package name, add a description (you can even use HTML formatting for a better look) and image.
- At this point you can also set the package price: you can specify the defined pack cost (if you want to make a discount, for example) or
- skip price box to later calculate the total amount of all the elements included into the package.
- Please note, it is not possible to create a package without a price.
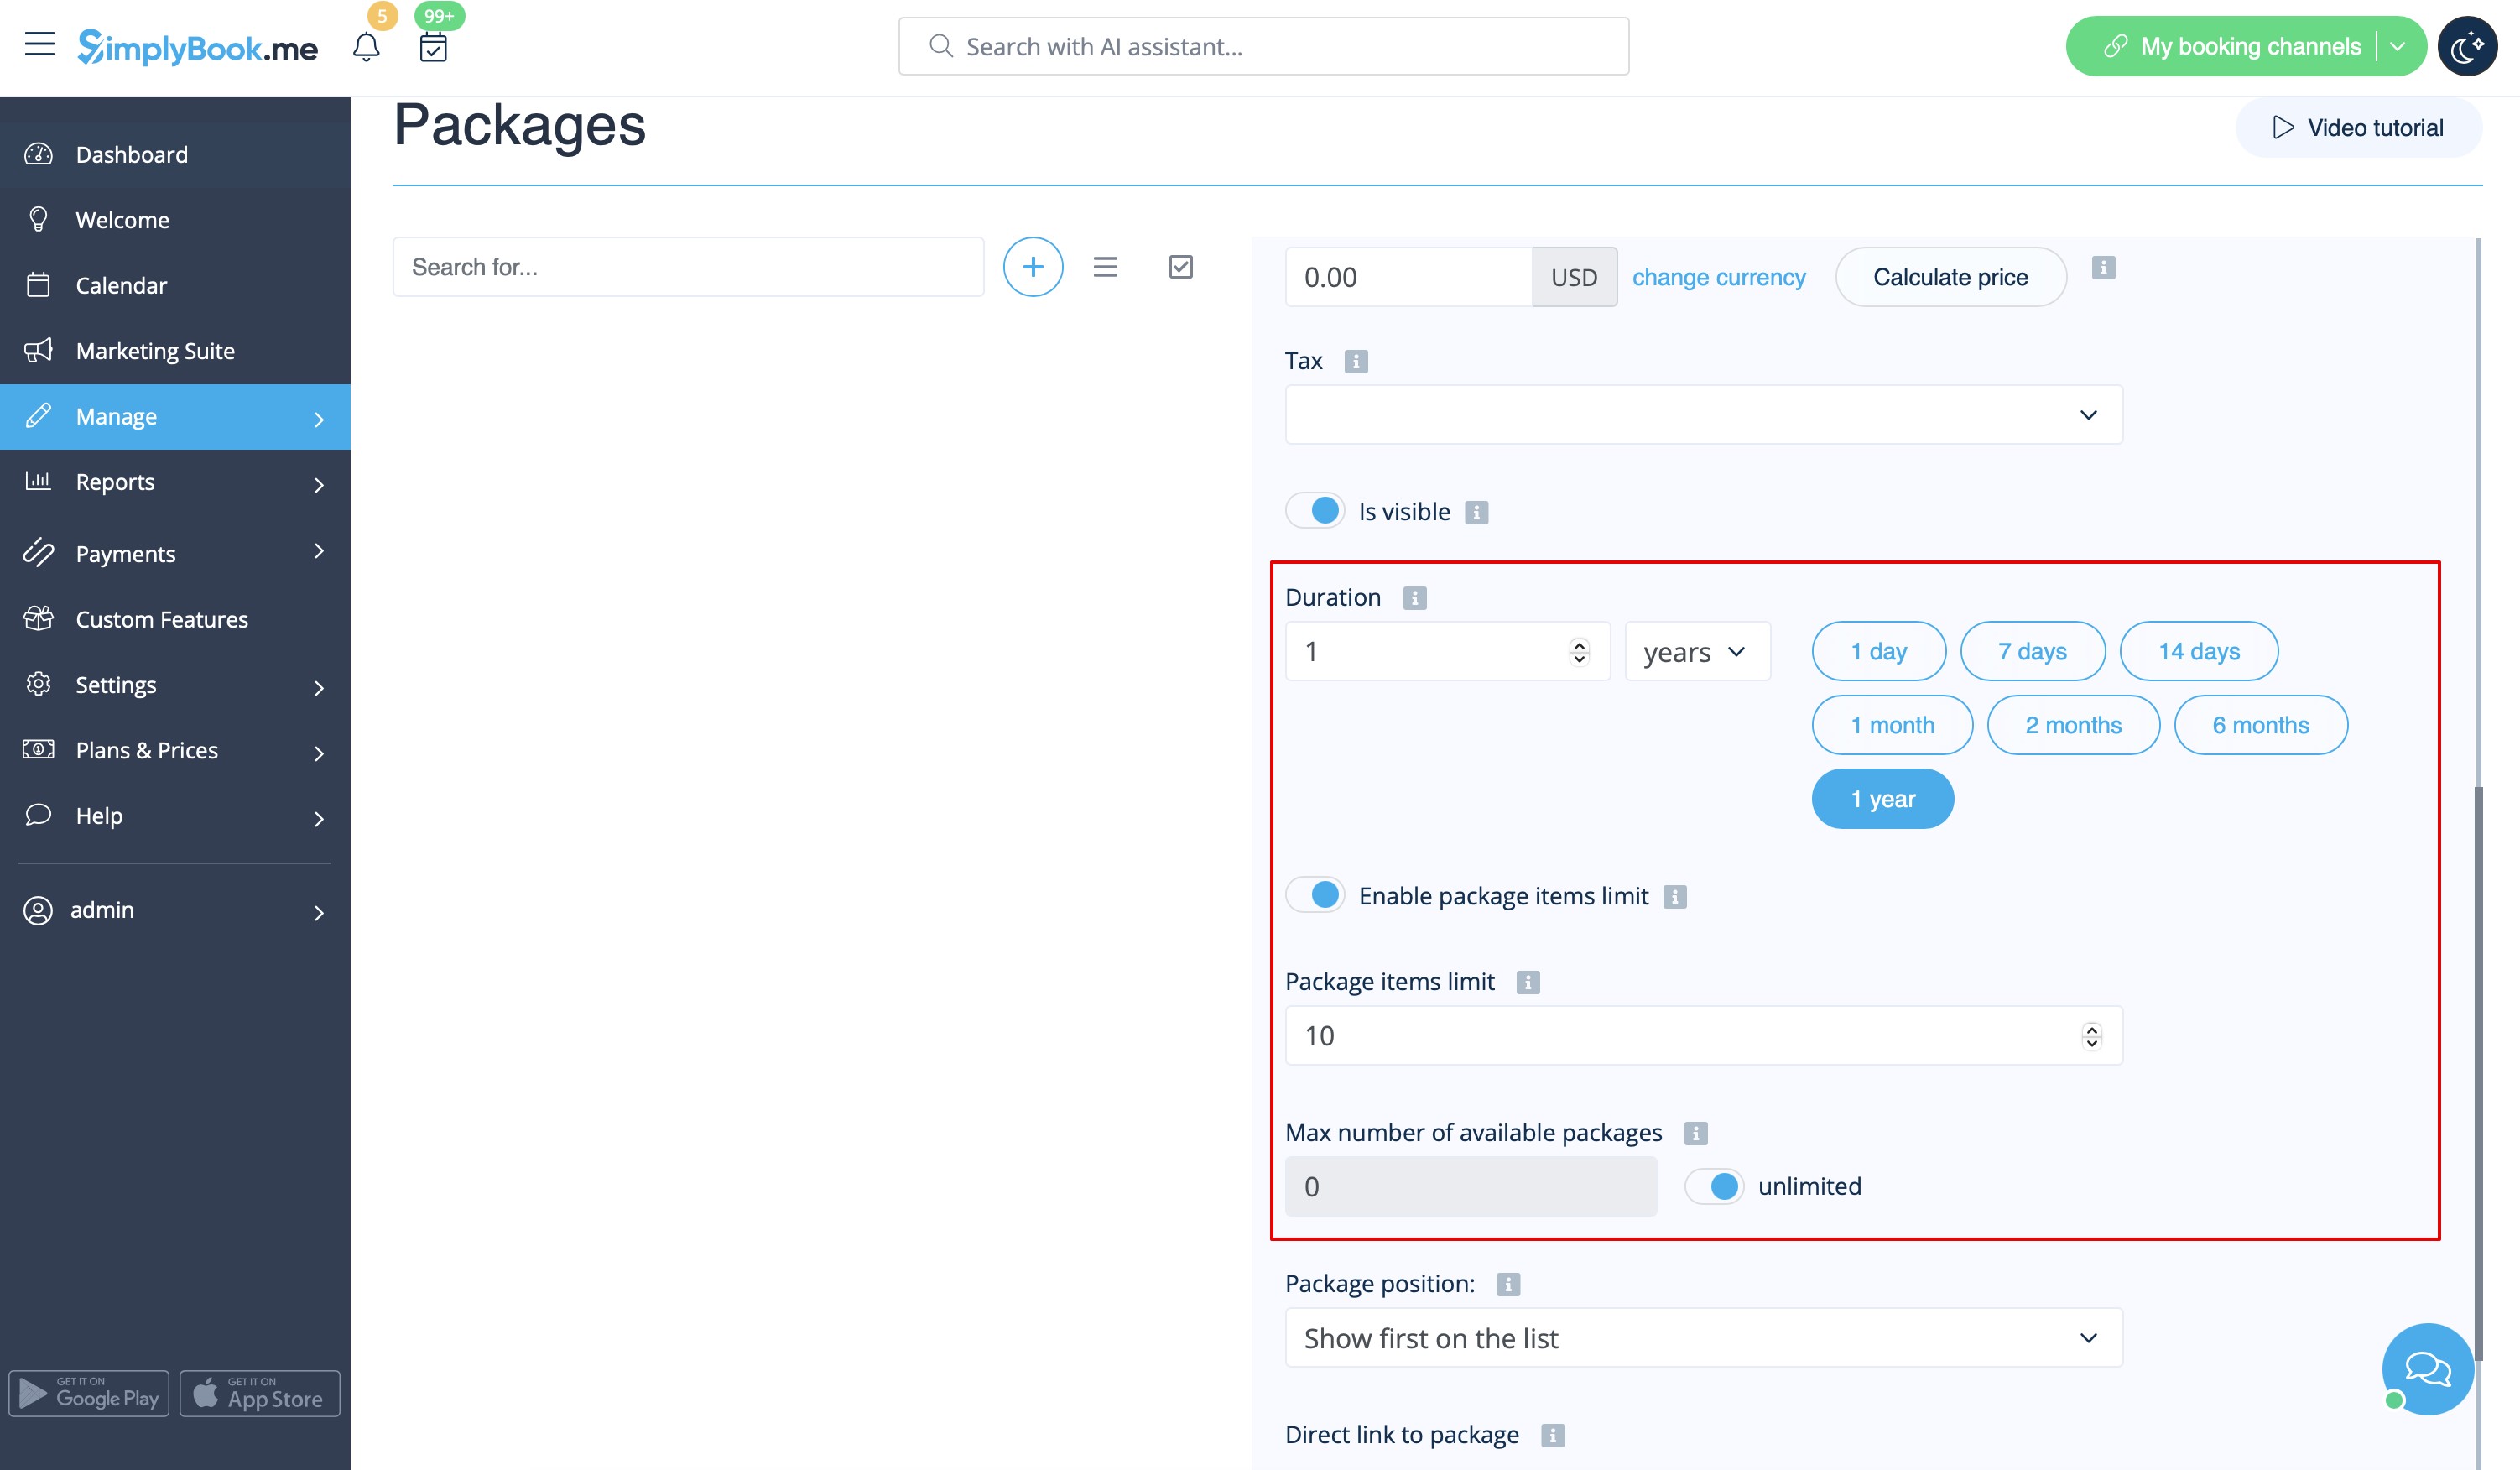
- 5. Define the validity period of the package,
- enable and set the general limit for the included items(optional, will be applied to services, add-ons and products connected to the package)
- and set the number of sets available for sale (unlimited by default).
- 6. Proceed to adding services, products and add-ons to the package
- (you still need to set them in addition to the general limit if you use it to include the desired items into the pack, otherwise it will not be possible to use the package during the service/class booking process).
- You will see three corresponding sections below.
- 7. Please select “Services” section, check the boxes with the necessary items and set the quantity that will be available for booking within the package.
- 8. If you are using Products for sale and/or Service Add-ons features simply select the corresponding tabs and add elements the same way.
- 9. After you have added all the options and if you have not set a package price yet, get back to the “Details” tab and use “Calculate price” button to make the system automatically sum up all the elements prices for you.
- 10. Now you can click on “Save and issue package” to issue it to certain customers or simply save everything and allow your clients to buy this package on your booking site.
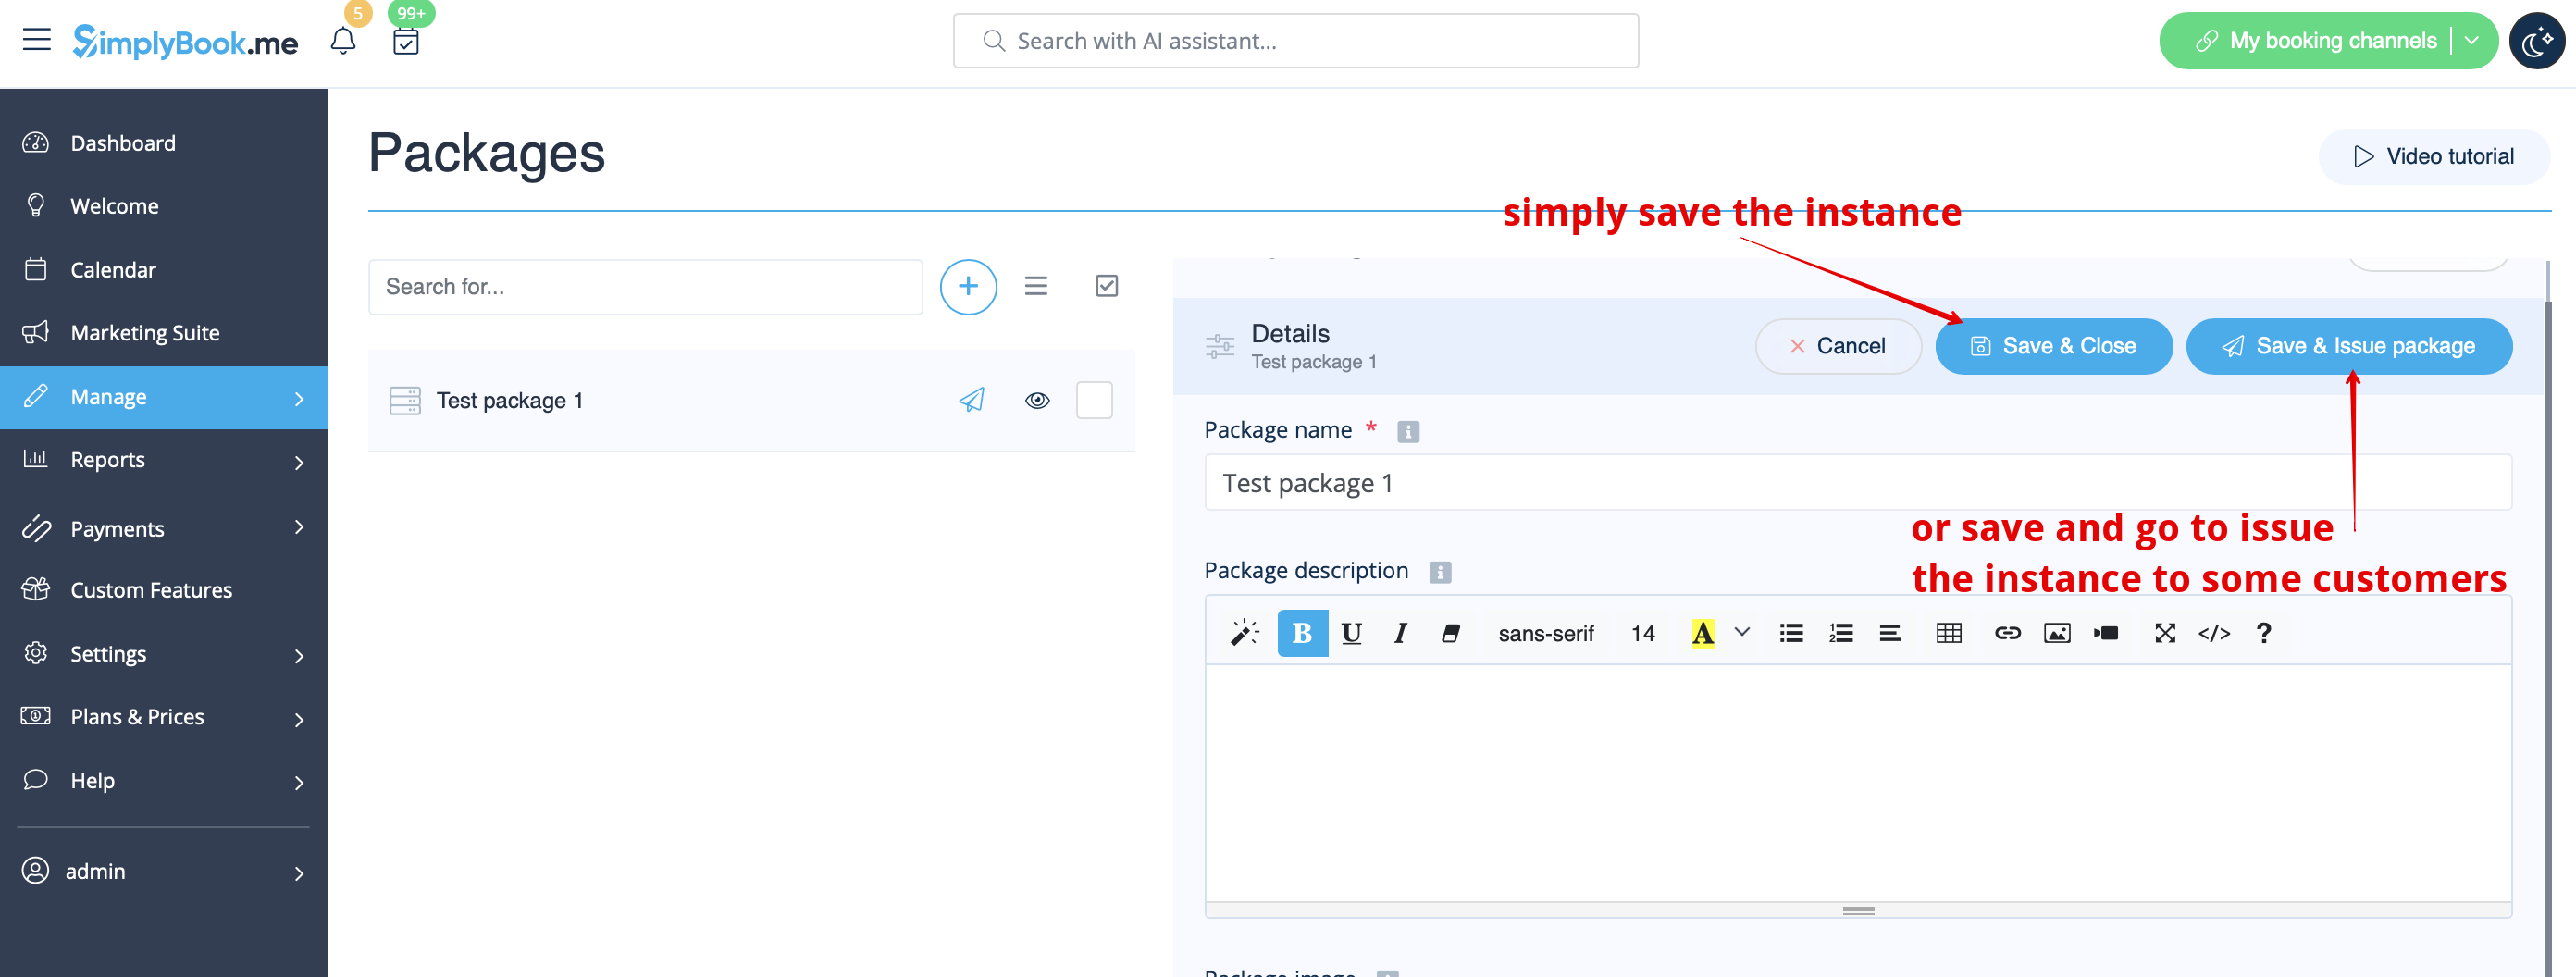
- If you assign a package from admin side or the client buys a package on the booking site he/she will receive package activation notification
- The invoice will be sent only in the case of the purchase and payment made from the client side.
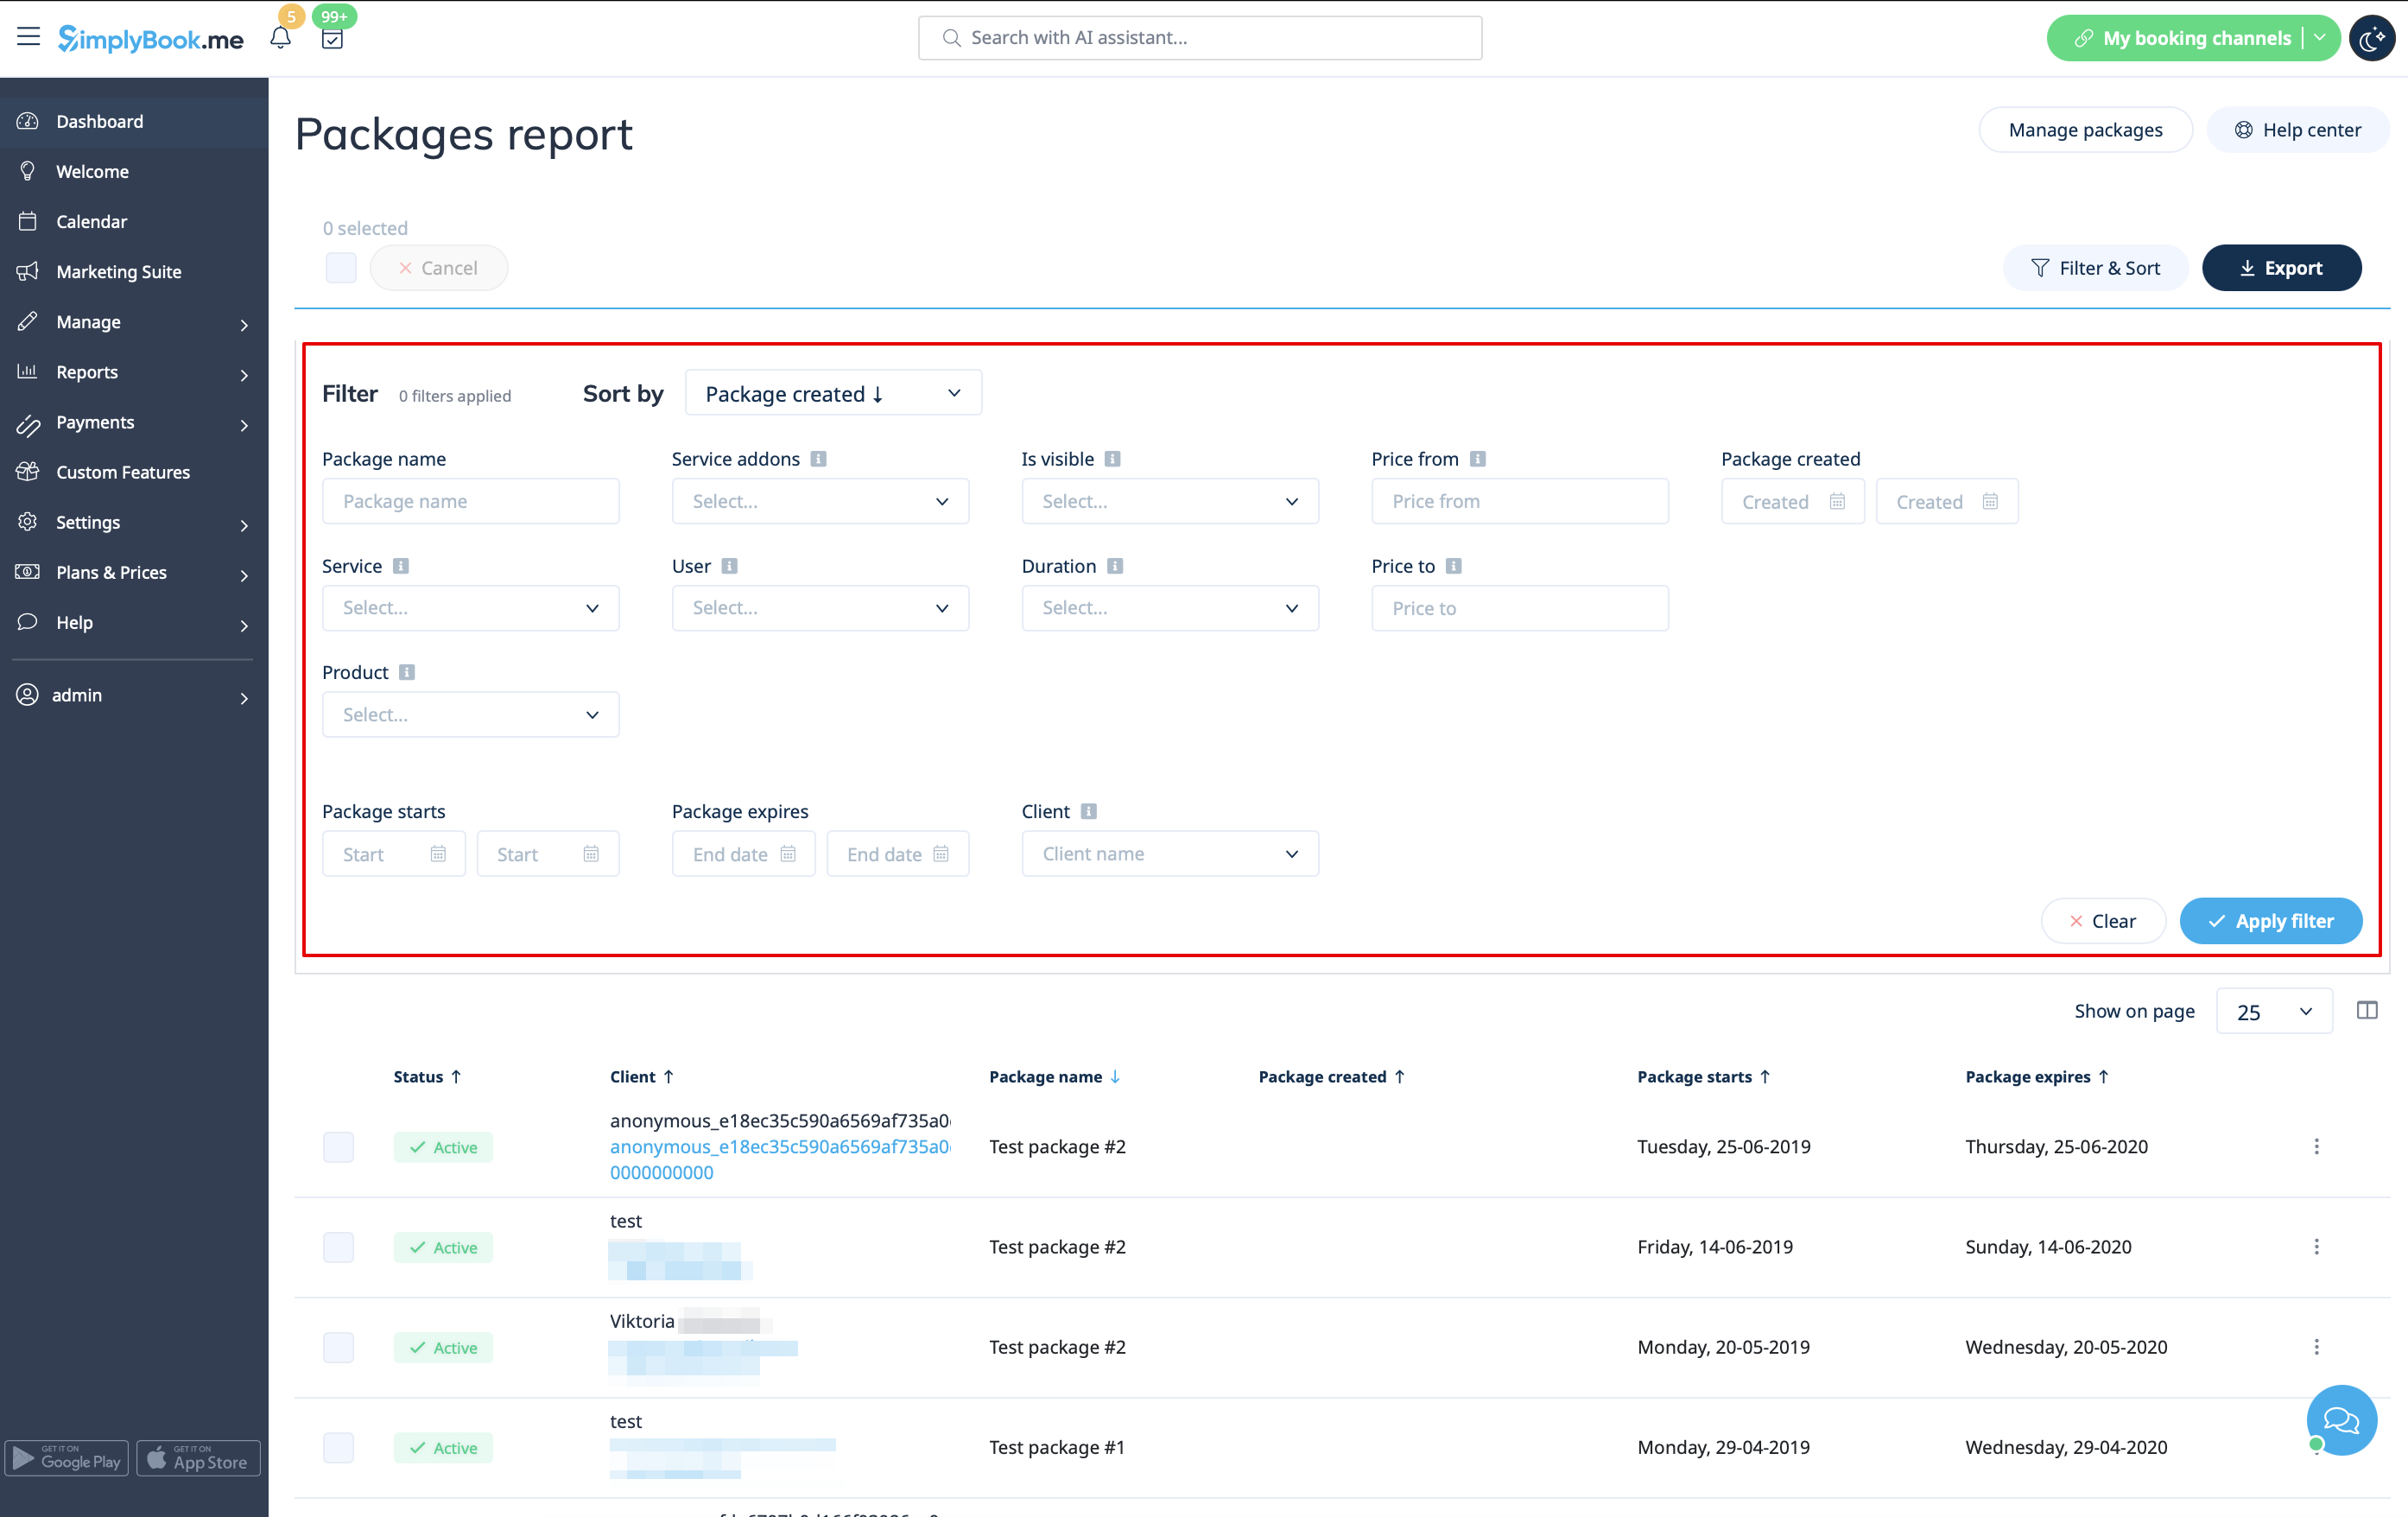
- 11. Go to Reports//Issued packages to check packages order history, customer data, as well as the number of remaining items.
- Use filters for more extensive analysis.
- Here you can also cancel the package for the specific client if needed.
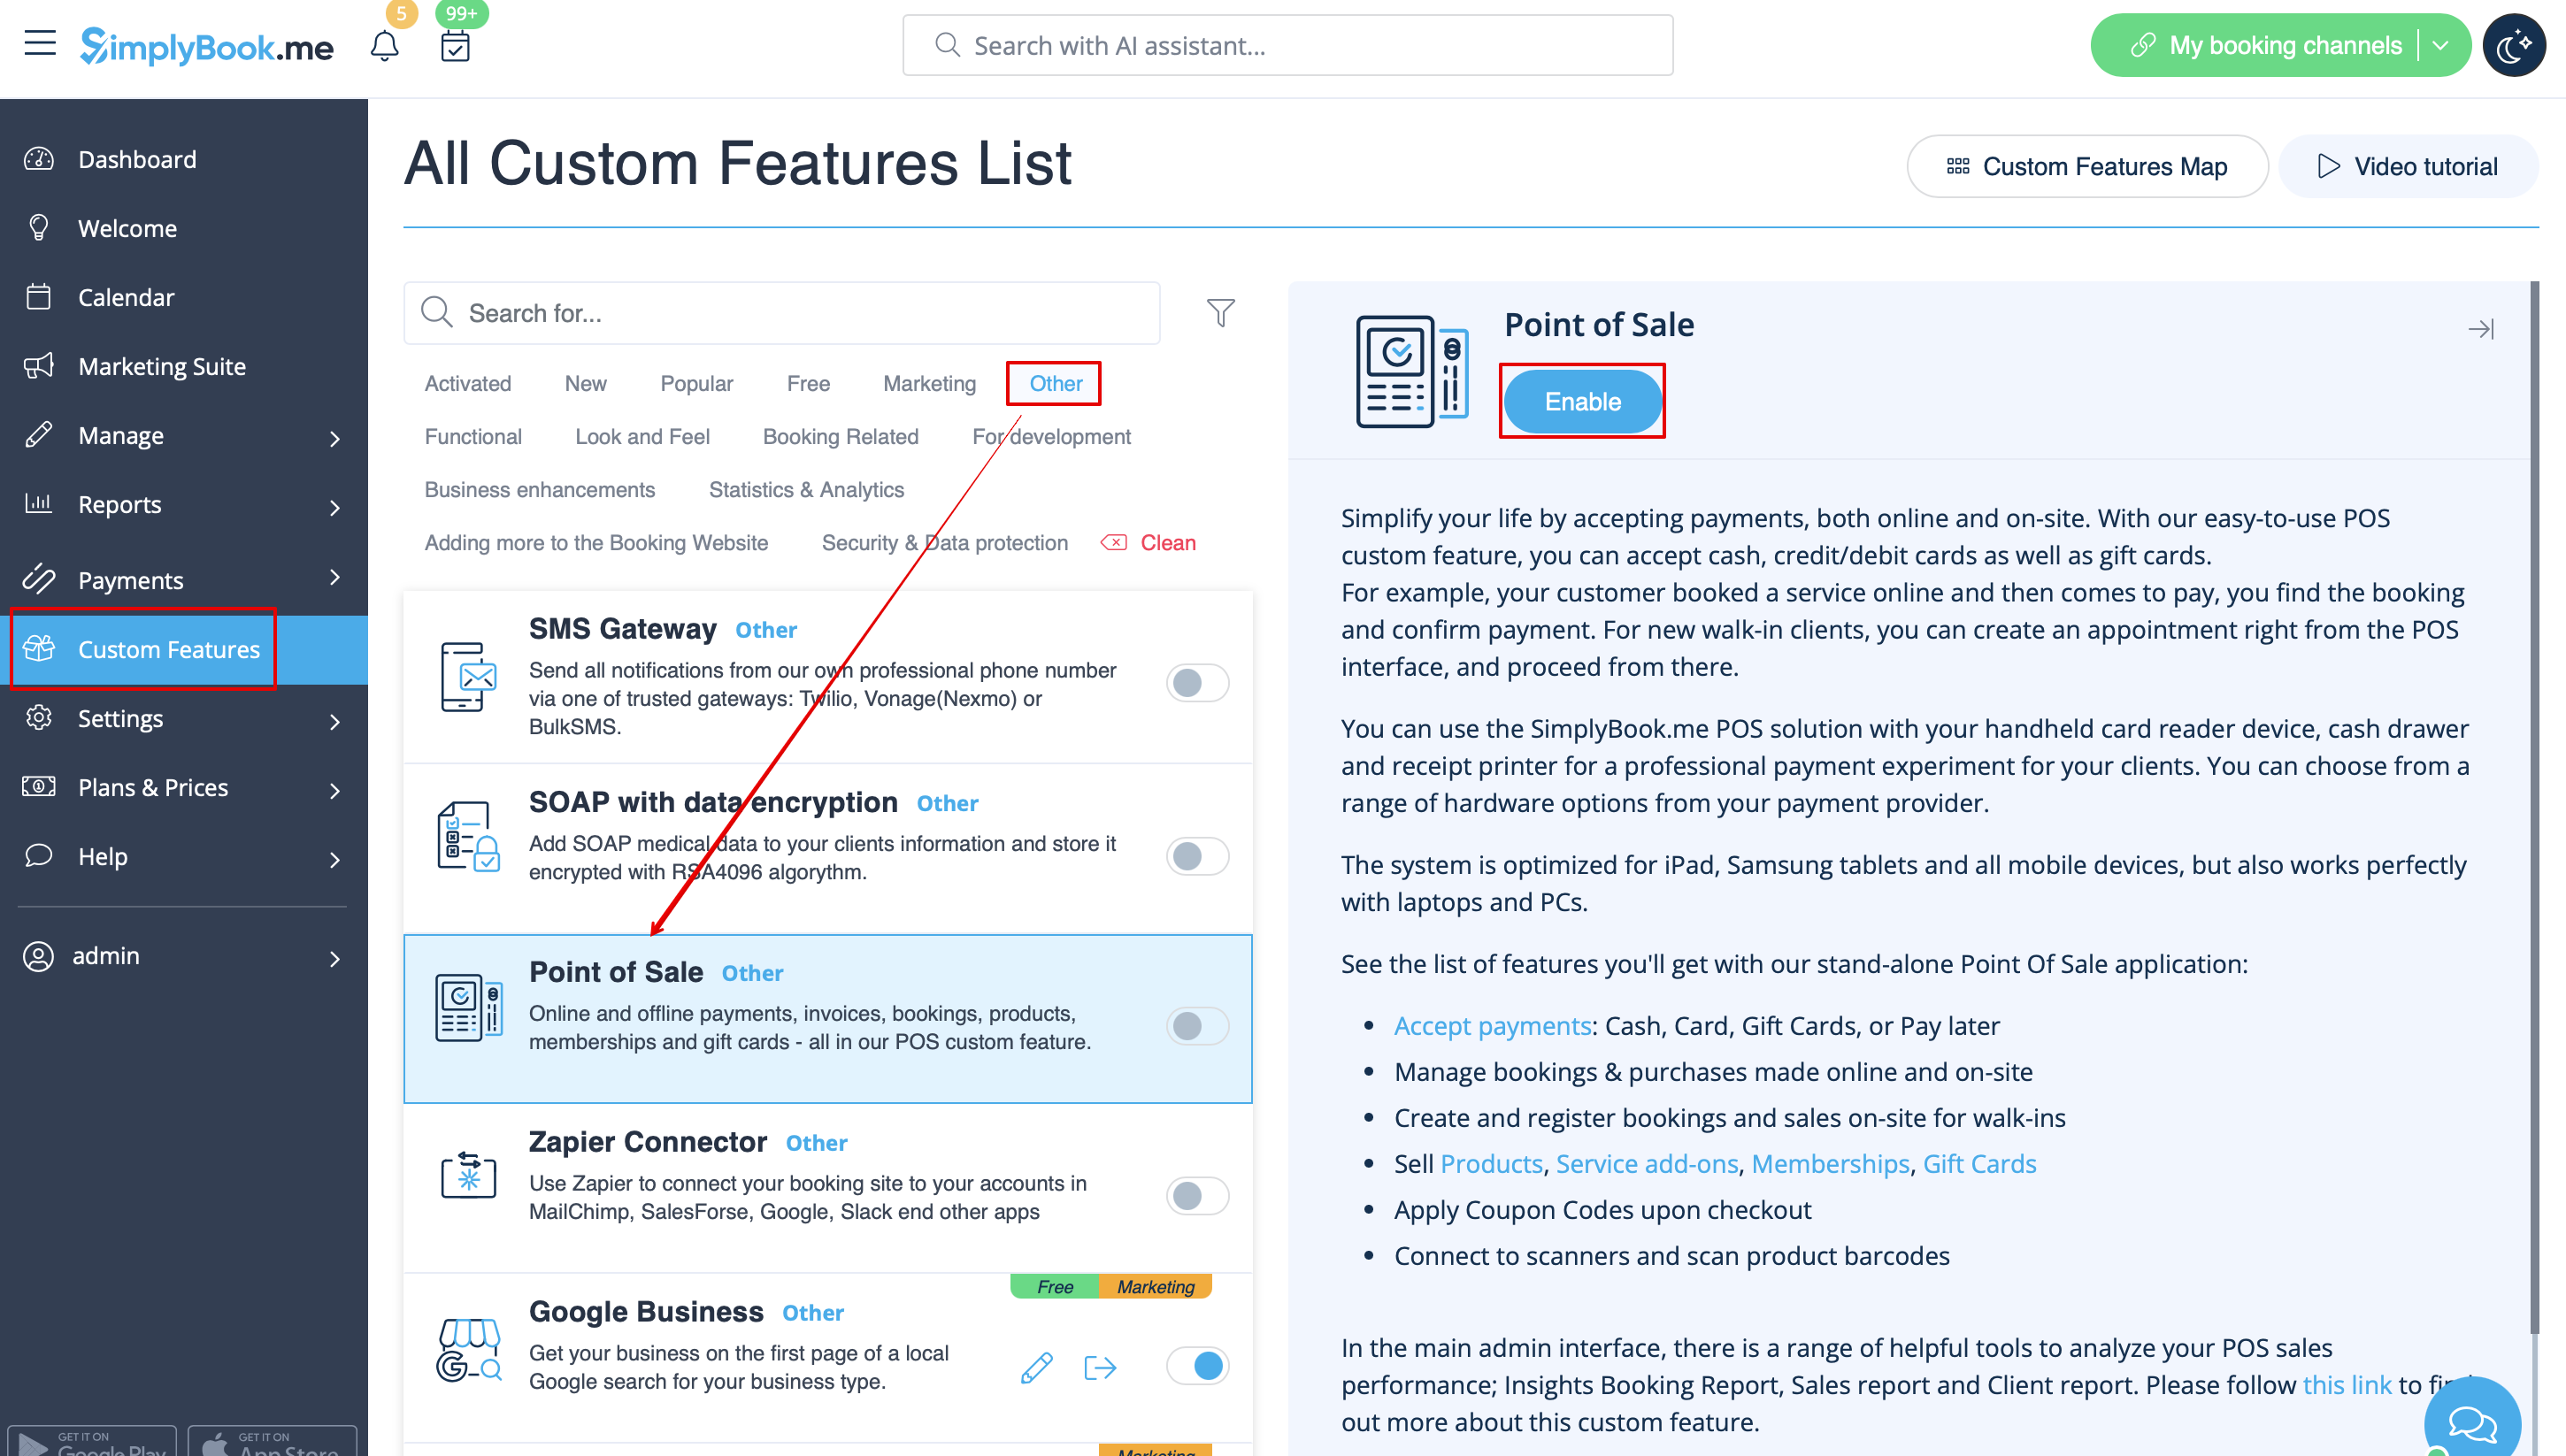
The use of Packages within the POS feature
- 1. Make sure you have enabled POS custom feature.
- 2. Go to POS interface, click on “New sale” button.

- 3. Select the client on the right side of the page to make the "Package" button active.

- 4. Pick the item and define the start date. End date will be automatically set based on the package duration after you save the selection.

- Please note, if the package is hidden from the booking page it will be still available within POS interface as it is part of admin side visible to POS user.
- 5. Proceed to checkout after you have added all the necessary services/products/add-ons/memberships/gift cards to the cart.

- 6. You may have a client who has already purchased a package before and wants to use it.
- You will be able to see if there is an applicable package after the necessary services are already added to cart.
- Then you will be able to click on “Use packages” button so that the items selected will be fully or partially paid with this set during the checkout.

Booking site operation
- 1. The clients will be able to navigate to the “Packages” tab on your booking site.
- Please note, the client must be logged in to see his/her purchases.

- 2. They will find a suitable set, choose a start date and buy the package.

- (if they select “pay later” option during checkout you will need to approve their purchase from admin side first. Then they will be able to book/buy the items included)
- 3. When the client has already the purchased package and books the separate services/products/add-ons, he/she will be able to cover those items with his packages’ credits (if included in packages) or pay for them in a regular way.
