No edit summary |
Marked this version for translation |
||
| (2 intermediate revisions by the same user not shown) | |||
| Line 1: | Line 1: | ||
<languages/> | |||
<translate> | |||
<!--T:1--> | |||
{{#seo: | {{#seo: | ||
|title=Creating a Private Service/Event with a Direct Link SimplyBook.me | |title=Creating a Private Service/Event with a Direct Link SimplyBook.me | ||
| Line 4: | Line 7: | ||
|keywords=faq, frequently asked questions, booking software, appointment system questions, appointments online, calendar software, booking system, booking calendar, scheduling software, online appointment scheduling, online scheduling, setup, setup help, support, help content, private booking link, private service link, book hidden service, book hidden event | |keywords=faq, frequently asked questions, booking software, appointment system questions, appointments online, calendar software, booking system, booking calendar, scheduling software, online appointment scheduling, online scheduling, setup, setup help, support, help content, private booking link, private service link, book hidden service, book hidden event | ||
}} | }} | ||
</translate> | |||
<translate> | |||
<!--T:2--> | |||
<br><br> | <br><br> | ||
It happens that you need to create a service/event which should be visible for you/your staff or specific clients only. | It happens that you need to create a service/event which should be visible for you/your staff or specific clients only. | ||
| Line 13: | Line 19: | ||
<br> | <br> | ||
*In the <span style="background-color:#d4f8e5; padding:5px; border-radius:5px;">Custom Features</span> section of your admin panel, enable the <span style="background-color:#cdeffc; padding:5px; border-radius:5px;">[[Service Categories custom feature|Service Categories]]</span> custom feature. This can be found under <span style="background-color:#d4f8e5; padding:5px; border-radius:5px;">Adding more to your Booking Website</span> section. | *In the <span style="background-color:#d4f8e5; padding:5px; border-radius:5px;">Custom Features</span> section of your admin panel, enable the <span style="background-color:#cdeffc; padding:5px; border-radius:5px;">[[Service Categories custom feature|Service Categories]]</span> custom feature. This can be found under <span style="background-color:#d4f8e5; padding:5px; border-radius:5px;">Adding more to your Booking Website</span> section. | ||
[[File:Service | [[File:Service caterories enable path redesigned.png|1200px|center|link=https://help.simplybook.me/images/b/b2/Service_caterories_enable_path_redesigned.png]] | ||
<br><br> | <br><br> | ||
''Step 2: Set Up Hidden and Visible Categories'' | ''Step 2: Set Up Hidden and Visible Categories'' | ||
| Line 21: | Line 27: | ||
*Create another category that will include all your currently visible services. | *Create another category that will include all your currently visible services. | ||
*As a result you will receive such a <span style="background-color:#d4f8e5; padding:5px; border-radius:5px;">Manage</span> -> <span style="background-color:#d4f8e5; padding:5px; border-radius:5px;">Services</span> page appearance as shown below. | *As a result you will receive such a <span style="background-color:#d4f8e5; padding:5px; border-radius:5px;">Manage</span> -> <span style="background-color:#d4f8e5; padding:5px; border-radius:5px;">Services</span> page appearance as shown below. | ||
[[File:Hide | [[File:Hide category redesigned.png|1200px|center|link=https://help.simplybook.me/images/5/54/Hide_category_redesigned.png]] | ||
<br><br> | <br><br> | ||
The front-end (client view) of your booking page remains unchanged and no categories will be shown if you leave only 1 visible Category as by this instruction. | The front-end (client view) of your booking page remains unchanged and no categories will be shown if you leave only 1 visible Category as by this instruction. | ||
| Line 31: | Line 37: | ||
3. Scroll down to <span style="background-color:#d4f8e5; padding:5px; border-radius:5px;">Direct link to service</span> option.<br> | 3. Scroll down to <span style="background-color:#d4f8e5; padding:5px; border-radius:5px;">Direct link to service</span> option.<br> | ||
4. Click the button [[File:Copy link icon.png]] to copy the direct link. | 4. Click the button [[File:Copy link icon.png]] to copy the direct link. | ||
[[File: | [[File:Direct link to service redesigned.png|1200px|center|link=https://help.simplybook.me/images/d/d2/Direct_link_to_service_redesigned.png]] | ||
<br><br> | <br><br> | ||
Done!<br> | Done!<br> | ||
| Line 41: | Line 47: | ||
In case you wish to manually arrange a booking from the admin page (<span style="background-color:#cdeffc; padding:5px; border-radius:5px;">[[How to manage bookings|Calendar]]</span> or <span style="background-color:#cdeffc; padding:5px; border-radius:5px;">[[Point of Sale custom feature|POS]]</span>) simply hide your service using the same <span style="background-color:#d4f8e5; padding:5px; border-radius:5px;">eye</span> button near it or <span style="background-color:#d4f8e5; padding:5px; border-radius:5px;">Hide</span> option. This ensures the service is available from admin side only to create a booking. | In case you wish to manually arrange a booking from the admin page (<span style="background-color:#cdeffc; padding:5px; border-radius:5px;">[[How to manage bookings|Calendar]]</span> or <span style="background-color:#cdeffc; padding:5px; border-radius:5px;">[[Point of Sale custom feature|POS]]</span>) simply hide your service using the same <span style="background-color:#d4f8e5; padding:5px; border-radius:5px;">eye</span> button near it or <span style="background-color:#d4f8e5; padding:5px; border-radius:5px;">Hide</span> option. This ensures the service is available from admin side only to create a booking. | ||
<br><br> | <br><br> | ||
</translate> | |||
Latest revision as of 13:08, 23 June 2025
It happens that you need to create a service/event which should be visible for you/your staff or specific clients only.
We have a small workaround to arrange such a set up so as a result you receive a service/event which is available only for the people you share the special direct link with.
- Please follow step by step instructions below
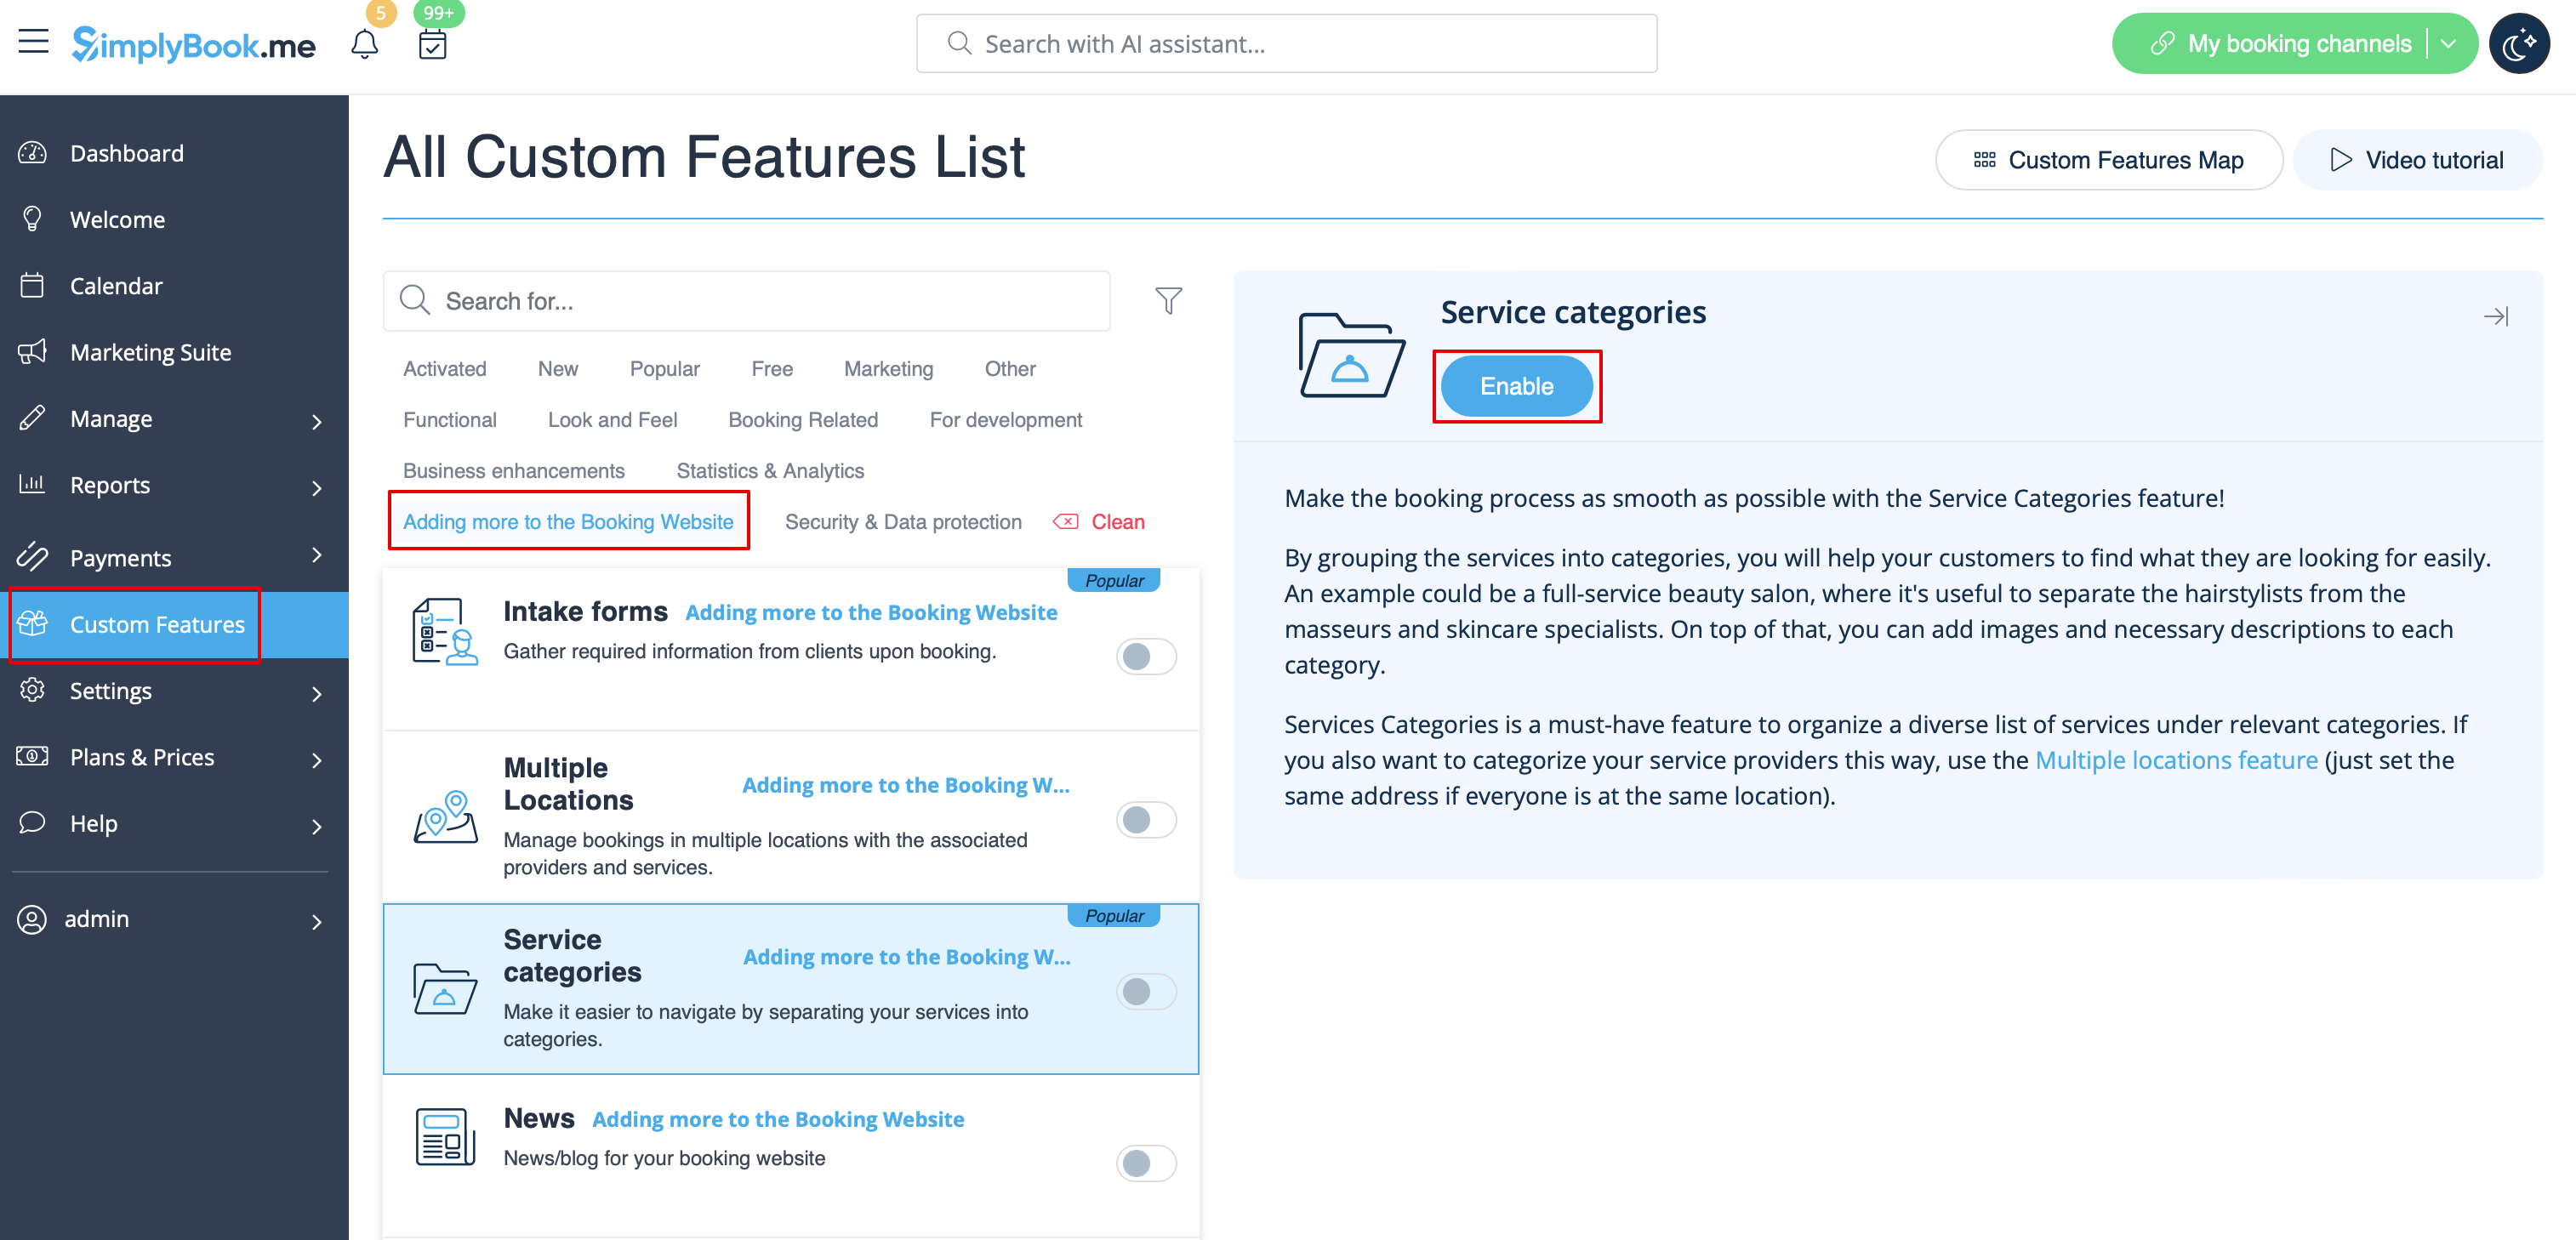
Step 1: Enable Service Categories custom feature
- In the Custom Features section of your admin panel, enable the Service Categories custom feature. This can be found under Adding more to your Booking Website section.
Step 2: Set Up Hidden and Visible Categories
- Using the guidance provided for the Service Categories custom feature, create the category on Manage -> Services page.
- Assign the necessary service to this category and then hide it by using the "eye" button next to the category or by selecting it and clicking the "Hide" button.
- Create another category that will include all your currently visible services.
- As a result you will receive such a Manage -> Services page appearance as shown below.
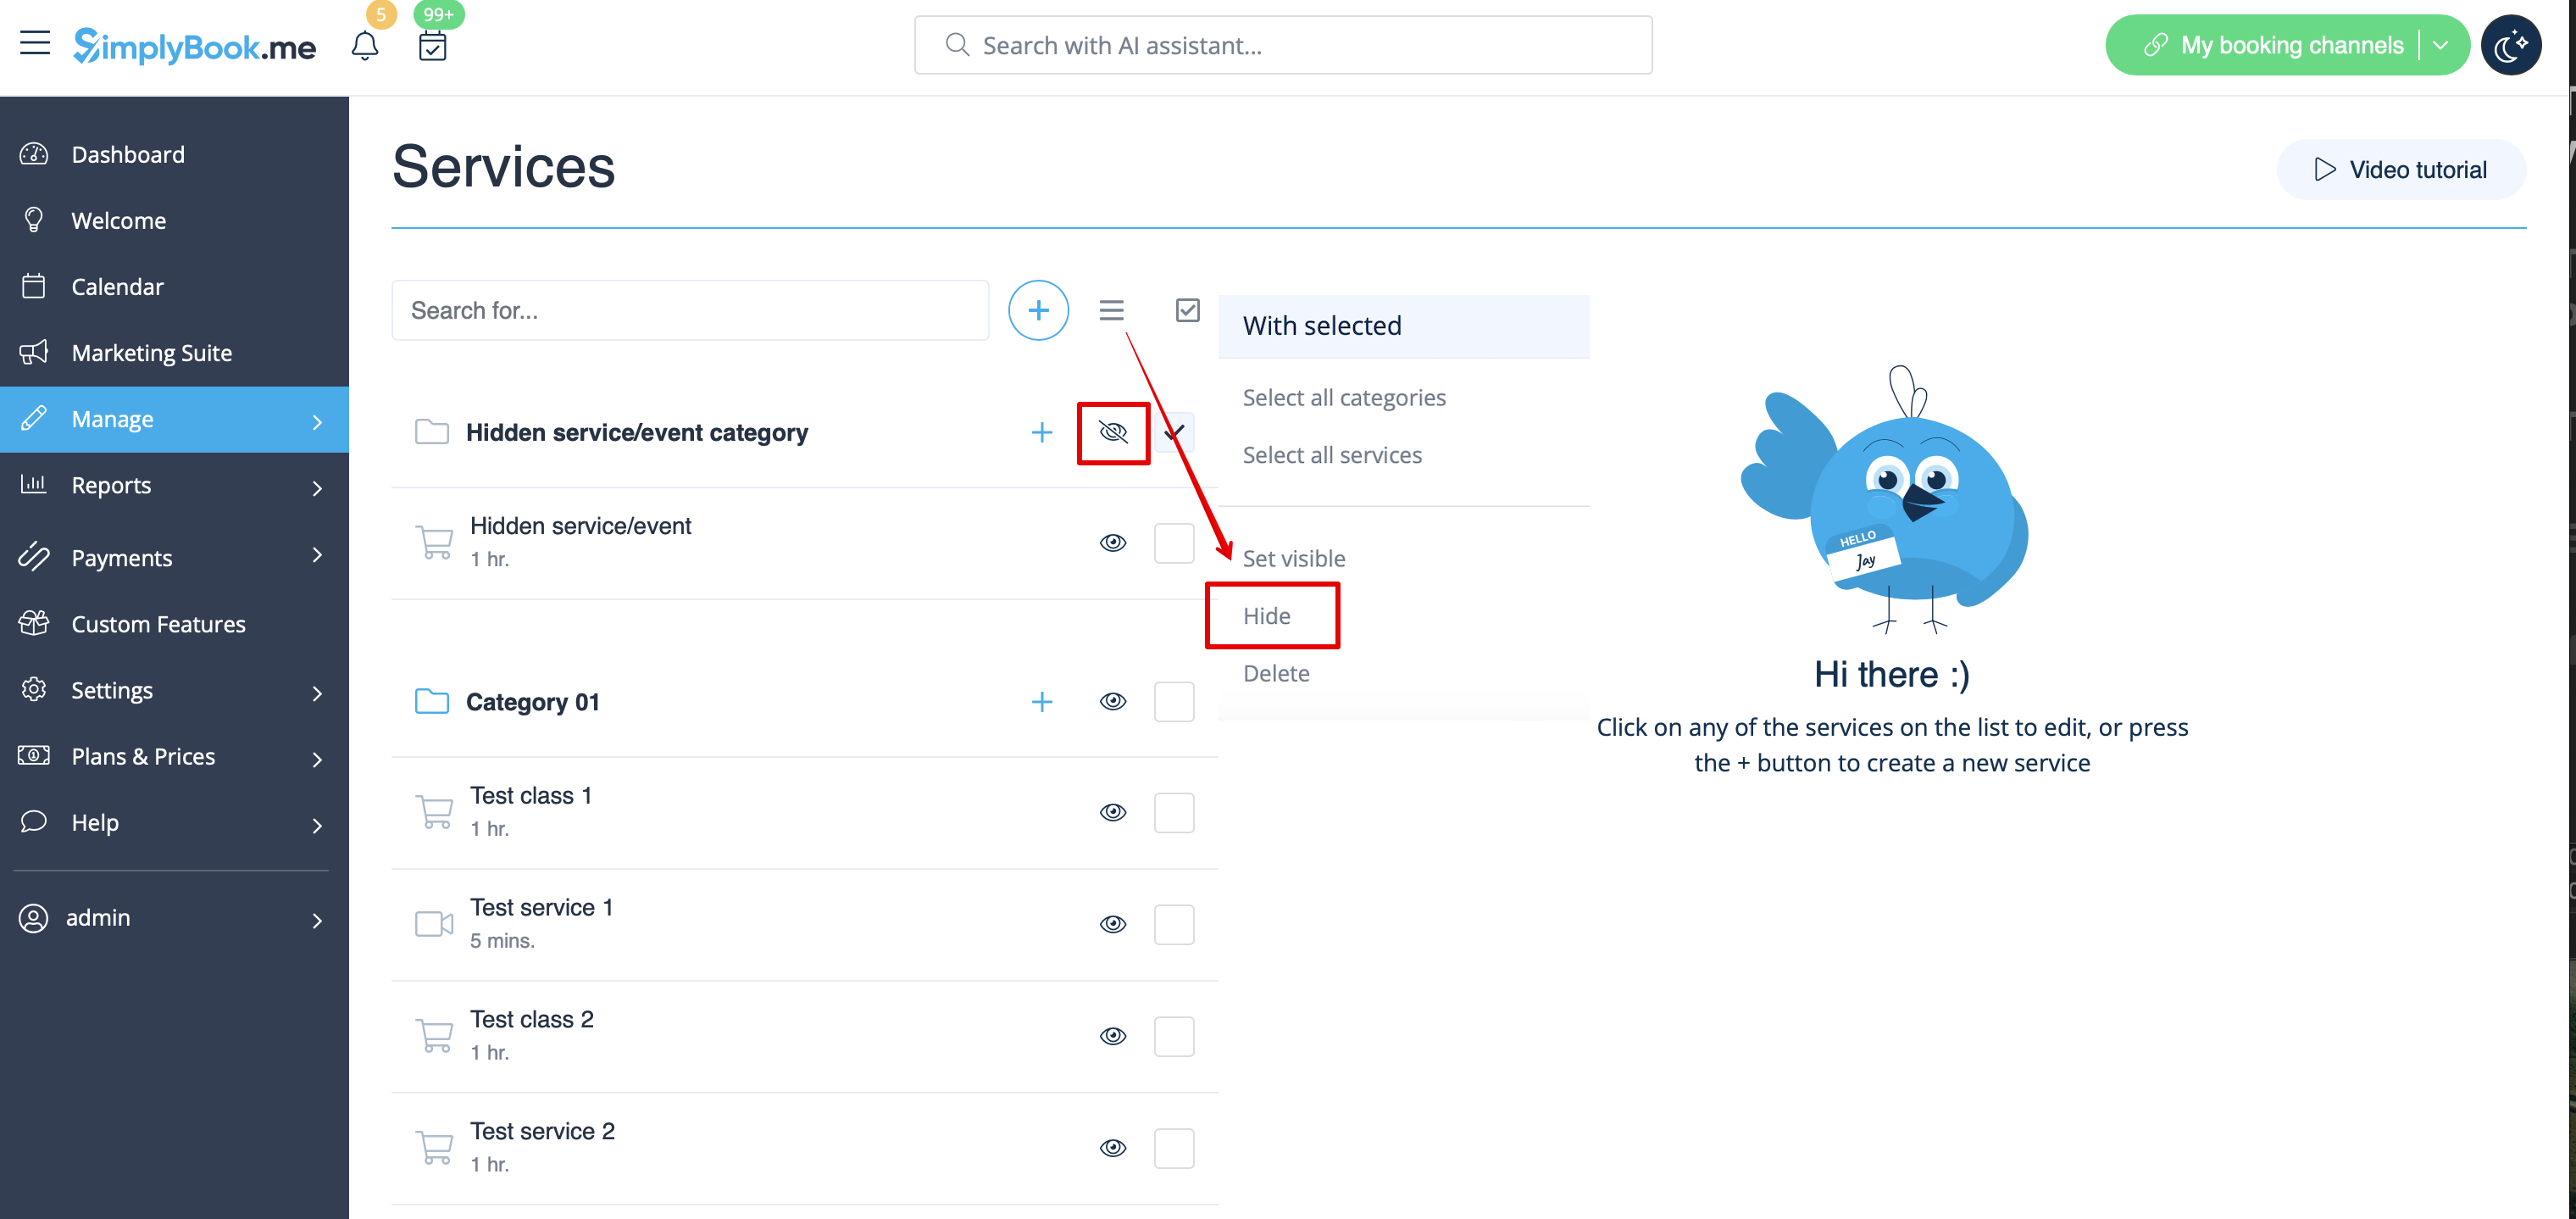
The front-end (client view) of your booking page remains unchanged and no categories will be shown if you leave only 1 visible Category as by this instruction.
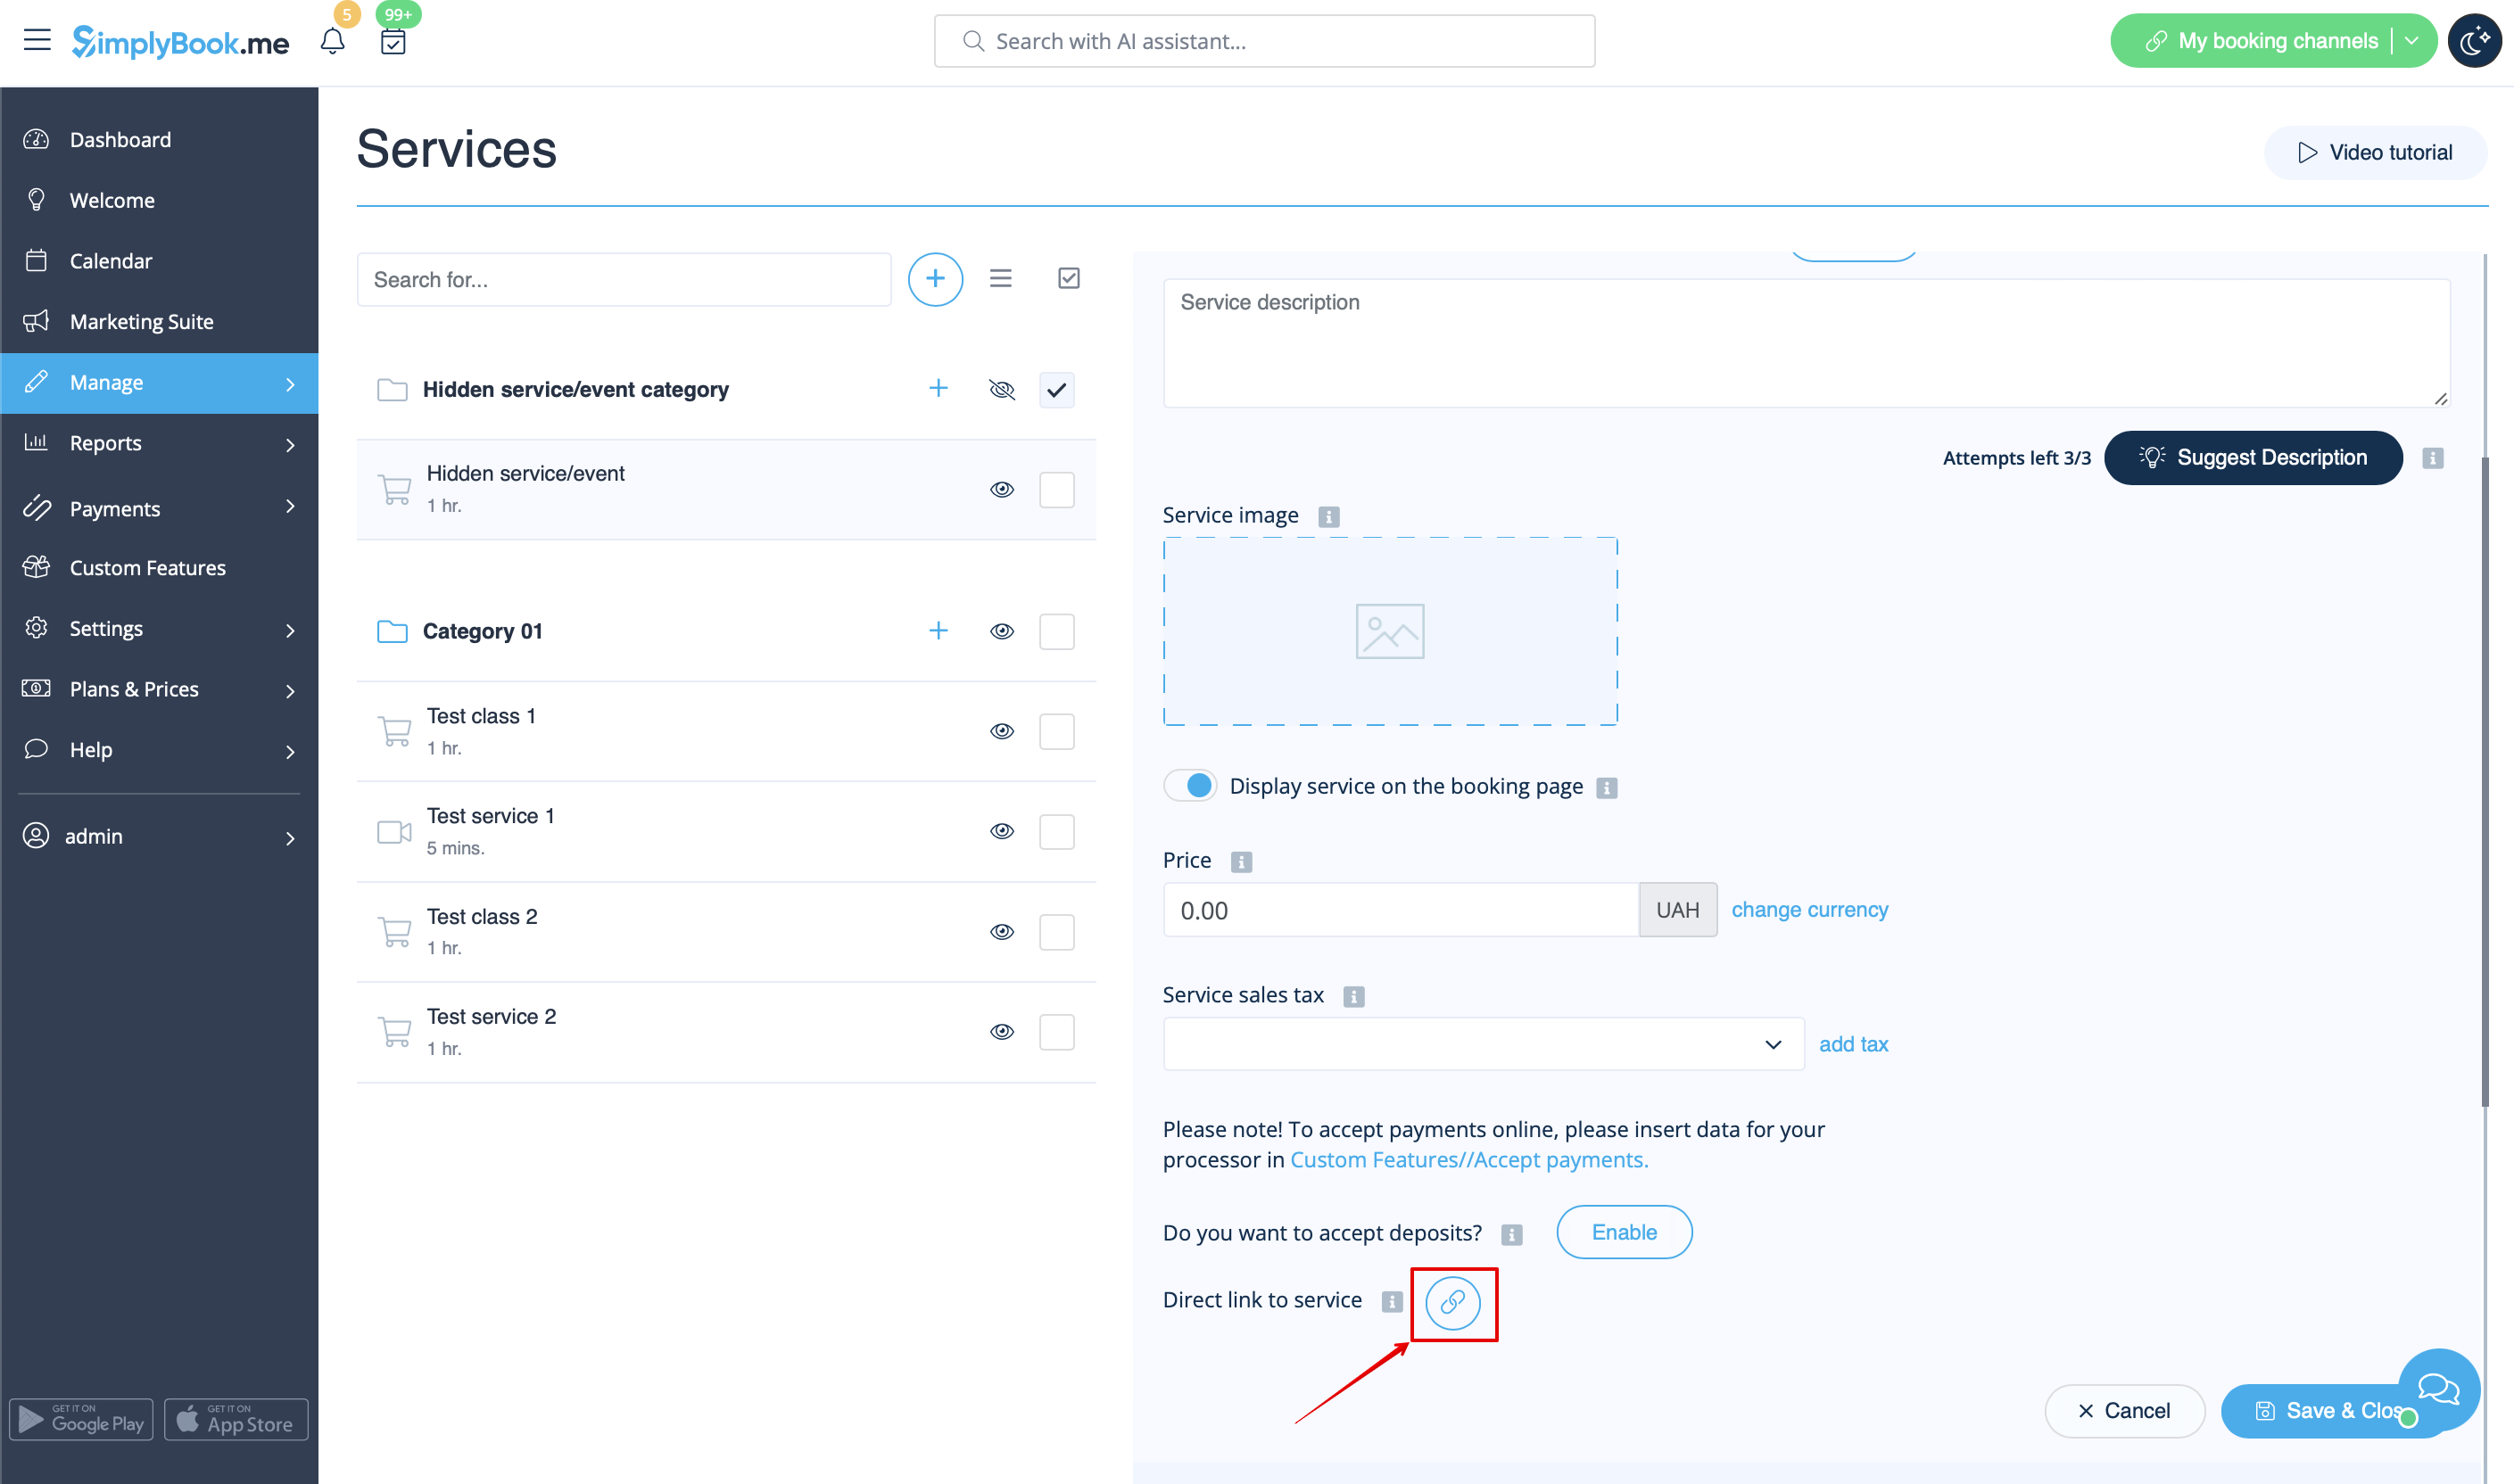
Step 3: How to share a direct link to your hidden service?
1. Go to Manage -> Services.
2. Locate your service/event under the hidden Category and click on it to open editing mode.
3. Scroll down to Direct link to service option.
4. Click the button ![]() to copy the direct link.
to copy the direct link.
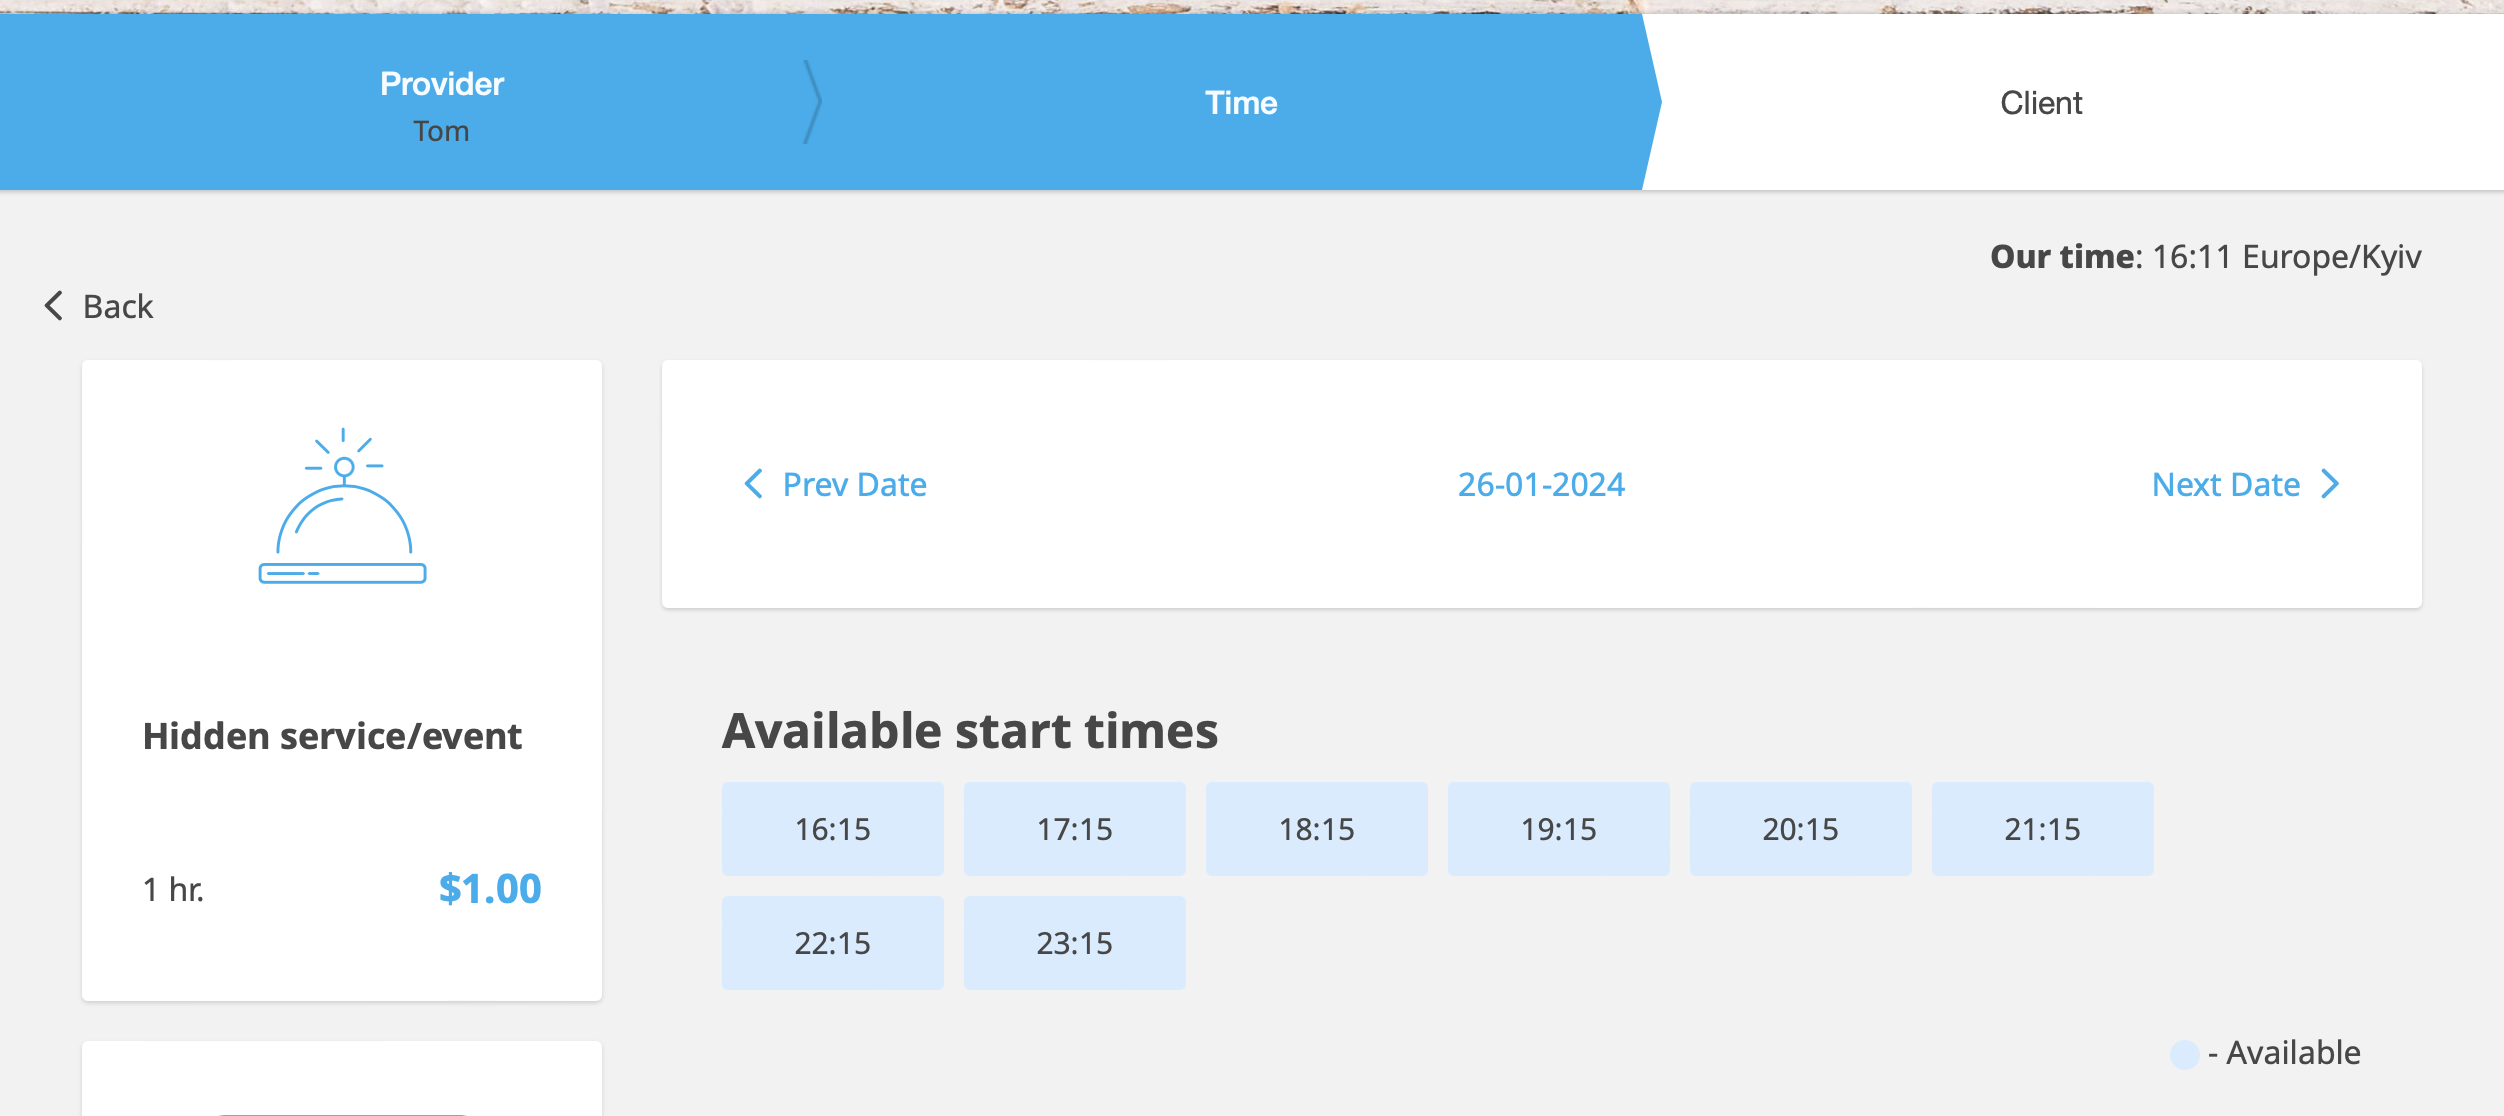
Done!
Now, you can share the link with your clients. When they follow it, they will be redirected to your booking page with the hidden service already chosen.
Additional Note: if you are always booking manually as admin:
In case you wish to manually arrange a booking from the admin page (Calendar or POS) simply hide your service using the same eye button near it or Hide option. This ensures the service is available from admin side only to create a booking.