No edit summary |
No edit summary |
||
| Line 1: | Line 1: | ||
{{#seo: | {{#seo: | ||
|title=Custom Features - SimplyBook.me | |title=Custom Features - SimplyBook.me | ||
|description=Secure your SOAP integrations with encryption. Ensure data protection while connecting external tools. Activate now! | |||
|titlemode=append | |titlemode=append | ||
|keywords=faq, frequently asked questions, booking software, appointment system questions, appointments online, calendar software, booking system, booking calendar, scheduling software, online appointment scheduling, online scheduling, plugins, custom features, additional functionality, soap notes, soap records, secure client notes, encrypted client notes, encrypted client records, client progress, time-stamped notes, time-stamped records | |keywords=faq, frequently asked questions, booking software, appointment system questions, appointments online, calendar software, booking system, booking calendar, scheduling software, online appointment scheduling, online scheduling, plugins, custom features, additional functionality, soap notes, soap records, secure client notes, encrypted client notes, encrypted client records, client progress, time-stamped notes, time-stamped records | ||
Revision as of 18:58, 13 December 2024
Need patient information to be more securely stored? SOAP (subjective, objective, assessment and plan) with data encryption feature allows to insert time-stamped record with 4 encrypted text fields that stay with client data. Sensitive medical data of your clients will be secured with RSA 4096.
How to use
- 1. Make sure that you have simple SOAP custom feature disabled(as they are not compatible)
- 2. Then please go to Custom features page using the left-side menu of your admin interface, use searchbox at the top or choose “Other” category.
- And click on “Enable” near “SOAP with data encryption” option.

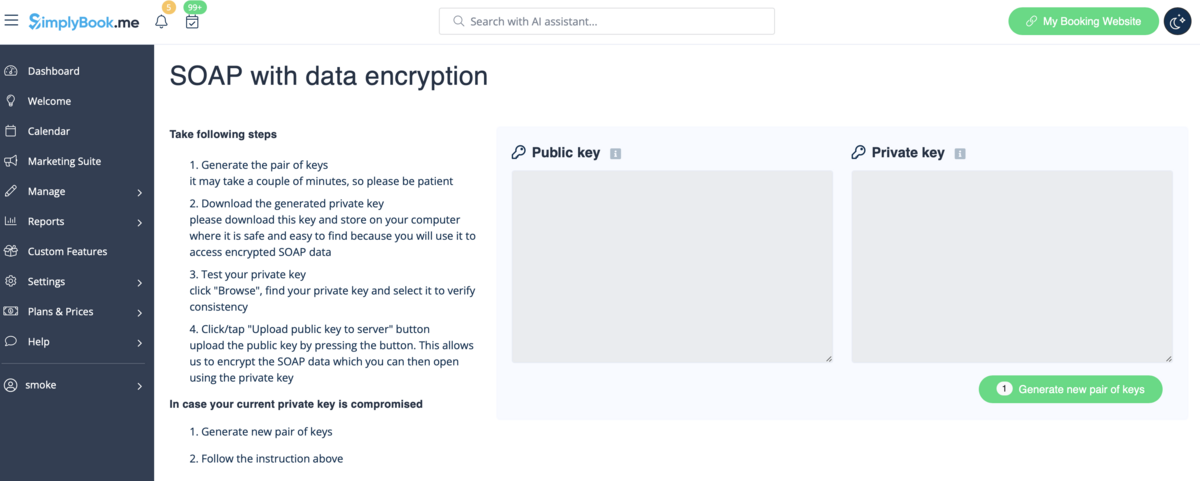
- 3. Please choose “Settings” near it to generate the keys and setup encryption.

Usage cases
Case 1. Just SOAP-with-encryption enabled.
1. Generate a pair of keys.
2. Download private key on your computer.
3. Upload public key to the server.
4. Use these keys to encrypt and decrypt SOAP data
Case 2. SOAP-with-encryption is enabled after SOAP
1. Generate pair of keys.
2. Download private key on your computer.
3. Upload public key to server.
4. Encrypt data from simple SOAP *
5. Use these keys to encrypt and decrypt SOAP data
- *You can skip this step, but please note that old SOAP data won’t be available in Edit client form. If not encrypted, you will be able to read it, if you disable SOAP-with-encryption and enable simple SOAP instead.
Case 3. SOAP-with-encryption is in use, and private key is compromised
1. Generate new pair of keys.
2. Download new private key on your computer.
3. Upload new public key to server. It means you have 2 pairs of keys now
- 1. Pair 1: your previous keys (with private key had been compromised) and
- 2. Pair 2: newly generated keys
4. Re-encrypt your current SOAP data with newly generated keys *. Use your previous private key to perform re-encryption. After this is done ** your previous public key is deleted from the server, and then only new pair of keys is considered valid.
5. Use new keys to encrypt and decrypt SOAP data
- *You can skip re-encrypting current SOAP data, but please note that in this case newly generated keys won’t be active, and all encryption and decryption will be performed with previous pair of keys.
- **Please note! If your previous private key is lost, it means that unfortunately you won’t be able to decrypt and restore your current SOAP data, since we keep only ciphertexts. Press “Clear data and use new keys” if you’d like to use SOAP-with-encryption with new keys.
Case 4. SOAP-with-encryption is enabled after SOAP, and private key is compromised
1. Generate a new pair of keys.
2. Download new private key on your computer.
3. Upload new public key to the server. It means you have 2 pairs of keys now
- 1. Pair 1: your previous keys (with the private key had been compromised) and
- 2. Pair 2: newly generated keys
4. Re-encrypt your current SOAP data with newly generated keys *. Use your previous private key to perform re-encryption. After this is done ** your previous public key is deleted from the server, and then only new pair of keys is considered valid.
5. Encrypt data from simple SOAP option will become available ***
6. Use new keys to encrypt and decrypt SOAP data
- *You can skip re-encrypting current SOAP data, but please note that in this case newly generated keys won’t be active, and all encryption and decryption will be performed with previous pair of keys.
- **Please note! If your previous private key is lost, it means that unfortunately you won’t be able to decrypt and restore your current SOAP data, since we keep only cipher-texts. Press “Clear data and use new keys” if you’d like to use SOAP-with-encryption with new keys.
- ***You can skip this step, but please note that old SOAP data won’t be available in Edit client form. If not encrypted, you will be able to read it, if you disable SOAP-with-encryption and enable simple SOAP instead.
Where to check SOAP information per client
Please note!
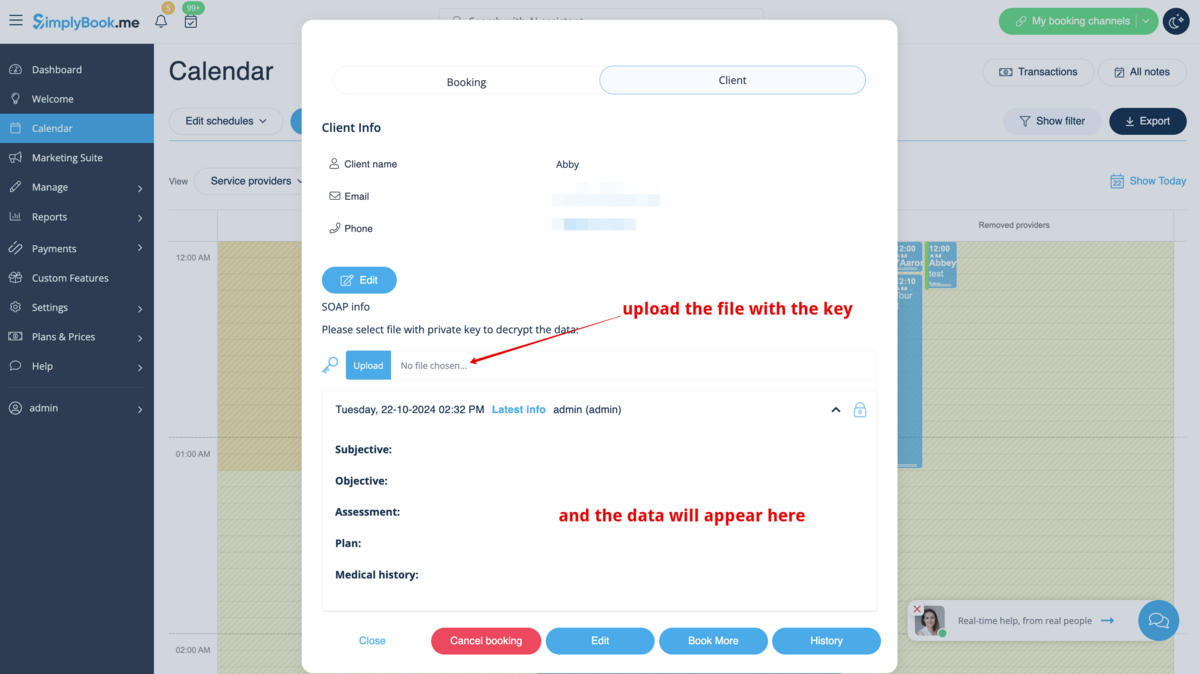
- It is possible to edit SOAP information only in bookings info pop-ups on Calendar page and in Manage//Clients interface. Other interfaces do not allow that.
- The information you add there is not seen from client side and is for internal use.
- The SOAP notes cannot be exported from the system.
1. To see the client information that was encrypted before please go to Manage//Clients and choose “soap info” near the corresponding client.
If you see the boxes in light blue color there it means that there is some data encrypted.
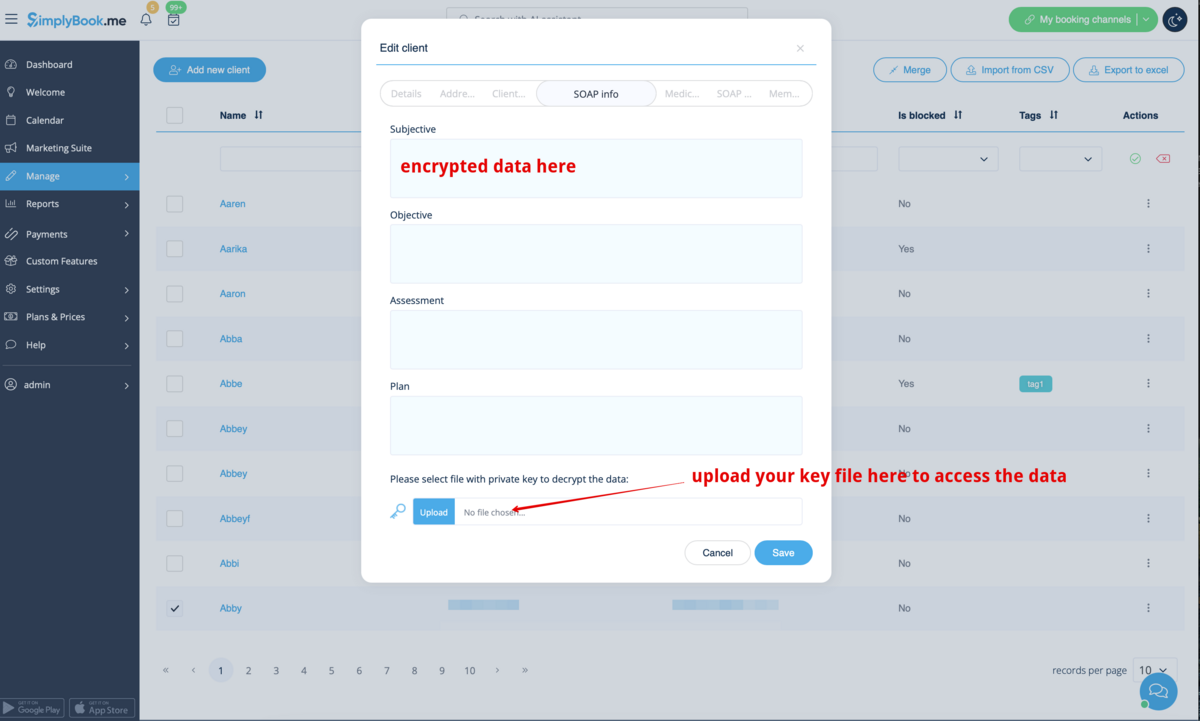
If the boxes are white it means that no data was added.
2. Upload your key to the corresponding box. If the key is correct you will be able to see the client details and add new information if neccesary.
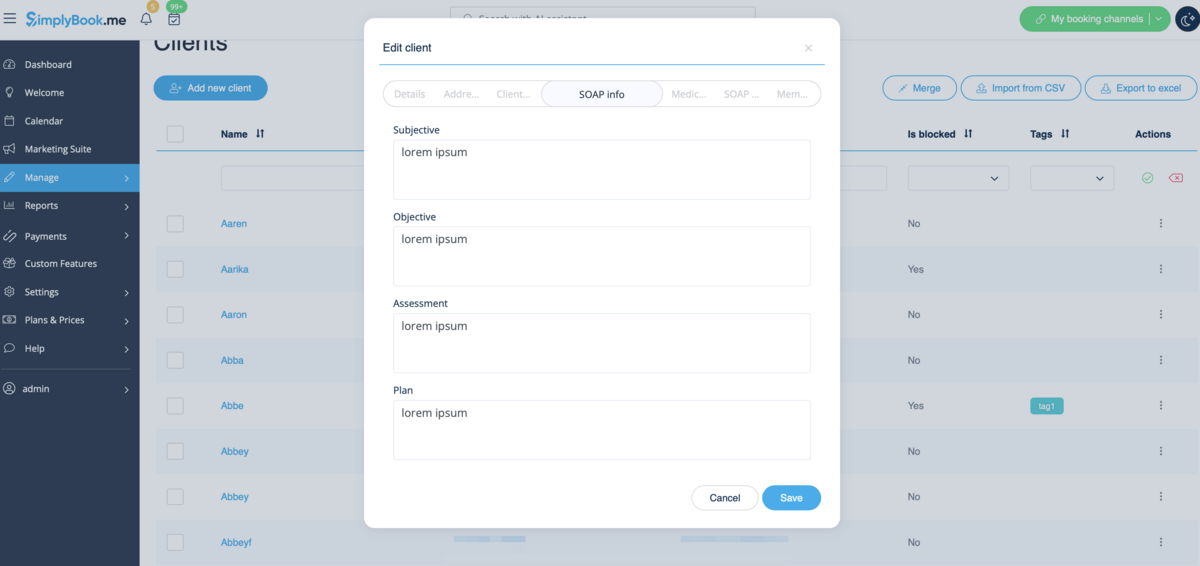
As well you can check the details in each booking on Calendar page.
