Created page with "<span style="background-color:#ffe9e9; padding:5px; border-radius:5px;">'''Зверніть увагу!'''</span> *<span style="background-color:#ffe9e9; padding:5px; border-radius:5px;">Рахунки-фактури, які генеруються в QuickBooks в результаті інтеграції, не містять інформації про податки та знижки, а лише загальну суму. Рахунки-фактури SimplyBook мі..." Tags: Mobile edit Mobile web edit |
Created page with "== Як налаштувати та використовувати ==" |
||
| Line 11: | Line 11: | ||
<br><br> | <br><br> | ||
< | <span id="How_to_set_and_use"></span> | ||
== | == Як налаштувати та використовувати == | ||
1. <span style="background-color:#d4f8e5; padding:5px; border-radius:5px;">Перейдіть на сторінку <span style="background-color:#d4f8e5; padding:5px; border-radius:5px;">«Custom Features»</span> (Налаштування) в інтерфейсі SBPay.me і натисніть кнопку «Enable» (Увімкнути) поруч із QuickBooks. | |||
1. | |||
[[File:Quickbooks enable path.png|1200px|center|link=https://help.simplybook.me/images/1/13/Quickbooks_enable_path.png]] | [[File:Quickbooks enable path.png|1200px|center|link=https://help.simplybook.me/images/1/13/Quickbooks_enable_path.png]] | ||
2. Після увімкнення натисніть кнопку <span style="background-color:#d4f8e5; padding:5px; border-radius:5px;">«Підключити»</span>, щоб продовжити налаштування. | |||
2. | |||
[[File:Quickbooks connect path.png|1200px|center|link=https://help.simplybook.me/images/6/63/Quickbooks_connect_path.png]] | [[File:Quickbooks connect path.png|1200px|center|link=https://help.simplybook.me/images/6/63/Quickbooks_connect_path.png]] | ||
3. Вам буде запропоновано <span style="background-color:#d4f8e5; padding:5px; border-radius:5px;">увійти до</span> свого облікового запису Quickbooks, щоб підключитися. Або, якщо ви вже увійшли в систему у своєму браузері, підключення буде встановлено автоматично після підтвердження. Ви також побачите SBPay.me в розділі <span style="background-color:#d4f8e5; padding:5px; border-radius:5px;">«Додатки»</span> -> <span style="background-color:#d4f8e5; padding:5px; border-radius:5px;">«Мої додатки»</span> QuickBooks. | |||
3. | |||
[[File:Confirm quickbooks connection.png|1200px|center|link=https://help.simplybook.me/images/f/fc/Confirm_quickbooks_connection.png]] | [[File:Confirm quickbooks connection.png|1200px|center|link=https://help.simplybook.me/images/f/fc/Confirm_quickbooks_connection.png]] | ||
4. Після підключення систем ви отримаєте доступ до налаштувань інтеграції в інтерфейсі SBPay.me. | |||
4. | |||
5. Виберіть тип транзакційного документа: є два варіанти: <span style="background-color:#d4f8e5; padding:5px; border-radius:5px;">«Інвойс»</span> та <span style="background-color:#d4f8e5; padding:5px; border-radius:5px;">«Квитанція про продаж</span>». | |||
5. | Інвойс ініціює створення інвойсу та відповідного платежу в QuickBooks для кожного виконаного замовлення в SimplyBook. Таким чином, ви побачите два записи (платіж та інвойс) на рахунку QuickBooks, пов'язаних з однією транзакцією. | ||
Sales Receipt призводить до створення квитанції про продаж (Payment) виключно після успішної оплати замовлення. | |||
Sales Receipt | |||
[[File:Quickbooks select document type.png|1200px|center|link=https://help.simplybook.me/images/1/1b/Quickbooks_select_document_type.png]] | [[File:Quickbooks select document type.png|1200px|center|link=https://help.simplybook.me/images/1/1b/Quickbooks_select_document_type.png]] | ||
<div lang="en" dir="ltr" class="mw-content-ltr"> | <div lang="en" dir="ltr" class="mw-content-ltr"> | ||
Revision as of 17:34, 15 May 2025

Ця проста в налаштуванні інтеграція SBPay.me з Quickbooks дозволяє автоматично створювати рахунки-фактури або квитанції про продаж у QuickBooks для кожного оплаченого замовлення та надсилати їх клієнтам.
Відеоурок ![]()
Зверніть увагу!
- Рахунки-фактури, які генеруються в QuickBooks в результаті інтеграції, не містять інформації про податки та знижки, а лише загальну суму. Рахунки-фактури SimplyBook містять інформацію про ціну товару, податки/знижки (якщо є) та загальну суму.
- Для транзакційних документів, що містять різні валюти, в QuickBooks має бути ввімкнена функція «Багато валют».
Як налаштувати та використовувати
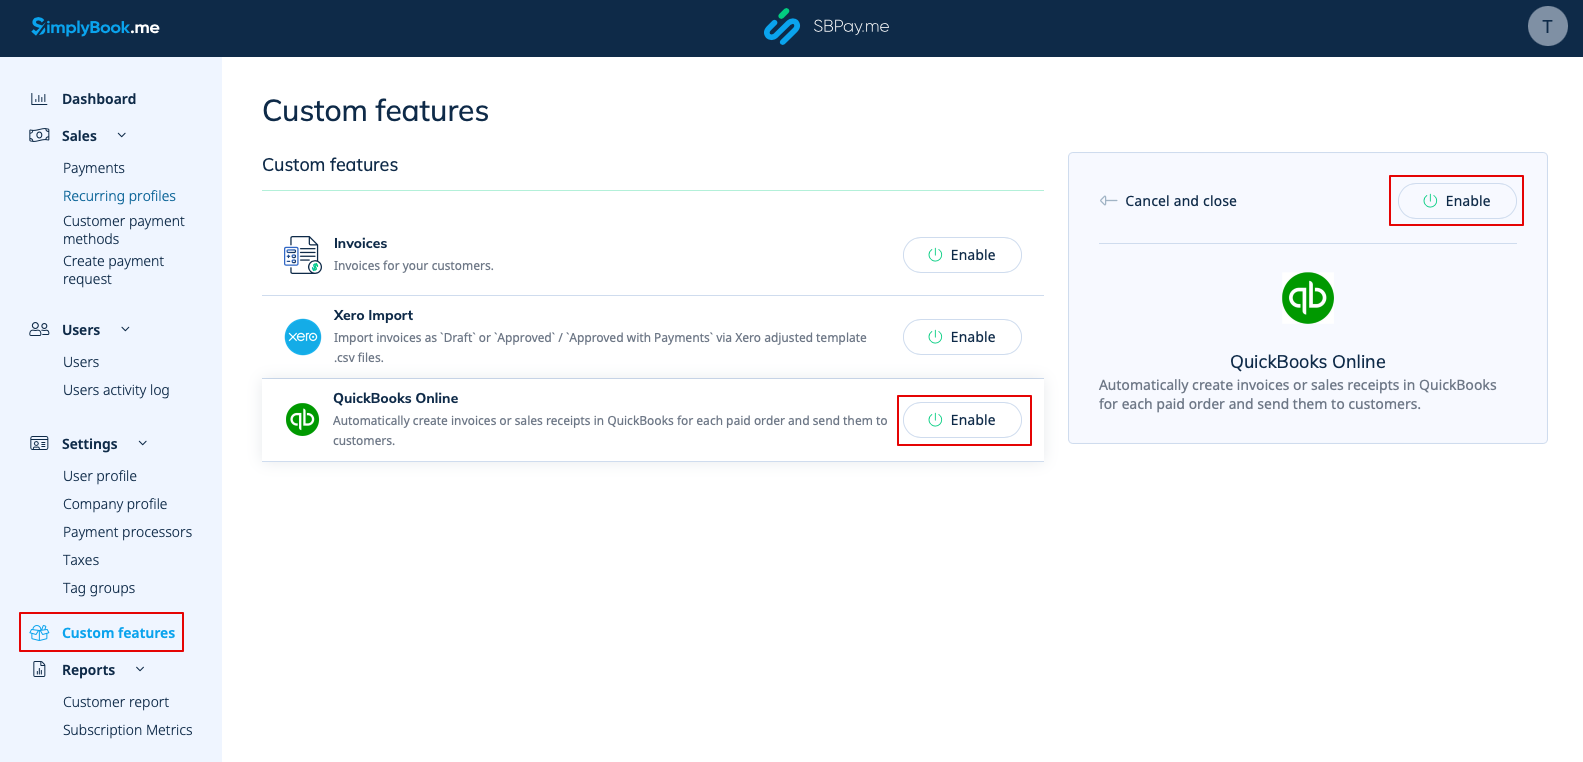
1. Перейдіть на сторінку «Custom Features» (Налаштування) в інтерфейсі SBPay.me і натисніть кнопку «Enable» (Увімкнути) поруч із QuickBooks.
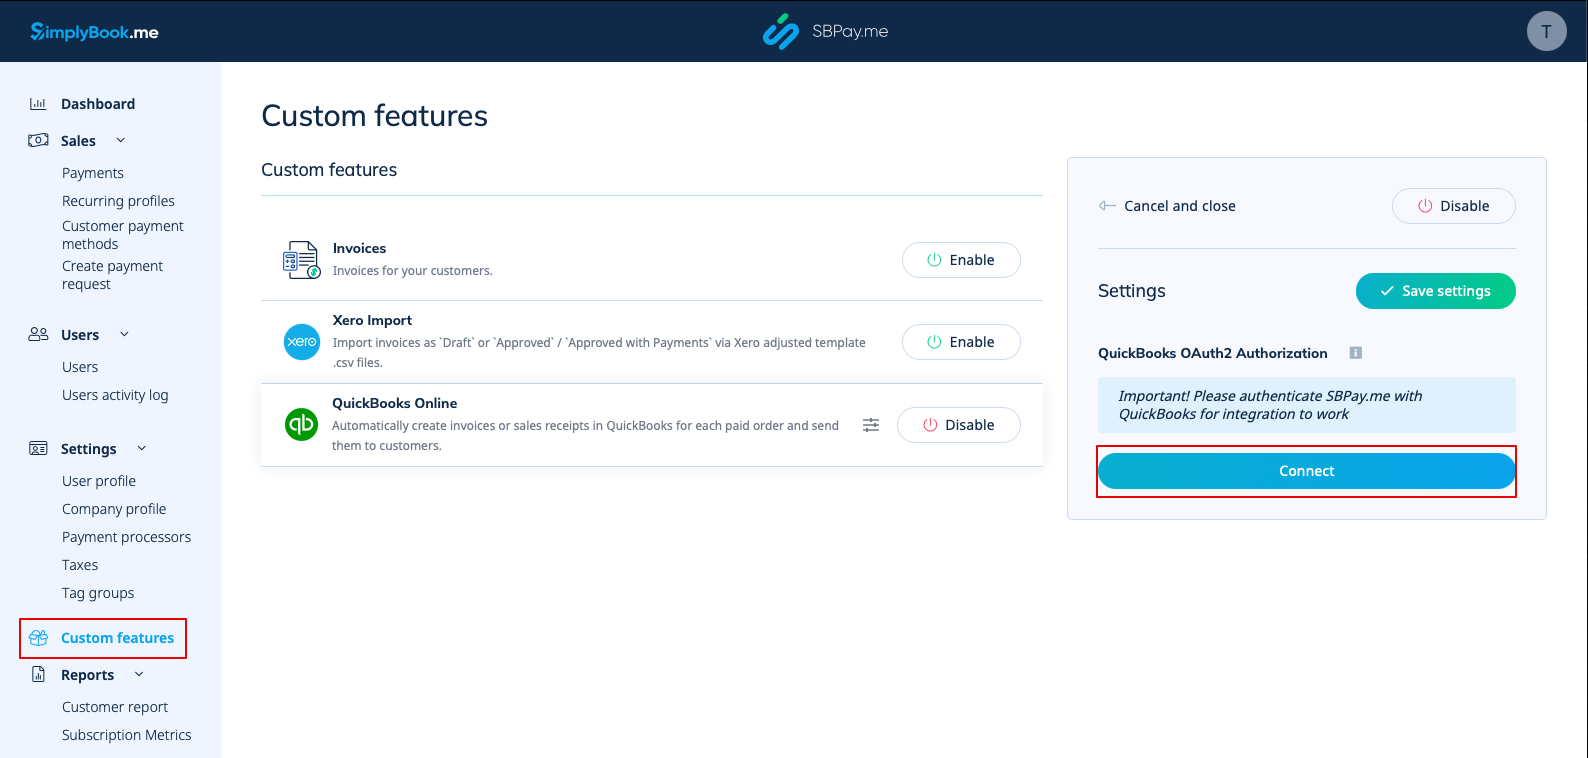
2. Після увімкнення натисніть кнопку «Підключити», щоб продовжити налаштування.
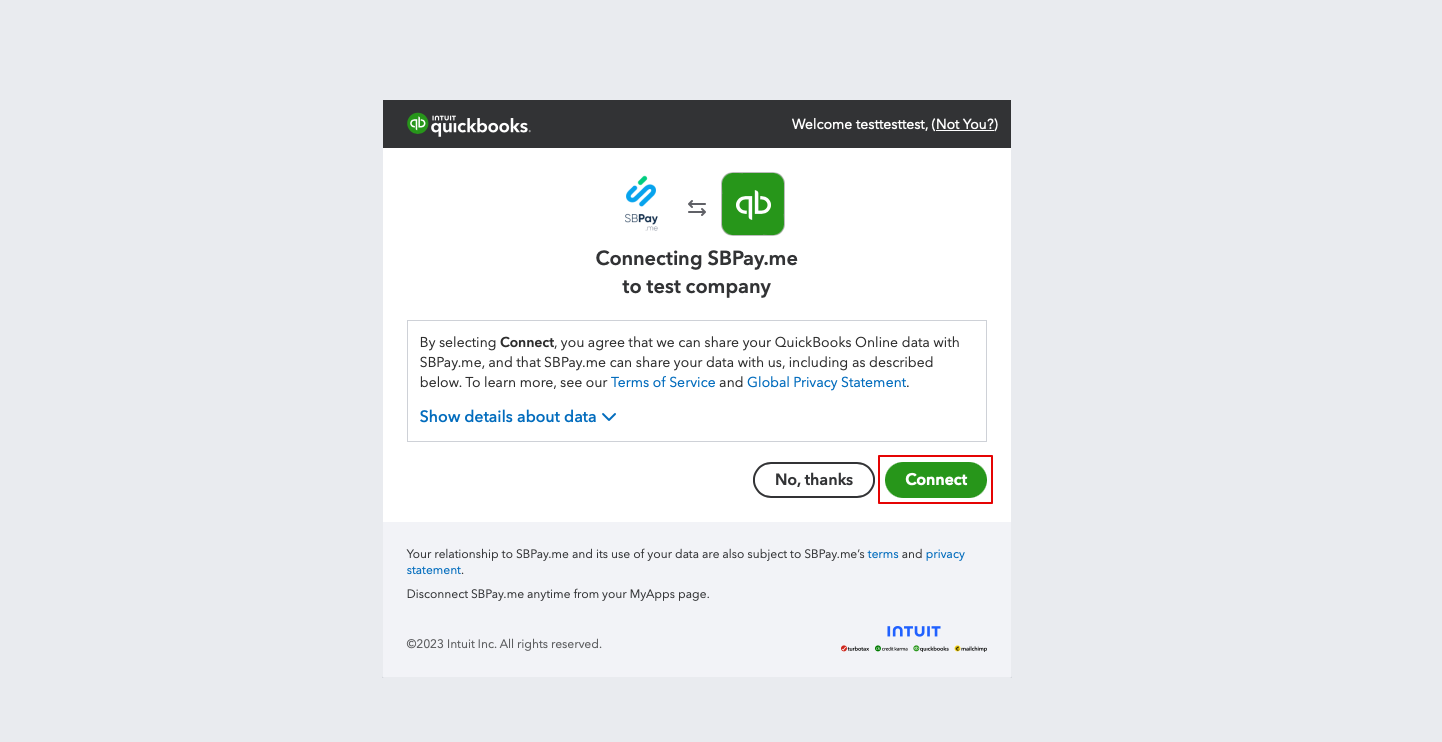
3. Вам буде запропоновано увійти до свого облікового запису Quickbooks, щоб підключитися. Або, якщо ви вже увійшли в систему у своєму браузері, підключення буде встановлено автоматично після підтвердження. Ви також побачите SBPay.me в розділі «Додатки» -> «Мої додатки» QuickBooks.
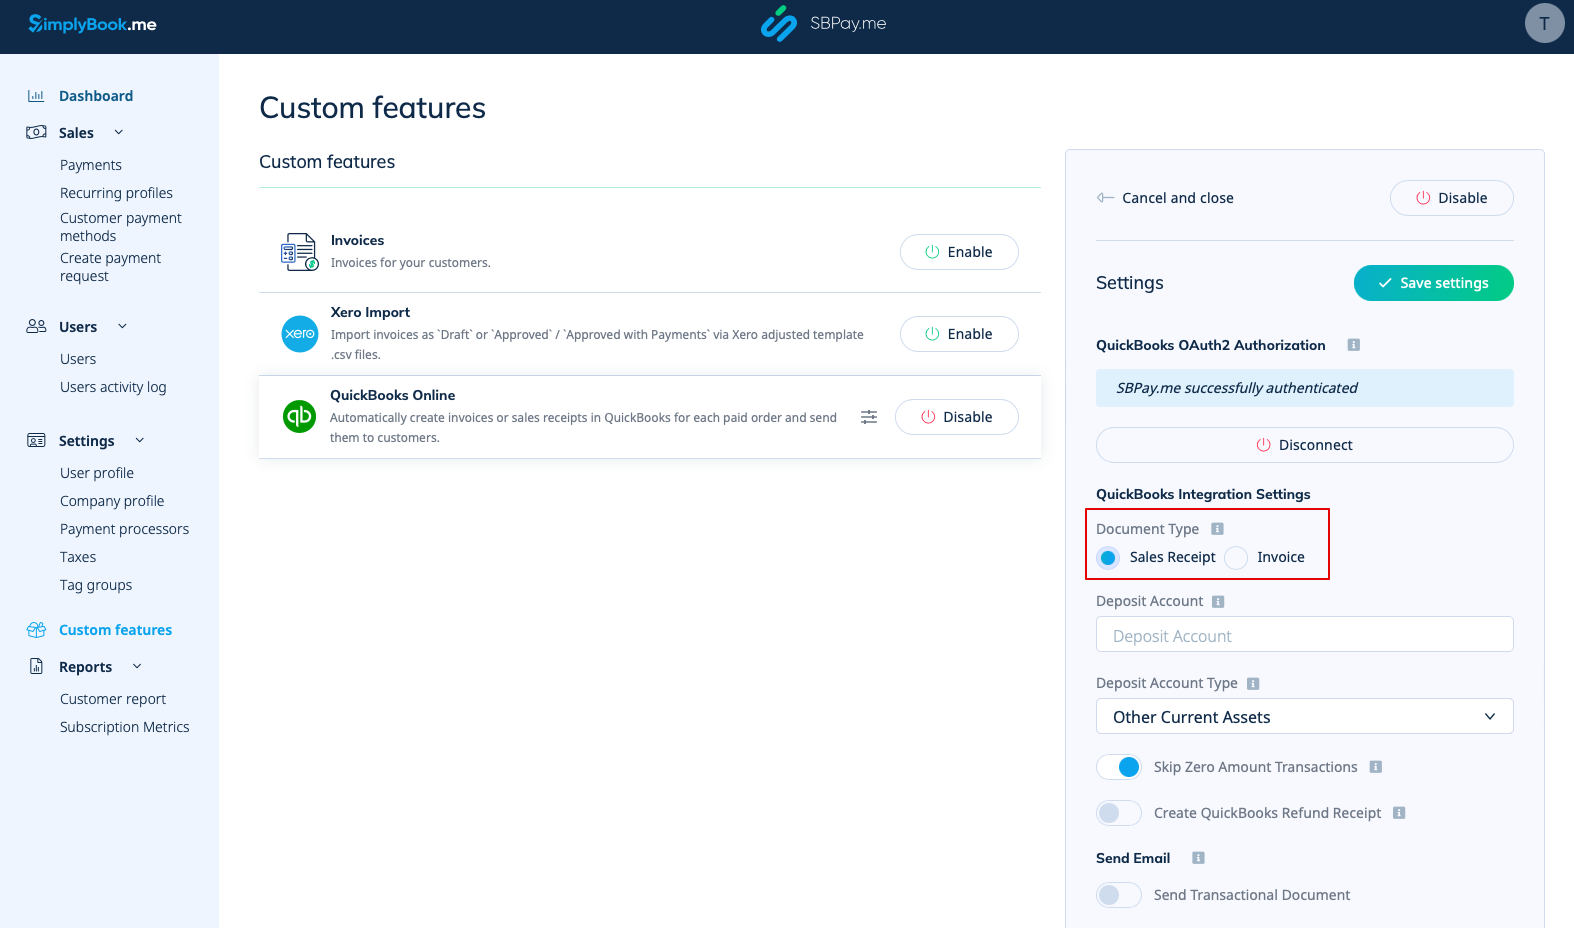
4. Після підключення систем ви отримаєте доступ до налаштувань інтеграції в інтерфейсі SBPay.me.
5. Виберіть тип транзакційного документа: є два варіанти: «Інвойс» та «Квитанція про продаж». Інвойс ініціює створення інвойсу та відповідного платежу в QuickBooks для кожного виконаного замовлення в SimplyBook. Таким чином, ви побачите два записи (платіж та інвойс) на рахунку QuickBooks, пов'язаних з однією транзакцією. Sales Receipt призводить до створення квитанції про продаж (Payment) виключно після успішної оплати замовлення.
6. You can add a Deposit Account Name and select the deposit Account Type. It should be either Other Current Assets or Bank (Cash on Hand) type. If deposit account is not specified QuickBooks will use a default account called Undeposited Funds.
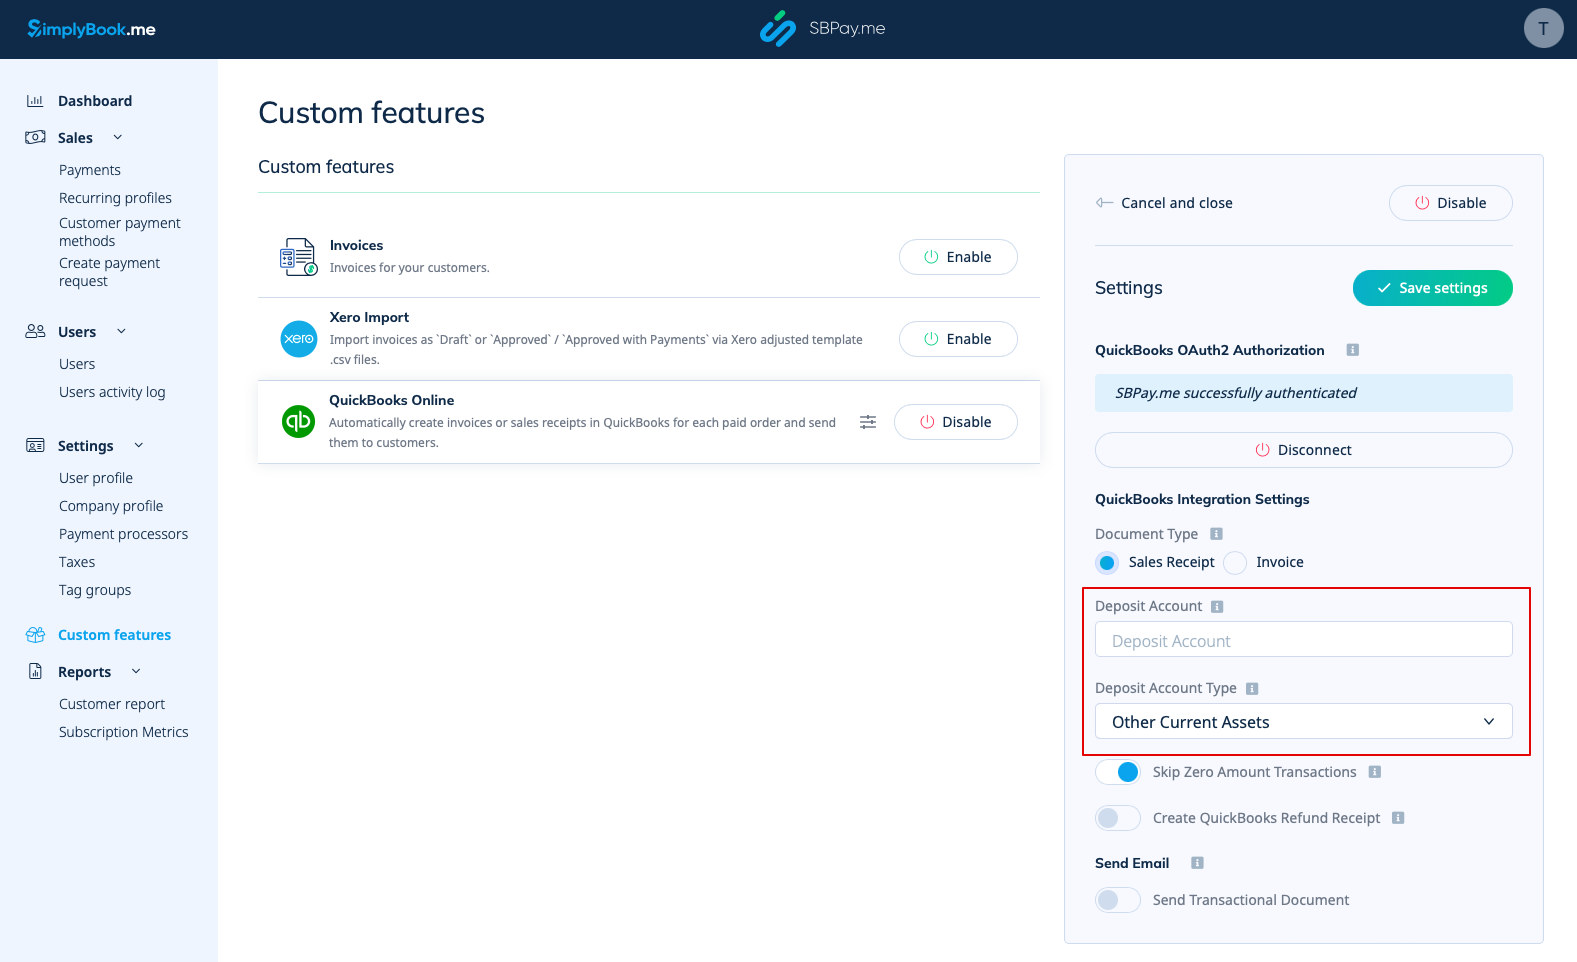
7. Skipping zero amount transactions is enabled by default to exclude zero amount orders from being transferred to QuickBooks. For example, the transactions where the discount was applied and the resulting total is 0. You can keep it as it is if you do not need to see such records in Quickbooks or disable if it is important to have them for your bookkeeping.
8. You can activate the automatic creation of a Refund Receipt entry in QuickBooks when a refund is made on the SBPay.me side. Please ensure to include the Deposit Account Name if you decide to enable this option as it is mandatory for refunds synchronisation.
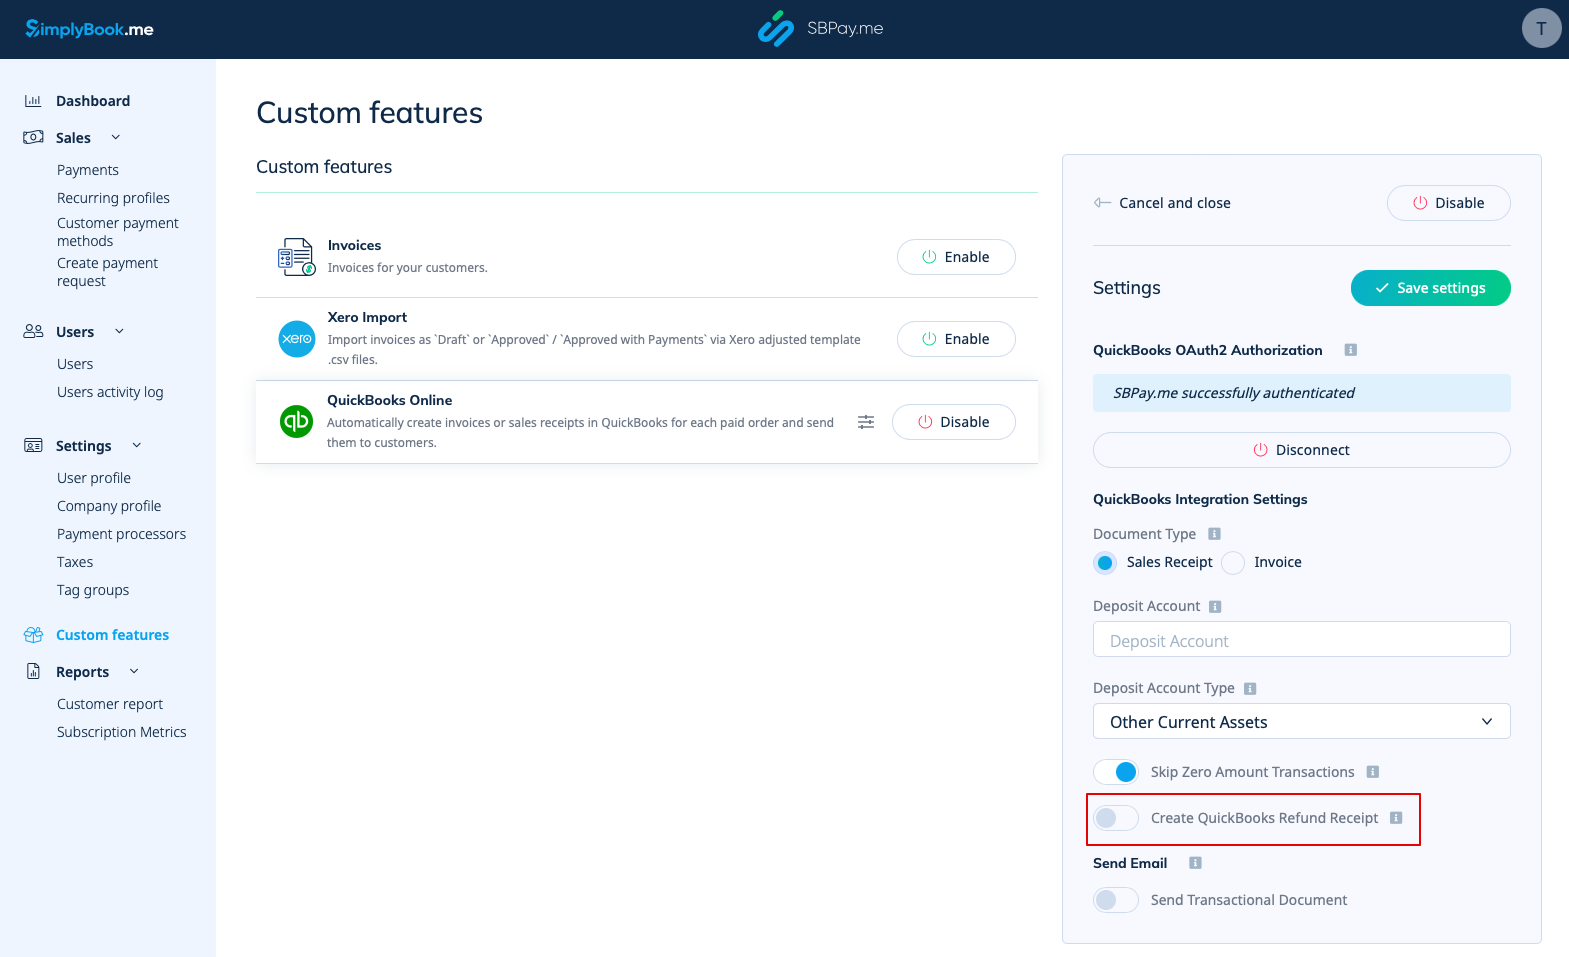
9. There is also an option to send a transactional document. If enabled, the client will also receive an invoice from QuickBooks in addition to other active notifications.
You can also add a note to be reflected in the Quickbooks invoices.
Taxes
To activate this option and pass taxes information to Quickbooks please check the "Add tax info to transaction document" in the Custom features -> Sales tax in your SBPay.me interface. And select the corresponding tax location.
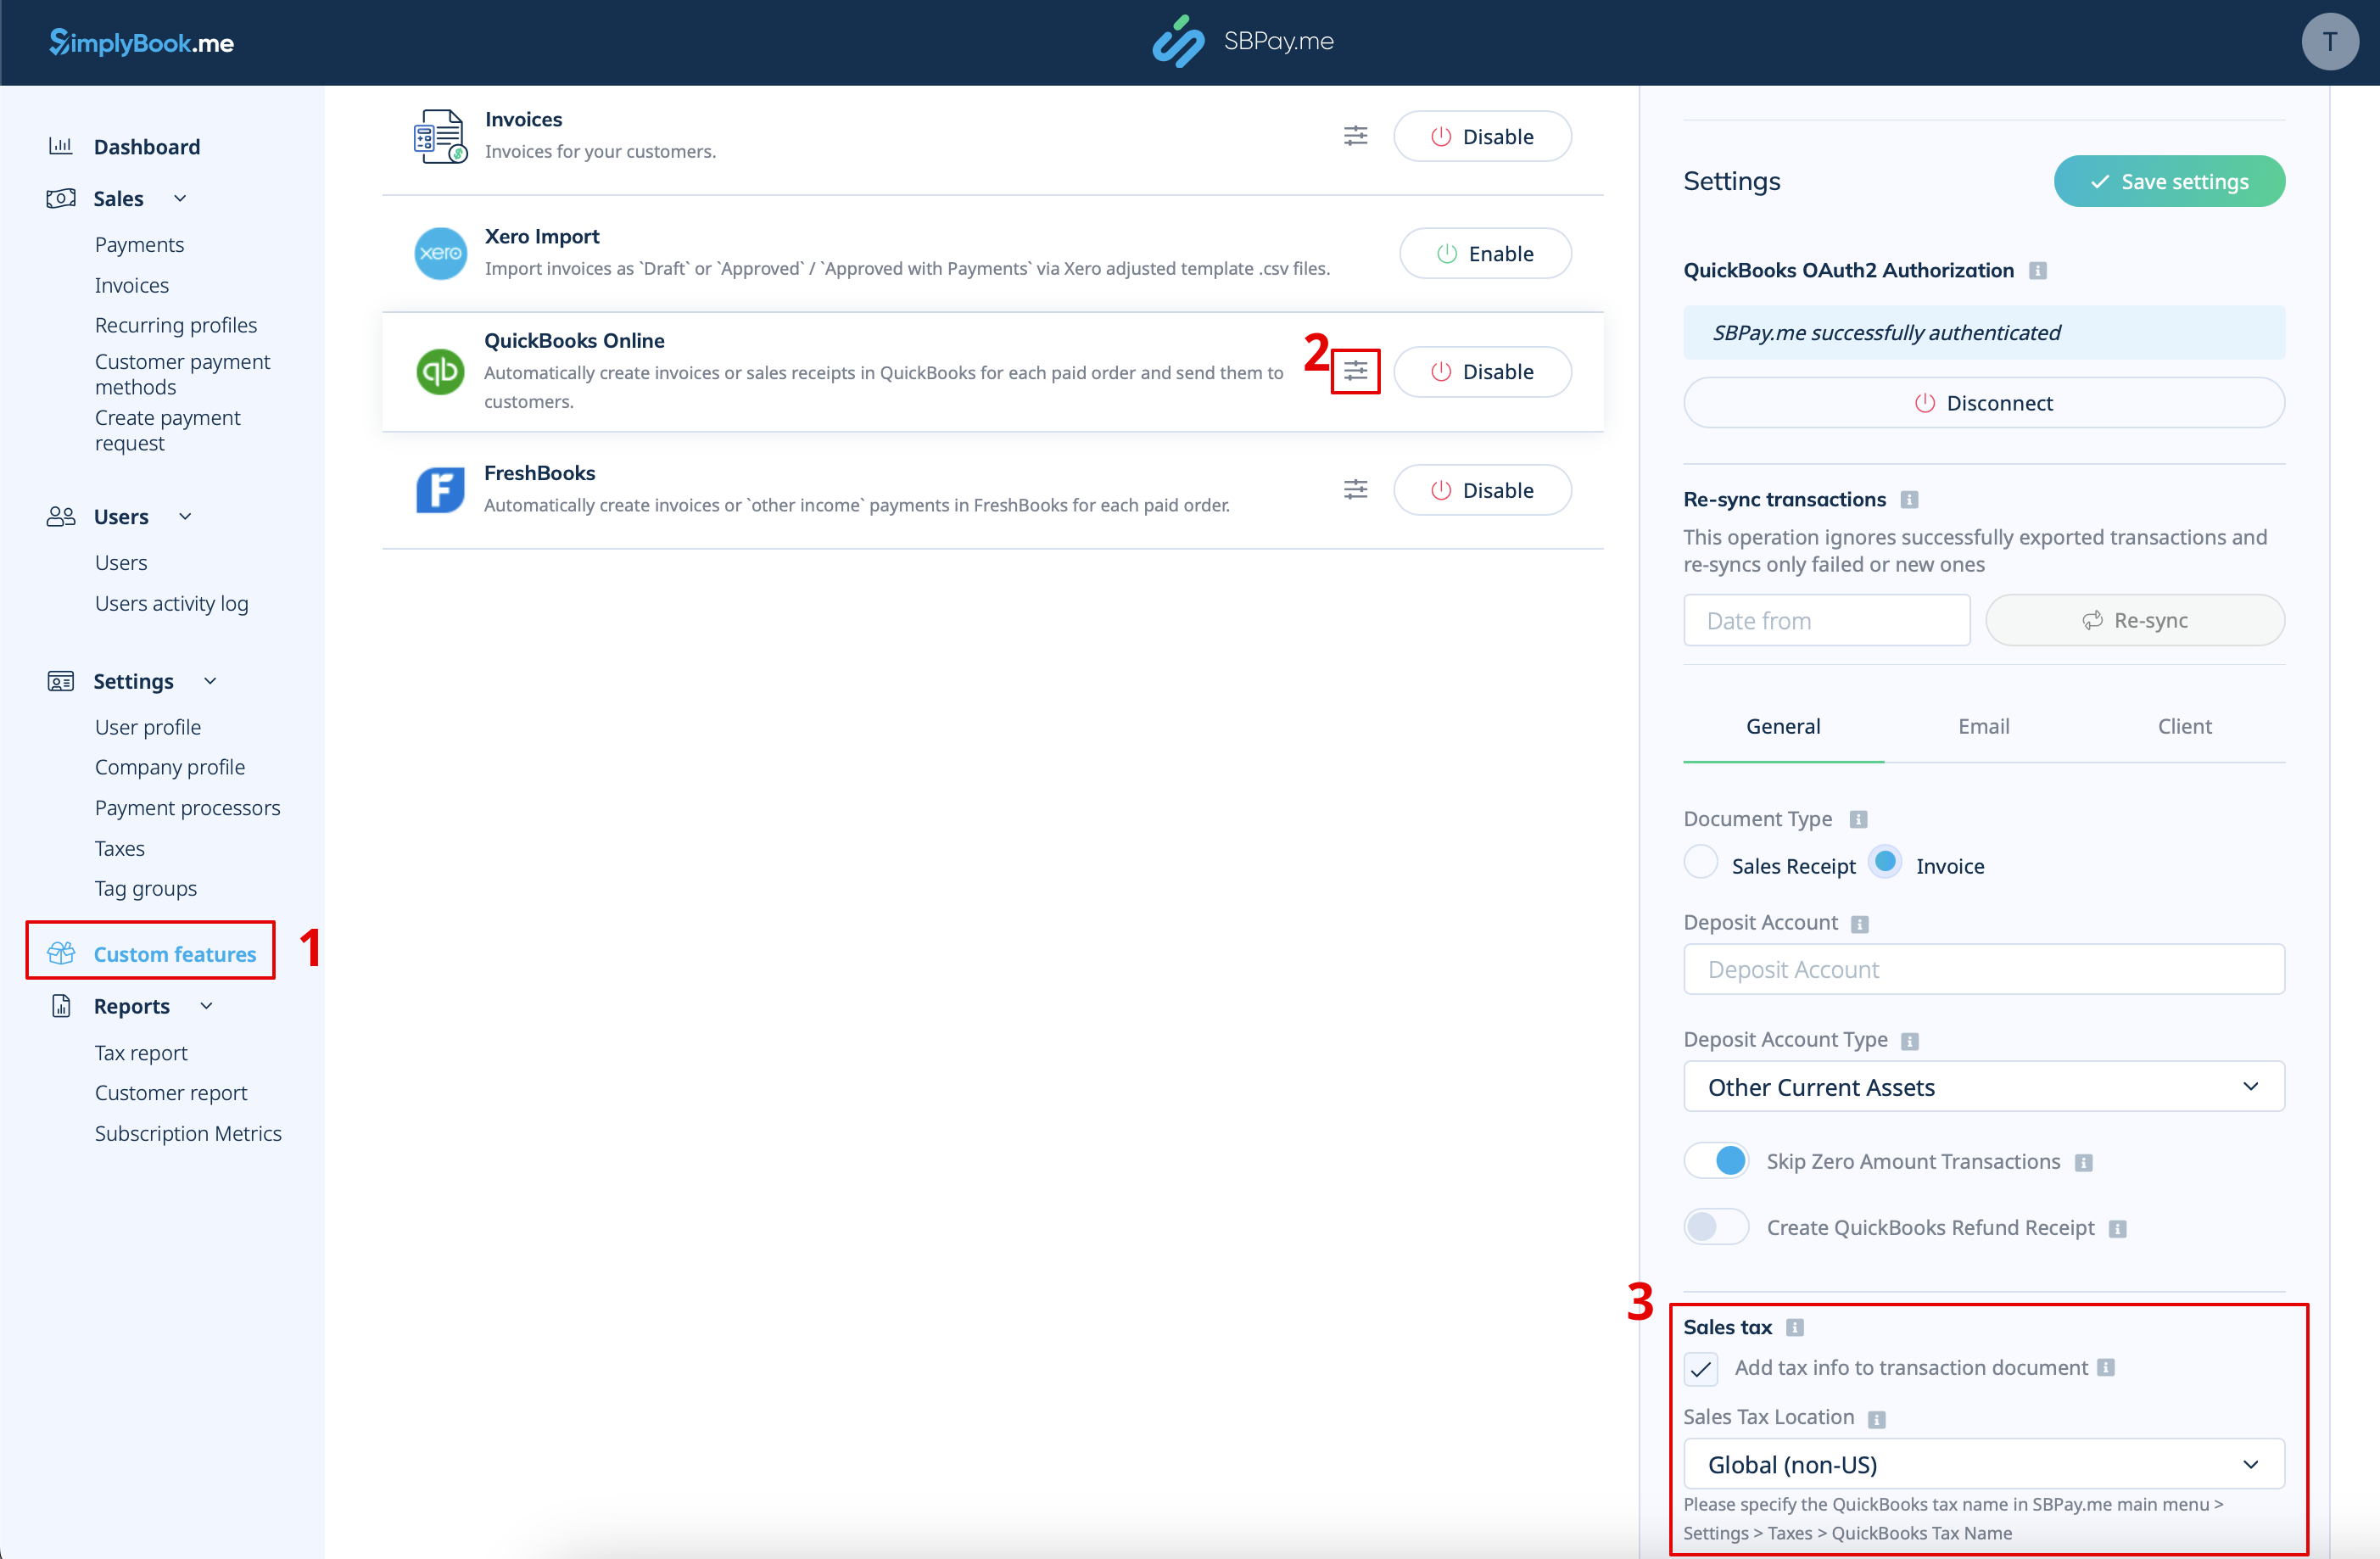
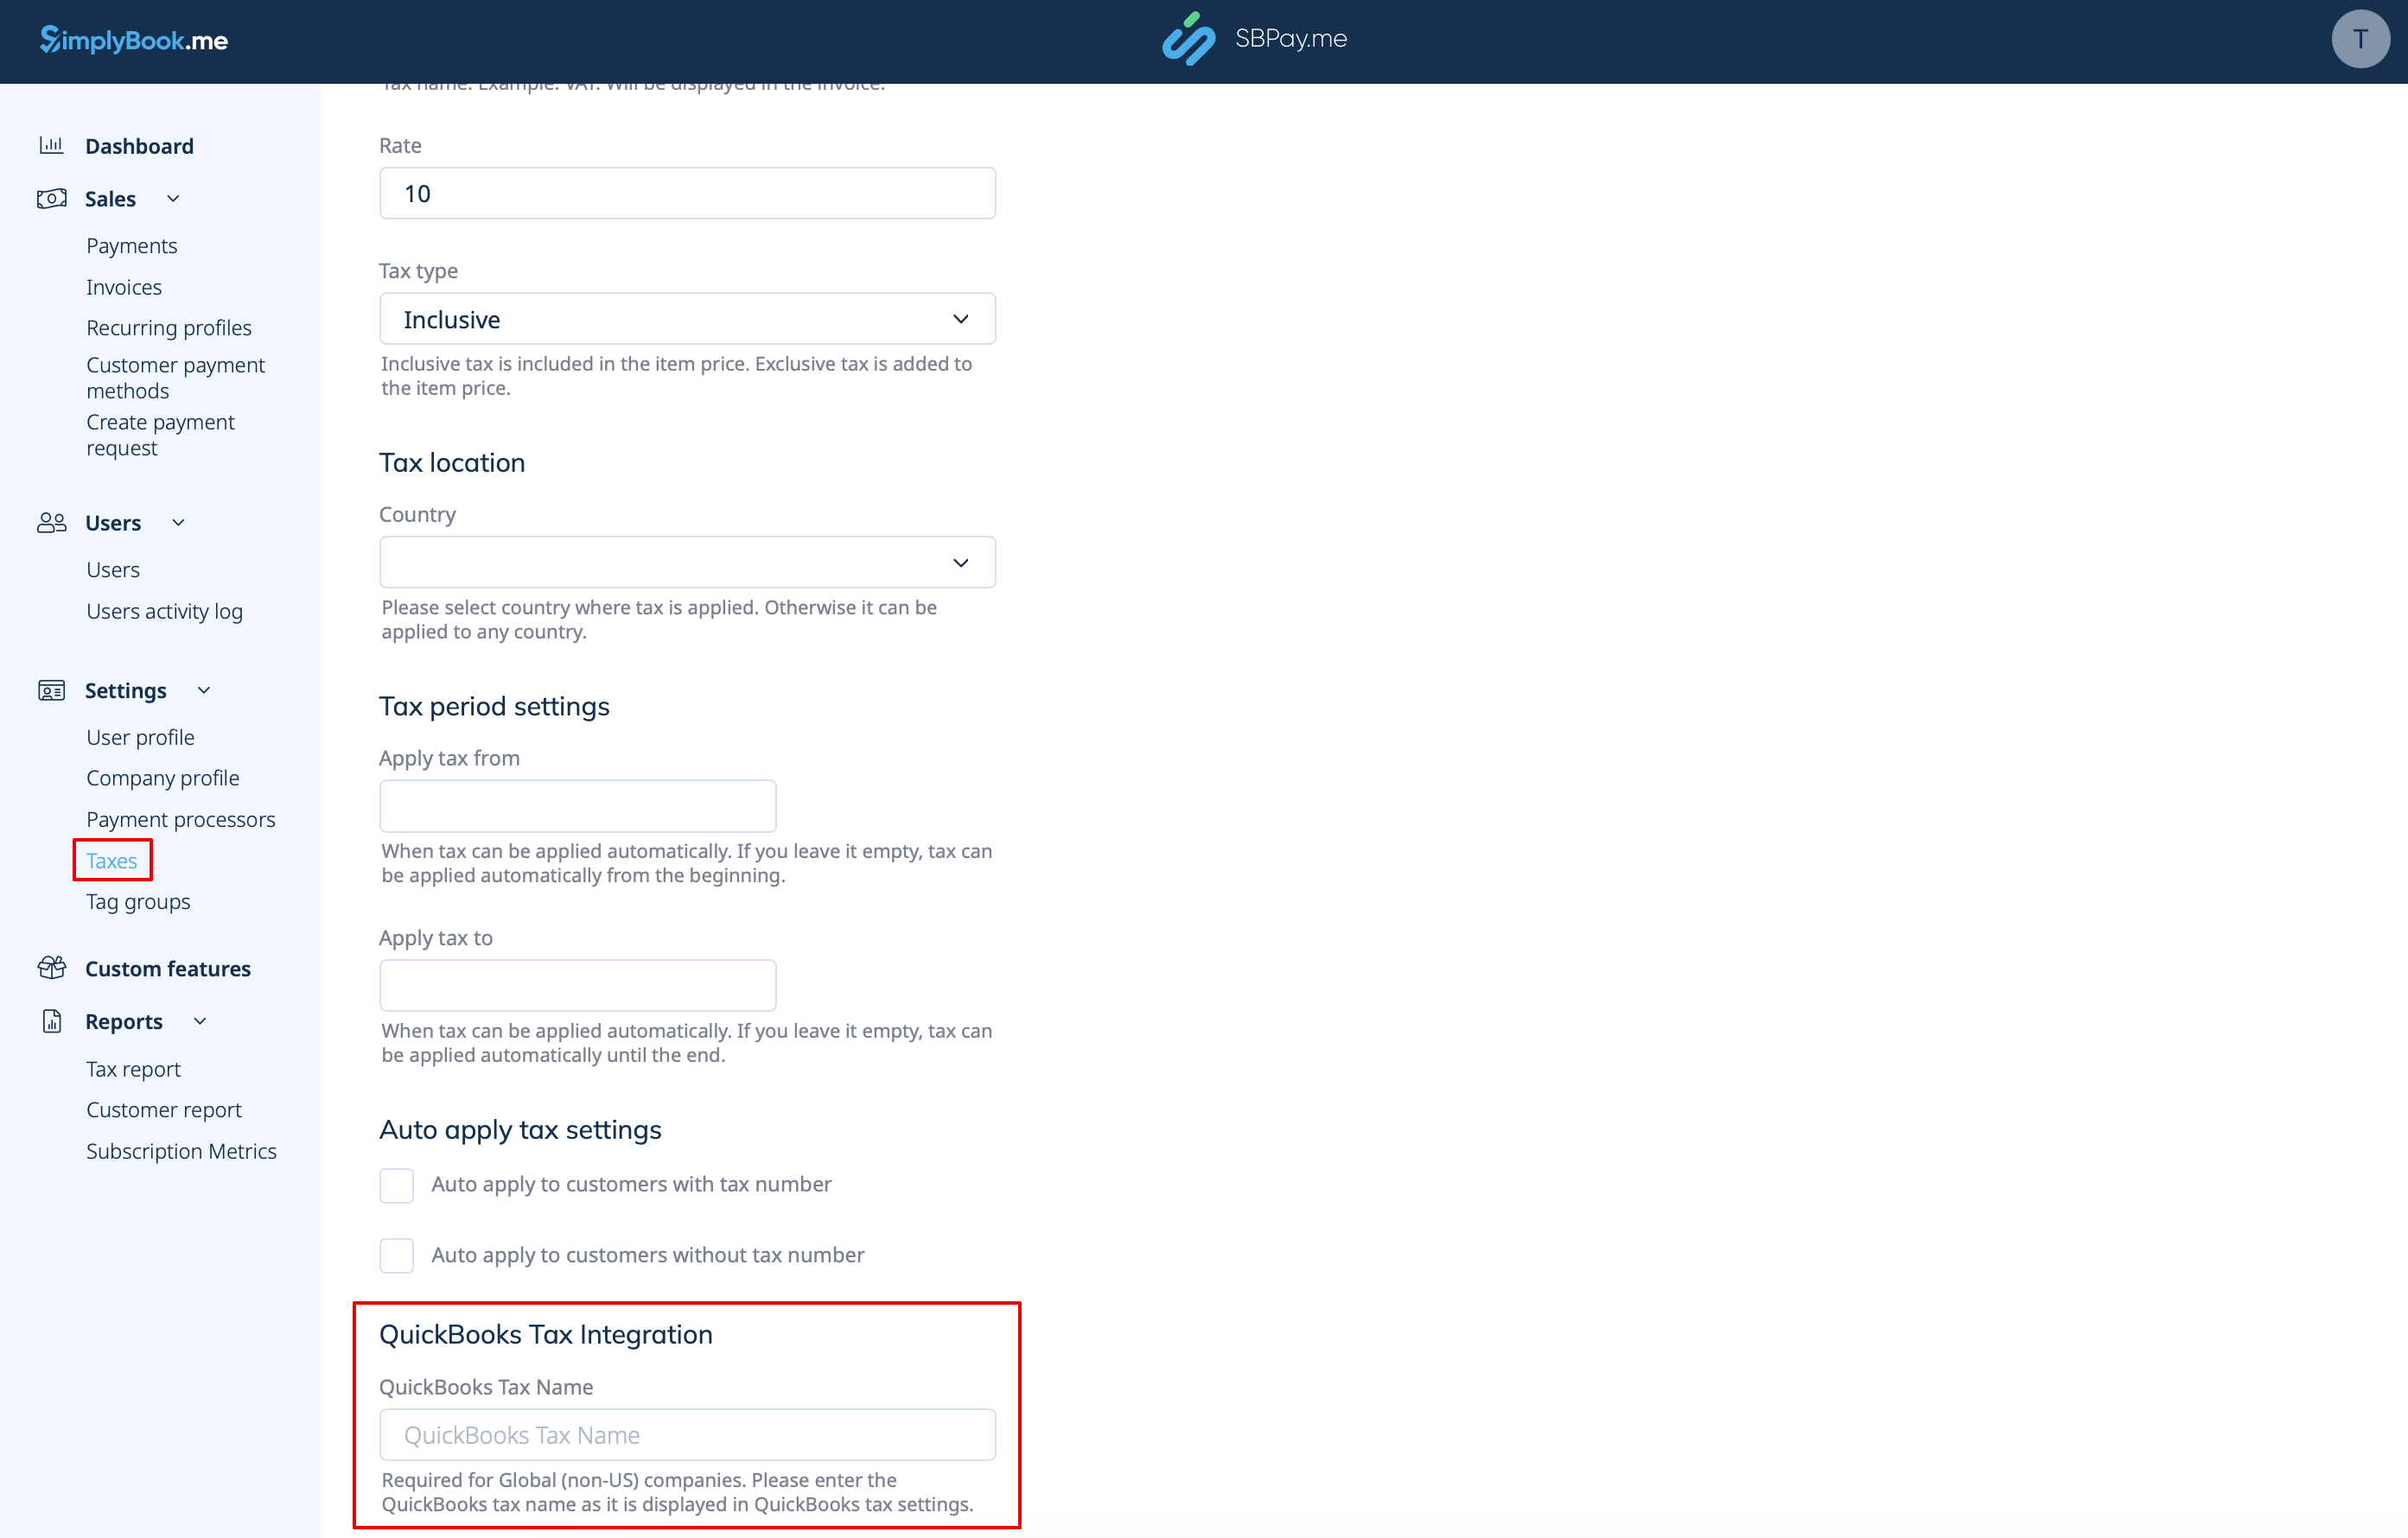
- For Global tax location
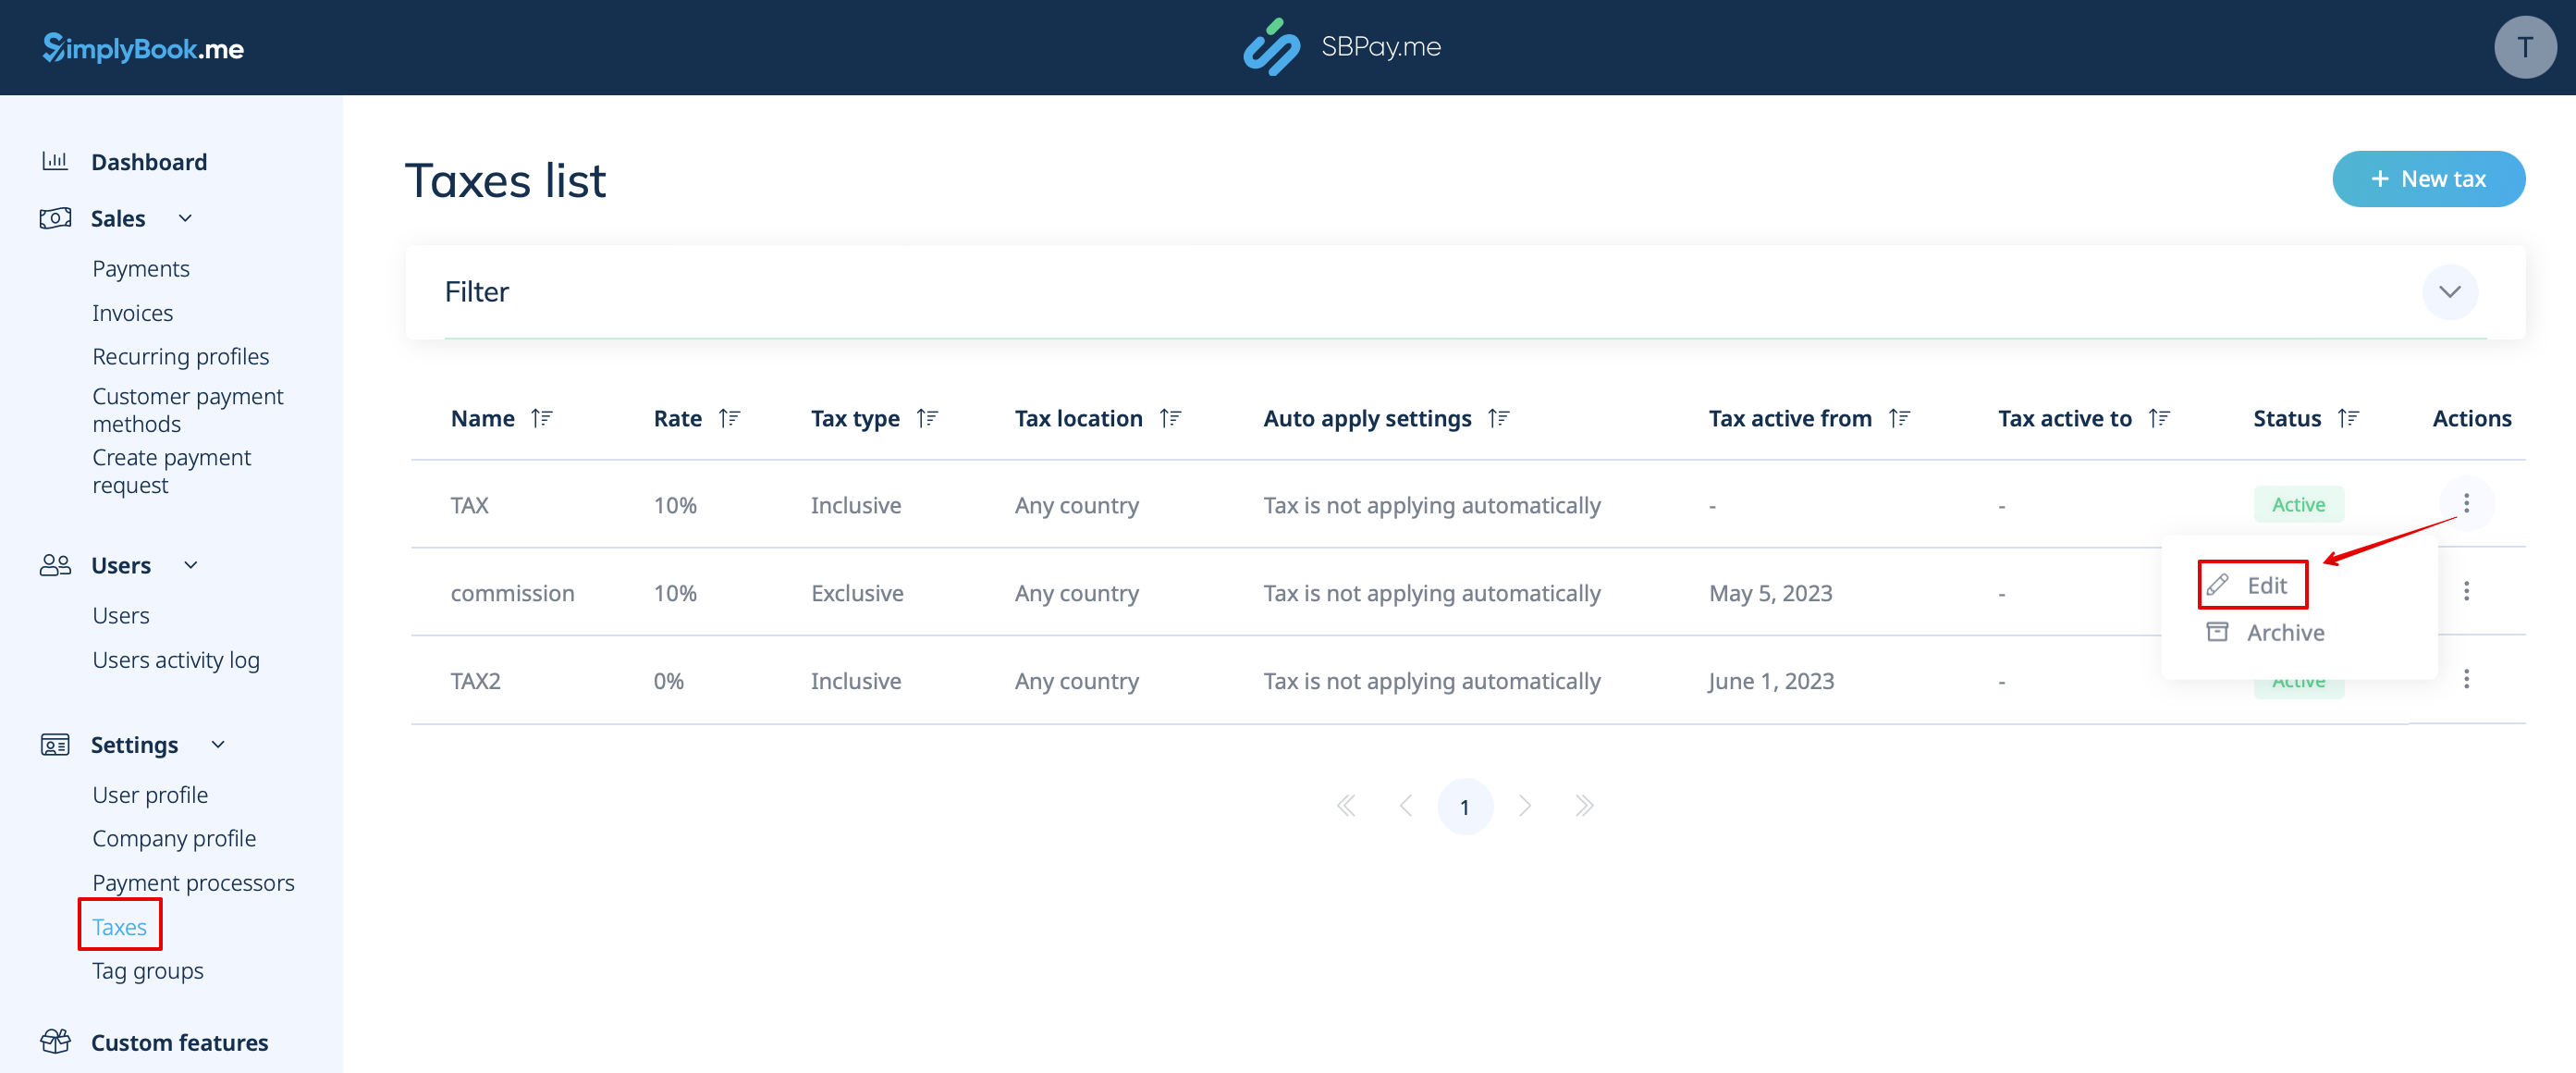
Also navigate to Settings -> Taxes in SBPay.me interface, select the necessary tax and set the exact tax name as it is defined in QuickBooks.
Please note!
- Tax is defined for each line separately;
- All lines with taxes should have the same tax type (inclusive or exclusive) throughout the order;
- The orders that contain lines with multiple taxes will not be passed to Quickbooks;
- If the order contains lines with no tax applied it will not be passed to Quickbooks;
- The orders that contain lines with mixed inclusive and exclusive taxes are not passed to Quickbooks;
- If the Quickbooks tax name is not set for some tax in that order it will not be passed to Quickbooks.
- For USA tax location
For now it is only possible to use Automated Sales Tax (AST) as defined in QuickBooks. If you set the tax name set in SBPay.me Settings -> Taxes, it will be ignored.
Please note!
- Tax is defined for the whole order. On the SBPay.me side, this means that ALL lines should have the same single tax with the same rate and type set for each order line;
- Tax is always exclusive.