Created page with "= Як замовити з календаря адміністратора =" |
Created page with "__FORCETOC__ <br><br> = Де знайти всі мої бронювання = 1. У <span style="background-color:#d4f8e5; padding:5px; border-radius:5px;">календарі</span> (пункт у меню зліва).<br/> (ви можете вибрати зручний для вас вигляд) 1200px | center|link=https://help.simplybook.me/images/c/cf/Calendar_overview_redesigned.png <br/><br/> 2. У <span style="backgrou..." |
||
| Line 17: | Line 17: | ||
= Як замовити з календаря адміністратора = | = Як замовити з календаря адміністратора = | ||
1. У <span style="background-color:#d4f8e5; padding:5px; border-radius:5px;">календарі</span> (пункт у меню зліва) виберіть бажаний вигляд, дату, до якої потрібно додати бронювання (для зручності можна також скористатися фільтрами вгорі), і просто натисніть на вільне місце або виберіть необхідний період часу, перетягнувши курсор. | |||
1. | |||
[[File:Booking from admin calendar steps redesigned.png|1200px|border|center|link=https://help.simplybook.me/images/7/70/Booking_from_admin_calendar_steps_redesigned.png]] | [[File:Booking from admin calendar steps redesigned.png|1200px|border|center|link=https://help.simplybook.me/images/7/70/Booking_from_admin_calendar_steps_redesigned.png]] | ||
<br><br> | <br><br> | ||
2. Заповніть спливаючу форму: виберіть або додайте клієнта, виберіть постачальника та послугу/клас, встановіть дату та час початку і закінчення. Можна забронювати час, який відрізняється від тривалості послуги і є кратним вибраному часовому проміжку.<br> | |||
(Якщо ви використовуєте додаткові <span style="background-color:#cdeffc; padding:5px; border-radius:5px;">[[Custom_Features|налаштування]],</span> може знадобитися заповнити більше полів у спливаючій формі <span style="background-color:#cdeffc; padding:5px; border-radius:5px;">.</span><br> | |||
2. | Наприклад, якщо ви використовуєте <span style="background-color:#cdeffc; padding:5px; border-radius:5px;">[[Accept_payments_custom_feature|функцію «Приймати платежі»]]</span> і хочете, щоб рахунок-фактура була сформована після додавання бронювання з боку адміністратора, вам потрібно встановити прапорець <span style="background-color:#d4f8e5; padding:5px; border-radius:5px;">«Отримати платіж»</span> і вибрати бажаний спосіб оплати перед збереженням бронювання.<br> | ||
( | <span style="background-color:#ffe9e9; padding:5px; border-radius:5px;">'''Зверніть увагу!''' Цю опцію можна вибрати тільки під час створення нового бронювання. Якщо бронювання було створено без формування рахунку, але вам потрібно додати рахунок, ви можете скасувати таке бронювання і створити нове, вибравши опцію <span style="background-color:#d4f8e5; padding:5px; border-radius:5px;">«Отримати оплату»</span> ).</span> | ||
<span style="background-color:#ffe9e9; padding:5px; border-radius:5px;">''' | |||
[[File:New booking form redesigned.png|1200px|border|center|link=https://help.simplybook.me/images/9/9b/New_booking_form_redesigned.png]] | [[File:New booking form redesigned.png|1200px|border|center|link=https://help.simplybook.me/images/9/9b/New_booking_form_redesigned.png]] | ||
<br><br> | <br><br> | ||
<div lang="en" dir="ltr" class="mw-content-ltr"> | <div lang="en" dir="ltr" class="mw-content-ltr"> | ||
Revision as of 09:48, 16 May 2025
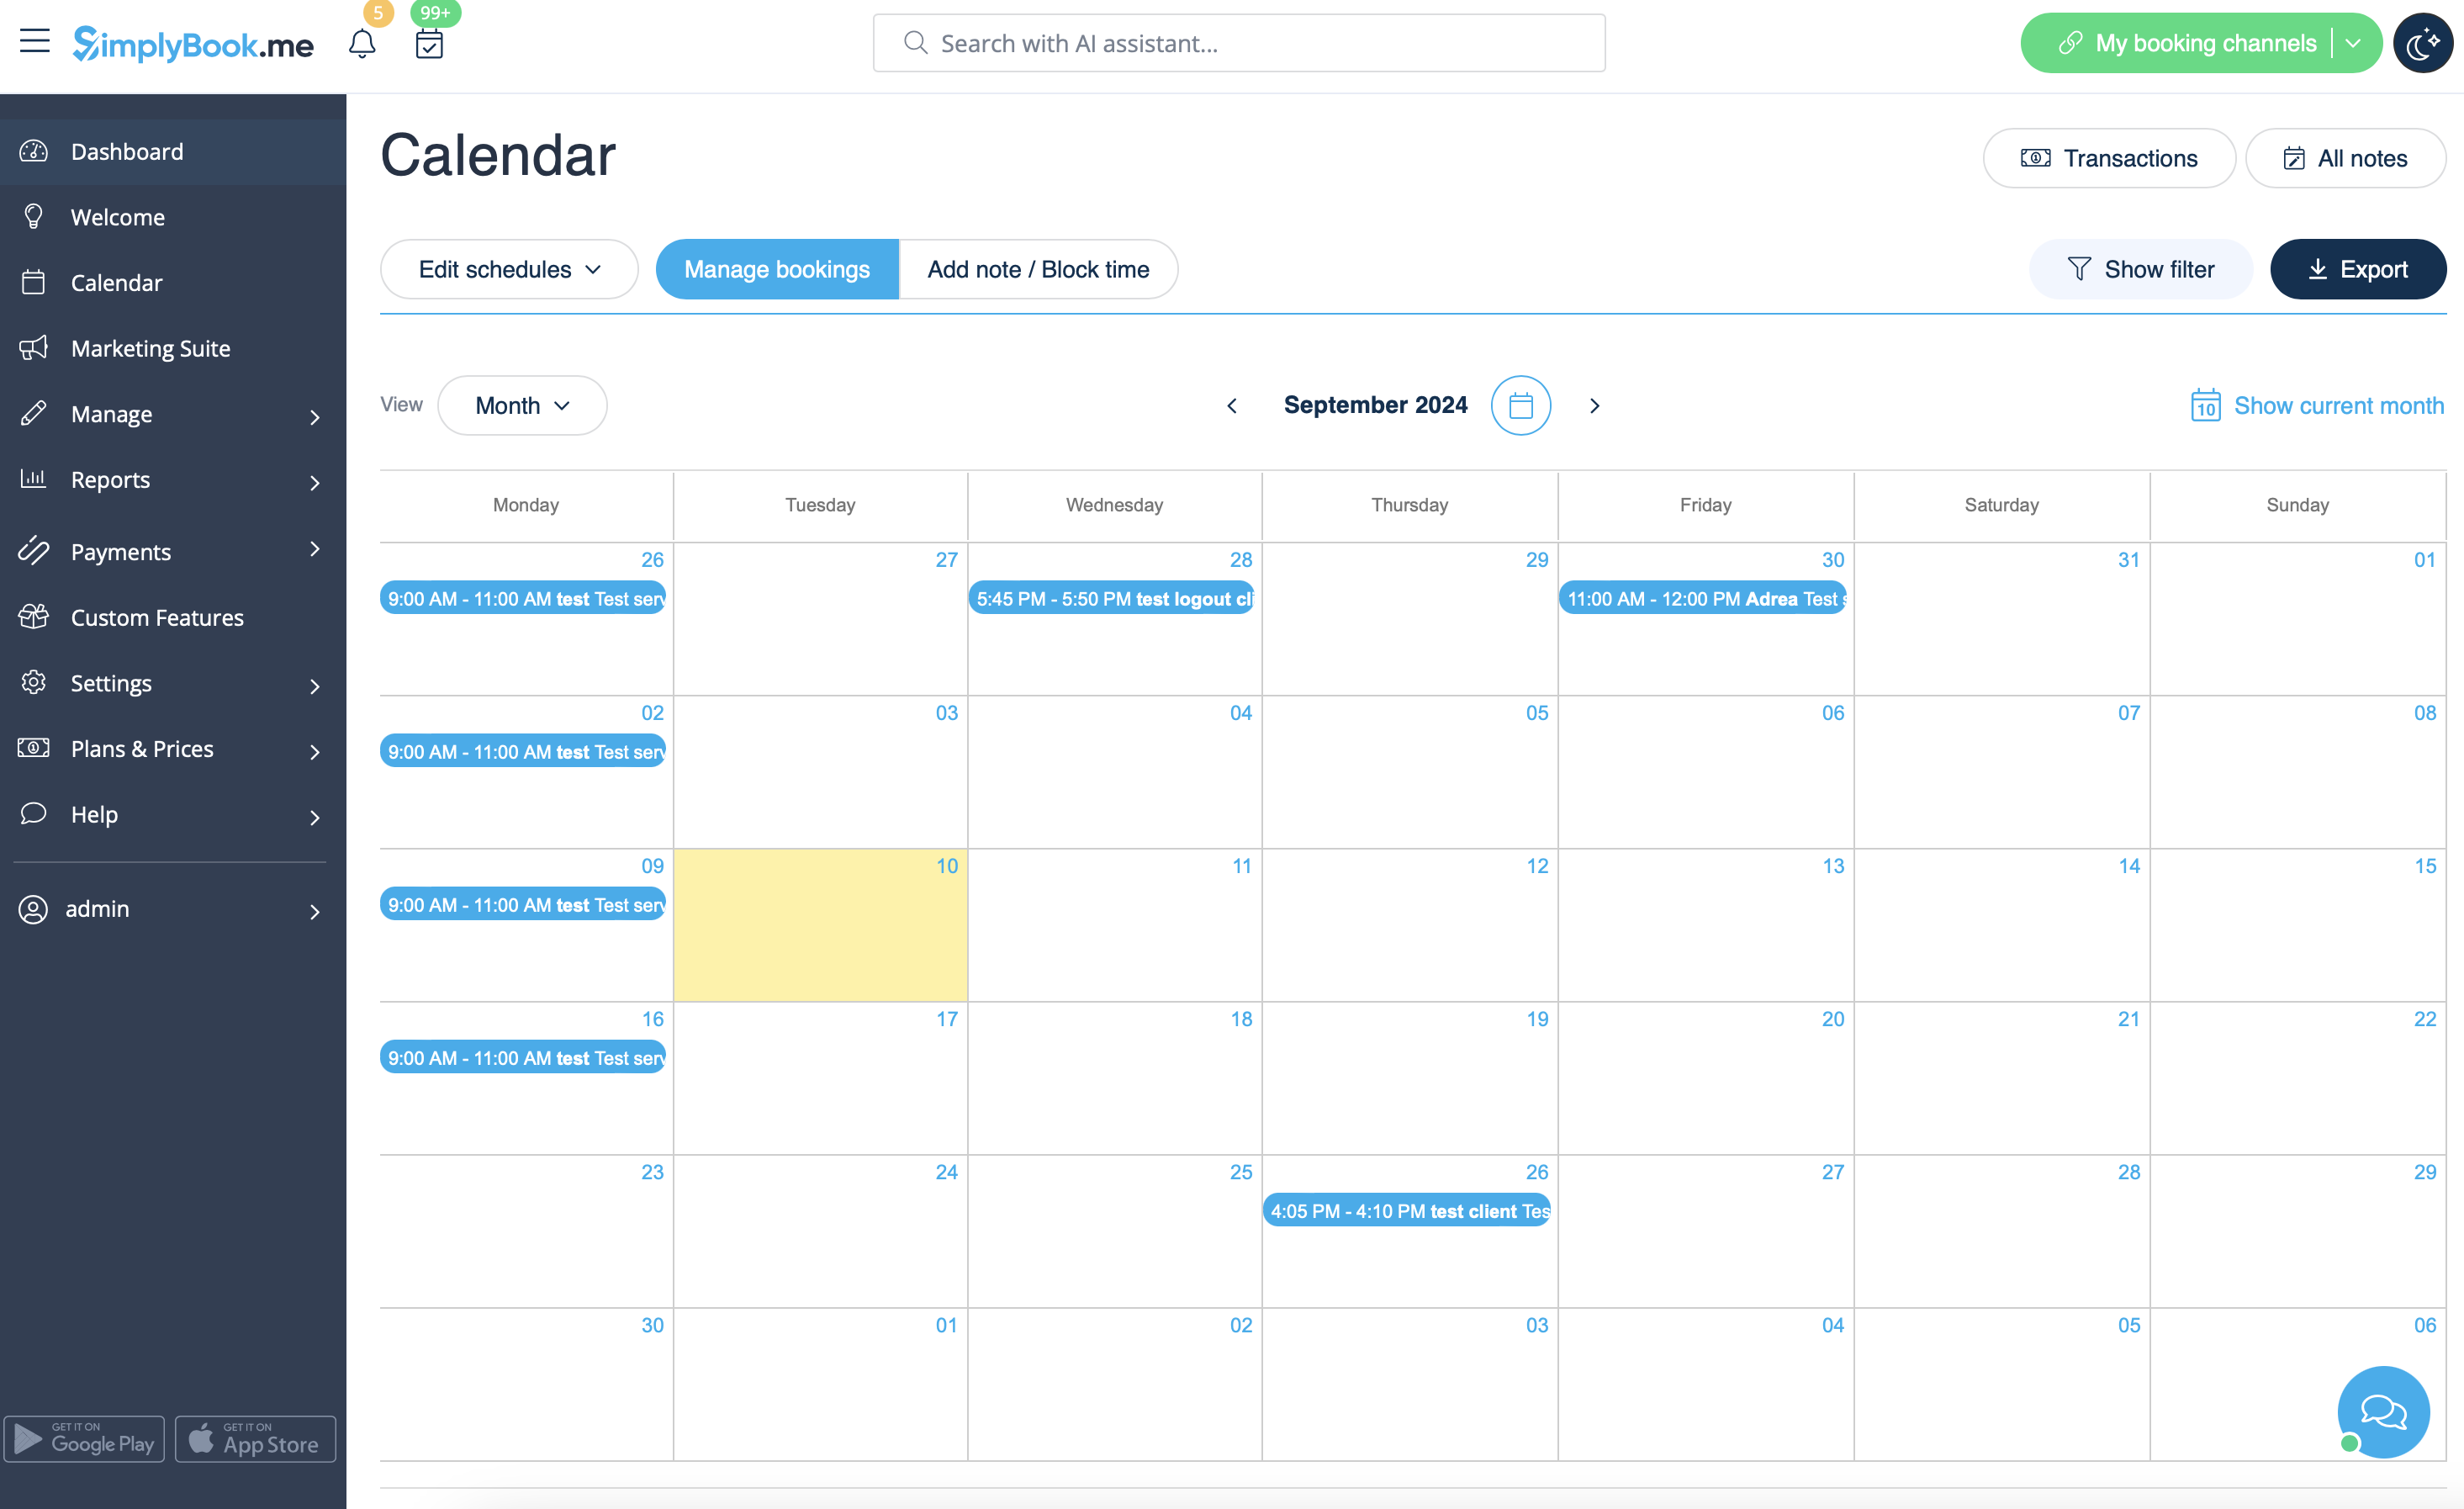
Де знайти всі мої бронювання
1. У календарі (пункт у меню зліва).
(ви можете вибрати зручний для вас вигляд)
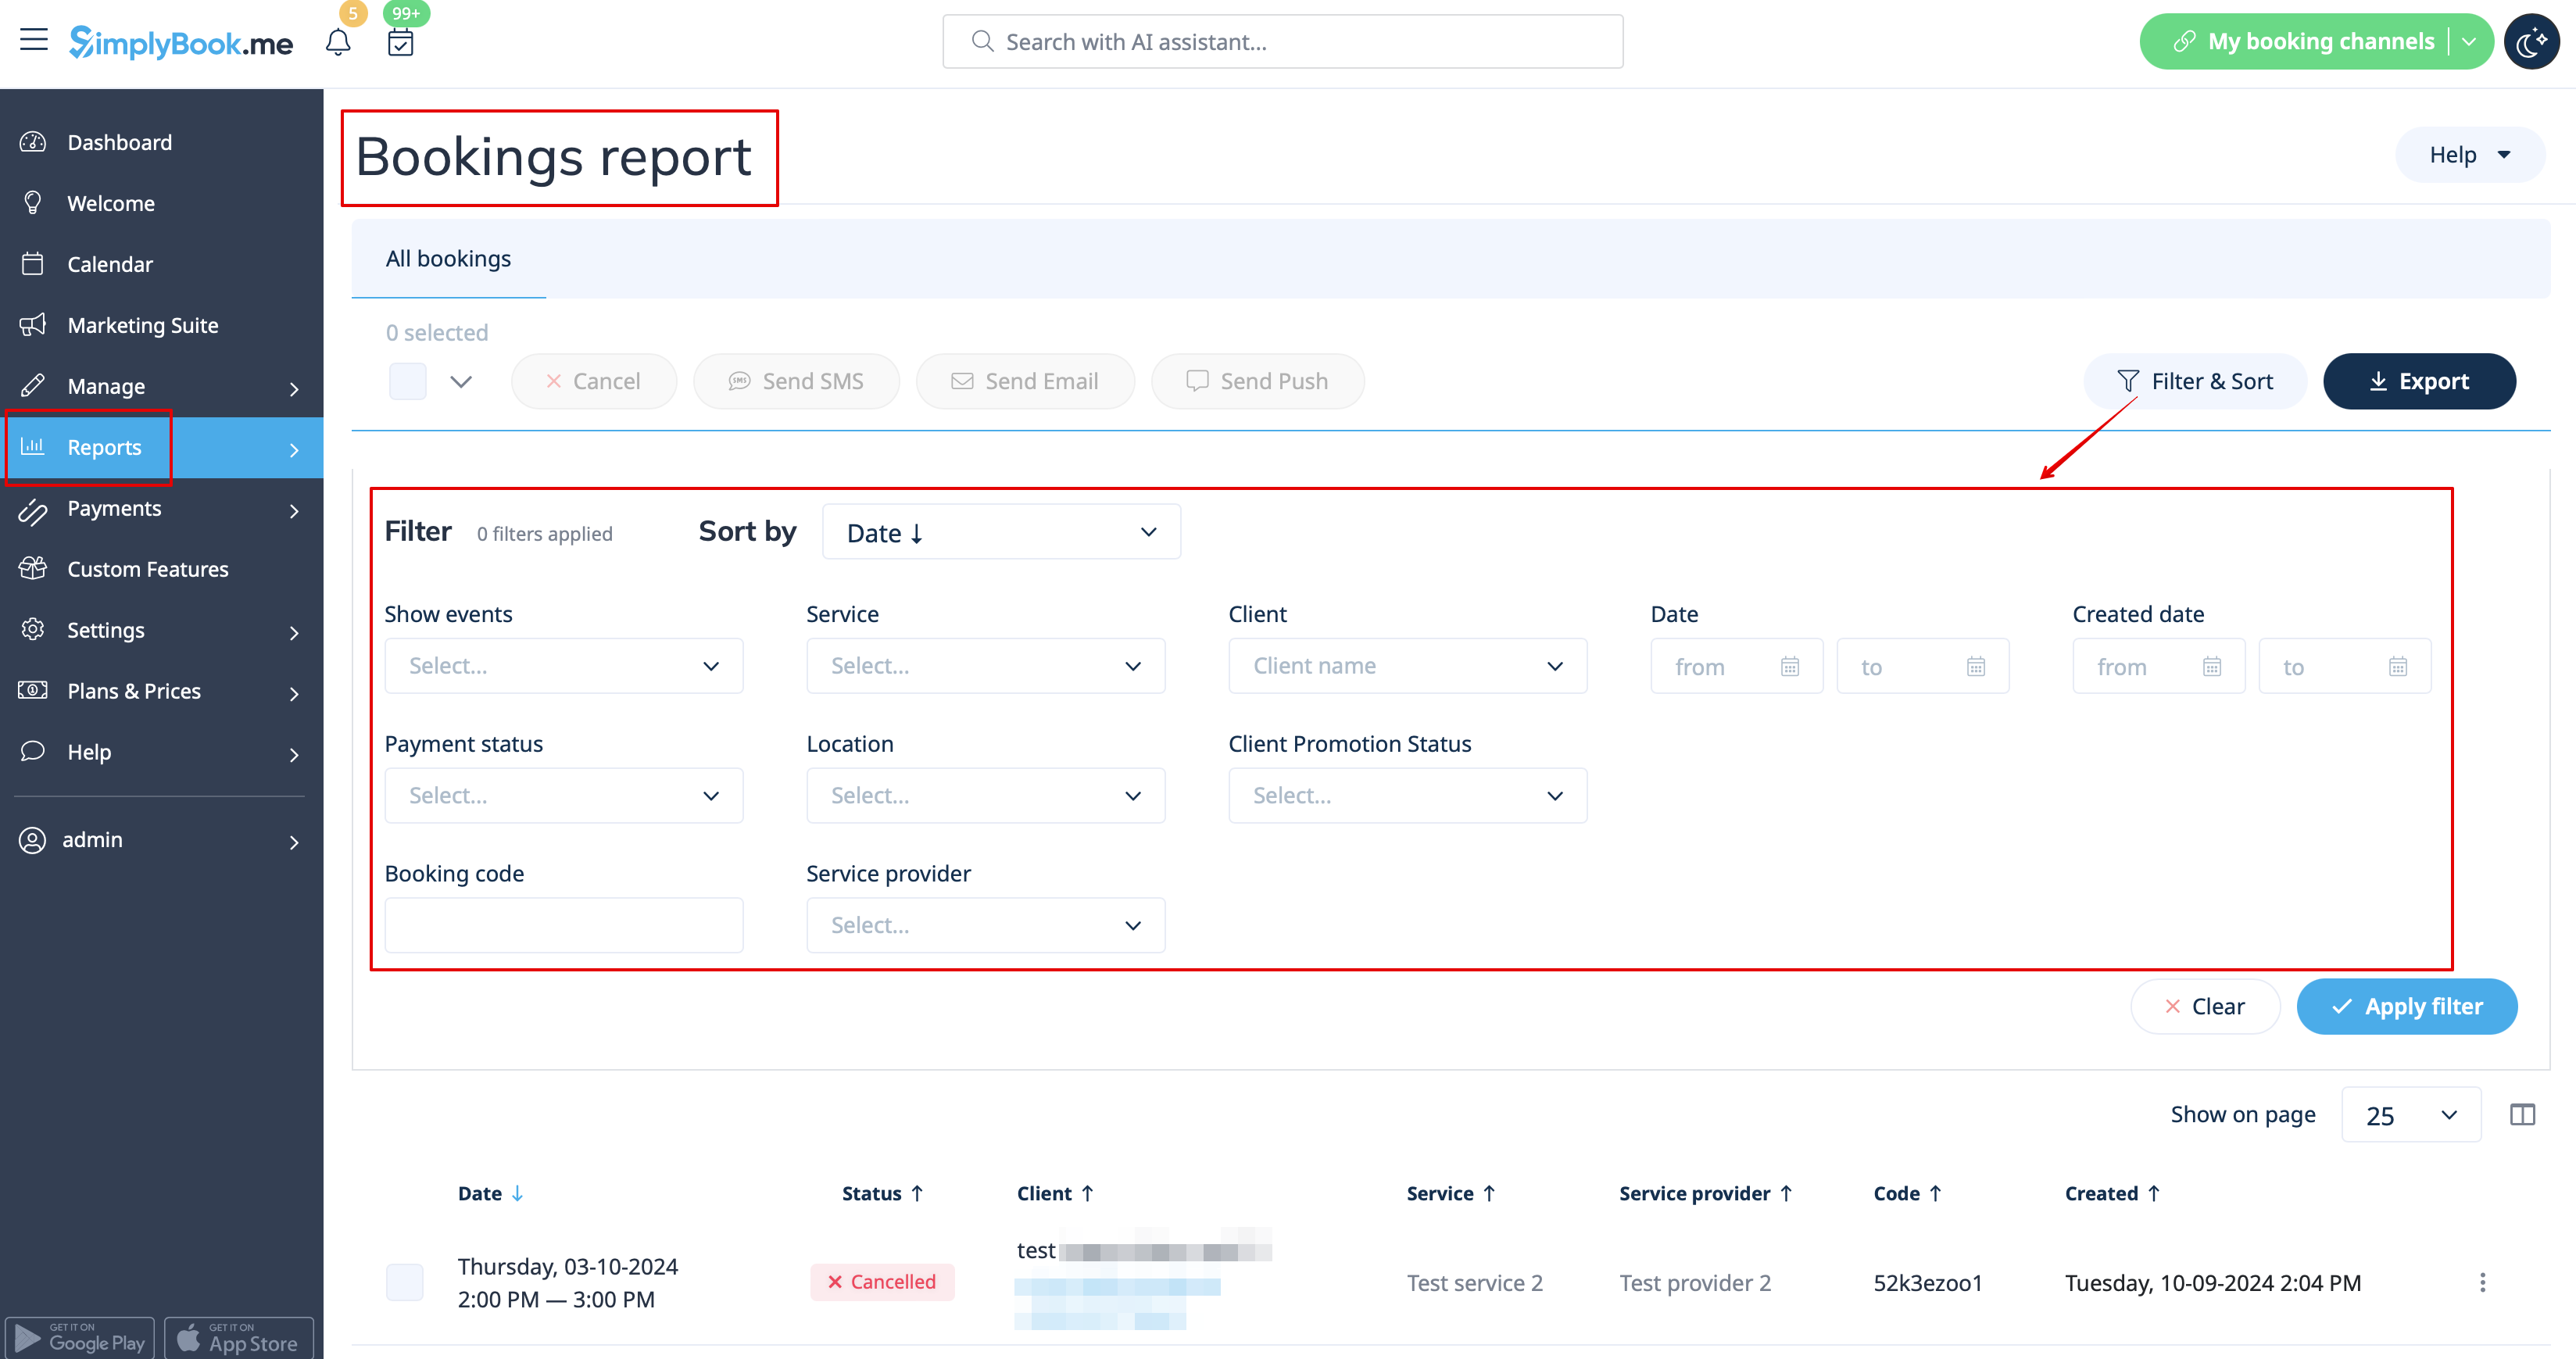
2. У звітах -> Деталі бронювання.
Ви можете використовувати фільтри, щоб легко знайти свої бронювання для конкретної послуги, постачальника, клієнта або діапазону дат.
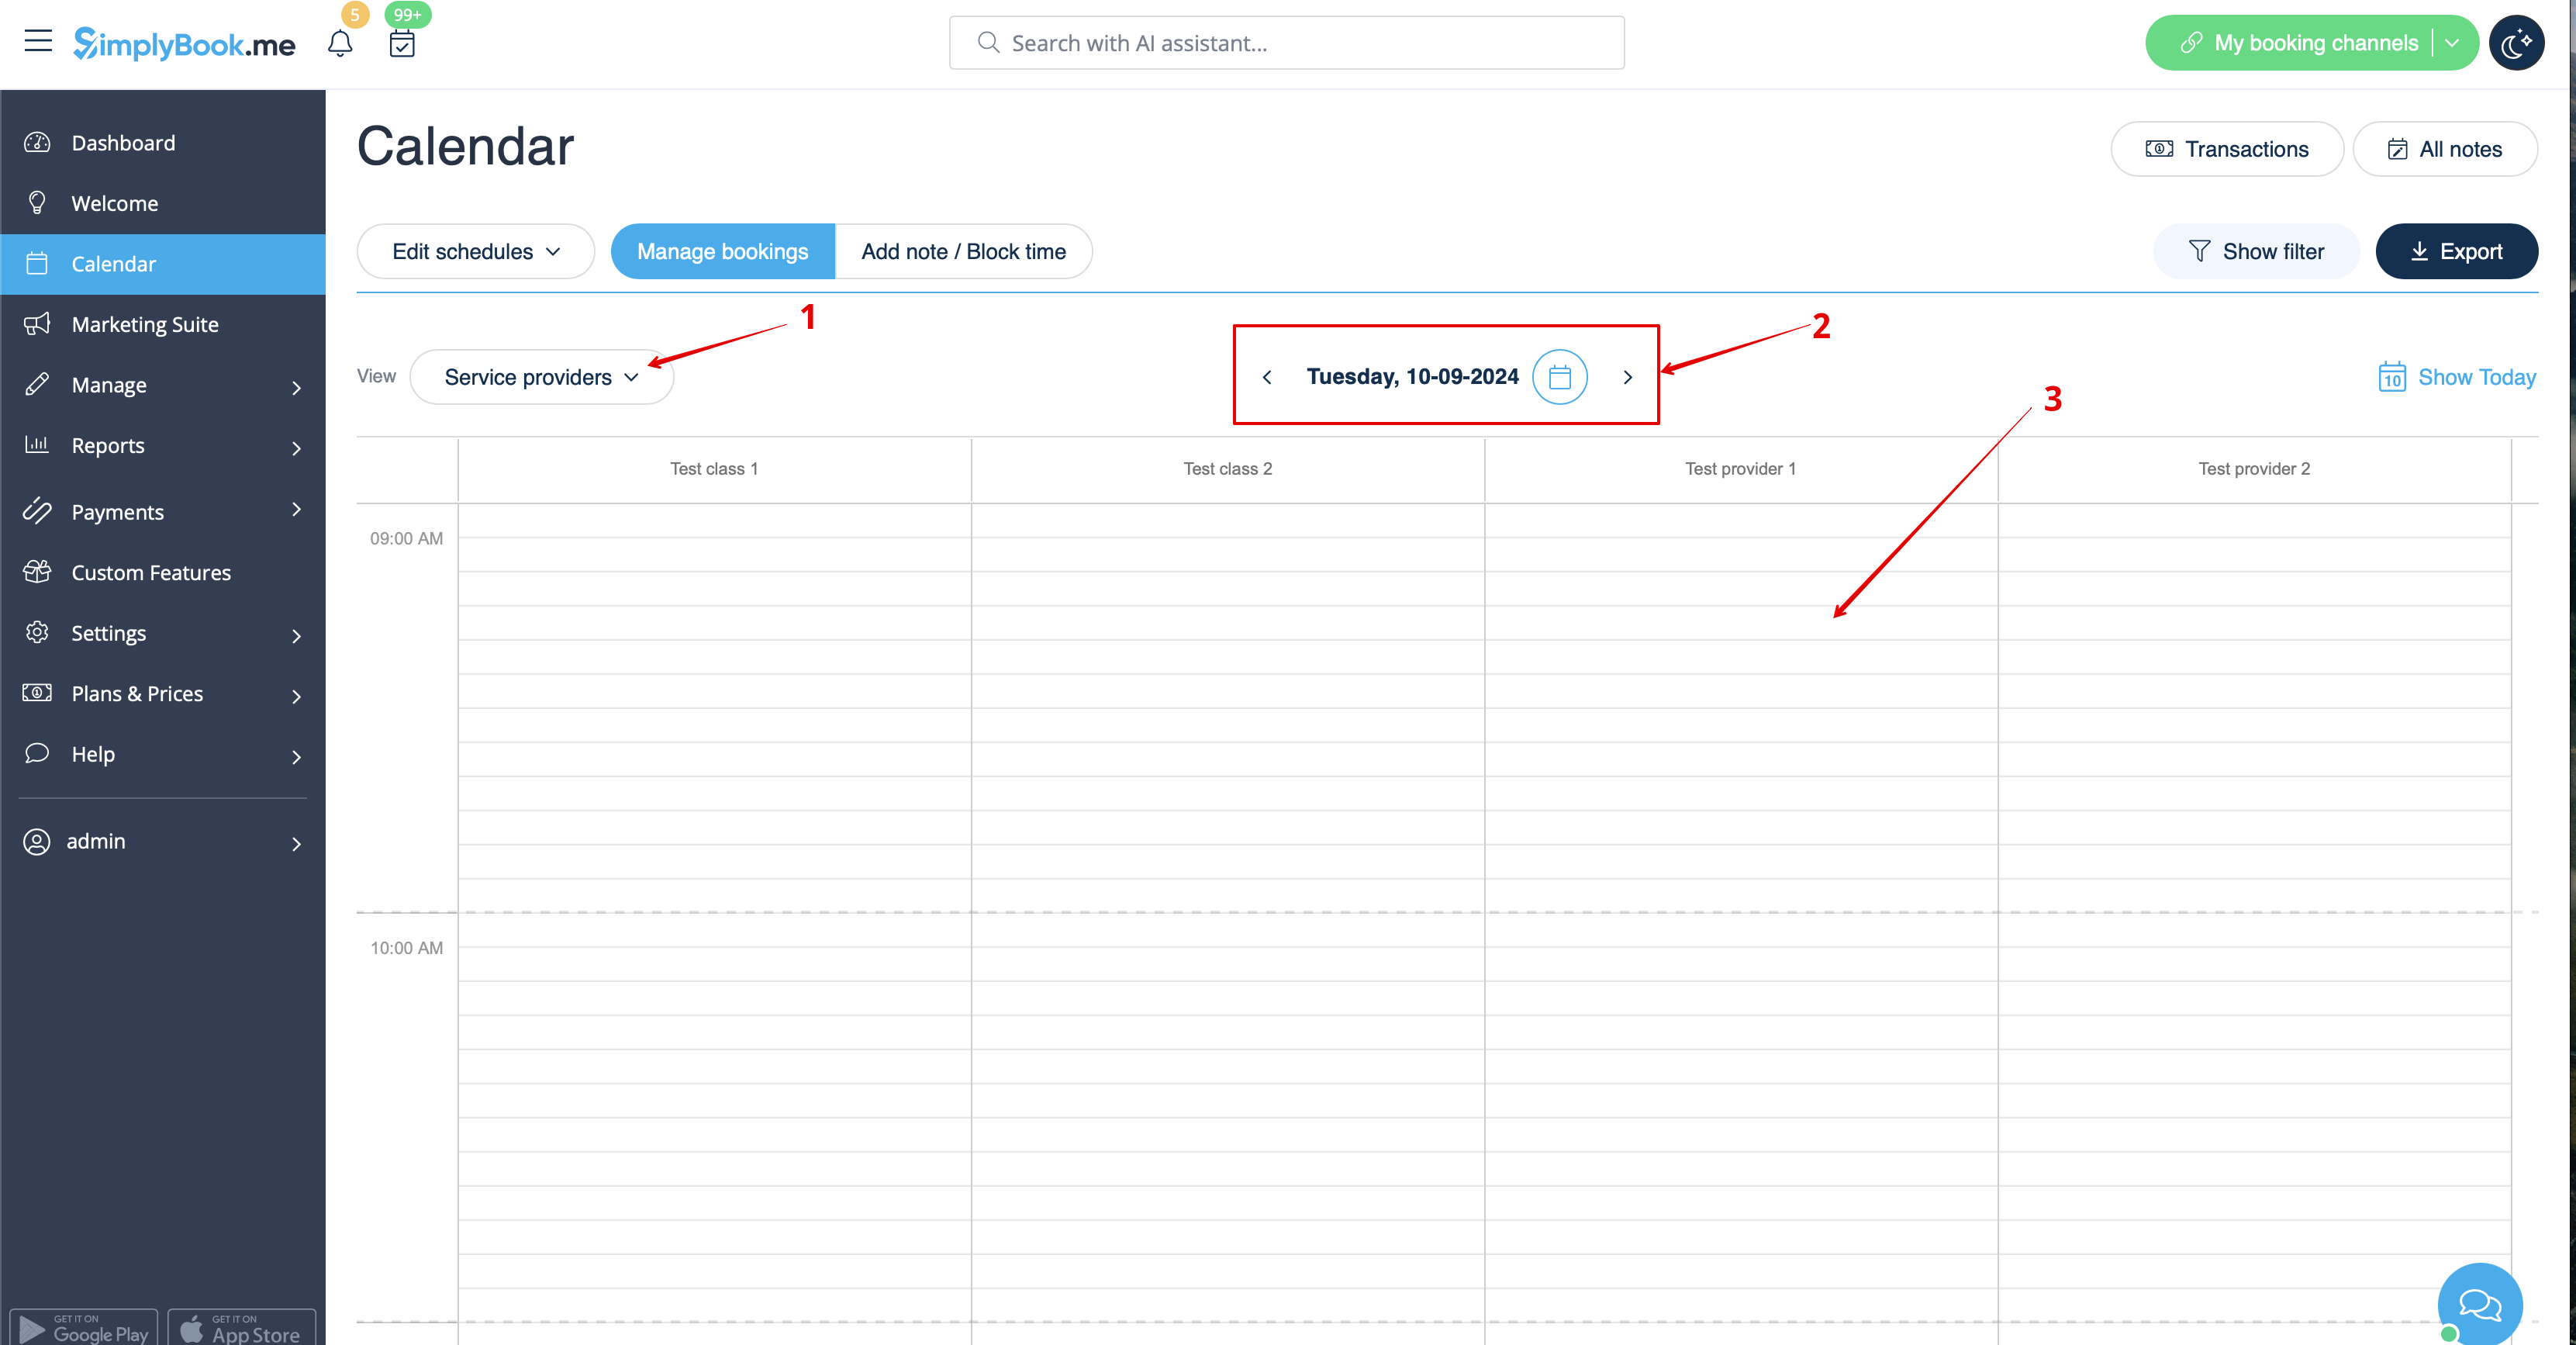
Як замовити з календаря адміністратора
1. У календарі (пункт у меню зліва) виберіть бажаний вигляд, дату, до якої потрібно додати бронювання (для зручності можна також скористатися фільтрами вгорі), і просто натисніть на вільне місце або виберіть необхідний період часу, перетягнувши курсор.
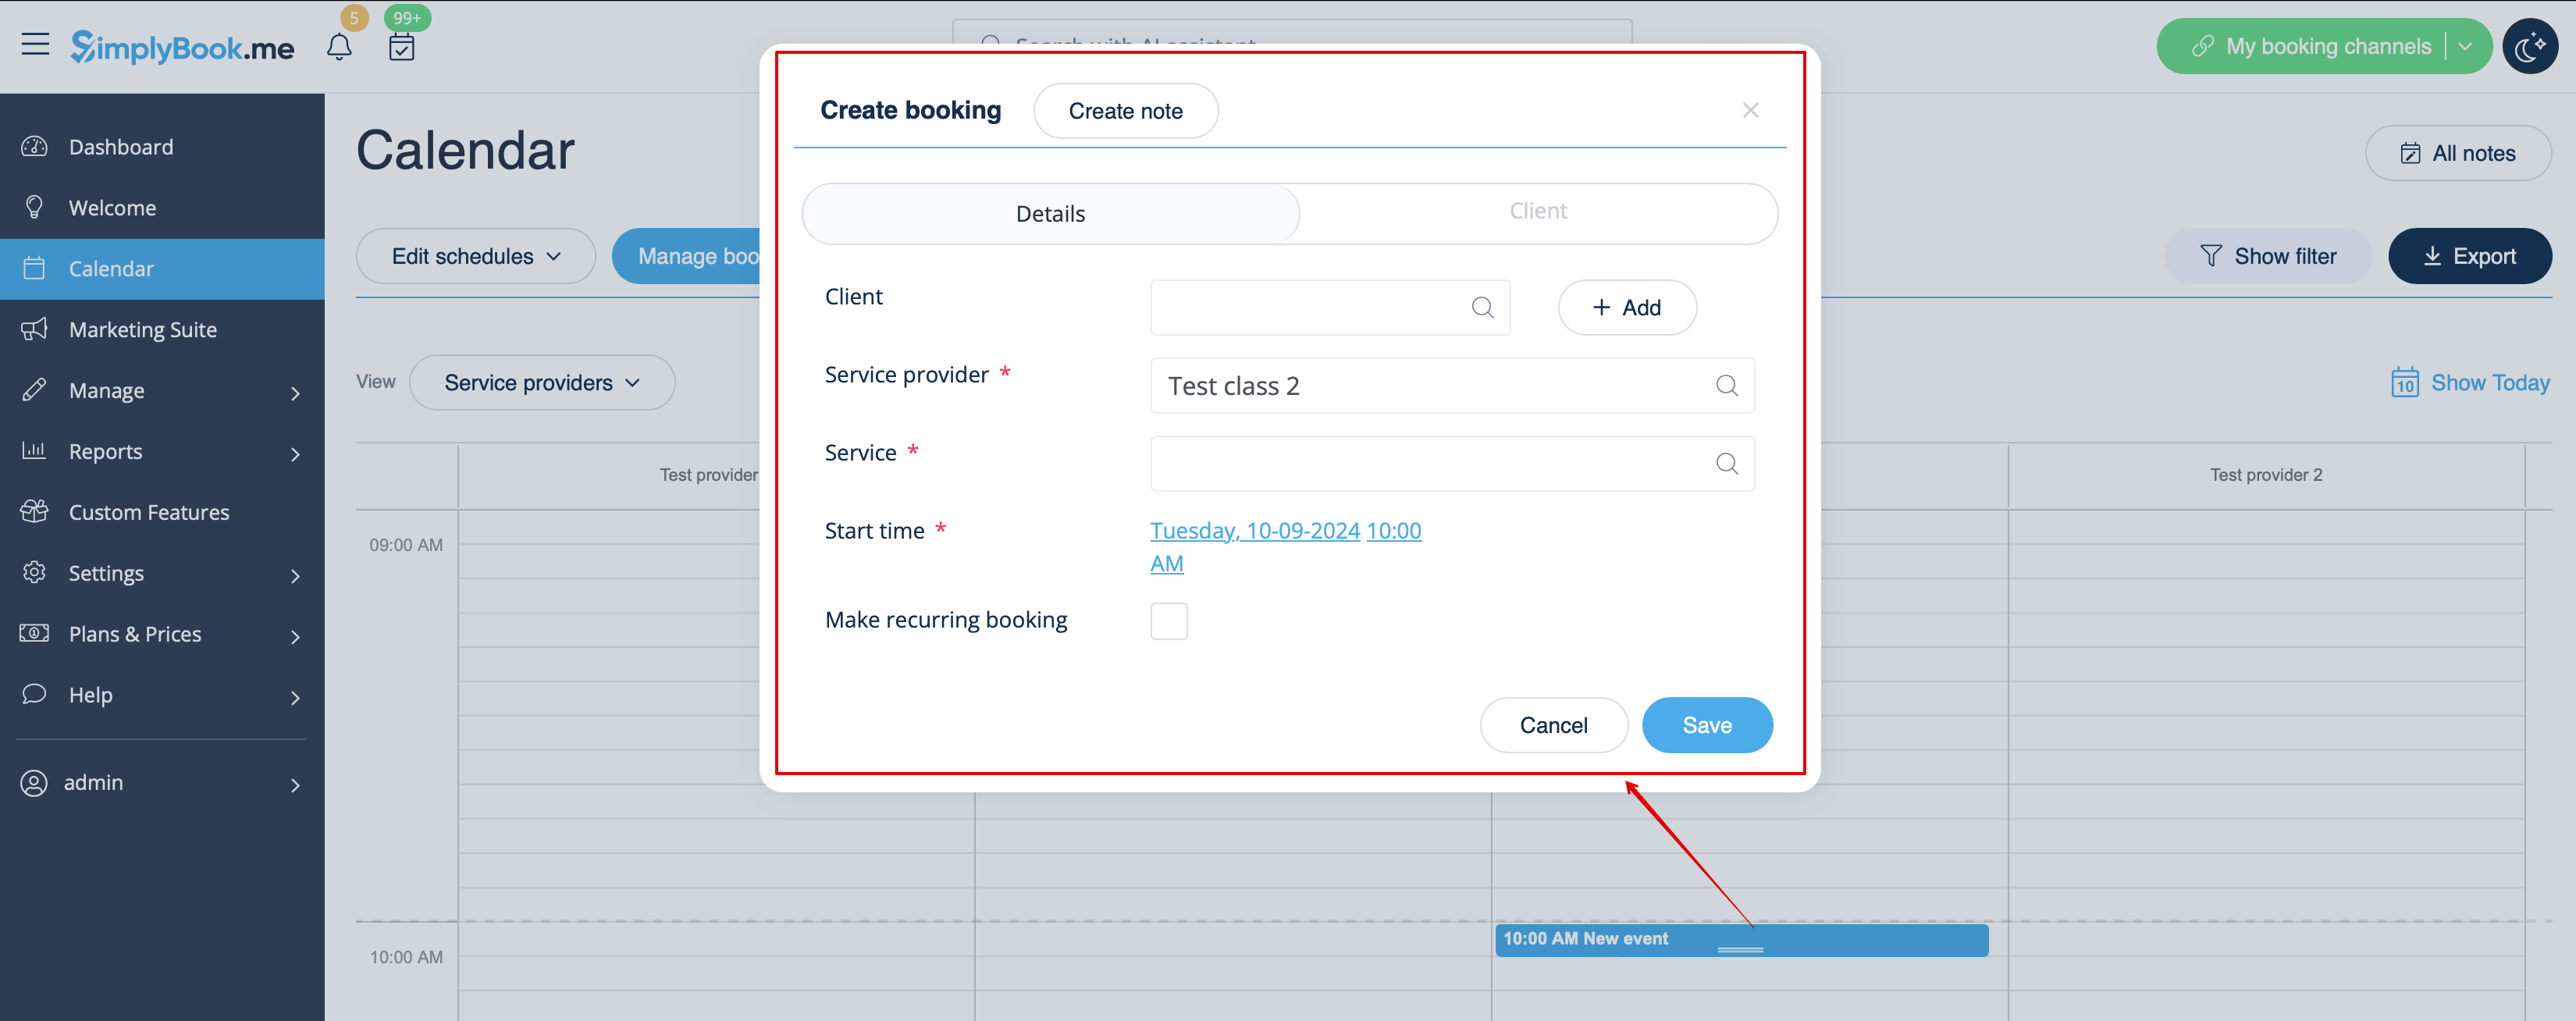
2. Заповніть спливаючу форму: виберіть або додайте клієнта, виберіть постачальника та послугу/клас, встановіть дату та час початку і закінчення. Можна забронювати час, який відрізняється від тривалості послуги і є кратним вибраному часовому проміжку.
(Якщо ви використовуєте додаткові налаштування, може знадобитися заповнити більше полів у спливаючій формі .
Наприклад, якщо ви використовуєте функцію «Приймати платежі» і хочете, щоб рахунок-фактура була сформована після додавання бронювання з боку адміністратора, вам потрібно встановити прапорець «Отримати платіж» і вибрати бажаний спосіб оплати перед збереженням бронювання.
Зверніть увагу! Цю опцію можна вибрати тільки під час створення нового бронювання. Якщо бронювання було створено без формування рахунку, але вам потрібно додати рахунок, ви можете скасувати таке бронювання і створити нове, вибравши опцію «Отримати оплату» ).
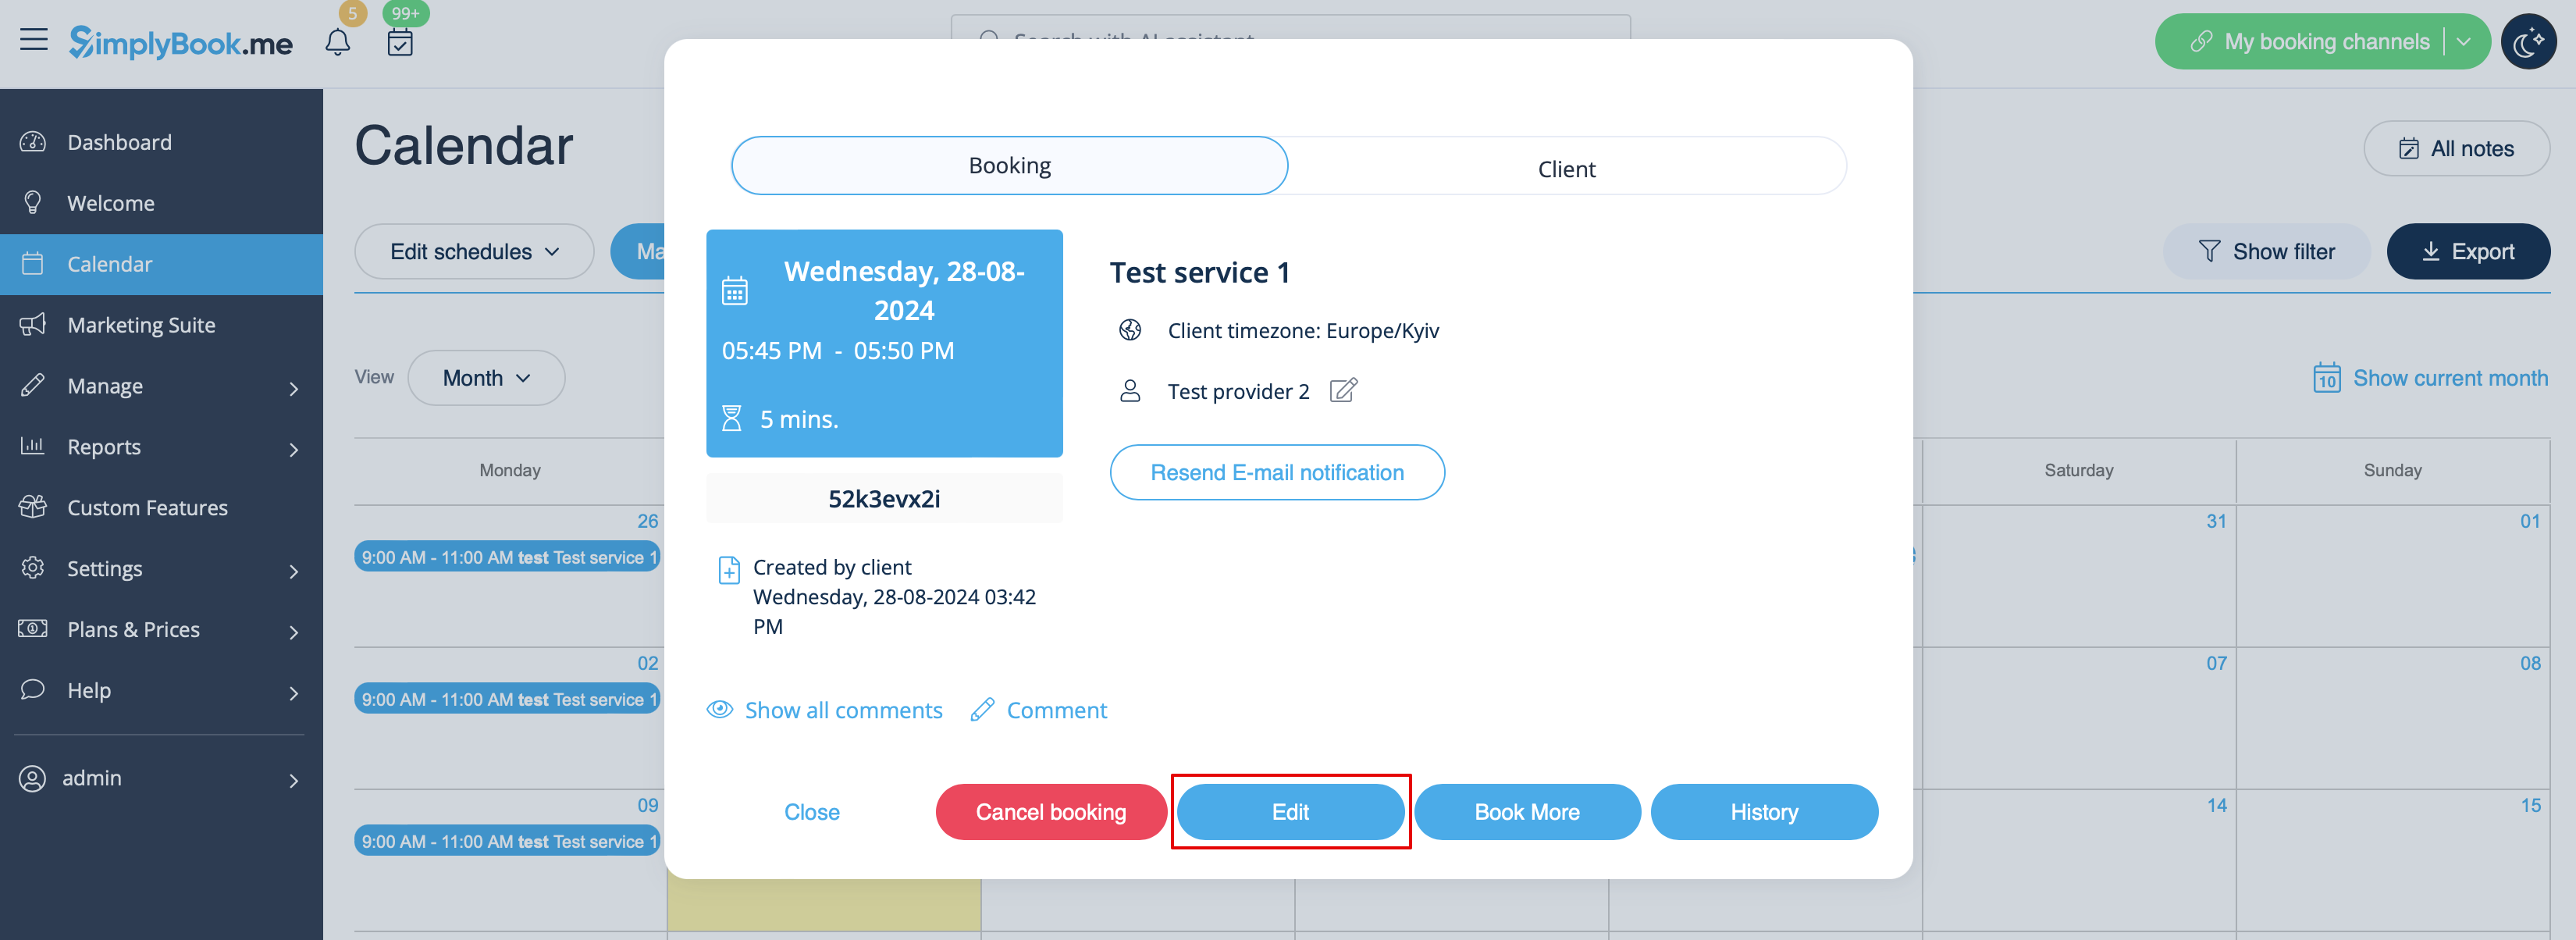
How to edit bookings
1. In Calendar (item in the left-side menu) click on the booking to open details and then press Edit to change any information about the booking. To change the time of the appointment, simply drag and drop booking to the available time you need. You can easily add Comment to the appointment or view other bookings of this client by pressing Clients button
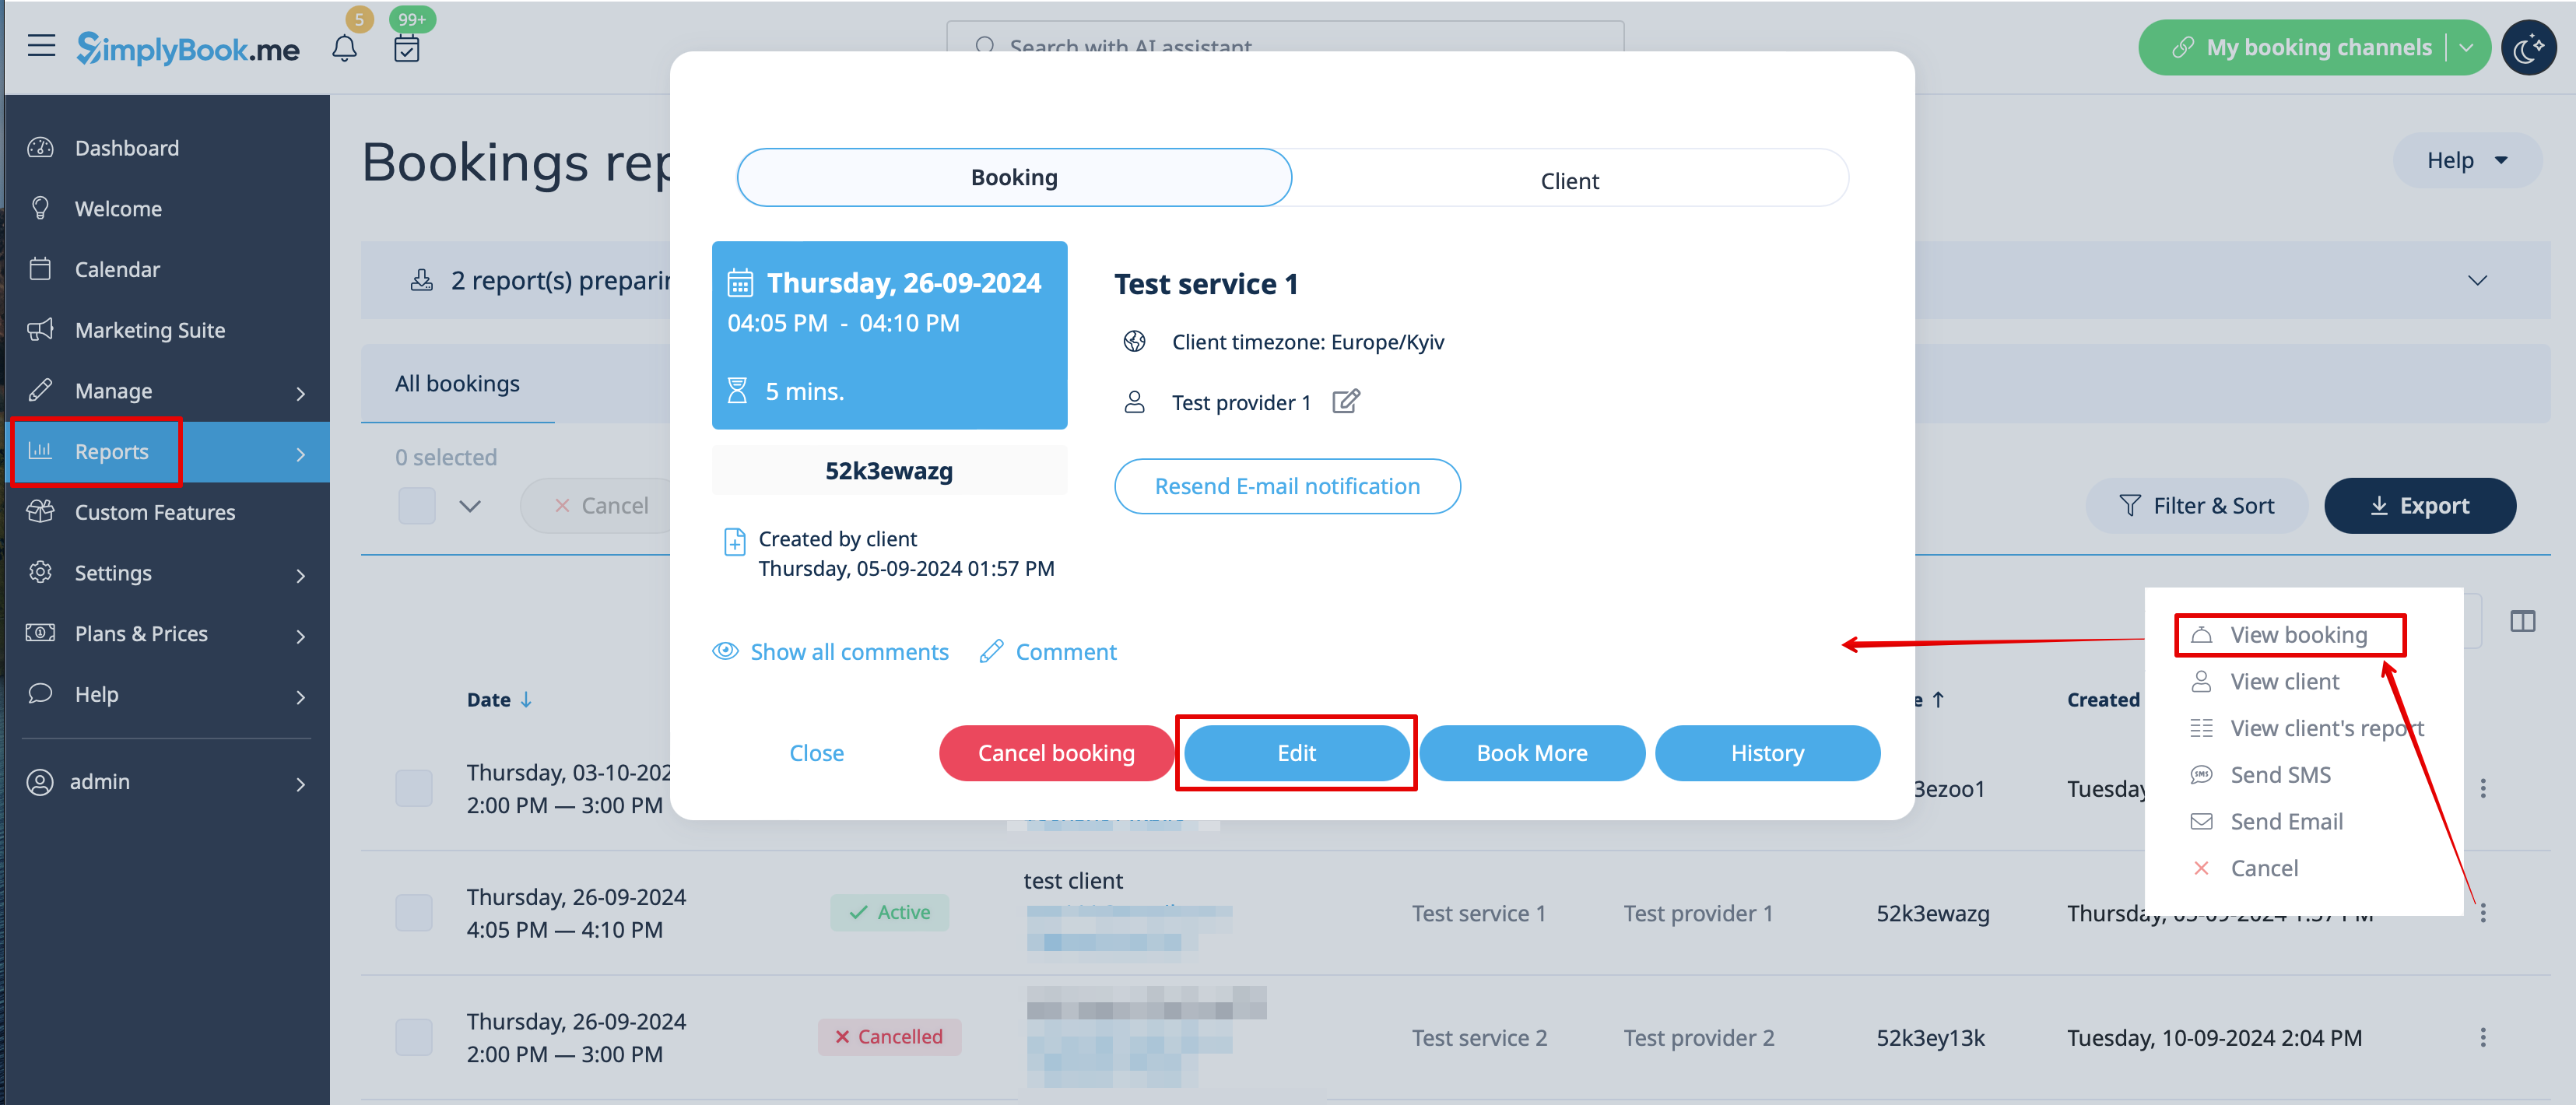
2. In Reports -> Booking details. Click on View button for the necessary booking to open details and then press Edit to change any information about the booking.
You can use filters to easily find your bookings for specific service, provider, client or date range.
Please note! It is not possible to edit booking that was already cancelled.
If you need to allow your clients to change the appointment date and/or time themselves please use Client Rescheduling custom feature.
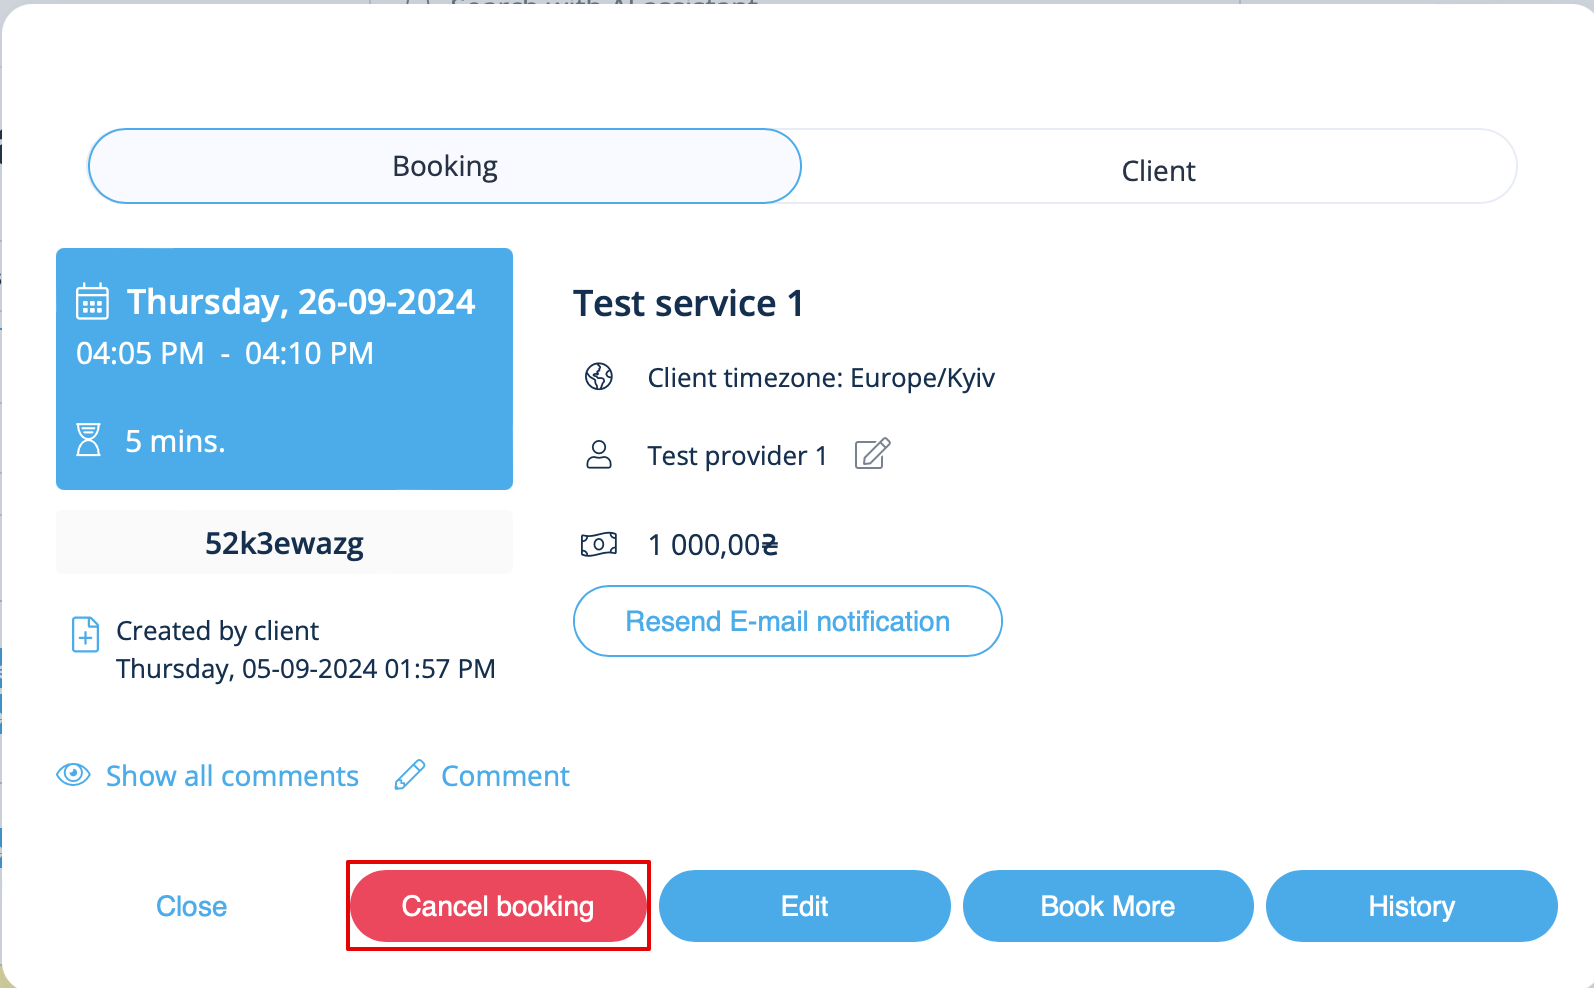
How to cancel bookings
1. For admin or user
In Calendar (left-side menu) or in in Reports -> Booking details. Click on the booking to open the details or use View option if in Reports and then press Cancel booking button.
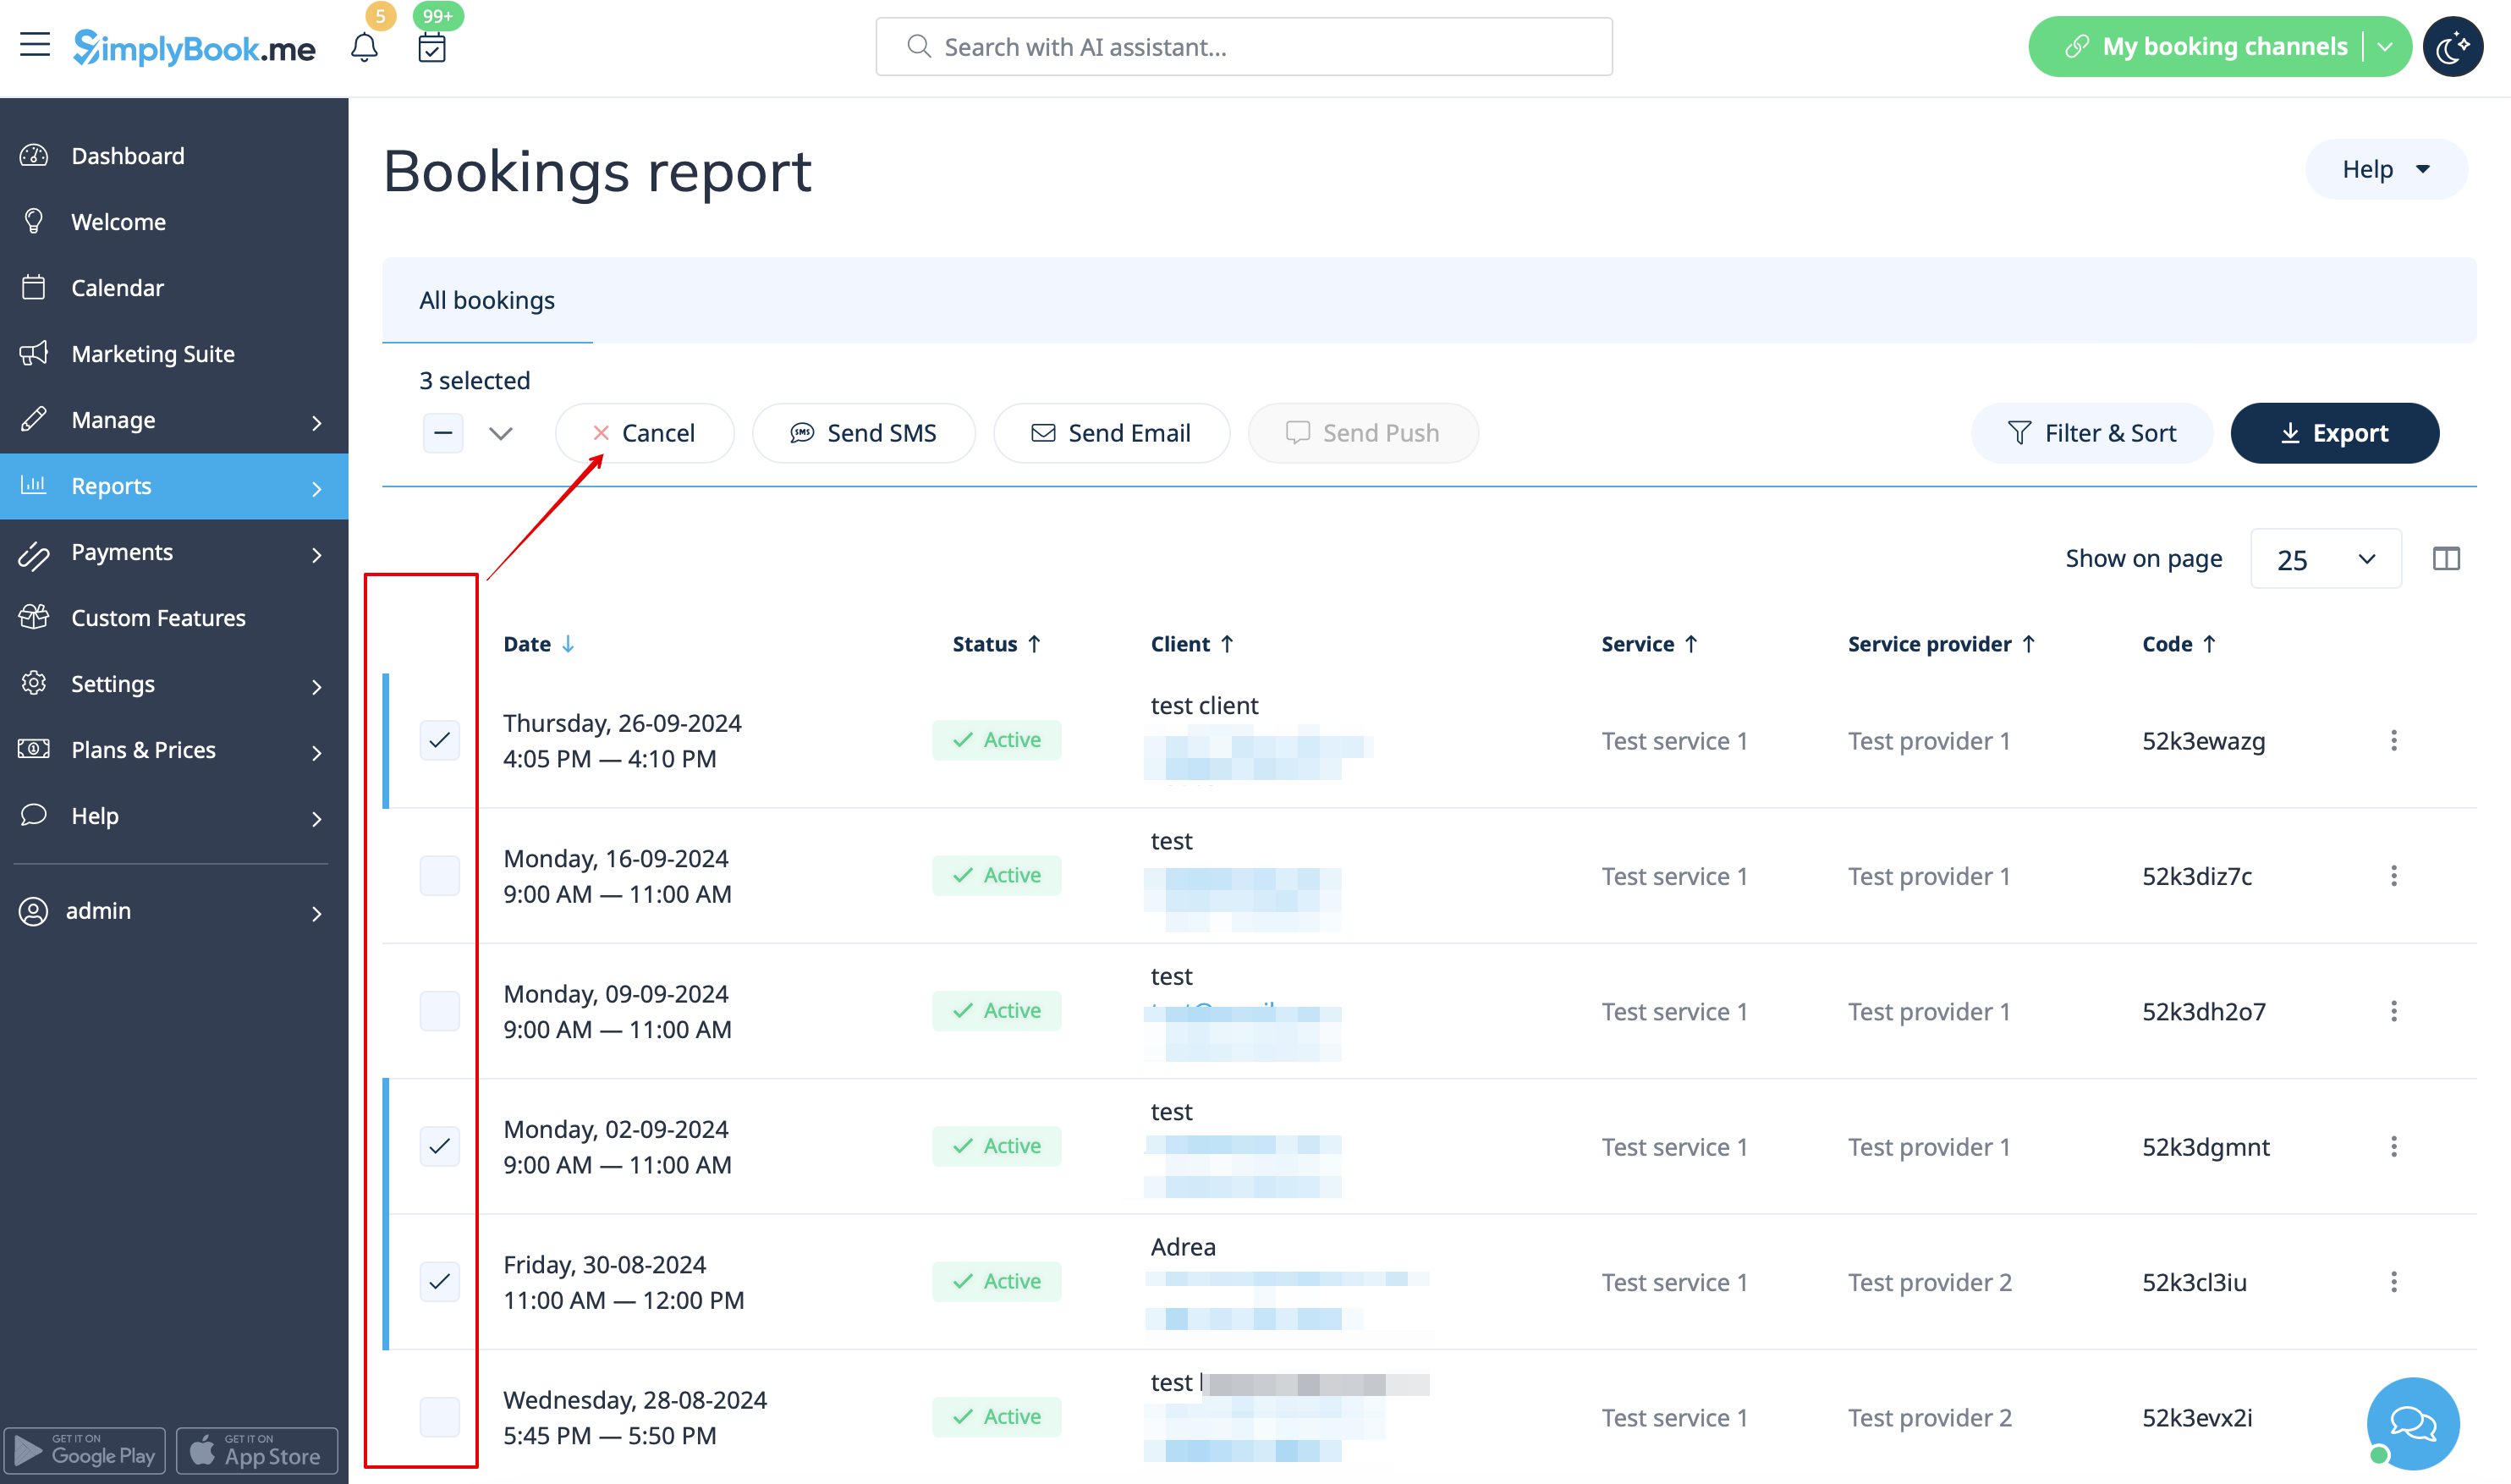
In case you need to cancel many bookings at once you can do that in Reports -> Booking details.
You can use the filter if necessary, check the boxes with the bookings to cancel and click on Cancel selected button at the top.
Please note! It is possible to cancel the appointments from one report page at a time.
2. For client To cancel their bookings, clients can click cancel link in their confirmation emails.

Or use Cancel button on the booking website, My bookings tab.
(If you want to prohibit clients from cancelling the appointments, you may need Cancellation Policy Custom Feature.)