Created page with "{{#seo: |title=Sådan administrerer du bookinger - SimplyBook.me |description=Lær, hvordan du administrerer bookinger effektivt med SimplyBook.me. Brug vores værktøjer til at holde styr på alt. Start her! |titlemode=tilføj |keywords=faq, ofte stillede spørgsmål, bookingssoftware, spørgsmål om aftalesystem, onlineaftaler, kalendersoftware, bookingsystem, bookingkalender, planlægningssoftware, online aftaleplanlægning, online planlægning, plugins, tilpassede fu..." |
Created page with "Sådan administreres bookinger" |
||
| Line 2: | Line 2: | ||
{{#seo: |title=Sådan administrerer du bookinger - SimplyBook.me |description=Lær, hvordan du administrerer bookinger effektivt med SimplyBook.me. Brug vores værktøjer til at holde styr på alt. Start her! |titlemode=tilføj |keywords=faq, ofte stillede spørgsmål, bookingssoftware, spørgsmål om aftalesystem, onlineaftaler, kalendersoftware, bookingsystem, bookingkalender, planlægningssoftware, online aftaleplanlægning, online planlægning, plugins, tilpassede funktioner, link til tilpasset bookingside, domænenavn, tilpasset domænenavn, tilpasset url }} | {{#seo: |title=Sådan administrerer du bookinger - SimplyBook.me |description=Lær, hvordan du administrerer bookinger effektivt med SimplyBook.me. Brug vores værktøjer til at holde styr på alt. Start her! |titlemode=tilføj |keywords=faq, ofte stillede spørgsmål, bookingssoftware, spørgsmål om aftalesystem, onlineaftaler, kalendersoftware, bookingsystem, bookingkalender, planlægningssoftware, online aftaleplanlægning, online planlægning, plugins, tilpassede funktioner, link til tilpasset bookingside, domænenavn, tilpasset domænenavn, tilpasset url }} | ||
__FORCETOC__ | __FORCETOC__ | ||
<br><br> | <br><br> | ||
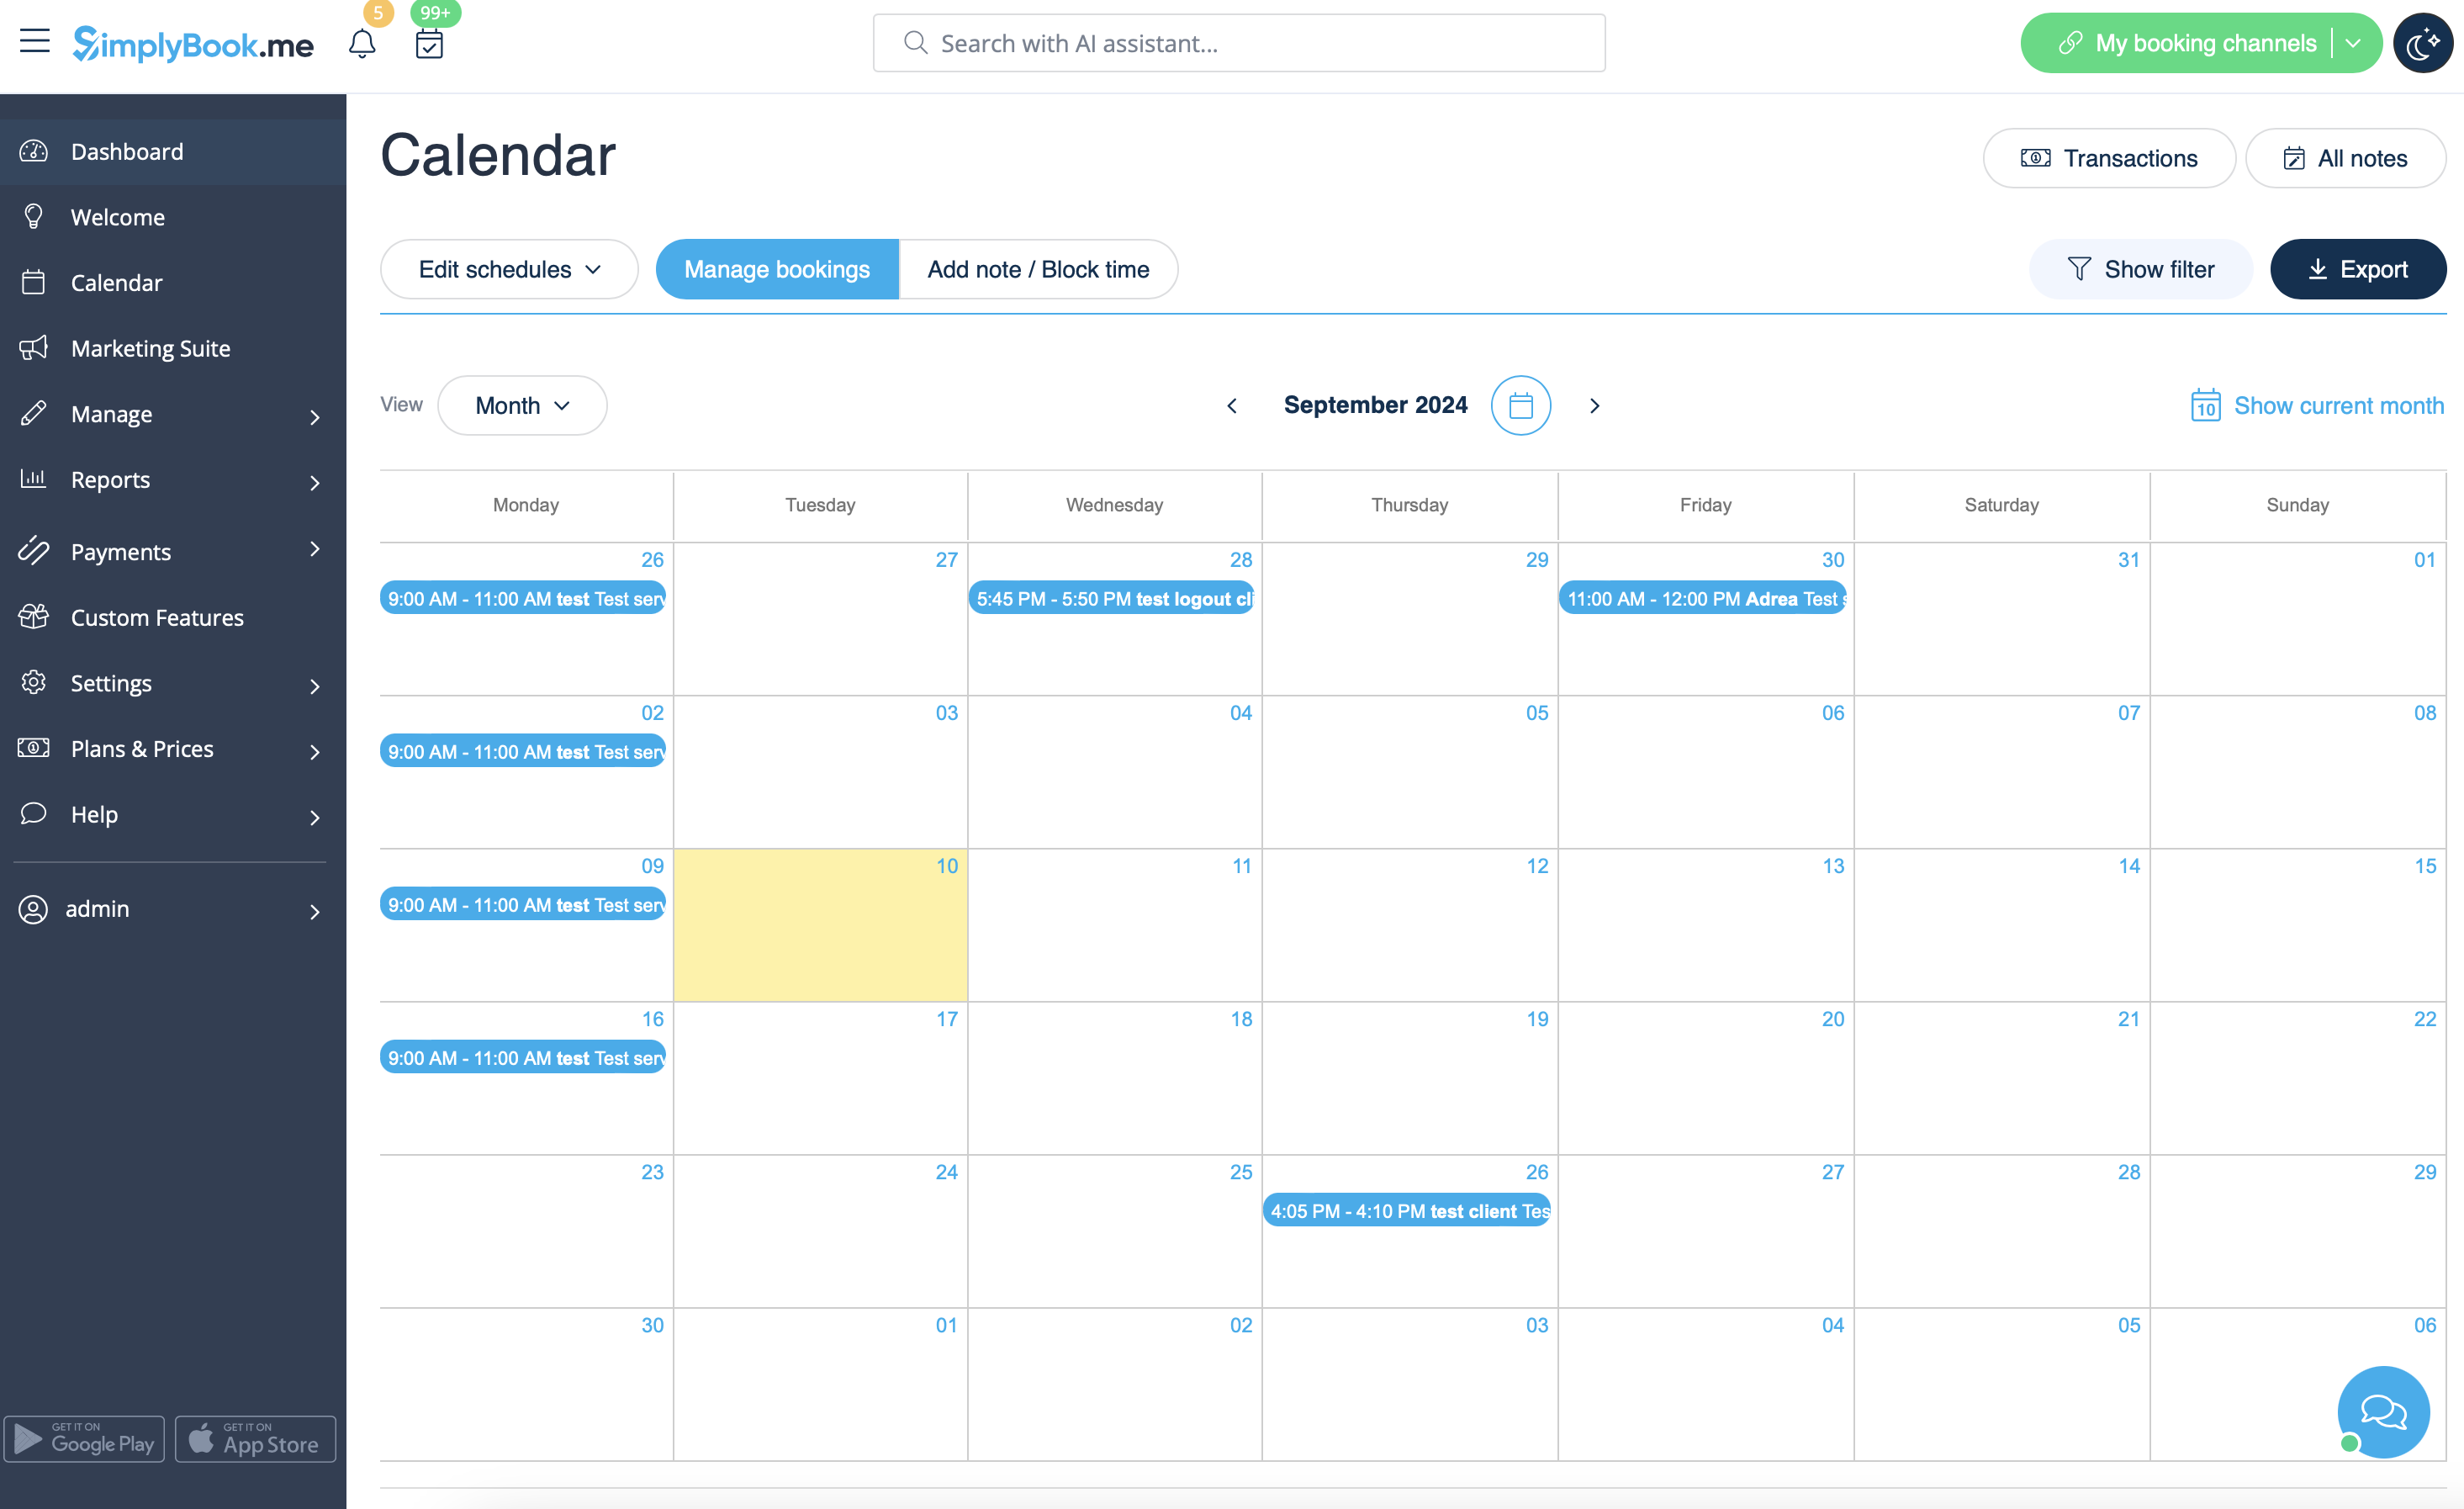
= | = Hvor finder jeg alle mine bookinger? = | ||
1. | 1. I <span style="background-color:#d4f8e5; padding:5px; border-radius:5px;">Kalenderen</span> (punkt i menuen til venstre).<br/> | ||
( | (du kan vælge den visning, der passer dig bedst) | ||
[[File:Calendar overview redesigned.png|1200px | center|link=https://help.simplybook.me/images/c/cf/Calendar_overview_redesigned.png]] | [[File:Calendar overview redesigned.png|1200px | center|link=https://help.simplybook.me/images/c/cf/Calendar_overview_redesigned.png]] | ||
<br/><br/> | <br/><br/> | ||
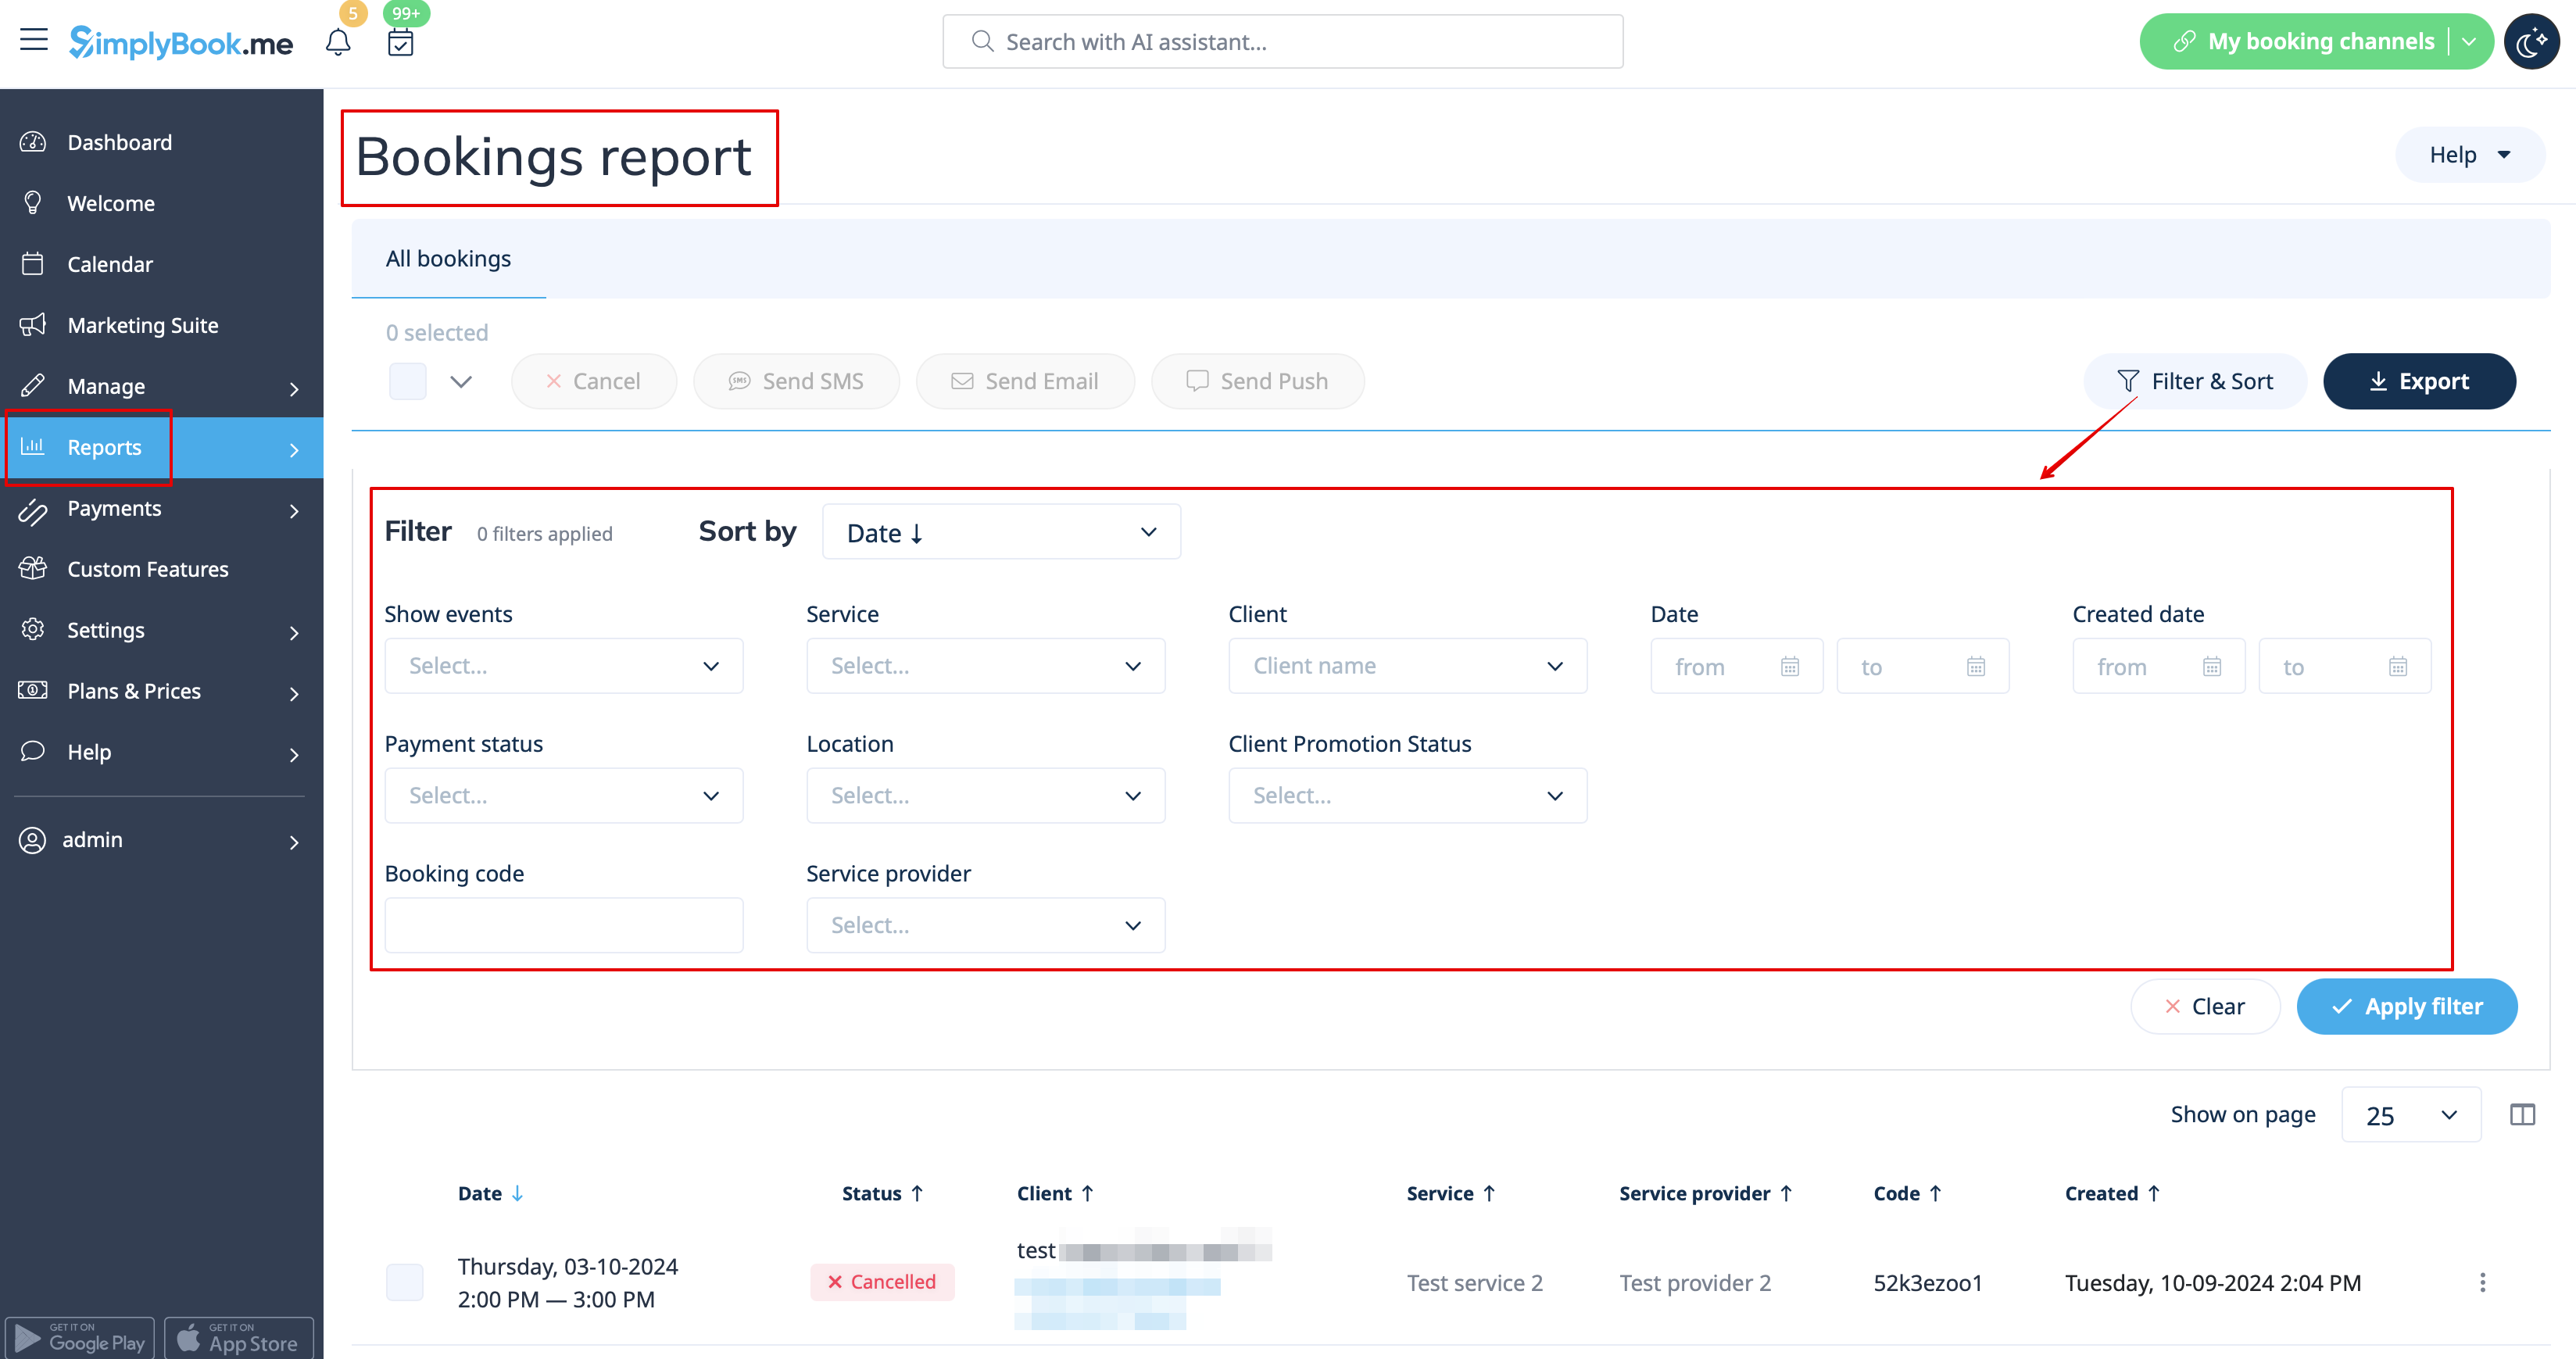
2. | 2. I <span style="background-color:#d4f8e5; padding:5px; border-radius:5px;">Rapporter</span> -> <span style="background-color:#d4f8e5; padding:5px; border-radius:5px;">Bookingsdetaljer.</span> | ||
Du kan bruge filtre til nemt at finde dine bookinger for en bestemt service, udbyder, klient eller datointerval. <br/> | |||
[[File:Booking details report overview redesigned.png|1200px | center|link=https://help.simplybook.me/images/5/5c/Booking_details_report_overview_redesigned.png ]]<br/> | [[File:Booking details report overview redesigned.png|1200px | center|link=https://help.simplybook.me/images/5/5c/Booking_details_report_overview_redesigned.png]]<br/> | ||
<br><br> | <br><br> | ||
< | <span id="How_to_book_from_admin_calendar"></span> | ||
= | = Sådan bookes fra administratorkalenderen = | ||
<div lang="en" dir="ltr" class="mw-content-ltr"> | <div lang="en" dir="ltr" class="mw-content-ltr"> | ||
Revision as of 09:48, 16 May 2025
Hvor finder jeg alle mine bookinger?
1. I Kalenderen (punkt i menuen til venstre).
(du kan vælge den visning, der passer dig bedst)
2. I Rapporter -> Bookingsdetaljer.
Du kan bruge filtre til nemt at finde dine bookinger for en bestemt service, udbyder, klient eller datointerval.
Sådan bookes fra administratorkalenderen
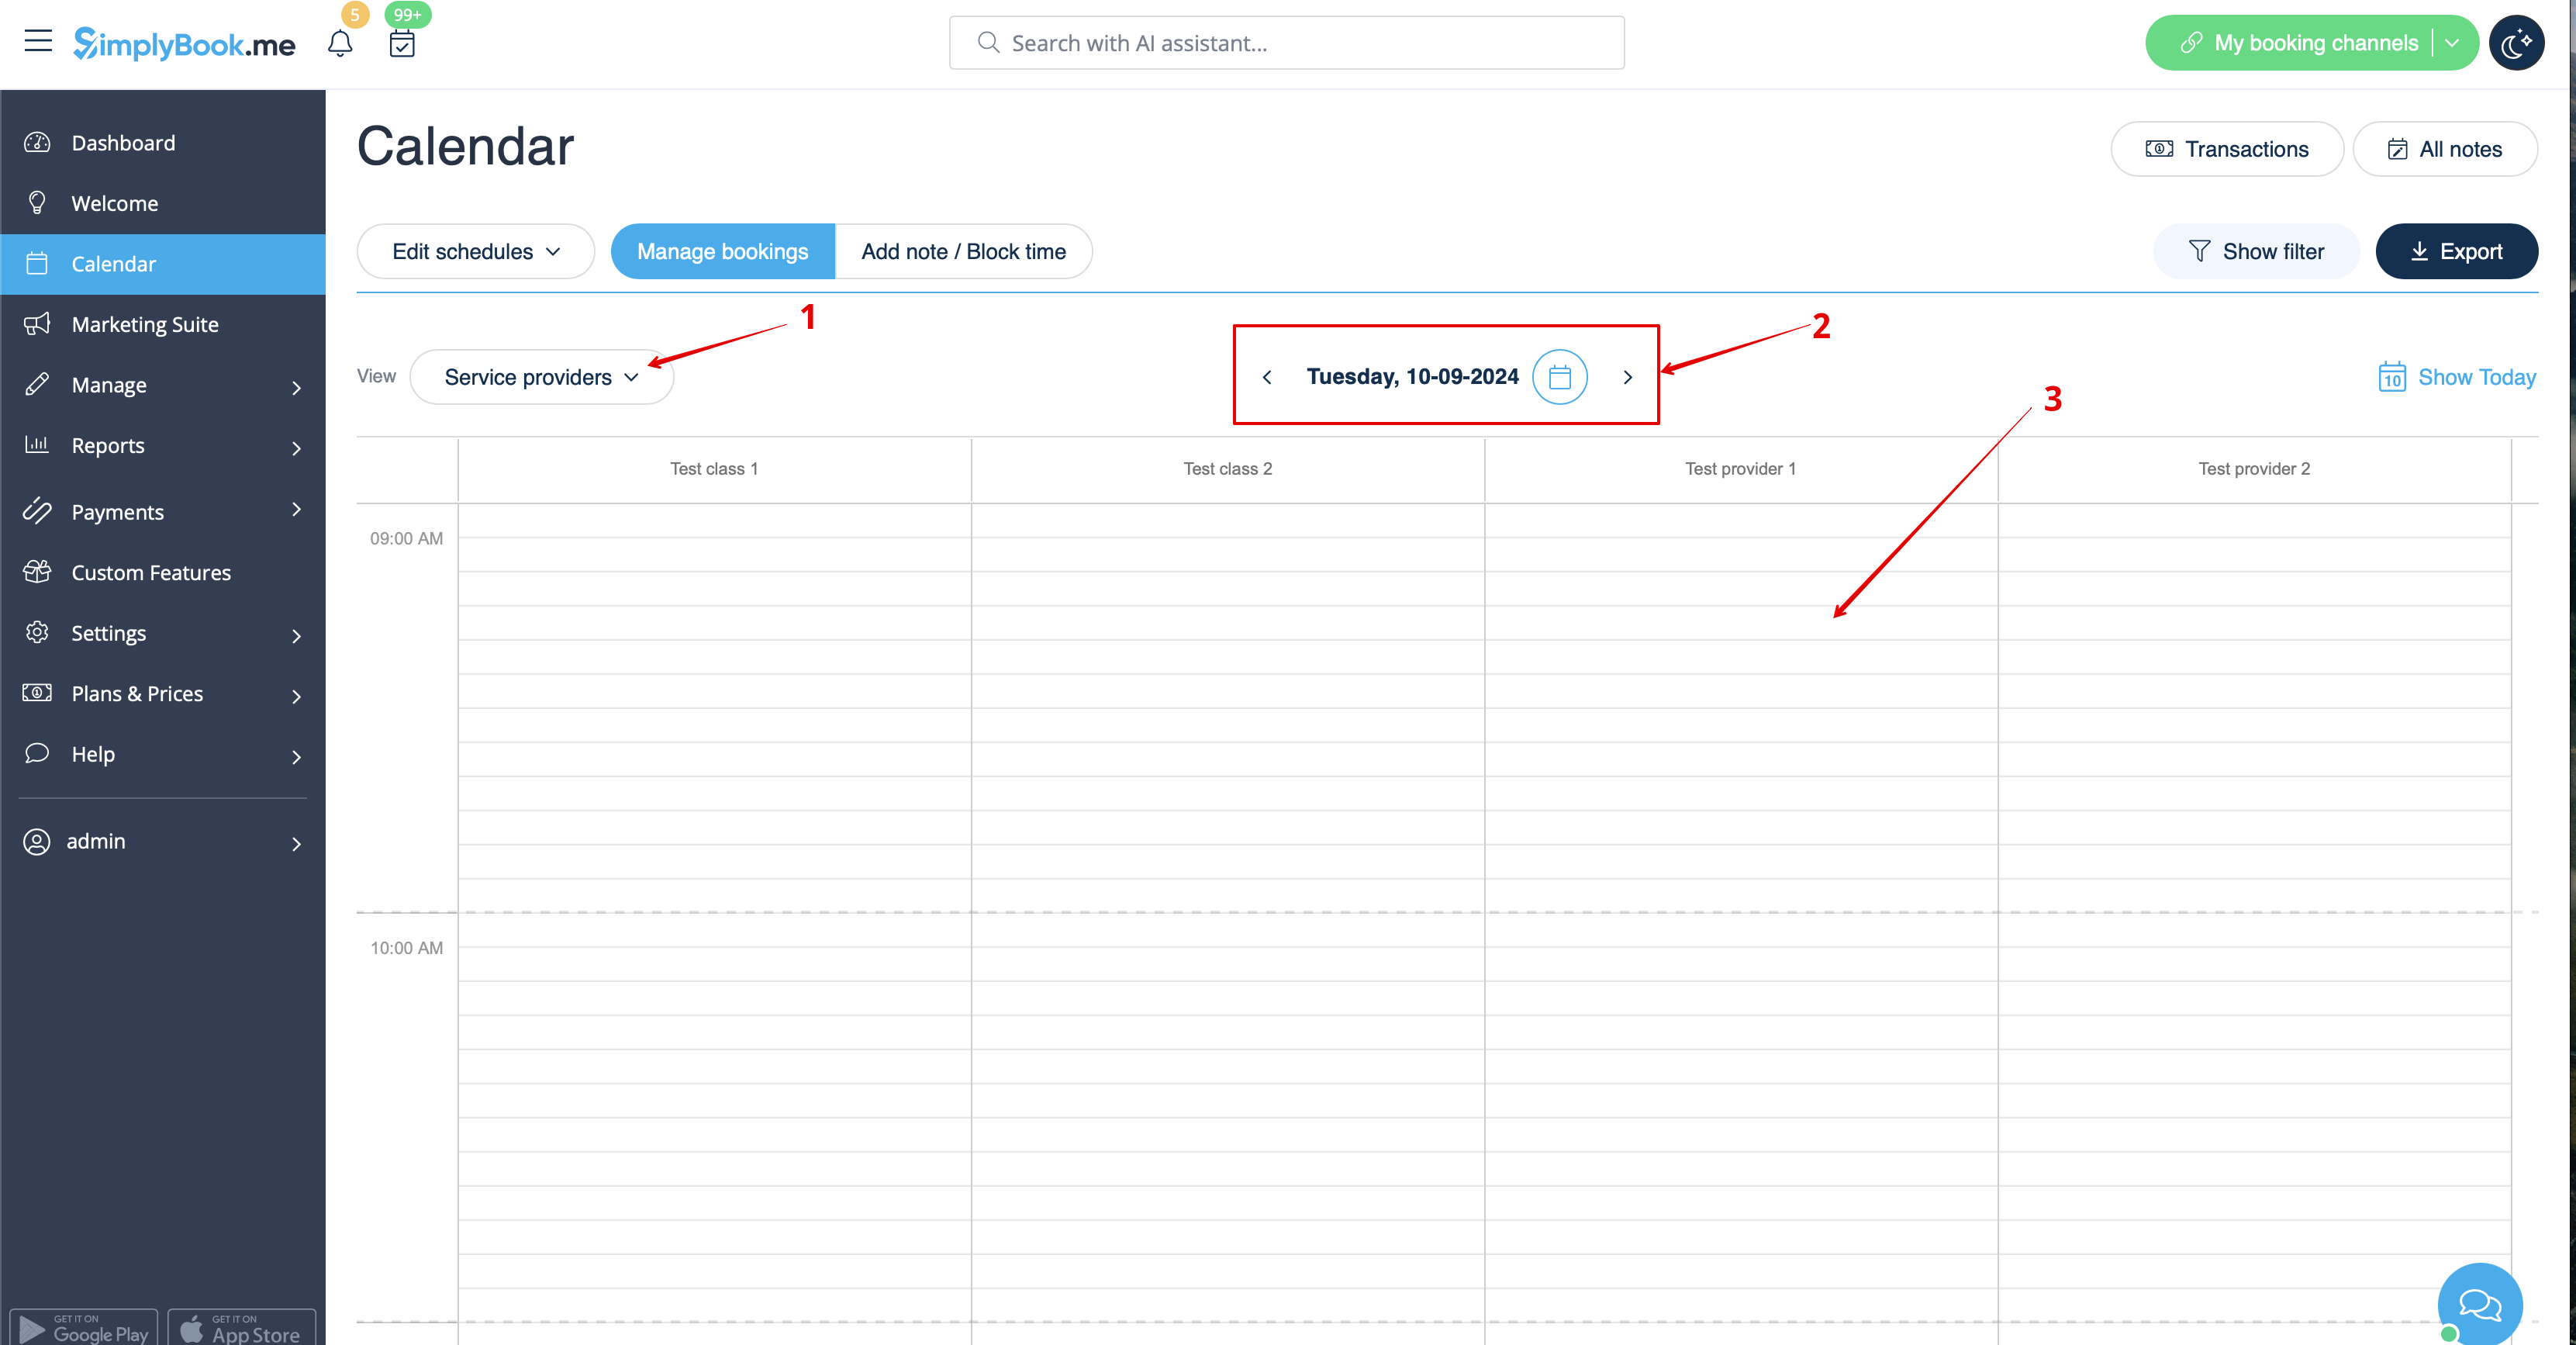
1. In Calendar (item in the left-side menu) select the desirable view, the date you need to add the booking to (you may also use the filters at the top for convenience) and either simply click on free space or select the necessary time period by dragging.
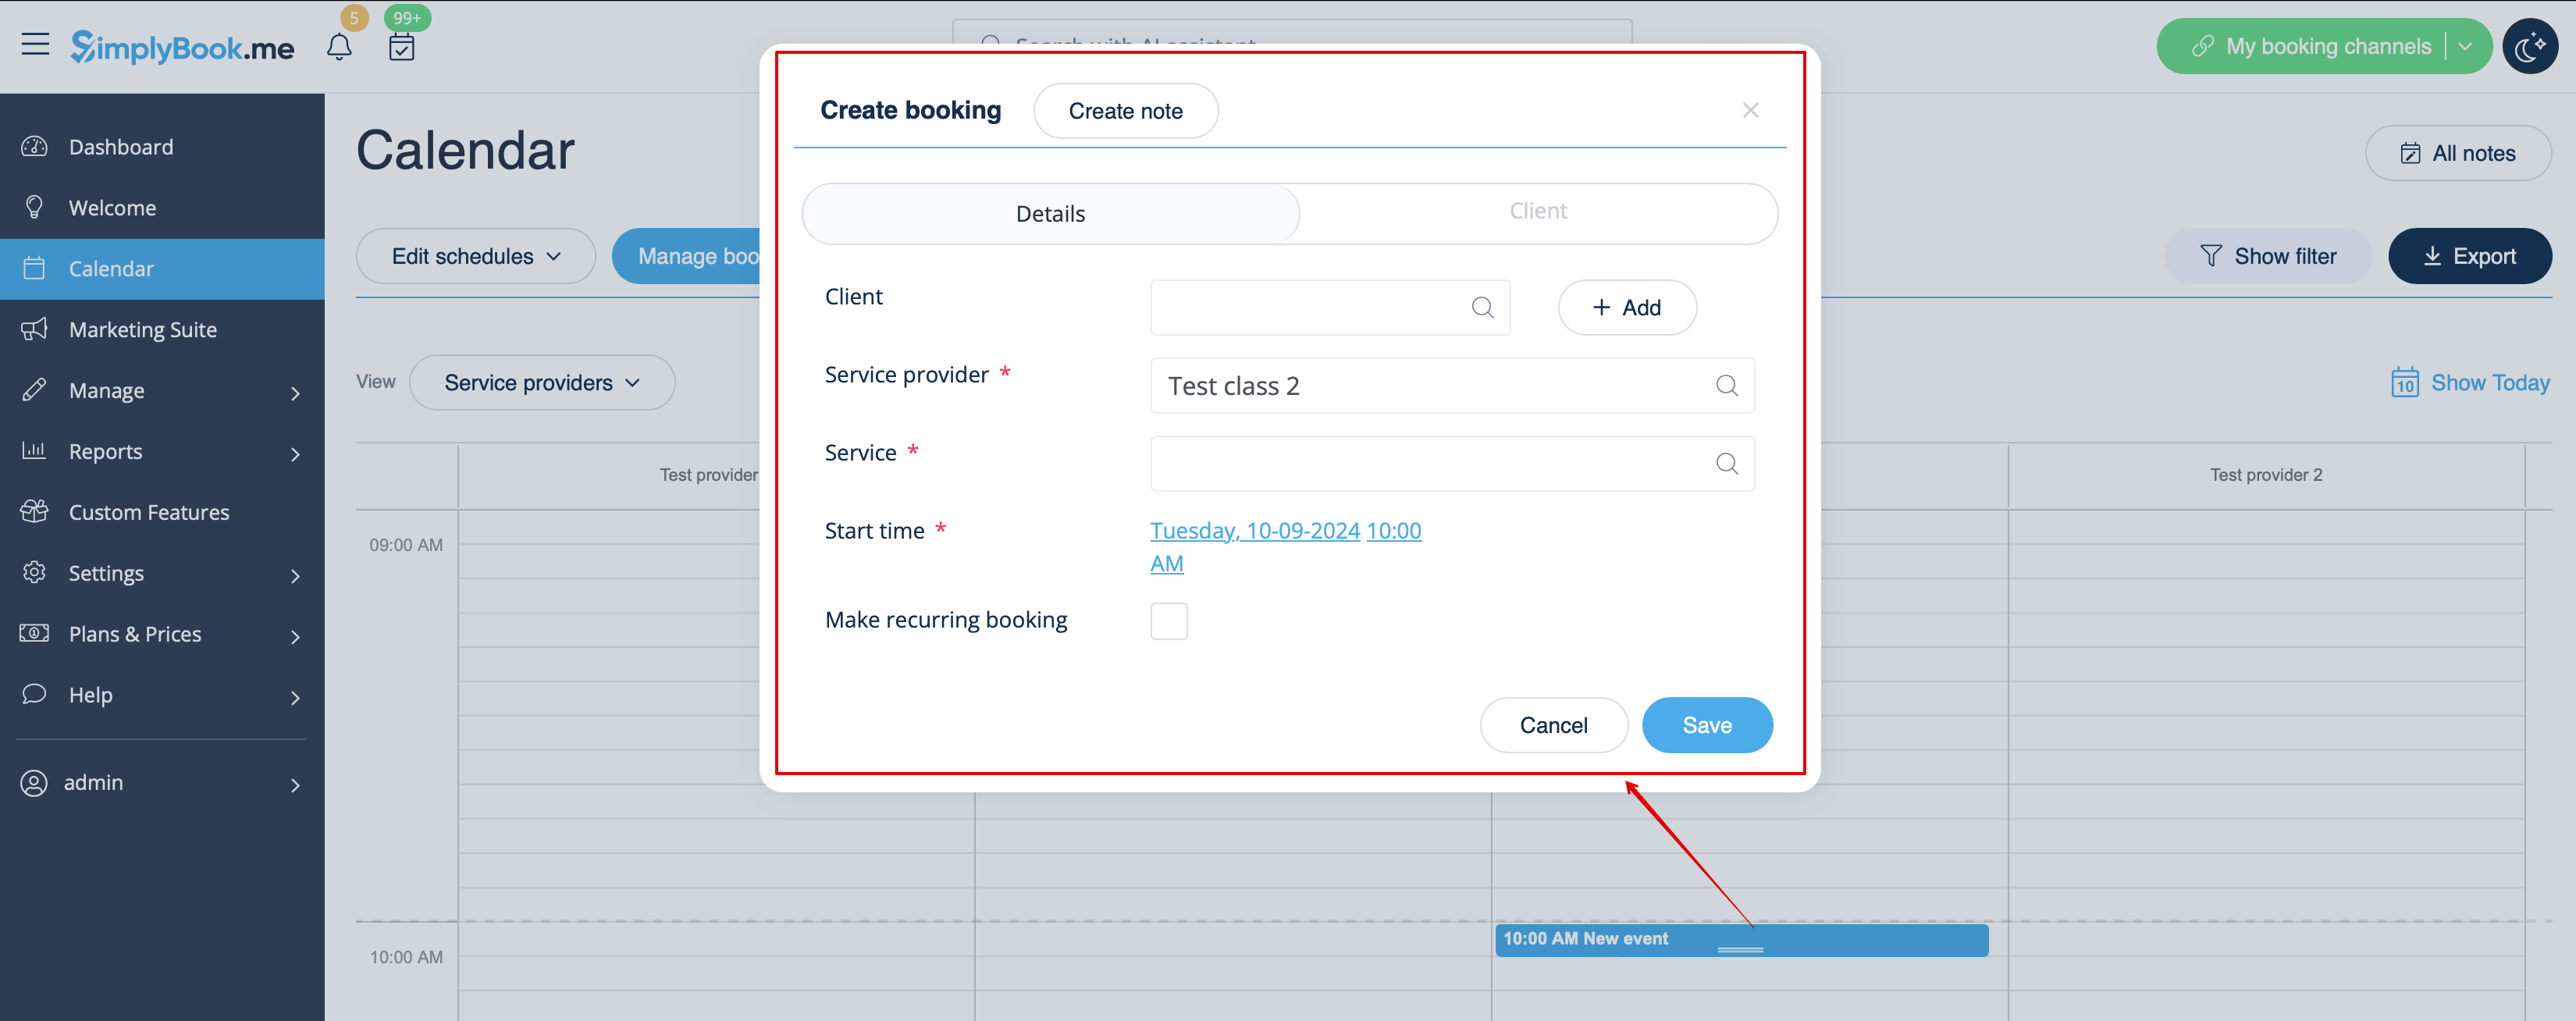
2. Fill in the pop-up form that appears: select or add the client, choose provider and service/class, set the start and end date and times. It is possible to book for a time period that is different from service duration and is multiple of the selected timeframe.
(It may be required to fill in more fields in the pop-up form in case you use additional Custom Features.
For example, if you are using Accept Payments and wish the invoice to be generated when the booking is added from the admin side you need to check the box Receive payment and select the desired payment method before saving the reservation.
Please note! This option can be selected during new booking creation only. If the booking was created without invoice generation but you need the invoice to be attached you can cancel such booking and create a new one with the use of Receive payment option selected)
How to edit bookings
1. In Calendar (item in the left-side menu) click on the booking to open details and then press Edit to change any information about the booking. To change the time of the appointment, simply drag and drop booking to the available time you need. You can easily add Comment to the appointment or view other bookings of this client by pressing Clients button
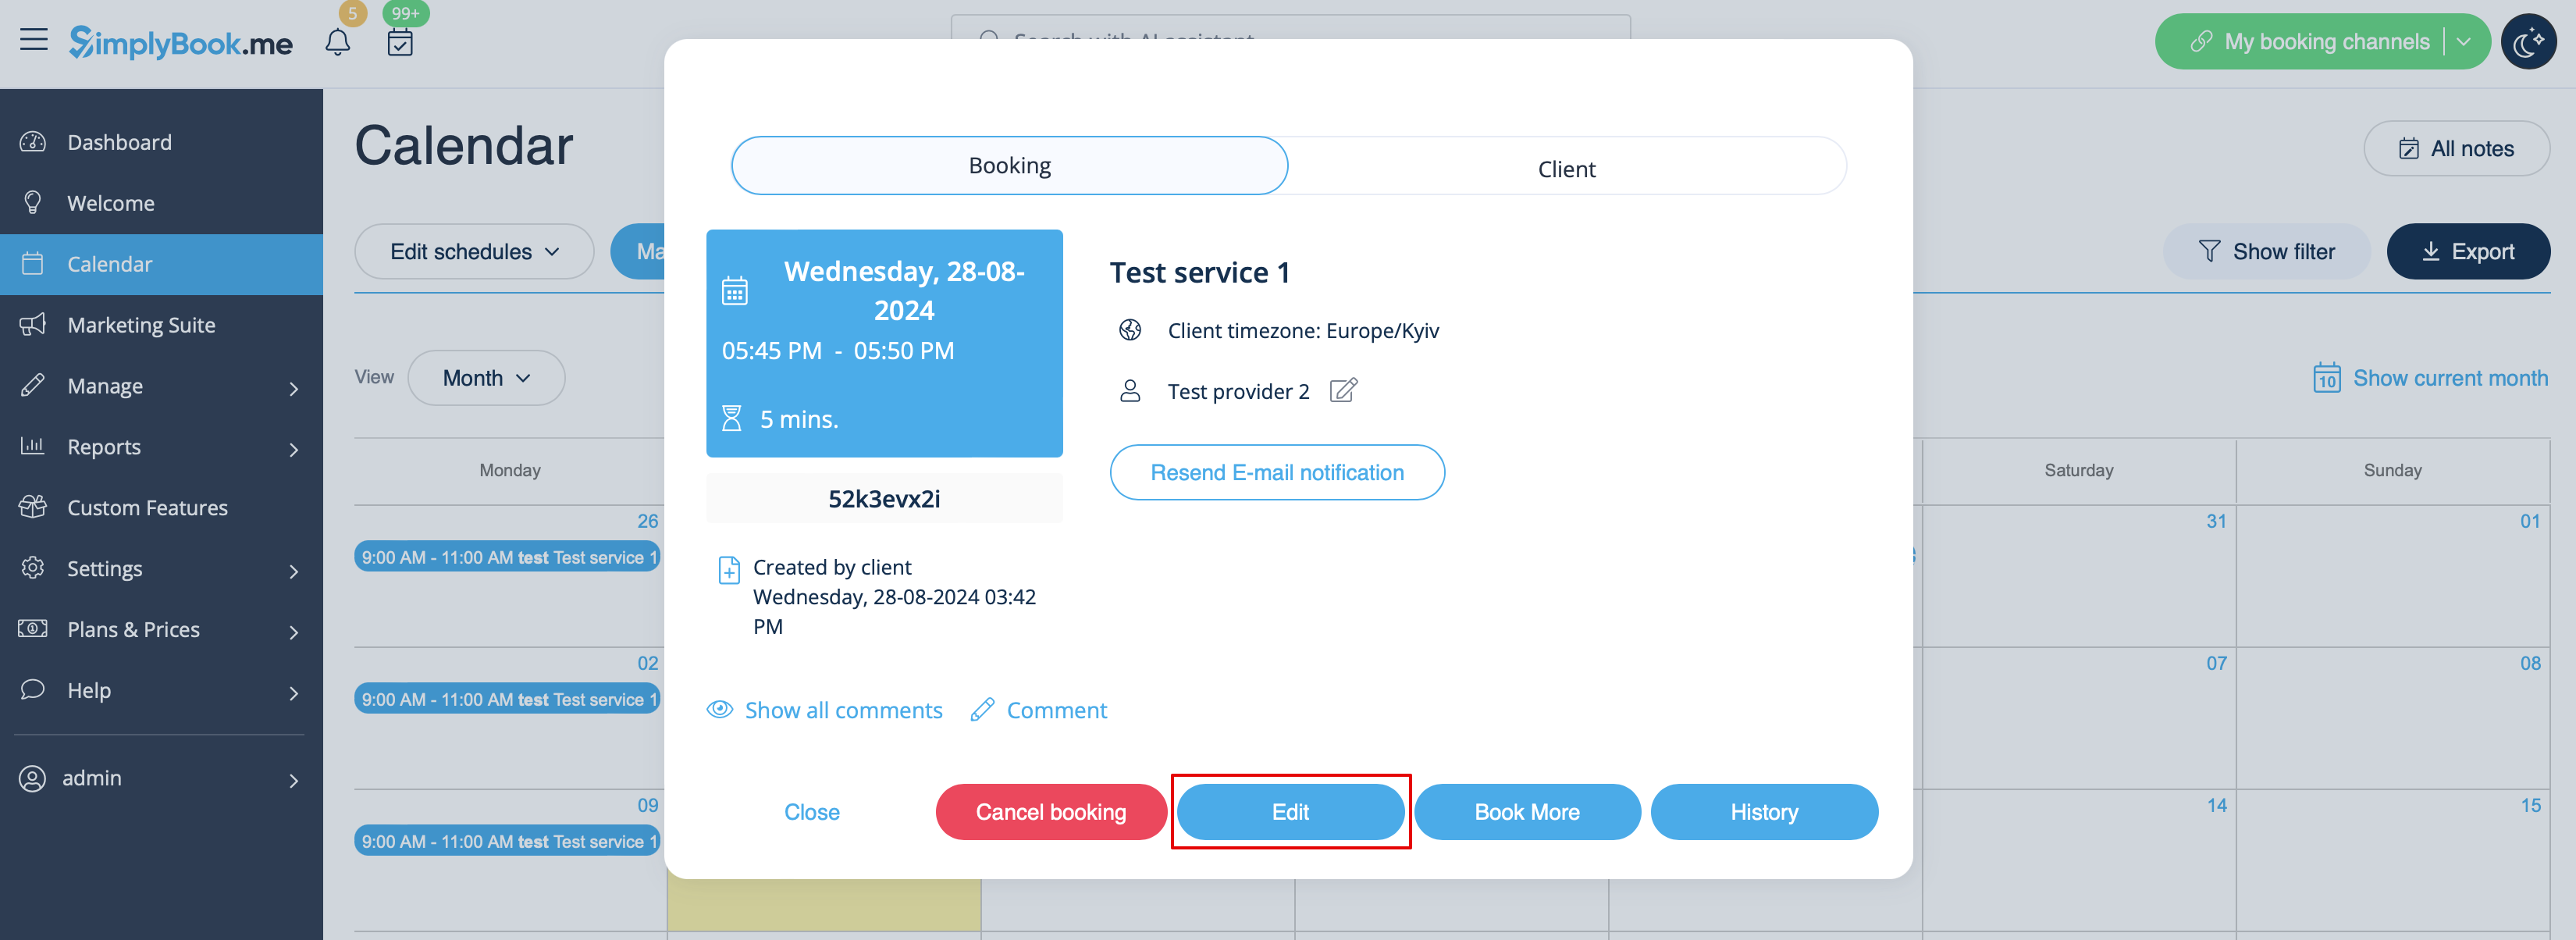
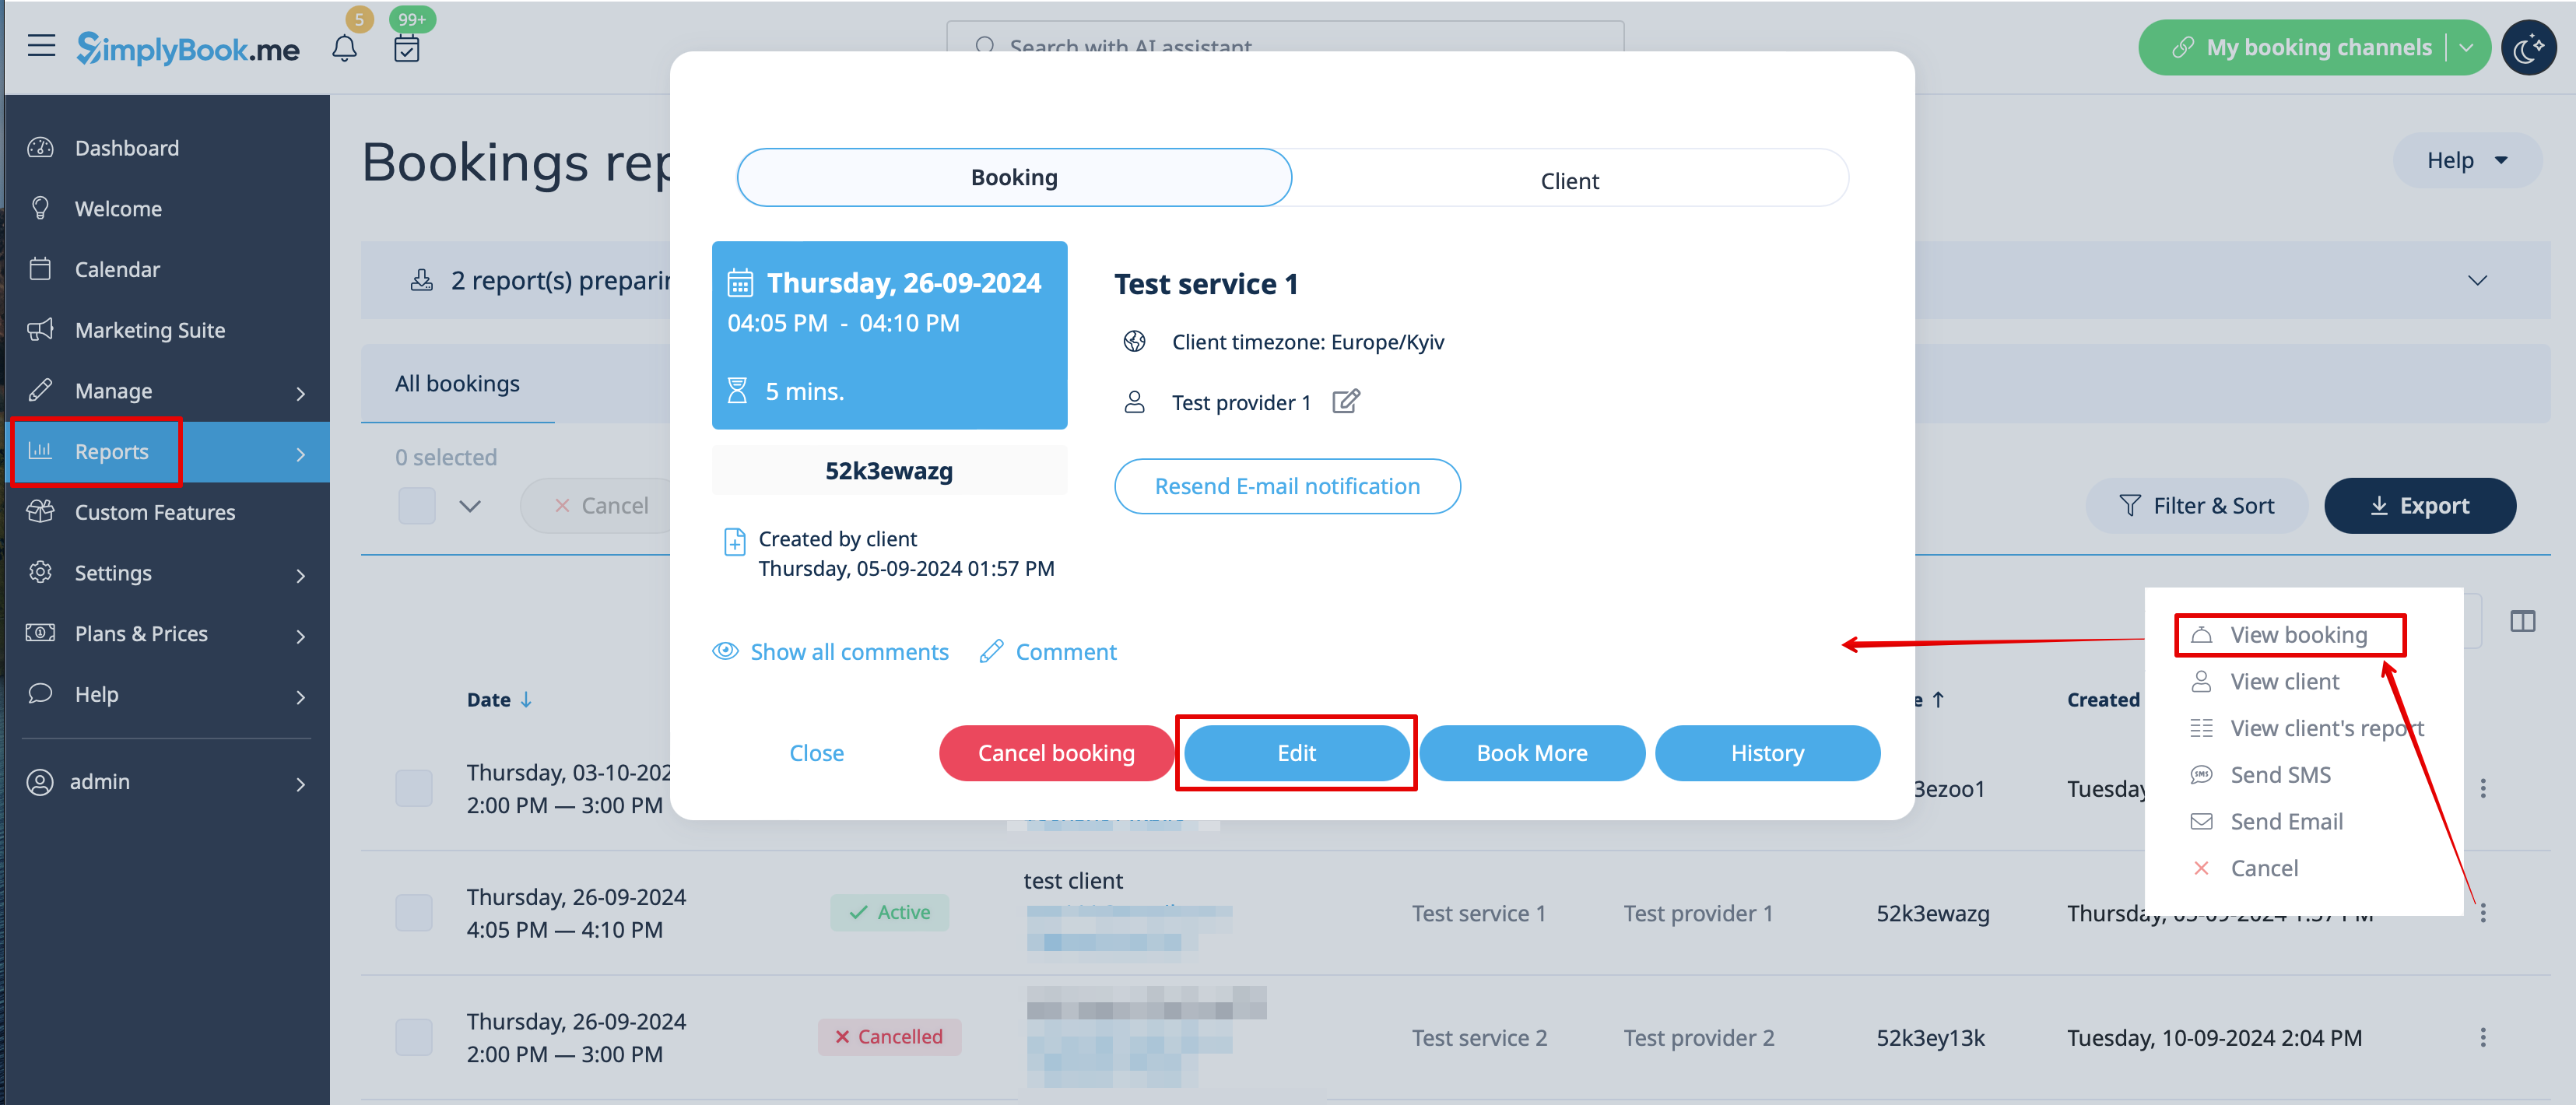
2. In Reports -> Booking details. Click on View button for the necessary booking to open details and then press Edit to change any information about the booking.
You can use filters to easily find your bookings for specific service, provider, client or date range.
Please note! It is not possible to edit booking that was already cancelled.
If you need to allow your clients to change the appointment date and/or time themselves please use Client Rescheduling custom feature.
How to cancel bookings
1. For admin or user
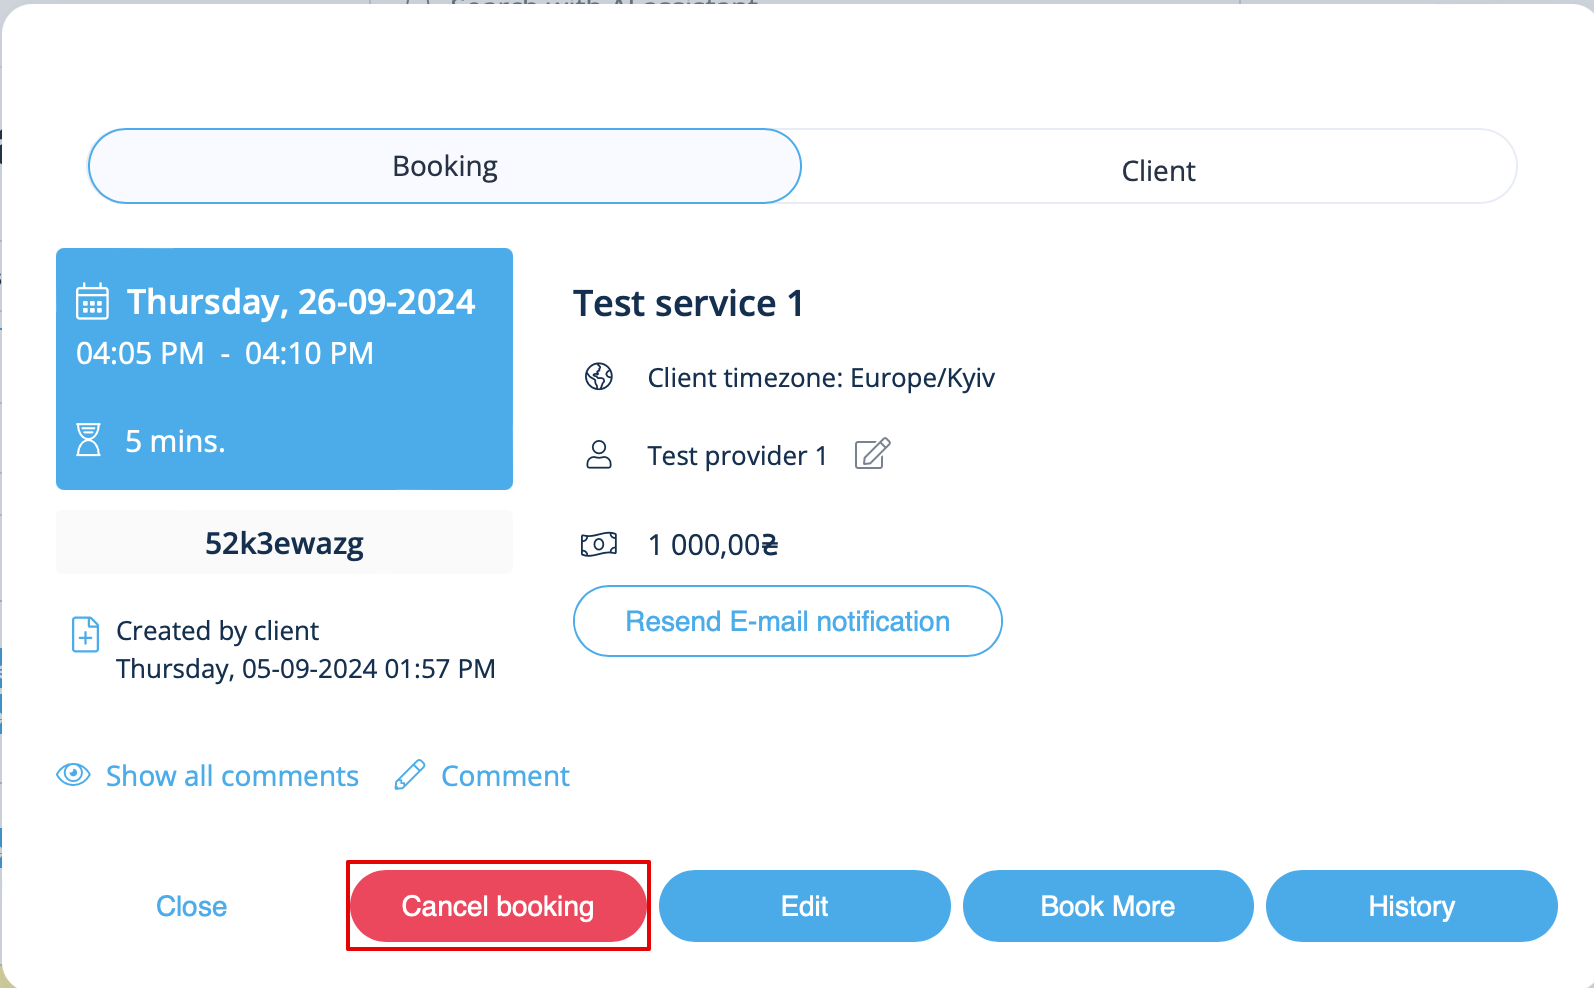
In Calendar (left-side menu) or in in Reports -> Booking details. Click on the booking to open the details or use View option if in Reports and then press Cancel booking button.
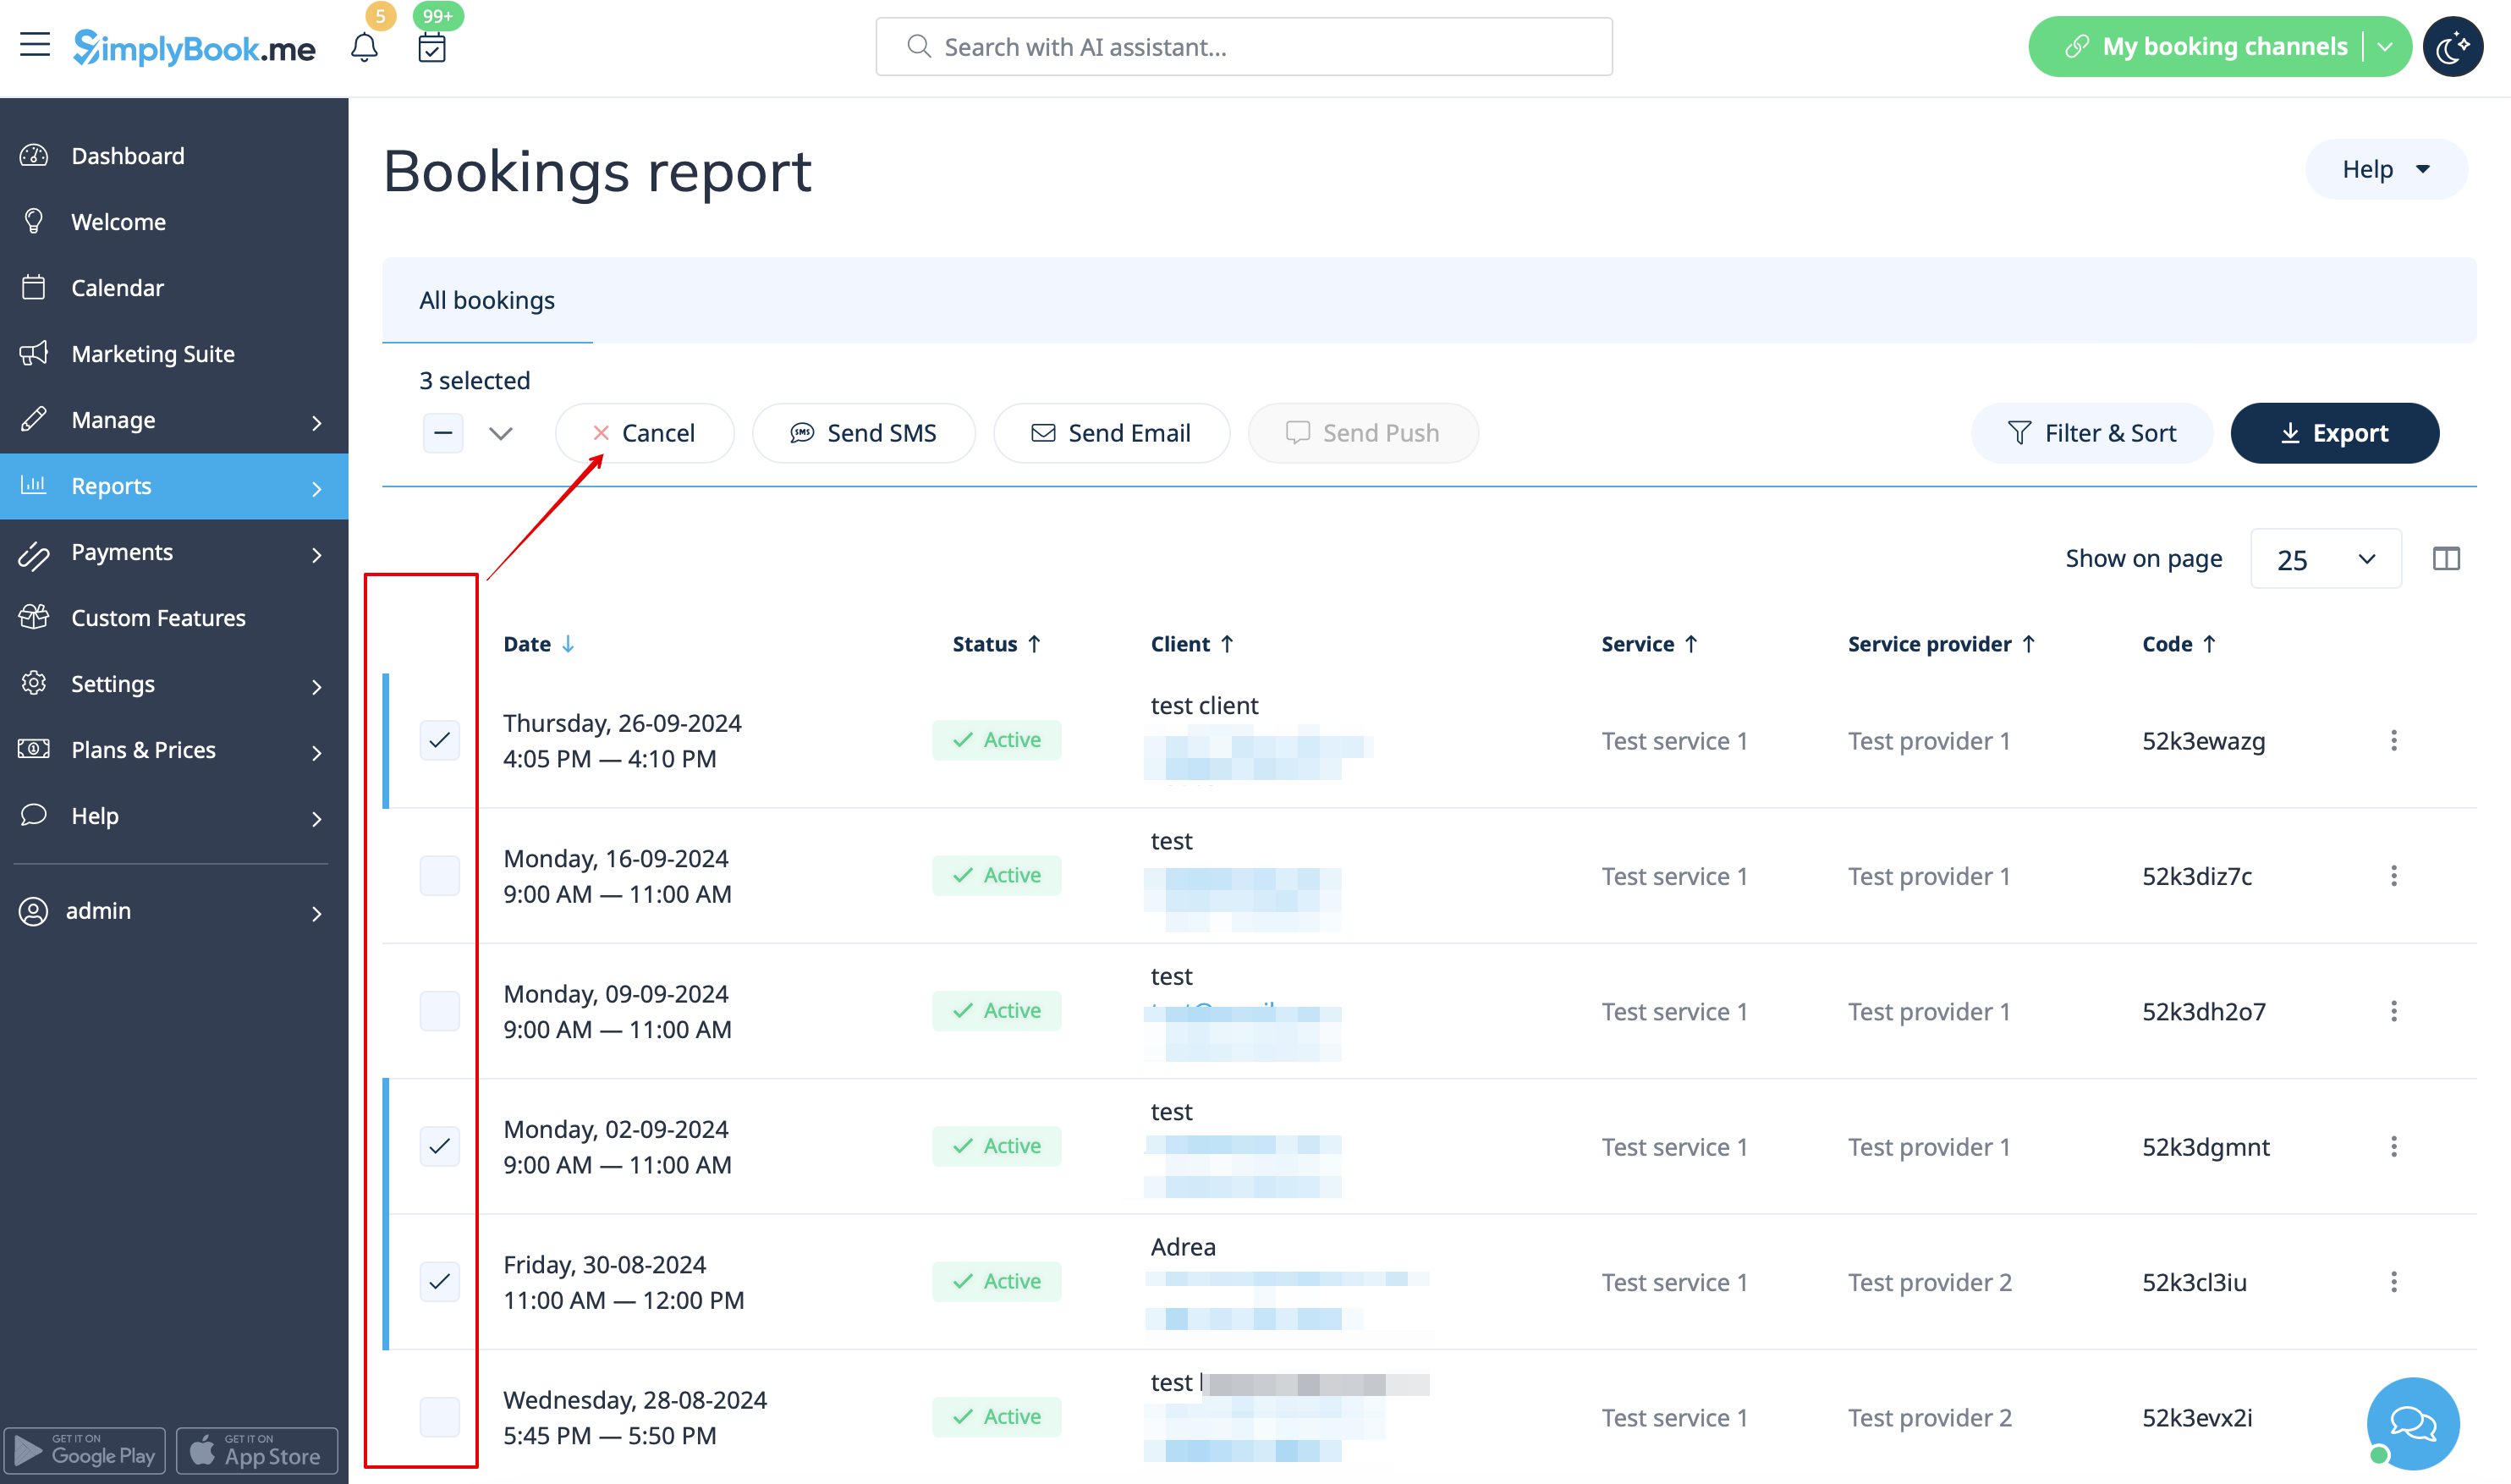
In case you need to cancel many bookings at once you can do that in Reports -> Booking details.
You can use the filter if necessary, check the boxes with the bookings to cancel and click on Cancel selected button at the top.
Please note! It is possible to cancel the appointments from one report page at a time.
2. For client To cancel their bookings, clients can click cancel link in their confirmation emails.

Or use Cancel button on the booking website, My bookings tab.
(If you want to prohibit clients from cancelling the appointments, you may need Cancellation Policy Custom Feature.)