From SimplyBook.me
Created page with "Aangepaste pagina aangepaste functie" |
Created page with "<br><br> = Hoe links toevoegen = <br> Het kan voorkomen dat u uw klanten naar een andere pagina moet doorverwijzen (bijv. uw website, enz.). <br> In dat geval kunt u gebruikmaken van "Link toevoegen aan menubalk". <br>" |
||
| Line 17: | Line 17: | ||
= Hoe de optie voor het maken van pagina's te gebruiken = | = Hoe de optie voor het maken van pagina's te gebruiken = | ||
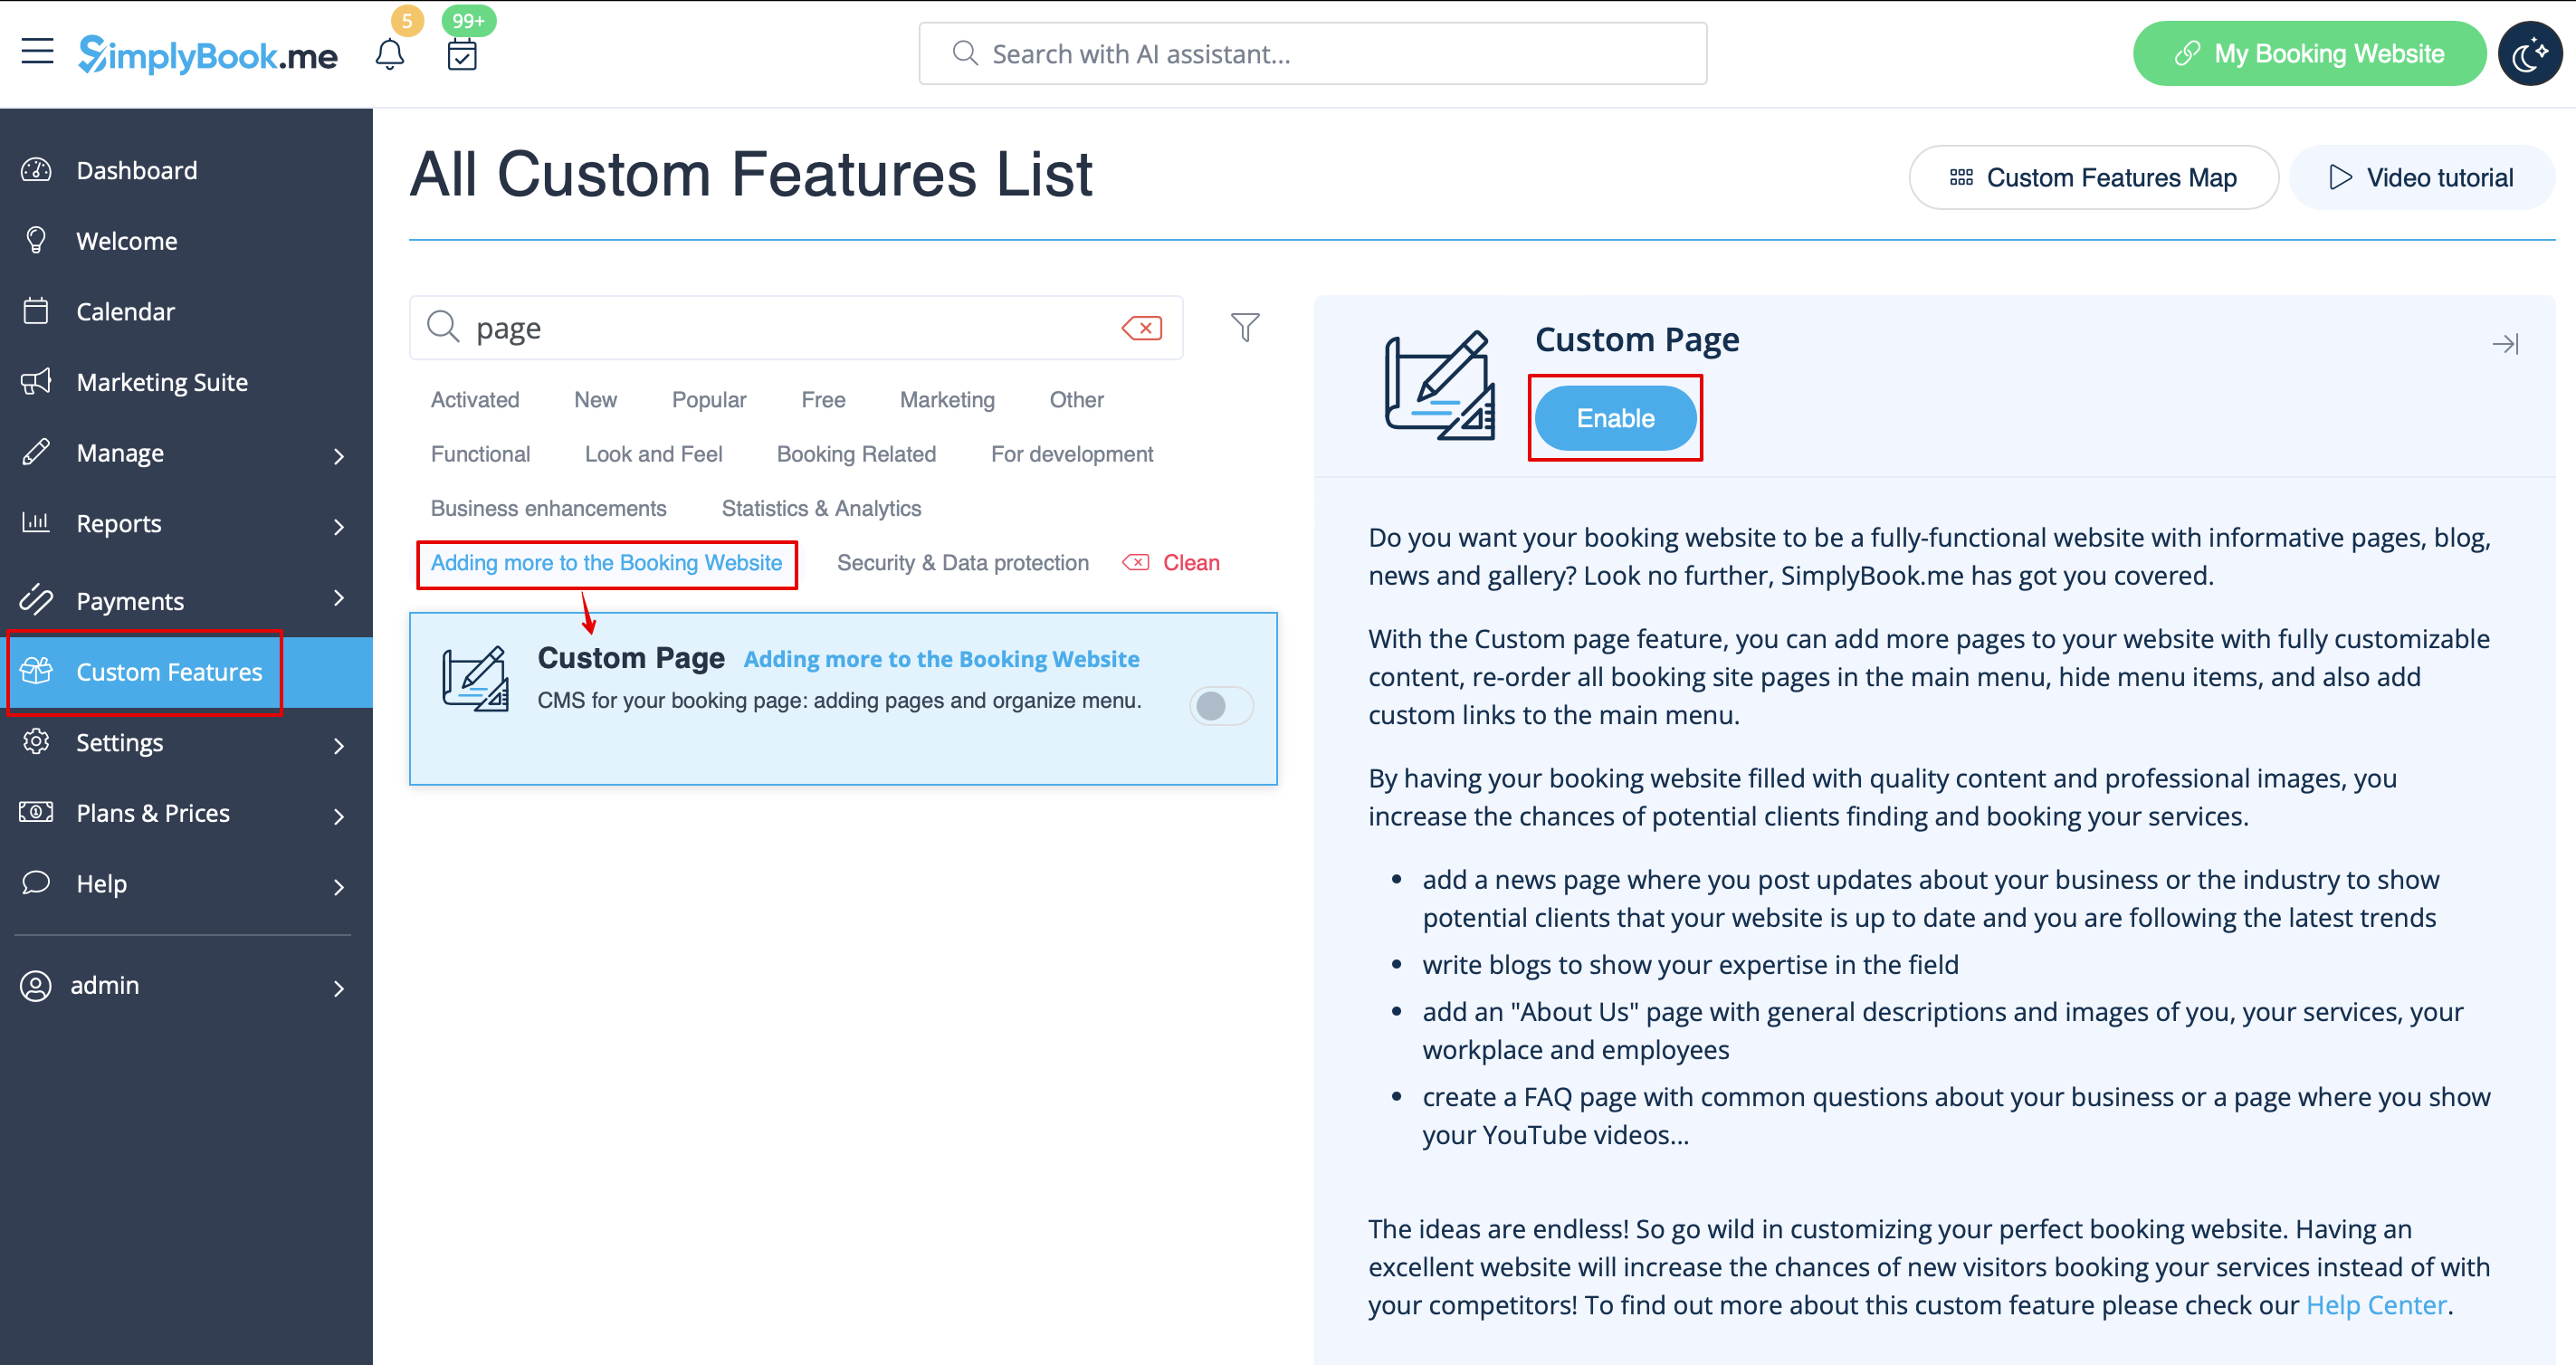
:1. Schakel de functie "Aangepaste pagina" in op uw ''pagina Aangepaste functies -> Meer toevoegen aan de'' sectie ''Boekingssite''. | |||
:1. | |||
[[File:Custom page enable path redesigned.png|1200px| center|link=https://help.simplybook.me/images/5/54/Custom_page_enable_path_redesigned.png]] | [[File:Custom page enable path redesigned.png|1200px| center|link=https://help.simplybook.me/images/5/54/Custom_page_enable_path_redesigned.png]] | ||
<br><br> | <br><br> | ||
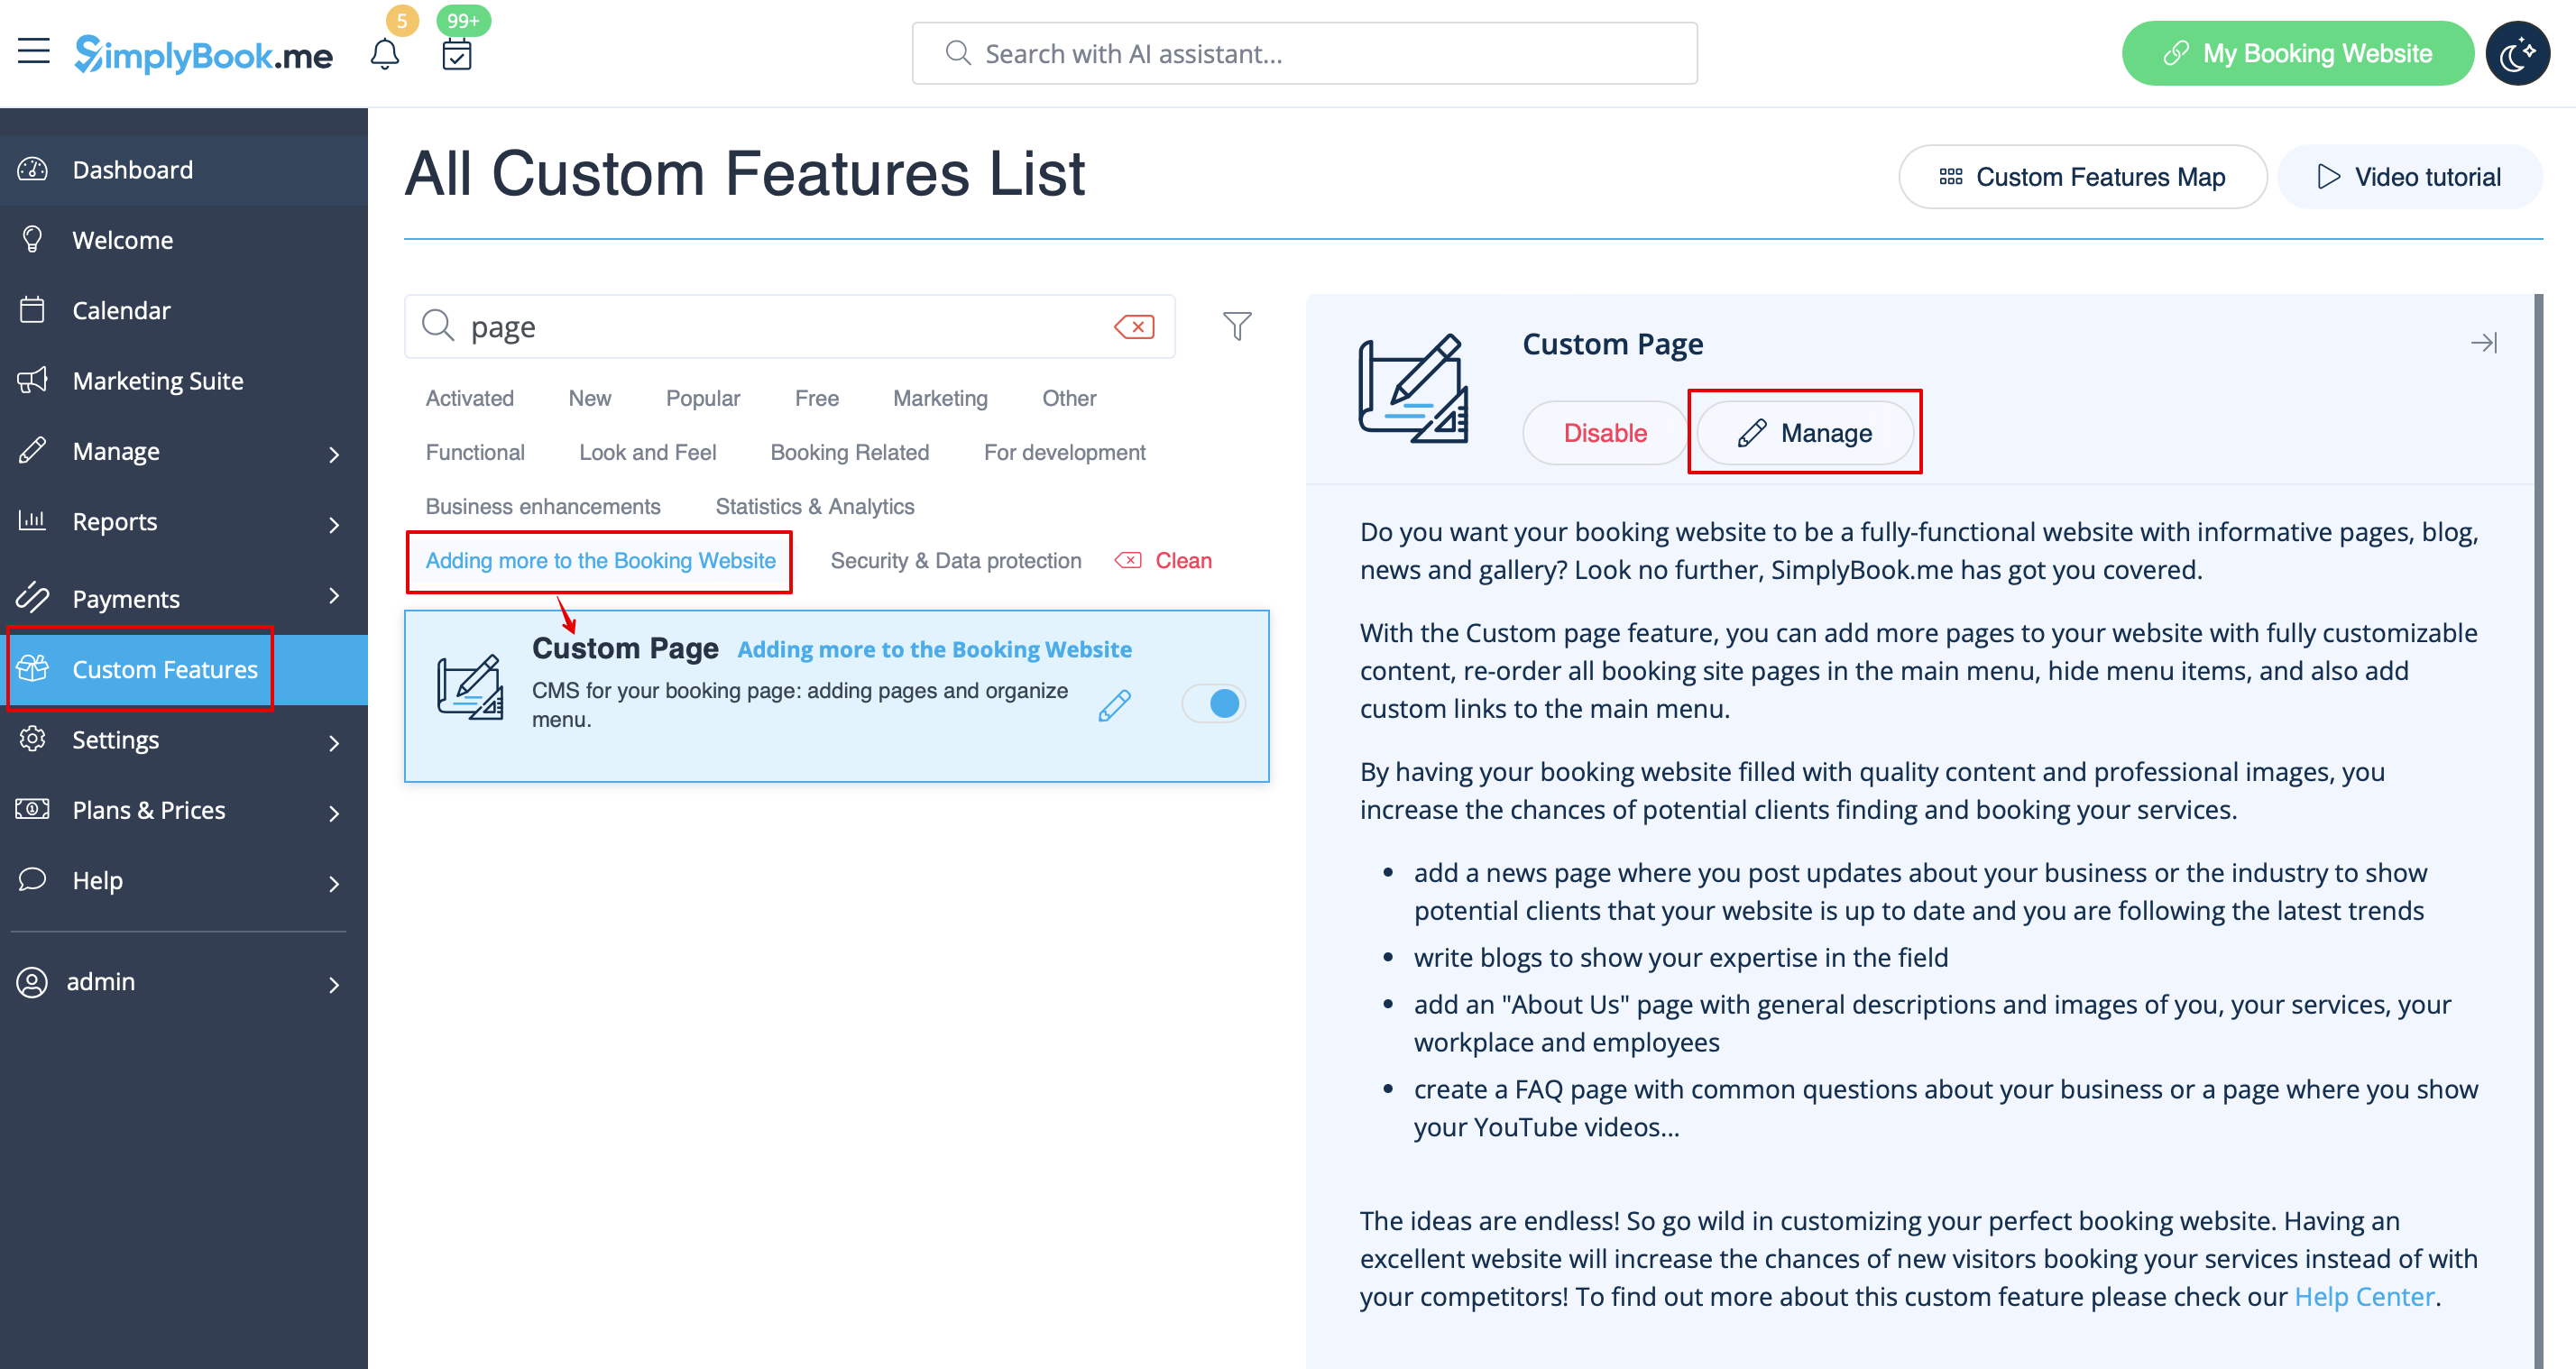
:2. | :2. Ga naar "Beheren" om de gewenste pagina's in te stellen. | ||
[[File:Custom page settings path redesigned.png|1200px | center|link=https://help.simplybook.me/images/e/ee/Custom_page_settings_path_redesigned.png]] | [[File:Custom page settings path redesigned.png|1200px | center|link=https://help.simplybook.me/images/e/ee/Custom_page_settings_path_redesigned.png]] | ||
<br><br> | <br><br> | ||
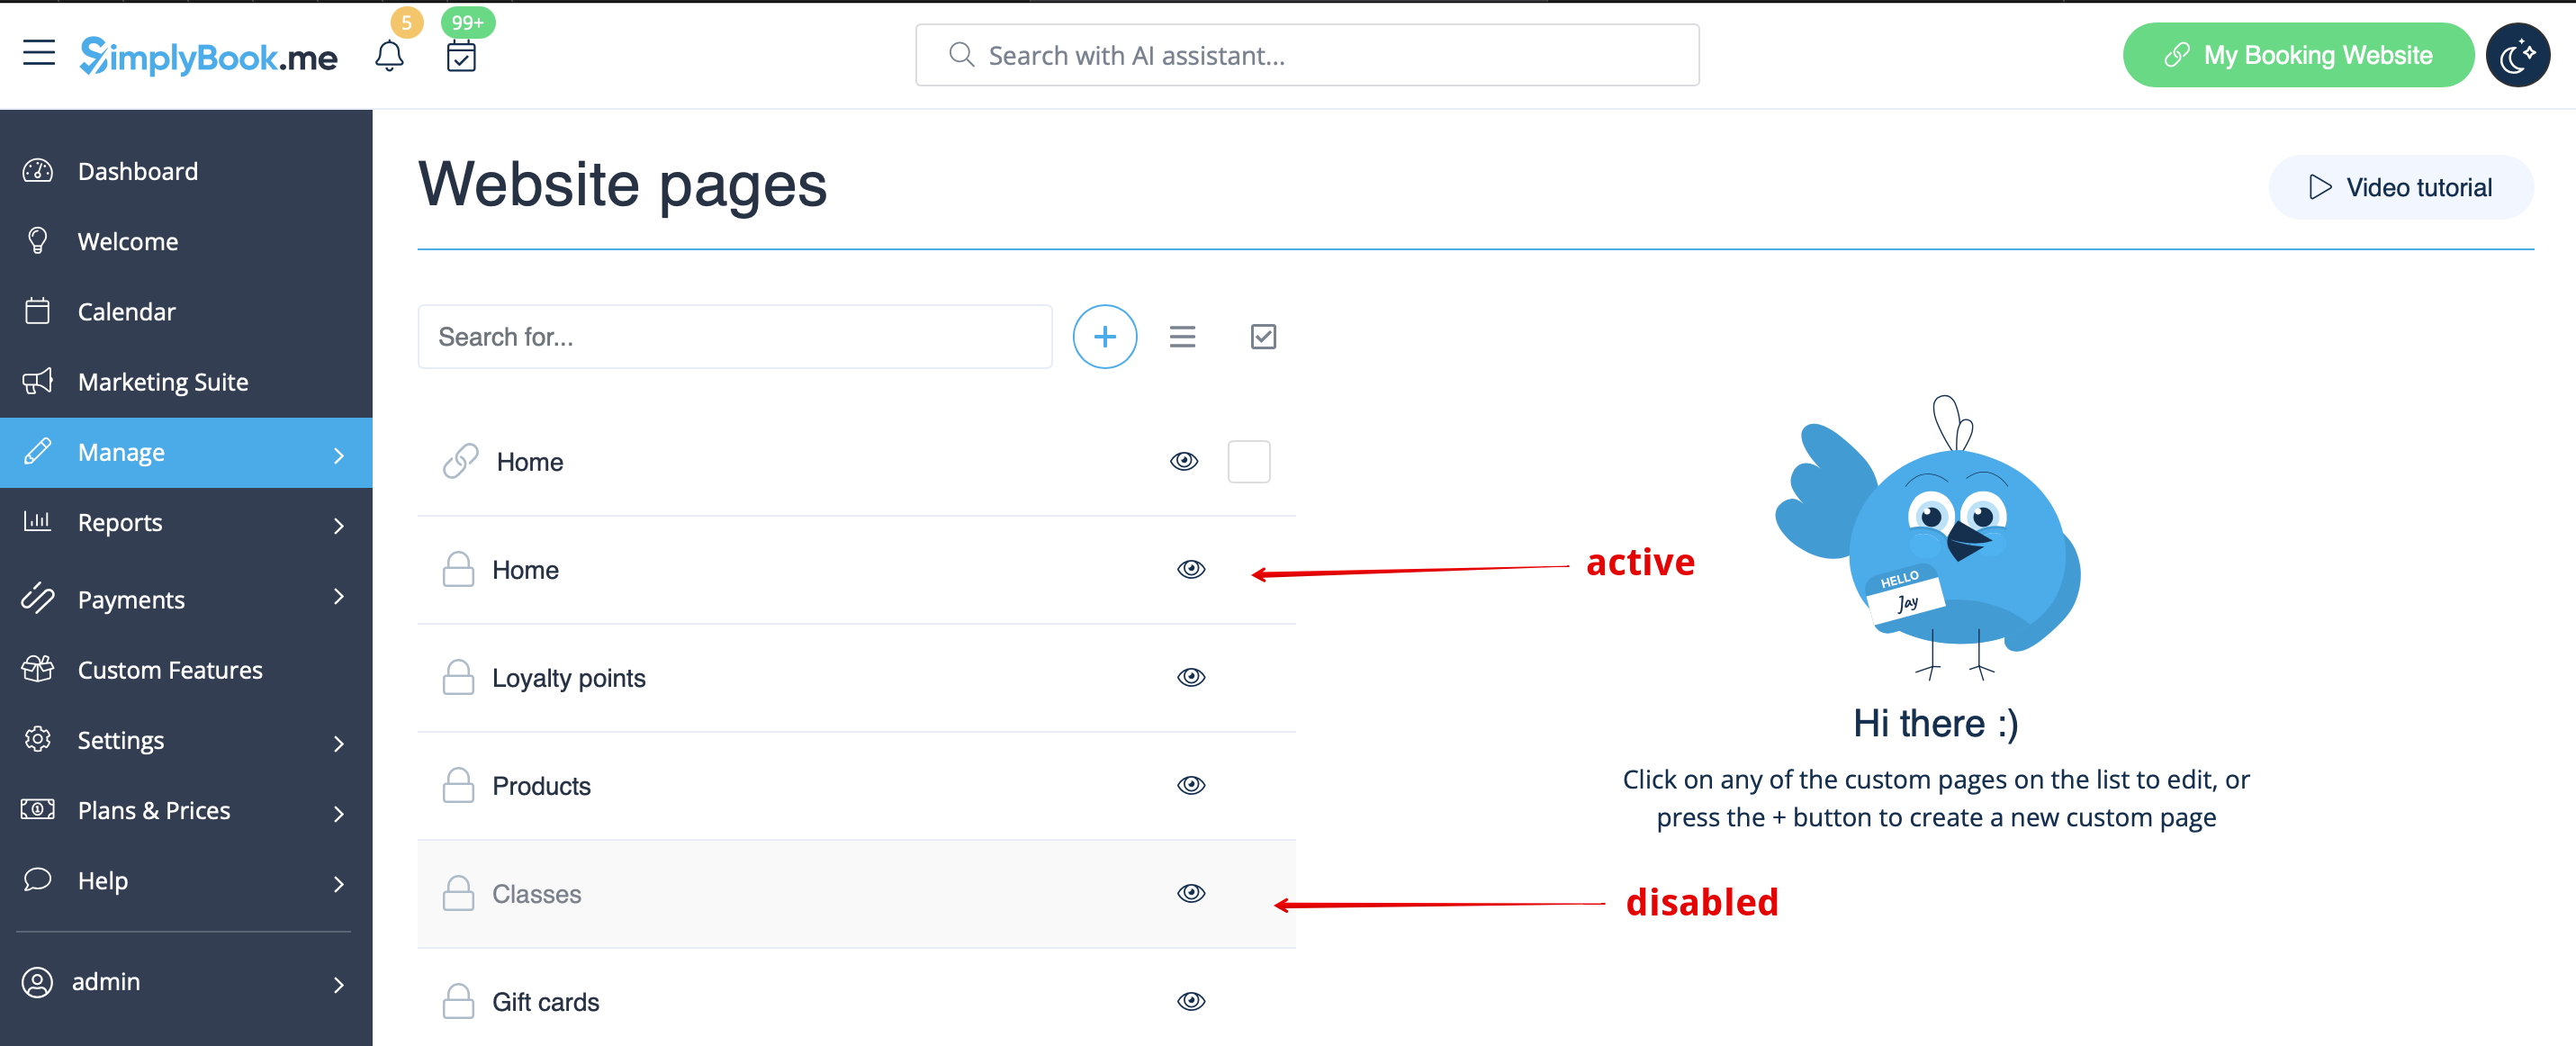
:3. | :3. Op de volgende pagina ziet u de tabbladen voor de systeemboekingspagina's. | ||
:( | :(De tabbladen die momenteel zijn uitgeschakeld, zijn grijs weergegeven.) | ||
: | :Systeempagina's kunnen niet worden bewerkt in deze interface. U moet naar het betreffende gedeelte navigeren via de betreffende links. | ||
[[File:Custom page active and disabled pages redesigned.png|1200px | center|link=https://help.simplybook.me/images/1/14/Custom_page_active_and_disabled_pages_redesigned.png]] | [[File:Custom page active and disabled pages redesigned.png|1200px | center|link=https://help.simplybook.me/images/1/14/Custom_page_active_and_disabled_pages_redesigned.png]] | ||
<br><br> | <br><br> | ||
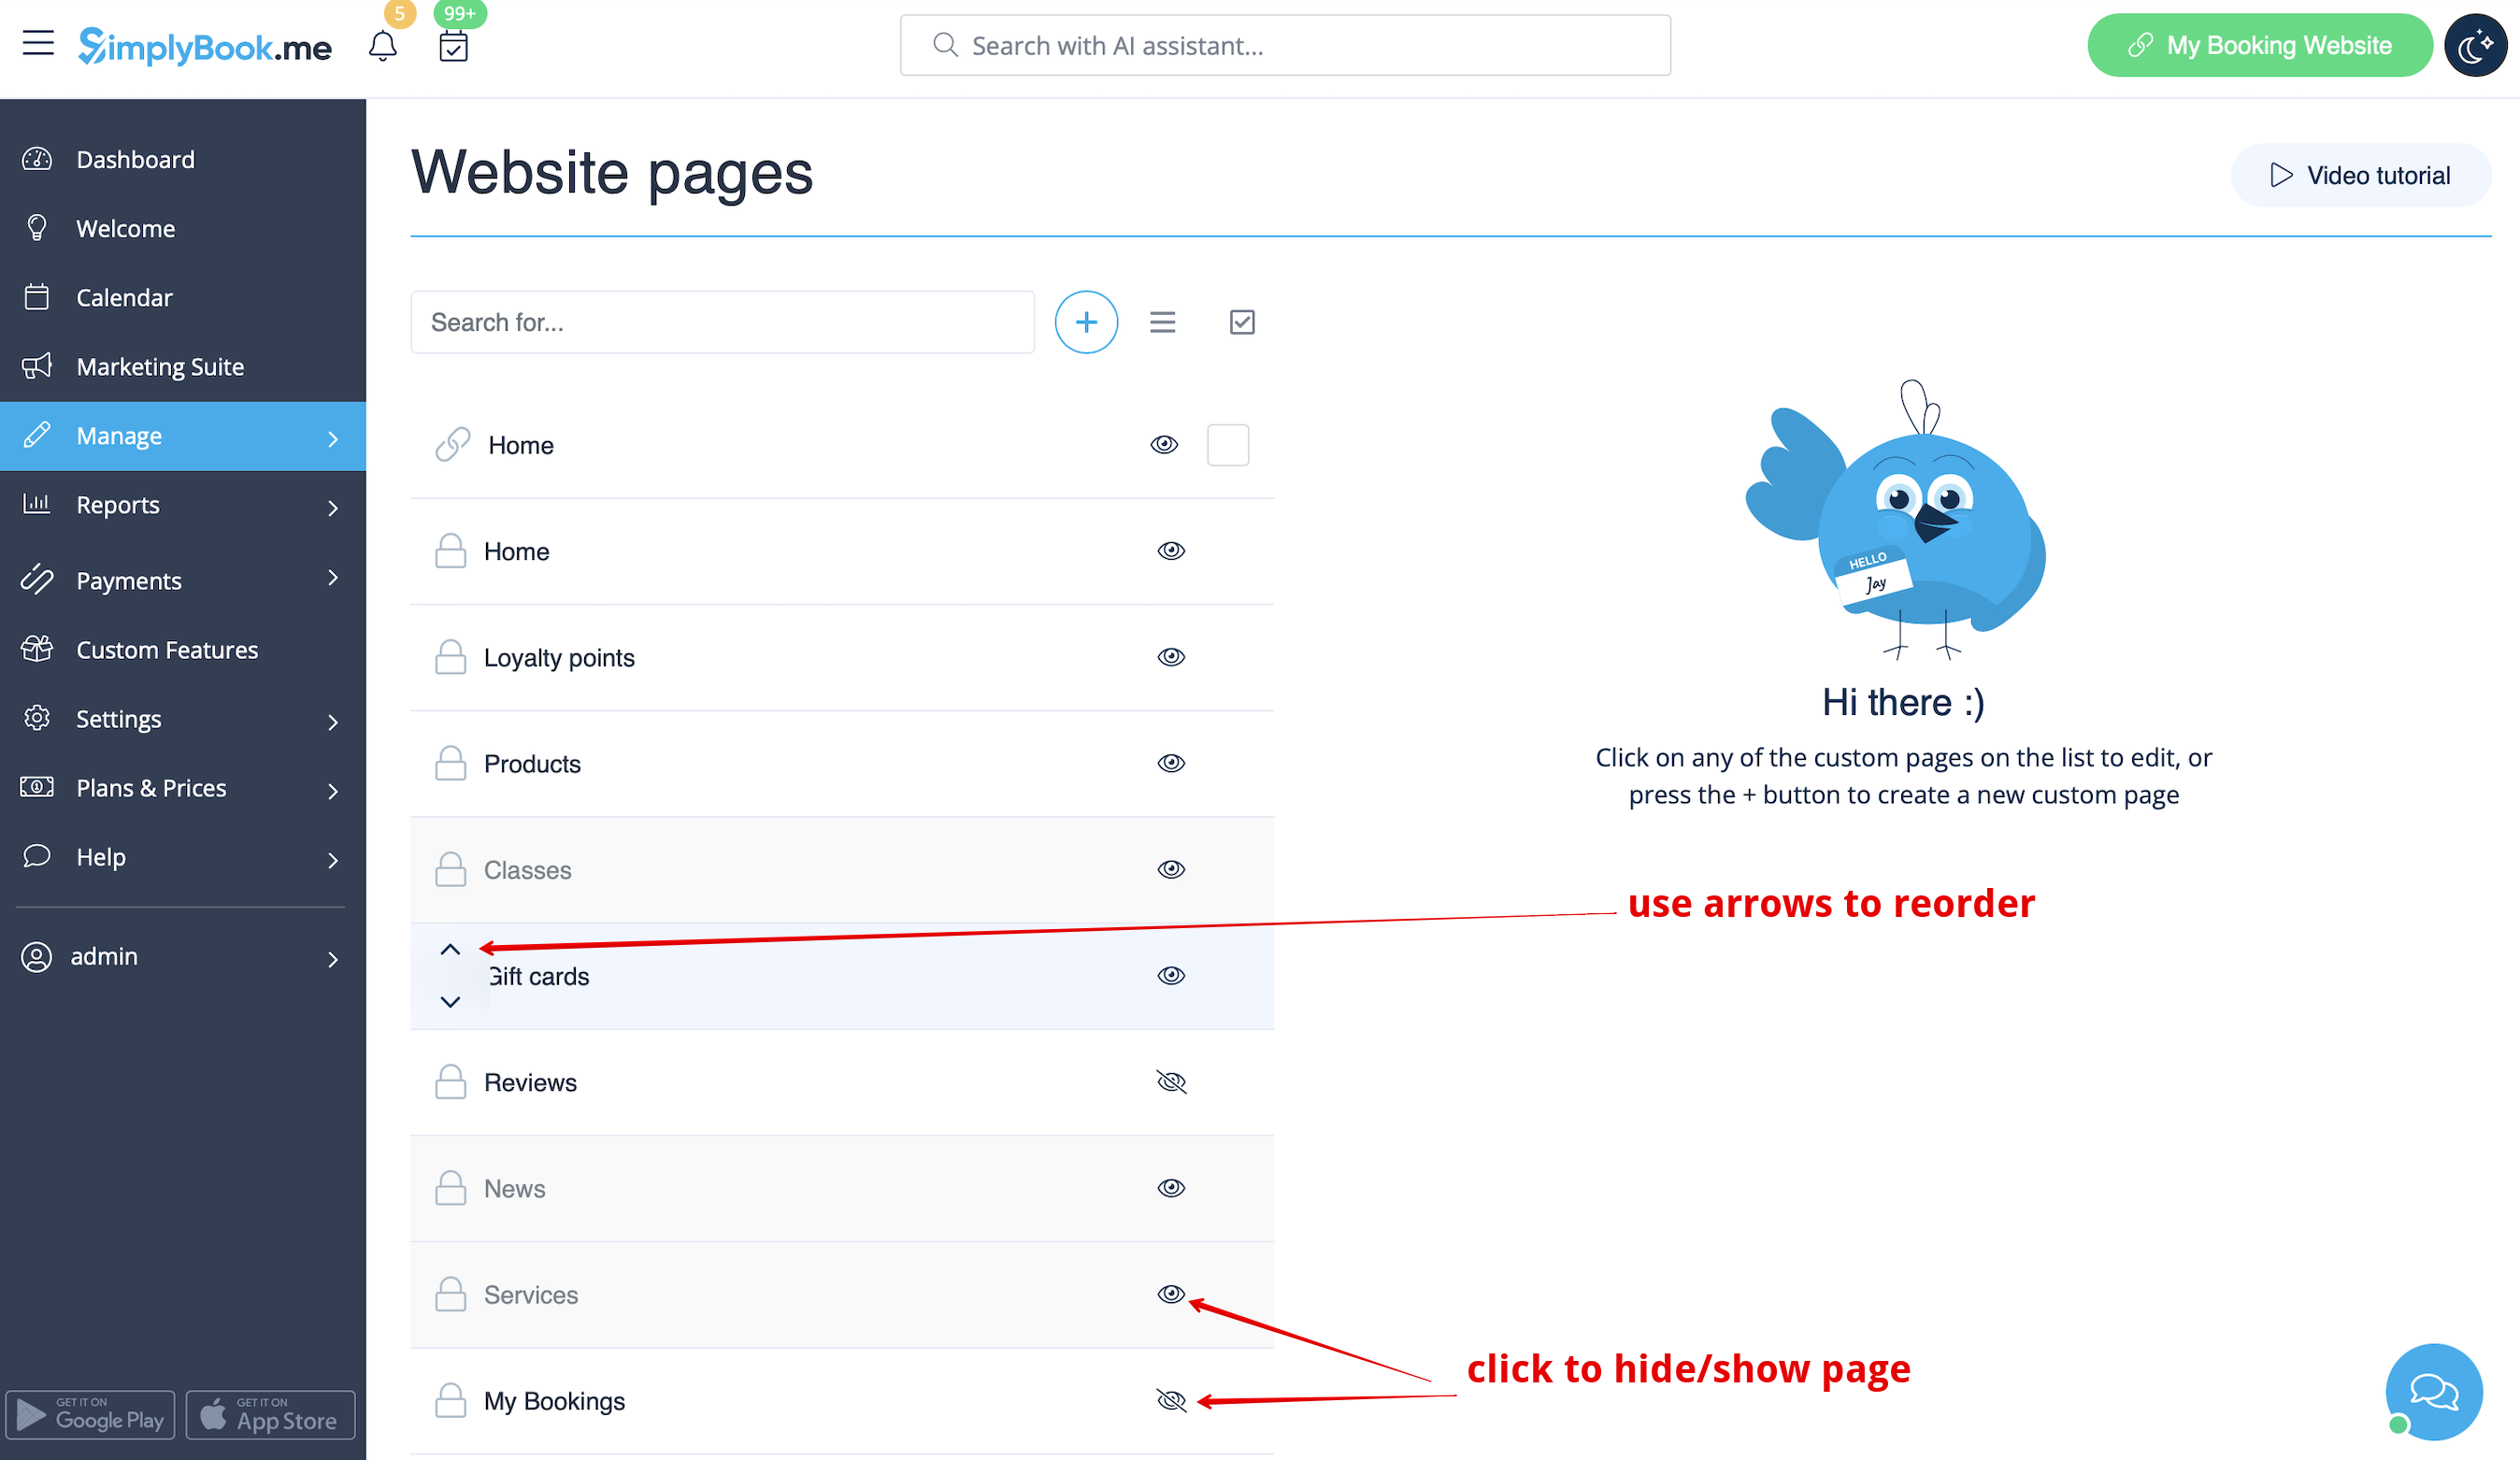
:4. | :4. U kunt de tabbladen opnieuw ordenen met de pijltjes en pagina's verbergen en weergeven met de oogpictogrammen. | ||
:''' | :'''Let op''': als u een pagina verbergt, blijft deze toegankelijk via een directe link. | ||
[[File:Custom page hide show reorder redesigned.png|1200px | center|link=https://help.simplybook.me/images/8/87/Custom_page_hide_show_reorder_redesigned.png]] | [[File:Custom page hide show reorder redesigned.png|1200px | center|link=https://help.simplybook.me/images/8/87/Custom_page_hide_show_reorder_redesigned.png]] | ||
<br><br> | <br><br> | ||
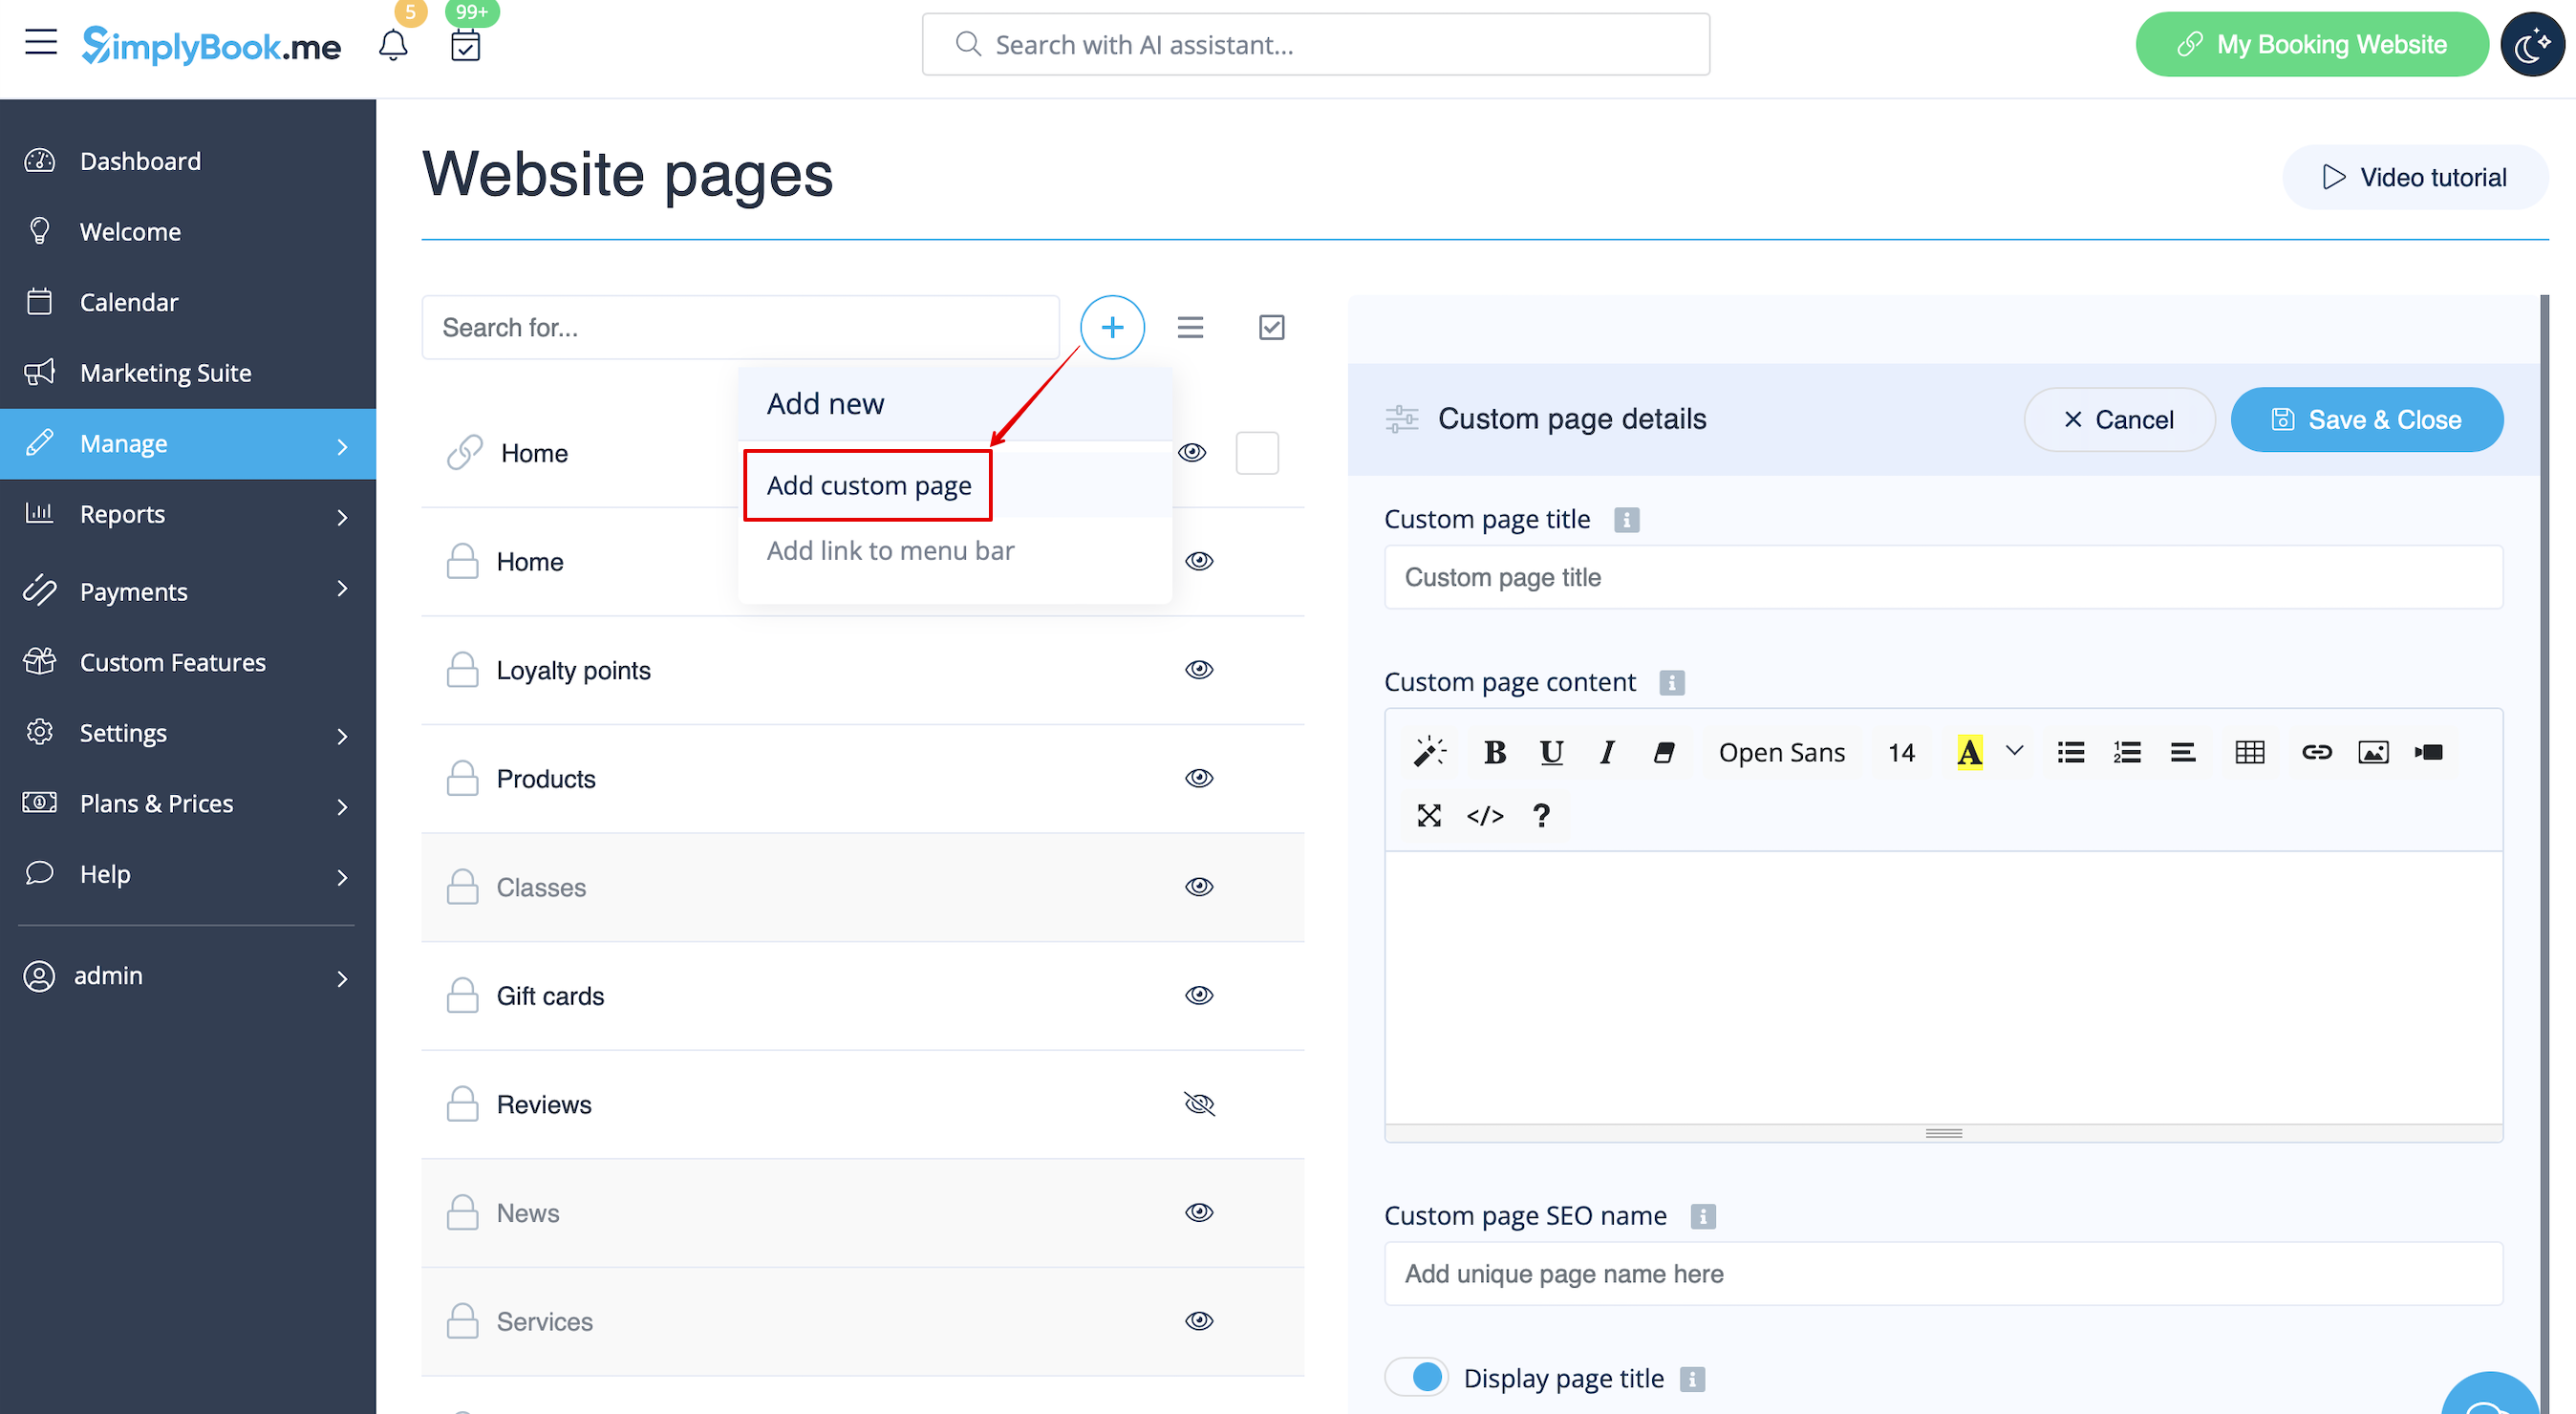
:5. | :5. Als u een nieuwe aangepaste pagina wilt toevoegen, klikt u op het pictogram '+' bovenaan en kiest u de optie 'Aangepaste pagina toevoegen'. | ||
[[File:Add custom page path redesigned.png|1200px | center|link=https://help.simplybook.me/images/d/d3/Add_custom_page_path_redesigned.png]] | [[File:Add custom page path redesigned.png|1200px | center|link=https://help.simplybook.me/images/d/d3/Add_custom_page_path_redesigned.png]] | ||
<br><br> | <br><br> | ||
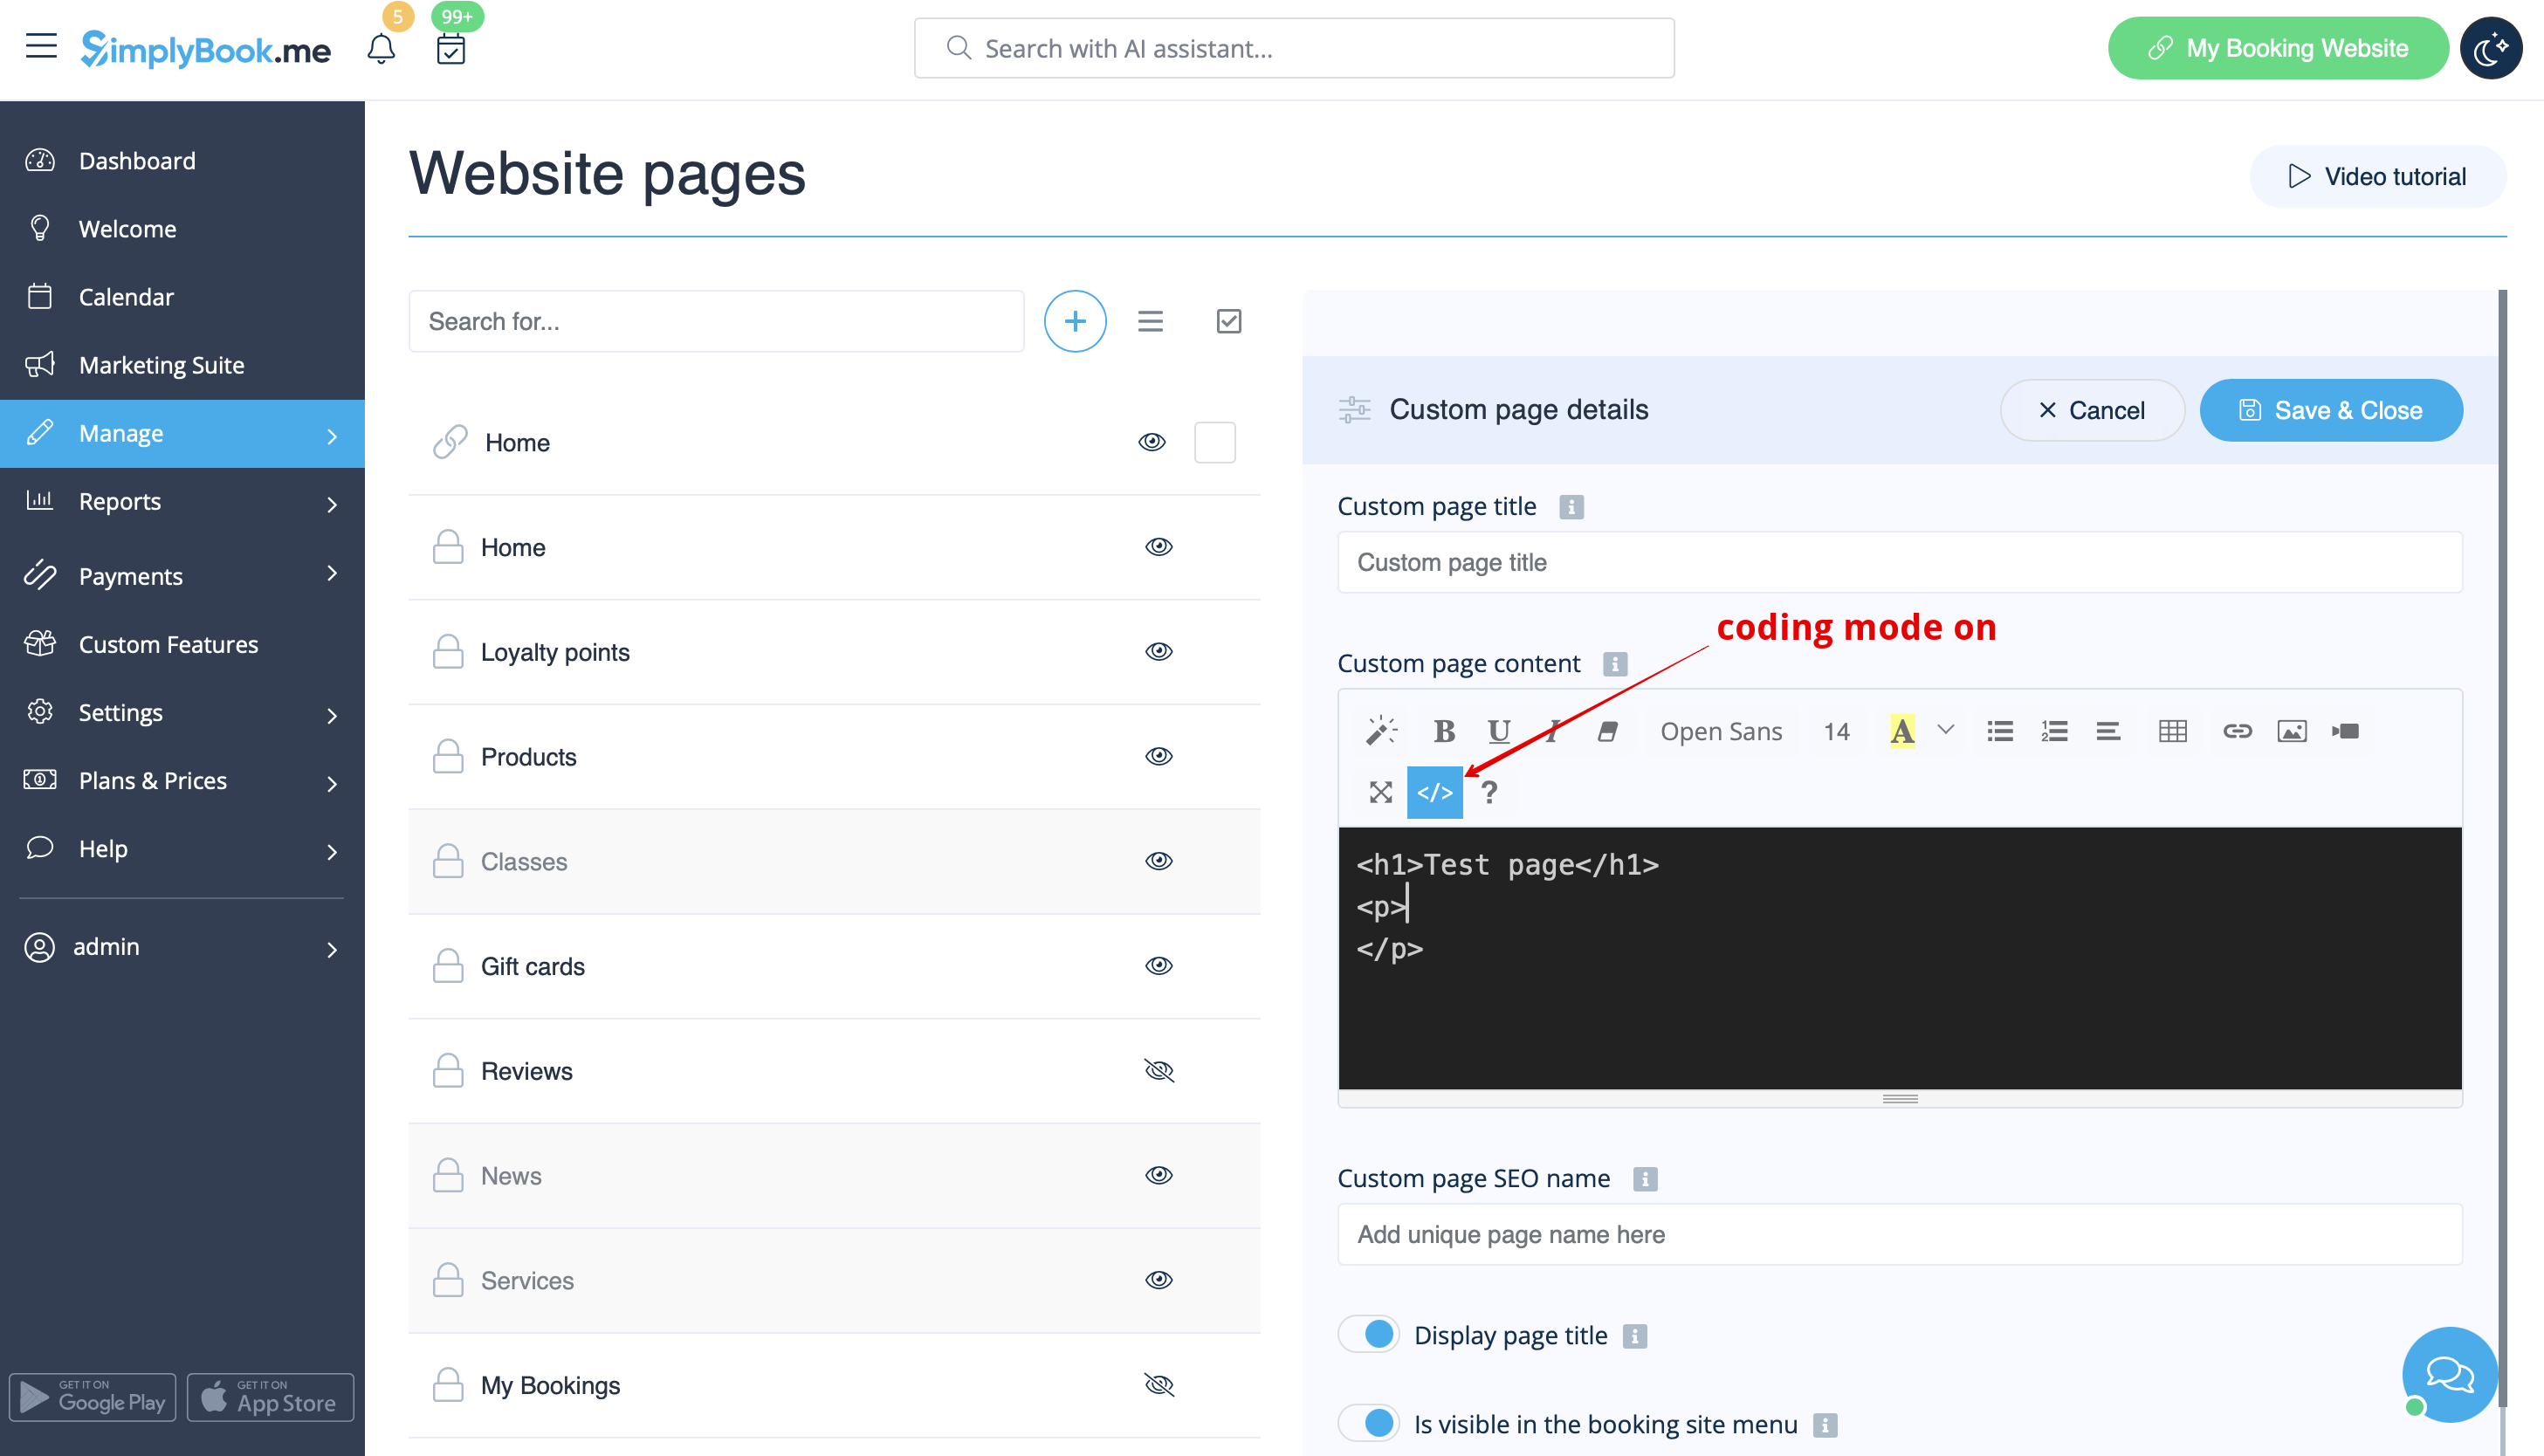
:6. | :6. Aan de rechterkant verschijnt het menu voor het bouwen van pagina's. Voeg een titel en de gewenste pagina-inhoud toe. | ||
: | :U kunt de ingebouwde HTML-editor gebruiken om elementen toe te voegen of, als u kennis hebt van HTML-codering, overschakelen naar de codemodus met het pictogram "</>". | ||
:''' | :'''Let op''': u moet de codemodus uitschakelen voordat u de pagina opslaat, zodat de code correct wordt opgeslagen. | ||
[[File:Custom page coding mode on redesigned.png|1200px | center|link=https://help.simplybook.me/images/9/93/Custom_page_coding_mode_on_redesigned.png]] | [[File:Custom page coding mode on redesigned.png|1200px | center|link=https://help.simplybook.me/images/9/93/Custom_page_coding_mode_on_redesigned.png]] | ||
<br><br> | <br><br> | ||
<br><br> | <br><br> | ||
= | = Hoe links toevoegen = | ||
<br> | <br> | ||
Het kan voorkomen dat u uw klanten naar een andere pagina moet doorverwijzen (bijv. uw website, enz.). <br> | |||
In | In dat geval kunt u gebruikmaken van "Link toevoegen aan menubalk". | ||
<br> | <br> | ||
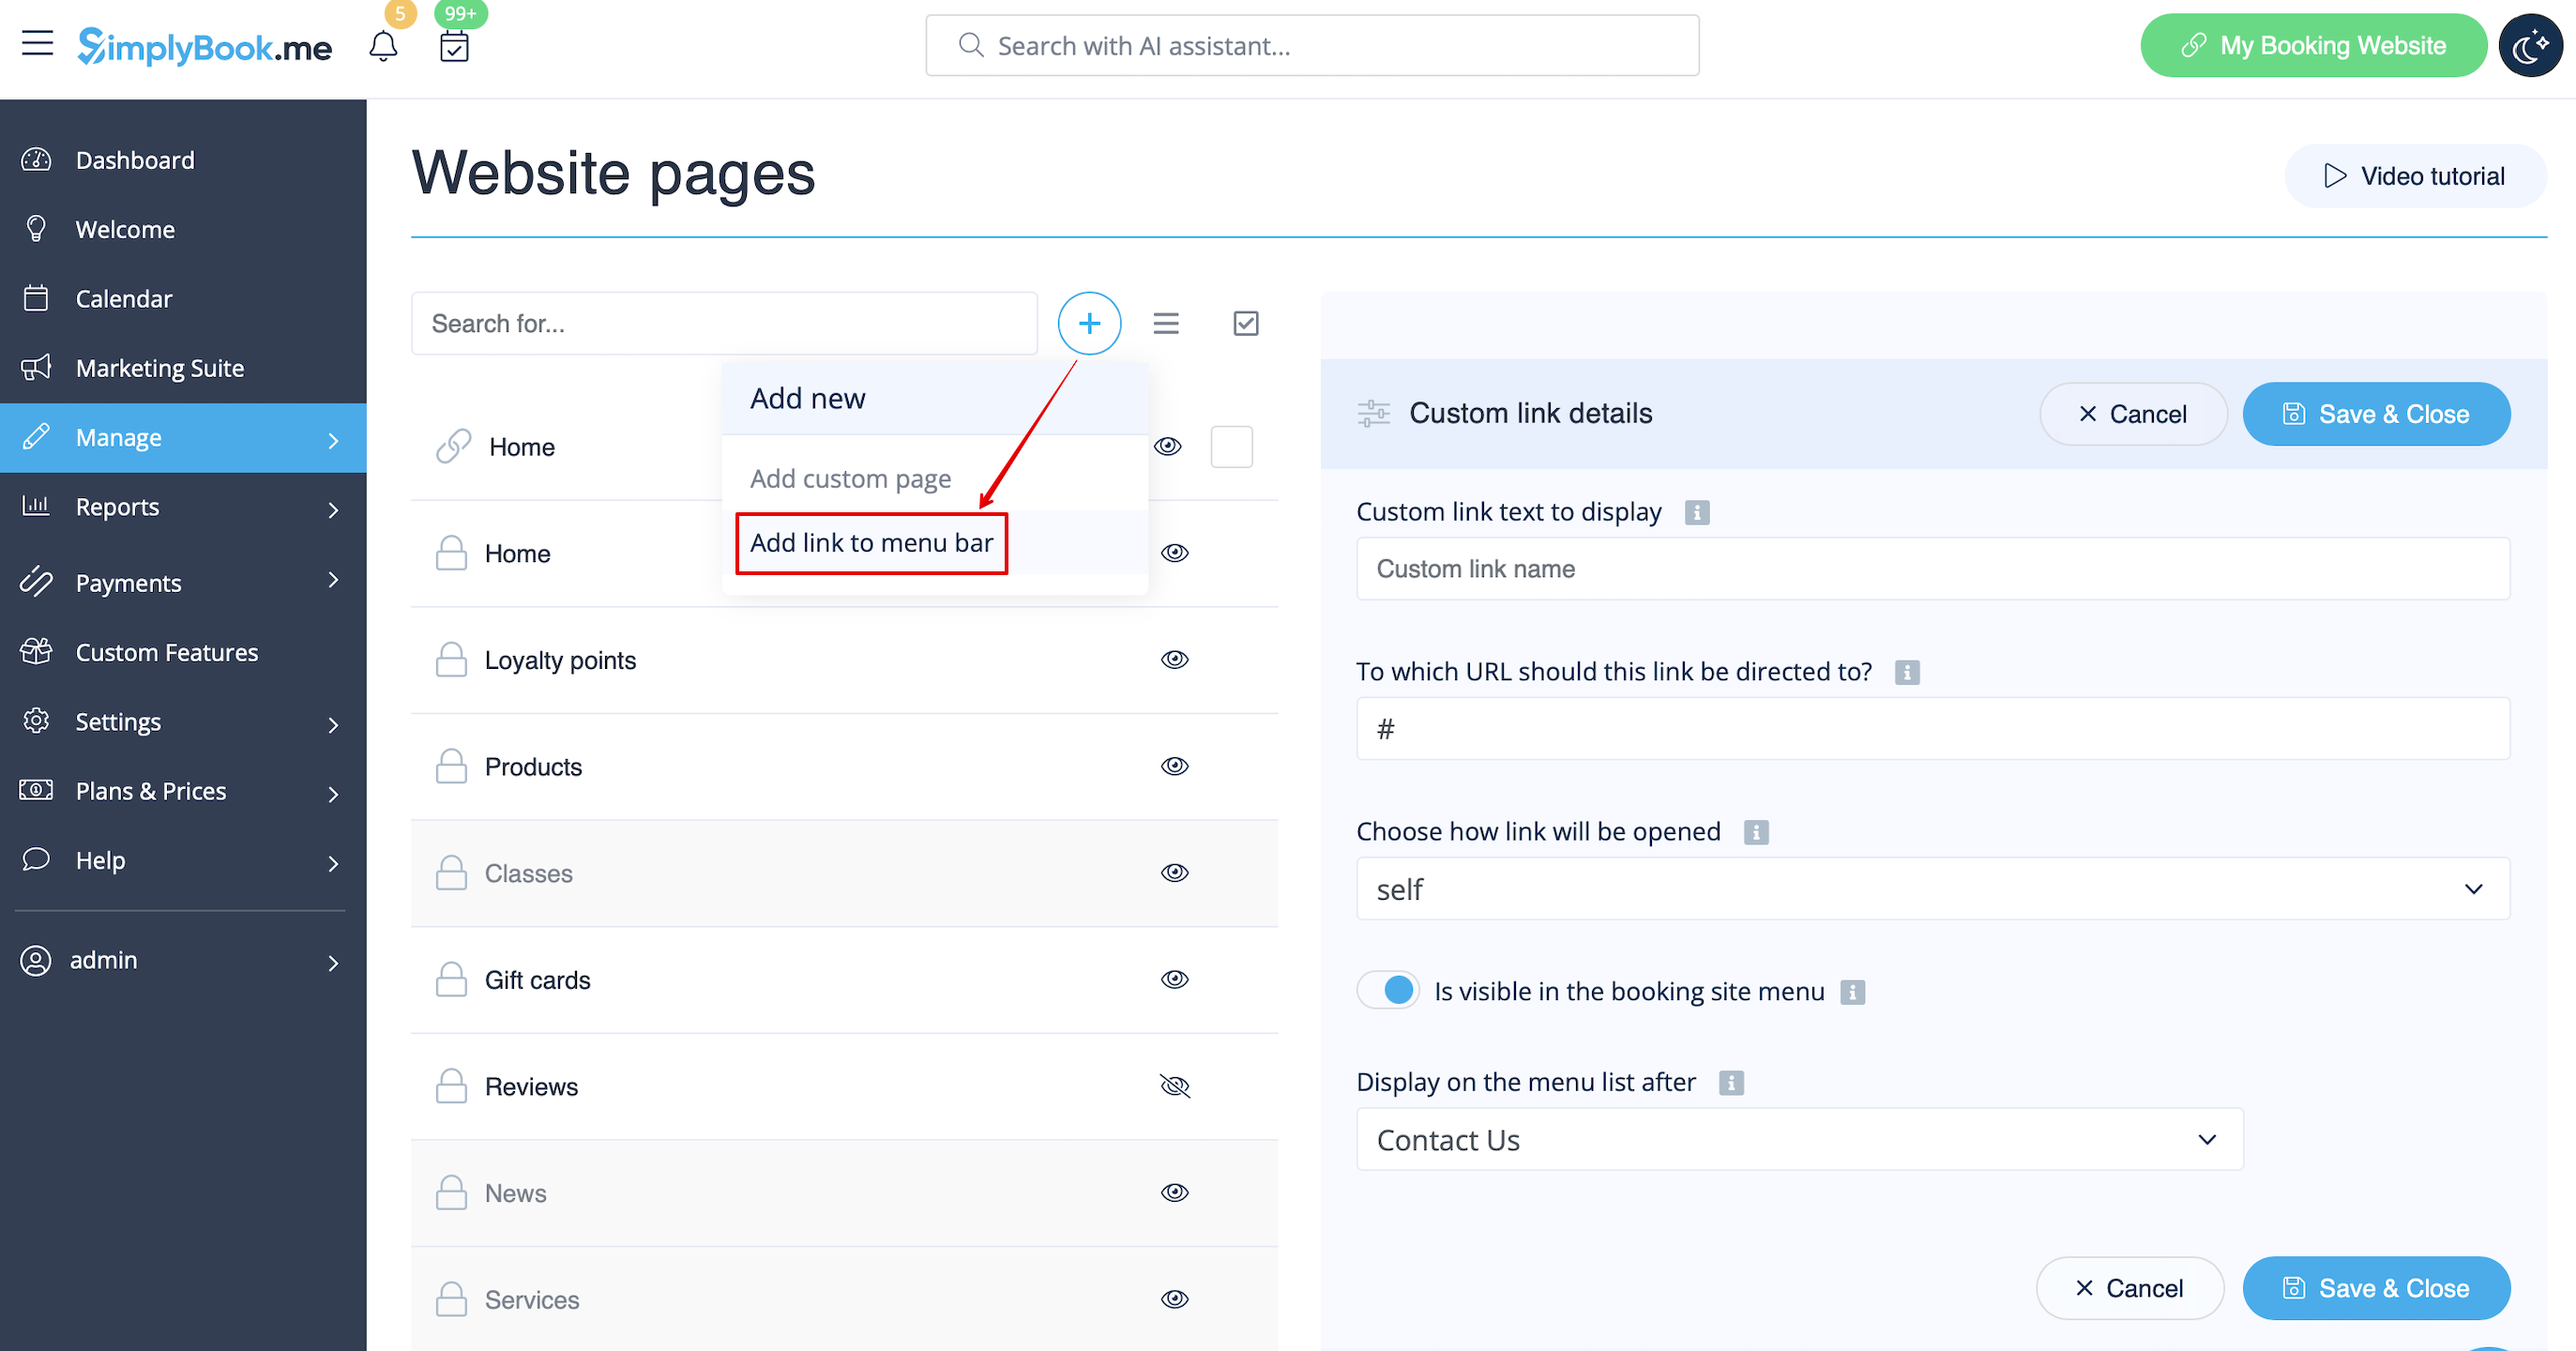
:1. Klik op het pictogram "+" bovenaan en kies de optie "Link toevoegen aan menubalk". | |||
:1. | [[File:Add custom links redesigned.png|1200px | center|link=https://help.simplybook.me/images/1/19/Add_custom_links_redesigned.png]][[File:Custom link main settings redesigned.png|1200px | center|link=https://help.simplybook.me/images/f/f9/Custom_link_main_settings_redesigned.png]][[File:Add custom links redesigned.png|1200px | center|link=https://help.simplybook.me/images/1/19/Add_custom_links_redesigned.png]] | ||
[[File:Add custom links redesigned.png|1200px | center|link=https://help.simplybook.me/images/1/19/Add_custom_links_redesigned.png]] | |||
<br><br> | <br><br> | ||
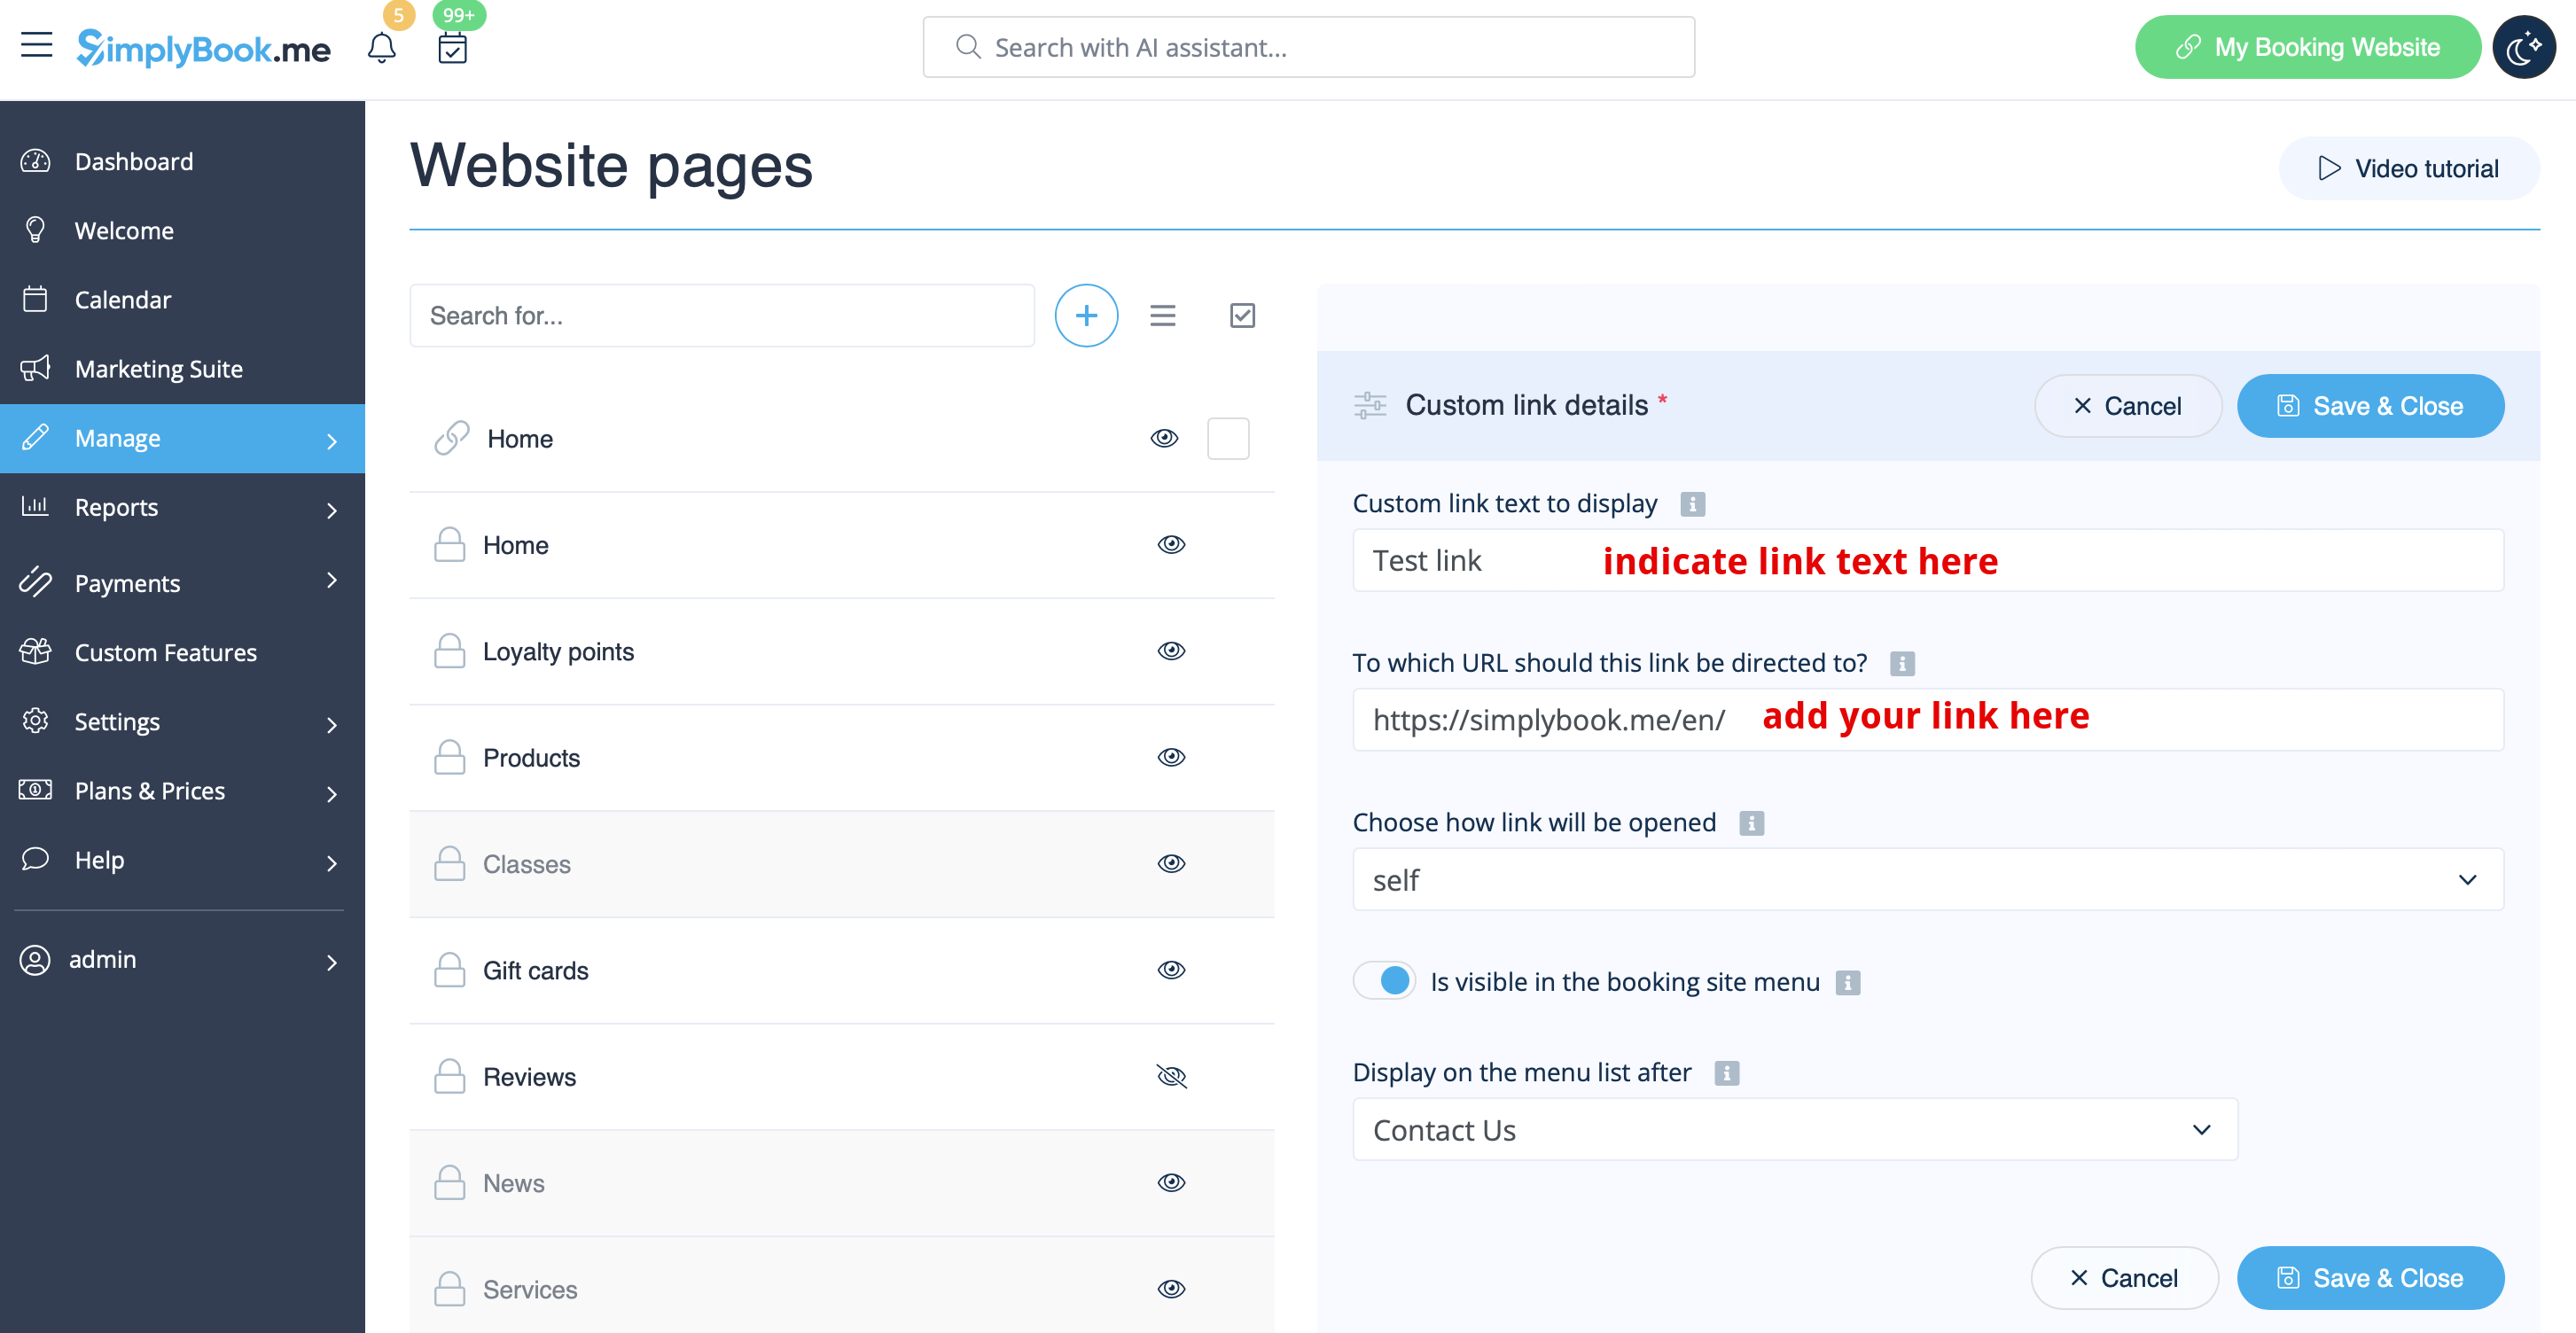
:2. | :2. Voer de titel die u in de koptekst van de boekingspagina wilt weergeven in het veld "Aangepaste linktekst weergeven" in en geef de link zelf op in het bijbehorende veld. | ||
[[File:Custom link main settings redesigned.png|1200px | center|link=https://help.simplybook.me/images/f/f9/Custom_link_main_settings_redesigned.png]] | [[File:Custom link main settings redesigned.png|1200px | center|link=https://help.simplybook.me/images/f/f9/Custom_link_main_settings_redesigned.png]] | ||
<br><br> | <br><br> | ||
:3. | :3. U kunt ook kiezen of de link in een nieuw browsertabblad of in hetzelfde tabblad moet worden geopend. <br> | ||
: | :Kies hiervoor "''zelf''" als u wilt dat de pagina in hetzelfde tabblad wordt geopend of "''leeg''" als u wilt dat deze in een apart tabblad wordt geopend in de instelling "Kies hoe de link wordt geopend". | ||
[[File:Custom link blank or self redesigned.png|1200px | center|link=https://help.simplybook.me/images/2/2b/Custom_link_blank_or_self_redesigned.png]] | [[File:Custom link blank or self redesigned.png|1200px | center|link=https://help.simplybook.me/images/2/2b/Custom_link_blank_or_self_redesigned.png]] | ||
<br><br> | <br><br> | ||
Revision as of 14:46, 19 May 2025

Met deze aangepaste functie kunt u uw eigen aangepaste statische pagina's toevoegen aan uw boekingswebsite, alle pagina's van de boekingssite in het hoofdmenu opnieuw ordenen, menu-items verbergen en aangepaste links toevoegen aan het hoofdmenu.
Hoe de optie voor het maken van pagina's te gebruiken
- 1. Schakel de functie "Aangepaste pagina" in op uw pagina Aangepaste functies -> Meer toevoegen aan de sectie Boekingssite.
- 2. Ga naar "Beheren" om de gewenste pagina's in te stellen.
- 3. Op de volgende pagina ziet u de tabbladen voor de systeemboekingspagina's.
- (De tabbladen die momenteel zijn uitgeschakeld, zijn grijs weergegeven.)
- Systeempagina's kunnen niet worden bewerkt in deze interface. U moet naar het betreffende gedeelte navigeren via de betreffende links.
- 4. U kunt de tabbladen opnieuw ordenen met de pijltjes en pagina's verbergen en weergeven met de oogpictogrammen.
- Let op: als u een pagina verbergt, blijft deze toegankelijk via een directe link.
- 5. Als u een nieuwe aangepaste pagina wilt toevoegen, klikt u op het pictogram '+' bovenaan en kiest u de optie 'Aangepaste pagina toevoegen'.
- 6. Aan de rechterkant verschijnt het menu voor het bouwen van pagina's. Voeg een titel en de gewenste pagina-inhoud toe.
- U kunt de ingebouwde HTML-editor gebruiken om elementen toe te voegen of, als u kennis hebt van HTML-codering, overschakelen naar de codemodus met het pictogram "</>".
- Let op: u moet de codemodus uitschakelen voordat u de pagina opslaat, zodat de code correct wordt opgeslagen.
Hoe links toevoegen
Het kan voorkomen dat u uw klanten naar een andere pagina moet doorverwijzen (bijv. uw website, enz.).
In dat geval kunt u gebruikmaken van "Link toevoegen aan menubalk".
- 1. Klik op het pictogram "+" bovenaan en kies de optie "Link toevoegen aan menubalk".
- 2. Voer de titel die u in de koptekst van de boekingspagina wilt weergeven in het veld "Aangepaste linktekst weergeven" in en geef de link zelf op in het bijbehorende veld.
- 3. U kunt ook kiezen of de link in een nieuw browsertabblad of in hetzelfde tabblad moet worden geopend.
- Kies hiervoor "zelf" als u wilt dat de pagina in hetzelfde tabblad wordt geopend of "leeg" als u wilt dat deze in een apart tabblad wordt geopend in de instelling "Kies hoe de link wordt geopend".