Created page with "|description=Téléchargez et stockez des fichiers directement sur Google Drive lors des réservations. Organisez vos documents en toute simplicité. Activez dès maintenant !" |
Created page with "left png <br><br>Activez cette fonctionnalité personnalisée pour permettre à vos clients de télécharger des documents signés ou d'autres informations directement sur votre compte Google Drive. <br><br> <span style="background-color:#ffe9e9; padding:5px; border-radius:5px;">'''Remarque importante !'''</span> *<span style="background-color:#ffe9e9; padding:5px; border-radius:5px;">Cette fonctionnalité n'est pas entièrement prise en c..." |
||
| Line 17: | Line 17: | ||
;Comment utiliser | ;Comment utiliser | ||
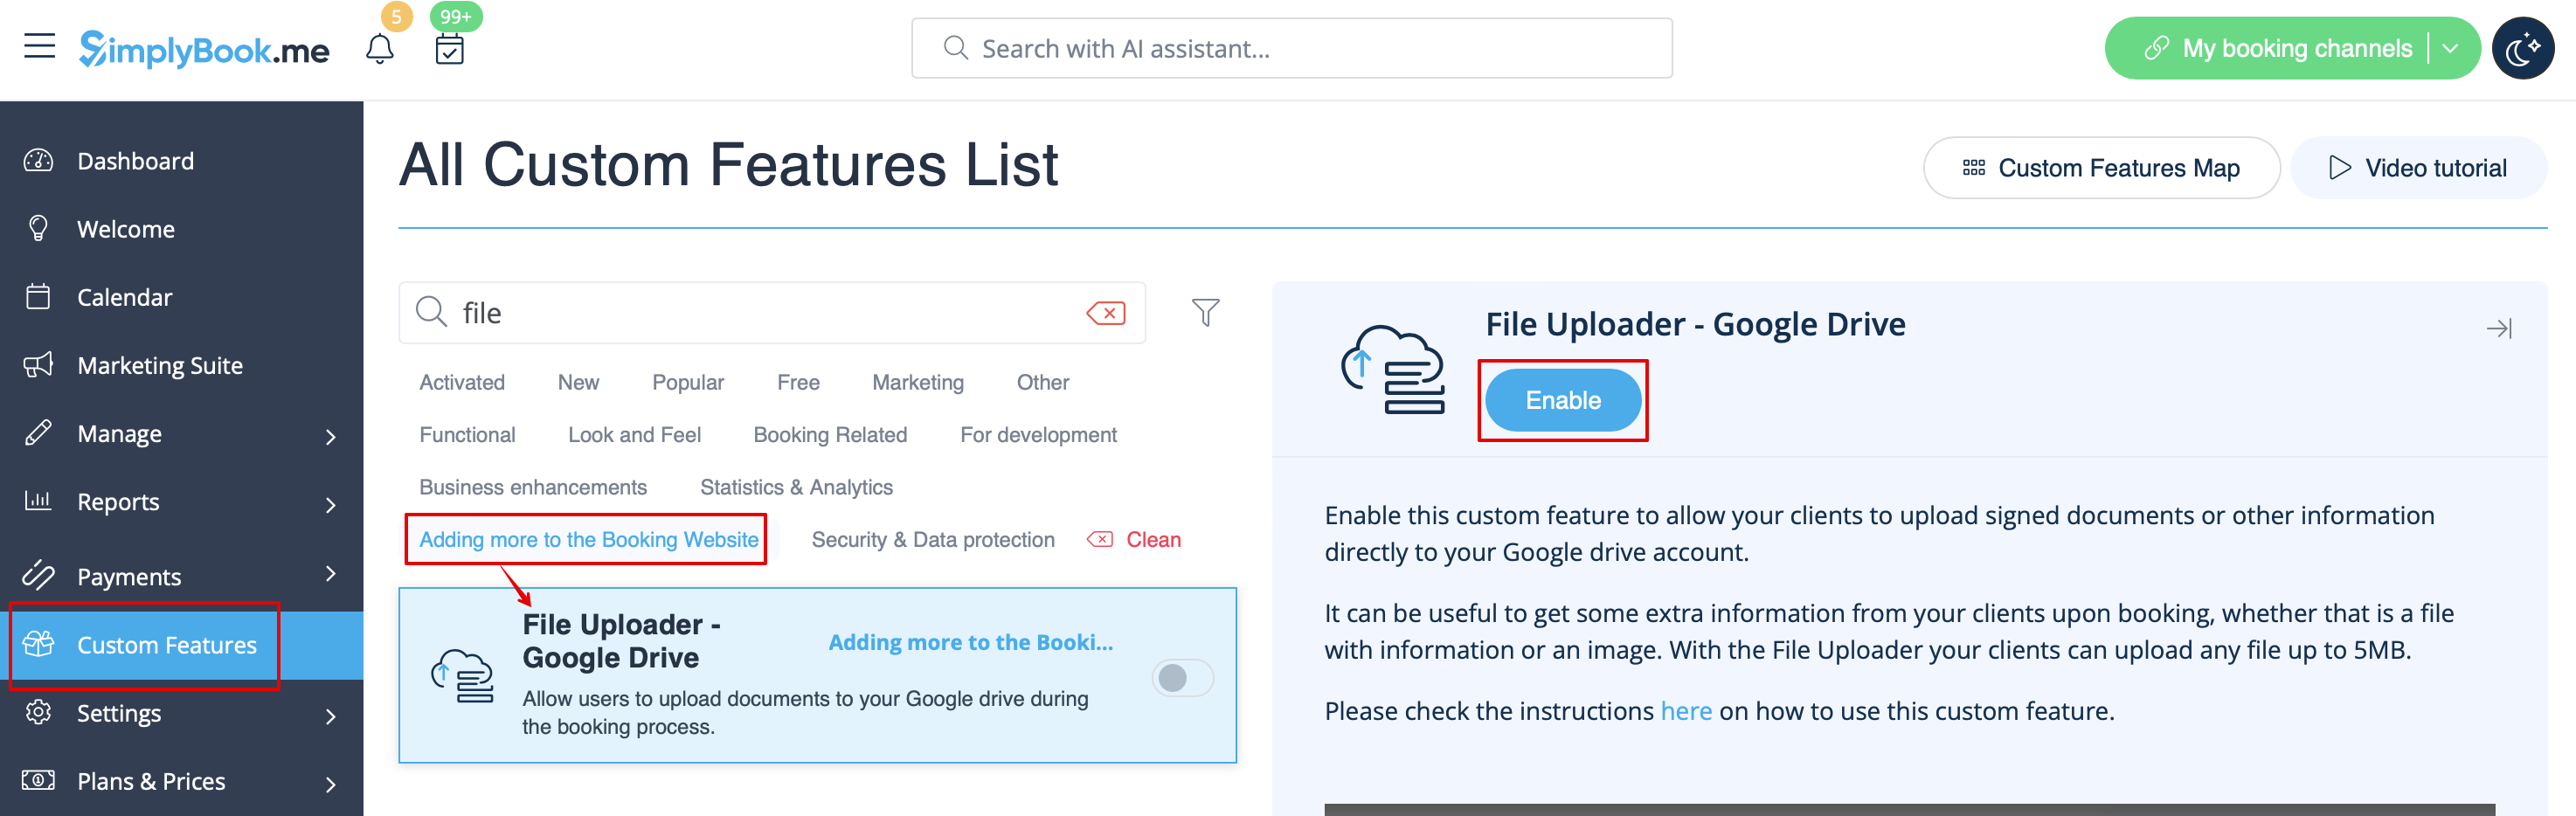
< | 1. Activez cette option sur votre page <span style="background-color:#d4f8e5; padding:5px; border-radius:5px;">Fonctionnalités personnalisées</span> -> <span style="background-color:#d4f8e5; padding:5px; border-radius:5px;">Ajouter d'autres éléments à la</span> catégorie <span style="background-color:#d4f8e5; padding:5px; border-radius:5px;">Site Web de réservation</span>. | ||
[[File:File upload enable path redesigned.png|1200px|center|link=https://help.simplybook.me/images/8/8c/File_upload_enable_path_redesigned.png]] | [[File:File upload enable path redesigned.png|1200px|center|link=https://help.simplybook.me/images/8/8c/File_upload_enable_path_redesigned.png]] | ||
<br><br> | <br><br> | ||
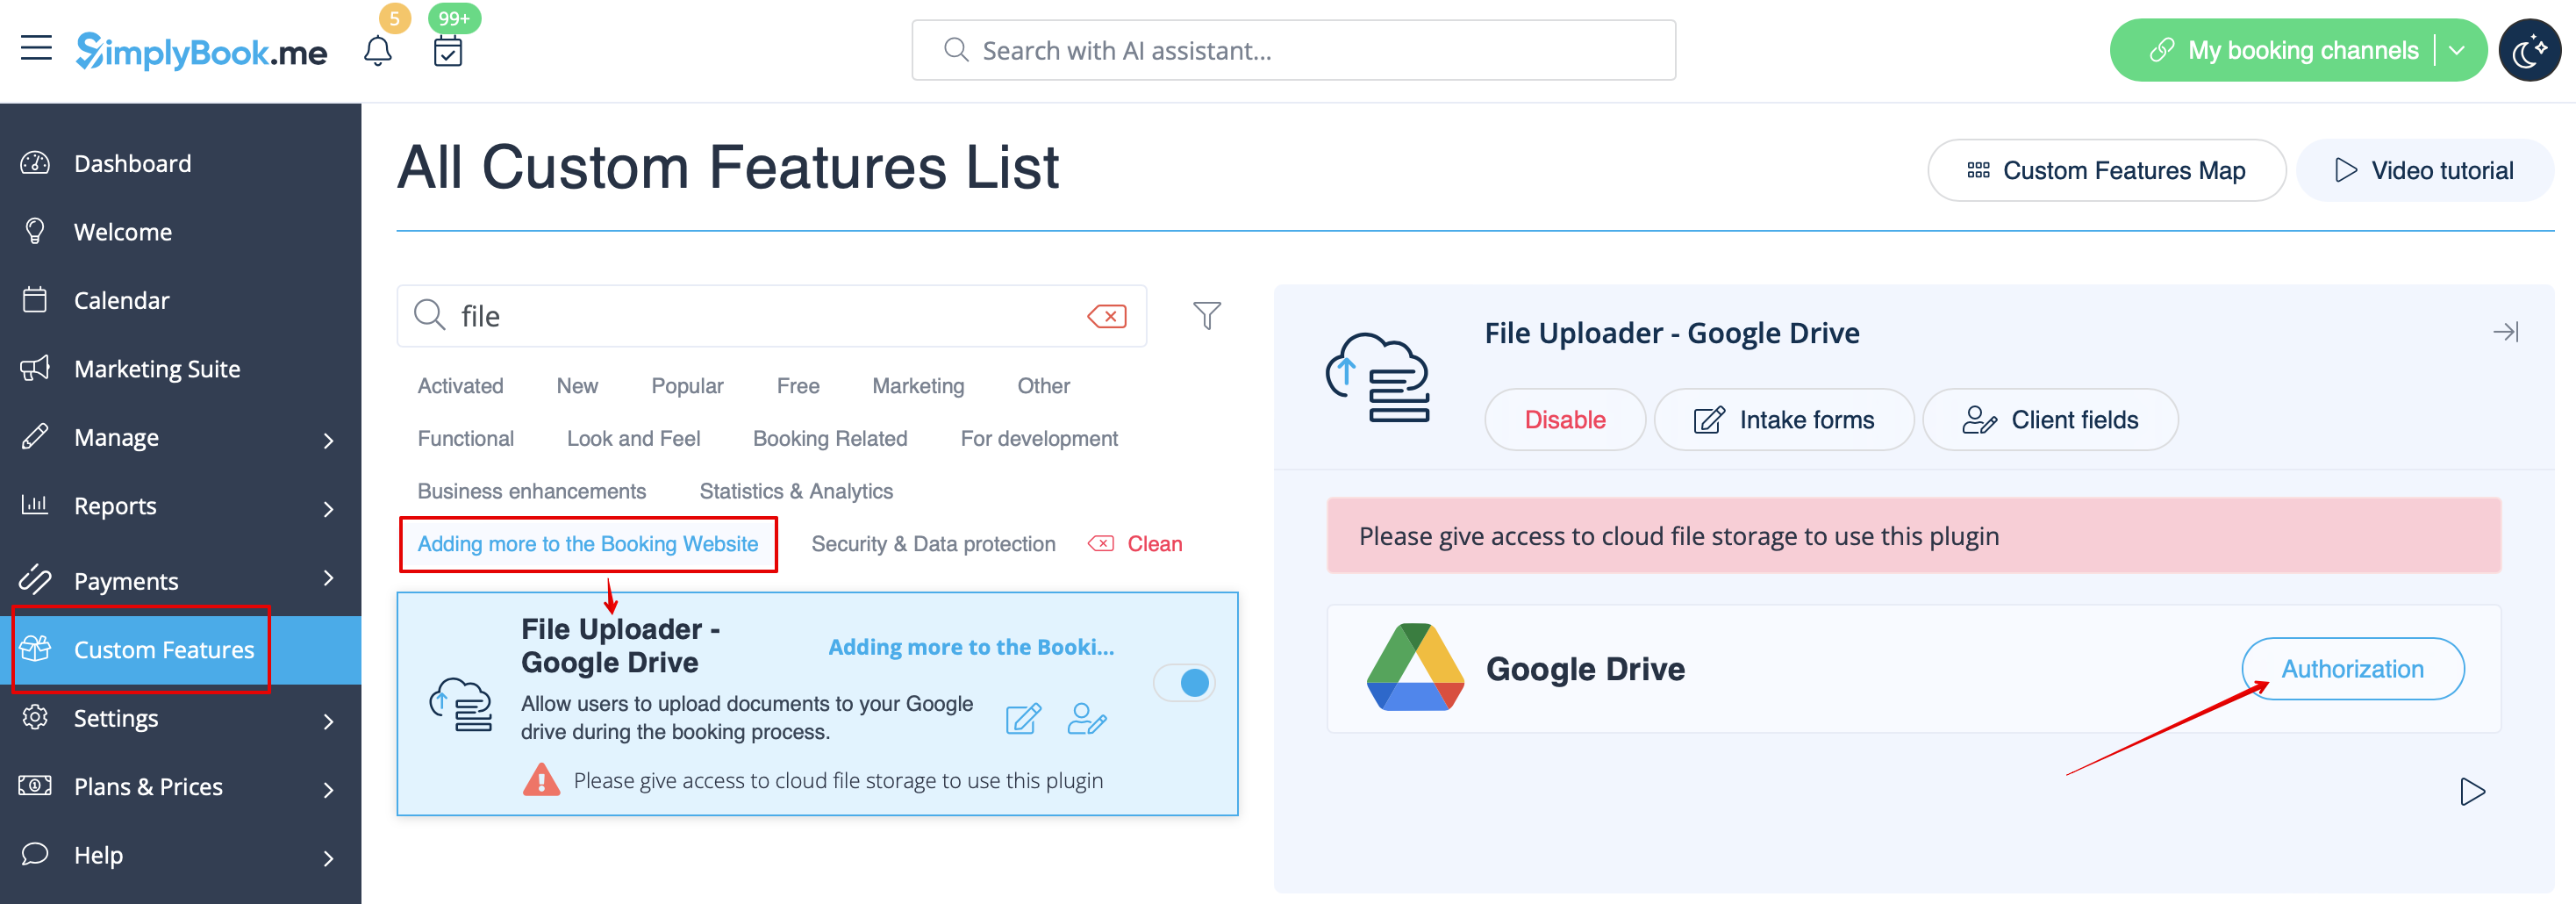
2. | 2. Sur le côté droit de la page, vous verrez ses paramètres. Cliquez sur <span style="background-color:#d4f8e5; padding:5px; border-radius:5px;">Autoriser</span> pour vous connecter à votre Google Drive et accordez les autorisations demandées. | ||
[[File:File uploader auth path redesigned.png|1200px|center|link=https://help.simplybook.me/images/2/2b/File_uploader_auth_path_redesigned.png]] | [[File:File uploader auth path redesigned.png|1200px|center|link=https://help.simplybook.me/images/2/2b/File_uploader_auth_path_redesigned.png]] | ||
<br><br> | <br><br> | ||
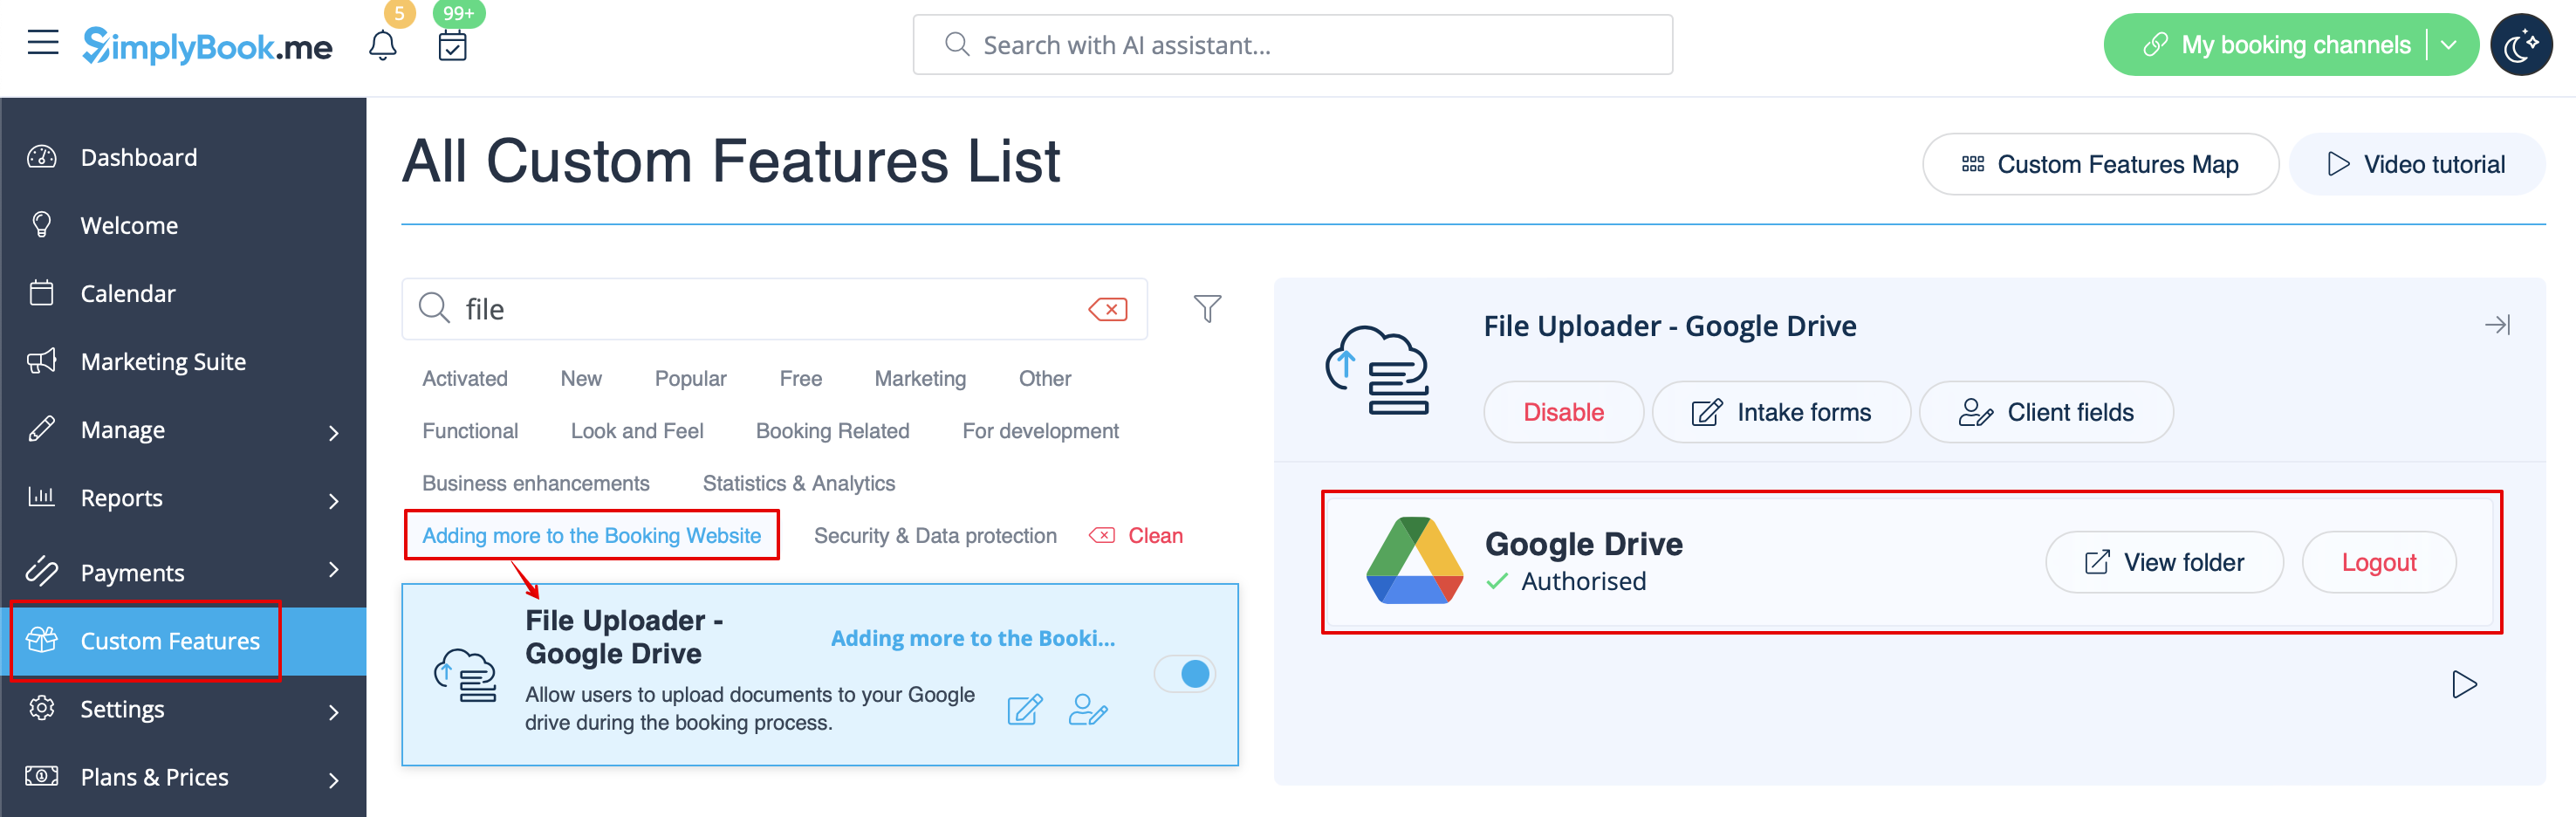
3. | 3. Une fois la connexion établie, vous pourrez voir son statut et utiliser le lien vers le dossier de fichiers sur votre Google Drive à partir de la même page Fonctionnalités personnalisées. | ||
[[File:File upload authorized redesigned.png|1200px|center|link=https://help.simplybook.me/images/1/11/File_upload_authorized_redesigned.png]] | [[File:File upload authorized redesigned.png|1200px|center|link=https://help.simplybook.me/images/1/11/File_upload_authorized_redesigned.png]] | ||
<br><br> | <br><br> | ||
4. | 4. Accédez à <span style="background-color:#d4f8e5; padding:5px; border-radius:5px;">Gérer</span> -> <span style="background-color:#cdeffc; padding:5px; border-radius:5px;">[[Special:MyLanguage/Intake_Forms_custom_feature|Formulaires d'admission]]</span> ou <span style="background-color:#d4f8e5; padding:5px; border-radius:5px;">Gérer</span> -> <span style="background-color:#cdeffc; padding:5px; border-radius:5px;">[[Special:MyLanguage/Client_Fields_Custom_Feature|Champs client]]</span> (ou activez l'une ou les deux fonctionnalités si nécessaire) et créez le formulaire <span style="background-color:#d4f8e5; padding:5px; border-radius:5px;">File Uploader - Google Drive</span>. | ||
Rendez-le obligatoire ou non selon vos besoins. | |||
[[File:File type for intake form redesigned.png|1200px|center|link=https://help.simplybook.me/images/d/d3/File_type_for_intake_form_redesigned.png]] | [[File:File type for intake form redesigned.png|1200px|center|link=https://help.simplybook.me/images/d/d3/File_type_for_intake_form_redesigned.png]] | ||
<br><br> | <br><br> | ||
5. | 5. Une fois que vous avez créé les formulaires souhaités, les clients pourront télécharger leurs fichiers pendant le processus de réservation <span style="background-color:#cdeffc; padding:5px; border-radius:5px;">([[Special:MyLanguage/Intake_Forms_custom_feature|Formulaires d'inscription]])</span> | ||
[[File:Cloud storage client side booking form.png|1200px|center]] | [[File:Cloud storage client side booking form.png|1200px|center]] | ||
<br><br> | <br><br> | ||
ou s'inscrire <span style="background-color:#cdeffc; padding:5px; border-radius:5px;">([[Special:MyLanguage/Client_Fields_Custom_Feature|Champs client]])</span> | |||
[[File:Cloud storage client side sign up.png|1200px|center]] | [[File:Cloud storage client side sign up.png|1200px|center]] | ||
<br><br> | <br><br> | ||
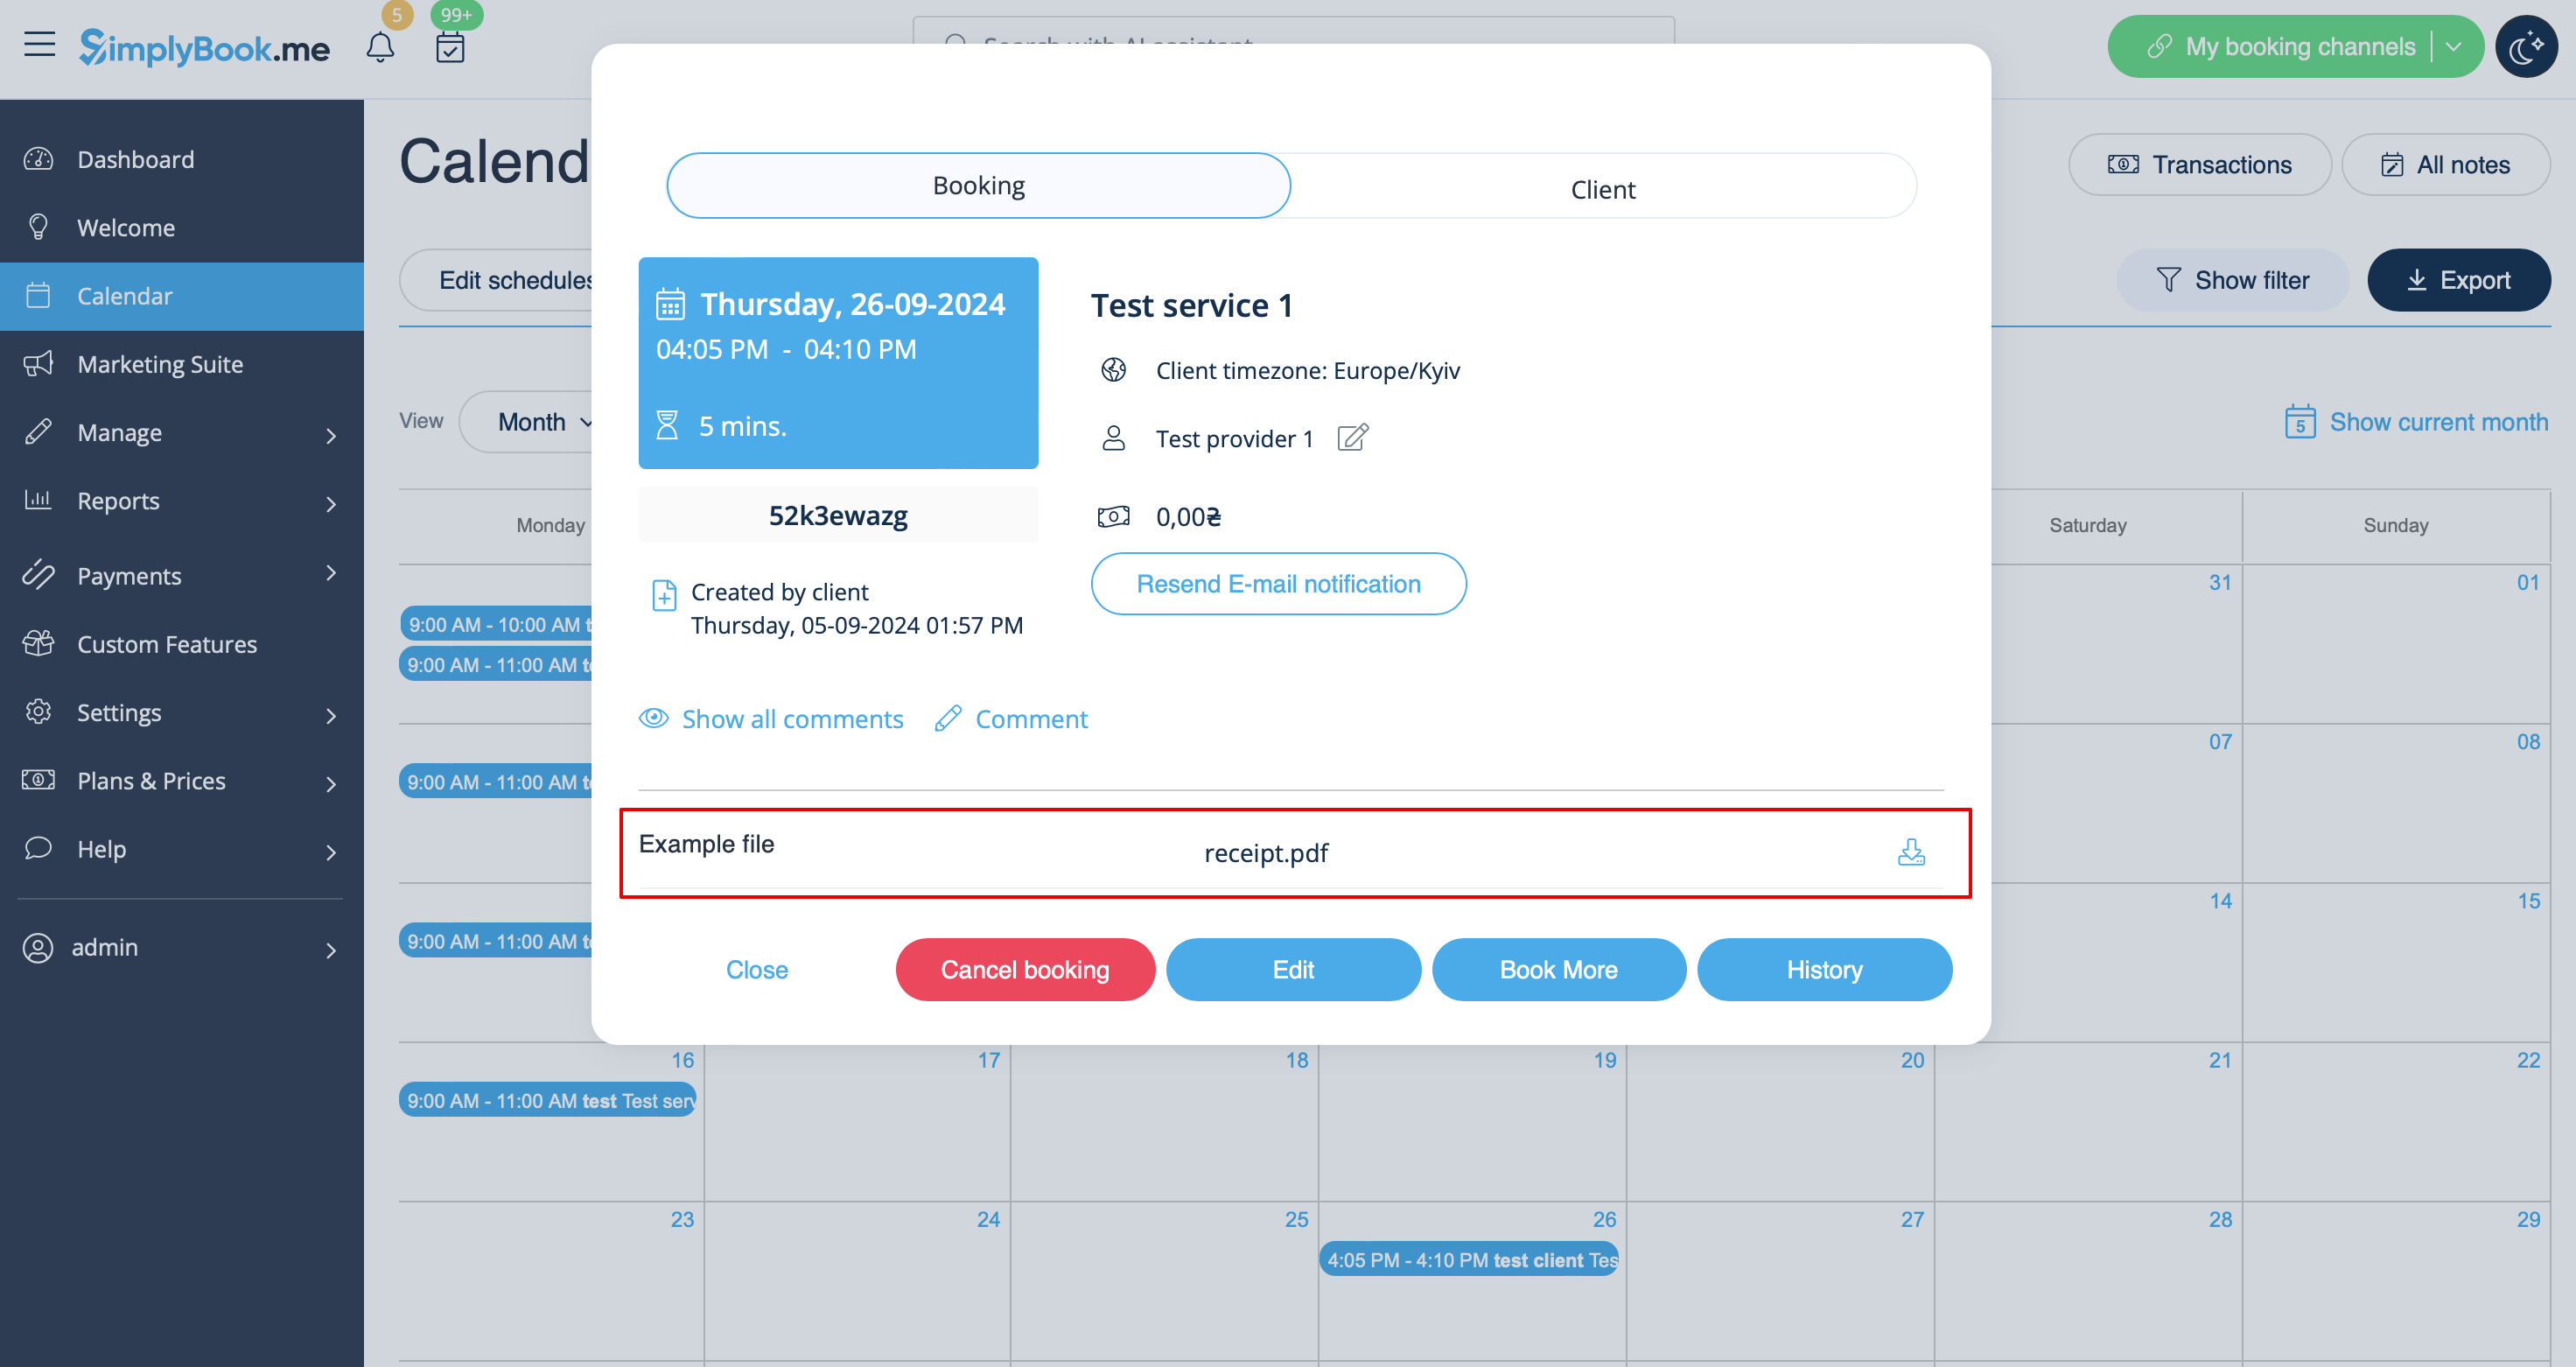
6. | 6. Du côté administrateur, vous pourrez voir et télécharger les fichiers soit <span style="background-color:#d4f8e5; padding:5px; border-radius:5px;">dans la fenêtre contextuelle de réservation</span> sur la page Calendrier s'il s'agit d'un <span style="background-color:#cdeffc; padding:5px; border-radius:5px;">[[Special:MyLanguage/Intake_Forms_custom_feature|formulaire d'inscription]]</span> | ||
[[File:View file in intake form in booking redesigned.png|1200px|center|link=https://help.simplybook.me/images/a/a9/View_file_in_intake_form_in_booking_redesigned.png]] | [[File:View file in intake form in booking redesigned.png|1200px|center|link=https://help.simplybook.me/images/a/a9/View_file_in_intake_form_in_booking_redesigned.png]] | ||
<br><br> | <br><br> | ||
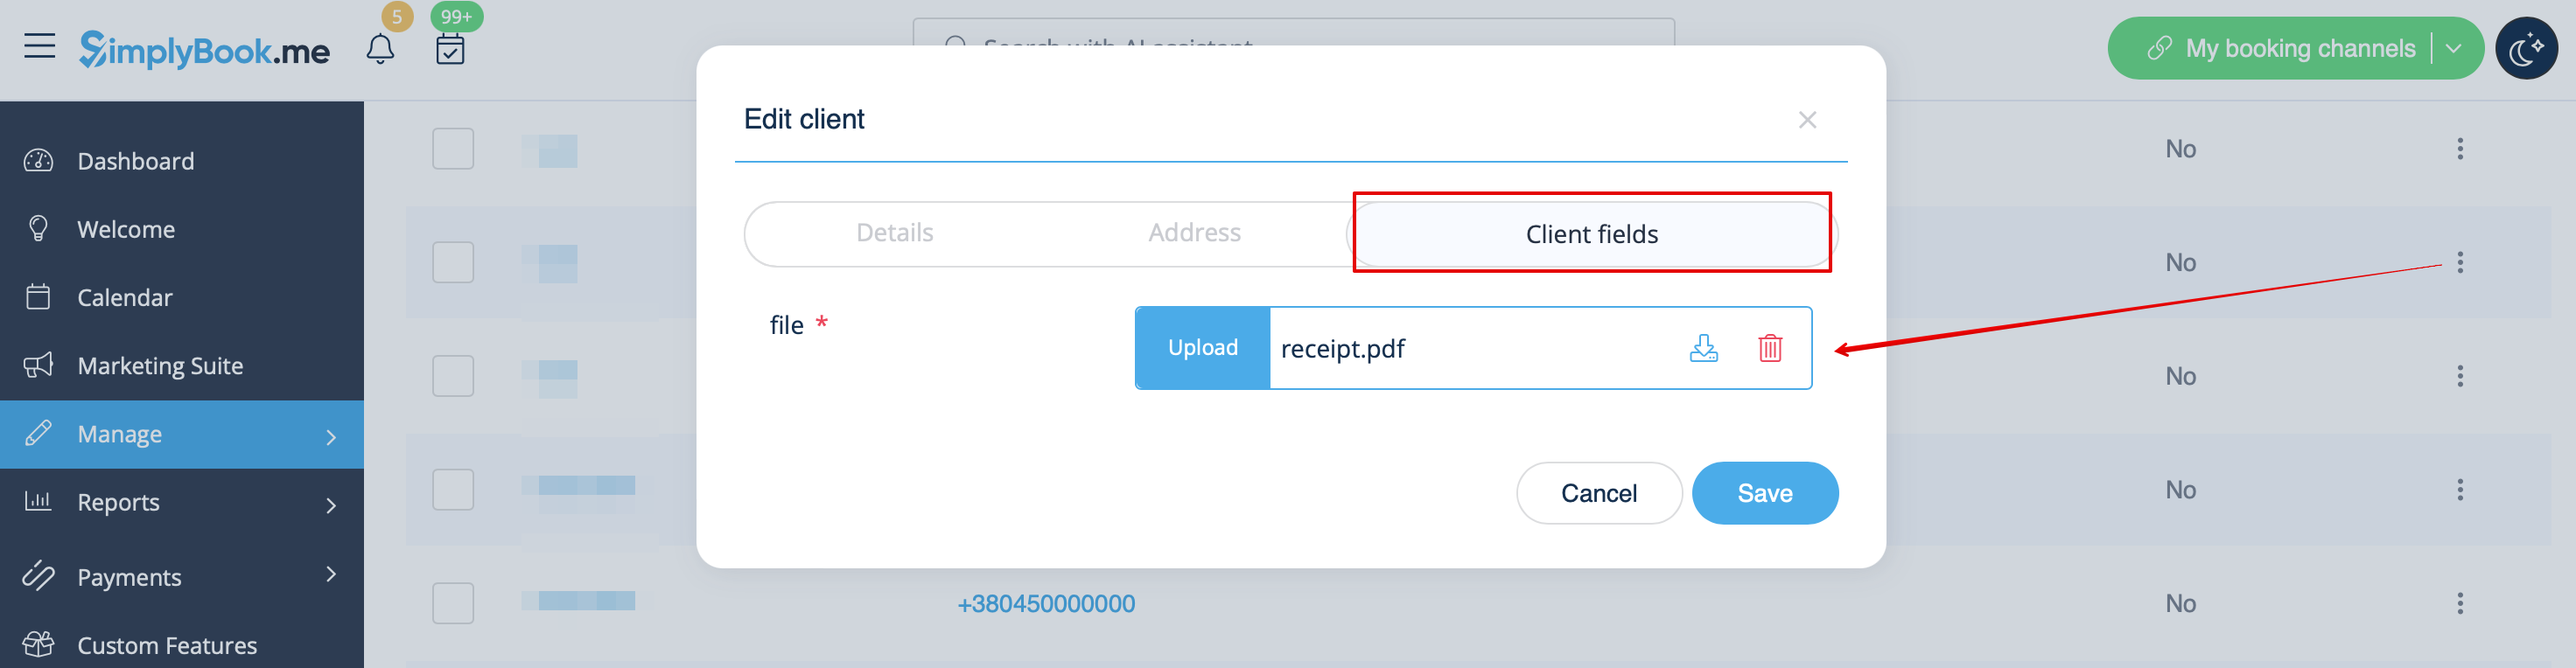
ou depuis <span style="background-color:#d4f8e5; padding:5px; border-radius:5px;">Gérer</span> -> <span style="background-color:#d4f8e5; padding:5px; border-radius:5px;">Clients</span> -> <span style="background-color:#d4f8e5; padding:5px; border-radius:5px;">modifier la fiche client</span> si vous l'avez enregistrée dans les <span style="background-color:#cdeffc; padding:5px; border-radius:5px;">[[Special:MyLanguage/Client_Fields_Custom_Feature|champs client]].</span> | |||
[[File:Client filed file in client profile redesigned.png|1200px|center|link=https://help.simplybook.me/images/5/50/Client_filed_file_in_client_profile_redesigned.png]] | [[File:Client filed file in client profile redesigned.png|1200px|center|link=https://help.simplybook.me/images/5/50/Client_filed_file_in_client_profile_redesigned.png]] | ||
<br><br> | <br><br> | ||
Et, bien sûr, vous pourrez télécharger manuellement les fichiers lors de la nouvelle réservation ou de la création/modification de la fiche client depuis le côté administrateur si nécessaire. | |||
<br><br> | <br><br> | ||
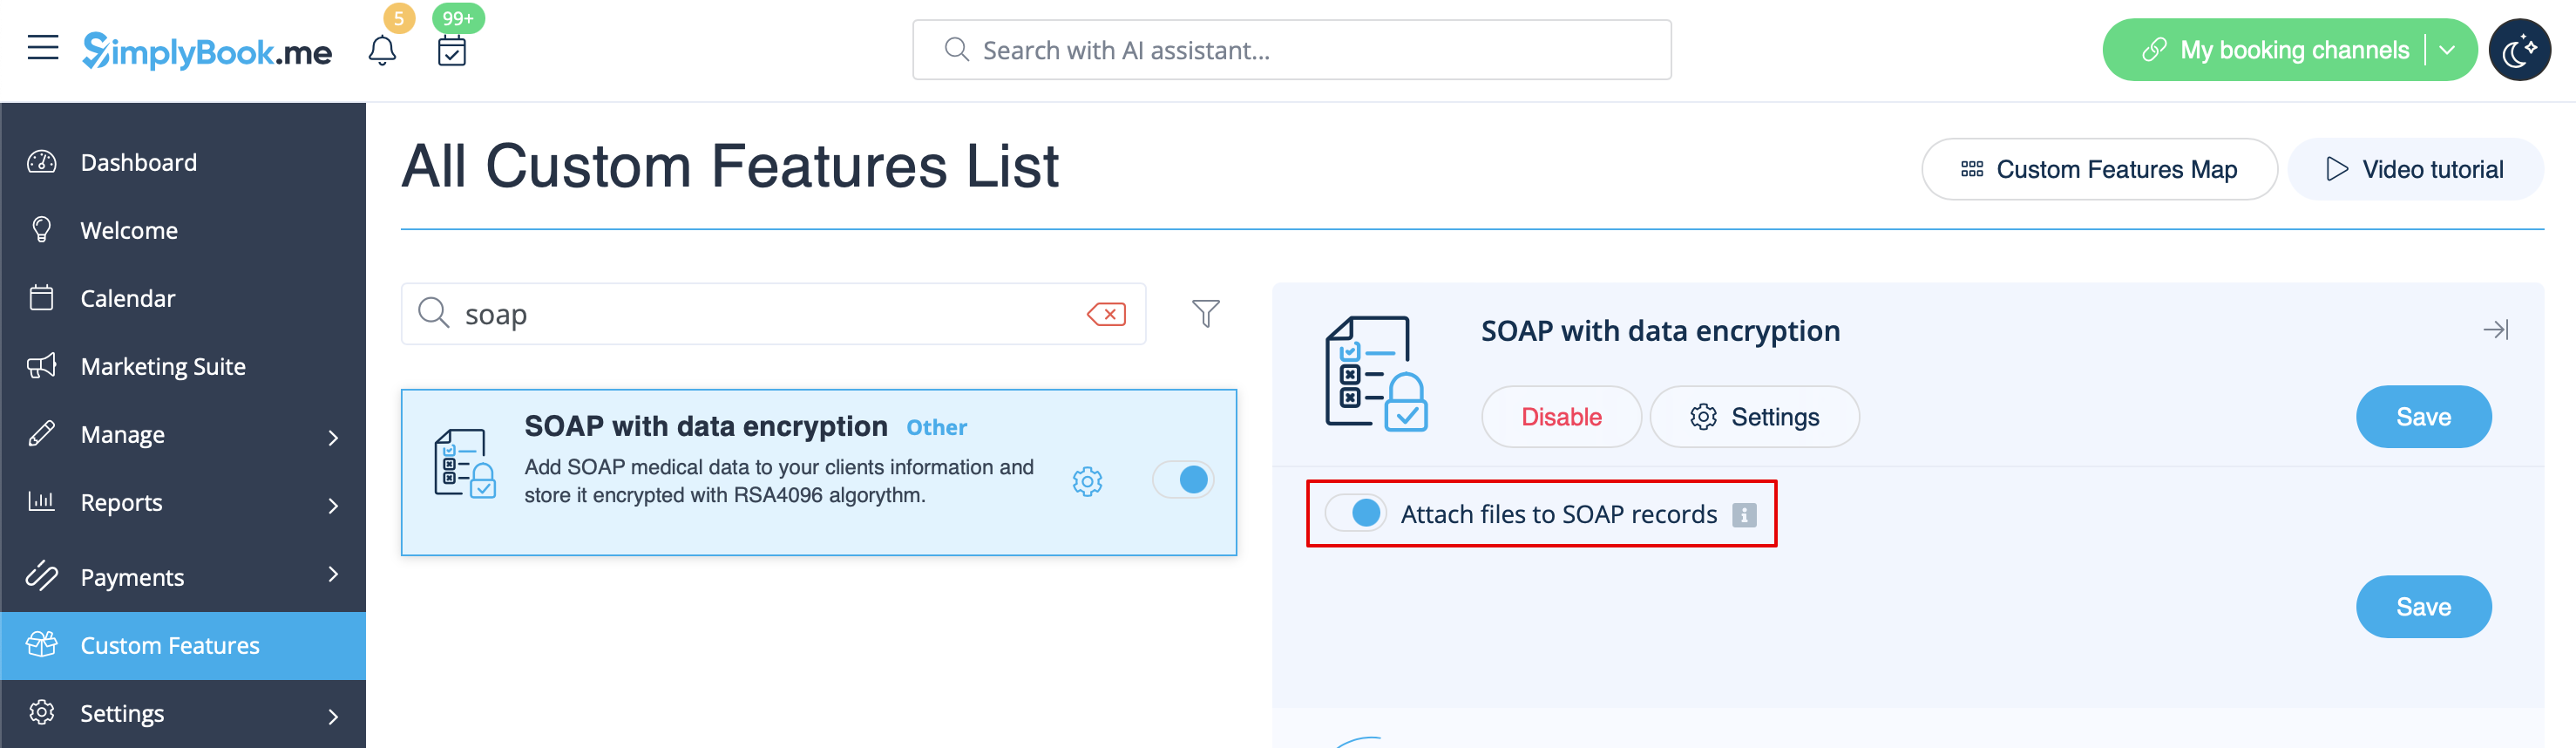
7. | 7. Si vous utilisez également la fonctionnalité personnalisée <span style="background-color:#cdeffc; padding:5px; border-radius:5px;">[[Special:MyLanguage/SOAP_with_Encryption_custom_feature| SOAP avec cryptage]]</span>, vous pouvez également activer la possibilité de joindre le fichier dans les paramètres de la fonctionnalité SOAP sur votre page Fonctionnalités personnalisées. | ||
[[File:Attach files to soap enable redesigned.png|1200px|border|center|link=https://help.simplybook.me/images/0/06/Attach_files_to_soap_enable_redesigned.png]] | [[File:Attach files to soap enable redesigned.png|1200px|border|center|link=https://help.simplybook.me/images/0/06/Attach_files_to_soap_enable_redesigned.png]] | ||
<br><br> | <br><br> | ||
Vous disposerez alors du formulaire correspondant dans <span style="background-color:#d4f8e5; padding:5px; border-radius:5px;">Gérer</span> -> <span style="background-color:#d4f8e5; padding:5px; border-radius:5px;">Clients</span> -> <span style="background-color:#d4f8e5; padding:5px; border-radius:5px;">Infos SOAP</span> -> <span style="background-color:#d4f8e5; padding:5px; border-radius:5px;">Joindre un fichier.</span> | |||
[[File:File in soap in edit clirent form redesigned.png|1200px|border|center|link=https://help.simplybook.me/images/1/1d/File_in_soap_in_edit_clirent_form_redesigned.png]] | [[File:File in soap in edit clirent form redesigned.png|1200px|border|center|link=https://help.simplybook.me/images/1/1d/File_in_soap_in_edit_clirent_form_redesigned.png]] | ||
<br><br><br><br> | <br><br><br><br> | ||
Revision as of 14:59, 19 May 2025
png
Activez cette fonctionnalité personnalisée pour permettre à vos clients de télécharger des documents signés ou d'autres informations directement sur votre compte Google Drive.
Remarque importante !
- Cette fonctionnalité n'est pas entièrement prise en charge dans l'application d'administration. Si vous l'utilisez et que vous devez créer des réservations à partir de là, veuillez rendre les champs de fichier facultatifs, car il n'est actuellement pas possible de télécharger des fichiers dans l'application. Cependant, vous pourrez voir les noms des fichiers dans les rendez-vous déjà créés.
- Le fichier téléchargé doit être inférieur à 5 Mo et ne peut pas être un fichier archive ou exécutable.
- Comment utiliser
1. Activez cette option sur votre page Fonctionnalités personnalisées -> Ajouter d'autres éléments à la catégorie Site Web de réservation.
2. Sur le côté droit de la page, vous verrez ses paramètres. Cliquez sur Autoriser pour vous connecter à votre Google Drive et accordez les autorisations demandées.
3. Une fois la connexion établie, vous pourrez voir son statut et utiliser le lien vers le dossier de fichiers sur votre Google Drive à partir de la même page Fonctionnalités personnalisées.
4. Accédez à Gérer -> Formulaires d'admission ou Gérer -> Champs client (ou activez l'une ou les deux fonctionnalités si nécessaire) et créez le formulaire File Uploader - Google Drive.
Rendez-le obligatoire ou non selon vos besoins.

5. Une fois que vous avez créé les formulaires souhaités, les clients pourront télécharger leurs fichiers pendant le processus de réservation (Formulaires d'inscription)

ou s'inscrire (Champs client)

6. Du côté administrateur, vous pourrez voir et télécharger les fichiers soit dans la fenêtre contextuelle de réservation sur la page Calendrier s'il s'agit d'un formulaire d'inscription
ou depuis Gérer -> Clients -> modifier la fiche client si vous l'avez enregistrée dans les champs client.
Et, bien sûr, vous pourrez télécharger manuellement les fichiers lors de la nouvelle réservation ou de la création/modification de la fiche client depuis le côté administrateur si nécessaire.
7. Si vous utilisez également la fonctionnalité personnalisée SOAP avec cryptage, vous pouvez également activer la possibilité de joindre le fichier dans les paramètres de la fonctionnalité SOAP sur votre page Fonctionnalités personnalisées.
Vous disposerez alors du formulaire correspondant dans Gérer -> Clients -> Infos SOAP -> Joindre un fichier.
