From SimplyBook.me
No edit summary |
No edit summary |
||
| Line 1: | Line 1: | ||
====How to import clients==== | ====How to import clients==== | ||
:1. Prepare your Excel file. | <br><br> | ||
:1. Enable "Import Clients" custom feature on your Custom features page: | |||
[[File:Import clients plugin enable.png | center]] | |||
<br><br> | |||
:2. Prepare your Excel file. | |||
:- No text above the list of clients should be written | :- No text above the list of clients should be written | ||
:- Make sure all cells are correctly displayed | :- Make sure all cells are correctly displayed | ||
:- Save file in .csv format with comma separation. | :- Save file in .csv format with comma separation. | ||
<br><br> | |||
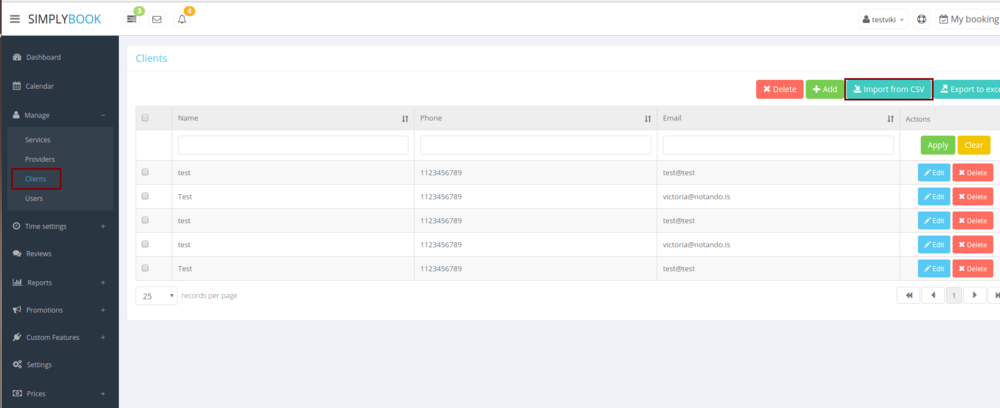
: | :3. Go to Manage//Clients//Import from CSV. | ||
[[ File:Import clients2.png| center]] | [[ File:Import clients2.png| center]] | ||
<br><br> | <br><br> | ||
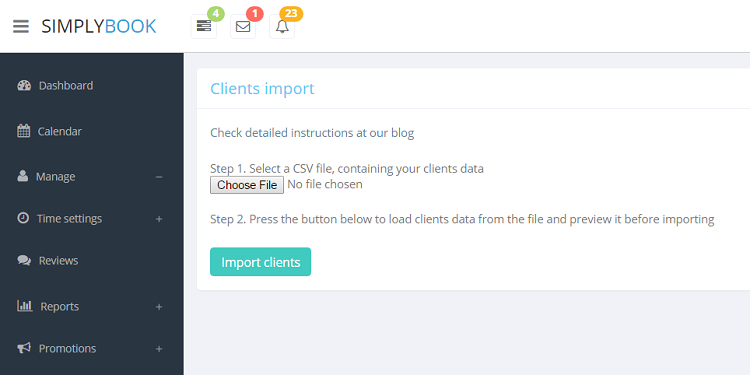
: | :4. Press "Choose file" and select the prepared file. | ||
[[File:Choose file.png| center]] | [[File:Choose file.png| center]] | ||
<br><br> | <br><br> | ||
: | :5. Assign values to the columns from drop-down lists in the upper bar (above each column, marked with black arrows). Assign "name", "email" and "phone". | ||
[[File:Import clients file2.png| center]] | [[File:Import clients file2.png| center]] | ||
<br><br> | <br><br> | ||
: | :6. Press "confirm import". | ||
:''Please note that only 10 clients will be shown in preview, but after you import, all clients will be shown.'' | :''Please note that only 10 clients will be shown in preview, but after you import, all clients will be shown.'' | ||
<br><br> | <br><br> | ||
| Line 21: | Line 25: | ||
:2. There is some text above the data that prevents successful import. Please delete the text.<br/> | :2. There is some text above the data that prevents successful import. Please delete the text.<br/> | ||
:3. Values are not assigned. Use drop-down menus above the columns to assign values "name", "email", "phone", etc. | :3. Values are not assigned. Use drop-down menus above the columns to assign values "name", "email", "phone", etc. | ||
<br><br> | |||
Revision as of 12:46, 17 October 2017
How to import clients
- 1. Enable "Import Clients" custom feature on your Custom features page:

- 2. Prepare your Excel file.
- - No text above the list of clients should be written
- - Make sure all cells are correctly displayed
- - Save file in .csv format with comma separation.
- 3. Go to Manage//Clients//Import from CSV.

- 4. Press "Choose file" and select the prepared file.

- 5. Assign values to the columns from drop-down lists in the upper bar (above each column, marked with black arrows). Assign "name", "email" and "phone".

- 6. Press "confirm import".
- Please note that only 10 clients will be shown in preview, but after you import, all clients will be shown.
- If you can't import clients, please check the possible reasons
- 1. Format of .csv file is incorrect. It should be saved in .csv with comma or tab separation.
- 2. There is some text above the data that prevents successful import. Please delete the text.
- 3. Values are not assigned. Use drop-down menus above the columns to assign values "name", "email", "phone", etc.