Created page with "AI Voice Booking" Tags: Mobile edit Mobile web edit |
Created page with "Tilføj en AI-drevet bookingoplevelse til dit website og dine beskedkanaler. Assistenten indsamler bookingoplysninger, kontrollerer tilgængeligheden af tider og opretter reservationer automatisk.
Et alt-i-én AI-bookingmodul, der forbinder din assistent med dit website og dine beskedkanaler for at modtage bookinger samt sende bekræftelser og påmindelser. Konfigurer integrationer (Facebook Messenger, WhatsApp, web-widget) og grundlæggende indstillinger, og begynd de..." |
||
| Line 1: | Line 1: | ||
<languages/> | <languages/> | ||
[[File:Ai icon.png|left]] | [[File:Ai icon.png|left]] | ||
Tilføj en AI-drevet bookingoplevelse til dit website og dine beskedkanaler. Assistenten indsamler bookingoplysninger, kontrollerer tilgængeligheden af tider og opretter reservationer automatisk.
Et alt-i-én AI-bookingmodul, der forbinder din assistent med dit website og dine beskedkanaler for at modtage bookinger samt sende bekræftelser og påmindelser. Konfigurer integrationer (Facebook Messenger, WhatsApp, web-widget) og grundlæggende indstillinger, og begynd derefter at acceptere reservationer automatisk.
<br><br>
;Sådan bruges funktionen: | |||
Aktivér funktionen på siden Brugerdefinerede funktioner -> Andet -> AI-stemmebooking.<br>
[[File:Ai voice booking enable path.png|1200px|center|link=https://help.simplybook.me/images/1/17/Ai_voice_booking_enable_path.png
]]
<br><br> | |||
Få gratis prøvecredits der eller køb flere AI-bookingcredits på siden Planer & Priser -> Ekstra elementer <br>
<br><br> | |||
<br><br> | Du kan se antallet af resterende credits på Dashboard-siden eller i Kontooplysninger.<br>
[[File:Ai credits balance.png|1200px|center|link=https://help.simplybook.me/images/8/8c/Ai_credits_balance.png
]]
<br><br> | ||
; | Gå tilbage til Brugerdefinerede funktioner -> Andet -> AI-stemmebooking for at justere præferencer for AI-stemme, model og e-mailbekræftelsestekst.<br>
[[File:Ai main configuration.png|1200px|center|link=https://help.simplybook.me/images/4/47/Ai_main_configuration.png
]]
<br><br> | ||
Vælg nu, hvor AI-booking skal være tilgængelig for dine kunder.
<br><br><br><br> | |||
[[File:Ai voice booking enable path.png|1200px|center|link=https://help.simplybook.me/images/1/17/Ai_voice_booking_enable_path. | ==Widget / Bookingside== | ||
<br><br> | Når credits er købt, tilføjes AI-chatwidgetten automatisk til din bookingside. Kunder kan sende tekst- eller talebeskeder for at gennemføre bookingprocessen med hjælp fra AI.
<br><br> | ||
Hvis du har dit eget website, kan du også tilføje AI-bookingwidgetten der. Gå blot til ‘’’Widgetindstillinger’’’, vælg de ønskede farver, og klik på “Gem & få widgetkode” for at generere koden.
[[File:Ai widget settings path.png|1200px|center|link=https://help.simplybook.me/images/d/d4/Ai_widget_settings_path.png
]]
[[File:Ai widget settings view & get code.png|1200px|center|link=https://help.simplybook.me/images/4/43/Ai_widget_settings_view_%26_get_code.png
]]
<br><br> | |||
<br><br> | Gå til din website-editor, og indsæt koden på den side, hvor AI-bookingwidgetten skal være tilgængelig. Det er det hele.
<br><br><br><br> | ||
==WhatsApp AI-booking== | |||
[[File:Ai credits balance.png|1200px|center|link=https://help.simplybook.me/images/8/8c/Ai_credits_balance. | Gå til https://developers.facebook.com/apps/
og klik på “Create App”:
[[File:Create sb app step 1.png|1200px|center|link=https://help.simplybook.me/images/9/9c/Create_sb_app_step_1.png
]]
<br><br> | ||
<br><br> | Indtast de ønskede app-oplysninger:
[[File:Add app name step2.png|1200px|center|link=https://help.simplybook.me/images/d/db/Add_app_name_step2.png
]]
<br><br> | ||
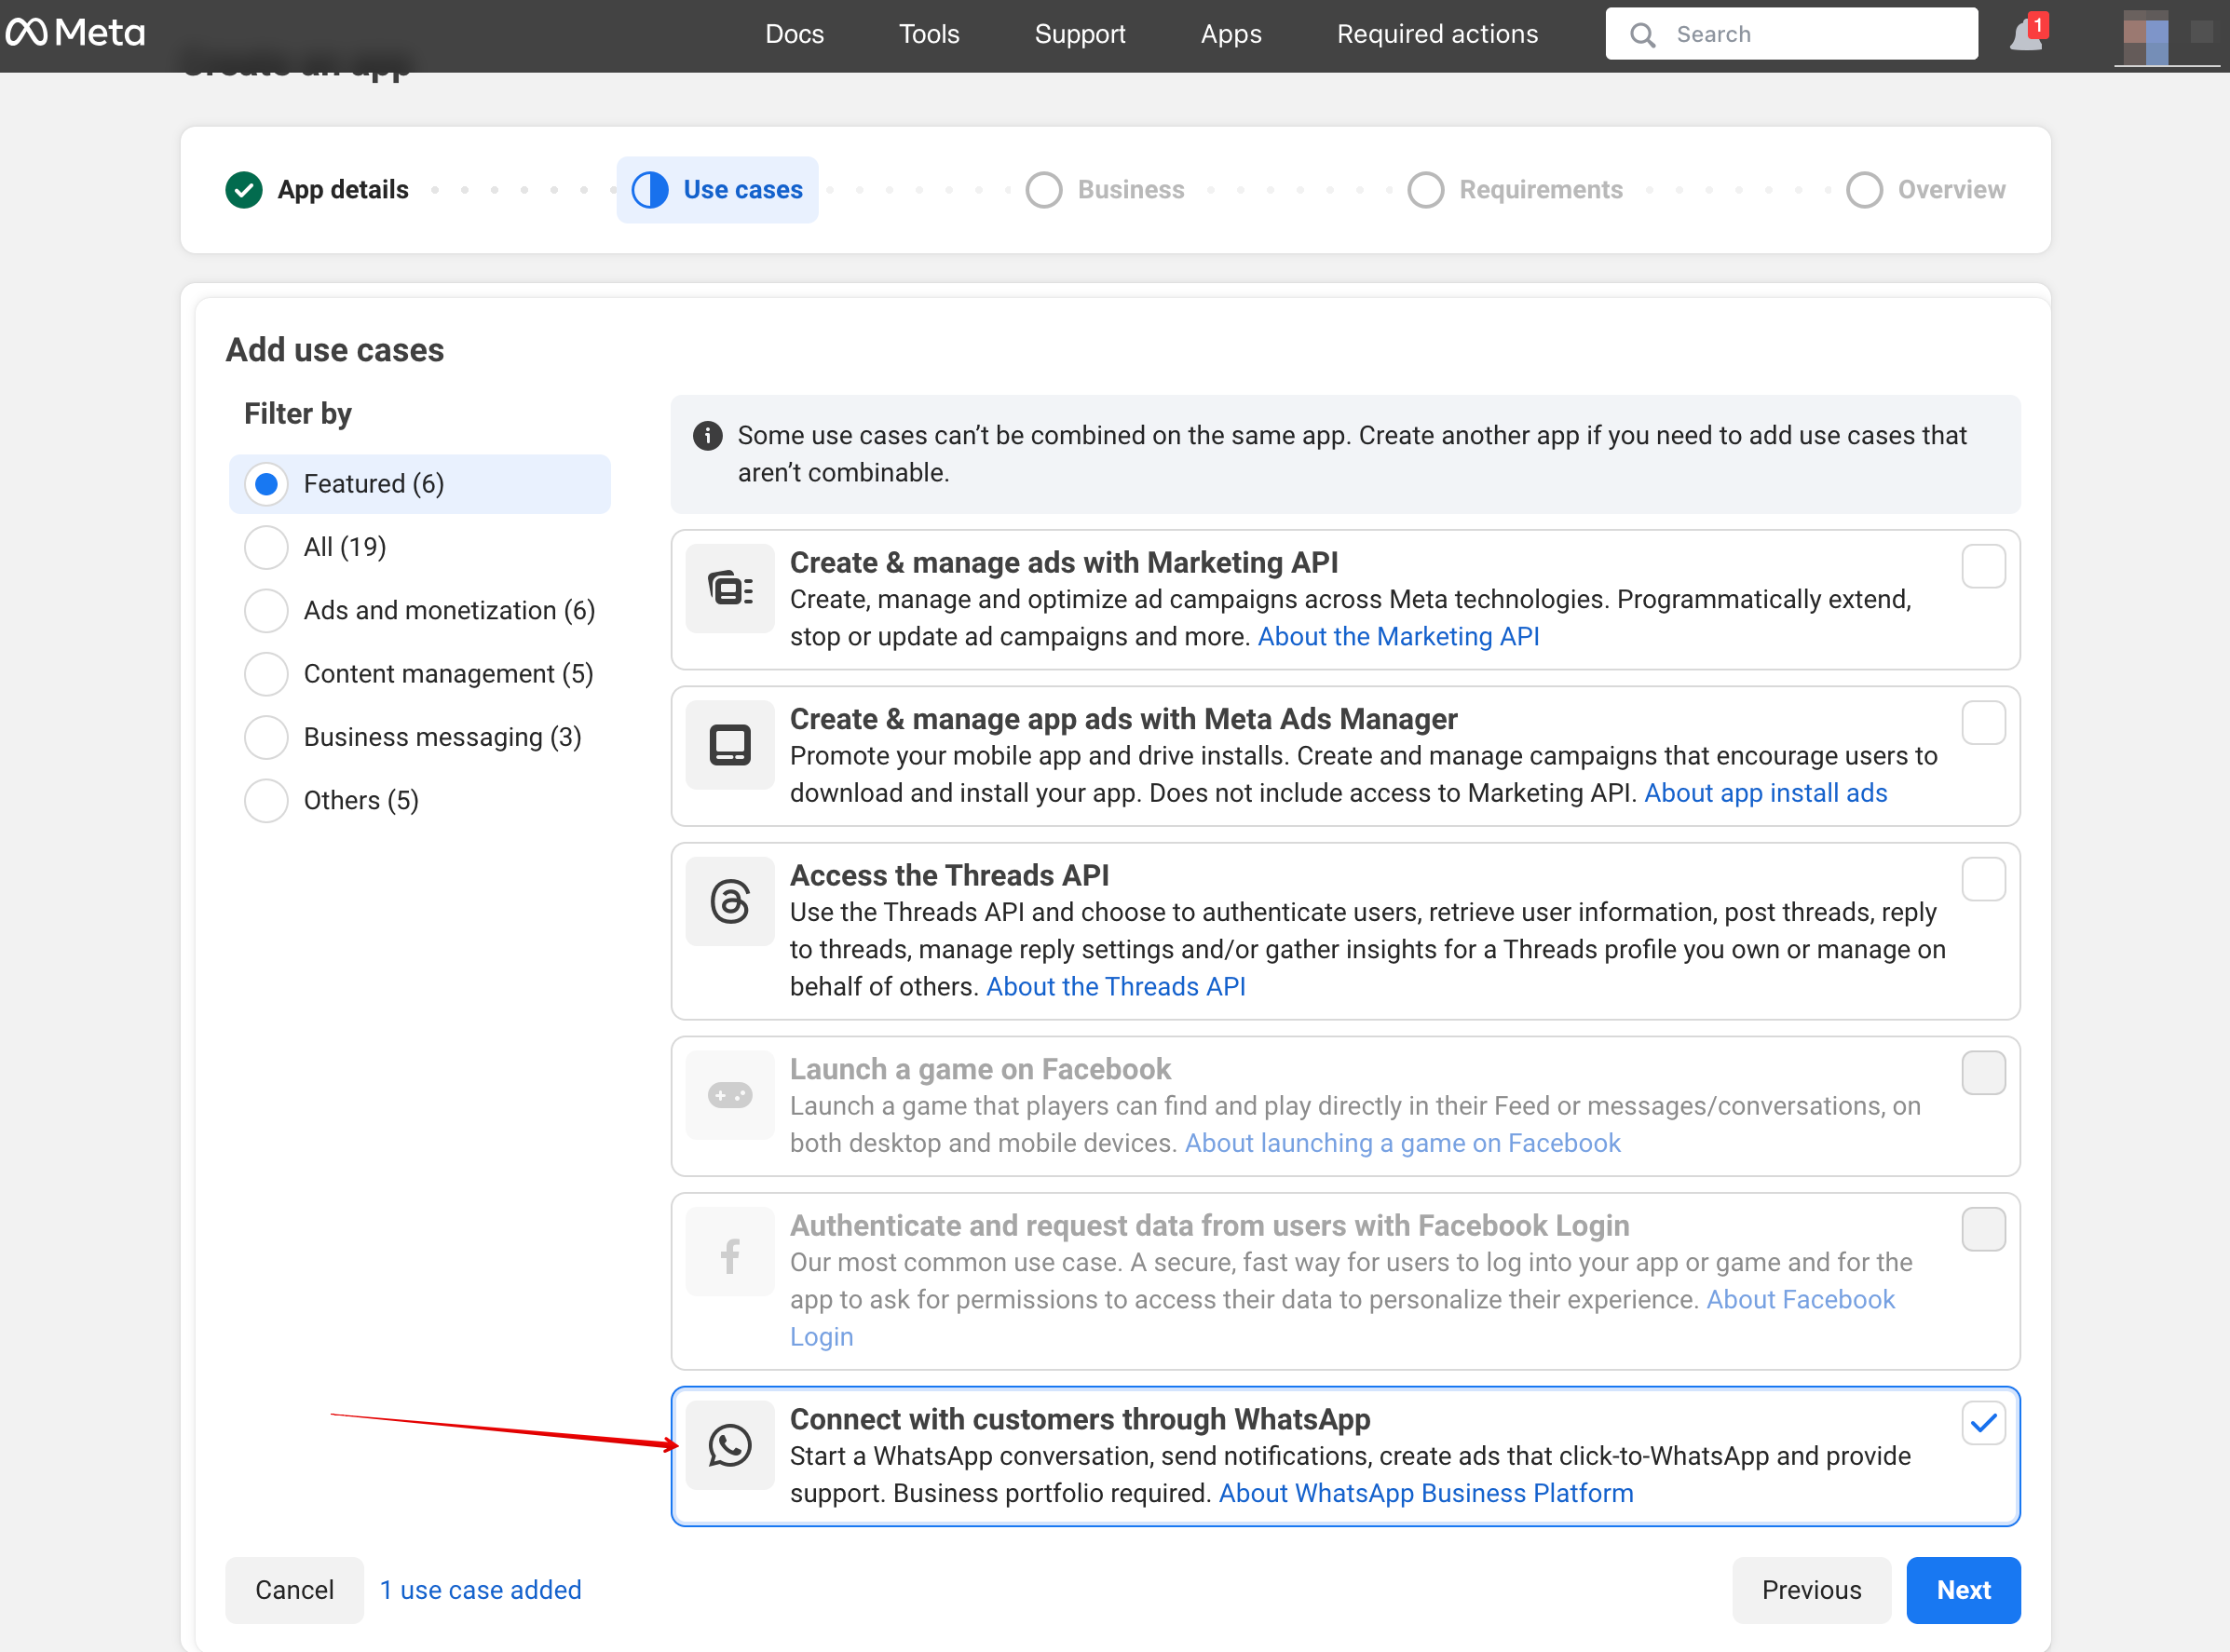
Vælg WhatsApp-brugsscenarie:
[[File:Connect through whatsapp step3.png|1200px|center|link=https://help.simplybook.me/images/8/8a/Connect_through_whatsapp_step3.png
]]
<br><br> | |||
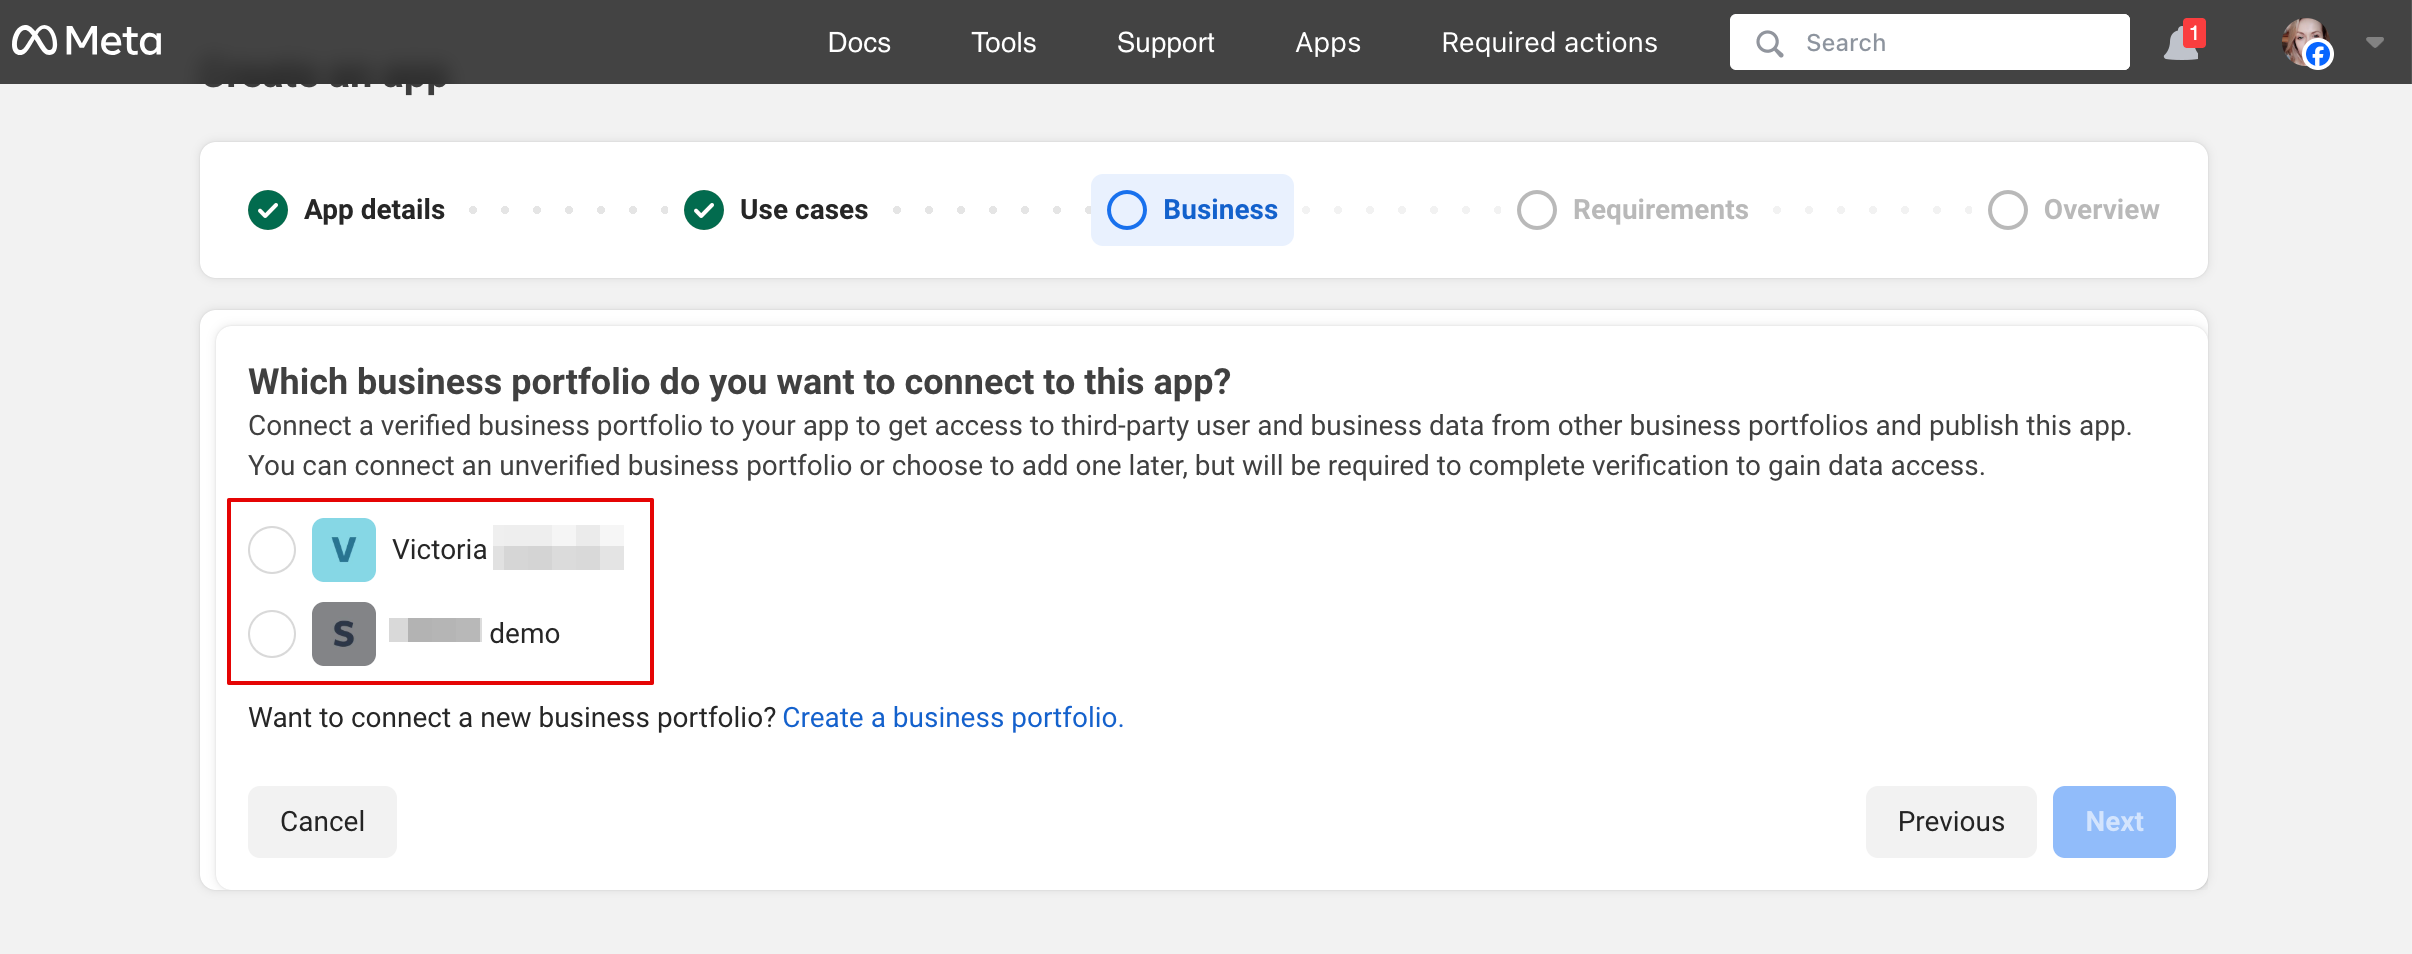
[[File:Ai main configuration.png|1200px|center|link=https://help.simplybook.me/images/4/47/Ai_main_configuration. | Vælg en virksomhedsprofil eller opret en ny.
[[File:Select or create business step 5.png|1200px|center|link=https://help.simplybook.me/images/1/18/Select_or_create_business_step_5.png
]]
<br><br> | ||
<br><br> | Klik på “Next” for at fortsætte.
<br><br> | ||
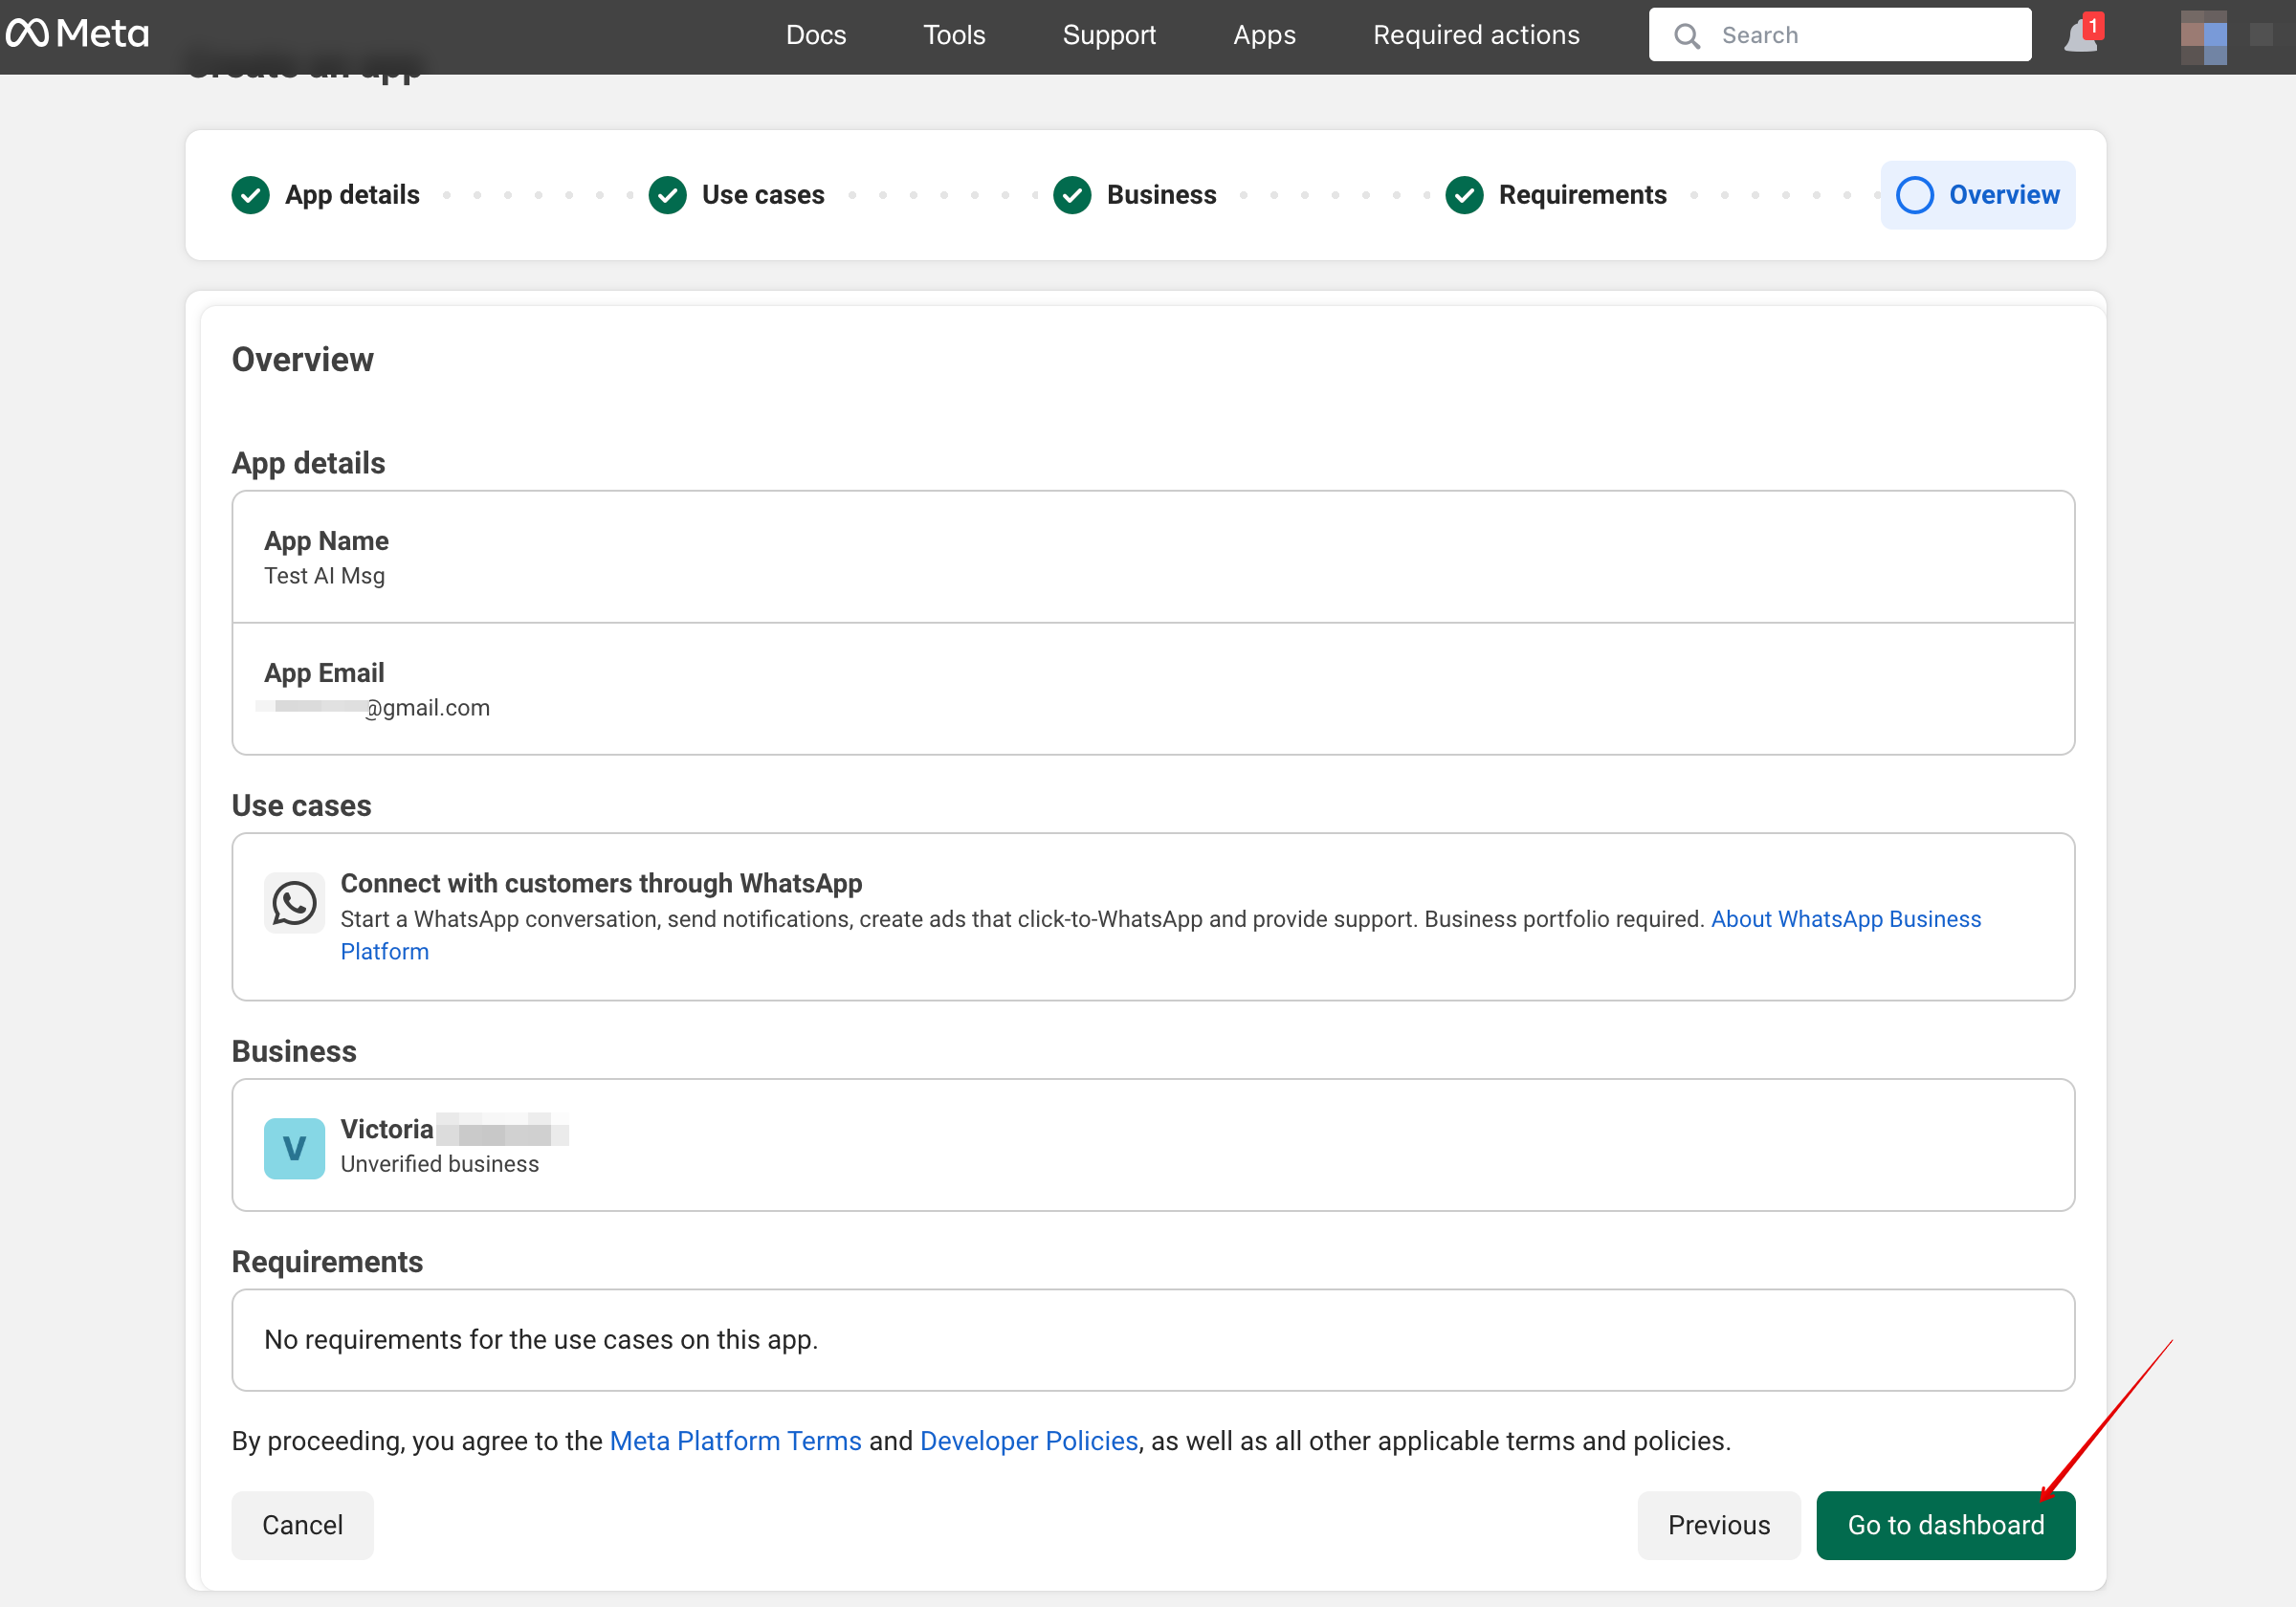
Gennemse oplysningerne, og klik på “Go to dashboard”:
[[File:Go to dashboard step 6.png|1200px|center|link=https://help.simplybook.me/images/f/fc/Go_to_dashboard_step_6.png
]]
<br><br> | |||
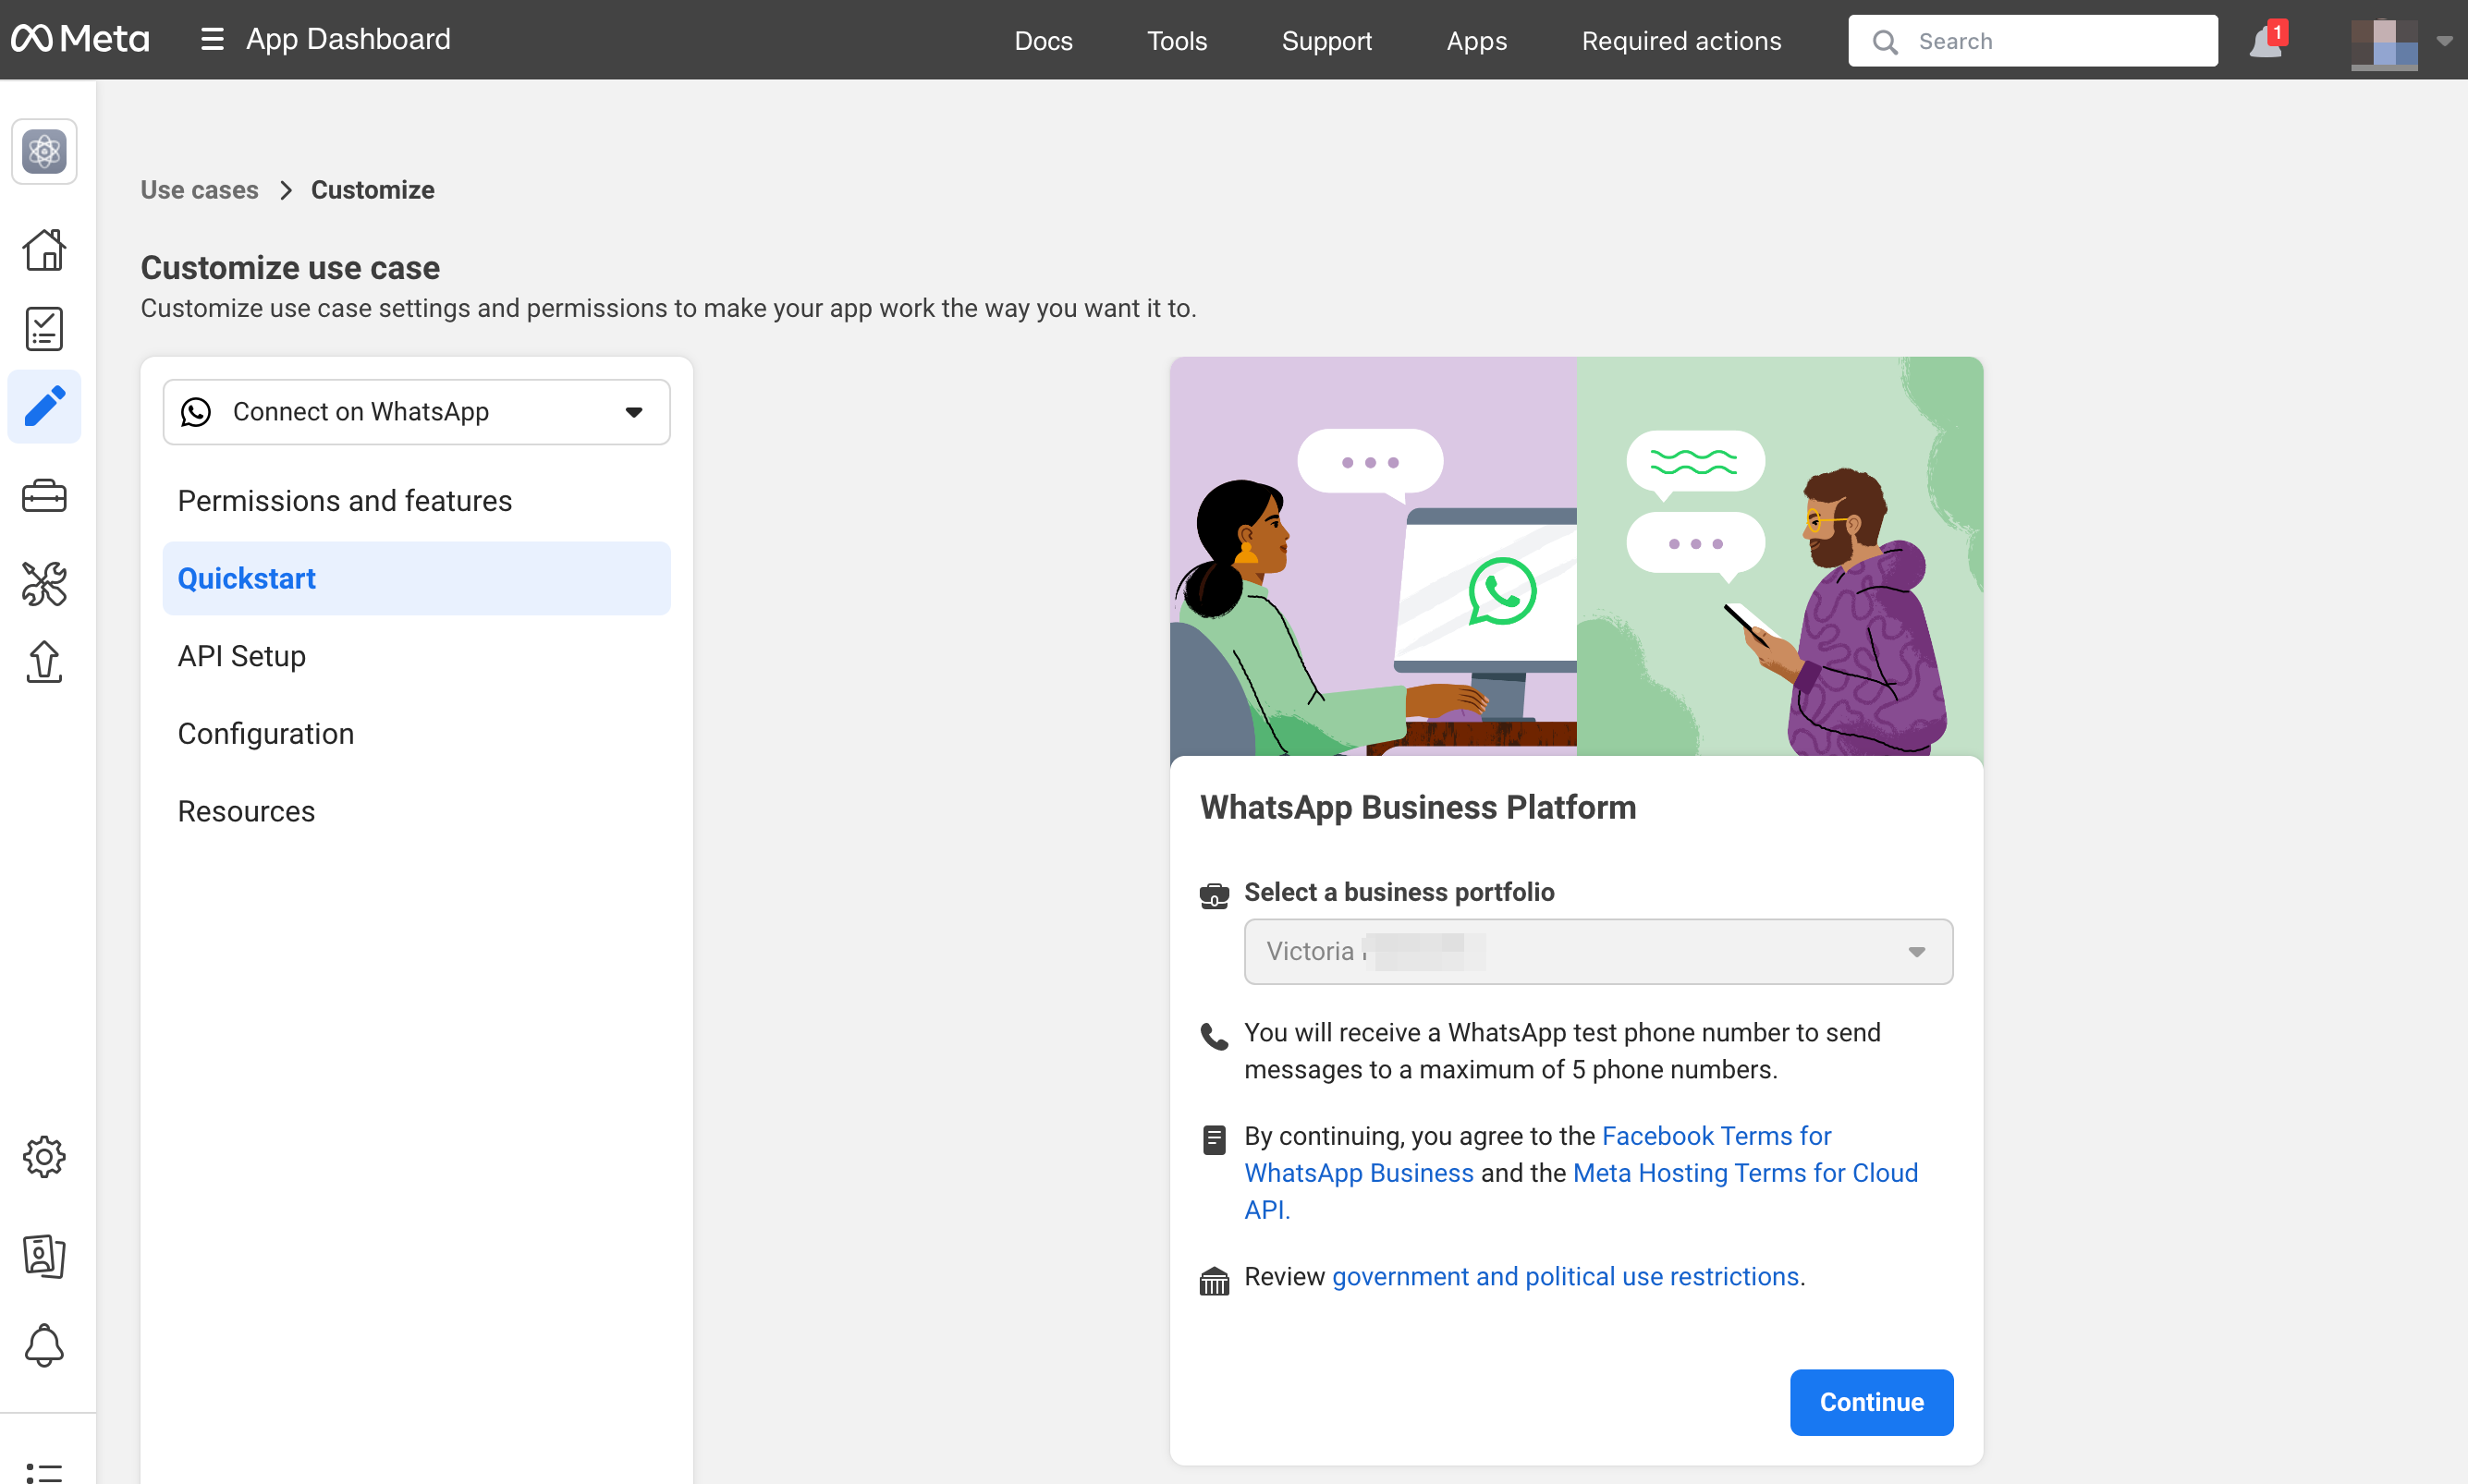
<br><br><br><br> | Vælg fanen “Use cases”, og klik på “Customize”:
[[File:User cases customize.png|1200px|center|link=https://help.simplybook.me/images/a/a7/User_cases_customize.png
]]
<br><br> | ||
==Widget/ | Accepter servicevilkår og bekræft virksomhedsprofilen:
[[File:Accept the terms and confirm profile.png|1200px|center|link=https://help.simplybook.me/images/8/8c/Accept_the_terms_and_confirm_profile.png
]]
<br><br> | ||
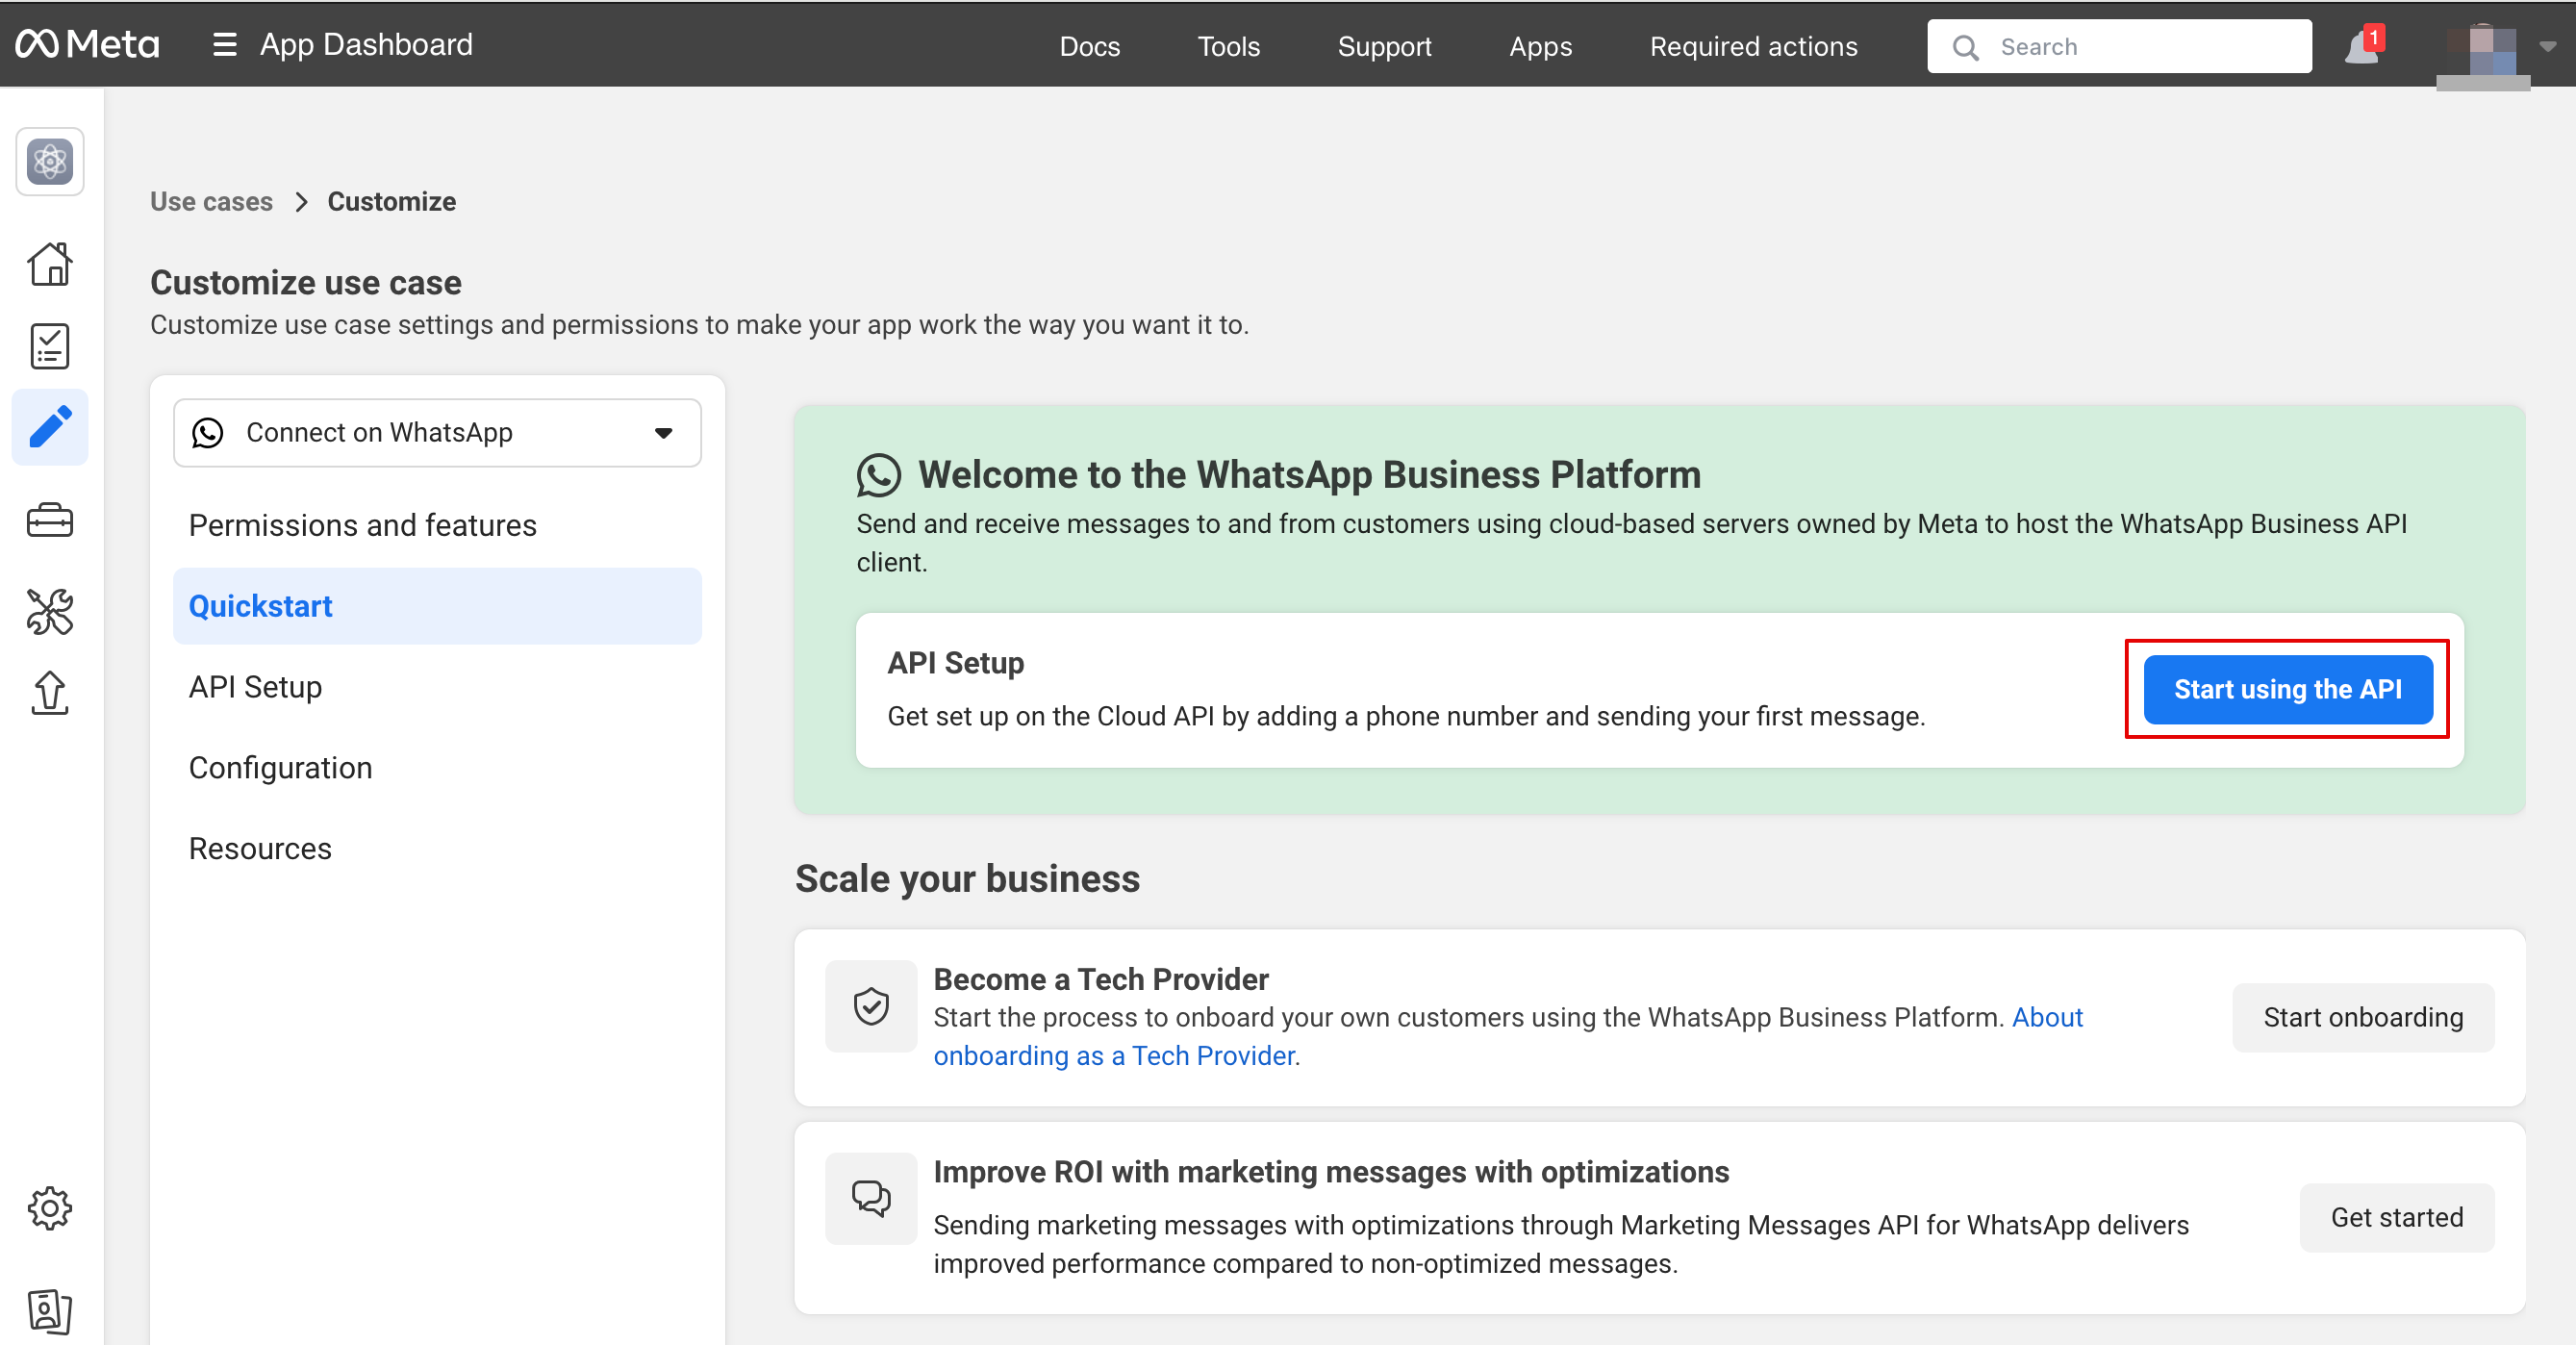
Vælg “Start using the API”:
[[File:Start using the api.png|1200px|center|link=https://help.simplybook.me/images/1/11/Start_using_the_api.png
]]
<br><br> | |||
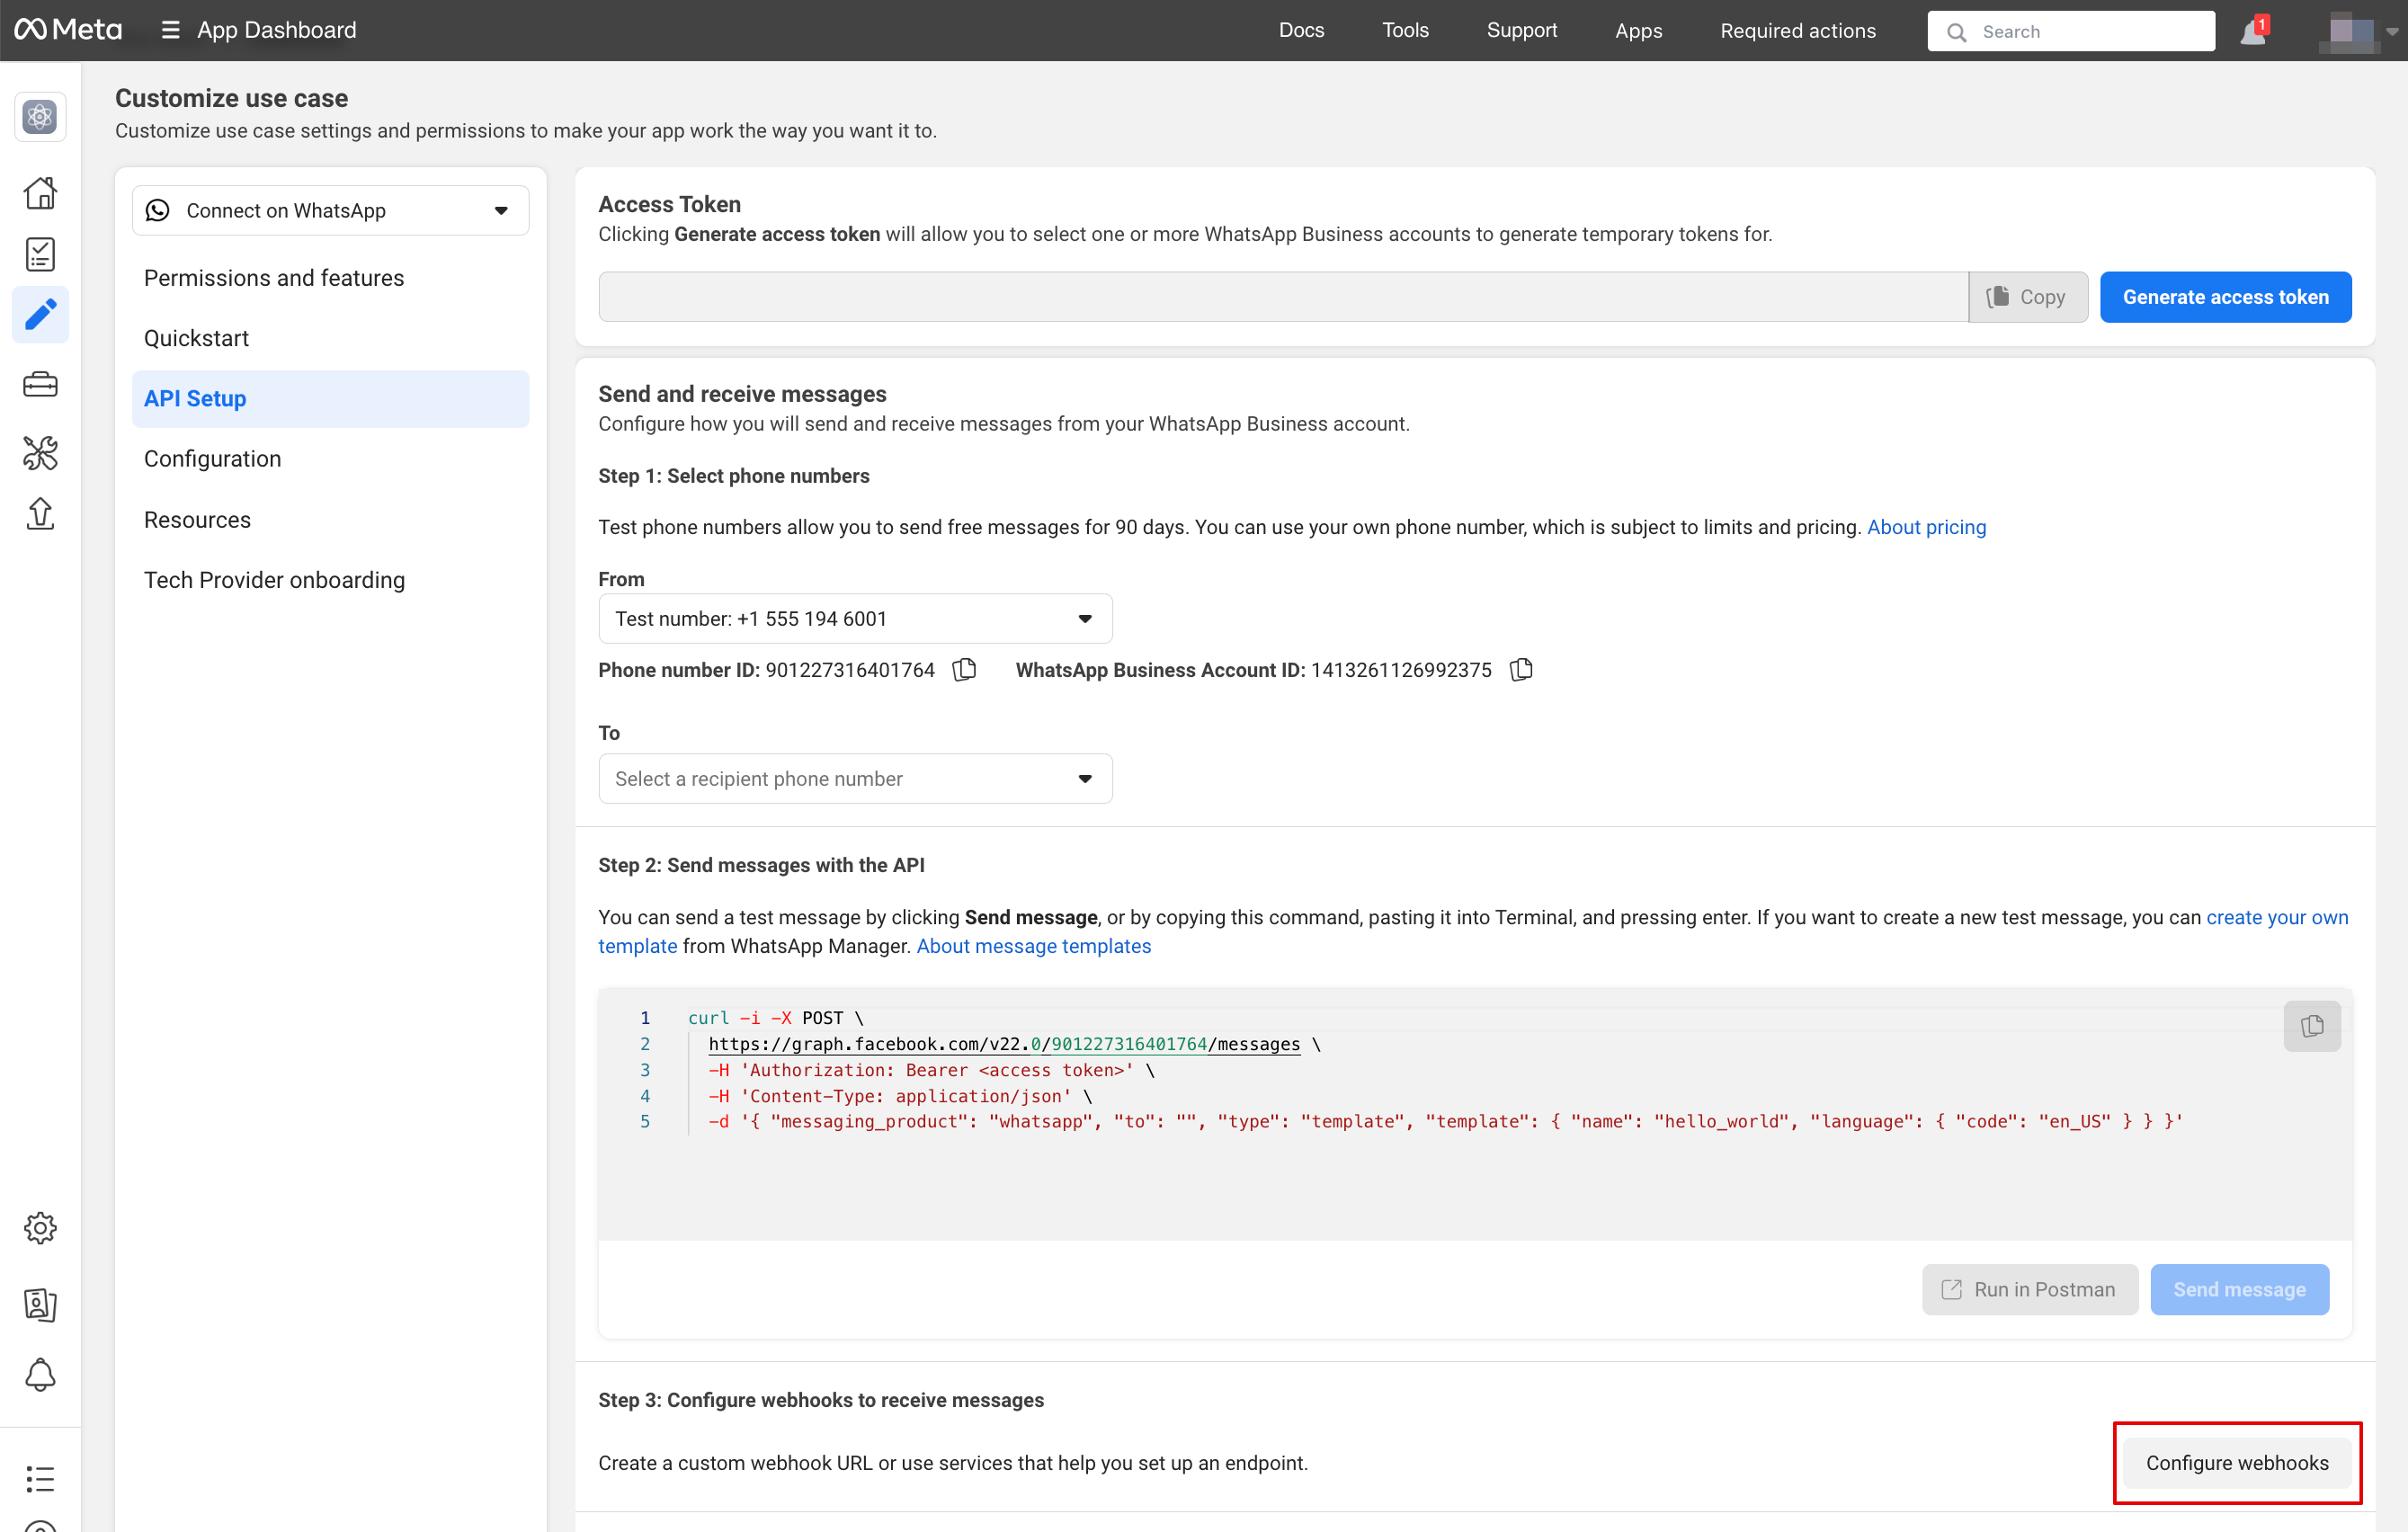
<br><br> | Gå til “Configure webhooks”:
[[File:Configure webhooks.png|1200px|center|link=https://help.simplybook.me/images/b/bc/Configure_webhooks.png
]]
<br><br> | ||
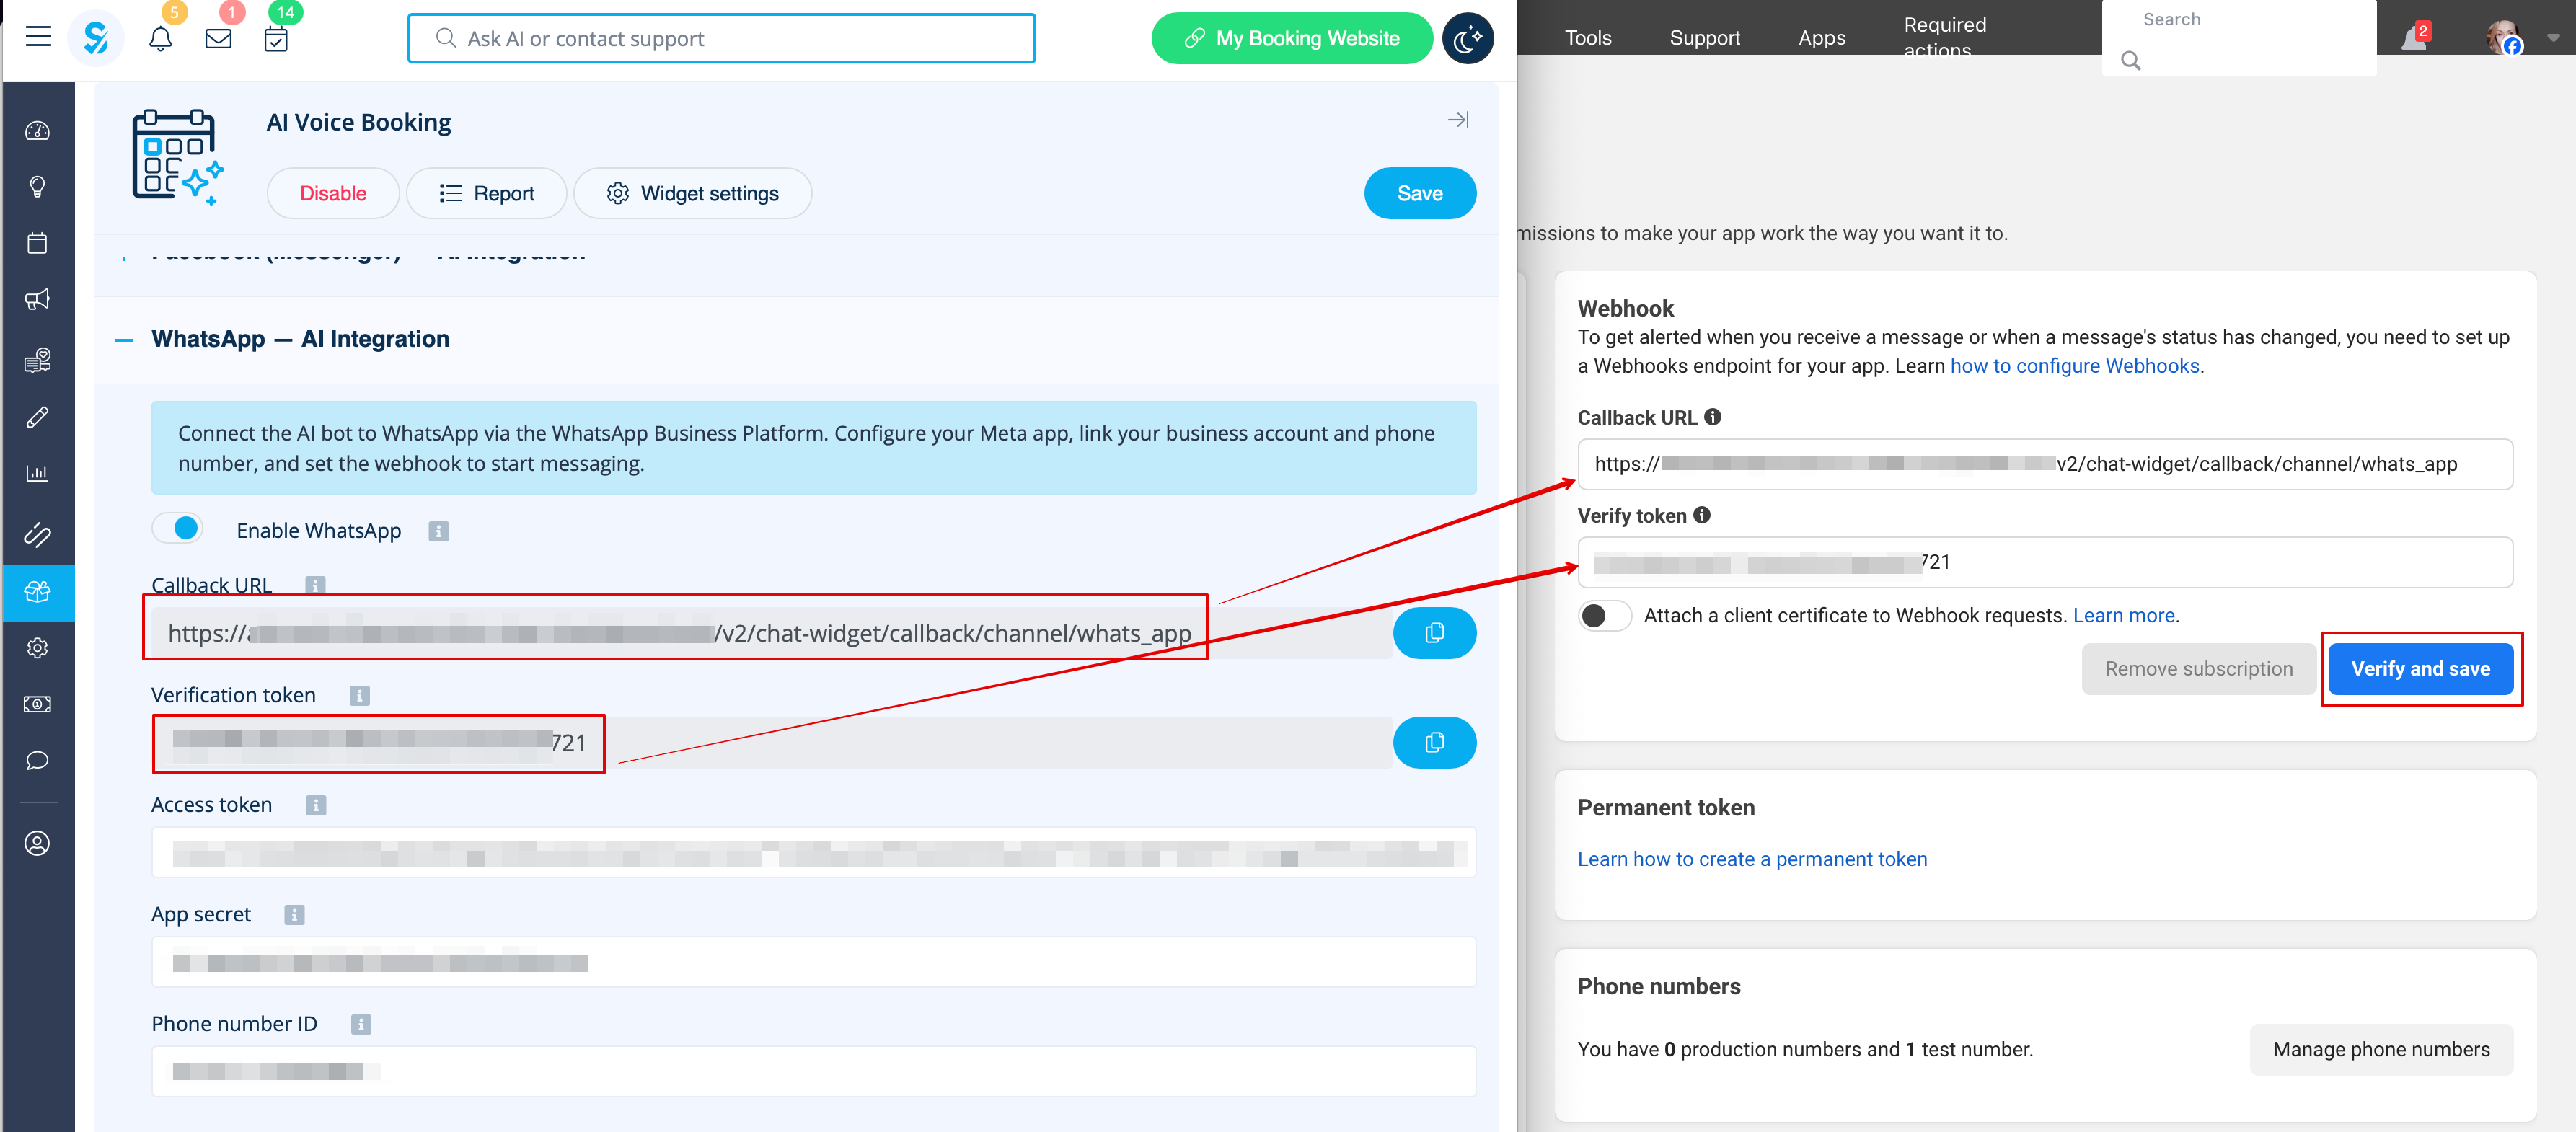
Kopiér “Callback URL” og “Verification token” fra din SimplyBook.me-konto -> Brugerdefinerede funktioner -> AI-stemmebooking, og indsæt dem i de tilsvarende felter i appen. Verificér og gem.
[[File:Callback and token.png|1200px|center|link=https://help.simplybook.me/images/f/f6/Callback_and_token.png
]]
<br><br> | |||
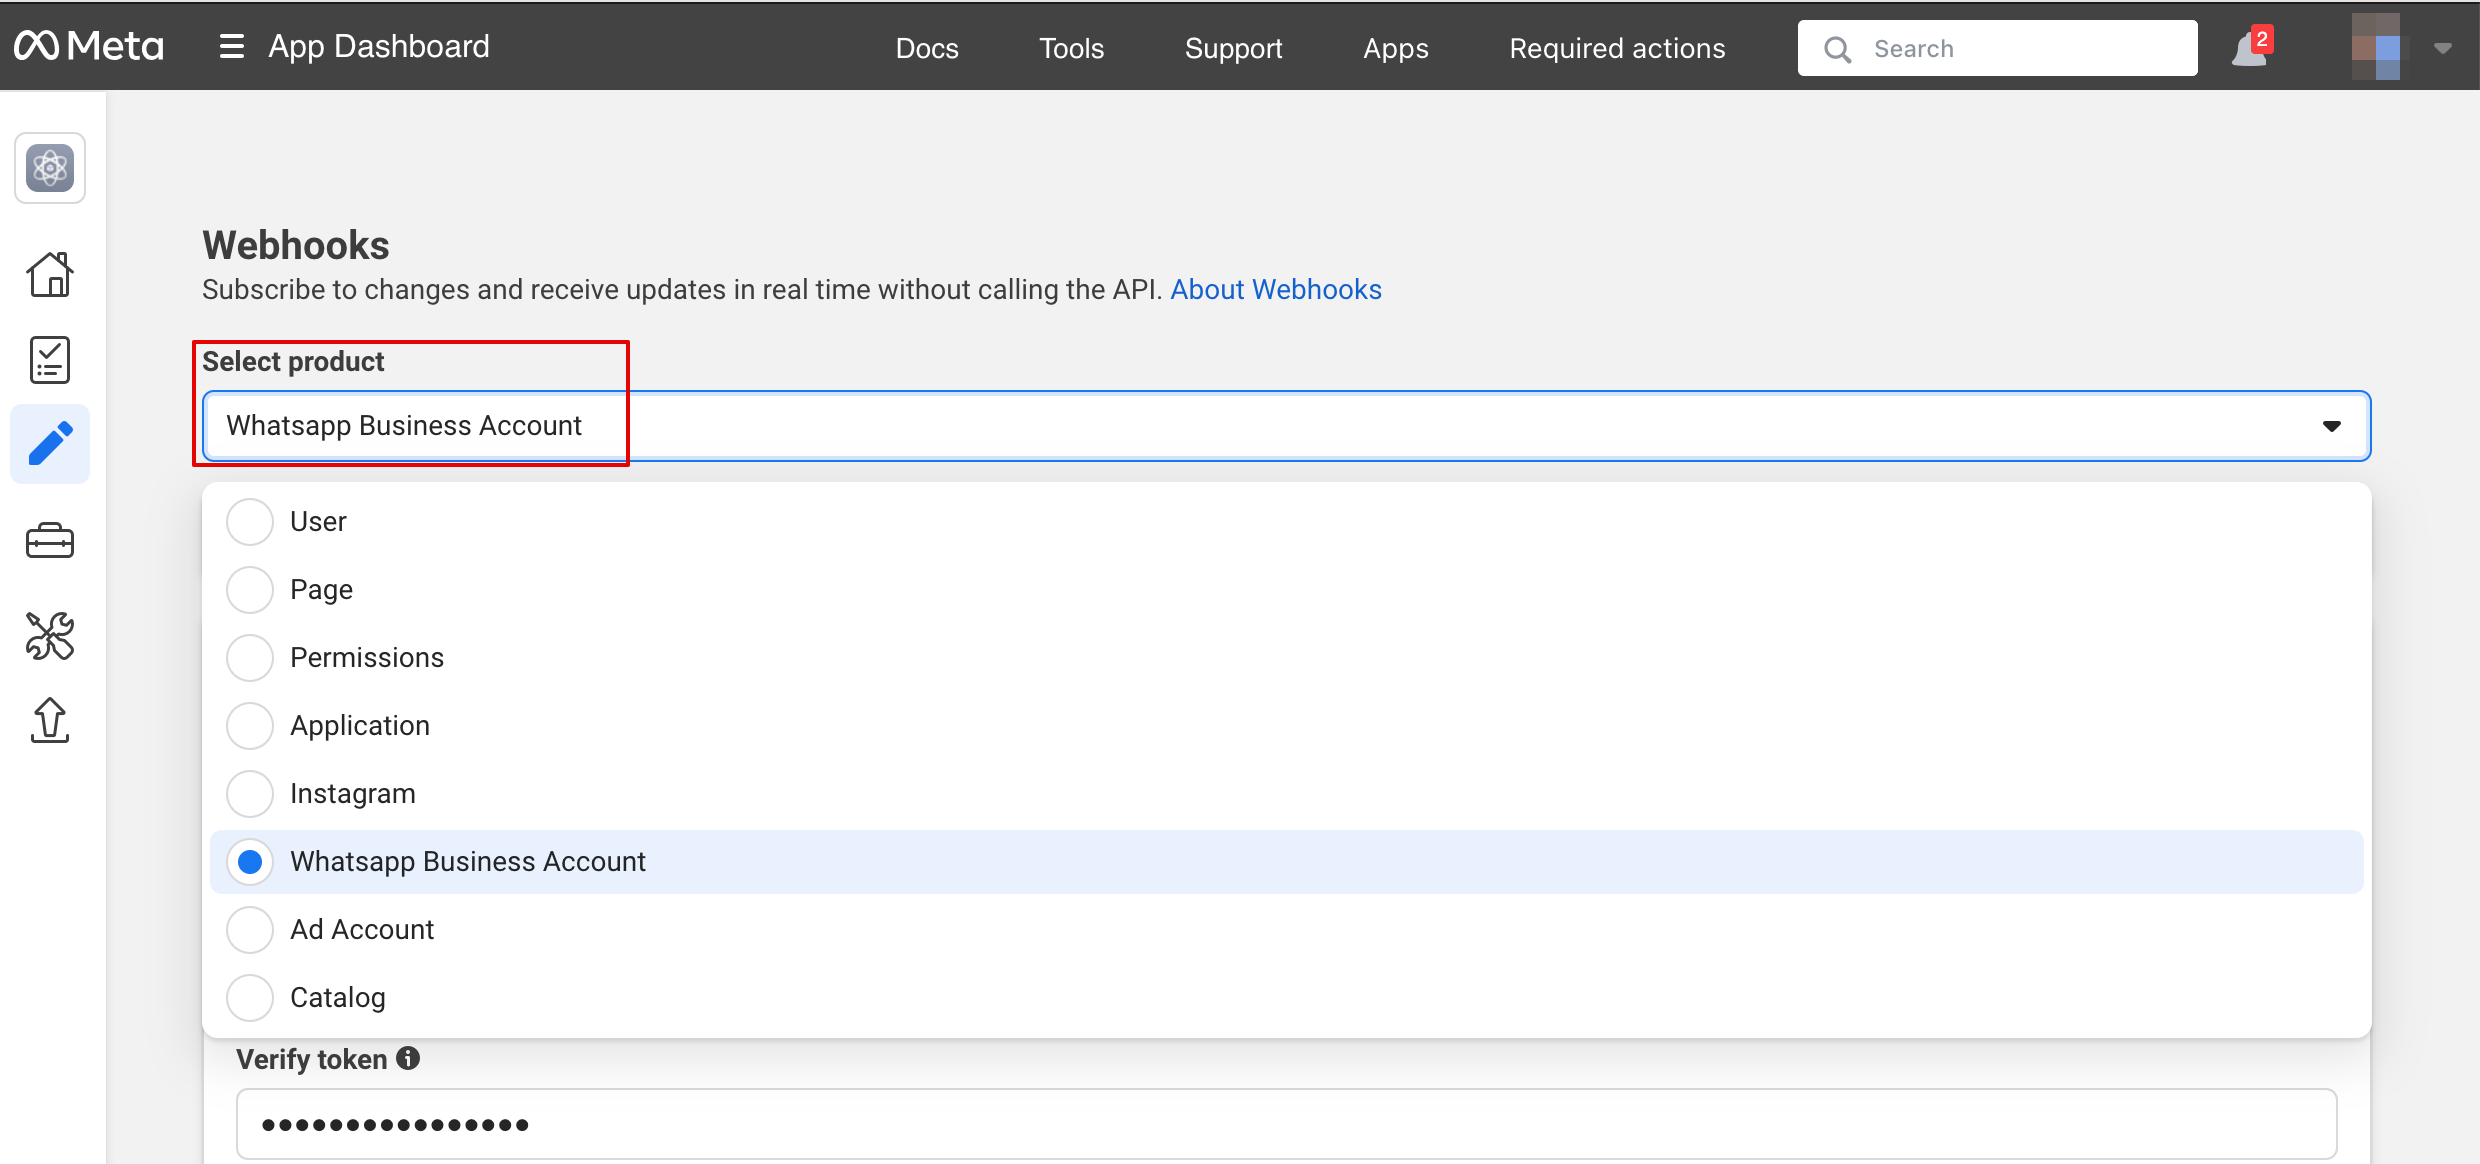
[[File:Ai widget settings path.png|1200px|center|link=https://help.simplybook.me/images/d/d4/Ai_widget_settings_path. | Vælg “WhatsApp Business Account” under “Select product”:
[[File:Select product.png|1200px|center|link=https://help.simplybook.me/images/6/66/Select_product.png
]]
<br><br> | ||
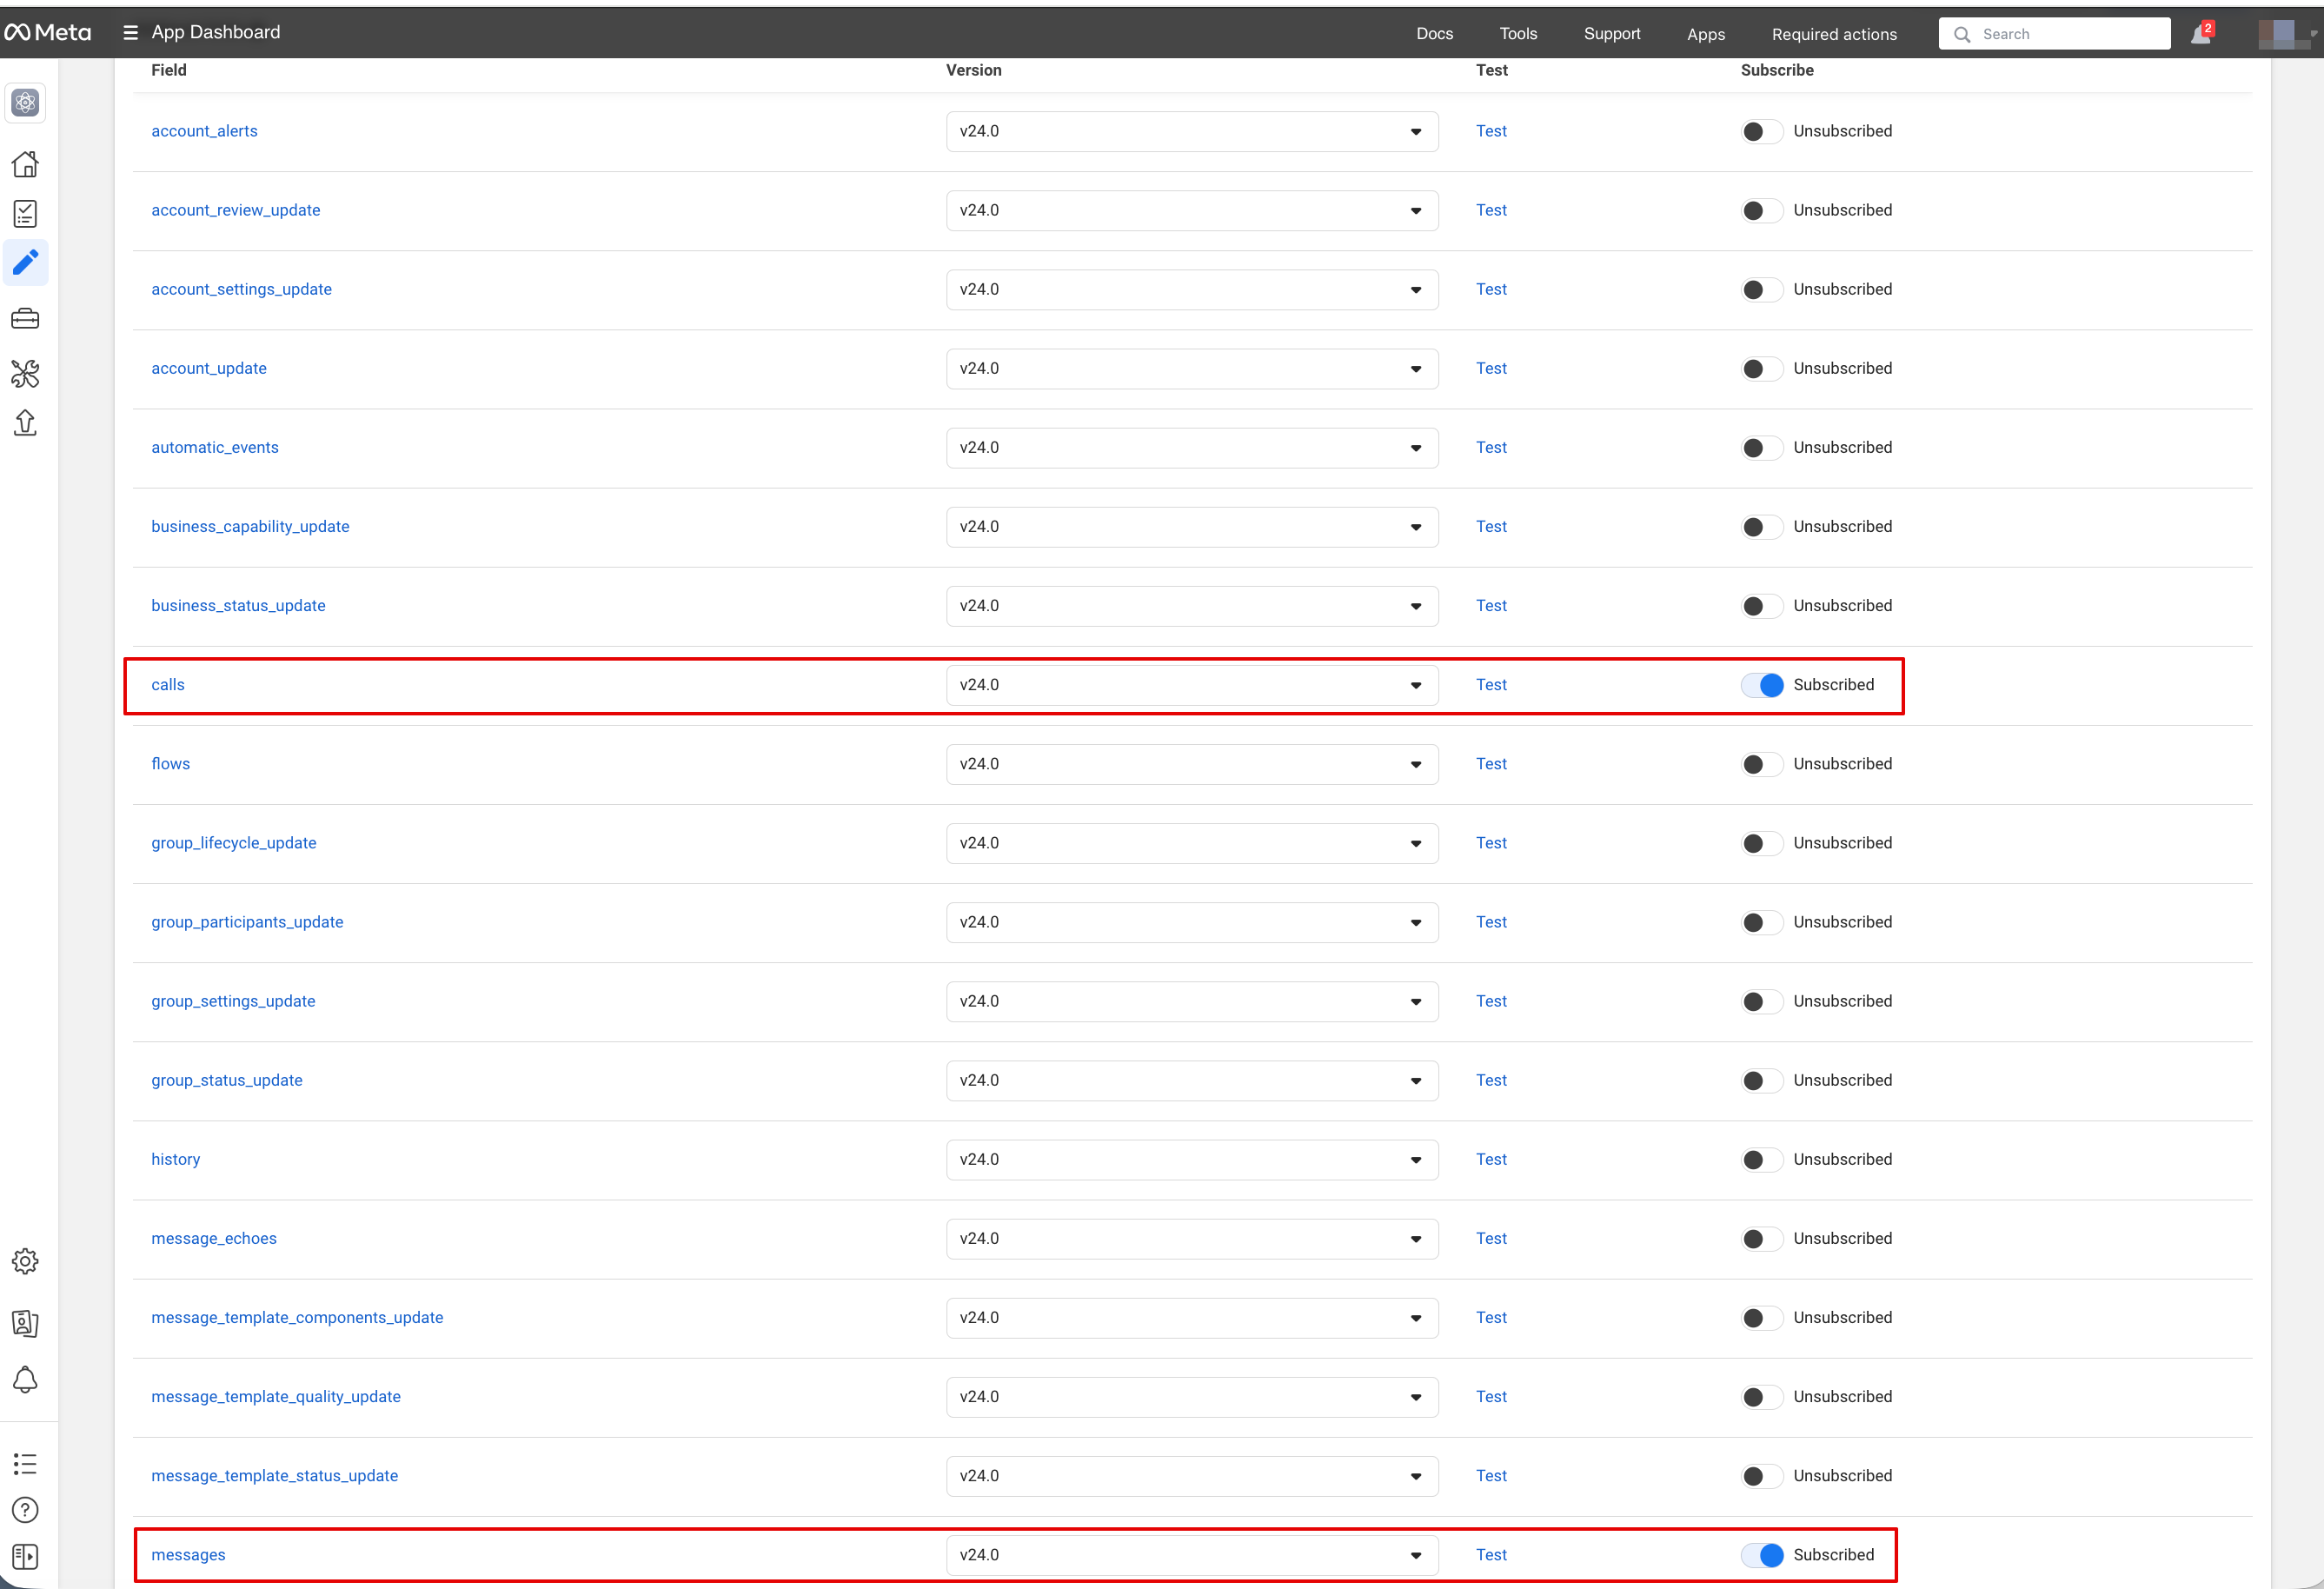
[[File:Ai widget settings view & get code.png|1200px|center|link=https://help.simplybook.me/images/4/43/Ai_widget_settings_view_%26_get_code. | Aktivér de nødvendige webhooks: beskeder og opkald (hvis du vil modtage opkald):
[[File:Calls and msg subscriptions.png|1200px|center|link=https://help.simplybook.me/images/5/5d/Calls_and_msg_subscriptions.png
]]
<br><br> | ||
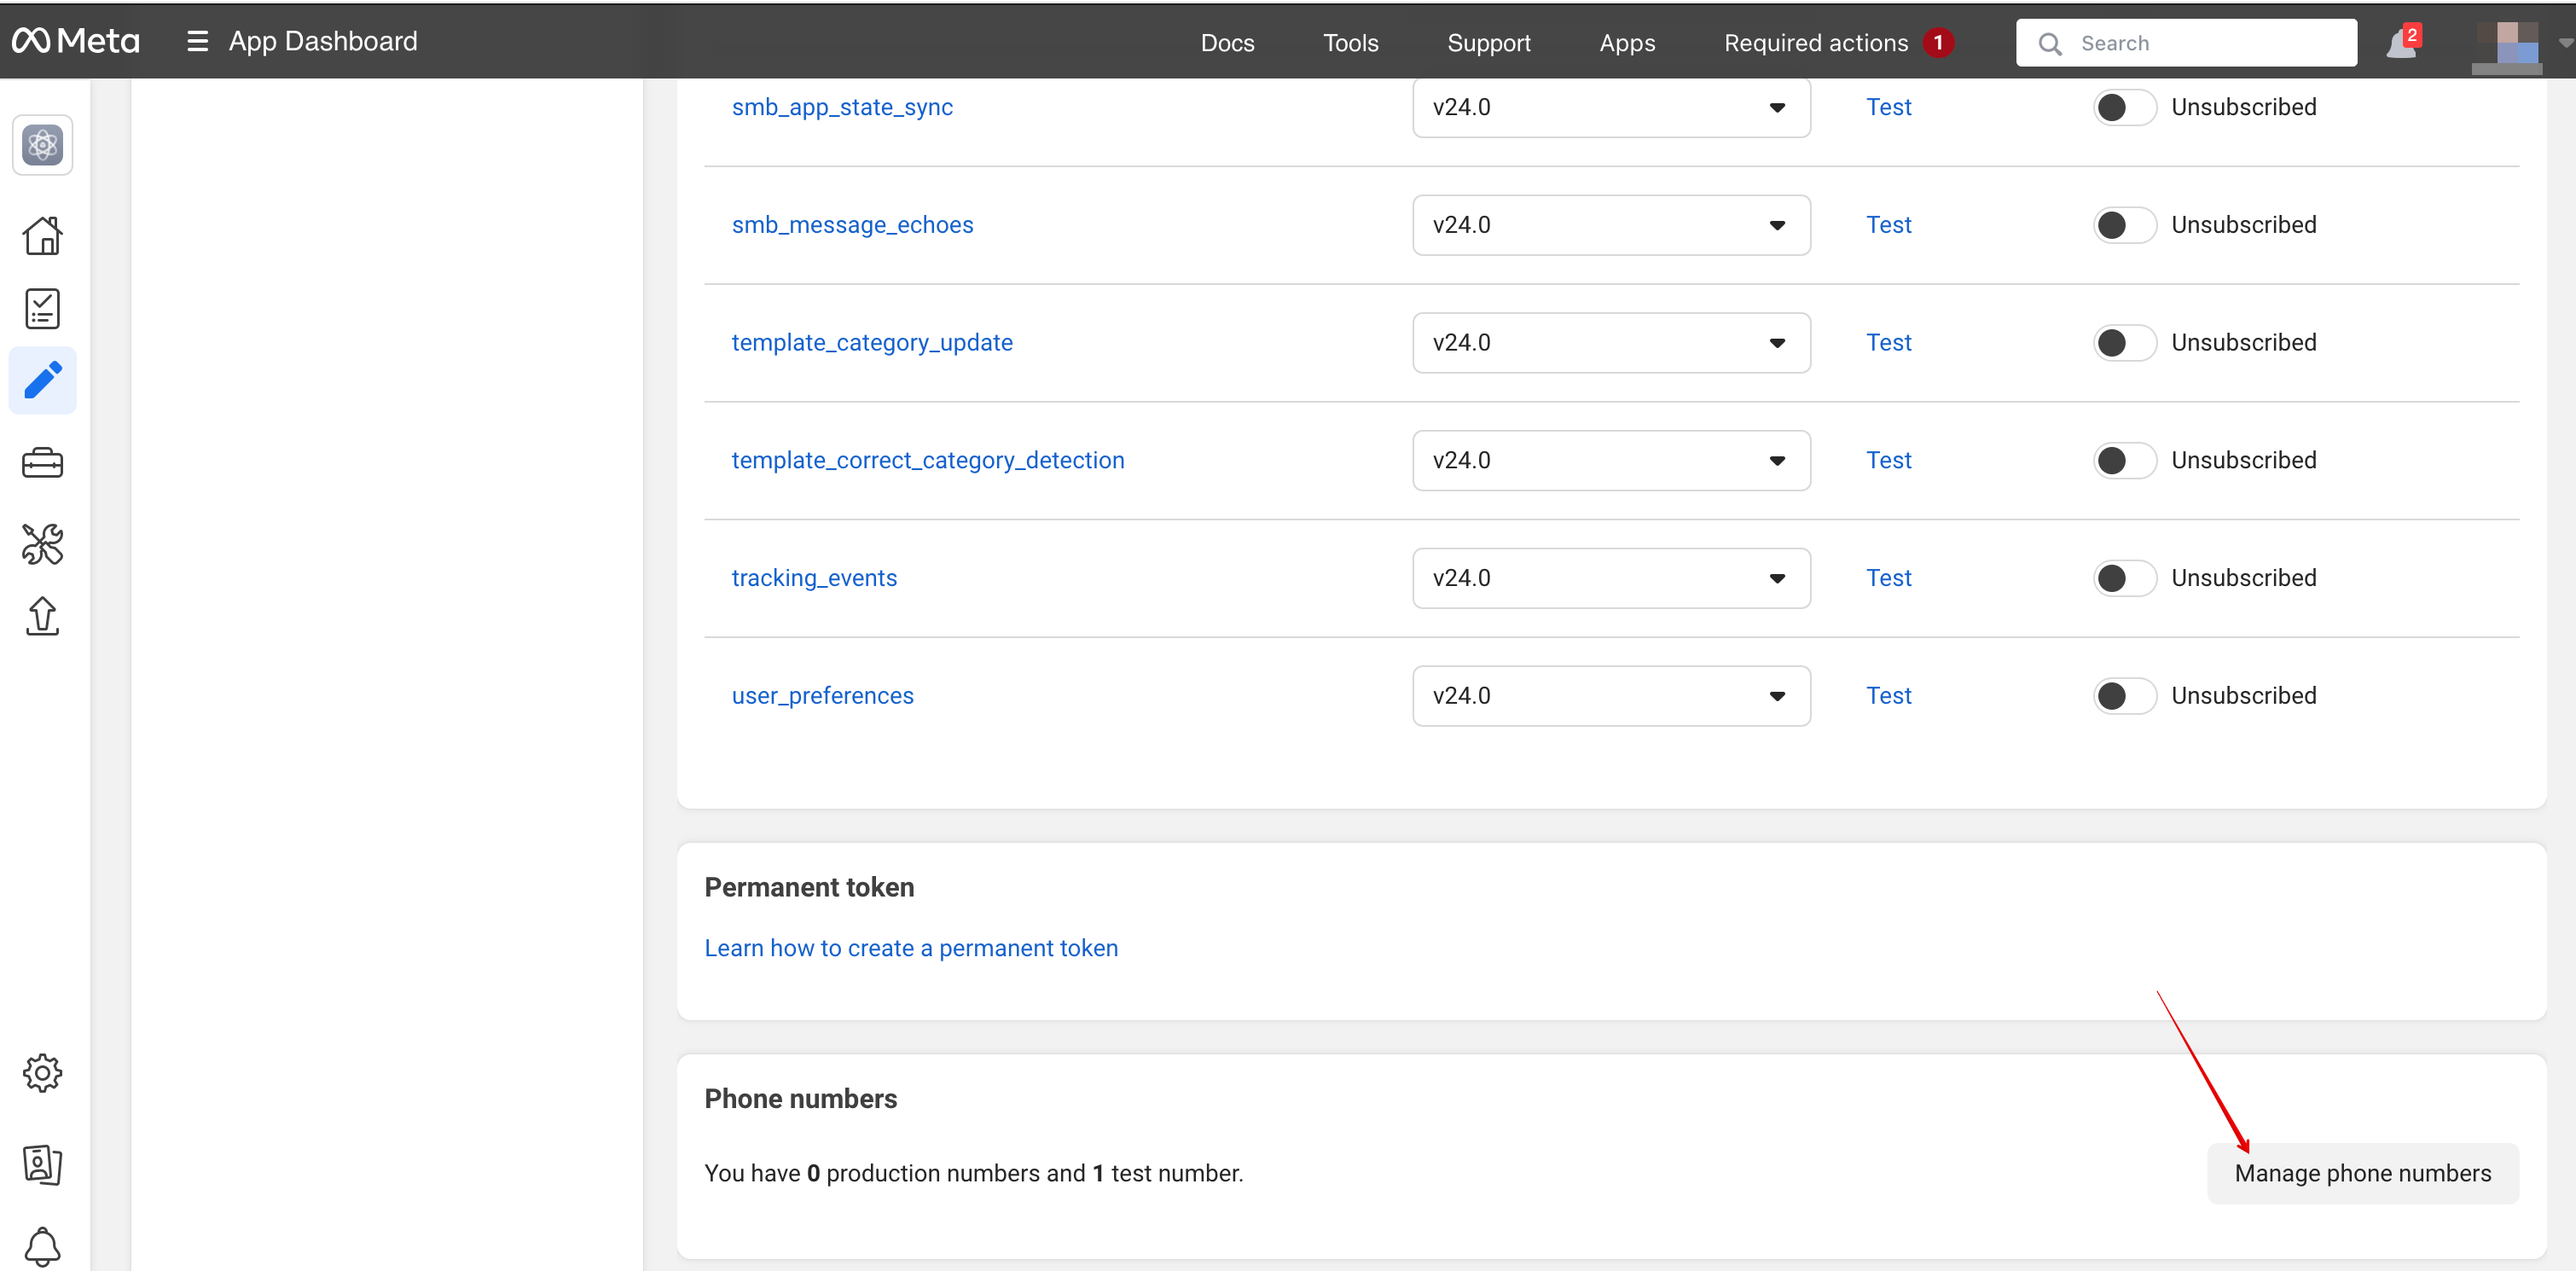
<br><br> | Tilføj telefonnumre og betalingsmetode (da Facebook opkræver betaling for beskeder).
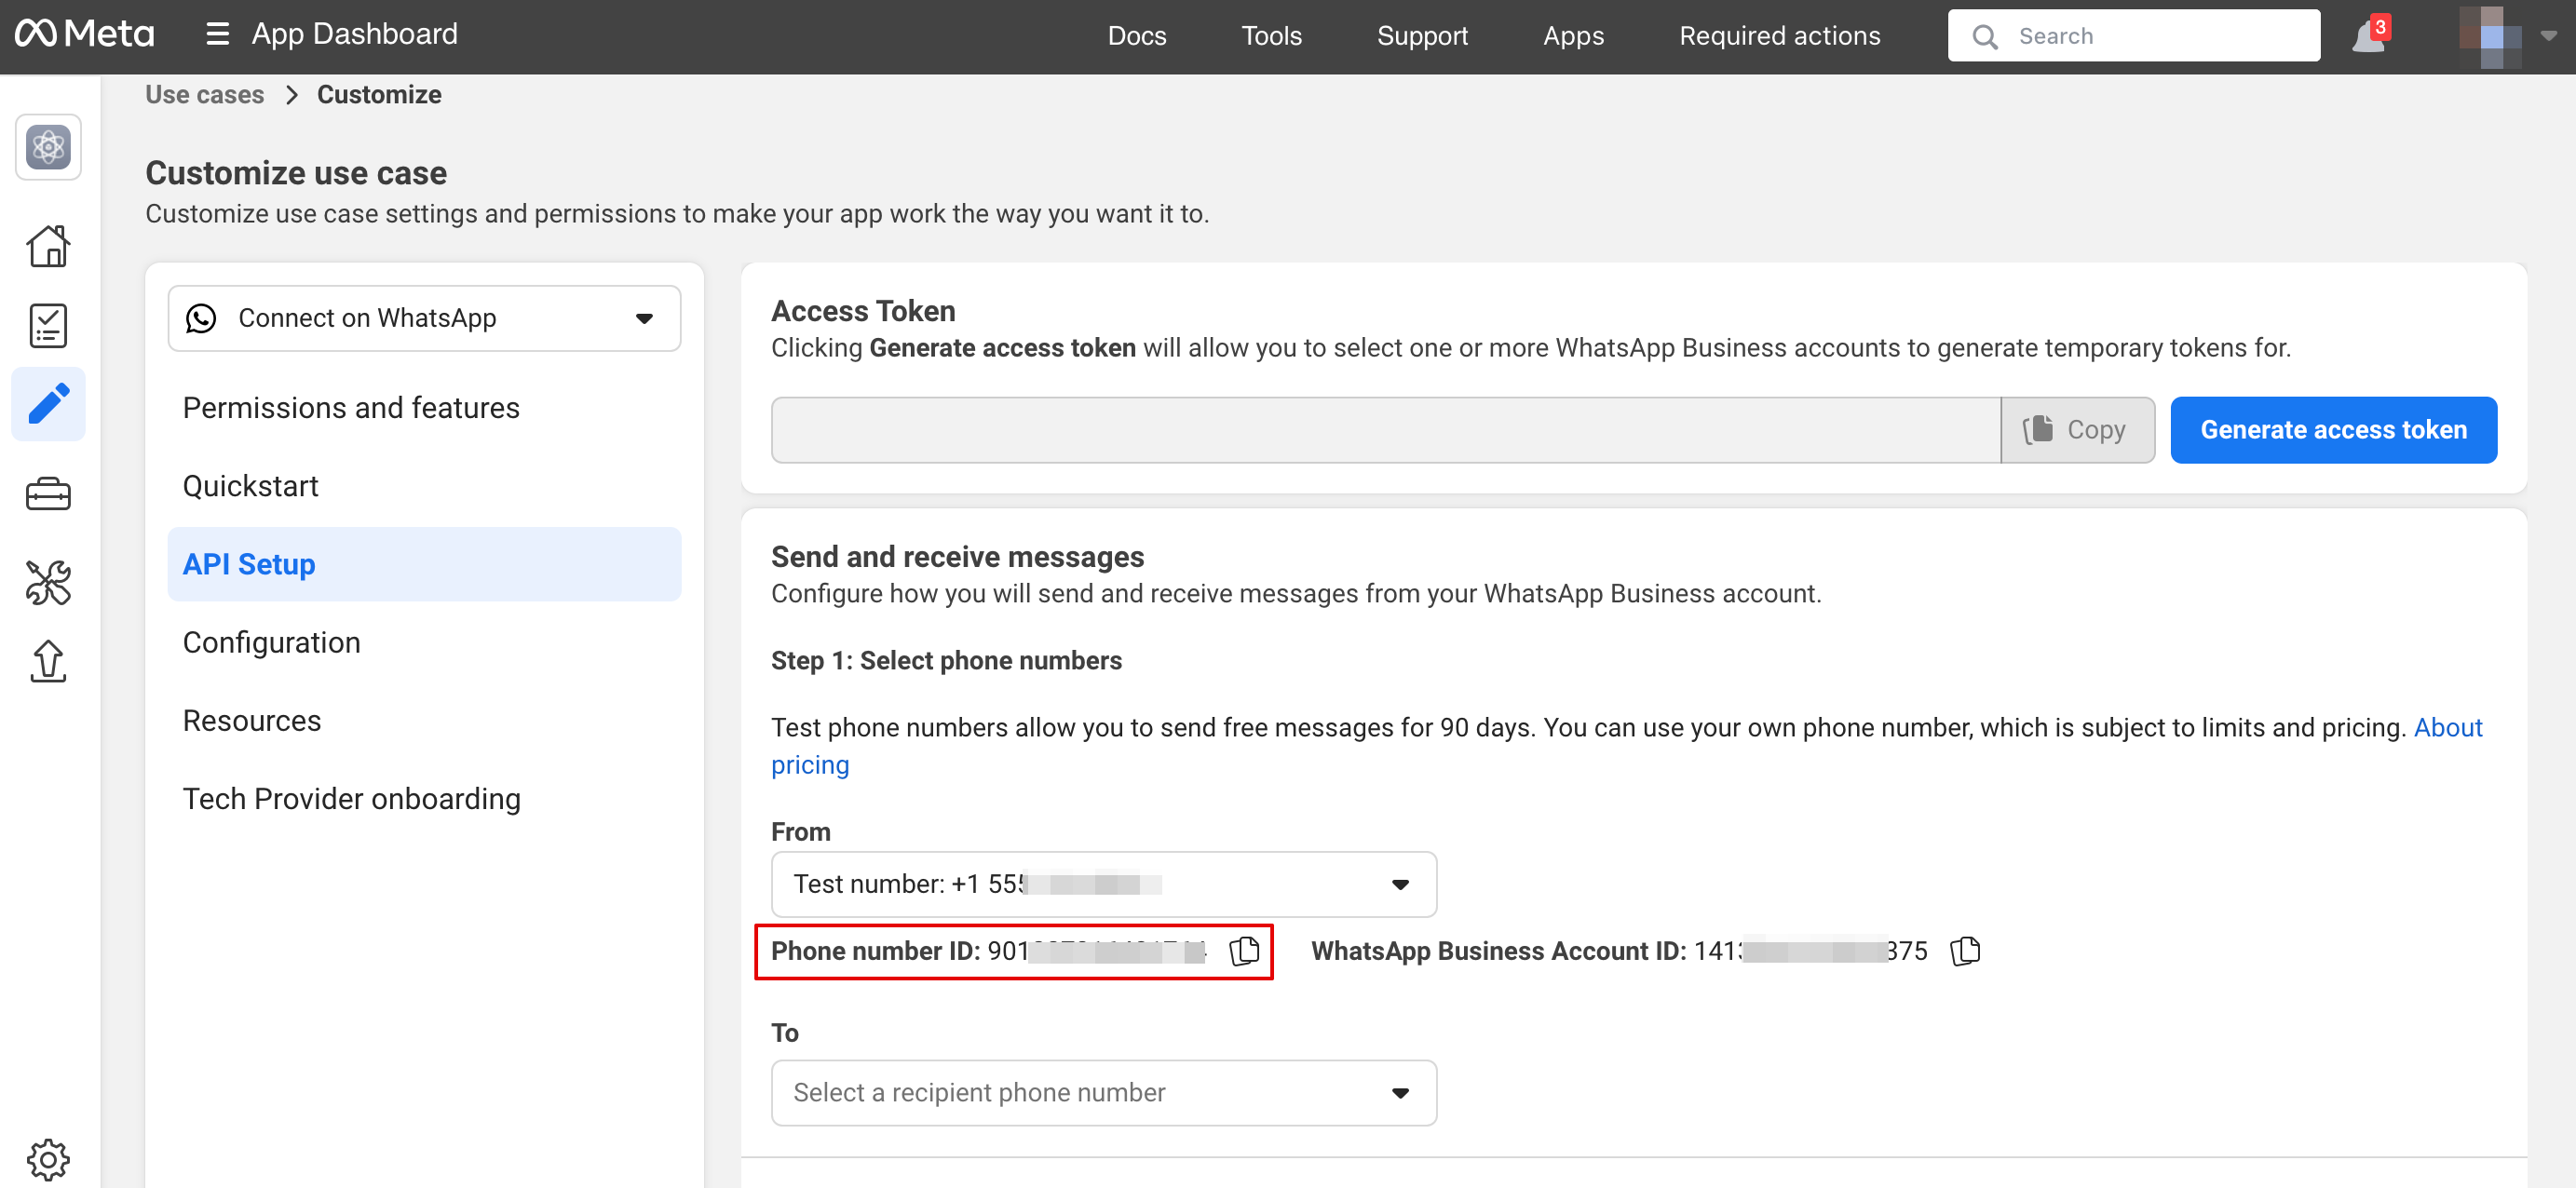
Kopiér telefonnummer-ID fra Facebook, og indsæt det i det tilsvarende felt i SimplyBook.me.
[[File:Manage phone numbers.png|1200px|center|link=https://help.simplybook.me/images/b/b1/Manage_phone_numbers.png
]]
[[File:Copy phone number id.png|1200px|center|link=https://help.simplybook.me/images/9/91/Copy_phone_number_id.png
]]
<br><br> | ||
Opret en systembruger. Gå til [https://business.facebook.com/latest/settings/
Facebook Business-profil] og åbn fanen “System users”:
[[File:Add user facebook.png|1200px|center|link=https://help.simplybook.me/images/b/b7/Add_user_facebook.png
]]
<br><br> | |||
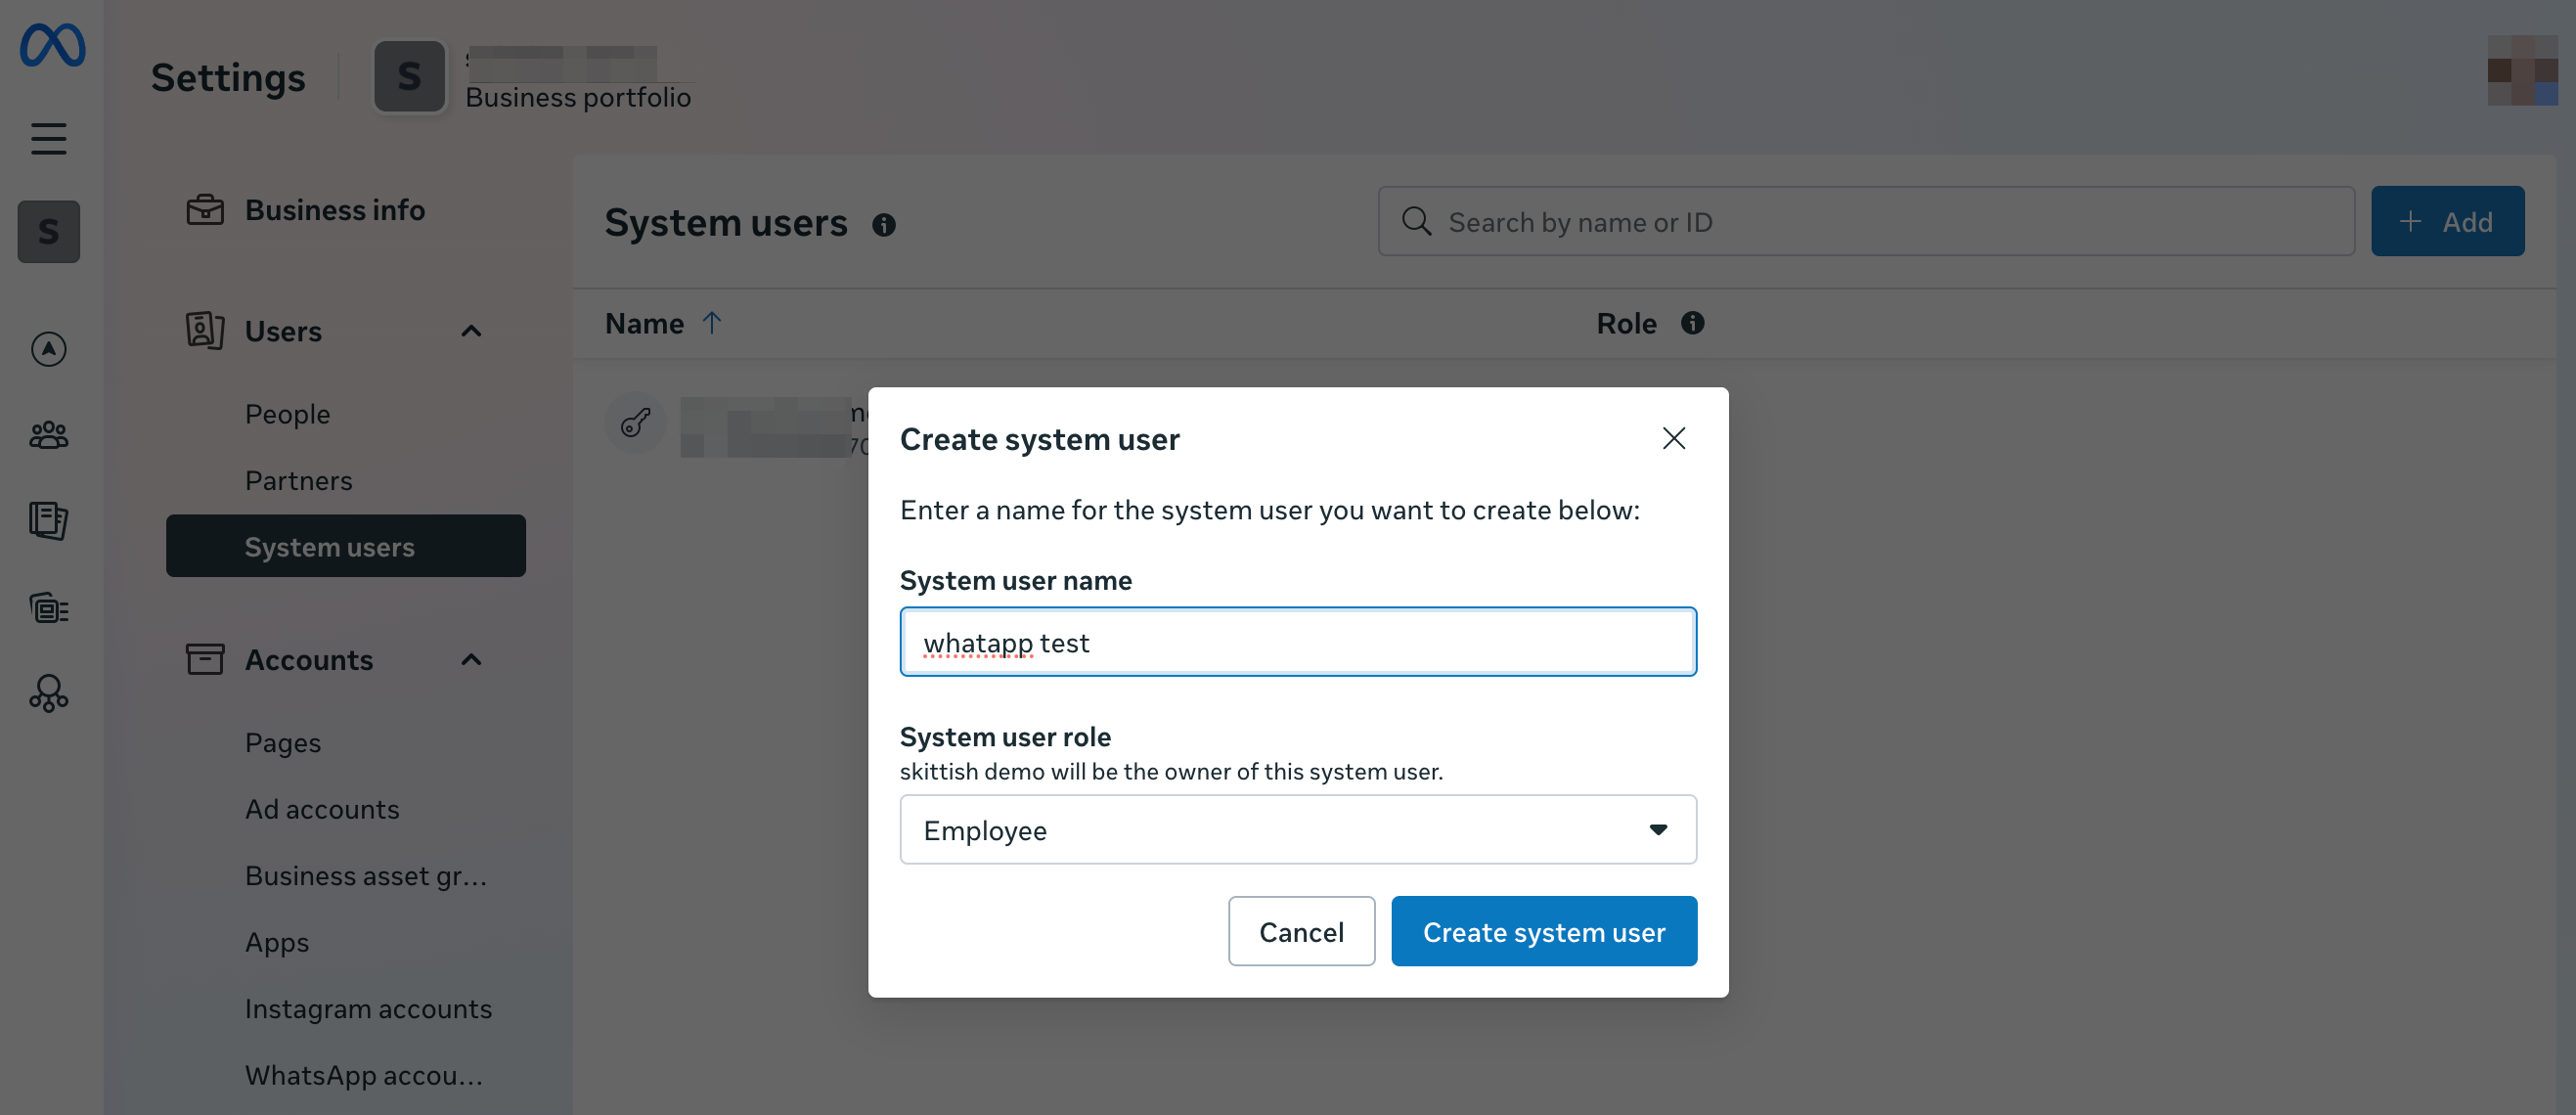
<br><br><br><br> | Klik på “Add new user”, og udfyld brugeroplysningerne:
[[File:Create user facebook step 2.png|1200px|center|link=https://help.simplybook.me/images/1/1b/Create_user_facebook_step_2.png
]]
<br><br> | ||
==WhatsApp AI booking== | Gå til “Assign Assets”:
[[File:Assign assets path.png|1200px|center|link=https://help.simplybook.me/images/9/9e/Assign_assets_path.png
]]
<br><br> | ||
På fanen Apps skal du vælge din app og aktivere tilladelsen “Manage app”:
[[File:Add manage app permission.png|1200px|center|link=https://help.simplybook.me/images/f/f3/Add_manage_app_permission.png
]]
<br><br> | |||
[[File:Create sb app step 1.png|1200px|center|link=https://help.simplybook.me/images/9/9c/Create_sb_app_step_1. | På fanen WhatsApp accounts skal du vælge dine WhatsApp-konti og aktivere tilladelsen “Manage WhatsApp business accounts”:
[[File:Whatsapp acc permissions add.png|1200px|center|link=https://help.simplybook.me/images/1/17/Whatsapp_acc_permissions_add.png
]]
<br><br> | ||
<br><br> | Når aktiver er tildelt, skal du klikke på “Generate Token”:
[[File:Generate token path.png|1200px|center|link=https://help.simplybook.me/images/d/dd/Generate_token_path.png
]]
<br><br> | ||
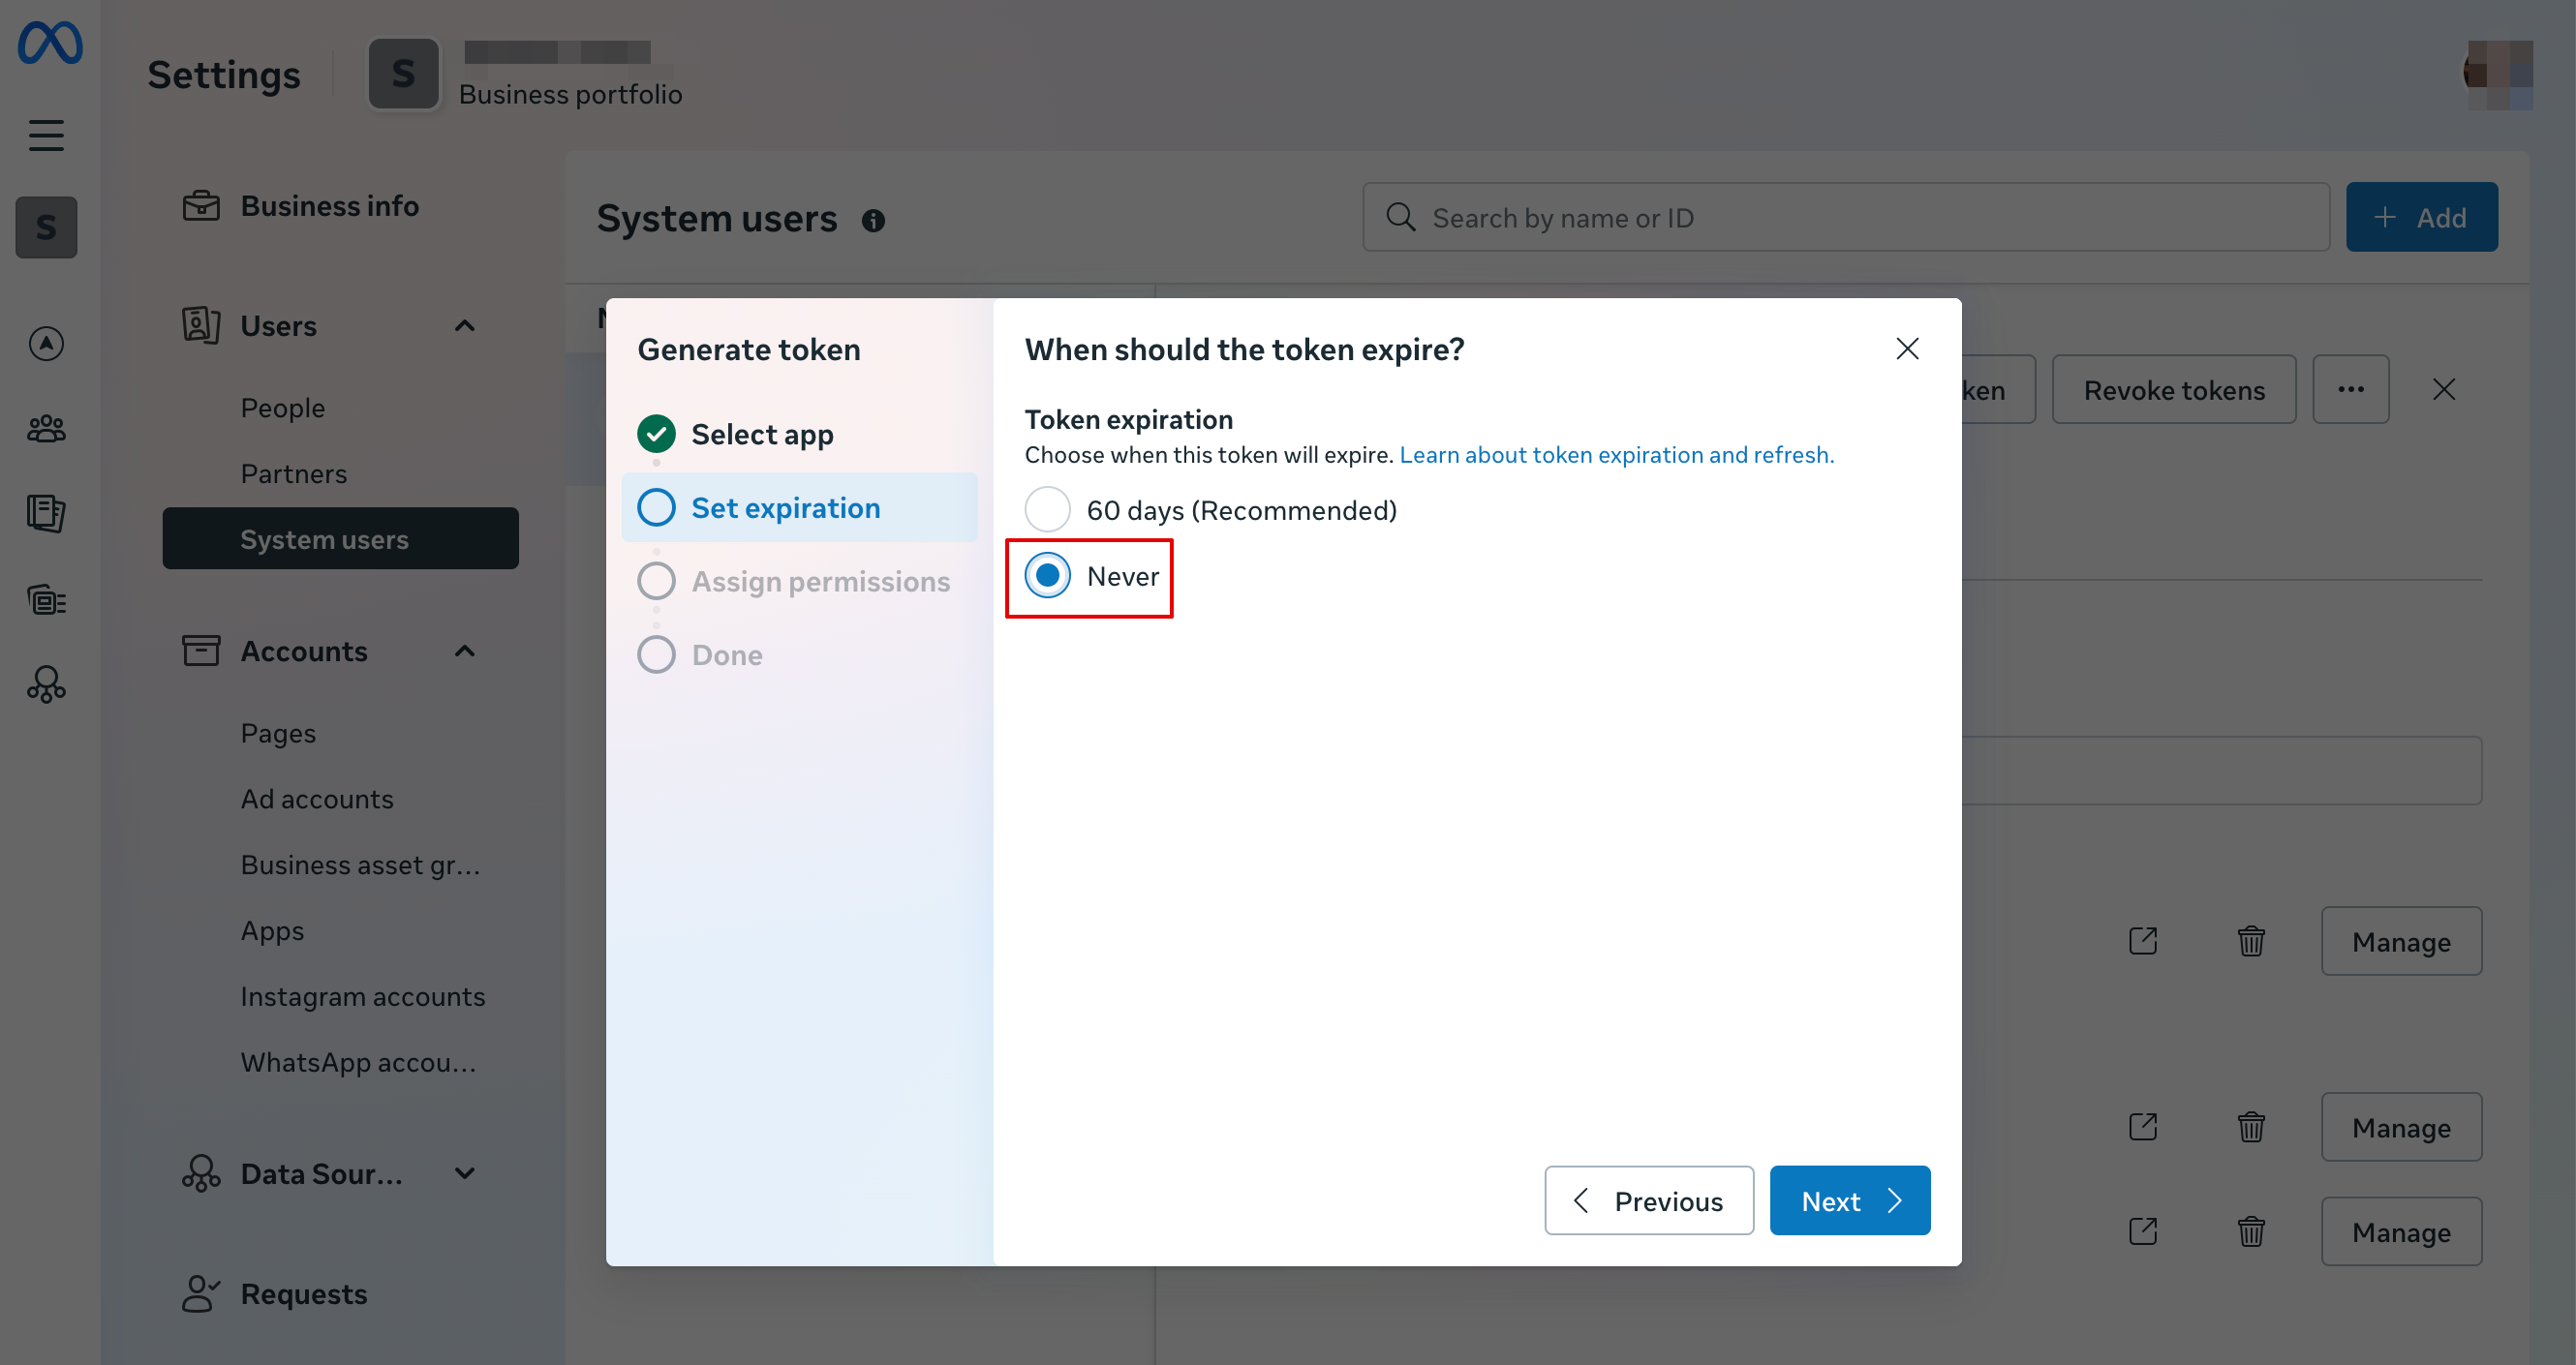
Vælg din app i rullemenuen, og indstil token-udløb til “never”:
[[File:Token never expire.png|1200px|center|link=https://help.simplybook.me/images/2/2a/Token_never_expire.png
]]
<br><br> | |||
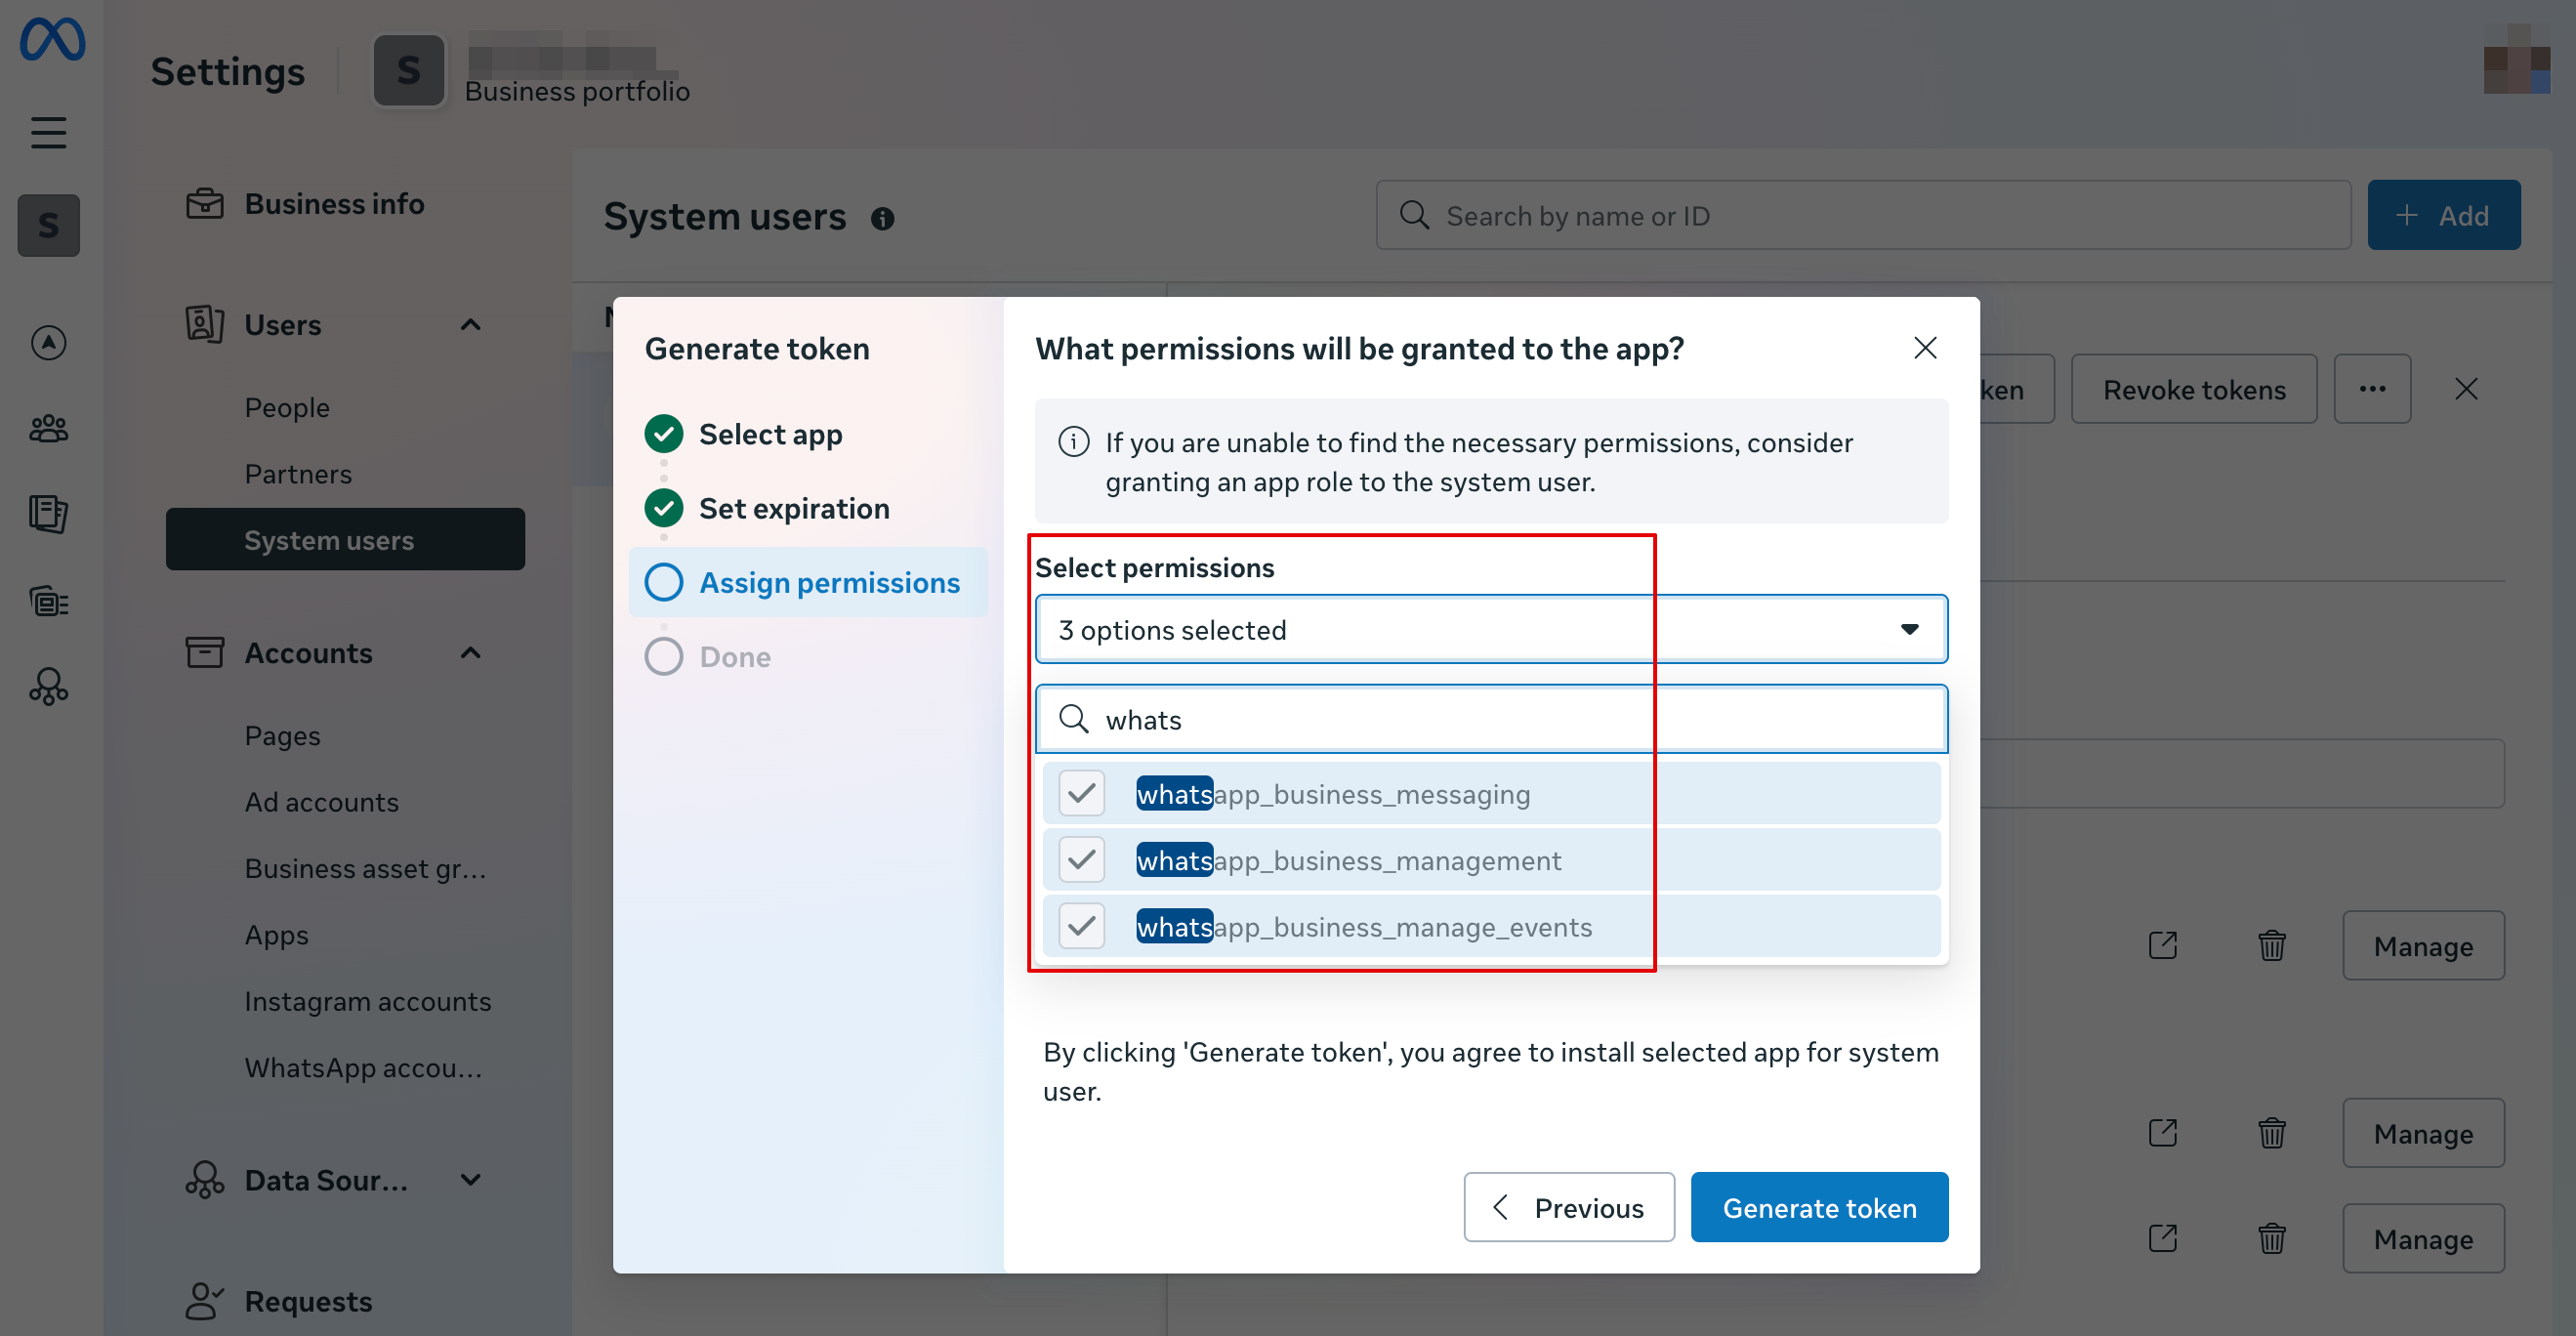
[[File:Add app name step2.png|1200px|center|link=https://help.simplybook.me/images/d/db/Add_app_name_step2. | Vælg følgende tilladelser:
[[File:Whatapp permissions.png|1200px|center|link=https://help.simplybook.me/images/9/97/Whatapp_permissions.png
]]
<br><br> | ||
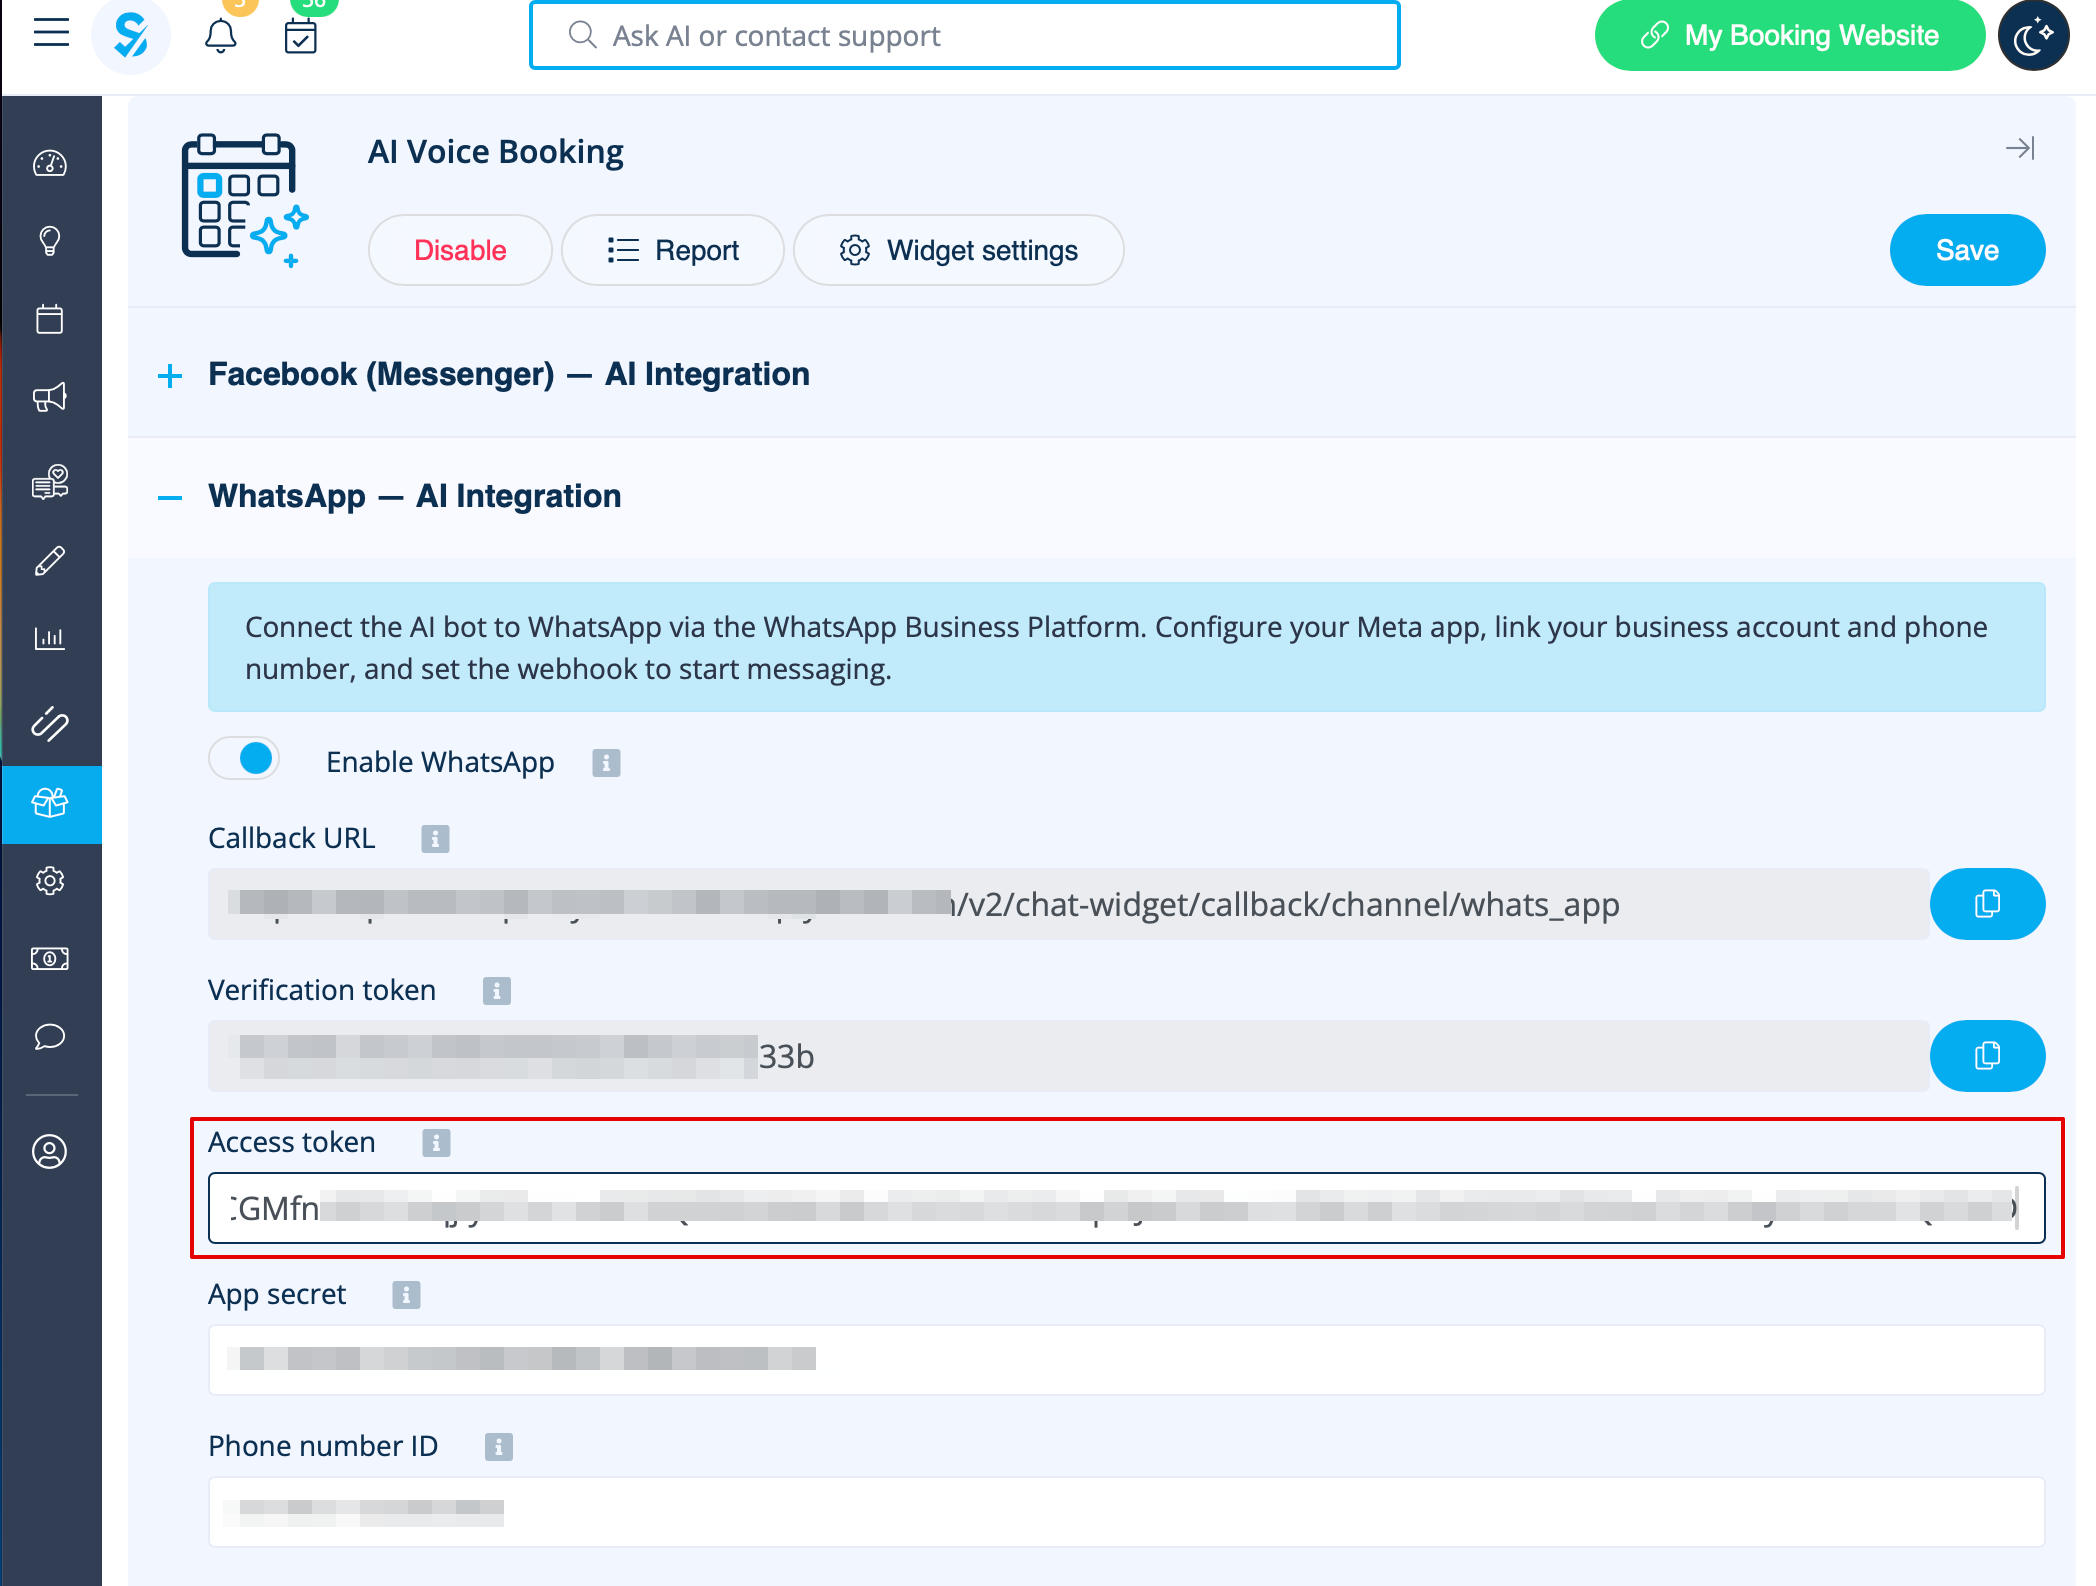
<br><br> | Kopiér token, indsæt det i SB, og gem indstillingerne.<br>
[[File:Paste token to sbm.png|1200px|center|link=https://help.simplybook.me/images/e/e7/Paste_token_to_sbm.png
]]
<br><br> | ||
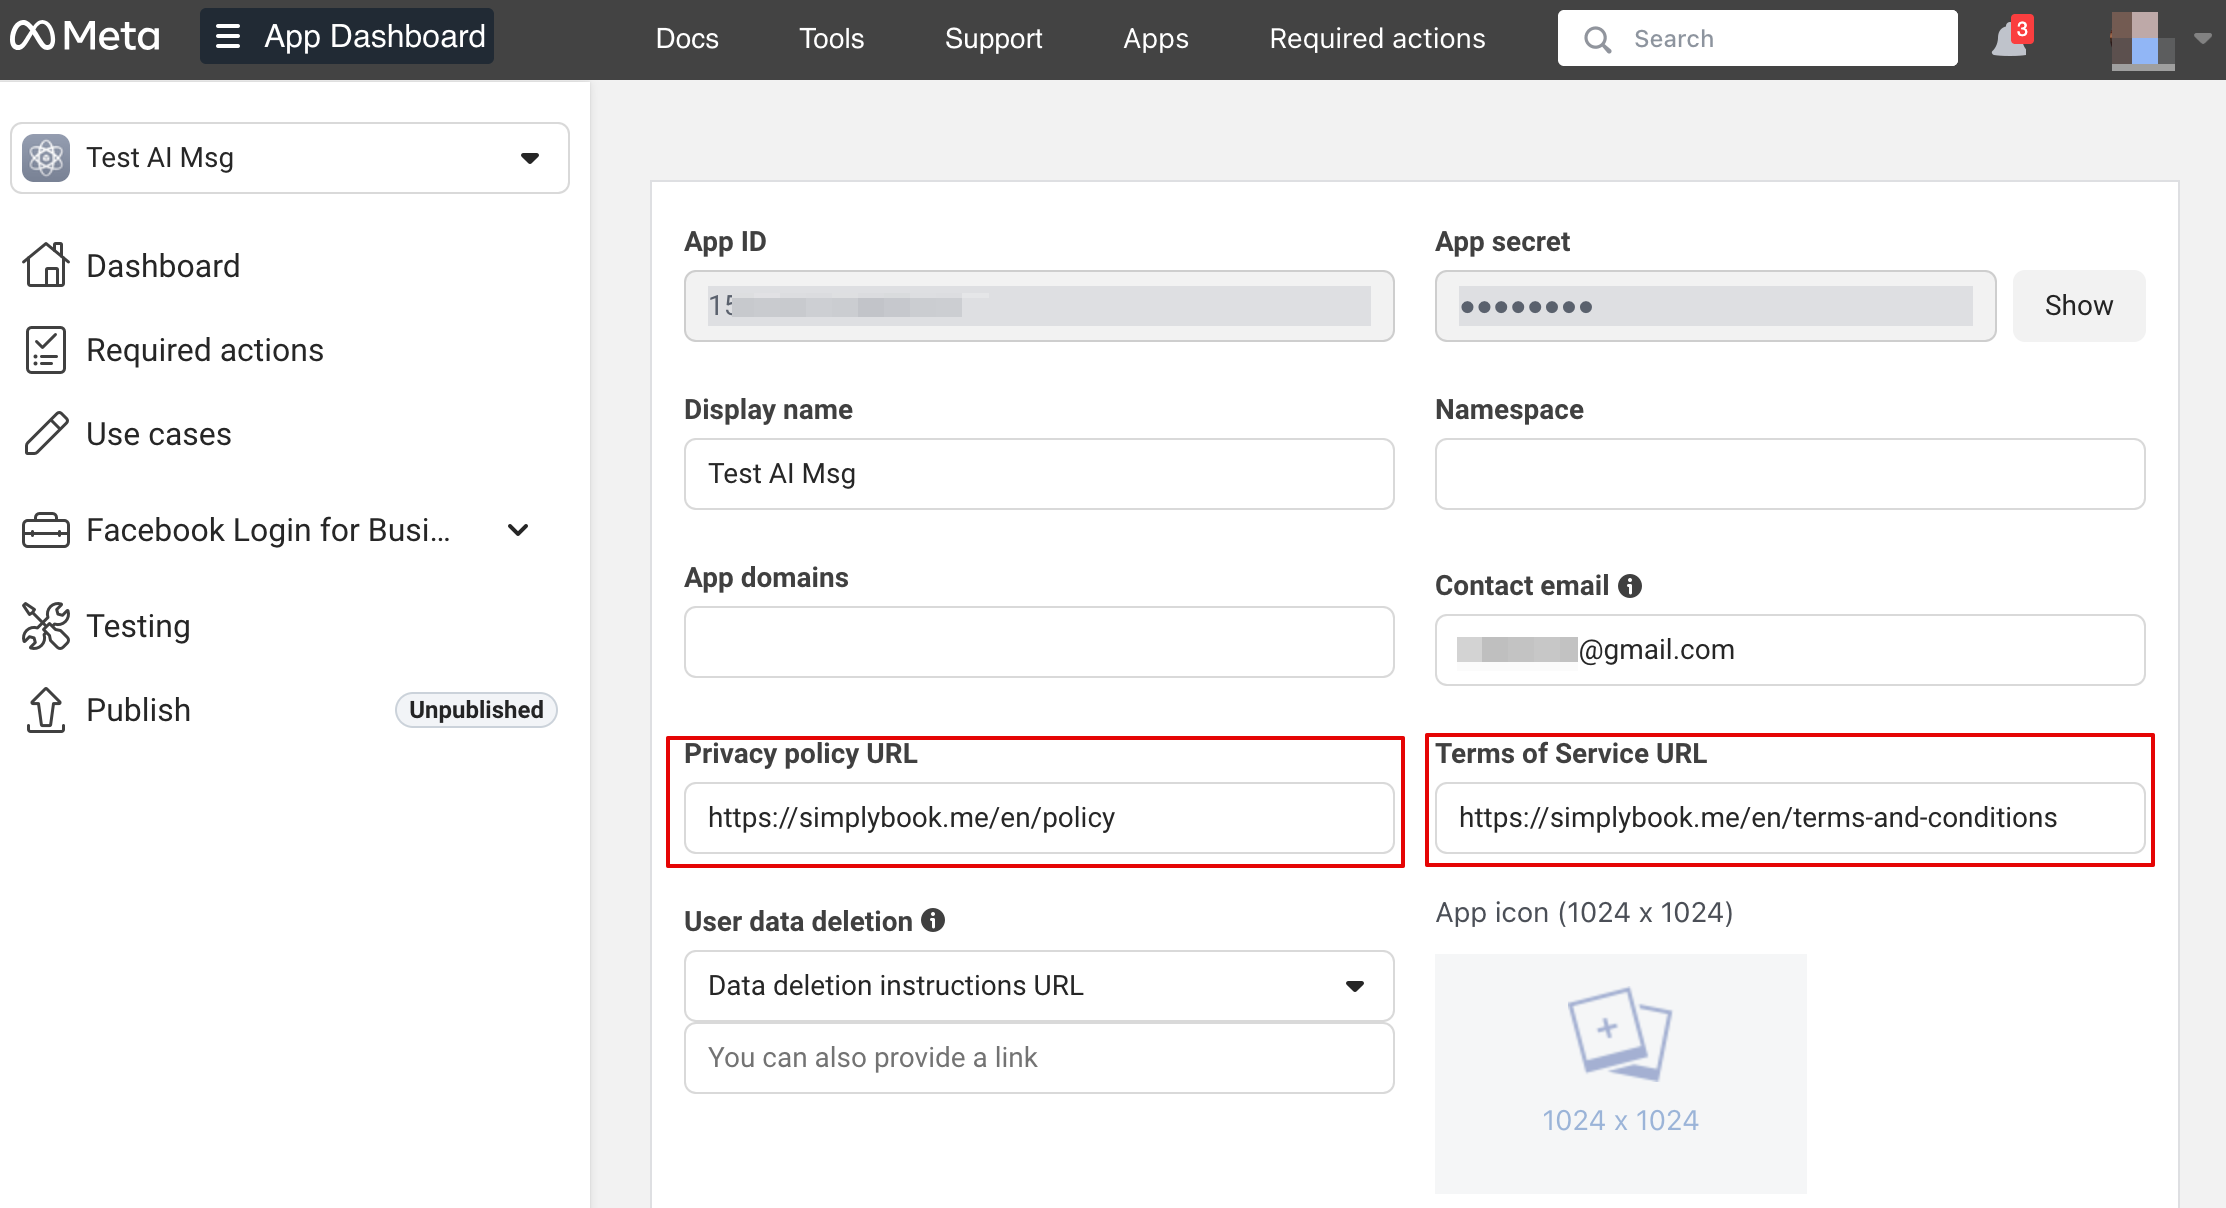
Gå tilbage til https://developers.facebook.com/apps/
, vælg din app, og klik på Indstillinger -> Grundlæggende. Indsæt links til privatlivspolitik og vilkår for brug.
[[File:App settings basic path.png|1200px|center|link=https://help.simplybook.me/images/7/70/App_settings_basic_path.png
]]
[[File:Insert your terms and privacy policy links upd.png|1200px|center|link=https://help.simplybook.me/images/9/92/Insert_your_terms_and_privacy_policy_links_upd.png
]]
<br><br> | |||
[[File:Connect through whatsapp step3.png|1200px|center|link=https://help.simplybook.me/images/8/8a/Connect_through_whatsapp_step3. | Kopiér App Secret, og indsæt det i SB.
[[File:Paste app secret to sbm.png|1200px|center|link=https://help.simplybook.me/images/2/20/Paste_app_secret_to_sbm.png
]]
<br><br> | ||
<br><br> | Nu kan du udgive appen, dele dit WhatsApp Business-nummer med dine kunder og lade dem booke tjenester ved hjælp af AI.
[[File:Publish wa app.png|1200px|center|link=https://help.simplybook.me/index.php?title=File
:Publish_wa_app.png]]
<br><br><br><br> | ||
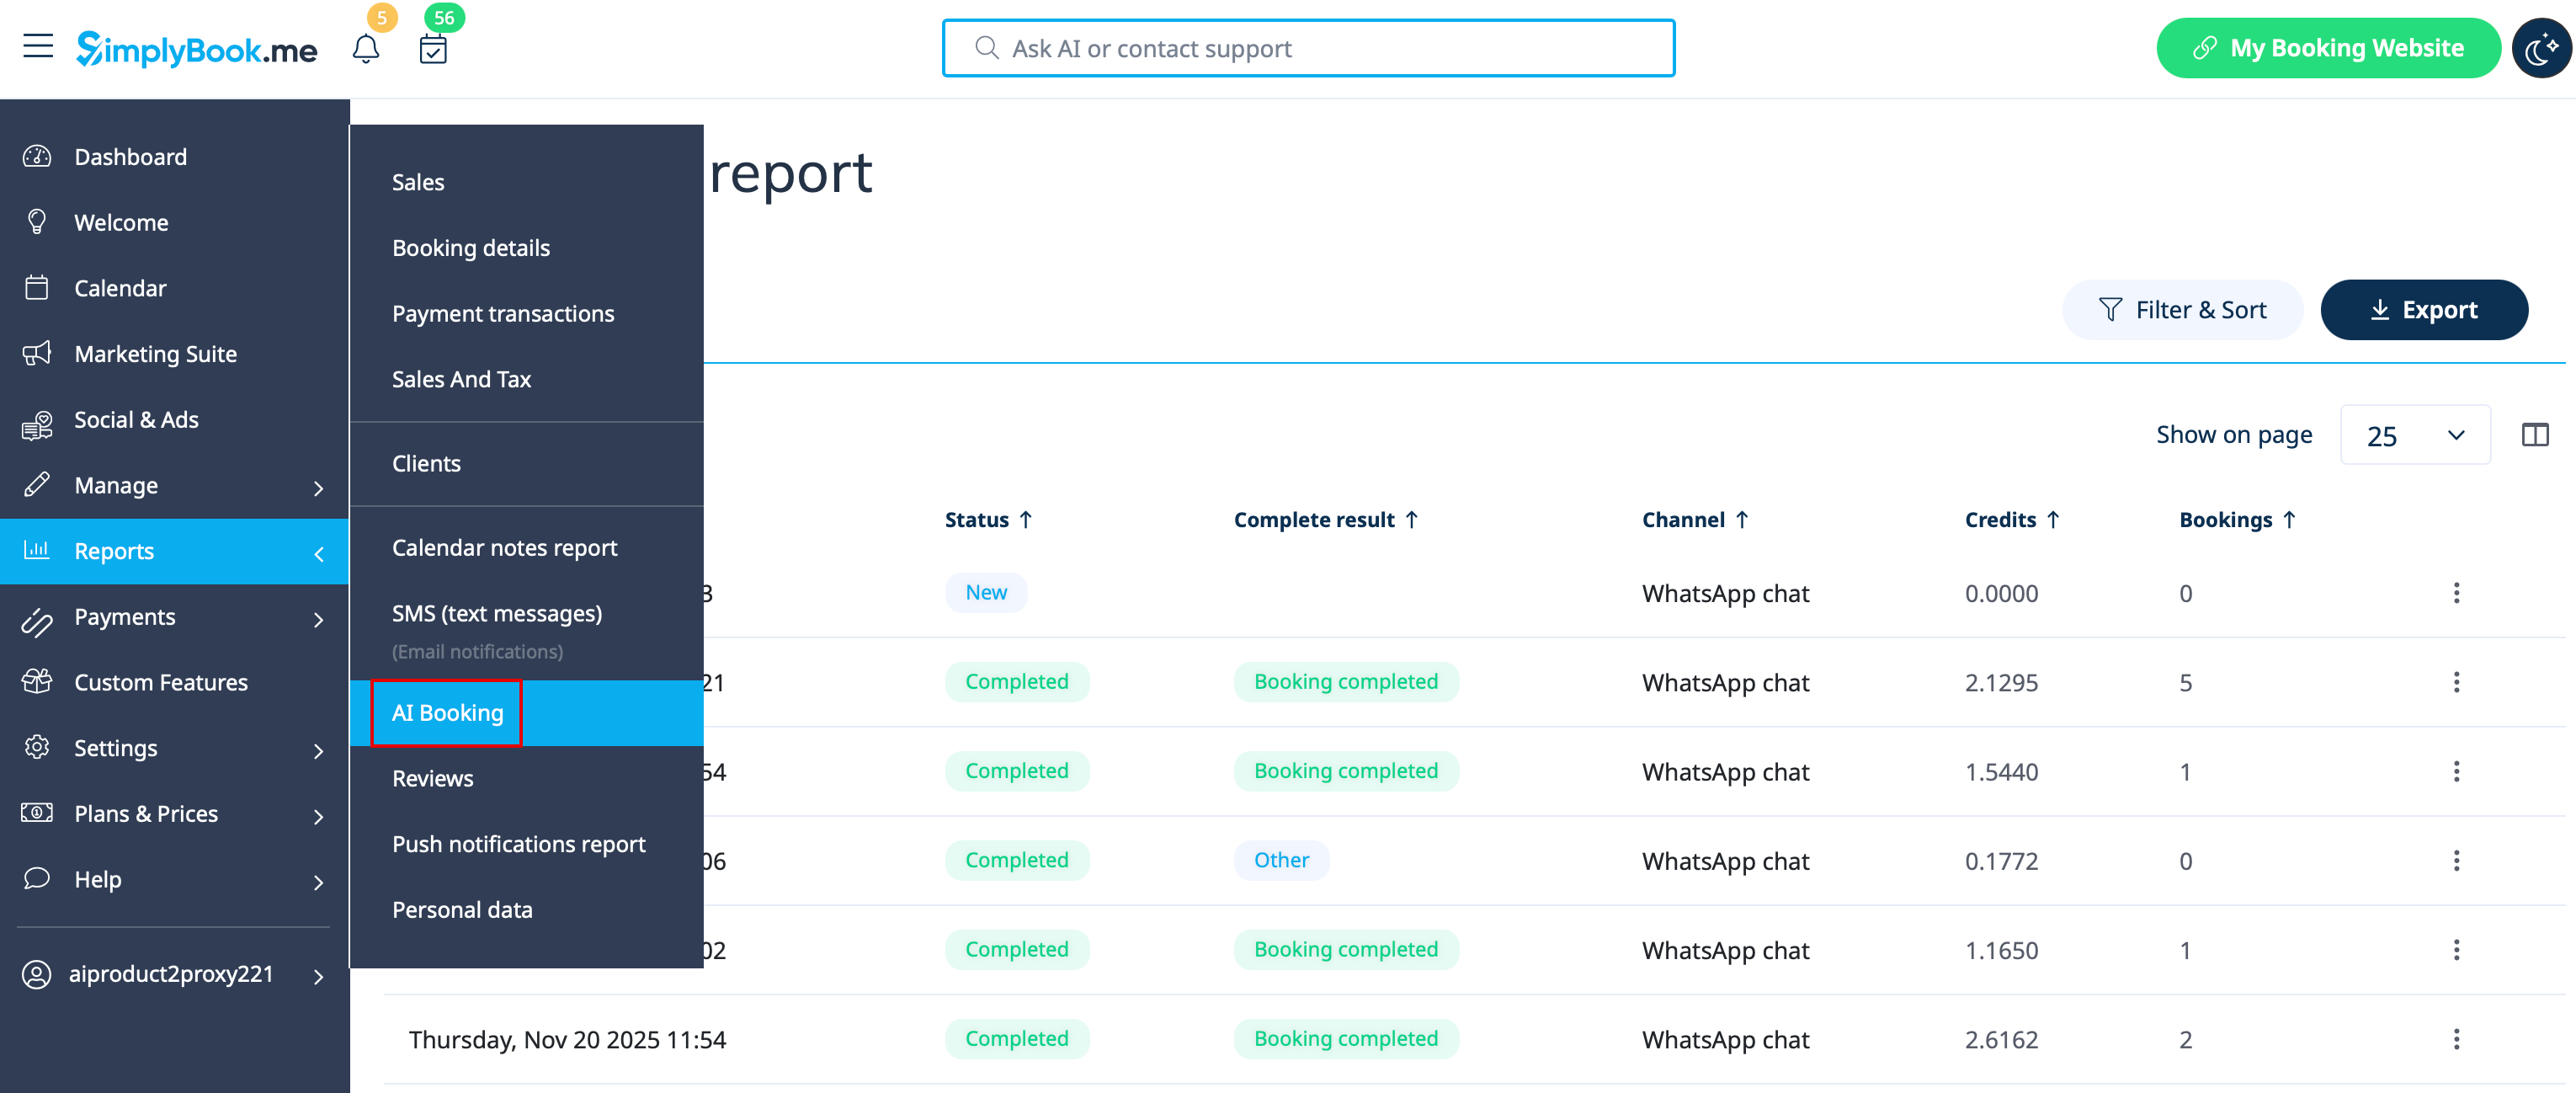
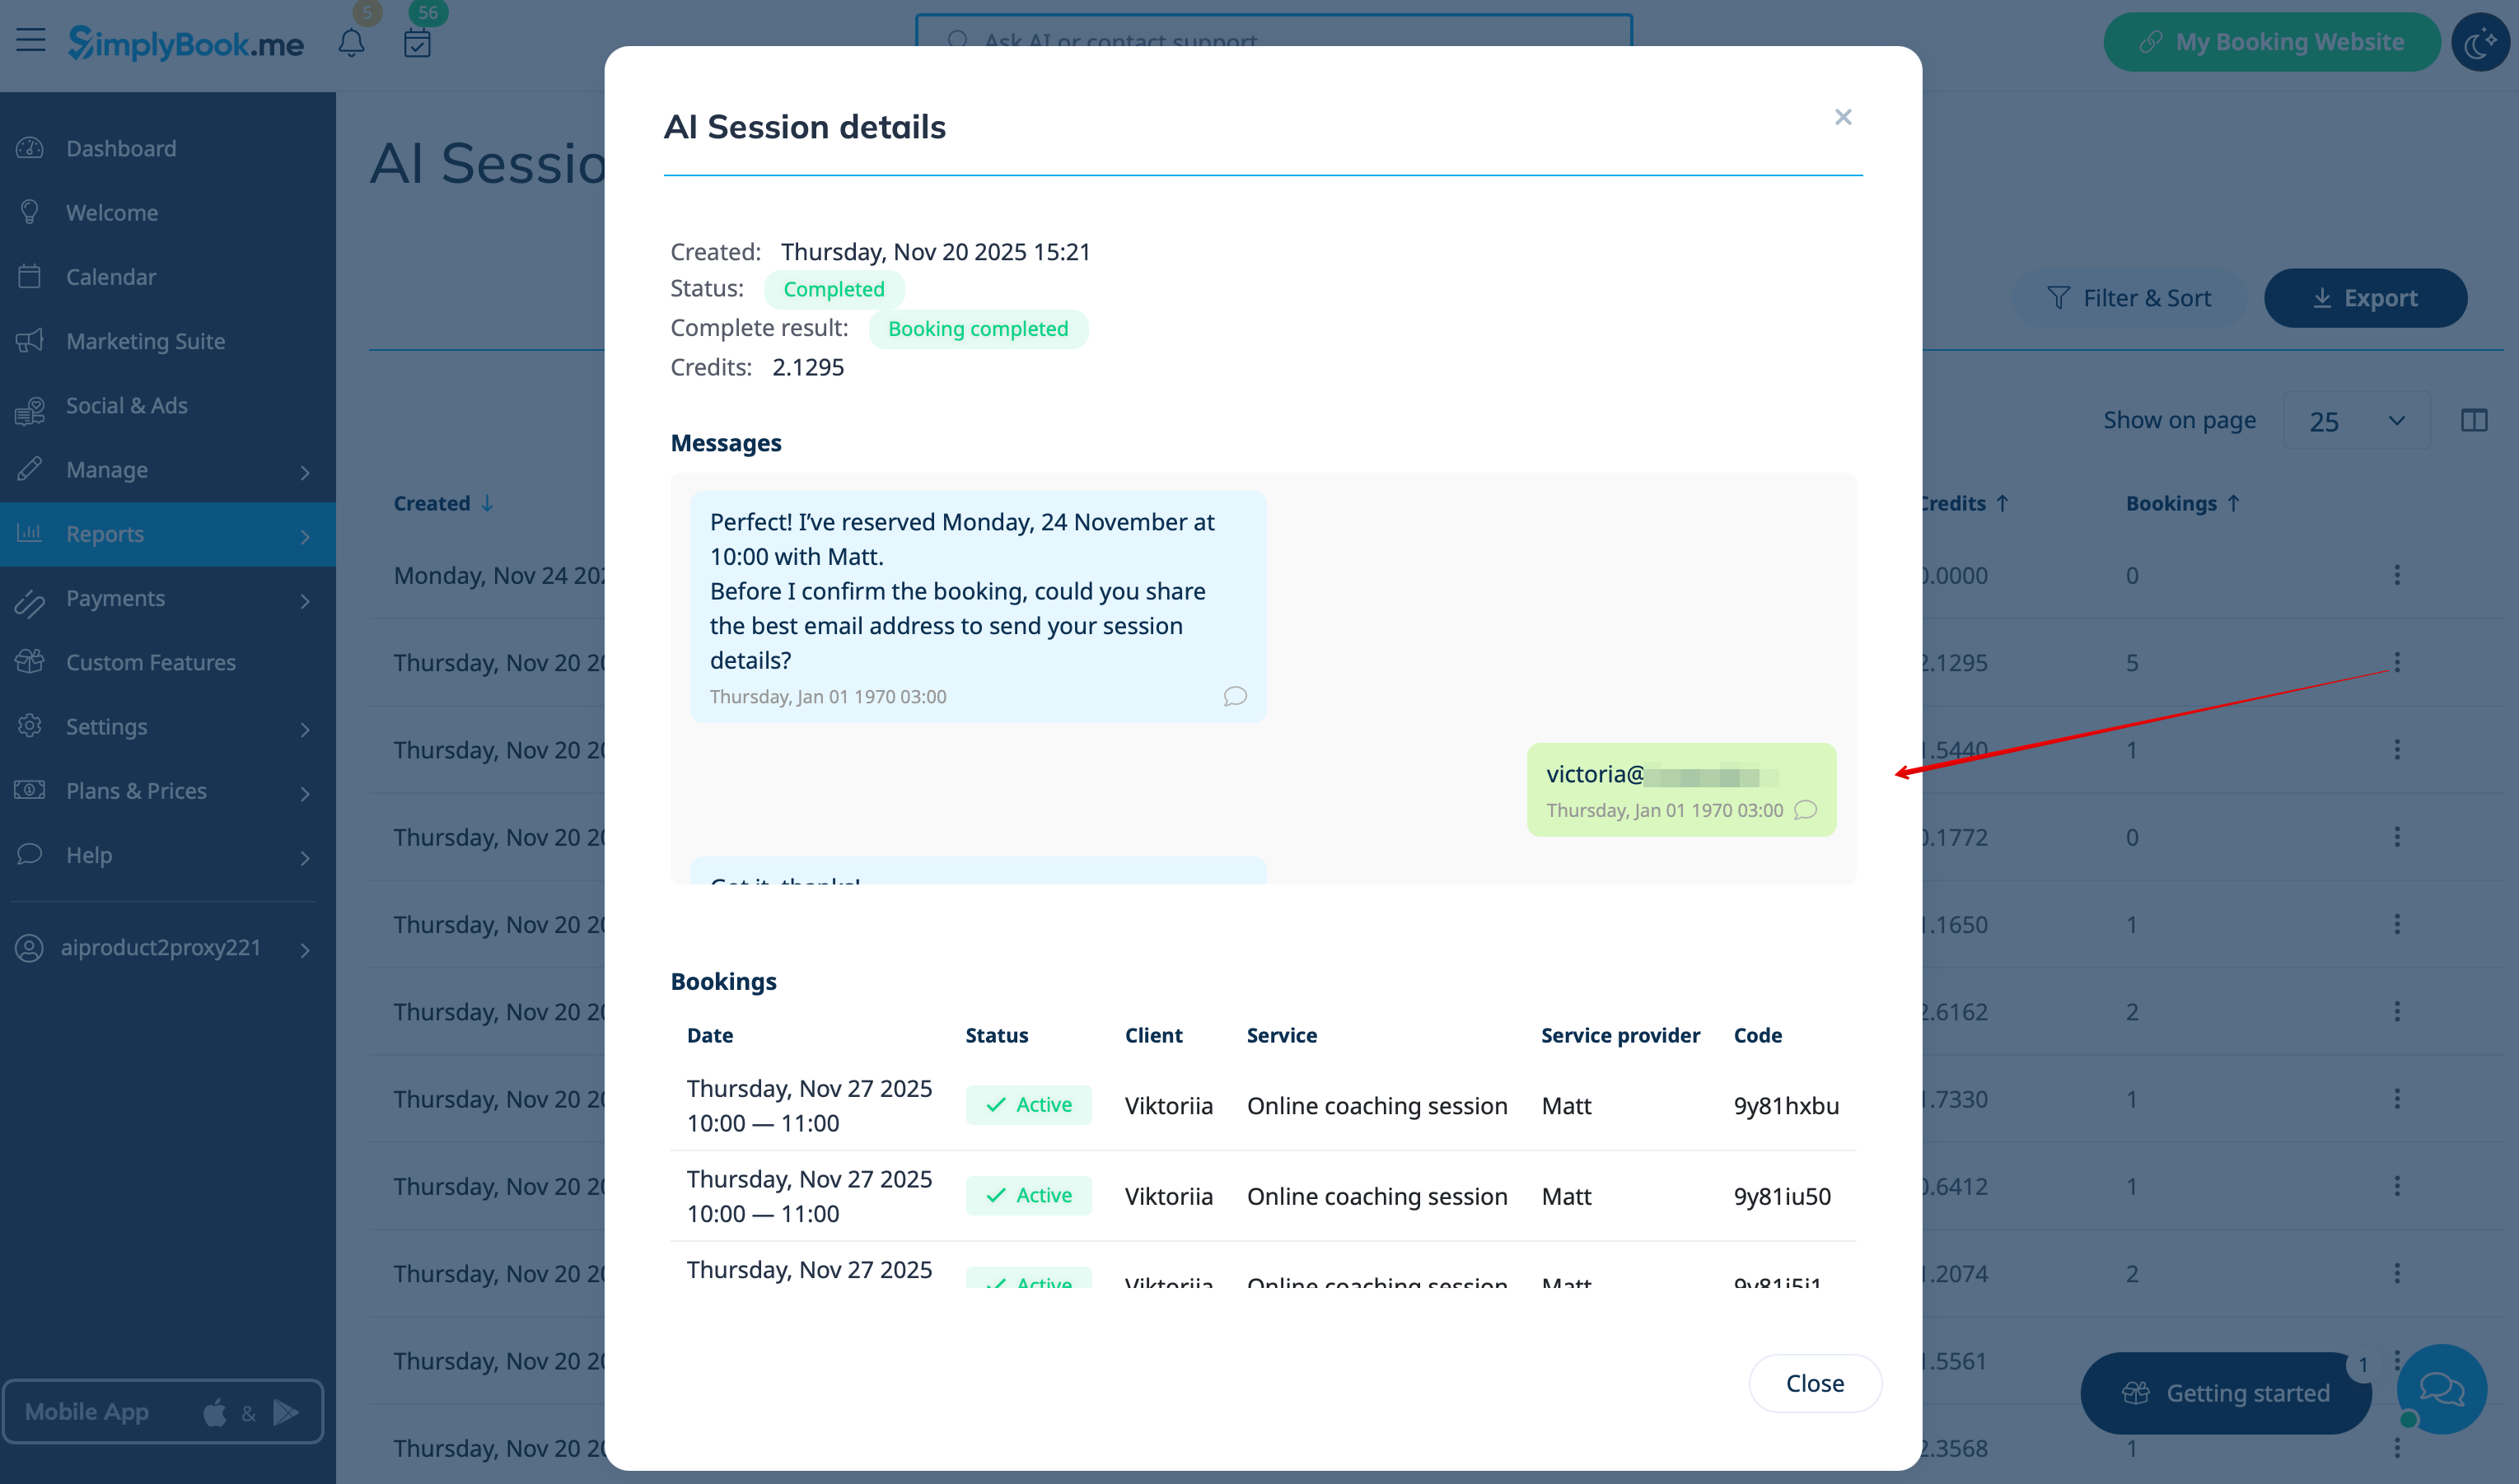
==Rapport==
Du kan se chats, antallet af brugte credits samt sessiondetaljer med tilhørende bookingoplysninger (hvis bookingprocessen blev gennemført) under Rapporter -> AI-booking.
[[File:Ai report path.png|1200px|center|link=https://help.simplybook.me/images/4/41/Ai_report_path.png | |||
[[File:Select or create business step 5.png|1200px|center|link=https://help.simplybook.me/images/1/18/Select_or_create_business_step_5. | |||
<br><br> | ]]
[[File:Ai report view session details.png|1200px|center|link=https://help.simplybook.me/images/c/ca/Ai_report_view_session_details.png]]
<br><br><br><br> | ||
<br><br> | |||
[[File:Go to dashboard step 6.png|1200px|center|link=https://help.simplybook.me/images/f/fc/Go_to_dashboard_step_6. | |||
<br><br> | |||
[[File:User cases customize.png|1200px|center|link=https://help.simplybook.me/images/a/a7/User_cases_customize. | |||
<br><br> | |||
[[File:Accept the terms and confirm profile.png|1200px|center|link=https://help.simplybook.me/images/8/8c/Accept_the_terms_and_confirm_profile. | |||
<br><br> | |||
[[File:Start using the api.png|1200px|center|link=https://help.simplybook.me/images/1/11/Start_using_the_api. | |||
<br><br> | |||
[[File:Configure webhooks.png|1200px|center|link=https://help.simplybook.me/images/b/bc/Configure_webhooks. | |||
<br><br> | |||
[[File:Callback and token.png|1200px|center|link=https://help.simplybook.me/images/f/f6/Callback_and_token. | |||
<br><br> | |||
[[File:Select product.png|1200px|center|link=https://help.simplybook.me/images/6/66/Select_product. | |||
<br><br> | |||
[[File:Calls and msg subscriptions.png|1200px|center|link=https://help.simplybook.me/images/5/5d/Calls_and_msg_subscriptions. | |||
<br><br> | |||
[[File:Manage phone numbers.png|1200px|center|link=https://help.simplybook.me/images/b/b1/Manage_phone_numbers. | |||
[[File:Copy phone number id.png|1200px|center|link=https://help.simplybook.me/images/9/91/Copy_phone_number_id. | |||
<br><br> | |||
[[File:Add user facebook.png|1200px|center|link=https://help.simplybook.me/images/b/b7/Add_user_facebook. | |||
<br><br> | |||
[[File:Create user facebook step 2.png|1200px|center|link=https://help.simplybook.me/images/1/1b/Create_user_facebook_step_2. | |||
<br><br> | |||
[[File:Assign assets path.png|1200px|center|link=https://help.simplybook.me/images/9/9e/Assign_assets_path. | |||
<br><br> | |||
[[File:Add manage app permission.png|1200px|center|link=https://help.simplybook.me/images/f/f3/Add_manage_app_permission. | |||
<br><br> | |||
[[File:Whatsapp acc permissions add.png|1200px|center|link=https://help.simplybook.me/images/1/17/Whatsapp_acc_permissions_add. | |||
<br><br> | |||
[[File:Generate token path.png|1200px|center|link=https://help.simplybook.me/images/d/dd/Generate_token_path. | |||
<br><br> | |||
[[File:Token never expire.png|1200px|center|link=https://help.simplybook.me/images/2/2a/Token_never_expire. | |||
<br><br> | |||
[[File:Whatapp permissions.png|1200px|center|link=https://help.simplybook.me/images/9/97/Whatapp_permissions. | |||
<br><br> | |||
[[File:Paste token to sbm.png|1200px|center|link=https://help.simplybook.me/images/e/e7/Paste_token_to_sbm. | |||
<br><br> | |||
[[File:App settings basic path.png|1200px|center|link=https://help.simplybook.me/images/7/70/App_settings_basic_path. | |||
[[File:Insert your terms and privacy policy links upd.png|1200px|center|link=https://help.simplybook.me/images/9/92/Insert_your_terms_and_privacy_policy_links_upd. | |||
<br><br> | |||
[[File:Paste app secret to sbm.png|1200px|center|link=https://help.simplybook.me/images/2/20/Paste_app_secret_to_sbm. | |||
<br><br> | |||
[[File:Publish wa app.png|1200px|center|link=https://help.simplybook.me/index.php?title= | |||
<br><br><br><br> | |||
== | |||
[[File:Ai report view session details.png|1200px|center|link=https://help.simplybook.me/images/c/ca/Ai_report_view_session_details.png]] | |||
<br><br><br><br | |||
Revision as of 09:39, 12 January 2026
Tilføj en AI-drevet bookingoplevelse til dit website og dine beskedkanaler. Assistenten indsamler bookingoplysninger, kontrollerer tilgængeligheden af tider og opretter reservationer automatisk.
Et alt-i-én AI-bookingmodul, der forbinder din assistent med dit website og dine beskedkanaler for at modtage bookinger samt sende bekræftelser og påmindelser. Konfigurer integrationer (Facebook Messenger, WhatsApp, web-widget) og grundlæggende indstillinger, og begynd derefter at acceptere reservationer automatisk.
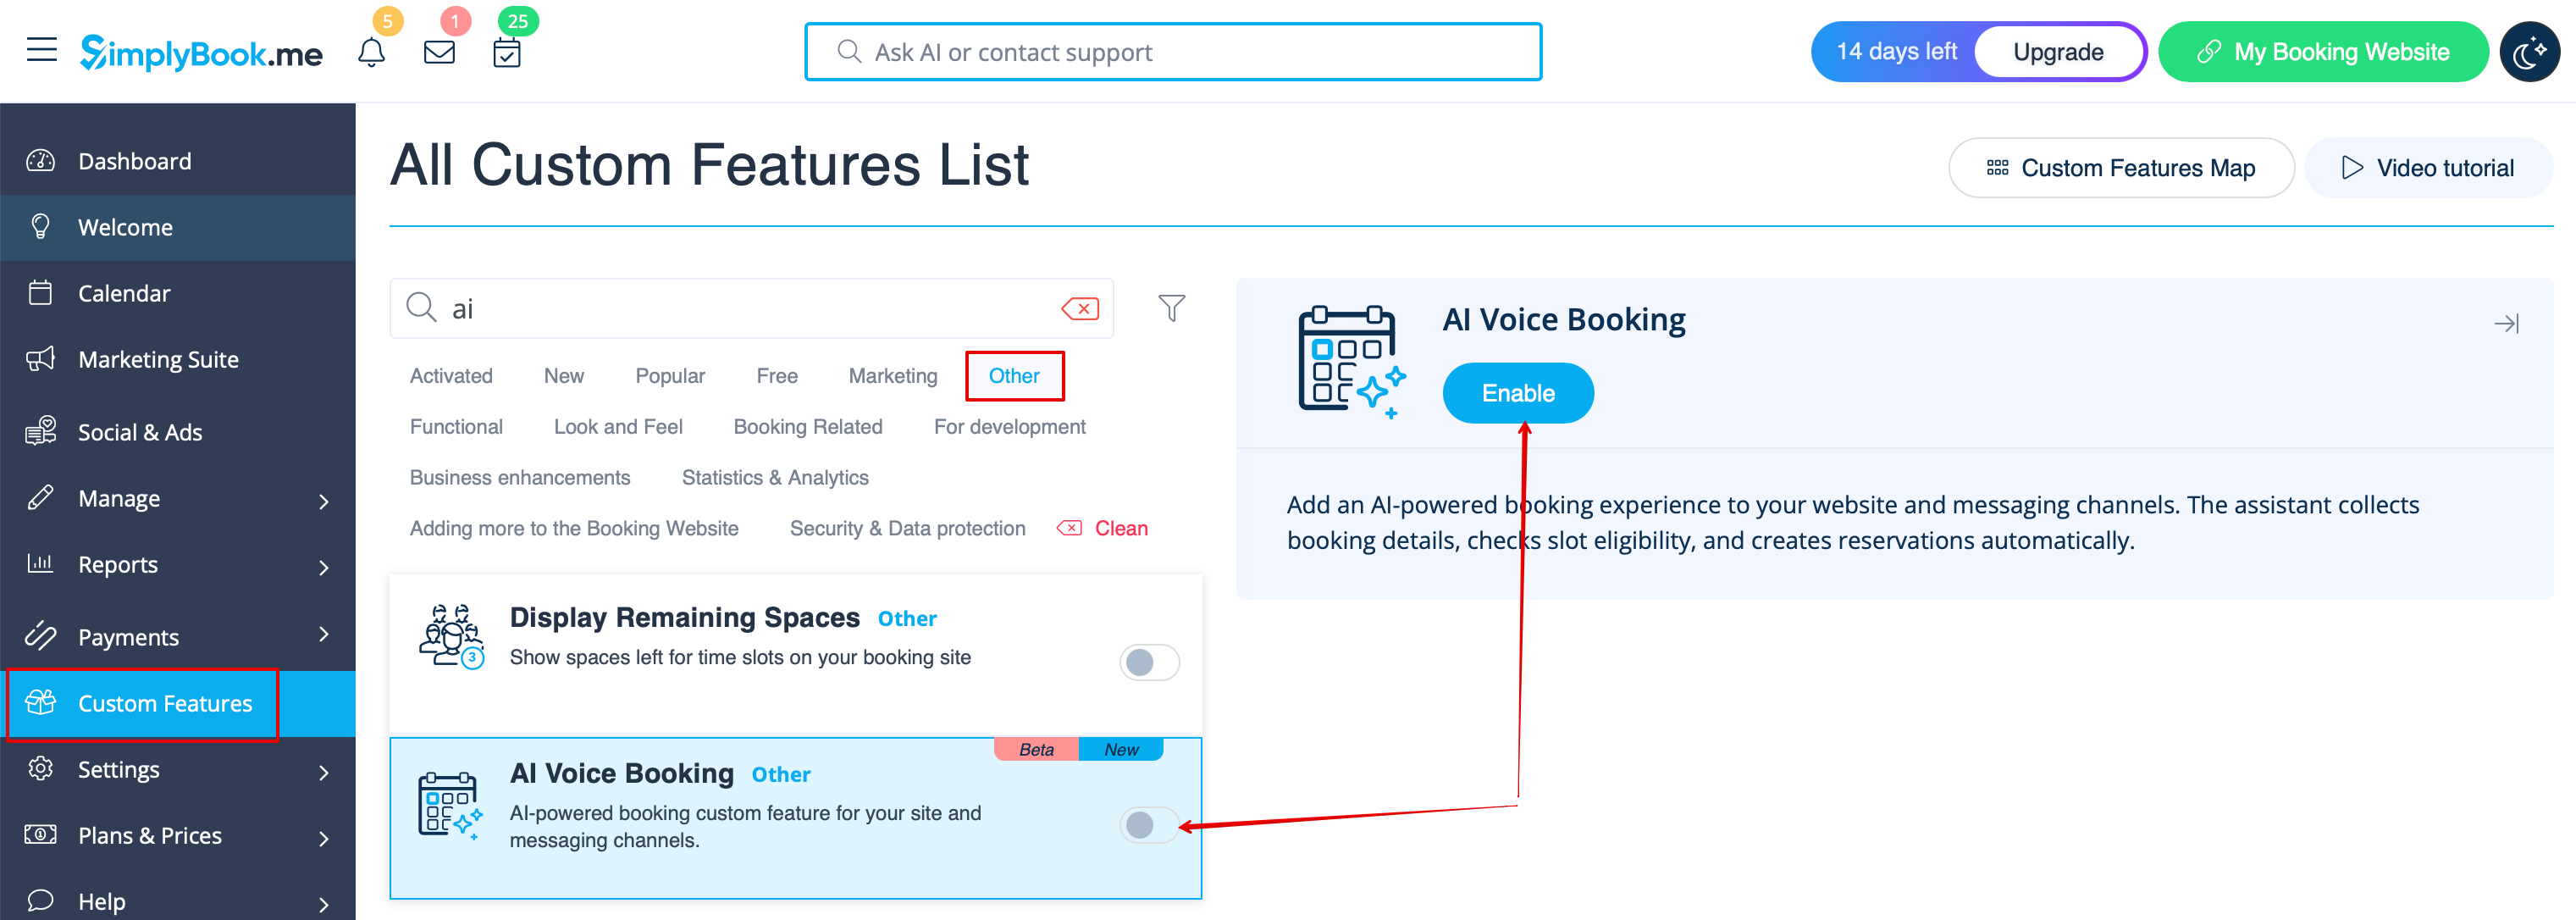
;Sådan bruges funktionen:
Aktivér funktionen på siden Brugerdefinerede funktioner -> Andet -> AI-stemmebooking.
Få gratis prøvecredits der eller køb flere AI-bookingcredits på siden Planer & Priser -> Ekstra elementer
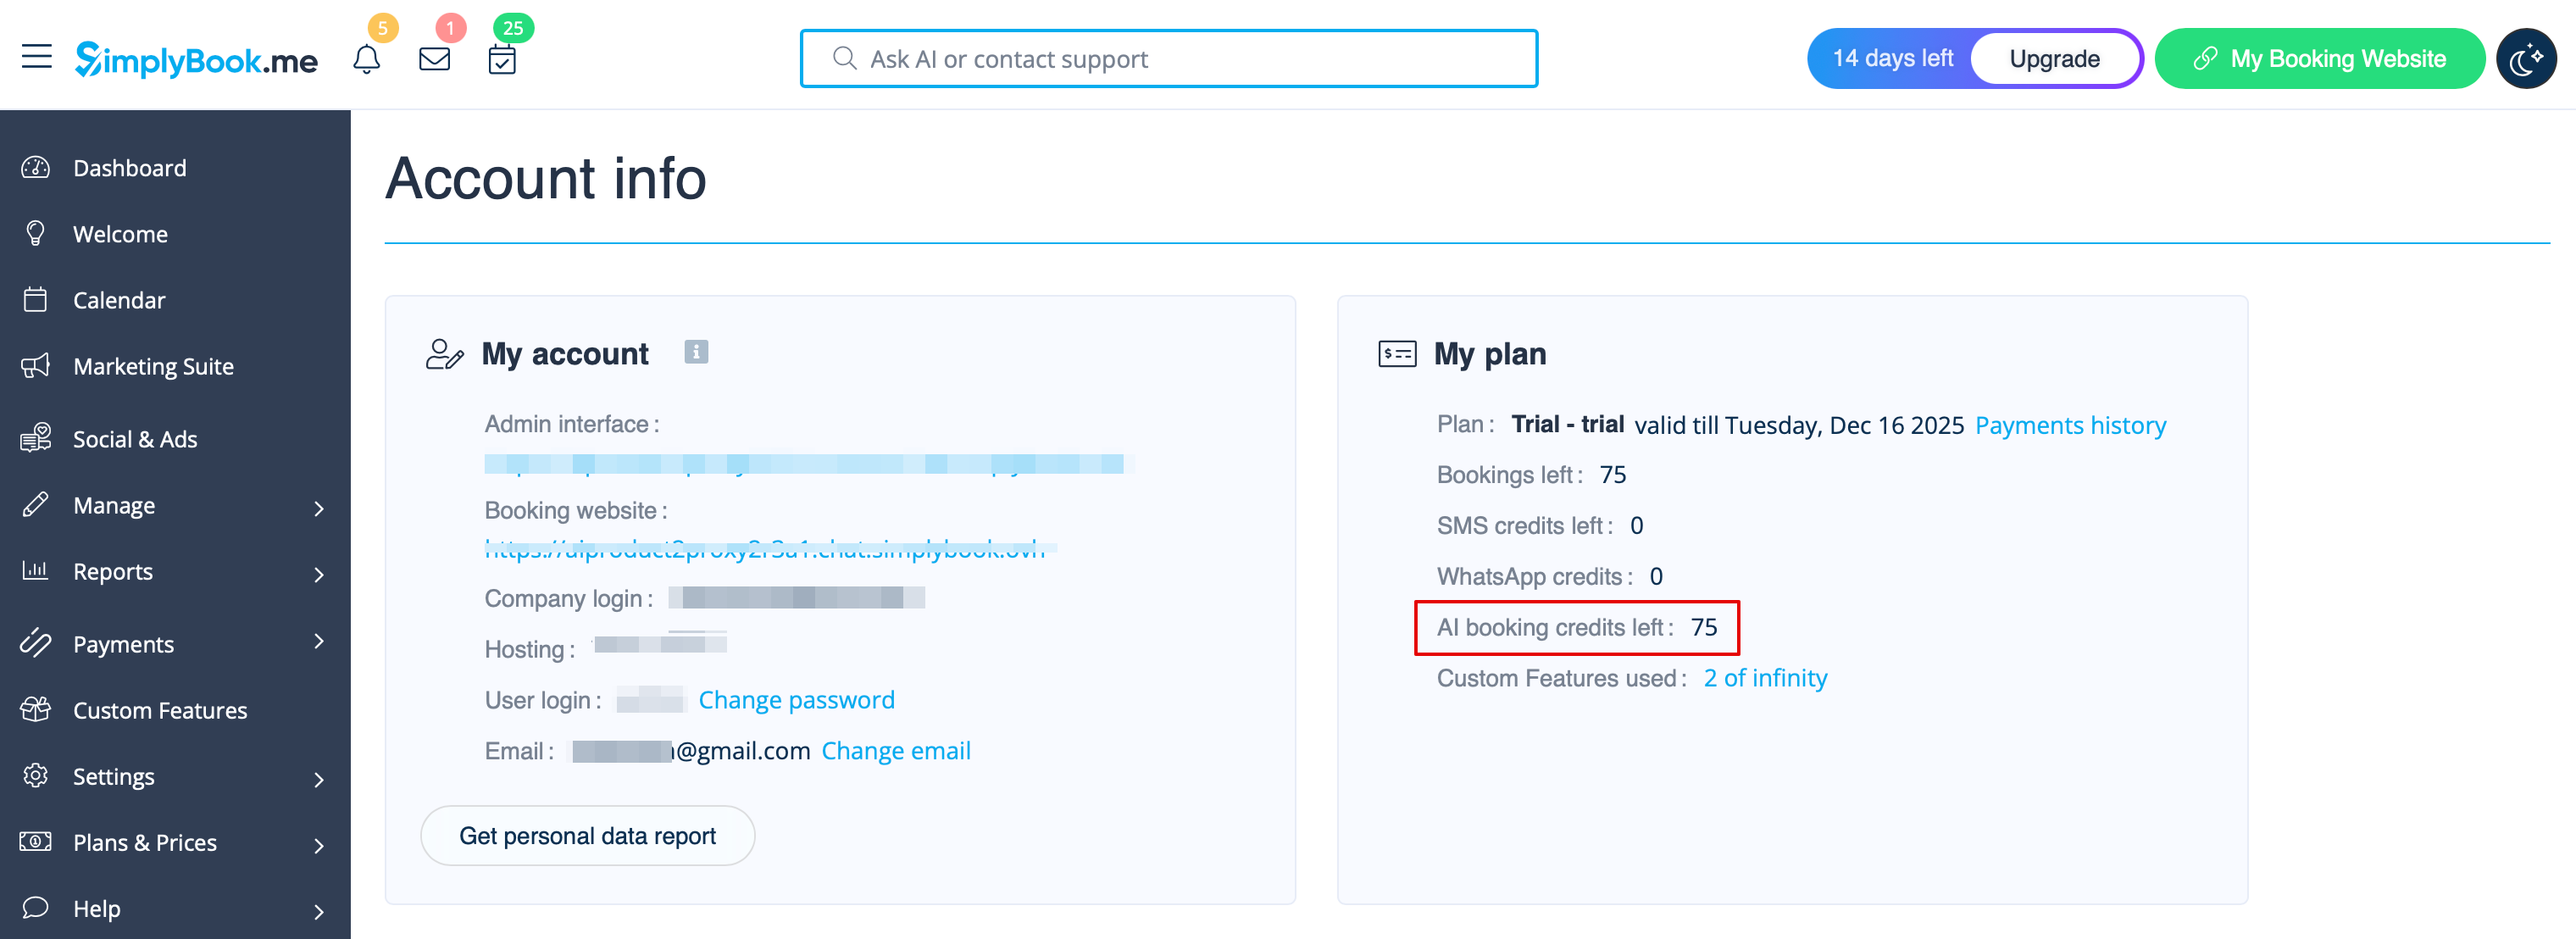
Du kan se antallet af resterende credits på Dashboard-siden eller i Kontooplysninger.
Gå tilbage til Brugerdefinerede funktioner -> Andet -> AI-stemmebooking for at justere præferencer for AI-stemme, model og e-mailbekræftelsestekst.
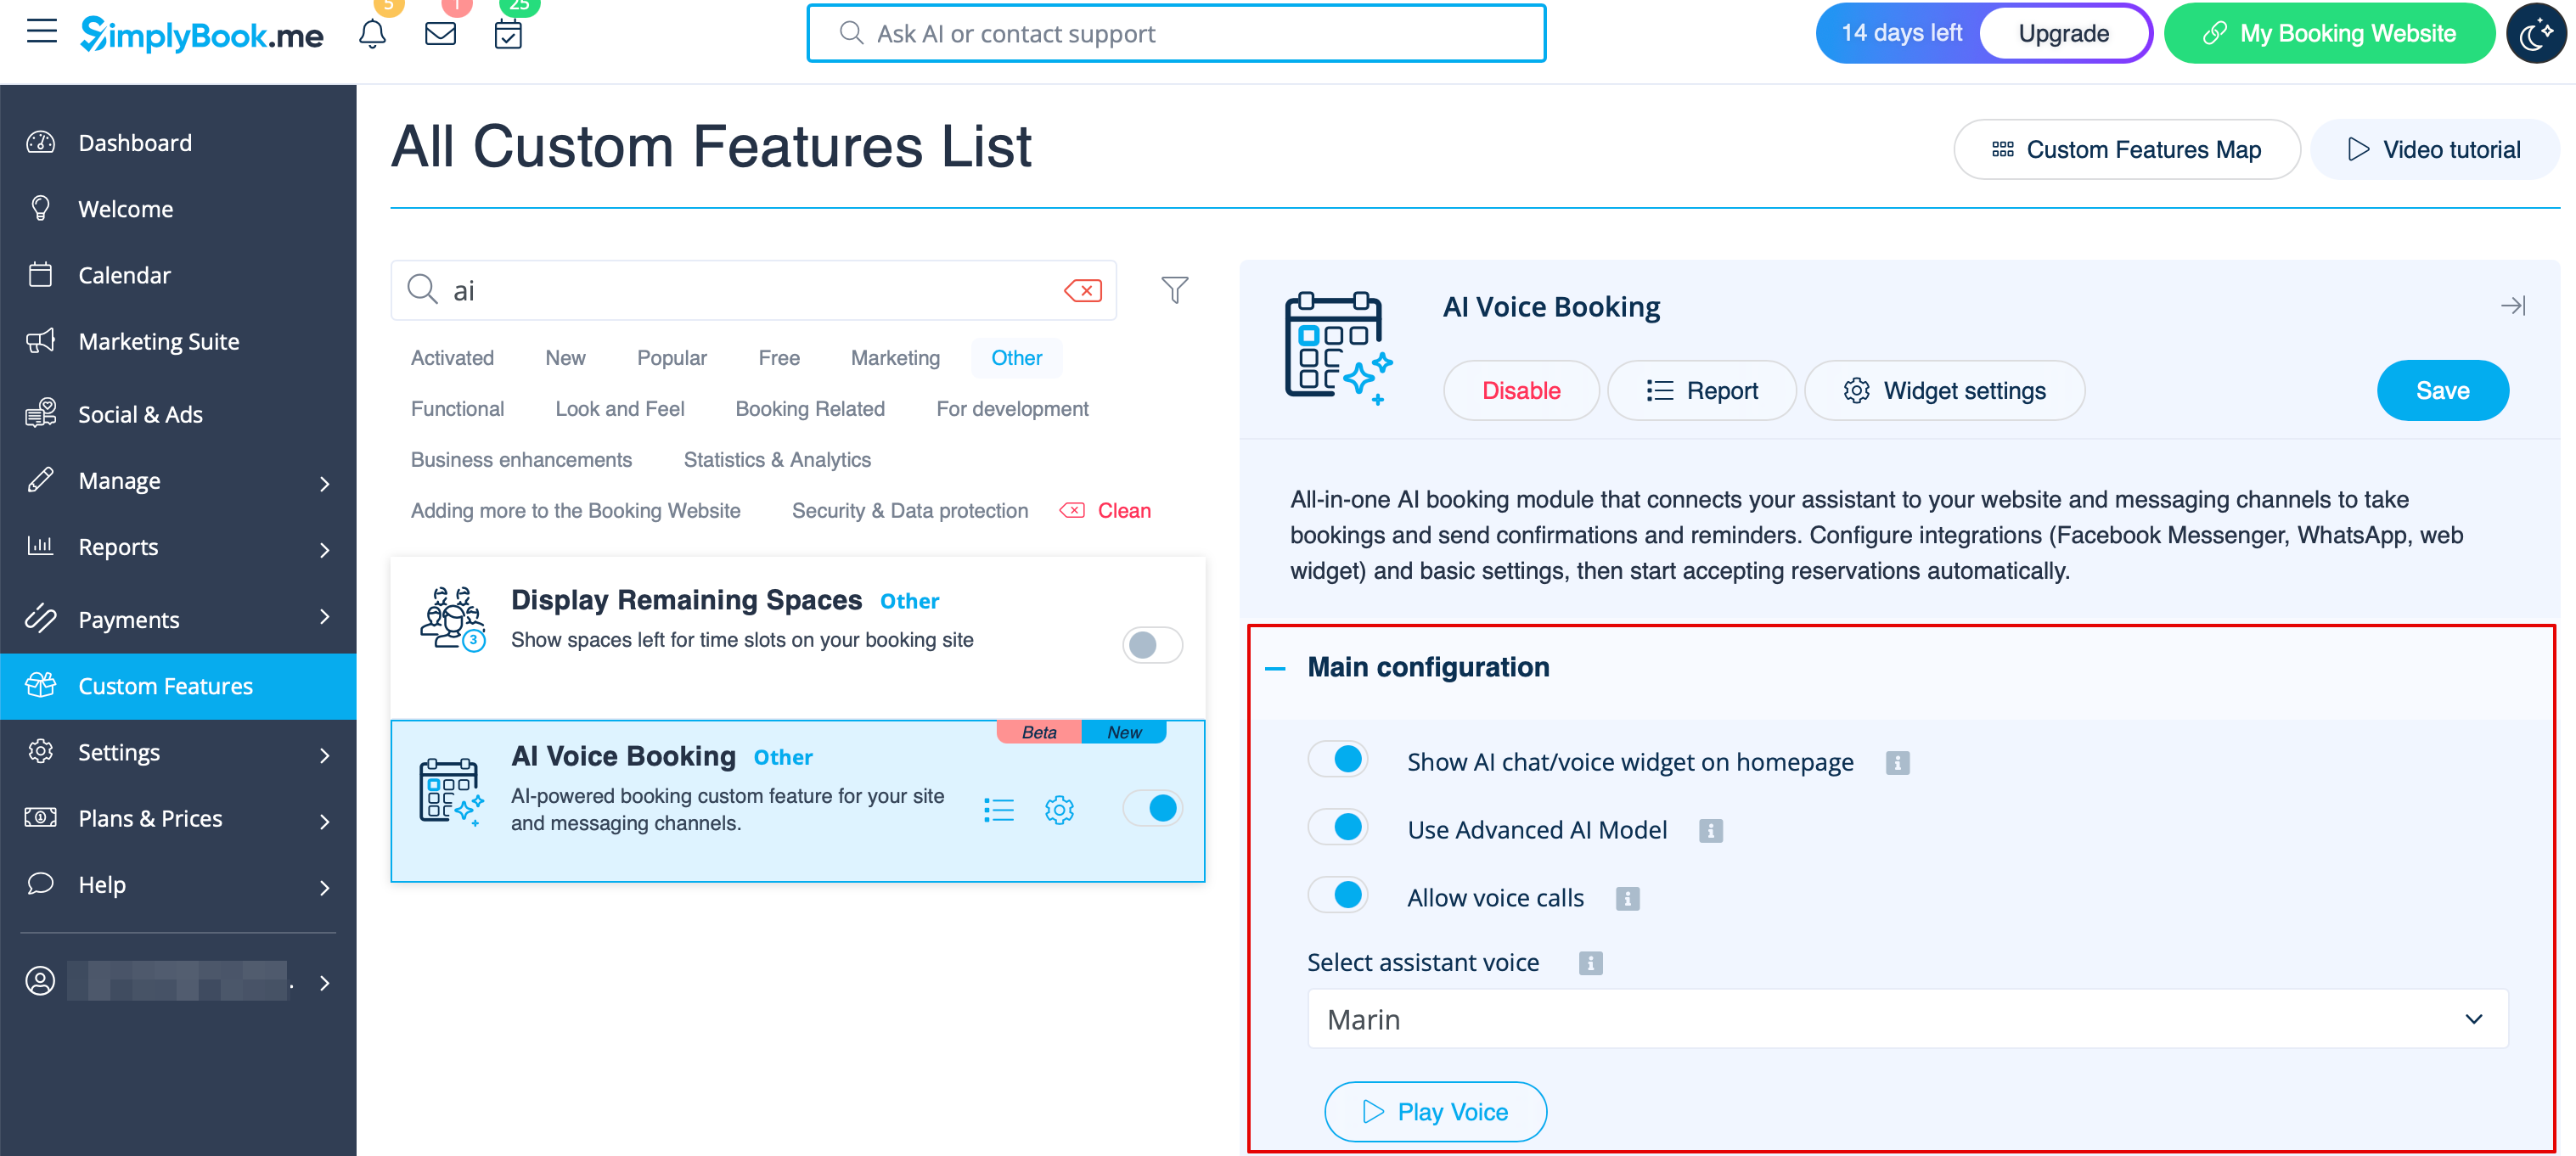
Vælg nu, hvor AI-booking skal være tilgængelig for dine kunder.
Widget / Bookingside
Når credits er købt, tilføjes AI-chatwidgetten automatisk til din bookingside. Kunder kan sende tekst- eller talebeskeder for at gennemføre bookingprocessen med hjælp fra AI.
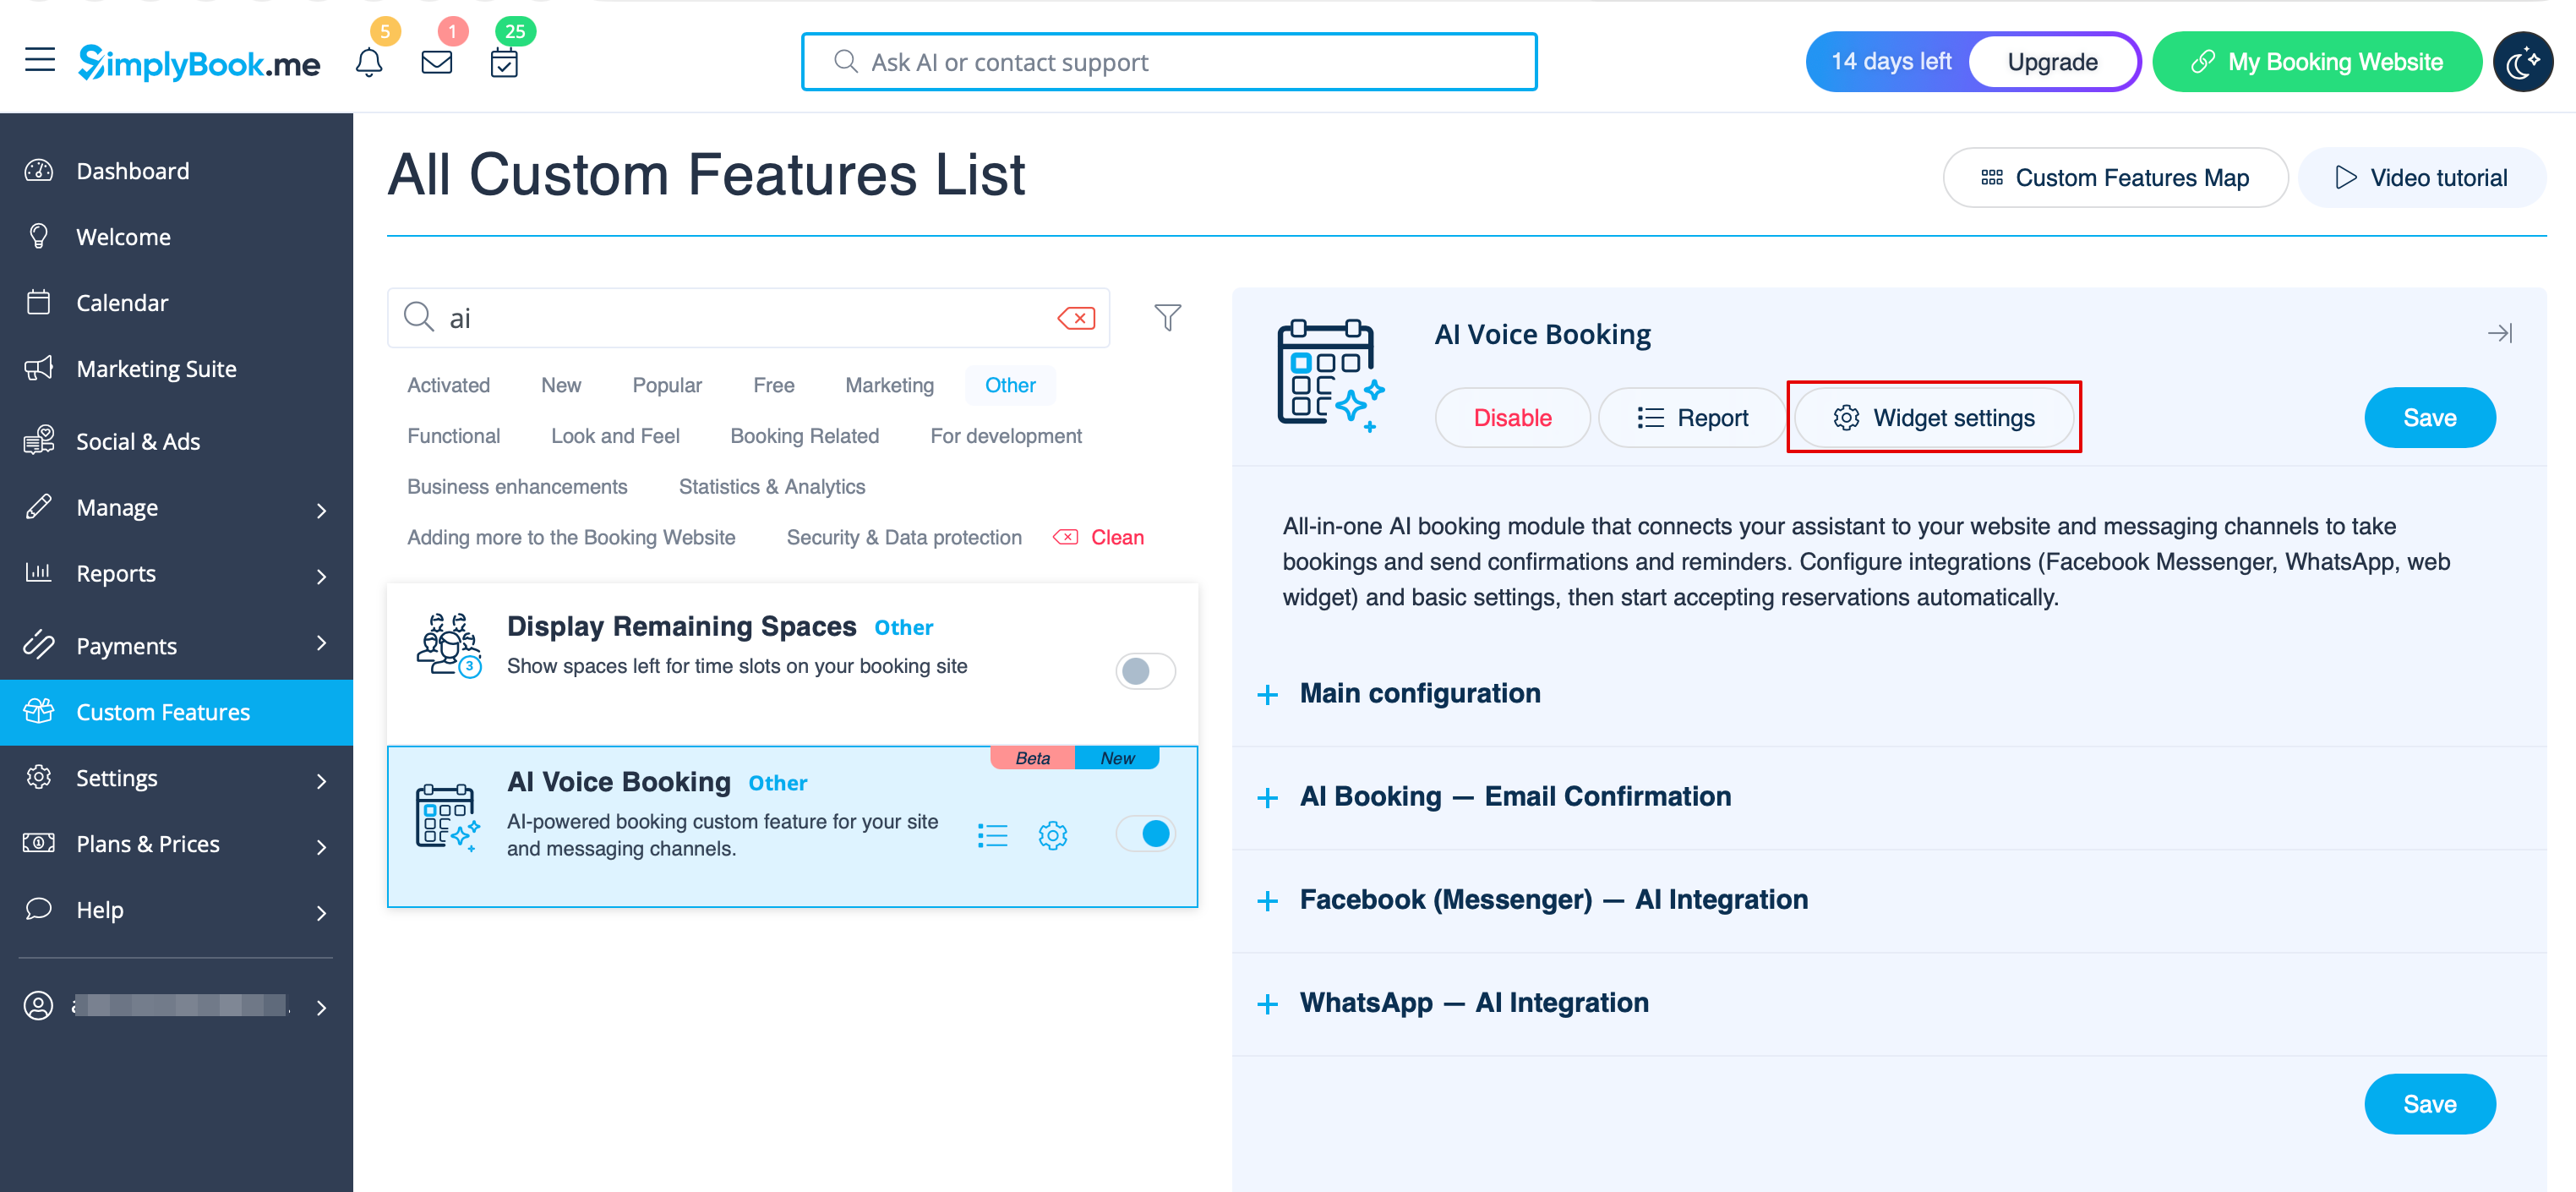
Hvis du har dit eget website, kan du også tilføje AI-bookingwidgetten der. Gå blot til ‘’’Widgetindstillinger’’’, vælg de ønskede farver, og klik på “Gem & få widgetkode” for at generere koden.
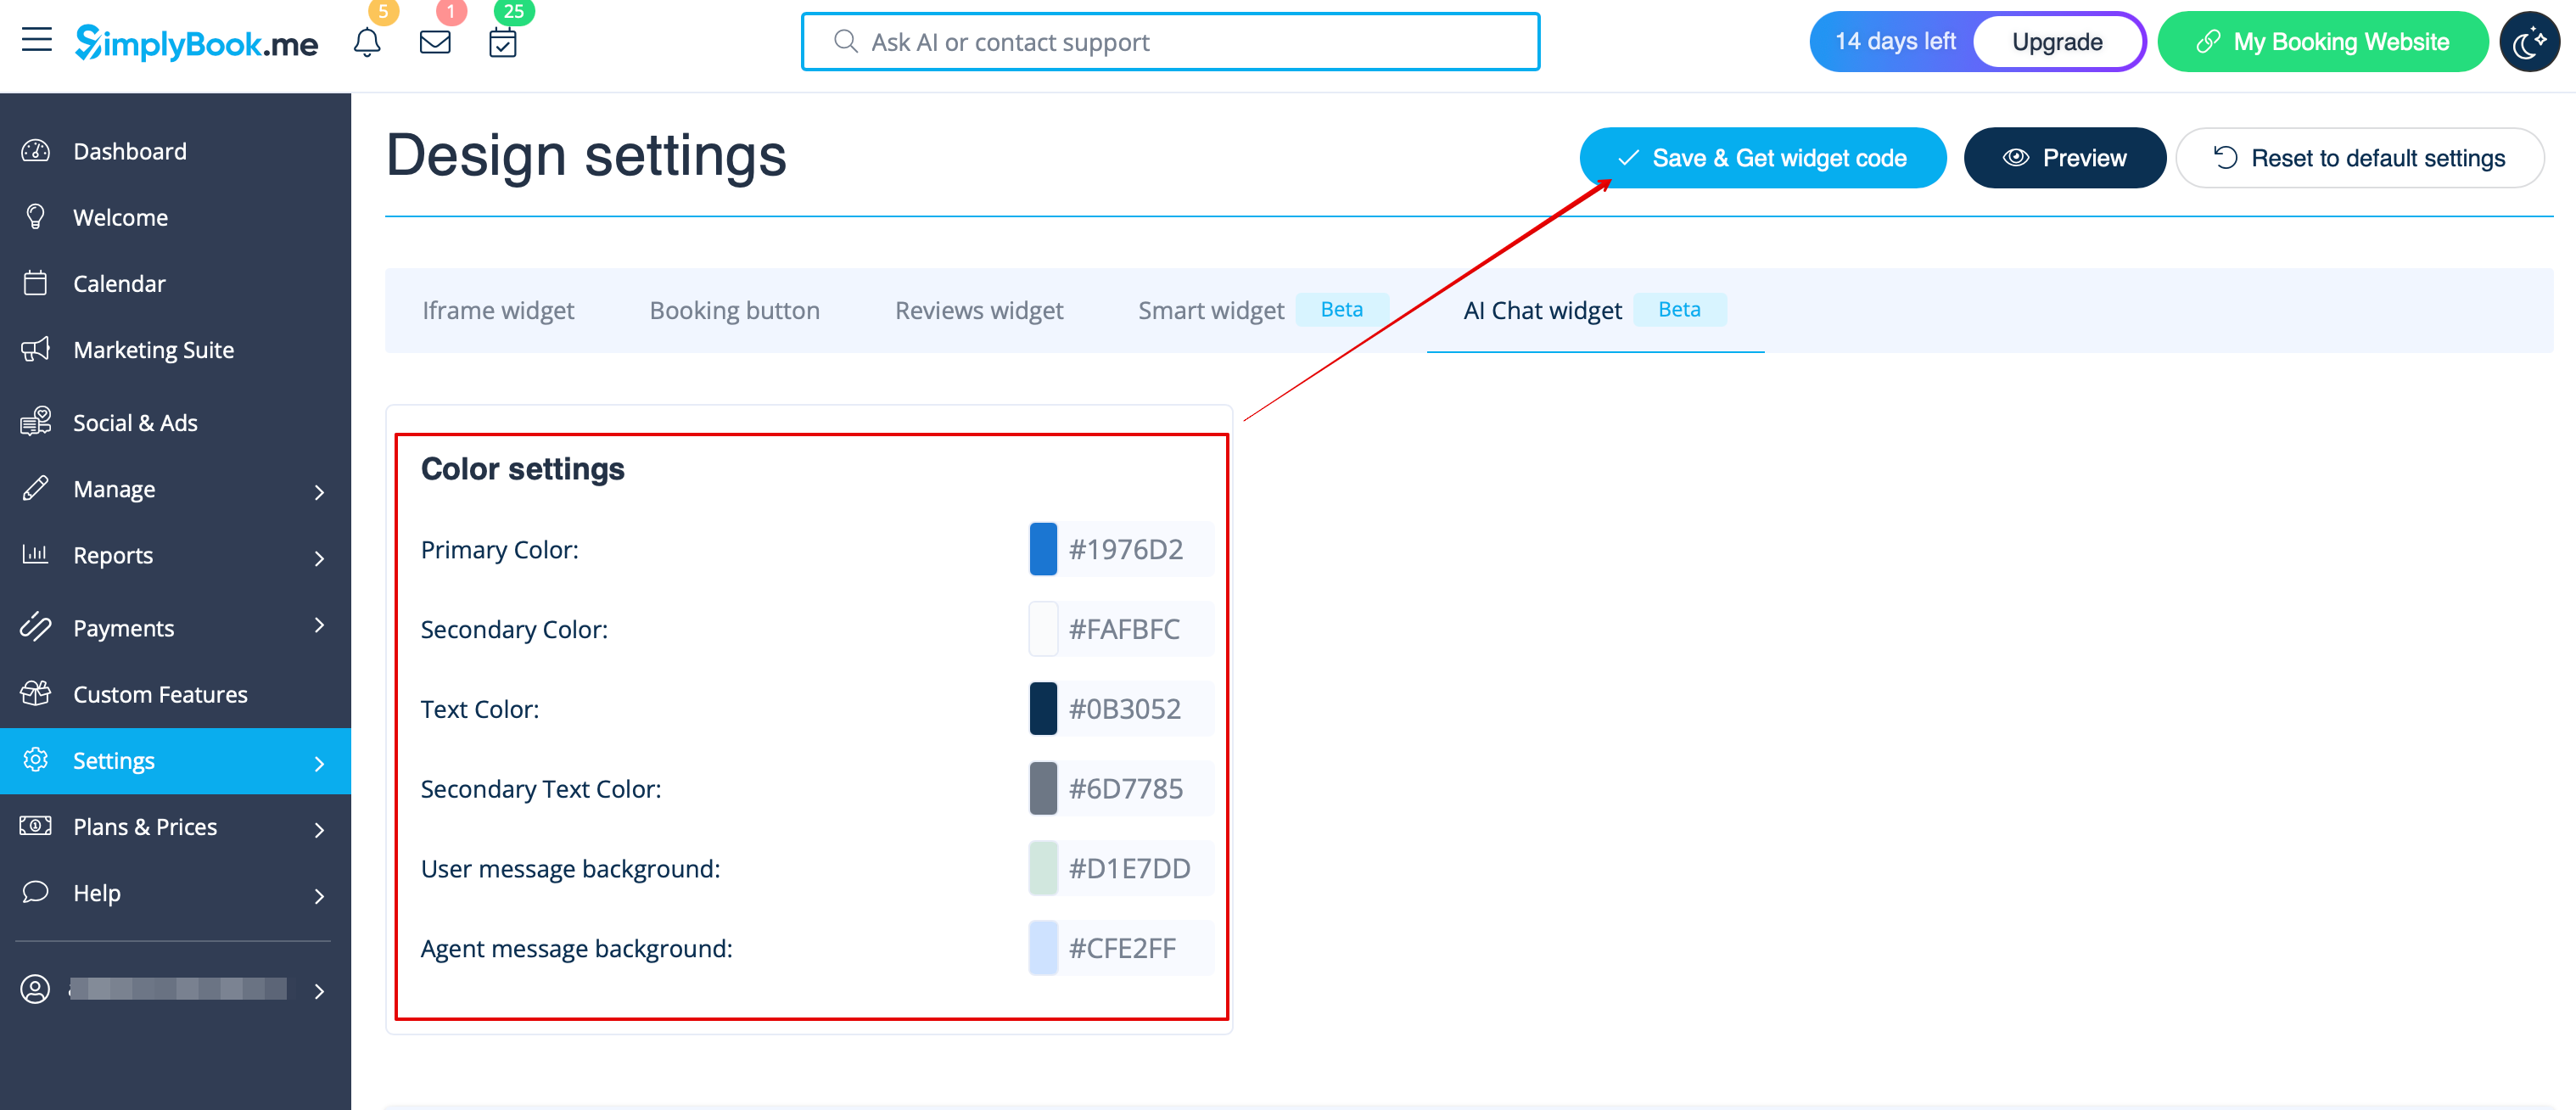
Gå til din website-editor, og indsæt koden på den side, hvor AI-bookingwidgetten skal være tilgængelig. Det er det hele.
WhatsApp AI-booking
Gå til https://developers.facebook.com/apps/ og klik på “Create App”:

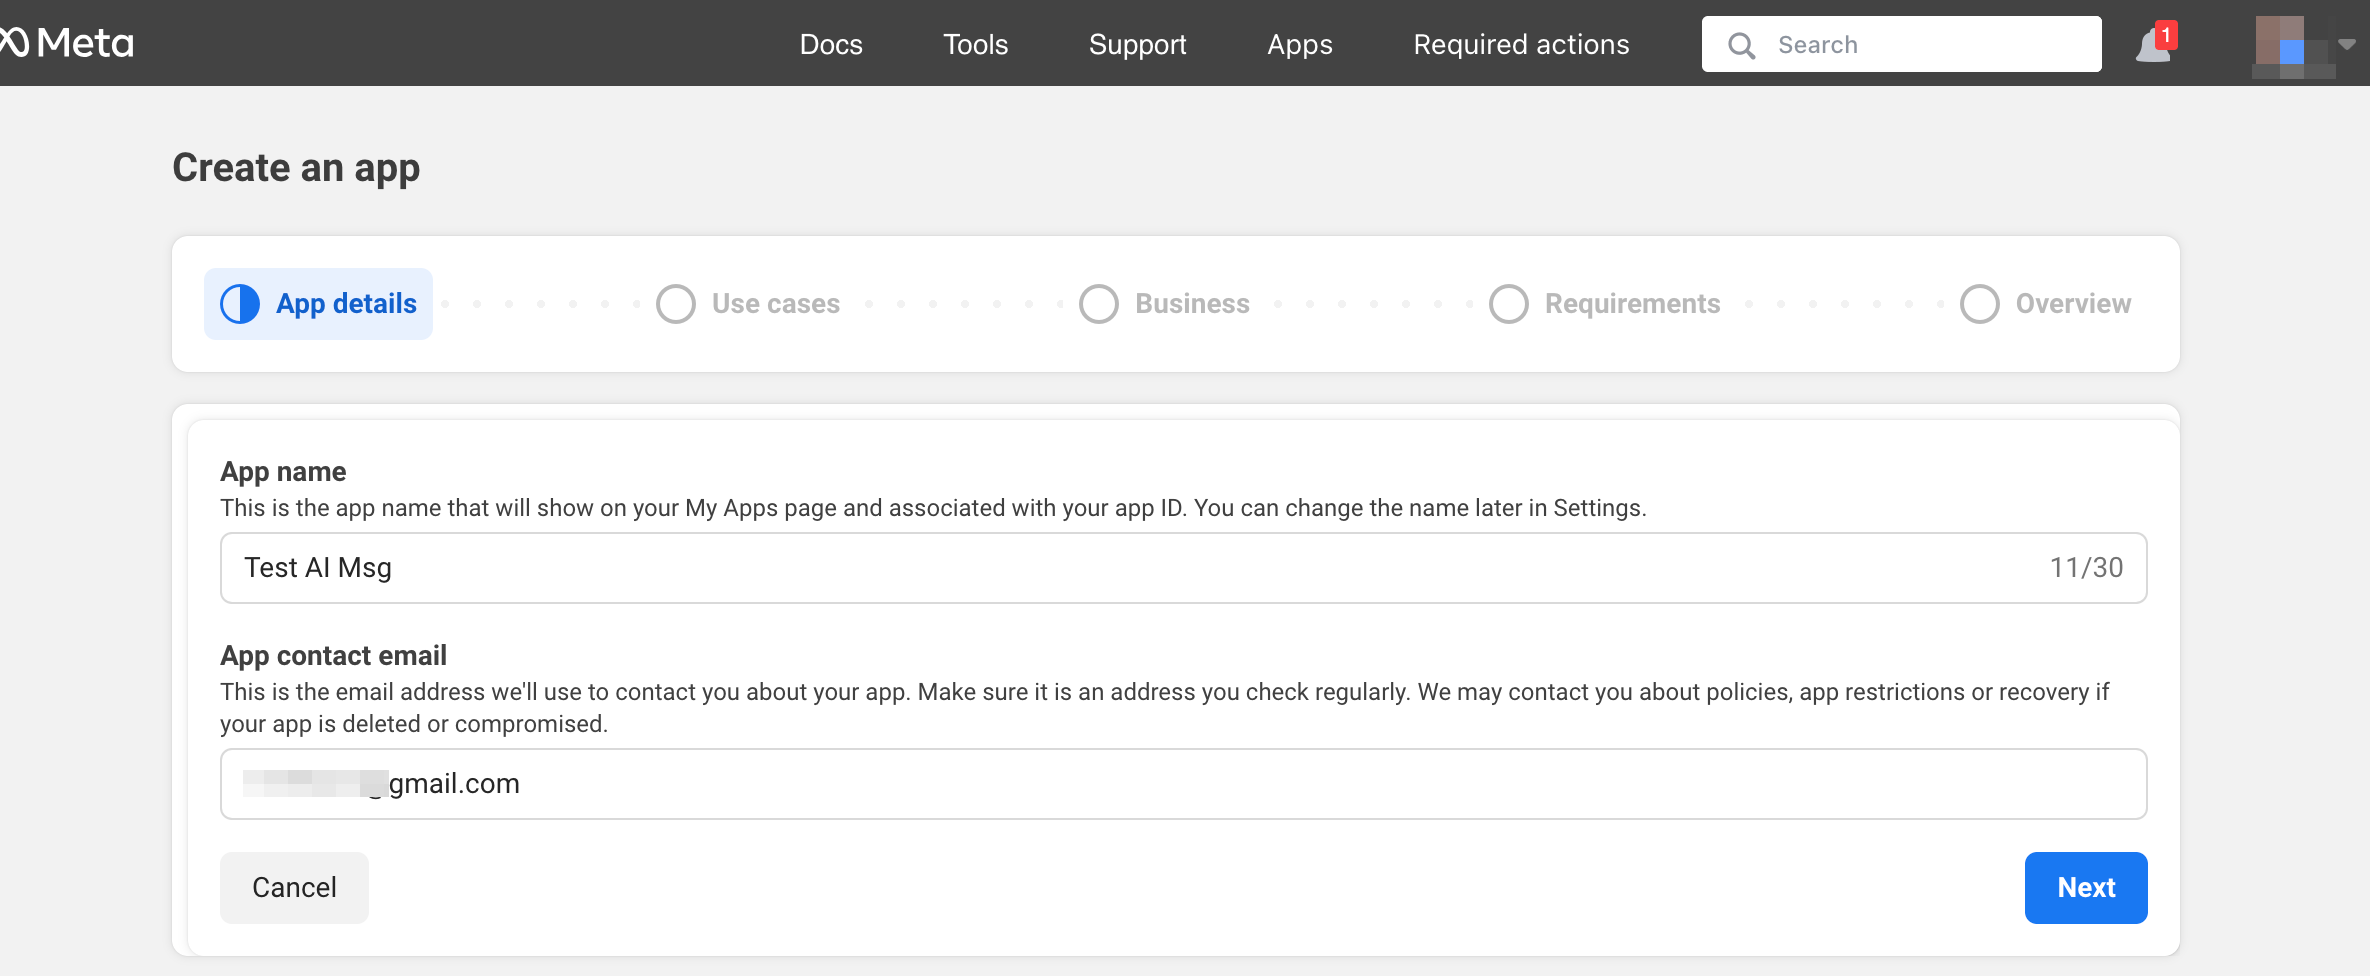
Indtast de ønskede app-oplysninger:
Vælg WhatsApp-brugsscenarie:
Vælg en virksomhedsprofil eller opret en ny.
Klik på “Next” for at fortsætte.
Gennemse oplysningerne, og klik på “Go to dashboard”:
Vælg fanen “Use cases”, og klik på “Customize”:

Accepter servicevilkår og bekræft virksomhedsprofilen:
Vælg “Start using the API”:
Gå til “Configure webhooks”:
Kopiér “Callback URL” og “Verification token” fra din SimplyBook.me-konto -> Brugerdefinerede funktioner -> AI-stemmebooking, og indsæt dem i de tilsvarende felter i appen. Verificér og gem.
Vælg “WhatsApp Business Account” under “Select product”:
Aktivér de nødvendige webhooks: beskeder og opkald (hvis du vil modtage opkald):
Tilføj telefonnumre og betalingsmetode (da Facebook opkræver betaling for beskeder).
Kopiér telefonnummer-ID fra Facebook, og indsæt det i det tilsvarende felt i SimplyBook.me.
Opret en systembruger. Gå til Business-profil og åbn fanen “System users”:

Klik på “Add new user”, og udfyld brugeroplysningerne:
Gå til “Assign Assets”:
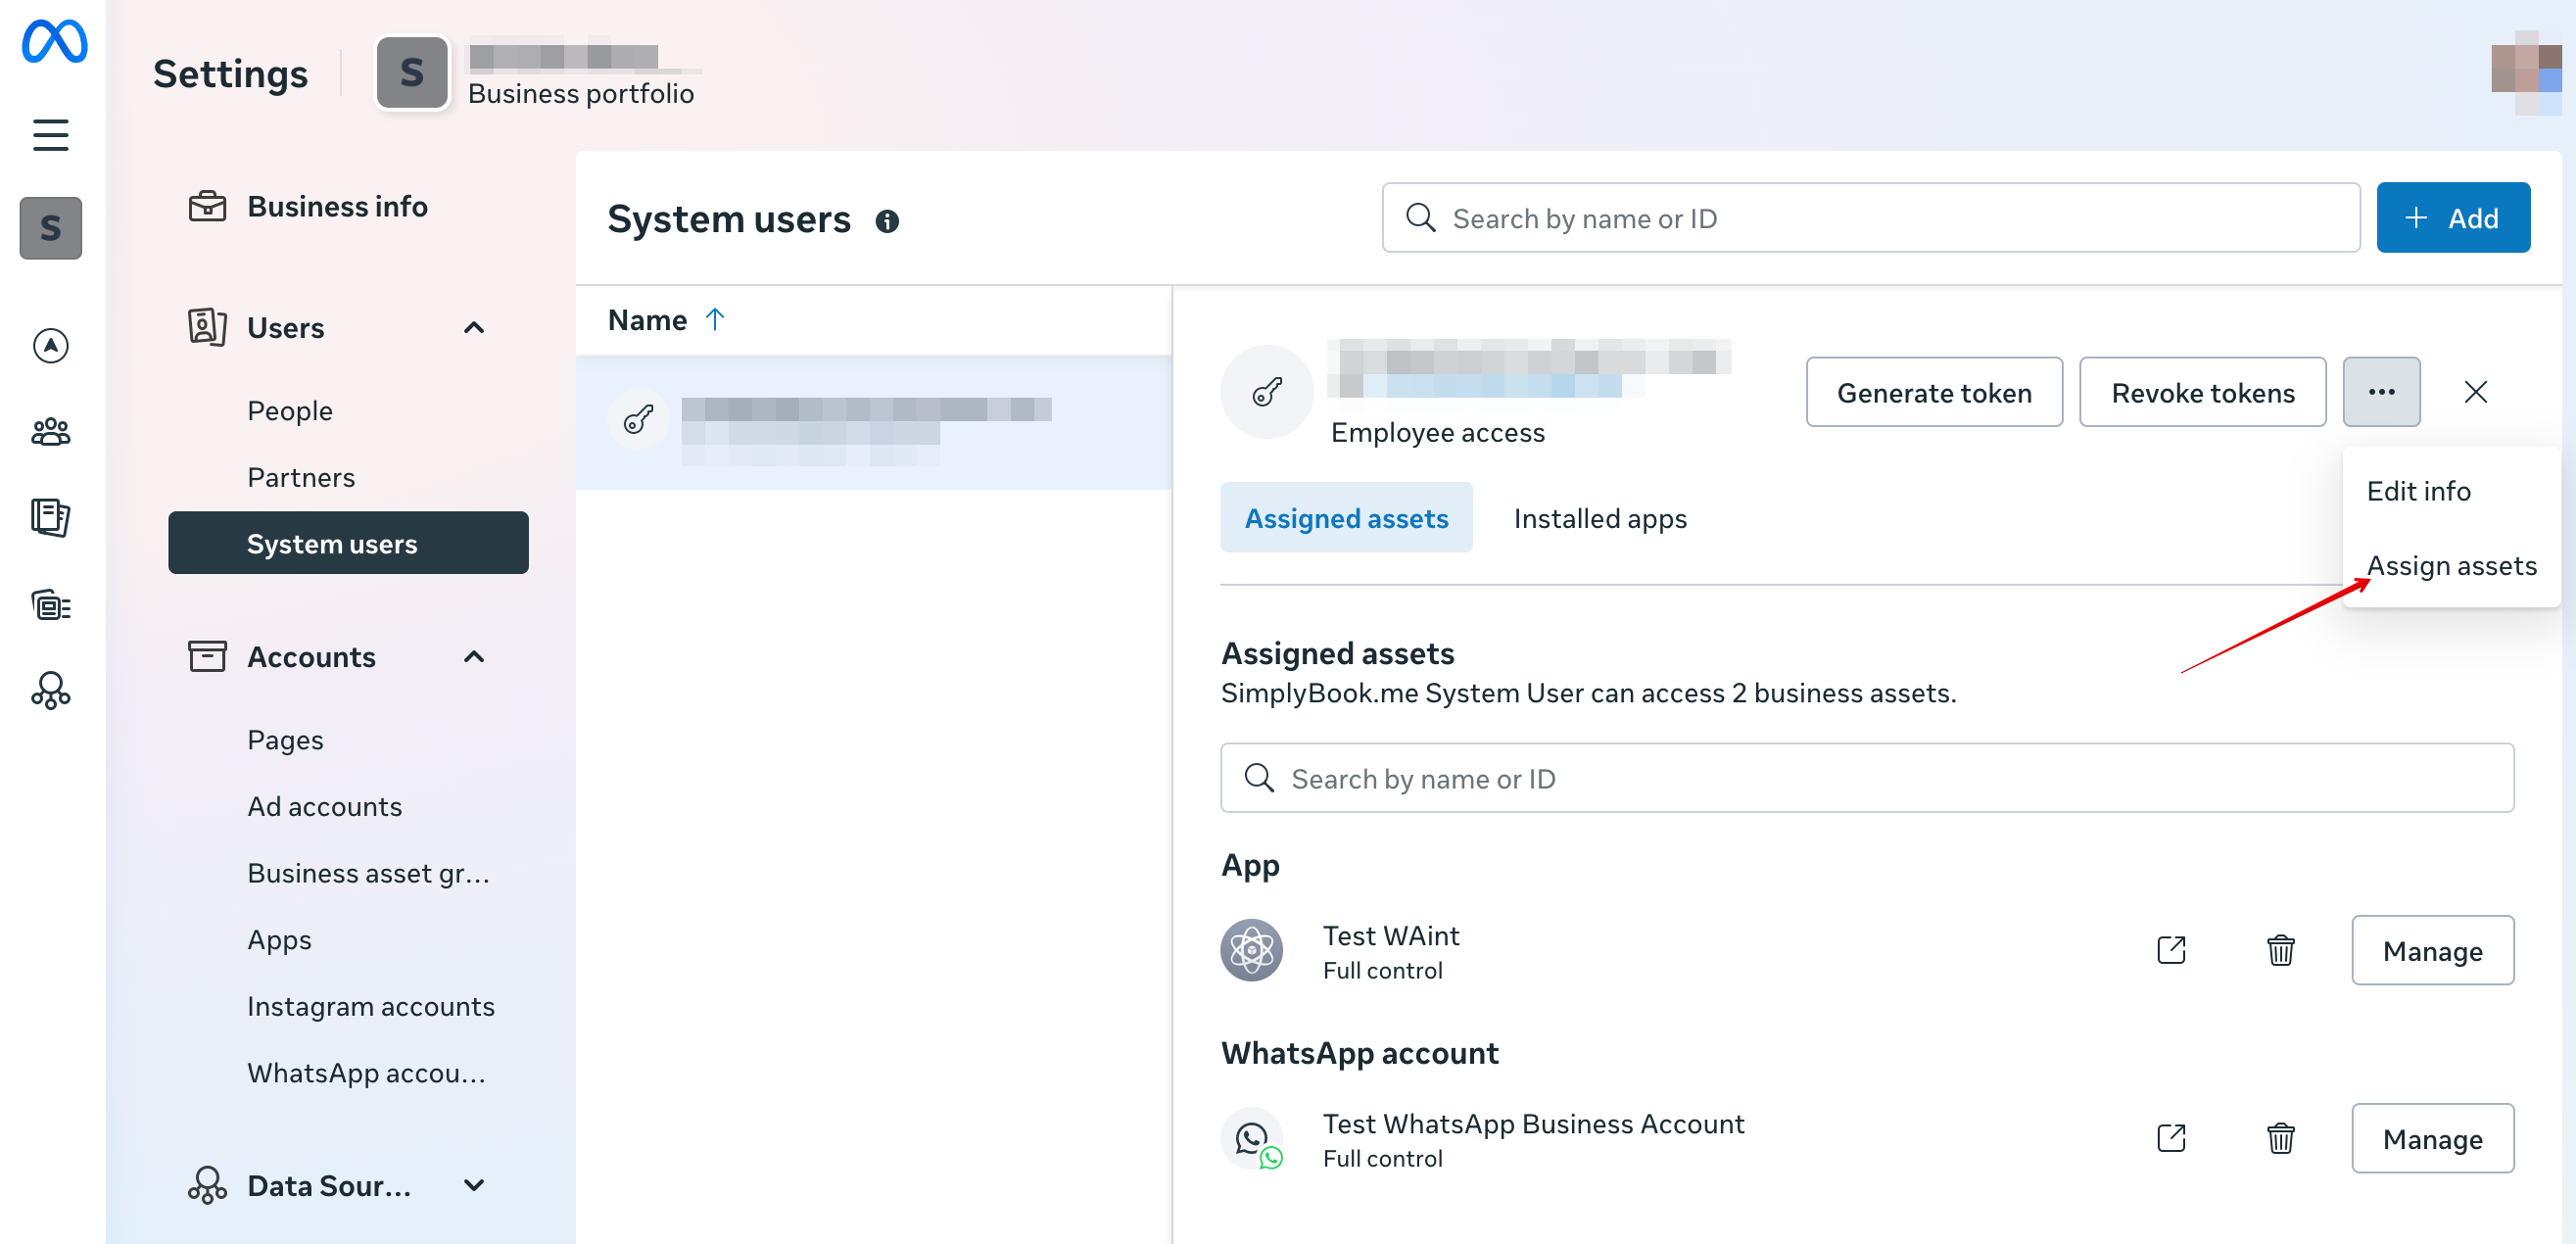
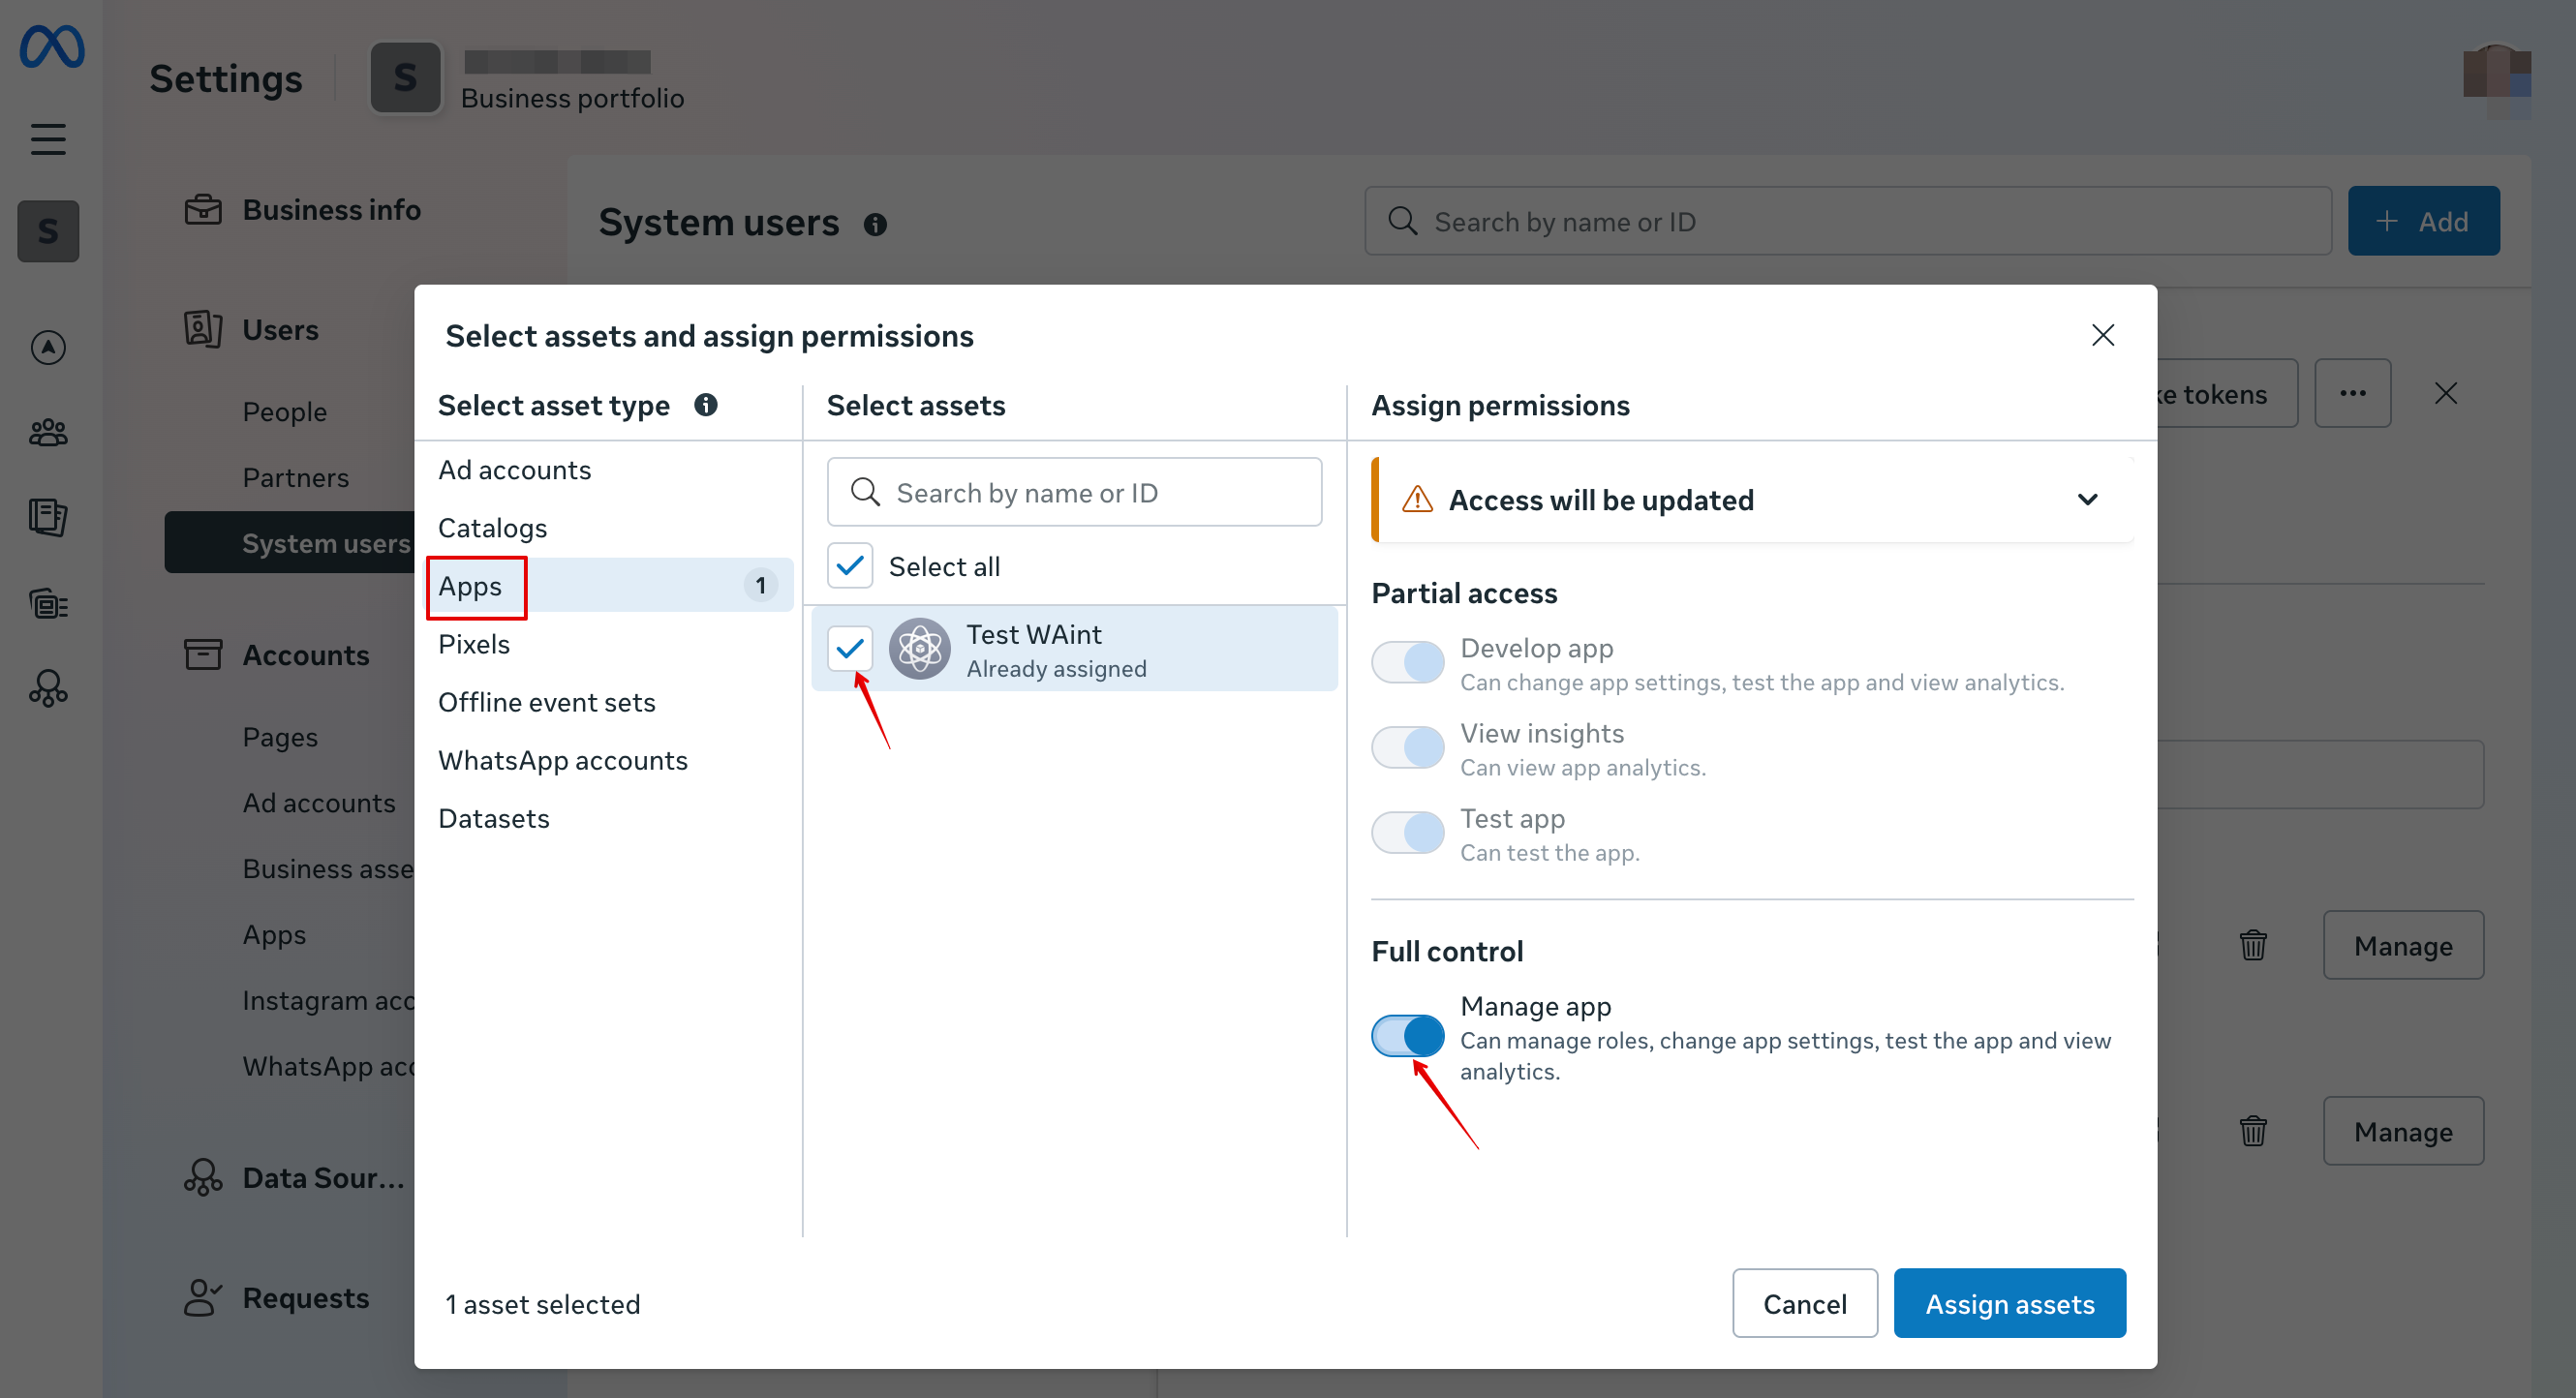
På fanen Apps skal du vælge din app og aktivere tilladelsen “Manage app”:
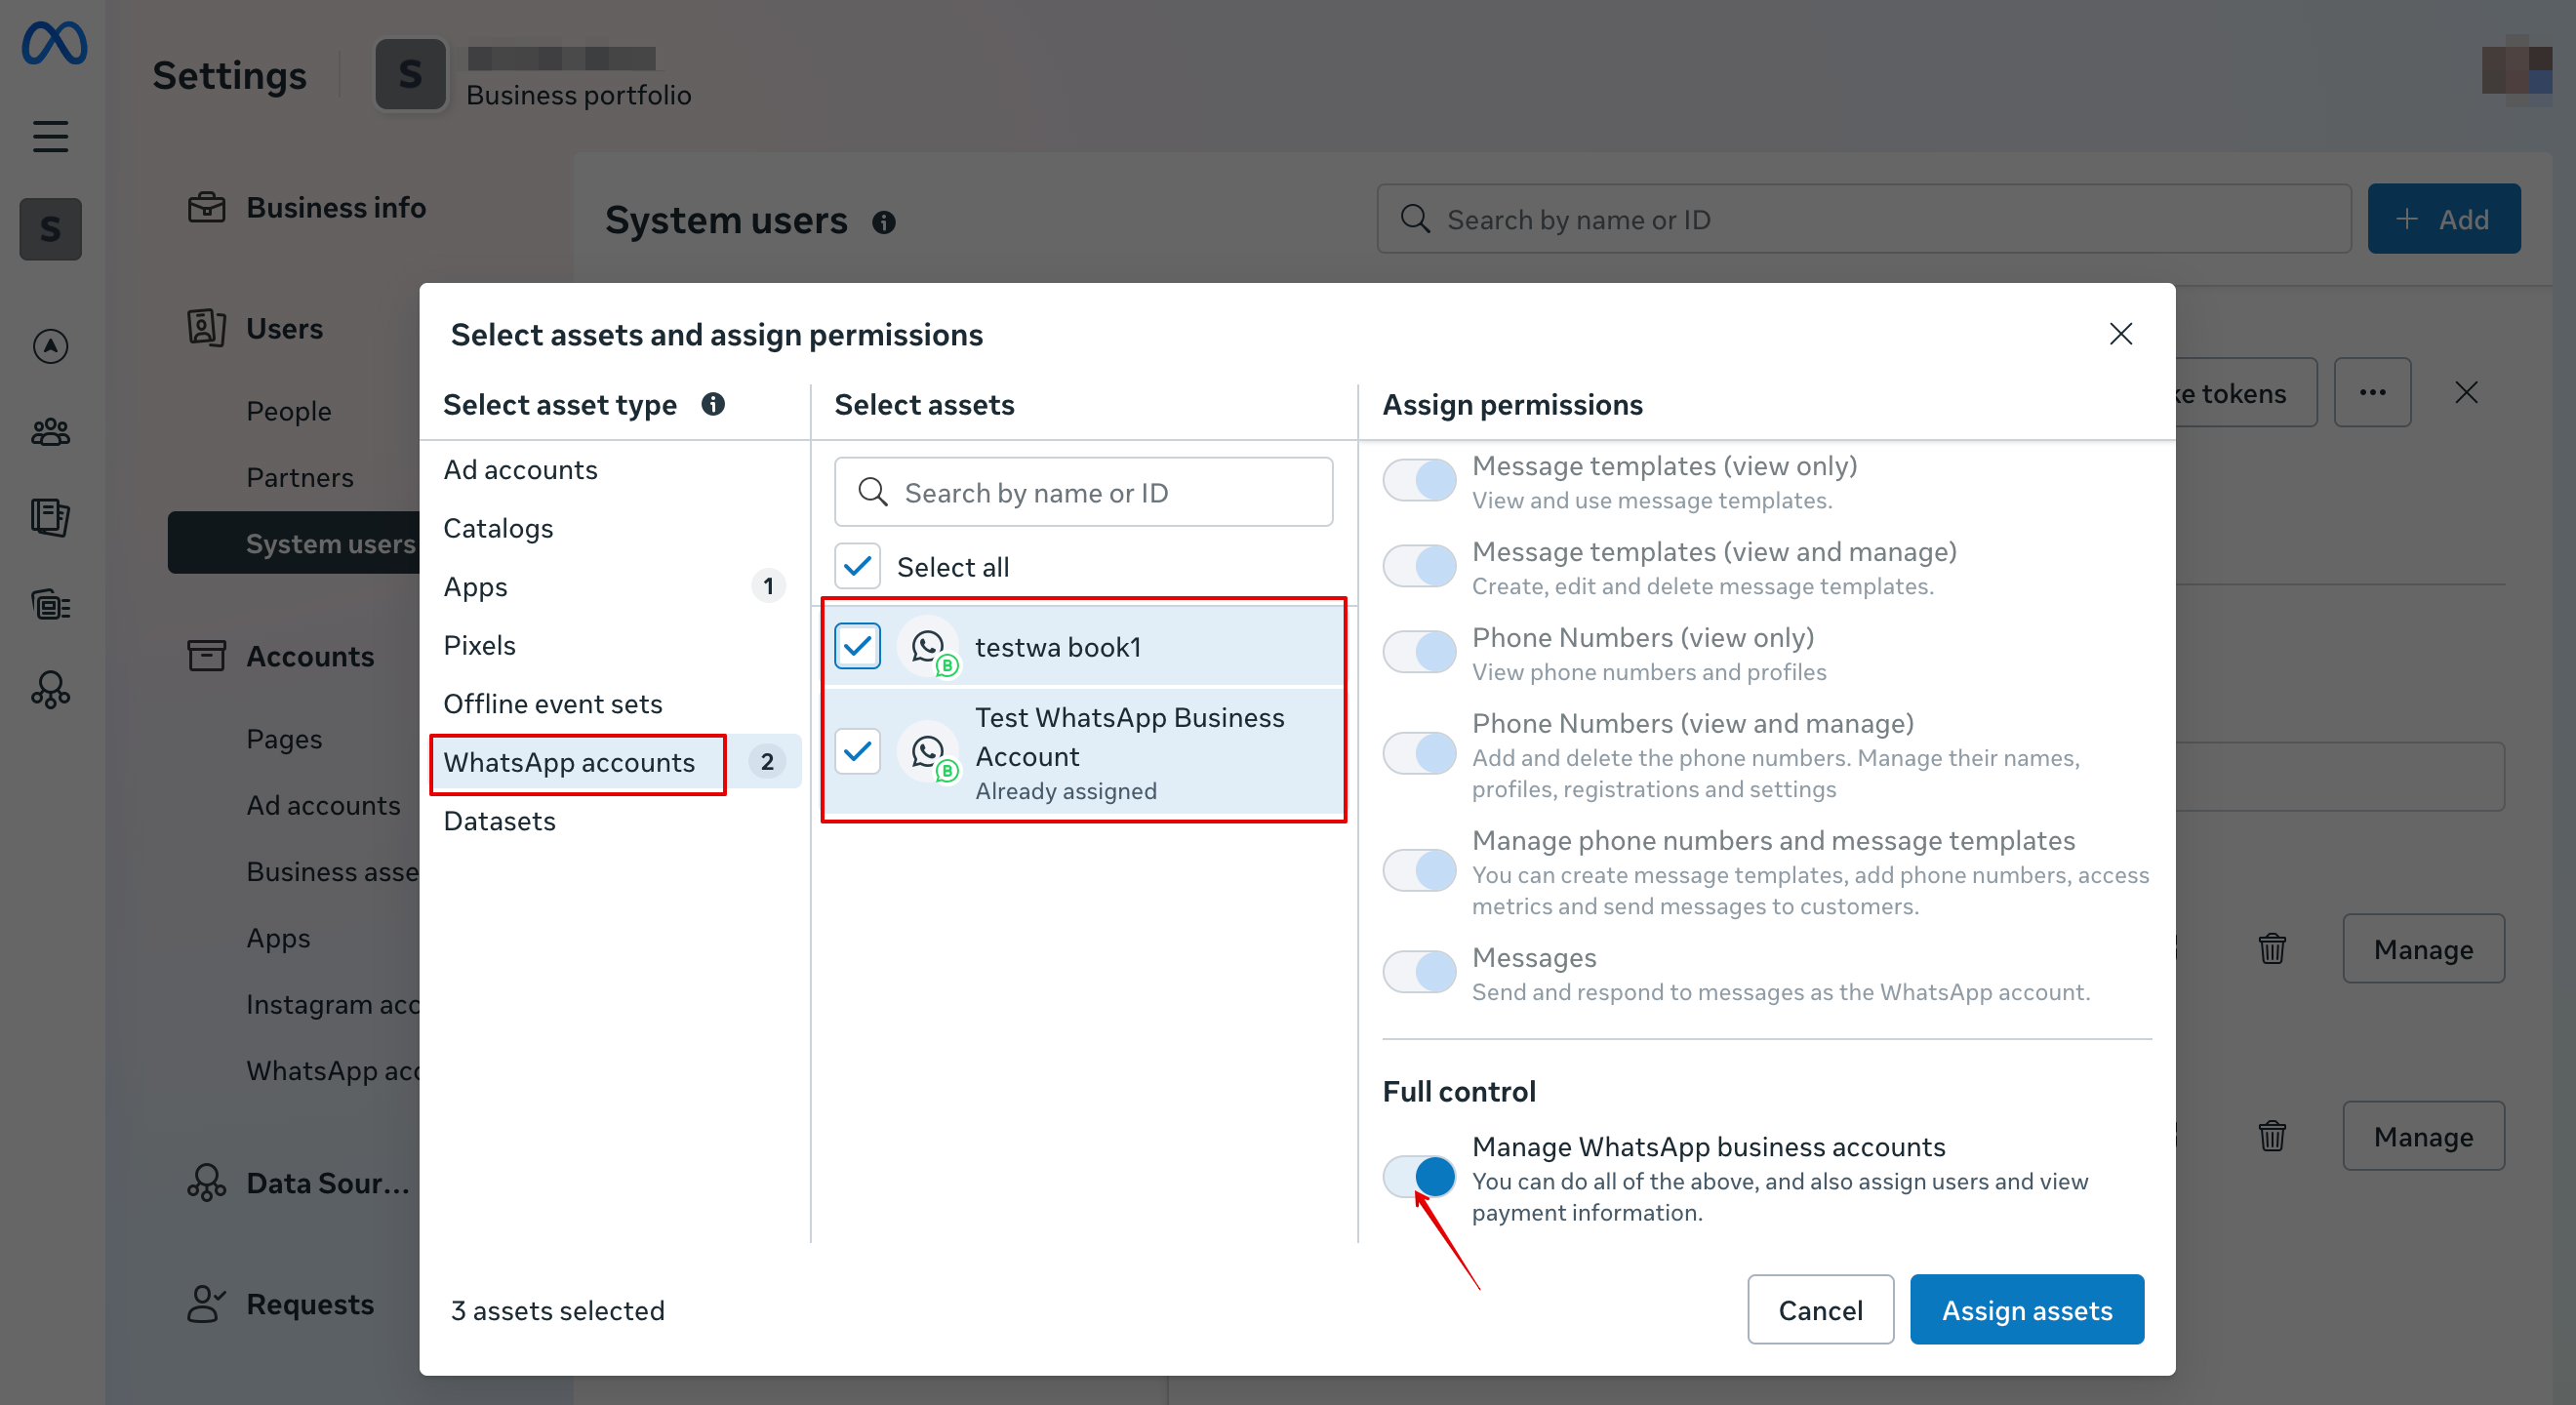
På fanen WhatsApp accounts skal du vælge dine WhatsApp-konti og aktivere tilladelsen “Manage WhatsApp business accounts”:
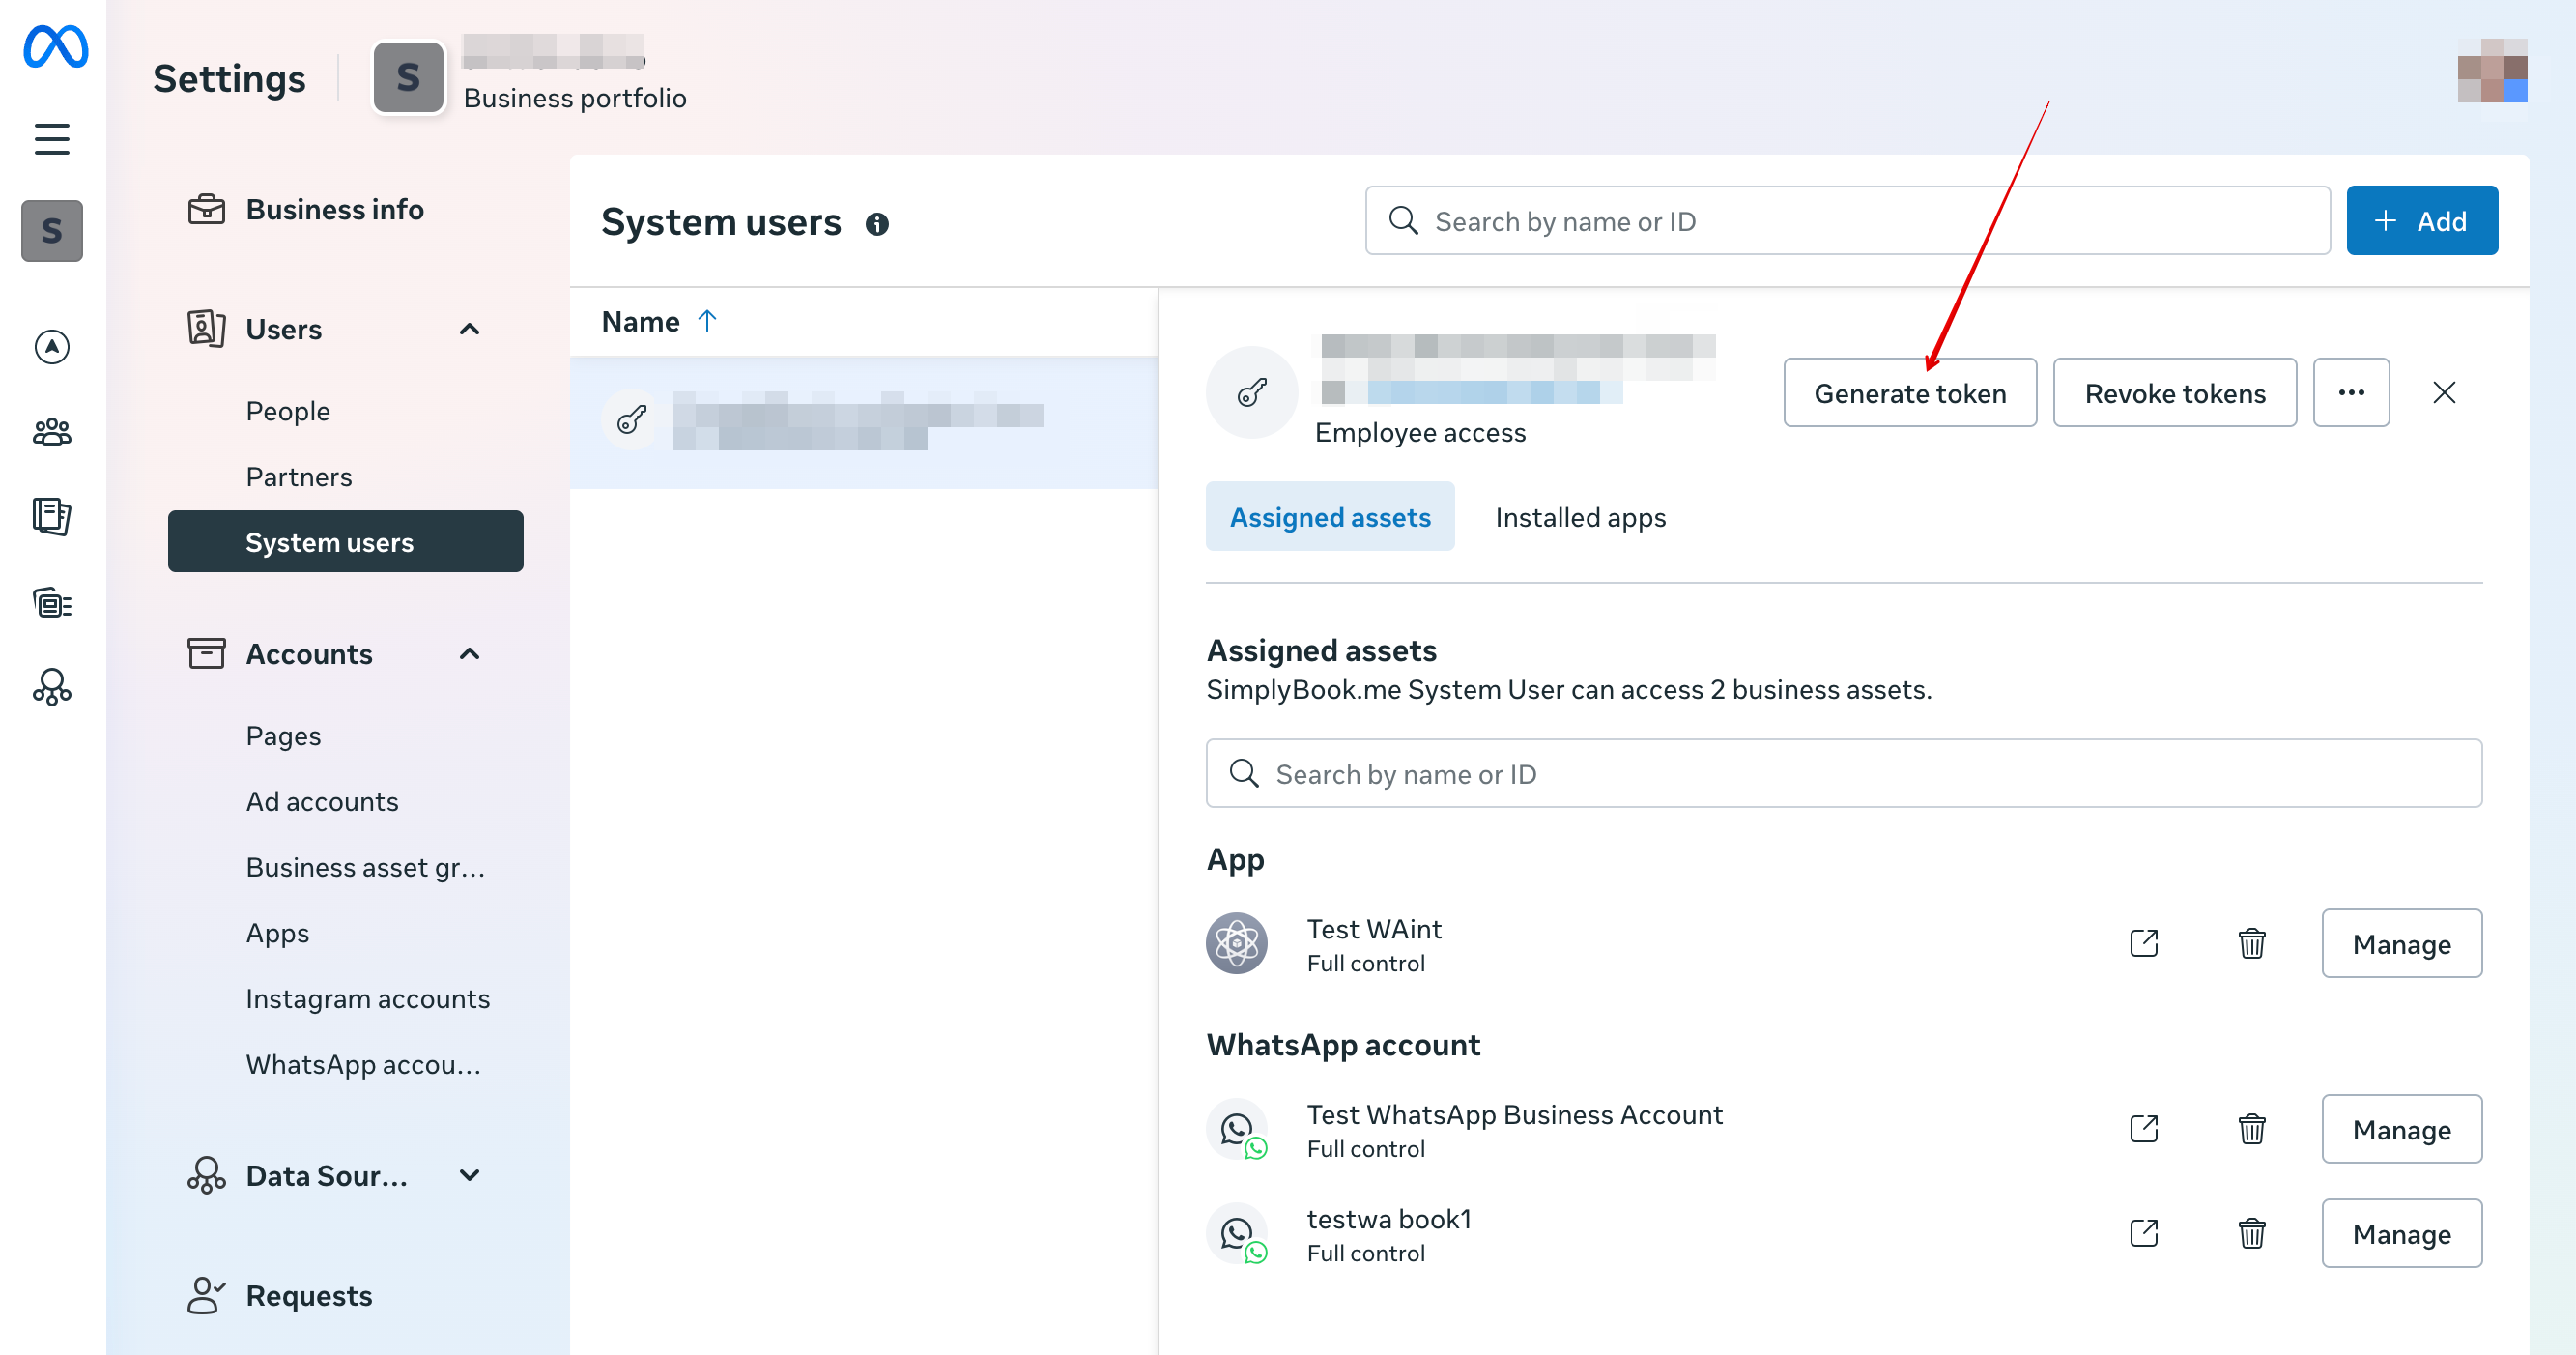
Når aktiver er tildelt, skal du klikke på “Generate Token”:
Vælg din app i rullemenuen, og indstil token-udløb til “never”:
Vælg følgende tilladelser:
Kopiér token, indsæt det i SB, og gem indstillingerne.
Gå tilbage til https://developers.facebook.com/apps/
, vælg din app, og klik på Indstillinger -> Grundlæggende. Indsæt links til privatlivspolitik og vilkår for brug.
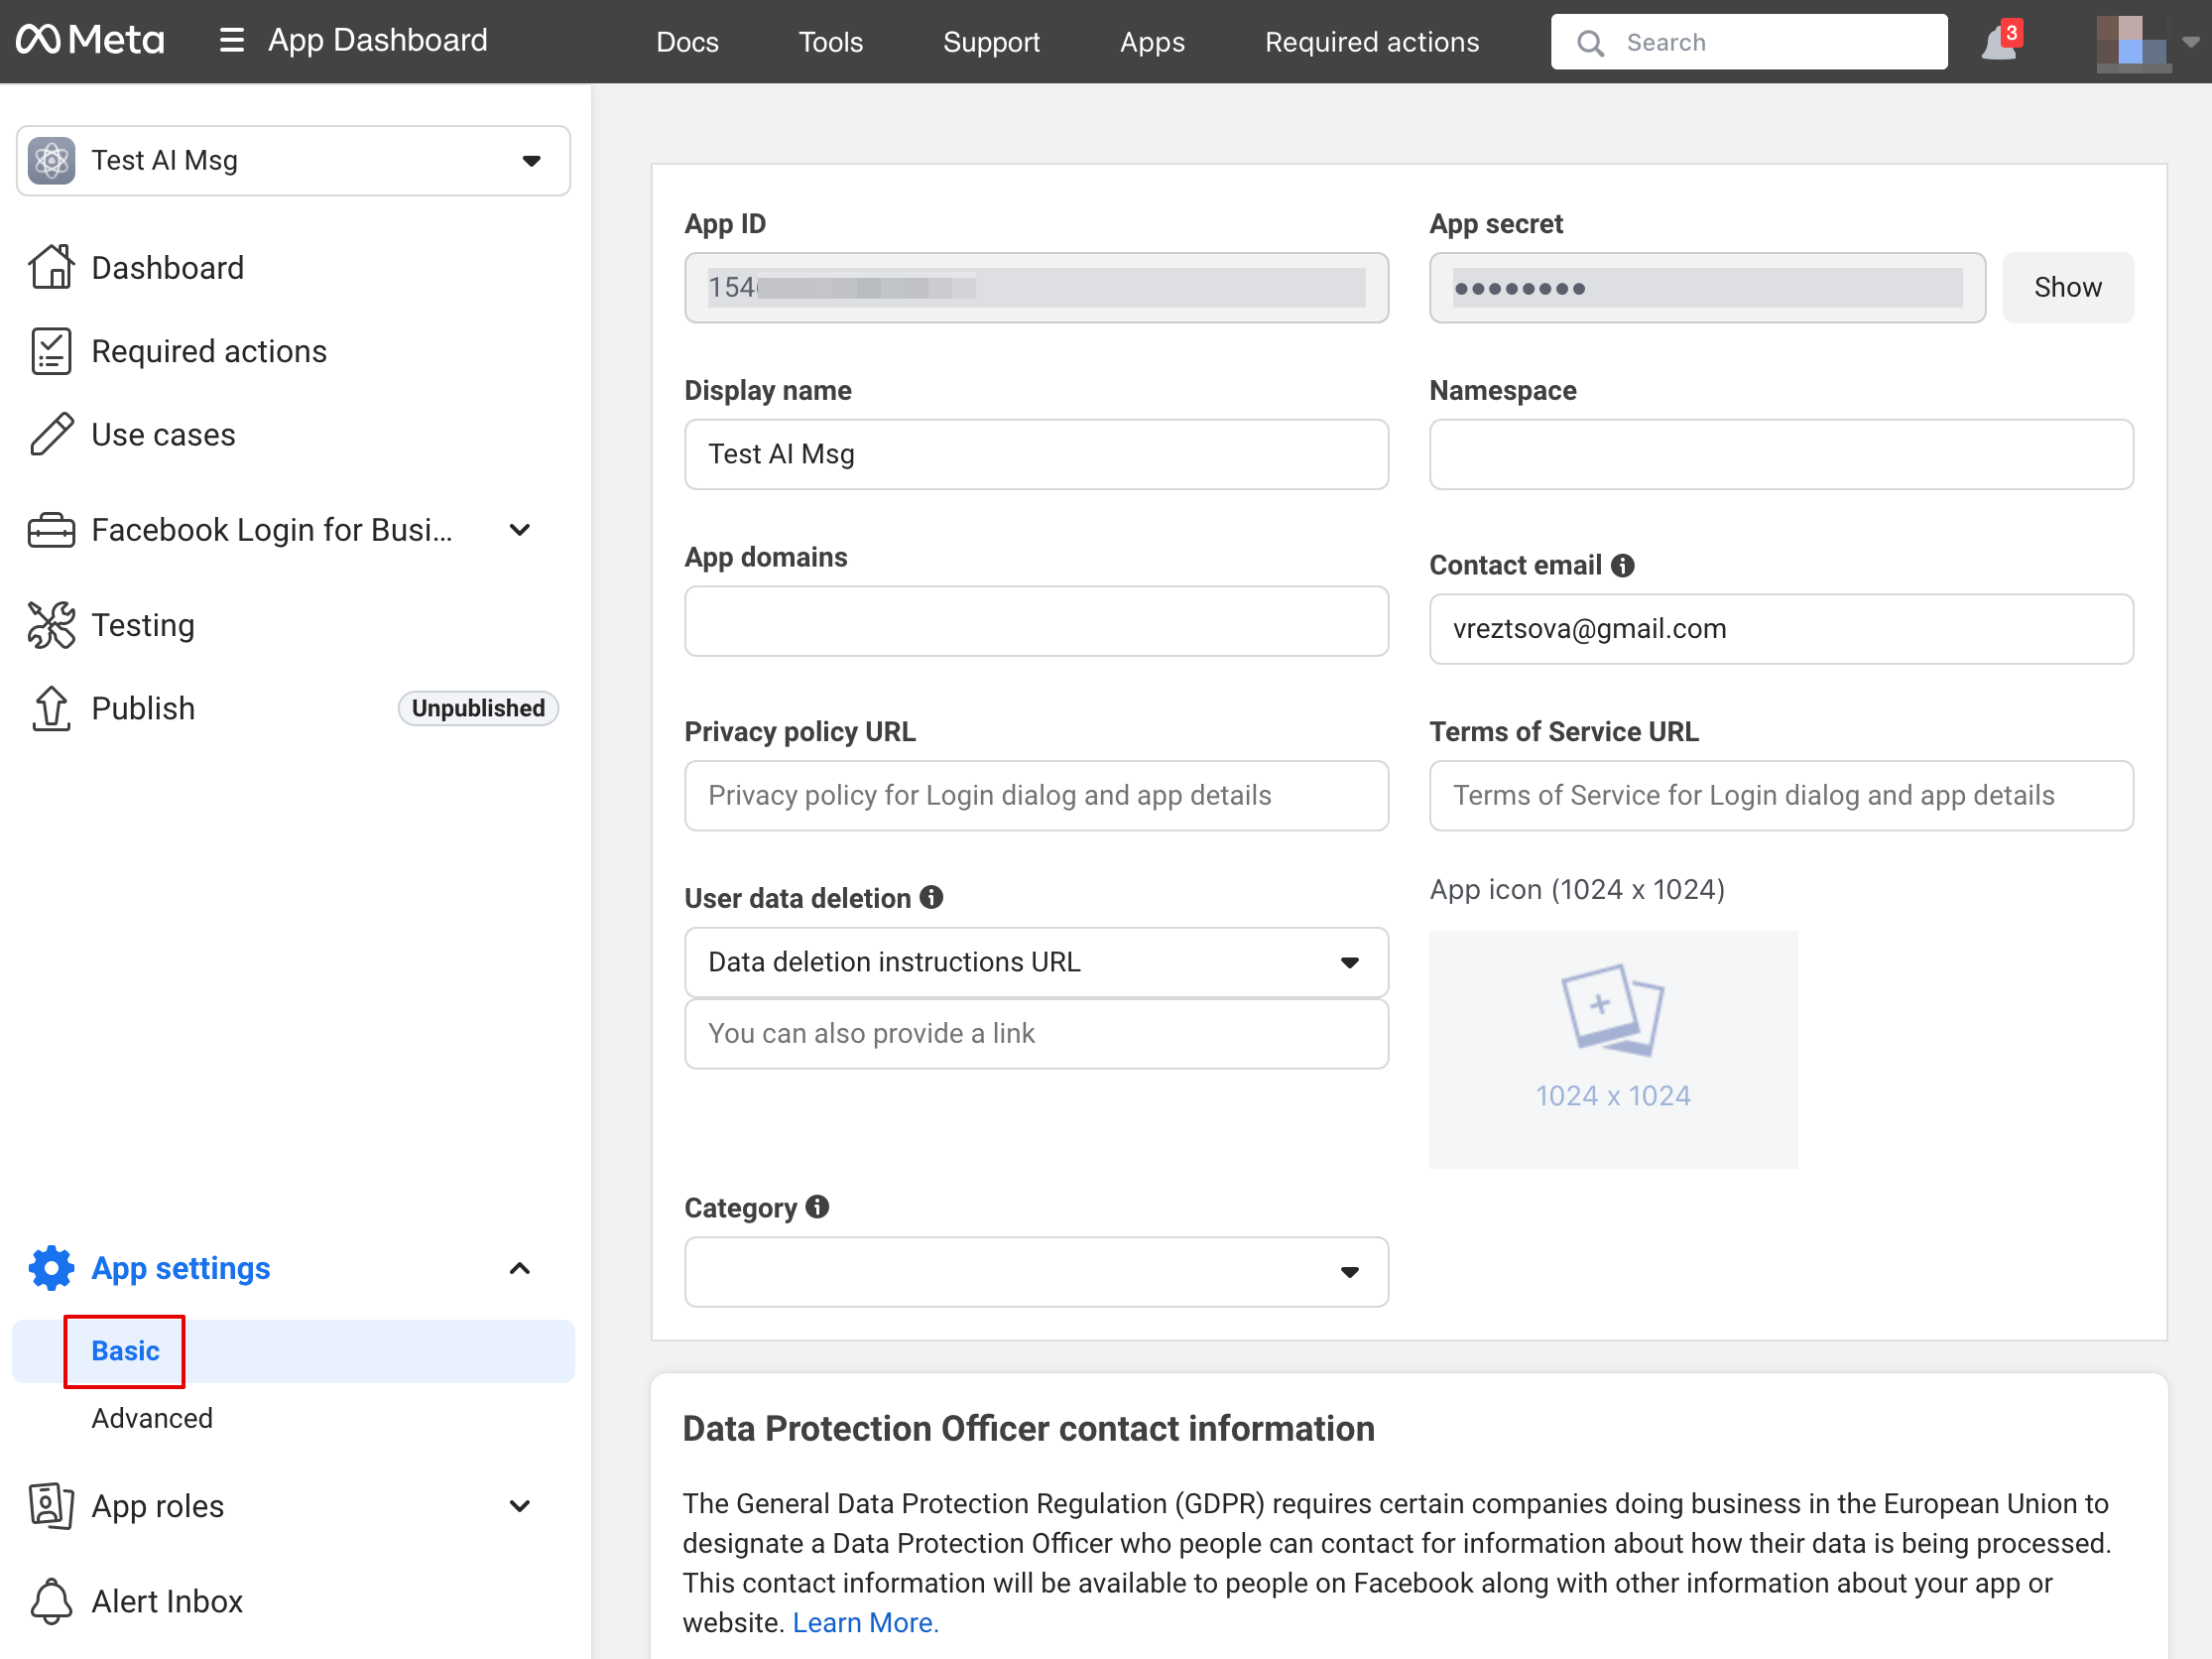
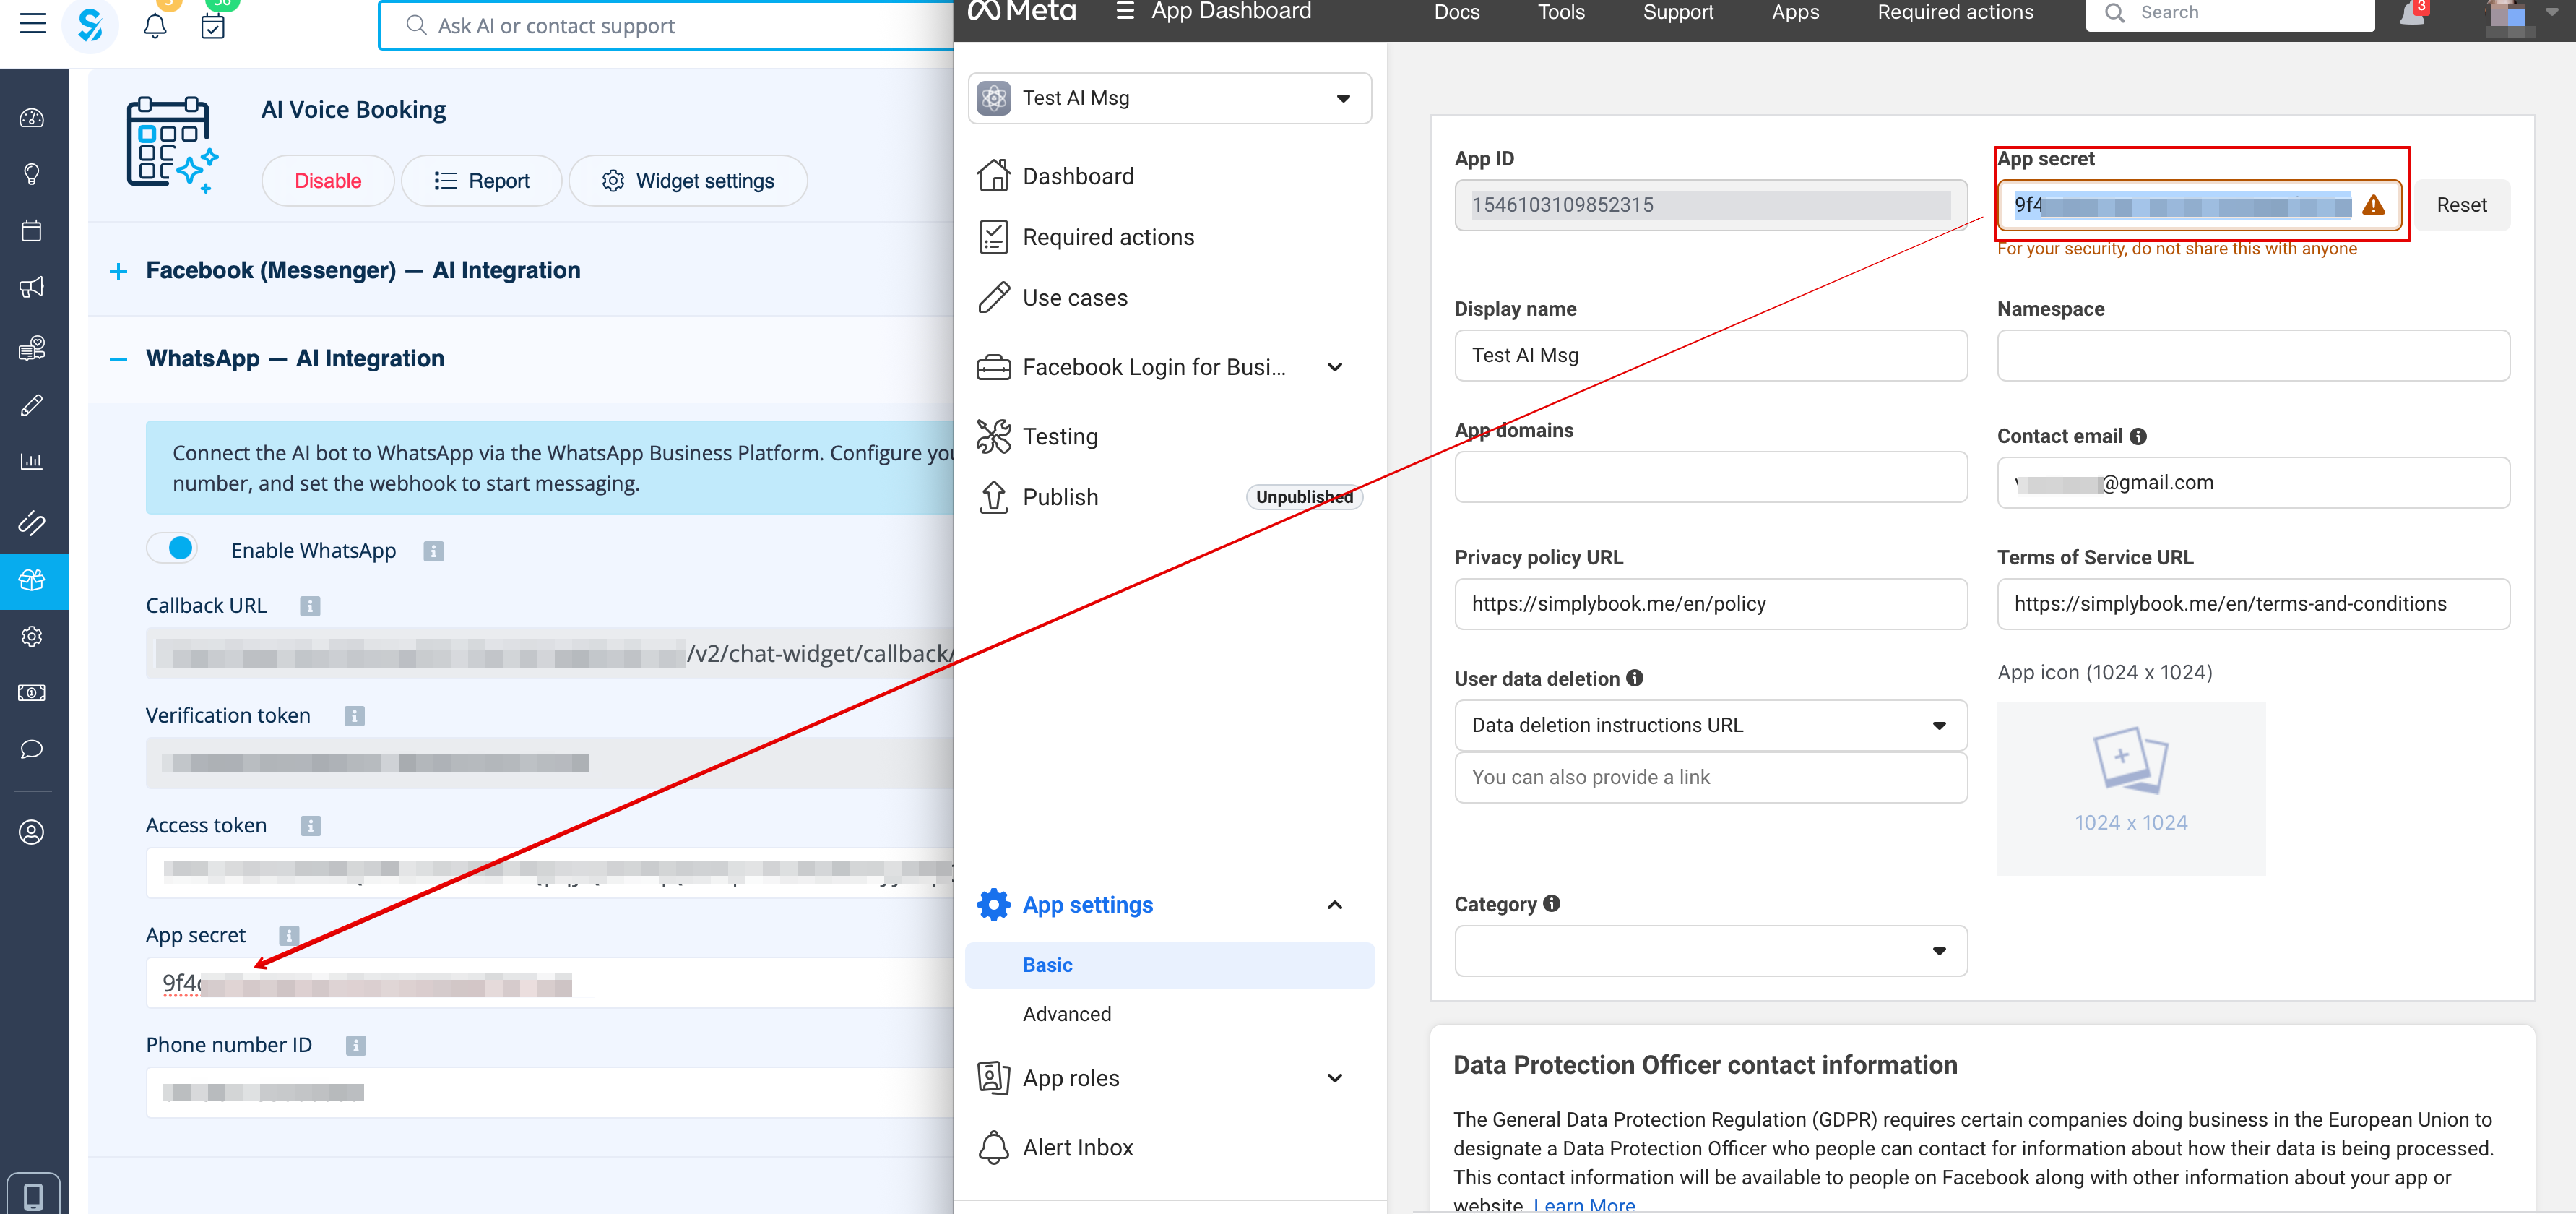
Kopiér App Secret, og indsæt det i SB.
Nu kan du udgive appen, dele dit WhatsApp Business-nummer med dine kunder og lade dem booke tjenester ved hjælp af AI.

==Rapport==
Du kan se chats, antallet af brugte credits samt sessiondetaljer med tilhørende bookingoplysninger (hvis bookingprocessen blev gennemført) under Rapporter -> AI-booking.