From SimplyBook.me
Created page with "|description=使用自定義域名進行預約網站。使用自己的URL進行白標品牌。專業外觀,刪除SimplyBook品牌。" |
Updating to match new version of source page |
||
| Line 1: | Line 1: | ||
<languages/> | |||
{{#seo: | {{#seo: | ||
|title=Own domain to SimplyBook.me | |title=Own domain to SimplyBook.me | ||
|description=使用自定義域名進行預約網站。使用自己的URL進行白標品牌。專業外觀,刪除SimplyBook品牌。 | |description=使用自定義域名進行預約網站。使用自己的URL進行白標品牌。專業外觀,刪除SimplyBook品牌。 | ||
|titlemode=append | |titlemode=append | ||
| Line 6: | Line 8: | ||
}} | }} | ||
<div lang="en" dir="ltr" class="mw-content-ltr"> | <div lang="en" dir="ltr" class="mw-content-ltr"> | ||
__FORCETOC__ | |||
:1. Enable | ==How to use if you already have a domain name== | ||
[[File:Custom domain enable path redesigned.png| 1200px| center|link=https://help.simplybook.me/images/a/a3/Custom_domain_enable_path_redesigned.png]] | :1. Enable this feature per one-time payment(you will see the exact price in your account) on your Custom features page. | ||
[[File:Custom domain enable path redesigned.png|1200px | center|link=https://help.simplybook.me/images/a/a3/Custom_domain_enable_path_redesigned.png]] | |||
<br><br> | <br><br> | ||
:2. Go to its "Settings" by selecting the corresponding option on the right side of the page. | :2. Go to its "Settings" by selecting the corresponding option on the right side of the page. | ||
[[File:Custom domain settings path redesigned.png|1200px| center|link=https://help.simplybook.me/images/e/ef/Custom_domain_settings_path_redesigned.png]] | [[File:Custom domain settings path redesigned.png|1200px| center|link=https://help.simplybook.me/images/e/ef/Custom_domain_settings_path_redesigned.png]] | ||
<br><br> | <br><br> | ||
:3. | </div> | ||
<div lang="en" dir="ltr" class="mw-content-ltr"> | |||
:3. In your Domain controller, you need to find where you set the DNS records and set A-record to IP mentioned in this feature settings. | |||
:'''Please note!''' AAAA (IPv6) record must not be set, otherwise SSL certificate cannot be issued. | :'''Please note!''' AAAA (IPv6) record must not be set, otherwise SSL certificate cannot be issued. | ||
[[File:Custom domain settings overview redesigned.png|1200px | center|link=https://help.simplybook.me/images/5/5b/Custom_domain_settings_overview_redesigned.png]] | [[File:Custom domain settings overview redesigned.png|1200px | center|link=https://help.simplybook.me/images/5/5b/Custom_domain_settings_overview_redesigned.png]] | ||
<br><br> | <br><br> | ||
:After A-records are set enter domain name you wish to use in its settings and save. | :After A-records are set enter domain name you wish to use in its settings and save.<br> | ||
:Then we will automatically receive the request and apply the settings on our side(it may take some time - usually around 24-48h). As soon as they are applied your domain name starts working for the booking site.<br><br> | |||
:''If you wish to change Custom Domain name to different one from the one set before it can be done for additional price as new SSL certificates need to be created. There will be a button in this custom feature settings that will allow you to process the change if needed. For additional information please contact support.'' | |||
<br><br> | |||
==How to set domain with Simply.com== | |||
:1. Enable Custom Domain feature per one-time payment(you will see the exact price in your account) on your Custom features page. | |||
[[File:Custom domain enable path redesigned.png|1200px | center|link=https://help.simplybook.me/images/a/a3/Custom_domain_enable_path_redesigned.png]] | |||
<br><br> | |||
:2. Go to its "Settings" by selecting the corresponding option on the right side of the page. | |||
[[File:Custom domain settings path redesigned.png|1200px| center|link=https://help.simplybook.me/images/e/ef/Custom_domain_settings_path_redesigned.png]] | |||
<br><br> | |||
:3. Click “Purchase domain”<br> | |||
:This opens Simply.com in a new browser tab with your session pre-configured. | |||
[[File:Simply.com domain purchase path.png|1200px| center|link=https://help.simplybook.me/images/d/d1/Simply.com_domain_purchase_path.png]] | |||
<br><br> | |||
:4. Choose and buy your domain at Simply.com: | |||
* Search for your desired domain name | |||
* Select a suitable option and complete checkout on Simply.com | |||
<br> | <br> | ||
: | :5. Wait for automatic configuration | ||
:After purchase, Simply.com points DNS to our servers and sends us a confirmation. No manual action is needed for default setups. | |||
<br><br> | <br><br> | ||
: | :6. Return to Custom Domain settings. The status should change to Connected. An SSL certificate is issued automatically shortly after connection. | ||
<br><br> | |||
</div> | |||
<div lang="en" dir="ltr" class="mw-content-ltr"> | |||
Useful links: | |||
*[[Special:MyLanguage/Cookie Banners: Essentials and Tips for Removal|Cookie Banners: Essentials and Tips for Removal]] | |||
<br><br> | <br><br> | ||
</div> | </div> | ||
Revision as of 09:32, 1 June 2026
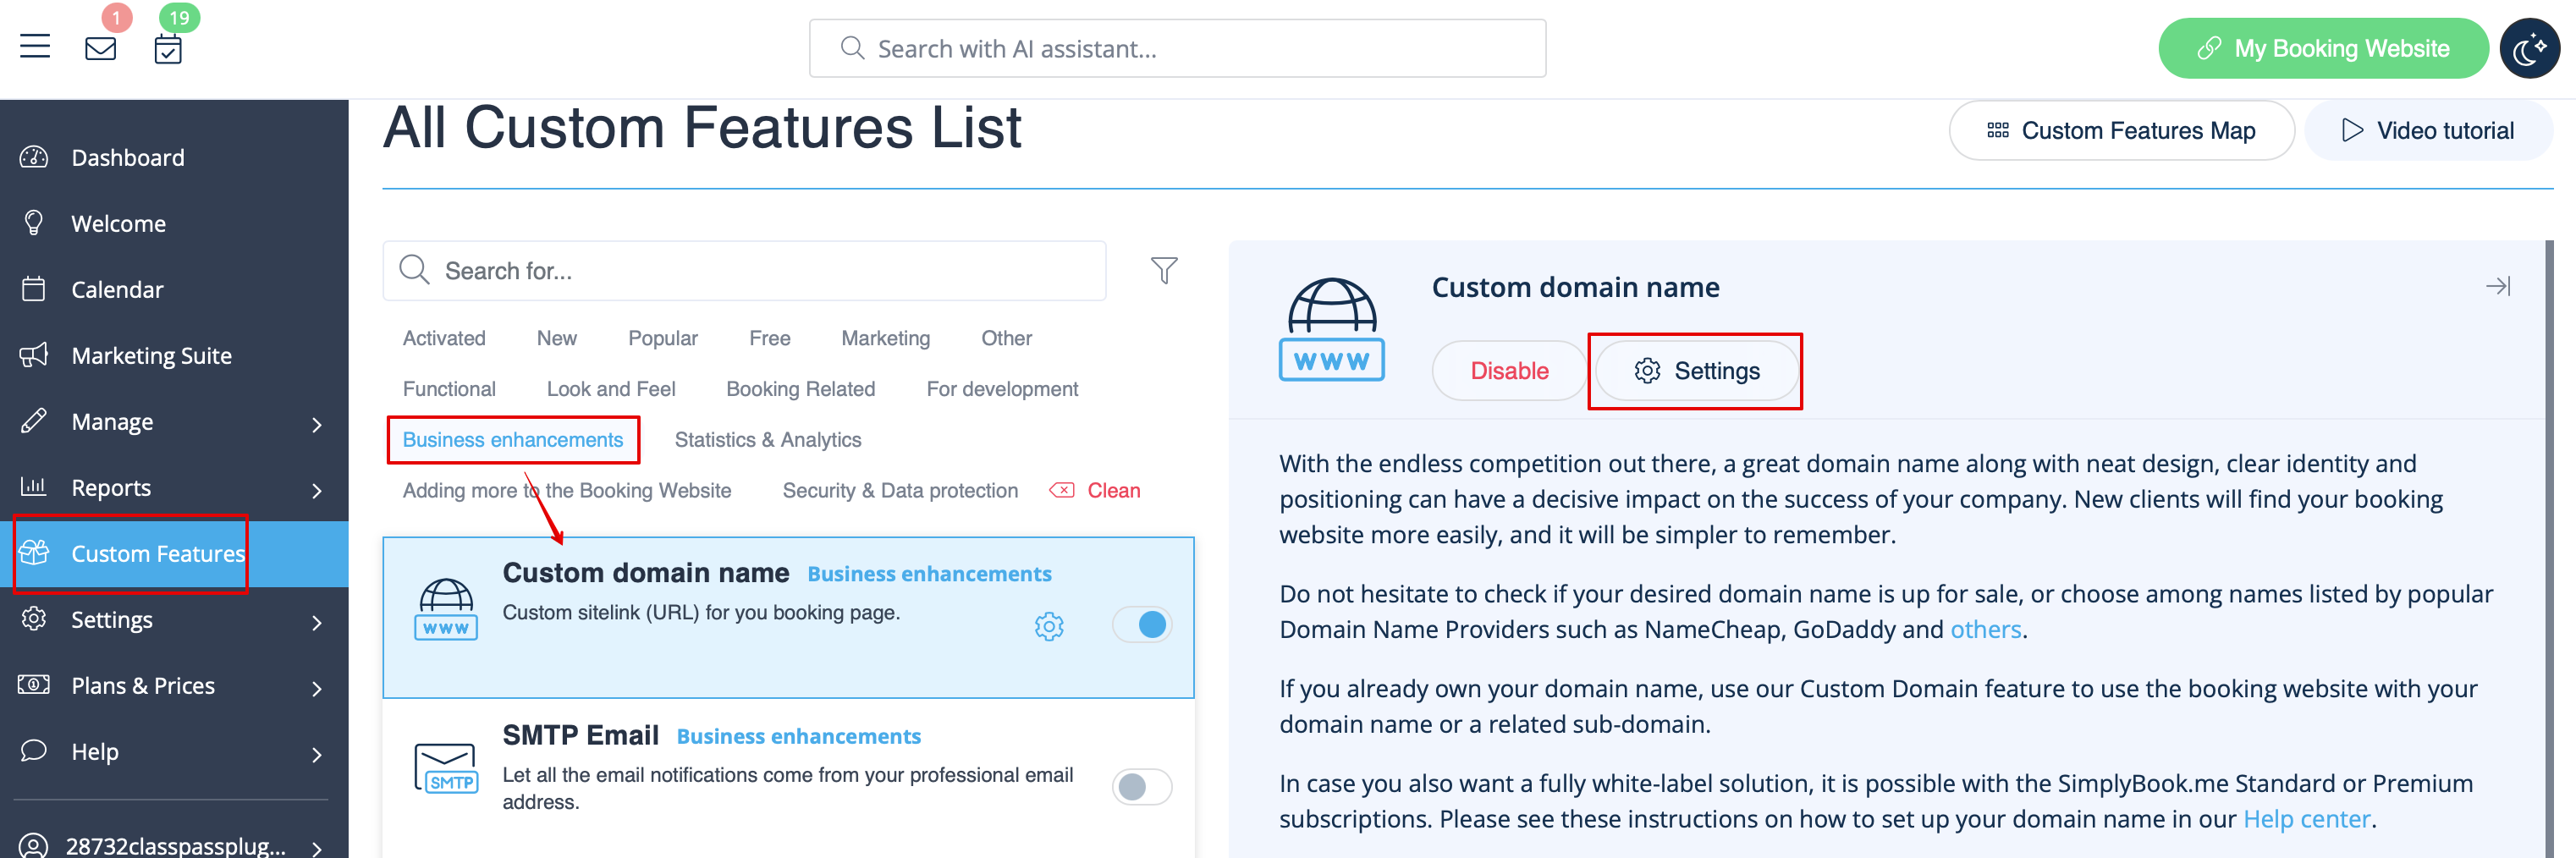
How to use if you already have a domain name
- 1. Enable this feature per one-time payment(you will see the exact price in your account) on your Custom features page.

- 2. Go to its "Settings" by selecting the corresponding option on the right side of the page.
- 3. In your Domain controller, you need to find where you set the DNS records and set A-record to IP mentioned in this feature settings.
- Please note! AAAA (IPv6) record must not be set, otherwise SSL certificate cannot be issued.
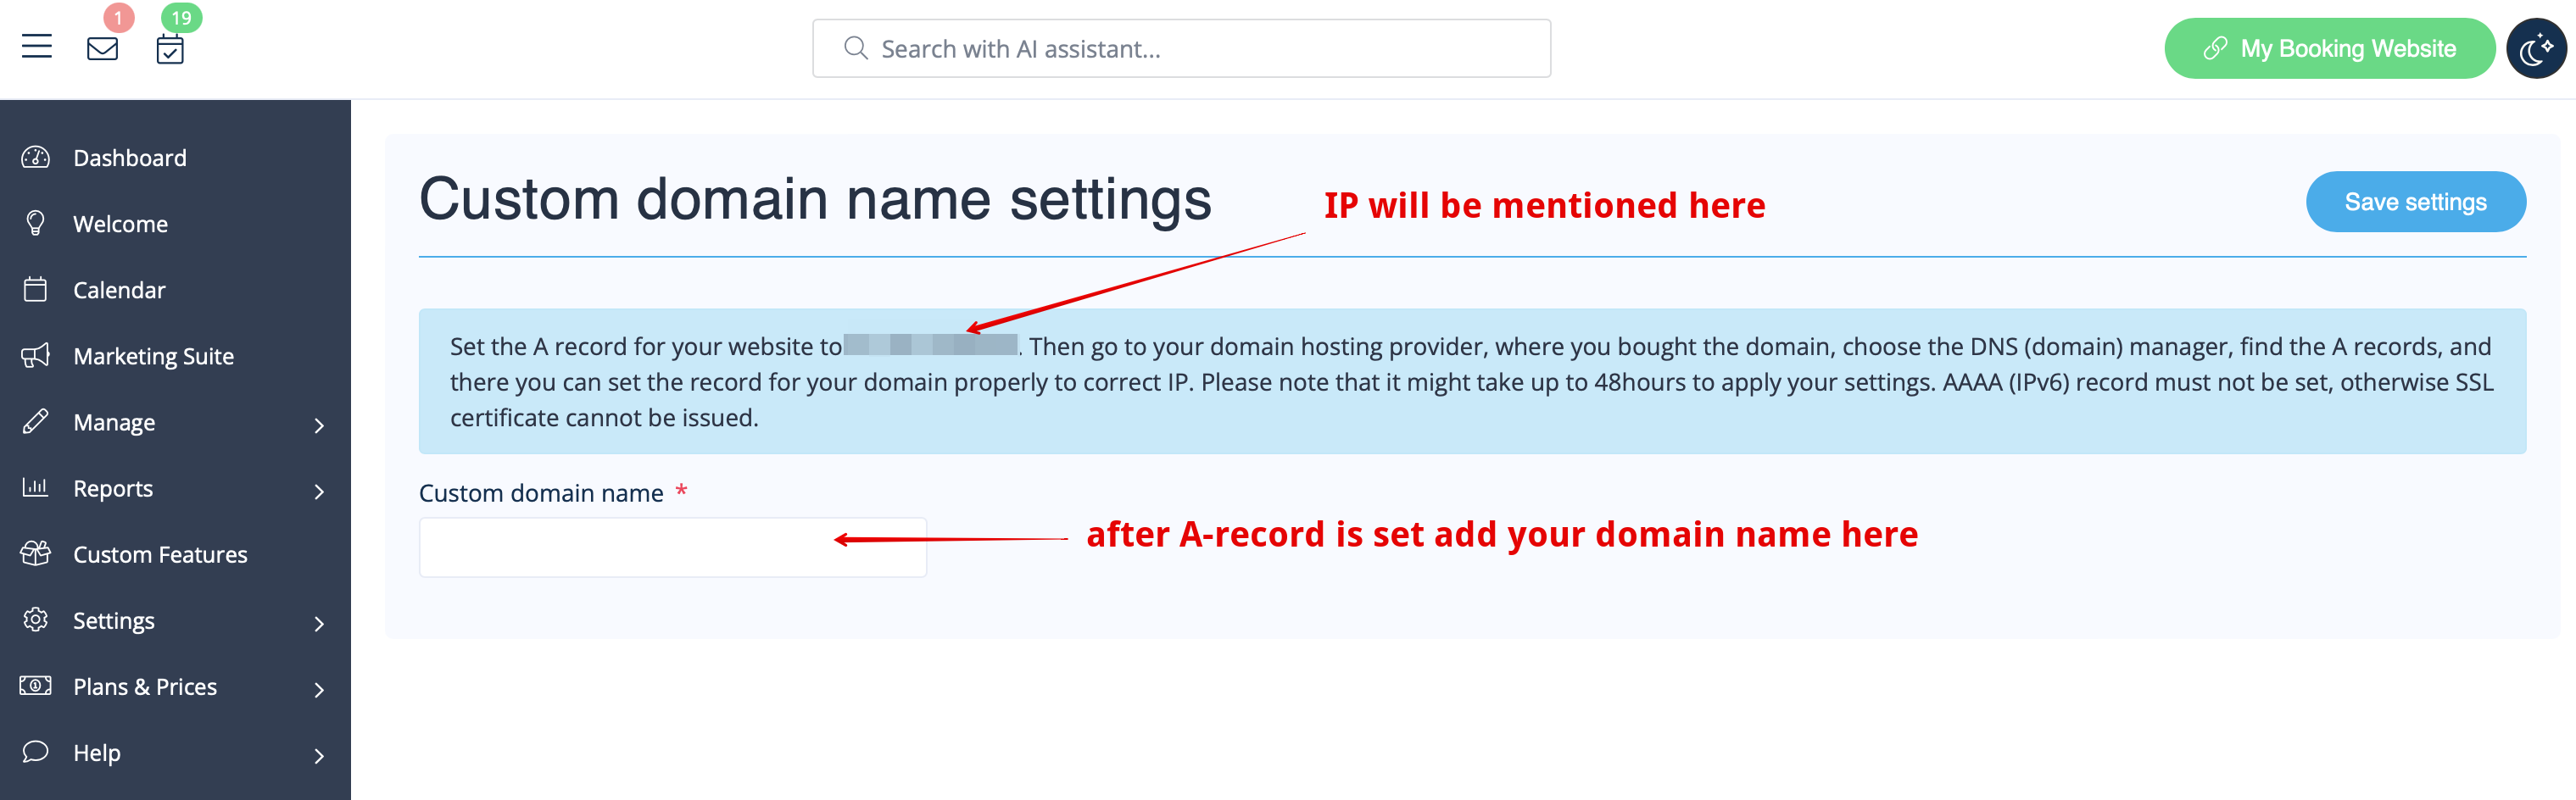
- After A-records are set enter domain name you wish to use in its settings and save.
- Then we will automatically receive the request and apply the settings on our side(it may take some time - usually around 24-48h). As soon as they are applied your domain name starts working for the booking site.
- If you wish to change Custom Domain name to different one from the one set before it can be done for additional price as new SSL certificates need to be created. There will be a button in this custom feature settings that will allow you to process the change if needed. For additional information please contact support.
How to set domain with Simply.com
- 1. Enable Custom Domain feature per one-time payment(you will see the exact price in your account) on your Custom features page.
- 2. Go to its "Settings" by selecting the corresponding option on the right side of the page.
- 3. Click “Purchase domain”
- This opens Simply.com in a new browser tab with your session pre-configured.
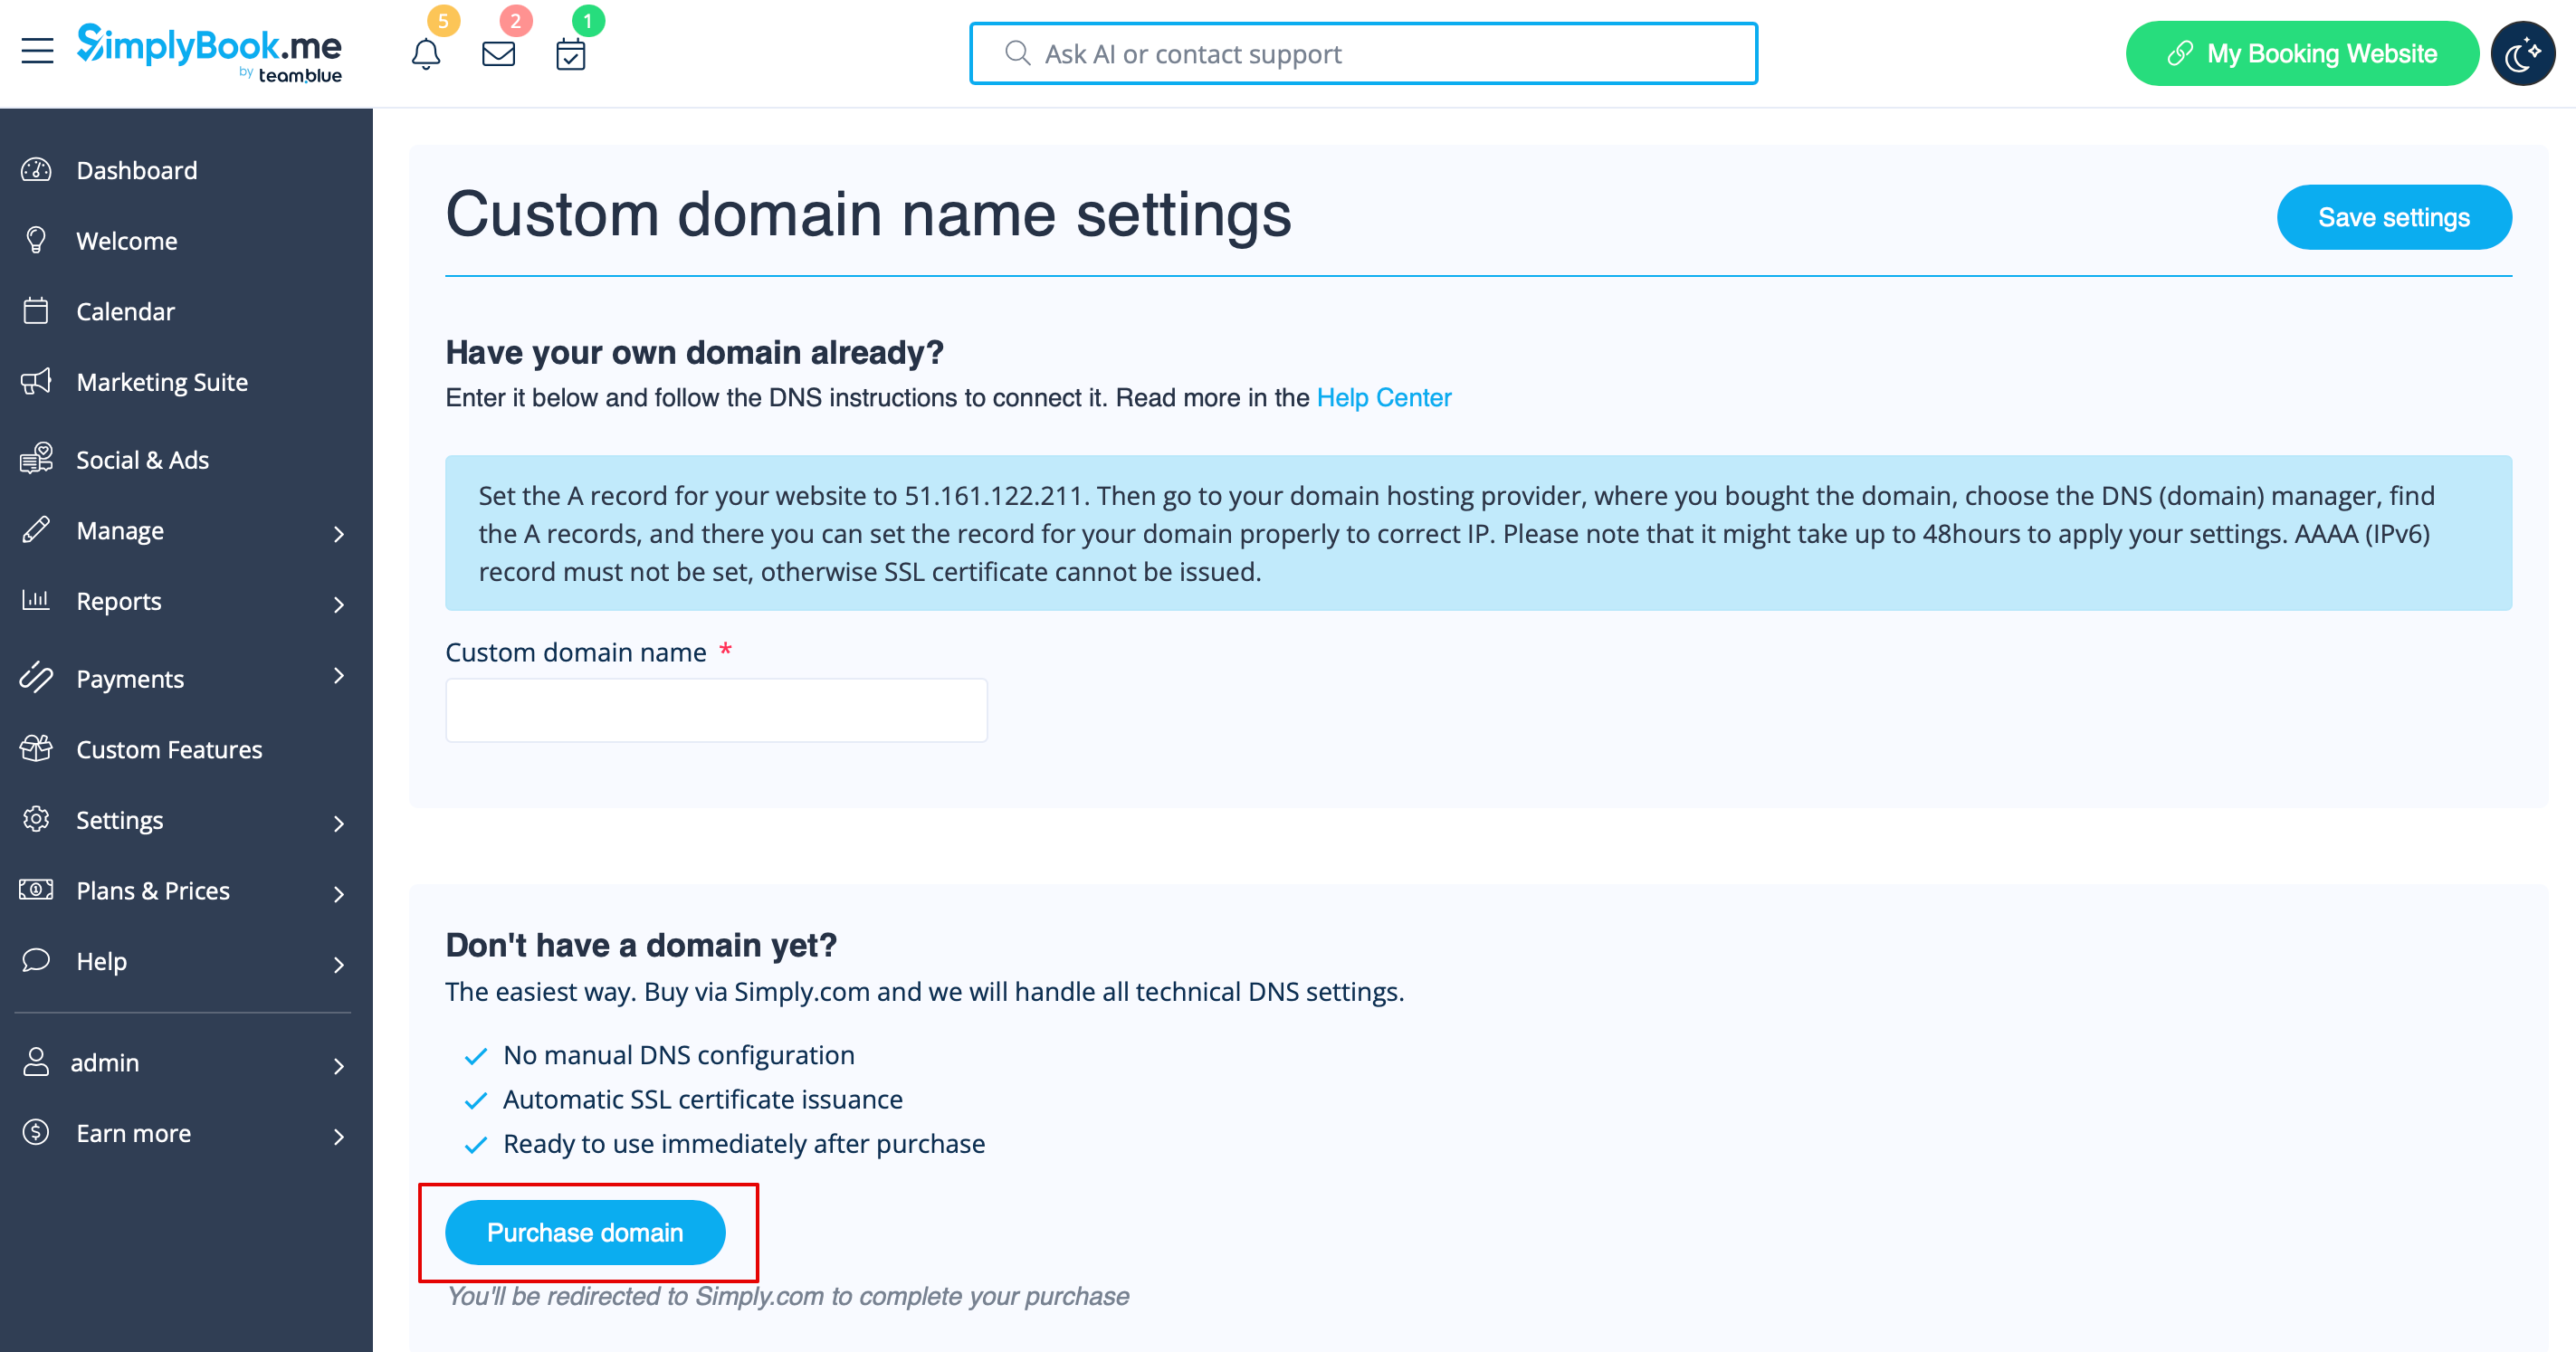
- 4. Choose and buy your domain at Simply.com:
- Search for your desired domain name
- Select a suitable option and complete checkout on Simply.com
- 5. Wait for automatic configuration
- After purchase, Simply.com points DNS to our servers and sends us a confirmation. No manual action is needed for default setups.
- 6. Return to Custom Domain settings. The status should change to Connected. An SSL certificate is issued automatically shortly after connection.