No edit summary |
No edit summary |
||
| Line 21: | Line 21: | ||
;How to use | ;How to use | ||
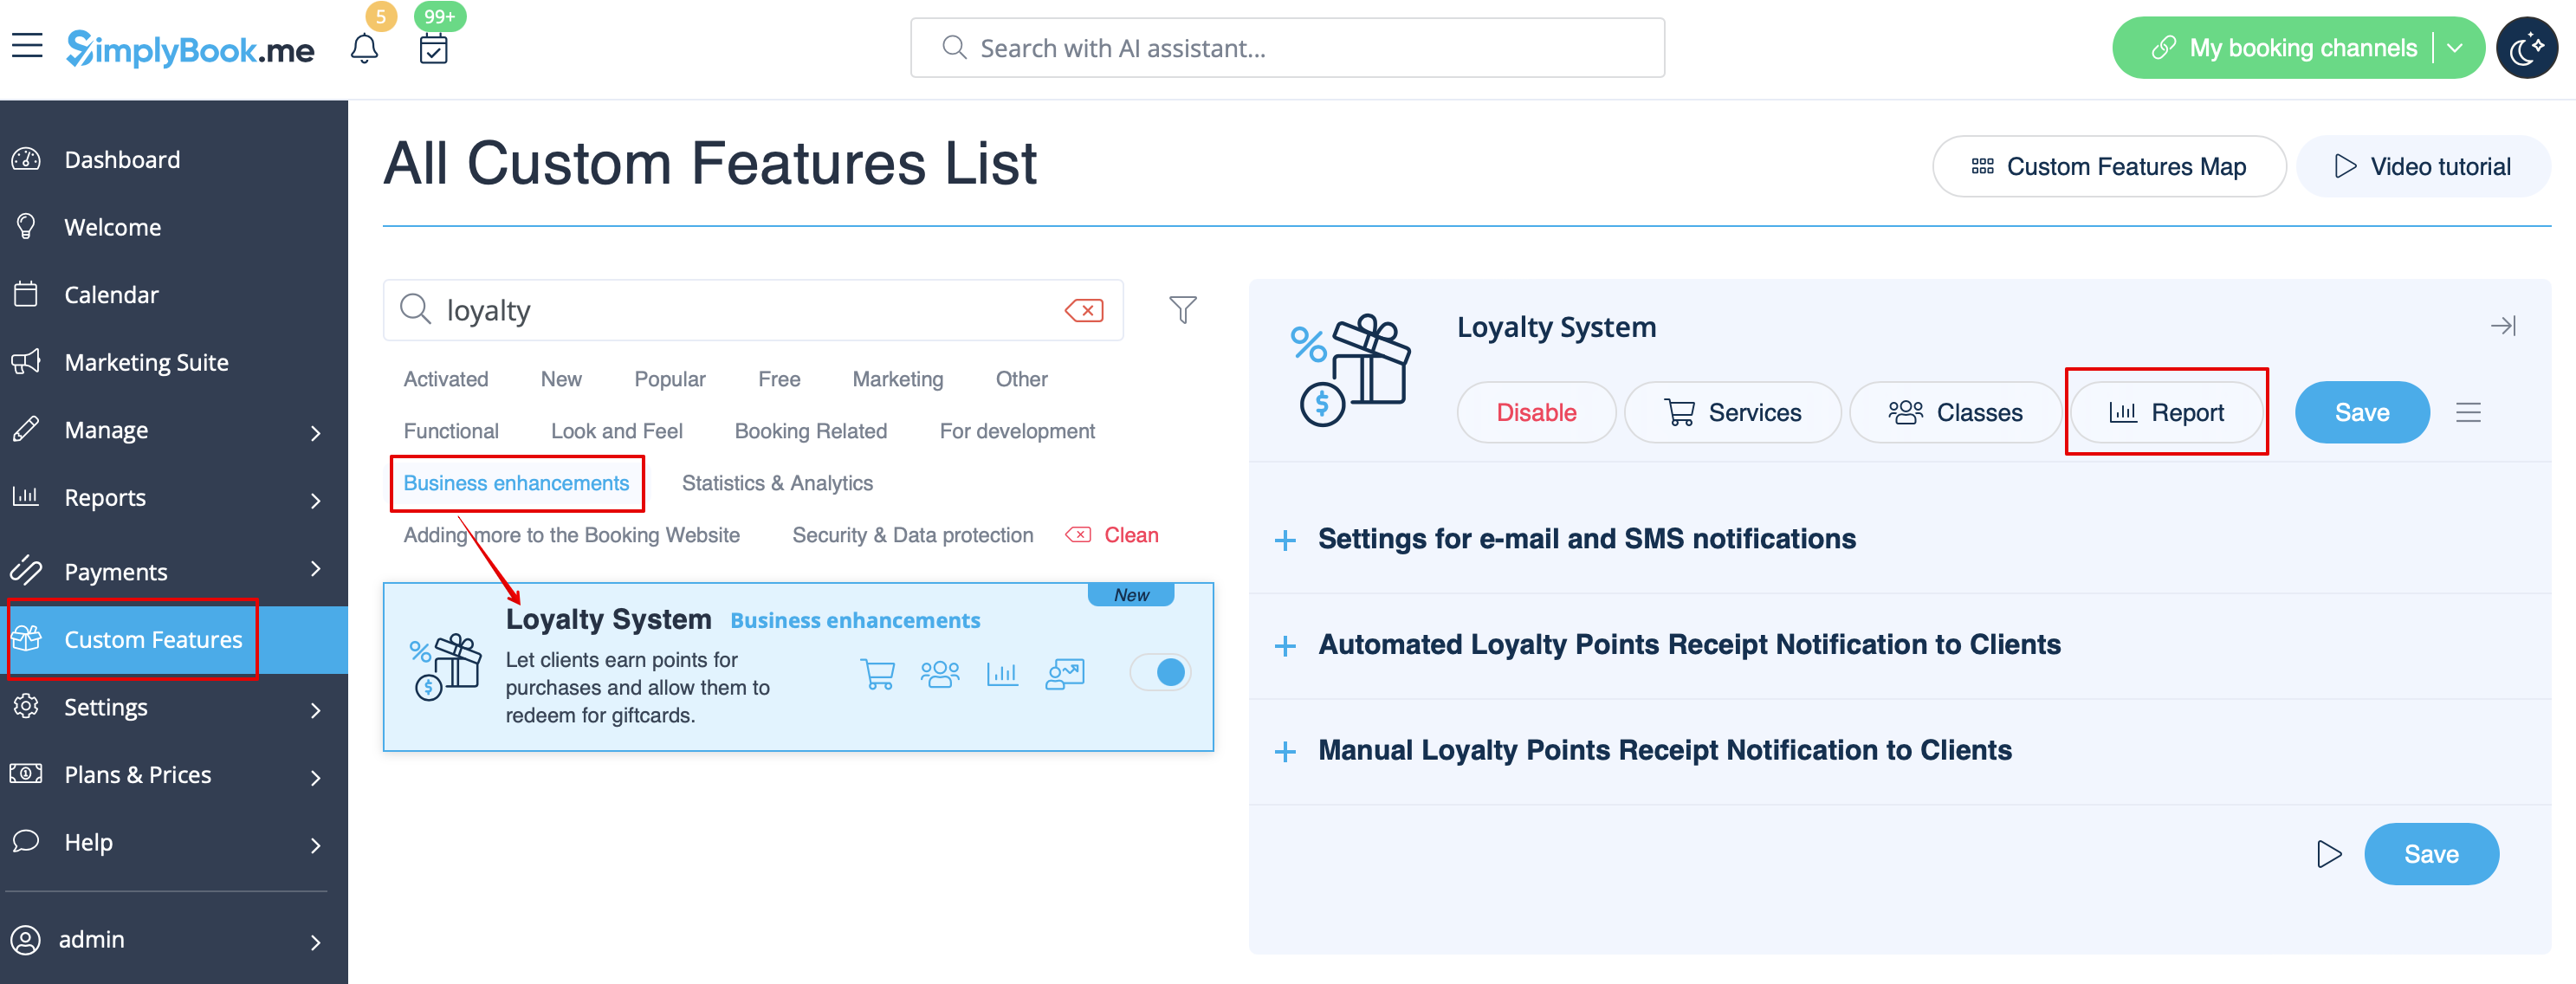
1. To enable <span style="background-color:#d4f8e5; padding:5px; border-radius:5px;">Loyalty System</span> please navigate to your <span style="background-color:#d4f8e5; padding:5px; border-radius:5px;">Custom Features</span> page, select <span style="background-color:#d4f8e5; padding:5px; border-radius:5px;">Business enhancements</span> section and click on <span style="background-color:#d4f8e5; padding:5px; border-radius:5px;">Enable</span> or use <span style="background-color:#d4f8e5; padding:5px; border-radius:5px;">the switcher</span> near the respective feature. | 1. To enable <span style="background-color:#d4f8e5; padding:5px; border-radius:5px;">Loyalty System</span> please navigate to your <span style="background-color:#d4f8e5; padding:5px; border-radius:5px;">Custom Features</span> page, select <span style="background-color:#d4f8e5; padding:5px; border-radius:5px;">Business enhancements</span> section and click on <span style="background-color:#d4f8e5; padding:5px; border-radius:5px;">Enable</span> or use <span style="background-color:#d4f8e5; padding:5px; border-radius:5px;">the switcher</span> near the respective feature. | ||
[[File:Loyalty system enable path.png|1200px|center]] | [[File:Loyalty system enable path redesigned.png|1200px|center|link=https://help.simplybook.me/images/1/10/Loyalty_system_enable_path_redesigned.png]] | ||
<br><br> | <br><br> | ||
2. After it is enabled you can edit the related notifications templates right away, on the right side of the page. Please use the suggested variables if needed. | 2. After it is enabled you can edit the related notifications templates right away, on the right side of the page. Please use the suggested variables if needed. | ||
Two notifications types are available: for automated points addition and manual client balance update.<br> | Two notifications types are available: for automated points addition and manual client balance update.<br> | ||
[[File:Loyalty system notifications | [[File:Loyalty system notifications settings redesigned.png|1200px|center|link=https://help.simplybook.me/images/a/a1/Loyalty_system_notifications_settings_redesigned.png]] | ||
<br><br> | <br><br> | ||
3. To set the points amounts please go to <span style="background-color:#d4f8e5; padding:5px; border-radius:5px;">Manage</span> -> <span style="background-color:#d4f8e5; padding:5px; border-radius:5px;">Services</span> (or use <span style="background-color:#d4f8e5; padding:5px; border-radius:5px;">Services</span> link near the custom feature) or <span style="background-color:#d4f8e5; padding:5px; border-radius:5px;">Manage</span> -> <span style="background-color:#cdeffc; padding:5px; border-radius:5px;">[[Classes_custom_feature|Classes]]</span> (if you are using them and wish to be a part of the loyalty program). | 3. To set the points amounts please go to <span style="background-color:#d4f8e5; padding:5px; border-radius:5px;">Manage</span> -> <span style="background-color:#d4f8e5; padding:5px; border-radius:5px;">Services</span> (or use <span style="background-color:#d4f8e5; padding:5px; border-radius:5px;">Services</span> link near the custom feature) or <span style="background-color:#d4f8e5; padding:5px; border-radius:5px;">Manage</span> -> <span style="background-color:#cdeffc; padding:5px; border-radius:5px;">[[Classes_custom_feature|Classes]]</span> (if you are using them and wish to be a part of the loyalty program). | ||
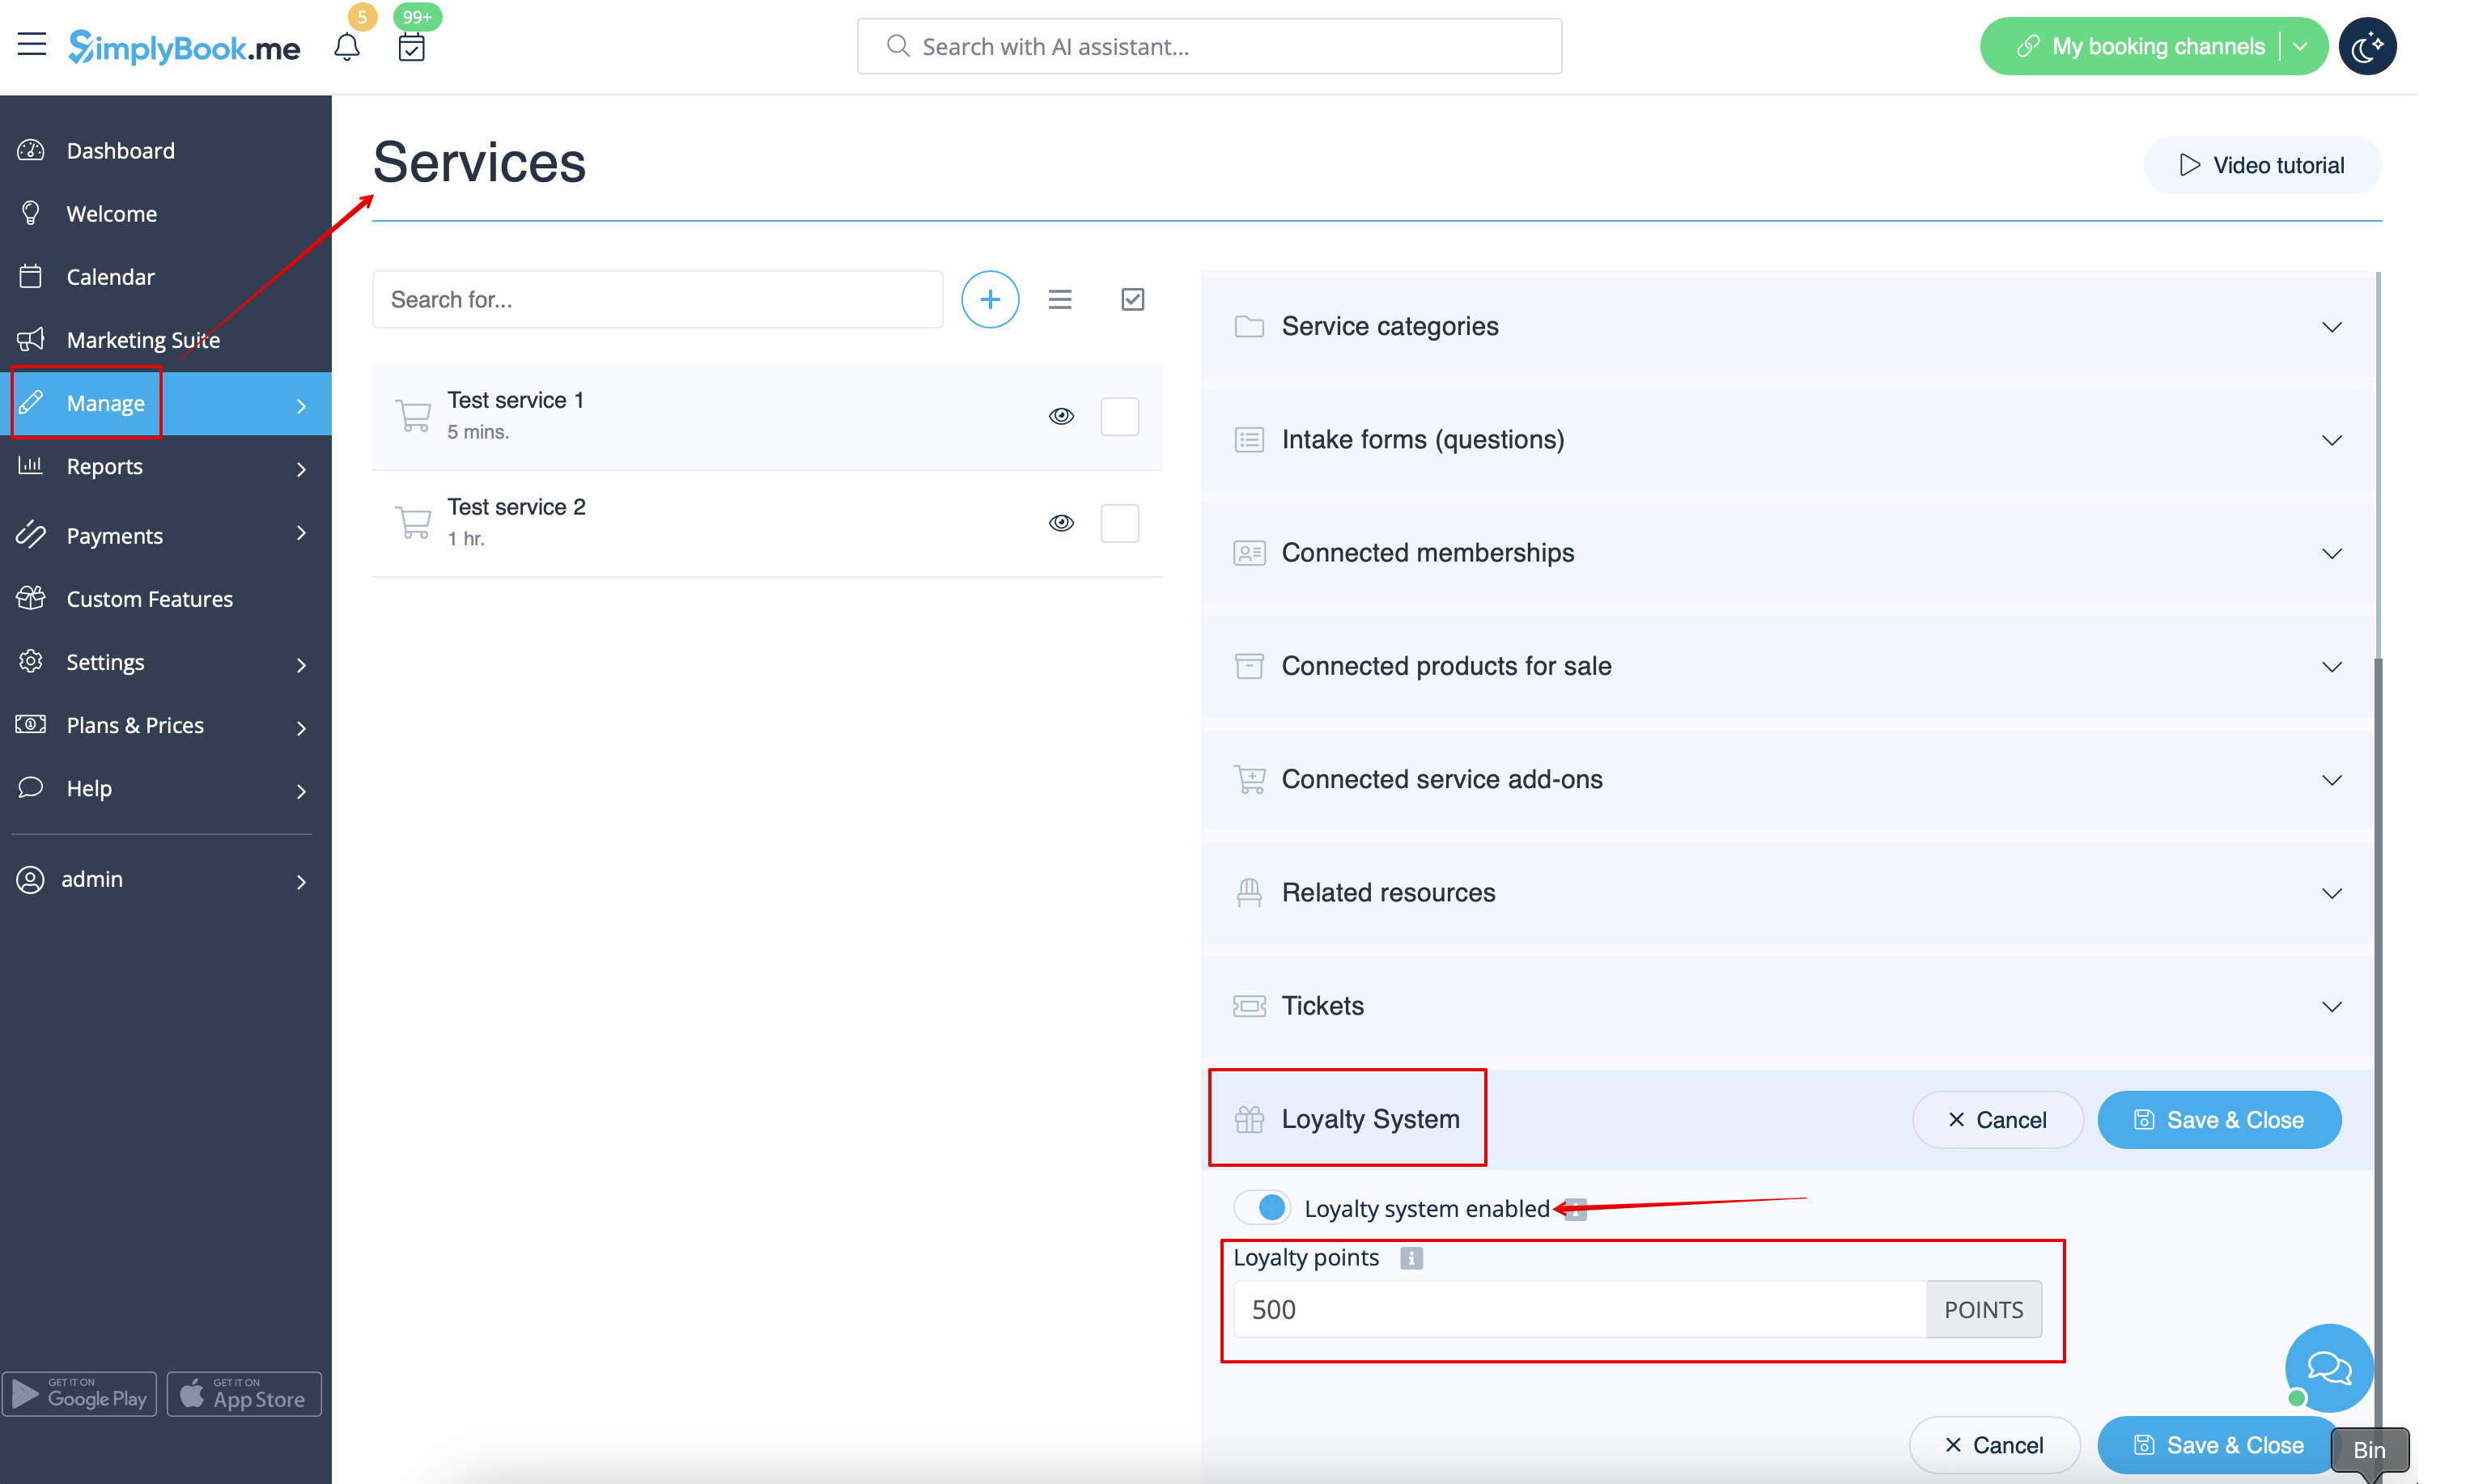
4. Create new service/<span style="background-color:#cdeffc; padding:5px; border-radius:5px;">[[Classes_custom_feature|class]]</span> if necessary or click on the existing one to edit, select <span style="background-color:#d4f8e5; padding:5px; border-radius:5px;">Loyalty System</span> tab. | 4. Create new service/<span style="background-color:#cdeffc; padding:5px; border-radius:5px;">[[Classes_custom_feature|class]]</span> if necessary or click on the existing one to edit, select <span style="background-color:#d4f8e5; padding:5px; border-radius:5px;">Loyalty System</span> tab. | ||
[[File: | [[File:Set loayalty points per service redesigned.png|1200px|center|link=https://help.simplybook.me/images/c/cf/Set_loayalty_points_per_service_redesigned.png]] | ||
<br><br> | <br><br> | ||
5. Enable <span style="background-color:#d4f8e5; padding:5px; border-radius:5px;">the switcher</span> to connect the service/<span style="background-color:#cdeffc; padding:5px; border-radius:5px;">[[Classes_custom_feature|class]]</span> to the loyalty system and <span style="background-color:#d4f8e5; padding:5px; border-radius:5px;">indicate the amount</span> of points the client will earn per this service/<span style="background-color:#cdeffc; padding:5px; border-radius:5px;">[[Classes_custom_feature|class]]</span> booking in the box that appears. Save settings. | 5. Enable <span style="background-color:#d4f8e5; padding:5px; border-radius:5px;">the switcher</span> to connect the service/<span style="background-color:#cdeffc; padding:5px; border-radius:5px;">[[Classes_custom_feature|class]]</span> to the loyalty system and <span style="background-color:#d4f8e5; padding:5px; border-radius:5px;">indicate the amount</span> of points the client will earn per this service/<span style="background-color:#cdeffc; padding:5px; border-radius:5px;">[[Classes_custom_feature|class]]</span> booking in the box that appears. Save settings. | ||
[[File: | [[File:Set points per service redesigned.png|1200px|center|link=https://help.simplybook.me/images/1/1f/Set_points_per_service_redesigned.png]] | ||
<br><br> | <br><br> | ||
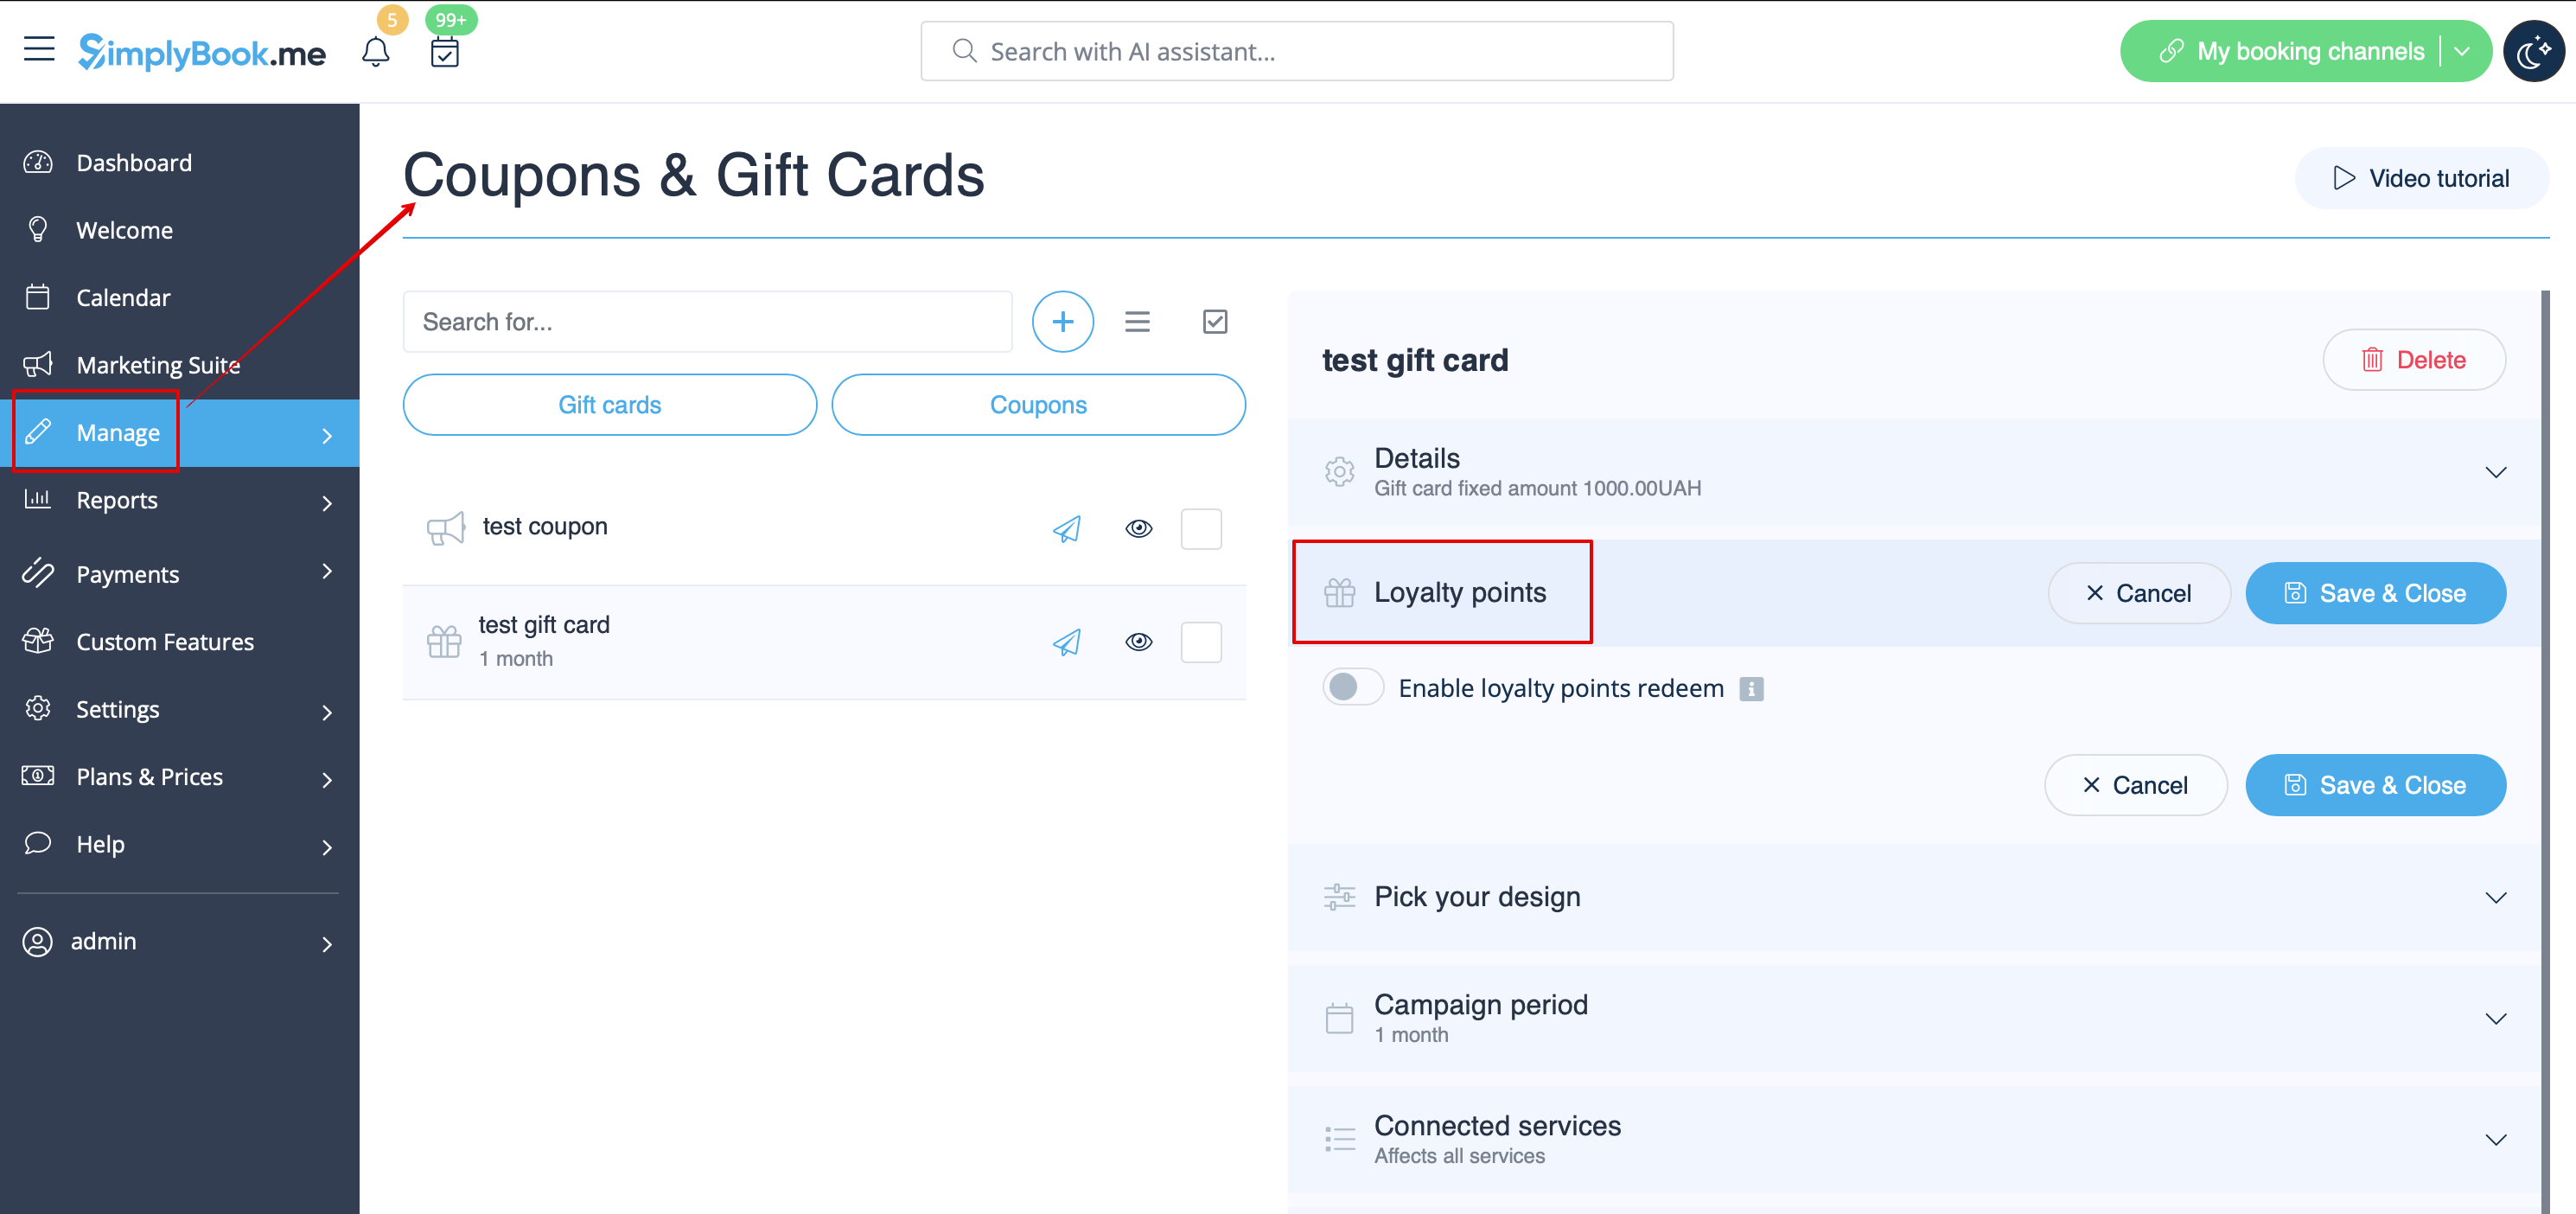
6. Then please go to <span style="background-color:#d4f8e5; padding:5px; border-radius:5px;">Manage</span> -> <span style="background-color:#d4f8e5; padding:5px; border-radius:5px;">Coupons & Gift Cards</span> page using the left-side menu, create a new gift card or click on the existing one to edit and choose <span style="background-color:#d4f8e5; padding:5px; border-radius:5px;">Loyalty System</span> tab. | 6. Then please go to <span style="background-color:#d4f8e5; padding:5px; border-radius:5px;">Manage</span> -> <span style="background-color:#d4f8e5; padding:5px; border-radius:5px;">Coupons & Gift Cards</span> page using the left-side menu, create a new gift card or click on the existing one to edit and choose <span style="background-color:#d4f8e5; padding:5px; border-radius:5px;">Loyalty System</span> tab. | ||
[[File: | [[File:Enable loyalty points for gift card.png|1200px|center|link=https://help.simplybook.me/images/5/5a/Enable_loyalty_points_for_gift_card.png]] | ||
<br><br> | <br><br> | ||
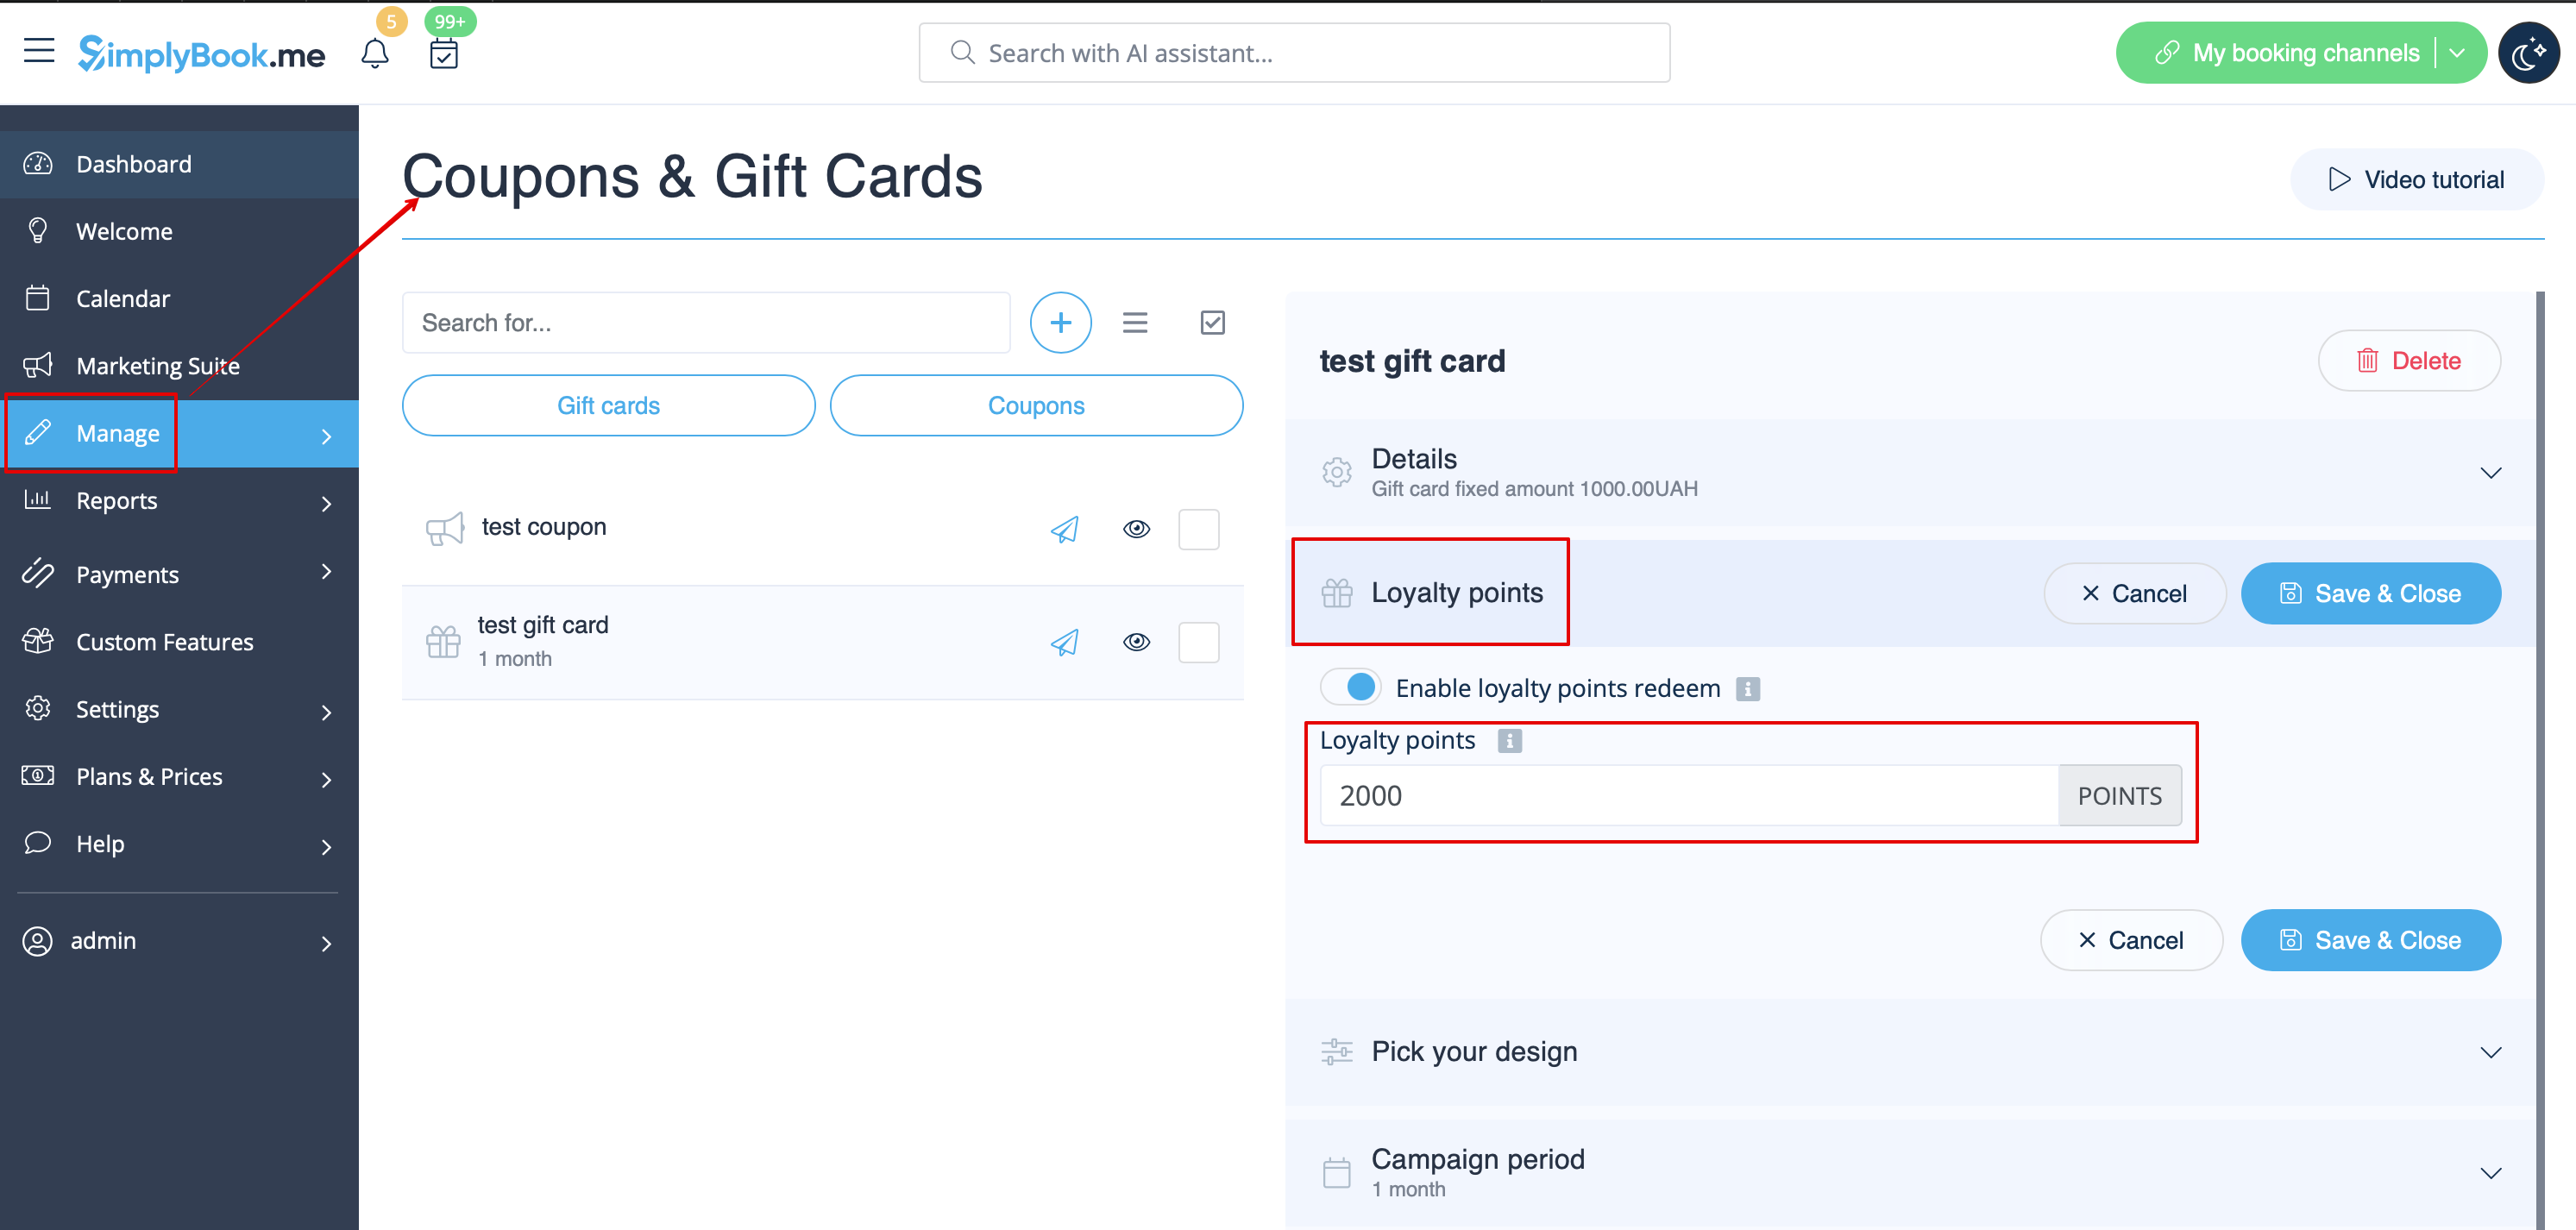
7. Enable <span style="background-color:#d4f8e5; padding:5px; border-radius:5px;">the switcher</span> to allow the clients to buy this gift card for bonuses. <span style="background-color:#d4f8e5; padding:5px; border-radius:5px;">Set the necessary amount</span> to be earned in the box that appears. Save settings. | 7. Enable <span style="background-color:#d4f8e5; padding:5px; border-radius:5px;">the switcher</span> to allow the clients to buy this gift card for bonuses. <span style="background-color:#d4f8e5; padding:5px; border-radius:5px;">Set the necessary amount</span> to be earned in the box that appears. Save settings. | ||
[[File: | [[File:Set number of points per gift card redesigned.png|1200px|center|link=https://help.simplybook.me/images/2/29/Set_number_of_points_per_gift_card_redesigned.png]] | ||
<br><br> | <br><br> | ||
8. From the client side they can see the amount of the points earned as well as the bonuses usage history inside <span style="background-color:#d4f8e5; padding:5px; border-radius:5px;">the client profile</span> or go to the specific <span style="background-color:#d4f8e5; padding:5px; border-radius:5px;">tab</span> of the booking website. | 8. From the client side they can see the amount of the points earned as well as the bonuses usage history inside <span style="background-color:#d4f8e5; padding:5px; border-radius:5px;">the client profile</span> or go to the specific <span style="background-color:#d4f8e5; padding:5px; border-radius:5px;">tab</span> of the booking website. | ||
| Line 51: | Line 51: | ||
<br><br> | <br><br> | ||
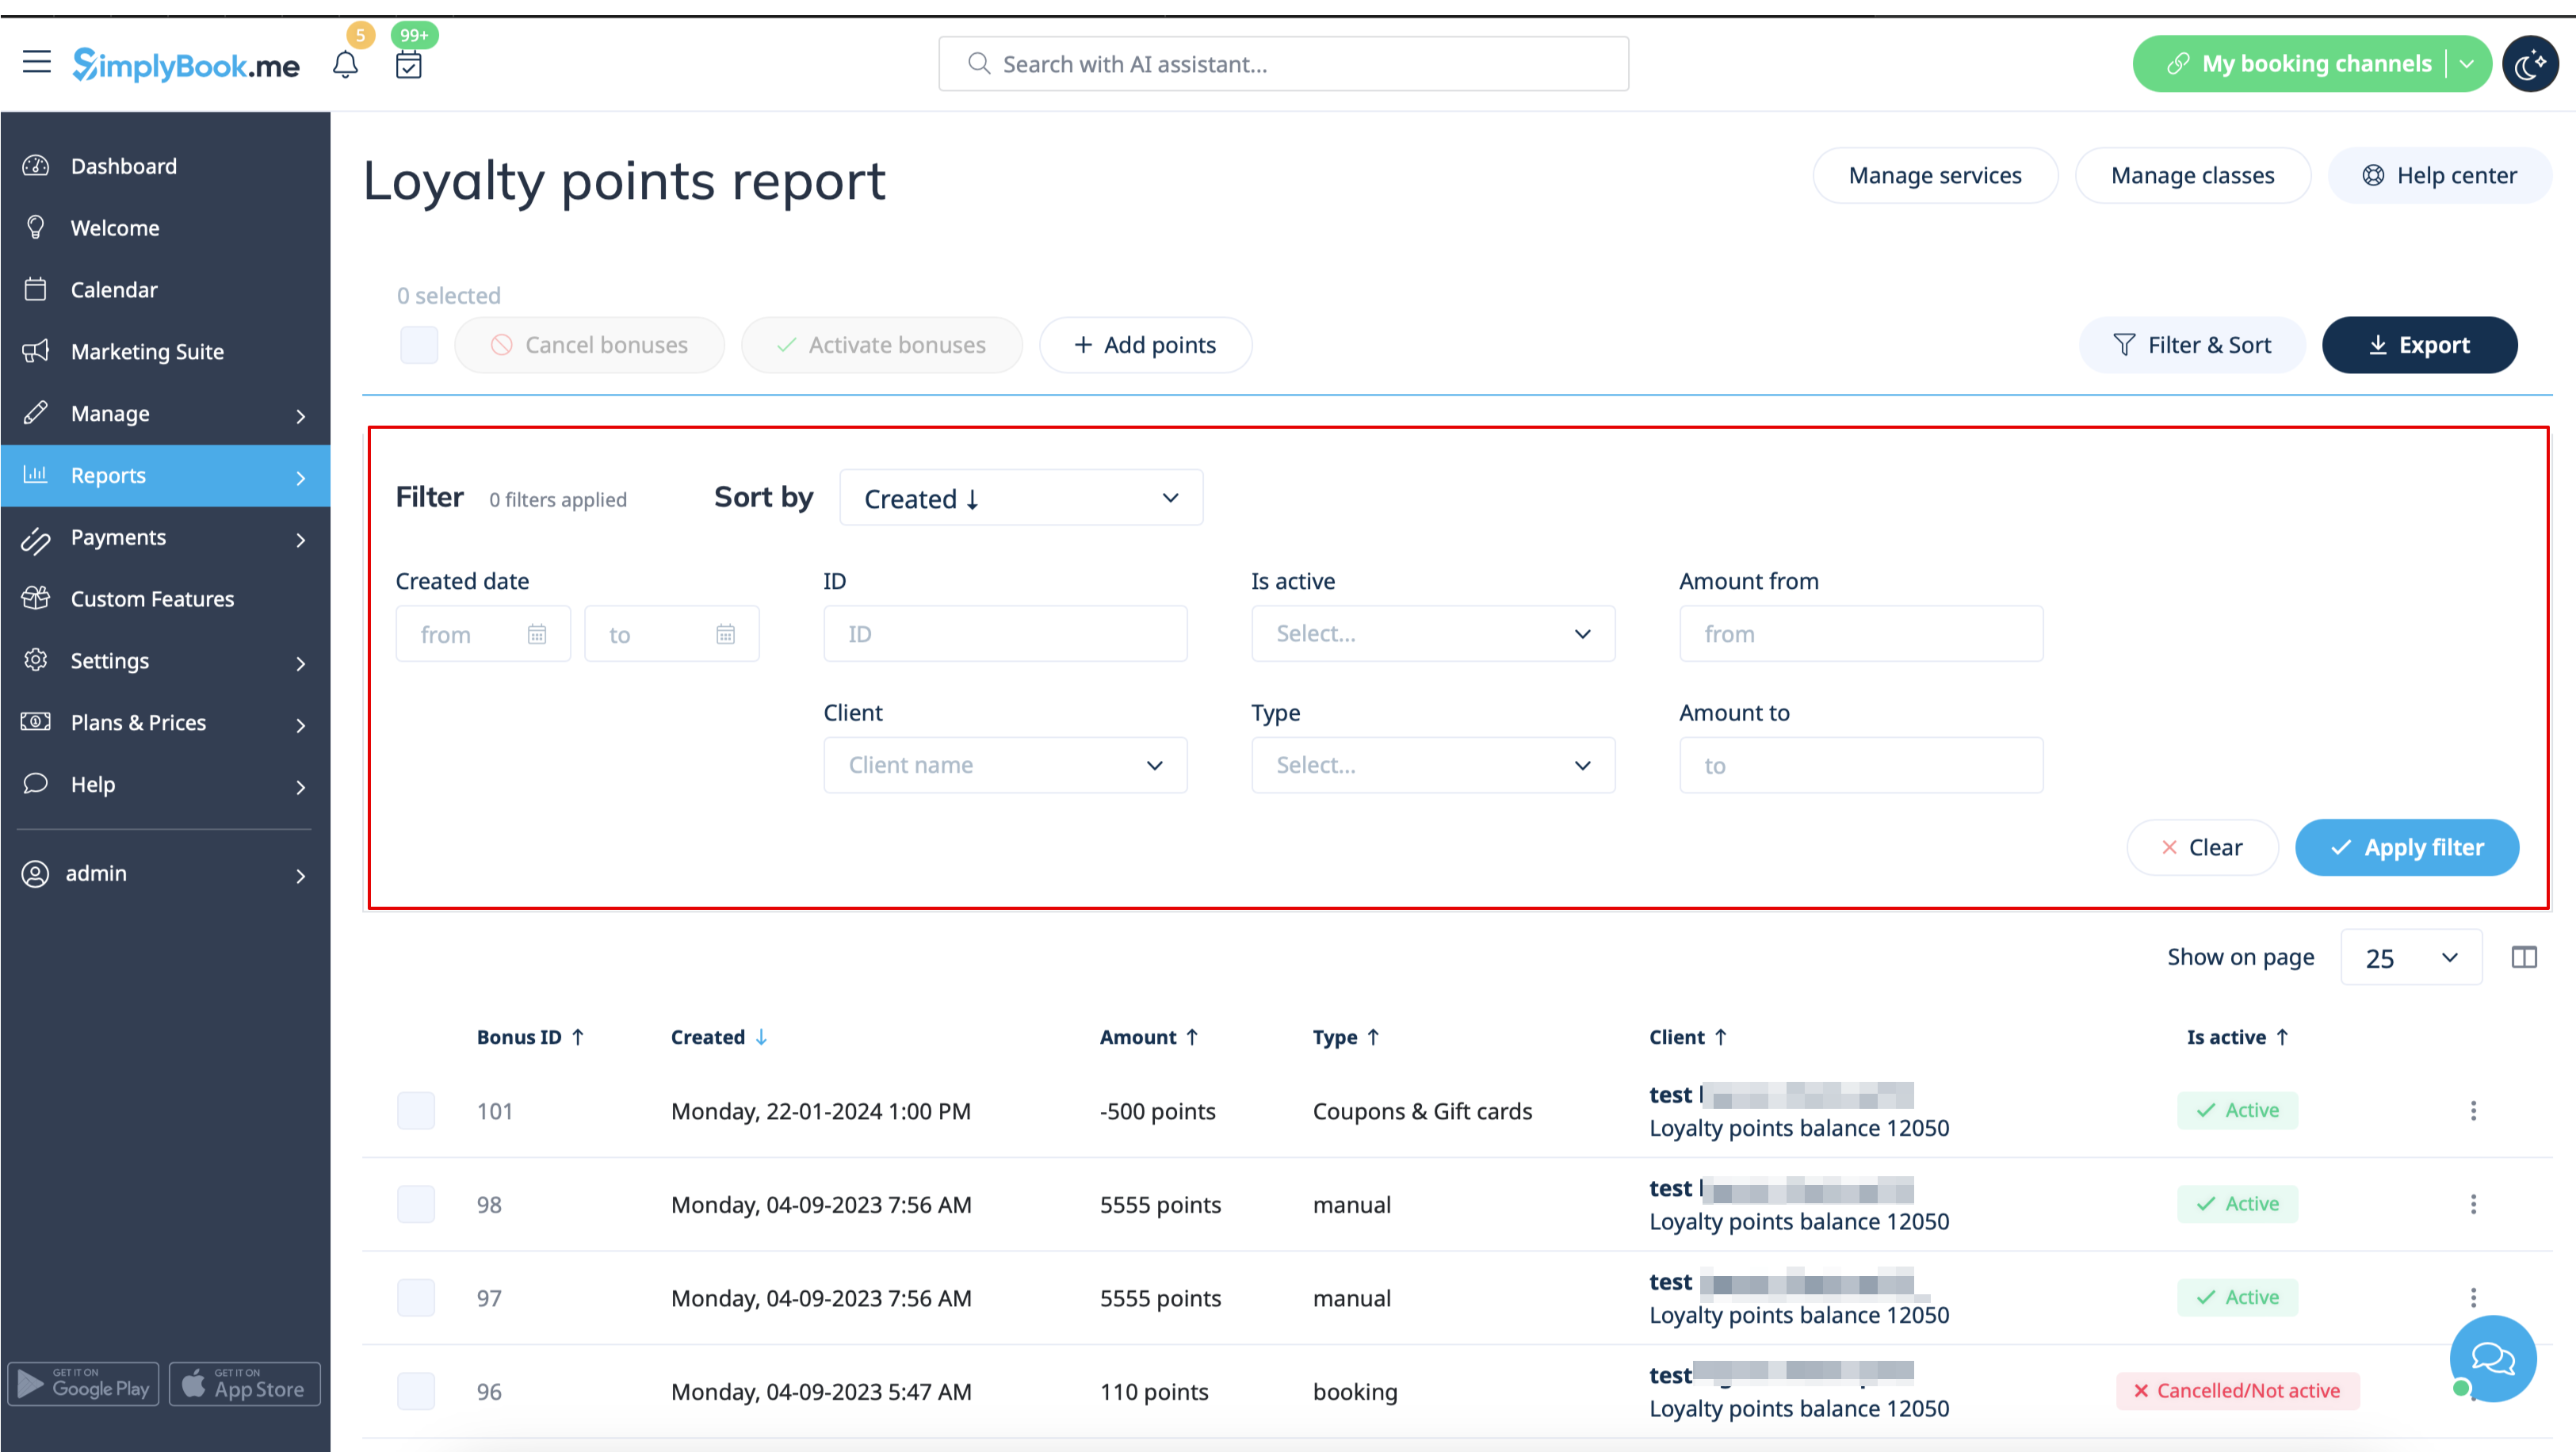
10. From the admin side you can also view all the points earning and spending in <span style="background-color:#d4f8e5; padding:5px; border-radius:5px;">Reports</span> -> <span style="background-color:#d4f8e5; padding:5px; border-radius:5px;">Loyalty points report</span>. Please use the filter if necessary to see some selected results, export the data to Excel or .csv. | 10. From the admin side you can also view all the points earning and spending in <span style="background-color:#d4f8e5; padding:5px; border-radius:5px;">Reports</span> -> <span style="background-color:#d4f8e5; padding:5px; border-radius:5px;">Loyalty points report</span>. Please use the filter if necessary to see some selected results, export the data to Excel or .csv. | ||
[[File:Loyalty | [[File:Loyalty points report path redesigned.png|1200px|center|link=https://help.simplybook.me/images/5/5e/Loyalty_points_report_path_redesigned.png]]<br><br> | ||
[[File:Loyalty | [[File:Loyalty points report overview redesigned.png|1200px|center|link=https://help.simplybook.me/images/e/ef/Loyalty_points_report_overview_redesigned.png]] | ||
<br><br> | <br><br> | ||
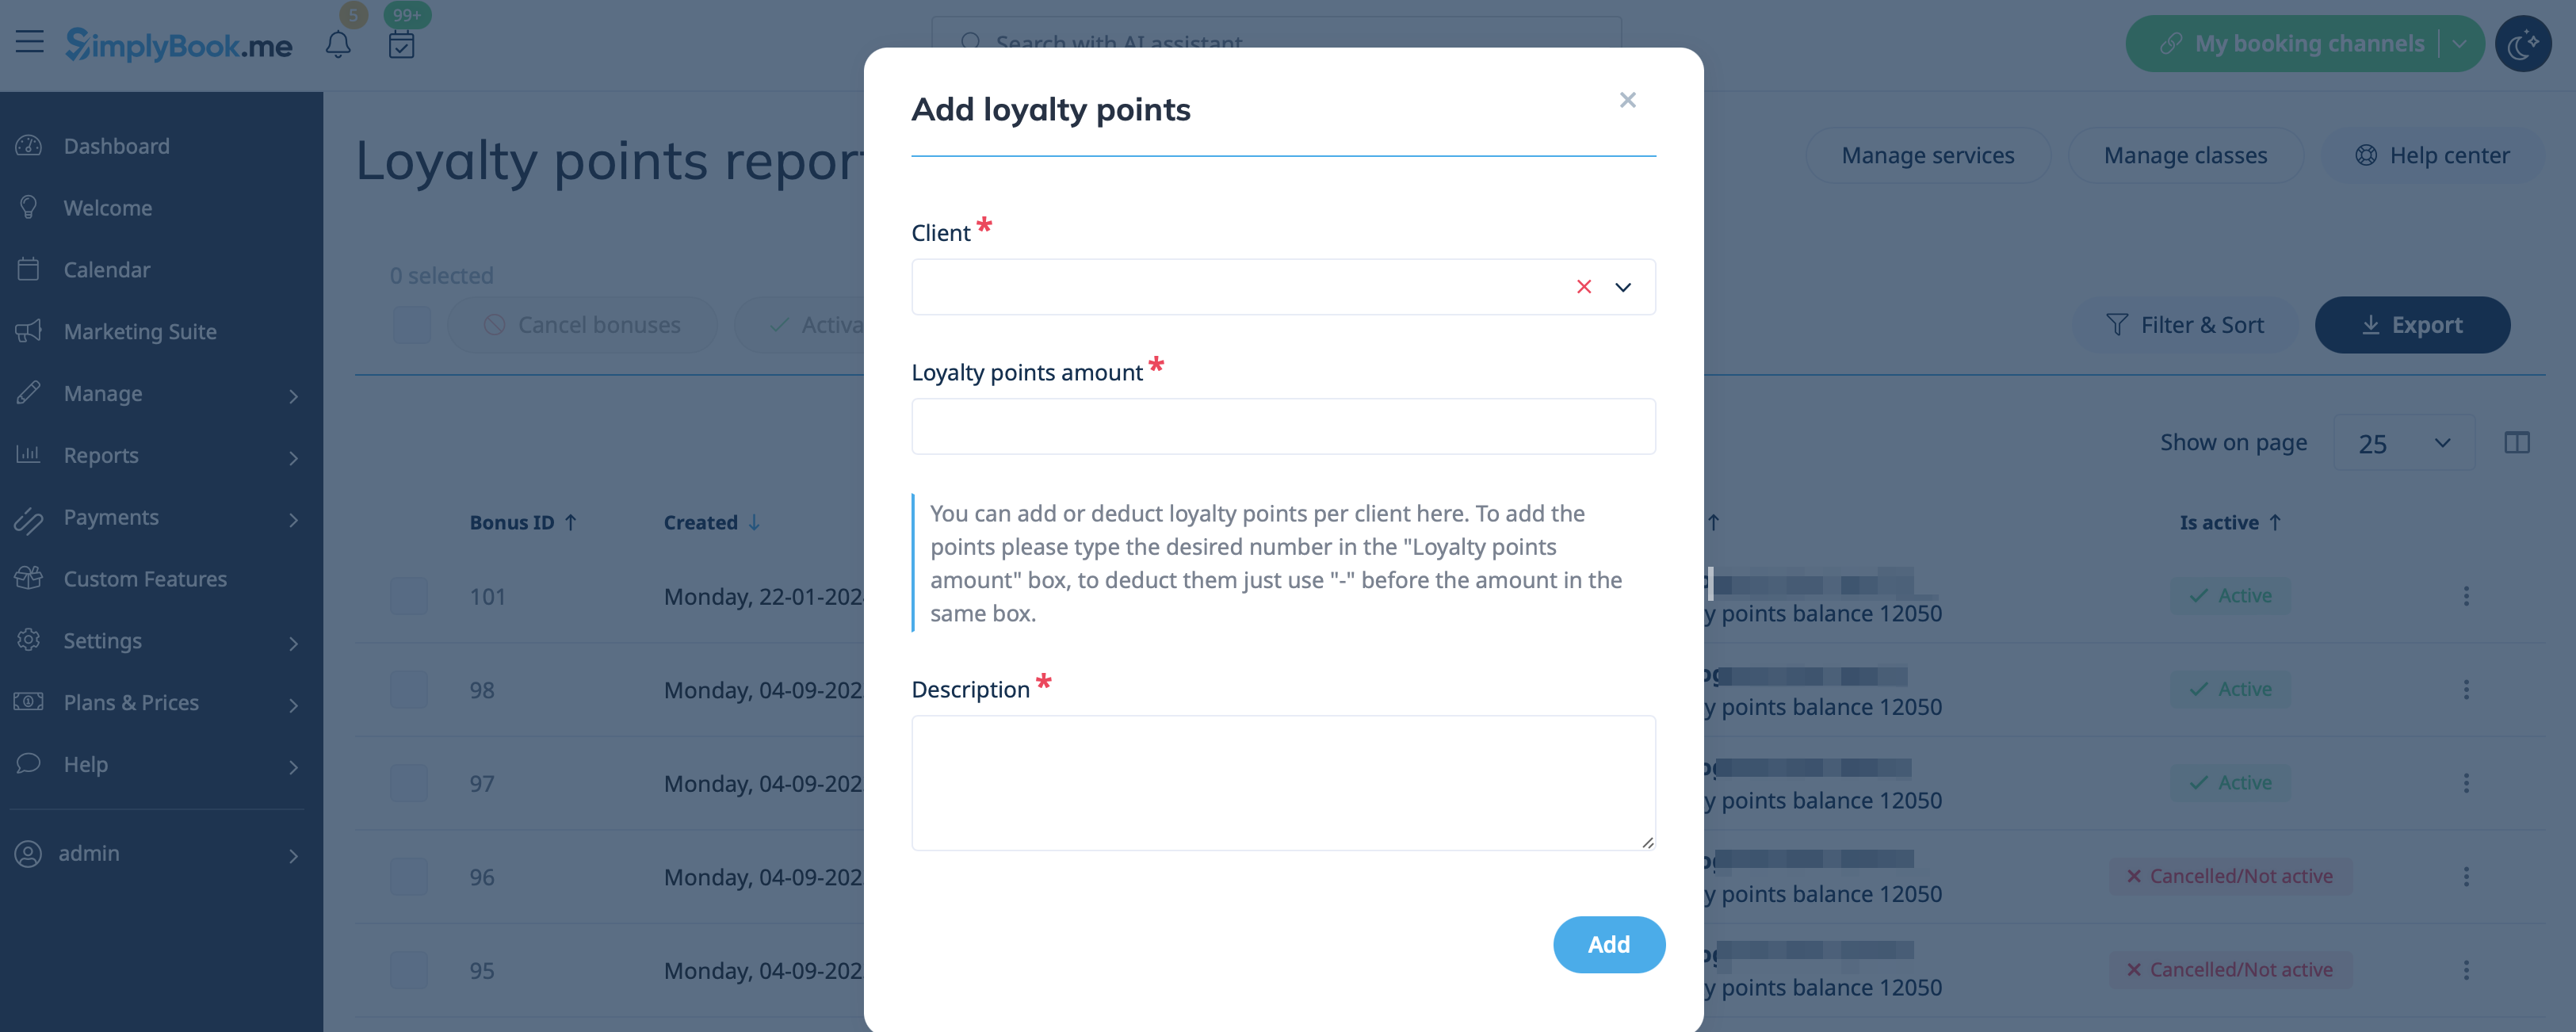
11. With the help of this report you can also manually manage the points amounts per client.<br> | 11. With the help of this report you can also manually manage the points amounts per client.<br> | ||
Please click on the <span style="background-color:#d4f8e5; padding:5px; border-radius:5px;">Add points</span> button at the top, use <span style="background-color:#d4f8e5; padding:5px; border-radius:5px;">the search box</span> in the popup that appears to find the desired client, <span style="background-color:#d4f8e5; padding:5px; border-radius:5px;">indicate the amount</span>to be added or deducted in the <span style="background-color:#d4f8e5; padding:5px; border-radius:5px;">Reward points amount</span> box (to deduct please simply <span style="background-color:#d4f8e5; padding:5px; border-radius:5px;">add "-"</span> before the amount), add some <span style="background-color:#d4f8e5; padding:5px; border-radius:5px;">description</span> (it will also be reflected on the client side) and hit <span style="background-color:#d4f8e5; padding:5px; border-radius:5px;">Add</span>. The client will receive the notification about the balance update.<br> | Please click on the <span style="background-color:#d4f8e5; padding:5px; border-radius:5px;">Add points</span> button at the top, use <span style="background-color:#d4f8e5; padding:5px; border-radius:5px;">the search box</span> in the popup that appears to find the desired client, <span style="background-color:#d4f8e5; padding:5px; border-radius:5px;">indicate the amount</span>to be added or deducted in the <span style="background-color:#d4f8e5; padding:5px; border-radius:5px;">Reward points amount</span> box (to deduct please simply <span style="background-color:#d4f8e5; padding:5px; border-radius:5px;">add "-"</span> before the amount), add some <span style="background-color:#d4f8e5; padding:5px; border-radius:5px;">description</span> (it will also be reflected on the client side) and hit <span style="background-color:#d4f8e5; padding:5px; border-radius:5px;">Add</span>. The client will receive the notification about the balance update.<br> | ||
[[File: | [[File:Manually add points redesigned.png|1200px|center|link=https://help.simplybook.me/images/4/4c/Manually_add_points_redesigned.png]] | ||
<br><br> | <br><br> | ||
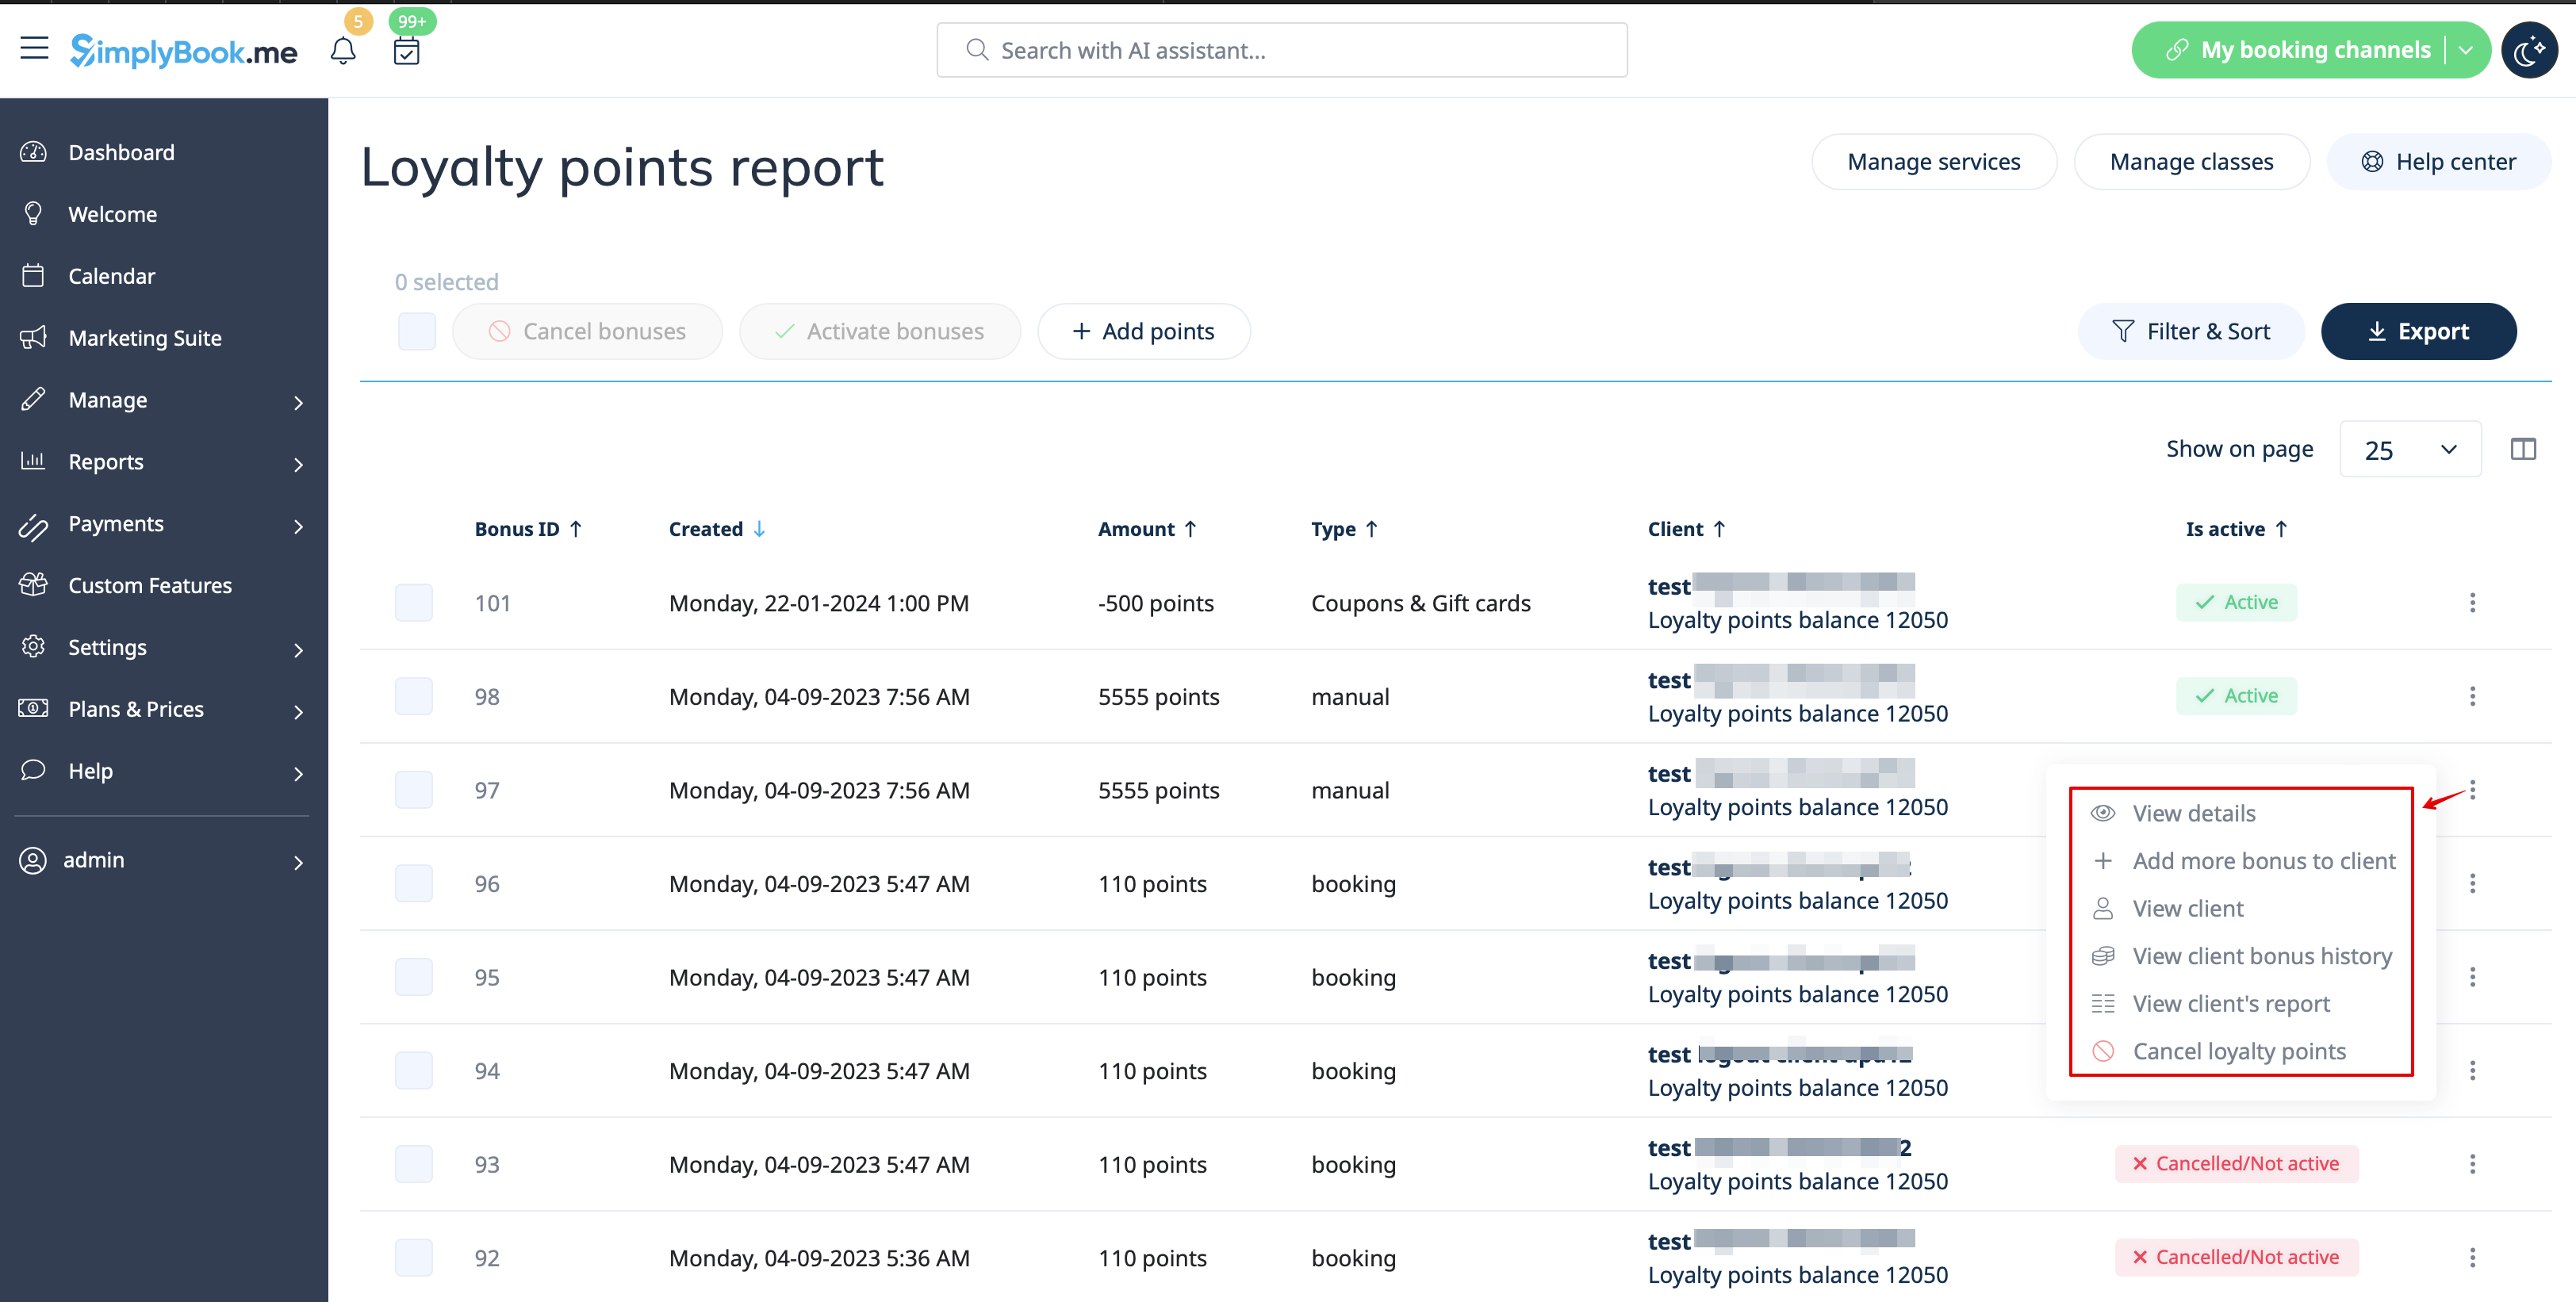
As well you can use the option <span style="background-color:#d4f8e5; padding:5px; border-radius:5px;">Add more bonus to client</span> in <span style="background-color:#d4f8e5; padding:5px; border-radius:5px;">Actions</span> per the specific report line for faster balance update as the client will be already preselected in this case, | As well you can use the option <span style="background-color:#d4f8e5; padding:5px; border-radius:5px;">Add more bonus to client</span> in <span style="background-color:#d4f8e5; padding:5px; border-radius:5px;">Actions</span> per the specific report line for faster balance update as the client will be already preselected in this case, | ||
[[File: | [[File:Bonuses actions redesigned.png|1200px|center|link=https://help.simplybook.me/images/a/a7/Bonuses_actions_redesigned.png]] | ||
<br><br> | <br><br> | ||
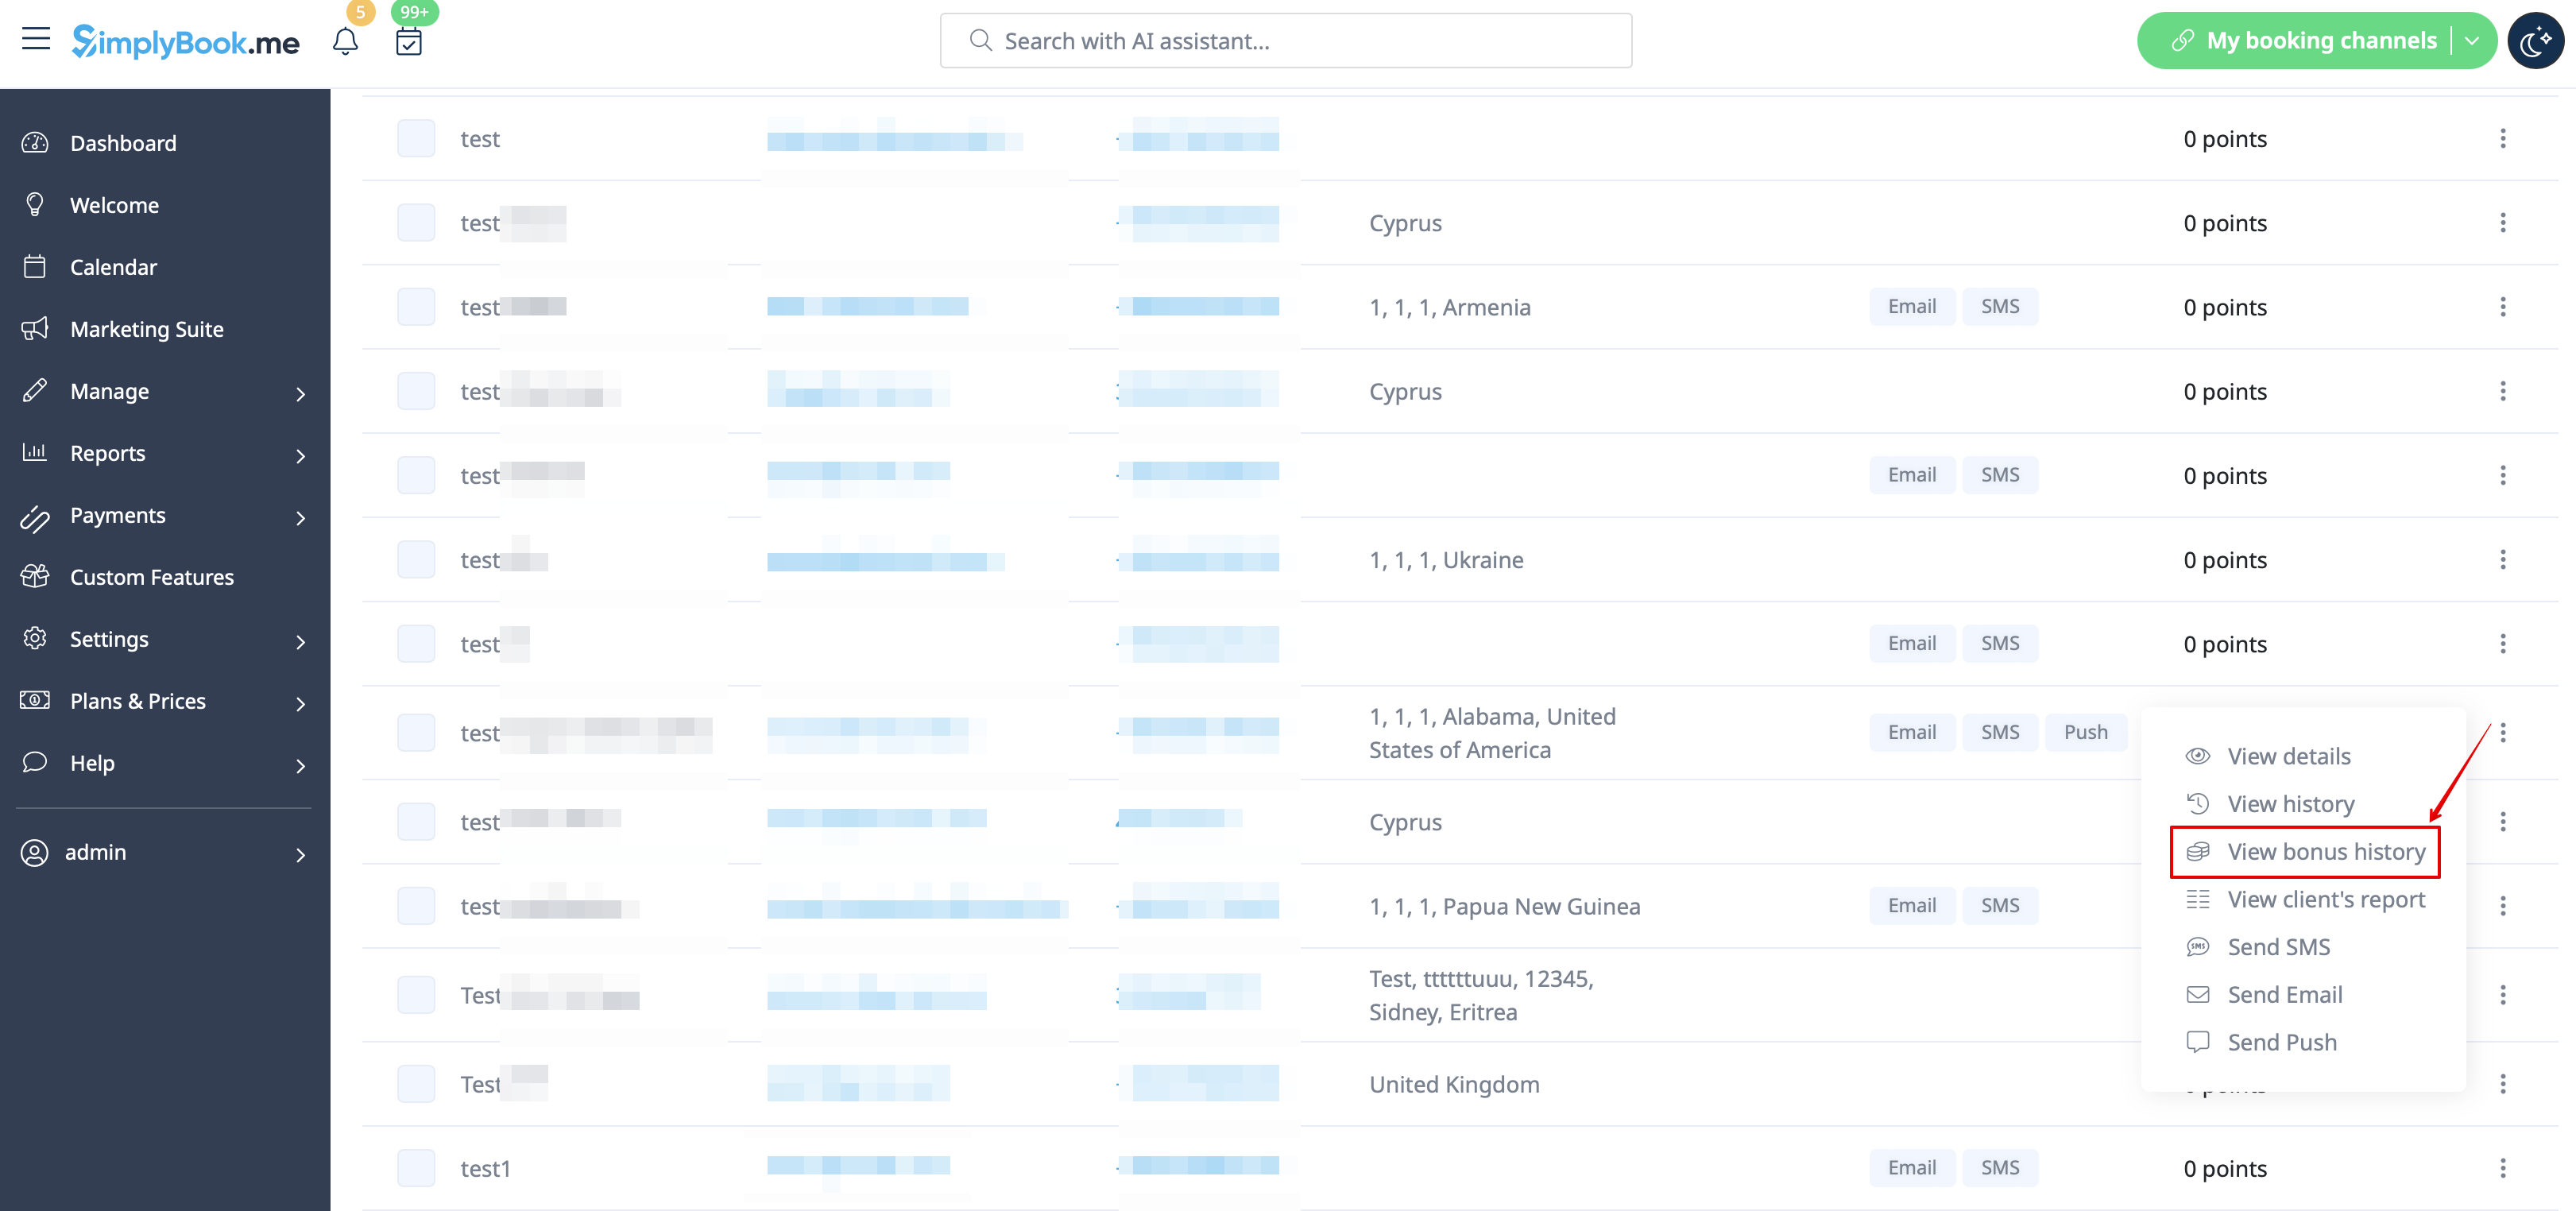
12. In case you need to view the point history per the particular client please use <span style="background-color:#d4f8e5; padding:5px; border-radius:5px;">Reports</span> -> <span style="background-color:#d4f8e5; padding:5px; border-radius:5px;">Clients</span> and click on the highlighted bonuses amount in the table to get to the bonuses history popup. | 12. In case you need to view the point history per the particular client please use <span style="background-color:#d4f8e5; padding:5px; border-radius:5px;">Reports</span> -> <span style="background-color:#d4f8e5; padding:5px; border-radius:5px;">Clients</span> and click on the highlighted bonuses amount in the table to get to the bonuses history popup. | ||
[[File: | [[File:Bonus history in client reoort redesigned.png|1200px|center|link=https://help.simplybook.me/images/b/b9/Bonus_history_in_client_reoort_redesigned.png]] | ||
<br><br><br><br> | <br><br><br><br> | ||
Revision as of 13:39, 16 September 2024
Let clients earn points for services/classes booking and allow them to redeem for gift cards. You can set different amount of points per each service/class and 3-4 hours after the meeting takes place the bonuses will be automatically added to the client's balance. As soon as the client gathers the necessary amount of points he/she will be able to exchange them for a gift card, which can be later used for another purchases on your booking website or as a present to someone.
Video tutorial ![]()
Please note!
- When you enable Loyalty System the following custom features will be enabled as well: Accept Payments, Client Login, Coupons & Gift Cards.
- The clients should be subscribed to your marketing materials to be able to receive such notifications.
- This feature is not compatible with Clean History.
- How to use
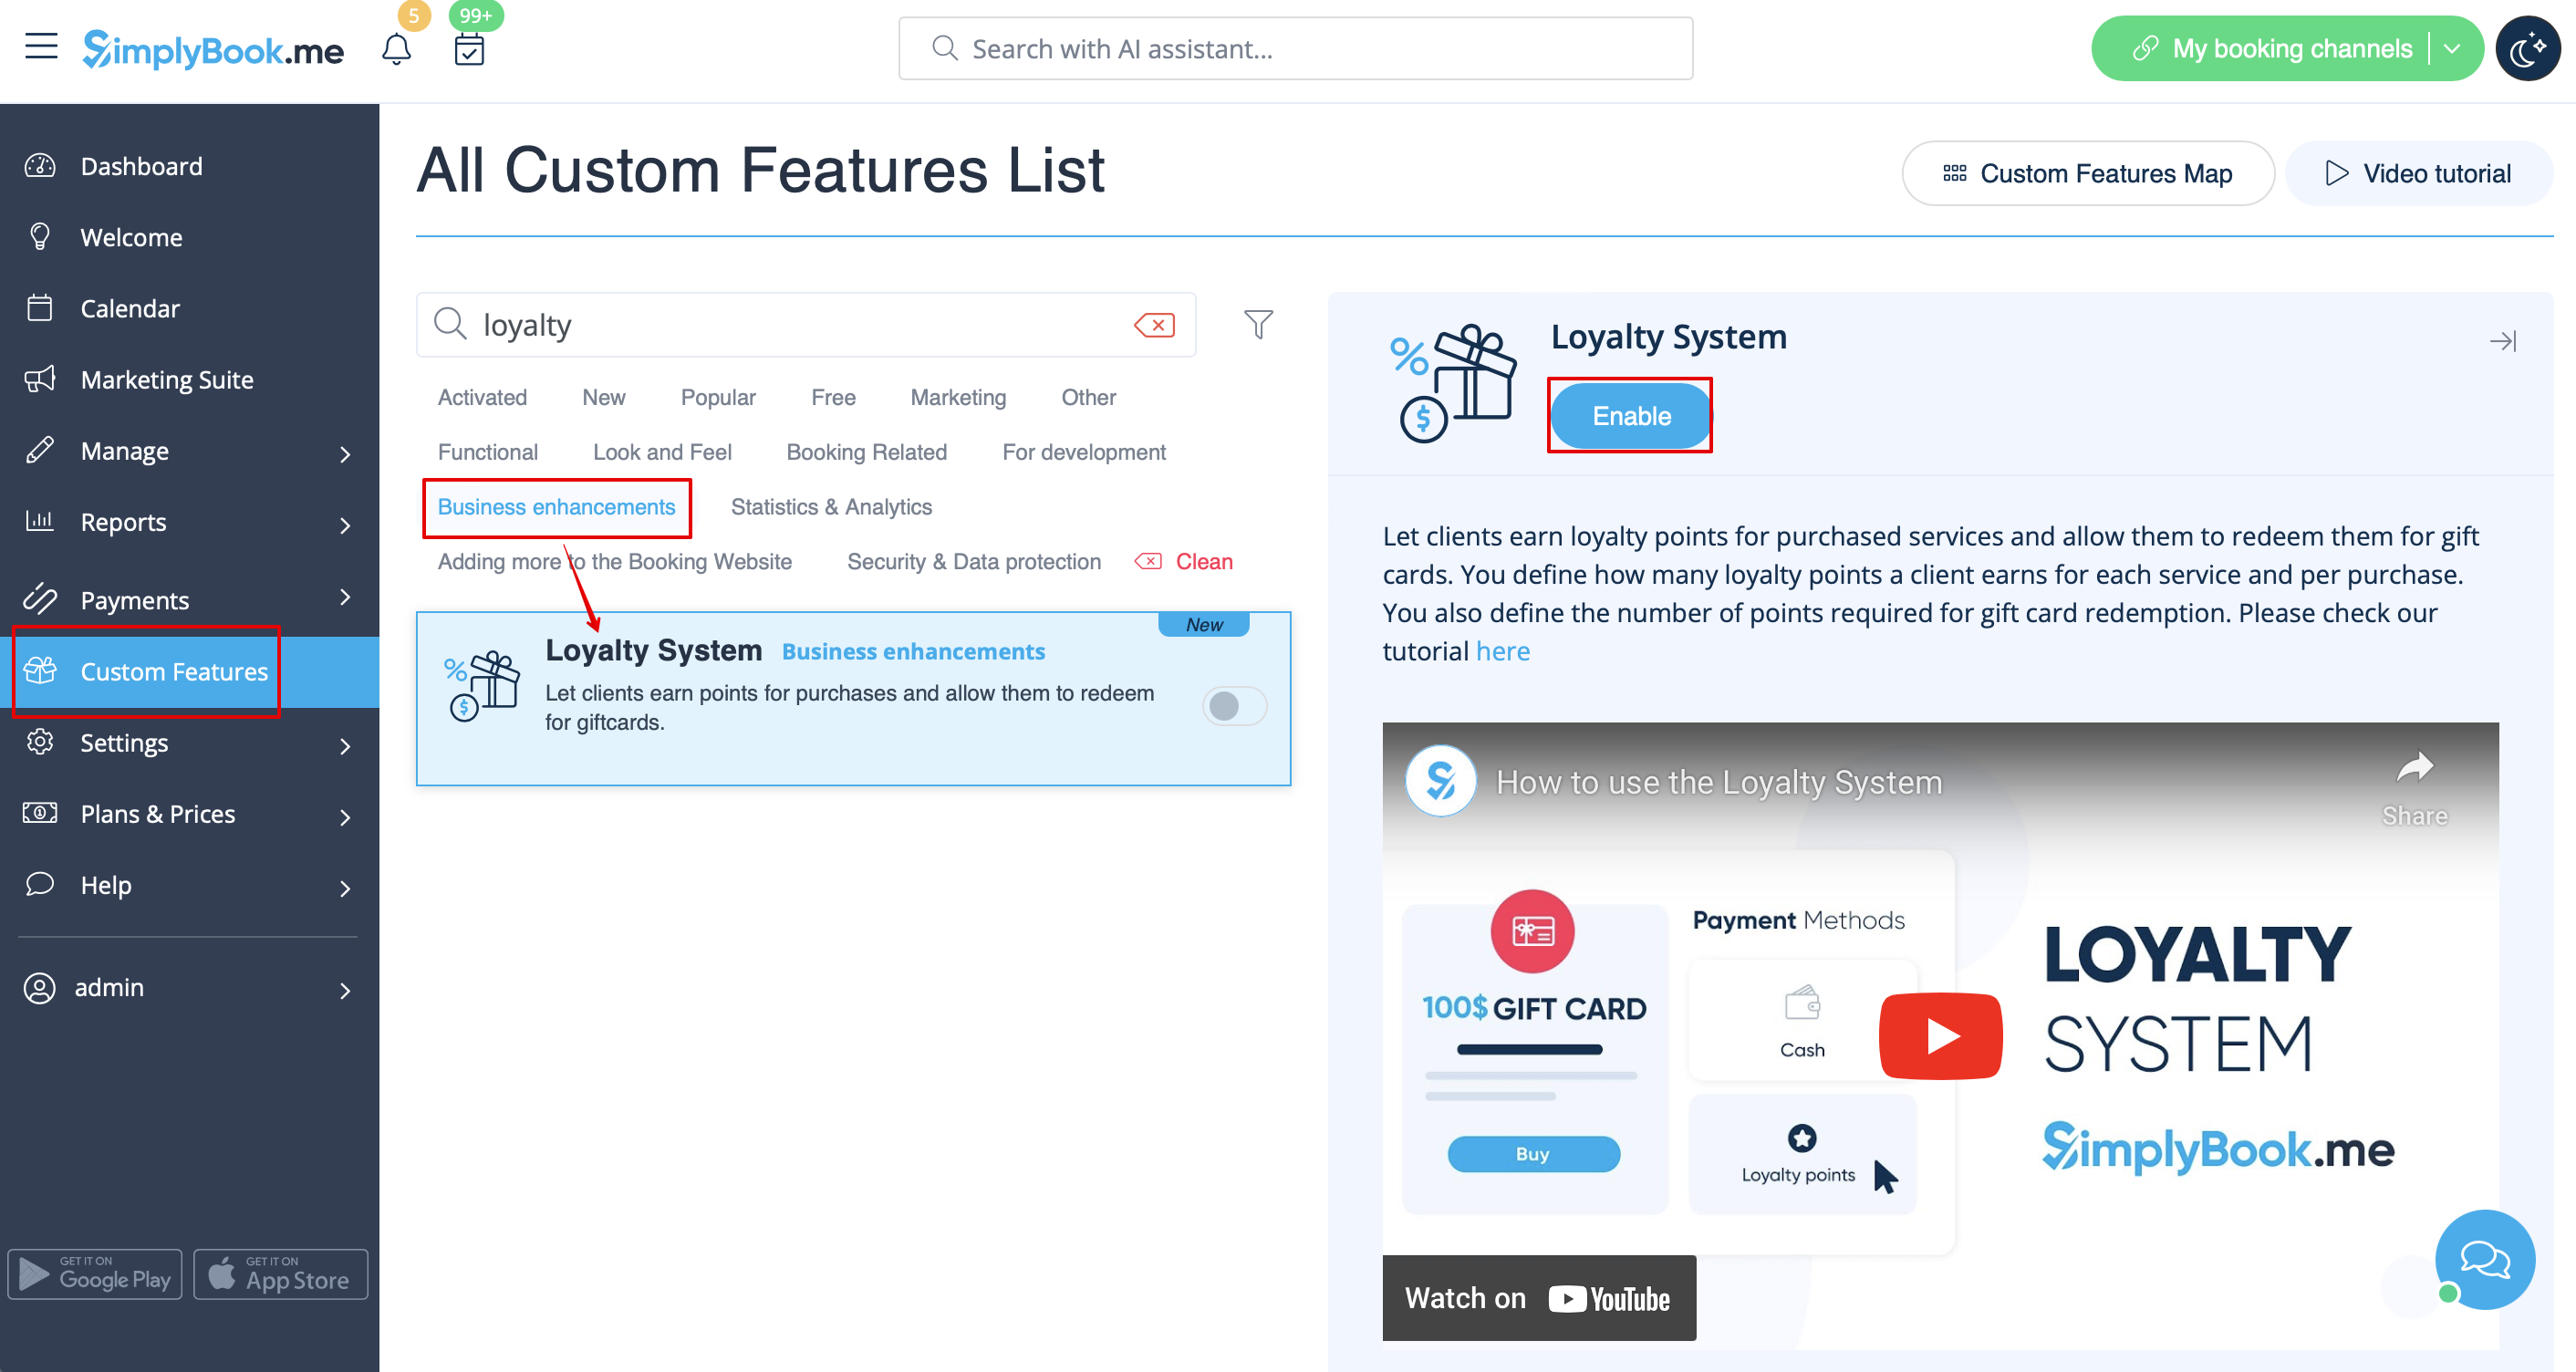
1. To enable Loyalty System please navigate to your Custom Features page, select Business enhancements section and click on Enable or use the switcher near the respective feature.
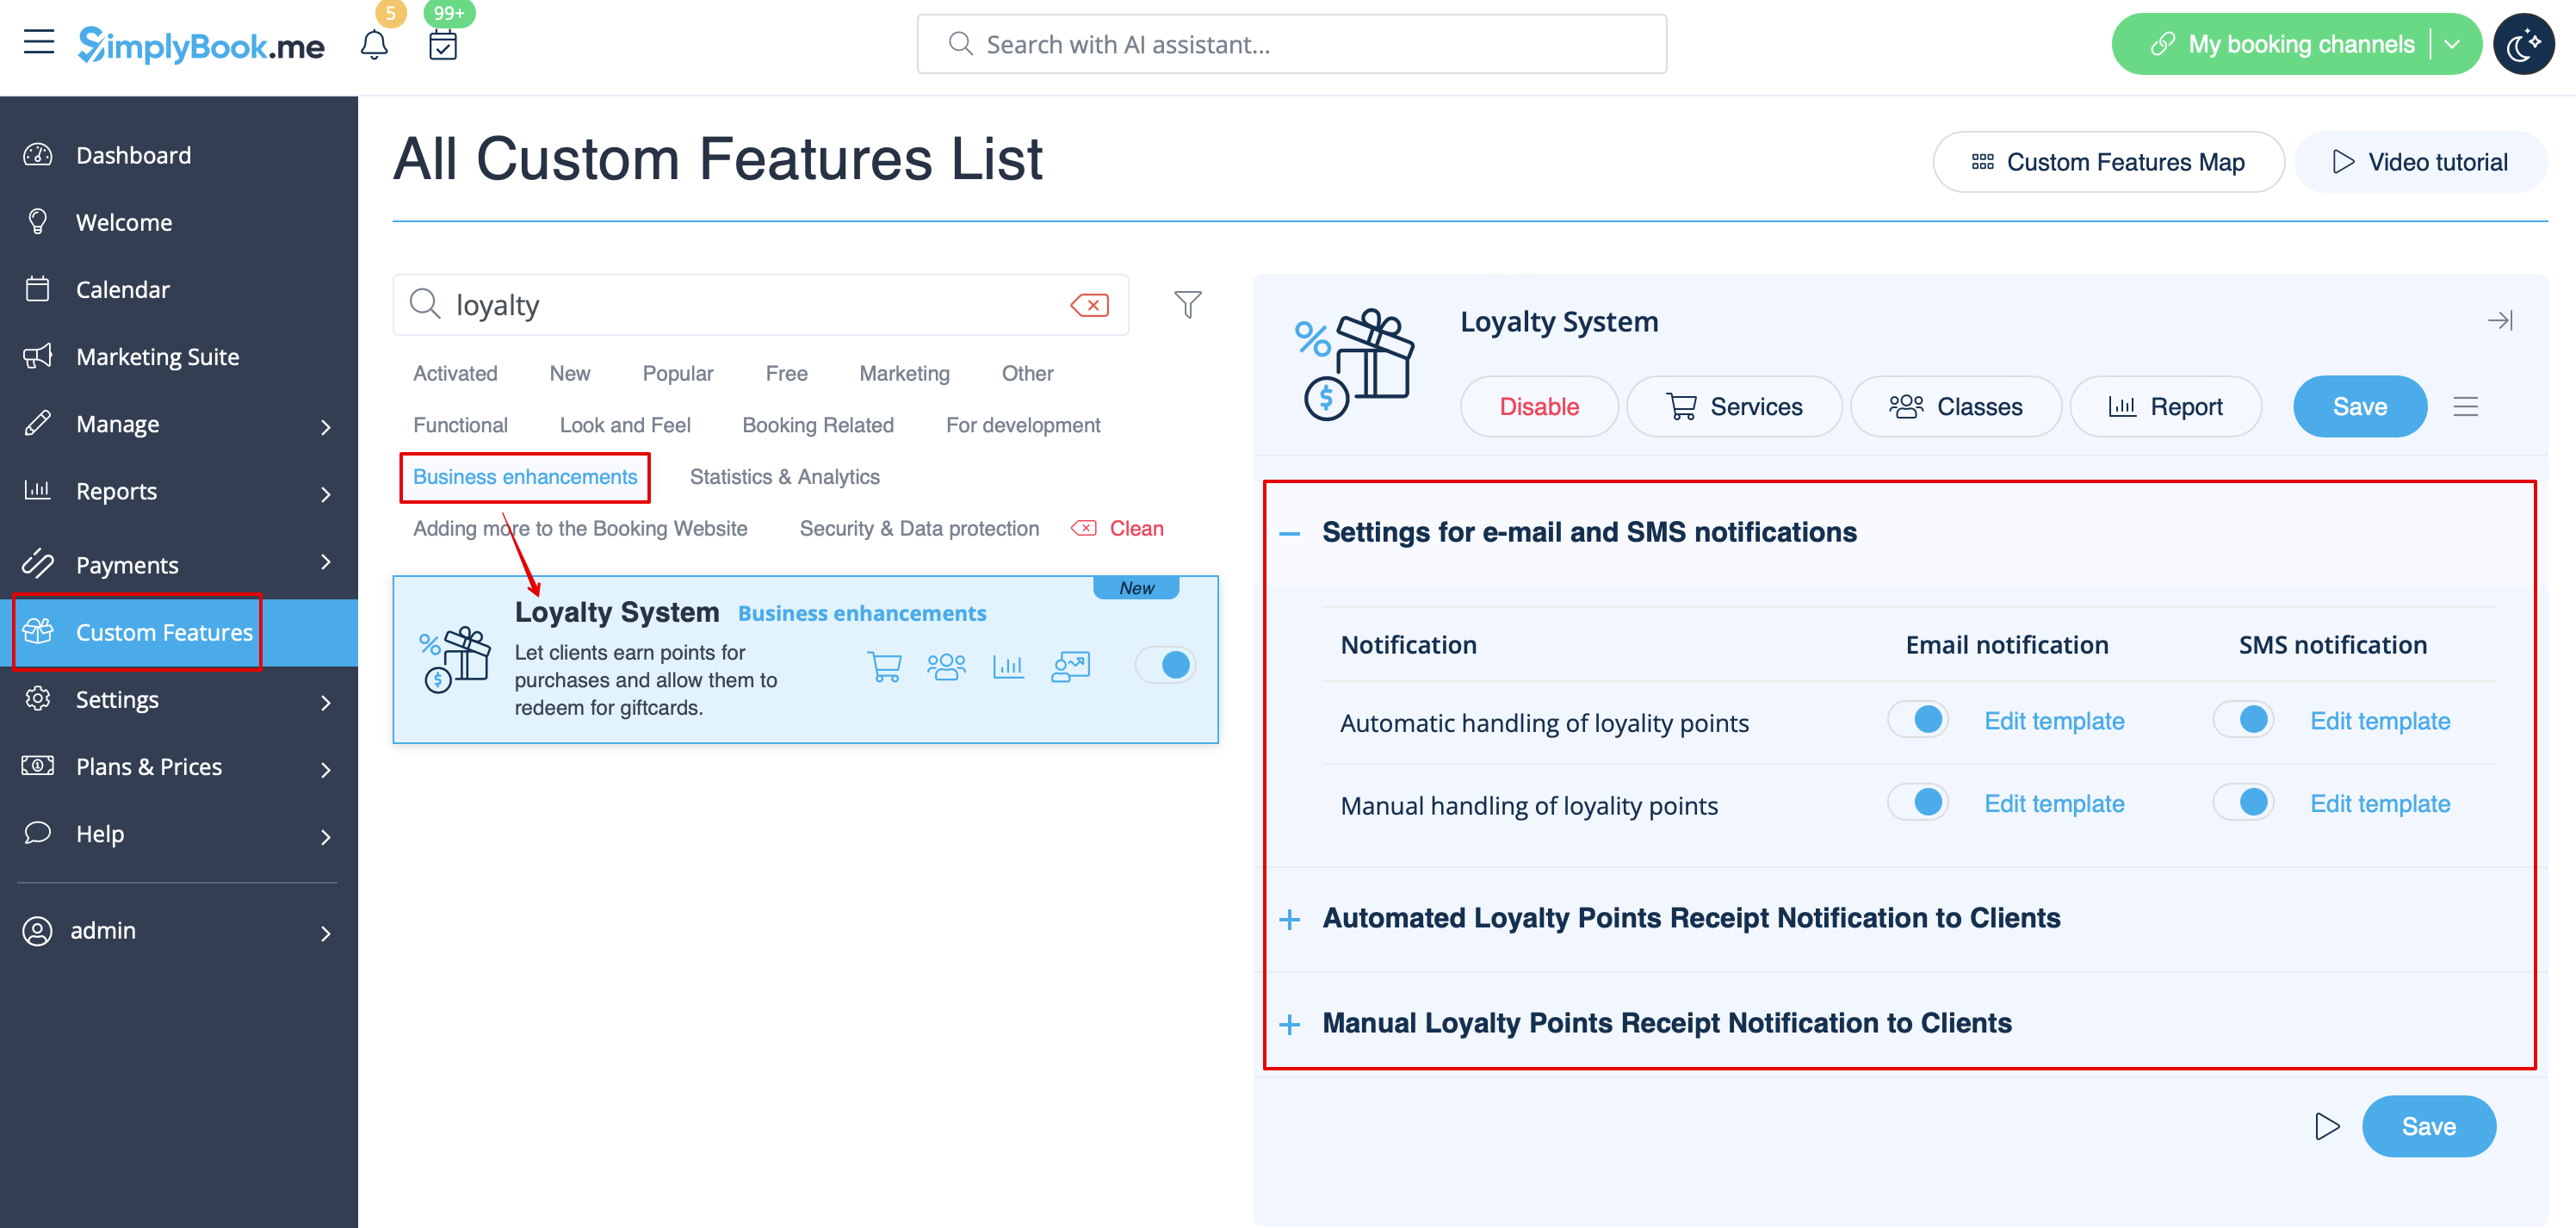
2. After it is enabled you can edit the related notifications templates right away, on the right side of the page. Please use the suggested variables if needed.
Two notifications types are available: for automated points addition and manual client balance update.
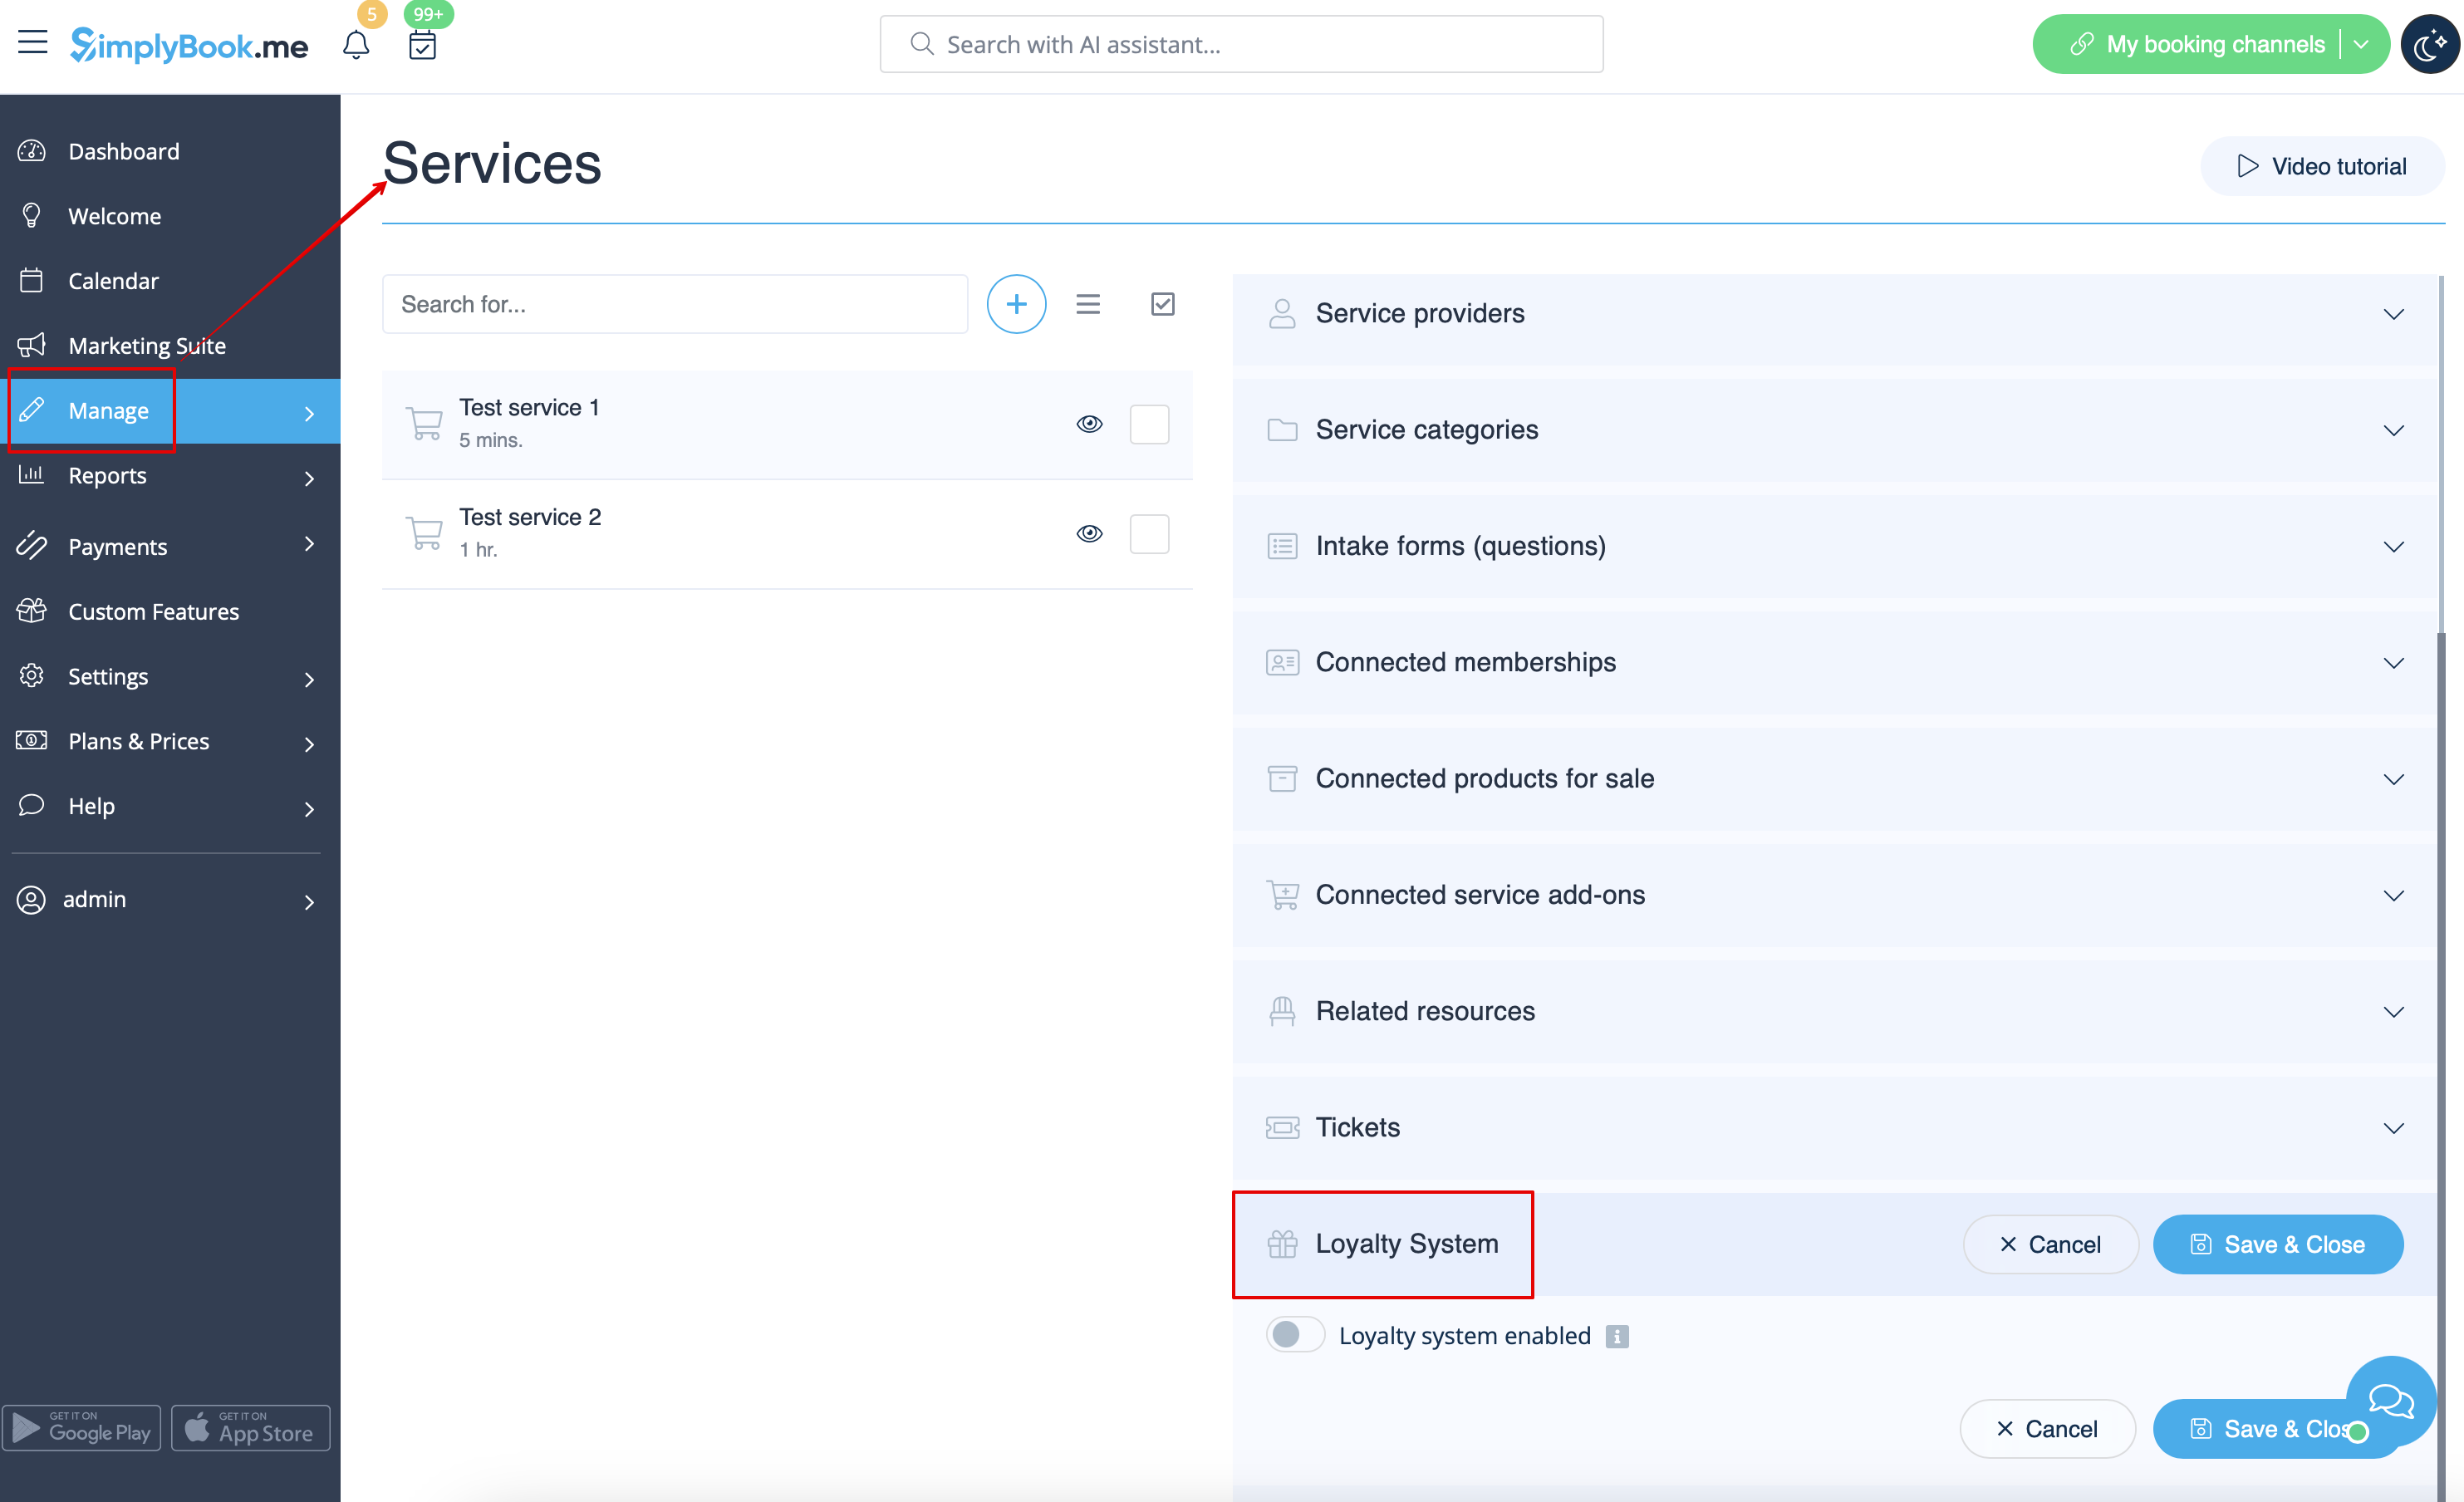
3. To set the points amounts please go to Manage -> Services (or use Services link near the custom feature) or Manage -> Classes (if you are using them and wish to be a part of the loyalty program).
4. Create new service/class if necessary or click on the existing one to edit, select Loyalty System tab.
5. Enable the switcher to connect the service/class to the loyalty system and indicate the amount of points the client will earn per this service/class booking in the box that appears. Save settings.
6. Then please go to Manage -> Coupons & Gift Cards page using the left-side menu, create a new gift card or click on the existing one to edit and choose Loyalty System tab.
7. Enable the switcher to allow the clients to buy this gift card for bonuses. Set the necessary amount to be earned in the box that appears. Save settings.
8. From the client side they can see the amount of the points earned as well as the bonuses usage history inside the client profile or go to the specific tab of the booking website.


9. As soon as the client has enough points the button Select by points becomes active on the Gift cards page on the booking website and such gift card can be purchased in exchange of these points.
As the result the client will get the gift card to his/her email or can copy its code in Gift cards tab -> Your gift cards and use as usual gift card for another purchases or make someone a present.

10. From the admin side you can also view all the points earning and spending in Reports -> Loyalty points report. Please use the filter if necessary to see some selected results, export the data to Excel or .csv.
11. With the help of this report you can also manually manage the points amounts per client.
Please click on the Add points button at the top, use the search box in the popup that appears to find the desired client, indicate the amountto be added or deducted in the Reward points amount box (to deduct please simply add "-" before the amount), add some description (it will also be reflected on the client side) and hit Add. The client will receive the notification about the balance update.
As well you can use the option Add more bonus to client in Actions per the specific report line for faster balance update as the client will be already preselected in this case,
12. In case you need to view the point history per the particular client please use Reports -> Clients and click on the highlighted bonuses amount in the table to get to the bonuses history popup.