From SimplyBook.me
Marked this version for translation |
No edit summary |
||
| Line 25: | Line 25: | ||
;How to use | ;How to use | ||
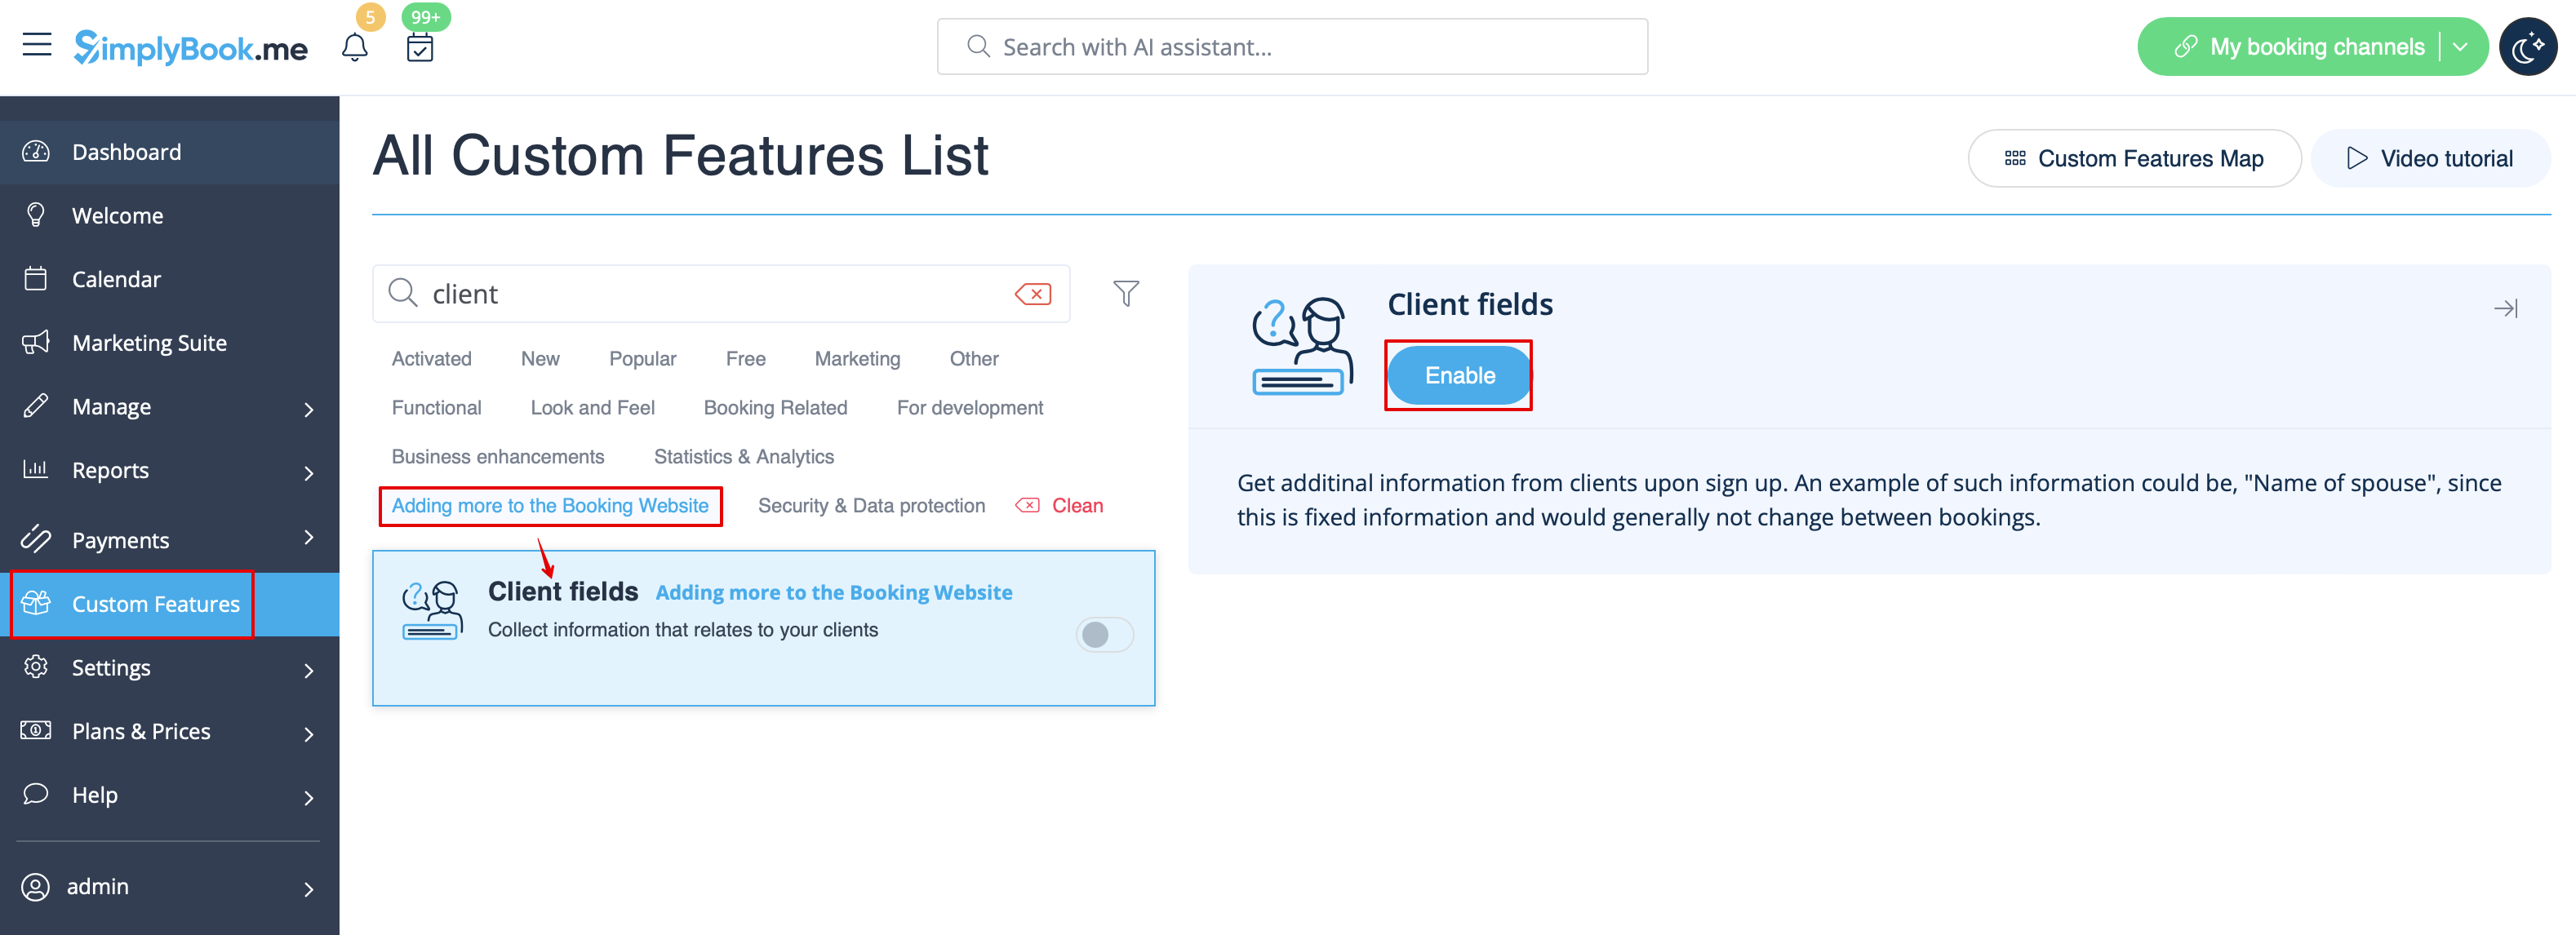
:1. Enable <span style="background-color:#d4f8e5; padding:5px; border-radius:5px;">Client Fields</span> Custom Feature on the <span style="background-color:#d4f8e5; padding:5px; border-radius:5px;">Custom Features</span> page. | :1. Enable <span style="background-color:#d4f8e5; padding:5px; border-radius:5px;">Client Fields</span> Custom Feature on the <span style="background-color:#d4f8e5; padding:5px; border-radius:5px;">Custom Features</span> page. | ||
[[File:Client | [[File:Client fiedls enable path redesigned.png|1200px|border|center|link=https://help.simplybook.me/images/e/e3/Client_fiedls_enable_path_redesigned.png]] | ||
<br><br> | <br><br> | ||
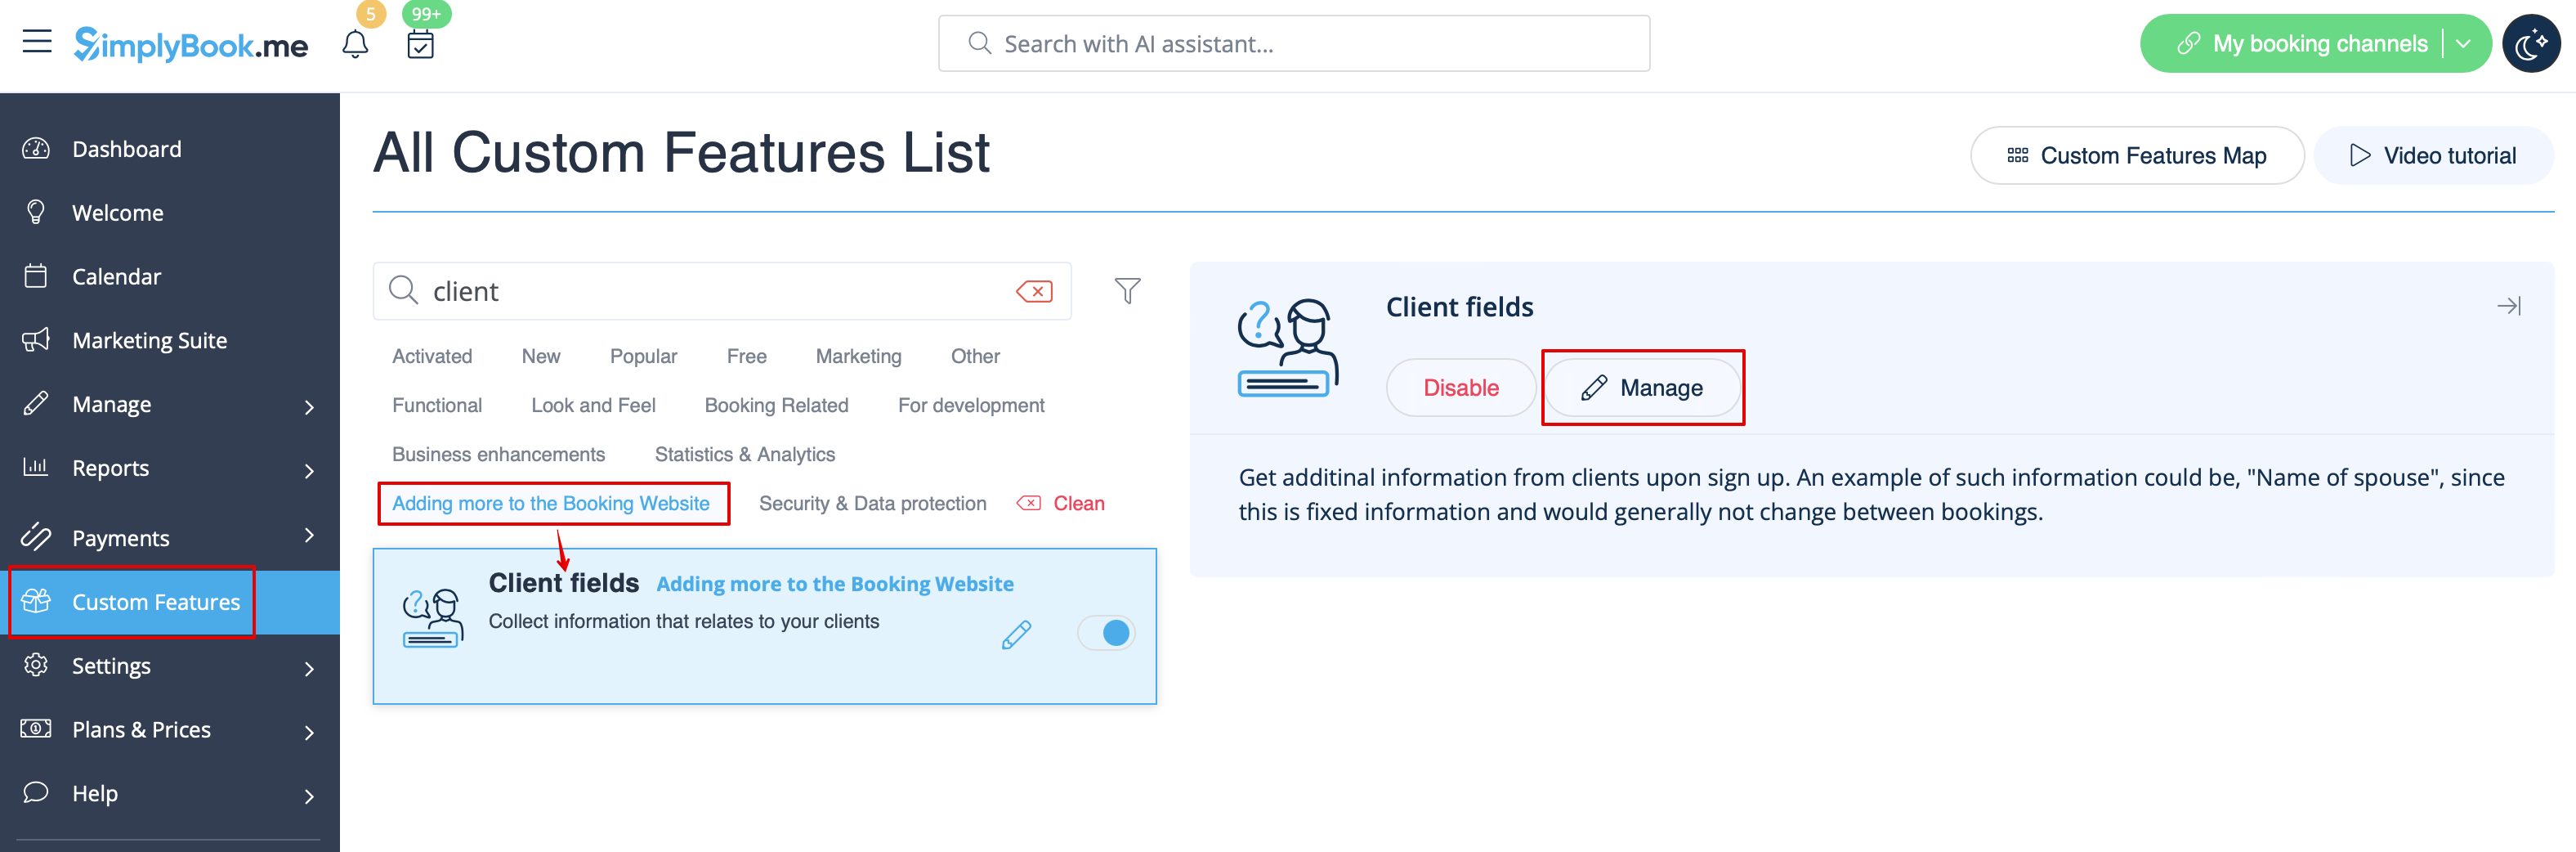
:2. Go to its settings by clicking on <span style="background-color:#d4f8e5; padding:5px; border-radius:5px;">Manage</span> link. | :2. Go to its settings by clicking on <span style="background-color:#d4f8e5; padding:5px; border-radius:5px;">Manage</span> link. | ||
[[File:Client fields settings path.png|border|center]] | [[File:Client fields settings path redesigned.png|1200px|border|center|link=https://help.simplybook.me/images/1/1d/Client_fields_settings_path_redesigned.png]] | ||
<br><br> | <br><br> | ||
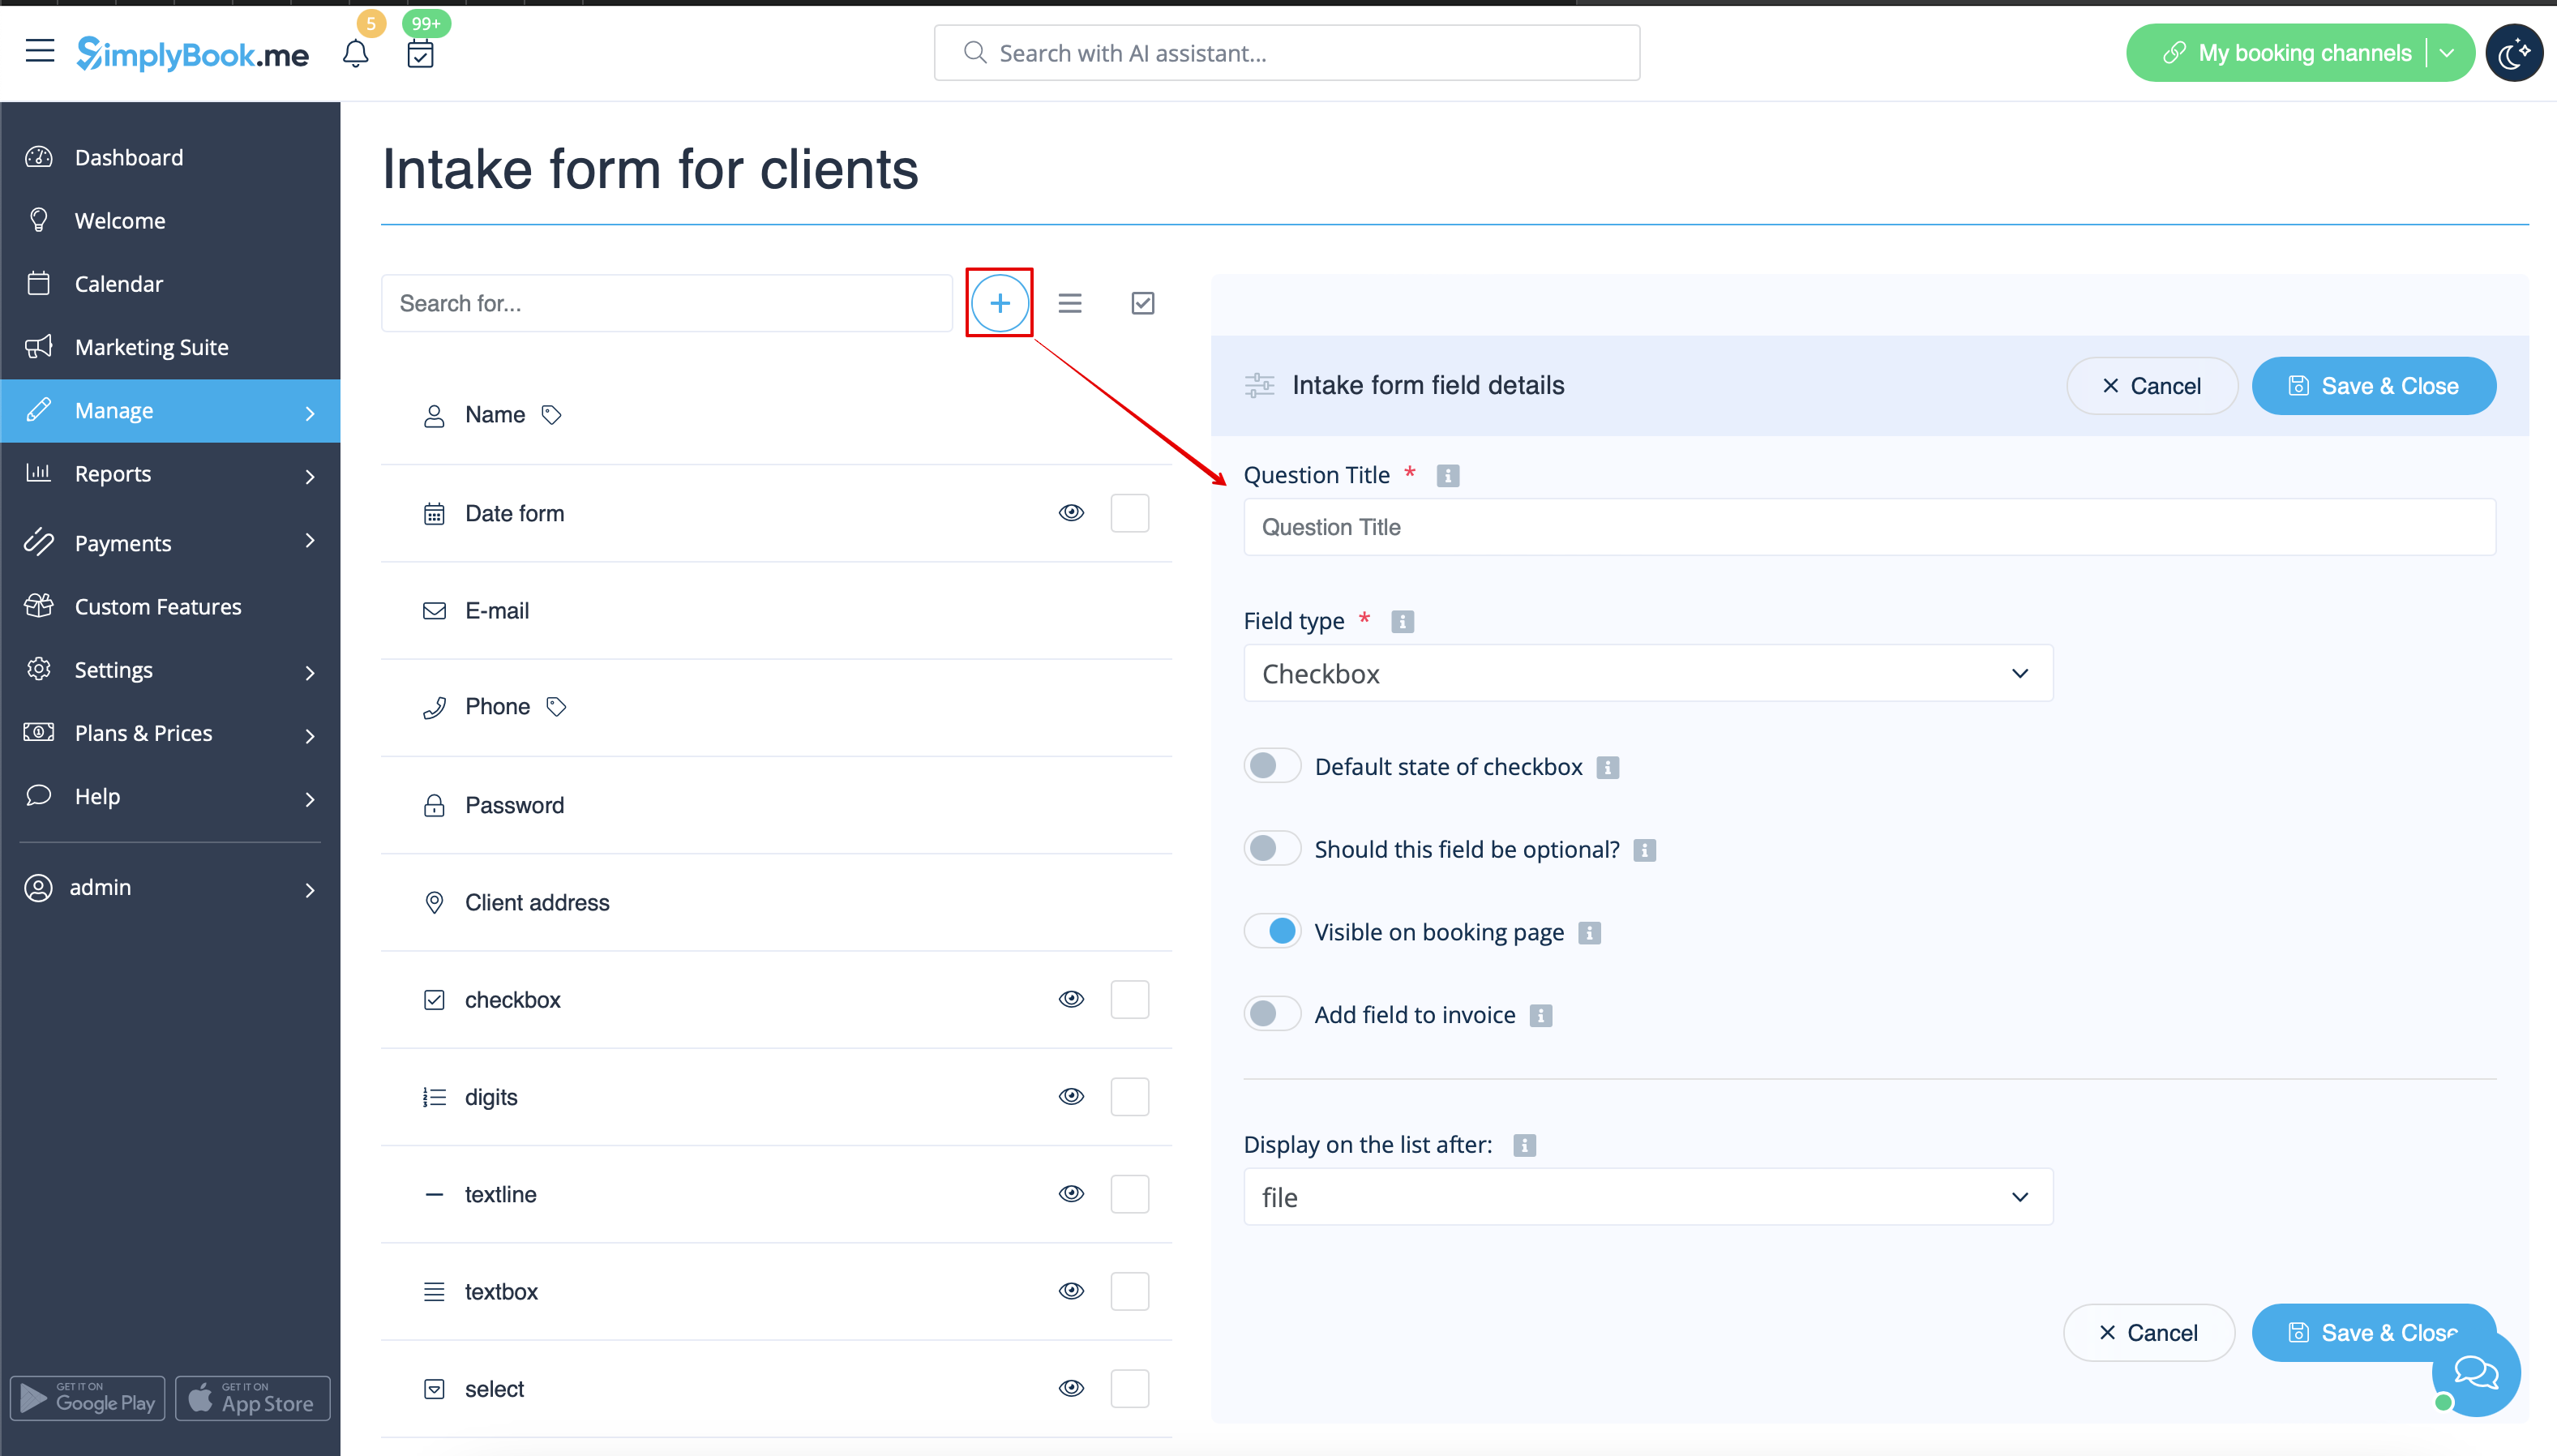
:3. Here you will see default client login registration fields. You can click on any of them to rename if needed. | :3. Here you will see default client login registration fields. You can click on any of them to rename if needed. | ||
:Press <span style="background-color:#d4f8e5; padding:5px; border-radius:5px;">+</span> button to create a new form. | :Press <span style="background-color:#d4f8e5; padding:5px; border-radius:5px;">+</span> button to create a new form. | ||
[[File: | [[File:Client field create redesigned.png|1200px|border|center|link=https://help.simplybook.me/images/e/e6/Client_field_create_redesigned.png]] | ||
<br><br> | <br><br> | ||
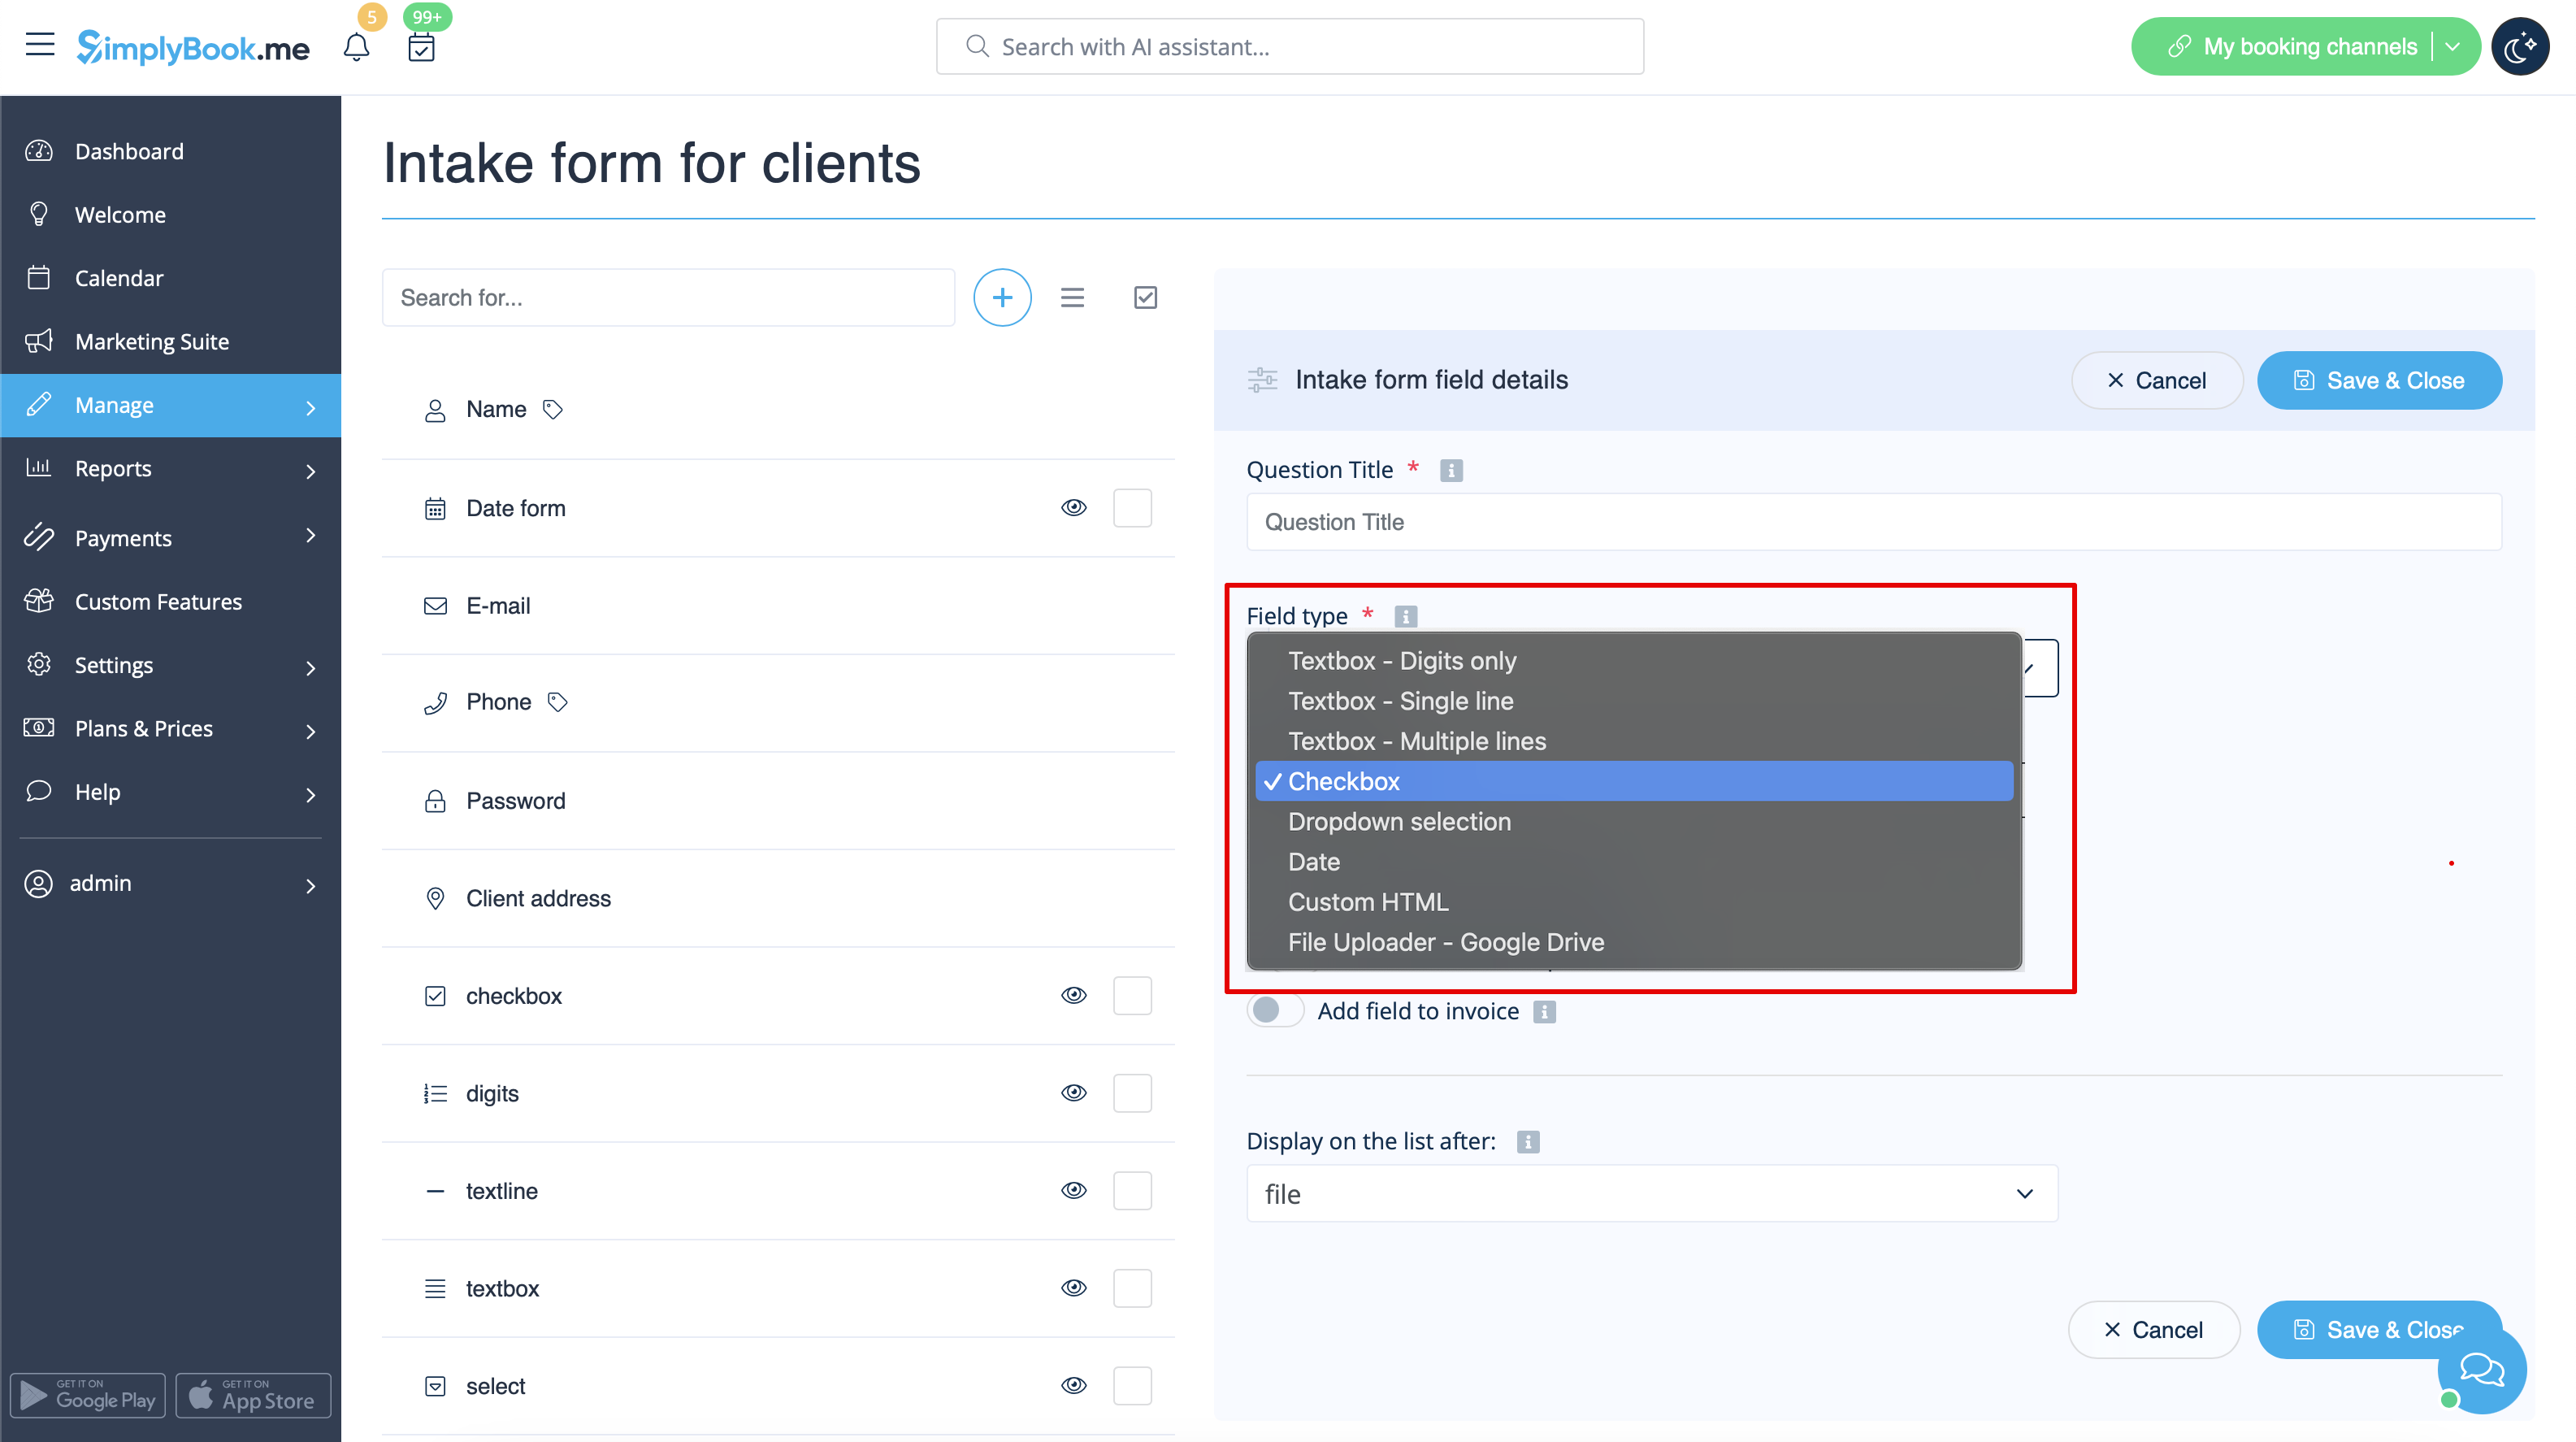
:4. In the field <span style="background-color:#d4f8e5; padding:5px; border-radius:5px;">Question title</span> write the question you want your clients to answer. | :4. In the field <span style="background-color:#d4f8e5; padding:5px; border-radius:5px;">Question title</span> write the question you want your clients to answer. | ||
| Line 44: | Line 44: | ||
:'''date''' - creates date selection option with calendar. | :'''date''' - creates date selection option with calendar. | ||
:'''custom HTML''' - allows to add visual dividers or additional text near the client field. Cannot be used for client input. | :'''custom HTML''' - allows to add visual dividers or additional text near the client field. Cannot be used for client input. | ||
[[File:Client fields | :'''file uploader - Google Drive''' - available if [[File Uploader - Google Drive custom feature]] is enabled. Allows file upload that you will be able to see in the dedicated folder on your Google Drive. | ||
[[File:Client fields types redesigned.png|1200px|border|center|link=https://help.simplybook.me/images/4/4f/Client_fields_types_redesigned.png]] | |||
<br><br> | <br><br> | ||
:6. Make it rather <span style="background-color:#d4f8e5; padding:5px; border-radius:5px;">obligatory or not</span> with the help of <span style="background-color:#d4f8e5; padding:5px; border-radius:5px;">Should this field be optional</span> switcher.<br> | :6. Make it rather <span style="background-color:#d4f8e5; padding:5px; border-radius:5px;">obligatory or not</span> with the help of <span style="background-color:#d4f8e5; padding:5px; border-radius:5px;">Should this field be optional</span> switcher.<br> | ||
| Line 51: | Line 52: | ||
<br><br> | <br><br> | ||
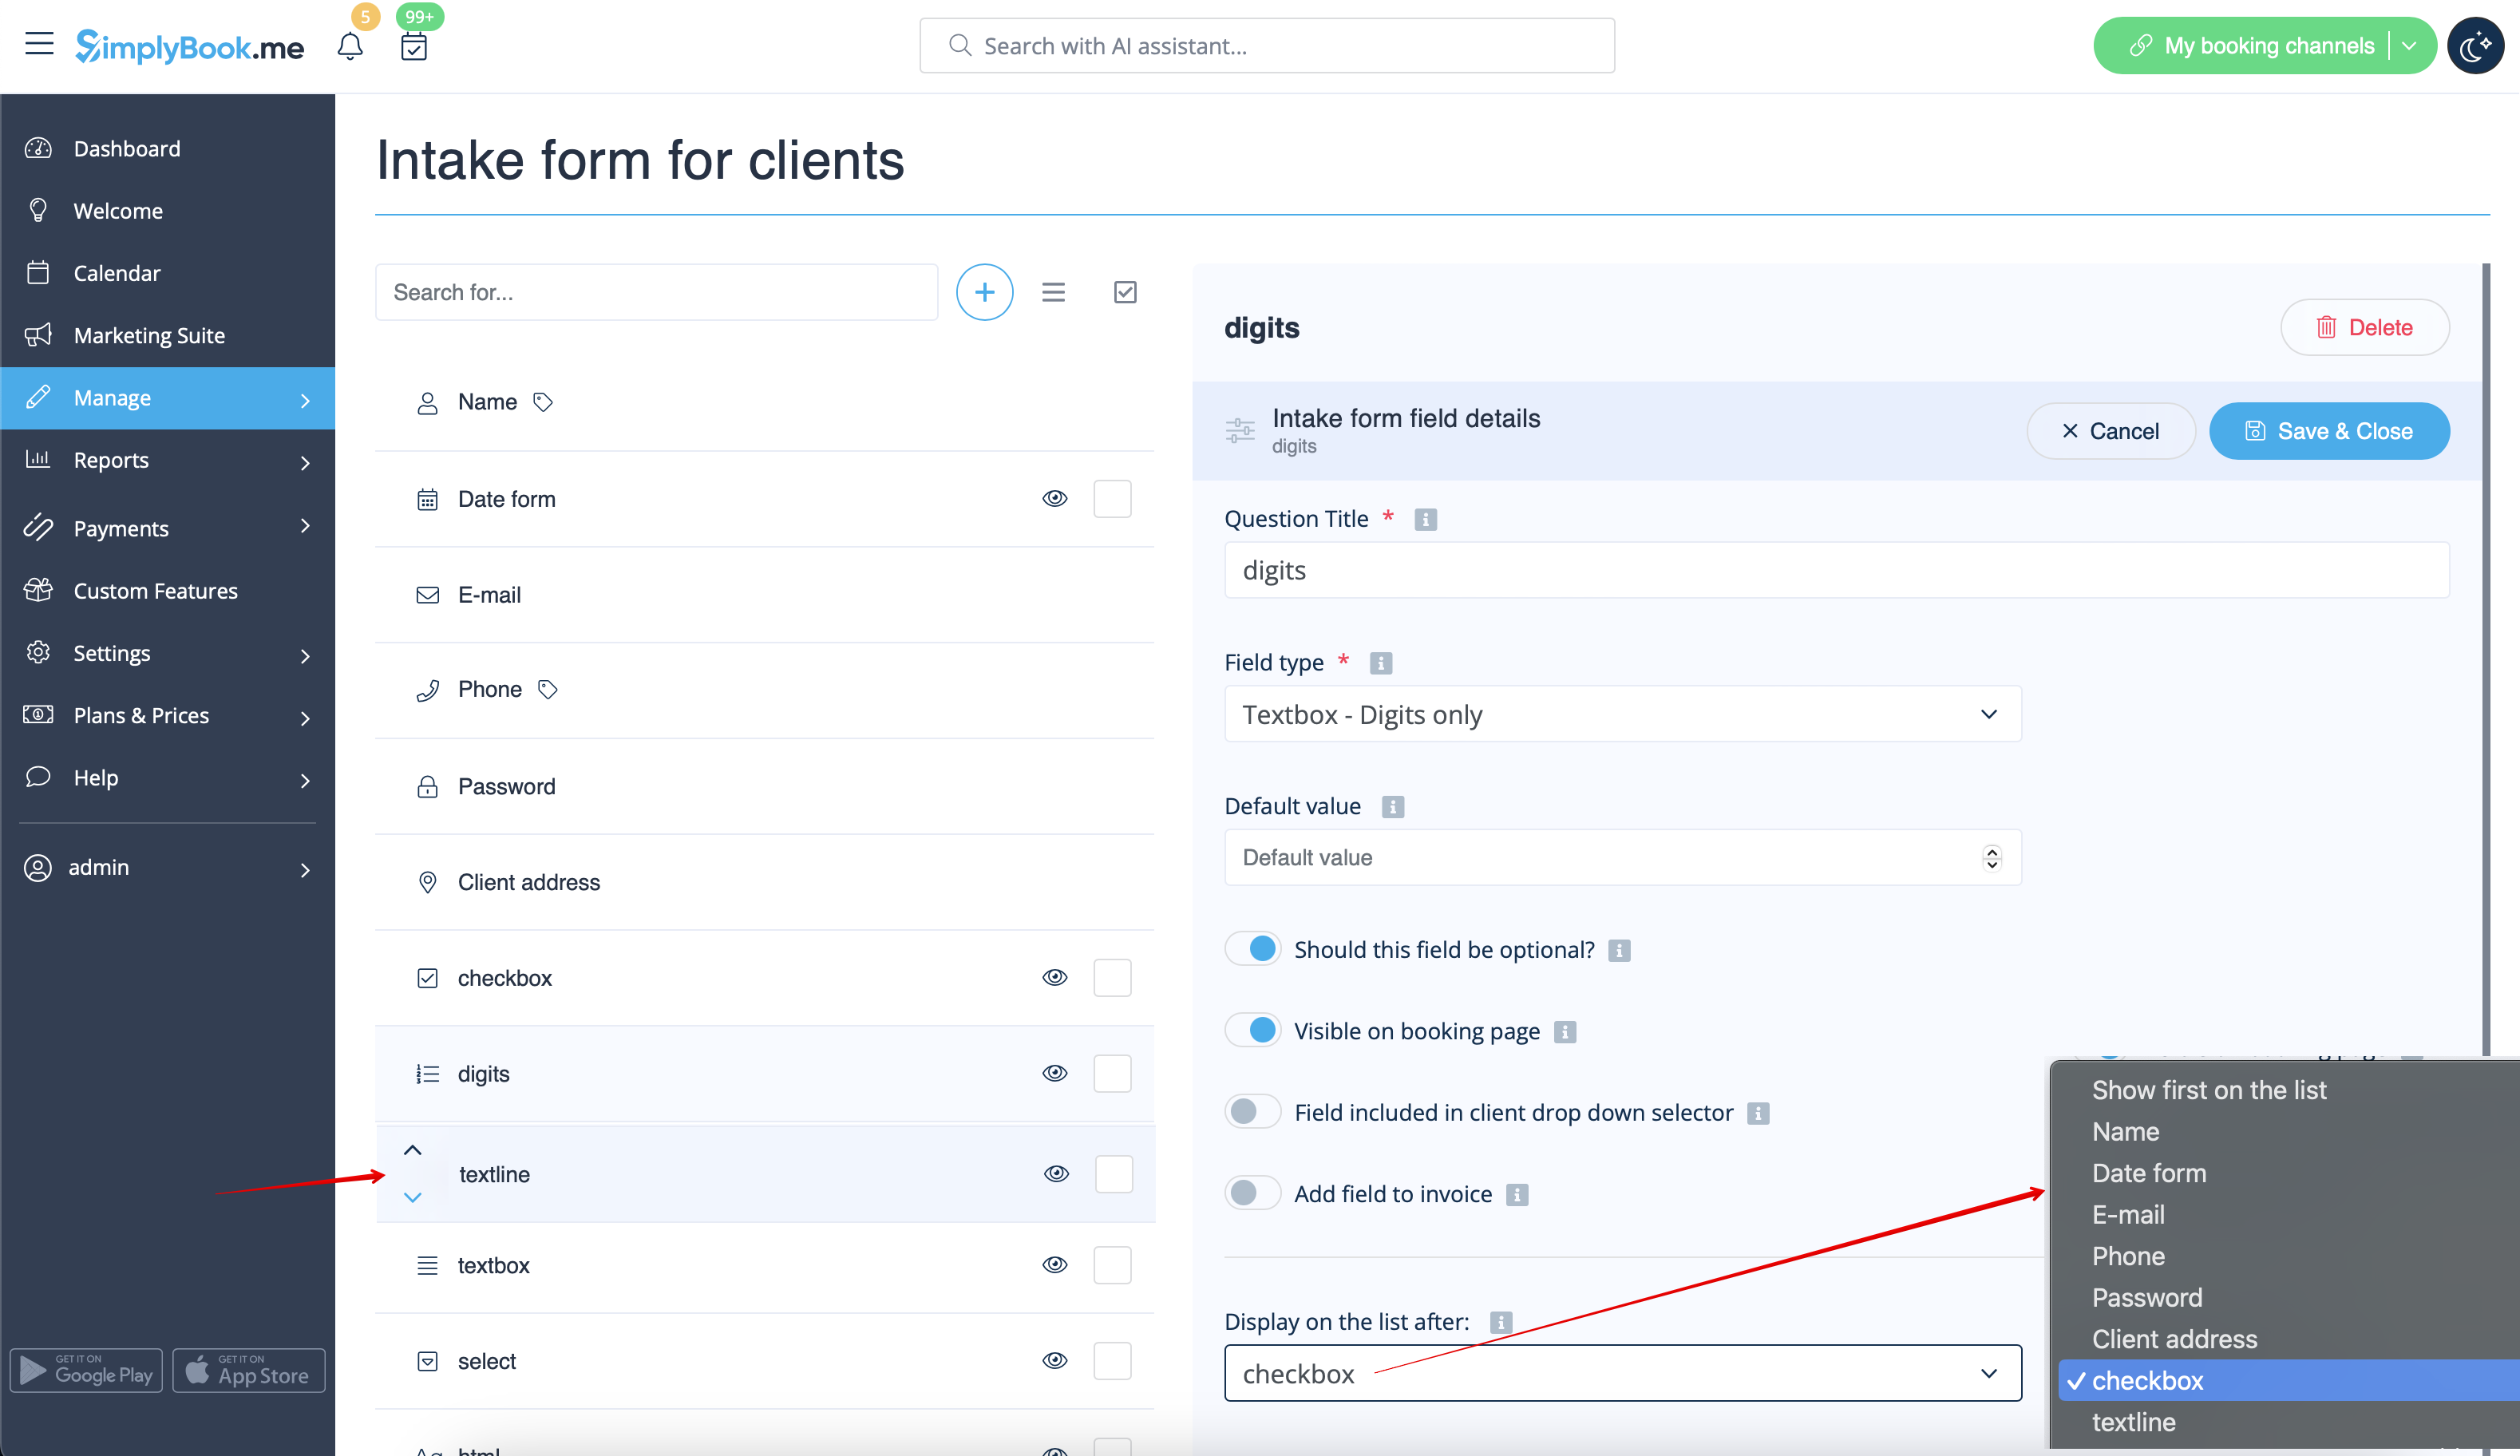
:7. You can also re-order all the forms to your taste by using the arrows on the left-side block or by setting the position in the form editing mode on the right side. | :7. You can also re-order all the forms to your taste by using the arrows on the left-side block or by setting the position in the form editing mode on the right side. | ||
[[File: | [[File:Client fields reorder redesigned.png|1200px|border|center|link=https://help.simplybook.me/images/a/aa/Client_fields_reorder_redesigned.png]] | ||
<br><br> | <br><br> | ||
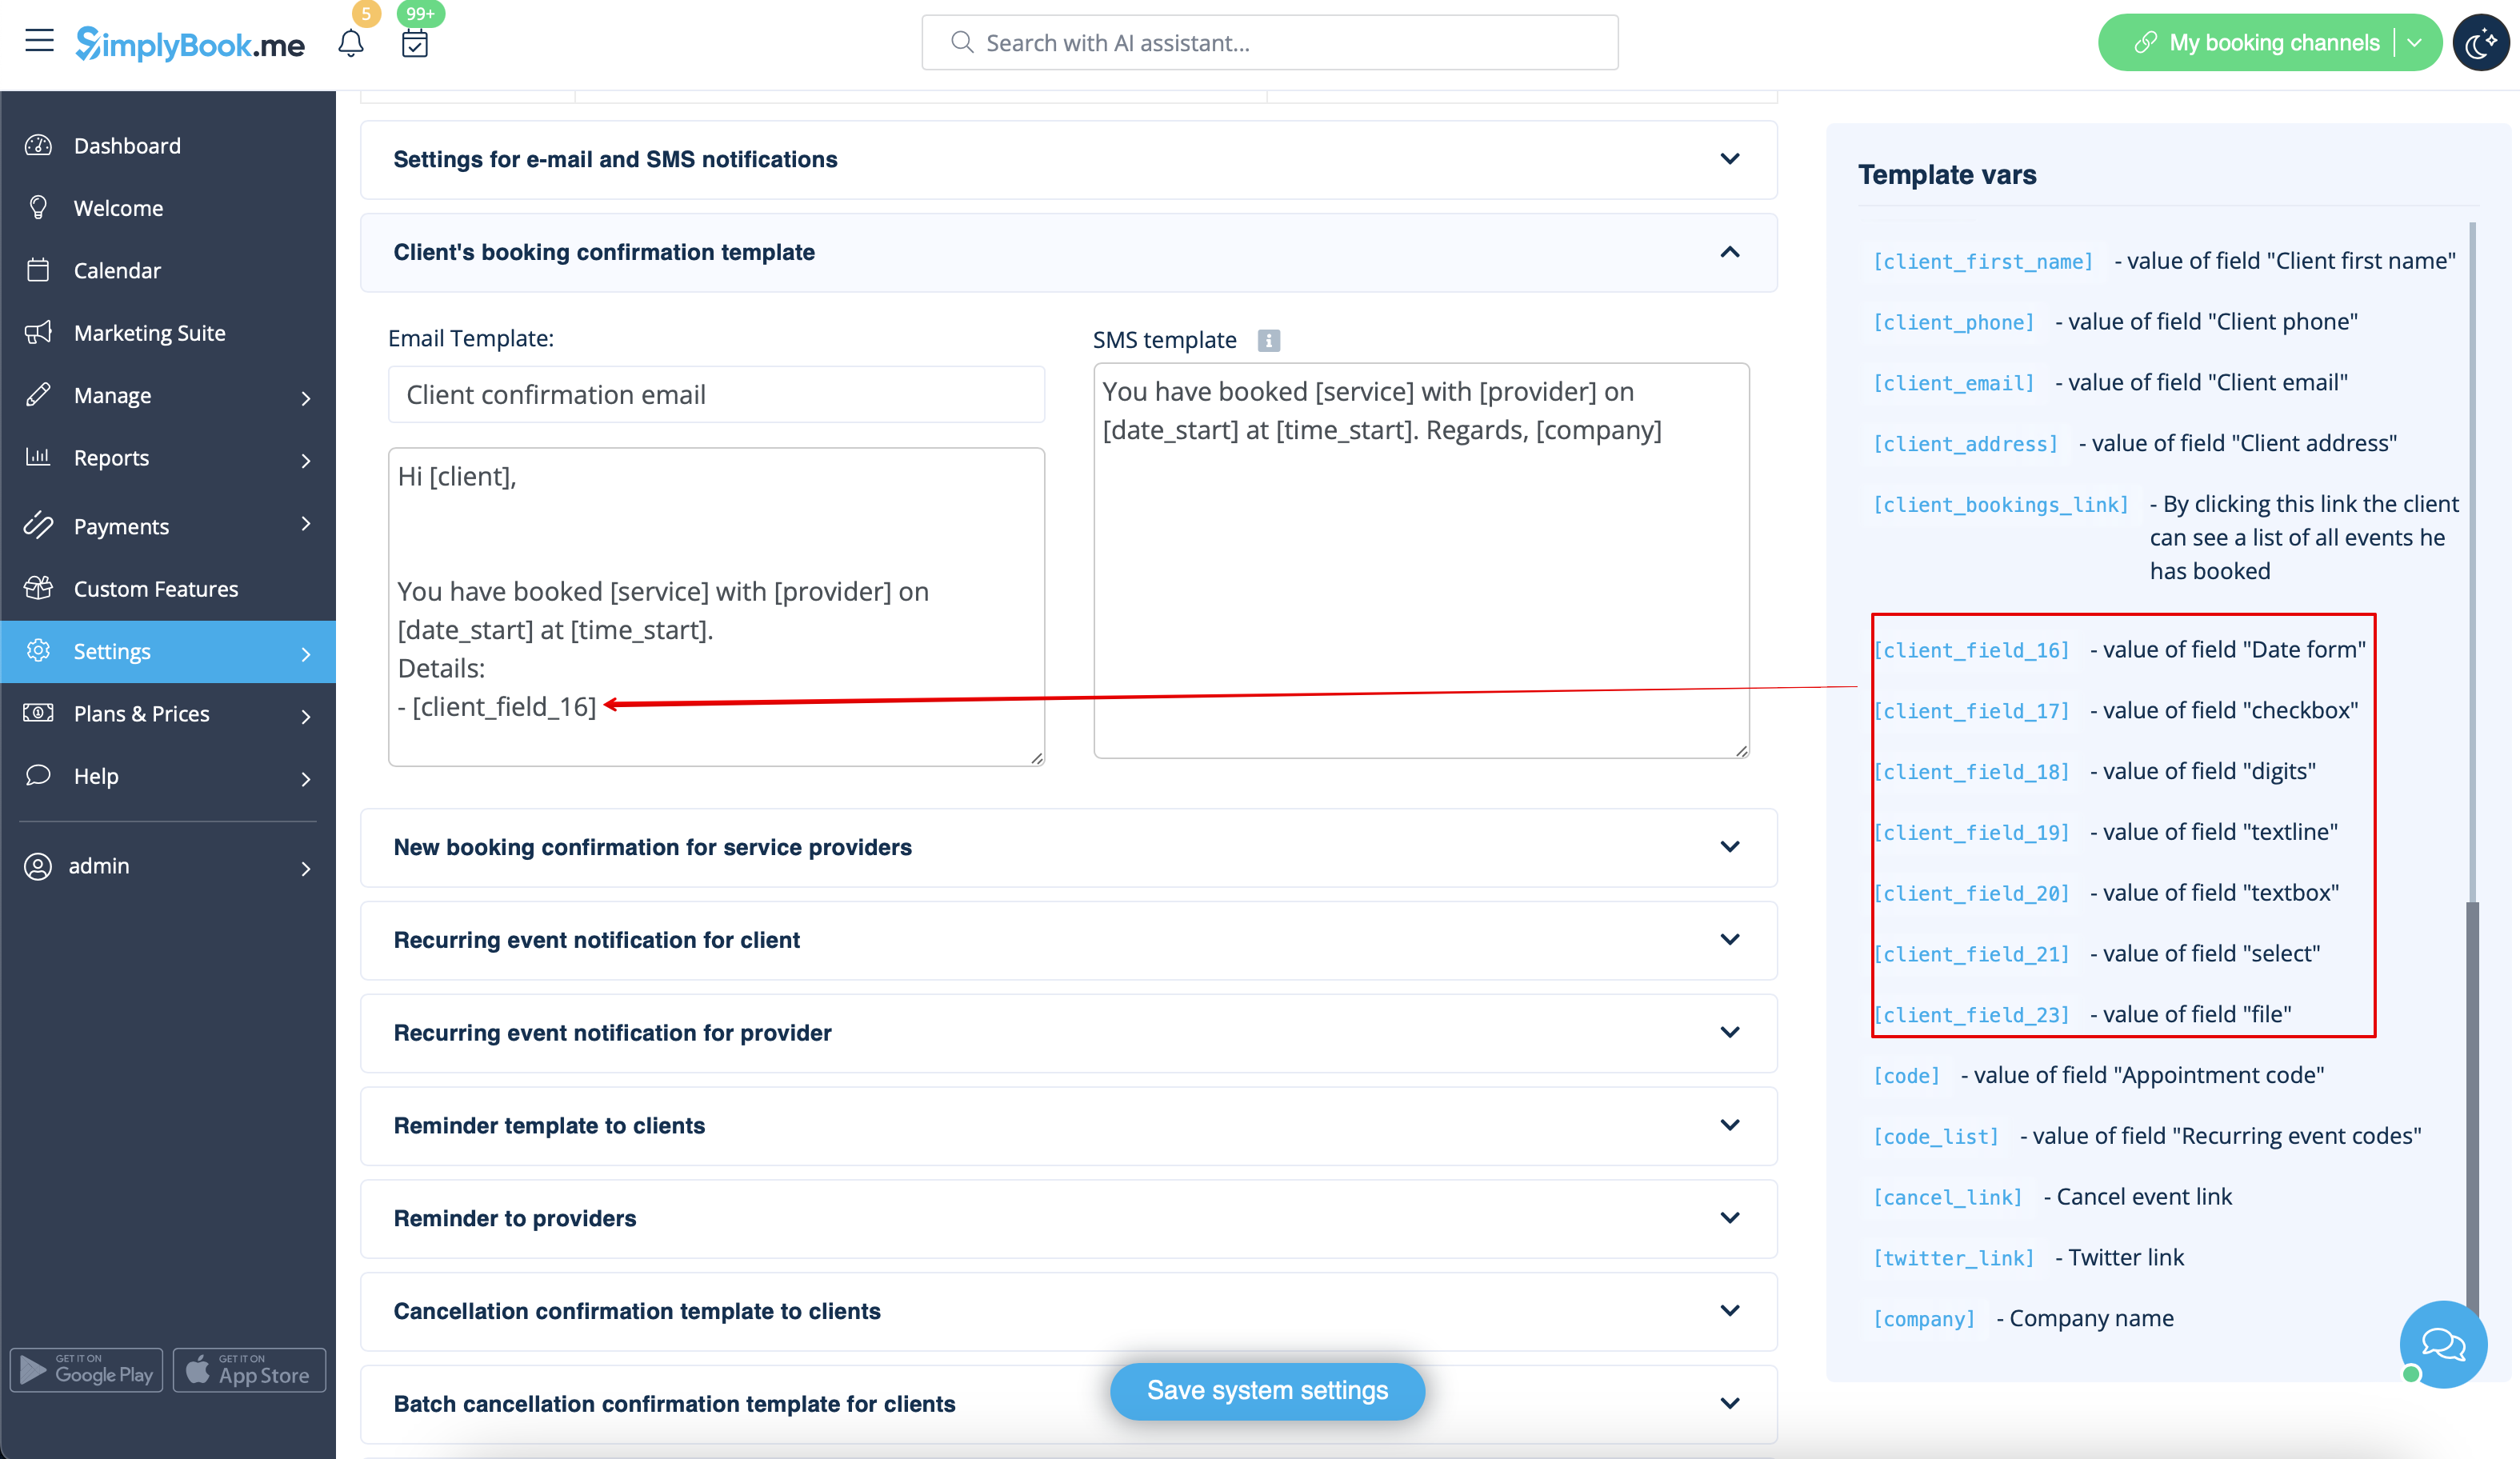
:8. If you want to include client form information to email templates, find the client forms <span style="background-color:#d4f8e5; padding:5px; border-radius:5px;">variables</span> and add them to templates in <span style="background-color:#d4f8e5; padding:5px; border-radius:5px;">Settings</span> -> <span style="background-color:#d4f8e5; padding:5px; border-radius:5px;">Email and SMS settings.</span><br> | :8. If you want to include client form information to email templates, find the client forms <span style="background-color:#d4f8e5; padding:5px; border-radius:5px;">variables</span> and add them to templates in <span style="background-color:#d4f8e5; padding:5px; border-radius:5px;">Settings</span> -> <span style="background-color:#d4f8e5; padding:5px; border-radius:5px;">Email and SMS settings.</span><br> | ||
:(Or use <span style="background-color:#cdeffc; padding:5px; border-radius:5px;">[[Special:MyLanguage/Flexible_Notifications_custom_feature|Flexible Notifications]]</span> feature for customized templates per service and/or provider) | :(Or use <span style="background-color:#cdeffc; padding:5px; border-radius:5px;">[[Special:MyLanguage/Flexible_Notifications_custom_feature|Flexible Notifications]]</span> feature for customized templates per service and/or provider) | ||
[[File: | [[File:Add client fields to notifications.png|1200px|border|center|link=https://help.simplybook.me/images/b/be/Add_client_fields_to_notifications.png]] | ||
<br><br> | <br><br> | ||
:9. The clients will then be able to fill in their replies during <span style="background-color:#d4f8e5; padding:5px; border-radius:5px;">sign up</span> on the booking site and edit their data in client profiles. | :9. The clients will then be able to fill in their replies during <span style="background-color:#d4f8e5; padding:5px; border-radius:5px;">sign up</span> on the booking site and edit their data in client profiles. | ||
| Line 63: | Line 64: | ||
<br><br> | <br><br> | ||
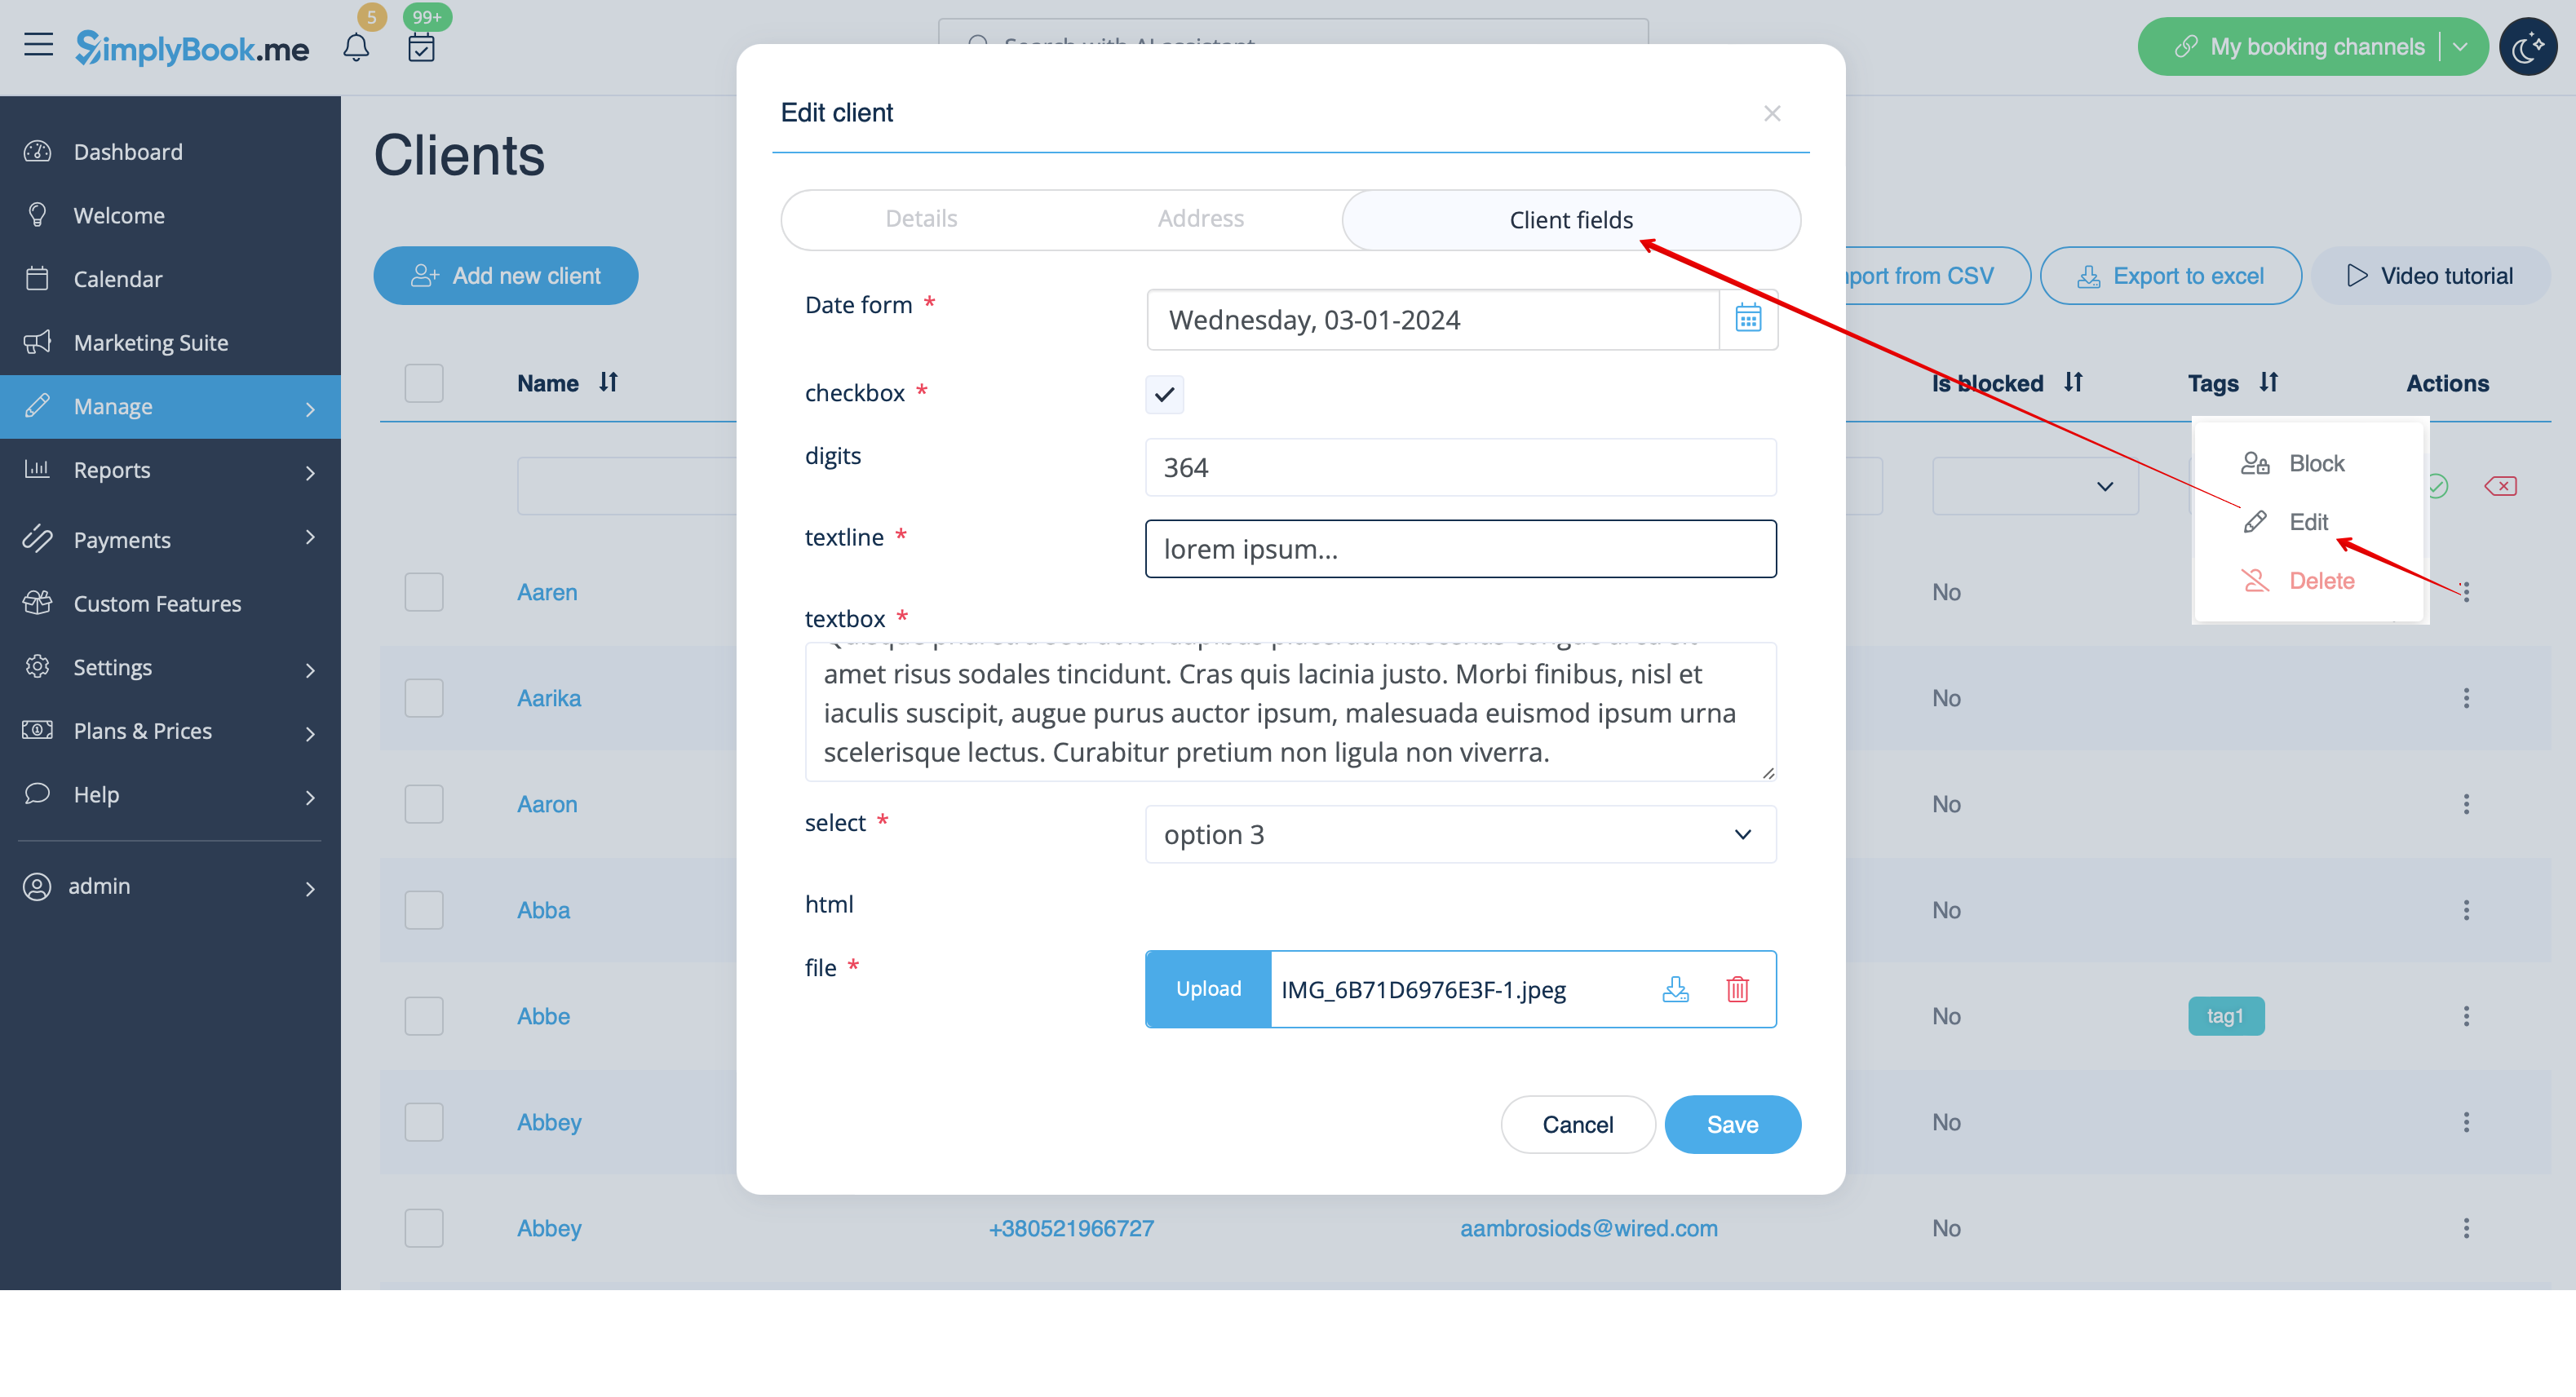
:10. From your admin page you will be able to view and edit the clients' replies in <span style="background-color:#d4f8e5; padding:5px; border-radius:5px;">Manage</span> -> <span style="background-color:#d4f8e5; padding:5px; border-radius:5px;">Clients</span> -> <span style="background-color:#d4f8e5; padding:5px; border-radius:5px;">Edit</span> for the corresponding client. | :10. From your admin page you will be able to view and edit the clients' replies in <span style="background-color:#d4f8e5; padding:5px; border-radius:5px;">Manage</span> -> <span style="background-color:#d4f8e5; padding:5px; border-radius:5px;">Clients</span> -> <span style="background-color:#d4f8e5; padding:5px; border-radius:5px;">Edit</span> for the corresponding client. | ||
[[File: | [[File:View and edit client fields per client redesigned.png|1200px|border|center|link=https://help.simplybook.me/images/7/79/View_and_edit_client_fields_per_client_redesigned.png]] | ||
<br><br> | <br><br> | ||
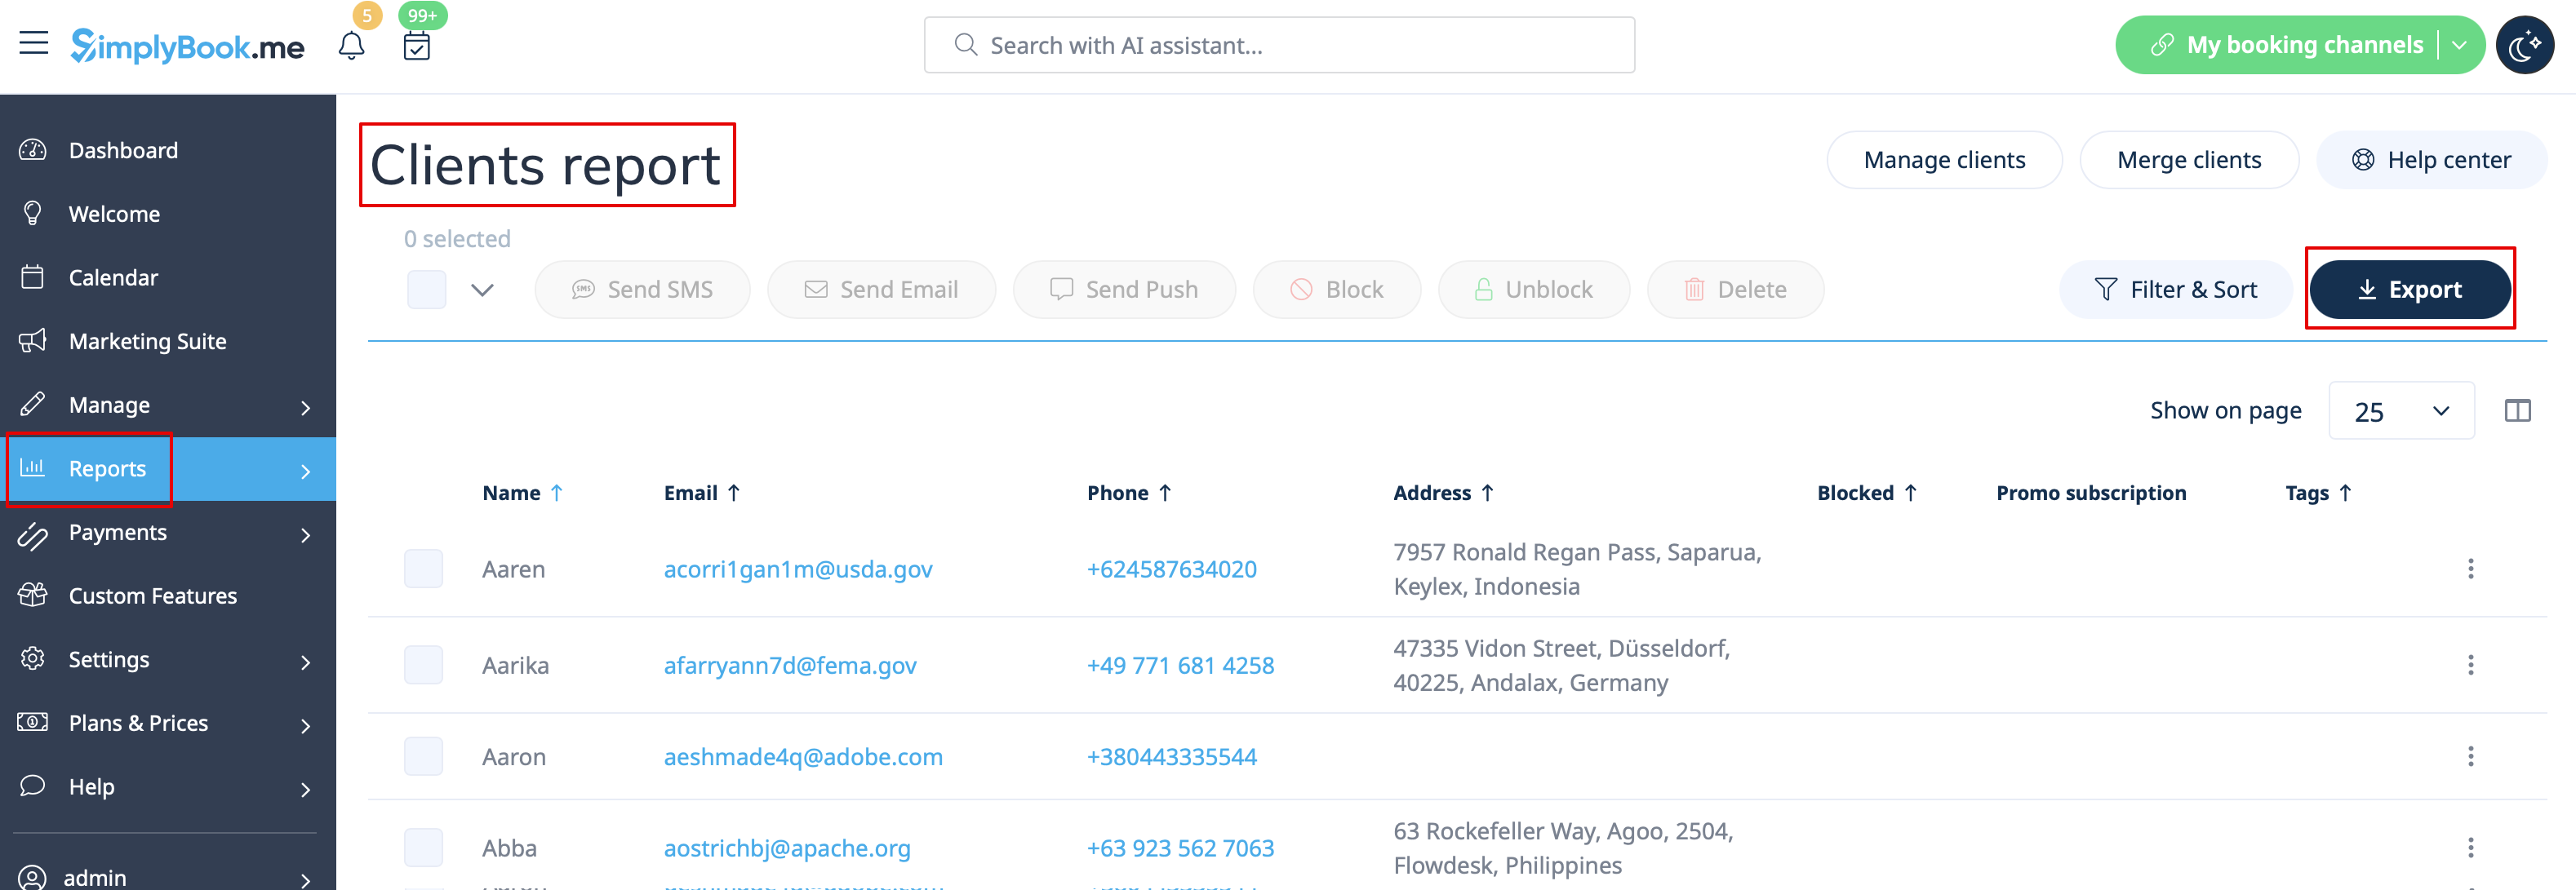
:and export answers to Excel file in <span style="background-color:#d4f8e5; padding:5px; border-radius:5px;">Reports</span> -> <span style="background-color:#d4f8e5; padding:5px; border-radius:5px;">Clients</span> -> <span style="background-color:#d4f8e5; padding:5px; border-radius:5px;">Export to excel.</span> | :and export answers to Excel file in <span style="background-color:#d4f8e5; padding:5px; border-radius:5px;">Reports</span> -> <span style="background-color:#d4f8e5; padding:5px; border-radius:5px;">Clients</span> -> <span style="background-color:#d4f8e5; padding:5px; border-radius:5px;">Export to excel.</span> | ||
[[File: | [[File:Clients report export path redesigned.png|1200px|border|center|link=https://help.simplybook.me/images/a/ae/Clients_report_export_path_redesigned.png]] | ||
:Or in <span style="background-color:#d4f8e5; padding:5px; border-radius:5px;">Manage</span> -> <span style="background-color:#d4f8e5; padding:5px; border-radius:5px;">Clients</span> -> <span style="background-color:#d4f8e5; padding:5px; border-radius:5px;">Export to Excel.</span><br> | :Or in <span style="background-color:#d4f8e5; padding:5px; border-radius:5px;">Manage</span> -> <span style="background-color:#d4f8e5; padding:5px; border-radius:5px;">Clients</span> -> <span style="background-color:#d4f8e5; padding:5px; border-radius:5px;">Export to Excel.</span><br> | ||
:Or together with booking information in <span style="background-color:#d4f8e5; padding:5px; border-radius:5px;">Reports</span> -> <span style="background-color:#d4f8e5; padding:5px; border-radius:5px;">Booking details</span> -> <span style="background-color:#d4f8e5; padding:5px; border-radius:5px;">Export to Excel.</span> | :Or together with booking information in <span style="background-color:#d4f8e5; padding:5px; border-radius:5px;">Reports</span> -> <span style="background-color:#d4f8e5; padding:5px; border-radius:5px;">Booking details</span> -> <span style="background-color:#d4f8e5; padding:5px; border-radius:5px;">Export to Excel.</span> | ||
Revision as of 10:16, 22 August 2024
Get information from clients upon sign up that relates to the client. An example of such information could be, "Name of spouse", or "Date of Birth" since this is fixed information and would generally not change between bookings.
Please note! When you enable Client Fields custom feature Client Login will be enabled as well.
- How to use
- 1. Enable Client Fields Custom Feature on the Custom Features page.
- 2. Go to its settings by clicking on Manage link.
- 3. Here you will see default client login registration fields. You can click on any of them to rename if needed.
- Press + button to create a new form.
- 4. In the field Question title write the question you want your clients to answer.
- 5. Choose the field type:
- digits only - allows entering only numbers. Useful when you need to know the age, height or any other information that will require only digits.
- single line - usually used for short answers
- multiple lines - use this type of filed if you expect lengthy explanations from your clients
- checkbox - creates a checkbox that clients should either check or leave unchecked.
- dropdown selection - creates a drop-down list with the ability to choose only 1 option. In order to create this field, you will need to create a list of values in the section "Dropdown options and default option". Also you can select the Default value that will be assigned if nothing is chosen from the list.
- date - creates date selection option with calendar.
- custom HTML - allows to add visual dividers or additional text near the client field. Cannot be used for client input.
- file uploader - Google Drive - available if File Uploader - Google Drive custom feature is enabled. Allows file upload that you will be able to see in the dedicated folder on your Google Drive.
- 6. Make it rather obligatory or not with the help of Should this field be optional switcher.
- Include to invoices if you would like its title and client response to be reflected there.
- Save the form when you are done.
- 7. You can also re-order all the forms to your taste by using the arrows on the left-side block or by setting the position in the form editing mode on the right side.
- 8. If you want to include client form information to email templates, find the client forms variables and add them to templates in Settings -> Email and SMS settings.
- (Or use Flexible Notifications feature for customized templates per service and/or provider)
- 9. The clients will then be able to fill in their replies during sign up on the booking site and edit their data in client profiles.


- 10. From your admin page you will be able to view and edit the clients' replies in Manage -> Clients -> Edit for the corresponding client.
- and export answers to Excel file in Reports -> Clients -> Export to excel.
- Or in Manage -> Clients -> Export to Excel.
- Or together with booking information in Reports -> Booking details -> Export to Excel.