| Line 14: | Line 14: | ||
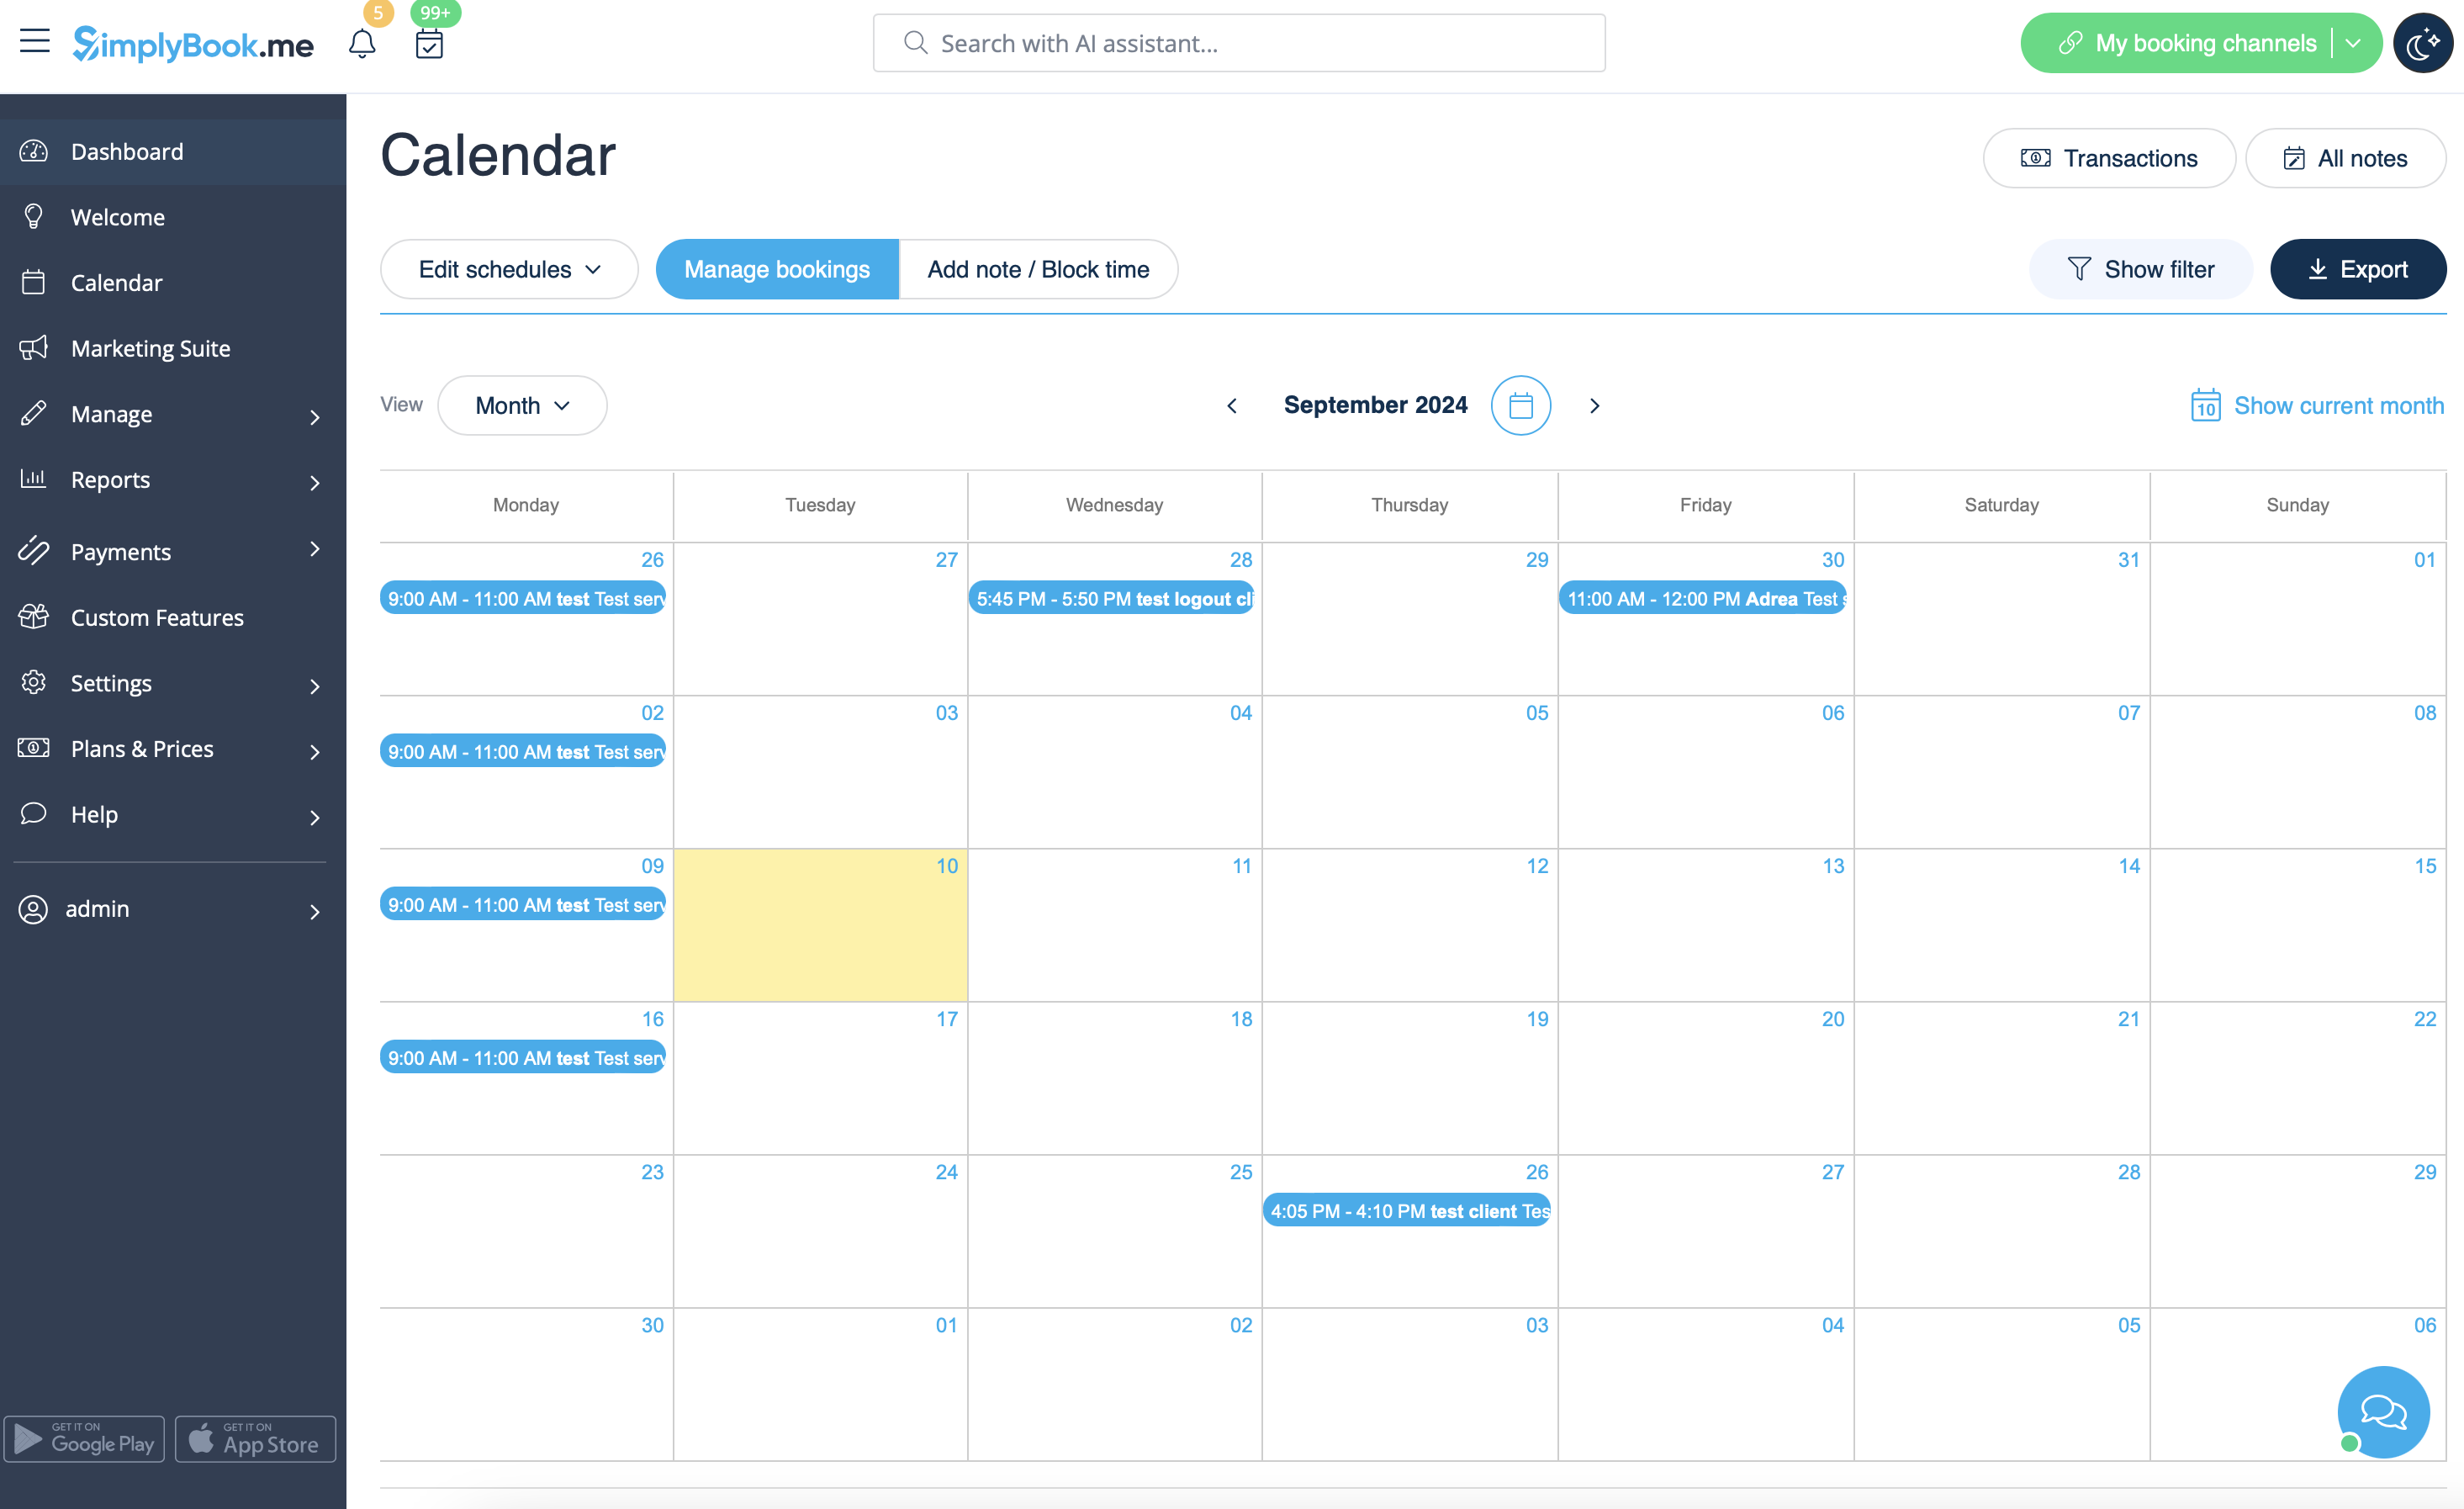
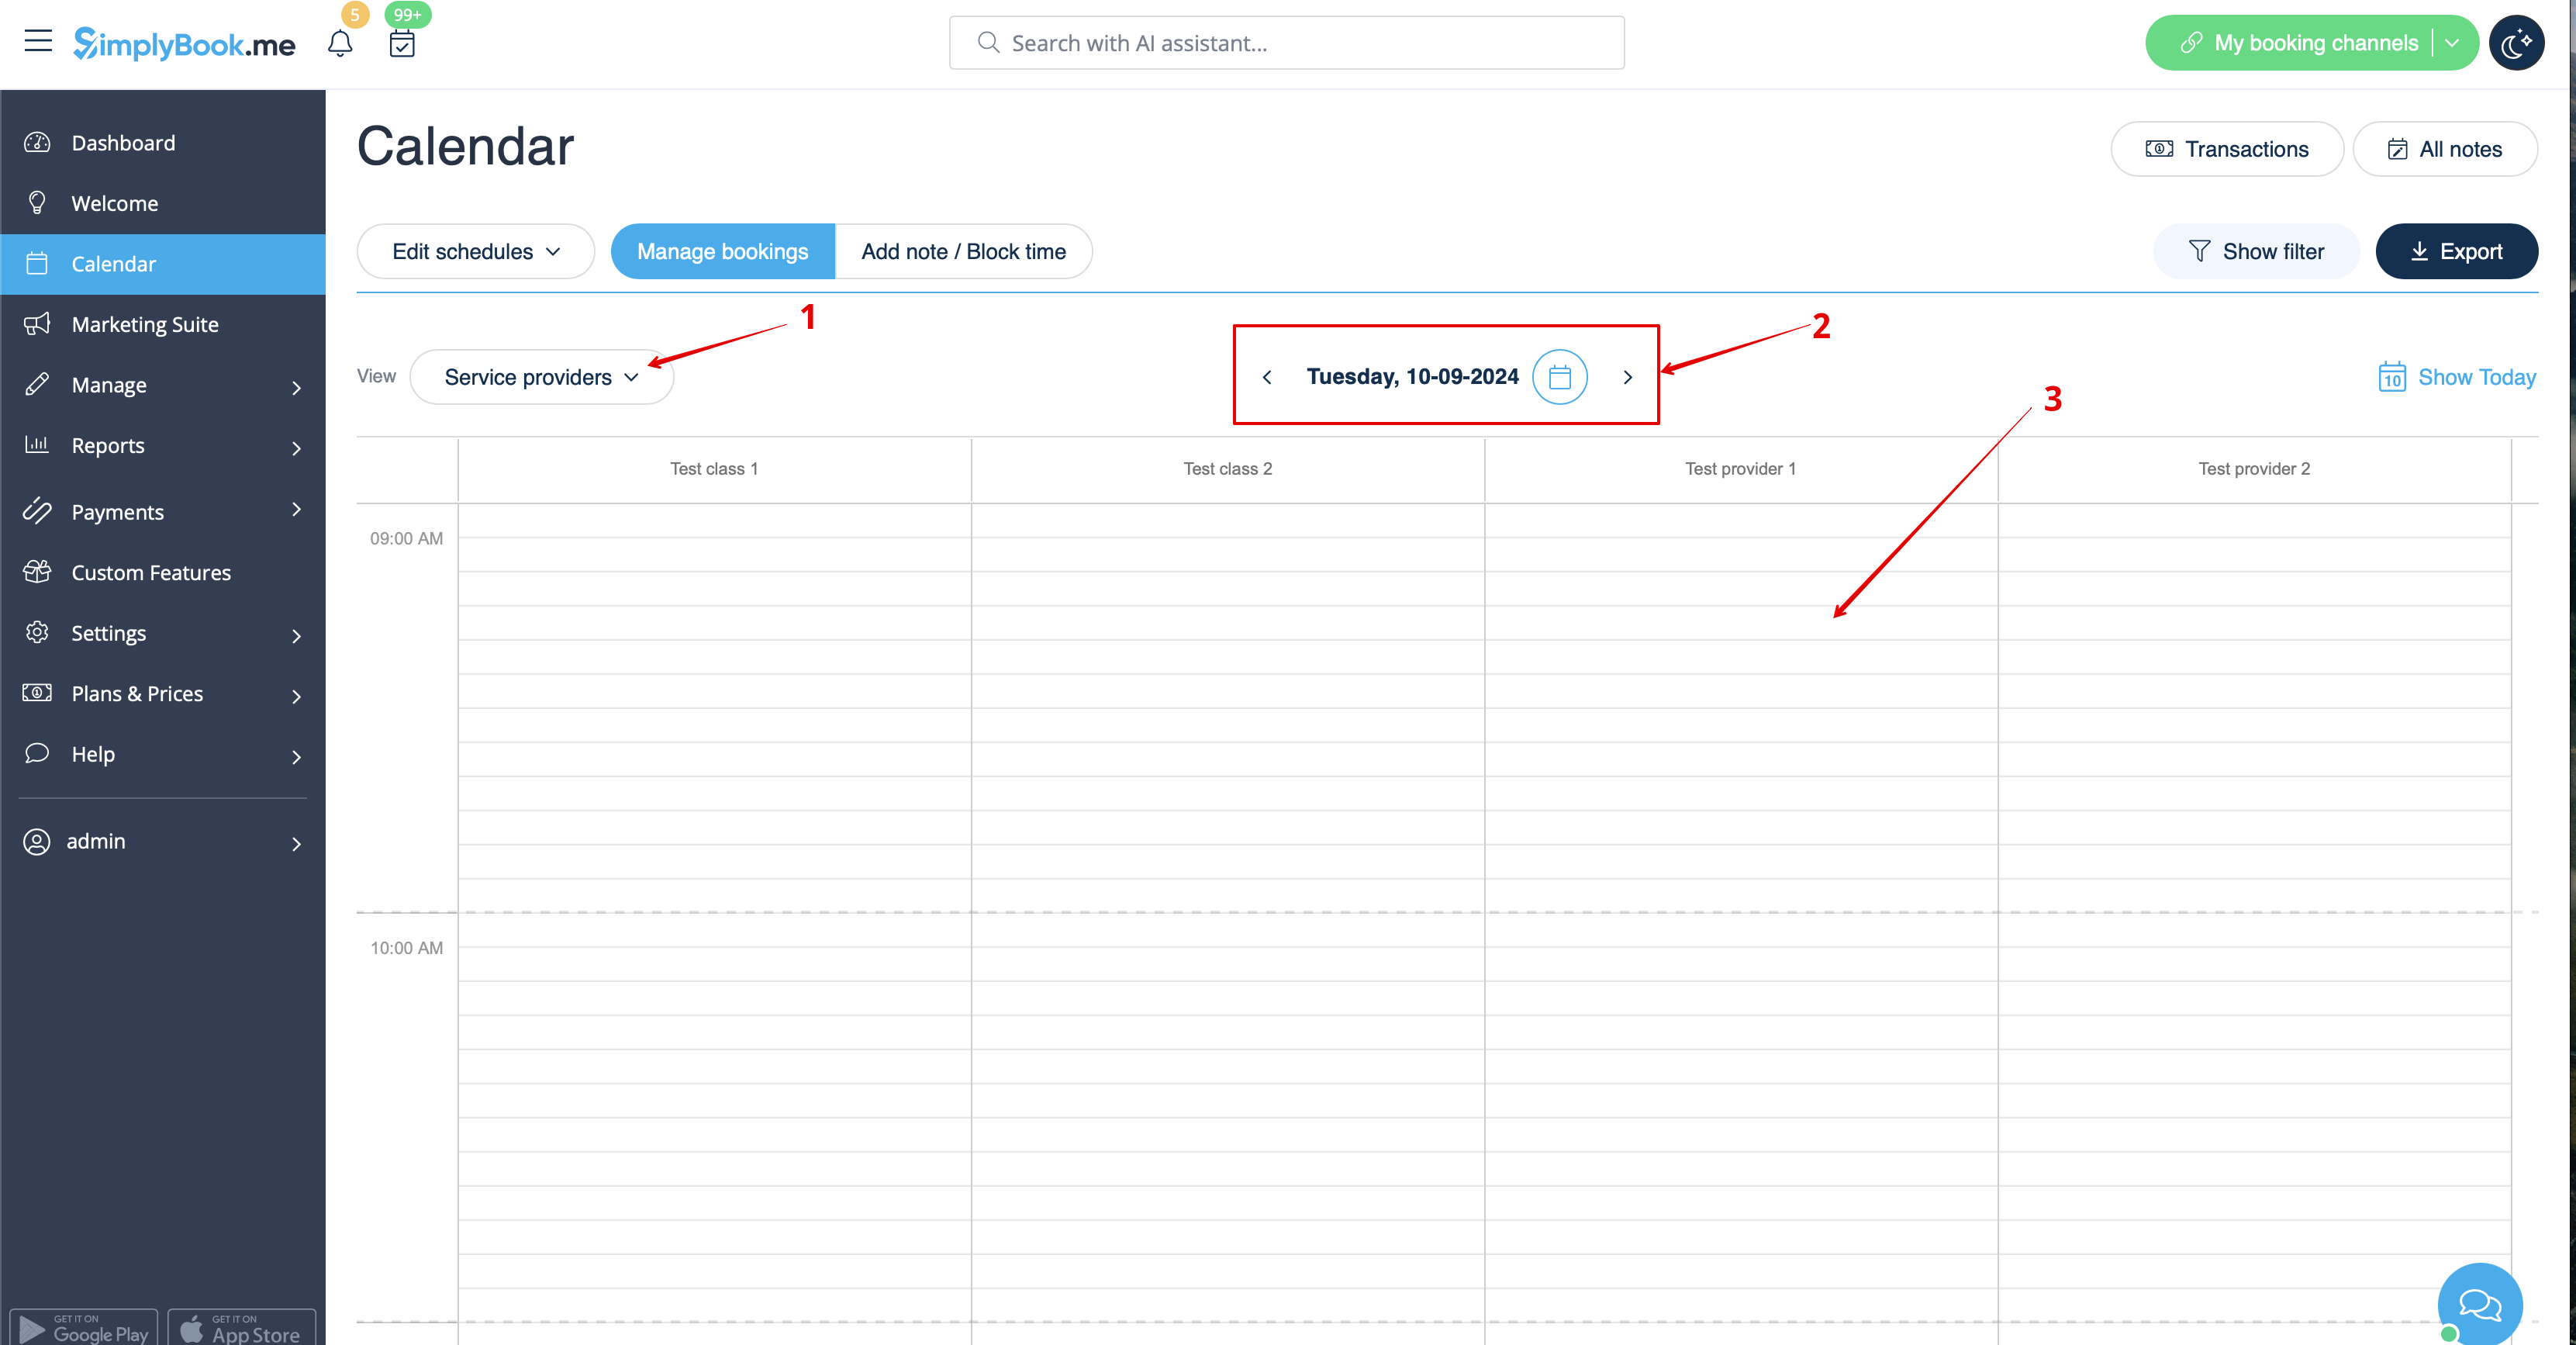
1. In <span style="background-color:#d4f8e5; padding:5px; border-radius:5px;">Calendar</span> (item in the left-side menu) select the desirable view, the date you need to add the booking to (you may also use the filters at the top for convenience) and either simply click on free space or select the necessary time period by dragging. | 1. In <span style="background-color:#d4f8e5; padding:5px; border-radius:5px;">Calendar</span> (item in the left-side menu) select the desirable view, the date you need to add the booking to (you may also use the filters at the top for convenience) and either simply click on free space or select the necessary time period by dragging. | ||
[[File: | [[File:Booking from admin calendar steps redesigned.png|1200px|border|center|link=https://help.simplybook.me/images/7/70/Booking_from_admin_calendar_steps_redesigned.png]] | ||
<br><br> | <br><br> | ||
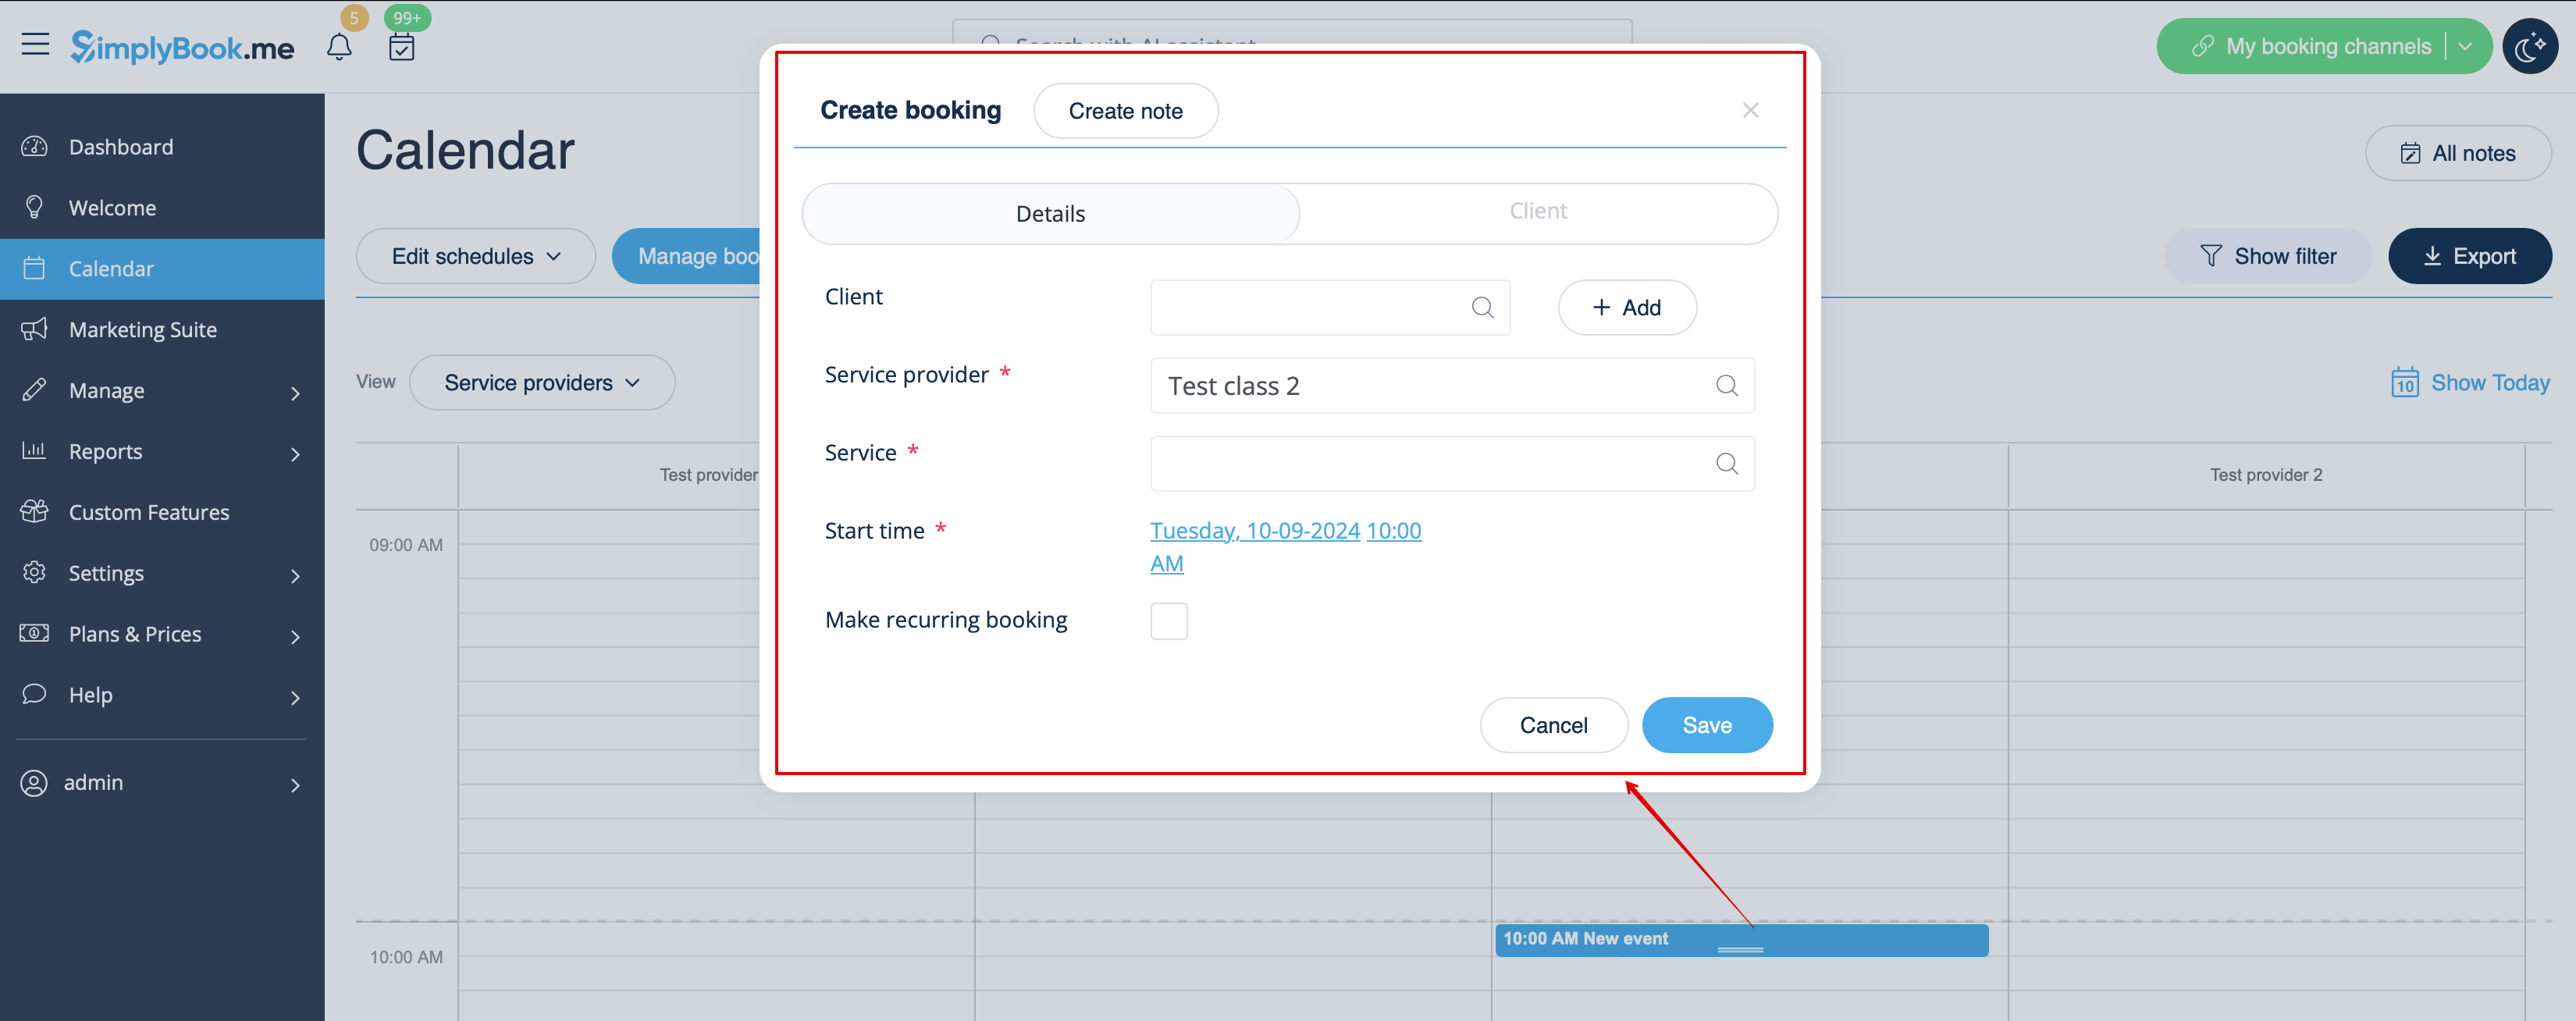
2. Fill in the pop-up form that appears: select or add the client, choose provider and service/class, set the start and end date and times. It is possible to book for a time period that is different from service duration and is multiple of the selected timeframe.<br> | 2. Fill in the pop-up form that appears: select or add the client, choose provider and service/class, set the start and end date and times. It is possible to book for a time period that is different from service duration and is multiple of the selected timeframe.<br> | ||
| Line 20: | Line 20: | ||
For example, if you are using <span style="background-color:#cdeffc; padding:5px; border-radius:5px;">[[Accept_payments_custom_feature|Accept Payments]]</span> and wish the invoice to be generated when the booking is added from the admin side you need to check the box <span style="background-color:#d4f8e5; padding:5px; border-radius:5px;">Receive payment</span> and select the desired payment method before saving the reservation.<br> | For example, if you are using <span style="background-color:#cdeffc; padding:5px; border-radius:5px;">[[Accept_payments_custom_feature|Accept Payments]]</span> and wish the invoice to be generated when the booking is added from the admin side you need to check the box <span style="background-color:#d4f8e5; padding:5px; border-radius:5px;">Receive payment</span> and select the desired payment method before saving the reservation.<br> | ||
<span style="background-color:#ffe9e9; padding:5px; border-radius:5px;">'''Please note!''' This option can be selected during new booking creation only. If the booking was created without invoice generation but you need the invoice to be attached you can cancel such booking and create a new one with the use of <span style="background-color:#d4f8e5; padding:5px; border-radius:5px;">Receive payment</span> option selected)</span> | <span style="background-color:#ffe9e9; padding:5px; border-radius:5px;">'''Please note!''' This option can be selected during new booking creation only. If the booking was created without invoice generation but you need the invoice to be attached you can cancel such booking and create a new one with the use of <span style="background-color:#d4f8e5; padding:5px; border-radius:5px;">Receive payment</span> option selected)</span> | ||
[[File: | [[File:New booking form redesigned.png|1200px|border|center|link=https://help.simplybook.me/images/9/9b/New_booking_form_redesigned.png]] | ||
<br><br> | <br><br> | ||
Revision as of 08:43, 13 September 2024
Where to find all my bookings
1. In Calendar (item in the left-side menu).
(you can choose the view convenient for you)
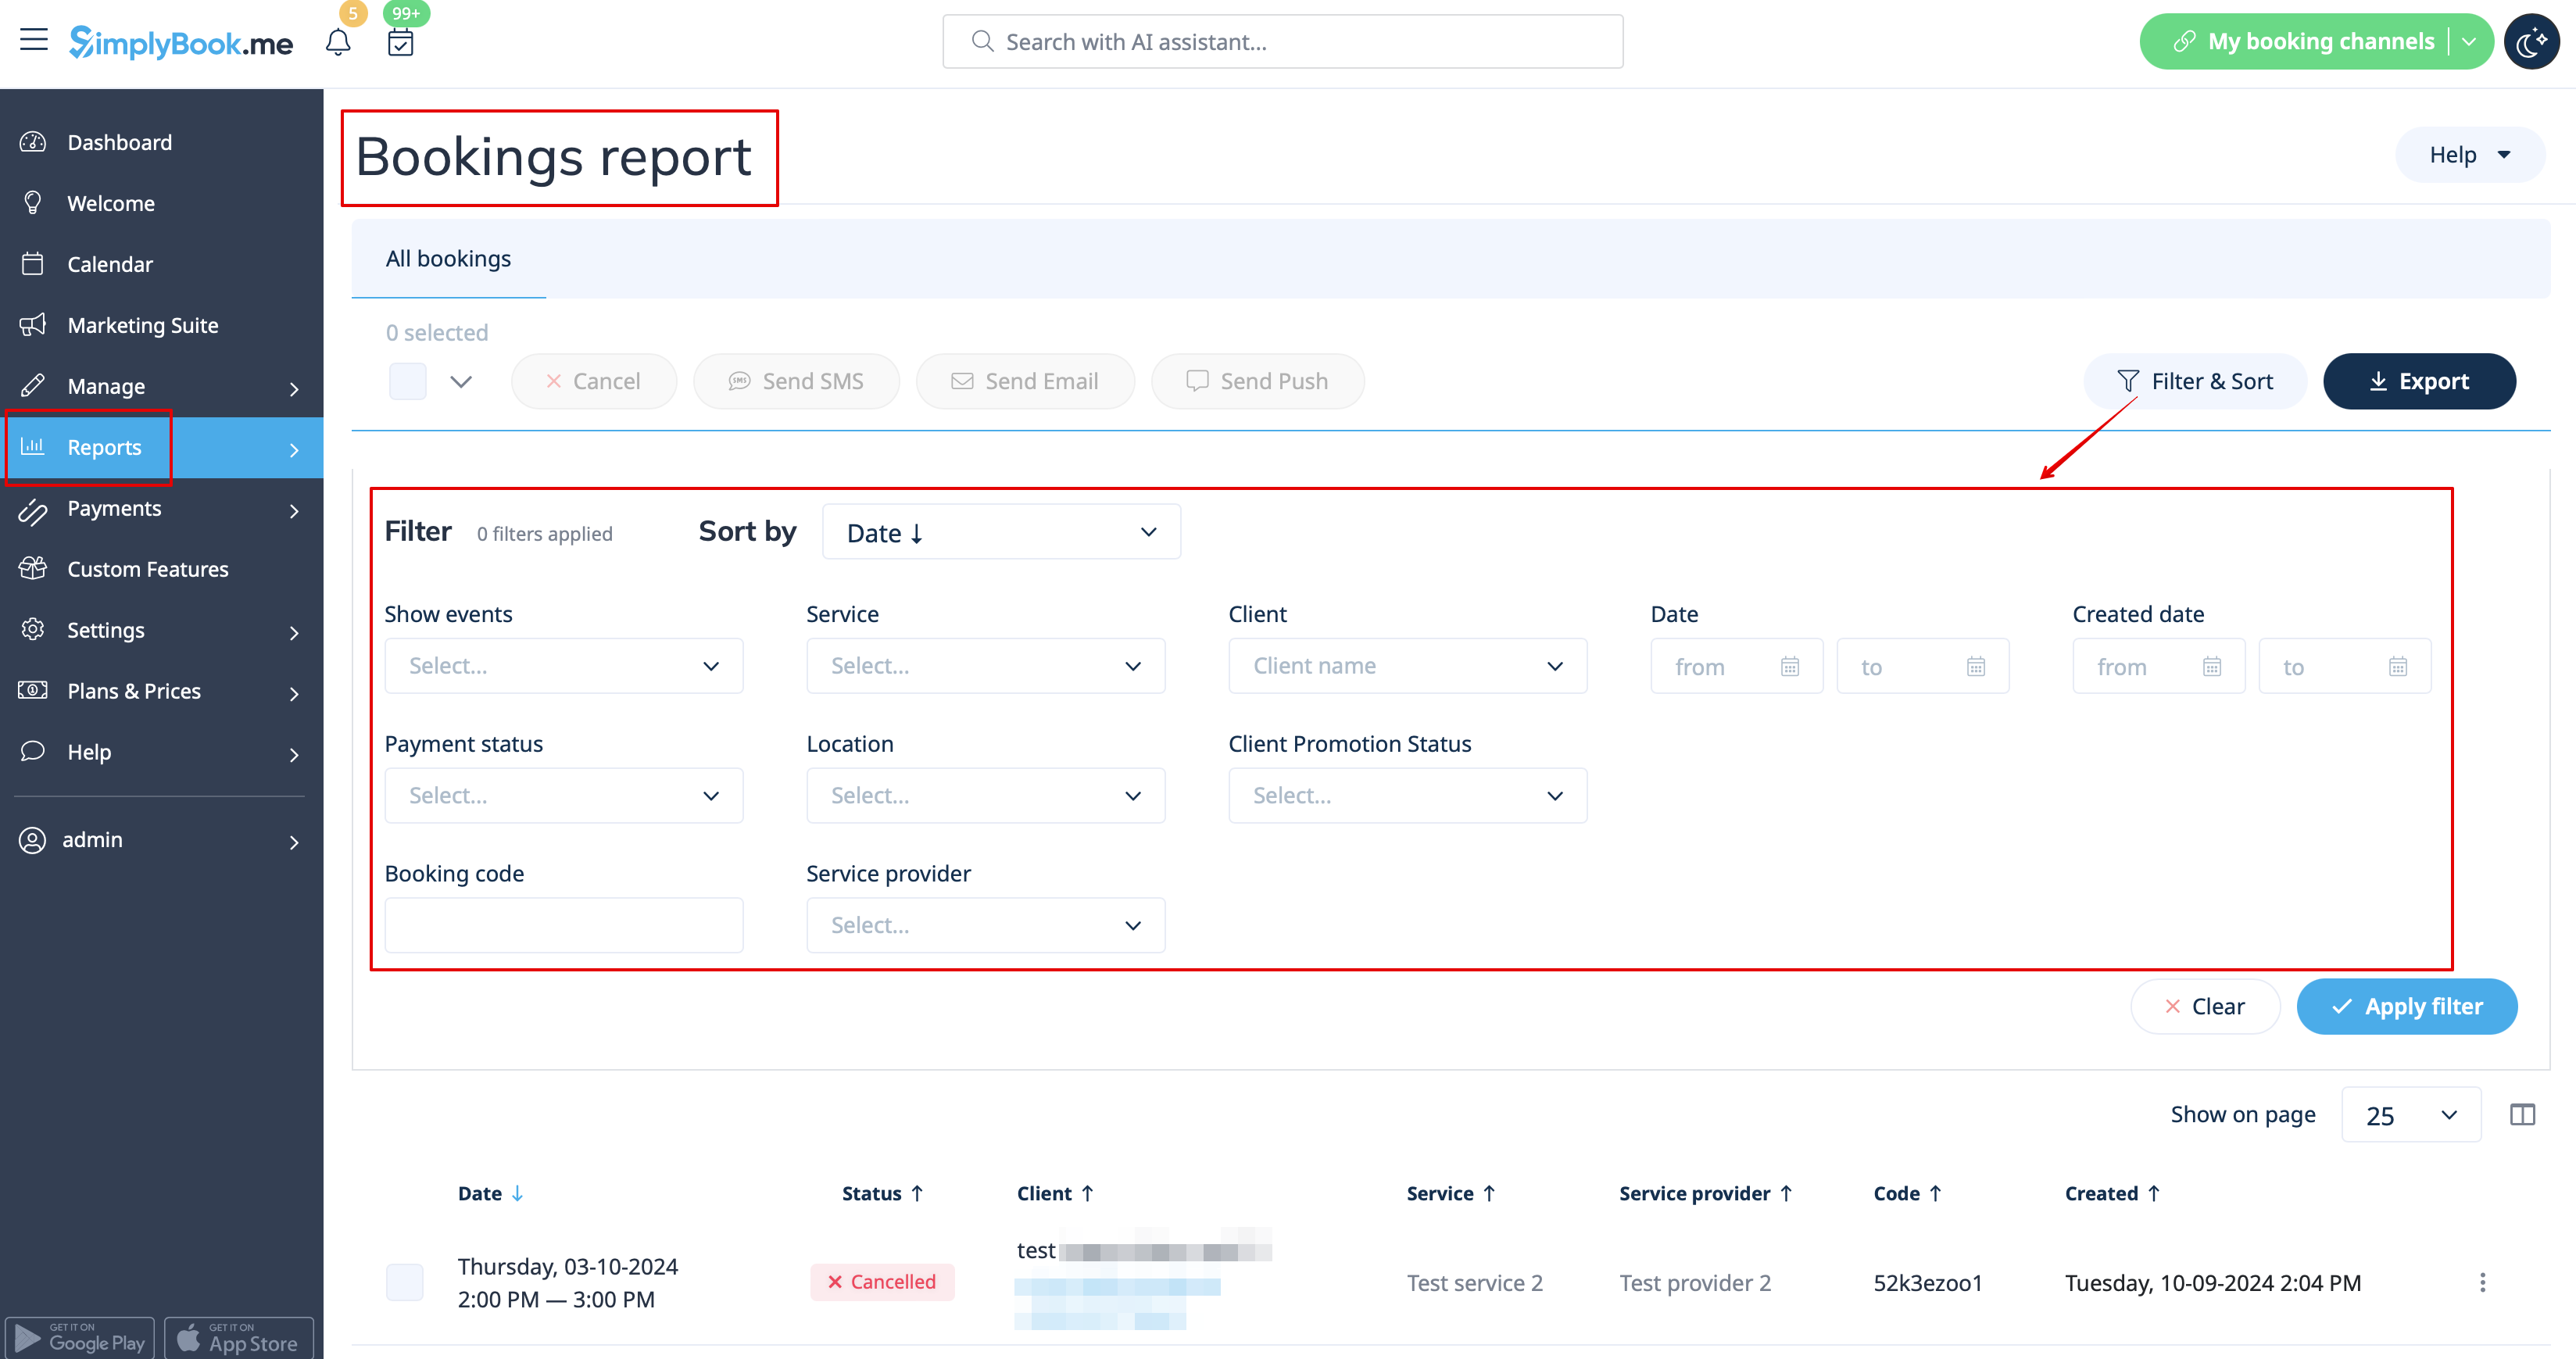
2. In Reports -> Booking details.
You can use filters to easily find your bookings for specific service, provider, client or date range.
How to book from admin calendar
1. In Calendar (item in the left-side menu) select the desirable view, the date you need to add the booking to (you may also use the filters at the top for convenience) and either simply click on free space or select the necessary time period by dragging.
2. Fill in the pop-up form that appears: select or add the client, choose provider and service/class, set the start and end date and times. It is possible to book for a time period that is different from service duration and is multiple of the selected timeframe.
(It may be required to fill in more fields in the pop-up form in case you use additional Custom Features.
For example, if you are using Accept Payments and wish the invoice to be generated when the booking is added from the admin side you need to check the box Receive payment and select the desired payment method before saving the reservation.
Please note! This option can be selected during new booking creation only. If the booking was created without invoice generation but you need the invoice to be attached you can cancel such booking and create a new one with the use of Receive payment option selected)
How to edit bookings
1. In Calendar (item in the left-side menu) click on the booking to open details and then press Edit to change any information about the booking. To change the time of the appointment, simply drag and drop booking to the available time you need. You can easily add Comment to the appointment or view other bookings of this client by pressing Clients button

2. In Reports -> Booking details. Click on View button for the necessary booking to open details and then press Edit to change any information about the booking.
You can use filters to easily find your bookings for specific service, provider, client or date range.

Please note! It is not possible to edit booking that was already cancelled.
If you need to allow your clients to change the appointment date and/or time themselves please use Client Rescheduling custom feature.
How to cancel bookings
1. For admin or user
In Calendar (left-side menu) or in in Reports -> Booking details. Click on the booking to open the details or use View option if in Reports and then press Cancel booking button.

In case you need to cancel many bookings at once you can do that in Reports -> Booking details.
You can use the filter if necessary, check the boxes with the bookings to cancel and click on Cancel selected button at the top.
Please note! It is possible to cancel the appointments from one report page at a time.

2. For client
To cancel their bookings, clients can click cancel link in their confirmation emails.

Or use Cancel button on the booking website, My bookings tab.
(If you want to prohibit clients from cancelling the appointments, you may need Cancellation Policy Custom Feature.)