No edit summary |
No edit summary |
||
| Line 1: | Line 1: | ||
{{#seo: | |||
|title=Frequently Asked Questions about the Popular Appointment Booking System Scheduler SimplyBook.me | |||
|description=Discover helpful tips to get the most from SimplyBook.me. Explore features and improve your setup today. Click to learn more! | |||
|titlemode=append | |||
|keywords=faq, frequently asked questions, booking software, appointment system questions, appointments online, calendar software, booking system, booking calendar, scheduling software, online appointment scheduling, online scheduling, setup, setup help, support, help content | |||
}} | |||
=How to take screenshot= | =How to take screenshot= | ||
<br><br> | <br><br> | ||
Revision as of 15:45, 6 December 2024
How to take screenshot
Taking Screenshot on Windows
1. Press the "PrtScn" key (The screenshot of the whole screen will be taken. If you need to take screenshot only of the currently active window then hold down Alt and press "PrtScn" on the keyboard)
2. Start "Paint" application
3. Press Ctrl + V on the keyboard to paste your screenshot
4. Click the main File option in the top-left corner of Paint, select Save as, give the title to the file and click Save.
Taking Screenshot on Mac
1. Screenshot of the entire screen: Hold down "Command" + "Shift" and press "3" on the keyboard. The file will be saved automatically on the desktop and will have the name like “Screen shot 2016-11-11 at 01.45.00 PM.png”.
2. Screenshot of the selected area: Hold down "Command" + "Shift" and press "4" on the keyboard, then use your mouse to rectangle and capture the area you need.
3. Press Shift-Command-4. The pointer changes to a crosshair. Press the Space bar. The pointer changes to a camera. Move the camera over a window to highlight it. Click your mouse or trackpad. To cancel, press the Esc (Escape) key before you click.Find the screenshot as a .png file on your desktop.
Taking Screenshot on Android
Hold down together Volume down(or Home) and Power buttons for 1-2 seconds. The screen flashes and the screenshot of the entire screen is saved to you Gallery.
Taking Screenshot on iOS
If you have the device with Home button. Hold down the Lock(Sleep/Wake) button at the top of the device, then press and immediately release Home button. The screen flashed and you can find the picture in the Photos app.
If you have the device without Home button. Hold down together Volume down and Power buttons for 1-2 seconds.
Taking Screenshot on Chrome OS
1. Screenshot of the entire screen: Hold down the ‘Ctrl’ and "Window Switcher" keys at the same time, "Window Switcher" is the icon of multiple squares located in the top row. Then you will see the message at the bottom of the screen that Screenshot is taken. You will be able to find it in the Downloads folder.
2. Screenshot of the selected area: Press Ctrl and Shift buttons at once, then press the "Window Switcher" button. Chrome’s cursor will be switched to crosshair. Click and drag a square across area of the screen you want to save, then release the trackpad or mouse button. Screenshot will be saved to the Download folder.
How to copy link from browser
Go to the page you need to get the link from, example is https://sbdemo.simplybook.me/v2, in the upper section of browser you will see the url link, highlight the link, right-mouse-click it and "Copy" it. Then right-mouse-click and "Paste" it to the place where you need to insert it.

How to reload page
1. Reload page in Chrome:
1.1. Click the Reload icon in address bar.
1.2. Press F5 button.
1.3. Press Ctr + F5 or Ctrl + R in Windows.
1.4. Press ⌘Command + R in OS X.

2. Reload page in Firefox:
2.1. Click the Reload icon in address bar.
2.2. Press F5 button.
2.3. Press Ctr + F5 or Ctrl + R in Windows.
2.4. Press ⌘Command+Shift+R in OS X.
3. Reload page in Internet Explorer:
3.1. Click the Reload icon in address bar.
3.2. Press F5 button.
3. Reload page in Chrome on Android and iOS devices:
1. Android device:
1.1 Launch the Google Chrome app.
1.2 Open in Chrome menu window by clicking on the "..." icon.
1.3 Click on refresh icon to refresh the page.
2. IOS device:
2.1 Launch the Google Chrome app.
2.2 Tap the Settings button at the top of the window (the button with three horizontal lines).
2.3 Press the Refresh button at the top of the menu.
How to clear cache
Google Chrome
- Computer
- 1. Open Chrome browser.
- 2. On your toolbar, click "More".
- 3. Hover More tools, and then click "Clear browsing data".
- 4. In the "Clear browsing data" page that opens, check the boxes for "Cookies and other site and plug-in data" and "Cached images and files".
- 5. In the menu at the top "Obliterate the following items from" , select "the beginning of time".
- 6. Click Clear browsing data.
- Mobile Android and iOS
- 1. Open Chrome browser.
- 2. On your toolbar, click "More".
- 3. Click "History", and then click "Clear browsing data".
- 4. In the page "Clear browsing data," check the boxes for "Cookies and site data" and "Cached images and files".
- 5. In the menu at the top "Obliterate the following items from" , select "the beginning of time".
- 6. Click Clear browsing data.
Mozilla Firefox
- 1. Click the menu button of the browser and click Options.
- 2. Choose the Advanced tab.
- 3. Select Network panel.
- 4. Near the "Cached Web Content" option, click the button "Clear Now".
Edge
- 1. Select the ... icon in the top right corner of the browser window to get to the settings menu.
NOTE: You can also access this menu by holding Ctrl + Shift + Delete. By using this shortcut you may skip down to step 3.
- 2. In the settings menu, towards the bottom, click on Choose what to clear.
- 3. Select Cookies and saved website data and Cached data and files. After the two are marked click on clear.
Internet Explorer
- 1. Select Tools (via the Gear Icon) > Safety > Delete browsing history....
NOTE: You can also access this menu by holding Ctrl + Shift + Delete.
- 2. Make sure to uncheck Preserve Favorites website data and check both Temporary Internet Files and Cookies then click Delete.
- 3. You will get a confirmation at the bottom of the window once it has successfully cleared your cache and cookies.
More about cache in IE here
Safari
- 1. Click Safari in the upper left hand side of your screen. In the menu that appears, click Preferences.
- 2. In the window that appears, click the Privacy tab. Click the button Remove All Website Data....
- 3. Click Remove Now in the pop up window that appears.
Tutorial with screenshots here.
Opera
- 1. Open the red O and then click Settings. Alternatively you can press Alt and P together.
- 2. Open the Privacy & Security tab. Now click Clear browsing data...
- 3. In the drop-down box select the beginning of time. Then check only Cookies and other site data and Cached images and files. Now click Clear browsing data.
Tutorial with screenshots here
More about clearing cache in different browsers here
How to add SimplyBook.me to mobile screen
1. Android device:
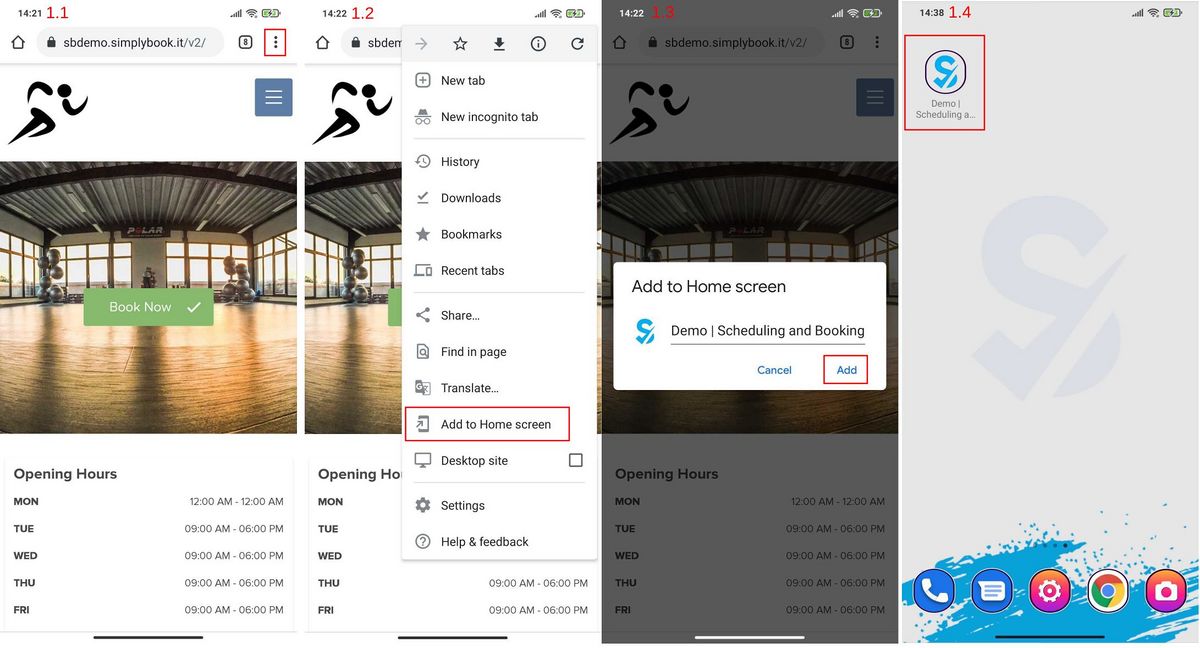
1.1. Open your mobile browser and log into your Simplybook.me admin account there. Click 3 dots icon in the right top corner of the mobile browser:
1.2. In the Menu pop up select "Add to Home screen"
1.3. Insert Title for the icon and click Add.
1.4 Check your home page, the icon will appear there.
2. IOS device:
2.1 Launch the Safari browser on Apple’s iOS and navigate to the website or web page you want to add to your home screen.
2.2 Tap the Share button on the browser’s toolbar(the rectangle with an arrow pointing upward. It’s on the bar at the top of the screen on an iPad, and on the bar at the bottom of the screen on an iPhone or iPod Touch).
2.3 Tap the Add to Home Screen icon in the Share menu. You’ll be prompted to name the shortcut before tapping the Add button.
Other browsers, like Chrome for iOS, don’t offer this feature. Due the limitations in Apple’s iOS, only Apple’s own Safari browser is allowed to do this.
Tracking pixel
To add tracking pixel to SimplyBook.me to track successful bookings:
1. In SimplyBook.me admin interface go to Custom Features // Custom Features section and enable Custom CSS custom feature.
2. In this custom feature Settings add to Booking pages CSS tab code:
- For usual confirmation page
#booking-result-view .booking-item.booking-confirmed {
content: url('http://    ';);
}
- In case Accept payments feature is on and invoices are used as the booking confirmation page.
.invoice-pay-page .invoice-info .part table b.text-success{
content: url('http://    ';);
}
- where content should contain tracking pixel url. And press Save CSS.
Create Facebook pixel
To add Facebook tracking pixel to your site please follow the instructions from Advertiser Help Center
- To add Facebook tracking pixel to SimplyBook.me site
- 1. Go to your Facebook Pixel tab in Ads Manager.
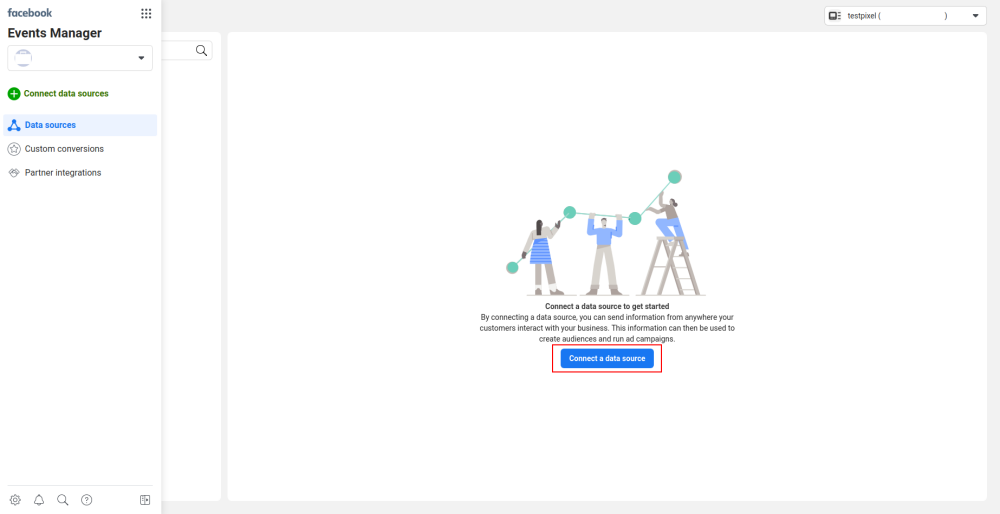
- 2. Follow the simple steps to create pixel. Choose to connect a data source.
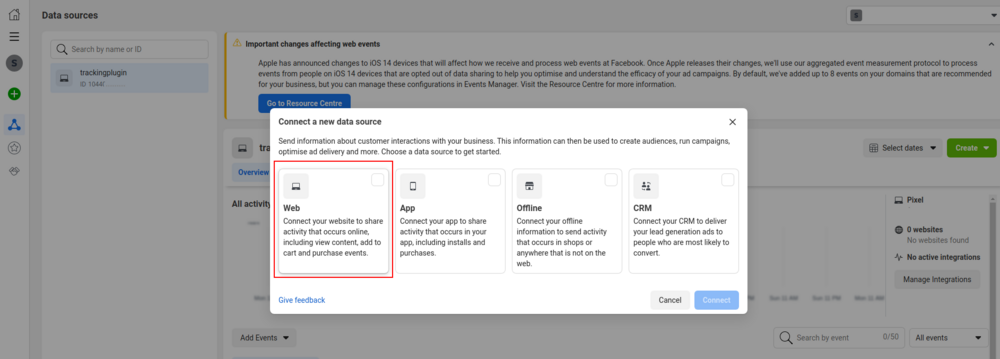
- 3. Choose Web option.
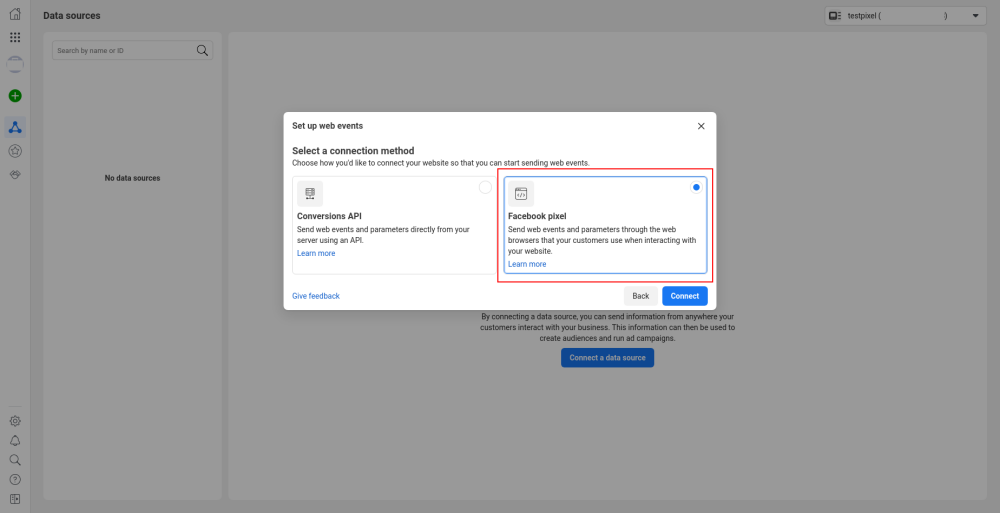
- 4. Select "Facebook pixel".
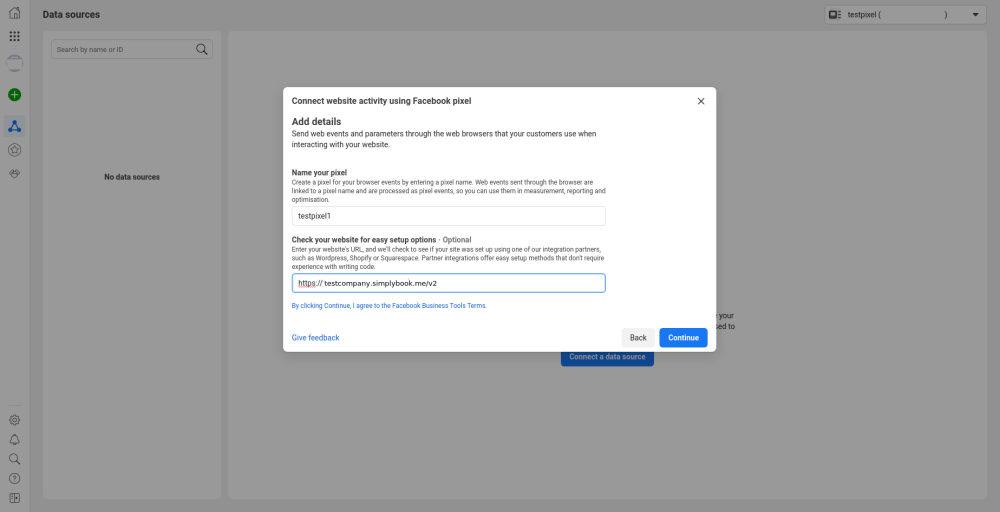
- 5. Insert the title of pixel, your booking website address and press "Continue" button.
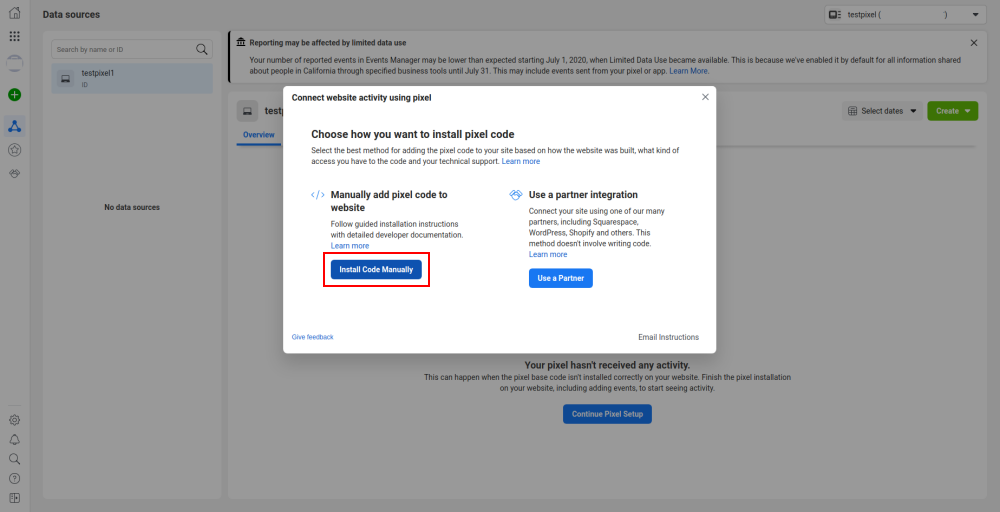
- 6. Choose manual code installation.
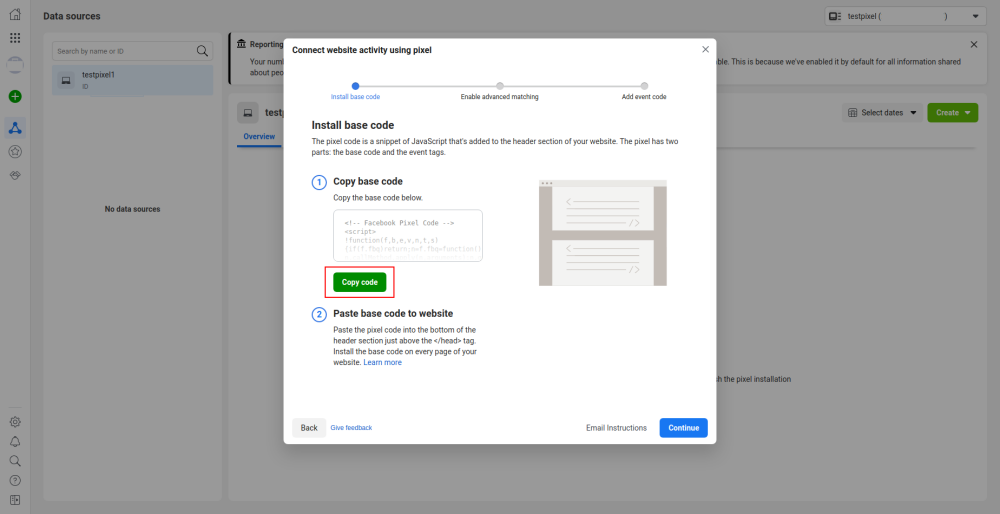
- 7. Copy the code and insert it to any text editor, copy the src of the tracking pixel.

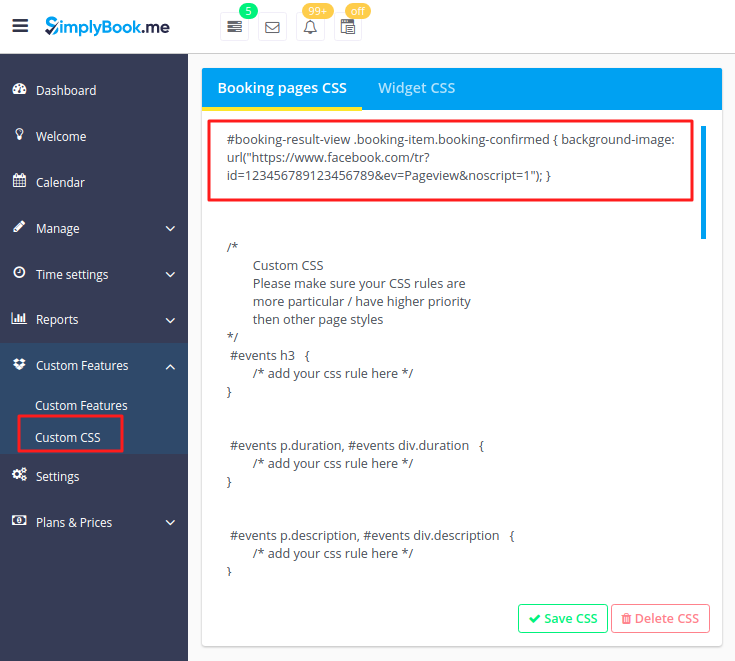
- 8. In your SimplyBook.me admin interface go to Custom Features // Custom Features section and enable Custom CSS Custom Feature.
In this Custom Feature settings select the tab depending on whether you will be traking successful bookings on the booking website provided by SimplyBook.me or booking widget on your own website . Add the code with src copied from previous step.: - For usual confirmation page:
#booking-result-view .booking-item.booking-confirmed { background-image: url("src from facebook"); }
- In case Accept payments feature is on and invoices are used as the booking confirmation page.
- This way you will track successful purchases.
.invoice-pay-page .invoice-info .part table b.text-success{ background-image: url("src from facebook"); }
- And press Save CSS button.
- 9. Get back to Facebook pixel setup page and skip the next steps in case you do not need them.
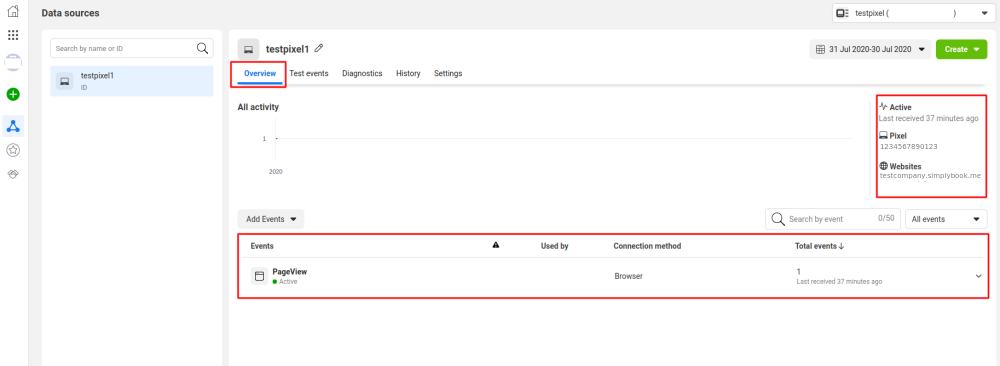
- 10. Check your booking page activity in Facebook pixel -> Overview tab.
