No edit summary |
Updating to match new version of source page |
||
| Line 1: | Line 1: | ||
<languages/> | <languages/> | ||
{{#seo: | {{#seo: | ||
|title=Custom Page custom feature - SimplyBook.me | |title=Custom Page custom feature - SimplyBook.me | ||
<div lang="en" dir="ltr" class="mw-content-ltr"> | |||
|description=Create unique pages for your booking website. Add personalized content and improve user experience. Start using this feature now! | |||
</div> | |||
|titlemode=append | |titlemode=append | ||
|keywords=faq, frequently asked questions, booking software, appointment system questions, appointments online, calendar software, booking system, booking calendar, scheduling software, online appointment scheduling, online scheduling, plugins, custom features, additional page, additional content | |keywords=faq, frequently asked questions, booking software, appointment system questions, appointments online, calendar software, booking system, booking calendar, scheduling software, online appointment scheduling, online scheduling, plugins, custom features, additional page, additional content | ||
| Line 17: | Line 19: | ||
=So verwenden Sie die Option zur Seitenerstellung= | =So verwenden Sie die Option zur Seitenerstellung= | ||
<div class="mw-translate-fuzzy"> | |||
1. Aktivieren Sie die Funktion "Individuelle Seite" auf der Seite "Individuelle Funktionen" -> im Abschnitt "Weiteres zur Buchungsseite hinzufügen". | 1. Aktivieren Sie die Funktion "Individuelle Seite" auf der Seite "Individuelle Funktionen" -> im Abschnitt "Weiteres zur Buchungsseite hinzufügen". | ||
[[File:Custom page enable path redesigned.png|1200px| center|link=https://help.simplybook.me/images/5/54/Custom_page_enable_path_redesigned.png]] | [[File:Custom page enable path redesigned.png|1200px| center|link=https://help.simplybook.me/images/5/54/Custom_page_enable_path_redesigned.png]] | ||
| Line 40: | Line 43: | ||
[[File:Custom page coding mode on redesigned.png|1200px | center|link=https://help.simplybook.me/images/9/93/Custom_page_coding_mode_on_redesigned.png]] | [[File:Custom page coding mode on redesigned.png|1200px | center|link=https://help.simplybook.me/images/9/93/Custom_page_coding_mode_on_redesigned.png]] | ||
<br><br> | <br><br> | ||
</div> | |||
| Line 51: | Line 55: | ||
<div class="mw-translate-fuzzy"> | |||
1. Klicken Sie auf das "+"-Symbol am oberen Rand und wählen Sie die Option "Link zur Menüleiste hinzufügen". | 1. Klicken Sie auf das "+"-Symbol am oberen Rand und wählen Sie die Option "Link zur Menüleiste hinzufügen". | ||
[[File:Add custom links redesigned.png|1200px | center|link=https://help.simplybook.me/images/1/19/Add_custom_links_redesigned.png]] | [[File:Add custom links redesigned.png|1200px | center|link=https://help.simplybook.me/images/1/19/Add_custom_links_redesigned.png]] | ||
| Line 61: | Line 66: | ||
[[File:Custom link blank or self redesigned.png|1200px | center|link=https://help.simplybook.me/images/2/2b/Custom_link_blank_or_self_redesigned.png]] | [[File:Custom link blank or self redesigned.png|1200px | center|link=https://help.simplybook.me/images/2/2b/Custom_link_blank_or_self_redesigned.png]] | ||
<br><br> | <br><br> | ||
</div> | |||
Revision as of 15:18, 15 January 2025

Mit dieser individuellen Funktion können Sie Ihre eigenen statischen Seiten zu Ihrer Buchungswebsite hinzufügen, alle Buchungsseiten im Hauptmenü neu anordnen, Menüpunkte ausblenden und individuelle Links zum Hauptmenü hinzufügen.
So verwenden Sie die Option zur Seitenerstellung
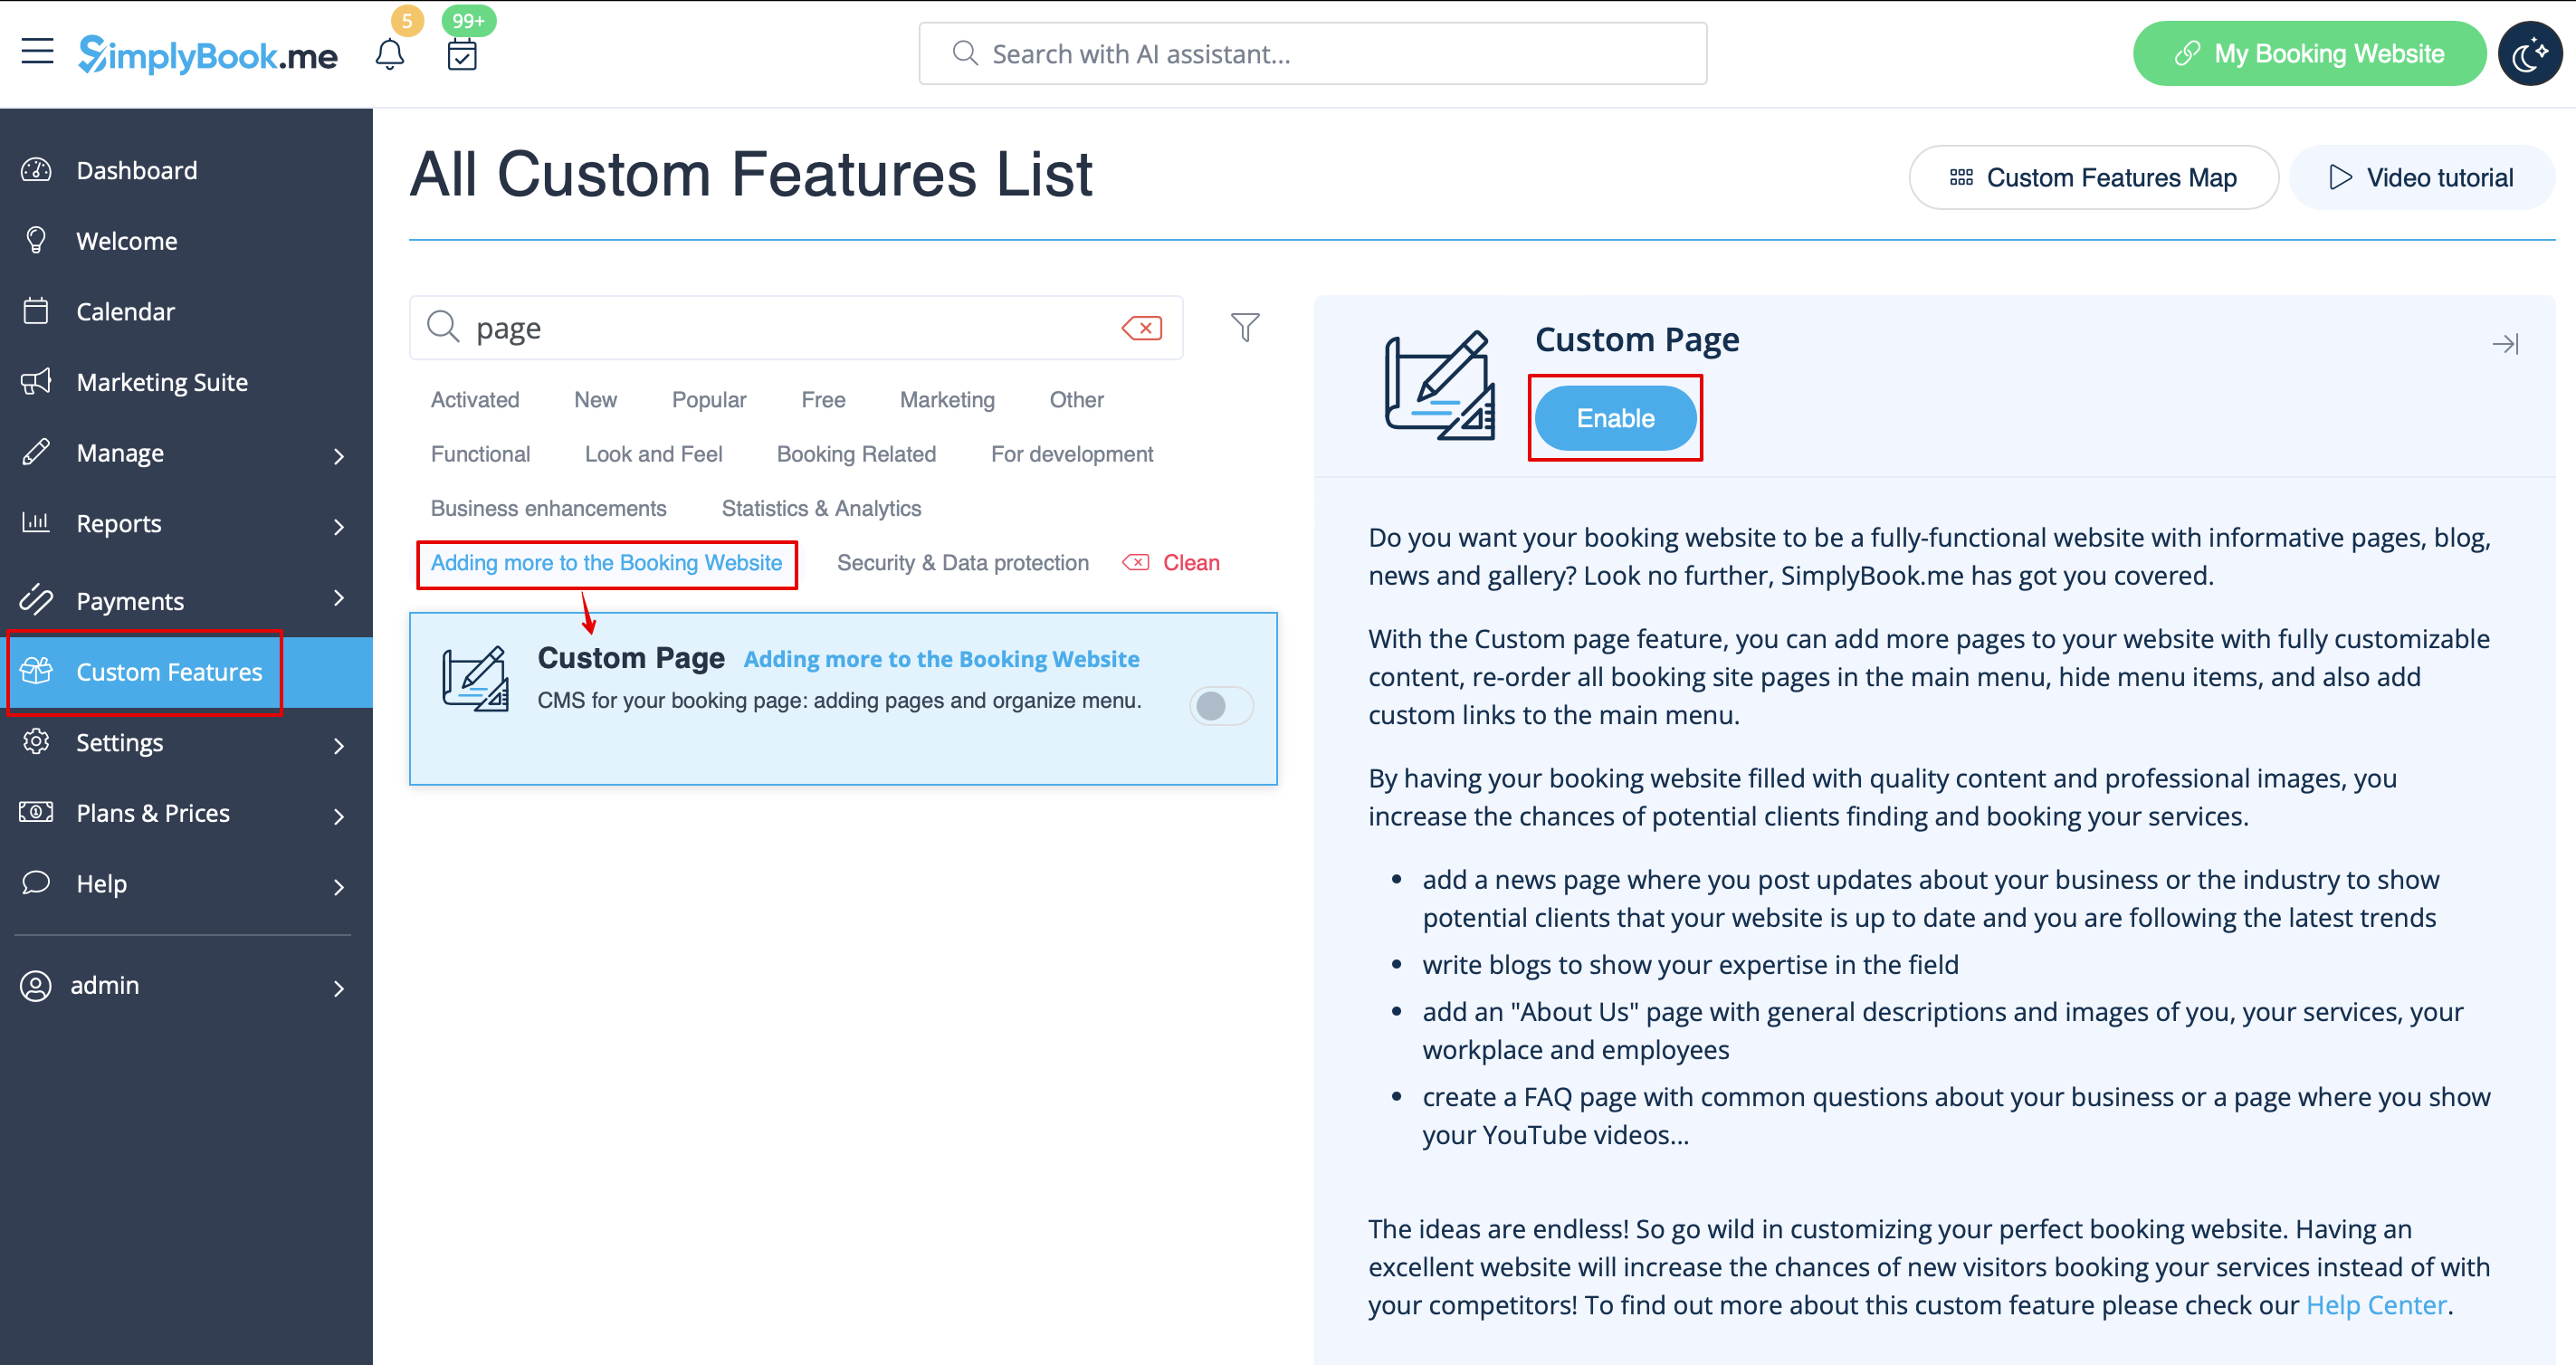
1. Aktivieren Sie die Funktion "Individuelle Seite" auf der Seite "Individuelle Funktionen" -> im Abschnitt "Weiteres zur Buchungsseite hinzufügen".
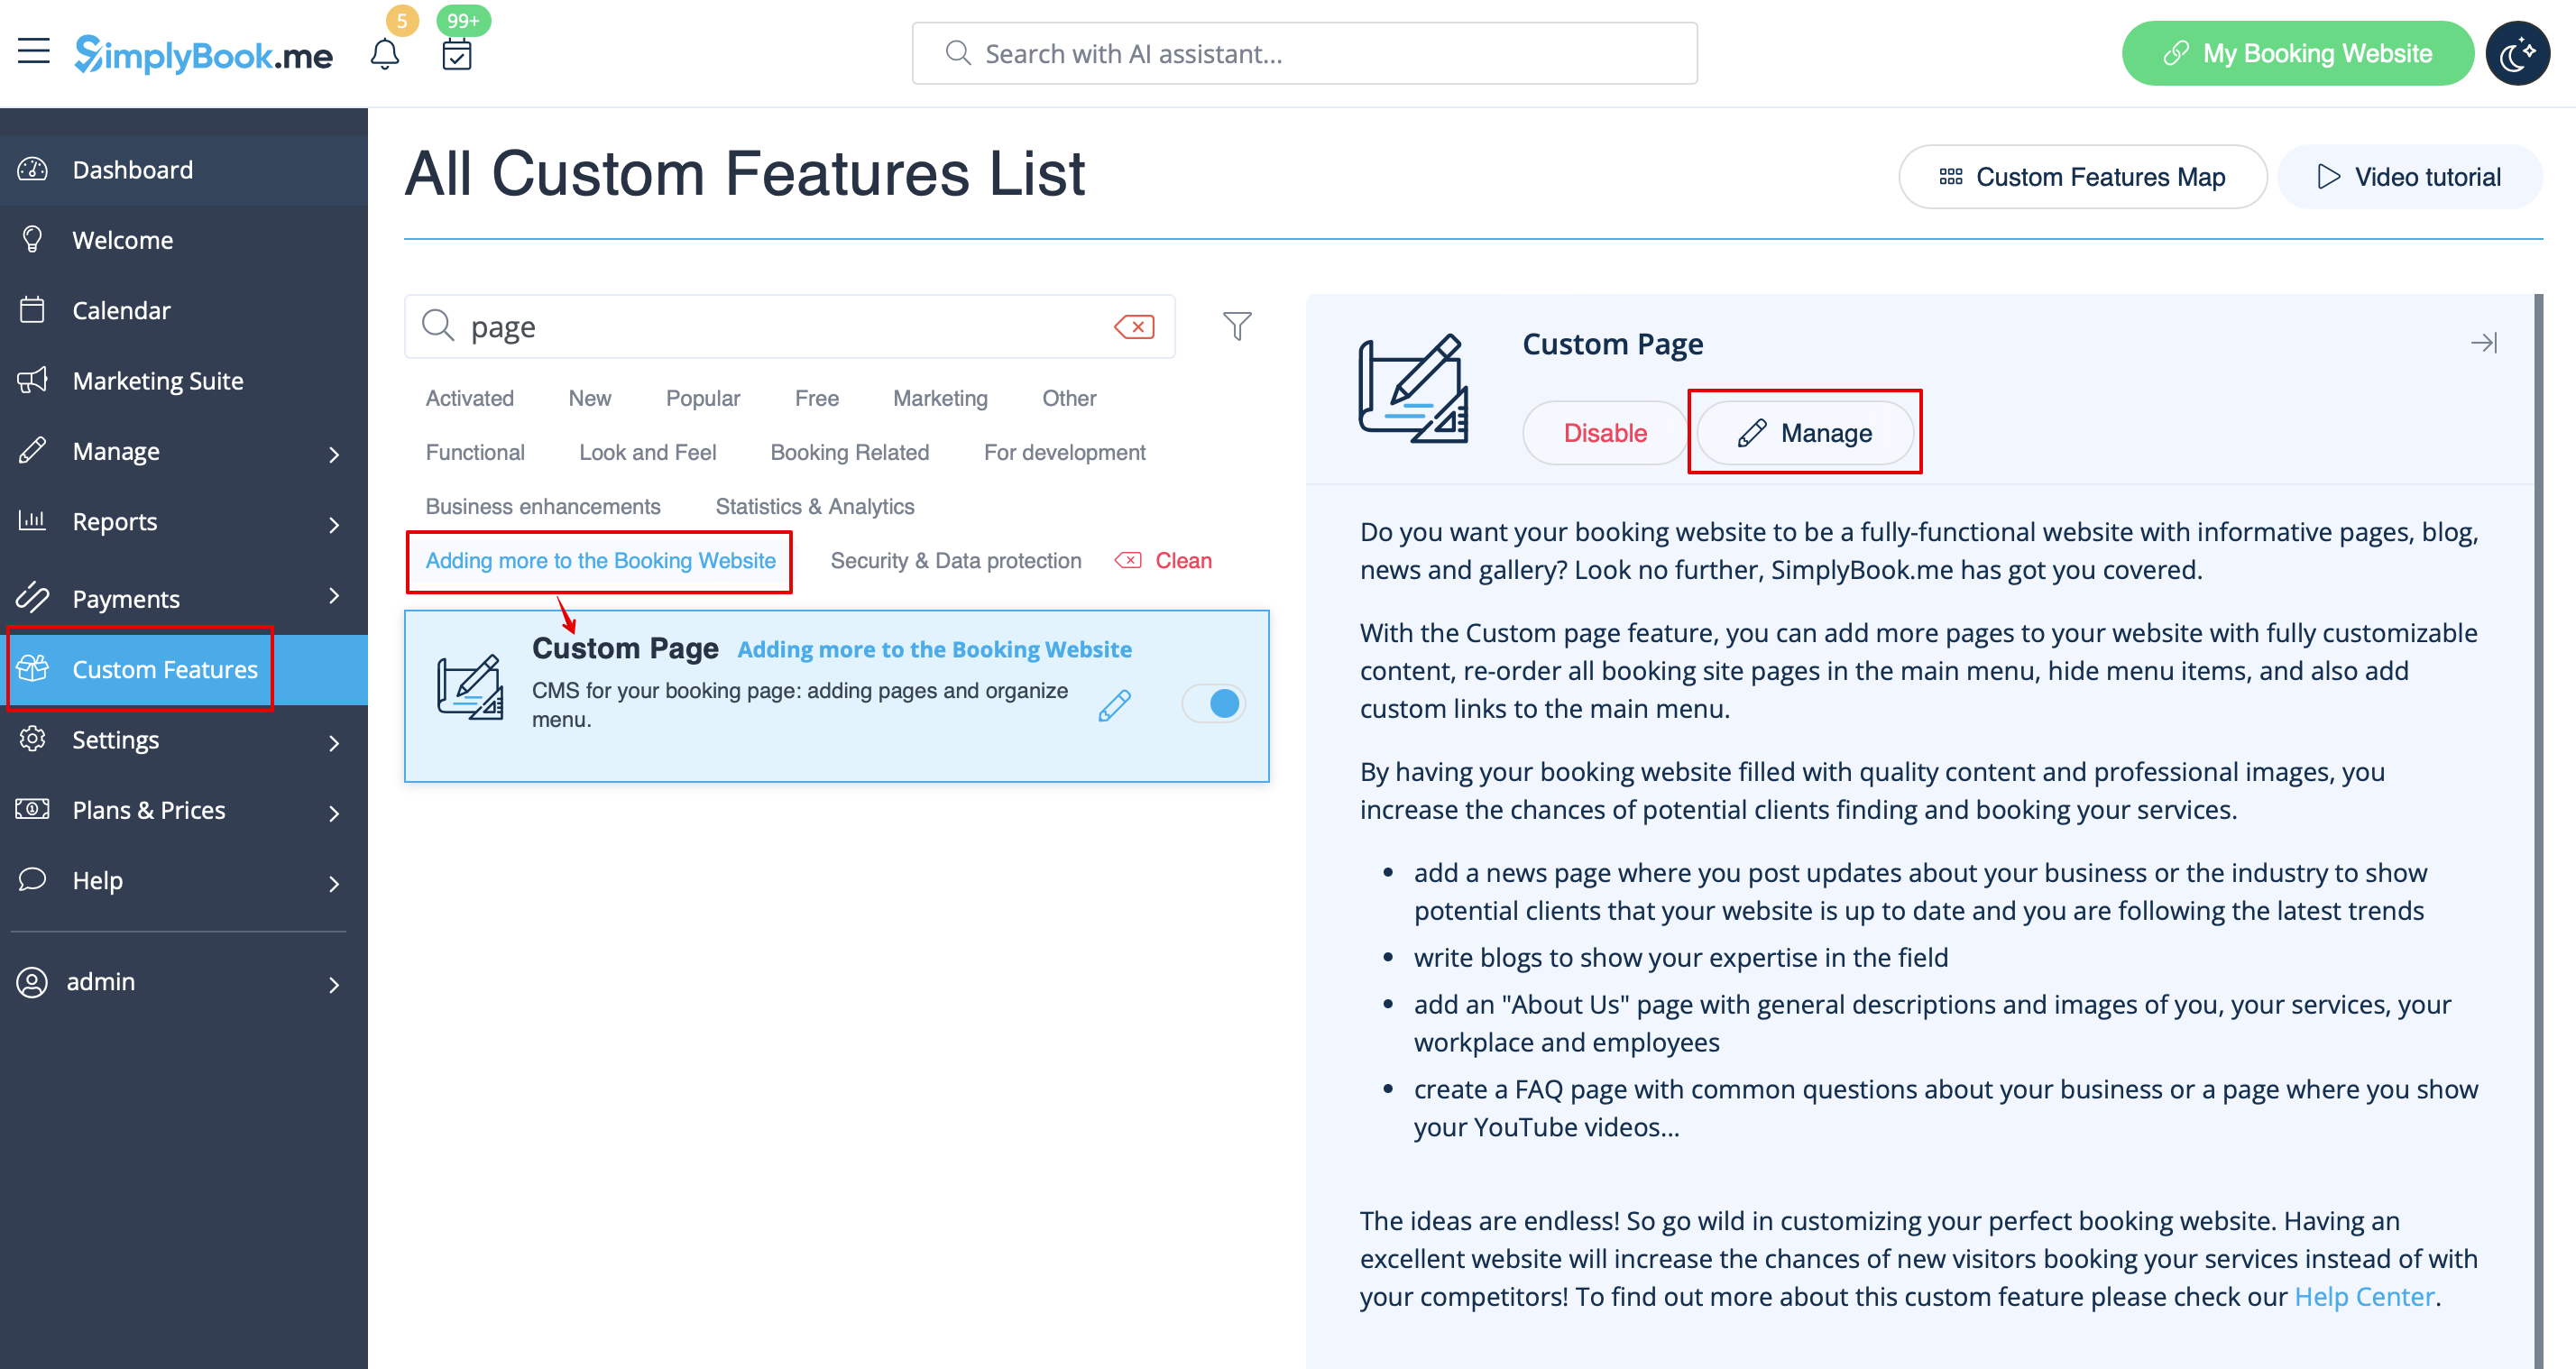
2. Gehen Sie zu "Verwalten", um die gewünschten Seiten einzurichten.
3. Auf der nächsten Seite sehen Sie die Registerkarten für die Buchungsseite des Systems.
(Diejenigen, die derzeit deaktiviert sind, sind ausgegraut.)
Systemseiten können in dieser Schnittstelle nicht bearbeitet werden. Sie müssen über die bereitgestellten Links zu dem entsprechenden Abschnitt navigieren.
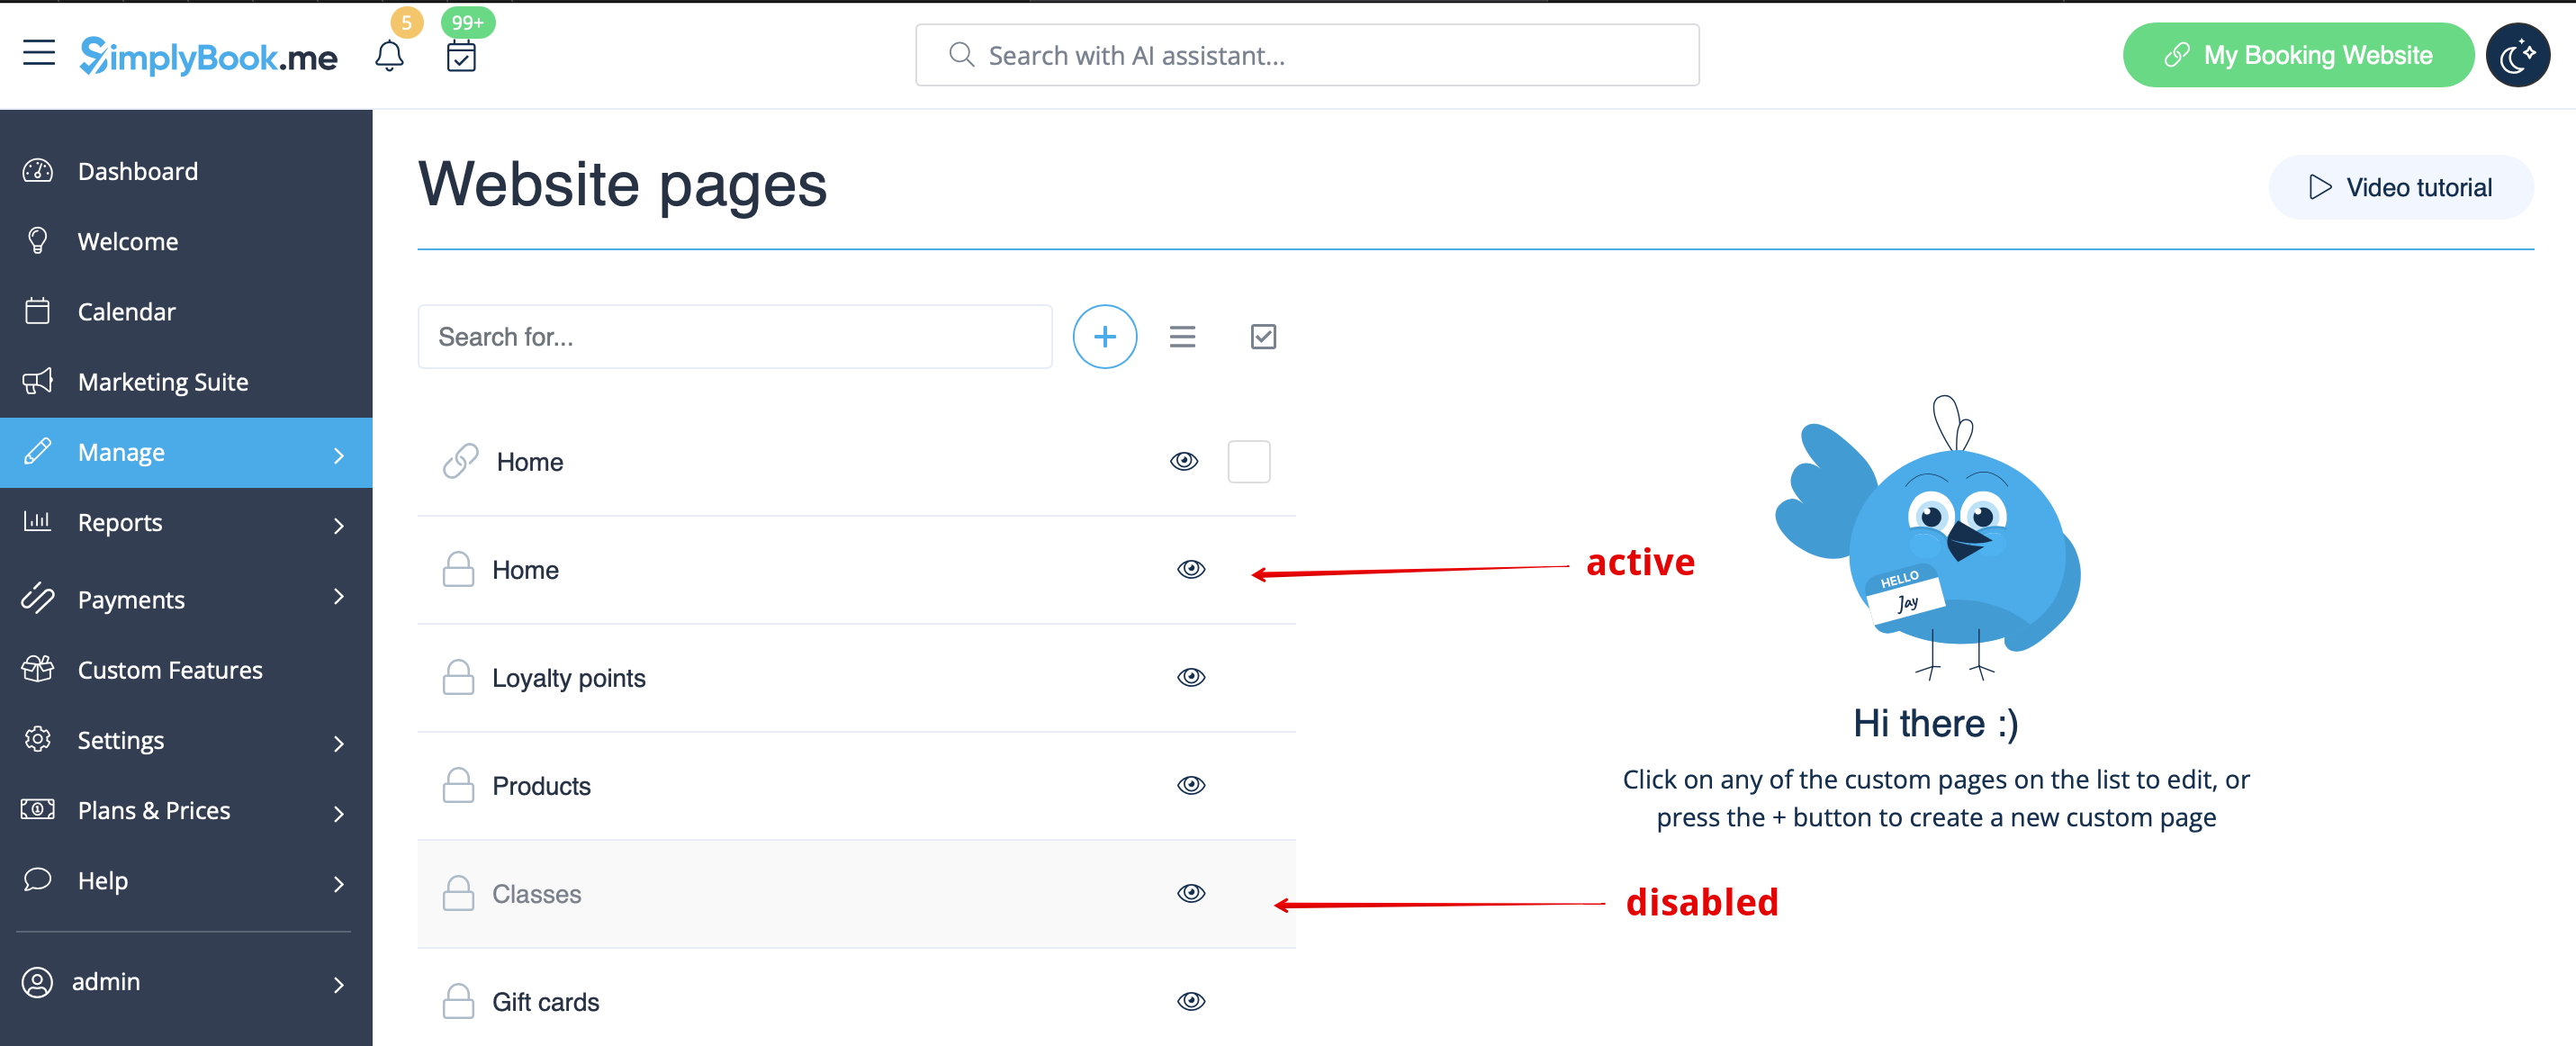
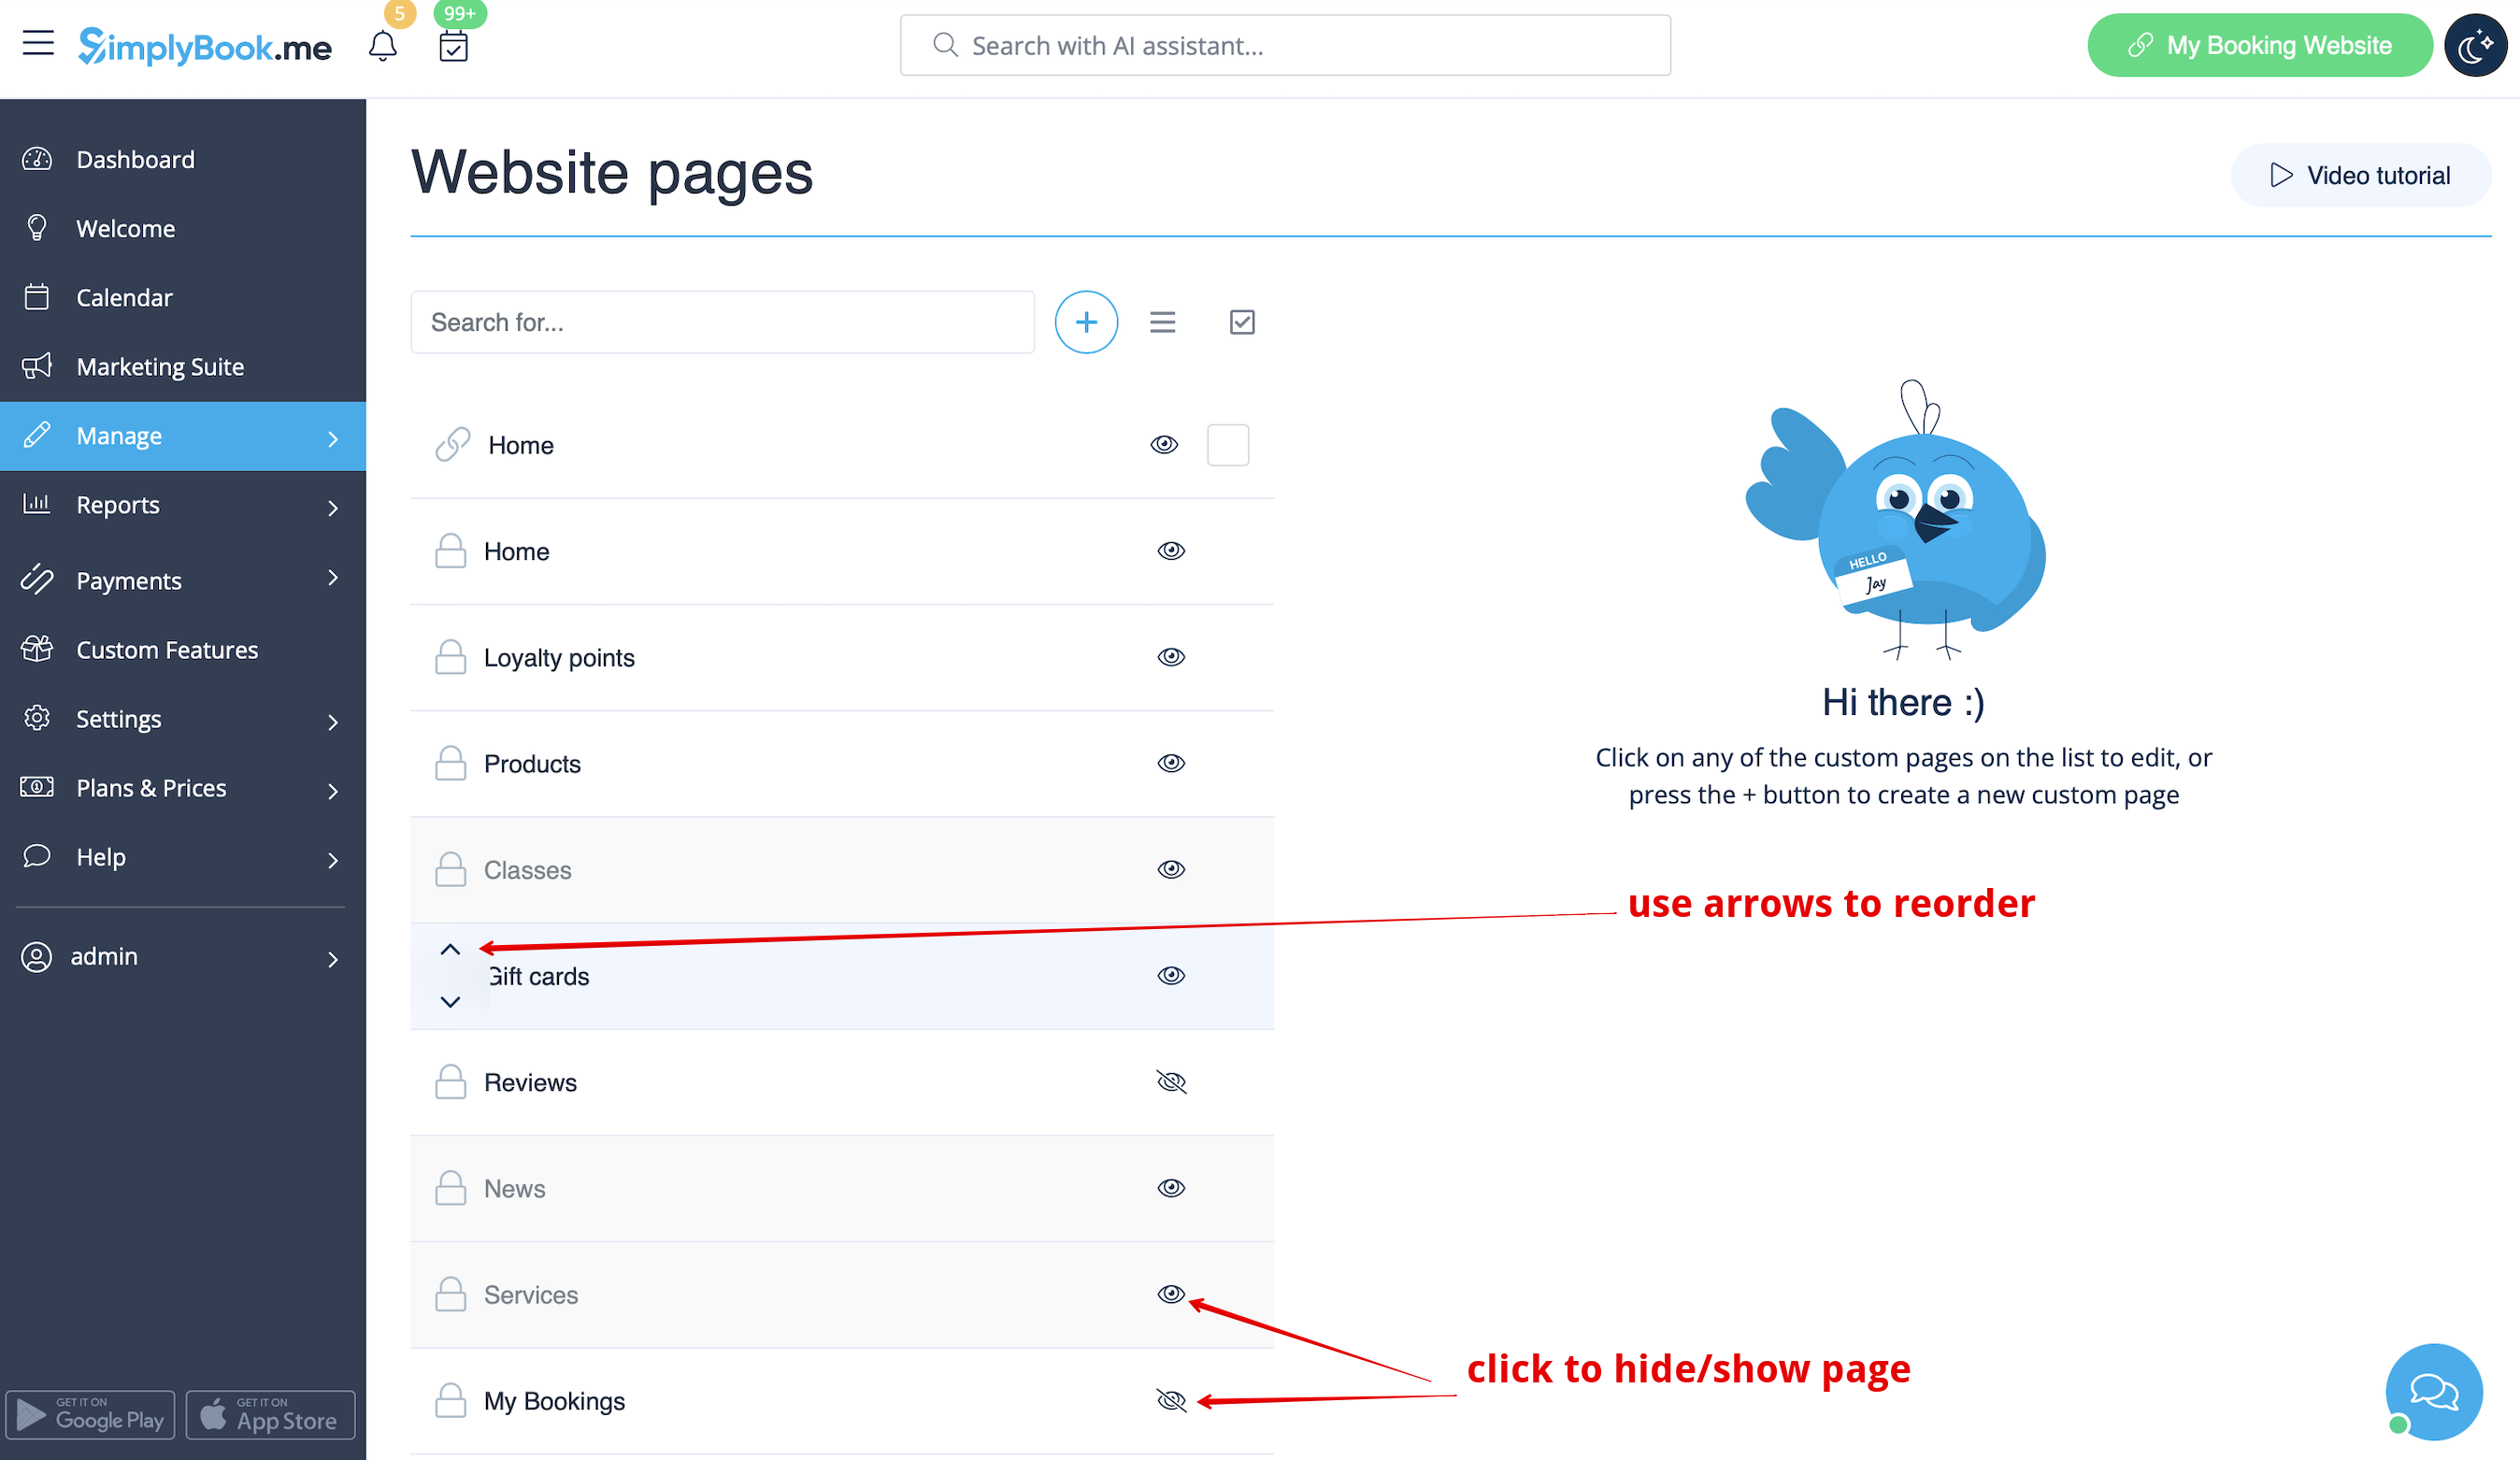
4. Mit den Pfeilen können Sie die Registerkarten neu anordnen und mit den "Augen"-Symbolen können Sie Seiten ein- und ausblenden.
Bitte beachten Sie, dass Sie auch nach dem Ausblenden einer Seite über einen direkten Link auf diese Seite zugreifen können.
5. Wenn Sie eine neue individuelle Seite hinzufügen möchten, klicken Sie bitte auf das "+"-Symbol am oberen Rand und wählen Sie die Option "Individuelle Seite hinzufügen".
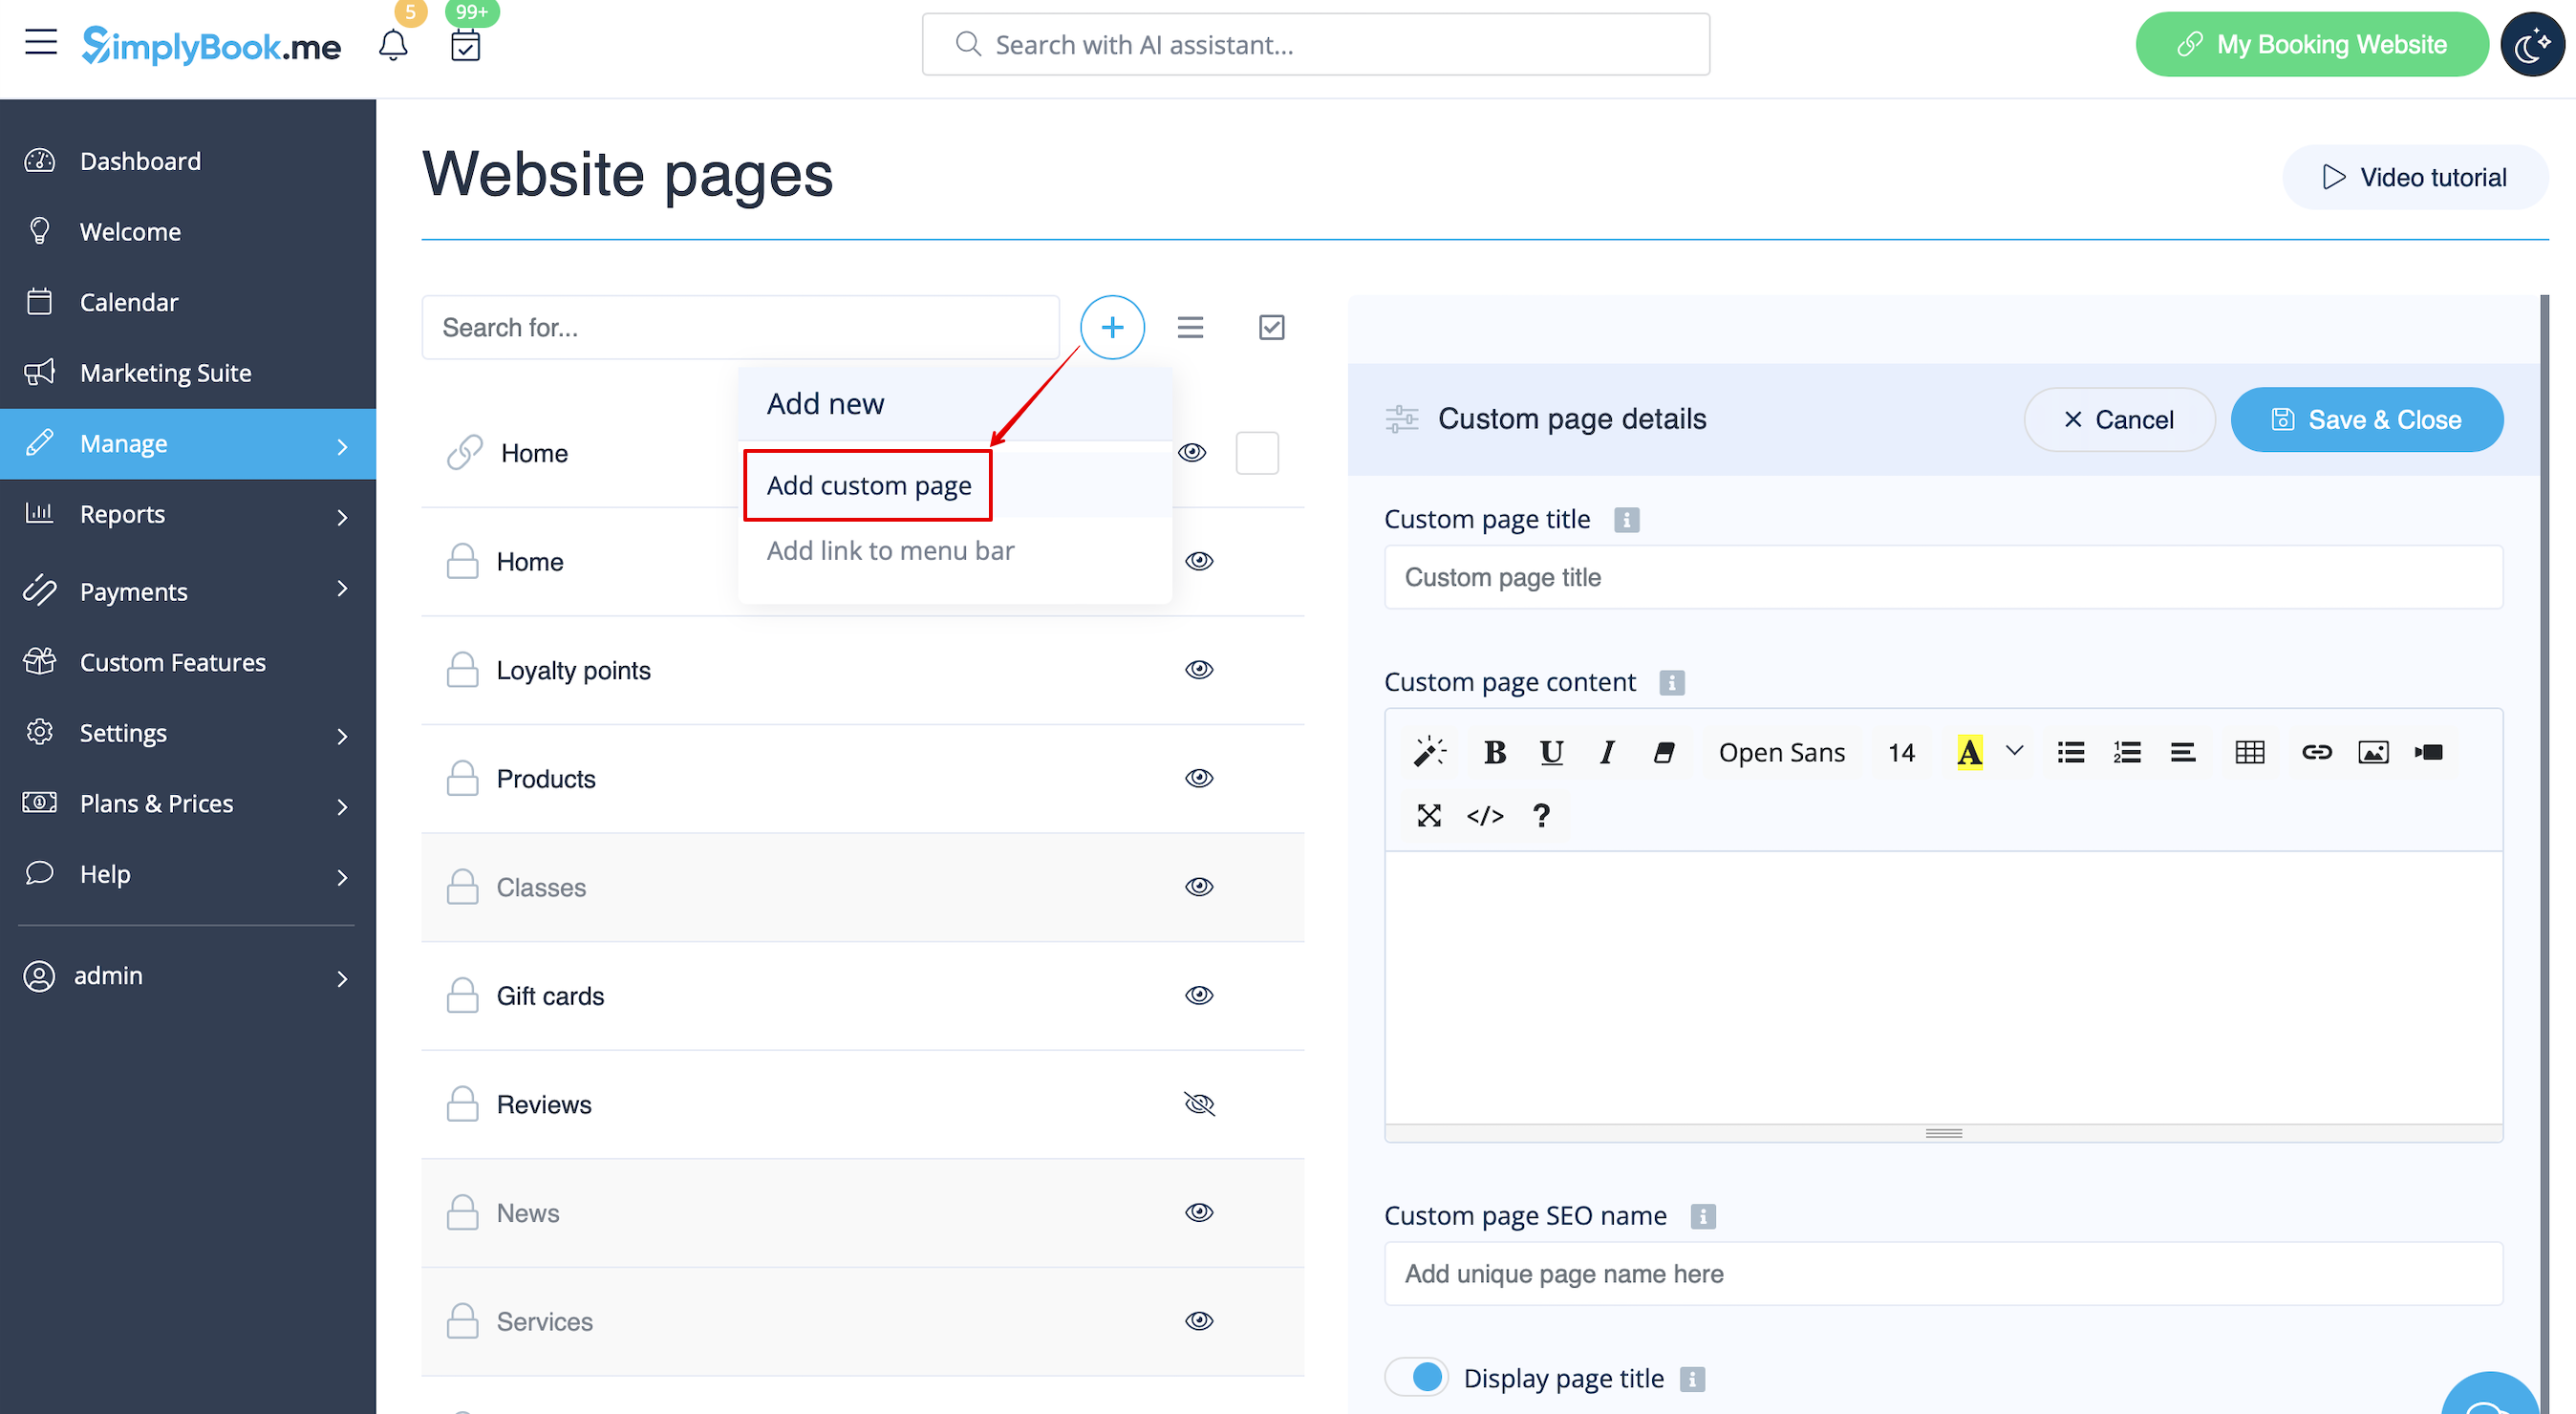
6. Auf der rechten Seite wird das Menü zur Seitenerstellung angezeigt. Bitte fügen Sie den Titel und den gewünschten Seiteninhalt hinzu.
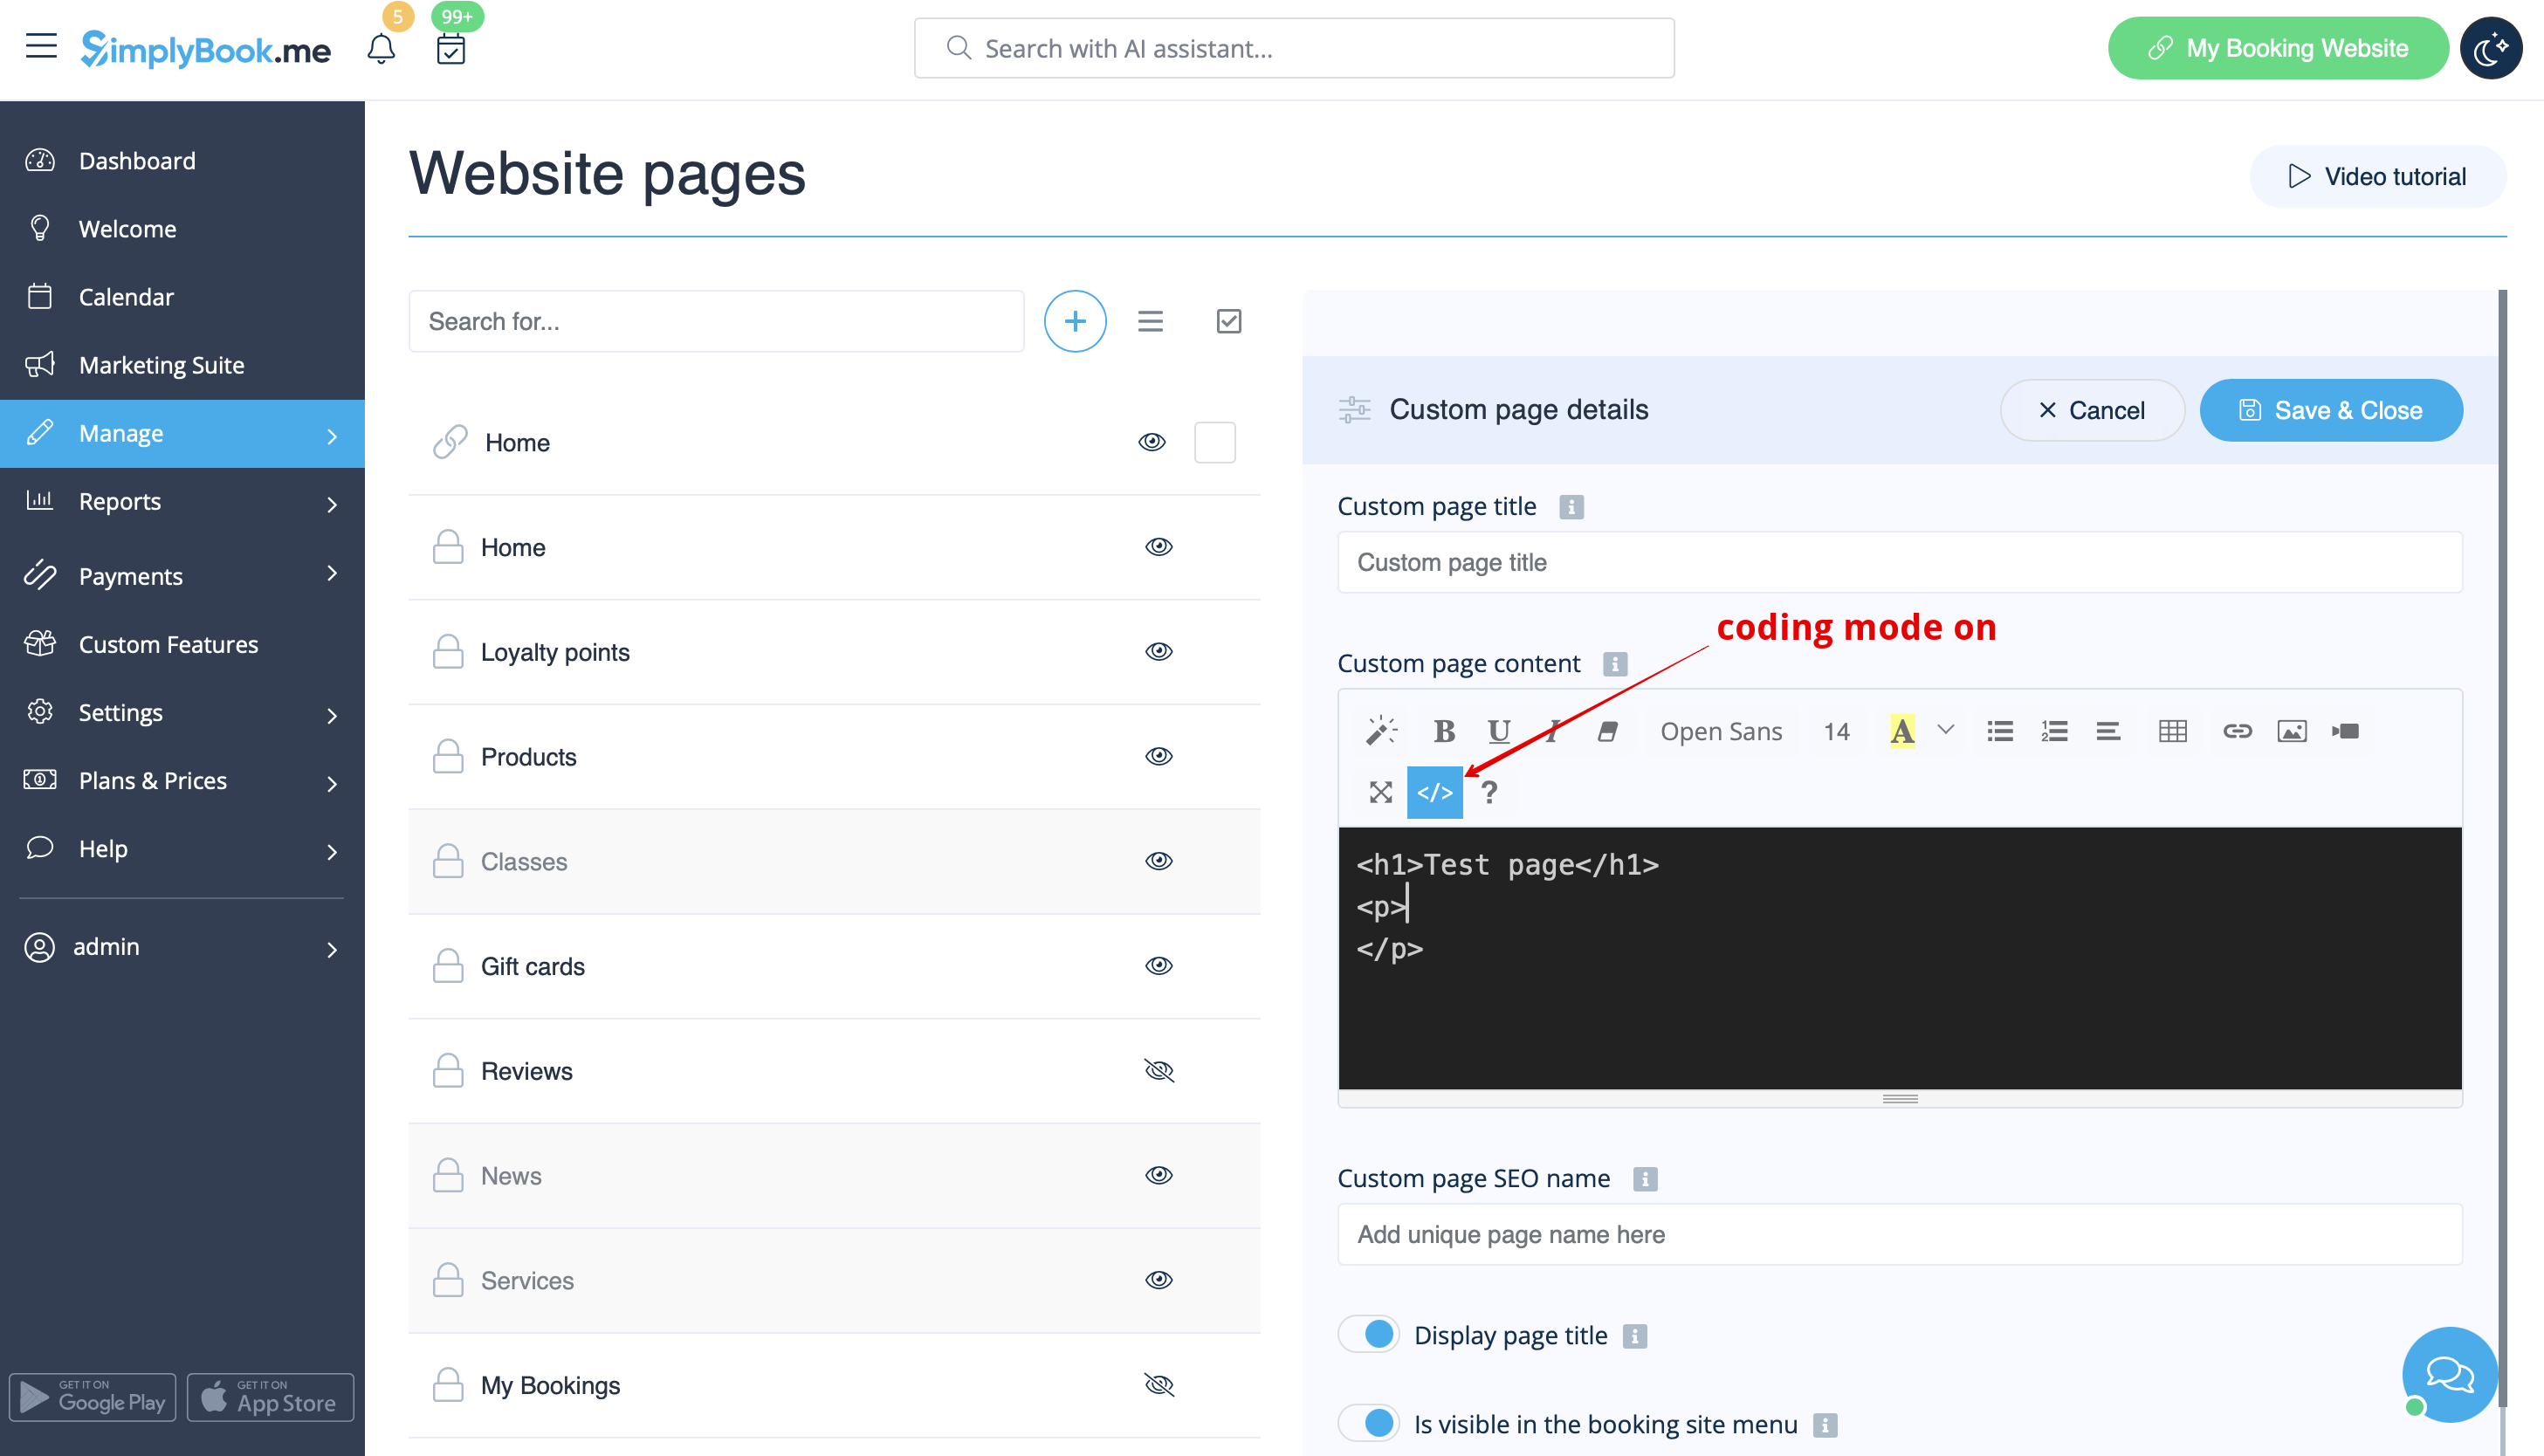
Sie können den eingebauten HTML-Editor verwenden, um Elemente hinzuzufügen, oder wenn Sie über HTML-Kenntnisse verfügen, können Sie mit dem Symbol "</>" in den Code-Modus wechseln.
Bitte beachten Sie, dass Sie den Codierungsmodus vor dem Speichern der Seite ausschalten müssen, damit der Code korrekt gespeichert wird.
Wie man Links hinzufügt
Es kann vorkommen, dass Sie Ihre Kunden auf eine andere Seite umleiten müssen (z.B. Ihre Website, etc.).
In diesem Fall wird Ihnen "Link zur Menüleiste hinzufügen" helfen.
1. Klicken Sie auf das "+"-Symbol am oberen Rand und wählen Sie die Option "Link zur Menüleiste hinzufügen".
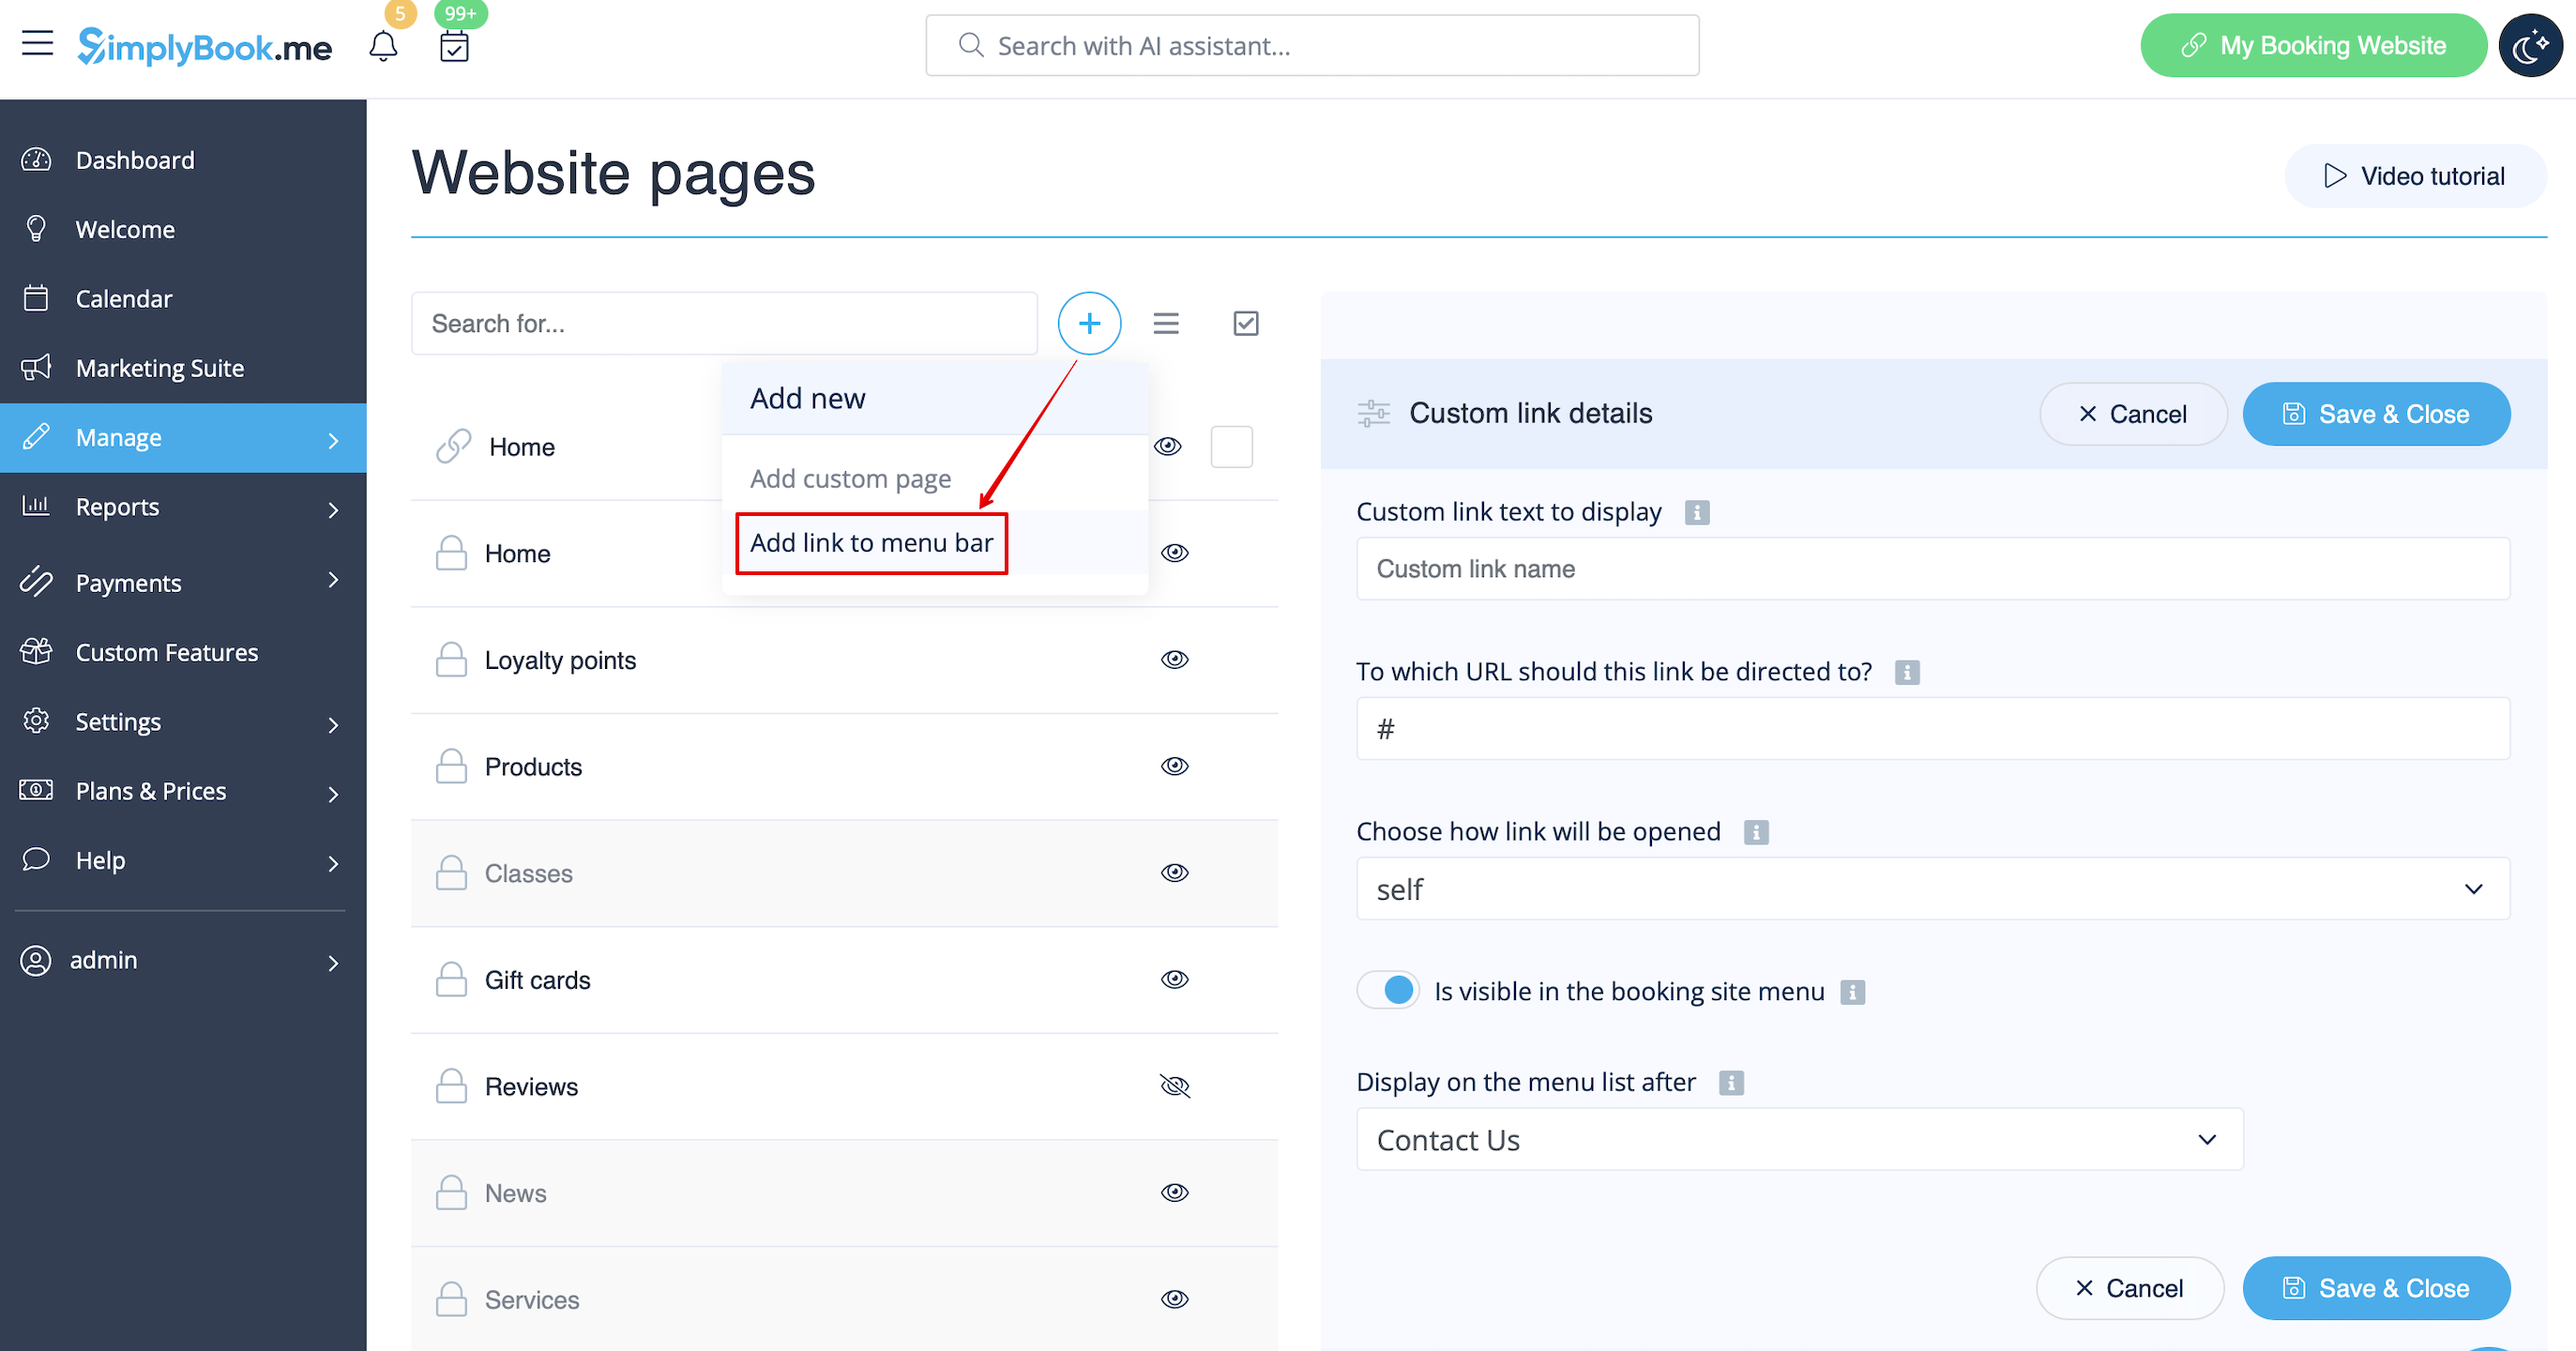
2. Fügen Sie den Titel, den Sie in der Kopfzeile der Buchungsseite anzeigen möchten, in das Feld "Benutzerdefinierter Linktext, der angezeigt werden soll" ein und geben Sie den Link selbst in dem entsprechenden Feld an.
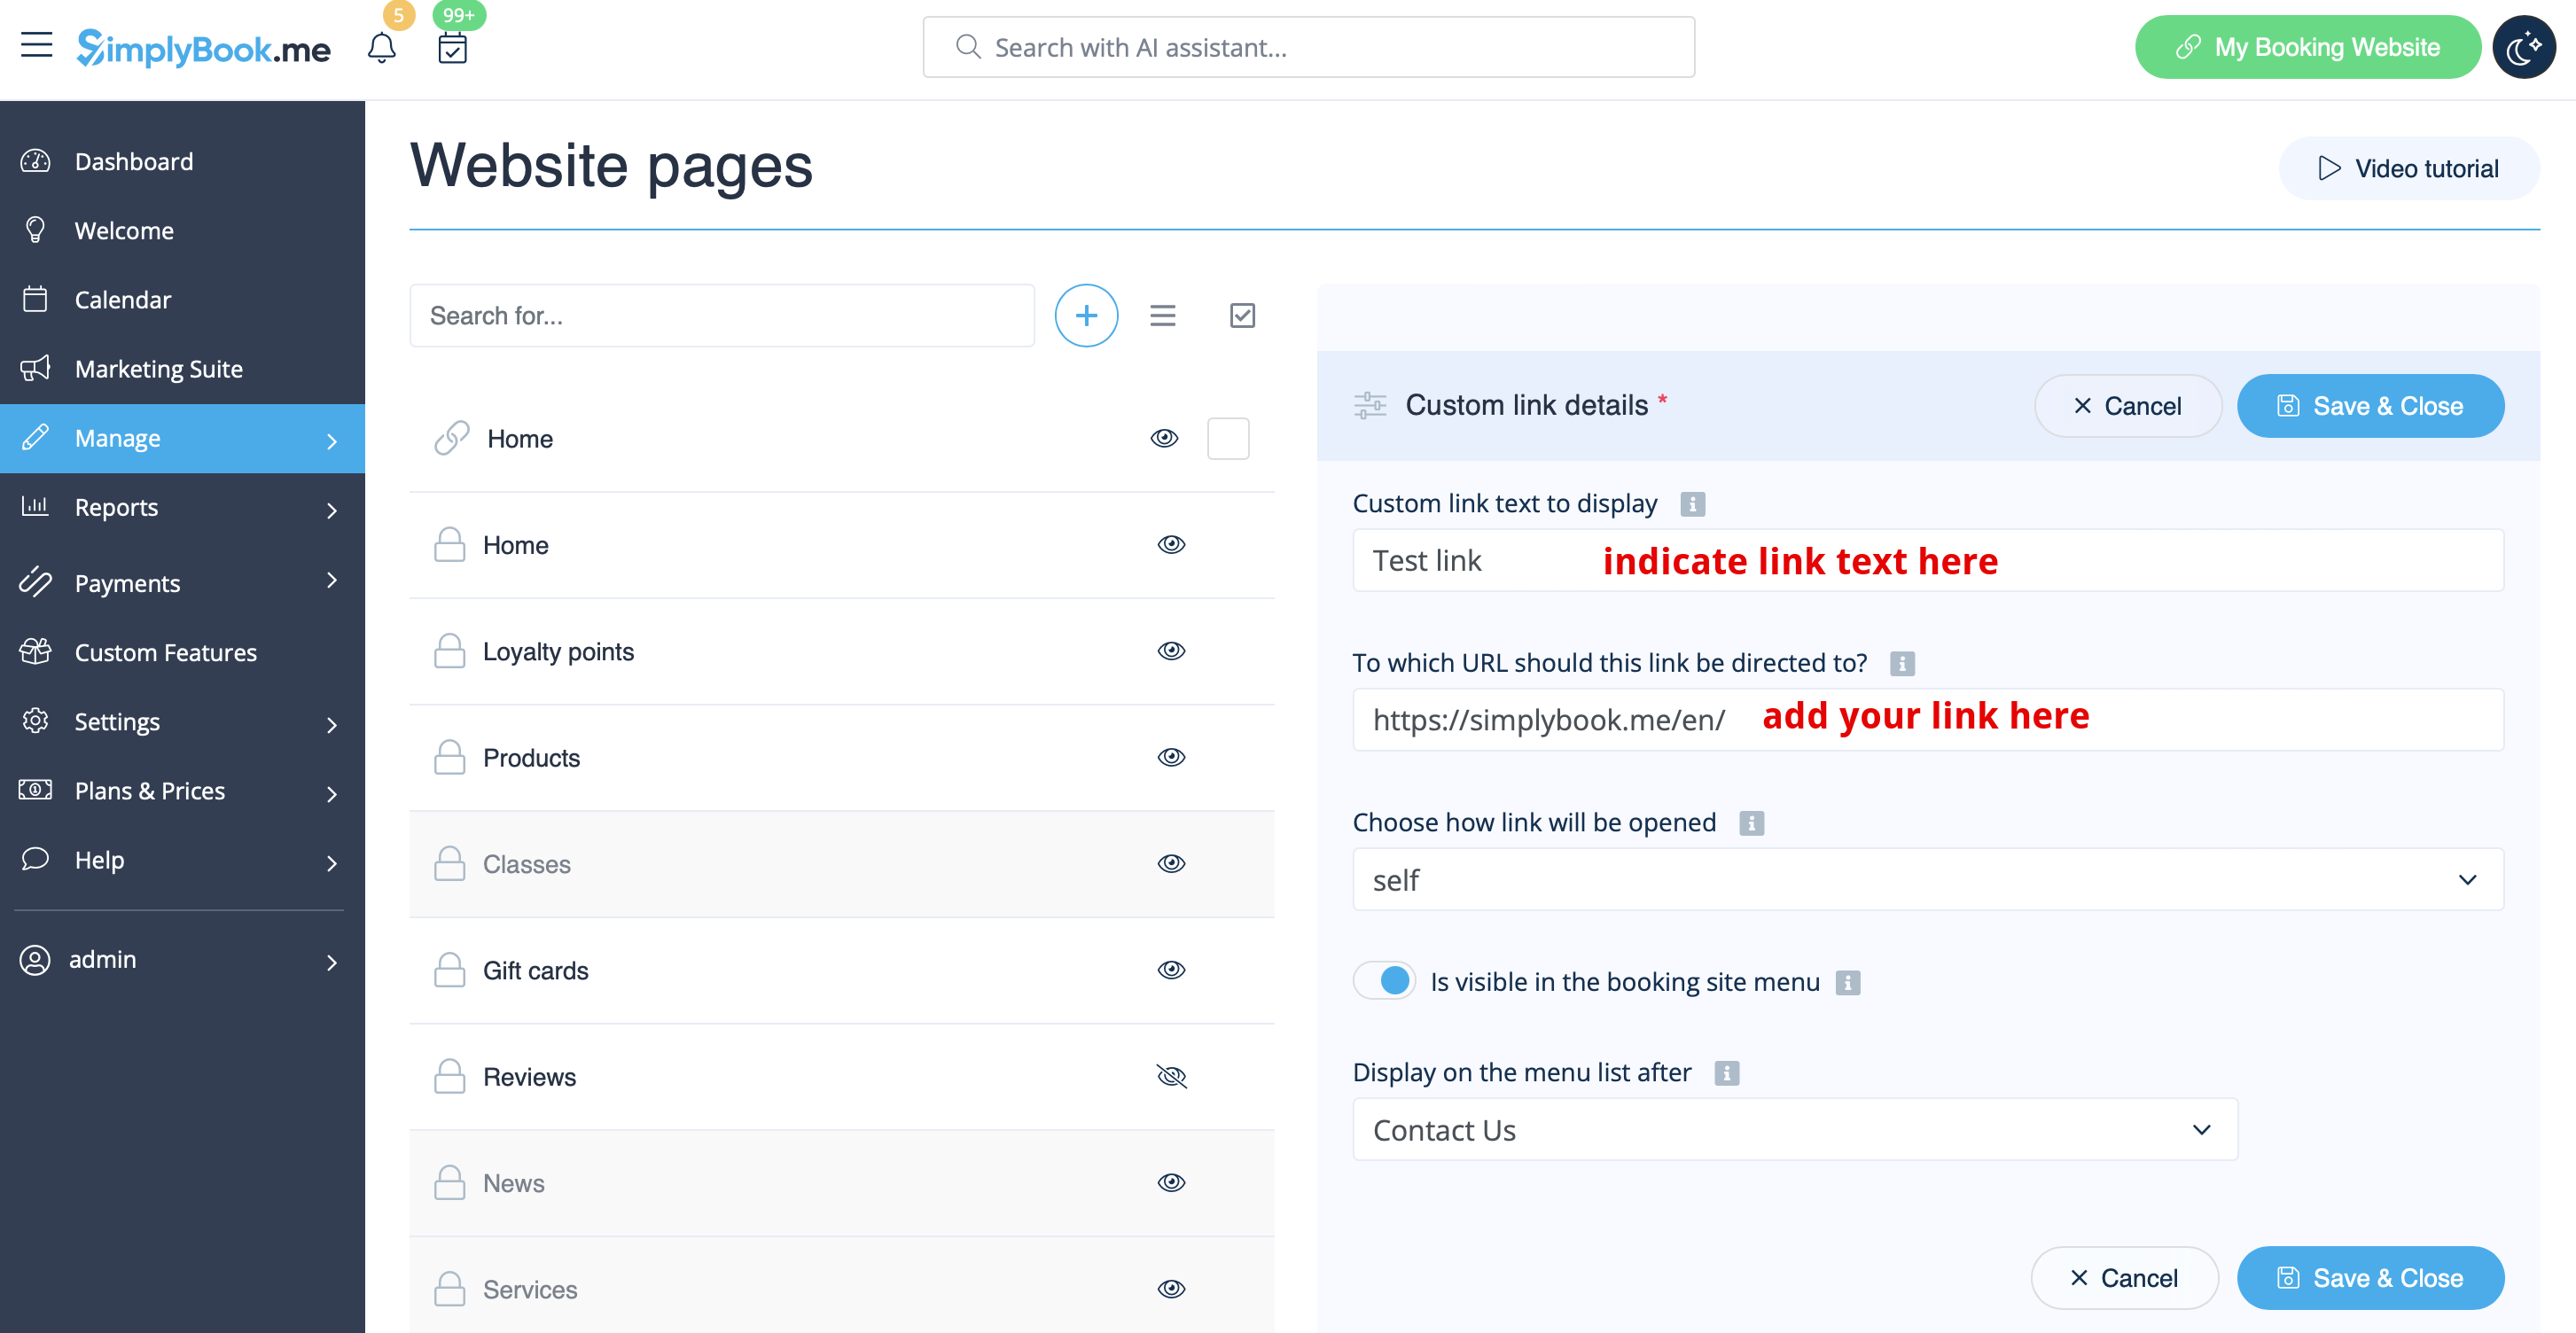
3. Sie können auch wählen, ob der Link in einem neuen Browser-Tab oder in demselben geöffnet werden soll.
Dazu wählen Sie bitte "selbst", wenn die Seite im gleichen Tab geöffnet werden soll, oder "leer", wenn der Link in einem separaten Tab geöffnet werden soll, in der Einstellung "Wählen Sie, wie der Link geöffnet werden soll".