From SimplyBook.me
Importing a new version from external source |
Importing a new version from external source |
||
| Line 10: | Line 10: | ||
'''How to use this option:''' | '''How to use this option:''' | ||
:1. Enable "Import Clients" custom feature on your Custom features page: | :1. Enable "Import Clients" custom feature on your Custom features page: | ||
[[File:Import clients enable path | [[File:Import clients enable path redesigned.png|1200px | center|link=https://help.simplybook.me/images/5/55/Import_clients_enable_path_redesigned.png]] | ||
<br><br> | <br><br> | ||
:2. Prepare your Excel file. | :2. Prepare your Excel file. | ||
| Line 18: | Line 18: | ||
<br><br> | <br><br> | ||
:3. Go to Manage//Clients//Import from CSV or simply click on "Settings" near this custom feature. | :3. Go to Manage//Clients//Import from CSV or simply click on "Settings" near this custom feature. | ||
[[ File:Import | [[ File:Import csv file path redesigned.png|1200px | center|link=https://help.simplybook.me/images/c/cb/Import_csv_file_path_redesigned.png]] | ||
<br><br> | <br><br> | ||
:4. Press "Choose file" and select the prepared file. | :4. Press "Choose file" and select the prepared file. | ||
[[File:Import | [[File:Import page redesigned.png|1200px| center|link=https://help.simplybook.me/images/0/06/Import_page_redesigned.png]] | ||
<br><br> | <br><br> | ||
:5. Assign values to the columns from drop-down lists in the upper bar (above each column, marked with black arrows). Assign "name", "email" and "phone". | :5. Assign values to the columns from drop-down lists in the upper bar (above each column, marked with black arrows). Assign "name", "email" and "phone".<br> | ||
[[File: | :(if you are using [[Special:MyLanguage/Client_Fields_Custom_Feature|Client Fields Custom Feature]] you can also import some of the forms values) | ||
[[File:Assign values to columns import redesigned.png|1200px | center|link=https://help.simplybook.me/images/b/bf/Assign_values_to_columns_import_redesigned.png]] | |||
<br><br> | <br><br> | ||
:6. Press "Confirm clients import". | :6. Press "Confirm clients import". | ||
Revision as of 15:31, 15 January 2025

Use this feature if you need to add the list of clients to your system with just several clicks. Simply upload a CSV file containing your clients data, then select headers for corresponding columns, and you will have an updated list of clients in your client register.
Free custom feature!
- Attention! It is forbidden to import a client list with emails and client information where the clients have not specifically granted you the right to do so.
- Please note that this feature is available with Standard and Premium subscriptions only(former Advanced, Gold and Platinum).
- It is only possible to import 500 clients by default. If you need to import more please contact support for details.
How to use this option:
- 1. Enable "Import Clients" custom feature on your Custom features page:

- 2. Prepare your Excel file.
- - No text above the list of clients should be written
- - Make sure all cells are correctly displayed
- - Save file in .csv format with comma separation.
- 3. Go to Manage//Clients//Import from CSV or simply click on "Settings" near this custom feature.

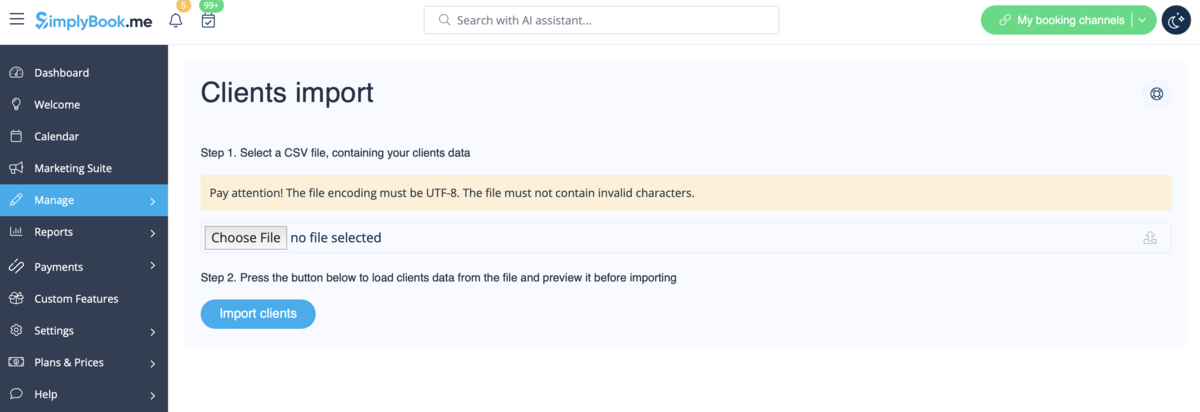
- 4. Press "Choose file" and select the prepared file.

- 5. Assign values to the columns from drop-down lists in the upper bar (above each column, marked with black arrows). Assign "name", "email" and "phone".
- (if you are using Client Fields Custom Feature you can also import some of the forms values)

- 6. Press "Confirm clients import".
- Please note that only 10 clients will be shown in preview, but after you import, all clients will be shown.
- If you can't import clients, please check the possible reasons
- 1. Format of .csv file is incorrect. It should be saved in .csv with comma or tab separation.
- 2. There is some text above the data or unnecessary columns that prevent successful import. Please delete the text.
- 3. Values are not assigned. Use drop-down menus above the columns to assign values "name", "email", "phone", etc.