From SimplyBook.me
No edit summary |
Marked this version for translation |
||
| Line 2: | Line 2: | ||
<translate> | <translate> | ||
<!--T:1--> | |||
{{#seo: | {{#seo: | ||
|title=First and Last Names - SimplyBook.me | |title=First and Last Names - SimplyBook.me | ||
| Line 12: | Line 13: | ||
<translate> | <translate> | ||
<!--T:2--> | |||
<br><br> | <br><br> | ||
:It may happen that you need to have separate fields for clients' first and last names during registration process. | :It may happen that you need to have separate fields for clients' first and last names during registration process. | ||
| Line 21: | Line 23: | ||
</translate> | </translate> | ||
<translate> | <translate> | ||
<!--T:3--> | |||
;'''How to use''' | ;'''How to use''' | ||
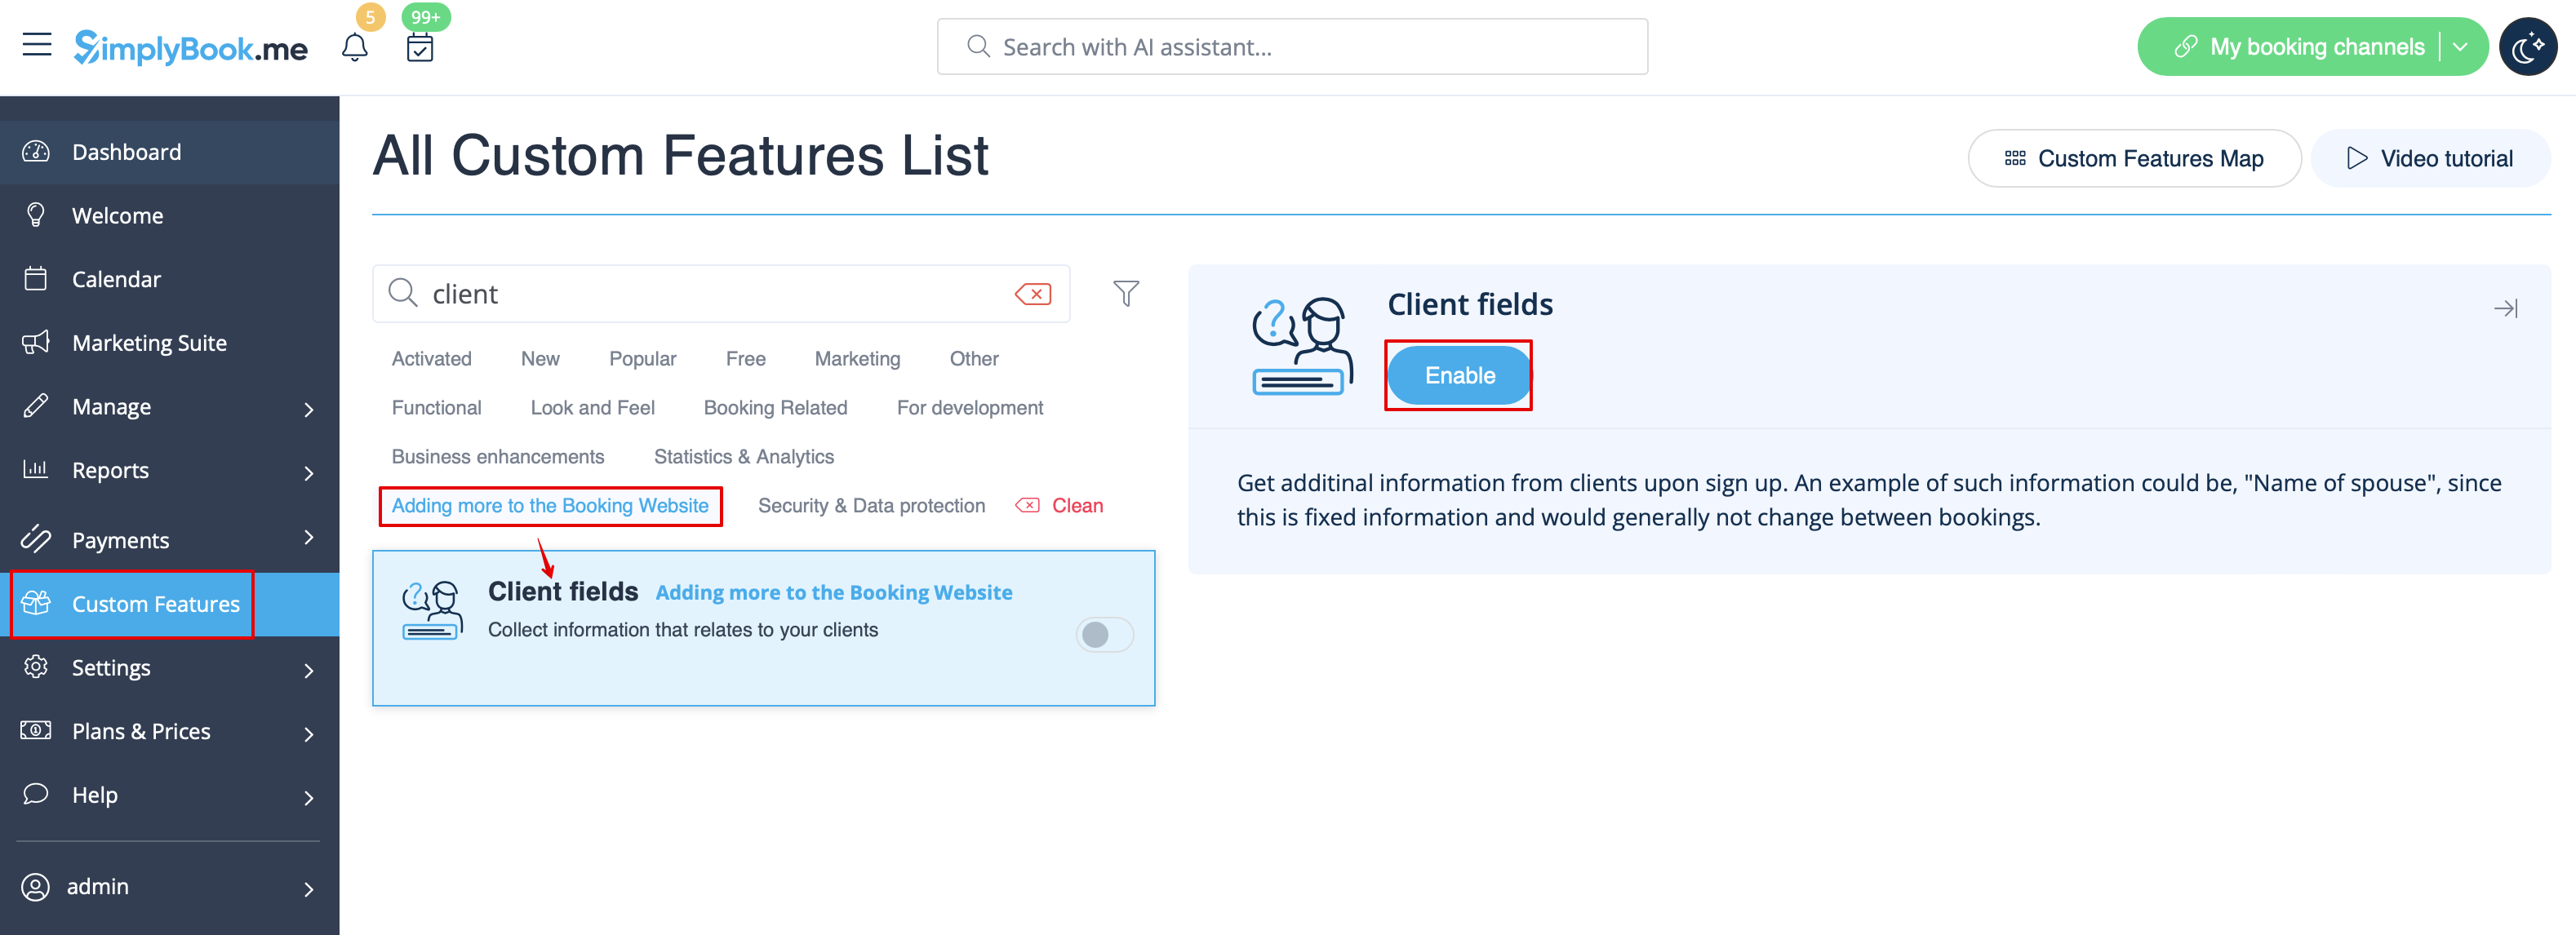
:1. Enable <span style="background-color:#d4f8e5; padding:5px; border-radius:5px;">Client Fields</span> custom feature on the <span style="background-color:#d4f8e5; padding:5px; border-radius:5px;">Custom Features</span> page. | :1. Enable <span style="background-color:#d4f8e5; padding:5px; border-radius:5px;">Client Fields</span> custom feature on the <span style="background-color:#d4f8e5; padding:5px; border-radius:5px;">Custom Features</span> page. | ||
| Line 32: | Line 35: | ||
</translate> | </translate> | ||
<translate> | <translate> | ||
<!--T:4--> | |||
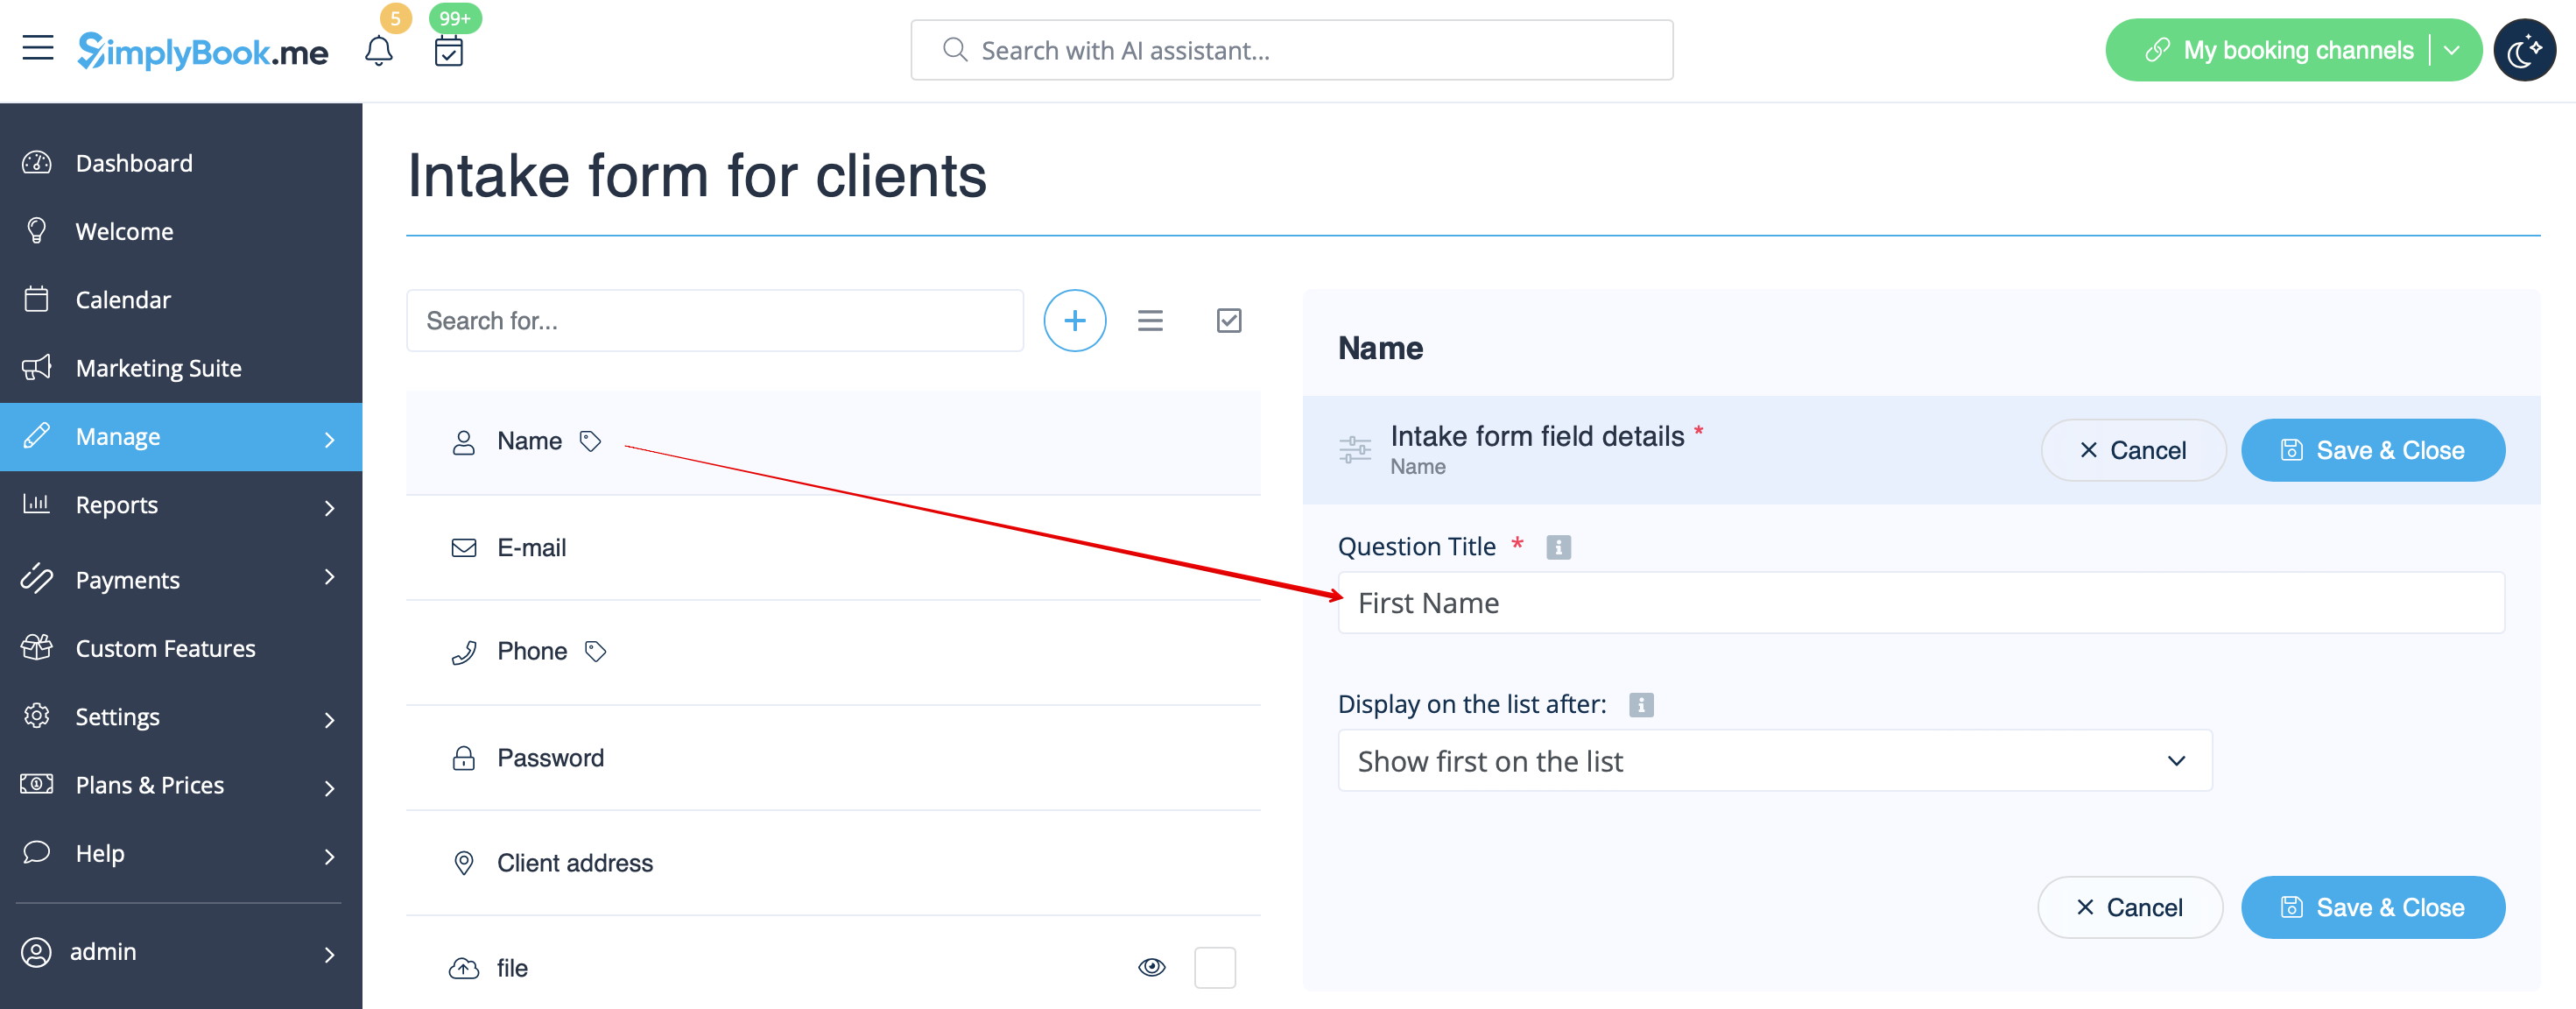
:3. You will see default registration fields there. Select the first one called <span style="background-color:#d4f8e5; padding:5px; border-radius:5px;">Name</span> and rename it to <span style="background-color:#d4f8e5; padding:5px; border-radius:5px;">First Name.</span> Save. | :3. You will see default registration fields there. Select the first one called <span style="background-color:#d4f8e5; padding:5px; border-radius:5px;">Name</span> and rename it to <span style="background-color:#d4f8e5; padding:5px; border-radius:5px;">First Name.</span> Save. | ||
[[File:Rename name to first name redesigned.png|1200px|border|center|link=https://help.simplybook.me/images/6/64/Rename_name_to_first_name_redesigned.png]] | [[File:Rename name to first name redesigned.png|1200px|border|center|link=https://help.simplybook.me/images/6/64/Rename_name_to_first_name_redesigned.png]] | ||
| Line 42: | Line 46: | ||
</translate> | </translate> | ||
<translate> | <translate> | ||
<!--T:5--> | |||
:5. Select its <span style="background-color:#d4f8e5; padding:5px; border-radius:5px;">position</span> to be after First Name and save. | :5. Select its <span style="background-color:#d4f8e5; padding:5px; border-radius:5px;">position</span> to be after First Name and save. | ||
:Or if you have already saved the field use <span style="background-color:#d4f8e5; padding:5px; border-radius:5px;">the arrows</span> to re-order. | :Or if you have already saved the field use <span style="background-color:#d4f8e5; padding:5px; border-radius:5px;">the arrows</span> to re-order. | ||
| Line 49: | Line 54: | ||
</translate> | </translate> | ||
<translate> | <translate> | ||
<!--T:6--> | |||
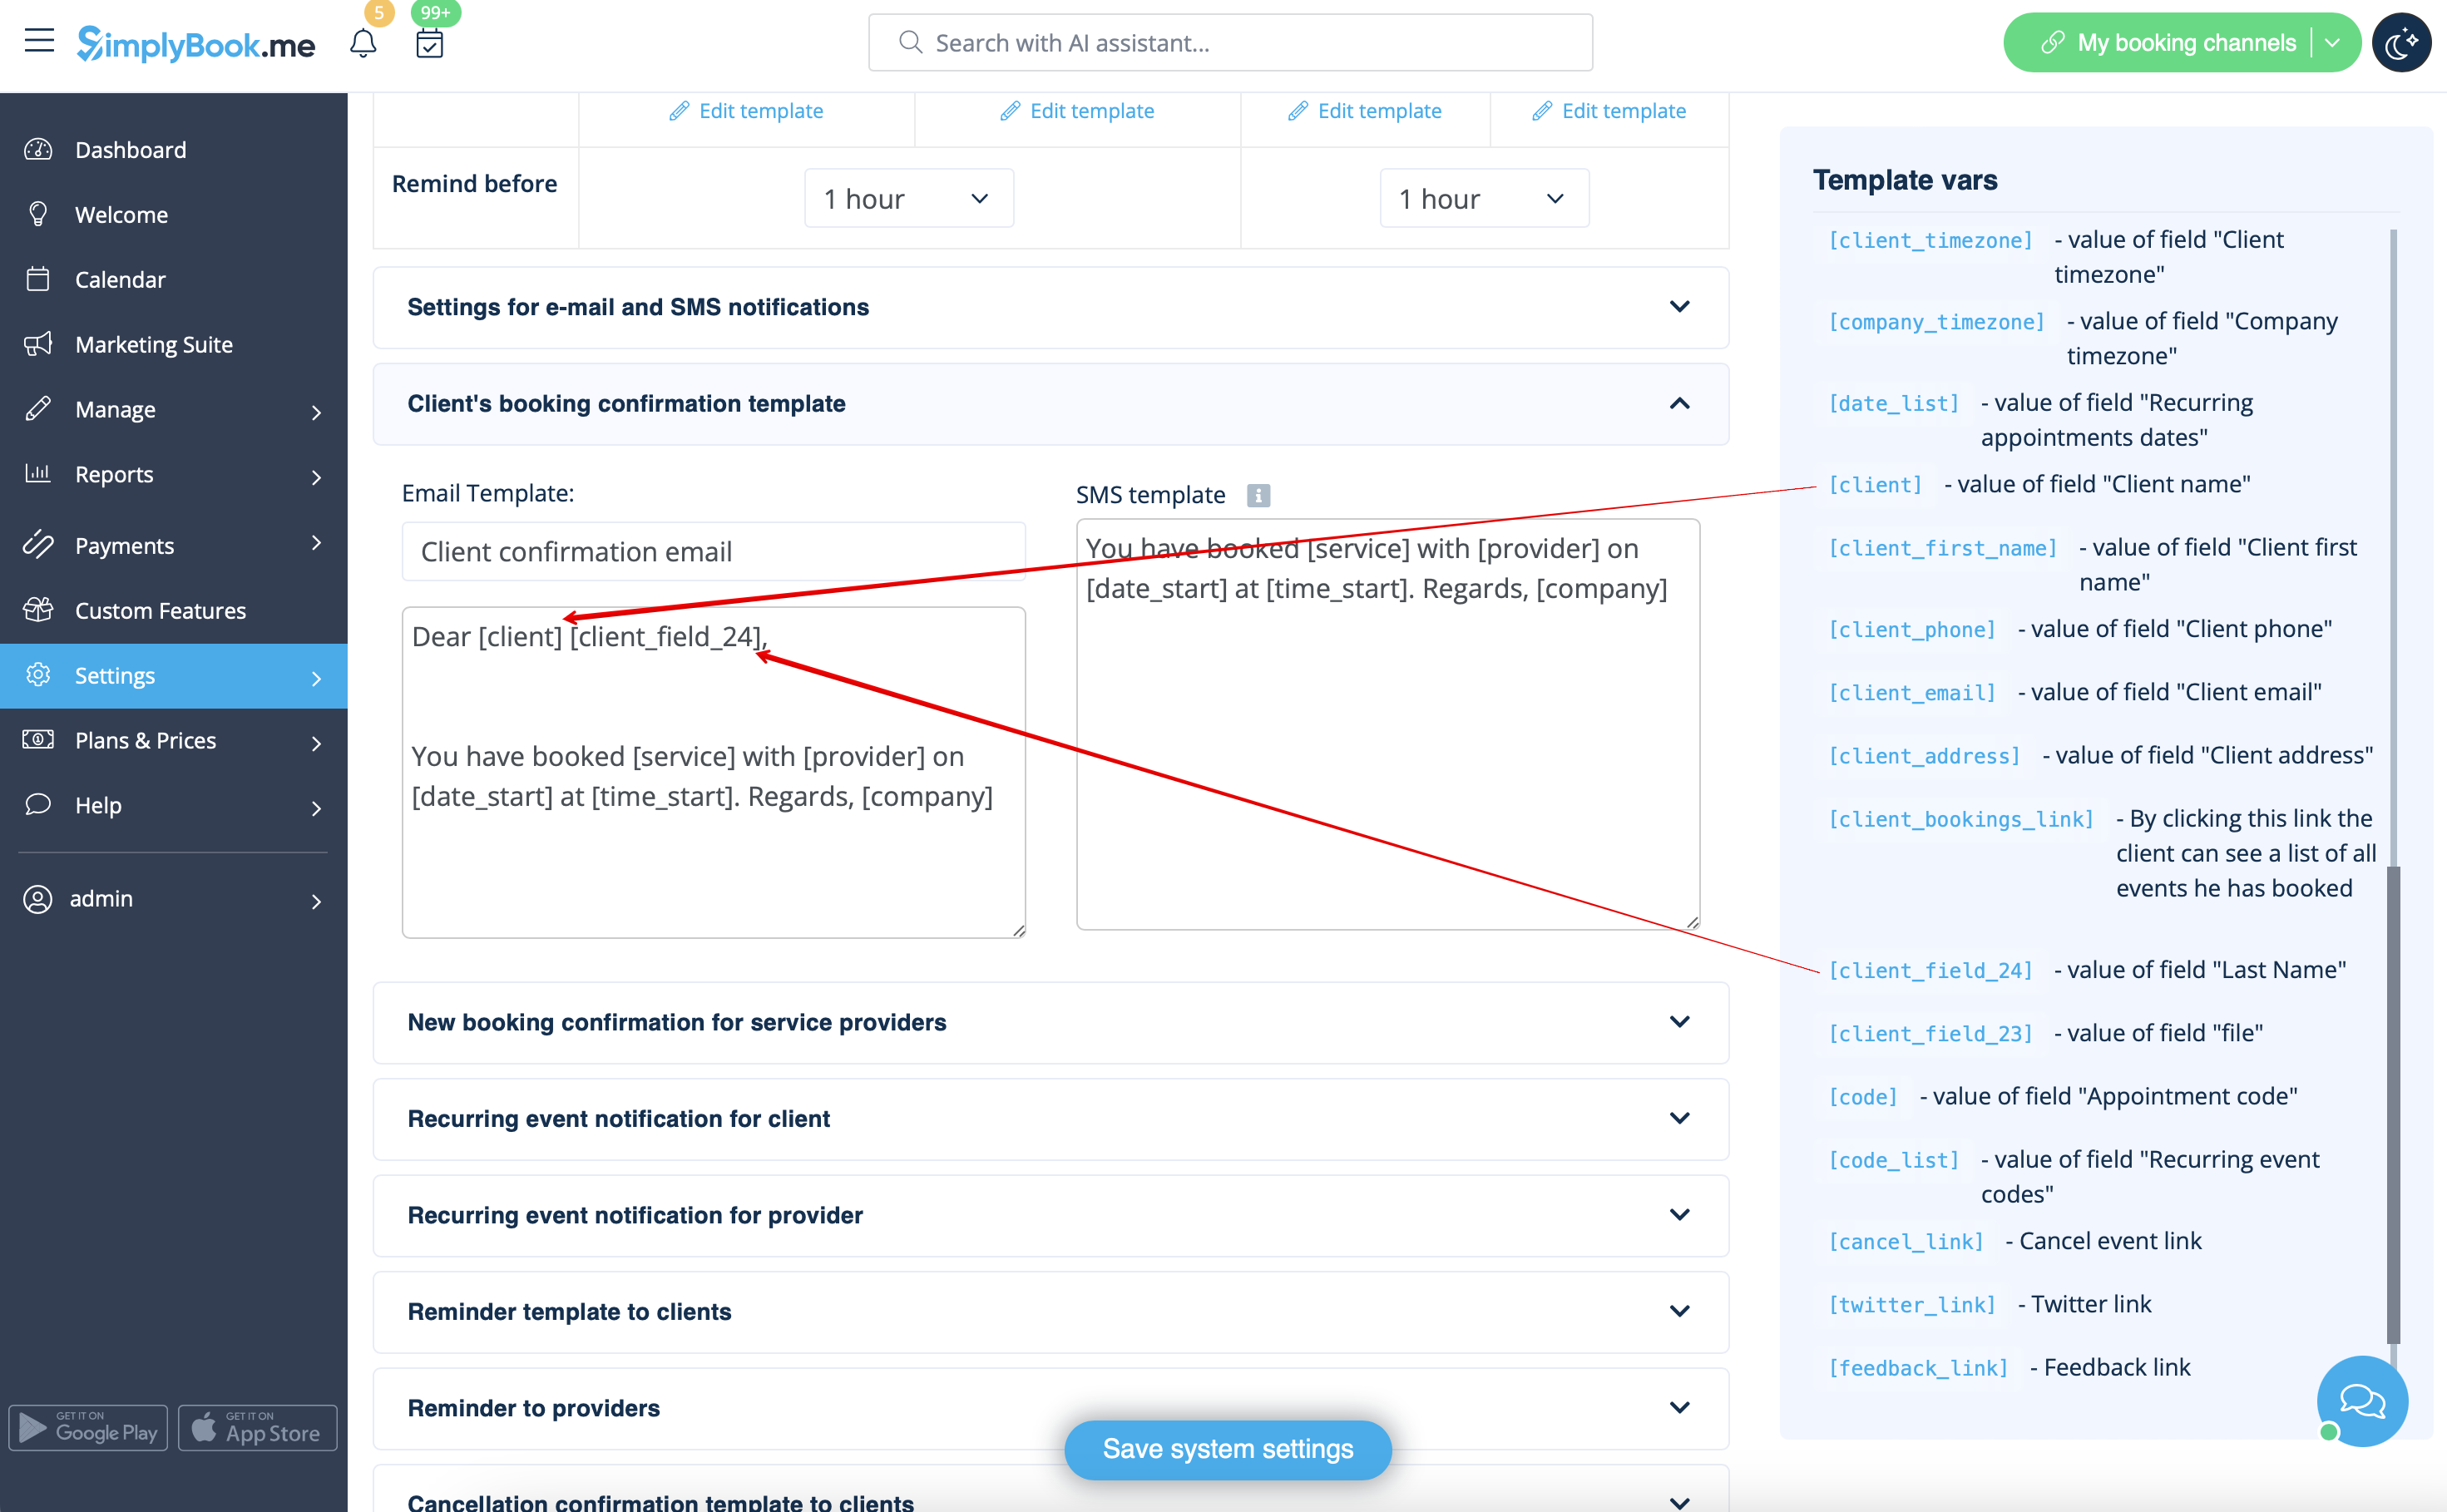
:6. (optional) Add the desired variables to the notifications templates in <span style="background-color:#d4f8e5; padding:5px; border-radius:5px;">Settings</span> -> <span style="background-color:#d4f8e5; padding:5px; border-radius:5px;">Email and SMS settings</span> (or <span style="background-color:#cdeffc; padding:5px; border-radius:5px;">[[Flexible_Notifications_custom_feature|Flexible notifications]]</span> feature if you have customized them per service/provider). | :6. (optional) Add the desired variables to the notifications templates in <span style="background-color:#d4f8e5; padding:5px; border-radius:5px;">Settings</span> -> <span style="background-color:#d4f8e5; padding:5px; border-radius:5px;">Email and SMS settings</span> (or <span style="background-color:#cdeffc; padding:5px; border-radius:5px;">[[Flexible_Notifications_custom_feature|Flexible notifications]]</span> feature if you have customized them per service/provider). | ||
| Line 54: | Line 60: | ||
<translate> | <translate> | ||
<!--T:7--> | |||
::For example, you can make booking related more personal by using only first name in the greeting. | ::For example, you can make booking related more personal by using only first name in the greeting. | ||
::(here we are using <span style="background-color:#d4f8e5; padding:5px; border-radius:5px;">default [client] variable</span> as we have simply renamed the default field in step #3) | ::(here we are using <span style="background-color:#d4f8e5; padding:5px; border-radius:5px;">default [client] variable</span> as we have simply renamed the default field in step #3) | ||
| Line 61: | Line 68: | ||
</translate> | </translate> | ||
<translate> | <translate> | ||
<!--T:8--> | |||
::Or sound more official with only last name use. | ::Or sound more official with only last name use. | ||
::<span style="background-color:#d4f8e5; padding:5px; border-radius:5px;">(client field</span> is used here, taken from step #4) | ::<span style="background-color:#d4f8e5; padding:5px; border-radius:5px;">(client field</span> is used here, taken from step #4) | ||
| Line 68: | Line 76: | ||
</translate> | </translate> | ||
<translate> | <translate> | ||
<!--T:9--> | |||
::Or even use <span style="background-color:#d4f8e5; padding:5px; border-radius:5px;">both</span> if you like. | ::Or even use <span style="background-color:#d4f8e5; padding:5px; border-radius:5px;">both</span> if you like. | ||
::(default variable and client form combined) | ::(default variable and client form combined) | ||
Revision as of 12:10, 15 May 2025
- It may happen that you need to have separate fields for clients' first and last names during registration process.
- Now it is possible with our Client Fields feature and new reordering functionality.
- Please note! This setup is available with Client login feature enabled.
- How to use
- 1. Enable Client Fields custom feature on the Custom Features page.
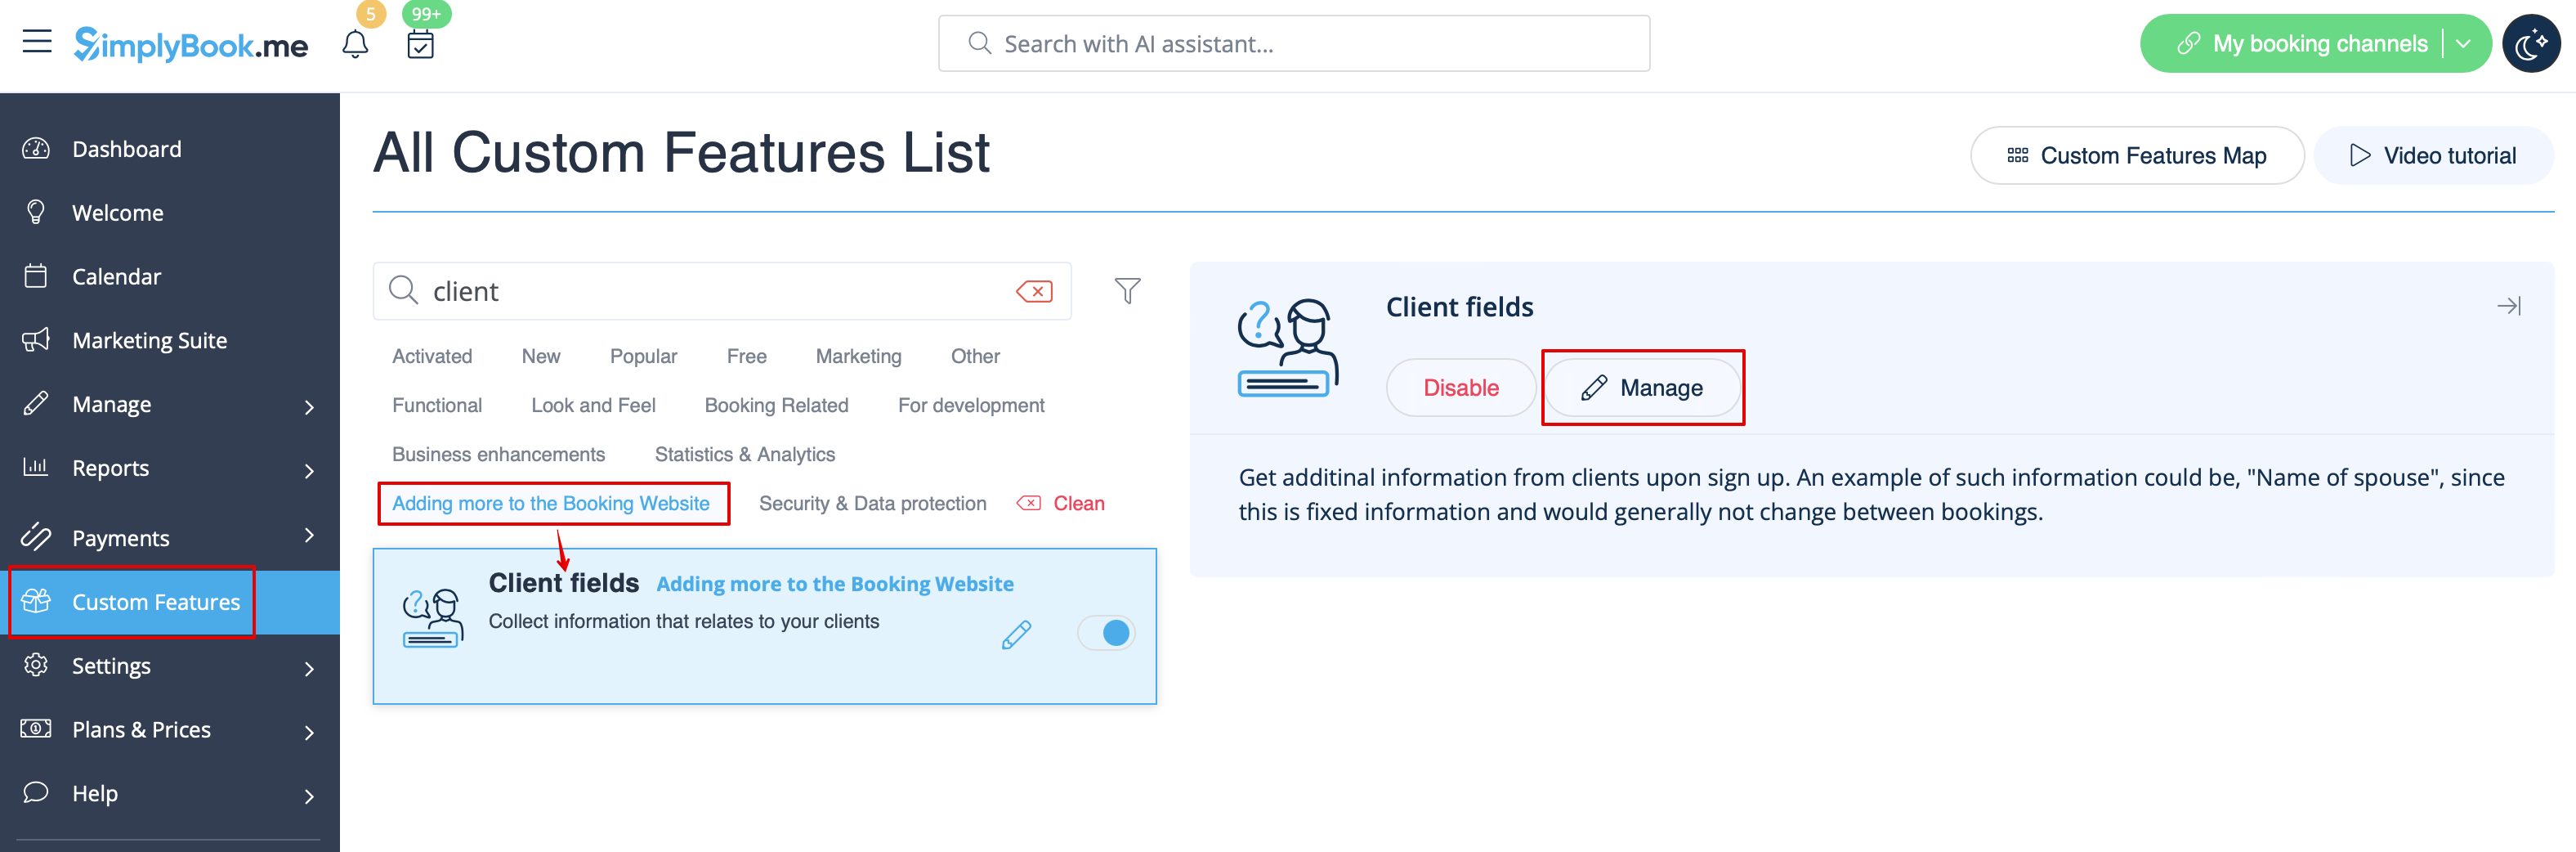
- 2. Go to its settings by clicking on Manage link.
- Or navigate to Manage -> Client fields in the left-side menu.
- 3. You will see default registration fields there. Select the first one called Name and rename it to First Name. Save.
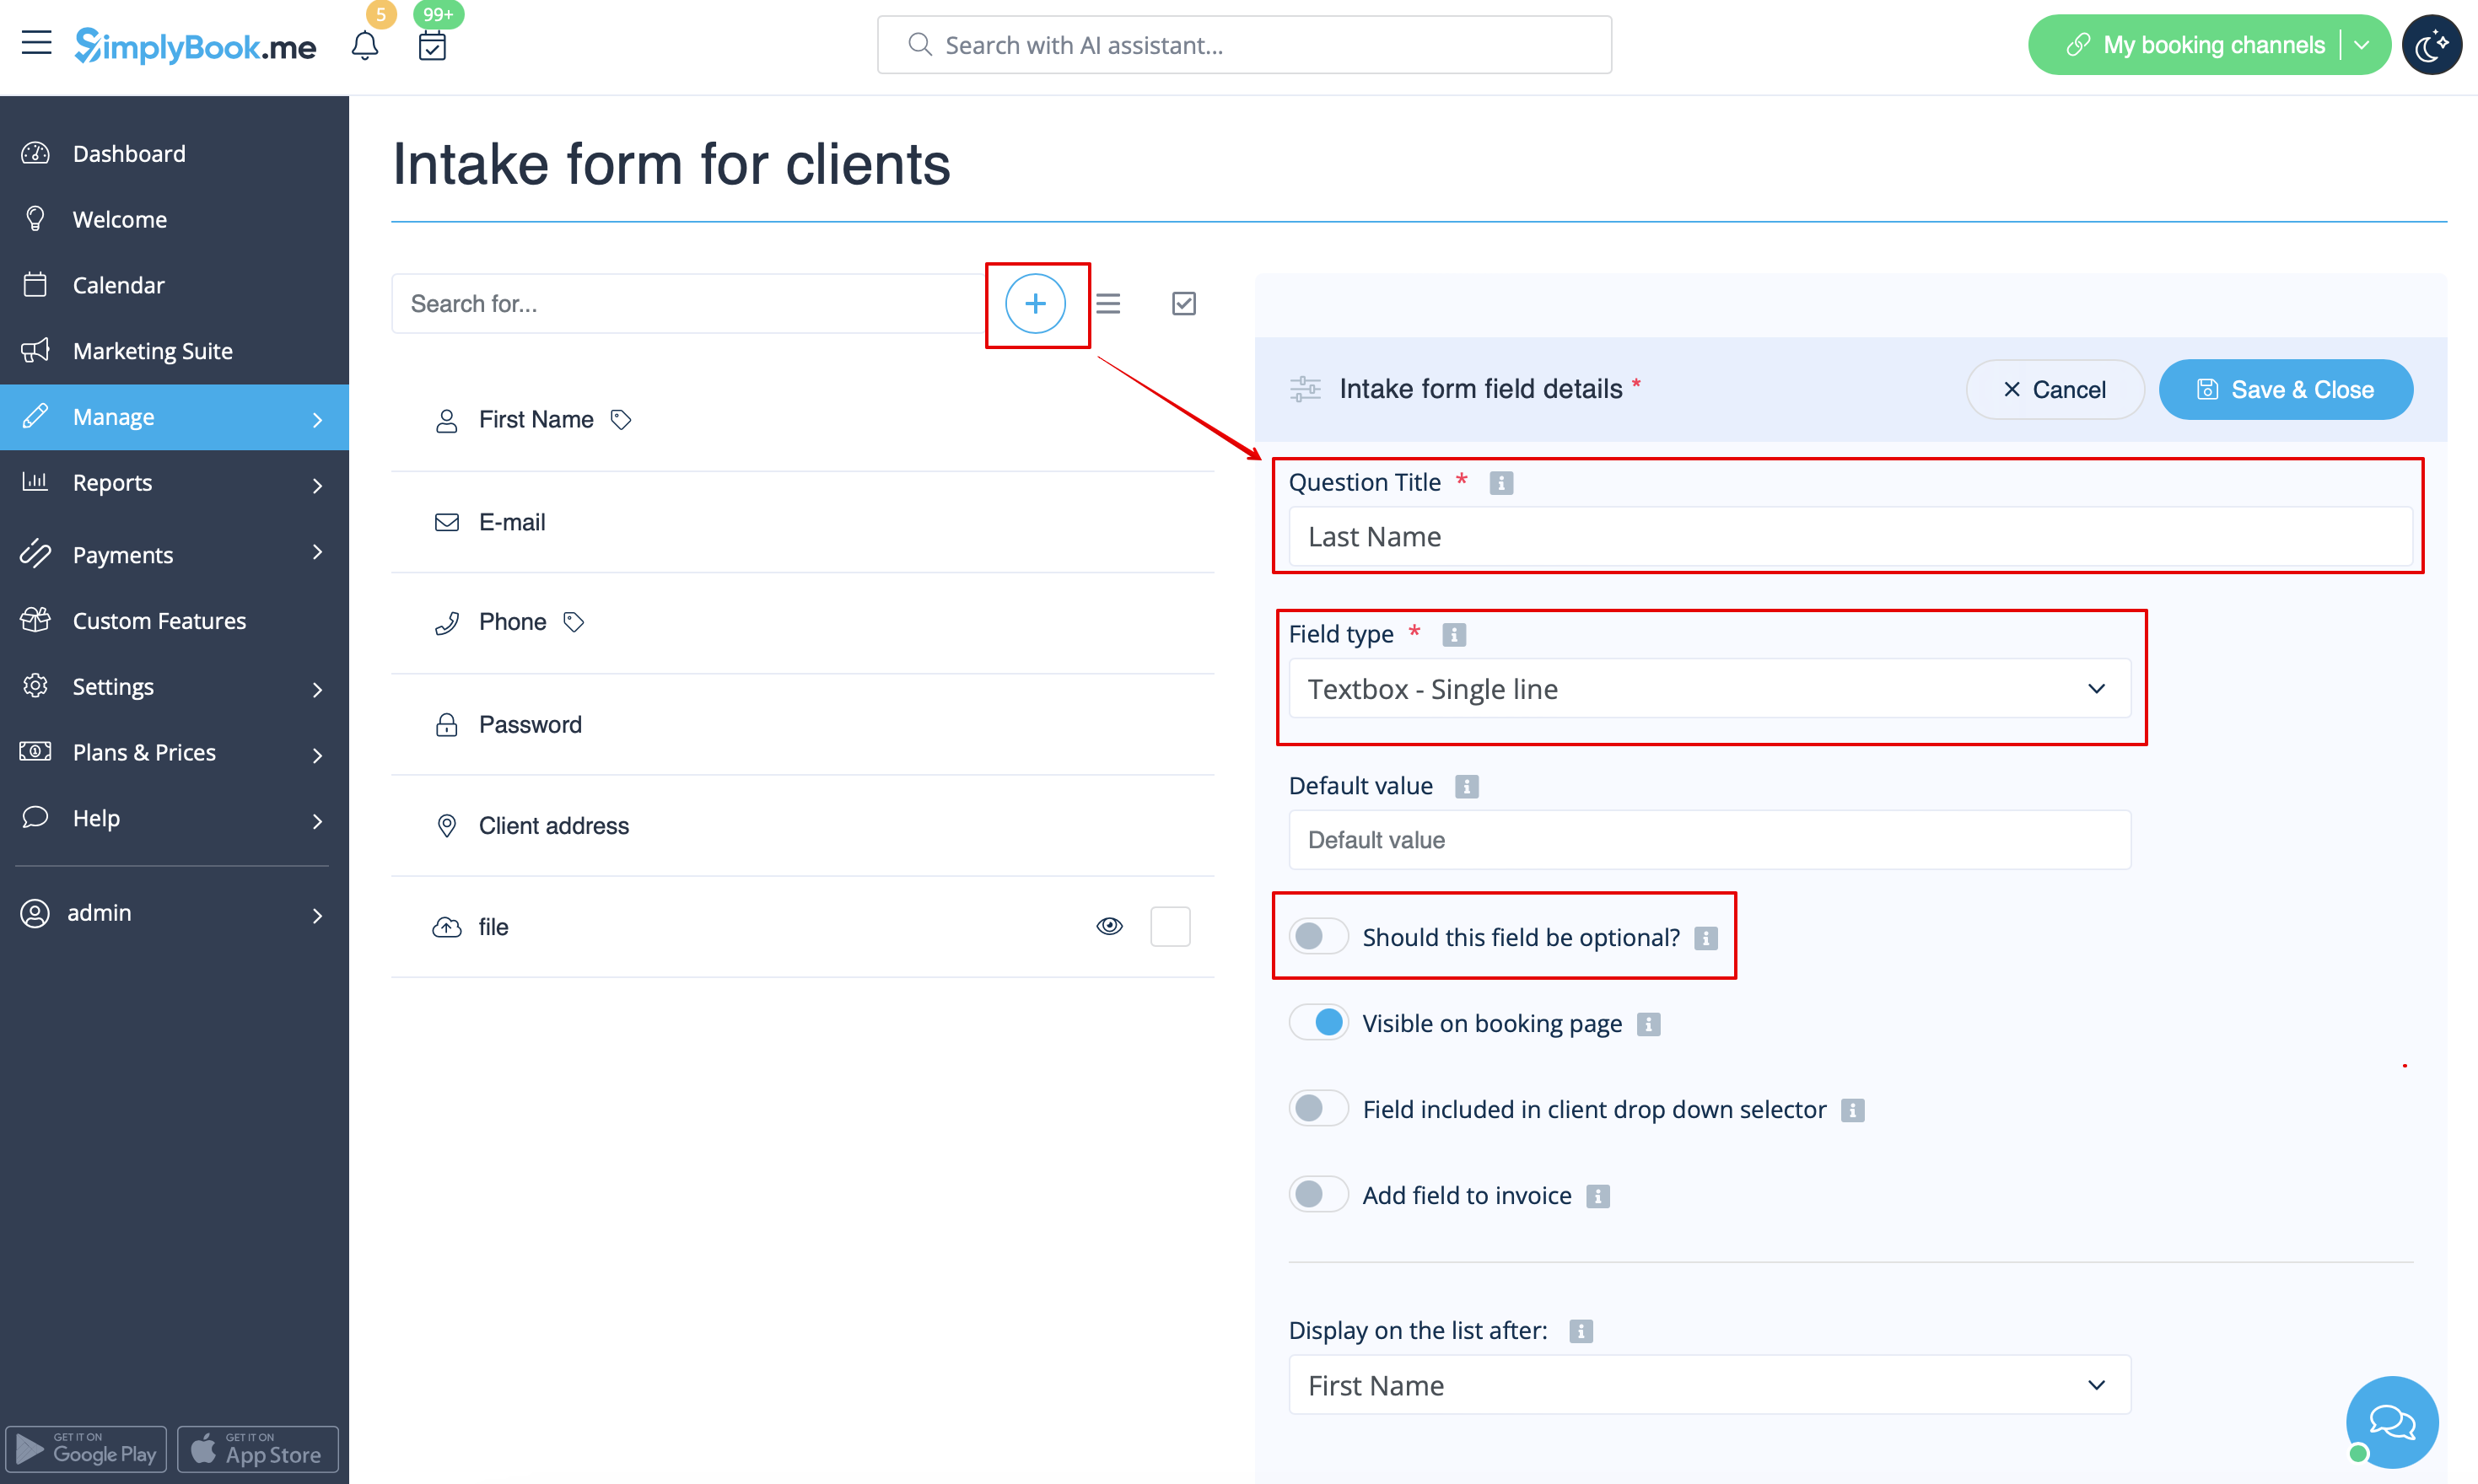
- 4. Click on + at the top to create new client field, add Last Name as a Question title and select Textbox - Single line type.
- By default the field is set to be obligatory to fill in by clients but if you need to make it non-mandatory please use the corresponding switcher.
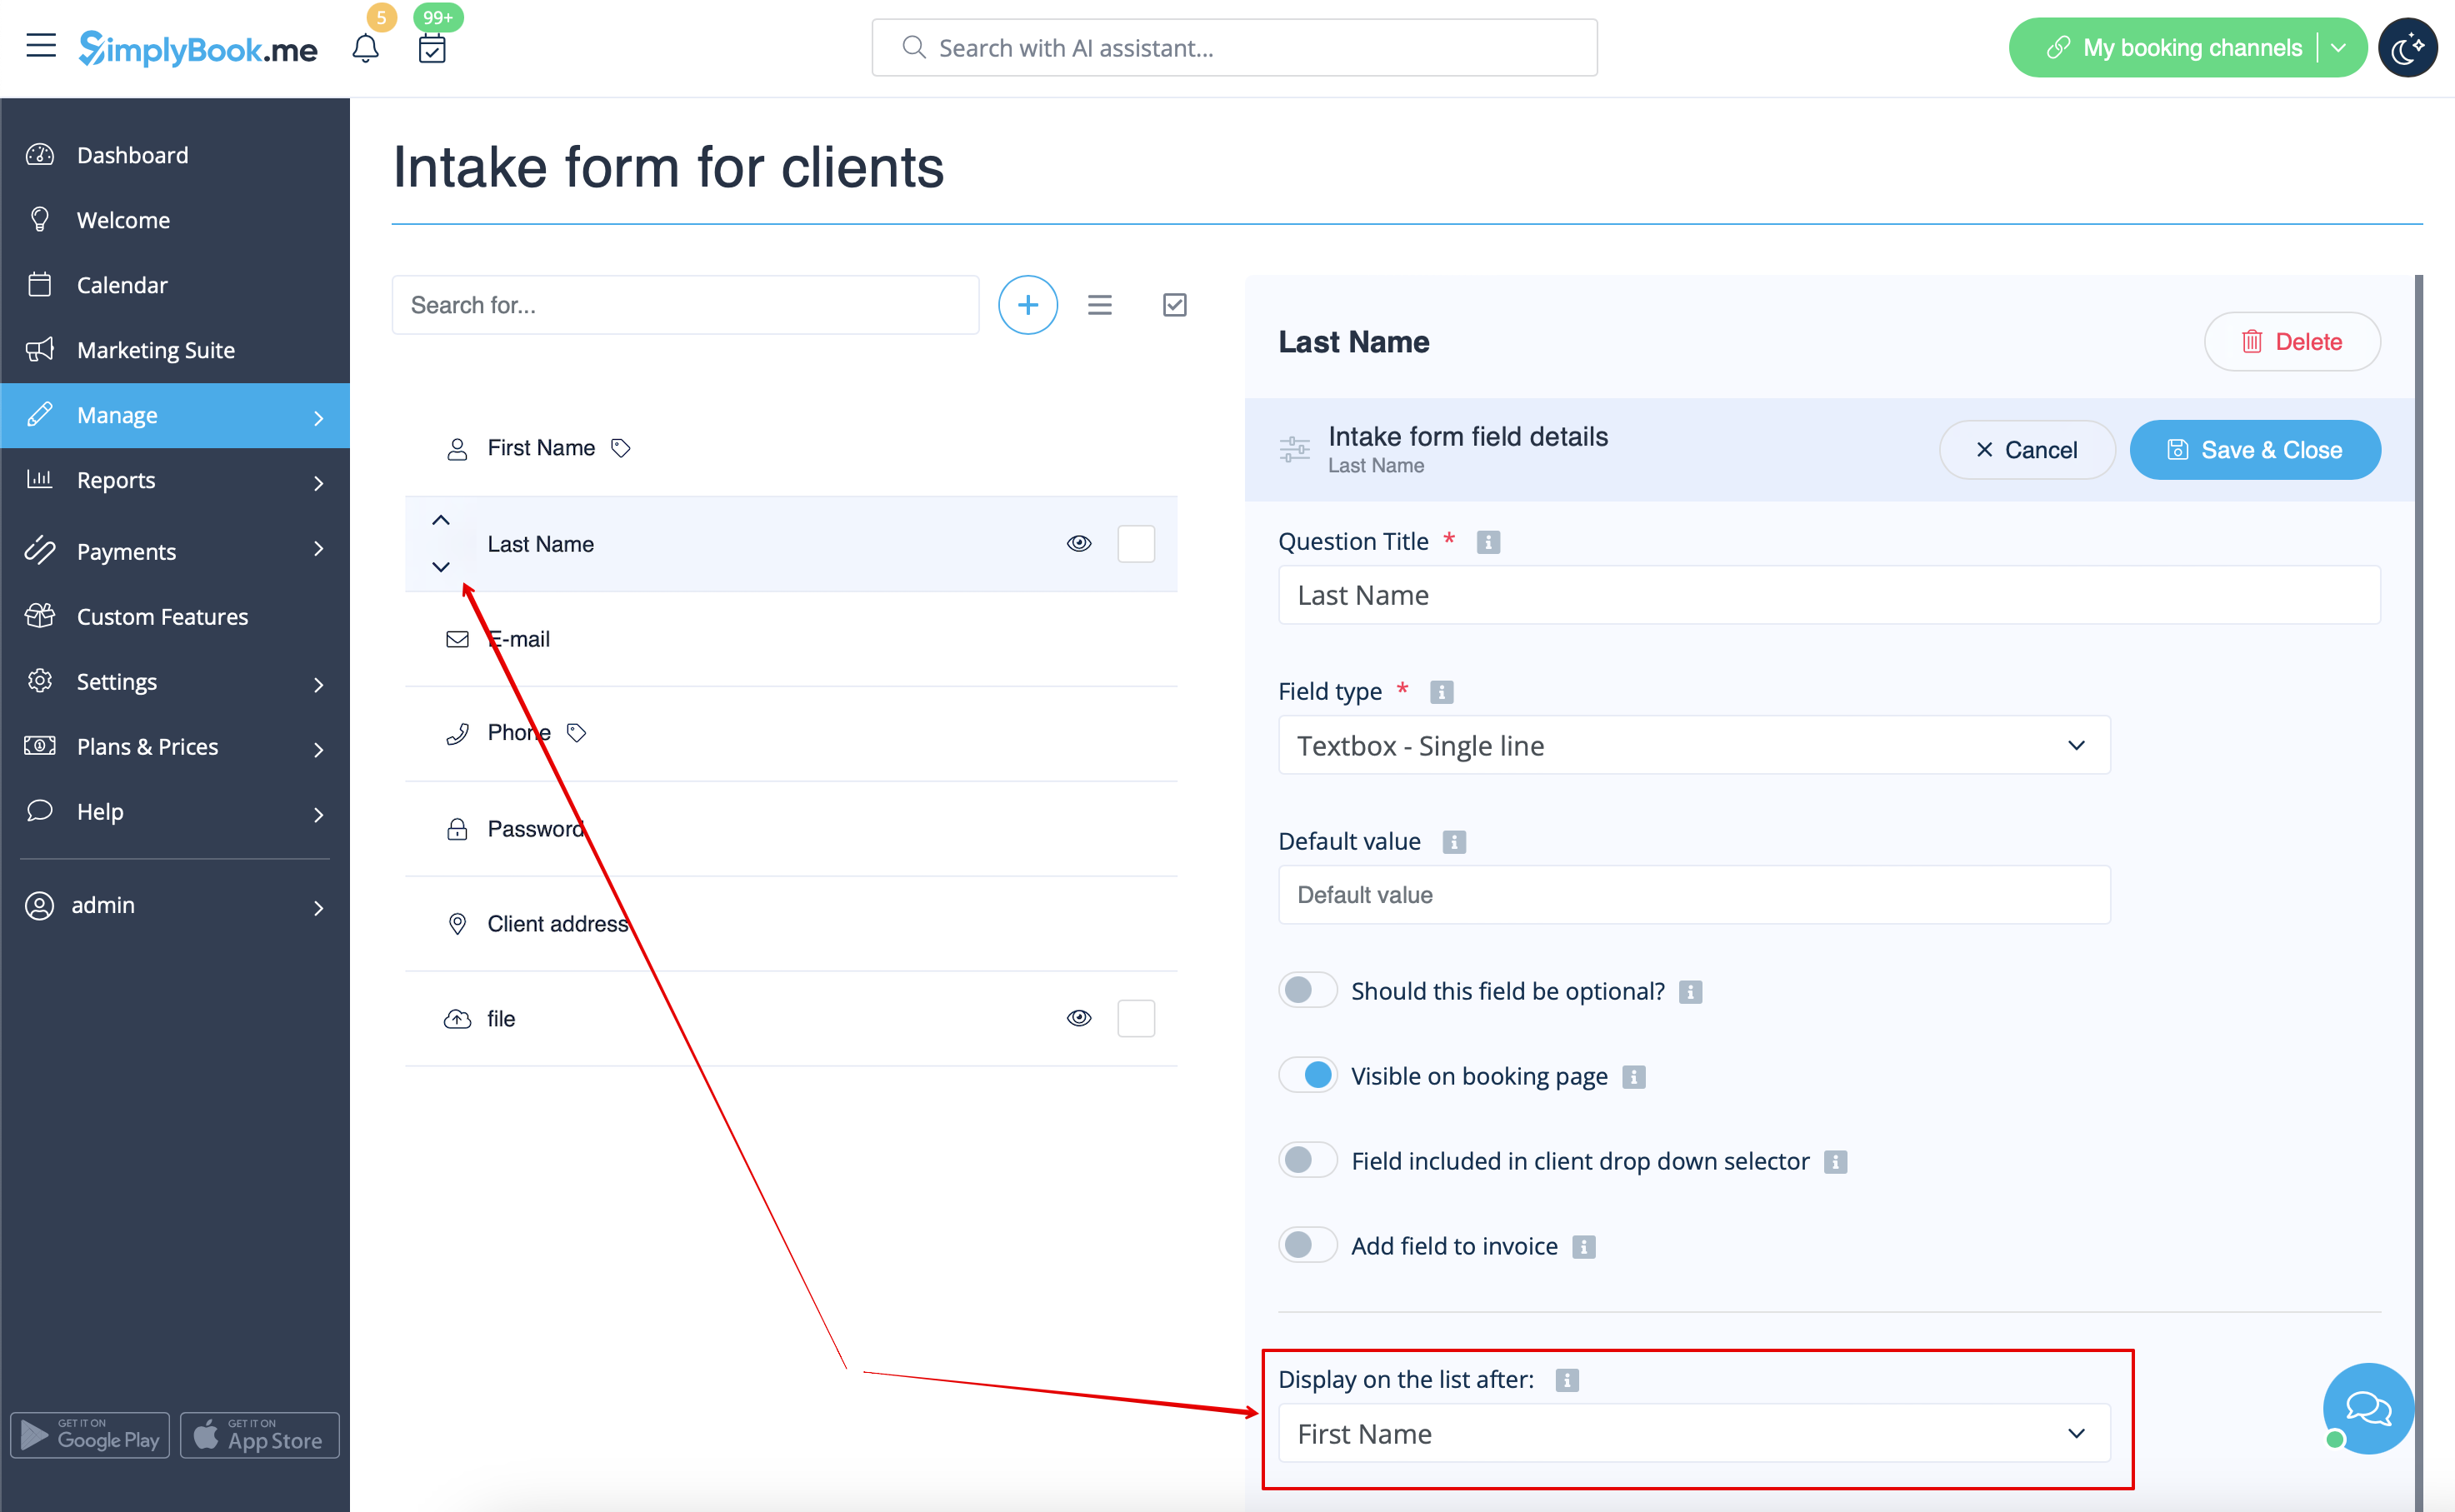
- 5. Select its position to be after First Name and save.
- Or if you have already saved the field use the arrows to re-order.
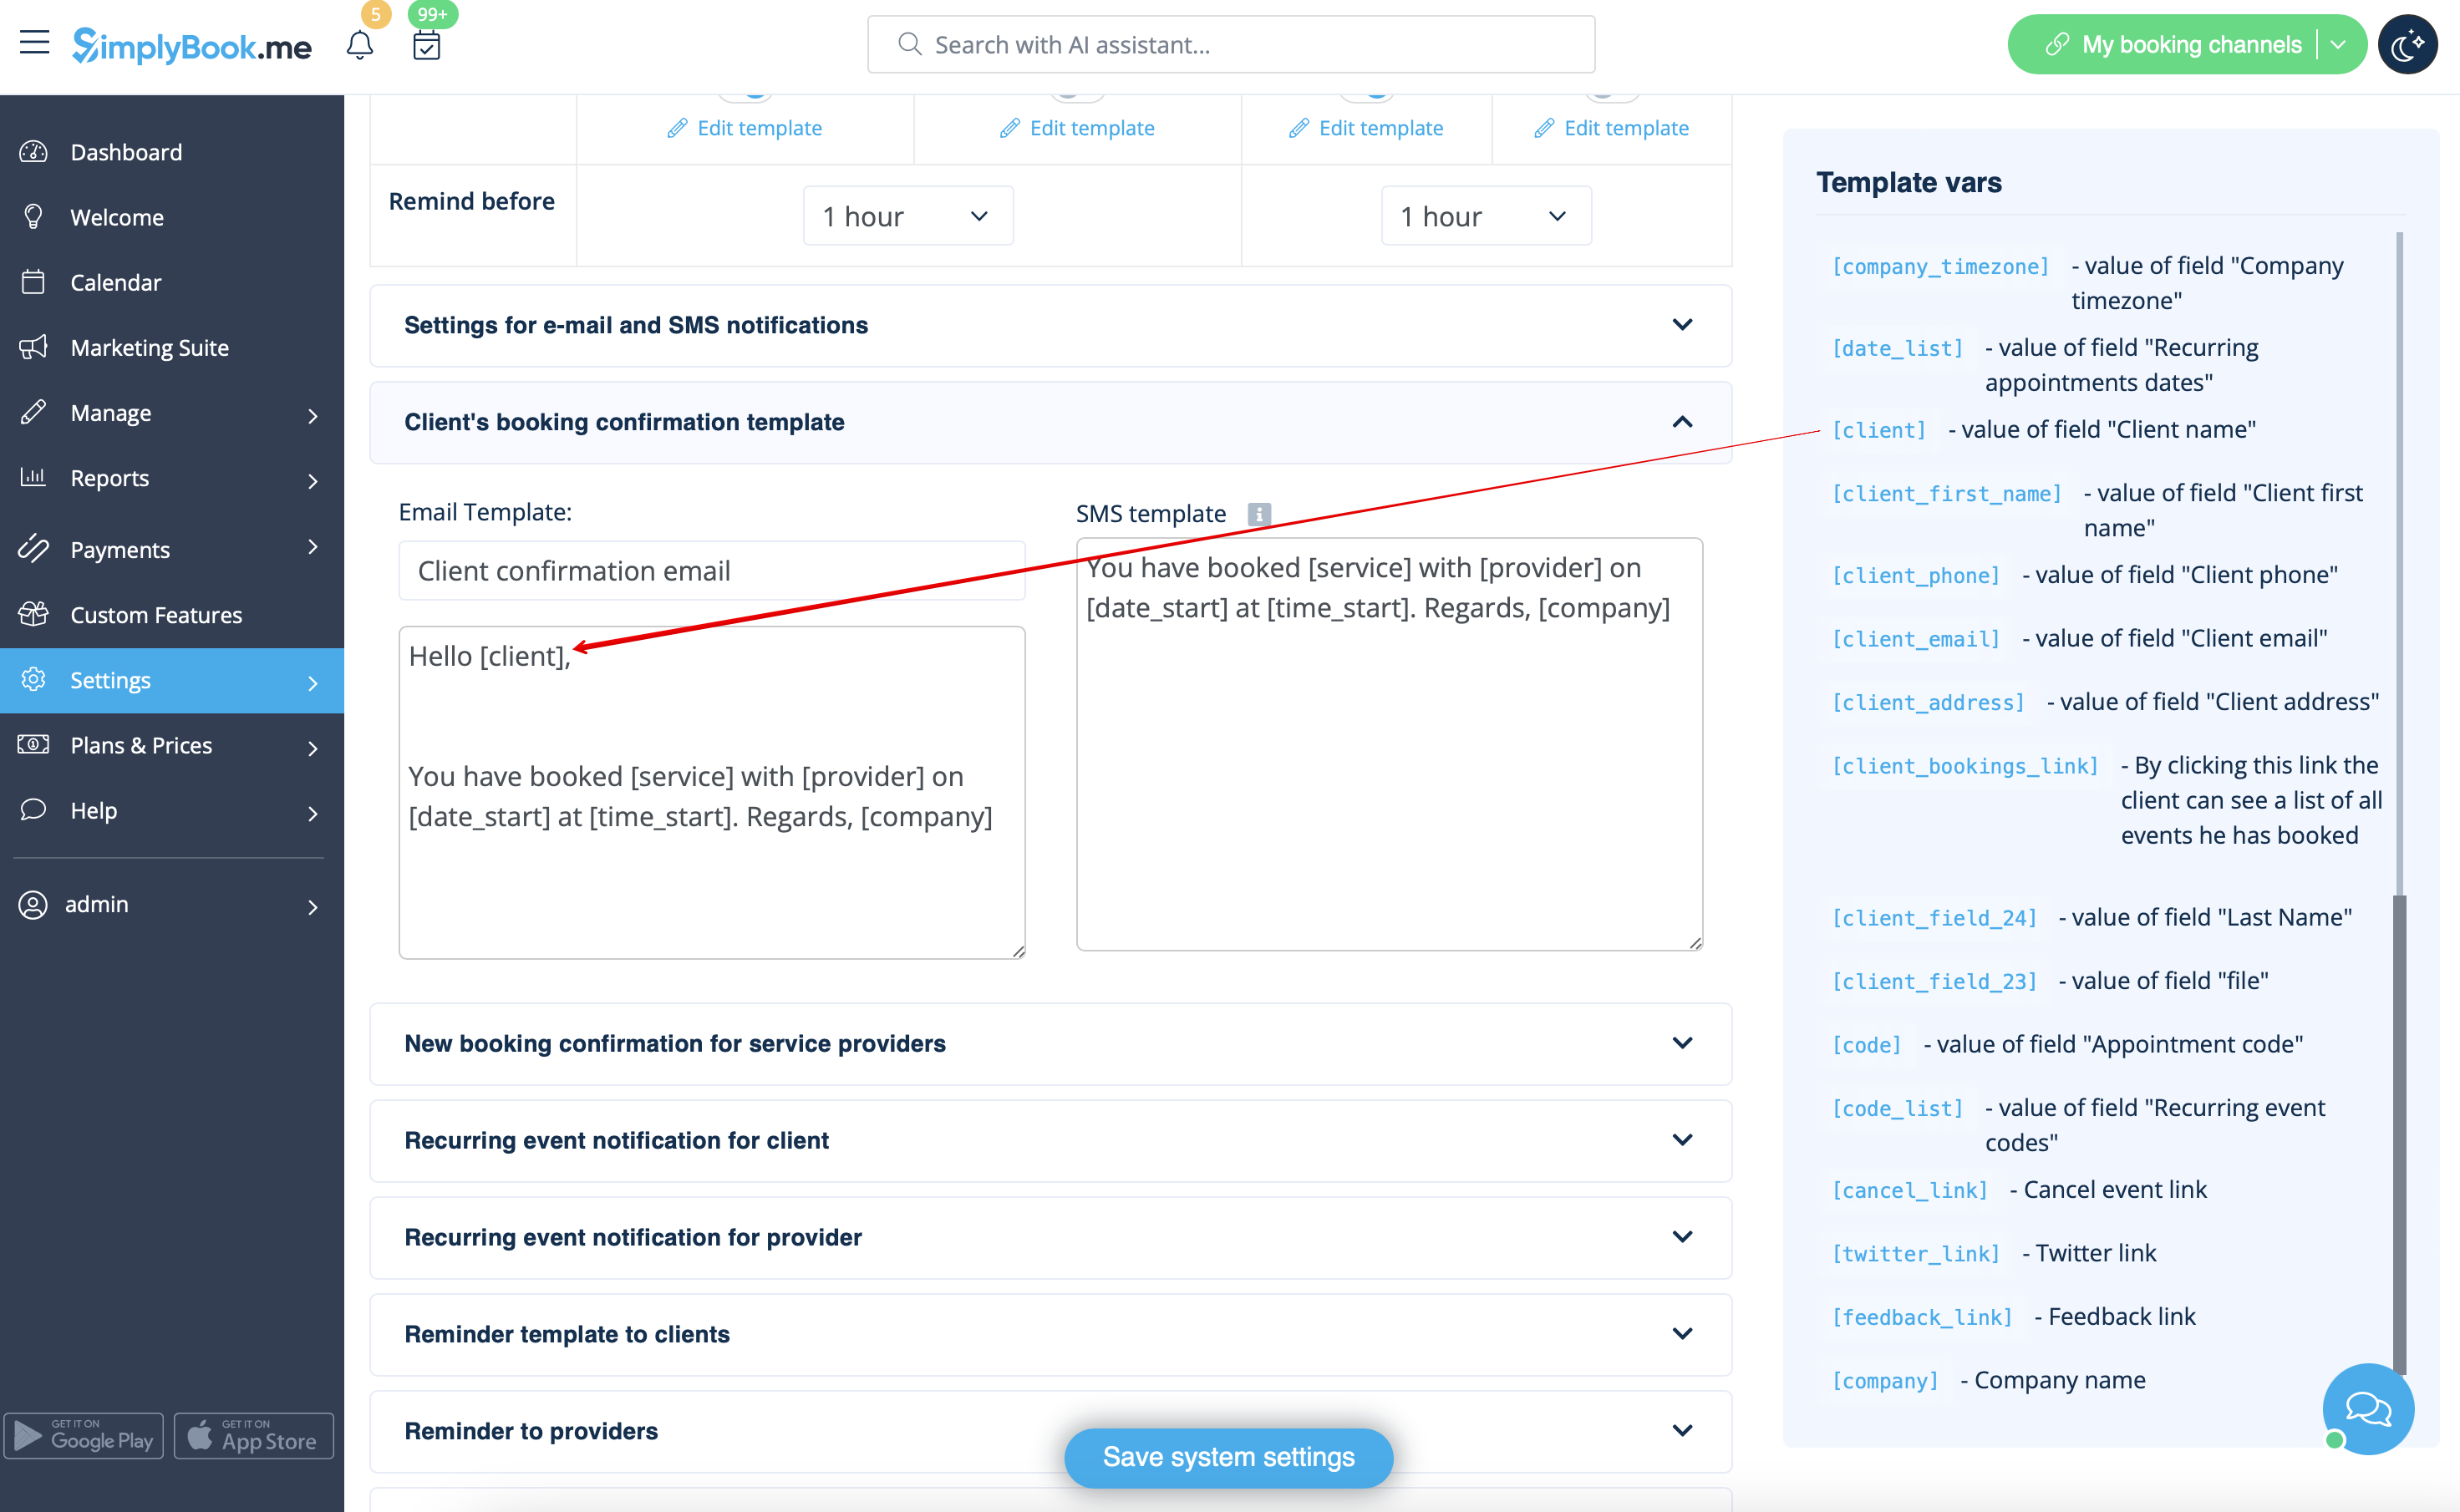
- 6. (optional) Add the desired variables to the notifications templates in Settings -> Email and SMS settings (or Flexible notifications feature if you have customized them per service/provider).
- For example, you can make booking related more personal by using only first name in the greeting.
- (here we are using default [client] variable as we have simply renamed the default field in step #3)
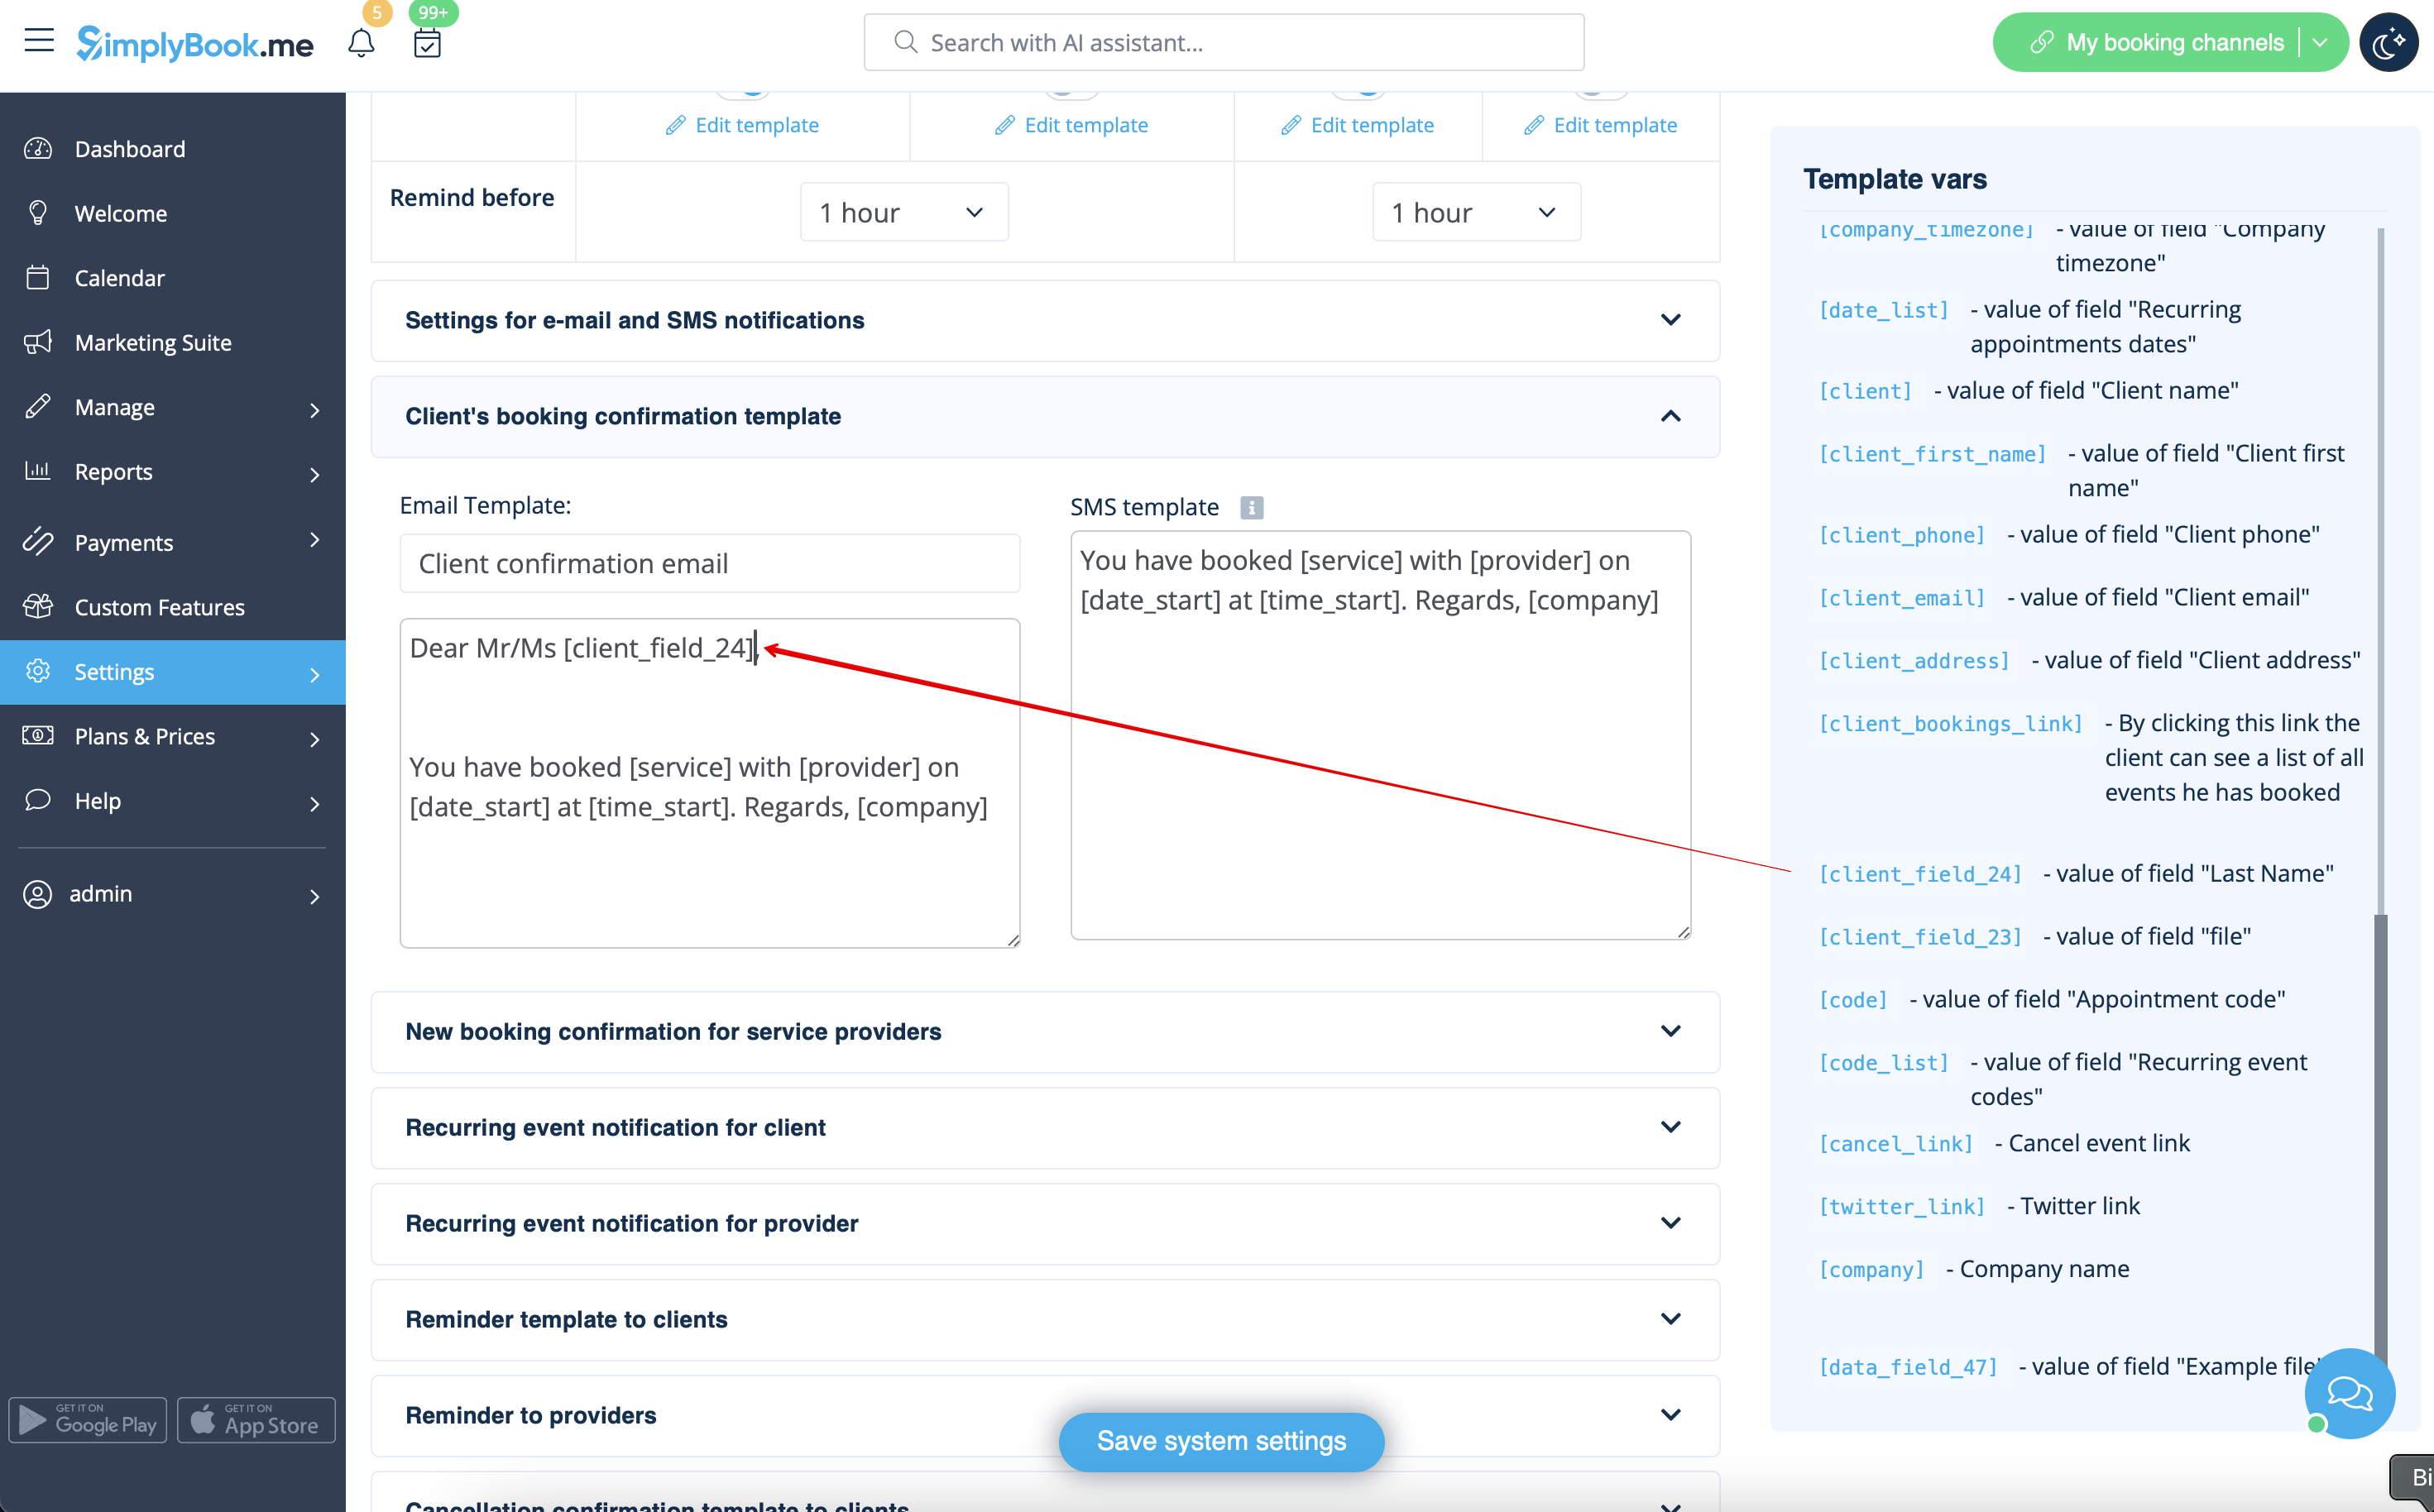
- Or sound more official with only last name use.
- (client field is used here, taken from step #4)
- Or even use both if you like.
- (default variable and client form combined)