From SimplyBook.me
Created page with "{{#seo: |title=Prénom et nom - SimplyBook.me |description=Assurez-vous que les prénoms et noms sont correctement affichés dans les informations client. Modifiez facilement les paramètres. En savoir plus ici ! |titlemode=ajouter |keywords=fAQ, questions fréquemment posées, logiciel de réservation, questions sur le système de rendez-vous, rendez-vous en ligne, logiciel de calendrier, système de réservation, calendrier de réservation, logiciel de planification, p..." Tags: Mobile edit Mobile web edit |
Created page with "Prénom et nom" |
||
| Line 4: | Line 4: | ||
<br><br> | <br><br> | ||
: | :Il peut arriver que vous ayez besoin de champs distincts pour le prénom et le nom de vos clients lors du processus d'inscription. | ||
: | :C'est désormais possible grâce à notre fonctionnalité <span style="background-color:#cdeffc; padding:5px; border-radius:5px;">[[Client_Fields_Custom_Feature|« Champs client]]</span> » et à la nouvelle fonctionnalité de réorganisation. | ||
<br><br> | <br><br> | ||
:<span style="background-color:#ffe9e9; padding:5px; border-radius:5px;">''' | :<span style="background-color:#ffe9e9; padding:5px; border-radius:5px;">'''Remarque :''' cette configuration est disponible lorsque la fonctionnalité</span> «<span style="background-color:#ffe9e9; padding:5px; border-radius:5px;"> <span style="background-color:#cdeffc; padding:5px; border-radius:5px;">[[Client_Login_custom_feature|Connexion client]]</span> » est activée.</span> | ||
<br><br> | <br><br> | ||
< | '''comment utiliser''' <span style="background-color:#d4f8e5; padding:5px; border-radius:5px;">les champs client</span> | ||
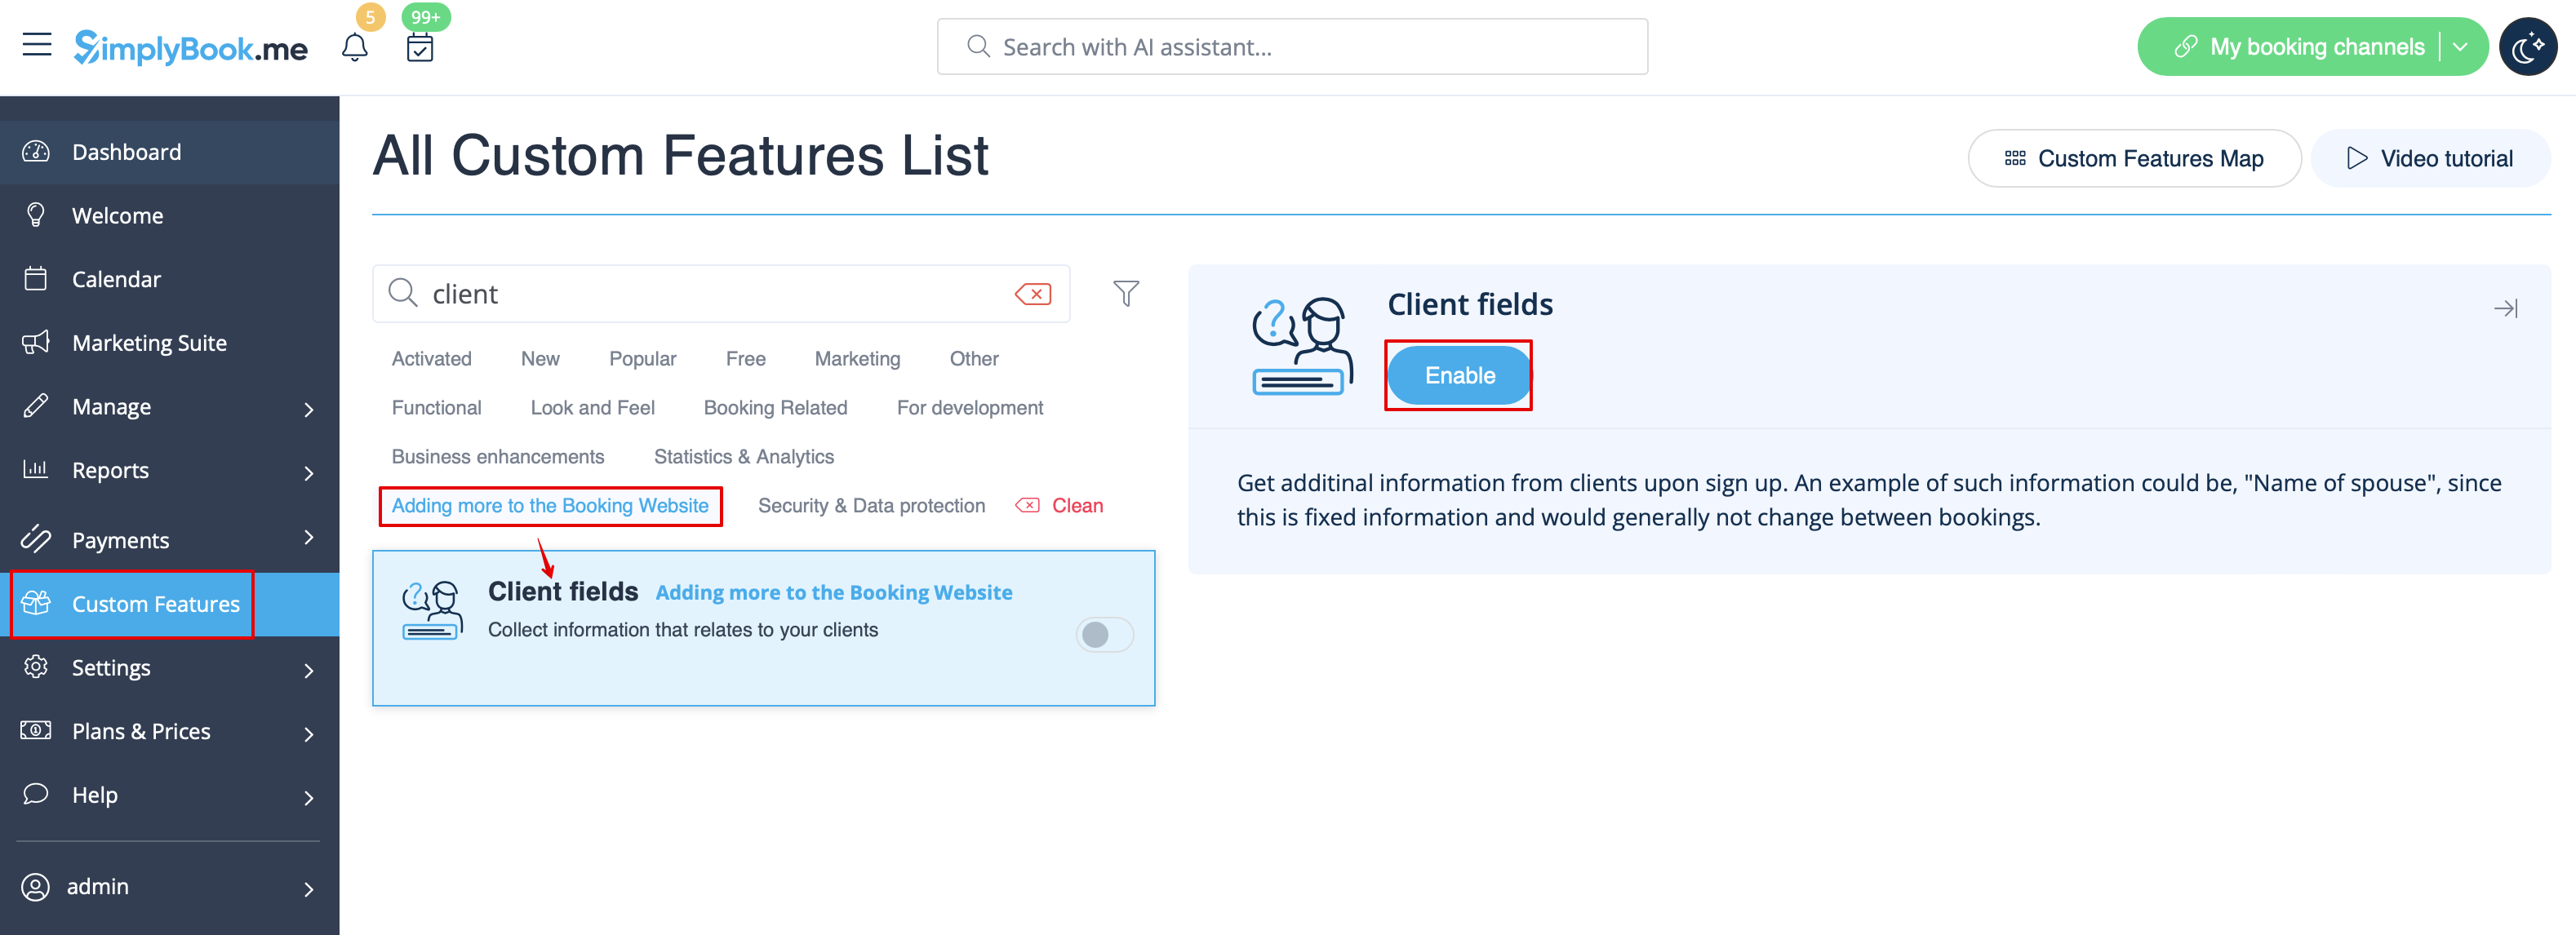
:1. Activez la fonctionnalité personnalisée <span style="background-color:#d4f8e5; padding:5px; border-radius:5px;">Champs client</span> sur la page <span style="background-color:#d4f8e5; padding:5px; border-radius:5px;">Fonctionnalités personnalisées</span>. | |||
:1. | |||
[[File:Client fiedls enable path redesigned.png|1200px|border|center|link=https://help.simplybook.me/images/e/e3/Client_fiedls_enable_path_redesigned.png]] | [[File:Client fiedls enable path redesigned.png|1200px|border|center|link=https://help.simplybook.me/images/e/e3/Client_fiedls_enable_path_redesigned.png]] | ||
<br><br> | <br><br> | ||
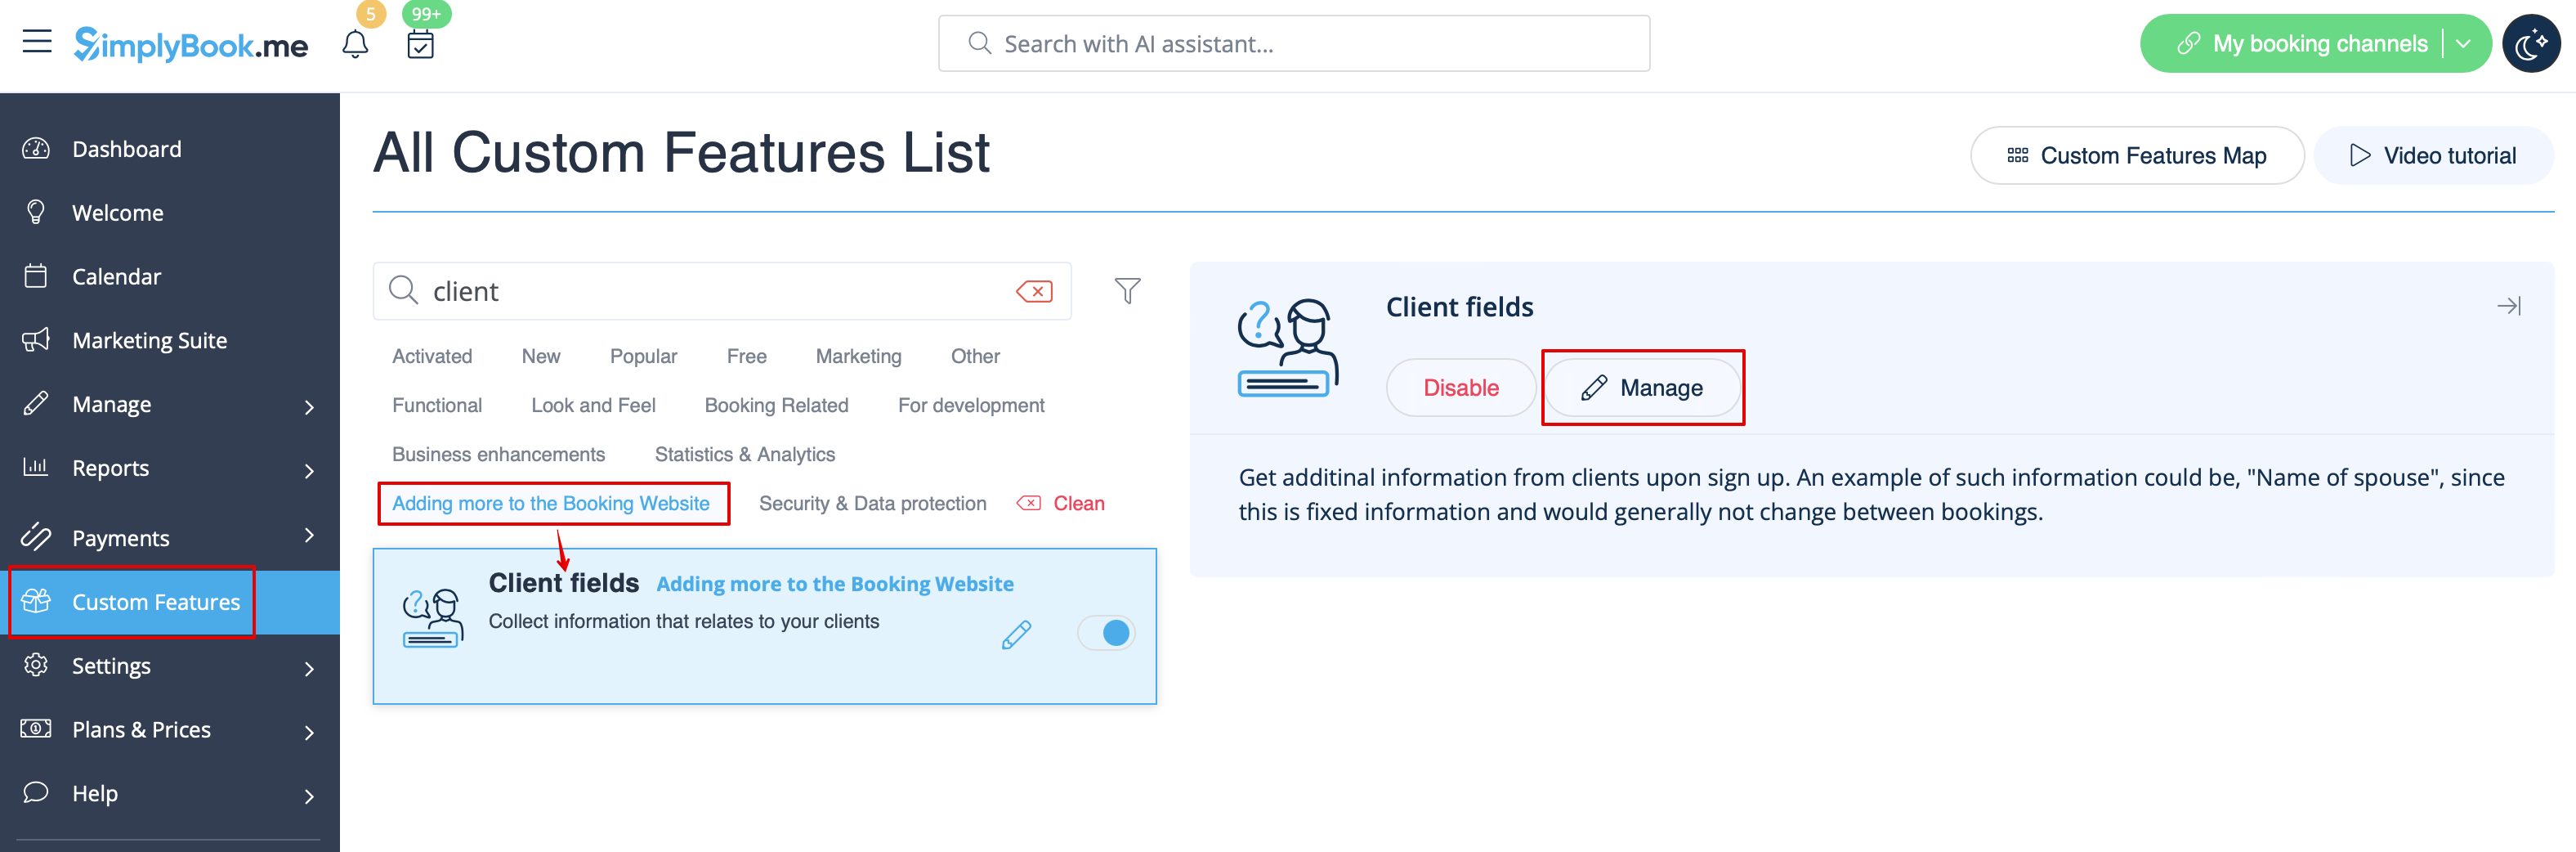
:2. | :2. Accédez à ses paramètres en cliquant sur le lien <span style="background-color:#d4f8e5; padding:5px; border-radius:5px;">Gérer</span>.<br> | ||
: | :Ou accédez à <span style="background-color:#d4f8e5; padding:5px; border-radius:5px;">Gérer</span> -> <span style="background-color:#d4f8e5; padding:5px; border-radius:5px;">Champs client</span> dans le menu de gauche. | ||
[[File:Client fields settings path redesigned.png|1200px|border|center|link=https://help.simplybook.me/images/1/1d/Client_fields_settings_path_redesigned.png]] | [[File:Client fields settings path redesigned.png|1200px|border|center|link=https://help.simplybook.me/images/1/1d/Client_fields_settings_path_redesigned.png]] | ||
<br><br> | <br><br> | ||
<div lang="en" dir="ltr" class="mw-content-ltr"> | <div lang="en" dir="ltr" class="mw-content-ltr"> | ||
Revision as of 12:12, 15 May 2025
- Il peut arriver que vous ayez besoin de champs distincts pour le prénom et le nom de vos clients lors du processus d'inscription.
- C'est désormais possible grâce à notre fonctionnalité « Champs client » et à la nouvelle fonctionnalité de réorganisation.
- Remarque : cette configuration est disponible lorsque la fonctionnalité « Connexion client » est activée.
comment utiliser les champs client
- 1. Activez la fonctionnalité personnalisée Champs client sur la page Fonctionnalités personnalisées.
- 2. Accédez à ses paramètres en cliquant sur le lien Gérer.
- Ou accédez à Gérer -> Champs client dans le menu de gauche.
- 3. You will see default registration fields there. Select the first one called Name and rename it to First Name. Save.
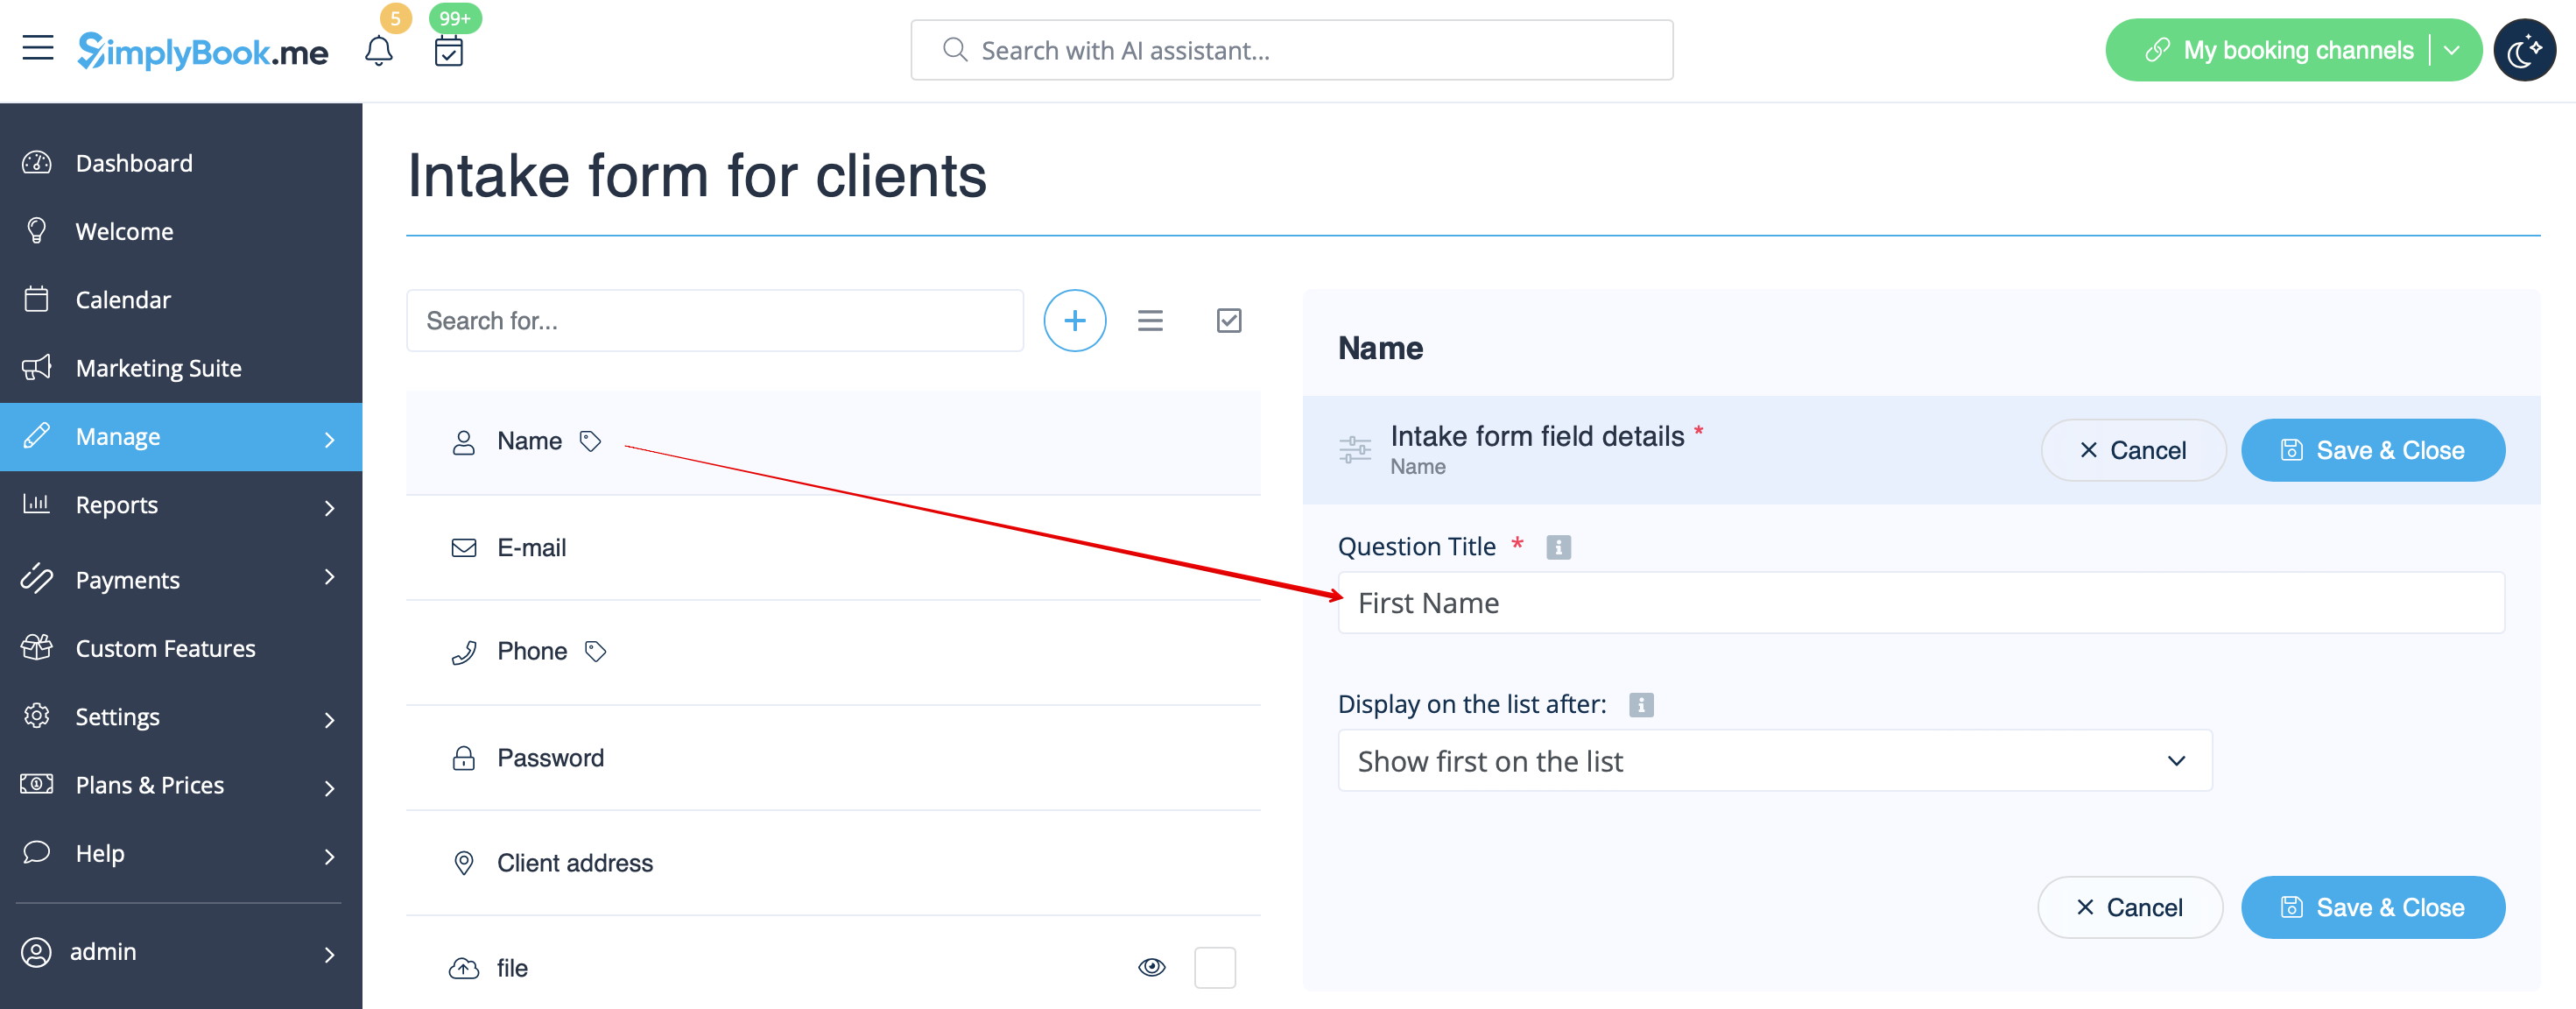
- 4. Click on + at the top to create new client field, add Last Name as a Question title and select Textbox - Single line type.
- By default the field is set to be obligatory to fill in by clients but if you need to make it non-mandatory please use the corresponding switcher.
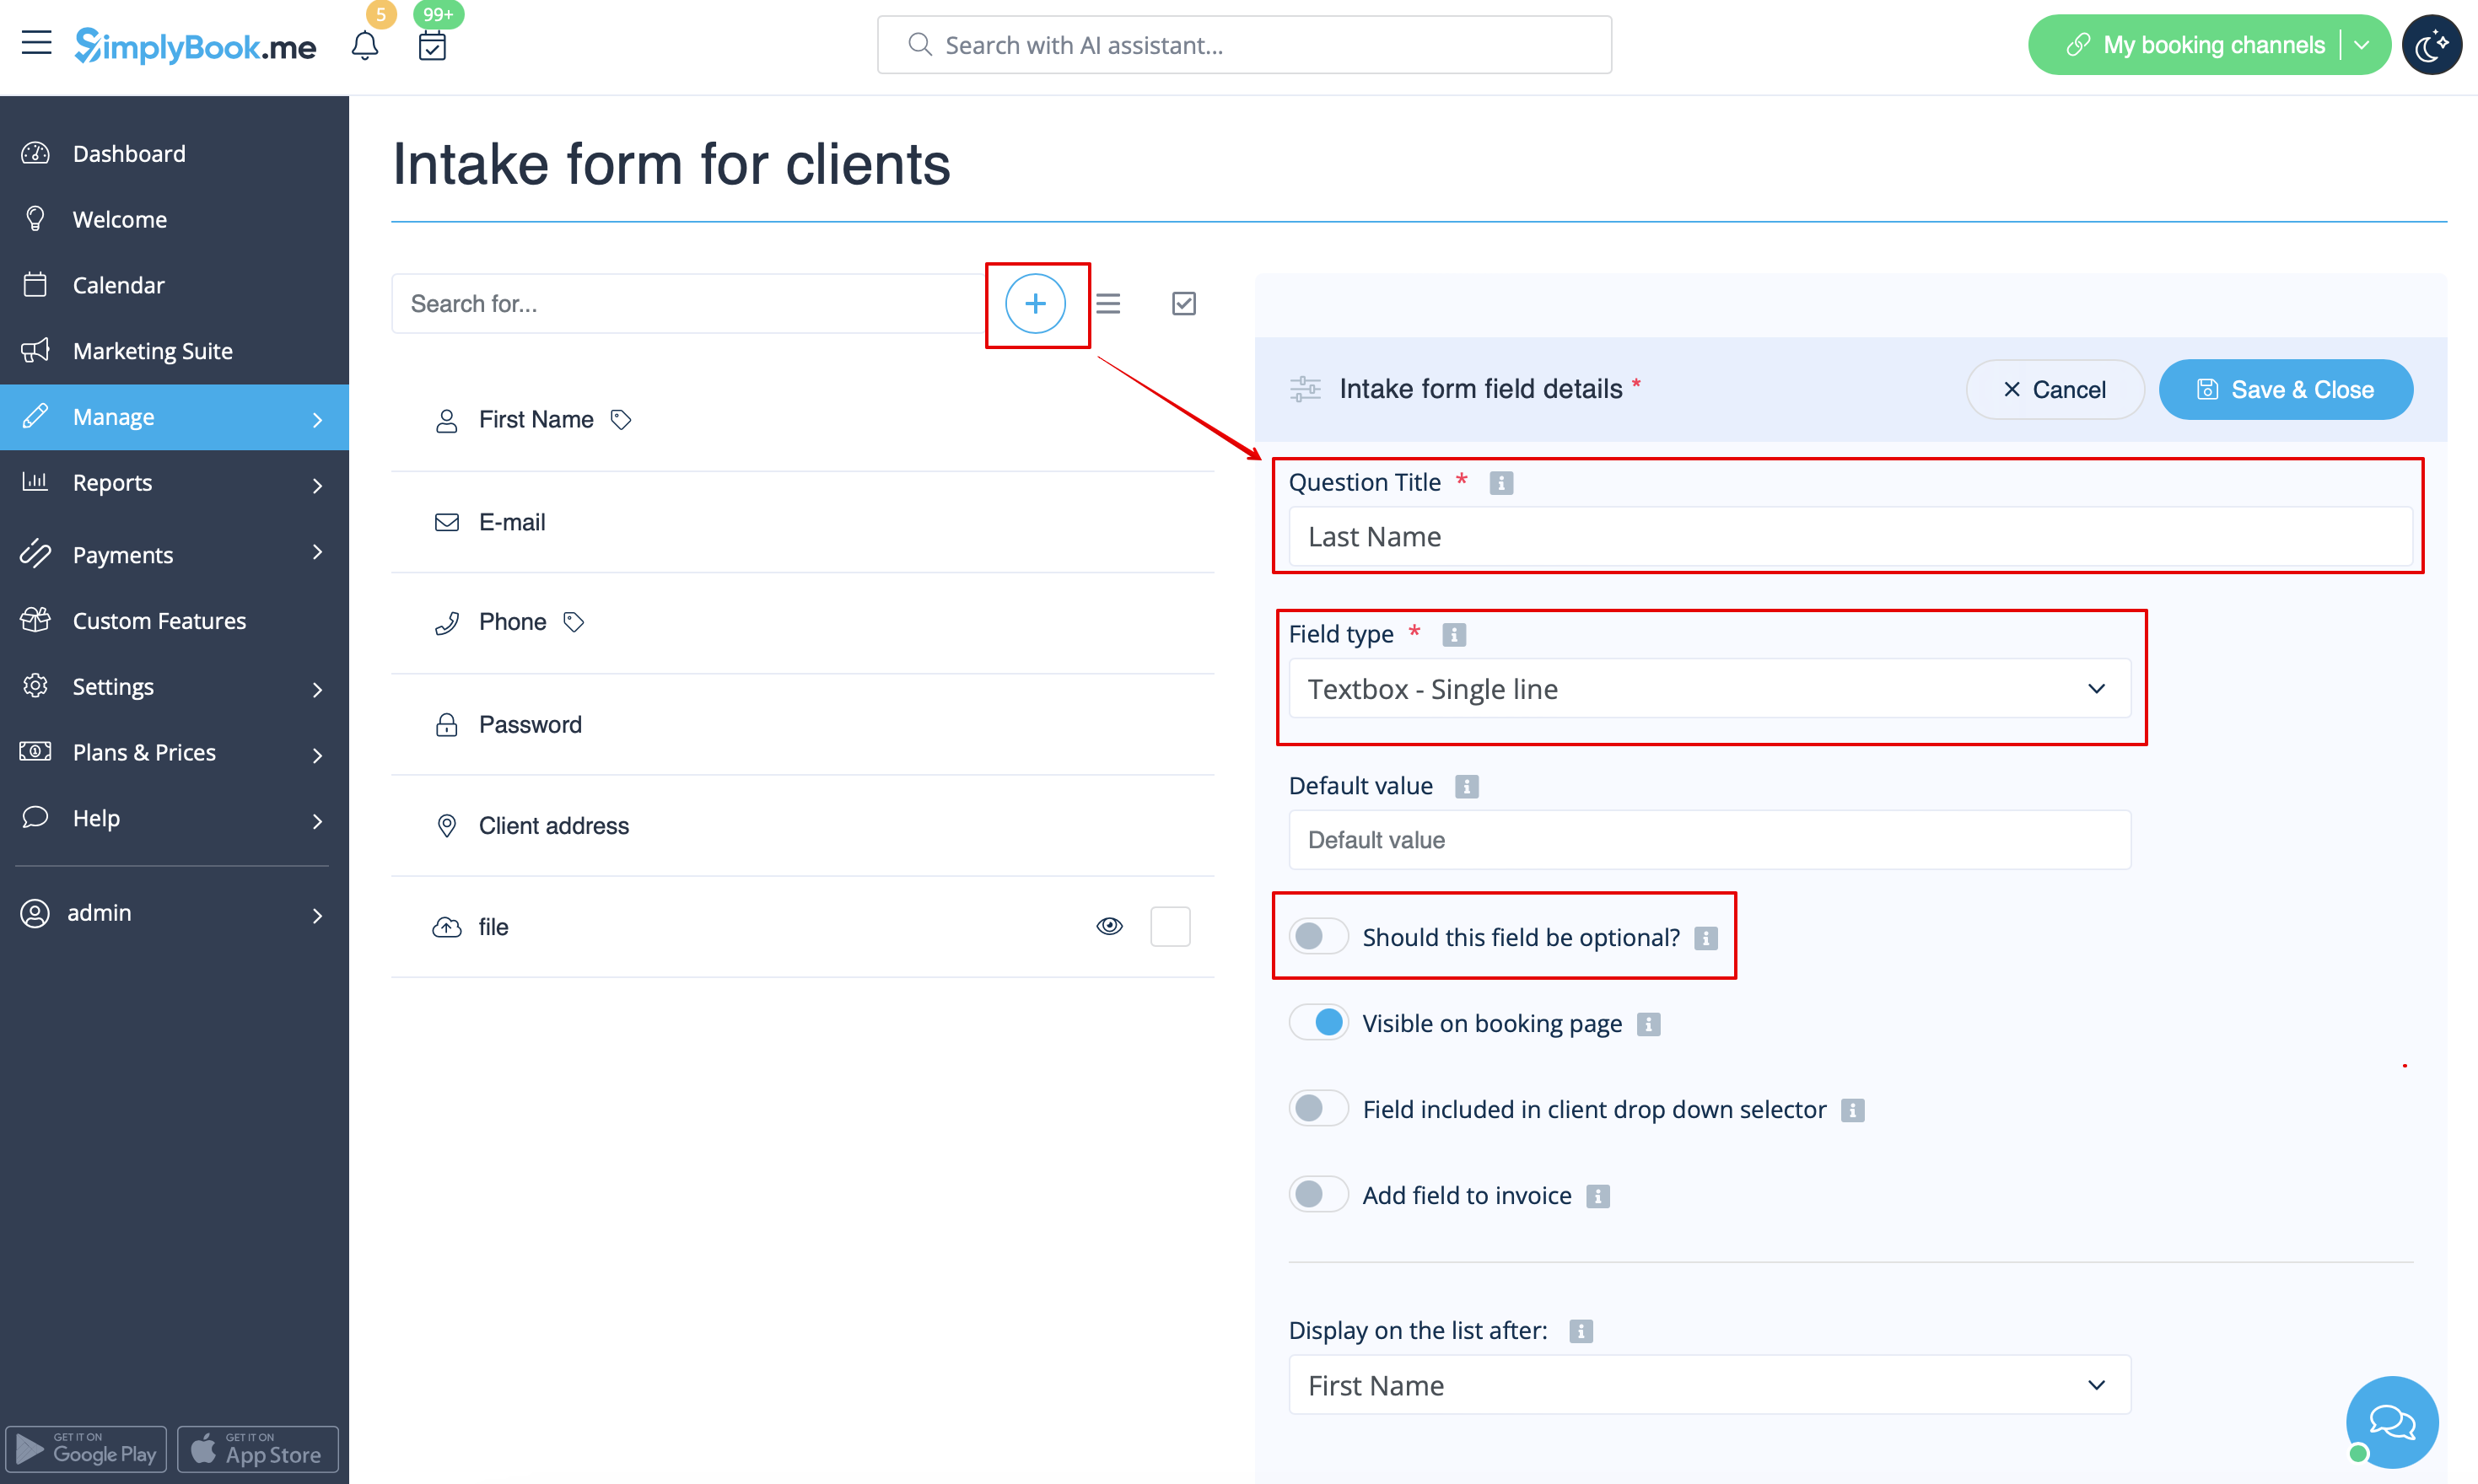
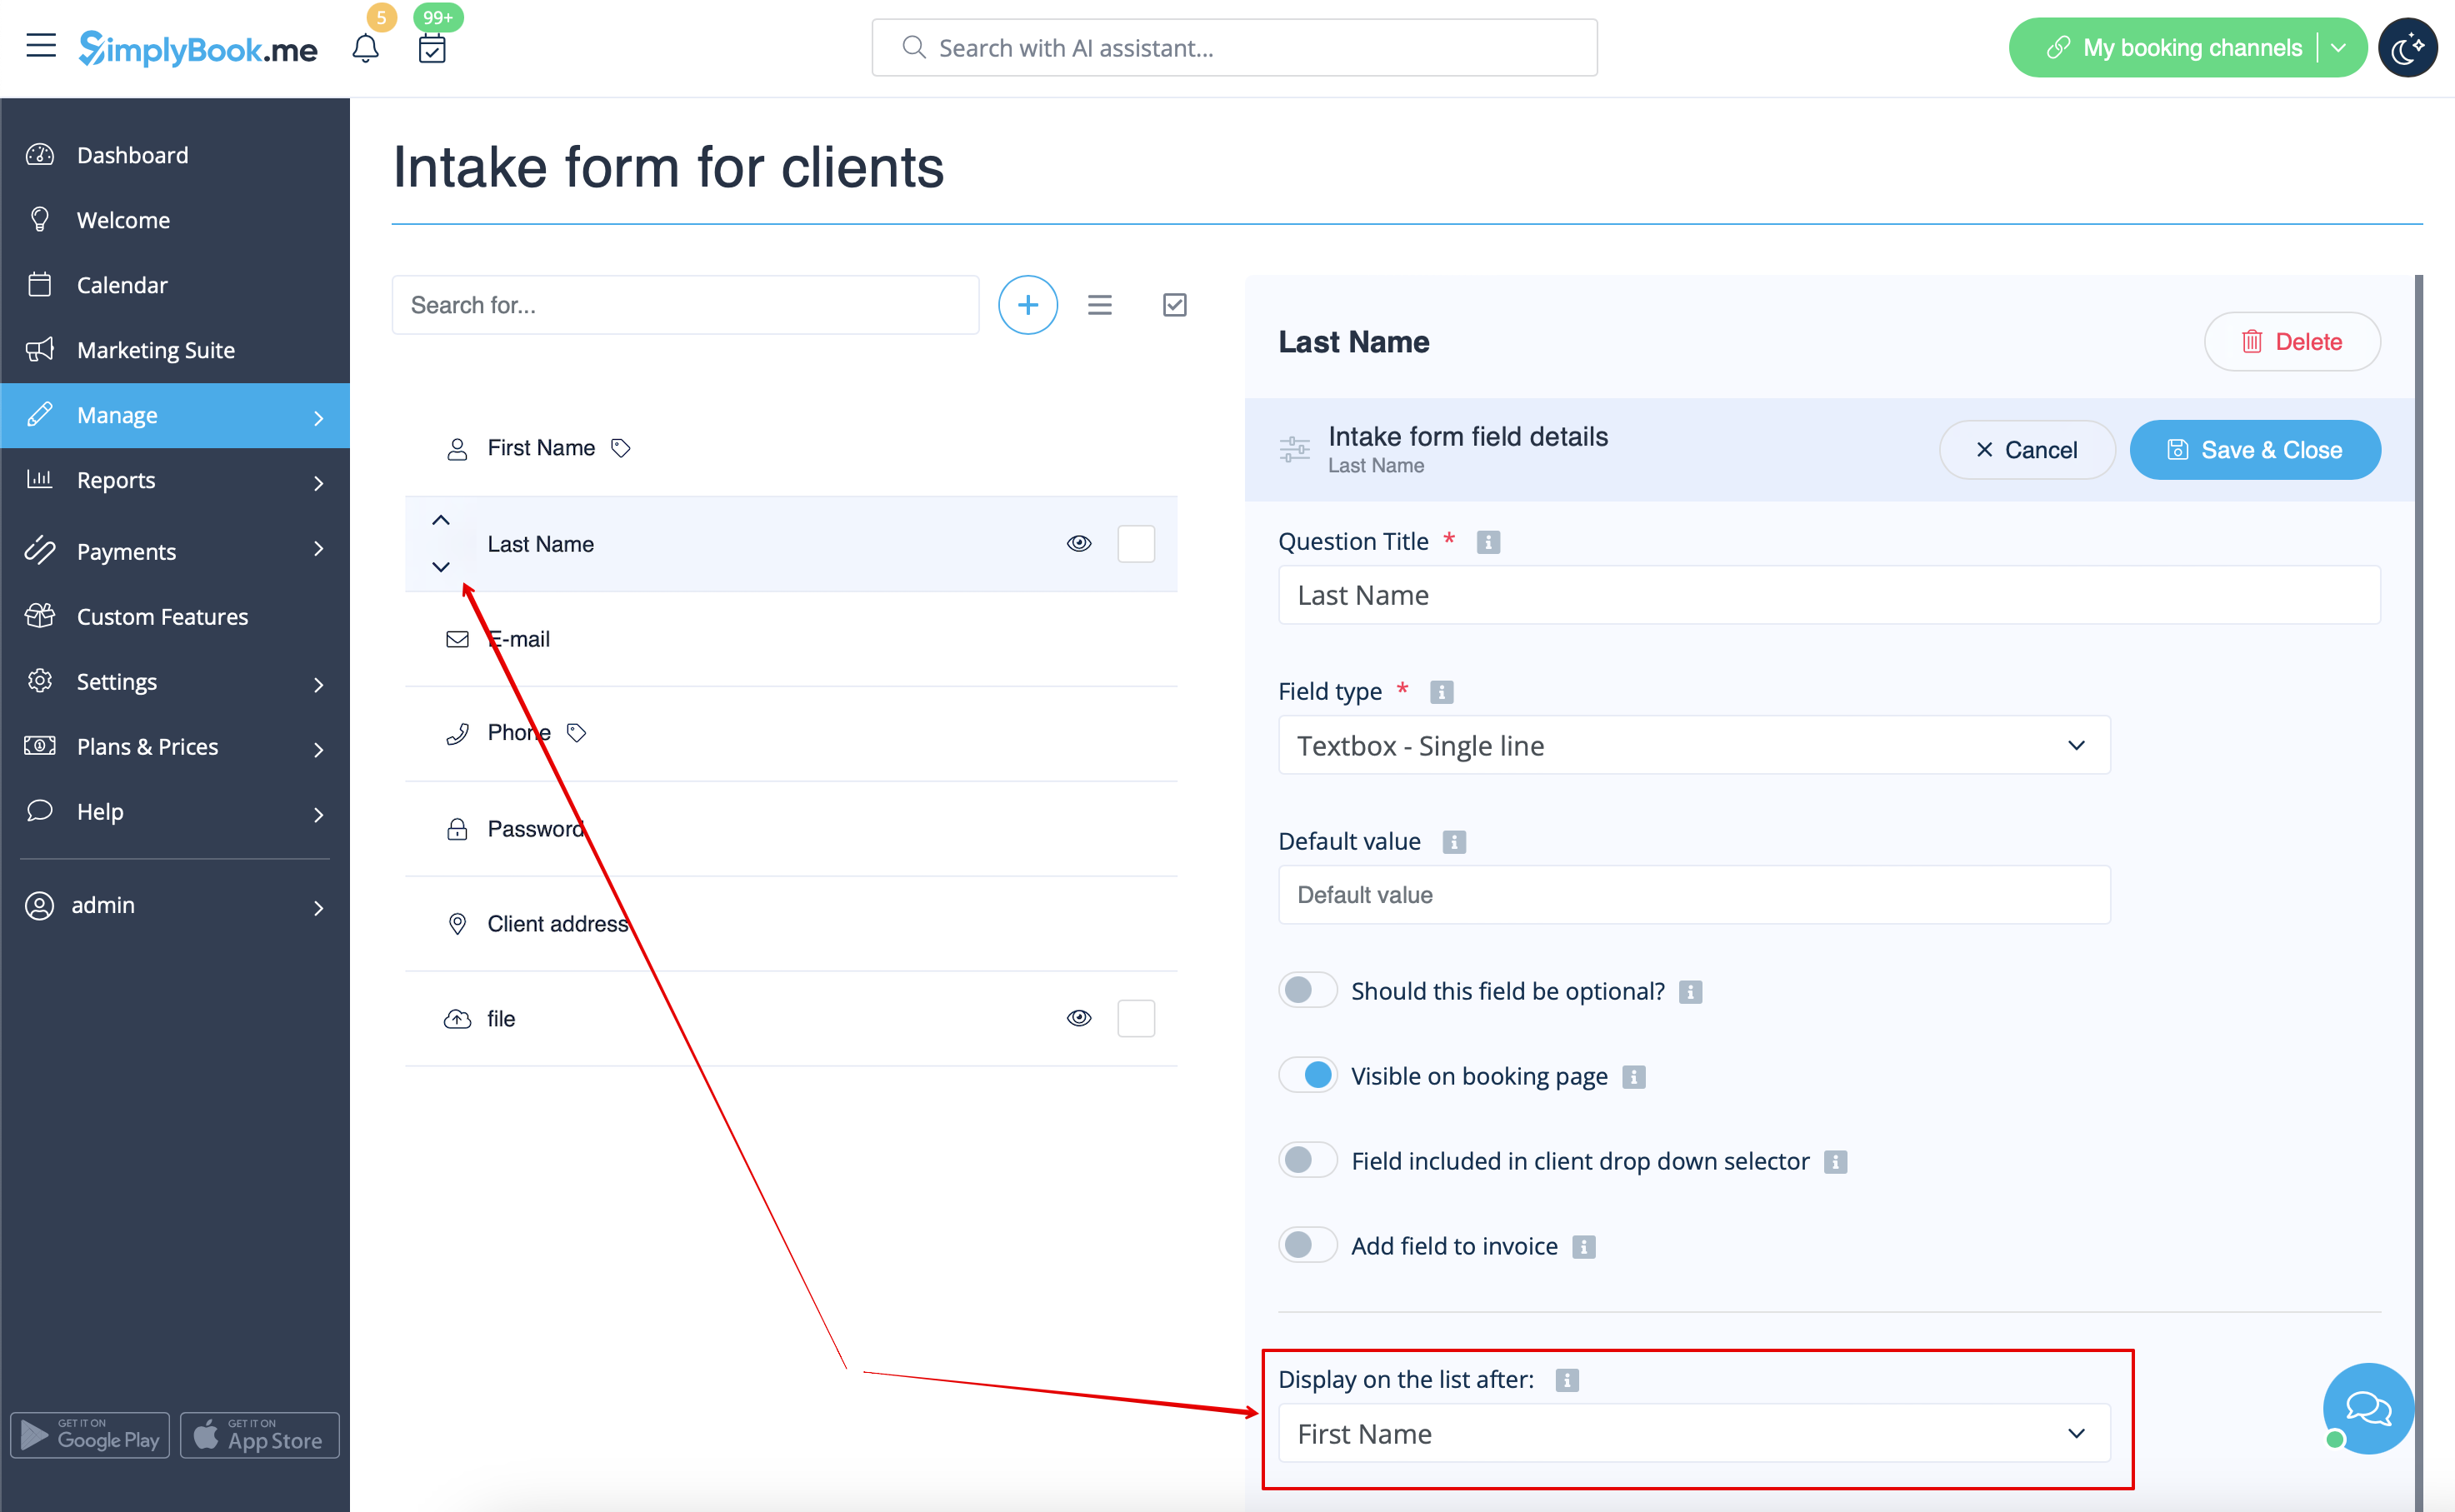
- 5. Select its position to be after First Name and save.
- Or if you have already saved the field use the arrows to re-order.
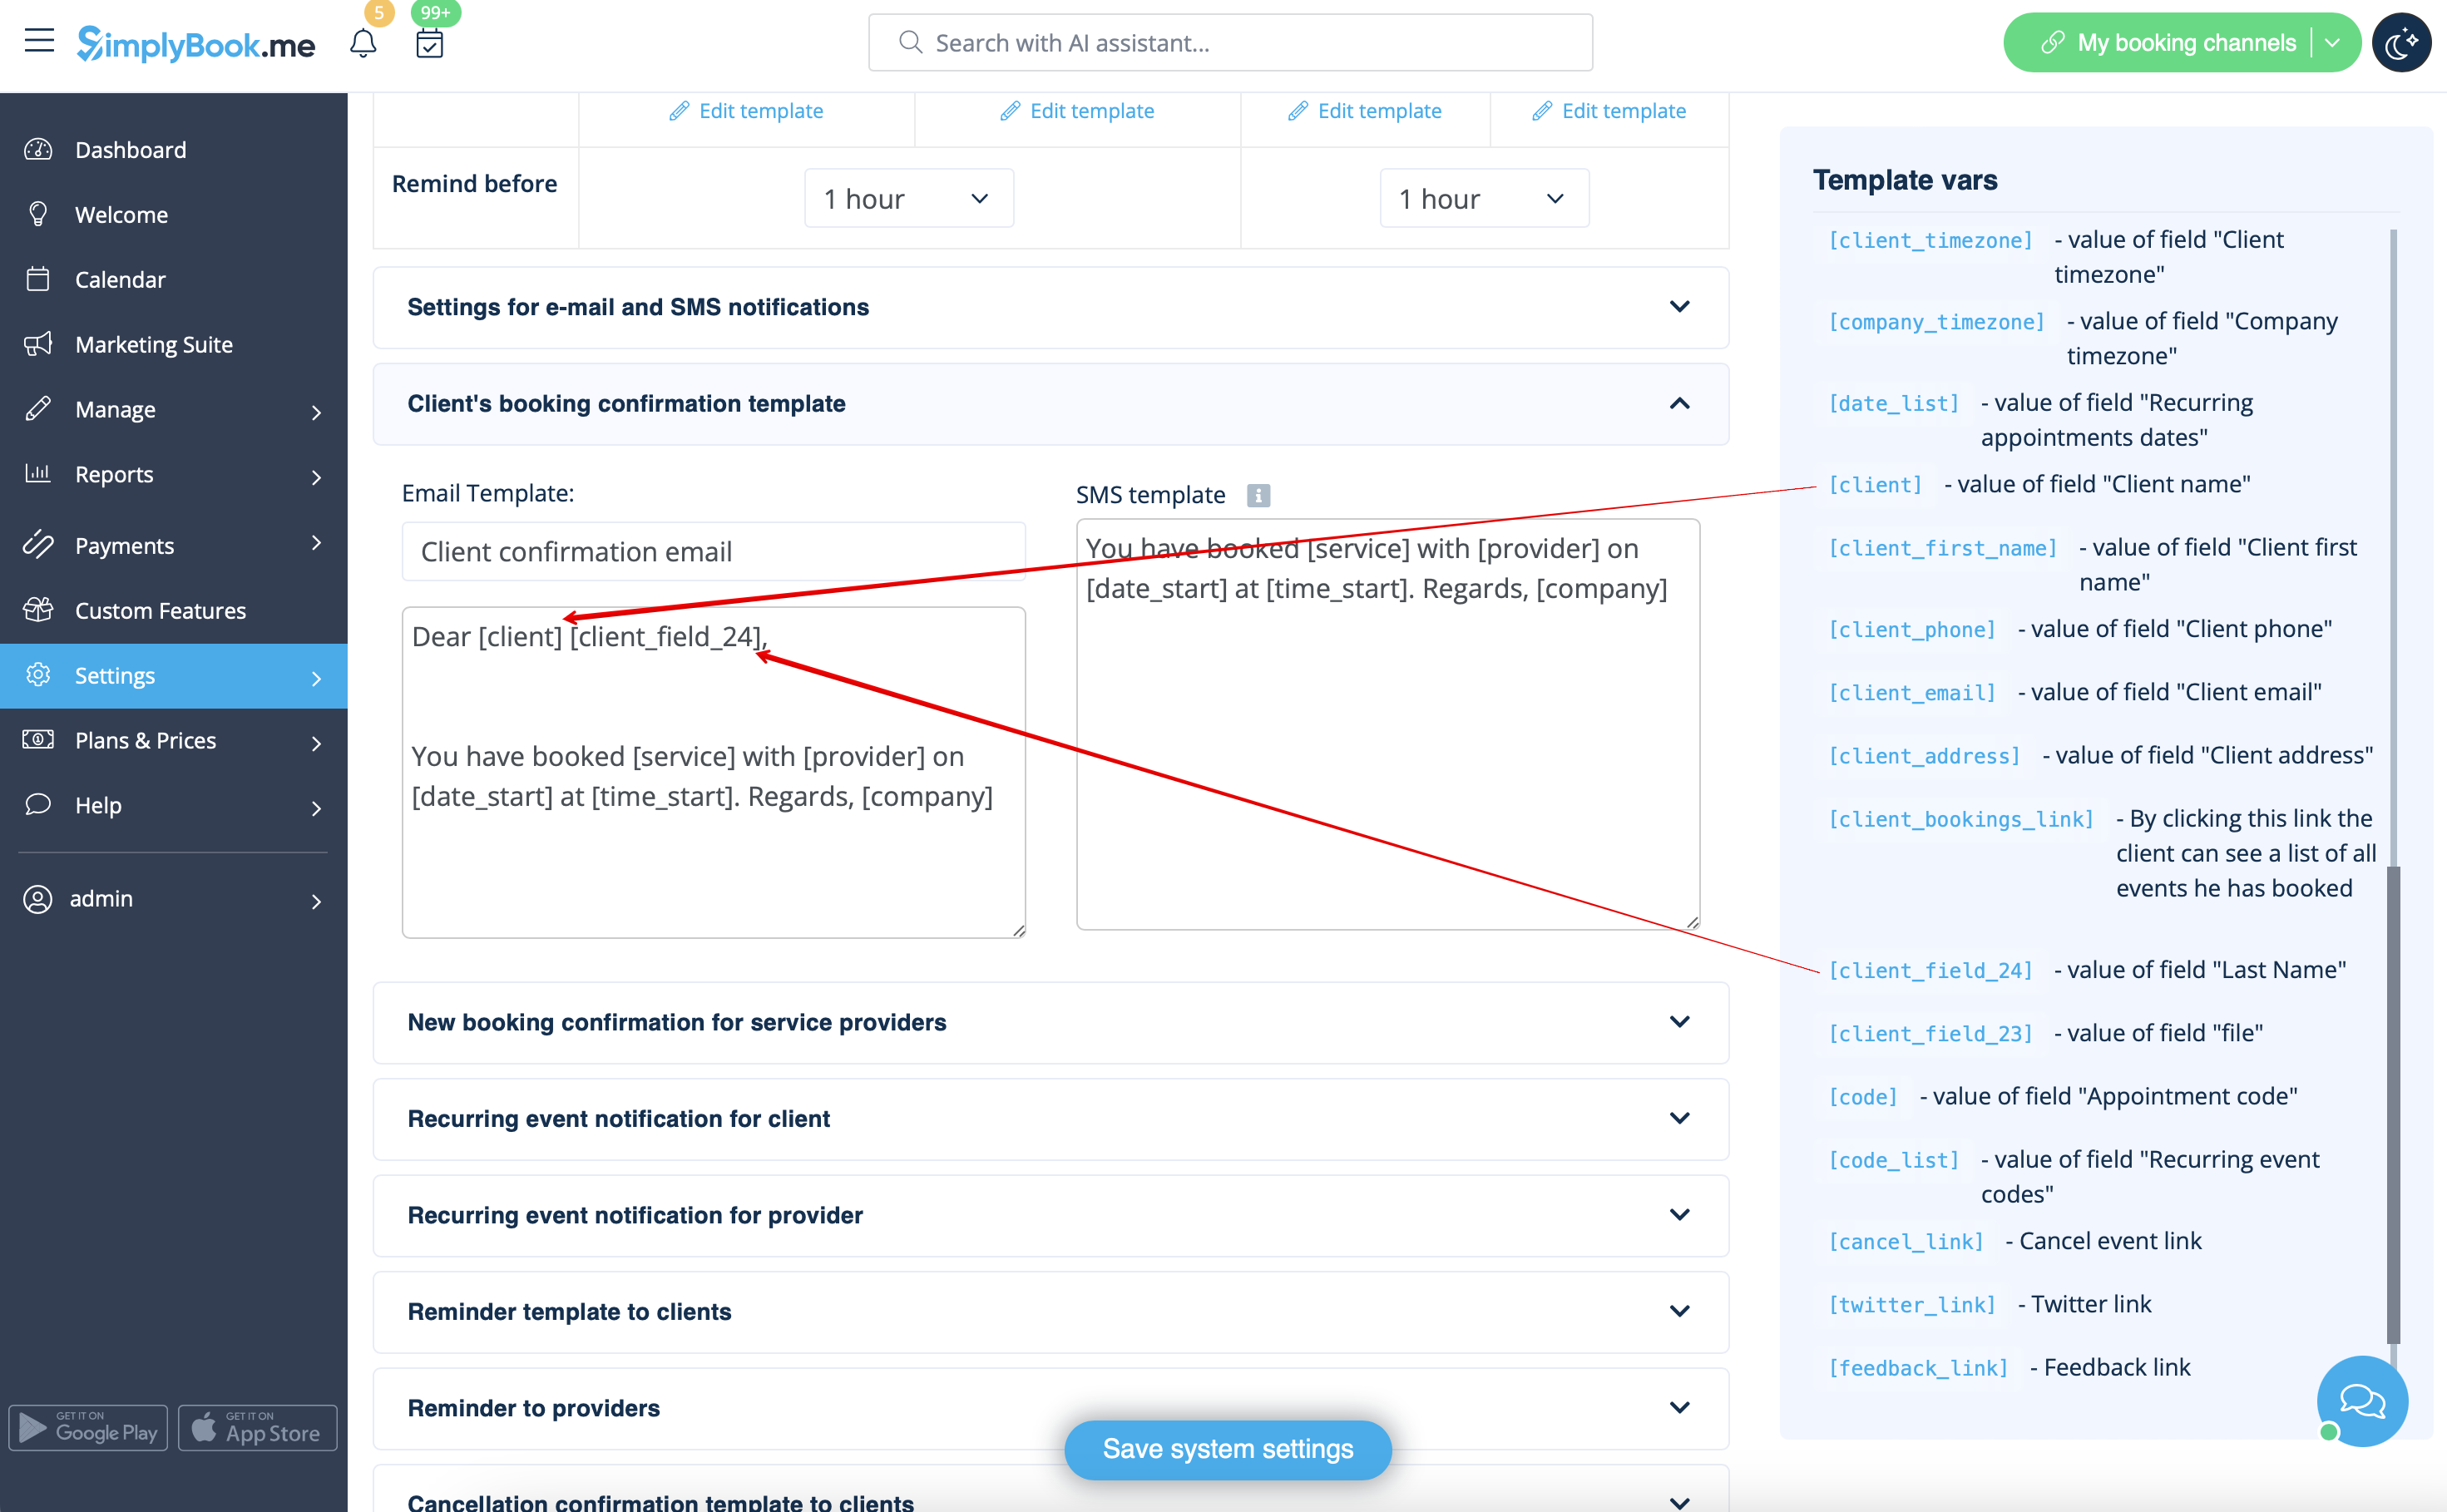
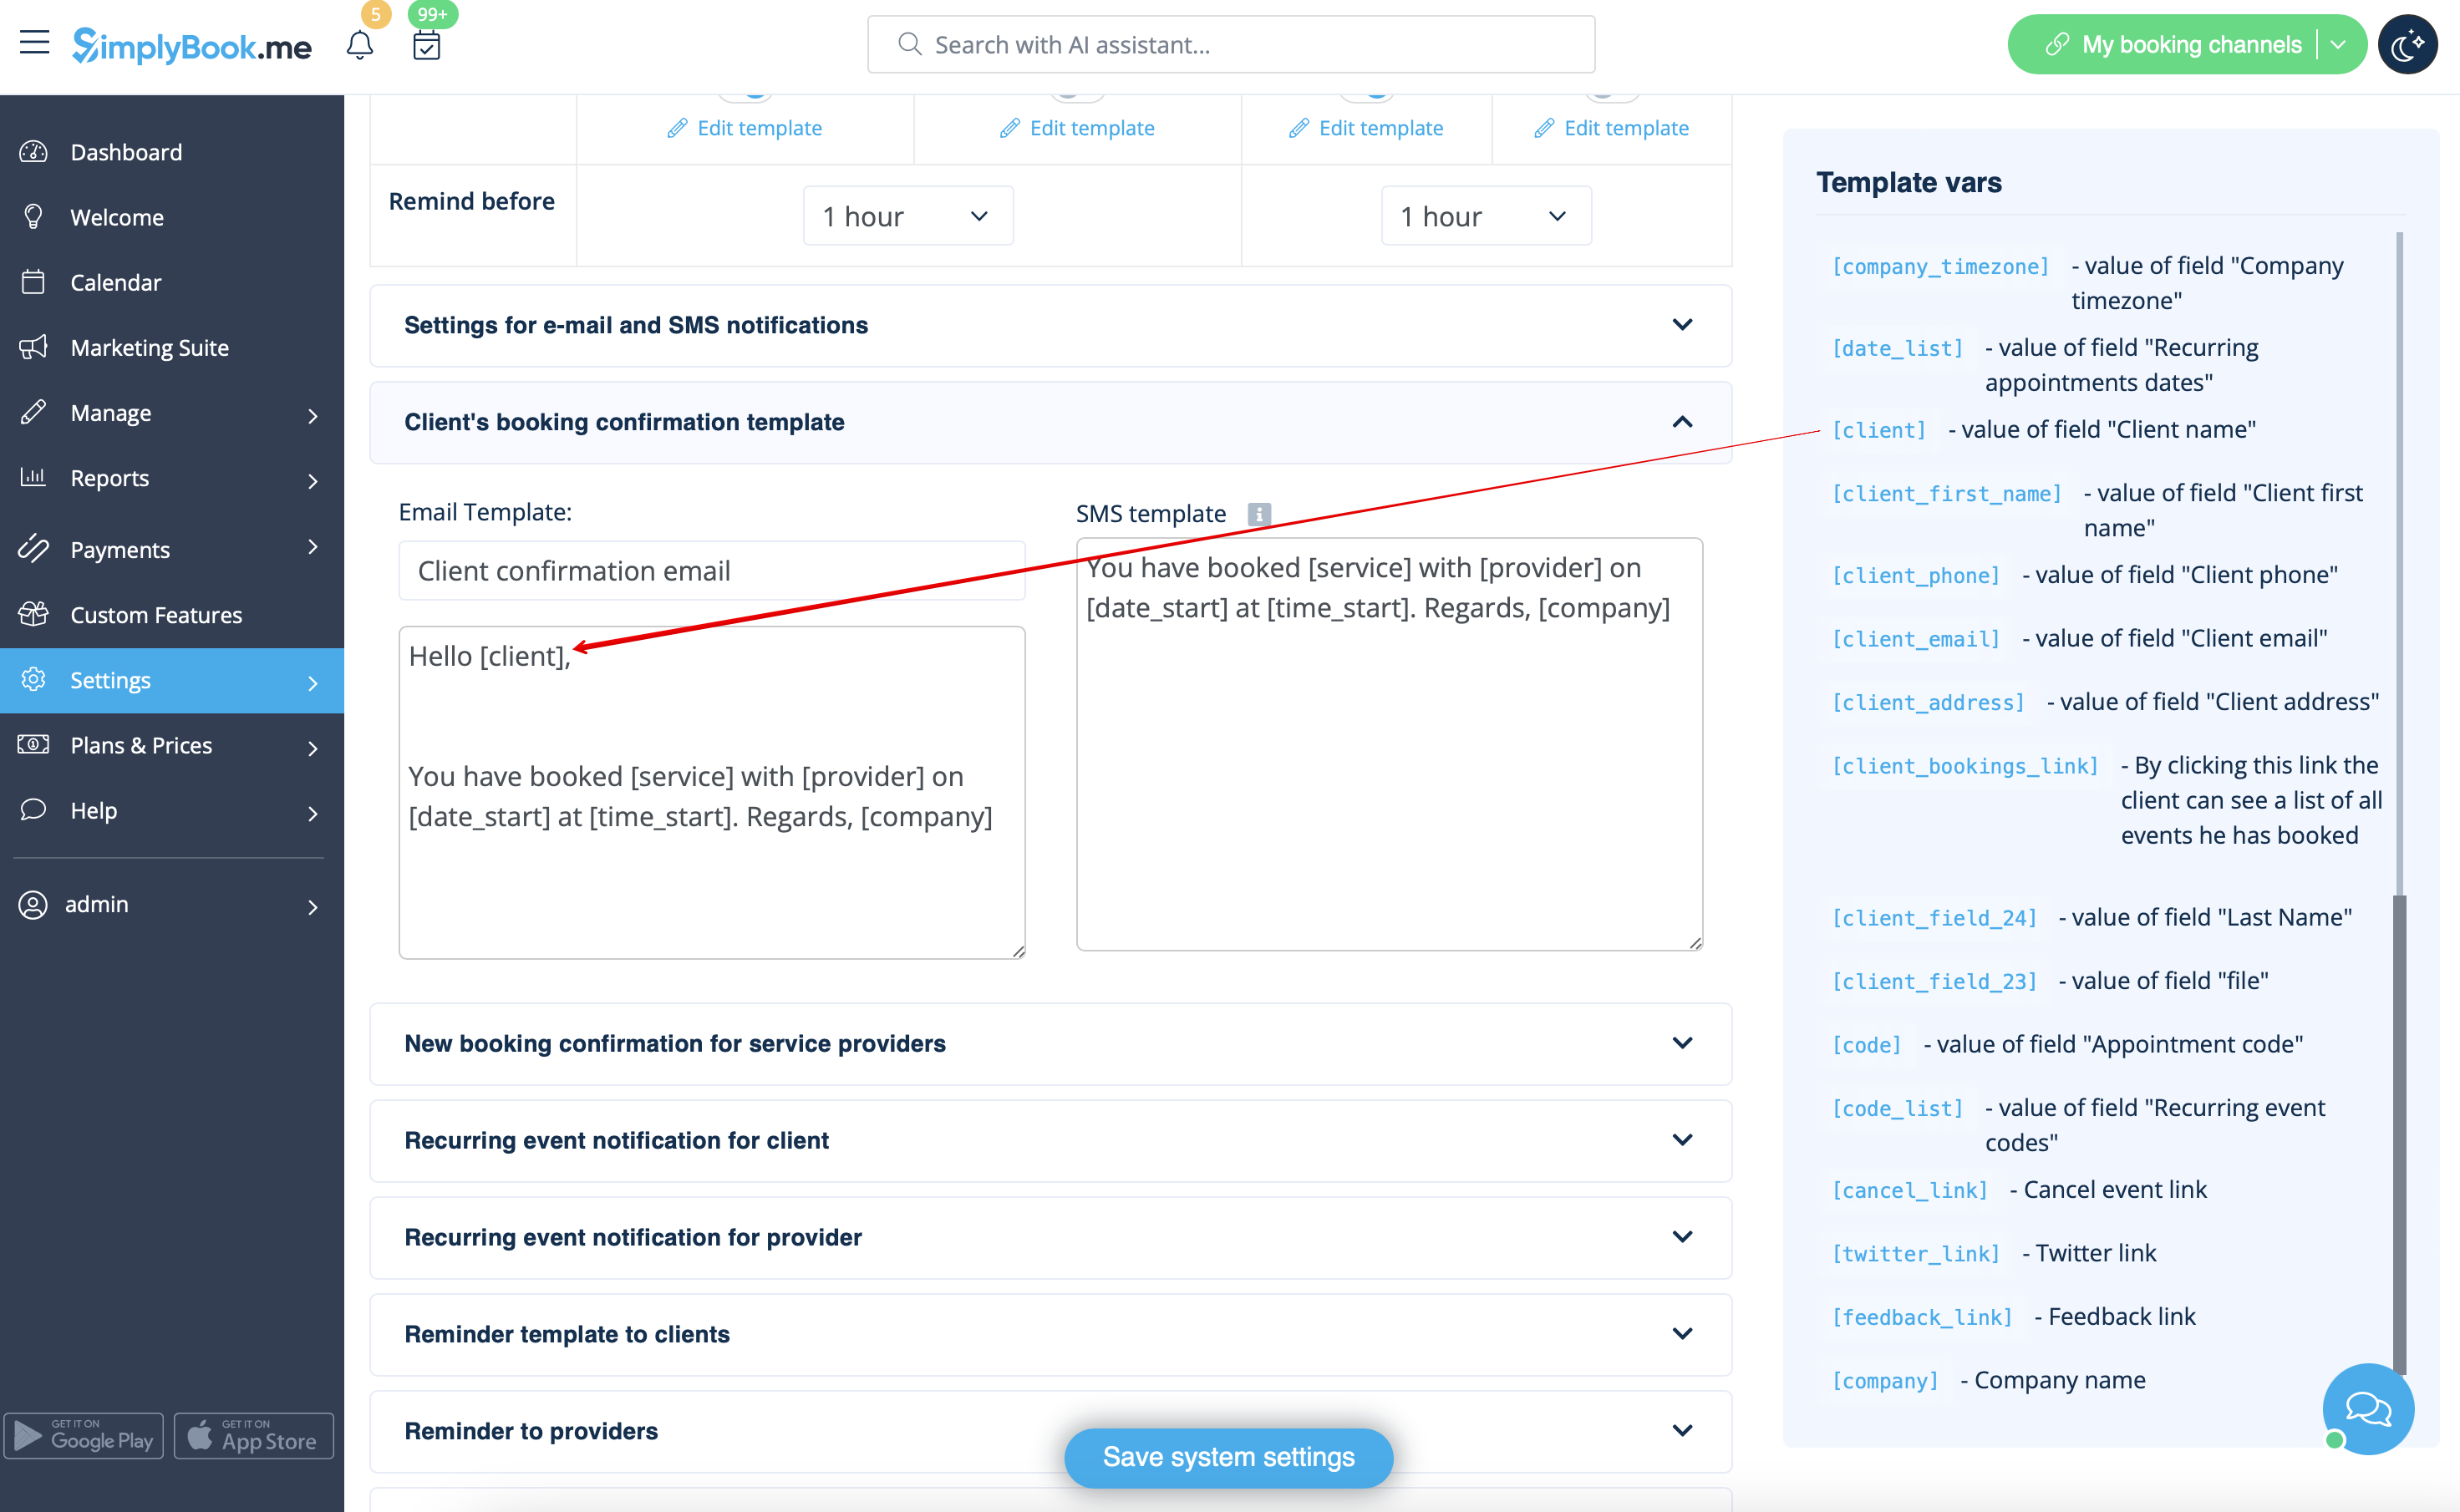
- 6. (optional) Add the desired variables to the notifications templates in Settings -> Email and SMS settings (or Flexible notifications feature if you have customized them per service/provider).
- For example, you can make booking related more personal by using only first name in the greeting.
- (here we are using default [client] variable as we have simply renamed the default field in step #3)
- Or sound more official with only last name use.
- (client field is used here, taken from step #4)
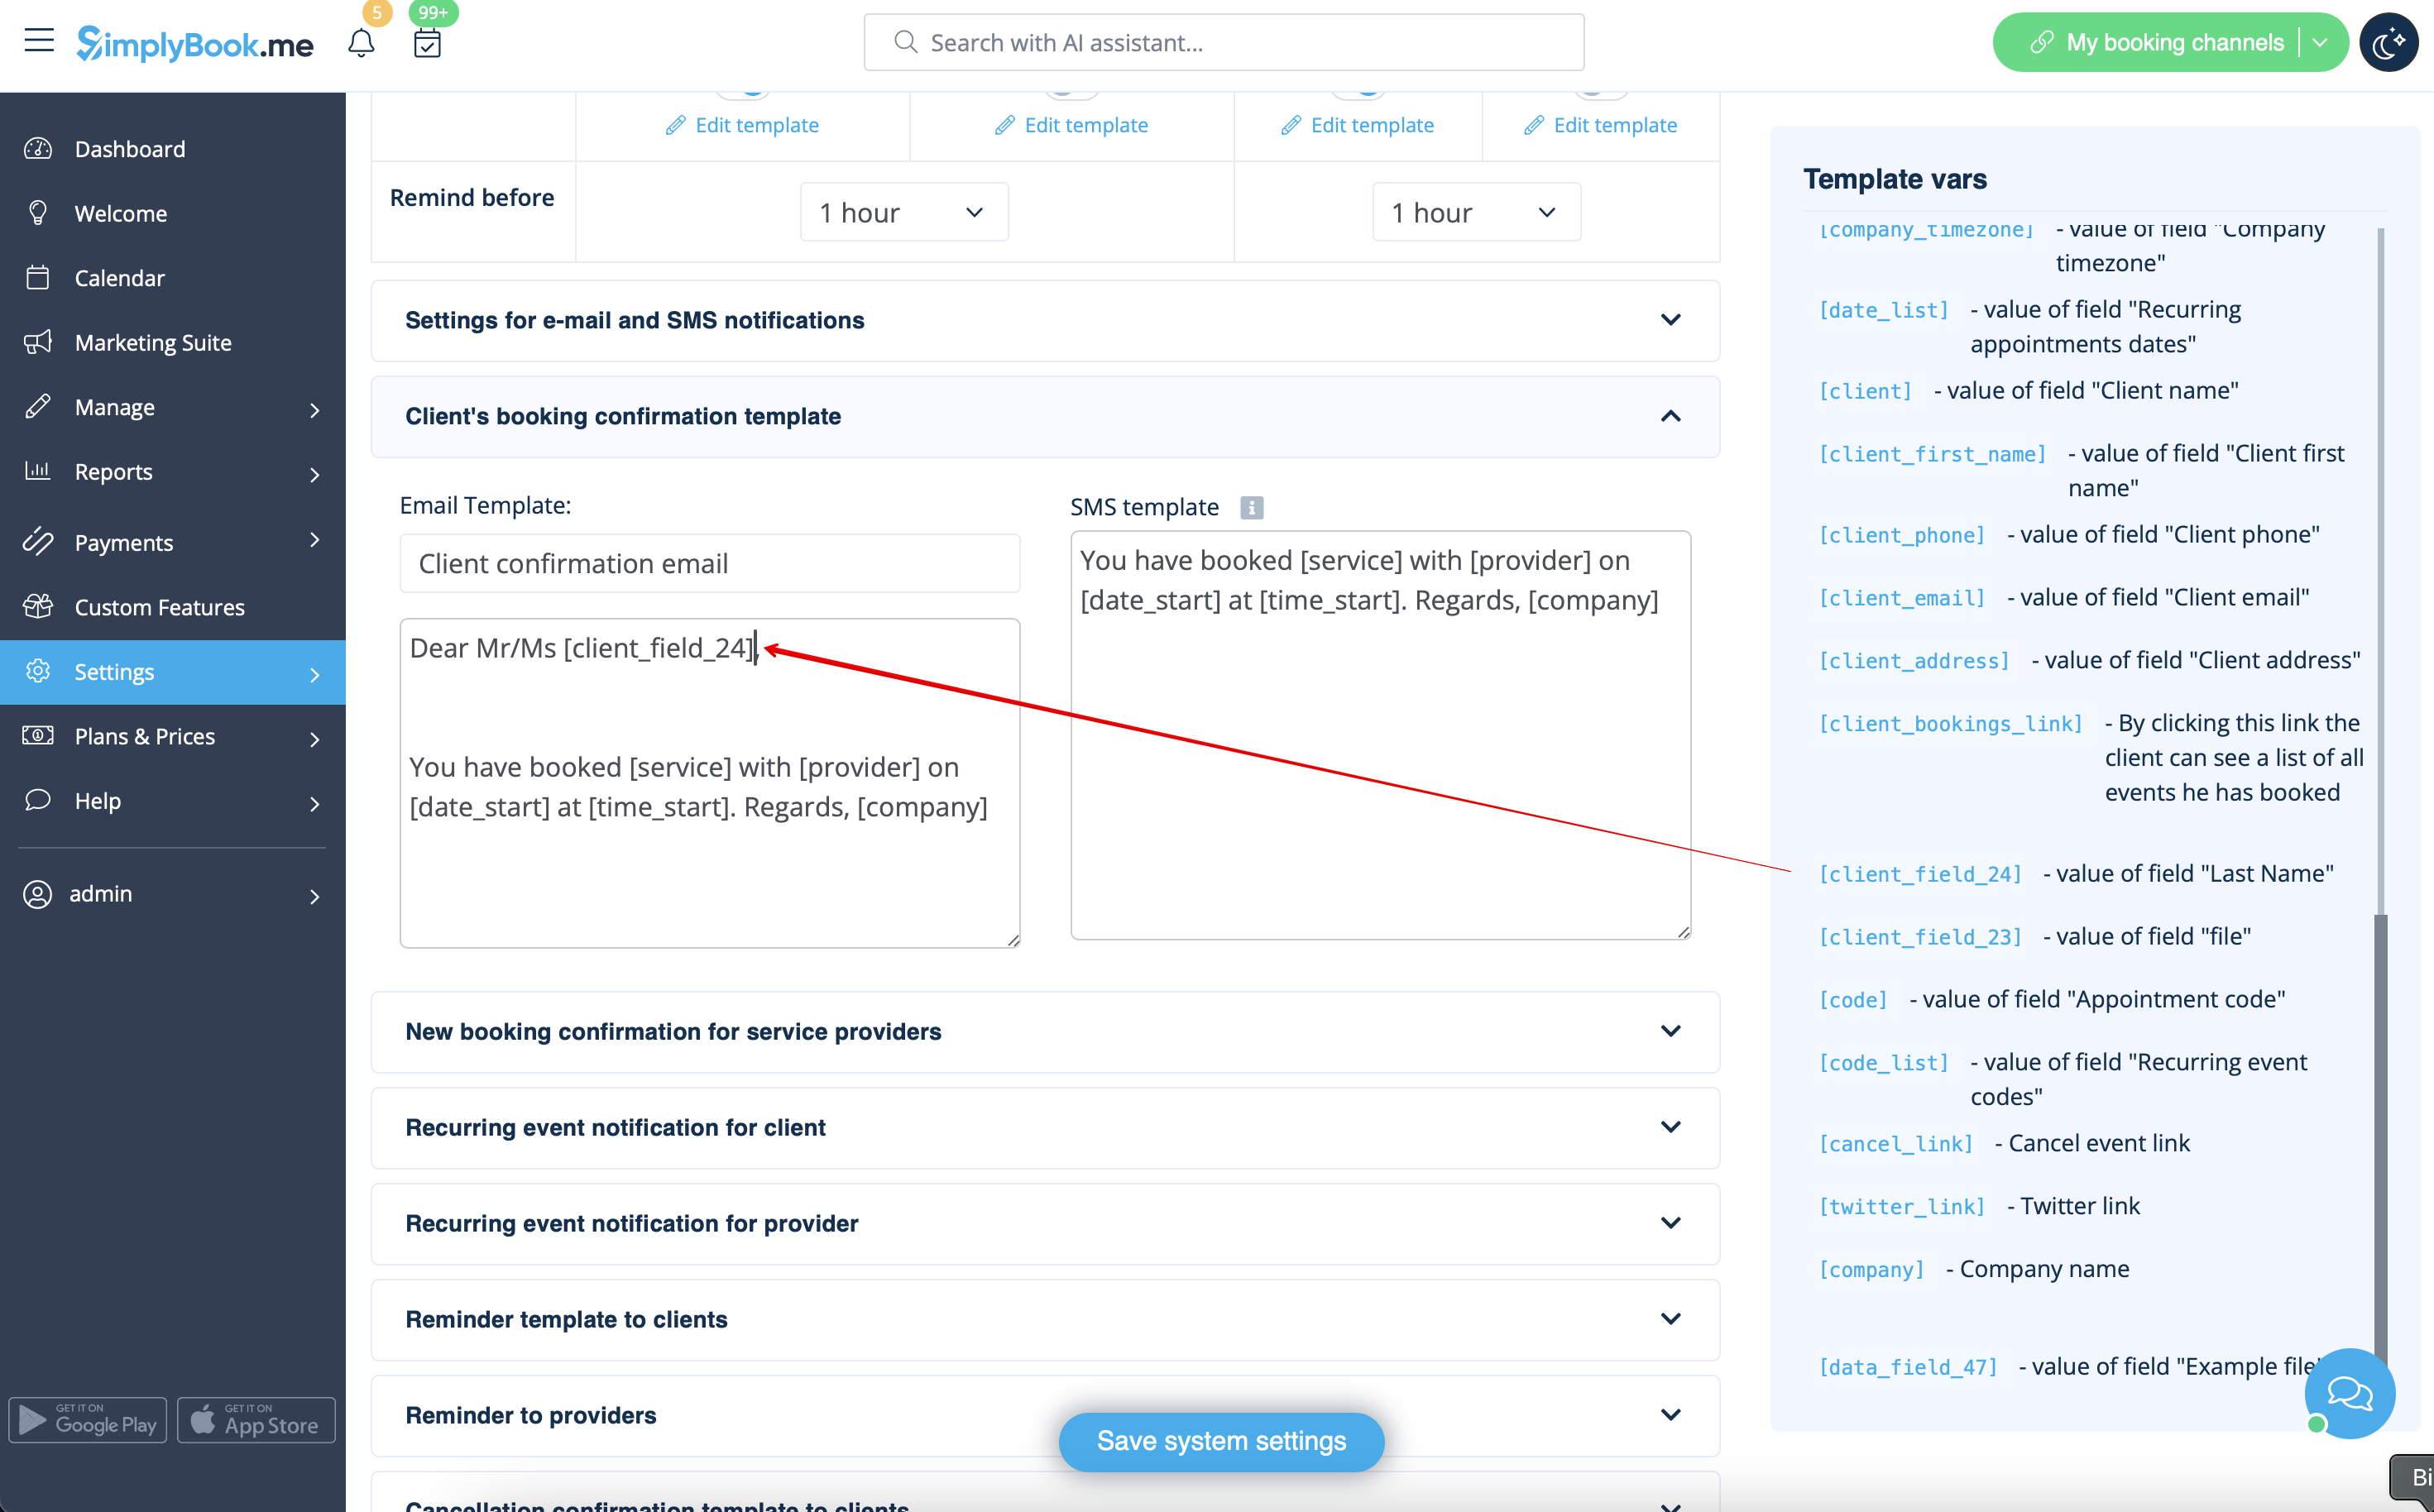
- Or even use both if you like.
- (default variable and client form combined)