From SimplyBook.me
No edit summary |
Marked this version for translation |
||
| Line 1: | Line 1: | ||
<languages/> | <languages/> | ||
<translate> | <translate> | ||
<!--T:1--> | |||
{{#seo: | {{#seo: | ||
|title=Custom Features - SimplyBook.me | |title=Custom Features - SimplyBook.me | ||
| Line 12: | Line 13: | ||
<!--T:2--> | |||
[[File:Tickets qr code.png |left]] | [[File:Tickets qr code.png |left]] | ||
<br><br> | <br><br> | ||
Create customized QR codes for your tickets consisting of one or more additional fields variables, with or without a delimiter. This QR code can be added to your tickets to facilitate further information reading into external systems after ticket validation. | Create customized QR codes for your tickets consisting of one or more additional fields variables, with or without a delimiter. This QR code can be added to your tickets to facilitate further information reading into external systems after ticket validation. | ||
<!--T:3--> | |||
<br><br> | <br><br> | ||
<span style="background-color:#ffe9e9; padding:5px; border-radius:5px;">'''Please note!''':</span> | <span style="background-color:#ffe9e9; padding:5px; border-radius:5px;">'''Please note!''':</span> | ||
| Line 24: | Line 27: | ||
<!--T:4--> | |||
;How to use | ;How to use | ||
<!--T:5--> | |||
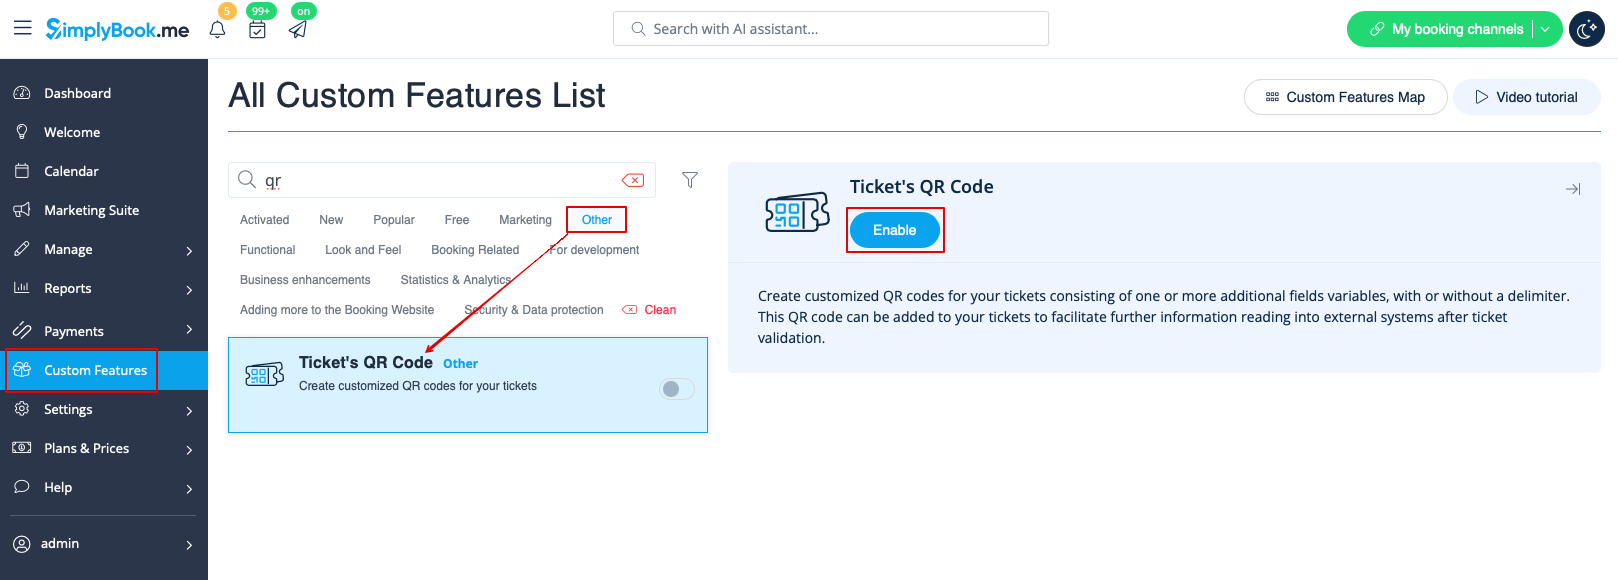
:1. Enable <span style="background-color:#d4f8e5; padding:5px; border-radius:5px;">Ticket's QR Code</span> feature on your <span style="background-color:#d4f8e5; padding:5px; border-radius:5px;">Custom features</span> page -> <span style="background-color:#d4f8e5; padding:5px; border-radius:5px;">Other</span> section. | :1. Enable <span style="background-color:#d4f8e5; padding:5px; border-radius:5px;">Ticket's QR Code</span> feature on your <span style="background-color:#d4f8e5; padding:5px; border-radius:5px;">Custom features</span> page -> <span style="background-color:#d4f8e5; padding:5px; border-radius:5px;">Other</span> section. | ||
[[File:Tickets qr enable path redesigned.png|1200px|border|center|link=https://help.simplybook.me/images/c/cb/Tickets_qr_enable_path_redesigned.png]] | [[File:Tickets qr enable path redesigned.png|1200px|border|center|link=https://help.simplybook.me/images/c/cb/Tickets_qr_enable_path_redesigned.png]] | ||
| Line 37: | Line 42: | ||
</translate> | </translate> | ||
<translate> | <translate> | ||
<!--T:6--> | |||
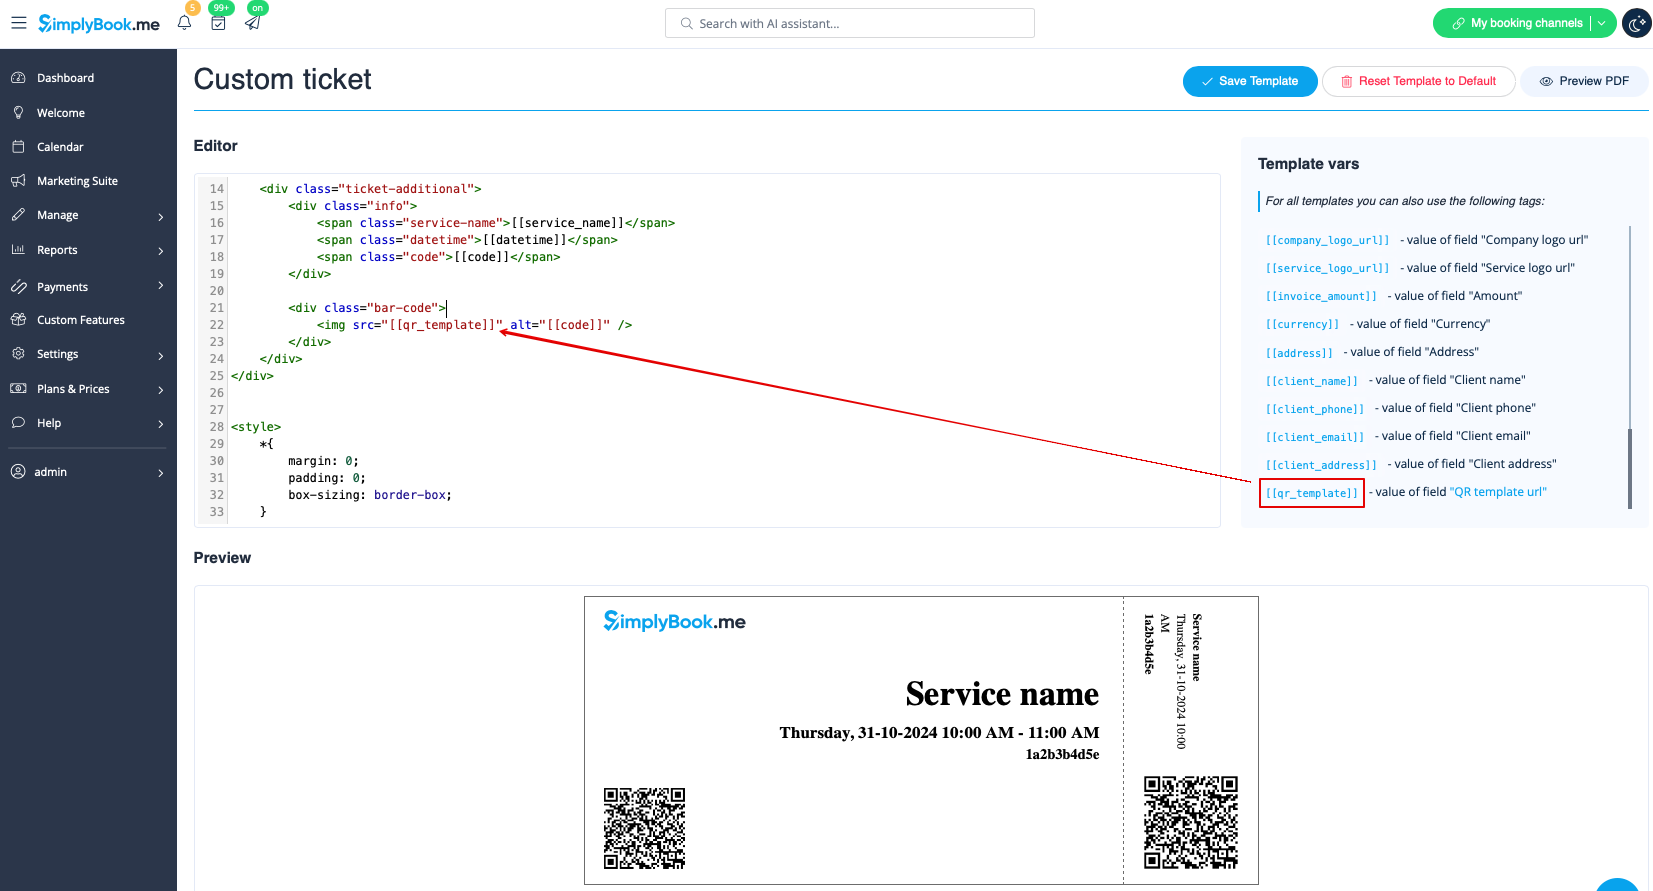
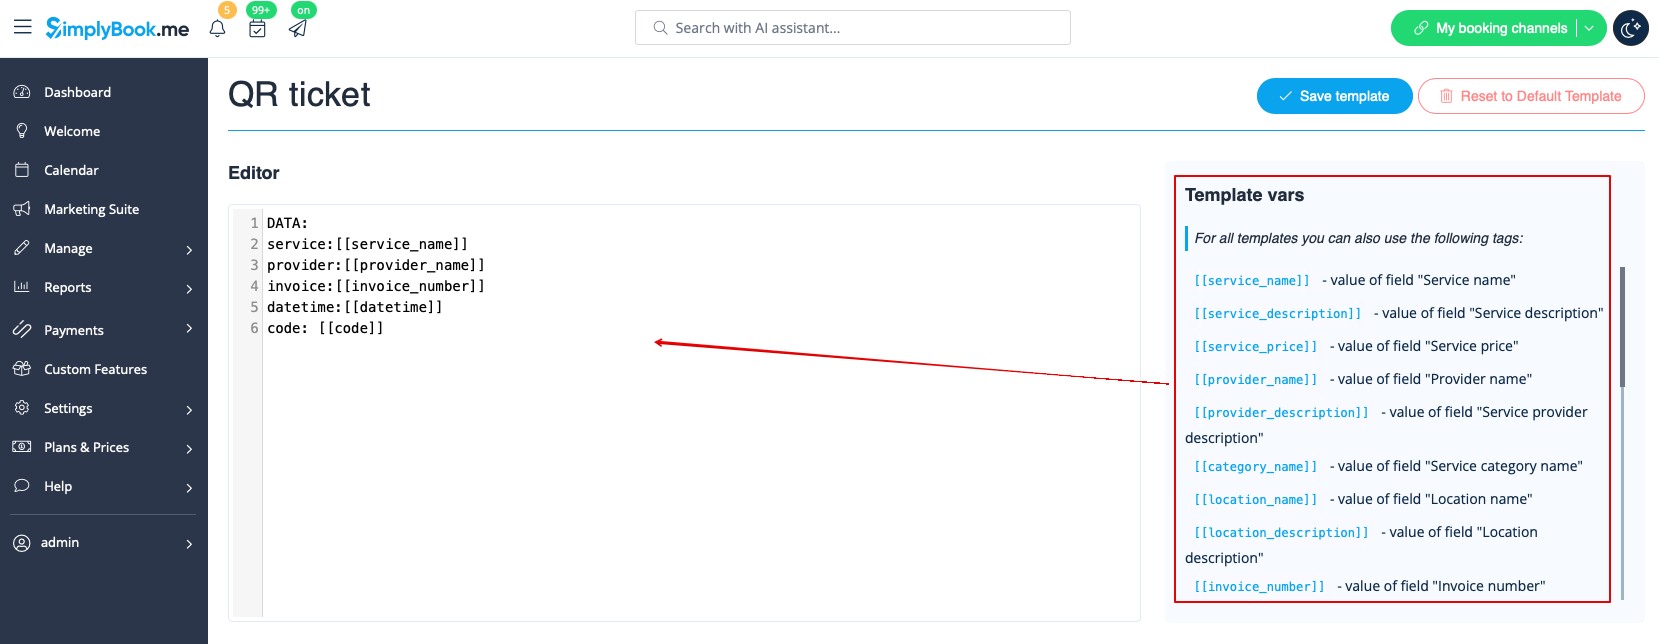
:4. Adjust the template to your needs using the <span style="background-color:#d4f8e5; padding:5px; border-radius:5px;">Editor</span> and the available <span style="background-color:#d4f8e5; padding:5px; border-radius:5px;">variables</span> on the right. | :4. Adjust the template to your needs using the <span style="background-color:#d4f8e5; padding:5px; border-radius:5px;">Editor</span> and the available <span style="background-color:#d4f8e5; padding:5px; border-radius:5px;">variables</span> on the right. | ||
[[File:Tickets qr template variables redesigned.png|1200px|border|center|link=https://help.simplybook.me/images/1/18/Tickets_qr_template_variables_redesigned.png]] | [[File:Tickets qr template variables redesigned.png|1200px|border|center|link=https://help.simplybook.me/images/1/18/Tickets_qr_template_variables_redesigned.png]] | ||
Revision as of 15:43, 19 May 2025

Create customized QR codes for your tickets consisting of one or more additional fields variables, with or without a delimiter. This QR code can be added to your tickets to facilitate further information reading into external systems after ticket validation.
Please note!:
- When you enable this custom feature Tickets will be enabled as well.
- With this feature you will need to edit custom ticket template with is available with premium subscriptions only.
- How to use
- 1. Enable Ticket's QR Code feature on your Custom features page -> Other section.
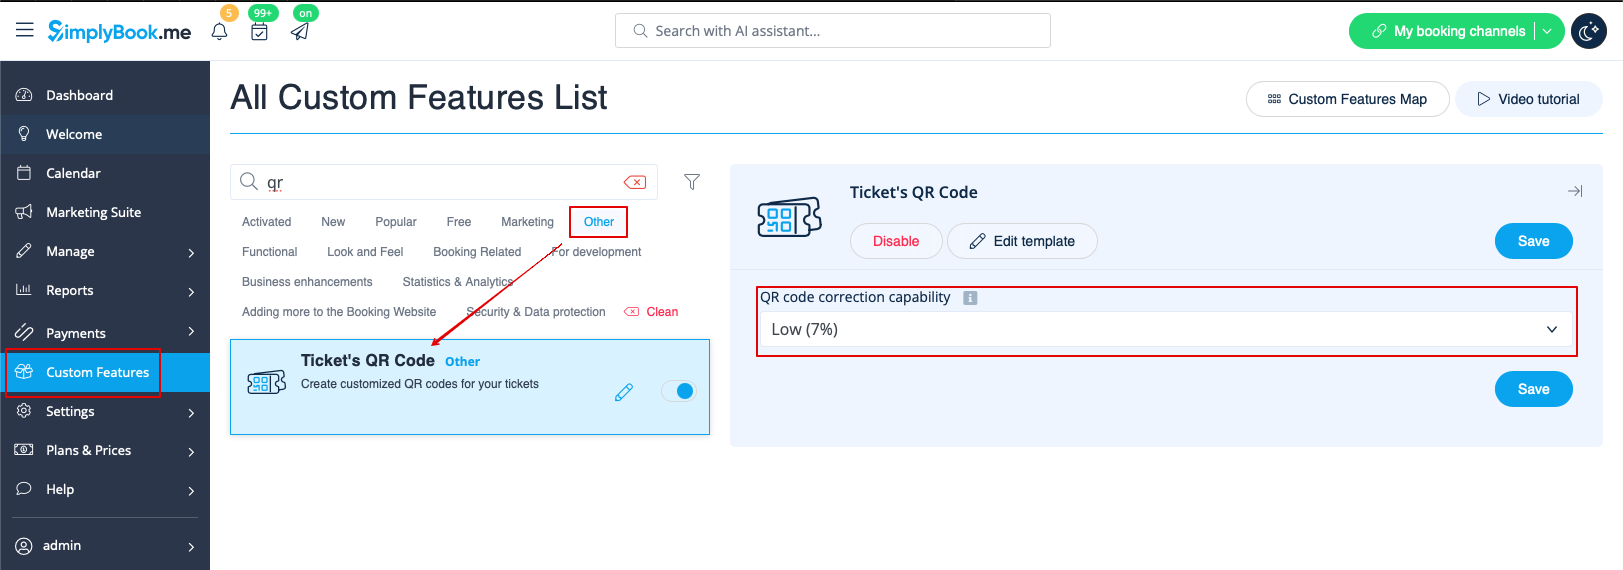
- 2. Select QR code correction capability if necessary.
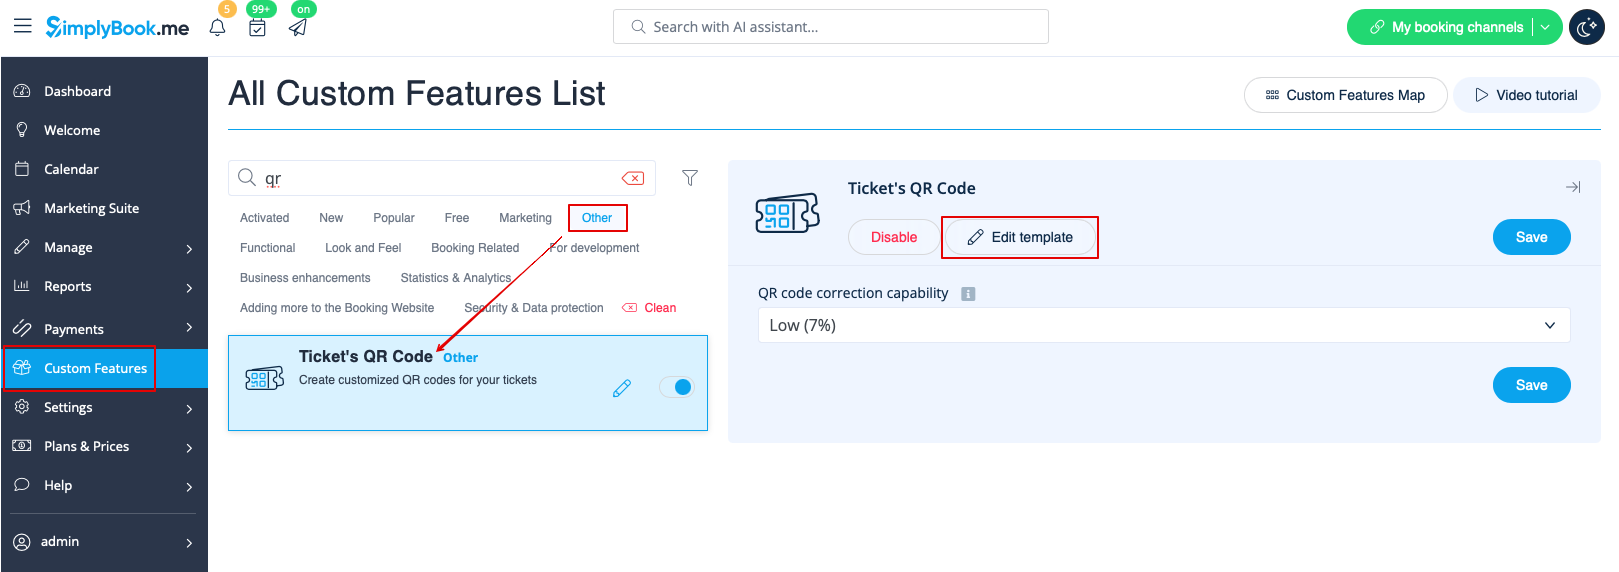
- 3. Navigate to Edit template page.
- 4. Adjust the template to your needs using the Editor and the available variables on the right.
- 5. Add QR template url variable to the ticket template in Custom features -> Tickets -> Custom ticket.
- (please also make sure that you have custom ticket attached to necessary services in Manage -> Services -> select the necessary service -> Tickets)