From SimplyBook.me
Marked this version for translation |
No edit summary |
||
| Line 18: | Line 18: | ||
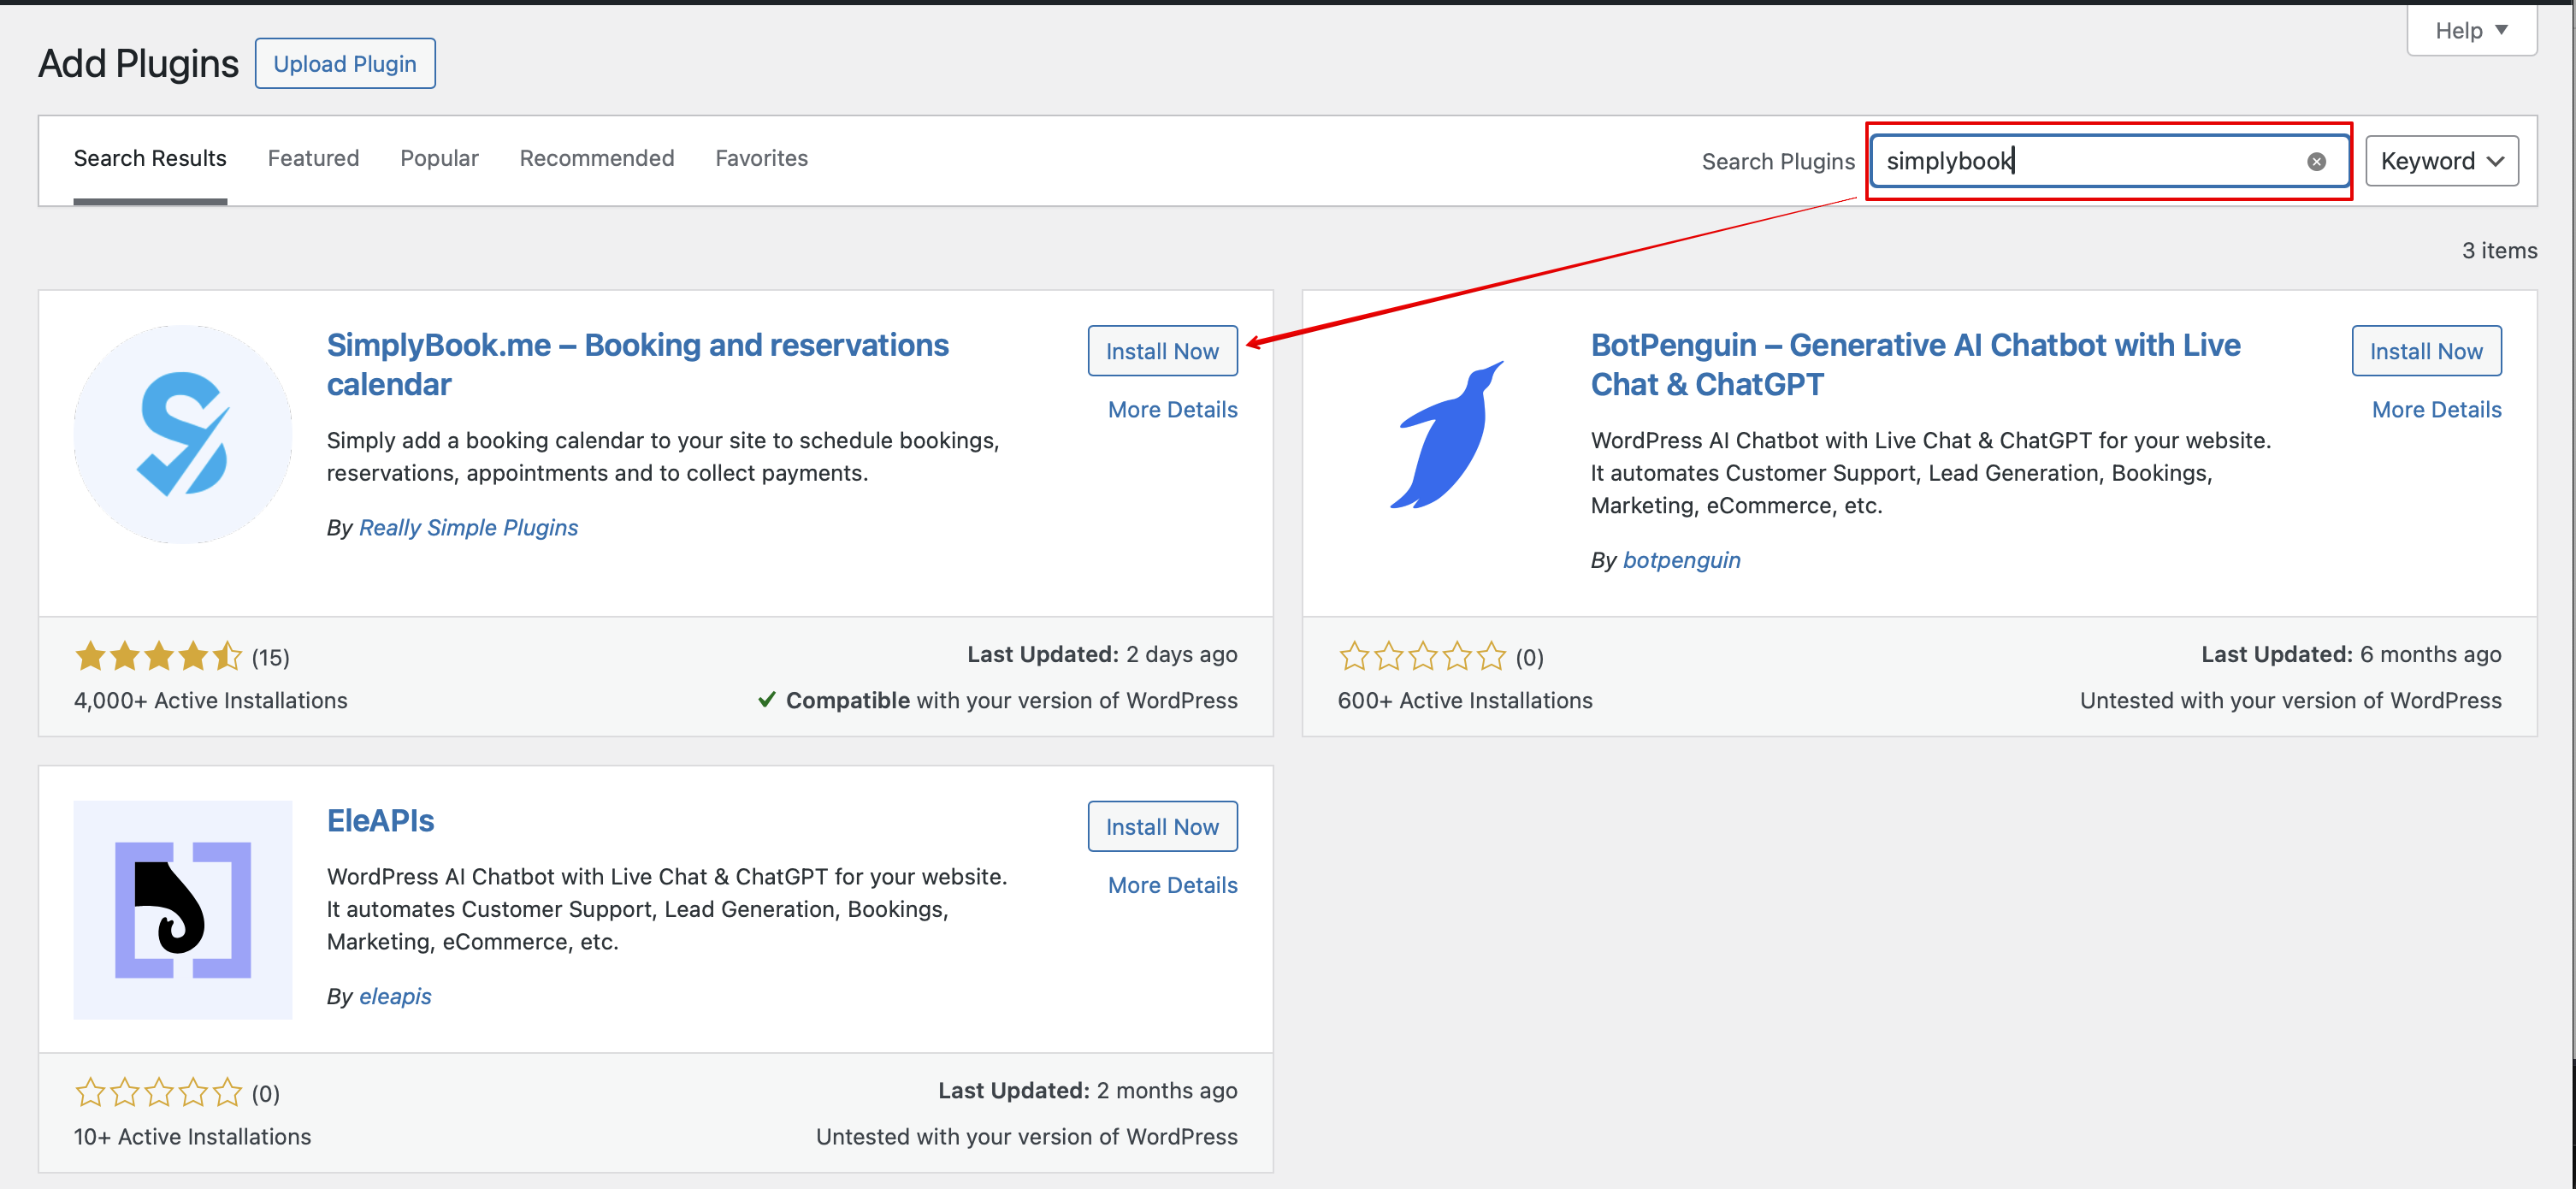
:1. In your WordPress admin interface navigate to <span style="background-color:#d4f8e5; padding:5px; border-radius:5px;">Plugins</span> -> <span style="background-color:#d4f8e5; padding:5px; border-radius:5px;">Add new Plugin</span> and search for '''Simplybook'''.<br> | :1. In your WordPress admin interface navigate to <span style="background-color:#d4f8e5; padding:5px; border-radius:5px;">Plugins</span> -> <span style="background-color:#d4f8e5; padding:5px; border-radius:5px;">Add new Plugin</span> and search for '''Simplybook'''.<br> | ||
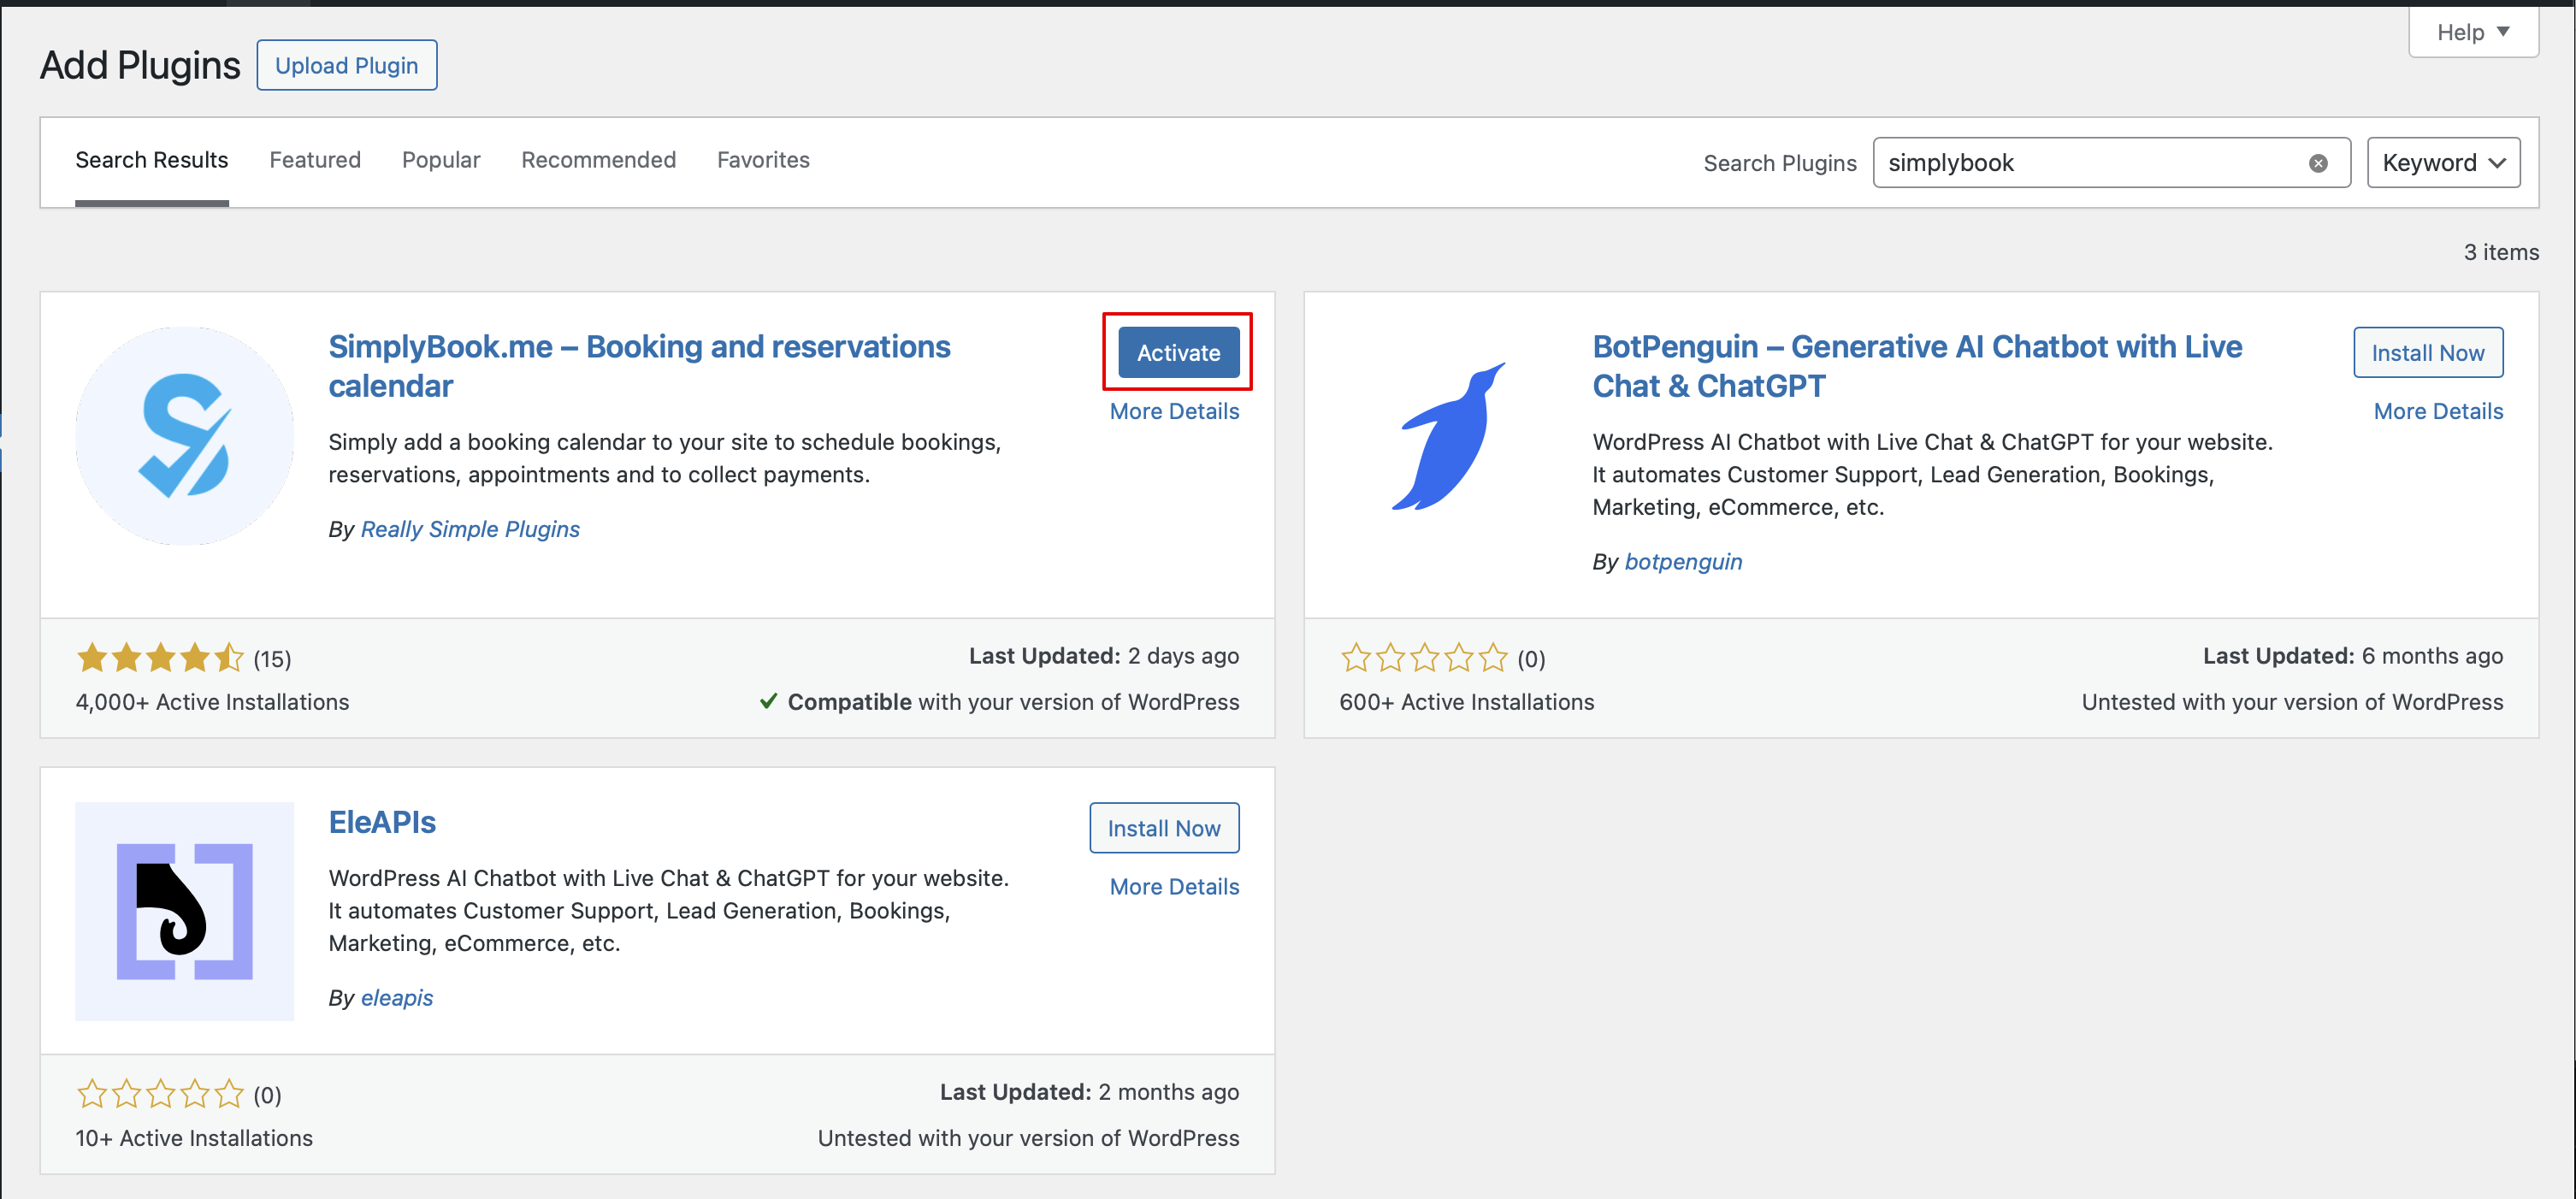
:Install it and Activate. | :Install it and Activate. | ||
[[File:Add | [[File:Add simplybook to wp new.png|1200px|center|link=https://help.simplybook.me/images/4/47/Add_simplybook_to_wp_new.png]] | ||
<br><br> | |||
[[File:Activate new wp plugin.png|1200px|center|link=https://help.simplybook.me/images/3/32/Activate_new_wp_plugin.png]] | |||
<br><br> | <br><br> | ||
:2. Navigate to plugin <span style="background-color:#d4f8e5; padding:5px; border-radius:5px;">Settings.</span> | :2. Navigate to plugin <span style="background-color:#d4f8e5; padding:5px; border-radius:5px;">Settings.</span> | ||
<br><br> | <br><br> | ||
</translate> | </translate> | ||
| Line 27: | Line 28: | ||
<!--T:4--> | <!--T:4--> | ||
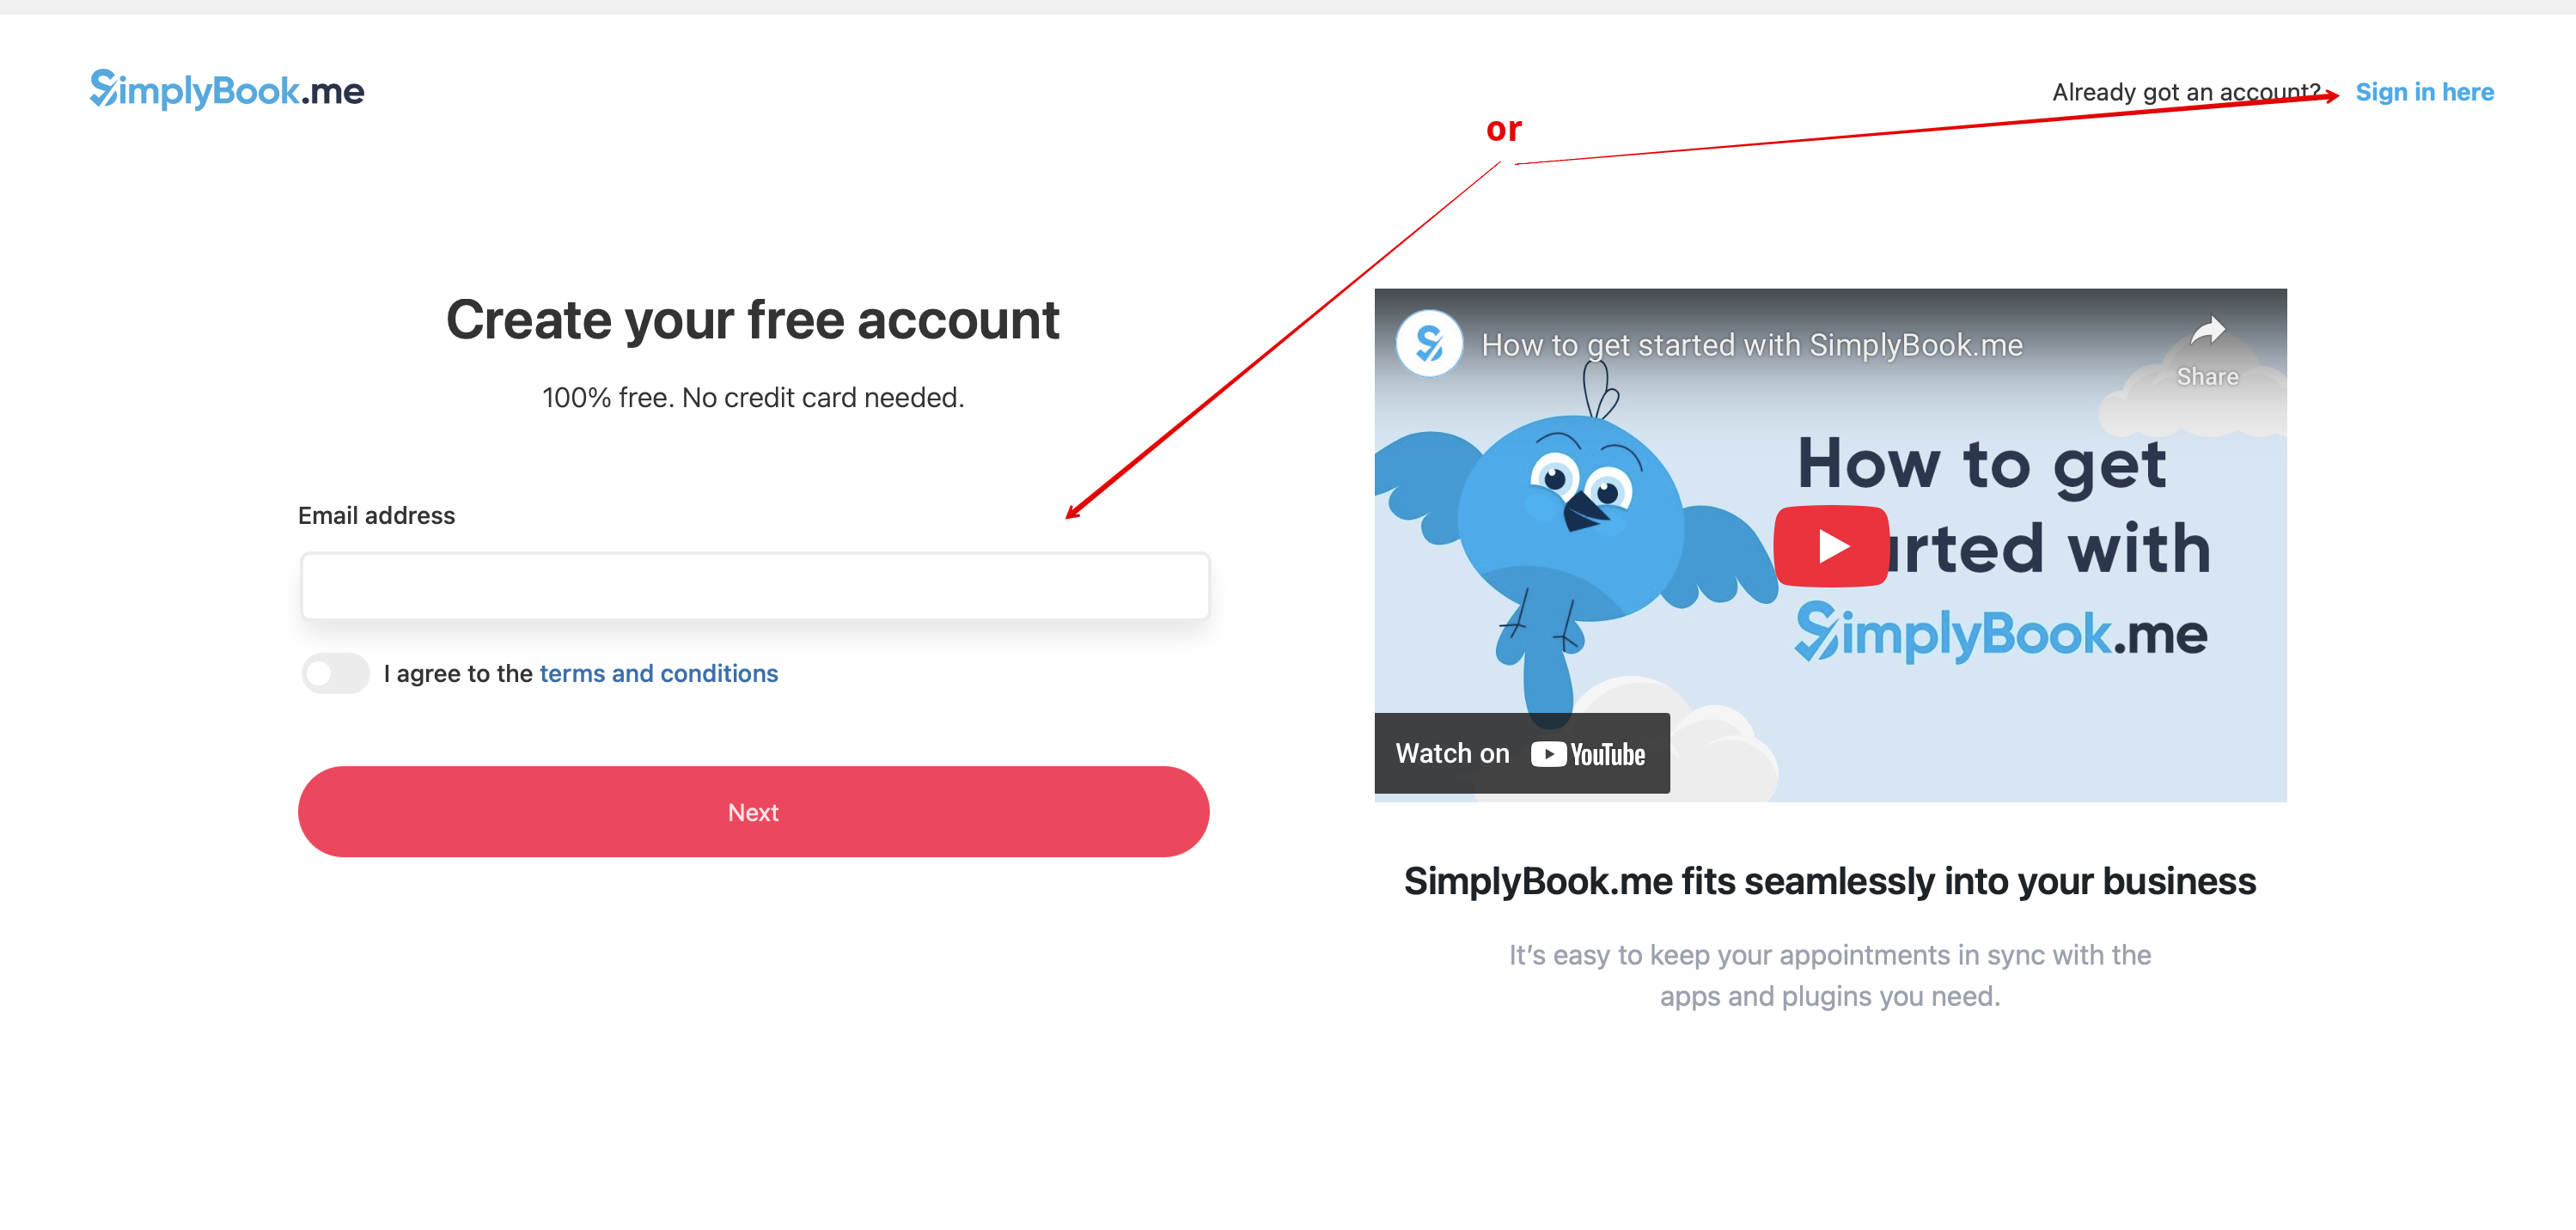
:3. If you already have an account with SimplyBook.me please choose the <span style="background-color:#d4f8e5; padding:5px; border-radius:5px;">Sign in here</span> option there.<br> | :3. If you already have an account with SimplyBook.me please choose the <span style="background-color:#d4f8e5; padding:5px; border-radius:5px;">Sign in here</span> option there.<br> | ||
:If you have not created it yet, simply | :If you have not created it yet, simply follow the <span style="background-color:#d4f8e5; padding:5px; border-radius:5px;">Create free account</span> steps. | ||
[[File: | [[File:Create account or sign up in wp.png|1200px|center|link=https://help.simplybook.me/images/2/2f/Create_account_or_sign_up_in_wp.png]] | ||
<br><br> | <br><br> | ||
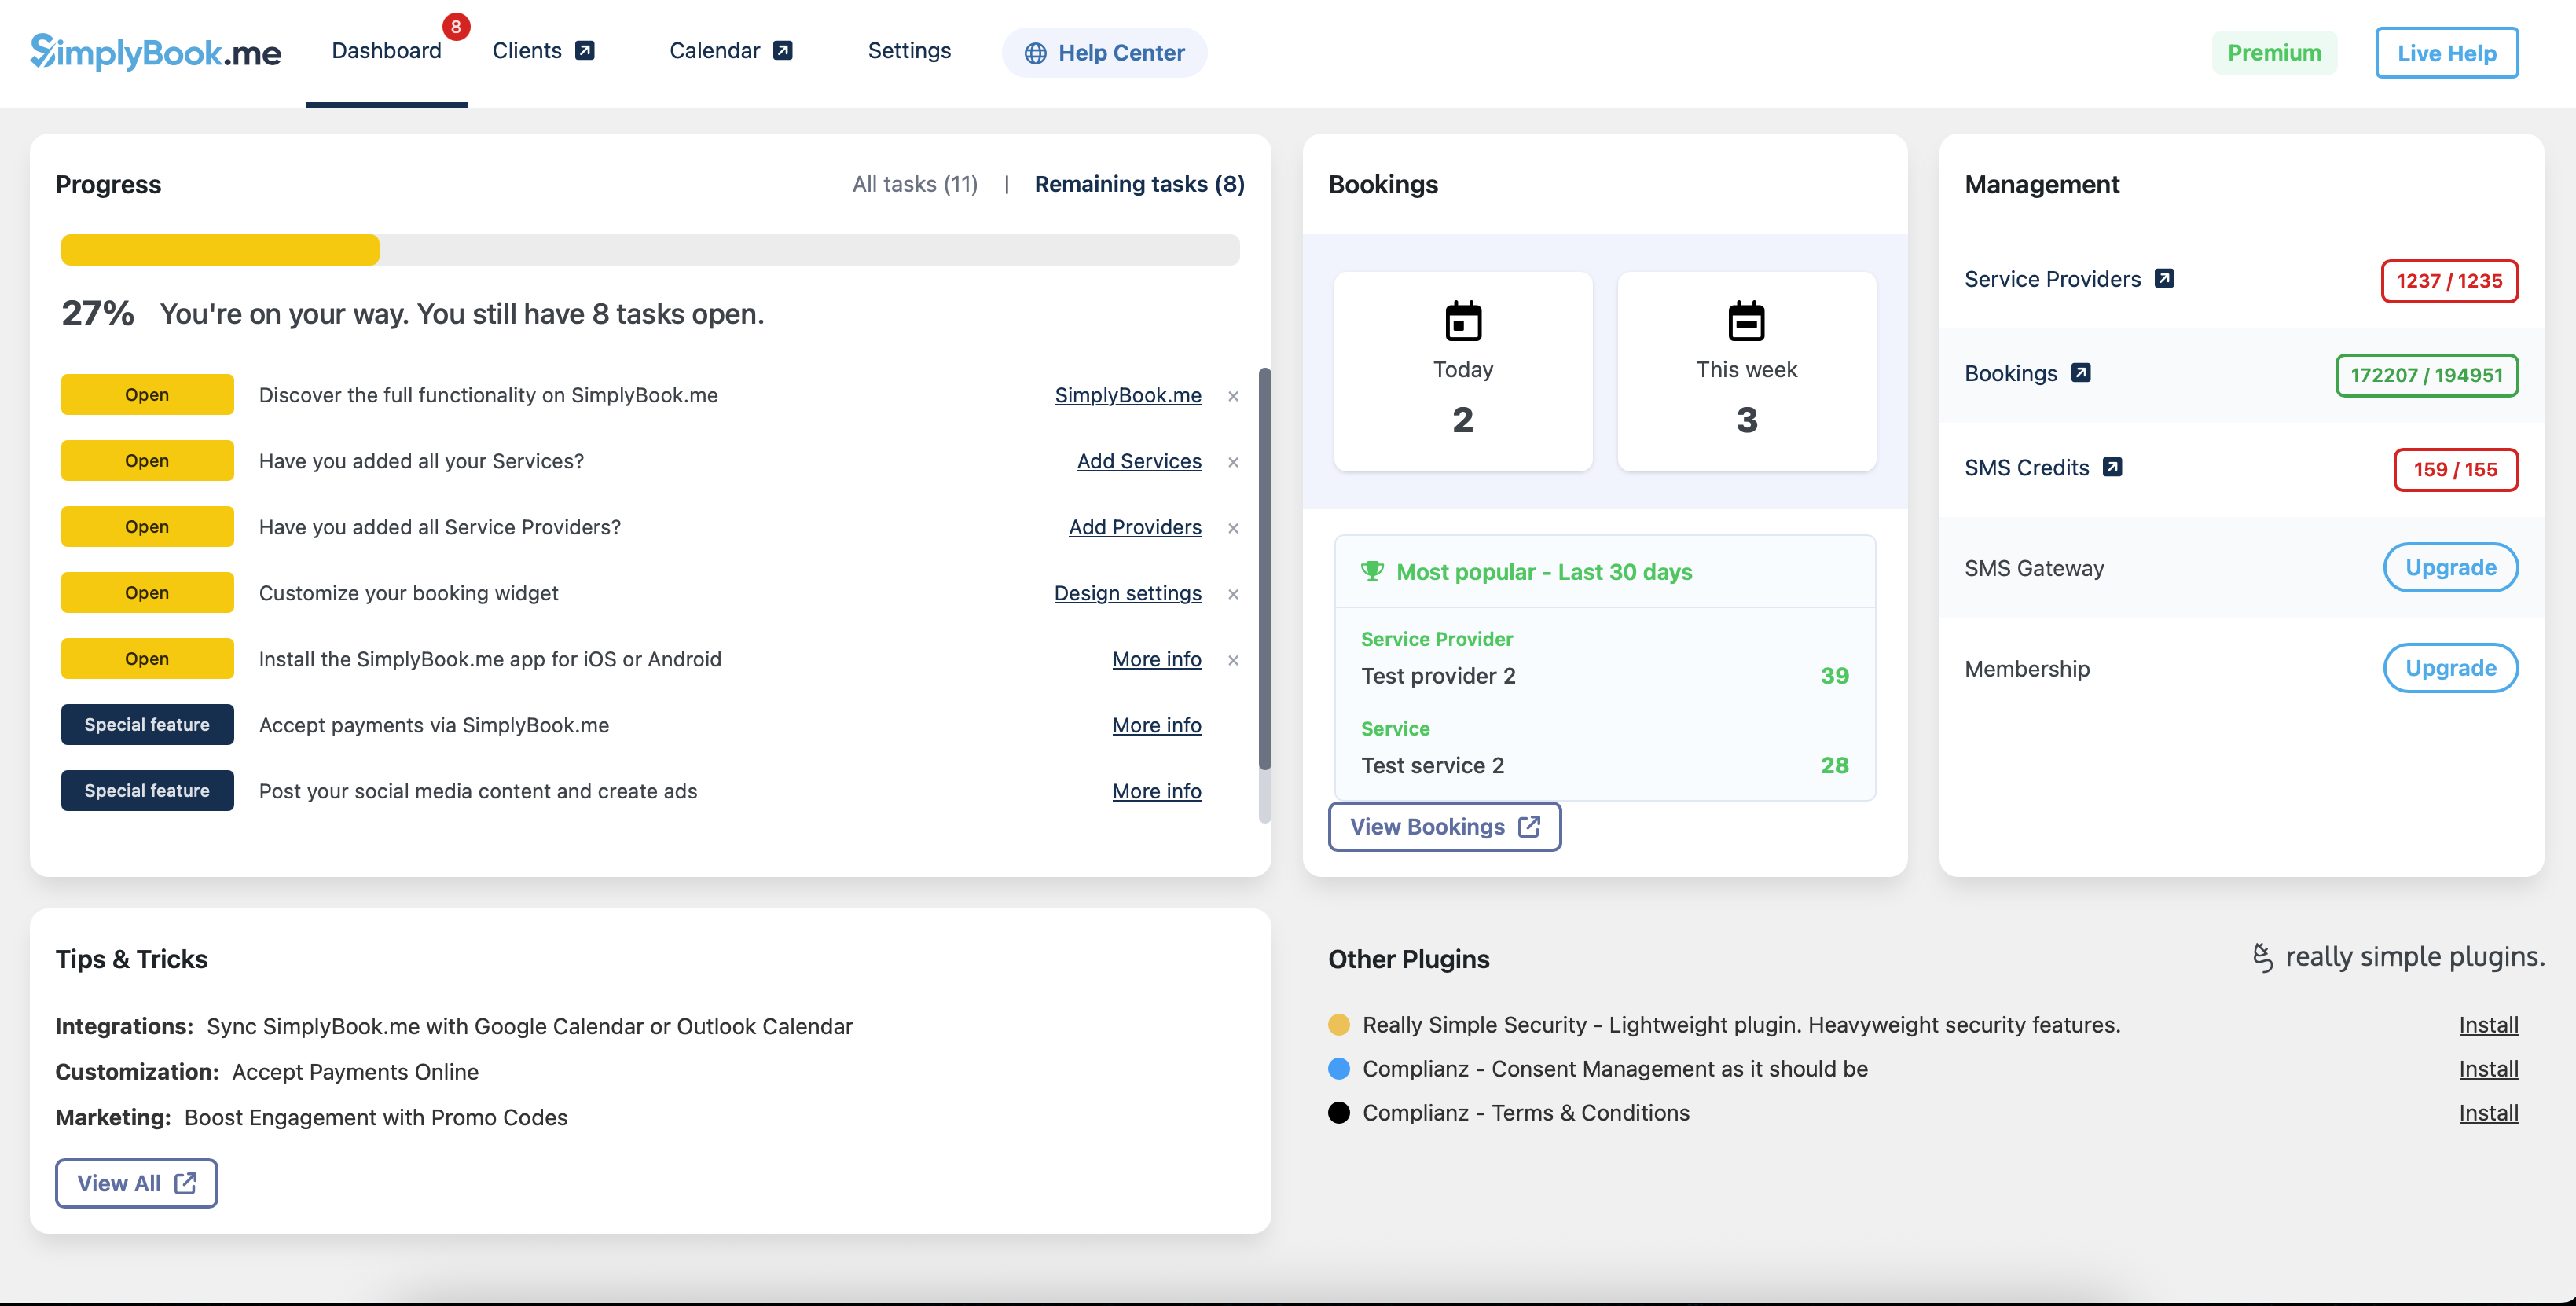
:4. | :4. After short registration/login process you will get to your <span style="background-color:#d4f8e5; padding:5px; border-radius:5px;">Dashboard</span> overview. | ||
[[File:Wp new dashboard overview.png|1200px|center|link=https://help.simplybook.me/images/a/ab/Wp_new_dashboard_overview.png]] | |||
[[File: | |||
<br><br> | <br><br> | ||
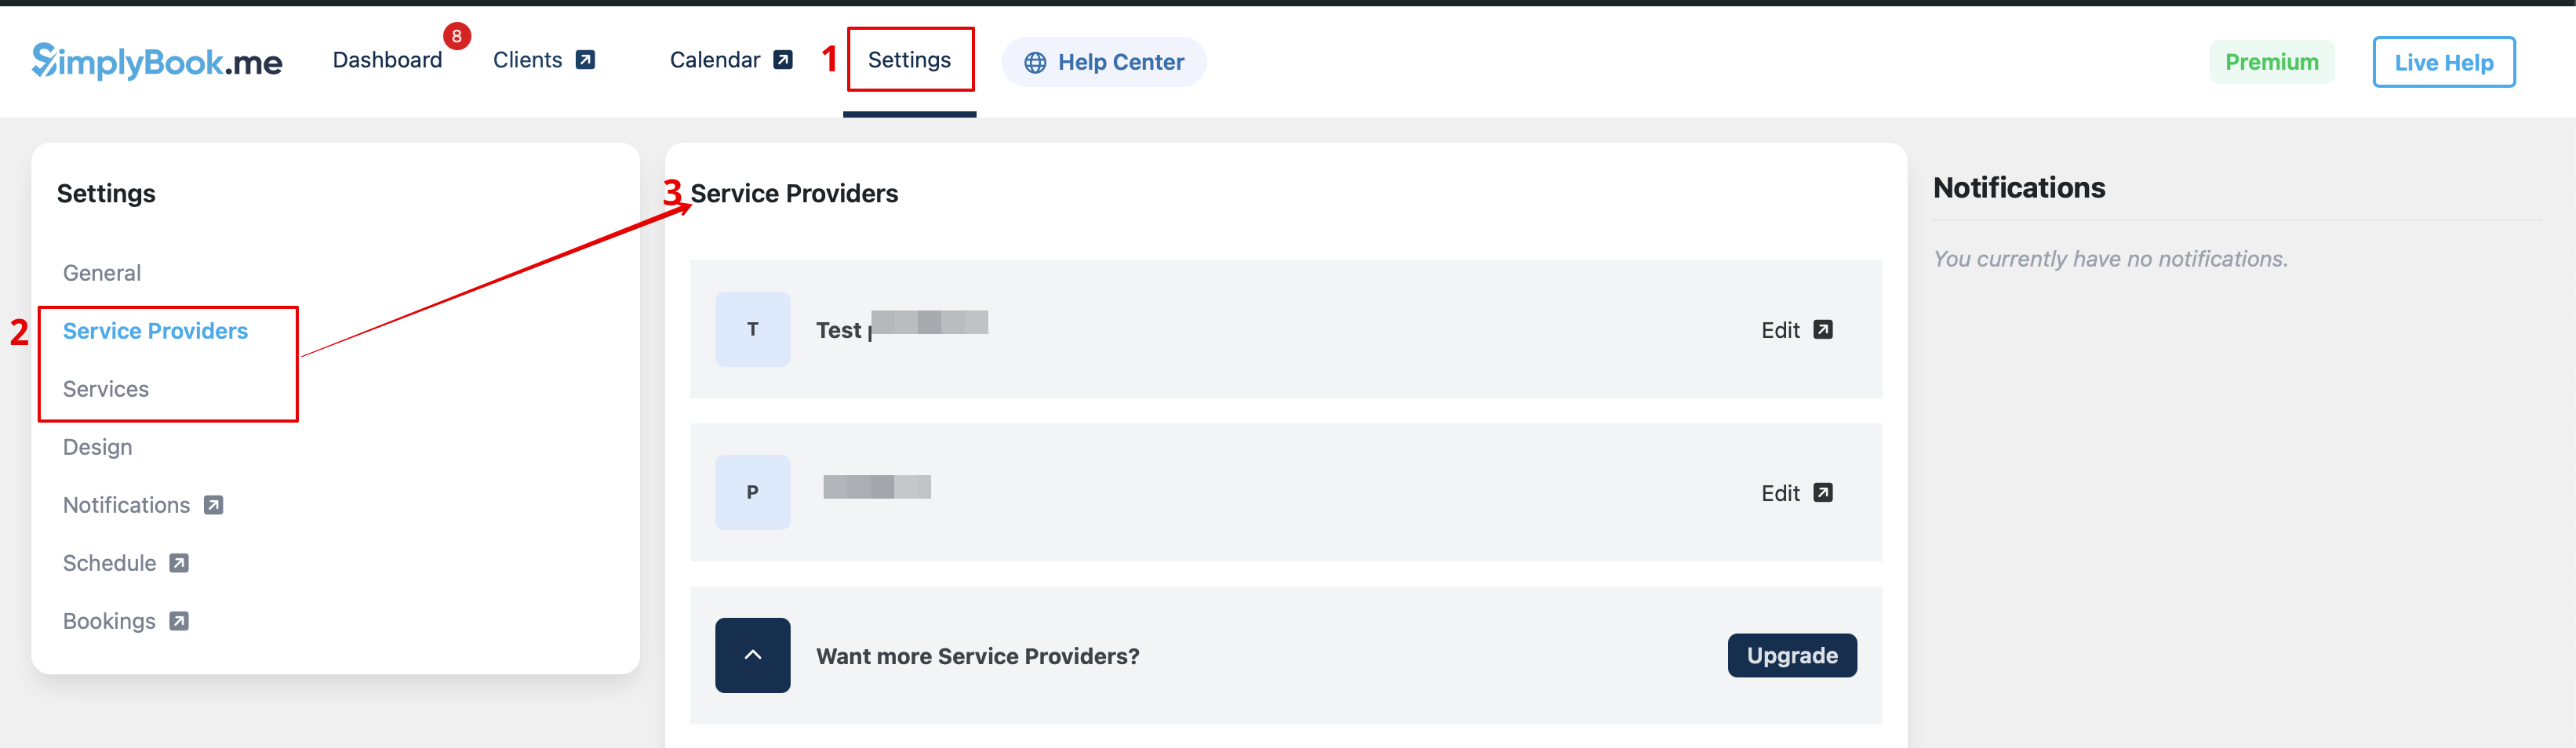
:5. Navigate to <span style="background-color:#d4f8e5; padding:5px; border-radius:5px;">Settings</span> tab and choose "Services" or "Providers" tab to see the list of existing ones in your account and easily navigate to manage them or add more. | |||
[[File:Wp new see the list of services and providers.png|1200px|center|link=https://help.simplybook.me/images/9/97/Wp_new_see_the_list_of_services_and_providers.png]] | |||
</translate> | </translate> | ||
<translate> | <translate> | ||
<!--T:5--> | <!--T:5--> | ||
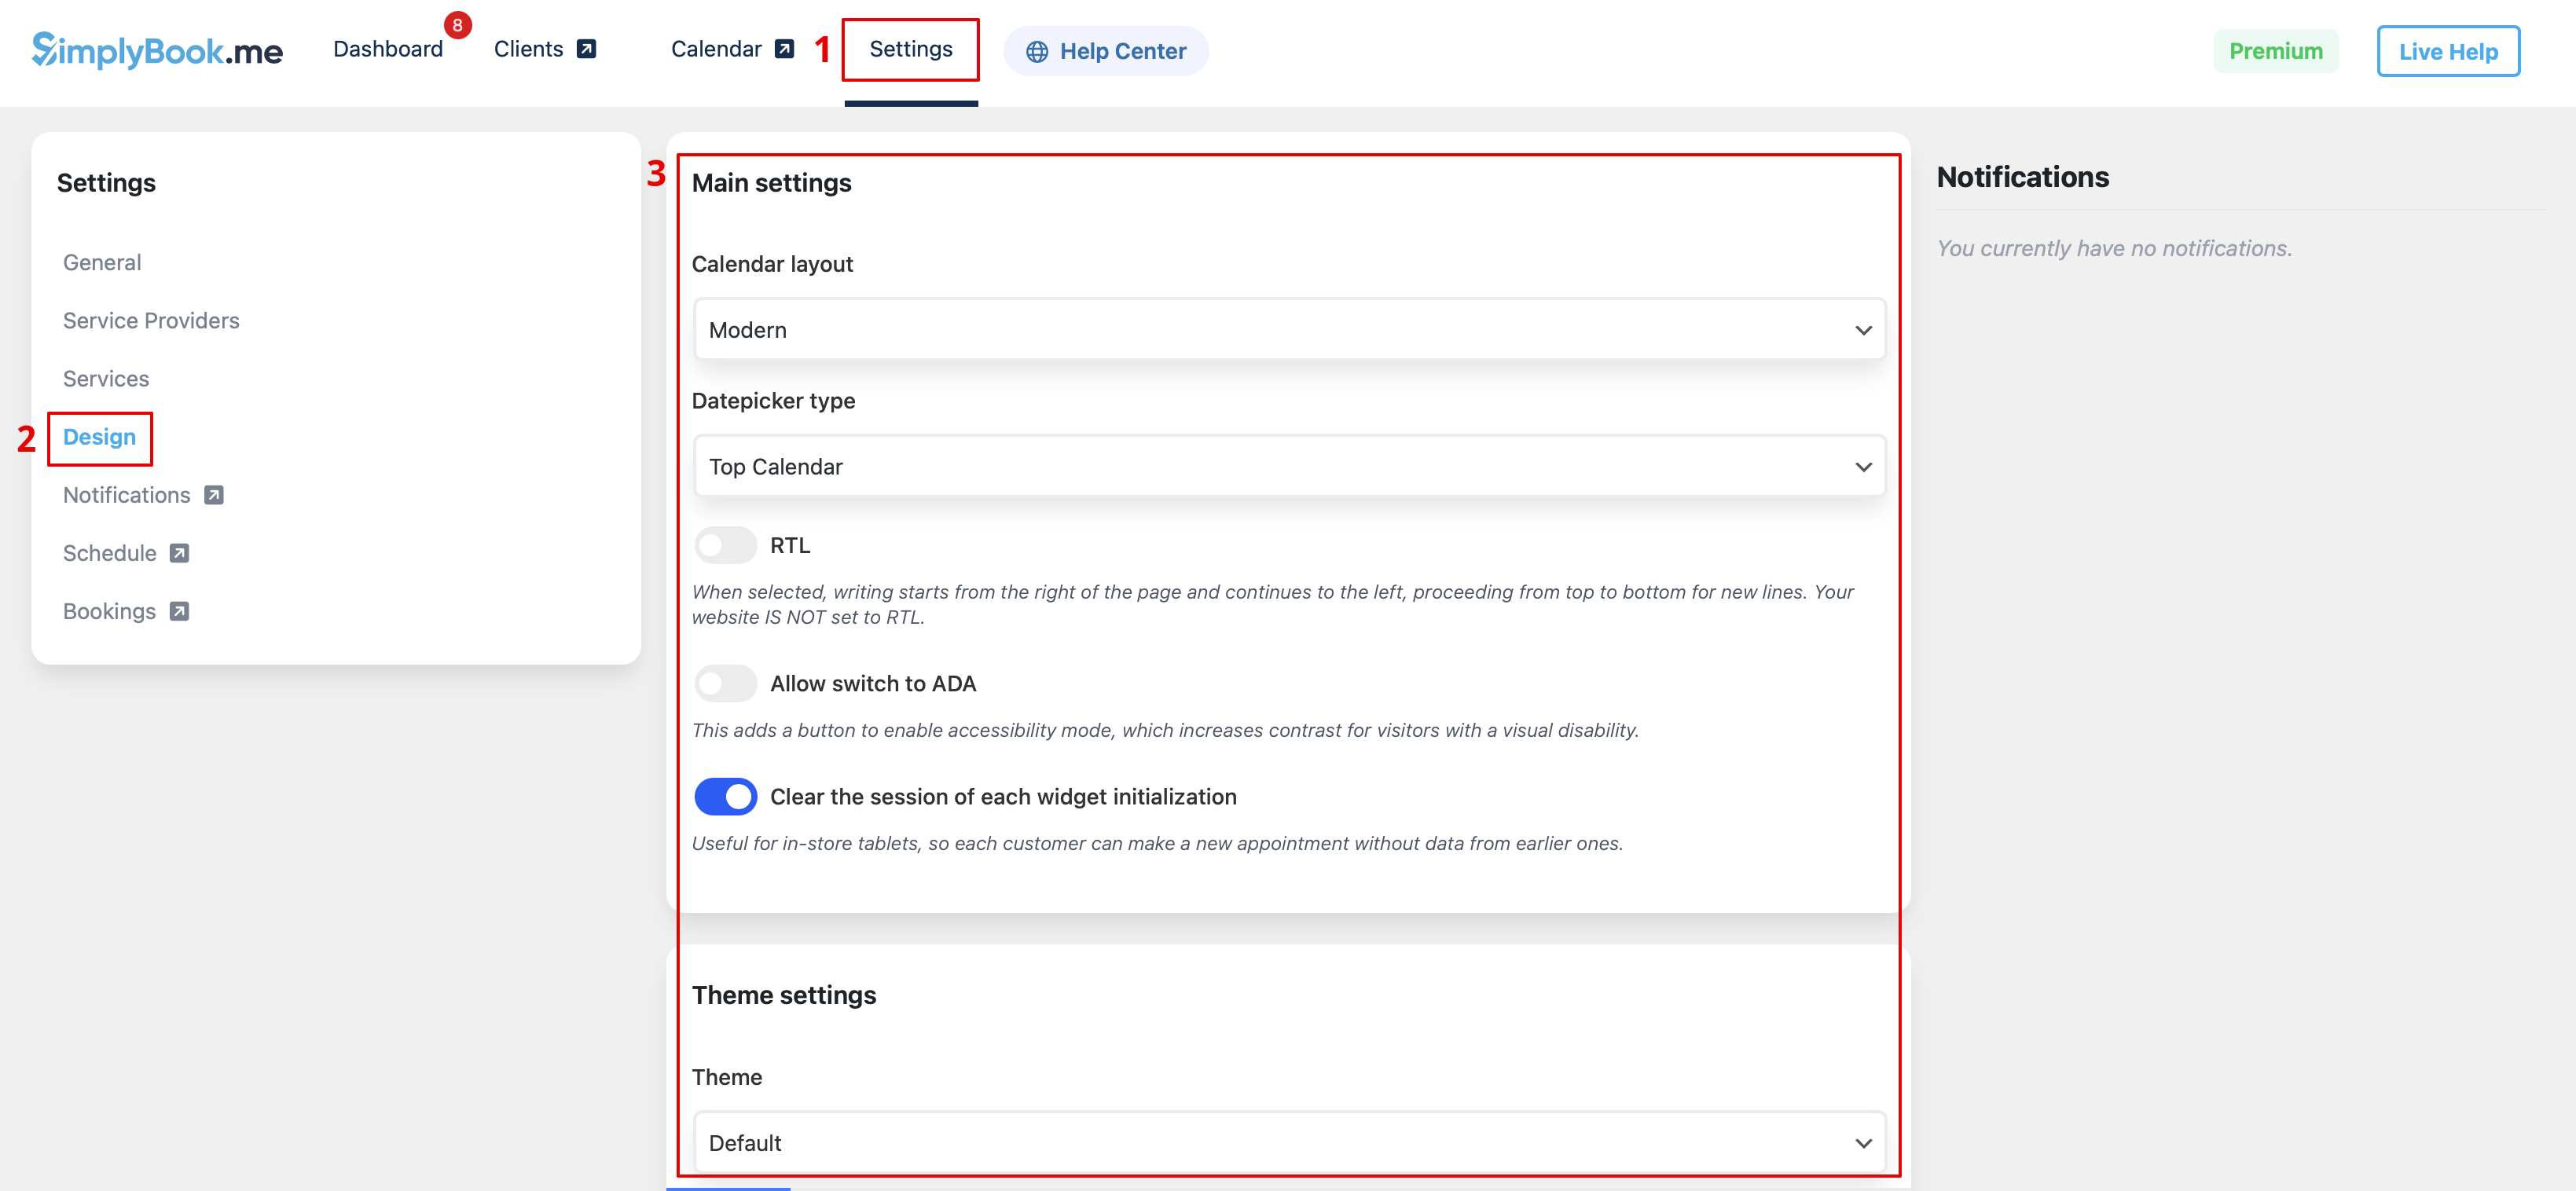
:6. Switch to | :6. Switch to <span style="background-color:#d4f8e5; padding:5px; border-radius:5px;">Design</span> tab.<br> | ||
:Adjust the look for your widget.<br> | |||
:You can select the | :You can select the preferable calendar layout, adjust the colors and much more. | ||
[[File:Wp new design settings path.png|1200px|center|link=https://help.simplybook.me/images/b/ba/Wp_new_design_settings_path.png]] | |||
[[File: | |||
<br><br> | <br><br> | ||
:7. Save your settings and navigate to <span style="background-color:#d4f8e5; padding:5px; border-radius:5px;"> | :7. Save your settings and navigate to <span style="background-color:#d4f8e5; padding:5px; border-radius:5px;">Pages</span> tab of the WordPress interface.<br> | ||
[[File: | :Open the page you would like to add the booking functionality to or add a new one. | ||
:Click on "+" button there and look for '''Simplybook''' option. Click on it to add to the page. Save the page. | |||
:After the website is published the clients will be able to book your services. | |||
[[File:Wp new add plugin to page.png|1200px|center|link=https://help.simplybook.me/images/7/7e/Wp_new_add_plugin_to_page.png]] | |||
<br><br> | <br><br> | ||
</translate> | </translate> | ||
<translate> | <translate> | ||
<!--T:6--> | <!--T:6--> | ||
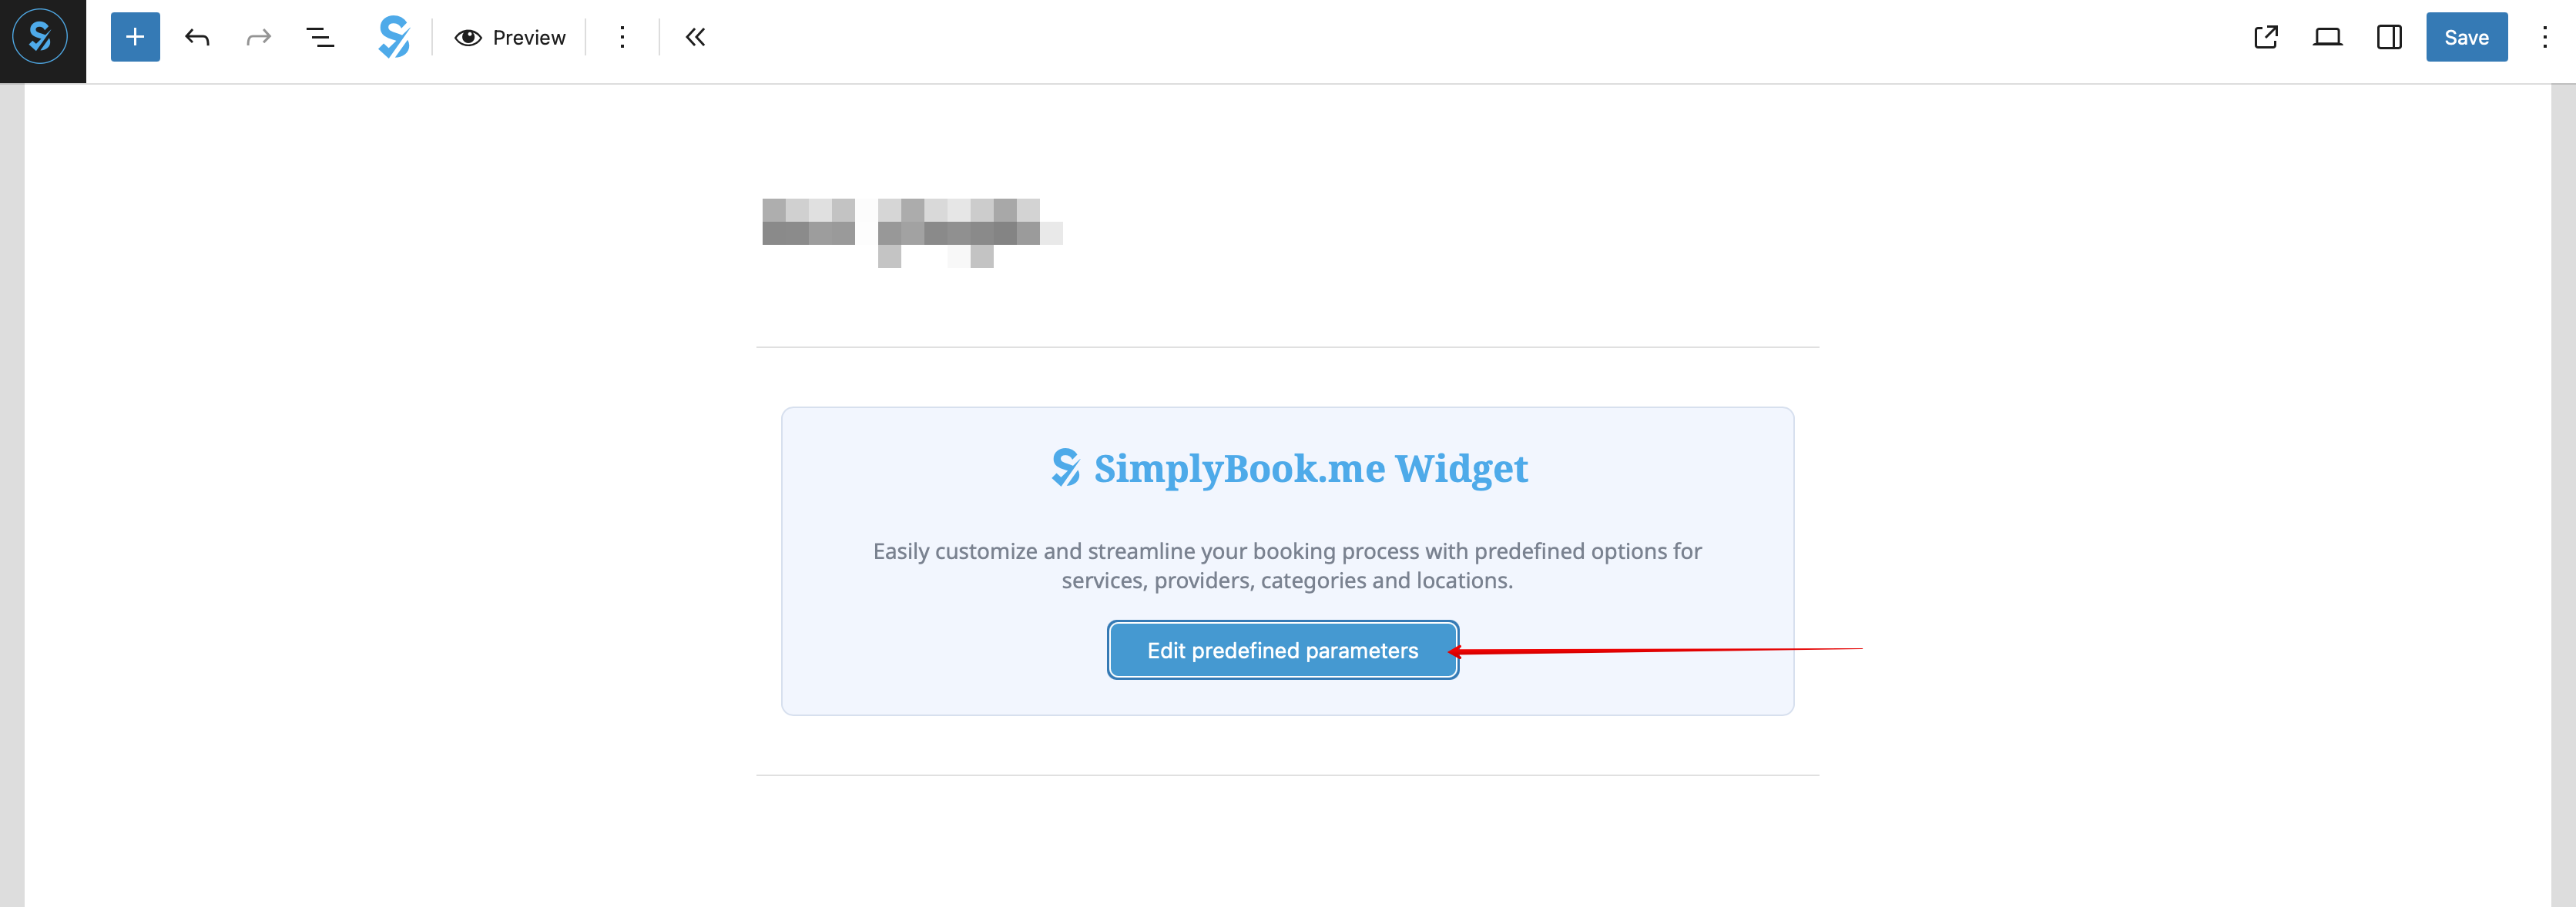
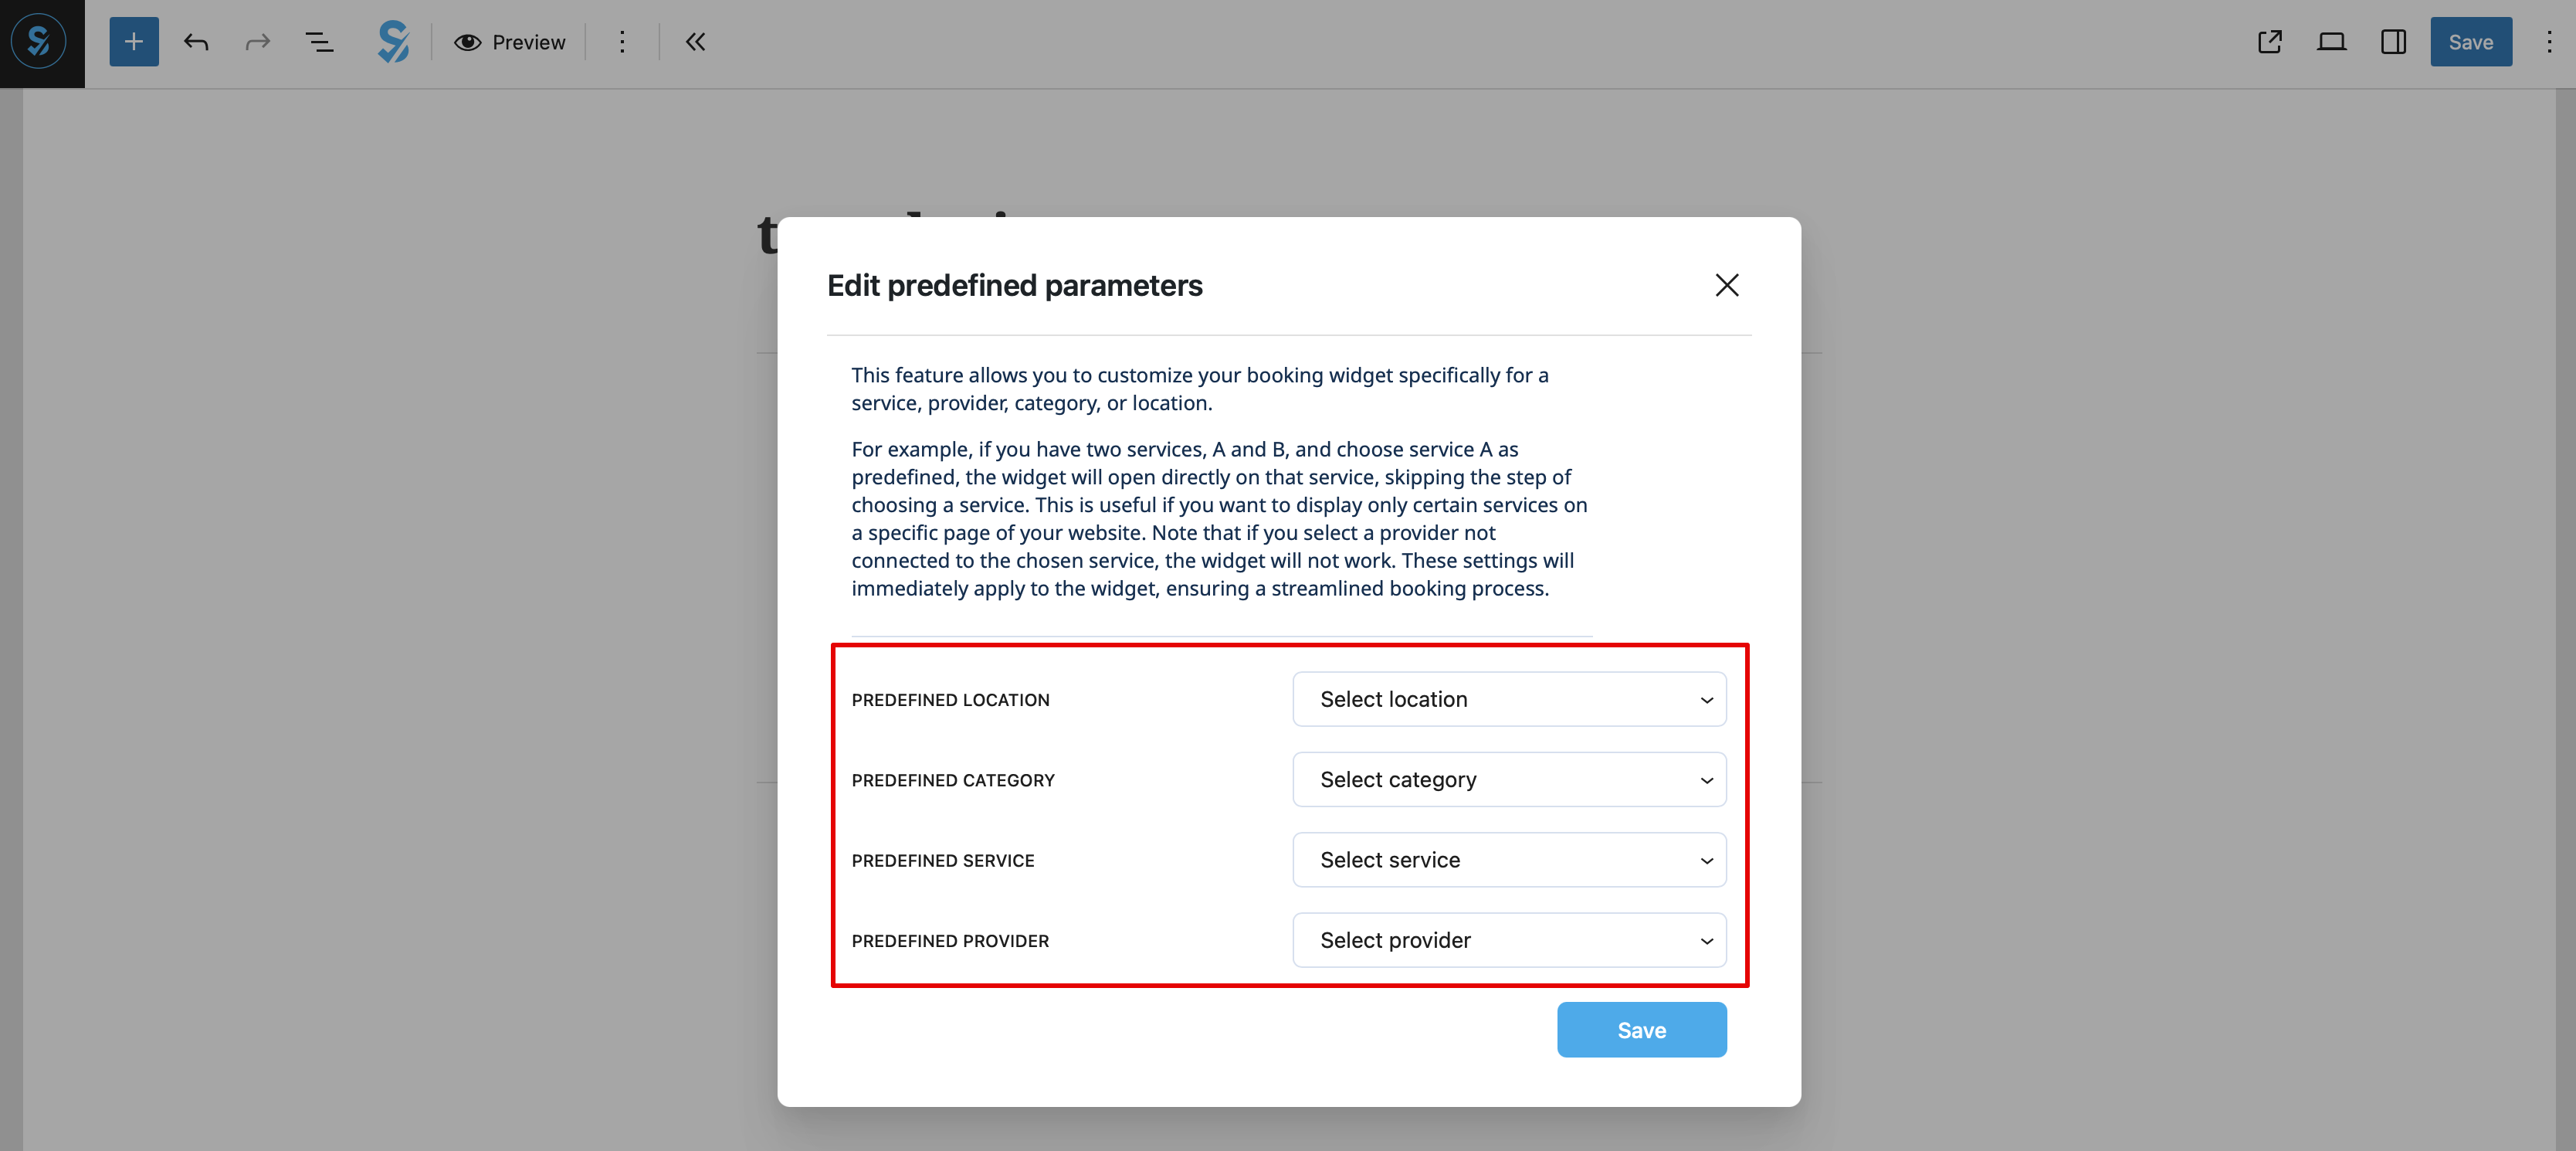
: | :8. (optional) If you need to have the booking functionality only for some service/provider/location/category you can use <span style="background-color:#d4f8e5; padding:5px; border-radius:5px;">Edit predefined parameters</span> option there. | ||
[[File:Wp edit predefined path.png|1200px|center|link=https://help.simplybook.me/images/d/d7/Wp_edit_predefined_path.png]] | |||
: | <br><br> | ||
[[File: | :And select the necessary one(s) in the popup that appears. | ||
<br><br><br><br> | [[File:Wp new predefined options.png|1200px|center|link=https://help.simplybook.me/images/7/70/Wp_new_predefined_options.png]] | ||
<br><br> | |||
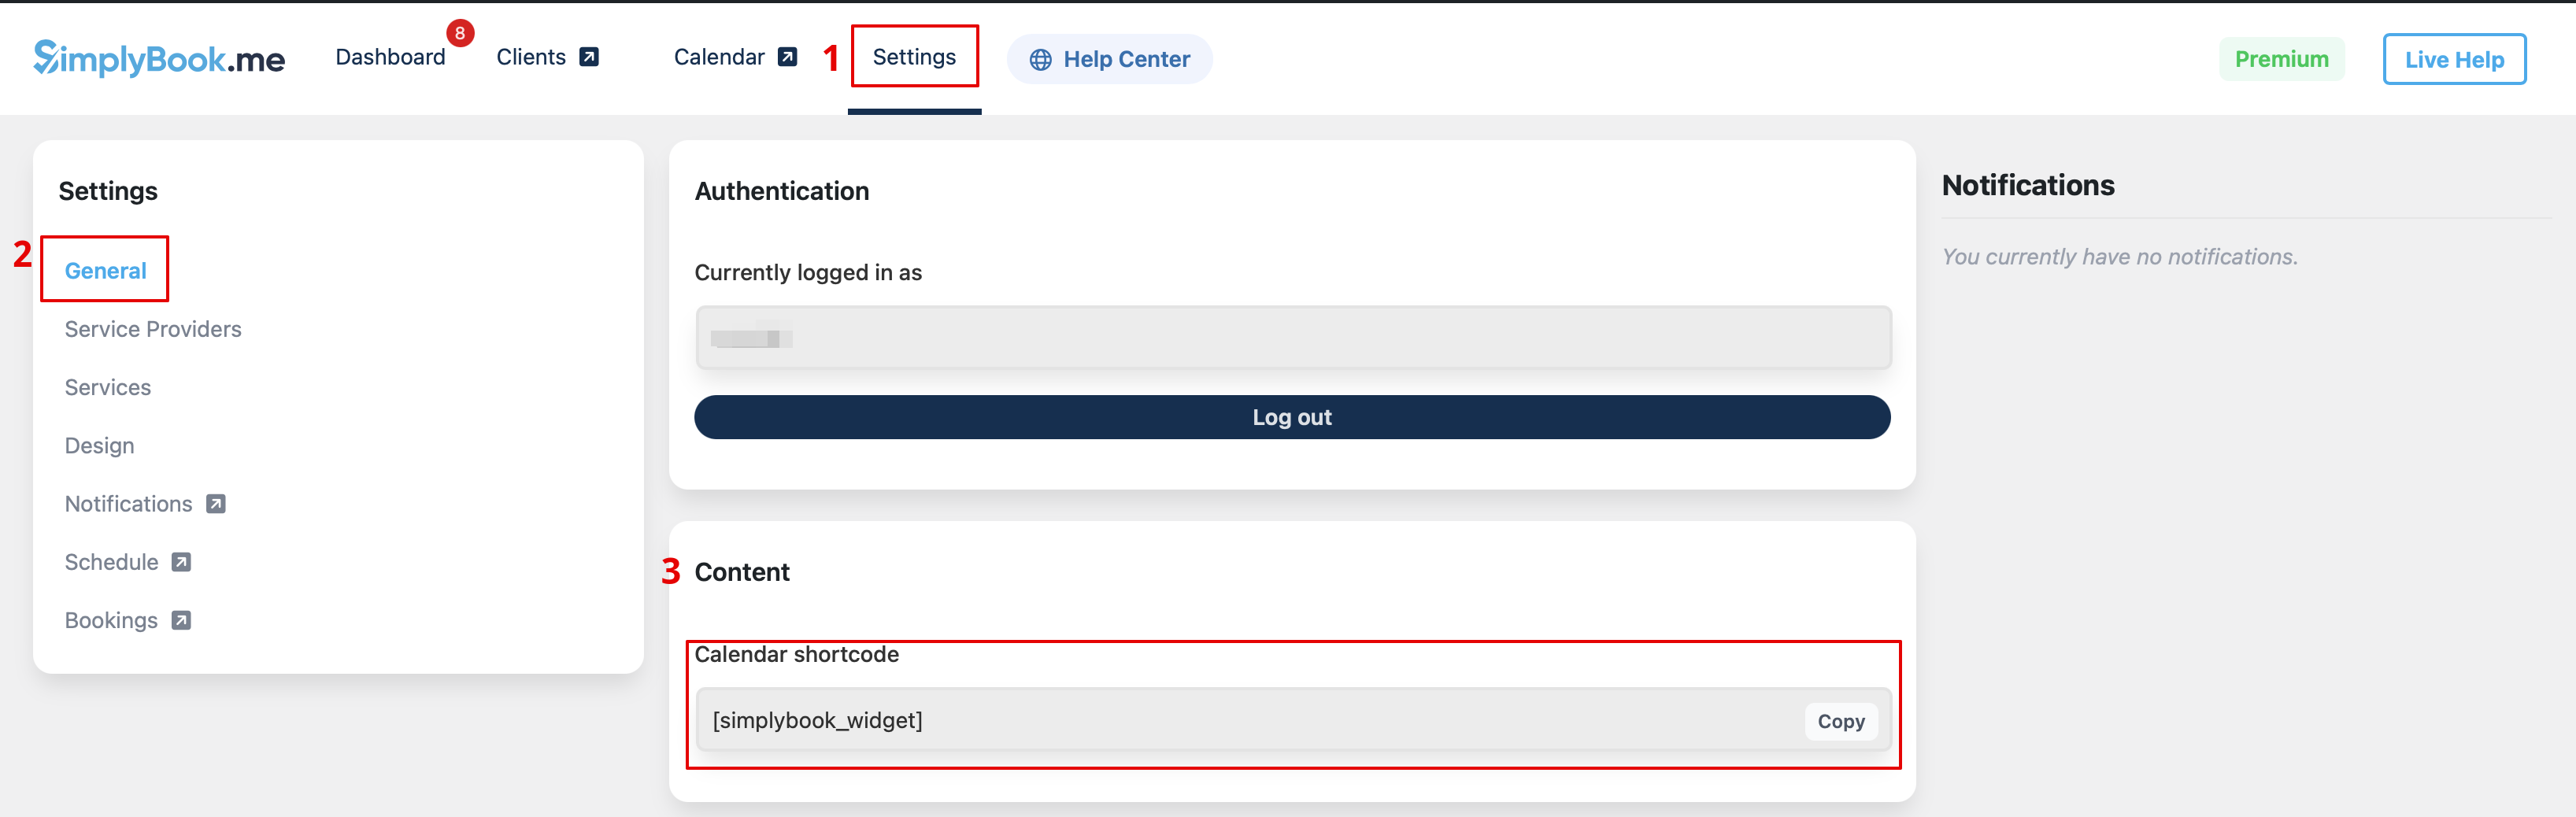
:9. As alternative way to add the functionality to the page you can use the shortcode. | |||
:Copy the calendar shortcode from the plugin <span style="background-color:#d4f8e5; padding:5px; border-radius:5px;">Settings</span> page. | |||
[[File:Wp new shortcode for widget.png|1200px|center|link=https://help.simplybook.me/images/e/e5/Wp_new_shortcode_for_widget.png]] | |||
<br><br> | |||
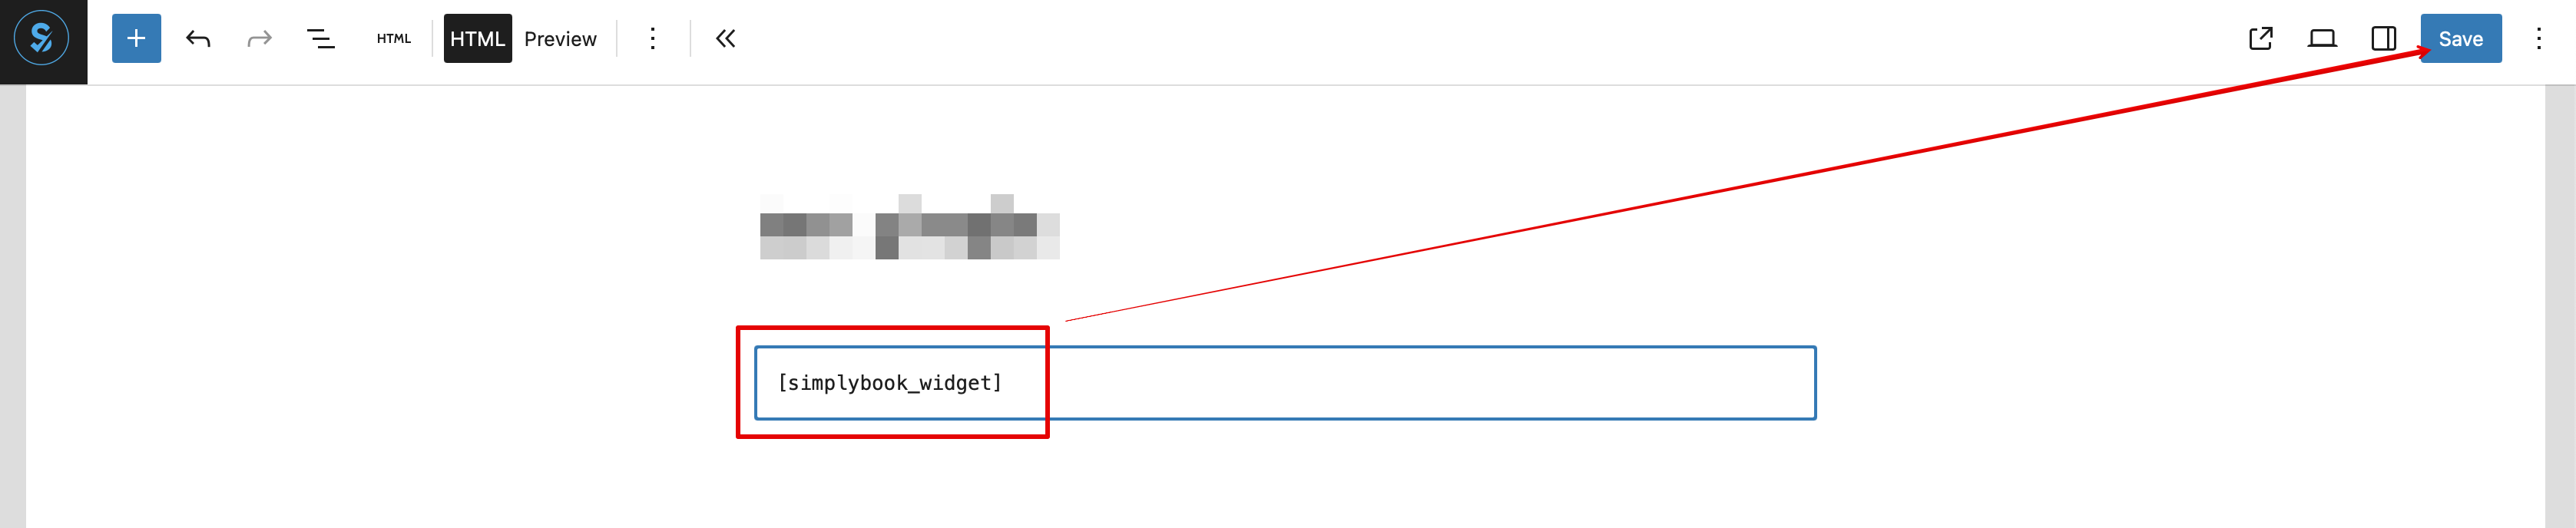
:And simply paste it to the HTML part on the desired page | |||
[[File:Wp new paste shortcode.png|1200px|center|link=https://help.simplybook.me/images/0/0a/Wp_new_paste_shortcode.png]] | |||
<br><br> | |||
</translate> | </translate> | ||
<translate> | <translate> | ||
Revision as of 08:49, 29 May 2025
With the help of WordPress plugin
- 1. In your WordPress admin interface navigate to Plugins -> Add new Plugin and search for Simplybook.
- Install it and Activate.
- 2. Navigate to plugin Settings.
- 3. If you already have an account with SimplyBook.me please choose the Sign in here option there.
- If you have not created it yet, simply follow the Create free account steps.
- 4. After short registration/login process you will get to your Dashboard overview.
- 5. Navigate to Settings tab and choose "Services" or "Providers" tab to see the list of existing ones in your account and easily navigate to manage them or add more.
- 6. Switch to Design tab.
- Adjust the look for your widget.
- You can select the preferable calendar layout, adjust the colors and much more.
- 7. Save your settings and navigate to Pages tab of the WordPress interface.
- Open the page you would like to add the booking functionality to or add a new one.
- Click on "+" button there and look for Simplybook option. Click on it to add to the page. Save the page.
- After the website is published the clients will be able to book your services.

- 8. (optional) If you need to have the booking functionality only for some service/provider/location/category you can use Edit predefined parameters option there.
- And select the necessary one(s) in the popup that appears.
- 9. As alternative way to add the functionality to the page you can use the shortcode.
- Copy the calendar shortcode from the plugin Settings page.
- And simply paste it to the HTML part on the desired page
As a Widget
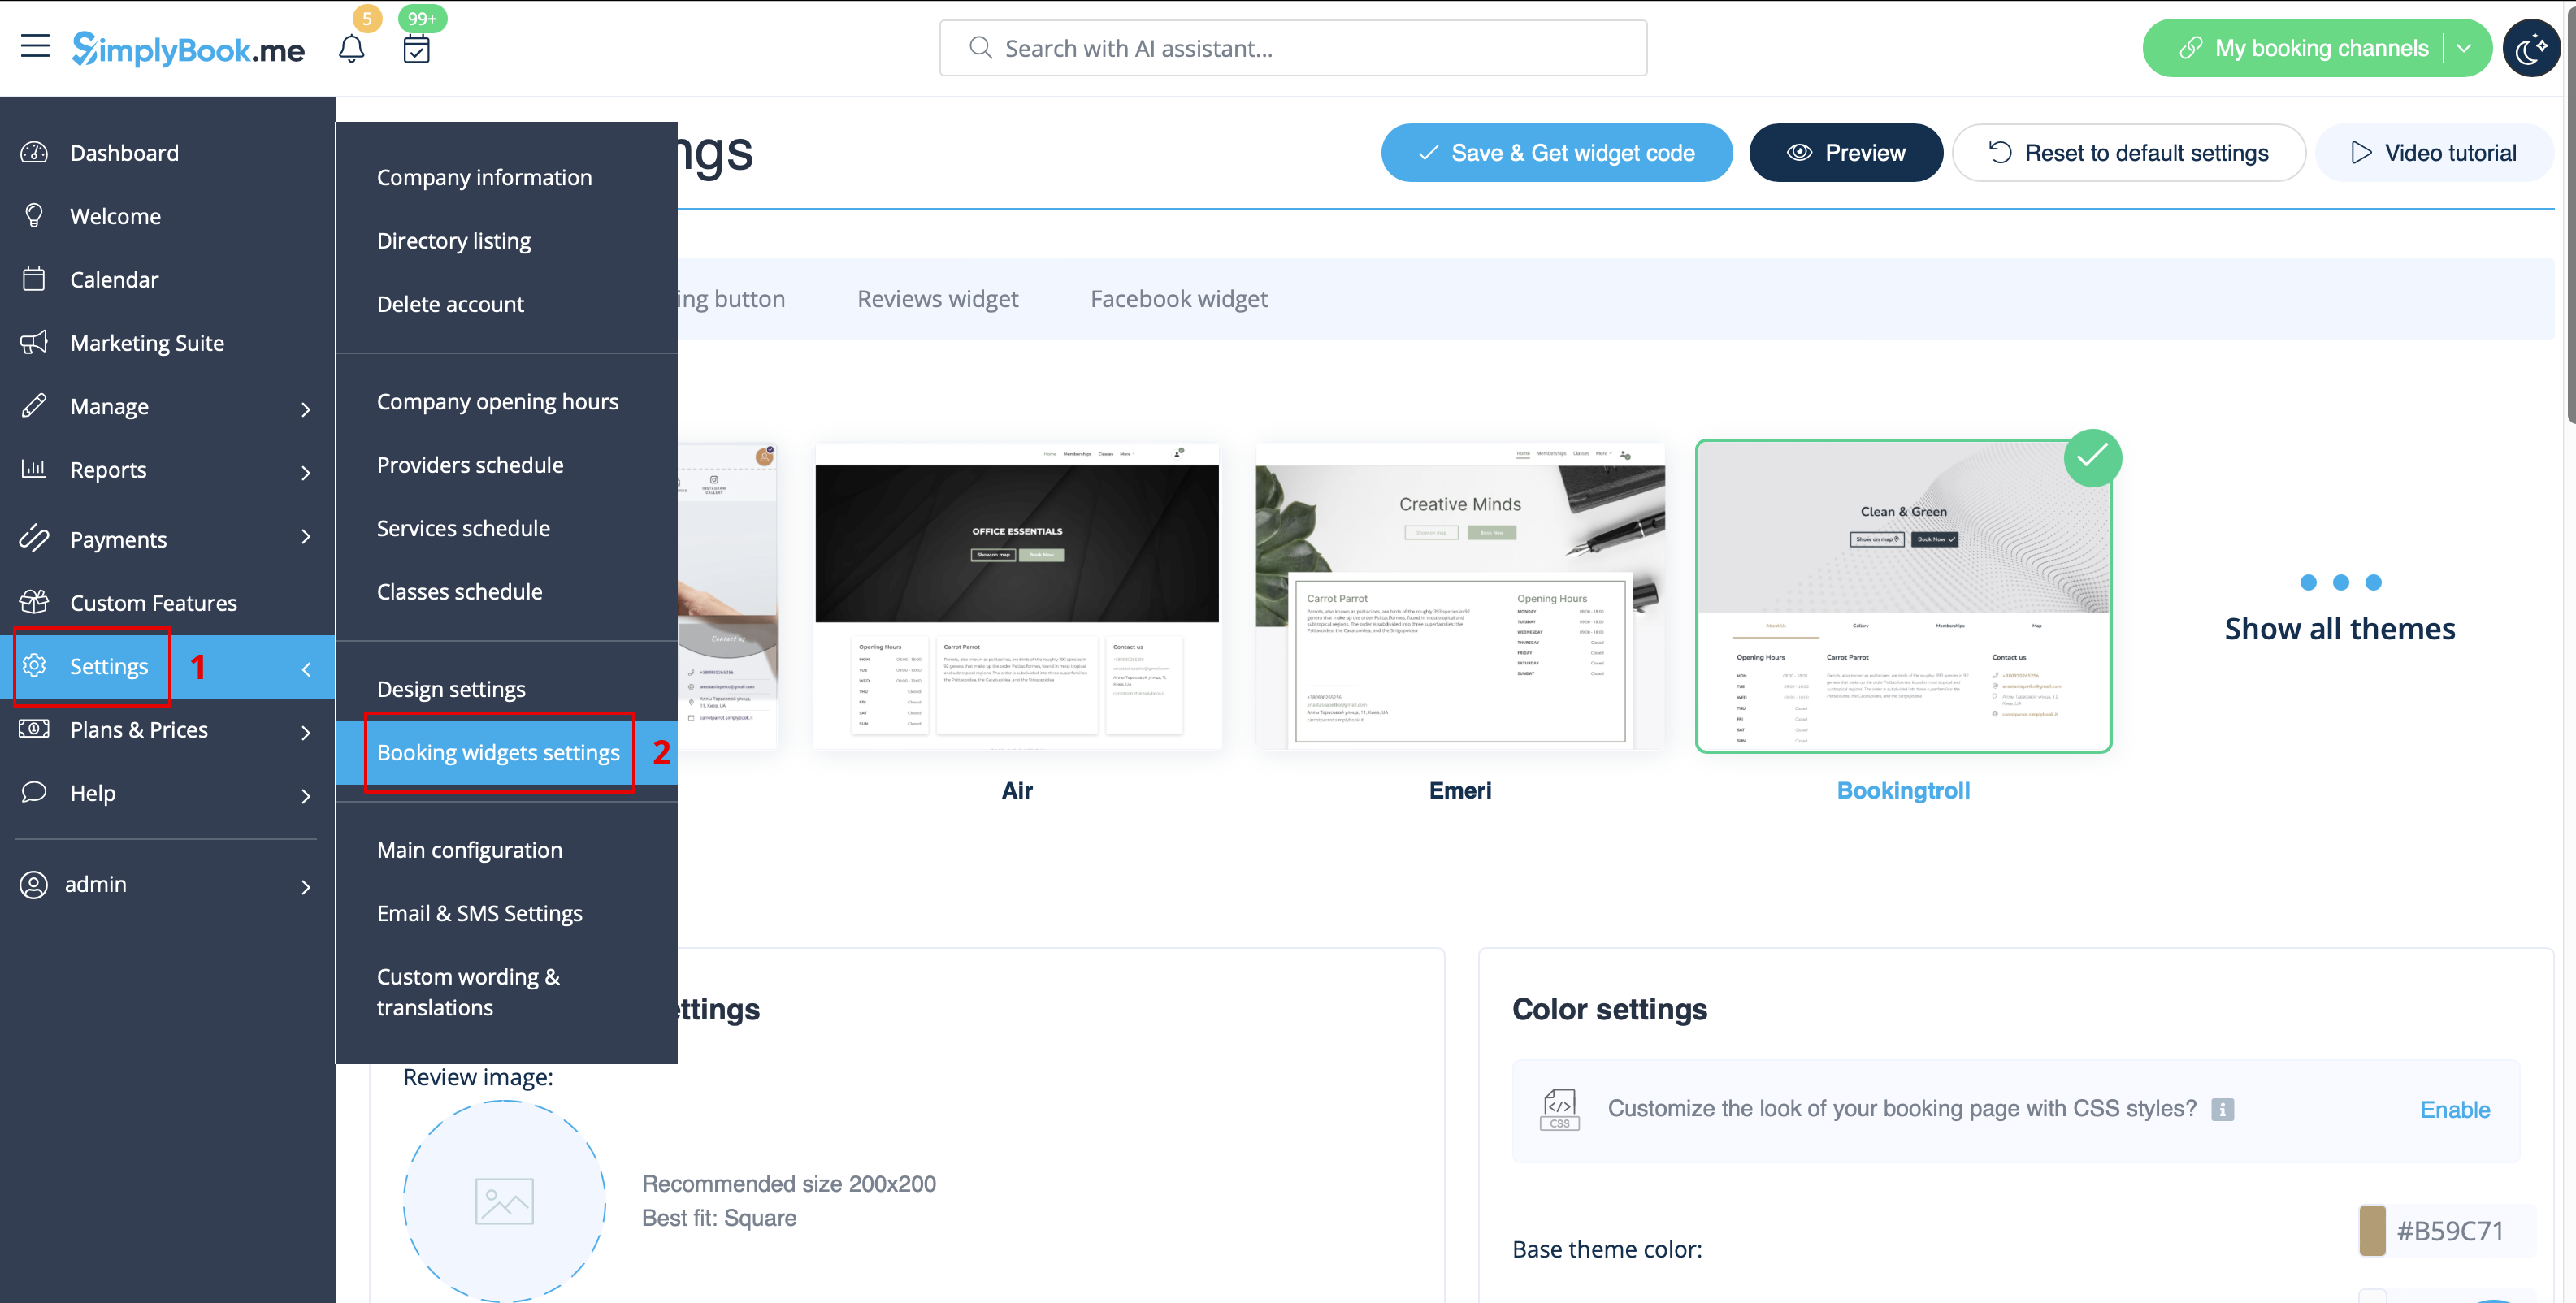
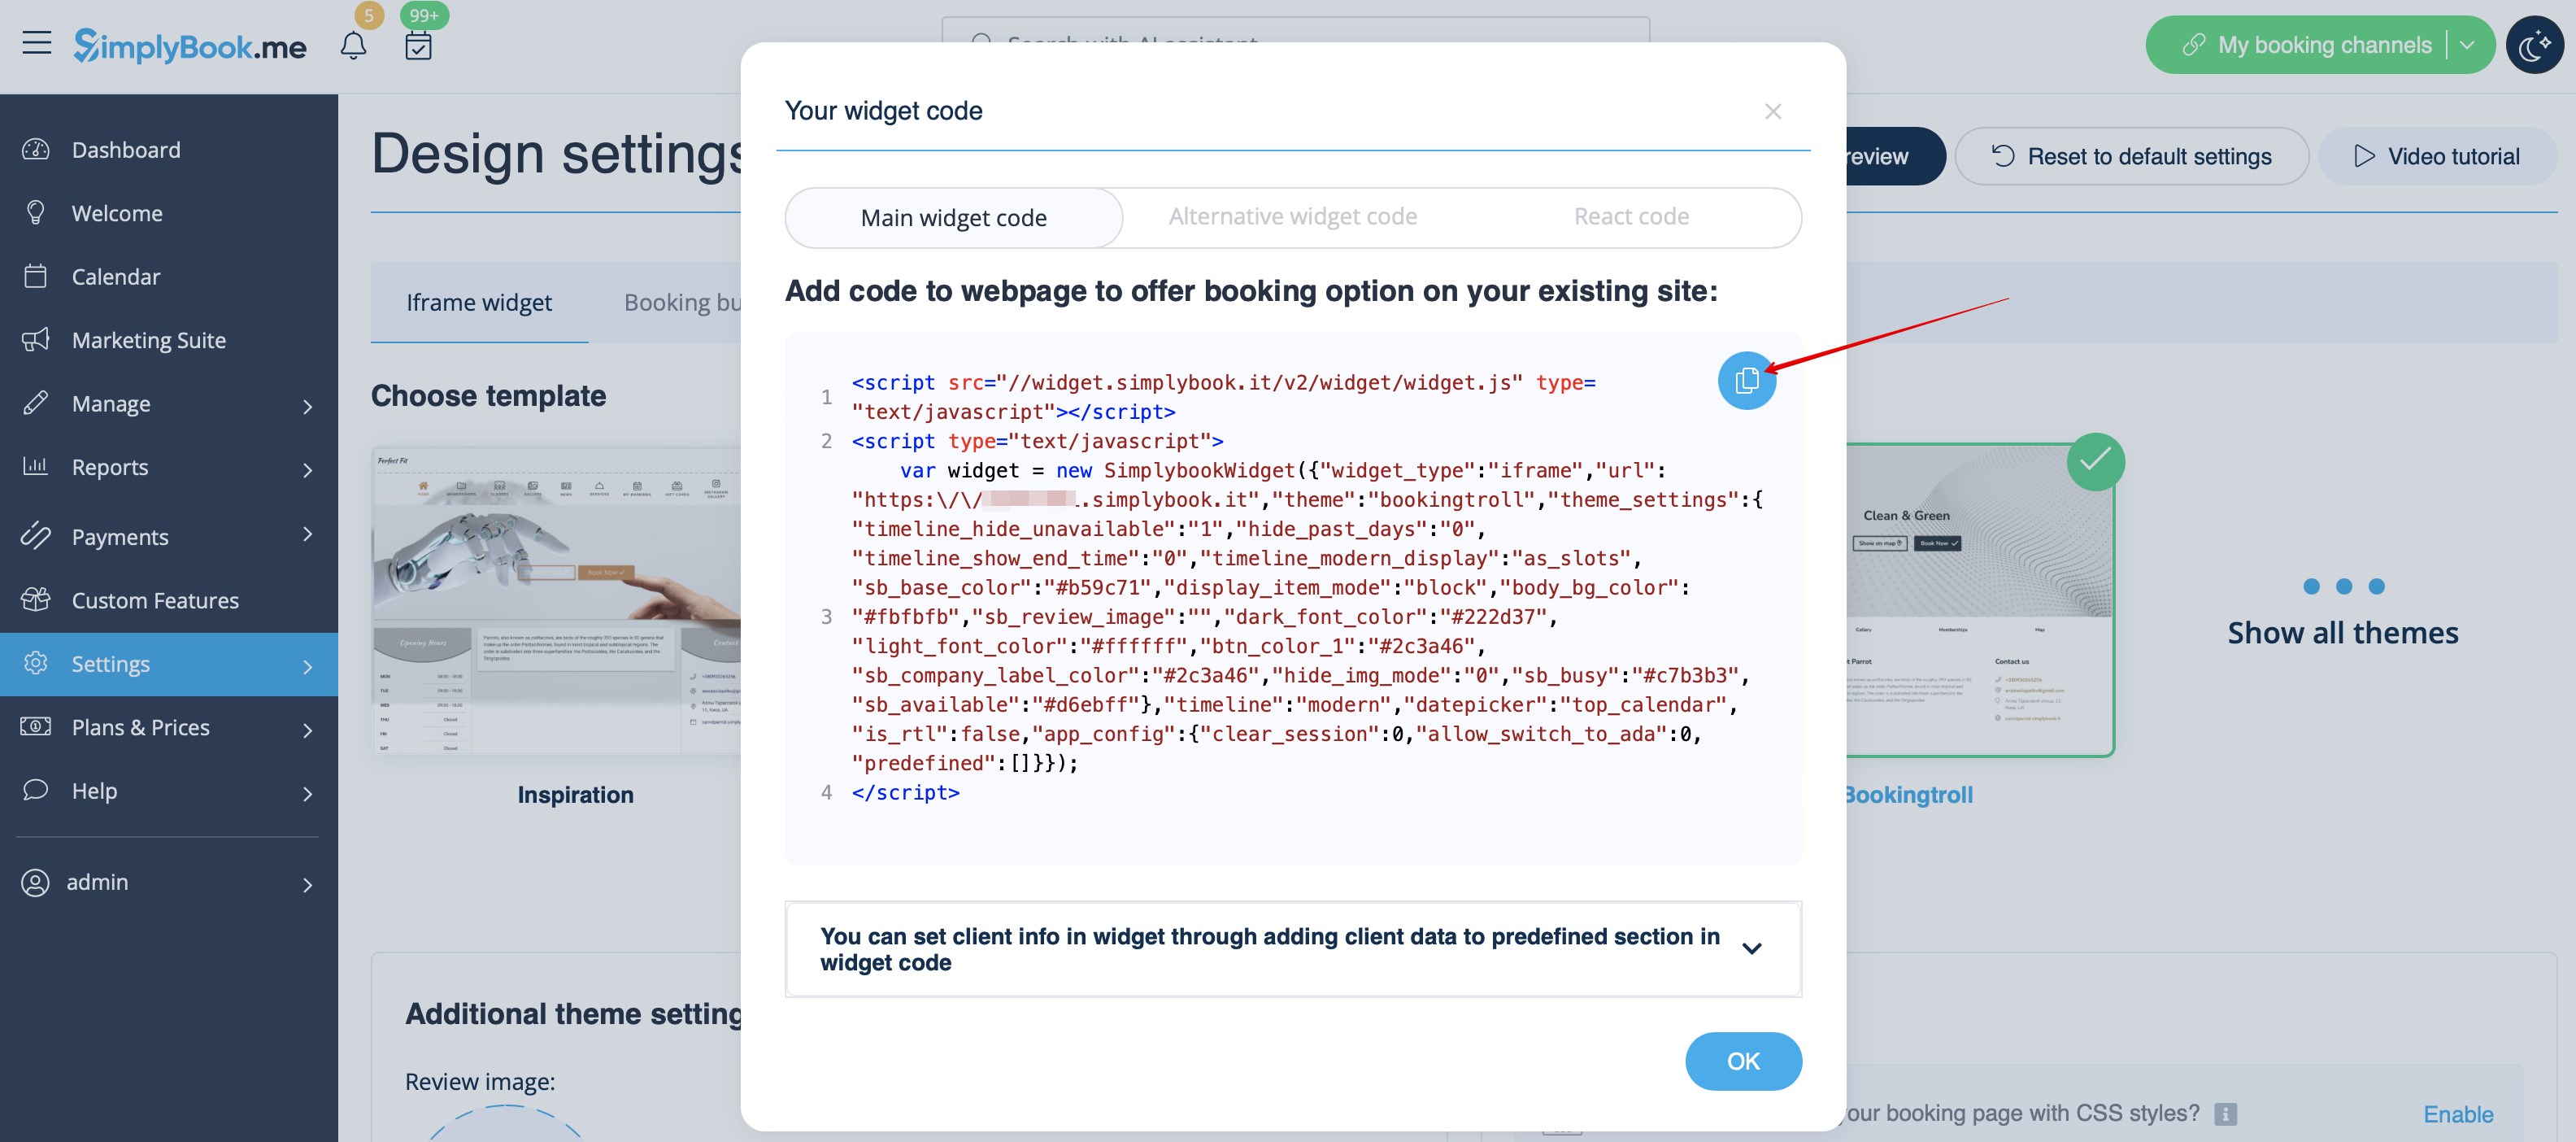
- 1. Please copy the code from Settings -> Booking widgets settings -> iFrame widget -> Get widget code.

- 2. Go to your WordPress admn side and create a new page or navigate to already created one, where you plan to add the widget. Click on + icon.

- 3. Search for HTML option.

- 4. Paste the previously copied code.

- 5. Publish your changes.
- Example (may look different depending on your WP theme and SimplyBook.me theme and settings).
