Created page with "<br><br> hoe het vergaderproces werkt 1. Nadat alles is ingesteld en de klant de onlinevergaderdienst/les heeft geboekt, ontvangen zowel de klant als de aanbieder (of het bedrijf, afhankelijk van uw instellingen) de links naar de vergadering. <br><br> 2. Aan de beheerderskant kan de aanbieder rechtstreeks vanuit de boeking in de "Agenda" naar de vergaderpagina gaan door op de link "Vergadering openen" in het pop-upvenster met boekingsdetails te..." |
Updating to match new version of source page |
||
| Line 1: | Line 1: | ||
<languages/> | <languages/> | ||
{{#seo: |title=Online videovergaderingen via Zoom -- SimplyBook.me |titlemode=toevoegen |keywords=faq, veelgestelde vragen, boekingssoftware, vragen over het afspraken systeem, online afspraken, kalendersoftware, boekingssysteem, boekingskalender, planningssoftware, online afspraken plannen, online planning, installatie, hulp bij installatie, ondersteuning, helpinhoud, videovergaderingen, online videovergaderingen, online diensten, online consultaties, zoom online videovergaderingen, online videogesprekken }} | {{#seo: |title=Online videovergaderingen via Zoom -- SimplyBook.me |titlemode=toevoegen |keywords=faq, veelgestelde vragen, boekingssoftware, vragen over het afspraken systeem, online afspraken, kalendersoftware, boekingssysteem, boekingskalender, planningssoftware, online afspraken plannen, online planning, installatie, hulp bij installatie, ondersteuning, helpinhoud, videovergaderingen, online videovergaderingen, online diensten, online consultaties, zoom online videovergaderingen, online videogesprekken }} | ||
<div class="mw-translate-fuzzy"> | |||
Om verbinding te maken met Zoom, hebt u een [https://zoom.us Zoom-account] nodig. Elke medewerker met de rechten van een planningbeheerder kan Simplybook.me verbinden met Zoom.<br> | Om verbinding te maken met Zoom, hebt u een [https://zoom.us Zoom-account] nodig. Elke medewerker met de rechten van een planningbeheerder kan Simplybook.me verbinden met Zoom.<br> | ||
SimplyBook.me kan slechts verbinding maken met één Zoom-account. | SimplyBook.me kan slechts verbinding maken met één Zoom-account. | ||
| Line 10: | Line 11: | ||
<br><br> | <br><br> | ||
;Hoe instellen | ;Hoe instellen | ||
</div> | |||
<div lang="en" dir="ltr" class="mw-content-ltr"> | |||
;How to set | |||
</div> | |||
<div class="mw-translate-fuzzy"> | |||
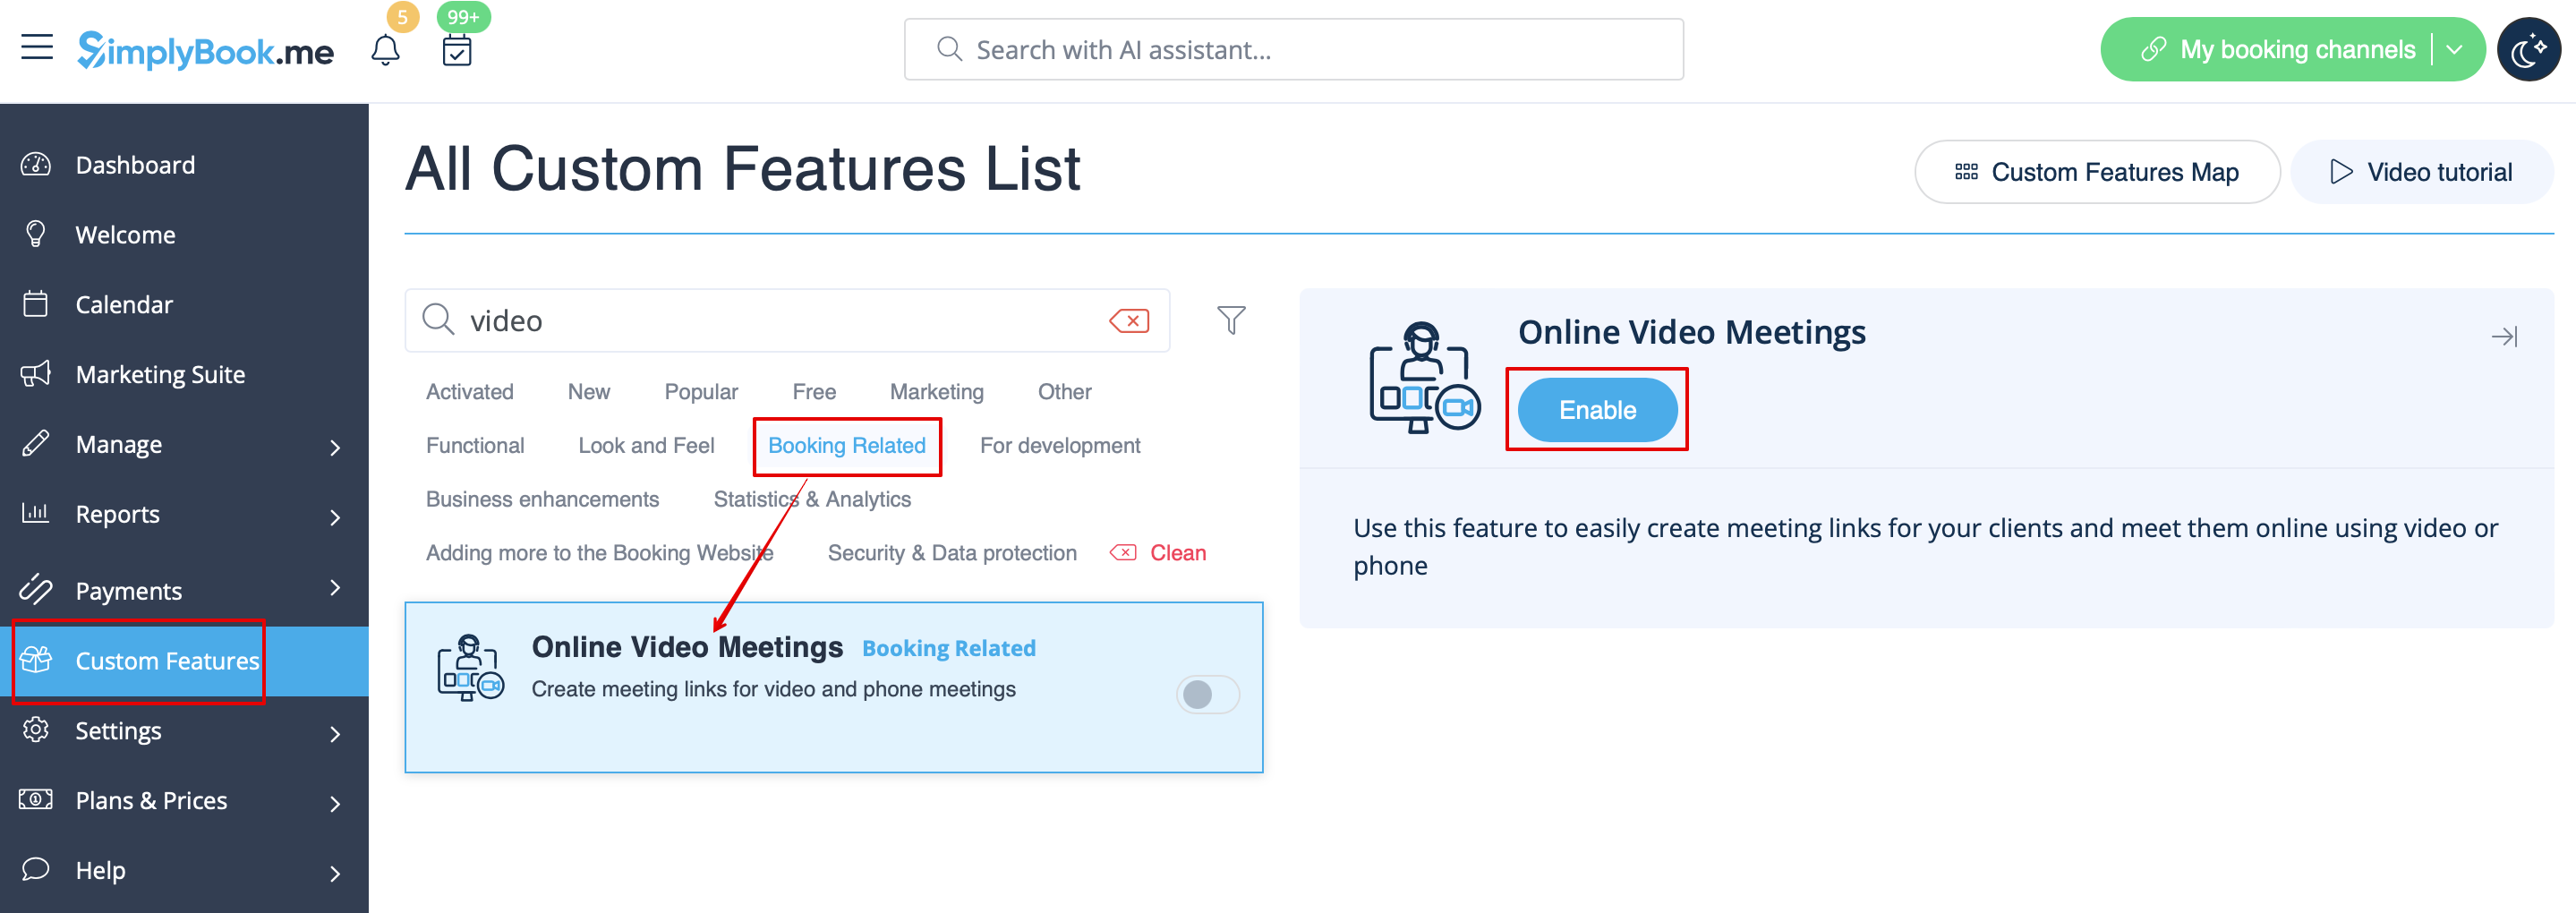
1. Schakel de aangepaste functie <span style="background-color:#d4f8e5; padding:5px; border-radius:5px;">Online vergaderingen</span> in uw SimplyBook.me-account in door naar de pagina <span style="background-color:#d4f8e5; padding:5px; border-radius:5px;">Aangepaste functies</span> in uw Simplybook.me-beheerdersinterface te gaan en op de knop <span style="background-color:#d4f8e5; padding:5px; border-radius:5px;">Inschakelen</span> naast de aangepaste functie <span style="background-color:#d4f8e5; padding:5px; border-radius:5px;">Online videovergaderingen</span> te klikken. | 1. Schakel de aangepaste functie <span style="background-color:#d4f8e5; padding:5px; border-radius:5px;">Online vergaderingen</span> in uw SimplyBook.me-account in door naar de pagina <span style="background-color:#d4f8e5; padding:5px; border-radius:5px;">Aangepaste functies</span> in uw Simplybook.me-beheerdersinterface te gaan en op de knop <span style="background-color:#d4f8e5; padding:5px; border-radius:5px;">Inschakelen</span> naast de aangepaste functie <span style="background-color:#d4f8e5; padding:5px; border-radius:5px;">Online videovergaderingen</span> te klikken. | ||
[[File:Online meetings enable path redesigned.png|1200px|center|link=https://help.simplybook.me/images/a/a1/Online_meetings_enable_path_redesigned.png]] | [[File:Online meetings enable path redesigned.png|1200px|center|link=https://help.simplybook.me/images/a/a1/Online_meetings_enable_path_redesigned.png]] | ||
| Line 37: | Line 43: | ||
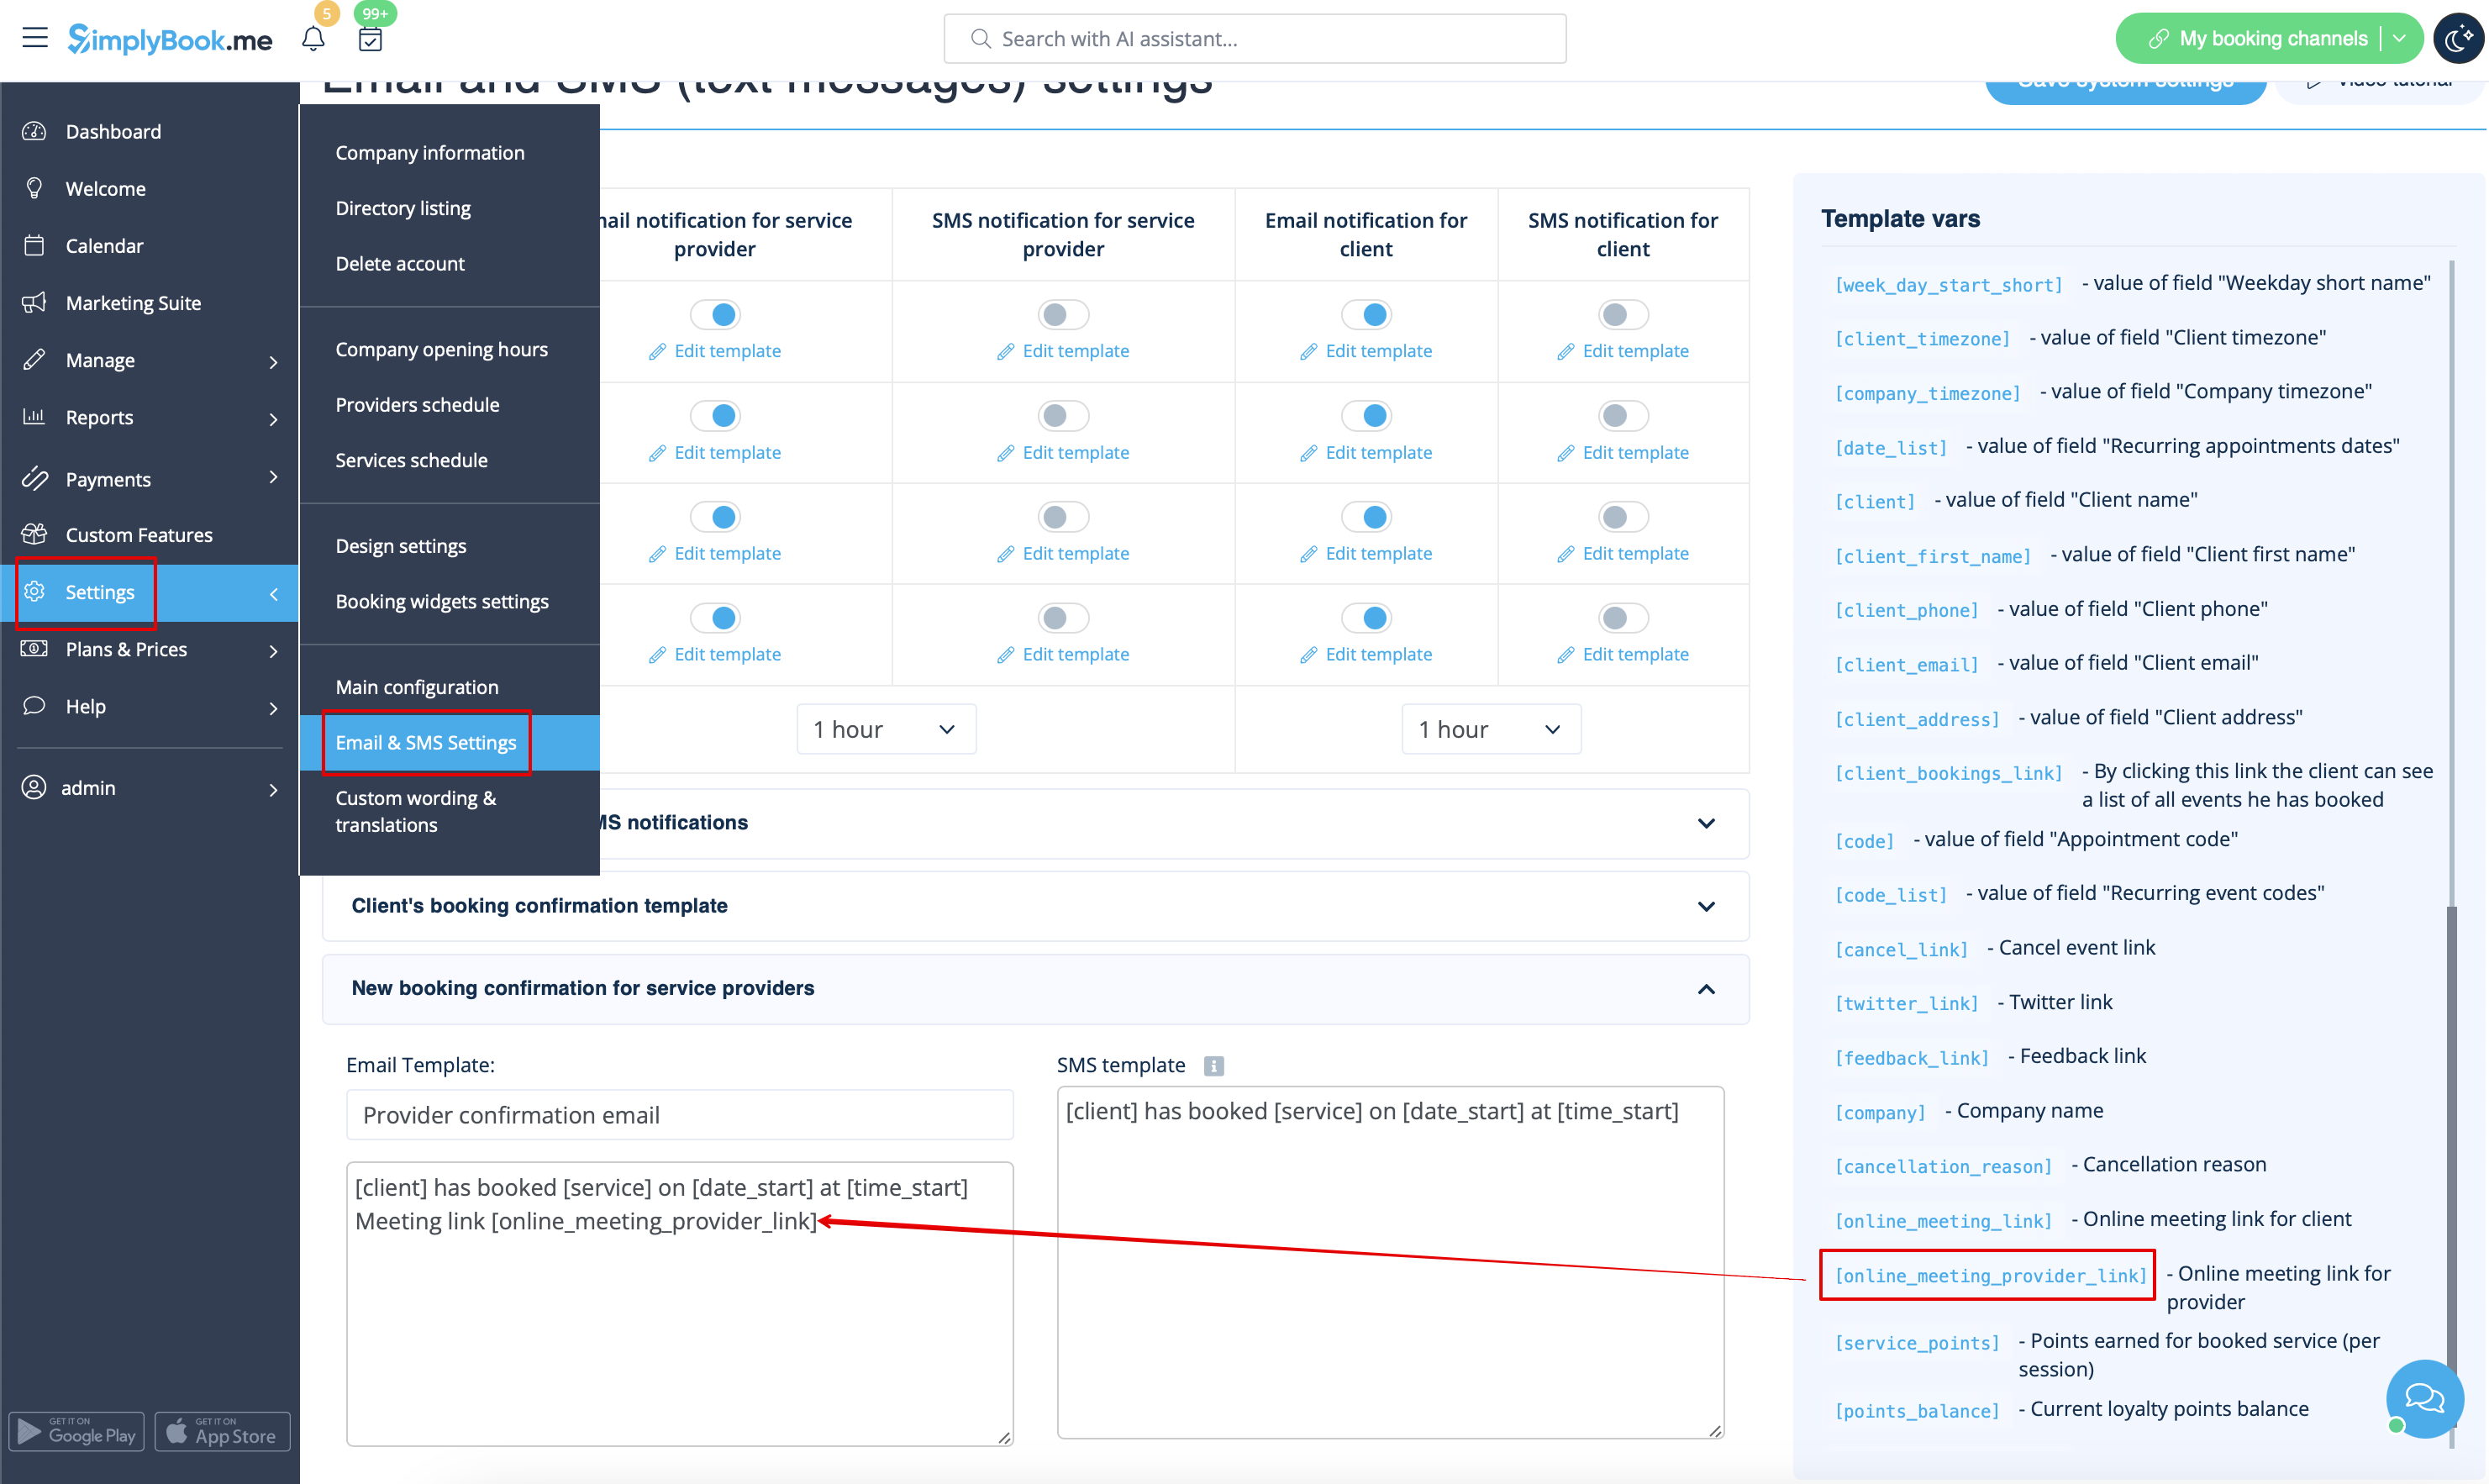
*Om uw dienstverleners Zoom-links in hun bevestigingen te laten ontvangen, voegt u de variabele ''[online_meeting_provider_link]'' toe aan uw <span style="background-color:#d4f8e5; padding:5px; border-radius:5px;">Nieuwe boekingsbevestiging voor dienstverleners</span> in <span style="background-color:#d4f8e5; padding:5px; border-radius:5px;">Instellingen</span> -> <span style="background-color:#d4f8e5; padding:5px; border-radius:5px;">E-mail- en sms-instellingen</span> (of <span style="background-color:#d4f8e5; padding:5px; border-radius:5px;">Aangepaste functies</span> -> <span style="background-color:#d4f8e5; padding:5px; border-radius:5px;">[[Flexible Notifications custom feature|Flexibele meldingen]]</span> -> <span style="background-color:#d4f8e5; padding:5px; border-radius:5px;">Beheren</span> als u meldingen per dienst en/of aanbieder hebt aangepast). | *Om uw dienstverleners Zoom-links in hun bevestigingen te laten ontvangen, voegt u de variabele ''[online_meeting_provider_link]'' toe aan uw <span style="background-color:#d4f8e5; padding:5px; border-radius:5px;">Nieuwe boekingsbevestiging voor dienstverleners</span> in <span style="background-color:#d4f8e5; padding:5px; border-radius:5px;">Instellingen</span> -> <span style="background-color:#d4f8e5; padding:5px; border-radius:5px;">E-mail- en sms-instellingen</span> (of <span style="background-color:#d4f8e5; padding:5px; border-radius:5px;">Aangepaste functies</span> -> <span style="background-color:#d4f8e5; padding:5px; border-radius:5px;">[[Flexible Notifications custom feature|Flexibele meldingen]]</span> -> <span style="background-color:#d4f8e5; padding:5px; border-radius:5px;">Beheren</span> als u meldingen per dienst en/of aanbieder hebt aangepast). | ||
[[File:Add meeting link to provider confirmation redesigned.png|1200px|border|center|link=https://help.simplybook.me/images/6/6c/Add_meeting_link_to_provider_confirmation_redesigned.png]] | [[File:Add meeting link to provider confirmation redesigned.png|1200px|border|center|link=https://help.simplybook.me/images/6/6c/Add_meeting_link_to_provider_confirmation_redesigned.png]] | ||
</div> | |||
<div lang="en" dir="ltr" class="mw-content-ltr"> | |||
2. In the feature settings click on <span style="background-color:#d4f8e5; padding:5px; border-radius:5px;">Authorization</span> button near Zoom option to connect your Zoom account. | |||
[[File:Online meetings zoom connect redesigned.png|1200px|center|link=https://help.simplybook.me/images/4/4c/Online_meetings_zoom_connect_redesigned.png]] | |||
<br><br> | |||
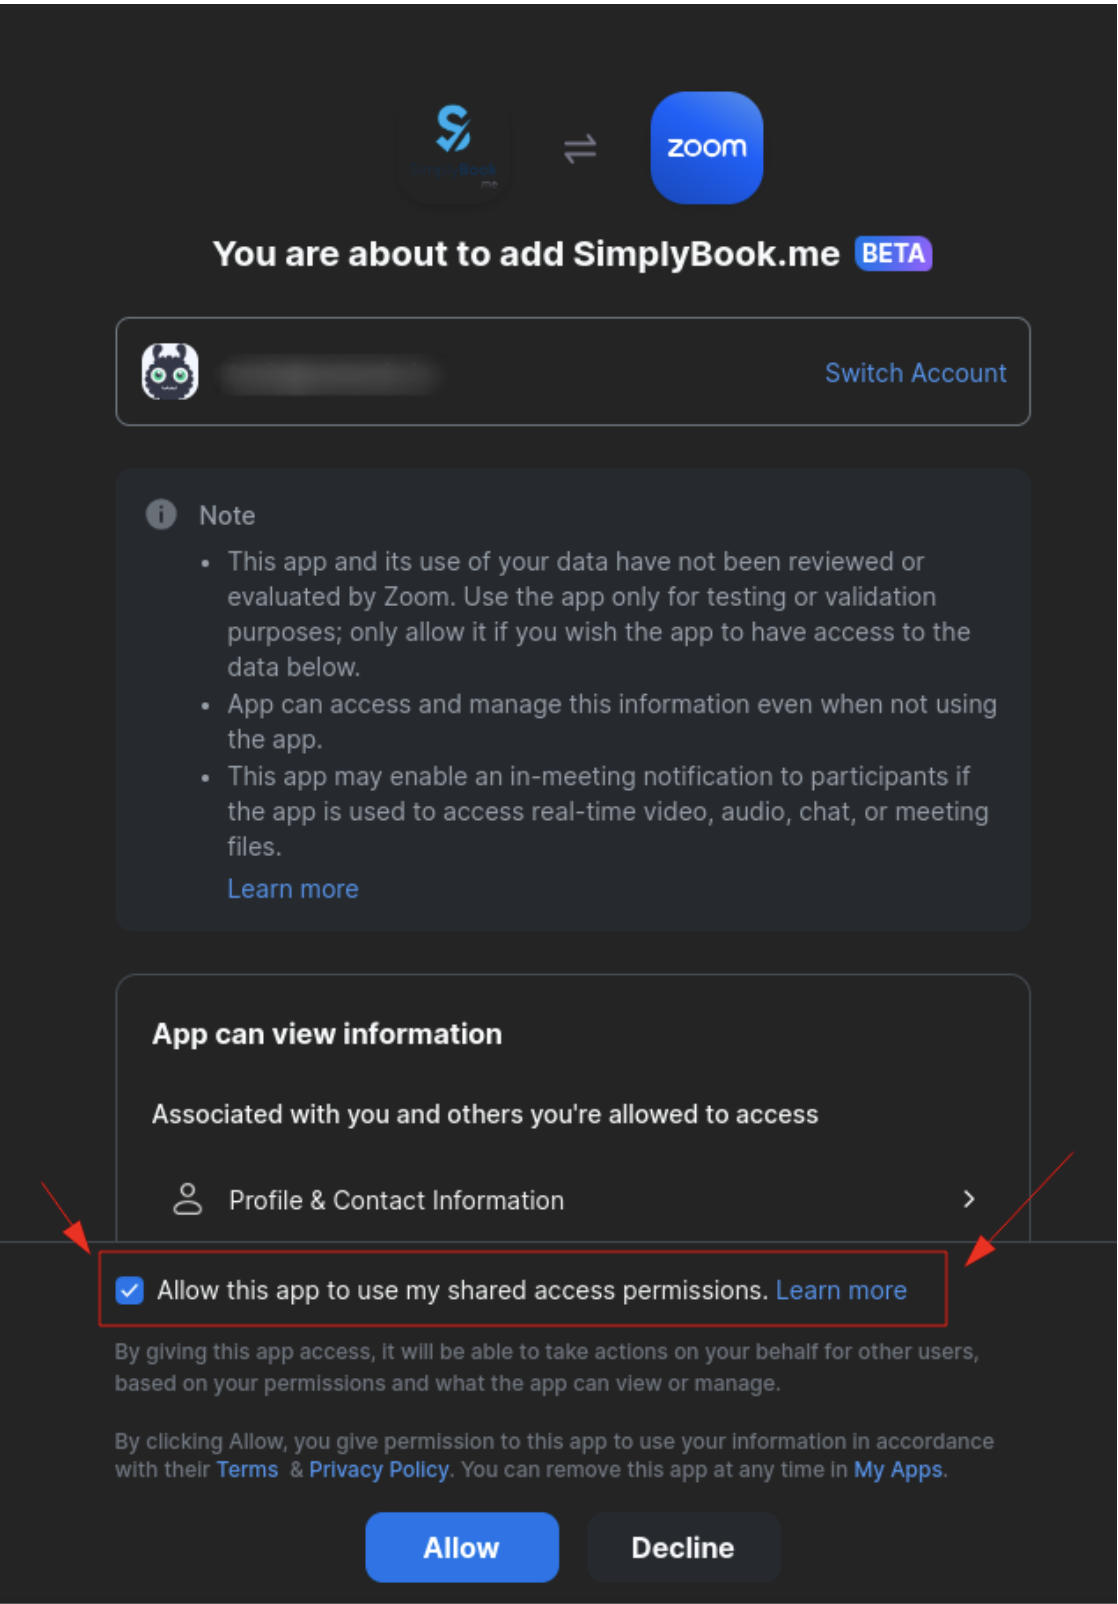
3. Enter your credentials to log into Zoom, or click SSO, Google, or Facebook to log in through those services.<br> | |||
You can connect one zoom account per company OR connect all zoom users added to your account by checking the checkbox <span style="background-color:#d4f8e5; padding:5px; border-radius:5px;">Allow this app to use my shared access permissions</span> | |||
[[File:Zoom permissions step.png|500px|center|link=https://help.simplybook.me/images/d/d8/Zoom_permissions_step.png]] | |||
<br><br> | |||
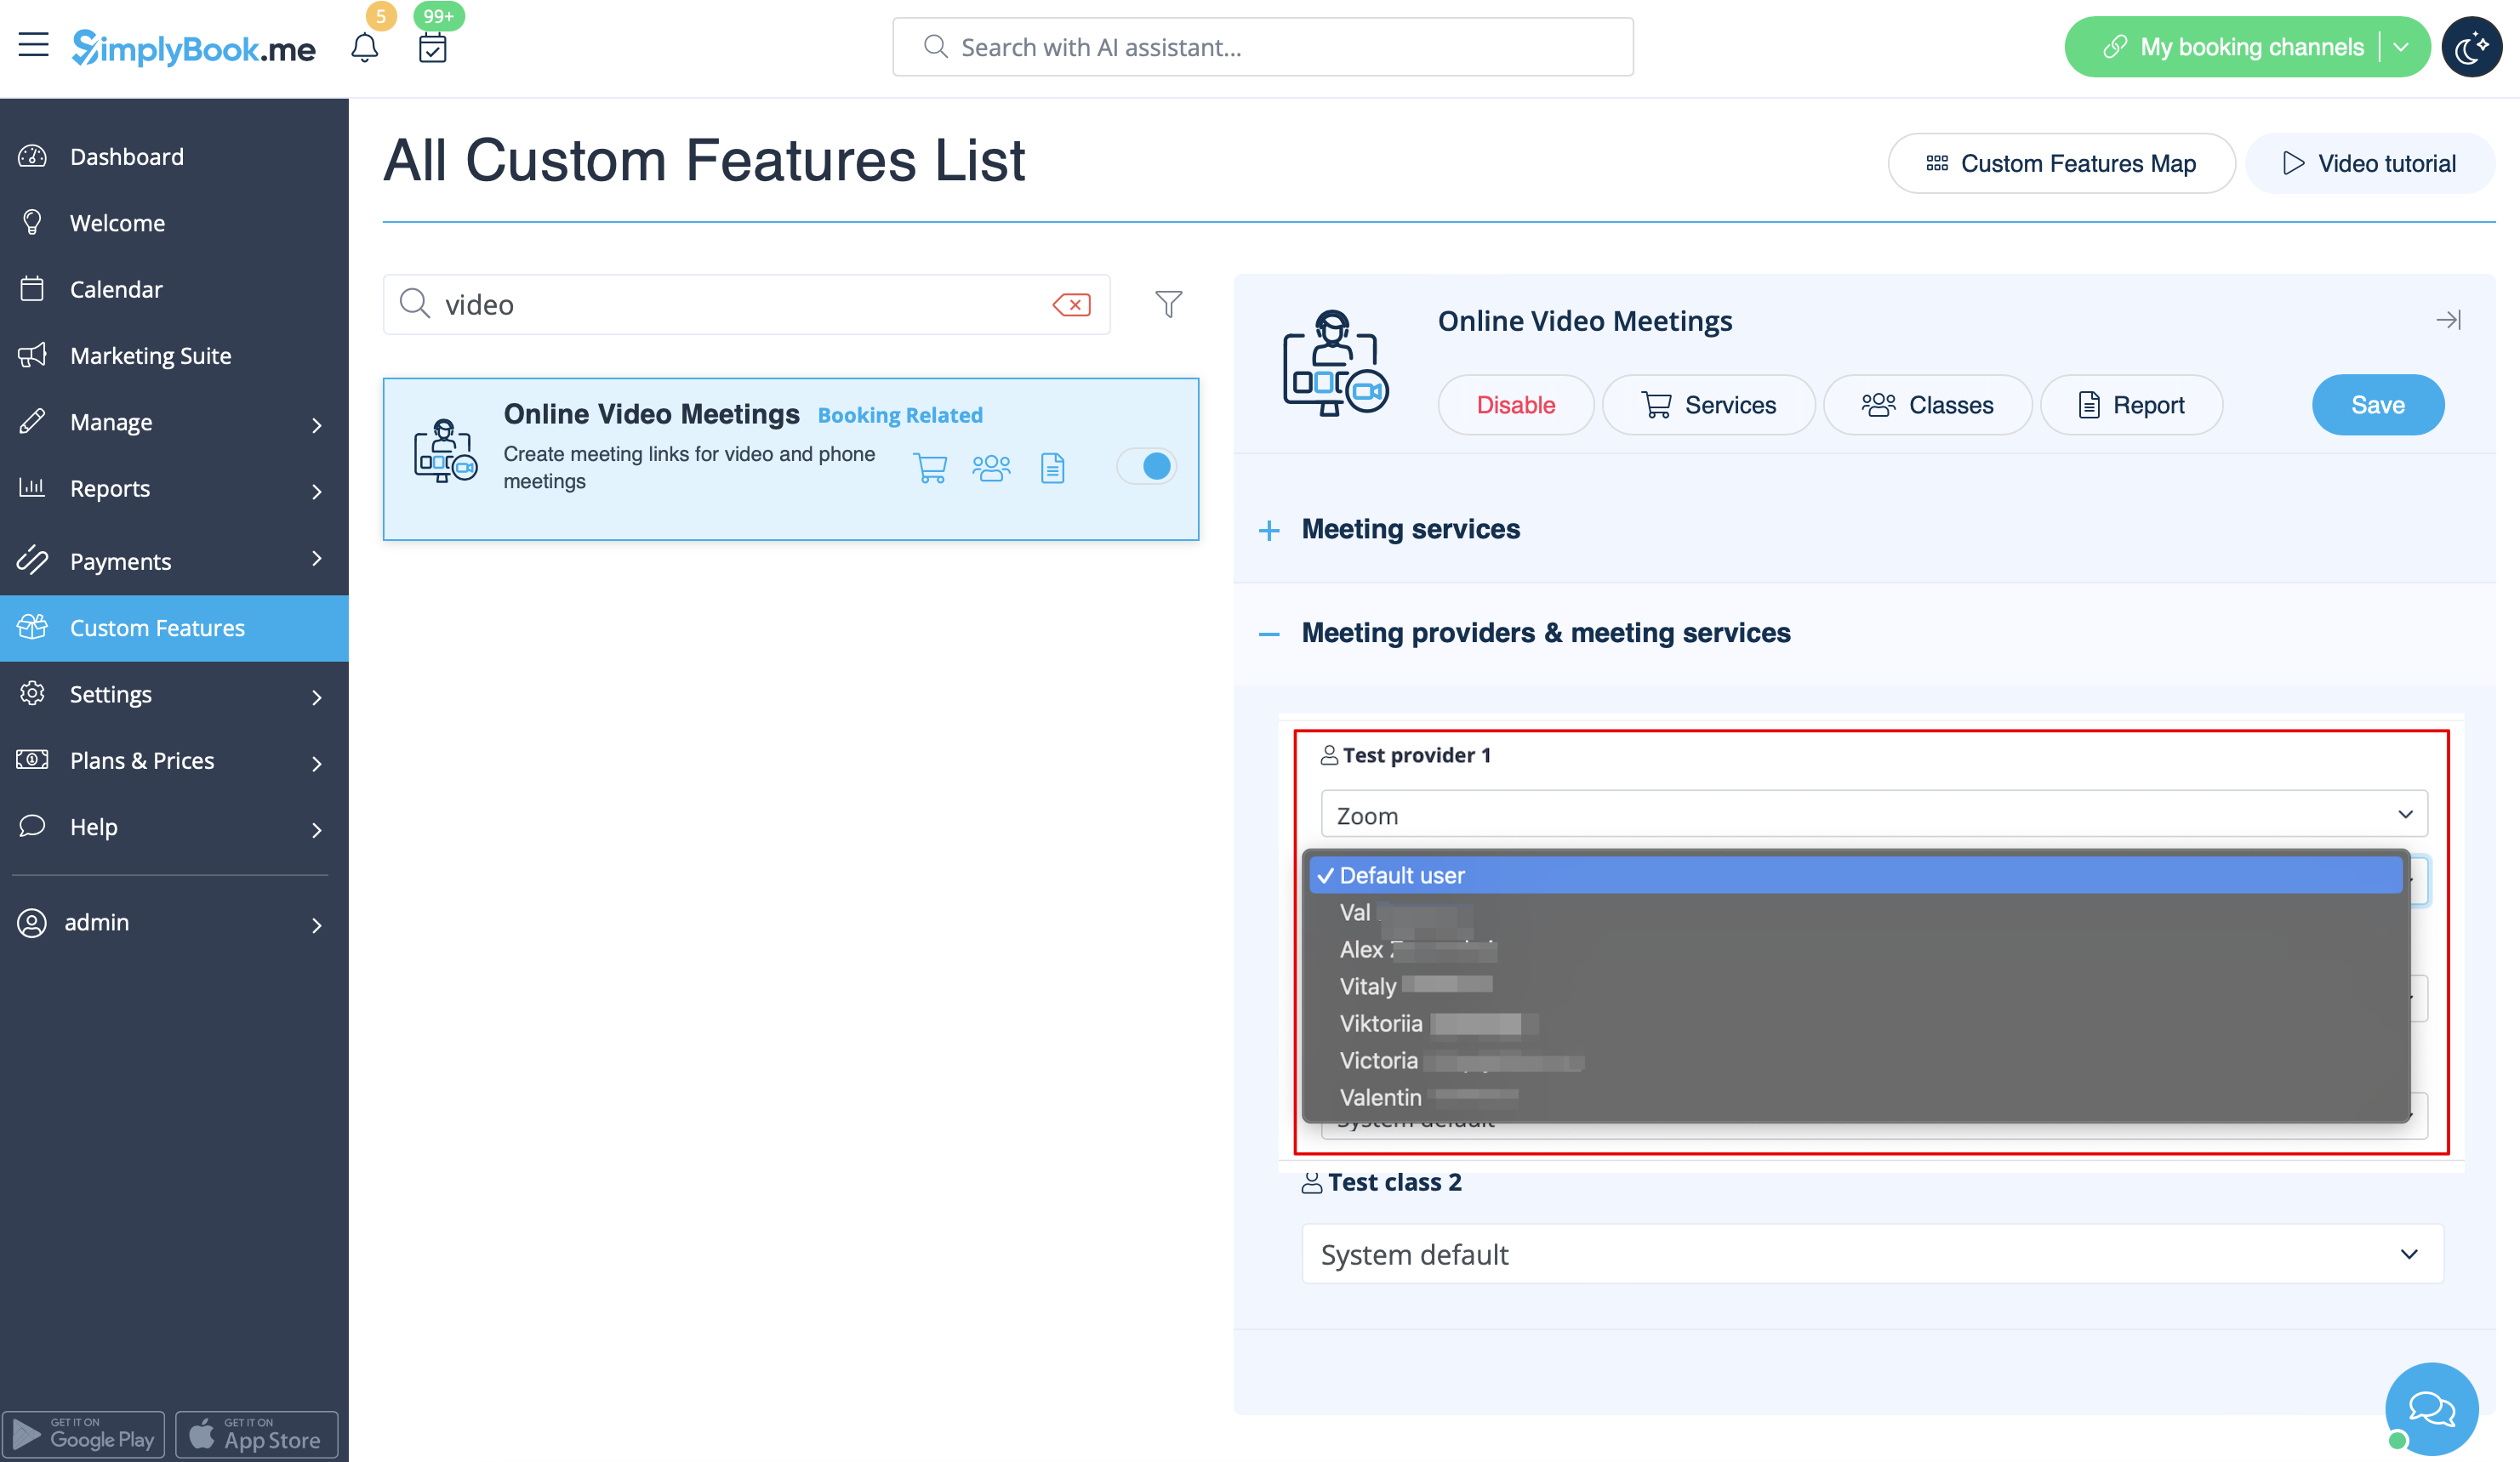
4. After Zoom is authorized, click on <span style="background-color:#d4f8e5; padding:5px; border-radius:5px;">Meeting Providers and Meeting Services</span> and choose providers that should be connected to Zoom by selecting Zoom option from the respective drop down. In the next drop-down please select Zoom user (if you have several users under your Zoom account) that should be connected to that provider. | |||
[[File:Zoom select account per provider redesigned.png|1200px|center|link=https://help.simplybook.me/images/3/36/Zoom_select_account_per_provider_redesigned.png]] | |||
<br><br> | |||
</div> | |||
<div lang="en" dir="ltr" class="mw-content-ltr"> | |||
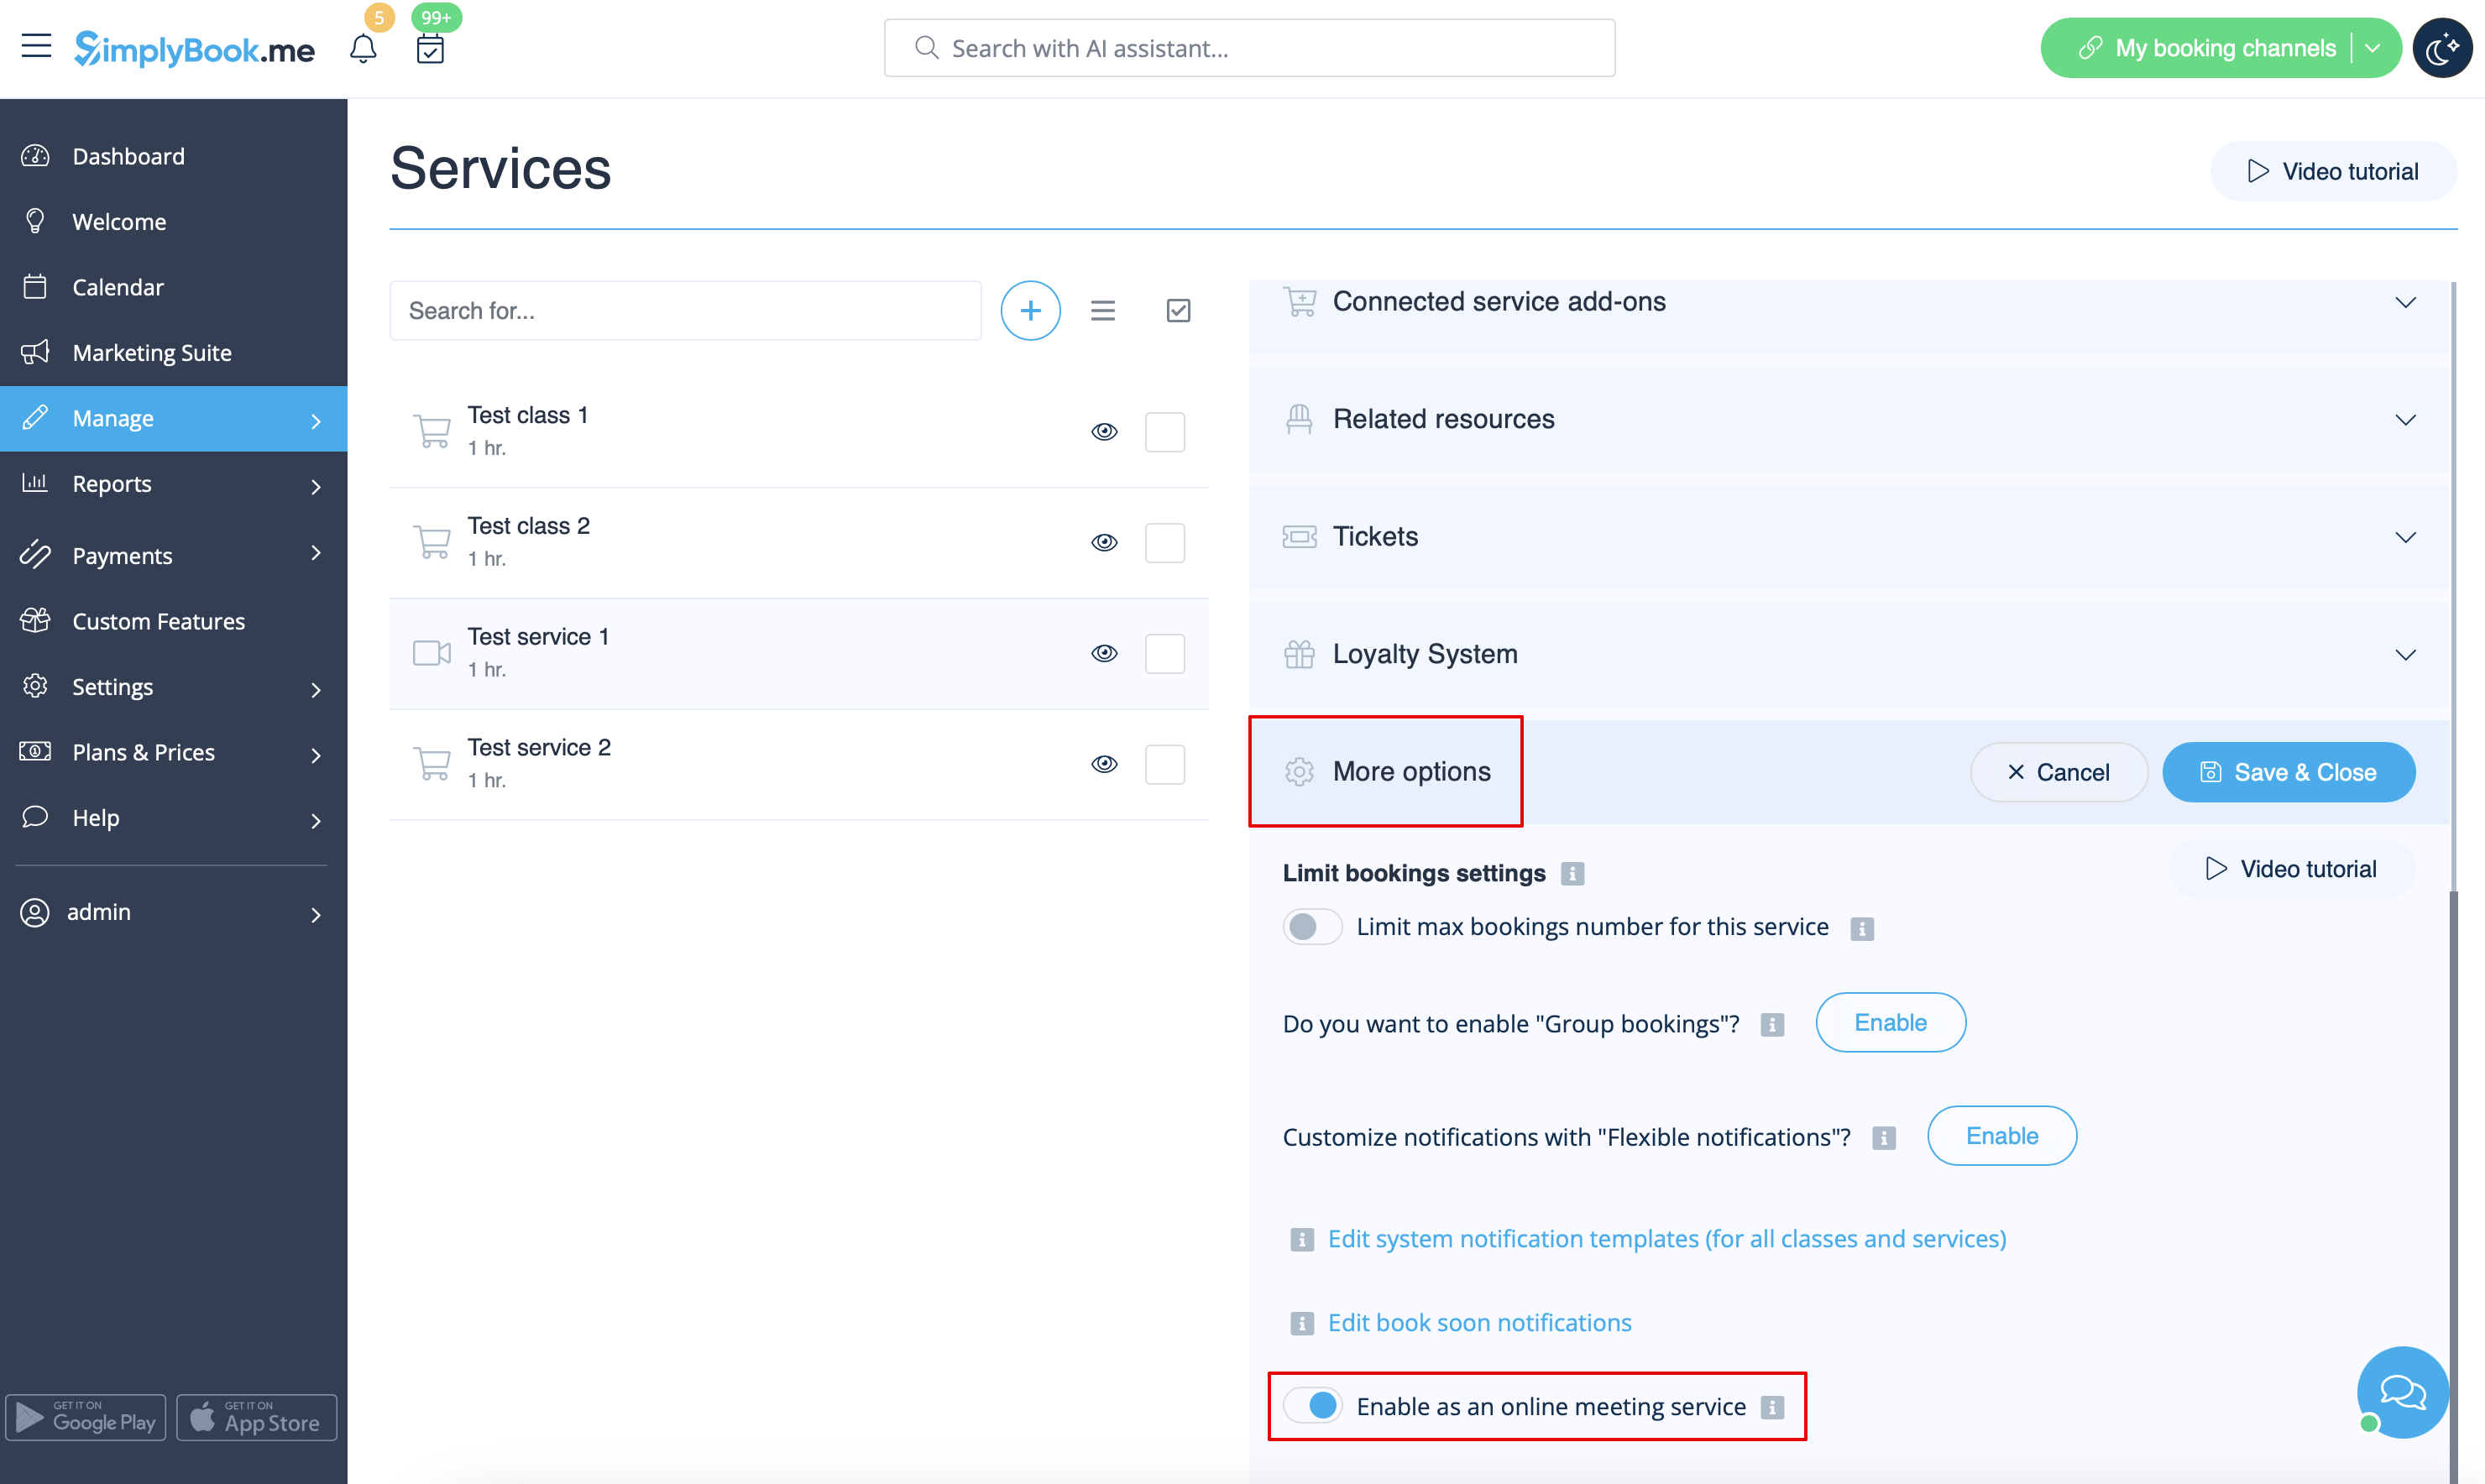
5. After your Zoom connection is set, the last thing you need to do is enable online meeting option for your services. To do that please navigate to <span style="background-color:#d4f8e5; padding:5px; border-radius:5px;">Manage</span> -> <span style="background-color:#d4f8e5; padding:5px; border-radius:5px;">Services</span> -> click on needed Service name -> scroll down to <span style="background-color:#d4f8e5; padding:5px; border-radius:5px;">More options.</span> | |||
(in <span style="background-color:#d4f8e5; padding:5px; border-radius:5px;">Manage</span> -> <span style="background-color:#d4f8e5; padding:5px; border-radius:5px;">[[Classes custom feature|Classes]]</span> -> click on Class name -> <span style="background-color:#d4f8e5; padding:5px; border-radius:5px;">More options</span> if you are using [[Classes custom feature|Classes]] feature) and switch on the option Enable as online meeting service/[[Classes custom feature|class]]. | |||
[[File:Enable service as online meeting redesigned.png|1200px|center|link=https://help.simplybook.me/images/e/ec/Enable_service_as_online_meeting_redesigned.png]] | |||
<br><br> | |||
</div> | |||
<div lang="en" dir="ltr" class="mw-content-ltr"> | |||
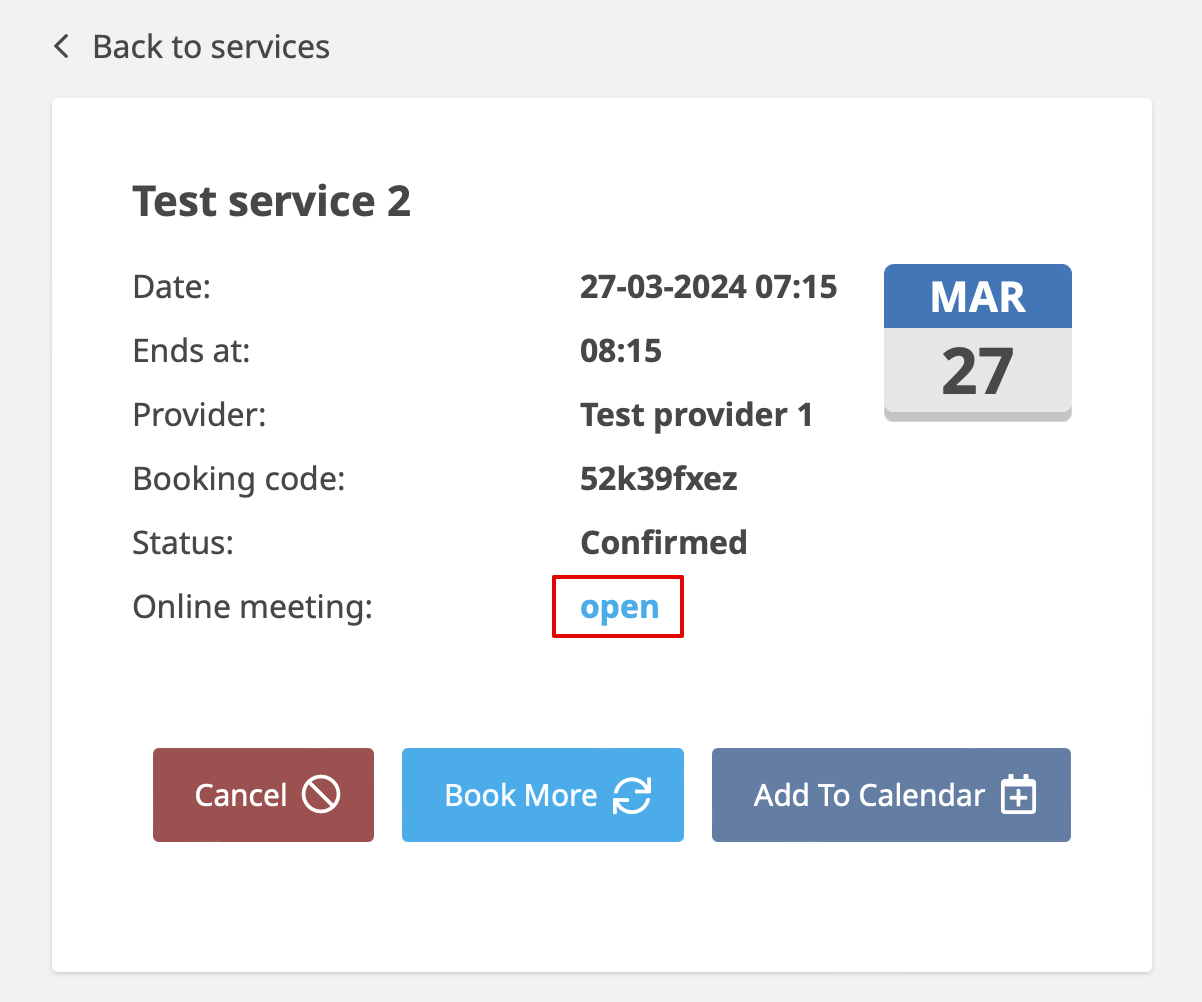
6. When the clients book such a service/[[Classes custom feature|class]] there will be online meeting link on My bookings page for the associated booking. When the appointment time comes the clients will be able to follow it to access the meeting. | |||
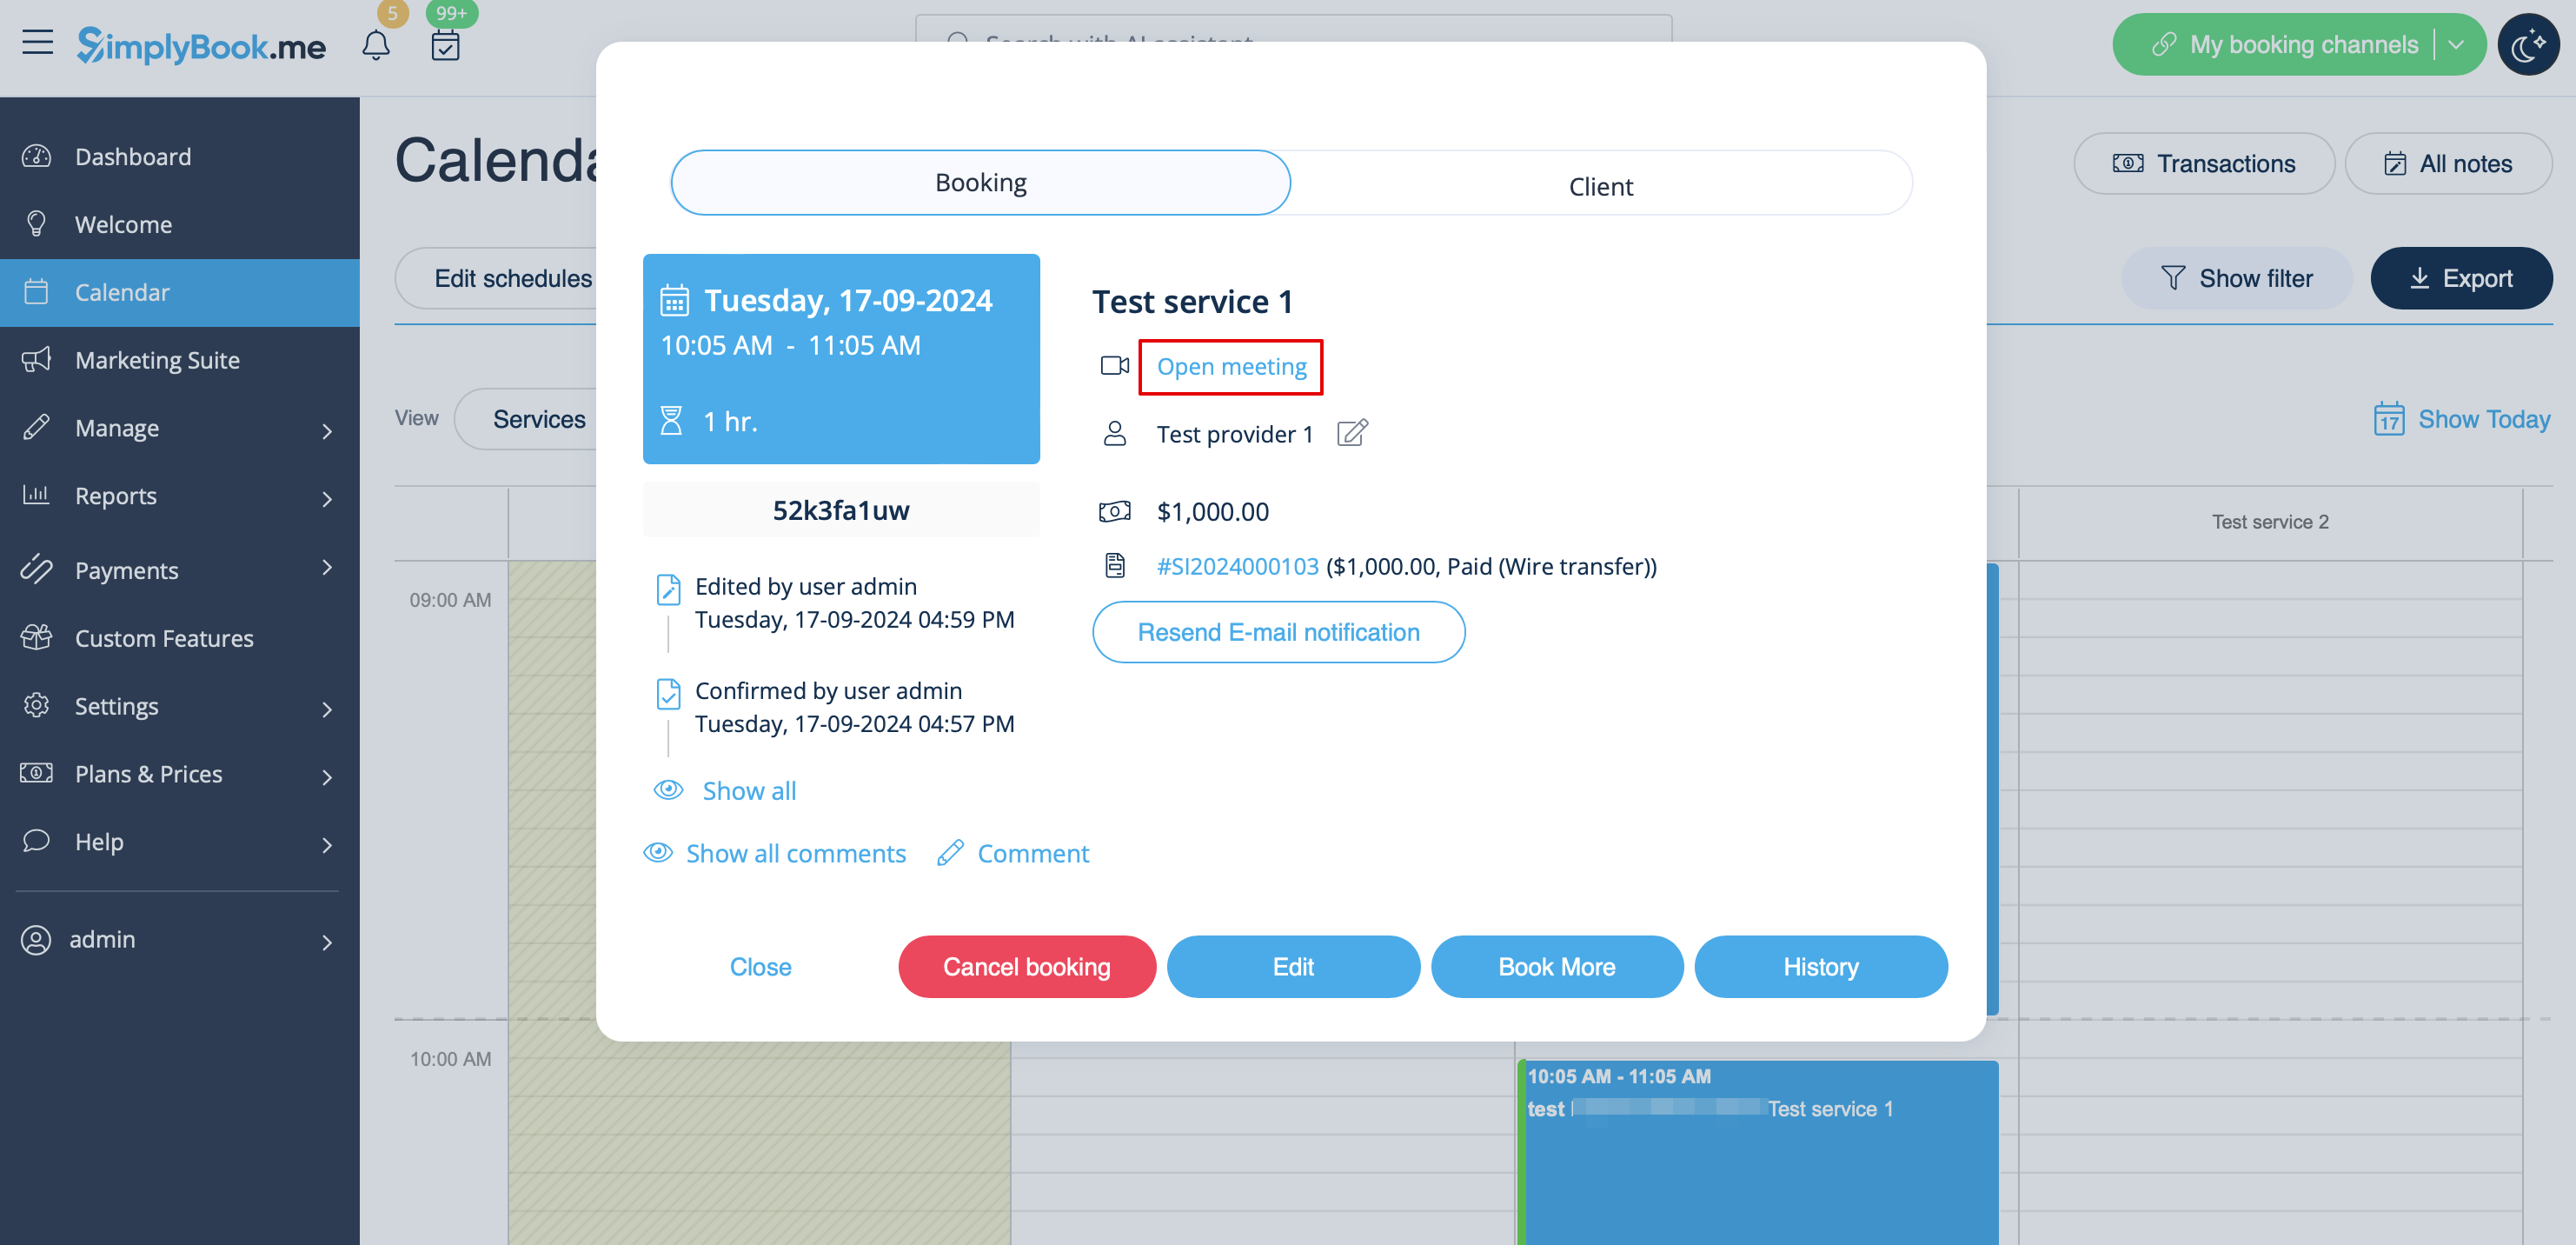
For admin side it will be possible to follow the link from booking info popup form in <span style="background-color:#d4f8e5; padding:5px; border-radius:5px;">Calendar</span> or in <span style="background-color:#d4f8e5; padding:5px; border-radius:5px;">Reports</span> -> <span style="background-color:#d4f8e5; padding:5px; border-radius:5px;">Booking details</span>, or in <span style="background-color:#d4f8e5; padding:5px; border-radius:5px;">Reports</span> -> <span style="background-color:#d4f8e5; padding:5px; border-radius:5px;">Online video meetings</span>. | |||
<br><br> | |||
</div> | |||
<div lang="en" dir="ltr" class="mw-content-ltr"> | |||
7. (optional) As well you can add online meetings link to provider and client notification templates so that both sides receive them with the booking details. | |||
* To do that for your client notifications please navigate to <span style="background-color:#d4f8e5; padding:5px; border-radius:5px;">Settings</span> -> <span style="background-color:#d4f8e5; padding:5px; border-radius:5px;">Email and SMS settings</span> (or <span style="background-color:#d4f8e5; padding:5px; border-radius:5px;">Custom features</span> -> <span style="background-color:#d4f8e5; padding:5px; border-radius:5px;">[[Flexible Notifications custom feature|Flexible notifications]]</span> -> <span style="background-color:#d4f8e5; padding:5px; border-radius:5px;">Manage</span> if you have customized notifications per service and/or provider) and edit your <span style="background-color:#d4f8e5; padding:5px; border-radius:5px;">Client's booking confirmation</span> template to add ''[online_meeting_link]'' variable to send Zoom links to your clients. | |||
To make everything work simply paste ''[online_meeting_link]'' variable to the desired place in your "Client's booking confirmation template" so when a client books a service, a Zoom meeting link will be automatically generated at the place of a variable. | |||
<br><br> | |||
* To let your service providers receive Zoom links in their confirmations please add ''[online_meeting_provider_link]'' variable to your <span style="background-color:#d4f8e5; padding:5px; border-radius:5px;">New booking confirmation for service providers</span> in <span style="background-color:#d4f8e5; padding:5px; border-radius:5px;">Settings</span> -> <span style="background-color:#d4f8e5; padding:5px; border-radius:5px;">Email and sms settings</span> (or <span style="background-color:#d4f8e5; padding:5px; border-radius:5px;">Custom features</span> -> <span style="background-color:#d4f8e5; padding:5px; border-radius:5px;">[[Flexible Notifications custom feature|Flexible notifications]]</span> -> <span style="background-color:#d4f8e5; padding:5px; border-radius:5px;">Manage</span> if you have customized notifications per service and/or provider). | |||
[[File:Add meeting link to provider confirmation redesigned.png|1200px|border|center|link=https://help.simplybook.me/images/6/6c/Add_meeting_link_to_provider_confirmation_redesigned.png]] | |||
</div> | |||
<div class="mw-translate-fuzzy"> | |||
<br><br> | <br><br> | ||
hoe het vergaderproces werkt | hoe het vergaderproces werkt | ||
| Line 67: | Line 105: | ||
[[File:Zoom disconnect from zoom side.png|1200px|center|link=https://help.simplybook.me/images/a/a4/Zoom_disconnect_from_zoom_side.png]] | [[File:Zoom disconnect from zoom side.png|1200px|center|link=https://help.simplybook.me/images/a/a4/Zoom_disconnect_from_zoom_side.png]] | ||
<br><br><br><br> | <br><br><br><br> | ||
</div> | |||
<div lang="en" dir="ltr" class="mw-content-ltr"> | |||
<br><br> | |||
;How to remove integration | |||
''From the Simplybook.me side'' | |||
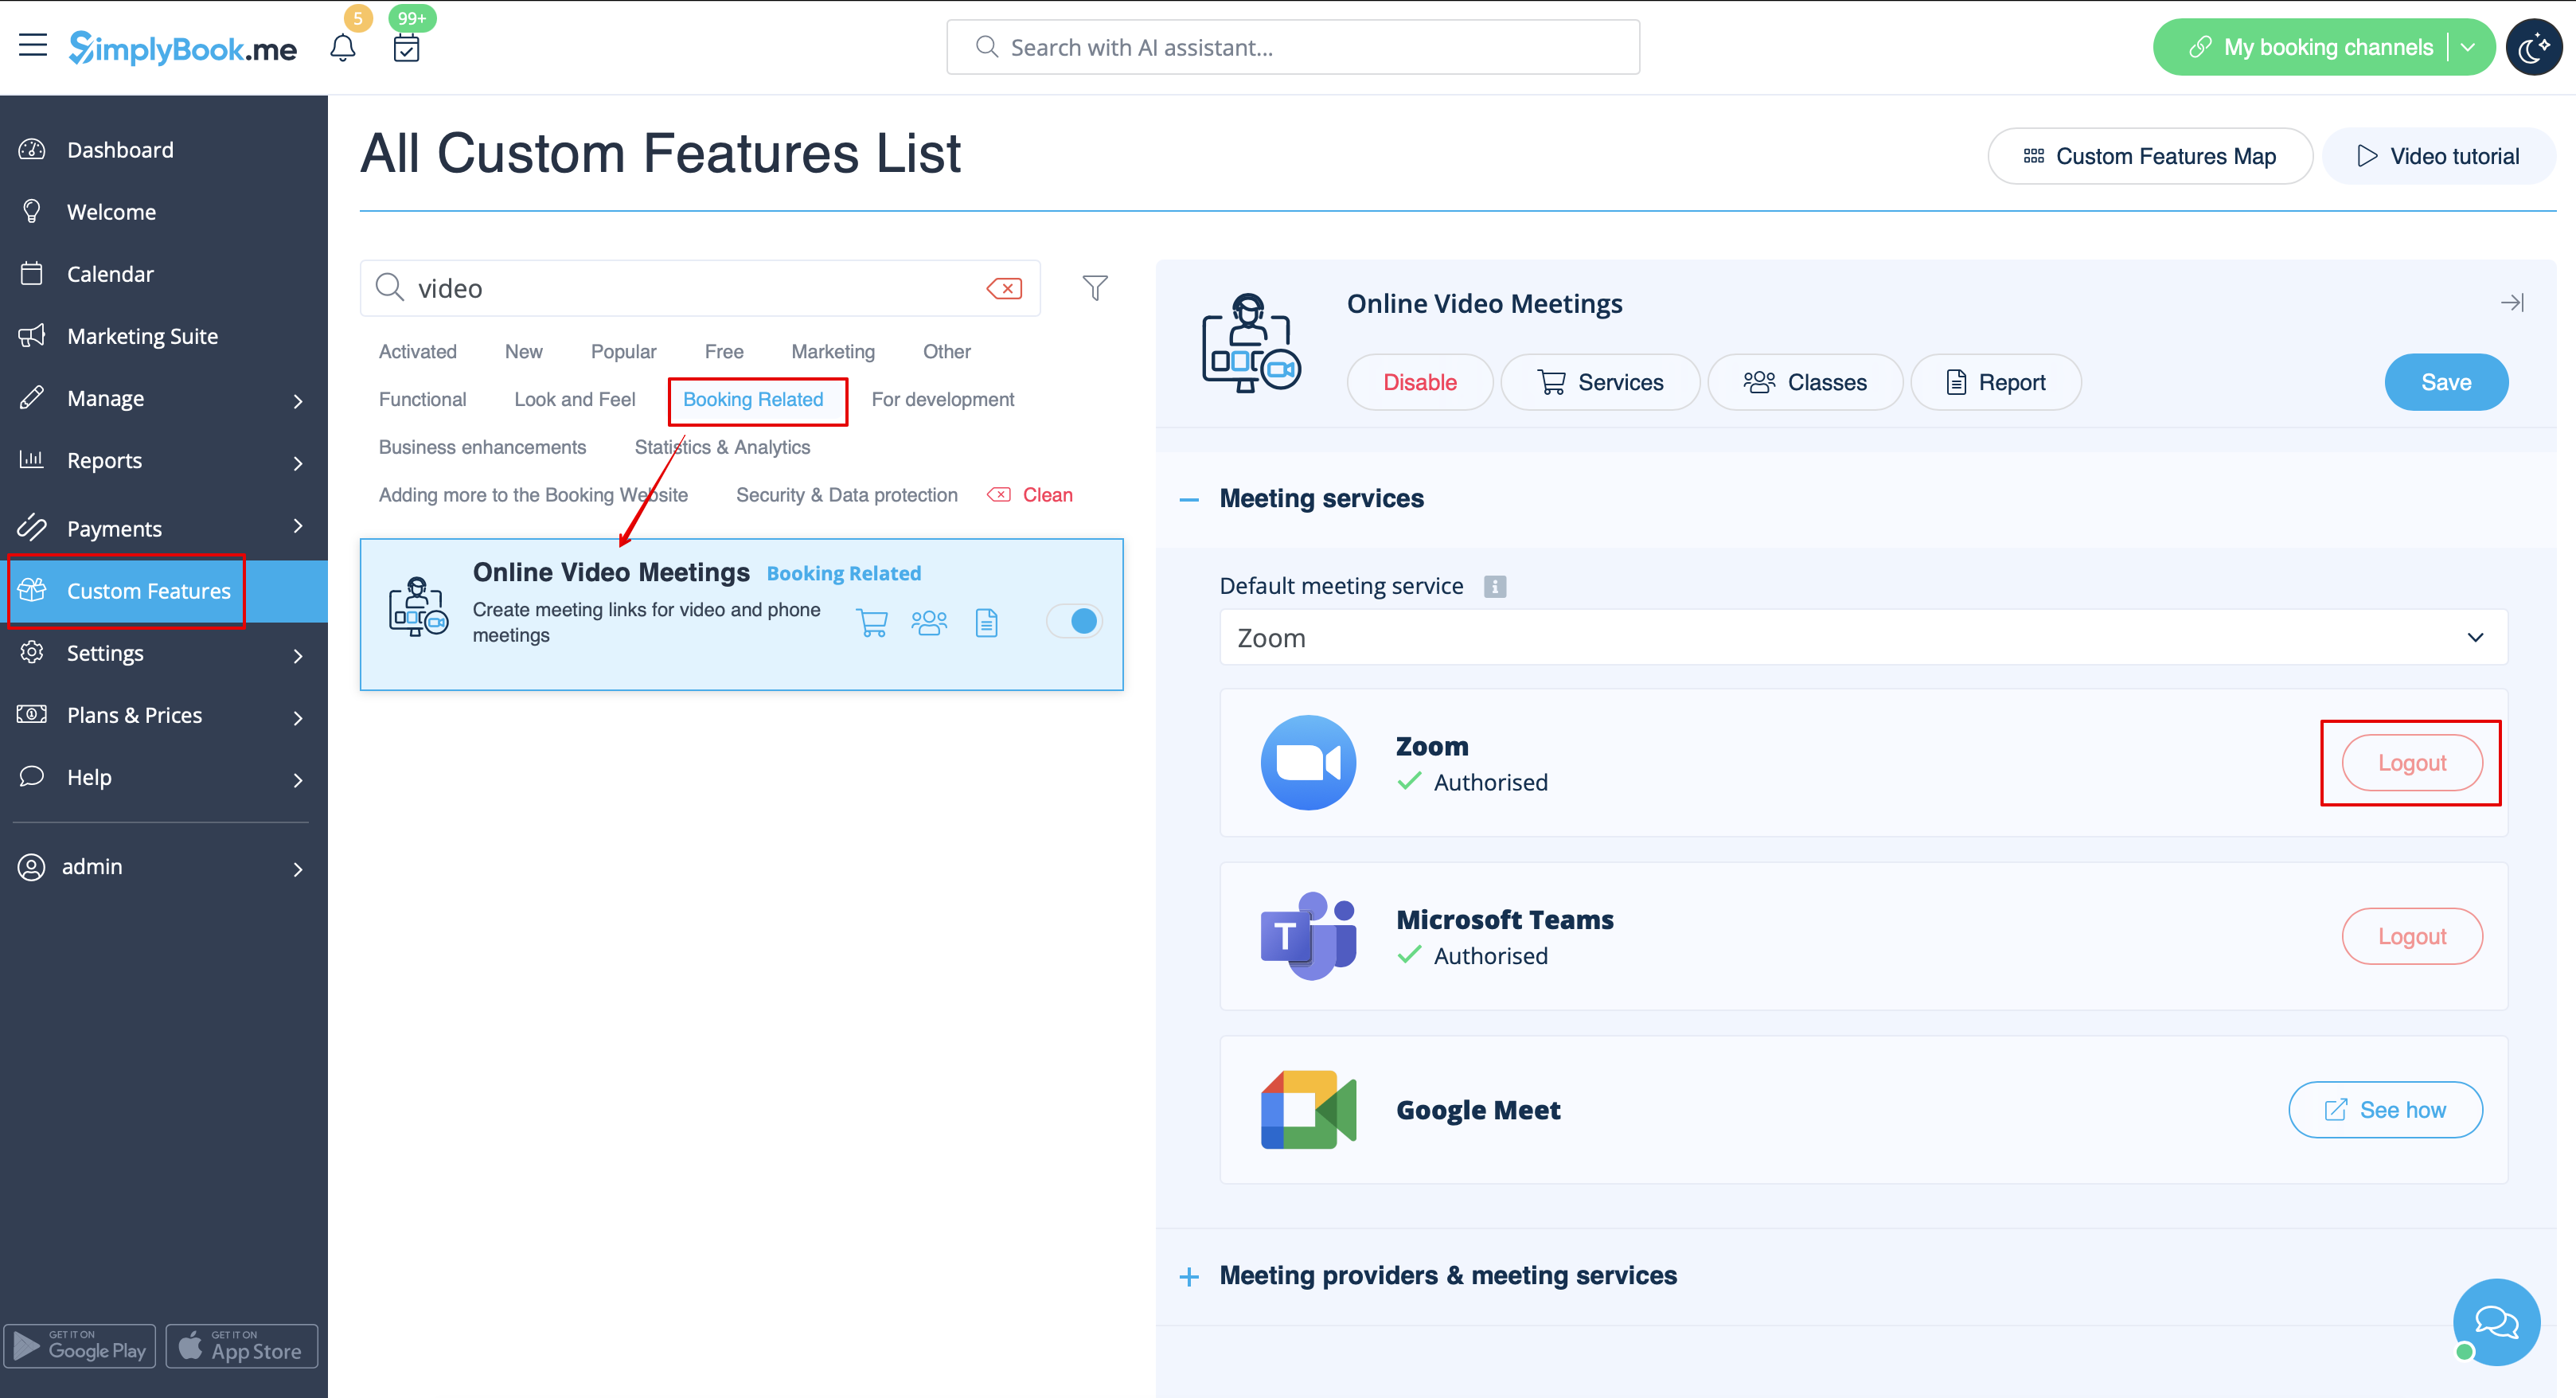
* Navigate to the <span style="background-color:#d4f8e5; padding:5px; border-radius:5px;">Custom Features</span> page within your Simplybook.me admin interface and click on Online video meetings custom feature to open its settings.<br> | |||
* In the feature settings locate Zoom and click <span style="background-color:#d4f8e5; padding:5px; border-radius:5px;">Logout.</span><br> | |||
* After that Zoom integration will be removed from your Simplybook.me account. | |||
[[File:Zoom disconnect path redesigned.png|1200px|center|link=https://help.simplybook.me/images/5/5a/Zoom_disconnect_path_redesigned.png]] | |||
<br><br> | |||
''From the Zoom side''<br> | |||
<span style="background-color:#ffe9e9; padding:5px; border-radius:5px;">'''Please note!''' If you did not check the box “Allow this app to use my shared access permissions” OR you want to switch connected Zoom account to another one - there will be no option to do that from Simplybook.me side due to technical restrictions.</span><br> | |||
<span style="background-color:#ffe9e9; padding:5px; border-radius:5px;">In order to do that you will need to disconnect Simplybook.me directly from Zoom and after that you will be able to connect new account on the Simplybook.me side.</span> | |||
</div> | |||
<div lang="en" dir="ltr" class="mw-content-ltr"> | |||
<br><br> | |||
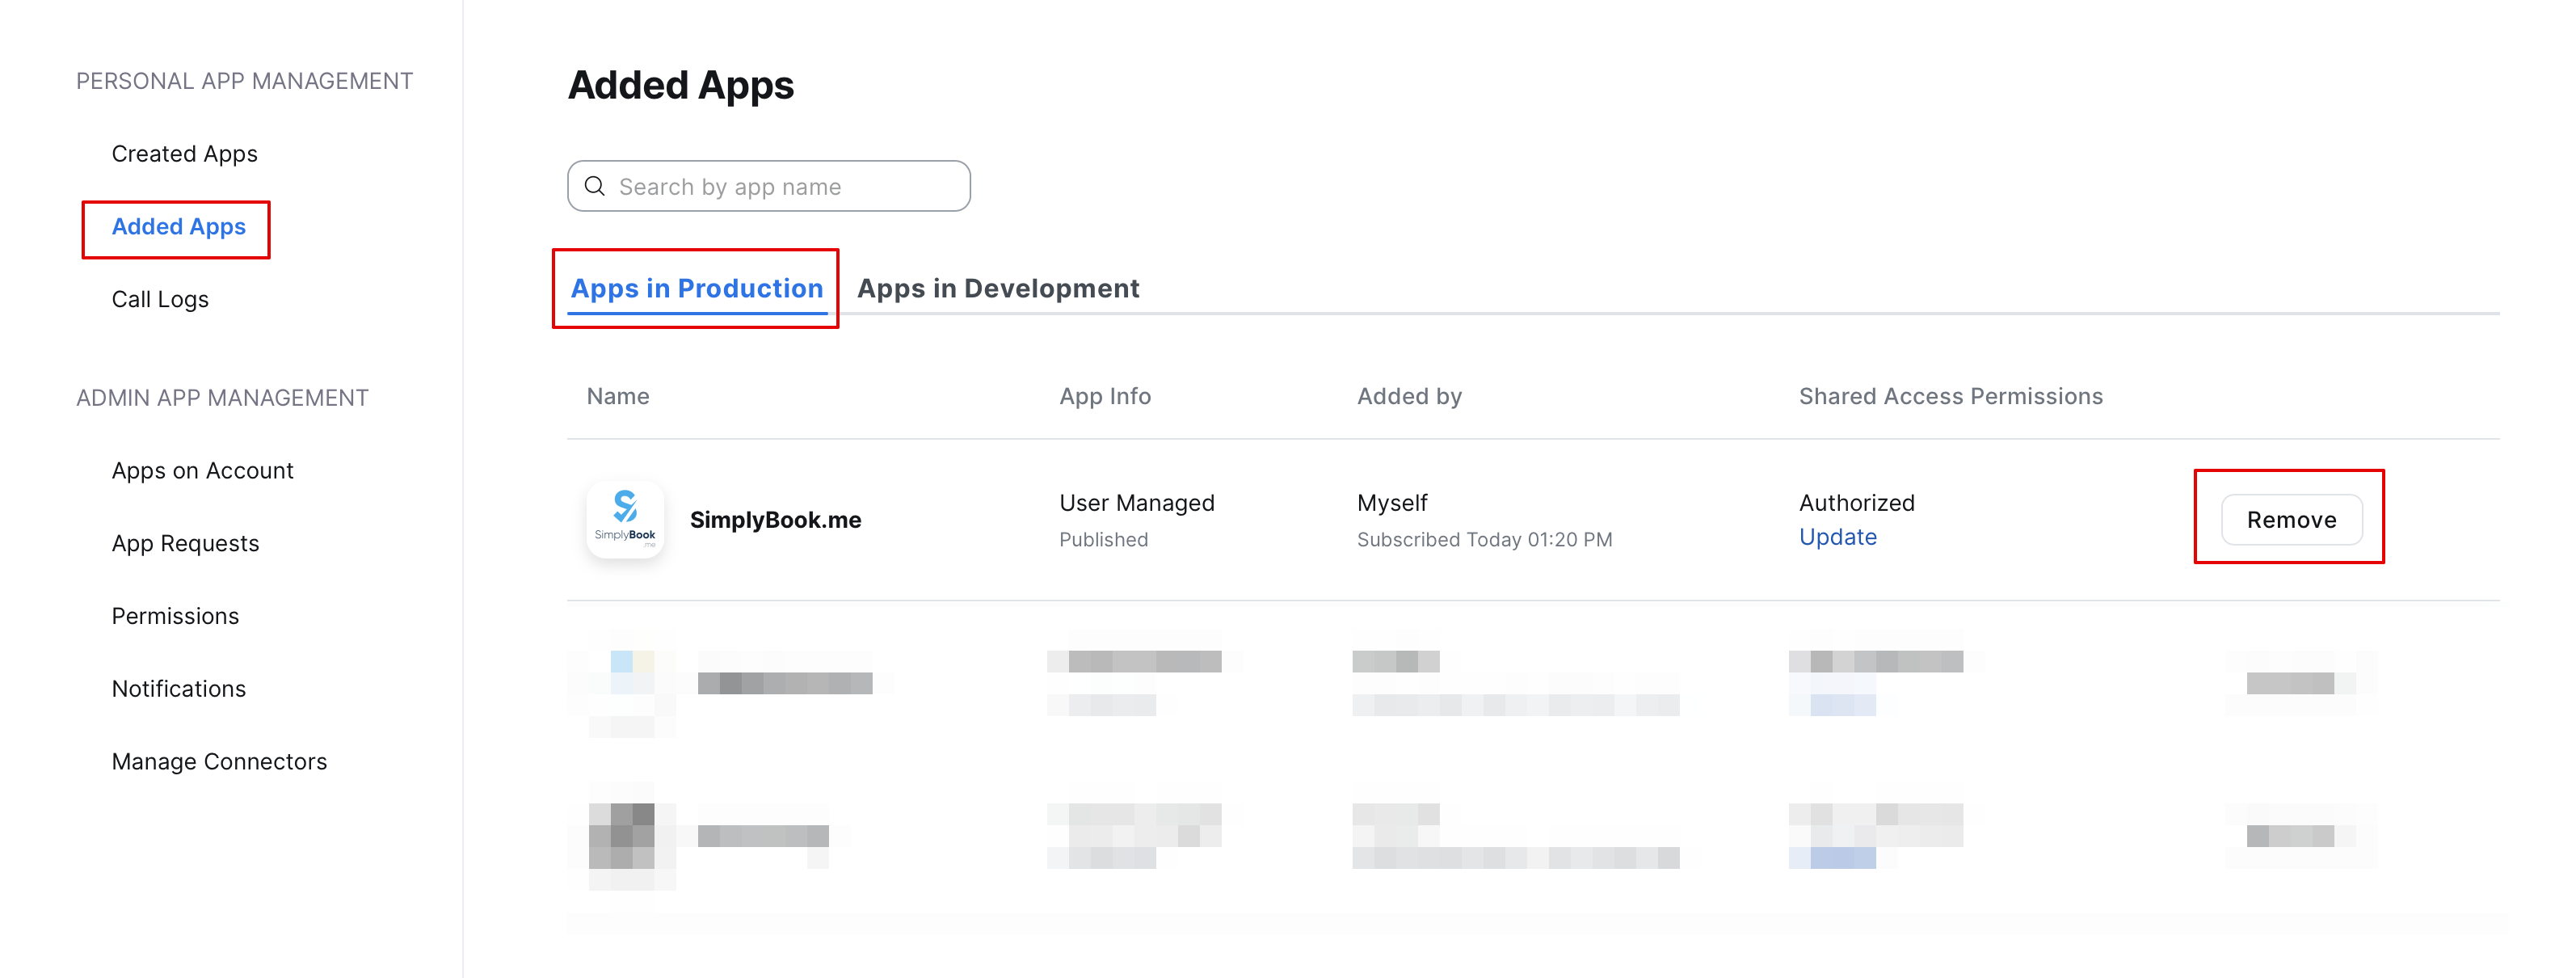
* To disconnect the integration from the Zoom side please follow [https://marketplace.zoom.us/user/installed this link].<br> | |||
* Locate Simplybook.me in the list of connected apps (you can use search if needed).<br> | |||
* Click on <span style="background-color:#d4f8e5; padding:5px; border-radius:5px;">Remove</span> button to disconnect.<br> | |||
* Now the integration is removed and you can connect different account if needed. | |||
[[File:Zoom disconnect from zoom side.png|1200px|center|link=https://help.simplybook.me/images/a/a4/Zoom_disconnect_from_zoom_side.png]] | |||
<br><br><br><br> | |||
</div> | |||
Revision as of 08:02, 1 July 2025
Om verbinding te maken met Zoom, hebt u een Zoom-account nodig. Elke medewerker met de rechten van een planningbeheerder kan Simplybook.me verbinden met Zoom.
SimplyBook.me kan slechts verbinding maken met één Zoom-account.
Let op:
- Zoom-boekingen worden niet toegevoegd aan uw Zoom-vergaderpagina in Zoom. Om online vergaderingen te controleren, gebruikt u filters per dienst in de Simplybook.me-beheerdersagenda om alleen boekingen voor de gewenste dienst te zien.
- Zelfs nadat het Zoom-account is verbonden, is videoconferencing standaard uitgeschakeld voor nieuwe diensten. Om videoconferenties toe te voegen aan een nieuwe dienst, gaat u in Beheer ->Diensten/Lessen naar Meer opties perdienst/les en schakelt u deze in als online vergaderdienst.
- Klanten die een groepsles bijwonen, ontvangen unieke Zoom-links, maar deze links leiden allemaal naar dezelfde Zoom-vergadering.
- Hoe instellen
- How to set
1. Schakel de aangepaste functie Online vergaderingen in uw SimplyBook.me-account in door naar de pagina Aangepaste functies in uw Simplybook.me-beheerdersinterface te gaan en op de knop Inschakelen naast de aangepaste functie Online videovergaderingen te klikken.
2. Klik in de functie-instellingen op de knop Autorisatie naast de optie Zoom om uw Zoom-account te koppelen.

3. Voer uw inloggegevens in om u aan te melden bij Zoom, of klik op SSO, Google of Facebook om u aan te melden via die diensten.
U kunt één Zoom-account per bedrijf koppelen OF alle Zoom-gebruikers die aan uw account zijn toegevoegd koppelen door het selectievakje 'Deze app toestemming geven om mijn gedeelde toegangsrechten te gebruiken' aan te vinken.
4. Nadat Zoom is geautoriseerd, klikt u op 'Meeting Providers' en 'Meeting Services' en kiest u de providers die aan Zoom moeten worden gekoppeld door de optie 'Zoom' te selecteren in de betreffende vervolgkeuzelijst. Selecteer in de volgende vervolgkeuzelijst de Zoom-gebruiker (als u meerdere gebruikers onder uw Zoom-account hebt) die aan die provider moet worden gekoppeld.
5. Nadat uw Zoom-verbinding is ingesteld, hoeft u alleen nog maar de optie voor onlinevergaderingen voor uw diensten in te schakelen. Ga hiervoor naar Beheer -> Diensten -> klik op de naam van de gewenste dienst -> scroll omlaag naar Meer opties.
(in Beheer -> Klassen -> klik op de naam van de klas -> Meer opties als u de functie Klassen gebruikt) en schakel de optie Inschakelen als onlinevergaderdienst/klas in.
6. Wanneer klanten een dergelijkeservice/klas boeken, verschijnt er een link naar de online vergadering op de pagina Mijn boekingen voor de bijbehorende boeking. Wanneer het tijdstip van de afspraak is aangebroken, kunnen de klanten deze volgen om toegang te krijgen tot de vergadering.
Voor beheerders is het mogelijk om de link te volgen vanuit het pop-upformulier met boekingsinformatie in Agenda of in Rapporten -> Boekingsdetails, of in Rapporten -> Online videovergaderingen.
7. (optioneel) U kunt ook een link naar online vergaderingen toevoegen aan de sjablonen voor meldingen aan providers en klanten, zodat beide partijen deze samen met de boekingsgegevens ontvangen.
- Om dit voor uw klantmeldingen te doen, gaat u naar Instellingen -> E-mail- en sms-instellingen (of Aangepaste functies -> Flexibele meldingen -> Beheren als u meldingen per dienst en/of provider hebt aangepast) en bewerkt u het sjabloon voor de boekingsbevestiging van uw klant om de variabele [online_meeting_link] toe te voegen om Zoom-links naar uw klanten te sturen.
Om alles te laten werken, plakt u de variabele [online_meeting_link] op de gewenste plaats in uw "Boekingsbevestigingssjabloon voor klanten", zodat wanneer een klant een dienst boekt, er automatisch een Zoom-vergaderlink wordt gegenereerd op de plaats van de variabele.
- Om uw dienstverleners Zoom-links in hun bevestigingen te laten ontvangen, voegt u de variabele [online_meeting_provider_link] toe aan uw Nieuwe boekingsbevestiging voor dienstverleners in Instellingen -> E-mail- en sms-instellingen (of Aangepaste functies -> Flexibele meldingen -> Beheren als u meldingen per dienst en/of aanbieder hebt aangepast).
2. In the feature settings click on Authorization button near Zoom option to connect your Zoom account.
3. Enter your credentials to log into Zoom, or click SSO, Google, or Facebook to log in through those services.
You can connect one zoom account per company OR connect all zoom users added to your account by checking the checkbox Allow this app to use my shared access permissions
4. After Zoom is authorized, click on Meeting Providers and Meeting Services and choose providers that should be connected to Zoom by selecting Zoom option from the respective drop down. In the next drop-down please select Zoom user (if you have several users under your Zoom account) that should be connected to that provider.
5. After your Zoom connection is set, the last thing you need to do is enable online meeting option for your services. To do that please navigate to Manage -> Services -> click on needed Service name -> scroll down to More options. (in Manage -> Classes -> click on Class name -> More options if you are using Classes feature) and switch on the option Enable as online meeting service/class.
6. When the clients book such a service/class there will be online meeting link on My bookings page for the associated booking. When the appointment time comes the clients will be able to follow it to access the meeting.
For admin side it will be possible to follow the link from booking info popup form in Calendar or in Reports -> Booking details, or in Reports -> Online video meetings.
7. (optional) As well you can add online meetings link to provider and client notification templates so that both sides receive them with the booking details.
- To do that for your client notifications please navigate to Settings -> Email and SMS settings (or Custom features -> Flexible notifications -> Manage if you have customized notifications per service and/or provider) and edit your Client's booking confirmation template to add [online_meeting_link] variable to send Zoom links to your clients.
To make everything work simply paste [online_meeting_link] variable to the desired place in your "Client's booking confirmation template" so when a client books a service, a Zoom meeting link will be automatically generated at the place of a variable.
- To let your service providers receive Zoom links in their confirmations please add [online_meeting_provider_link] variable to your New booking confirmation for service providers in Settings -> Email and sms settings (or Custom features -> Flexible notifications -> Manage if you have customized notifications per service and/or provider).
hoe het vergaderproces werkt
1. Nadat alles is ingesteld en de klant de onlinevergaderdienst/les heeft geboekt, ontvangen zowel de klant als de aanbieder (of het bedrijf, afhankelijk van uw instellingen) de links naar de vergadering.
2. Aan de beheerderskant kan de aanbieder rechtstreeks vanuit de boeking in de "Agenda" naar de vergaderpagina gaan door op de link "Vergadering openen" in het pop-upvenster met boekingsdetails te klikken.
3. Klanten kunnen de vergaderlink openen vanuit de boekingsdetails op de pagina 'Mijn boekingen' van de boekingssite.
4. Wanneer het tijd is voor de vergadering, worden zowel de aanbieder als de klant doorgestuurd naar de online vergaderpagina van Zoom.
- Integratie verwijderen
Vanuit Simplybook.me
- Ga naar de pagina 'Aangepaste functies' in uw Simplybook.me-beheerdersinterface en klik op 'Aangepaste functie voor online videovergaderingen' om de instellingen te openen.
- Zoek in de functie-instellingen Zoom en klik op Afmelden.
- Daarna wordt de Zoom-integratie verwijderd uit uw Simplybook.me-account.
Vanuit Zoom
Let op! Als u het vakje 'Deze app toestemming geven voor mijn gedeelde toegangsrechten' niet hebt aangevinkt OF als u het verbonden Zoom-account wilt wijzigen naar een ander account, is dit vanwege technische beperkingen niet mogelijk vanuit Simplybook.me.
Om dit te doen, moet u Simplybook.me rechtstreeks loskoppelen van Zoom. Daarna kunt u een nieuw account koppelen aan Simplybook.me.
- Volg deze link om de integratie los te koppelen aan de Zoom-kant.
- Zoek Simplybook.me in de lijst met gekoppelde apps (u kunt indien nodig zoeken).
- Klik op de knop Verwijderen om de koppeling te verbreken.
- De integratie is nu verwijderd en u kunt indien nodig een ander account koppelen.
- How to remove integration
From the Simplybook.me side
- Navigate to the Custom Features page within your Simplybook.me admin interface and click on Online video meetings custom feature to open its settings.
- In the feature settings locate Zoom and click Logout.
- After that Zoom integration will be removed from your Simplybook.me account.
From the Zoom side
Please note! If you did not check the box “Allow this app to use my shared access permissions” OR you want to switch connected Zoom account to another one - there will be no option to do that from Simplybook.me side due to technical restrictions.
In order to do that you will need to disconnect Simplybook.me directly from Zoom and after that you will be able to connect new account on the Simplybook.me side.
- To disconnect the integration from the Zoom side please follow this link.
- Locate Simplybook.me in the list of connected apps (you can use search if needed).
- Click on Remove button to disconnect.
- Now the integration is removed and you can connect different account if needed.