No edit summary |
No edit summary |
||
| Line 49: | Line 49: | ||
You can also add a note to be reflected in the Quickbooks invoices. | You can also add a note to be reflected in the Quickbooks invoices. | ||
[[File:Quickbooks send transactional email.png|1200px|center|link=https://help.simplybook.me/images/c/c3/Quickbooks_send_transactional_email.png]] | [[File:Quickbooks send transactional email.png|1200px|center|link=https://help.simplybook.me/images/c/c3/Quickbooks_send_transactional_email.png]] | ||
<br><br> | |||
==Taxes== | |||
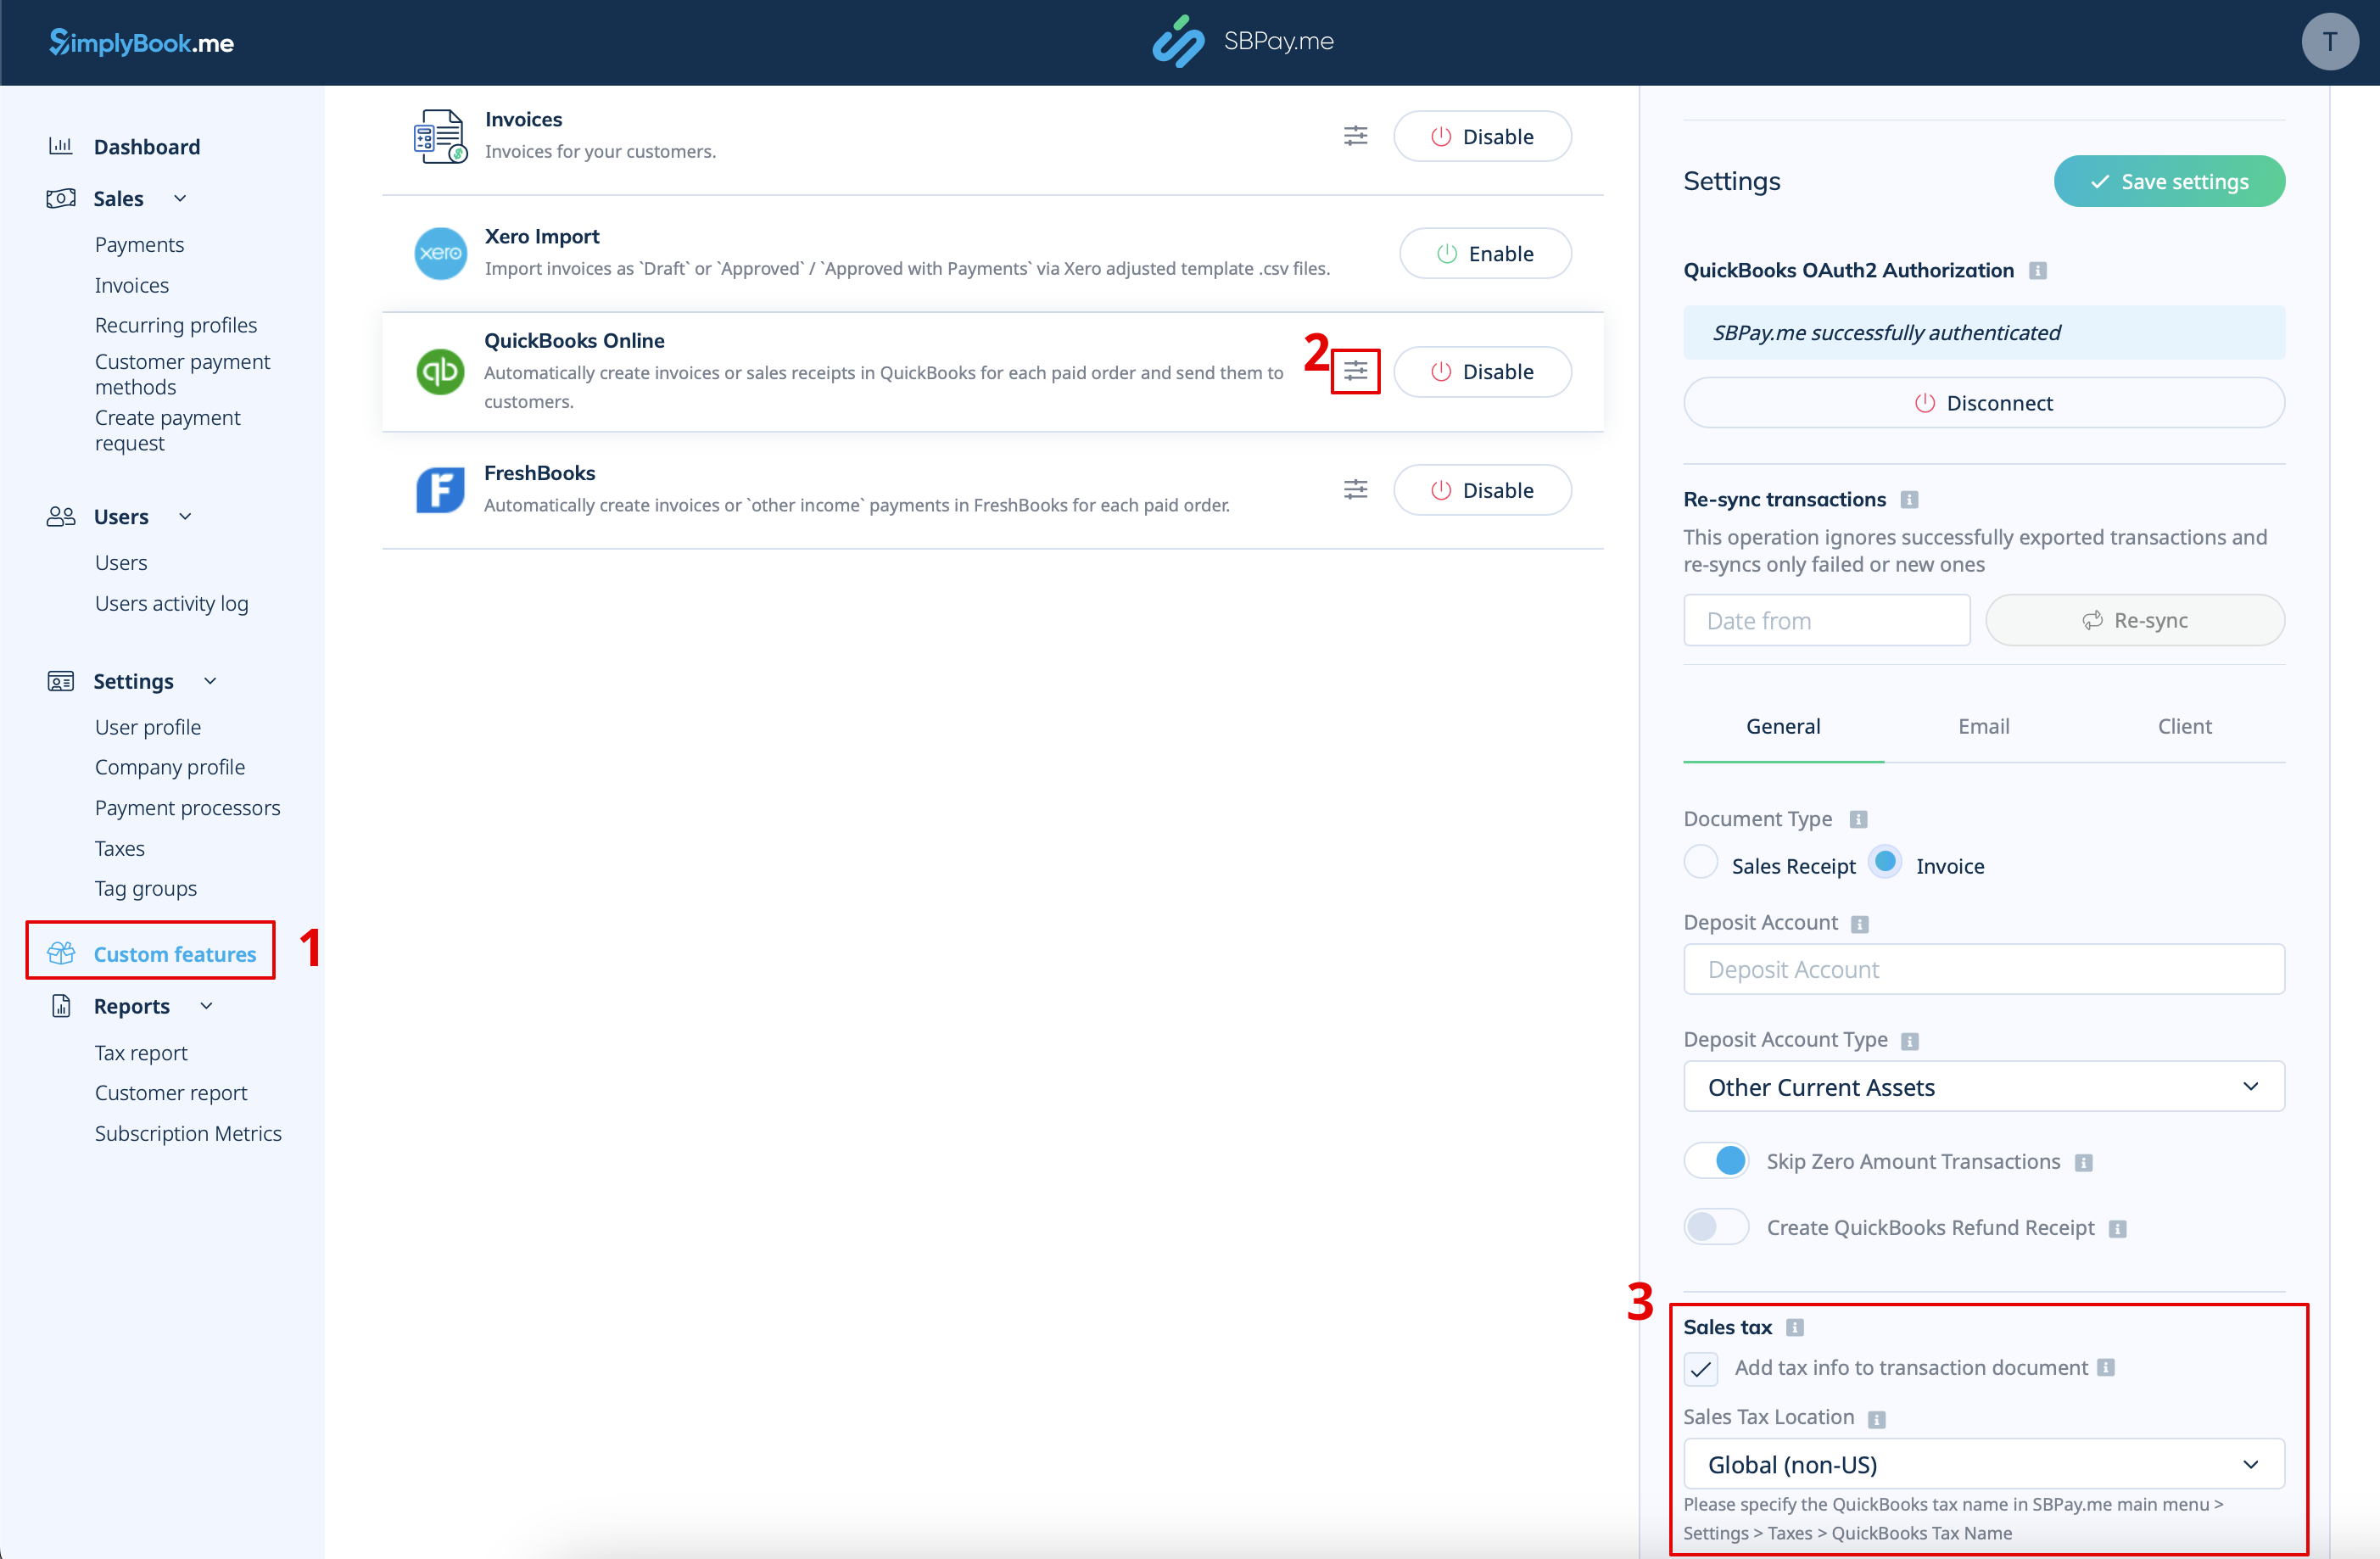
To activate this option and pass taxes information to Quickbooks please check the "Add tax info to transaction document" in the <span style="background-color:#d4f8e5; padding:5px; border-radius:5px;">Custom features</span> -> <span style="background-color:#d4f8e5; padding:5px; border-radius:5px;">Sales tax</span> in your SBPay.me interface. And select the corresponding tax location.<br><br> | |||
[[File:Qb tax enable path.png|1200px|center|link=https://help.simplybook.me/images/1/10/Qb_tax_enable_path.png]] | |||
''<u>For Global tax location</u>''<br> | |||
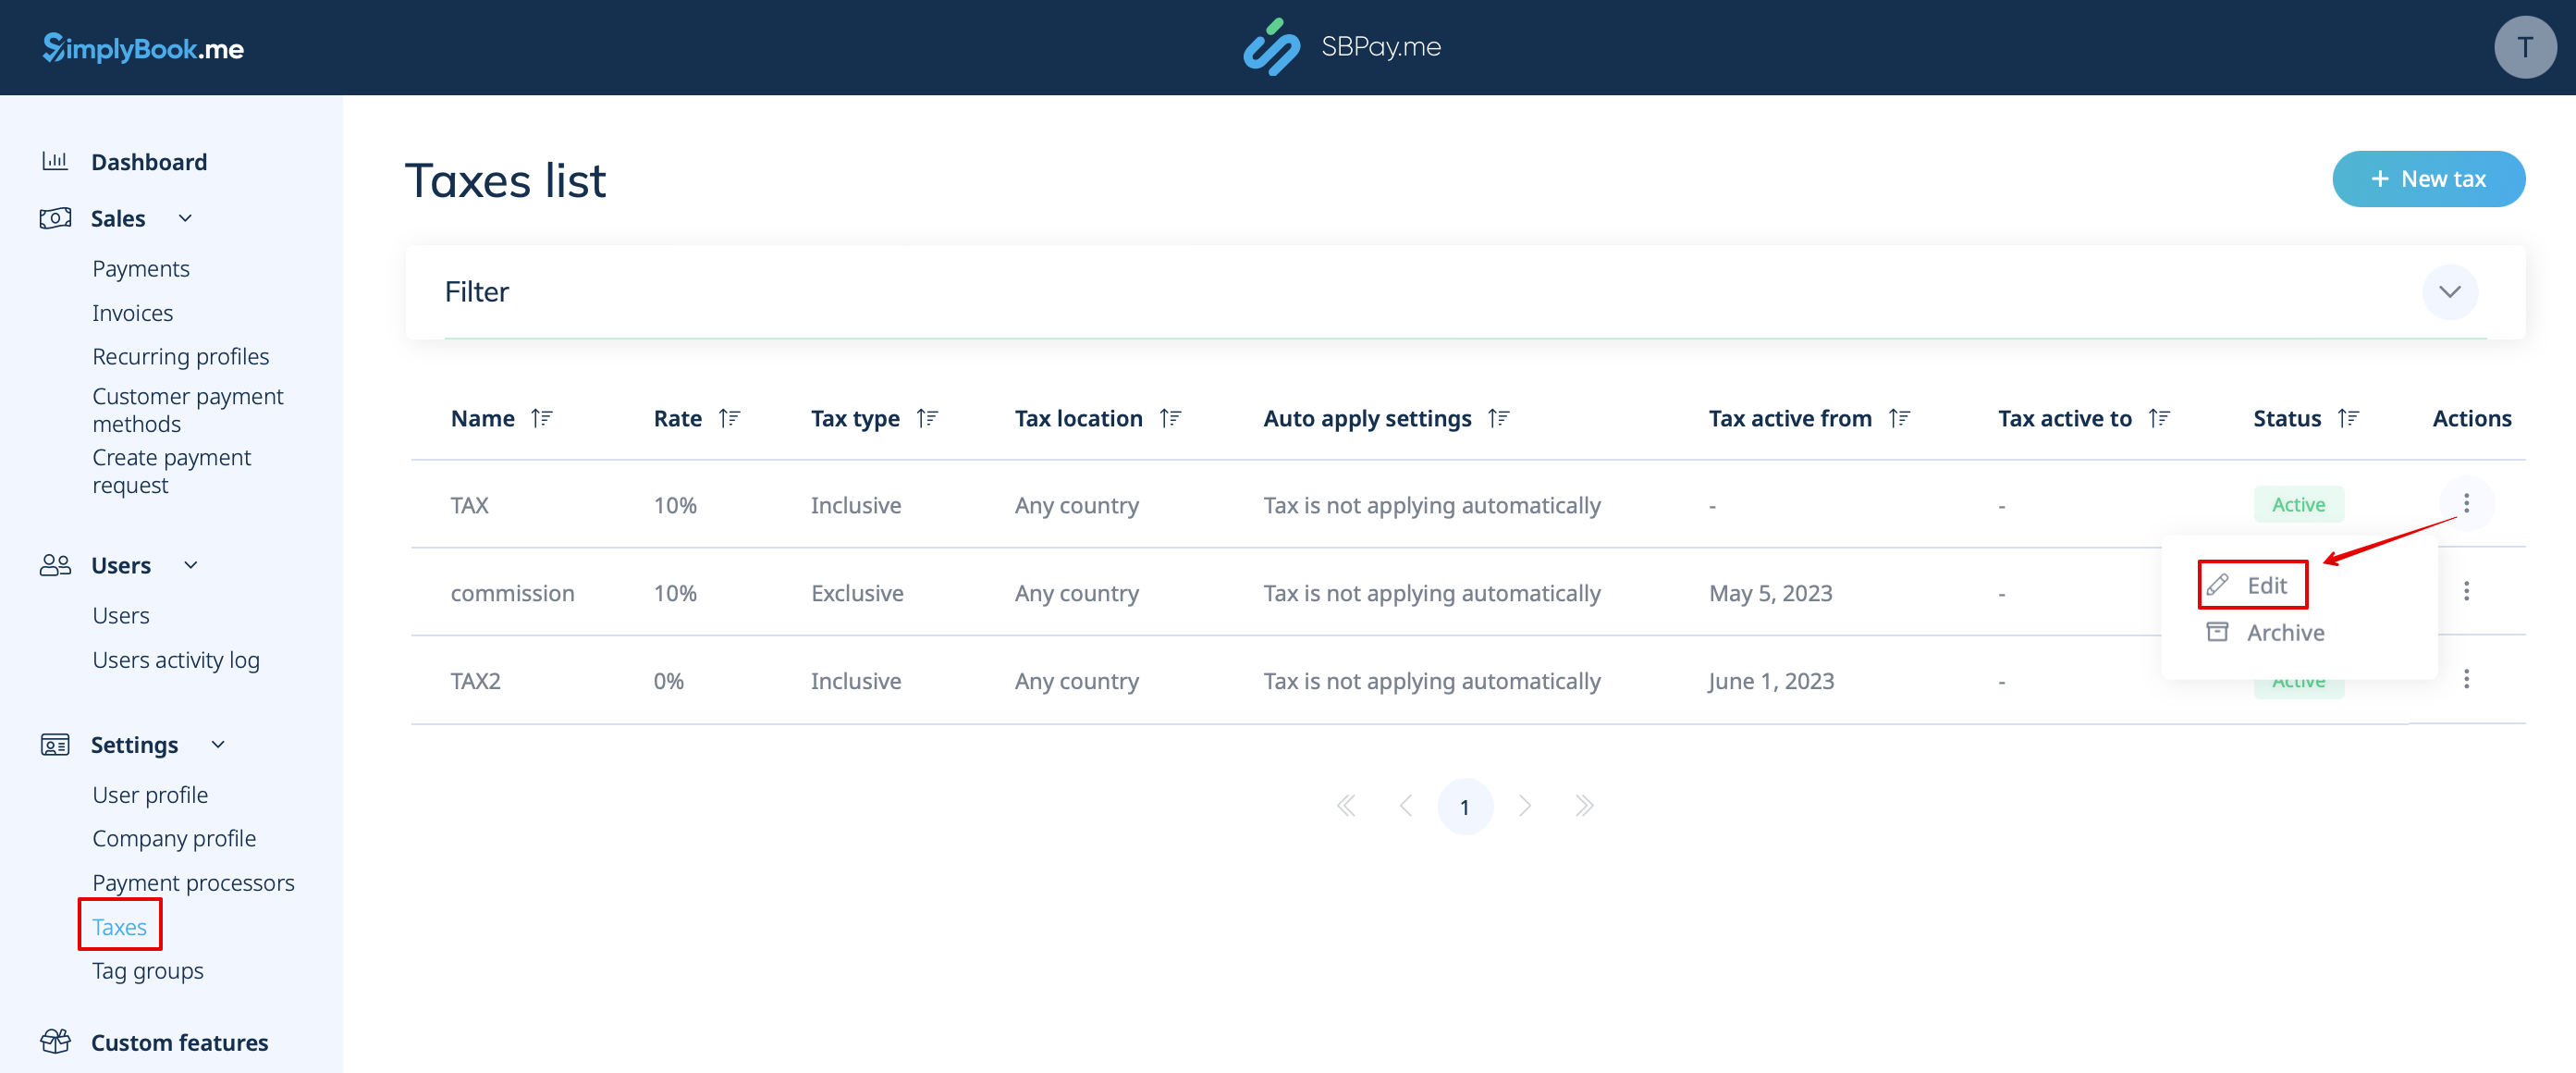
Also navigate to <span style="background-color:#d4f8e5; padding:5px; border-radius:5px;">Settings</span> -> <span style="background-color:#d4f8e5; padding:5px; border-radius:5px;">Taxes</span> in SBPay.me interface, select the necessary tax and set the exact tax name as it is defined in QuickBooks. | |||
[[File:Sbpay edit tax path.png|1200px|center|link=https://help.simplybook.me/images/4/43/Sbpay_edit_tax_path.png]] | |||
[[File:Qb tax global path.png|1200px|center|link=https://help.simplybook.me/images/c/cf/Qb_tax_global_path.png]] | |||
<br><br> | |||
<span style="background-color:#ffe9e9; padding:5px; border-radius:5px;">'''Please note!'''</span> | |||
* <span style="background-color:#ffe9e9; padding:5px; border-radius:5px;">Tax is defined for each line separately;</span> | |||
* <span style="background-color:#ffe9e9; padding:5px; border-radius:5px;">All lines with taxes should have the same tax type (inclusive or exclusive) throughout the order;</span> | |||
* <span style="background-color:#ffe9e9; padding:5px; border-radius:5px;">The orders that contain lines with multiple taxes will not be passed to Quickbooks;</span> | |||
* <span style="background-color:#ffe9e9; padding:5px; border-radius:5px;">If the order contains lines with no tax applied it will not be passed to Quickbooks;</span> | |||
* <span style="background-color:#ffe9e9; padding:5px; border-radius:5px;">The orders that contain lines with mixed inclusive and exclusive taxes are not passed to Quickbooks;</span> | |||
* <span style="background-color:#ffe9e9; padding:5px; border-radius:5px;">If the Quickbooks tax name is not set for some tax in that order it will not be passed to Quickbooks.</span> | |||
<br><br> | |||
''<u>For USA tax location</u>''<br> | |||
For now it is only possible to use Automated Sales Tax (AST) as defined in QuickBooks. If you set the tax name set in SBPay.me <span style="background-color:#d4f8e5; padding:5px; border-radius:5px;">Settings</span> -> <span style="background-color:#d4f8e5; padding:5px; border-radius:5px;">Taxes</span>, it will be ignored.<br> | |||
<br><br> | |||
<span style="background-color:#ffe9e9; padding:5px; border-radius:5px;">'''Please note!'''</span> | |||
* <span style="background-color:#ffe9e9; padding:5px; border-radius:5px;">Tax is defined for the whole order. On the SBPay.me side, this means that ALL lines should have the same single tax with the same rate and type set for each order line;</span> | |||
* <span style="background-color:#ffe9e9; padding:5px; border-radius:5px;">Tax is always exclusive.</span> | |||
<br><br><br><br> | <br><br><br><br> | ||
Revision as of 11:36, 25 January 2024

This easy-to-set SBPay.me integration with Quickbooks allows you to automatically create invoices or sales receipts in QuickBooks for each paid order and send them to customers.
Video tutorial ![]()
Please note!
- The invoices which get generated on the QuickBooks side as the result of the integration won't include information about taxes and discounts, they will contain only the total amount. While the SimplyBook invoices contain information about the item price taxes/discounts (if any), and the total amount.
- Multi-currency must be enabled in QuickBooks for transactional documents involving different currencies.
How to set and use
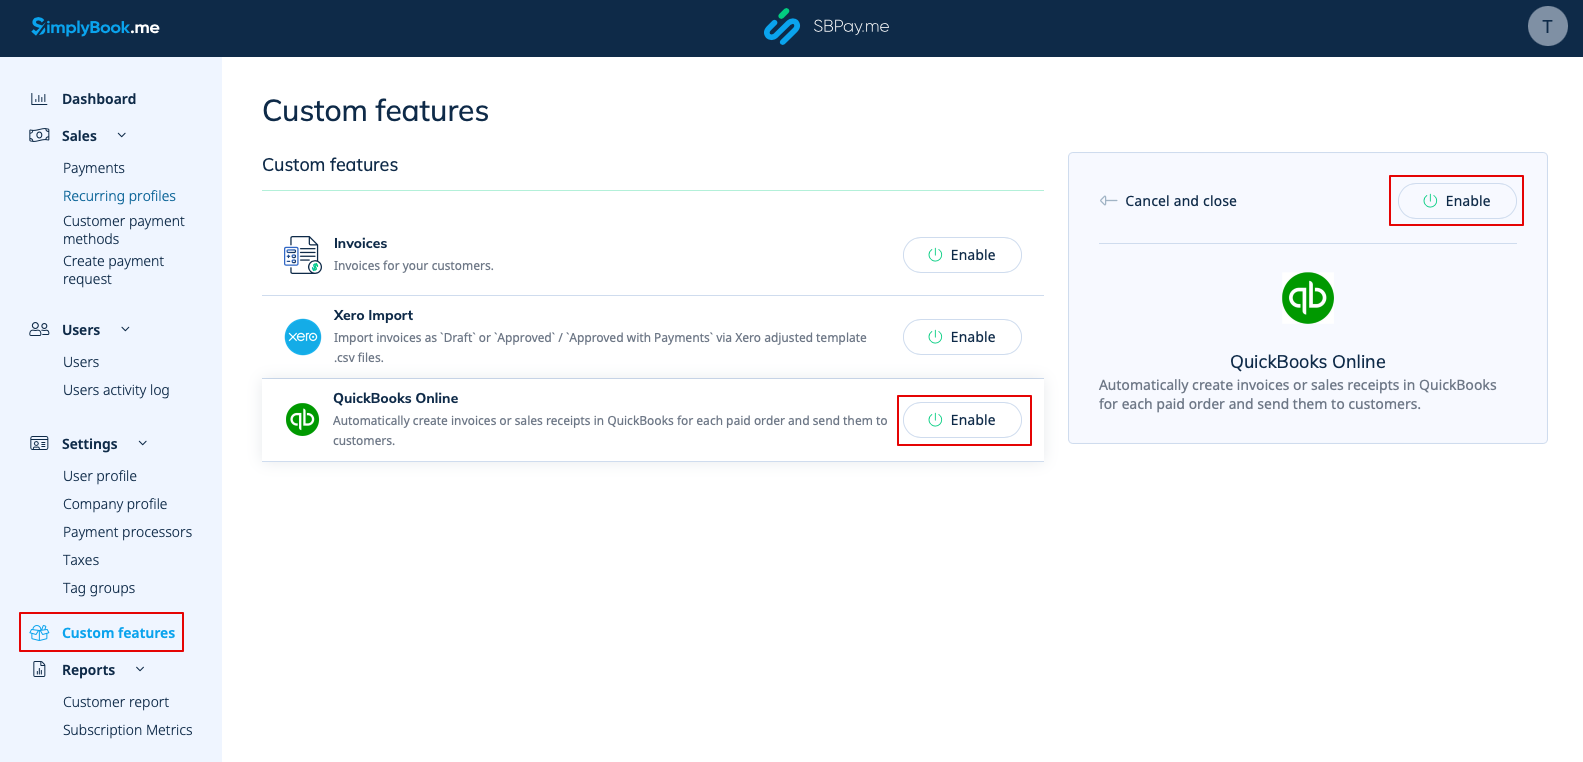
1. Navigate to Custom Features page within your SBPay.me interface and click on the Enable button next to QuickBooks.
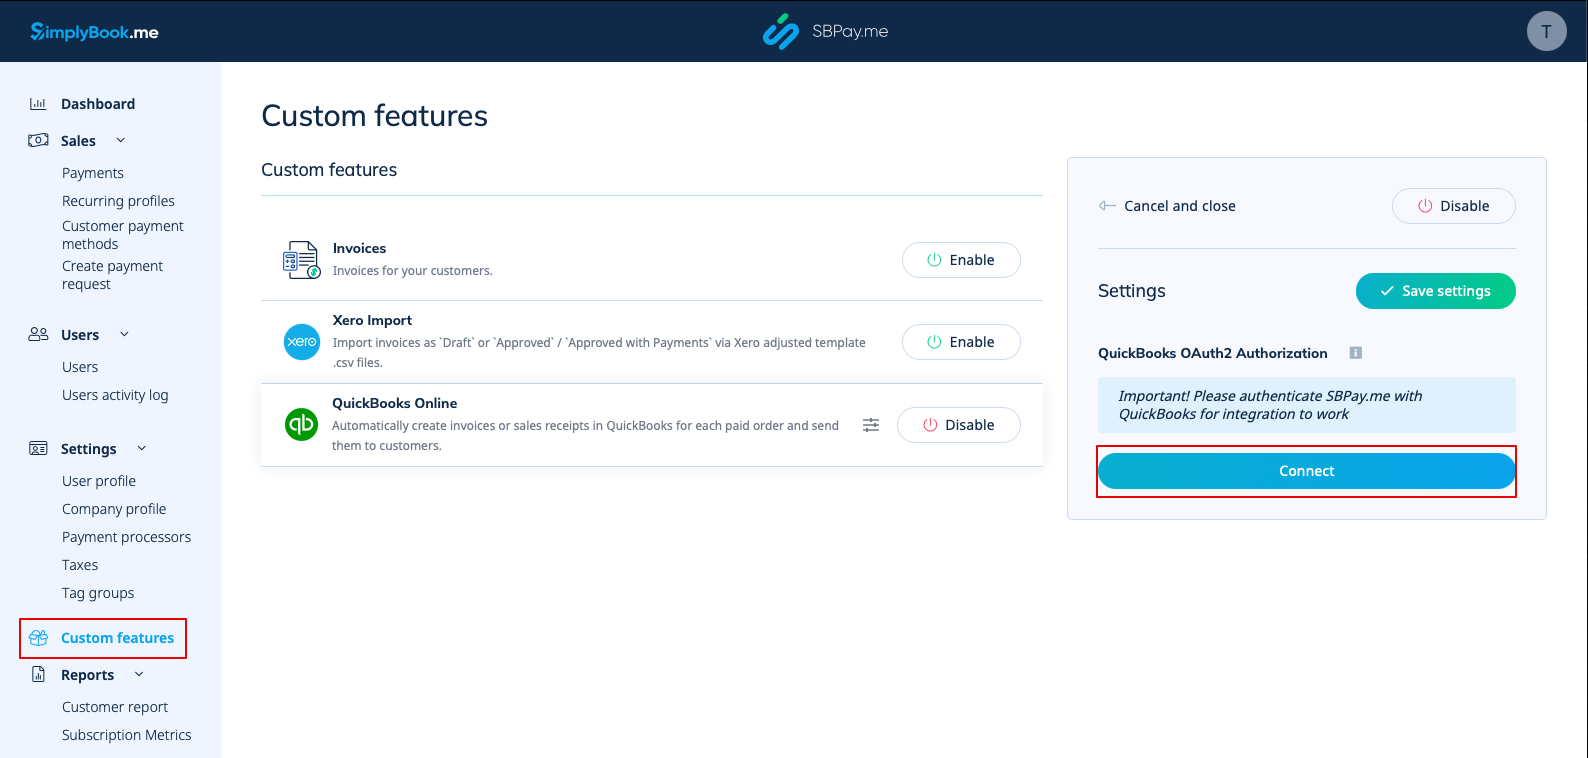
2. Once enabled, click on the Connect button to proceed with setup.
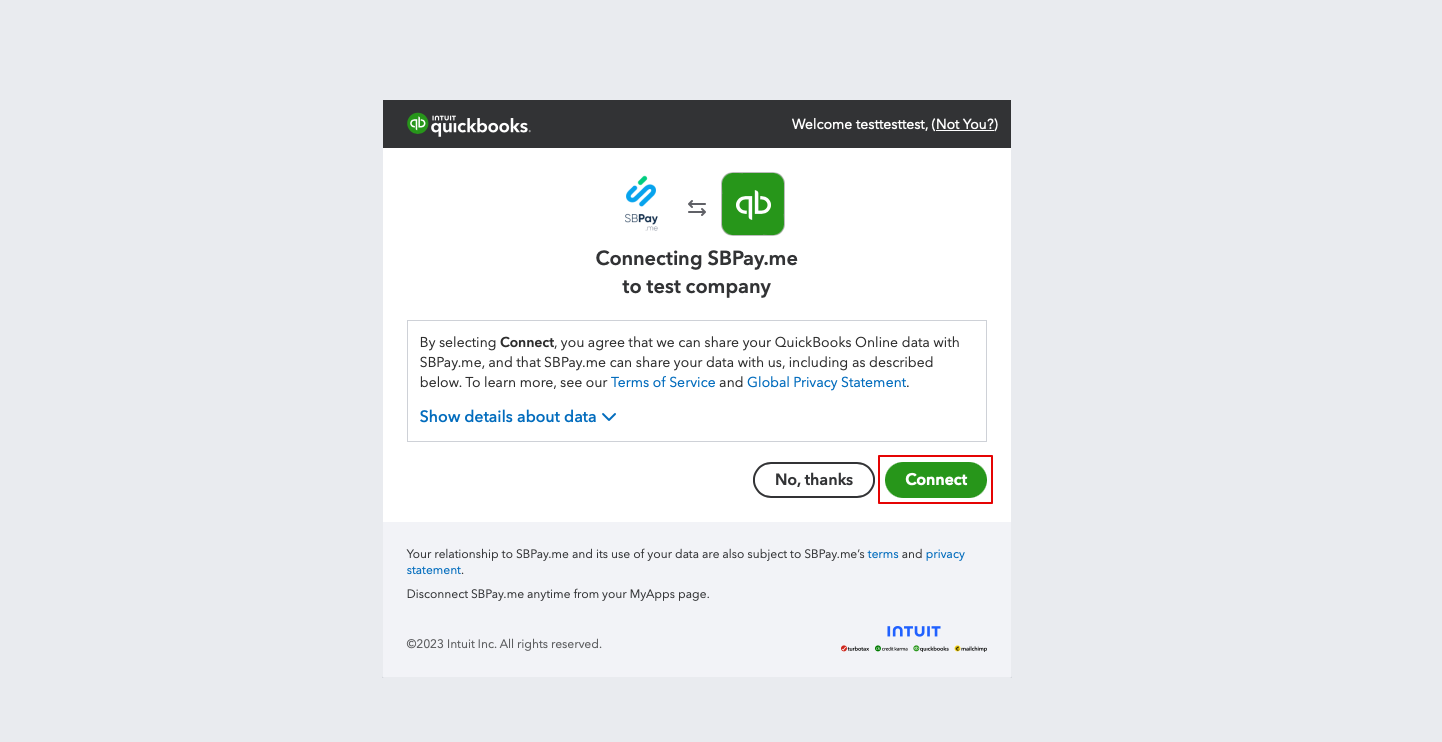
3. You will be prompted to log in to your Quickbooks account to get connected. Or, if you are already logged in there in your browser, the connection will be set automatically after confirmation. You will also see SBPay.me in the Apps -> My Apps section of QuickBooks.
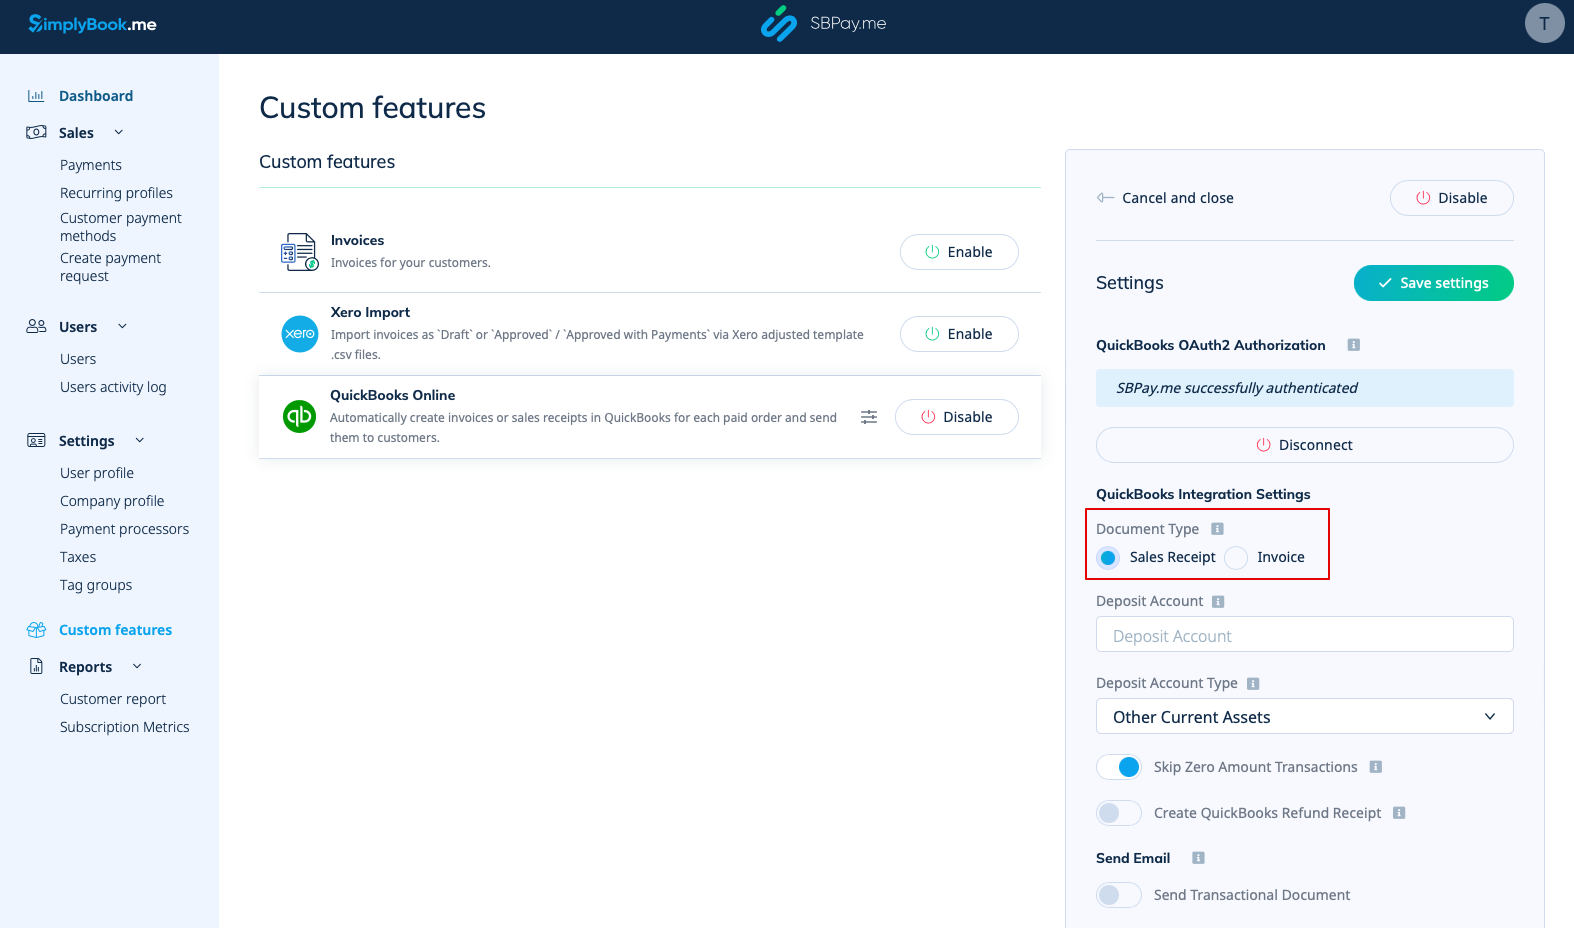
4. After the systems are connected you will get access to the integration settings in the SBPay.me interface.
5. Choose the transactional document type: There are two options: Invoice and Sales Receipt. Invoice triggers the creation of both an invoice and its corresponding payment within QuickBooks for each fulfilled order on the SimplyBook side. Thus, you will see two records (Payment and Invoice) on the QuickBooks account associated with the same transaction. Sales Receipt results in the generation of a sales receipt (Payment) solely upon successful payment for the order.
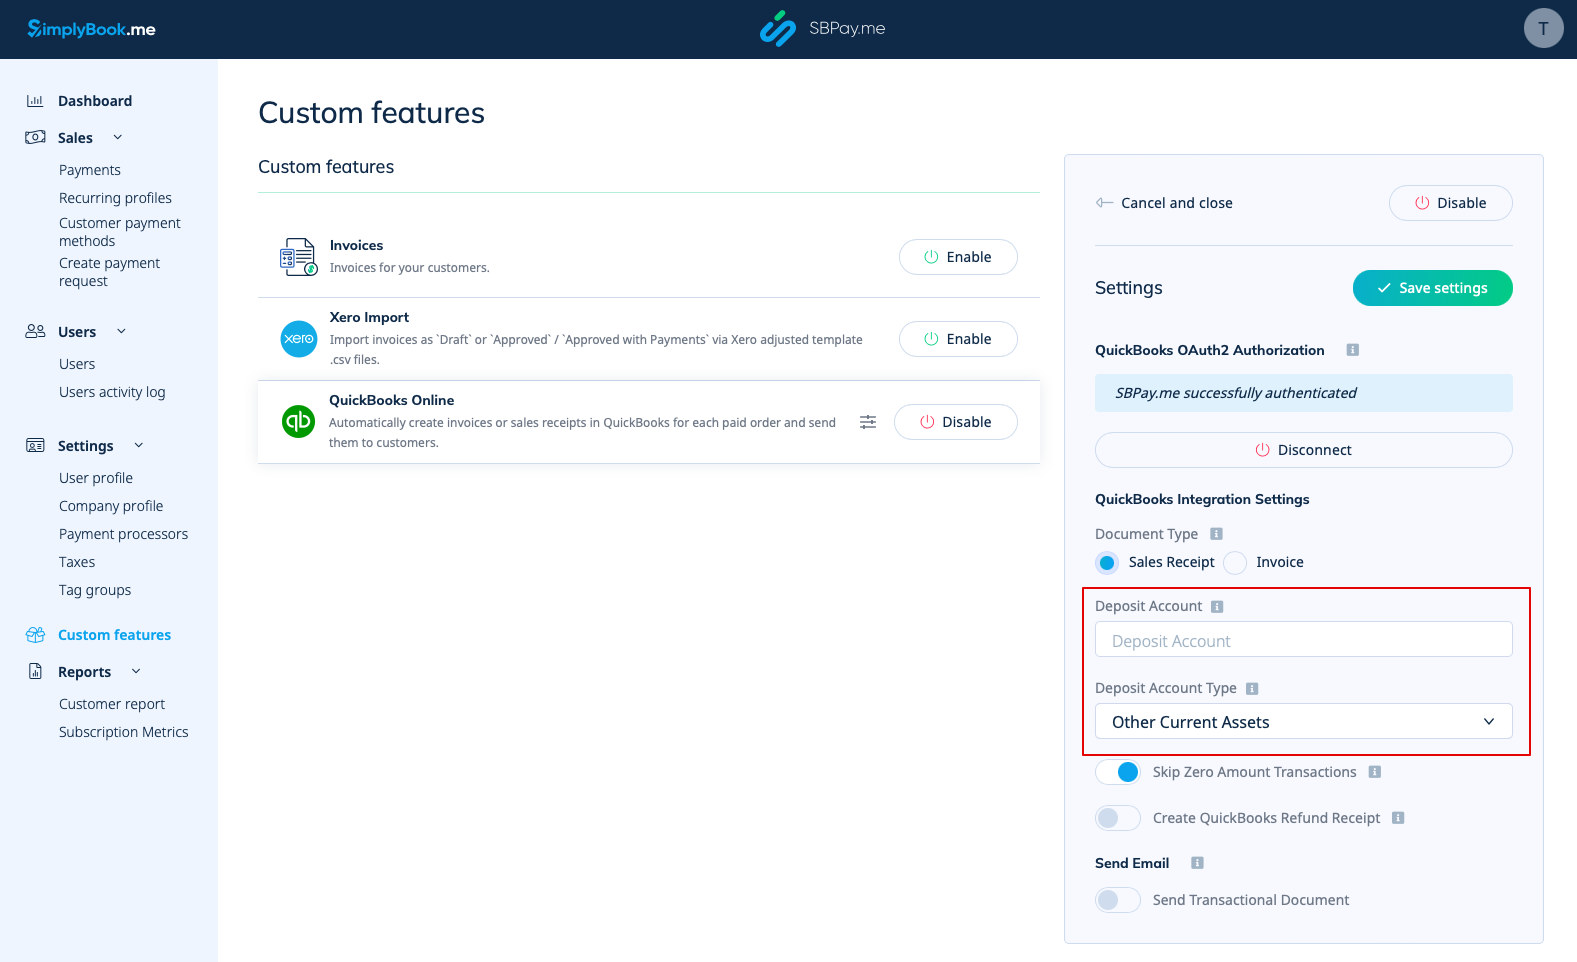
6. You can add a Deposit Account Name and select the deposit Account Type. It should be either Other Current Assets or Bank (Cash on Hand) type. If deposit account is not specified QuickBooks will use a default account called Undeposited Funds.
7. Skipping zero amount transactions is enabled by default to exclude zero amount orders from being transferred to QuickBooks. For example, the transactions where the discount was applied and the resulting total is 0. You can keep it as it is if you do not need to see such records in Quickbooks or disable if it is important to have them for your bookkeeping.
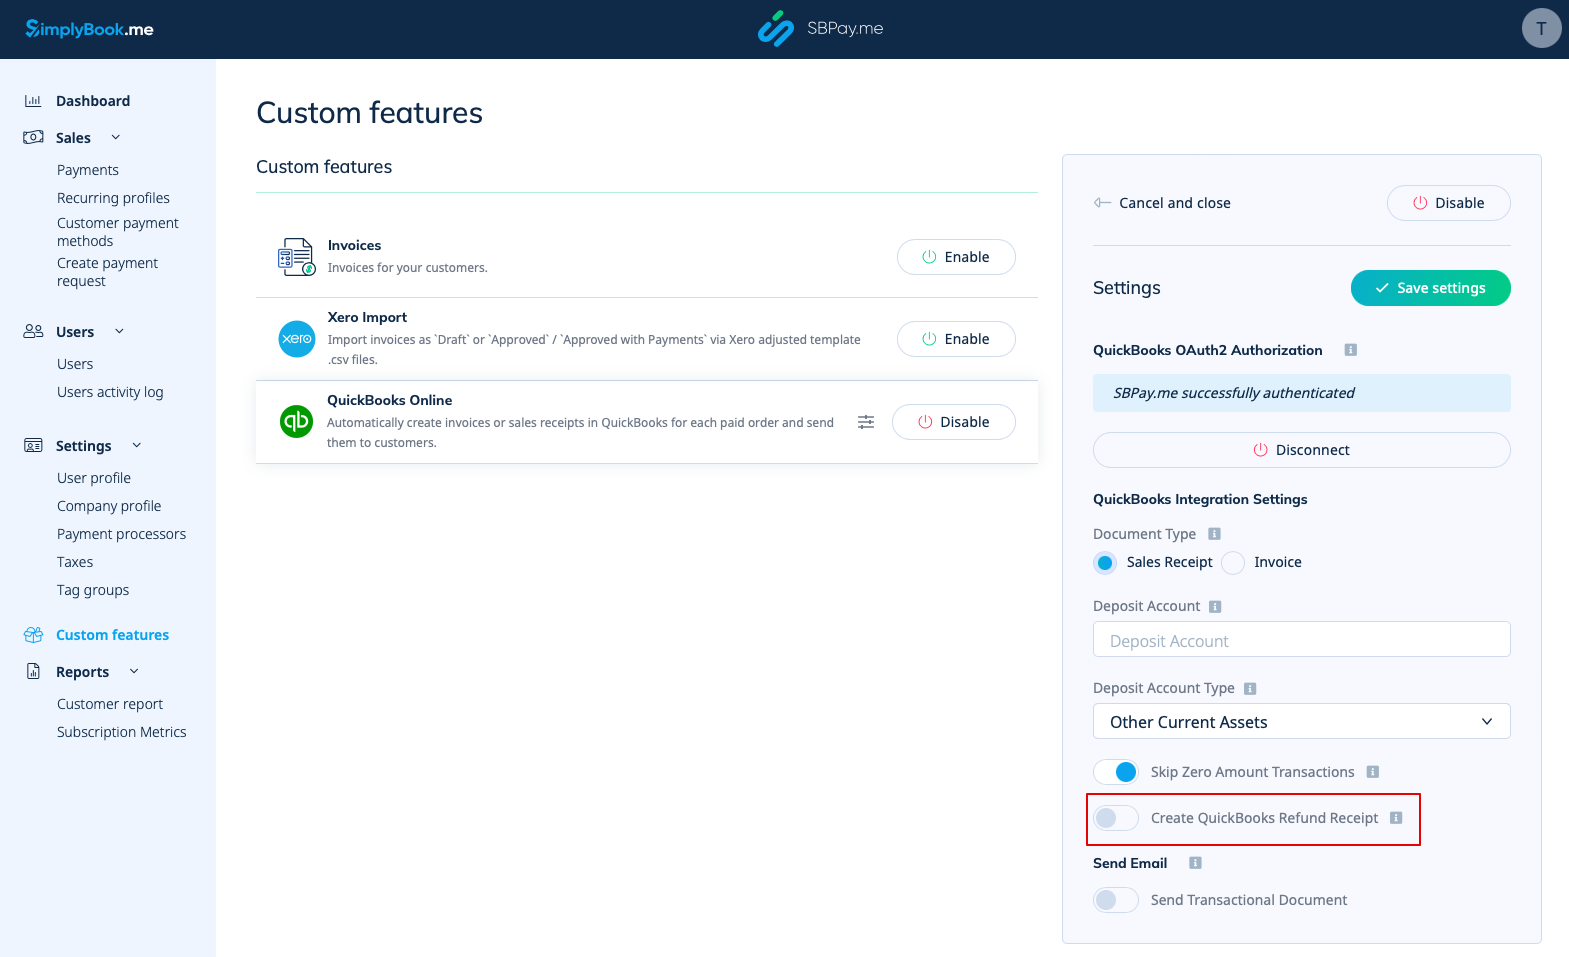
8. You can activate the automatic creation of a Refund Receipt entry in QuickBooks when a refund is made on the SBPay.me side. Please ensure to include the Deposit Account Name if you decide to enable this option as it is mandatory for refunds synchronisation.
9. There is also an option to send a transactional document. If enabled, the client will also receive an invoice from QuickBooks in addition to other active notifications.
You can also add a note to be reflected in the Quickbooks invoices.
Taxes
To activate this option and pass taxes information to Quickbooks please check the "Add tax info to transaction document" in the Custom features -> Sales tax in your SBPay.me interface. And select the corresponding tax location.
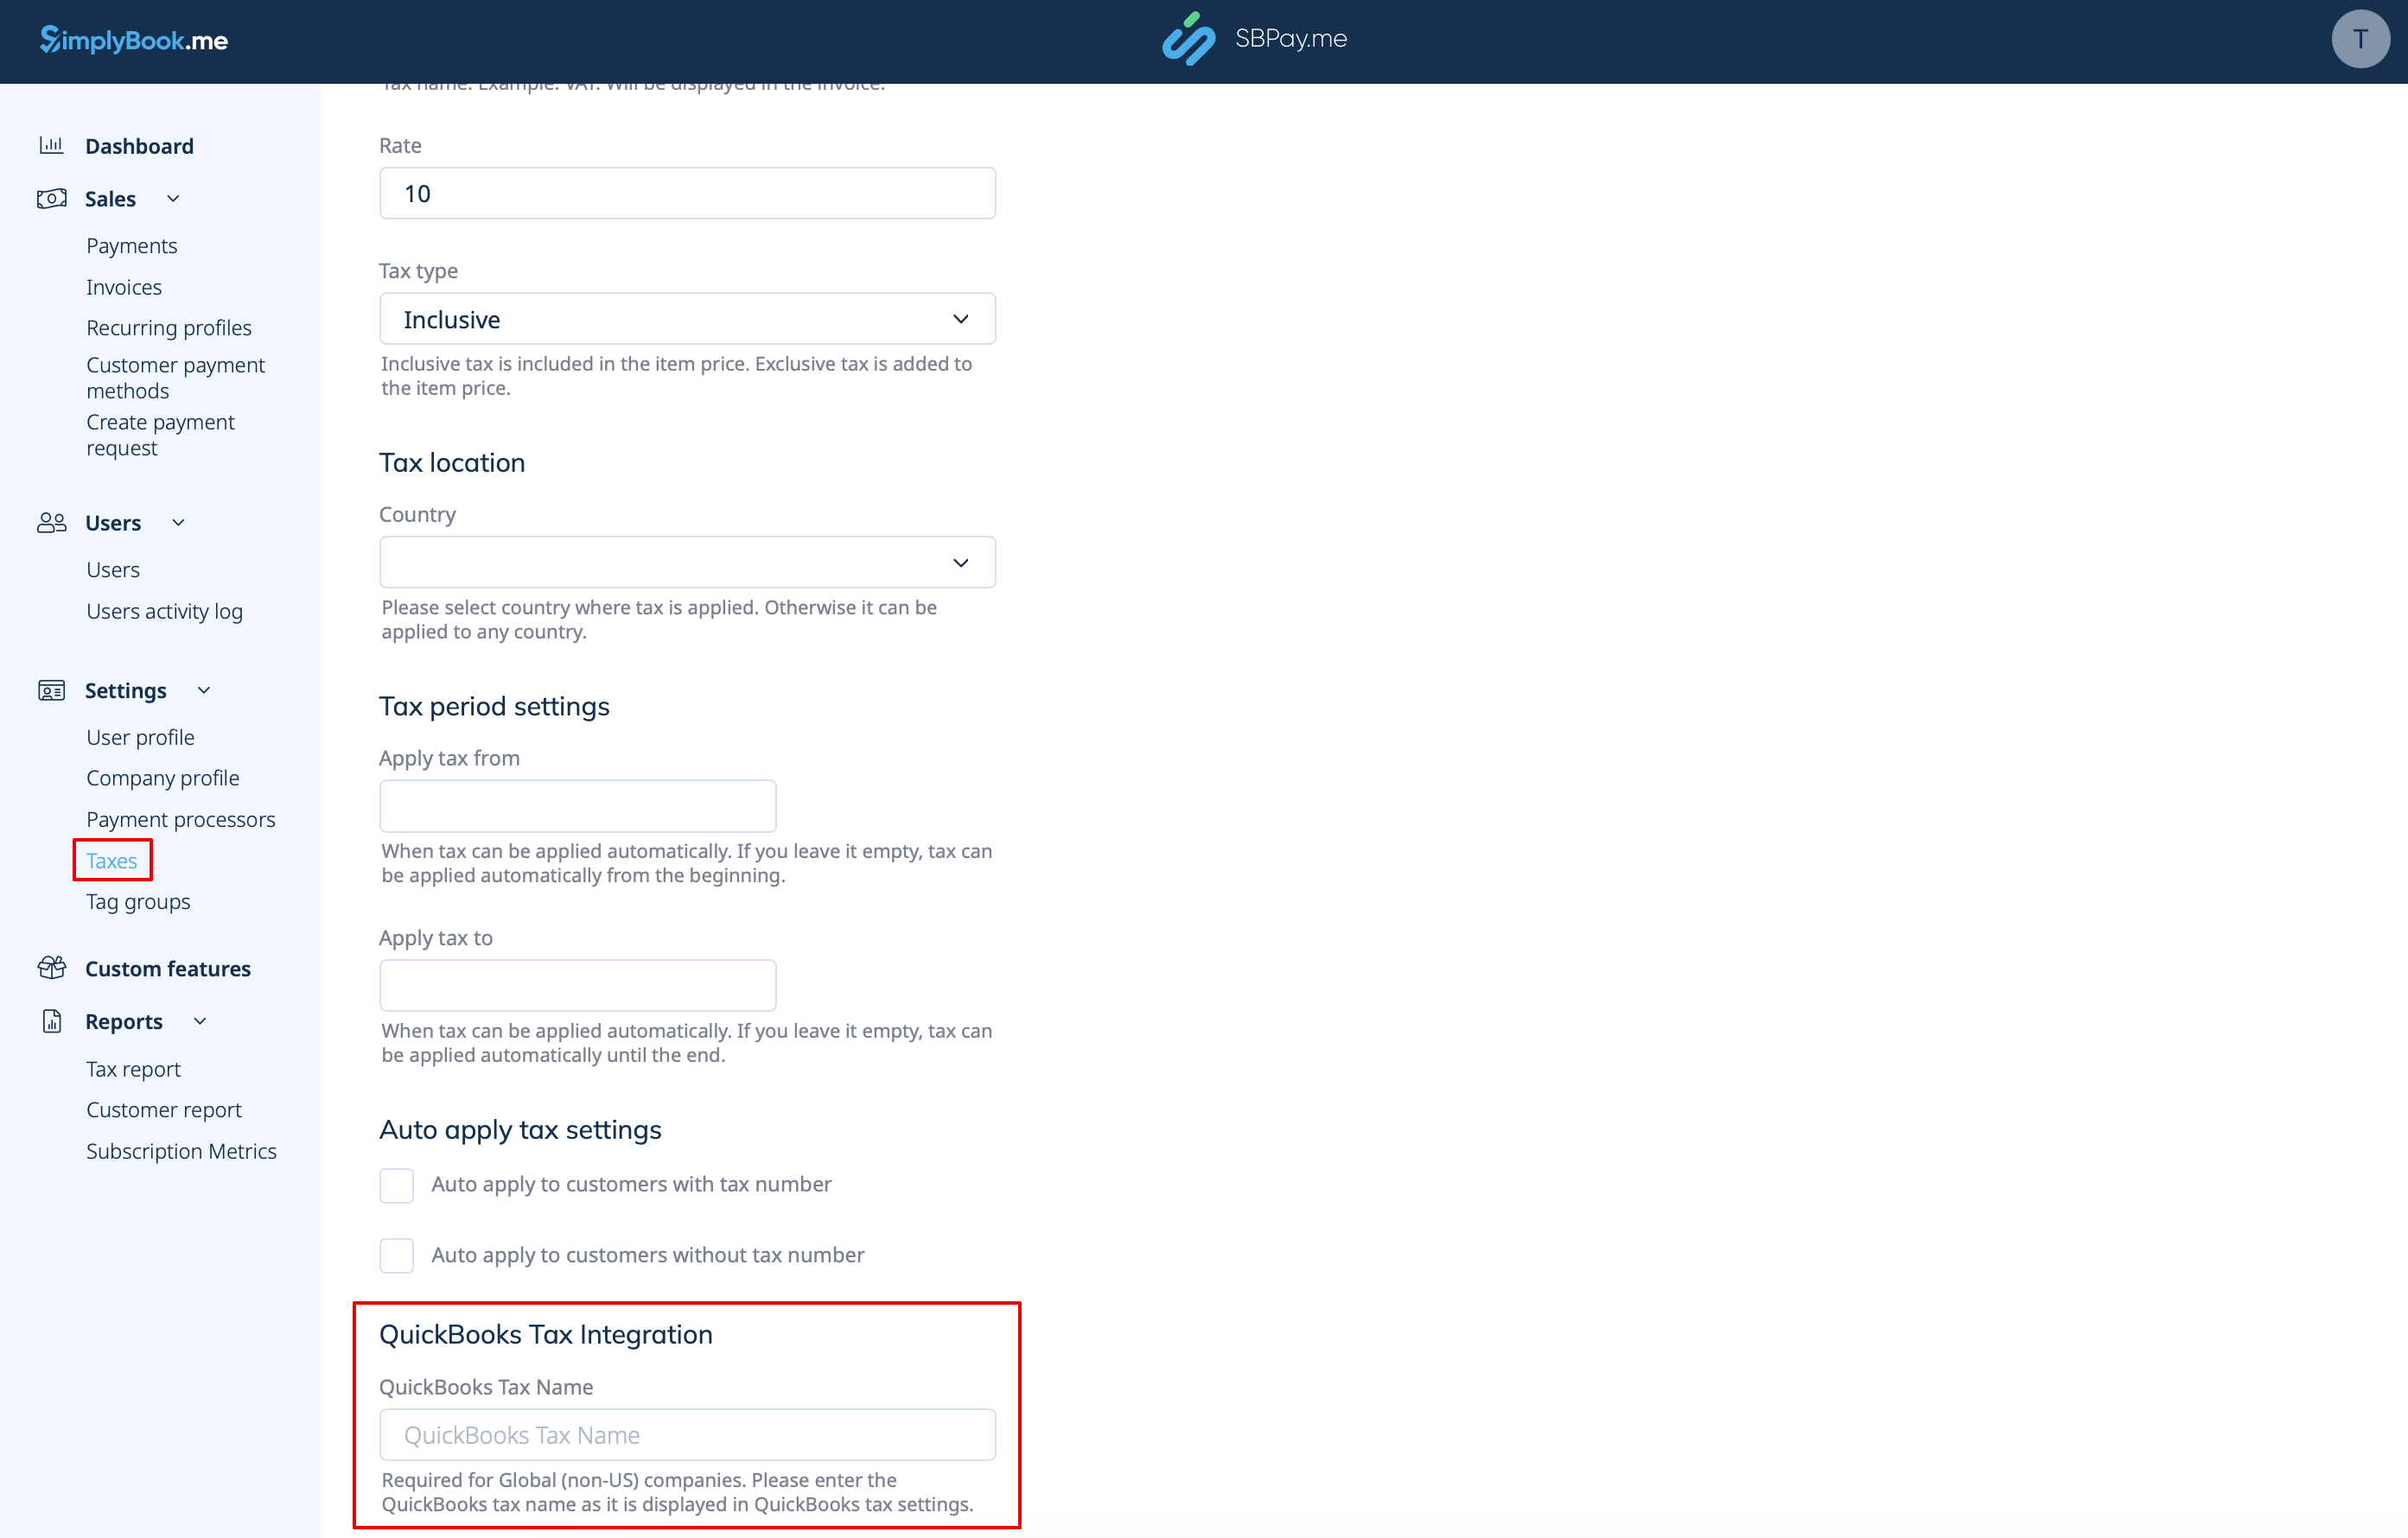
For Global tax location
Also navigate to Settings -> Taxes in SBPay.me interface, select the necessary tax and set the exact tax name as it is defined in QuickBooks.
Please note!
- Tax is defined for each line separately;
- All lines with taxes should have the same tax type (inclusive or exclusive) throughout the order;
- The orders that contain lines with multiple taxes will not be passed to Quickbooks;
- If the order contains lines with no tax applied it will not be passed to Quickbooks;
- The orders that contain lines with mixed inclusive and exclusive taxes are not passed to Quickbooks;
- If the Quickbooks tax name is not set for some tax in that order it will not be passed to Quickbooks.
For USA tax location
For now it is only possible to use Automated Sales Tax (AST) as defined in QuickBooks. If you set the tax name set in SBPay.me Settings -> Taxes, it will be ignored.
Please note!
- Tax is defined for the whole order. On the SBPay.me side, this means that ALL lines should have the same single tax with the same rate and type set for each order line;
- Tax is always exclusive.