Онлайн-відеоконференції через Zoom
Для підключення до Zoom необхідний обліковий запис Zoom. Будь-який учасник із правами адміністратора планування може підключити Simplybook.me до Zoom.
SimplyBook.me може підключатися тільки до одного облікового запису Zoom.
Зверніть увагу:
- Замовлення Zoom не будуть додані до вашої сторінки зустрічей Zoom у Zoom. Щоб перевірити онлайн-зустрічі, скористайтеся фільтрами за послугами в адміністративному календарі Simplybook.me,щоб побачити тільки замовлення на необхідну послугу.
- Навіть після підключення облікового запису Zoom для нових послуг відеоконференції за замовчуванням вимкнені. Щоб додати відеоконференції до нової послуги, в розділі «Управління» ->«Послуги/Заняття» перейдіть до «Додаткові параметридля послуги/заняття» та увімкніть цю функцію як послугу онлайн-зустрічі.
- Клієнти,які відвідують групові заняття, отримають унікальні посилання Zoom, але всі ці посилання ведуть до однієї і тієї ж зустрічі Zoom.
- Як встановити
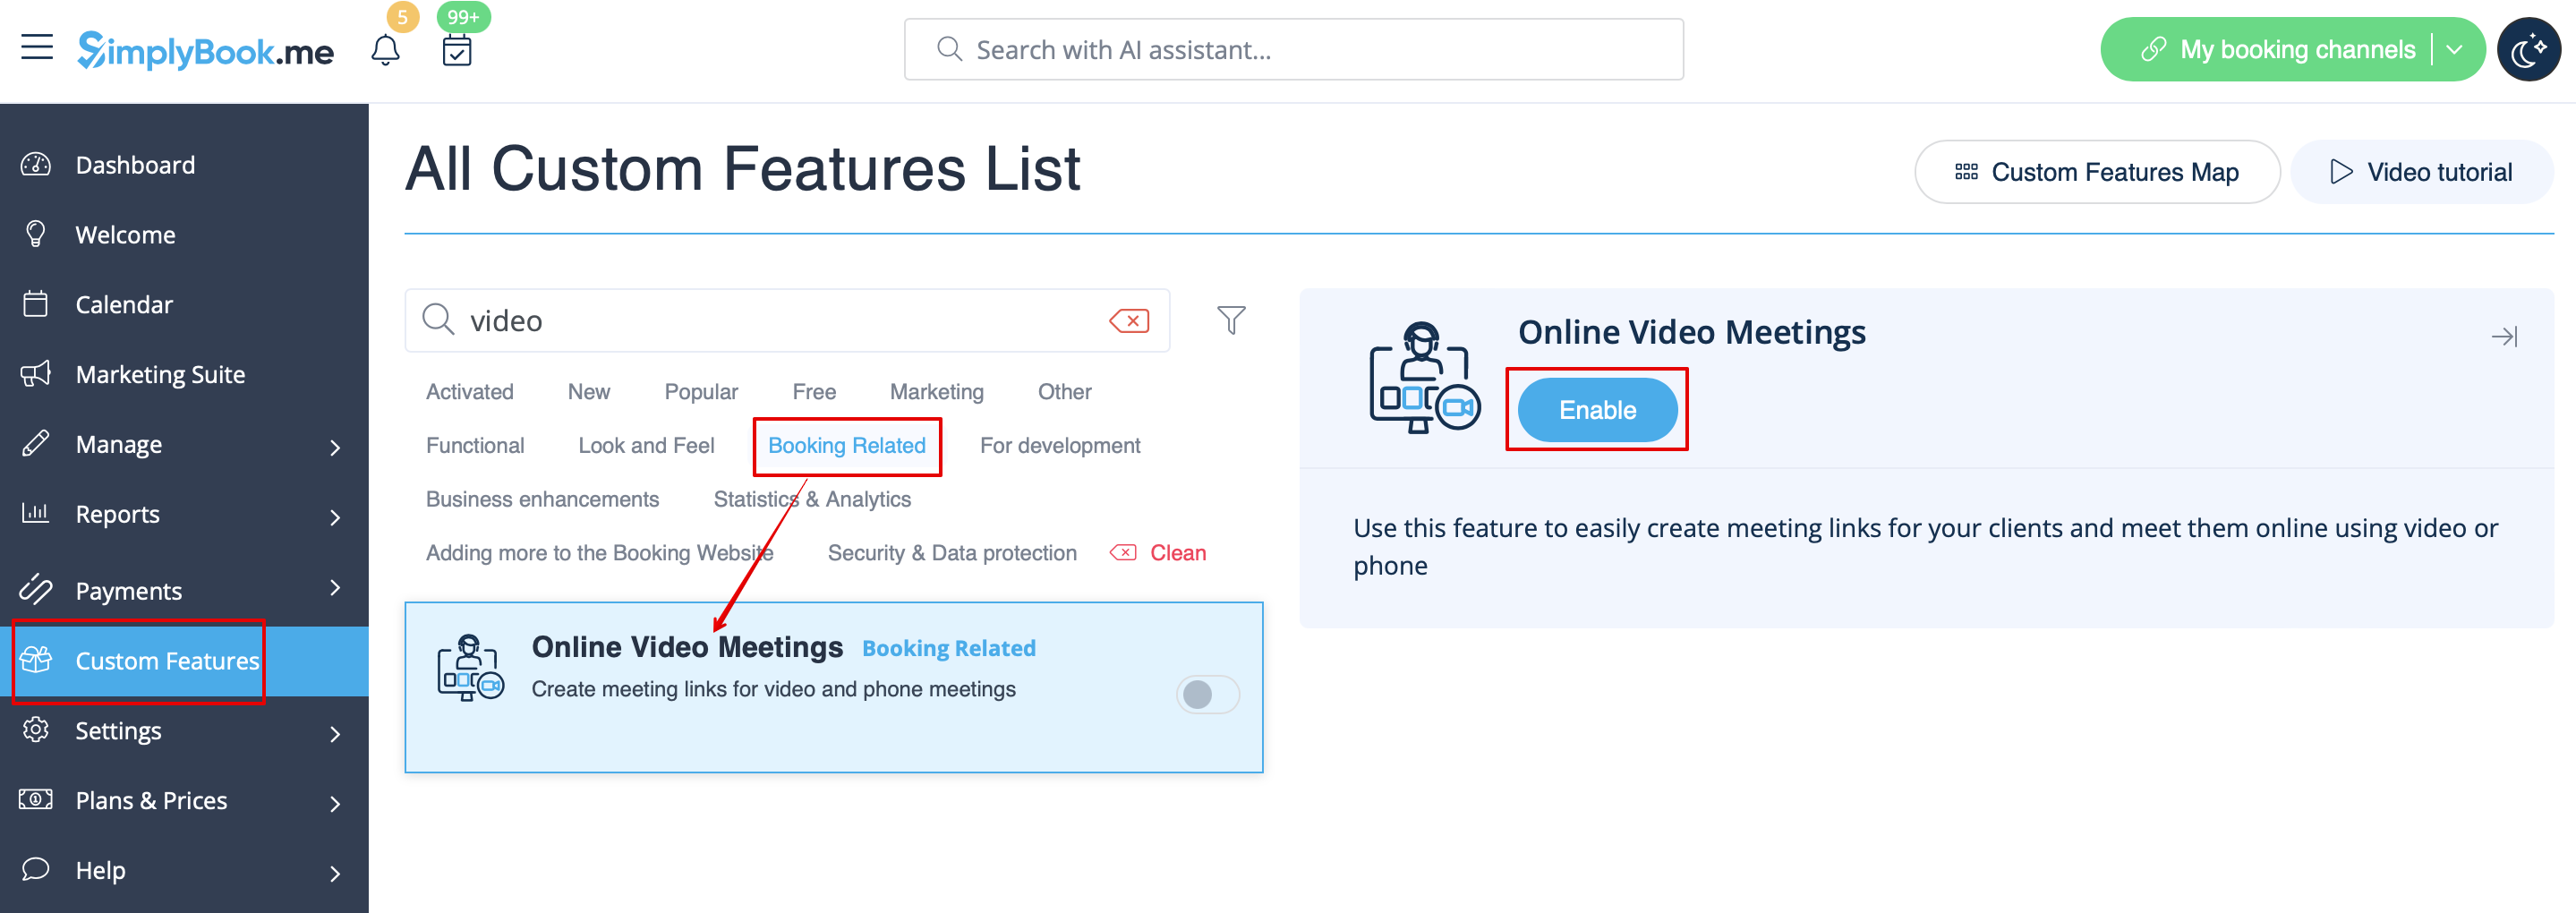
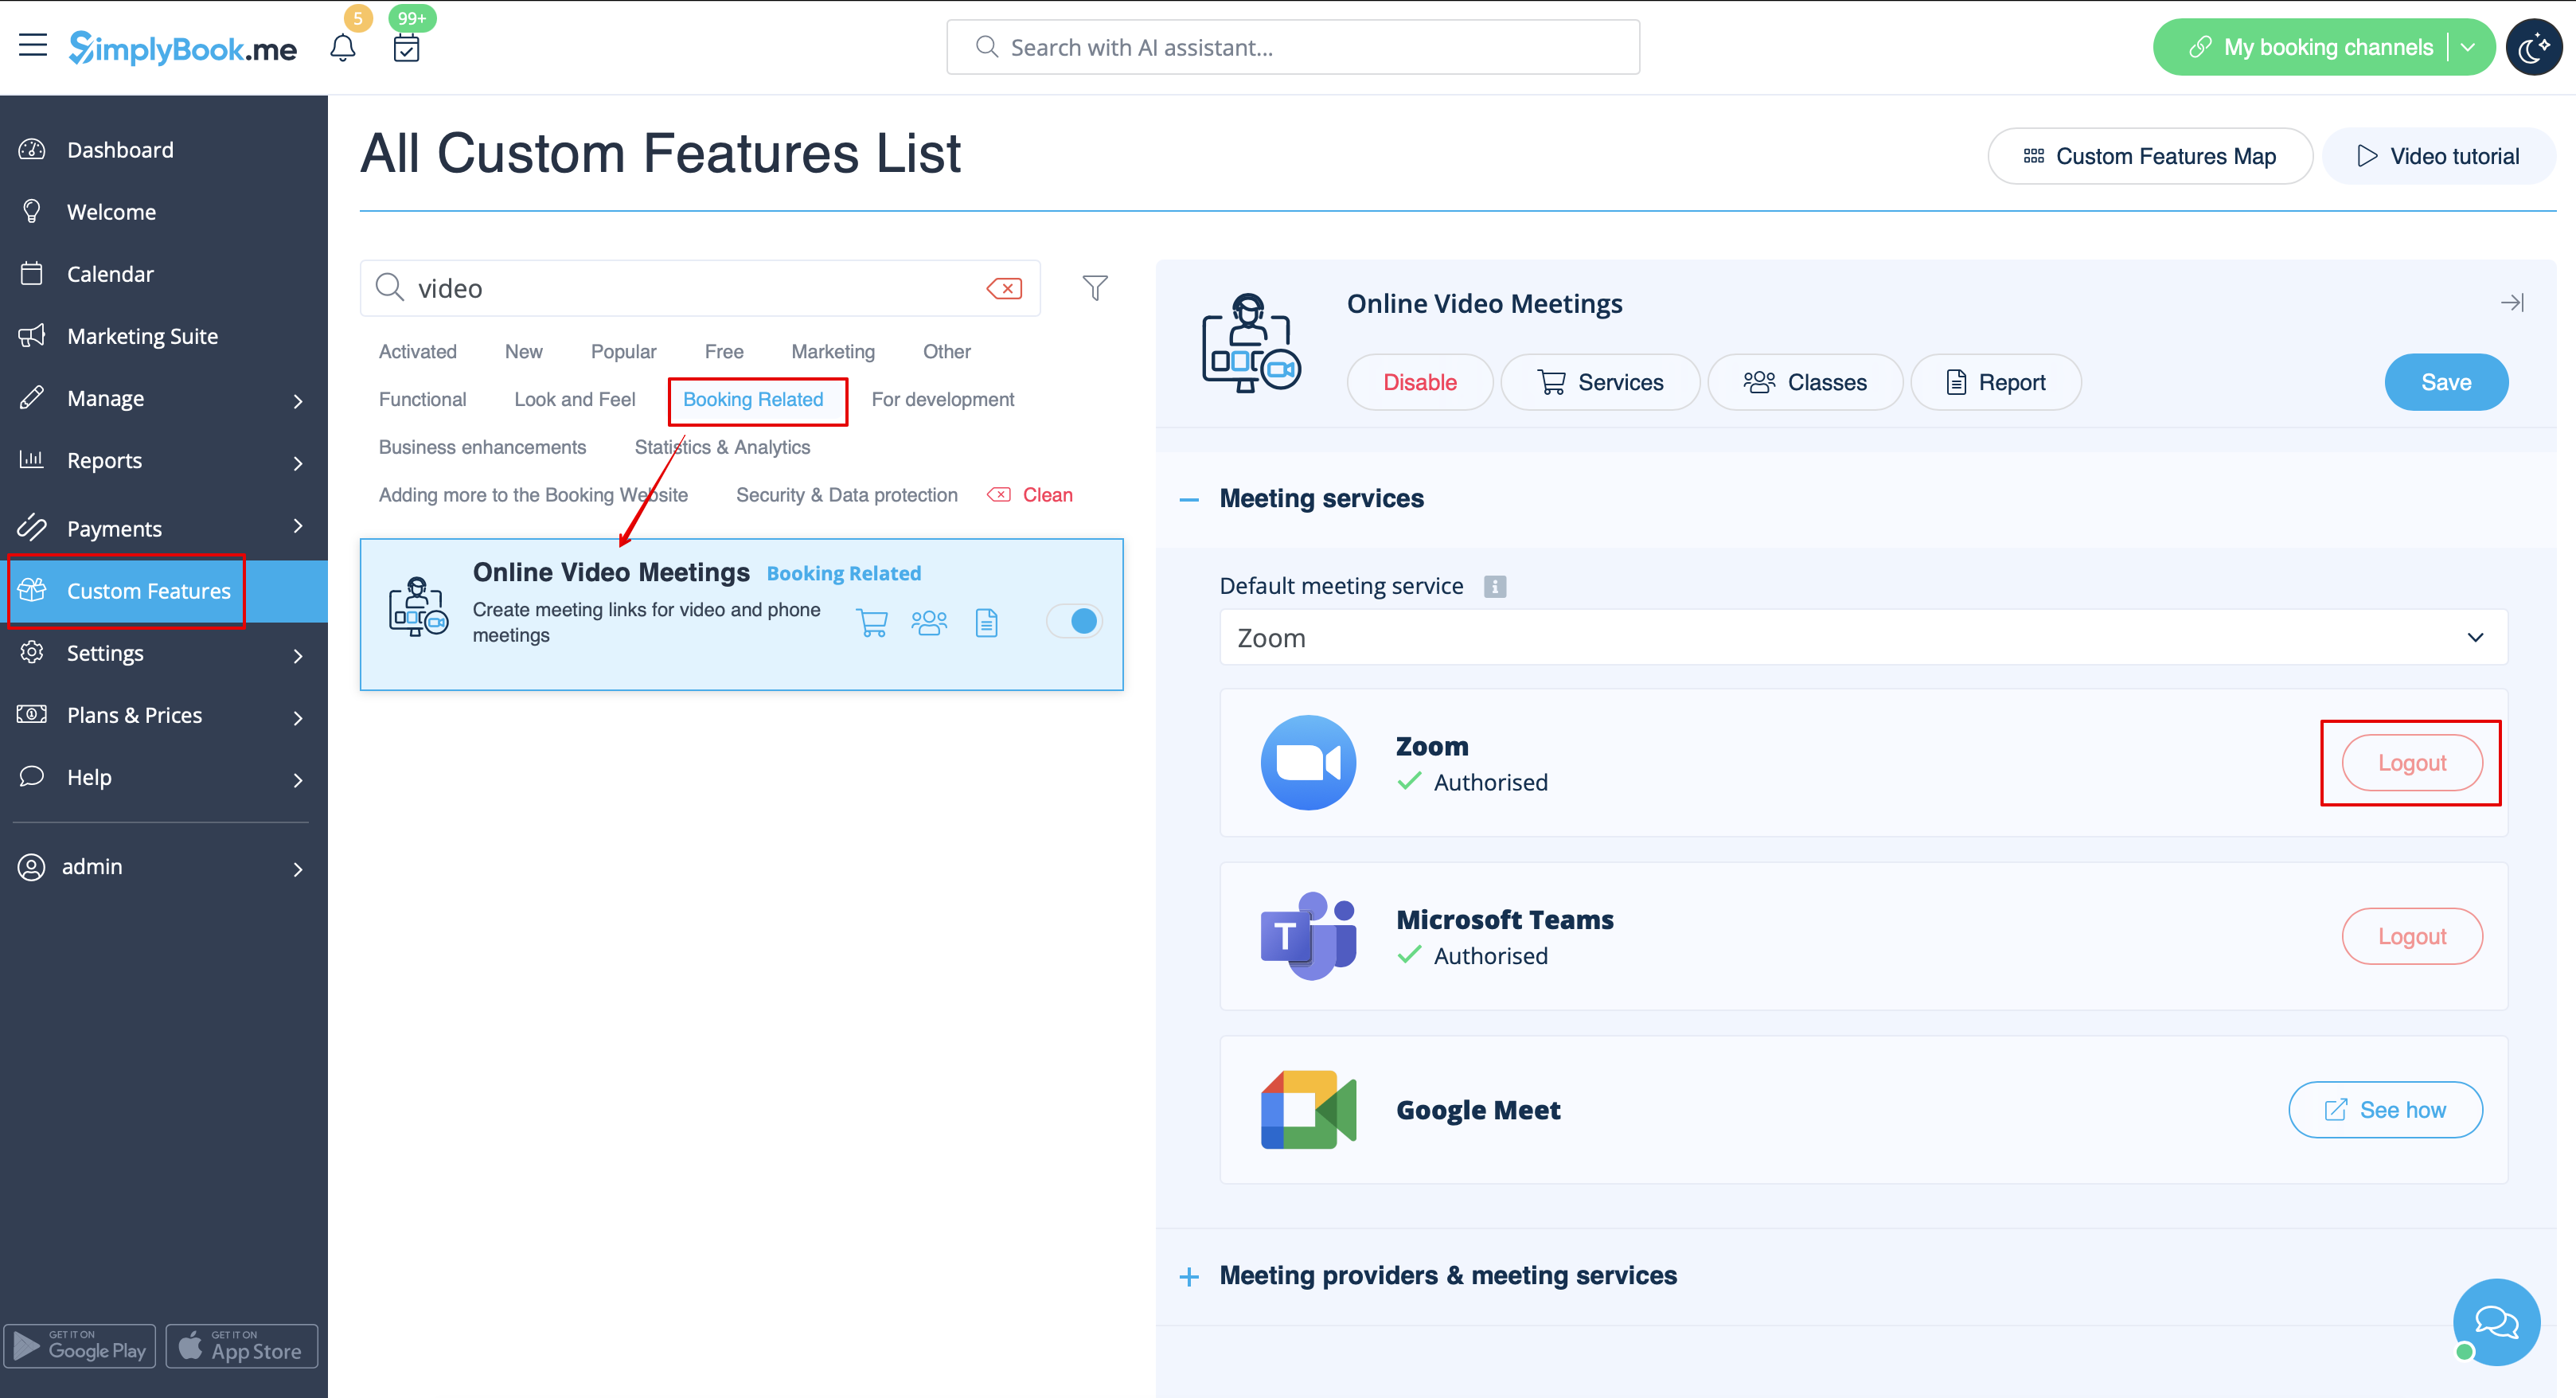
1. Увімкніть спеціальну функцію «Онлайн-зустрічі» у своєму обліковому записі SimplyBook.me, перейшовши на сторінку «Спеціальні функції» в адміністративному інтерфейсі Simplybook.me та натиснувши кнопку «Увімкнути» поруч із спеціальною функцією «Онлайн-відеозустрічі ».
2. In the feature settings click on Authorization button near Zoom option to connect your Zoom account.

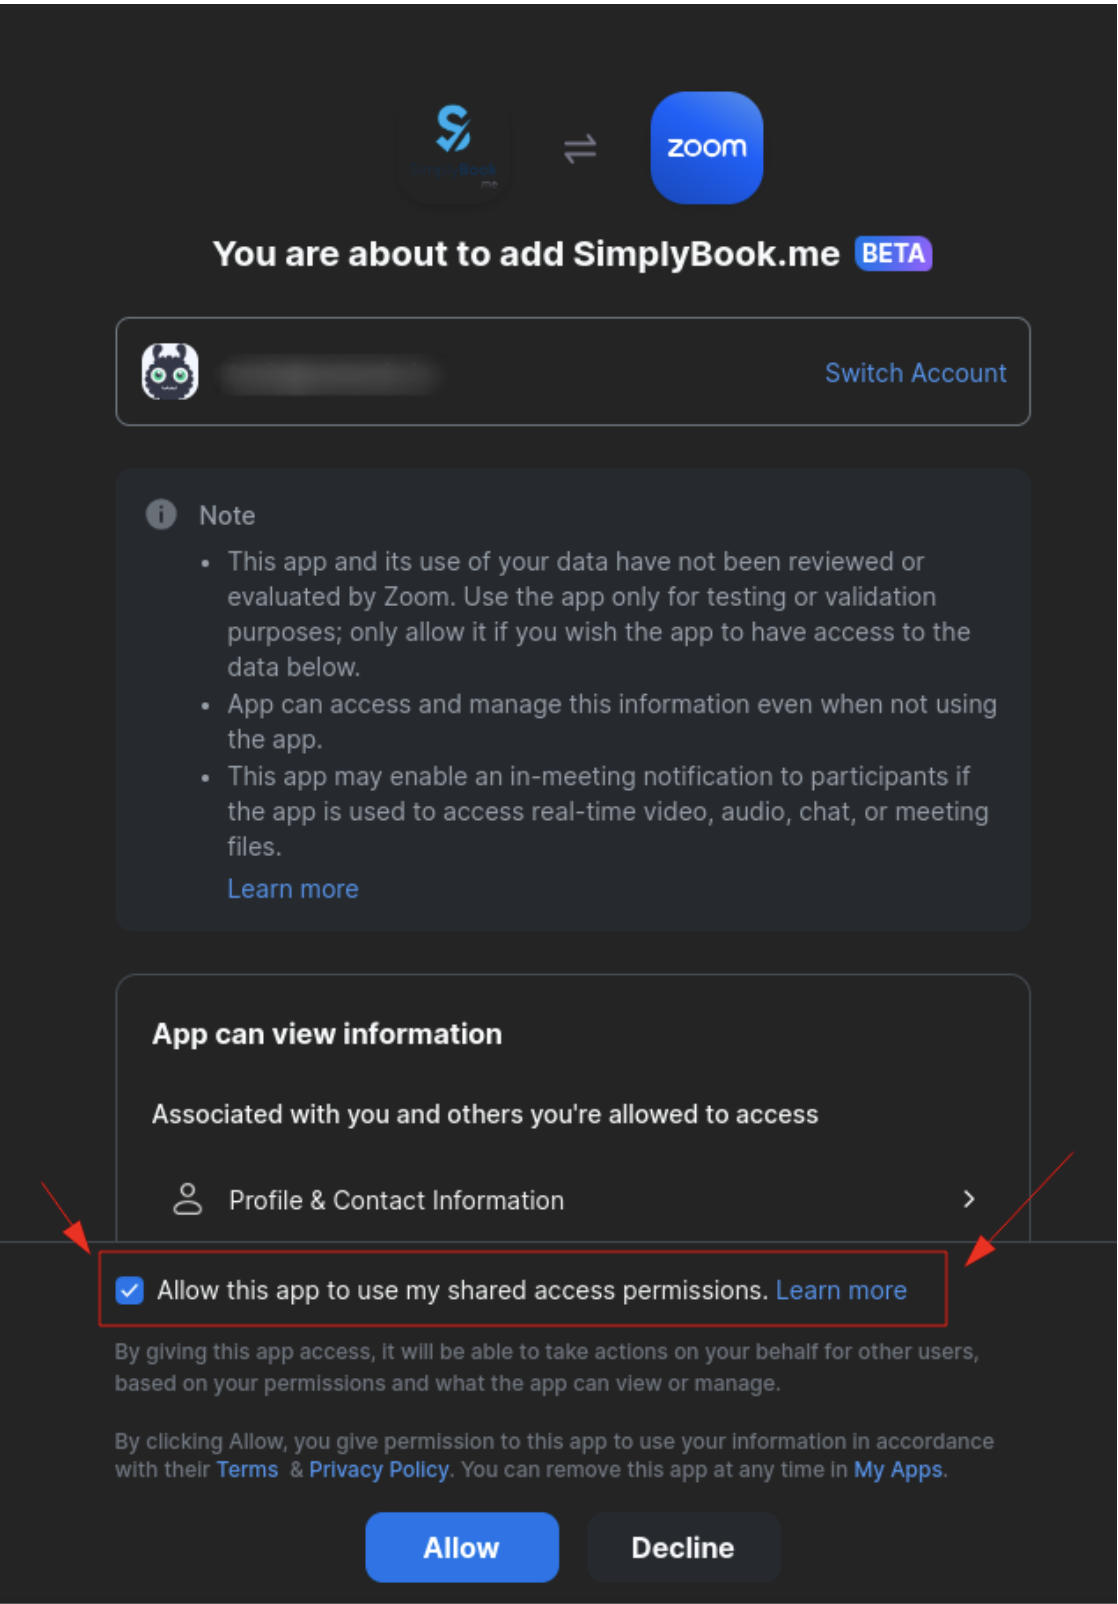
3. Enter your credentials to log into Zoom, or click SSO, Google, or Facebook to log in through those services.
You can connect one zoom account per company OR connect all zoom users added to your account by checking the checkbox Allow this app to use my shared access permissions
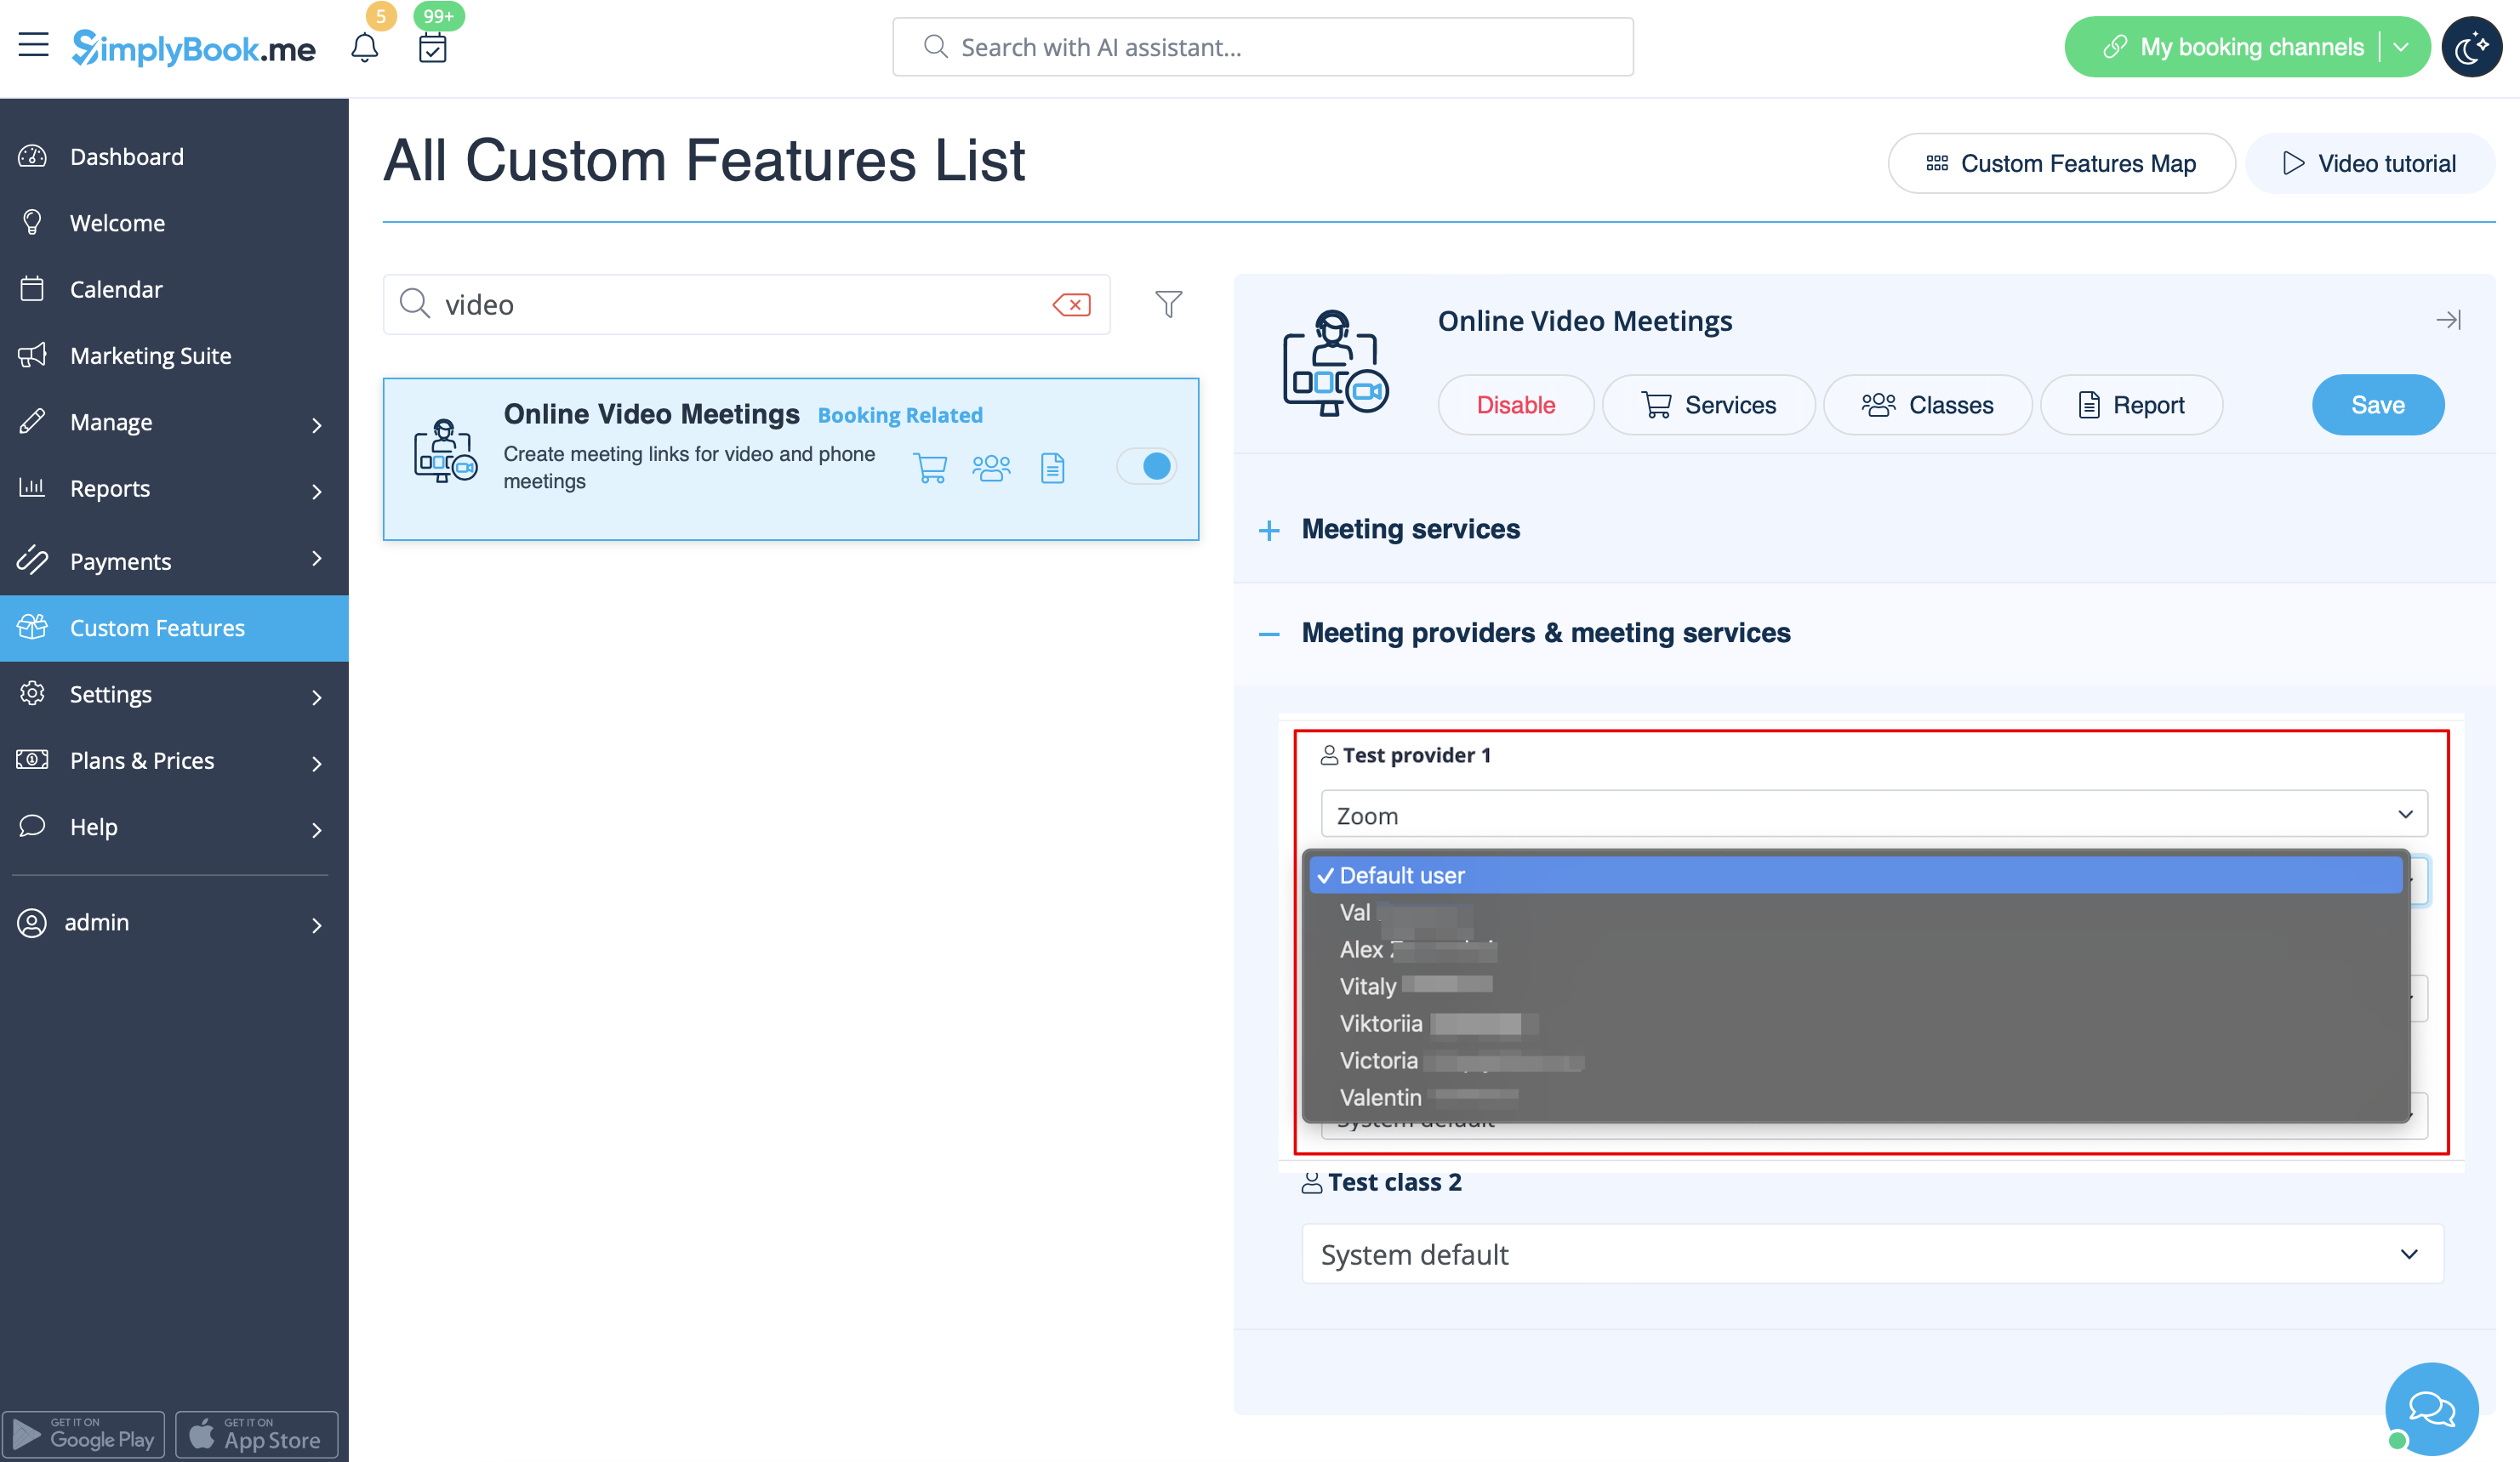
4. After Zoom is authorized, click on Meeting Providers and Meeting Services and choose providers that should be connected to Zoom by selecting Zoom option from the respective drop down. In the next drop-down please select Zoom user (if you have several users under your Zoom account) that should be connected to that provider.
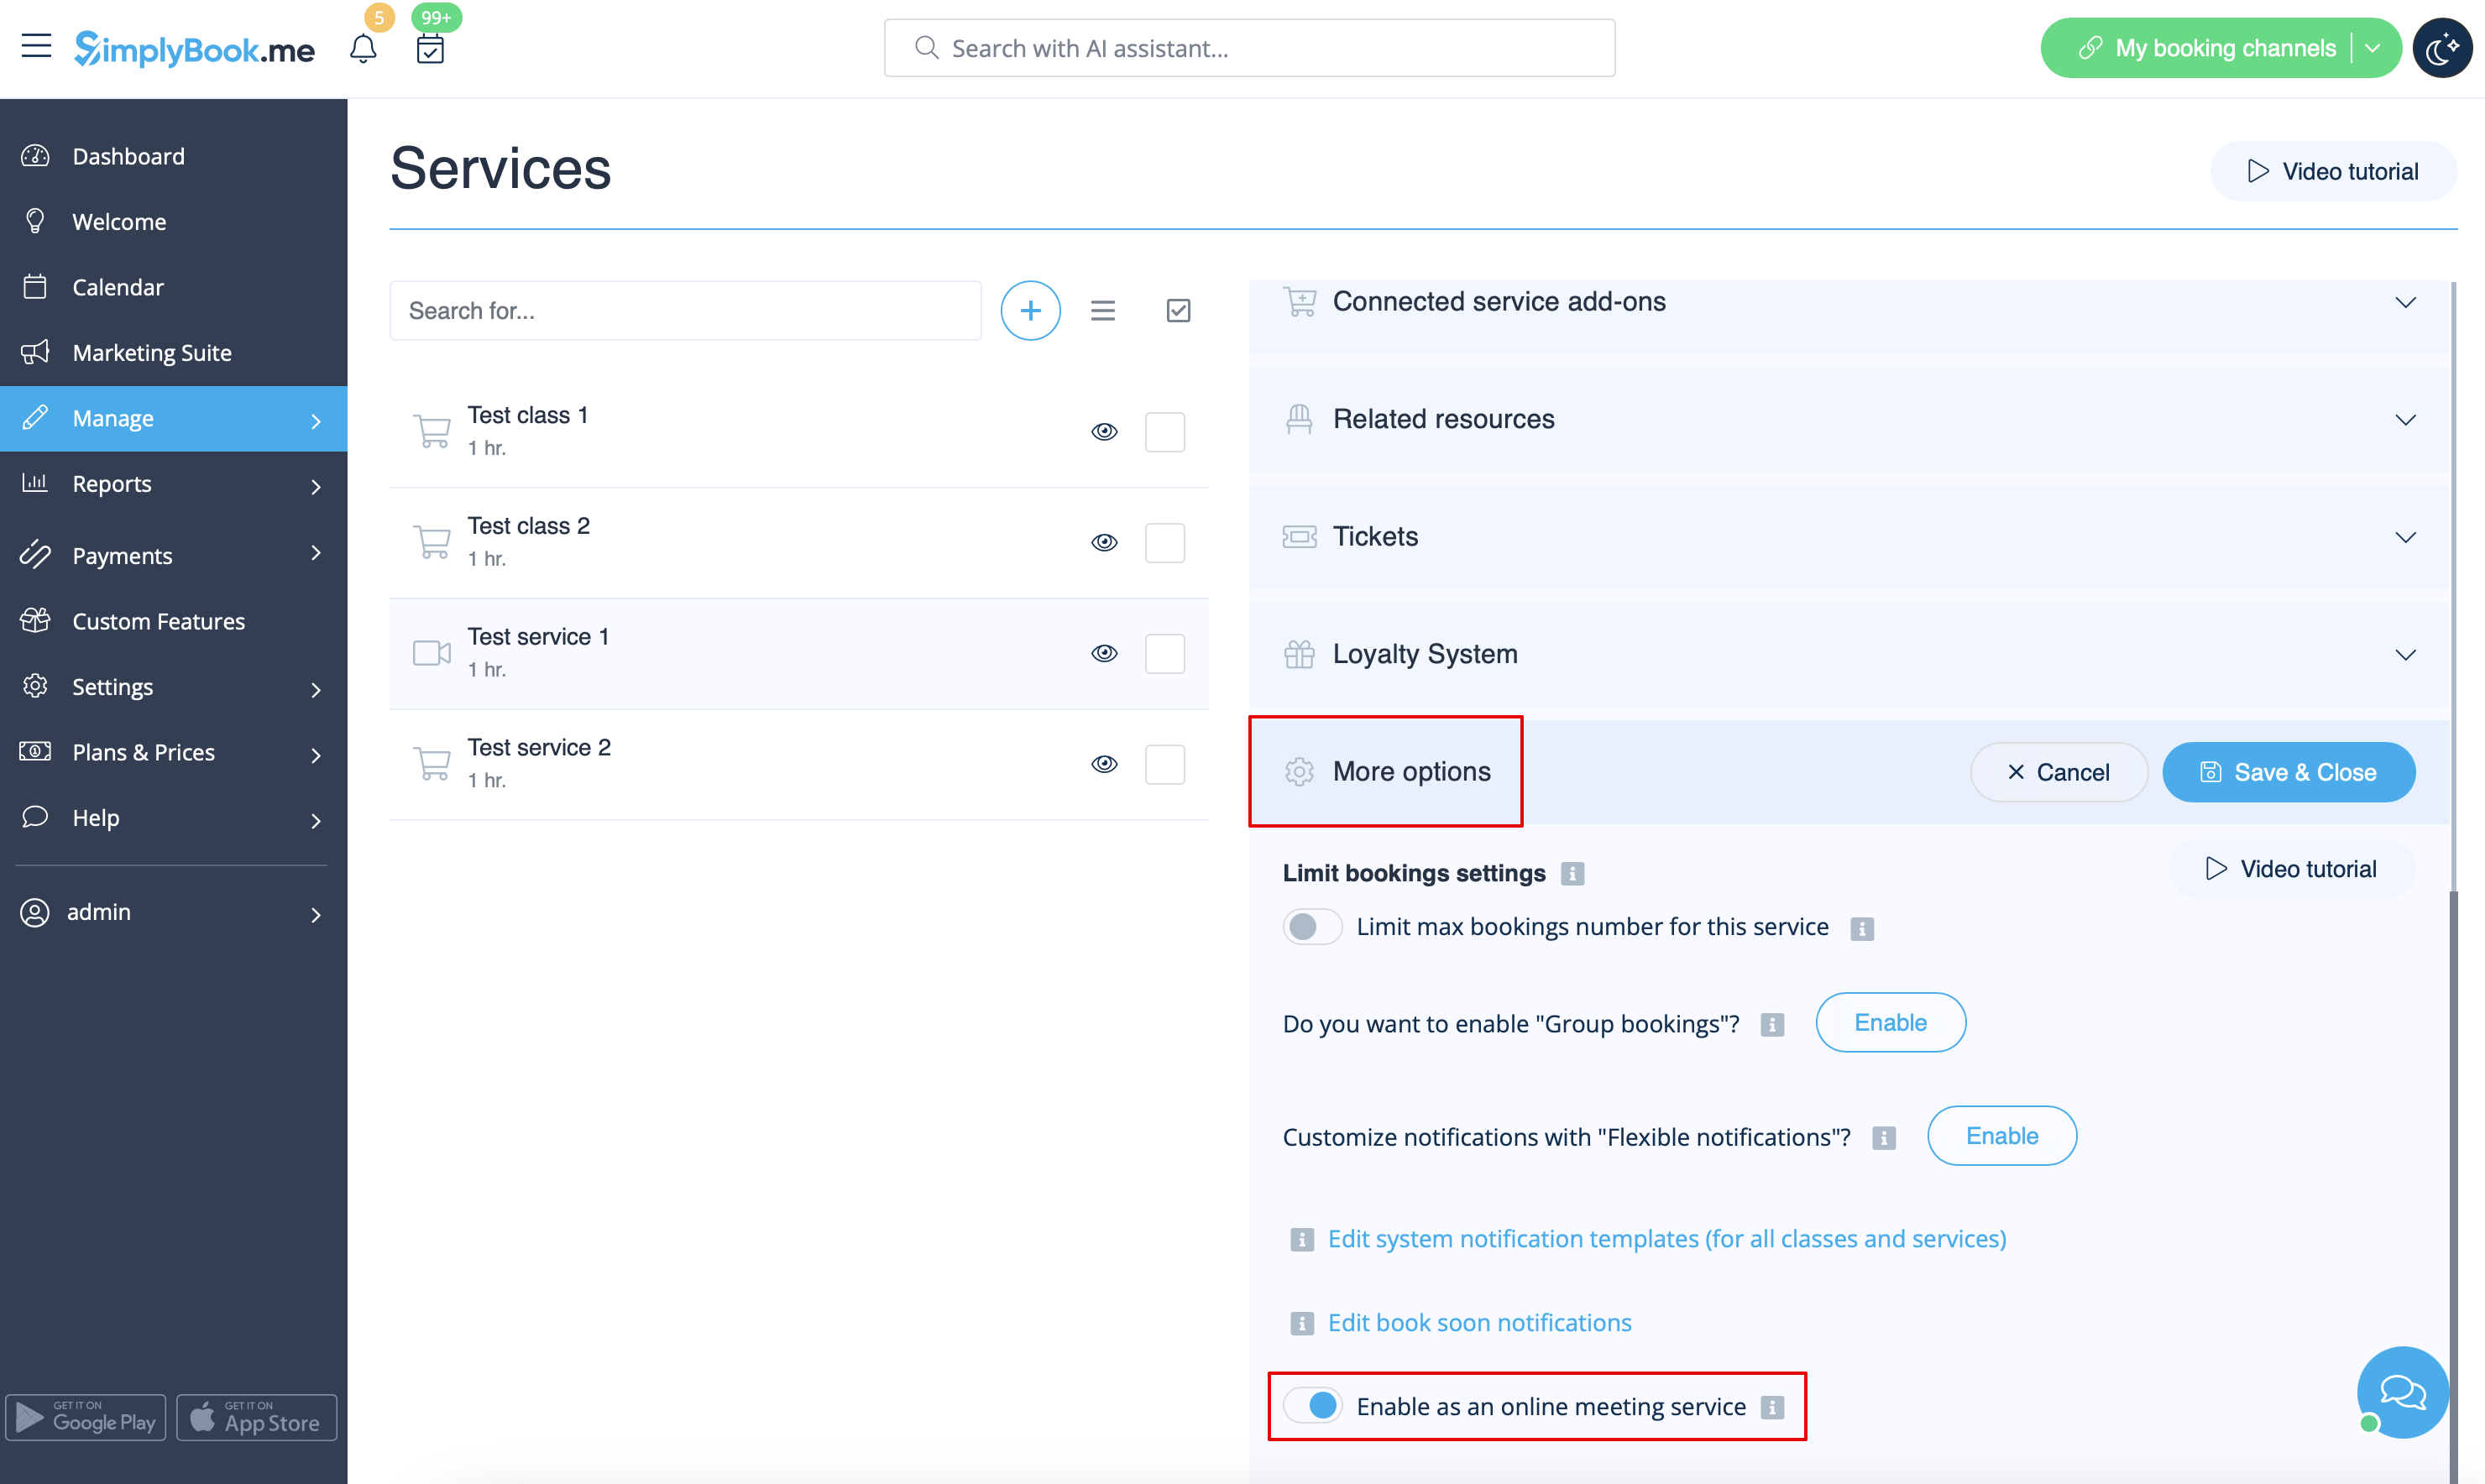
5. After your Zoom connection is set, the last thing you need to do is enable online meeting option for your services. To do that please navigate to Manage -> Services -> click on needed Service name -> scroll down to More options. (in Manage -> Classes -> click on Class name -> More options if you are using Classes feature) and switch on the option Enable as online meeting service/class.
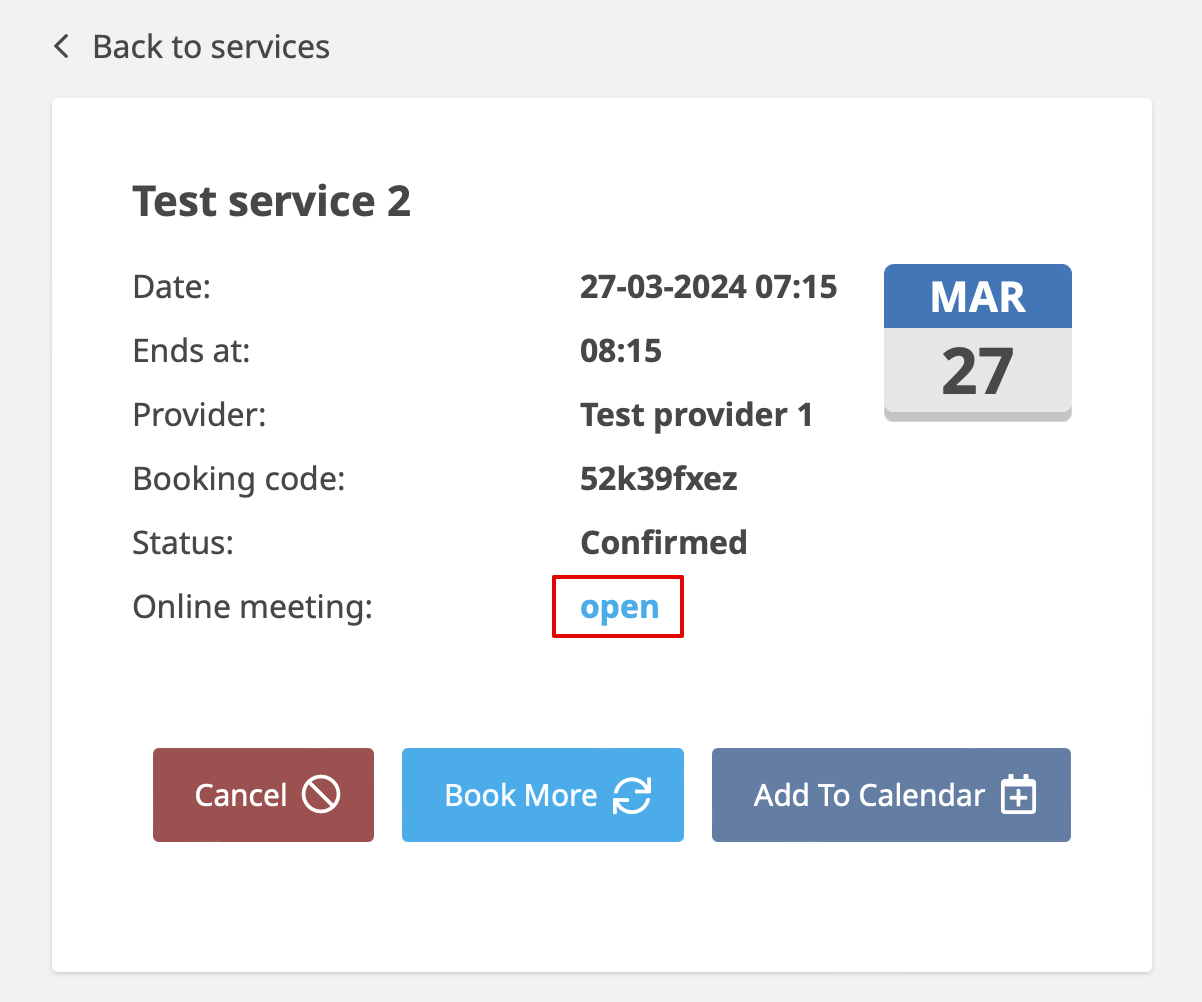
6. When the clients book such a service/class there will be online meeting link on My bookings page for the associated booking. When the appointment time comes the clients will be able to follow it to access the meeting.
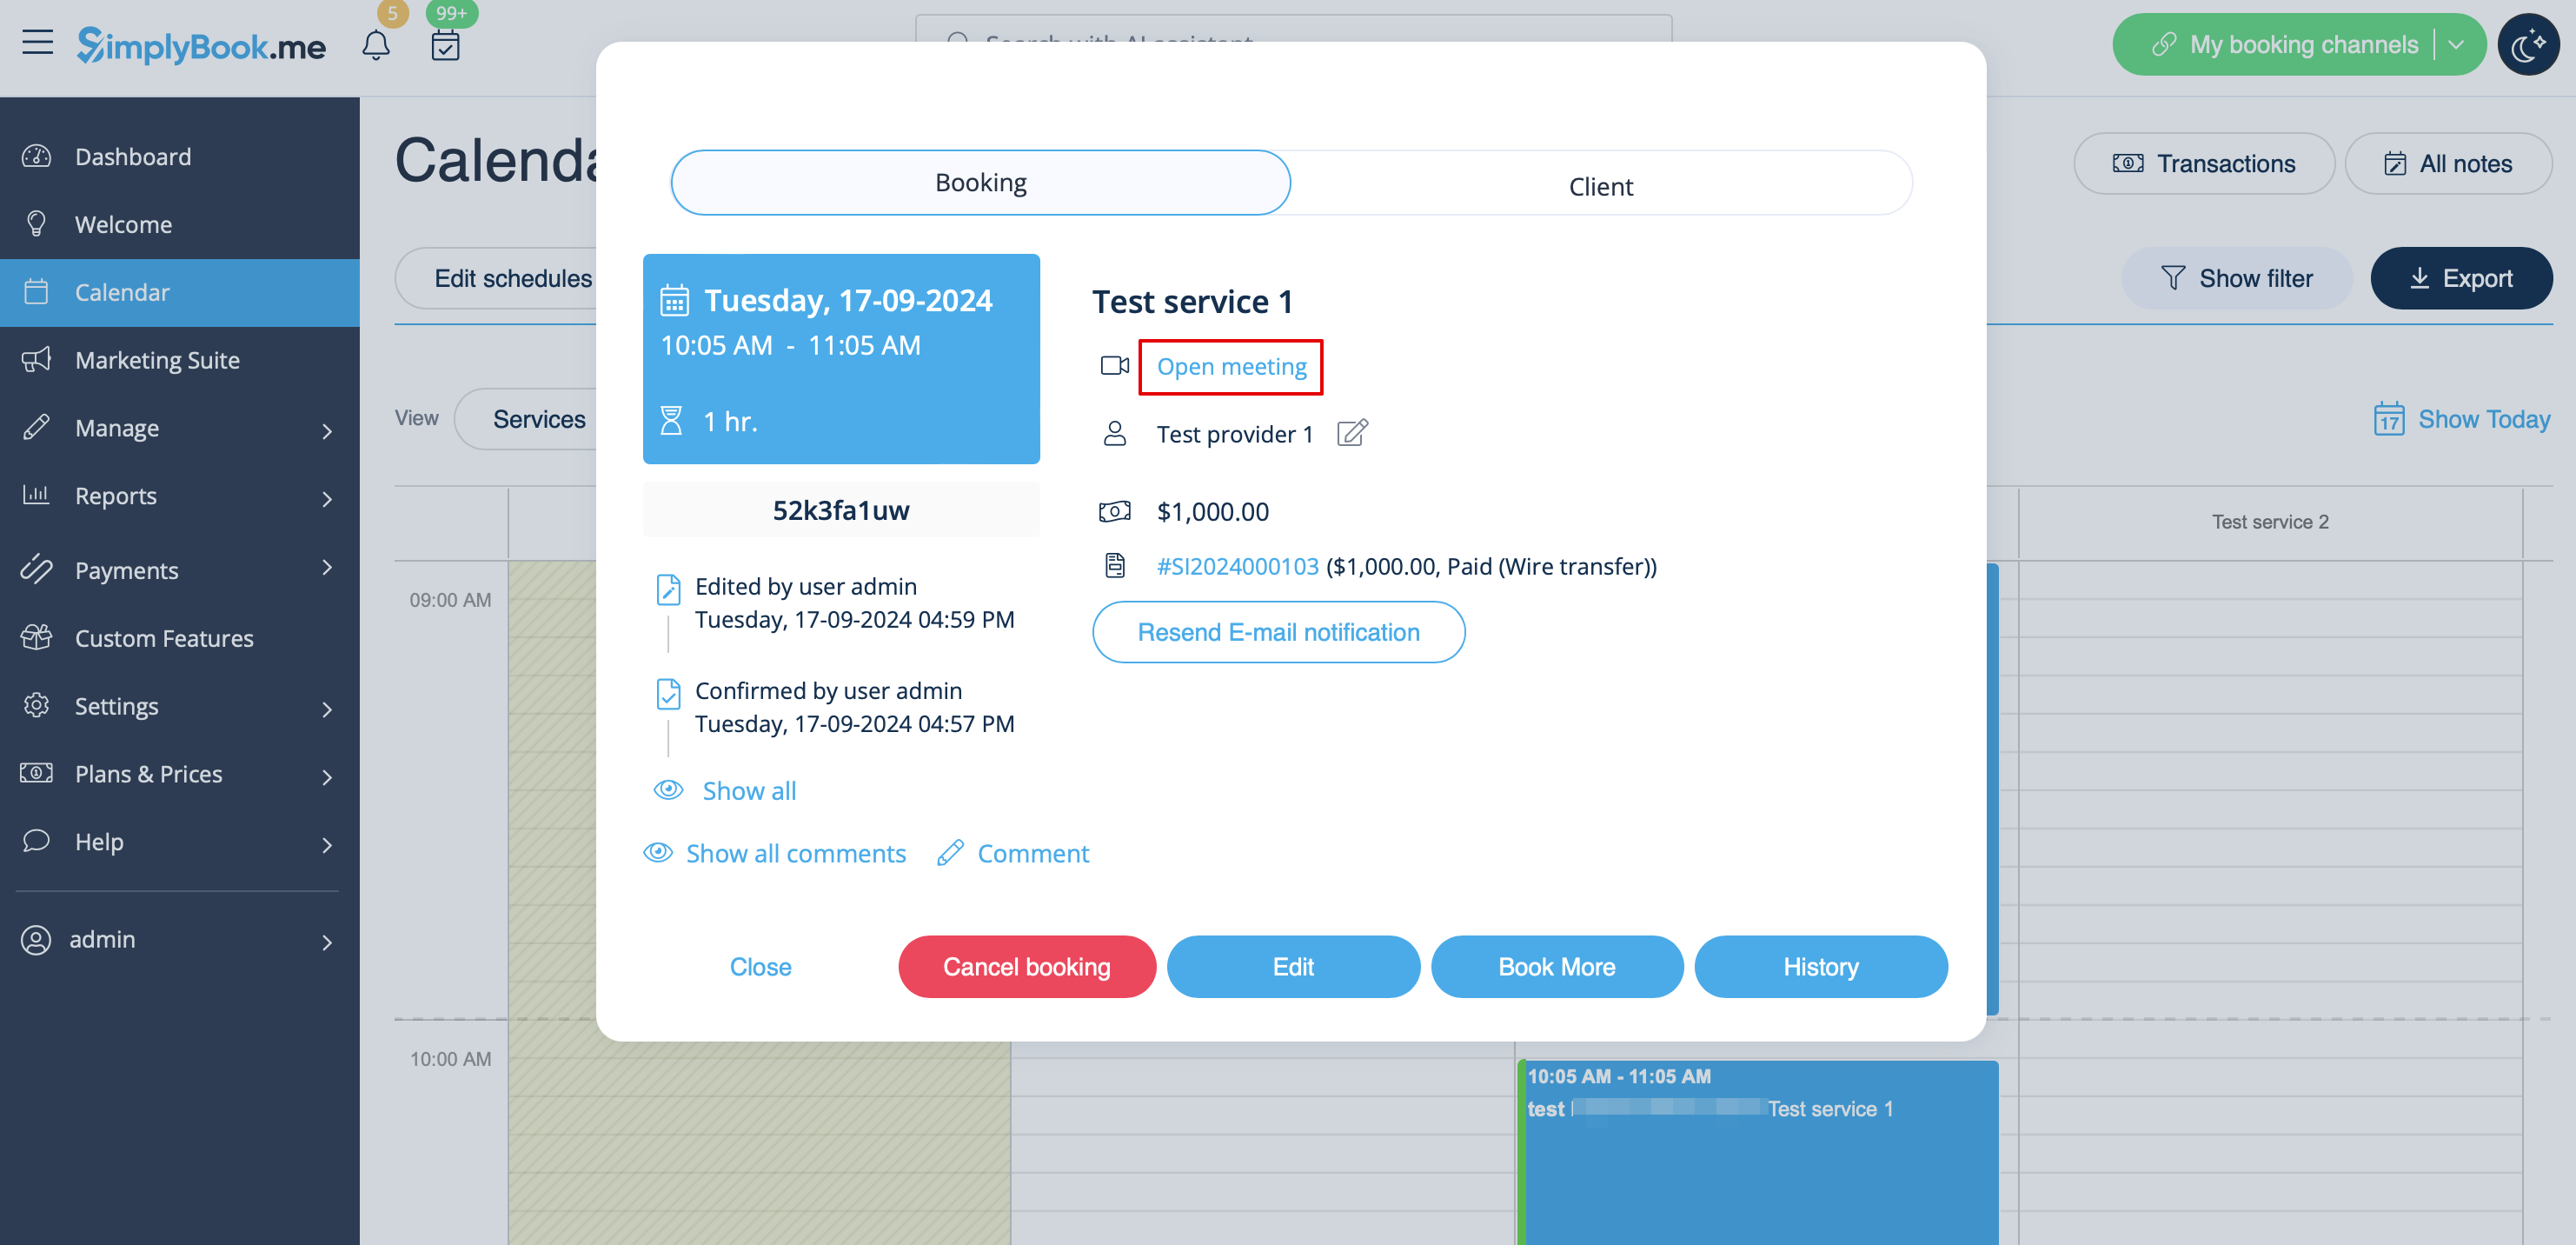
For admin side it will be possible to follow the link from booking info popup form in Calendar or in Reports -> Booking details, or in Reports -> Online video meetings.
7. (optional) As well you can add online meetings link to provider and client notification templates so that both sides receive them with the booking details.
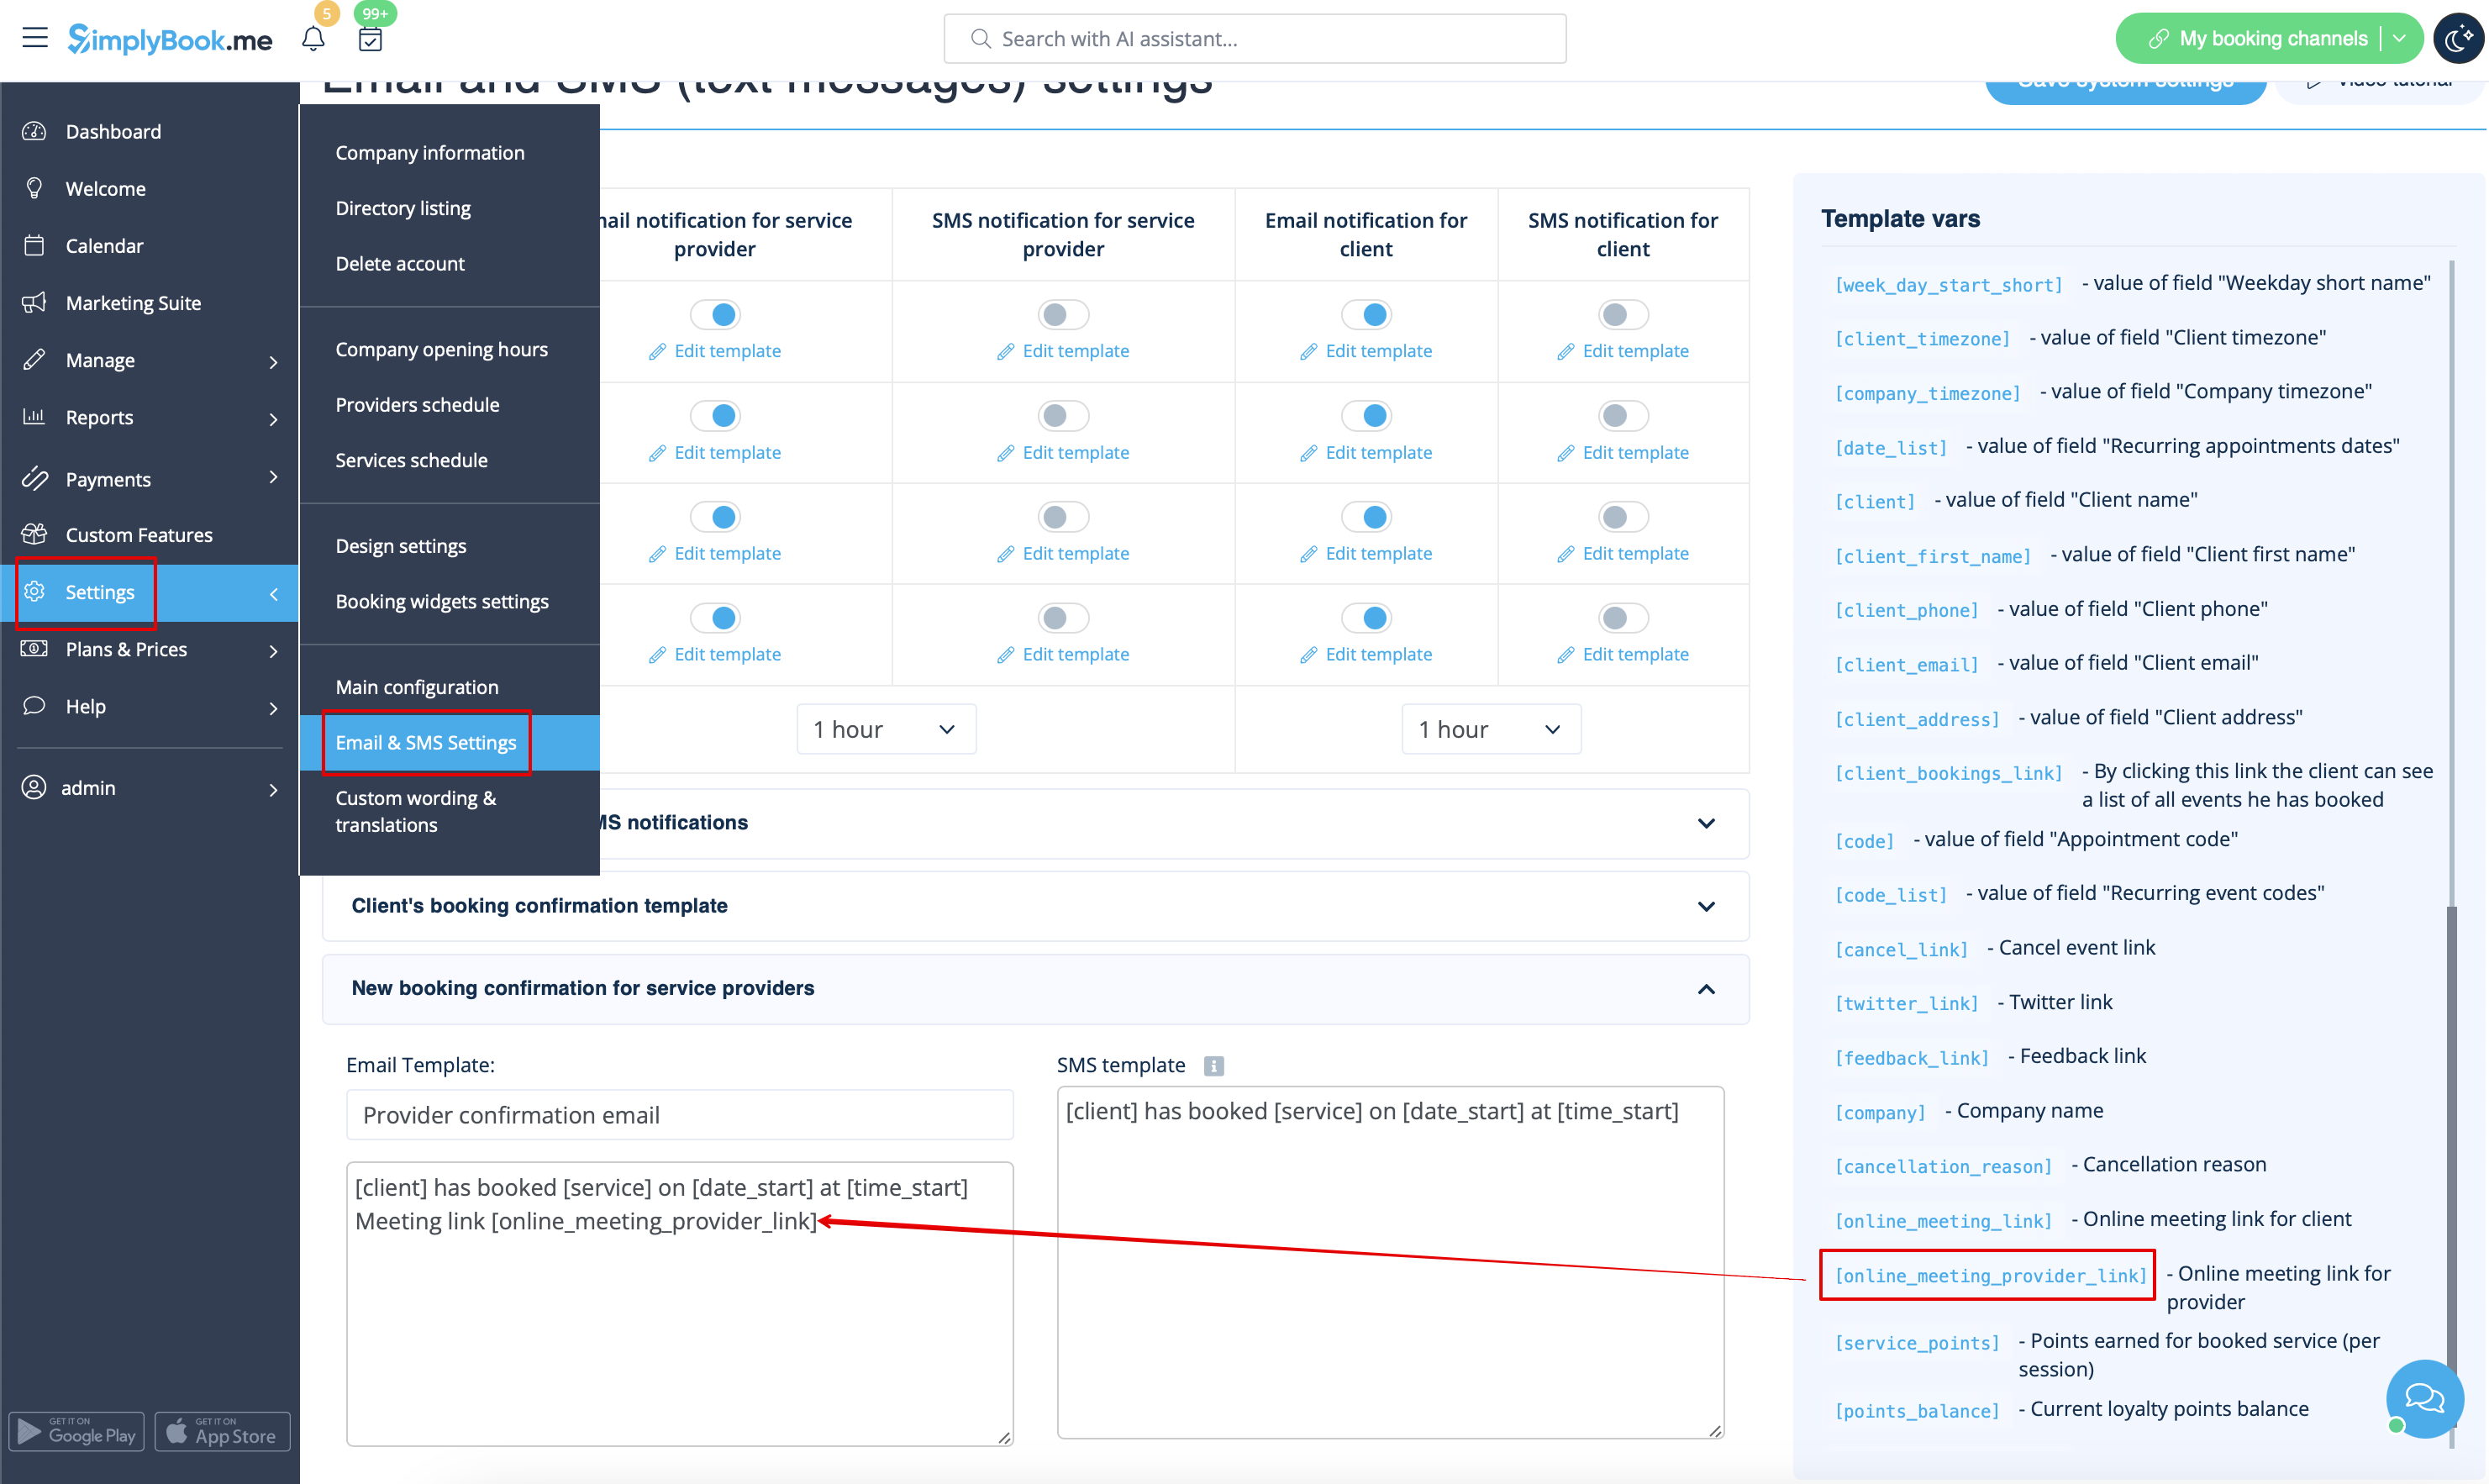
- To do that for your client notifications please navigate to Settings -> Email and SMS settings (or Custom features -> Flexible notifications -> Manage if you have customized notifications per service and/or provider) and edit your Client's booking confirmation template to add [online_meeting_link] variable to send Zoom links to your clients.
To make everything work simply paste [online_meeting_link] variable to the desired place in your "Client's booking confirmation template" so when a client books a service, a Zoom meeting link will be automatically generated at the place of a variable.
- To let your service providers receive Zoom links in their confirmations please add [online_meeting_provider_link] variable to your New booking confirmation for service providers in Settings -> Email and sms settings (or Custom features -> Flexible notifications -> Manage if you have customized notifications per service and/or provider).
- Як працює процес зустрічі
1. Після того, як все налаштовано і клієнт забронювавпослугу/клас, пов'язаний з онлайн-зустрічами, як клієнт, так і постачальник (або компанія, залежно від ваших налаштувань) отримають посилання на зустріч.
2. На стороні адміністратора постачальник може перейти на сторінку зустрічі прямо з бронювання в «Календарі», натиснувши посилання «Відкрити зустріч» у спливаючому вікні деталей бронювання.
3. Клієнти можуть відкрити посилання на зустріч з деталей бронювання на сторінці «Мої бронювання» на сайті бронювання.
4. Після цього, коли настане час зустрічі, і постачальник, і клієнт будуть перенаправлені на сторінку онлайн-зустрічі Zoom.
- Як видалити інтеграцію
З боку Simplybook.me
- Перейдіть на сторінку «Налаштування» в адміністративному інтерфейсі Simplybook.me і натисніть на «Налаштування онлайн-відеозустрічей», щоб відкрити їх налаштування.
- У налаштуваннях функції знайдіть Zoom і натисніть «Вийти».
- Після цього інтеграція Zoom буде видалена з вашого облікового запису Simplybook.me.
З боку Zoom
Зверніть увагу! Якщо ви не встановили прапорець «Дозволити цій програмі використовувати мої дозволи на спільний доступ» АБО ви хочете переключитися на інший підключений обліковий запис Zoom, зробити це з боку Simplybook.me неможливо через технічні обмеження.
Для цього вам потрібно буде від'єднати Simplybook.me безпосередньо від Zoom, після чого ви зможете під'єднати новий обліковий запис на стороні Simplybook.me.
- Щоб від'єднати інтеграцію з боку Zoom, перейдіть за цим посиланням.
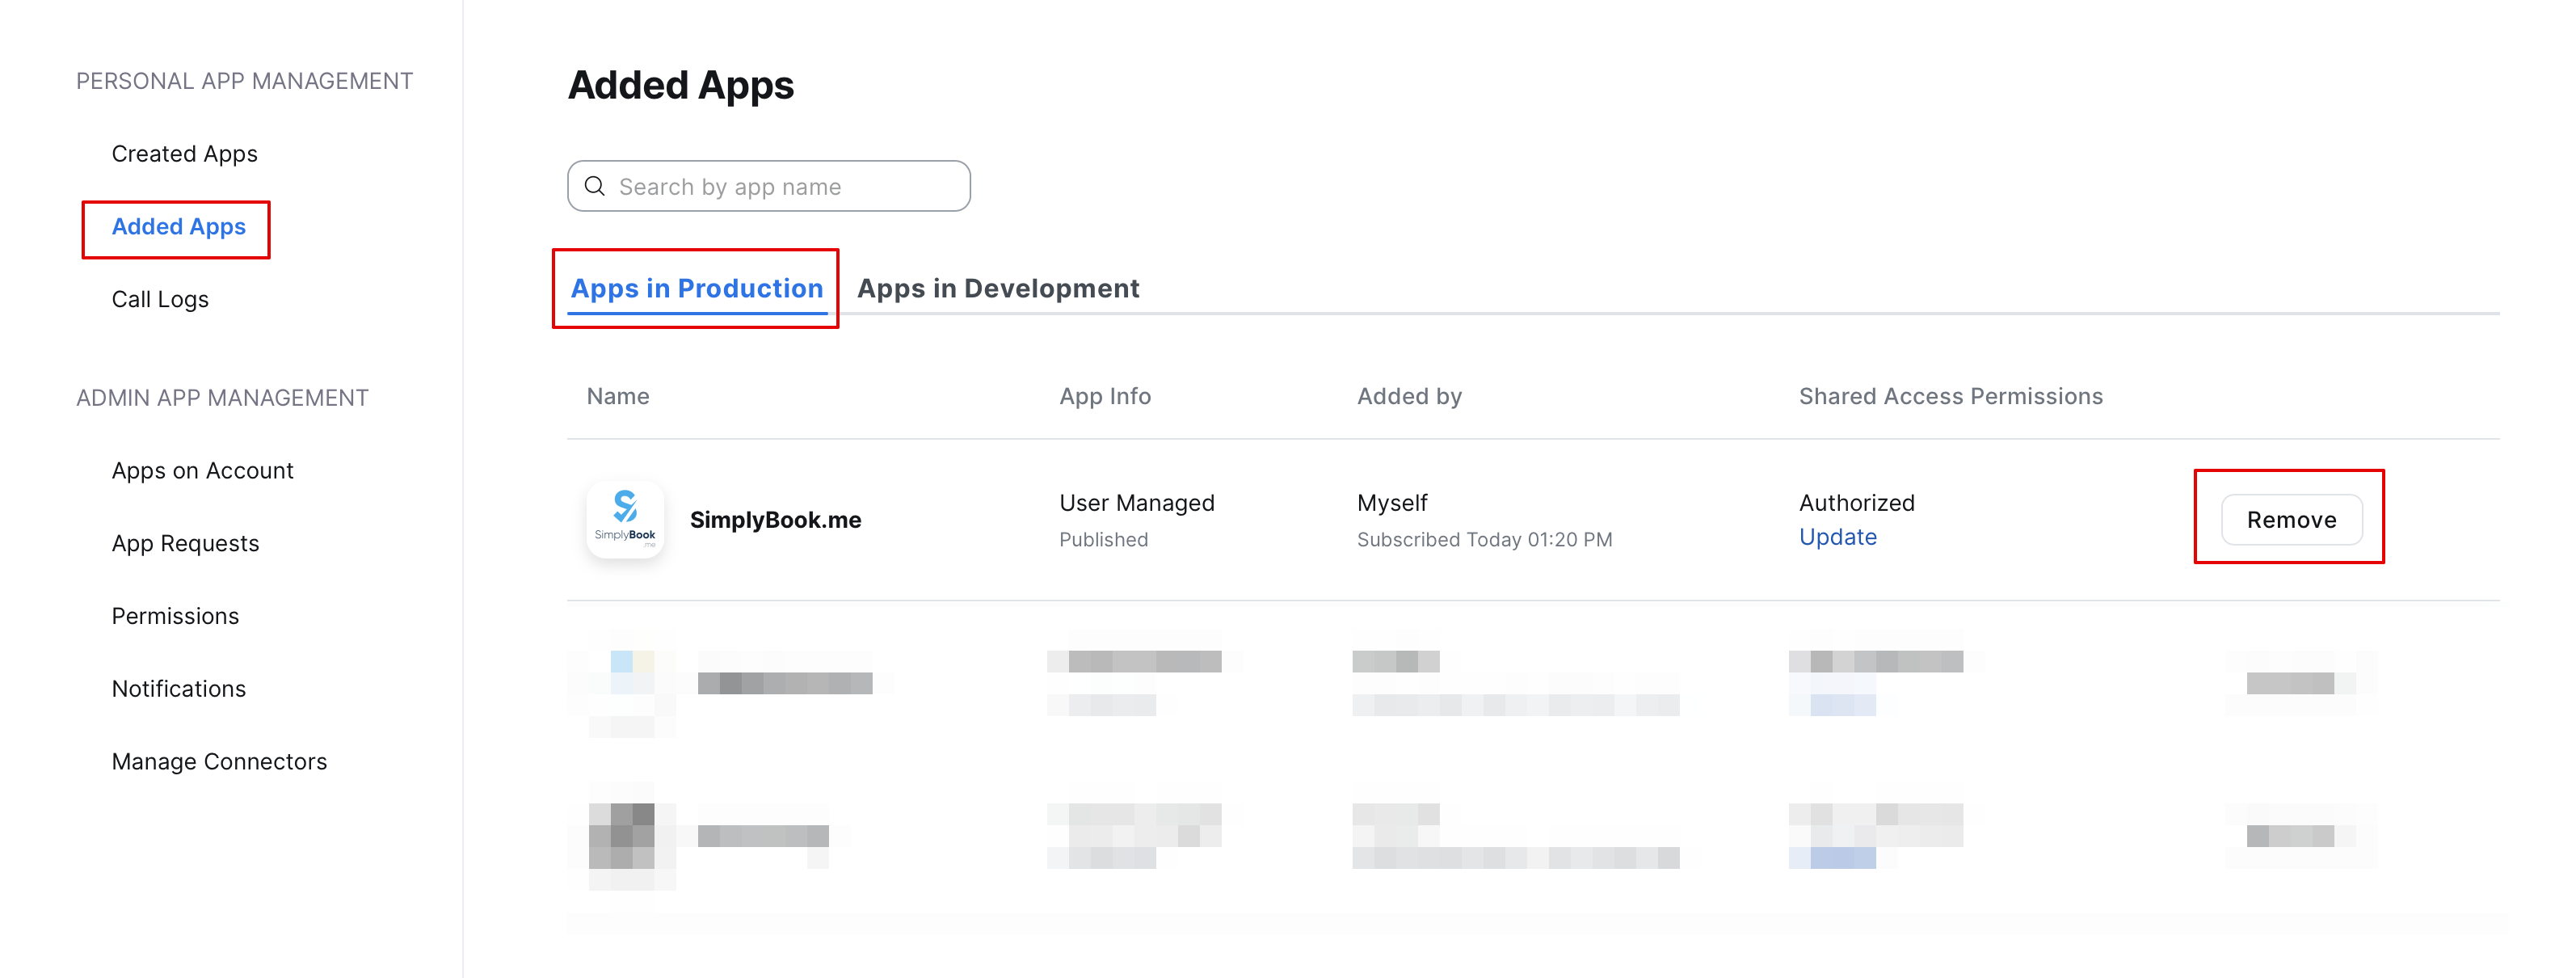
- Знайдіть Simplybook.me у списку підключених додатків (за потреби скористайтеся пошуком).
- Натисніть кнопку «Видалити», щоб від'єднати.
- Тепер інтеграція видалена, і ви можете підключити інший обліковий запис, якщо потрібно.
- How to remove integration
From the Simplybook.me side
- Navigate to the Custom Features page within your Simplybook.me admin interface and click on Online video meetings custom feature to open its settings.
- In the feature settings locate Zoom and click Logout.
- After that Zoom integration will be removed from your Simplybook.me account.
From the Zoom side
Please note! If you did not check the box “Allow this app to use my shared access permissions” OR you want to switch connected Zoom account to another one - there will be no option to do that from Simplybook.me side due to technical restrictions.
In order to do that you will need to disconnect Simplybook.me directly from Zoom and after that you will be able to connect new account on the Simplybook.me side.
- To disconnect the integration from the Zoom side please follow this link.
- Locate Simplybook.me in the list of connected apps (you can use search if needed).
- Click on Remove button to disconnect.
- Now the integration is removed and you can connect different account if needed.