Ajuster les notifications
Comment activer/désactiver les notifications de réservation et ajuster vos modèles
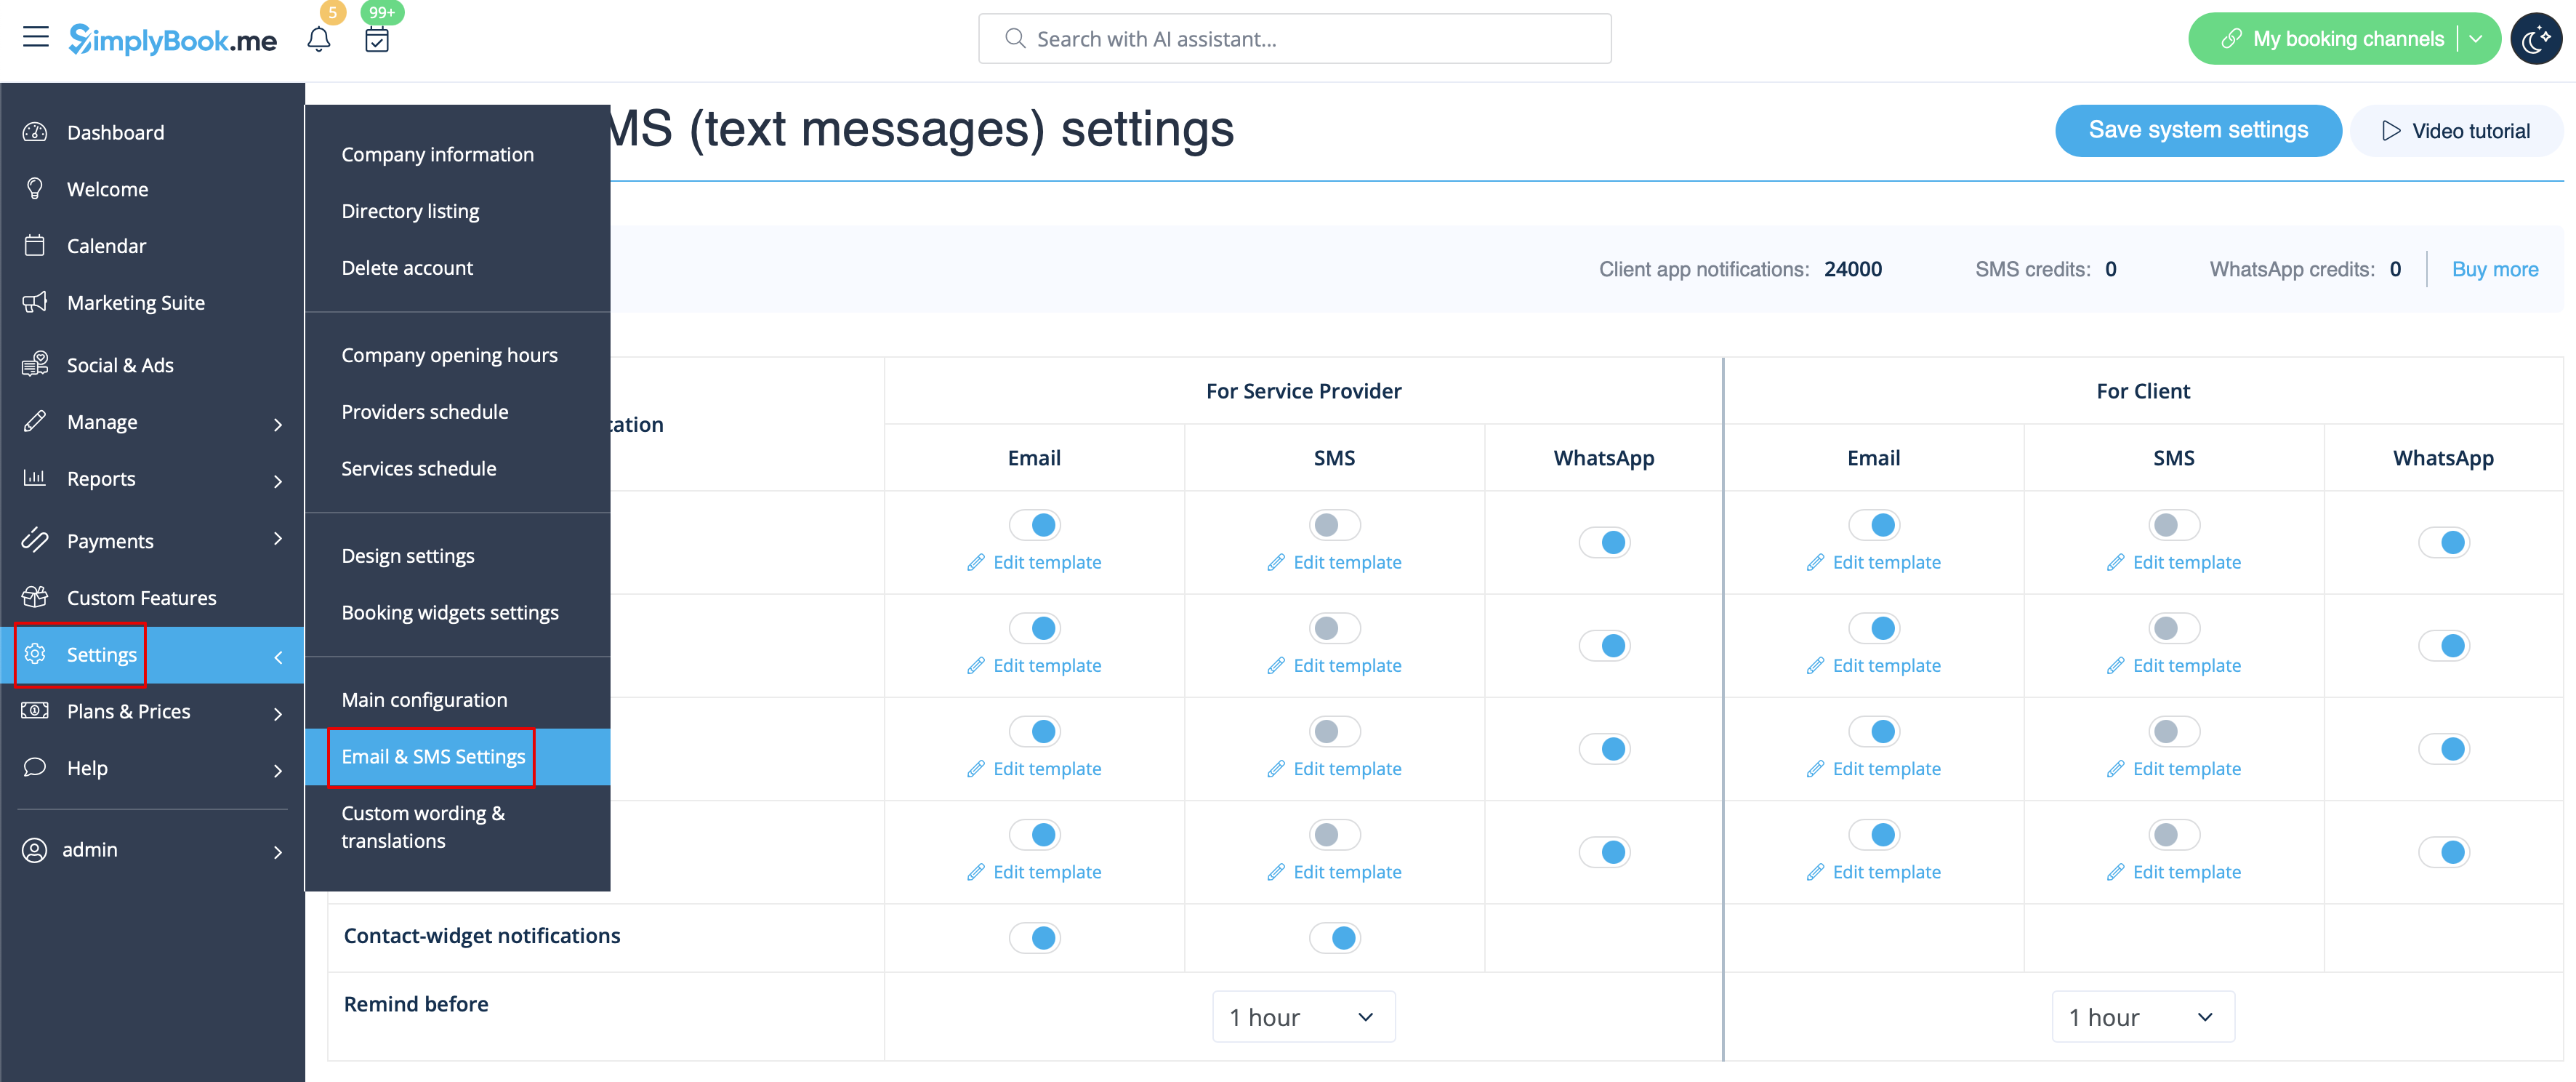
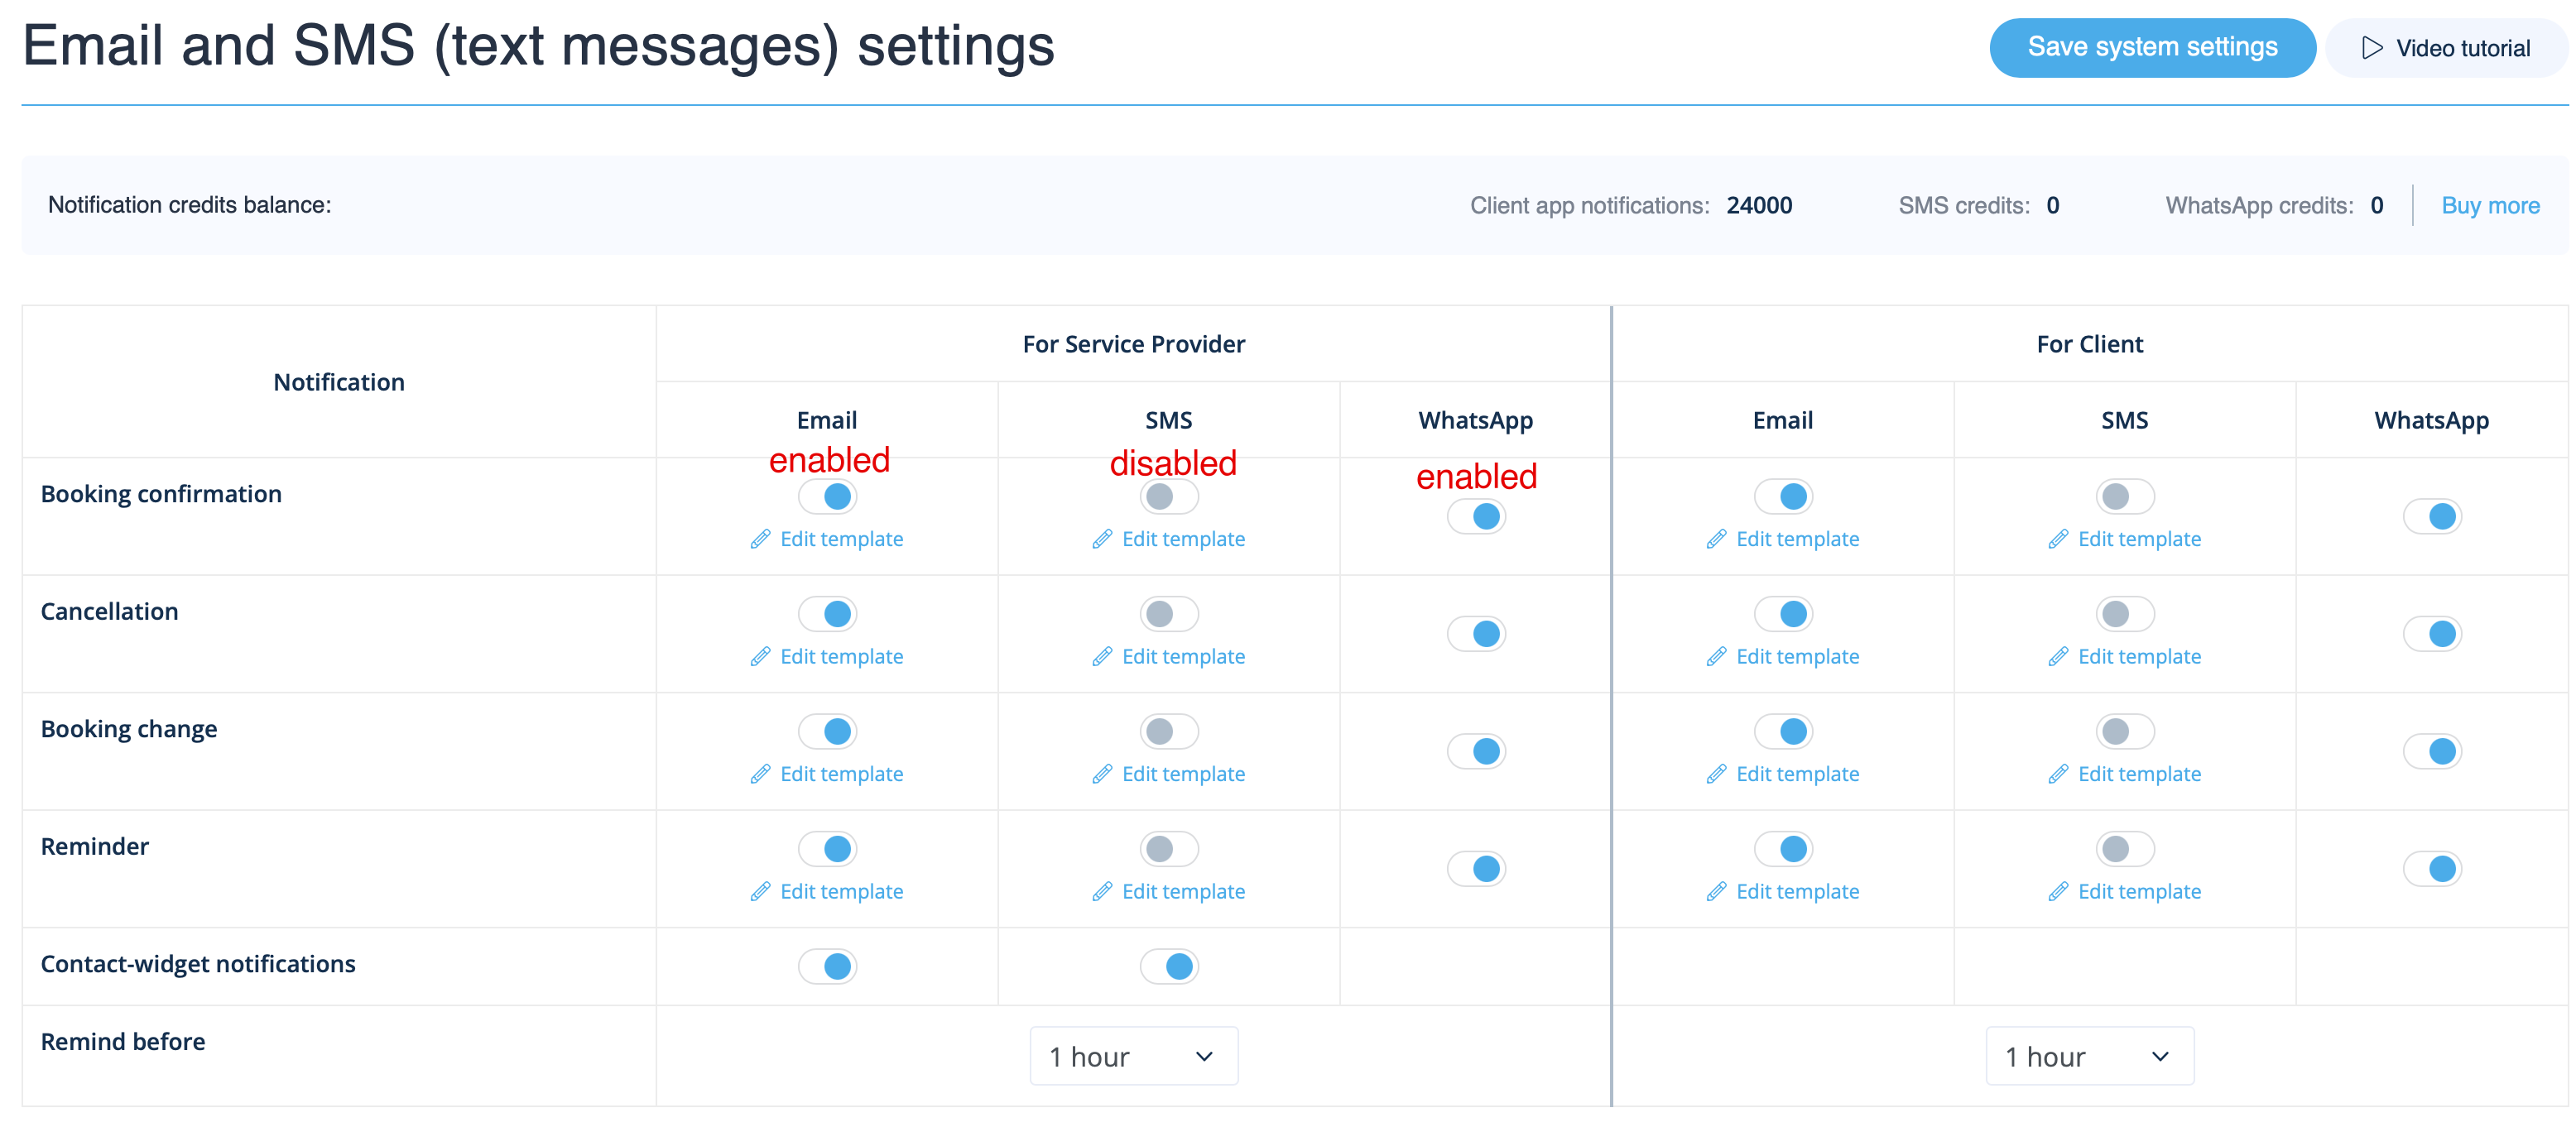
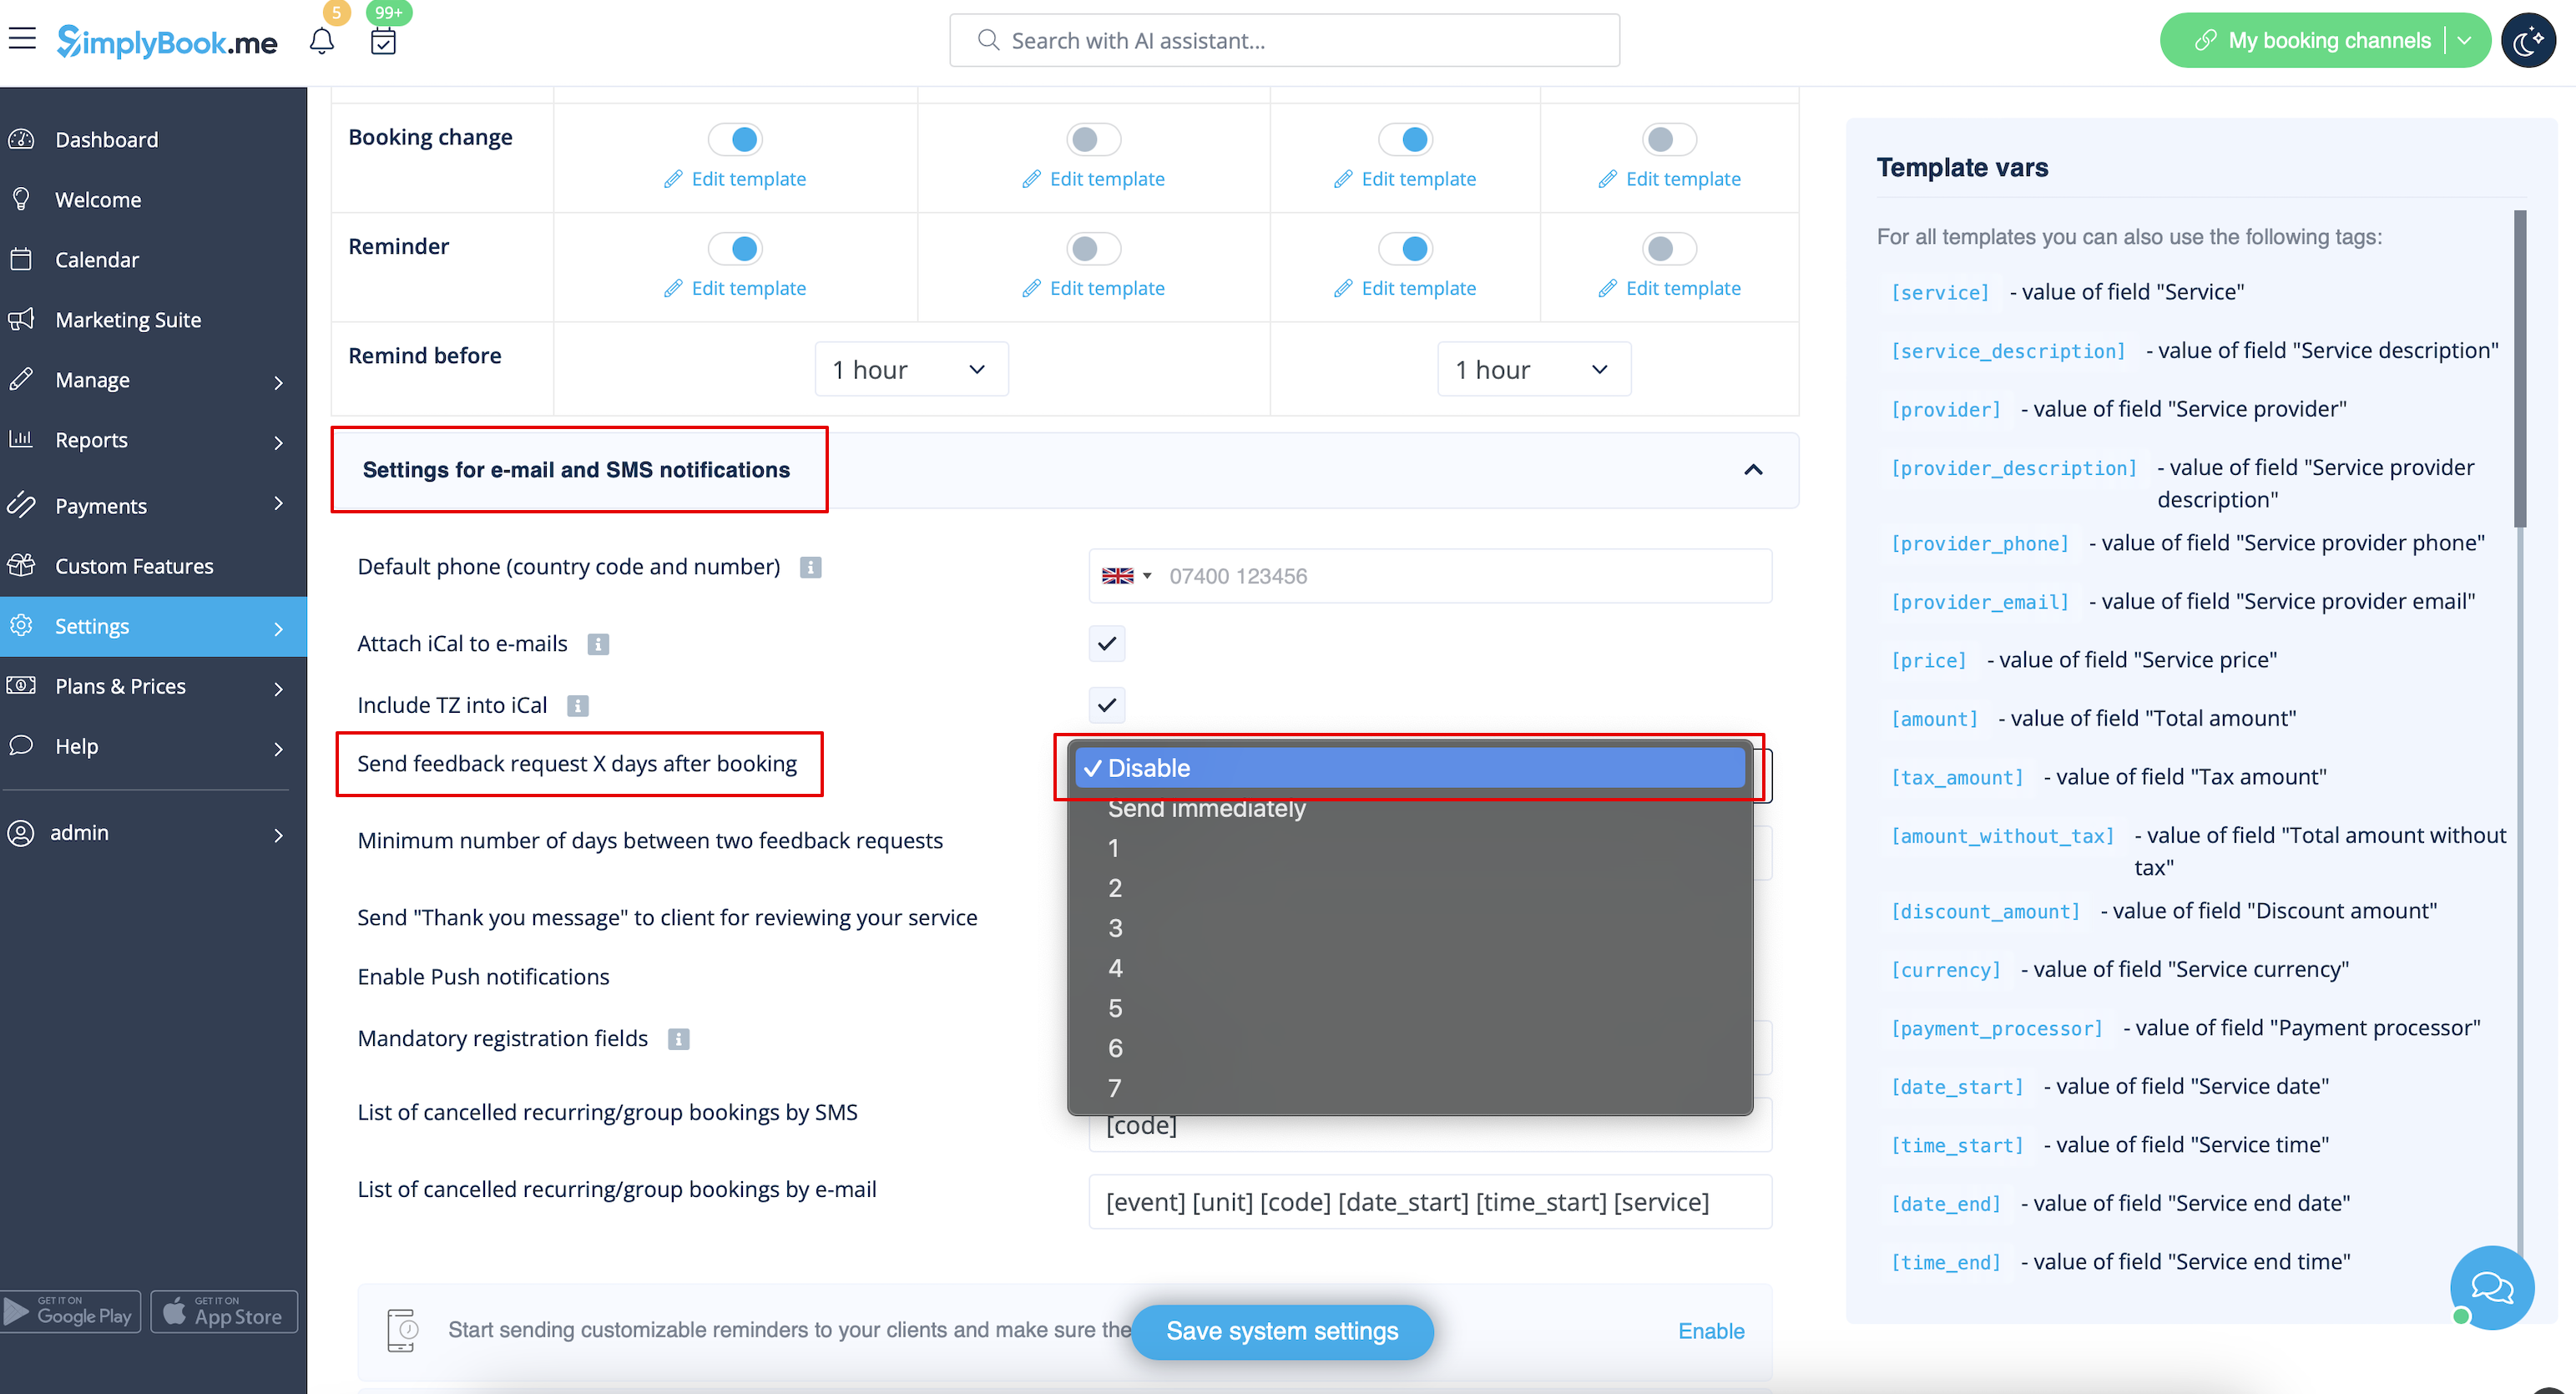
Allez dans Paramètres -> Paramètres e-mail et SMS et cochez/décochez les cases correspondantes pour envoyer/ne pas envoyer les notifications. Vous pouvez modifier le texte des notifications pour mieux l'adapter à vos besoins en cliquant sur Modifier le modèle, en apportant les modifications souhaitées et en enregistrant les paramètres système.
Notifications WhatsApp
Si vous et vos clients utilisez activement WhatsApp Messenger, vous pouvez recevoir des notifications relatives aux réservations sur cette plateforme.
- Comment utiliser
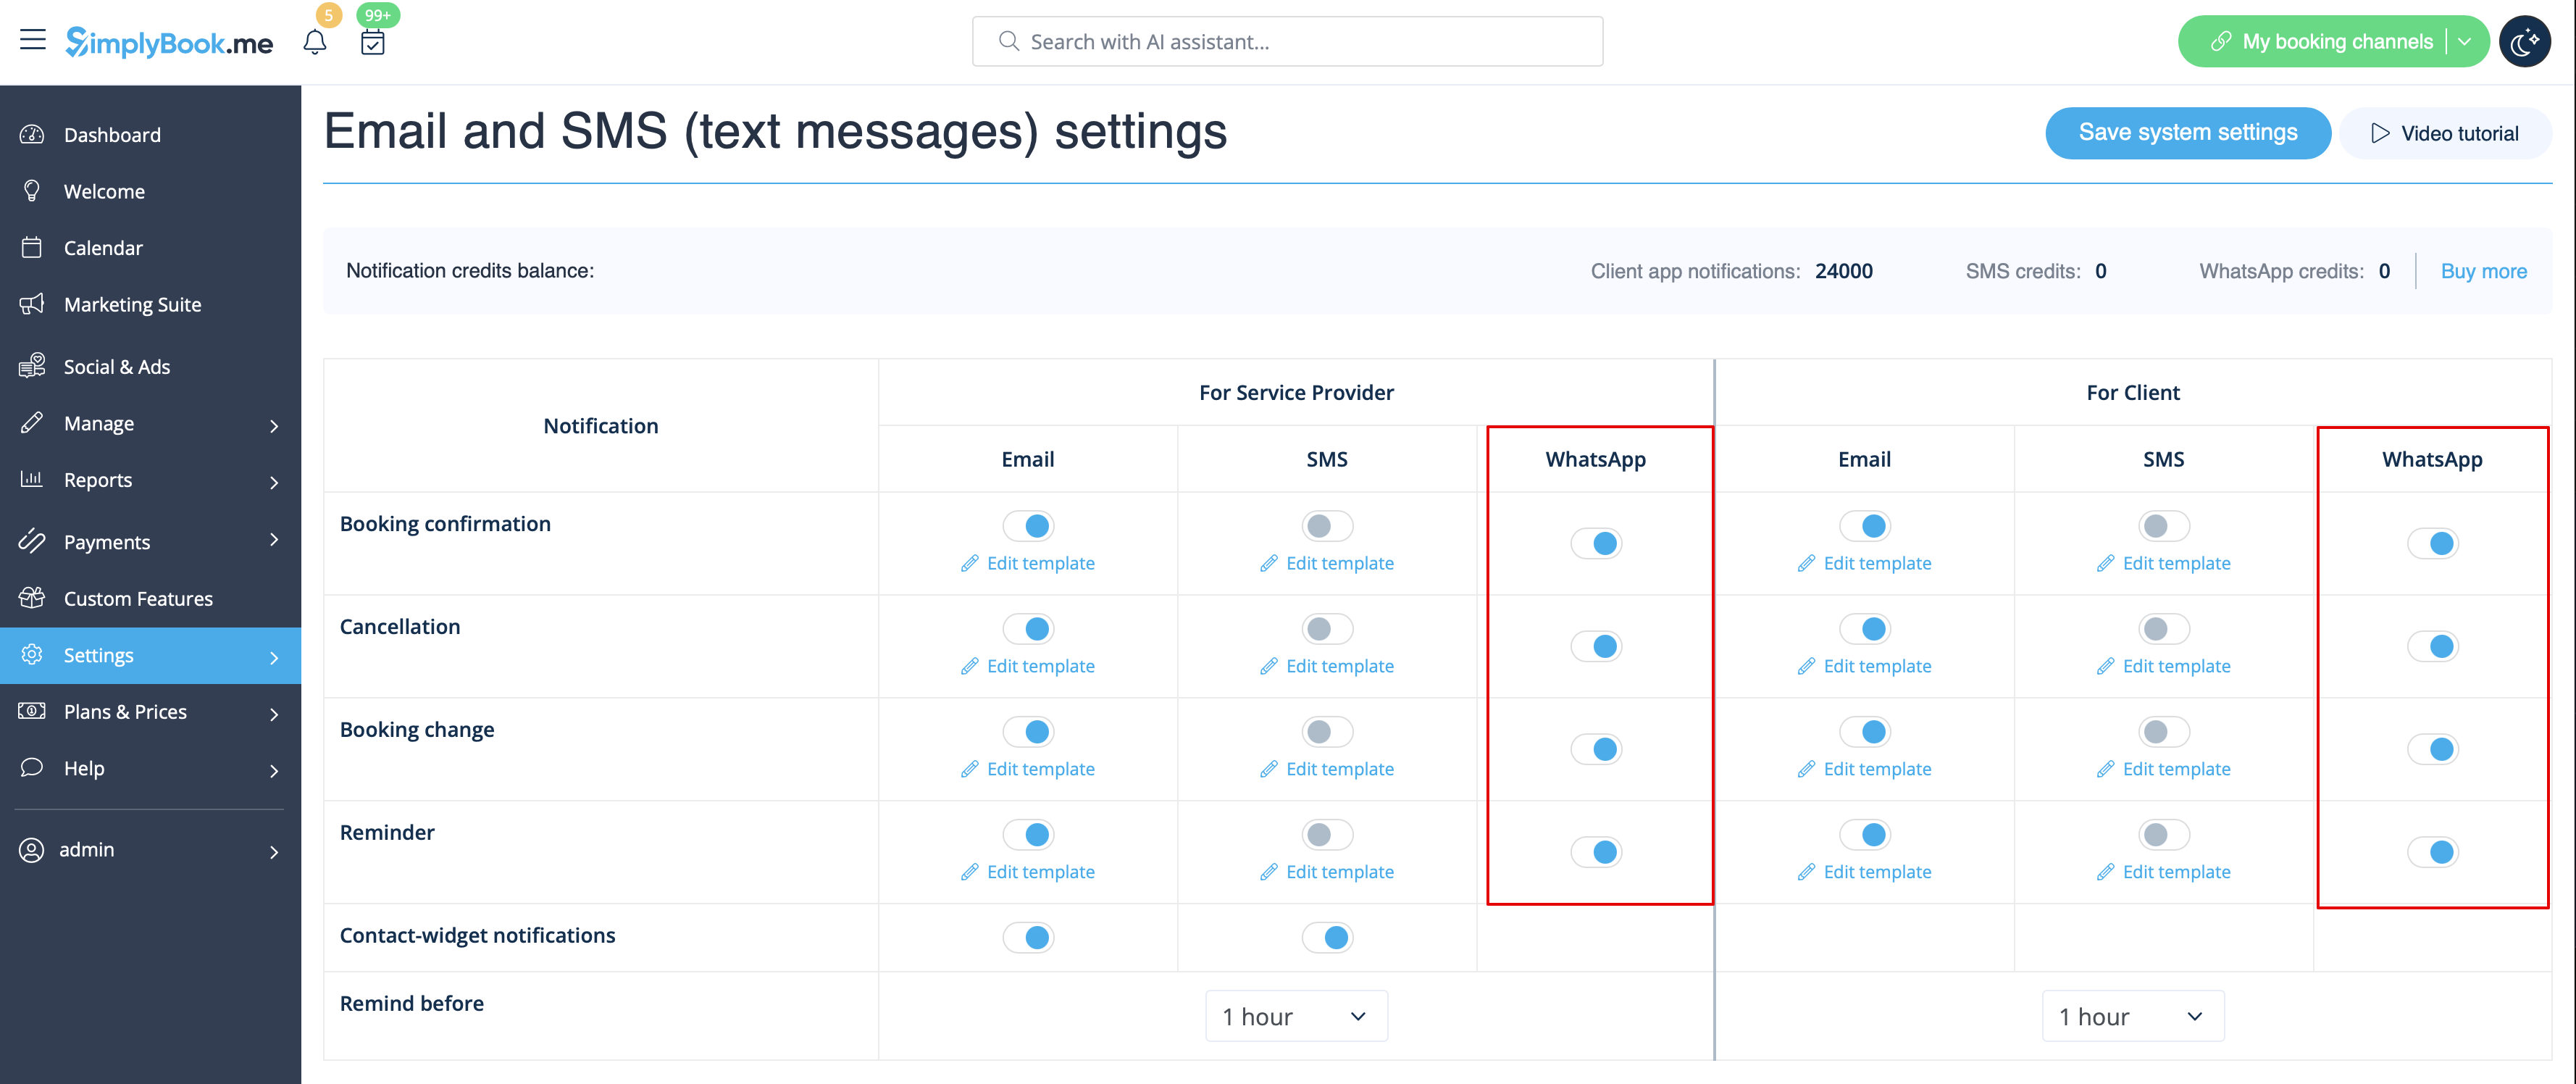
1. Activez les types de notifications WhatsApp souhaités dans Paramètres -> Paramètres e-mail et SMS
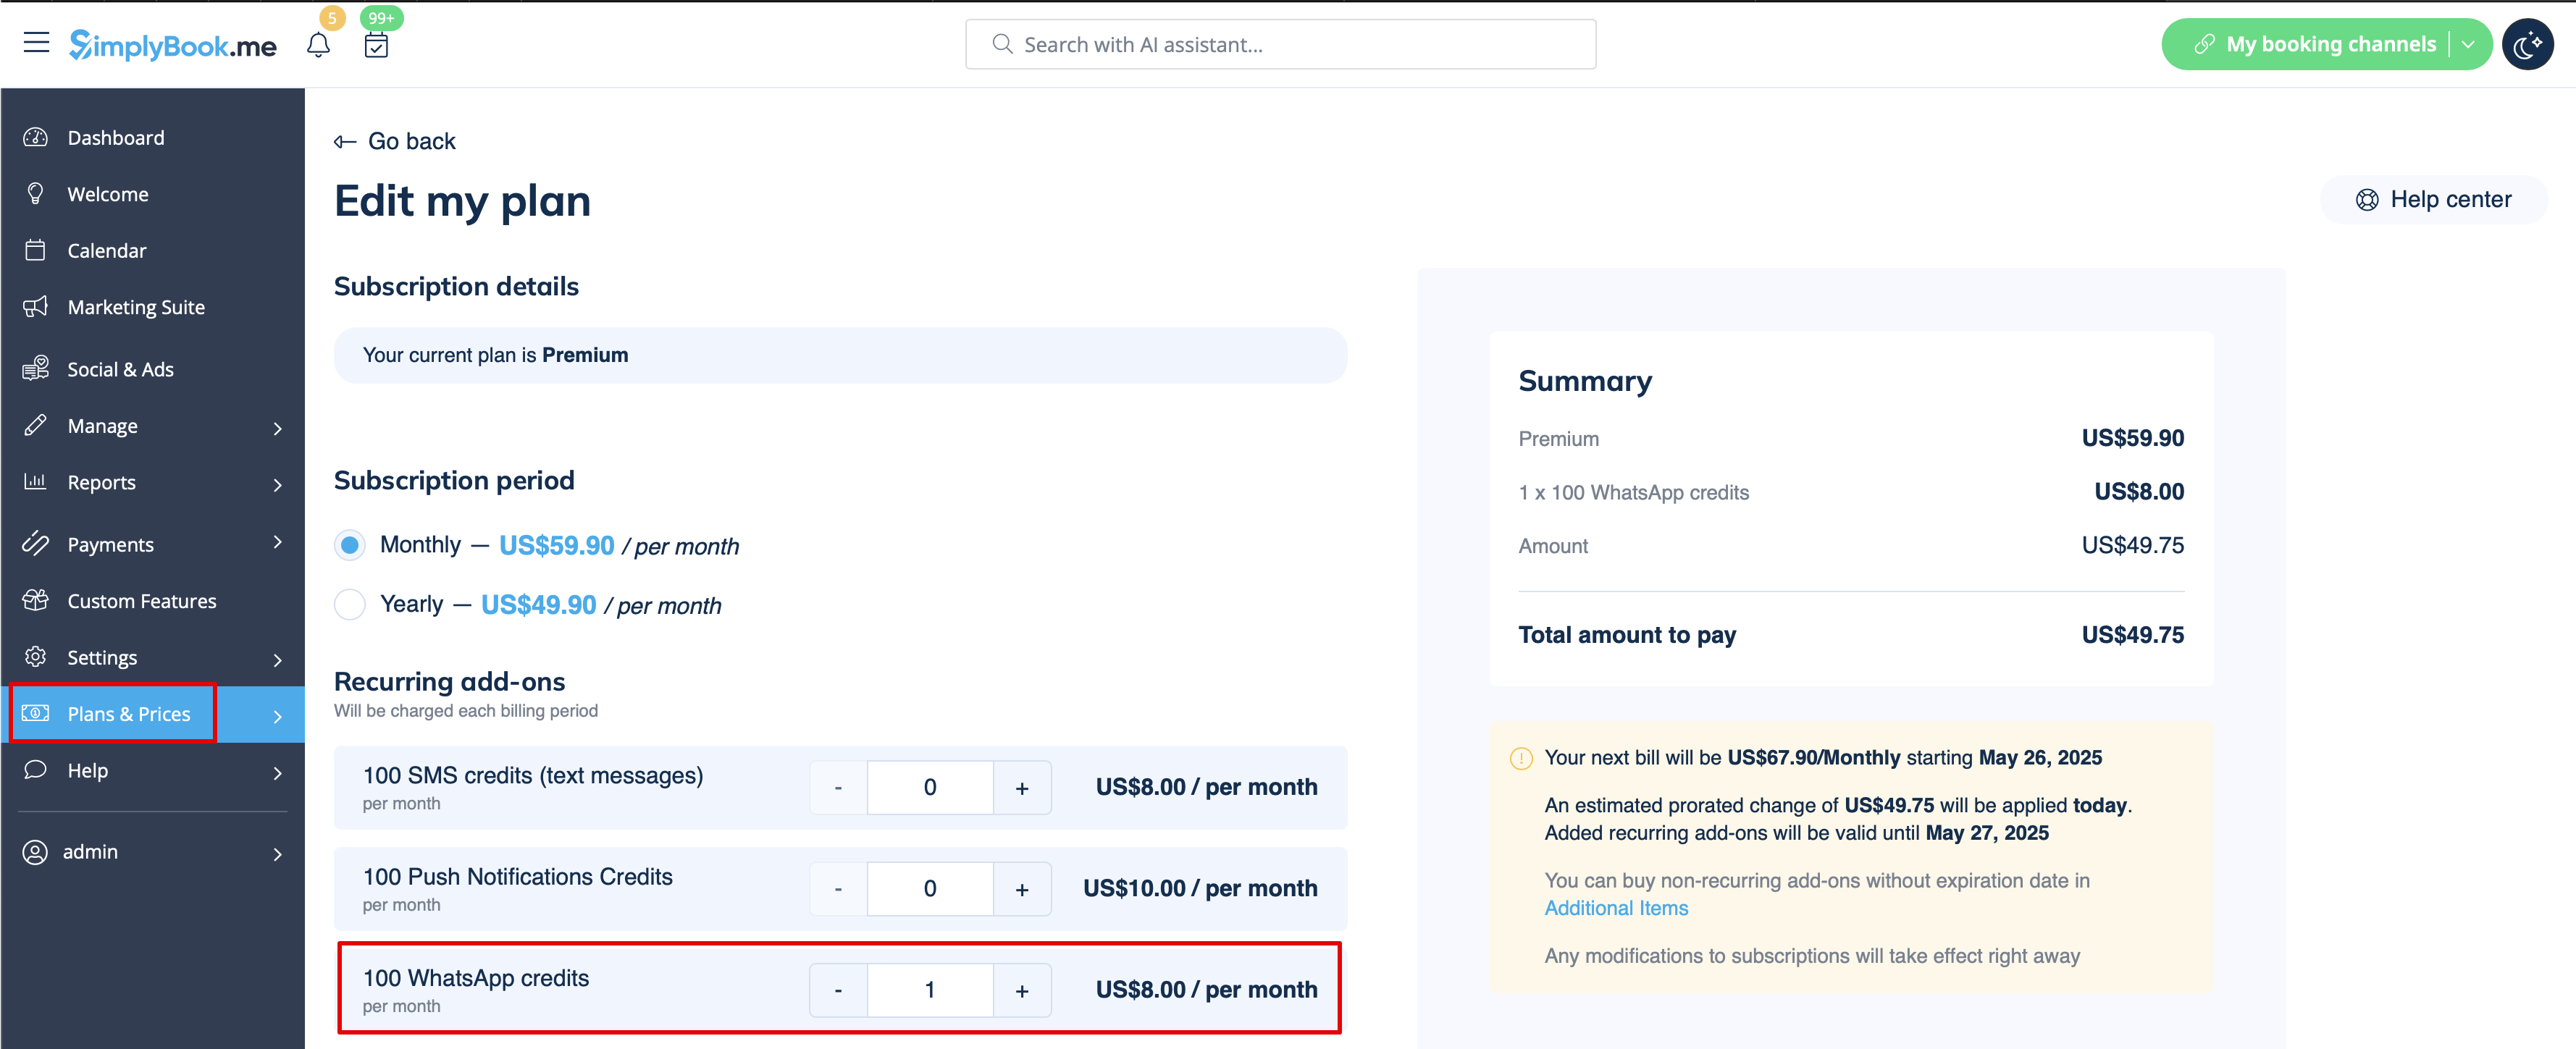
2. Achetez des crédits WhatsApp dans Plans et tarifs -> Abonnements ou Éléments supplémentaires selon que vous souhaitez que les crédits soient renouvelés automatiquement avec votre abonnement ou que vous préférez un achat unique.
(Vous pourrez également consulter les messages envoyés par le système ainsi que le nombre de crédits utilisés dans Rapports -> SMS (messages texte) -> Notifications WhatsApp)
Remarque importante ! Conformément à la politique de WhatsApp, les messages utilisent des modèles préapprouvés et ne peuvent pas être personnalisés. Ces modèles couvrent les informations essentielles de manière claire et professionnelle.
Application mobile Admin
Si vous utilisez l'application mobile Admin, vous pouvez recevoir des notifications relatives aux réservations, telles que les confirmations, les rappels, les modifications et les annulations.
Pour activer/désactiver ces notifications, veuillez vous rendre dans l'onglet Paramètres -> Gérer les notifications dans l'application mobile Admin.
Comment désactiver les commentaires
Vous pouvez consulter tous vos avis dans l'onglet Rapports -> Avis dans le menu de gauche, les supprimer ou y répondre. Si vous souhaitez supprimer la possibilité de laisser un avis et ne pas envoyer de demande de commentaires, allez dans Paramètres -> Paramètres e-mail et SMS -> Paramètres pour les notifications par e-mail et SMS -> définissez le nombre de jours avant l'envoi de la demande de commentaires au client sur Désactiver.
Notifications liéesaux fonctionnalités personnalisées
Les fonctionnalités personnalisées suivantes ont leurs propres types de notifications ou peuvent influencer les messages envoyés par le système :
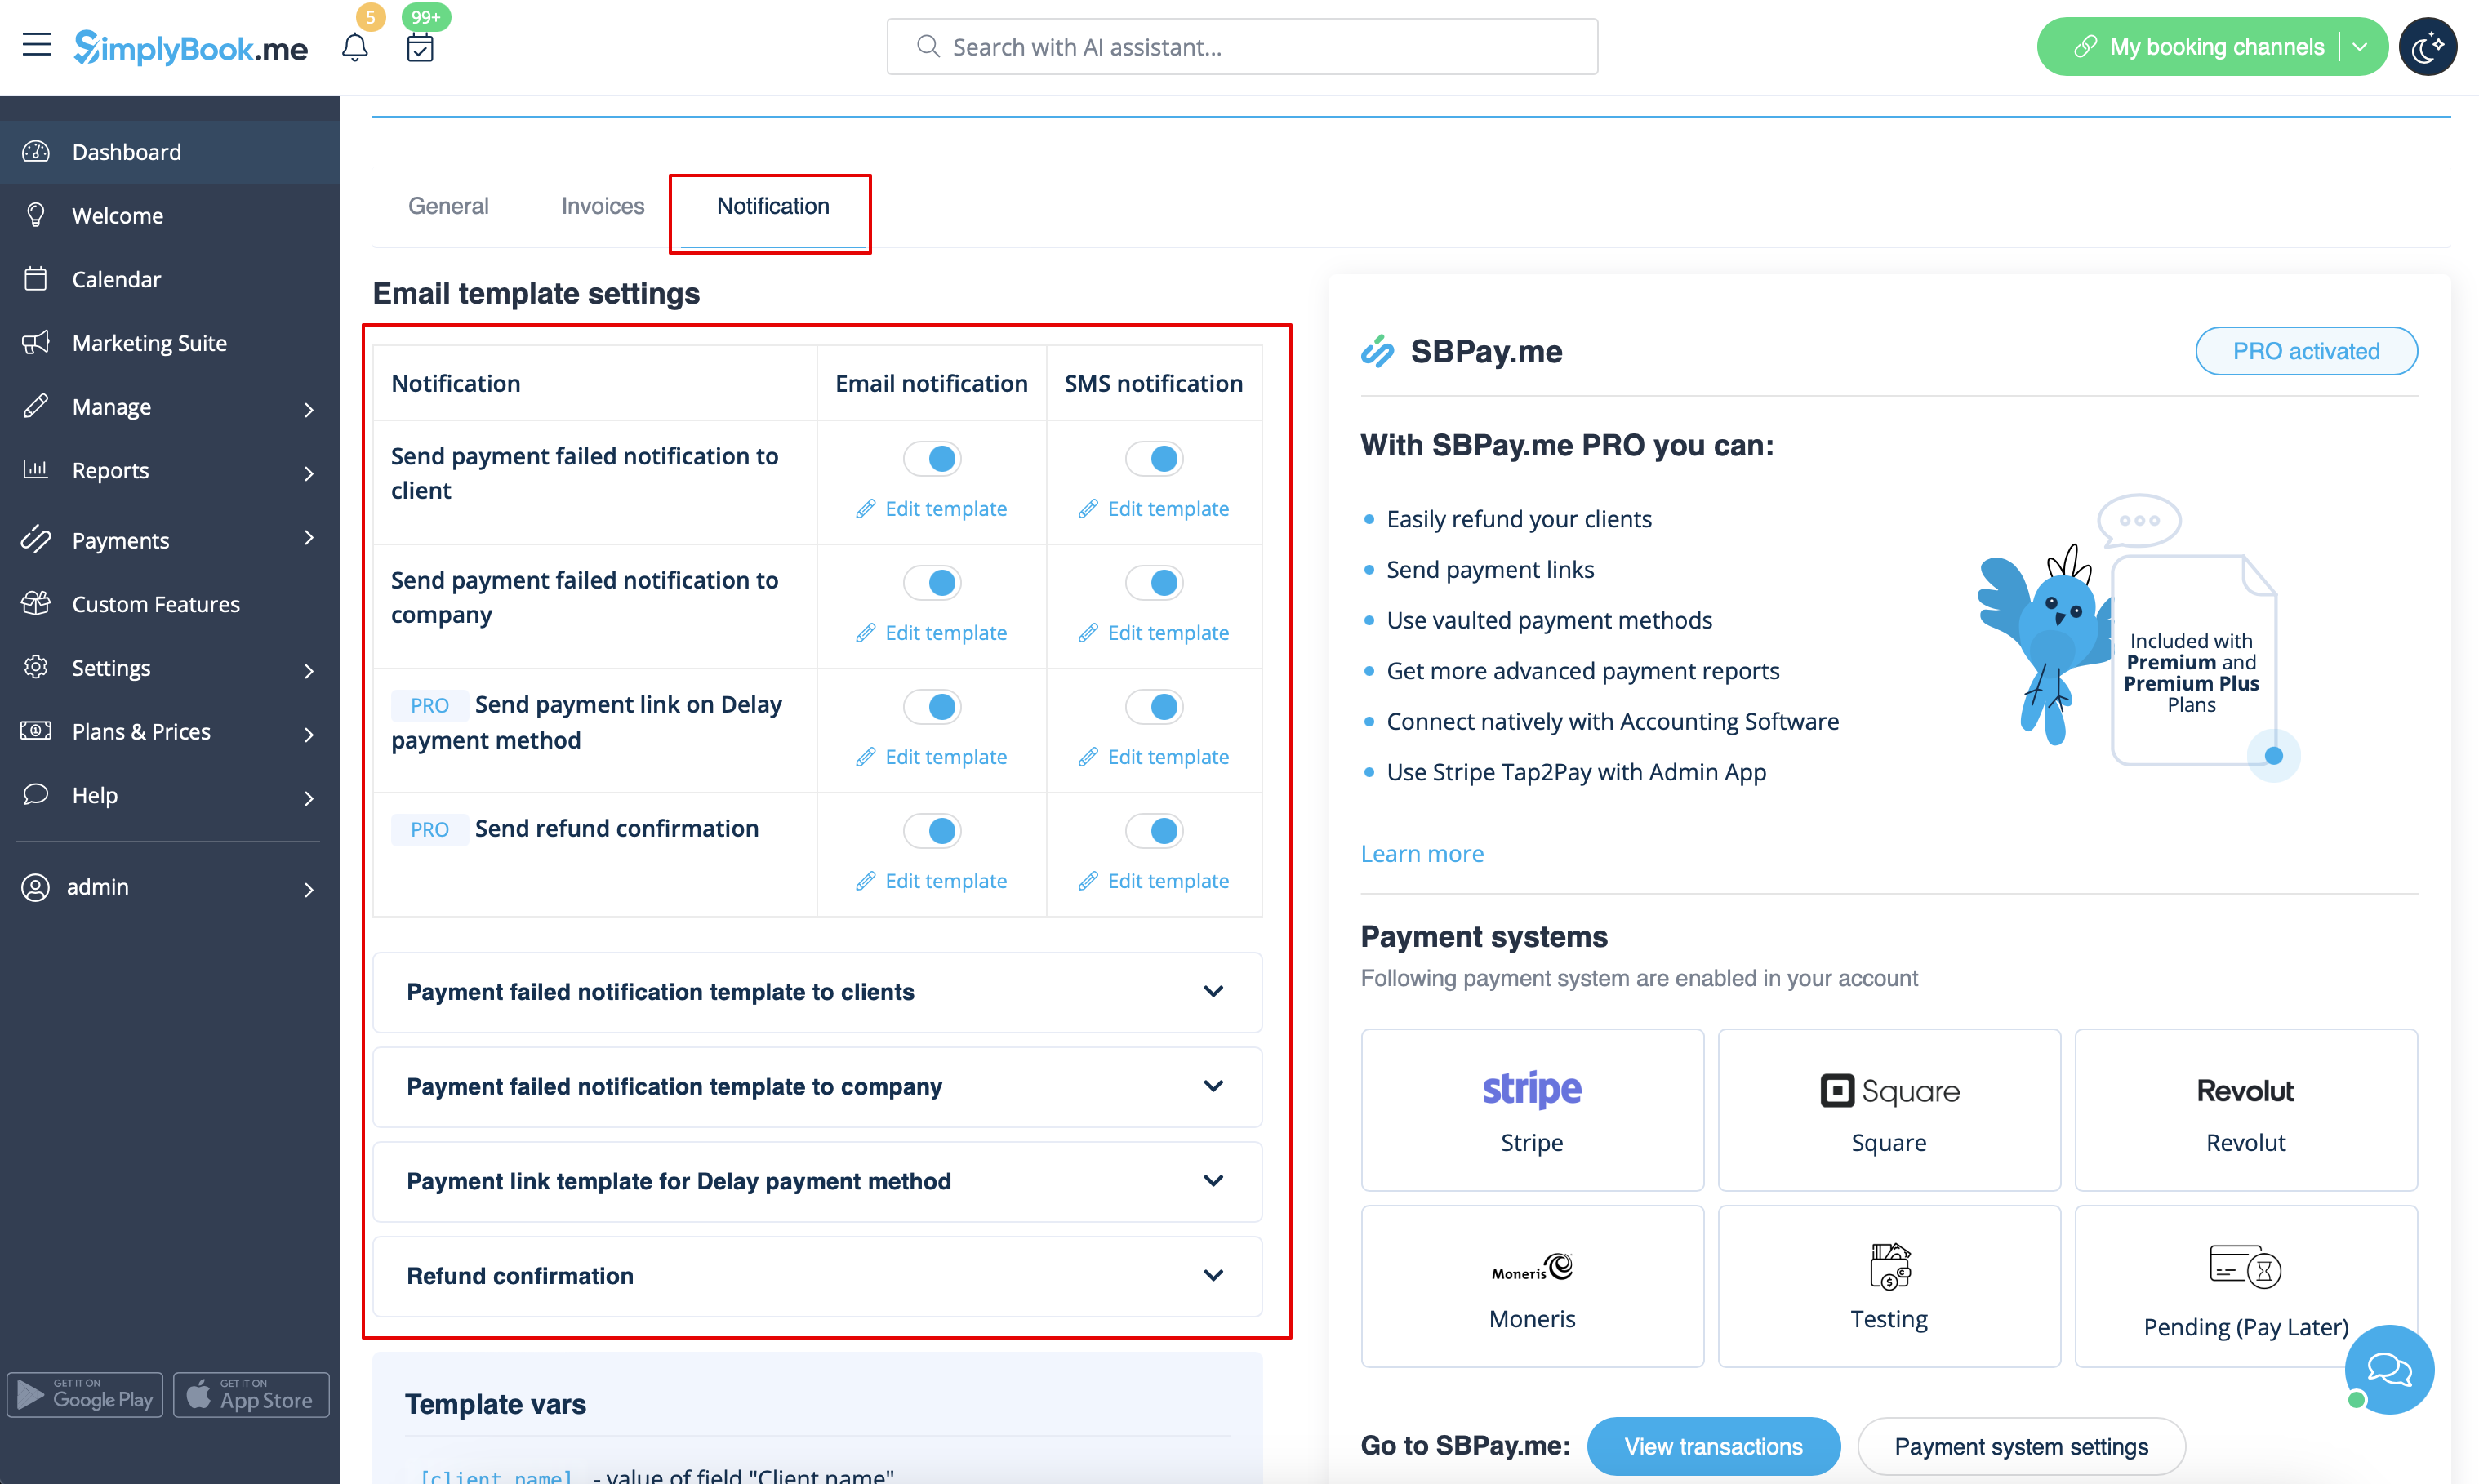
Accepter les paiements
Permet d'envoyer :
- Factures aux clients (modèle d'e-mail)
- Notifications de paiements échoués au client (modèle d'e-mail)
- Notifications de paiements échoués à l'entreprise (modèle d'e-mail)
Tous ces modèles peuvent être modifiés dans Fonctionnalités personnalisées -> Accepter les paiements -> Paramètres -> Paramètres du modèle d'e-mail.
- En savoir plus sur l'utilisation de cette fonctionnalité personnalisée.
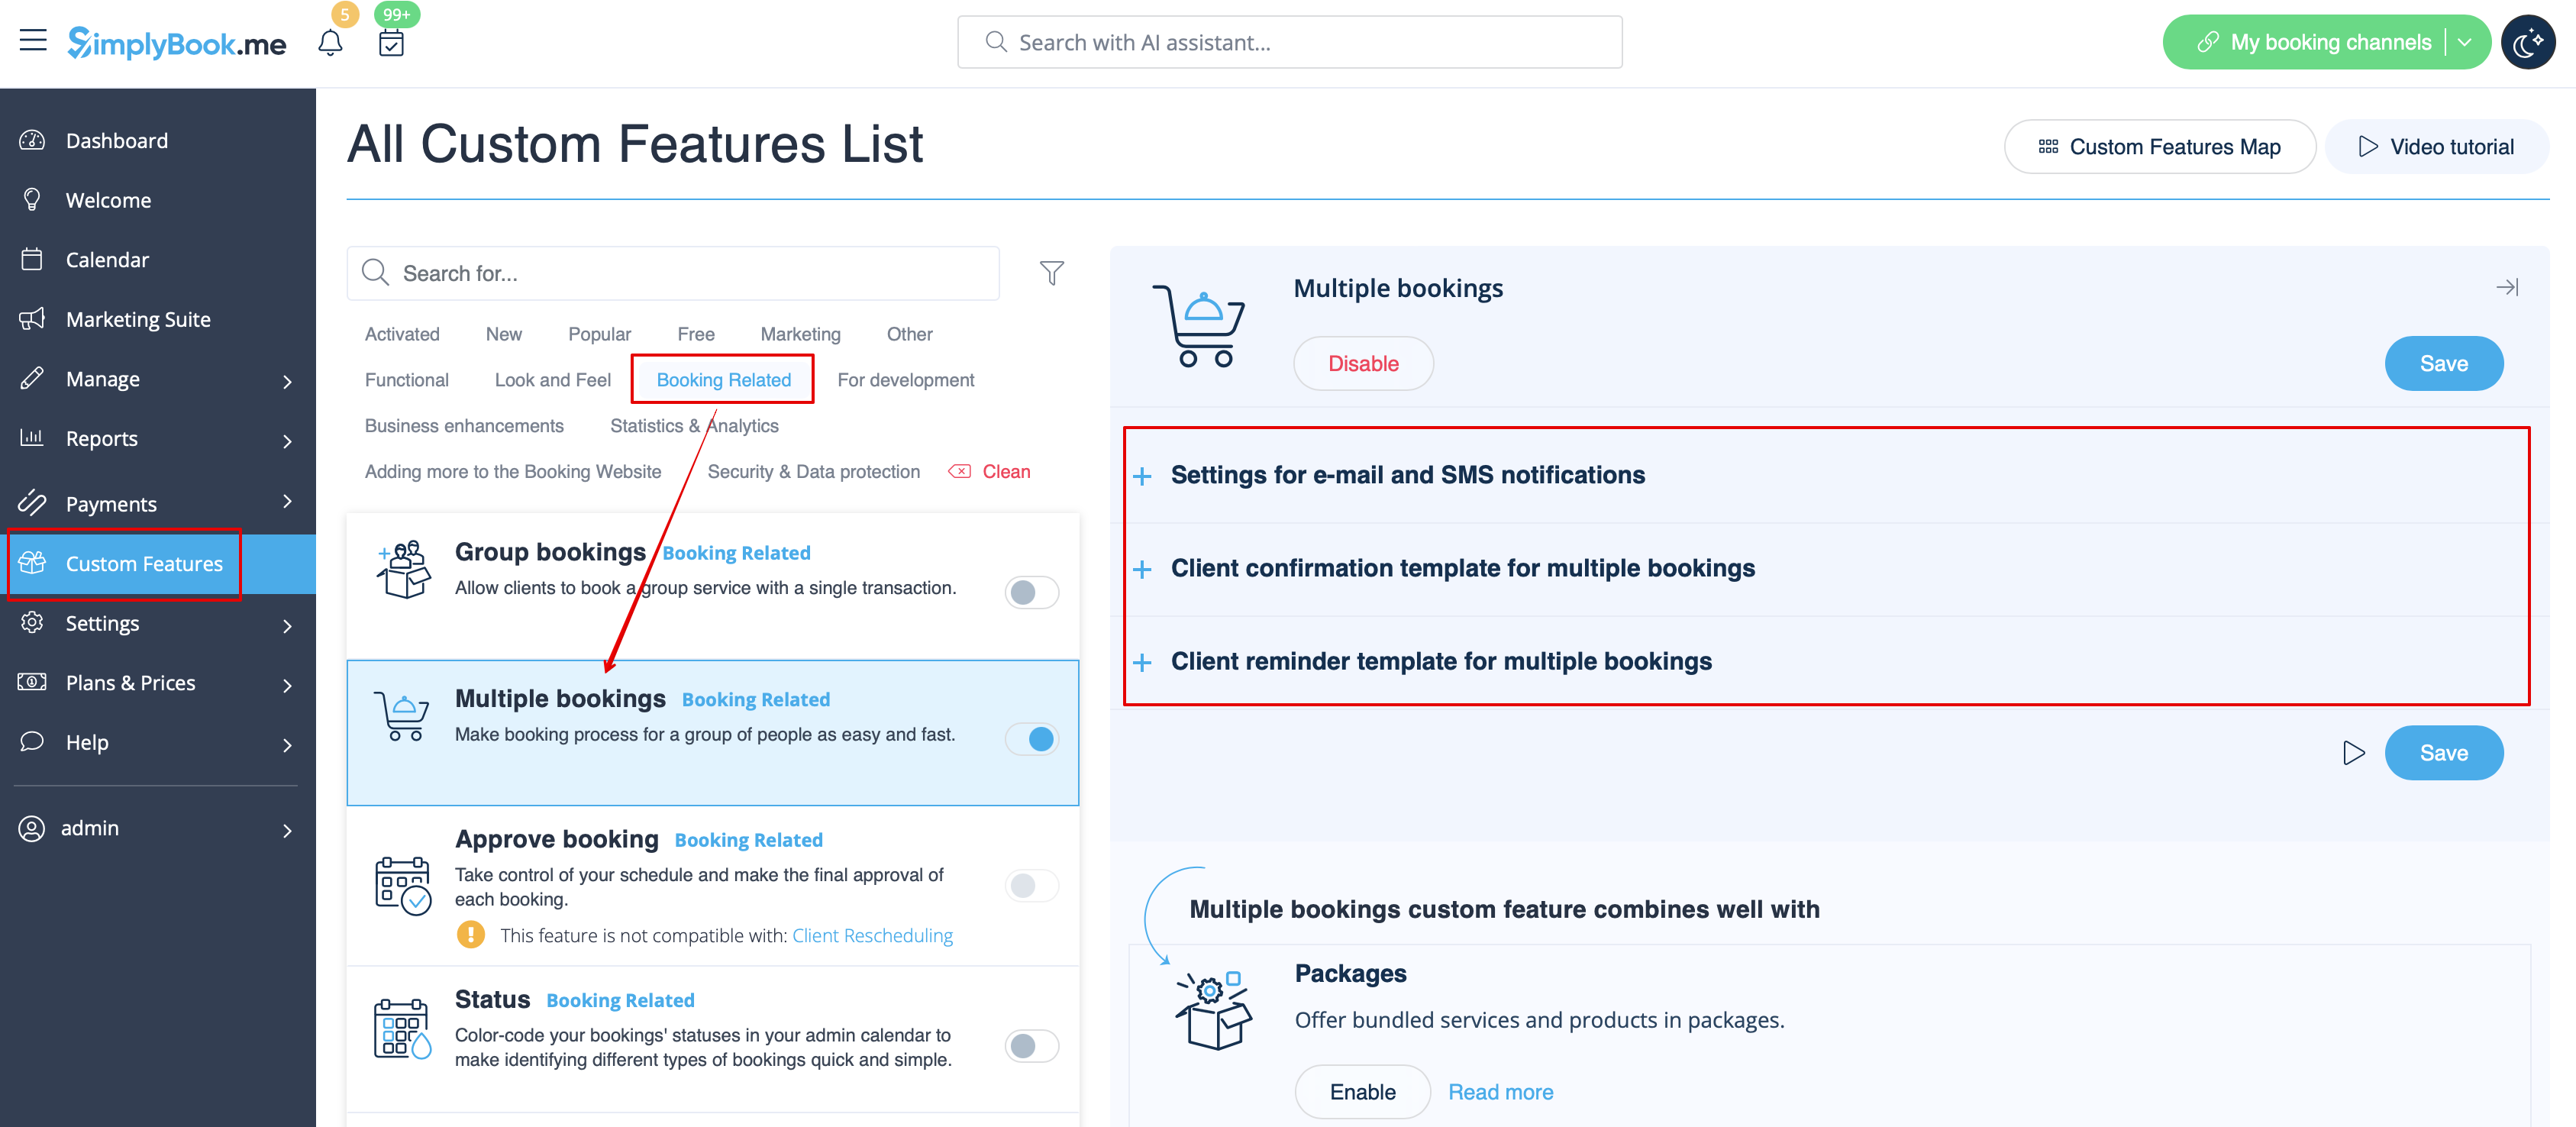
Réservations multiples
Dispose de ses propres modèles pour :
- Notification de confirmation de réservation au client (modèles d'e-mail et de SMS)
- Notification de rappel de réservation au client (modèles d'e-mail et de SMS)
Les deux types sont automatiquement appliqués lorsque cette fonctionnalité personnalisée est activée et que les clients prennent plusieurs rendez-vous à la fois à l'aide du bouton « Ajouter un autre service » lors du paiement. Les textes des modèles peuvent être modifiés dans Fonctionnalités personnalisées -> Réservations multiples -> sur le côté droit de la page.
- En savoir plus sur l'utilisation de cette fonctionnalité personnalisée.
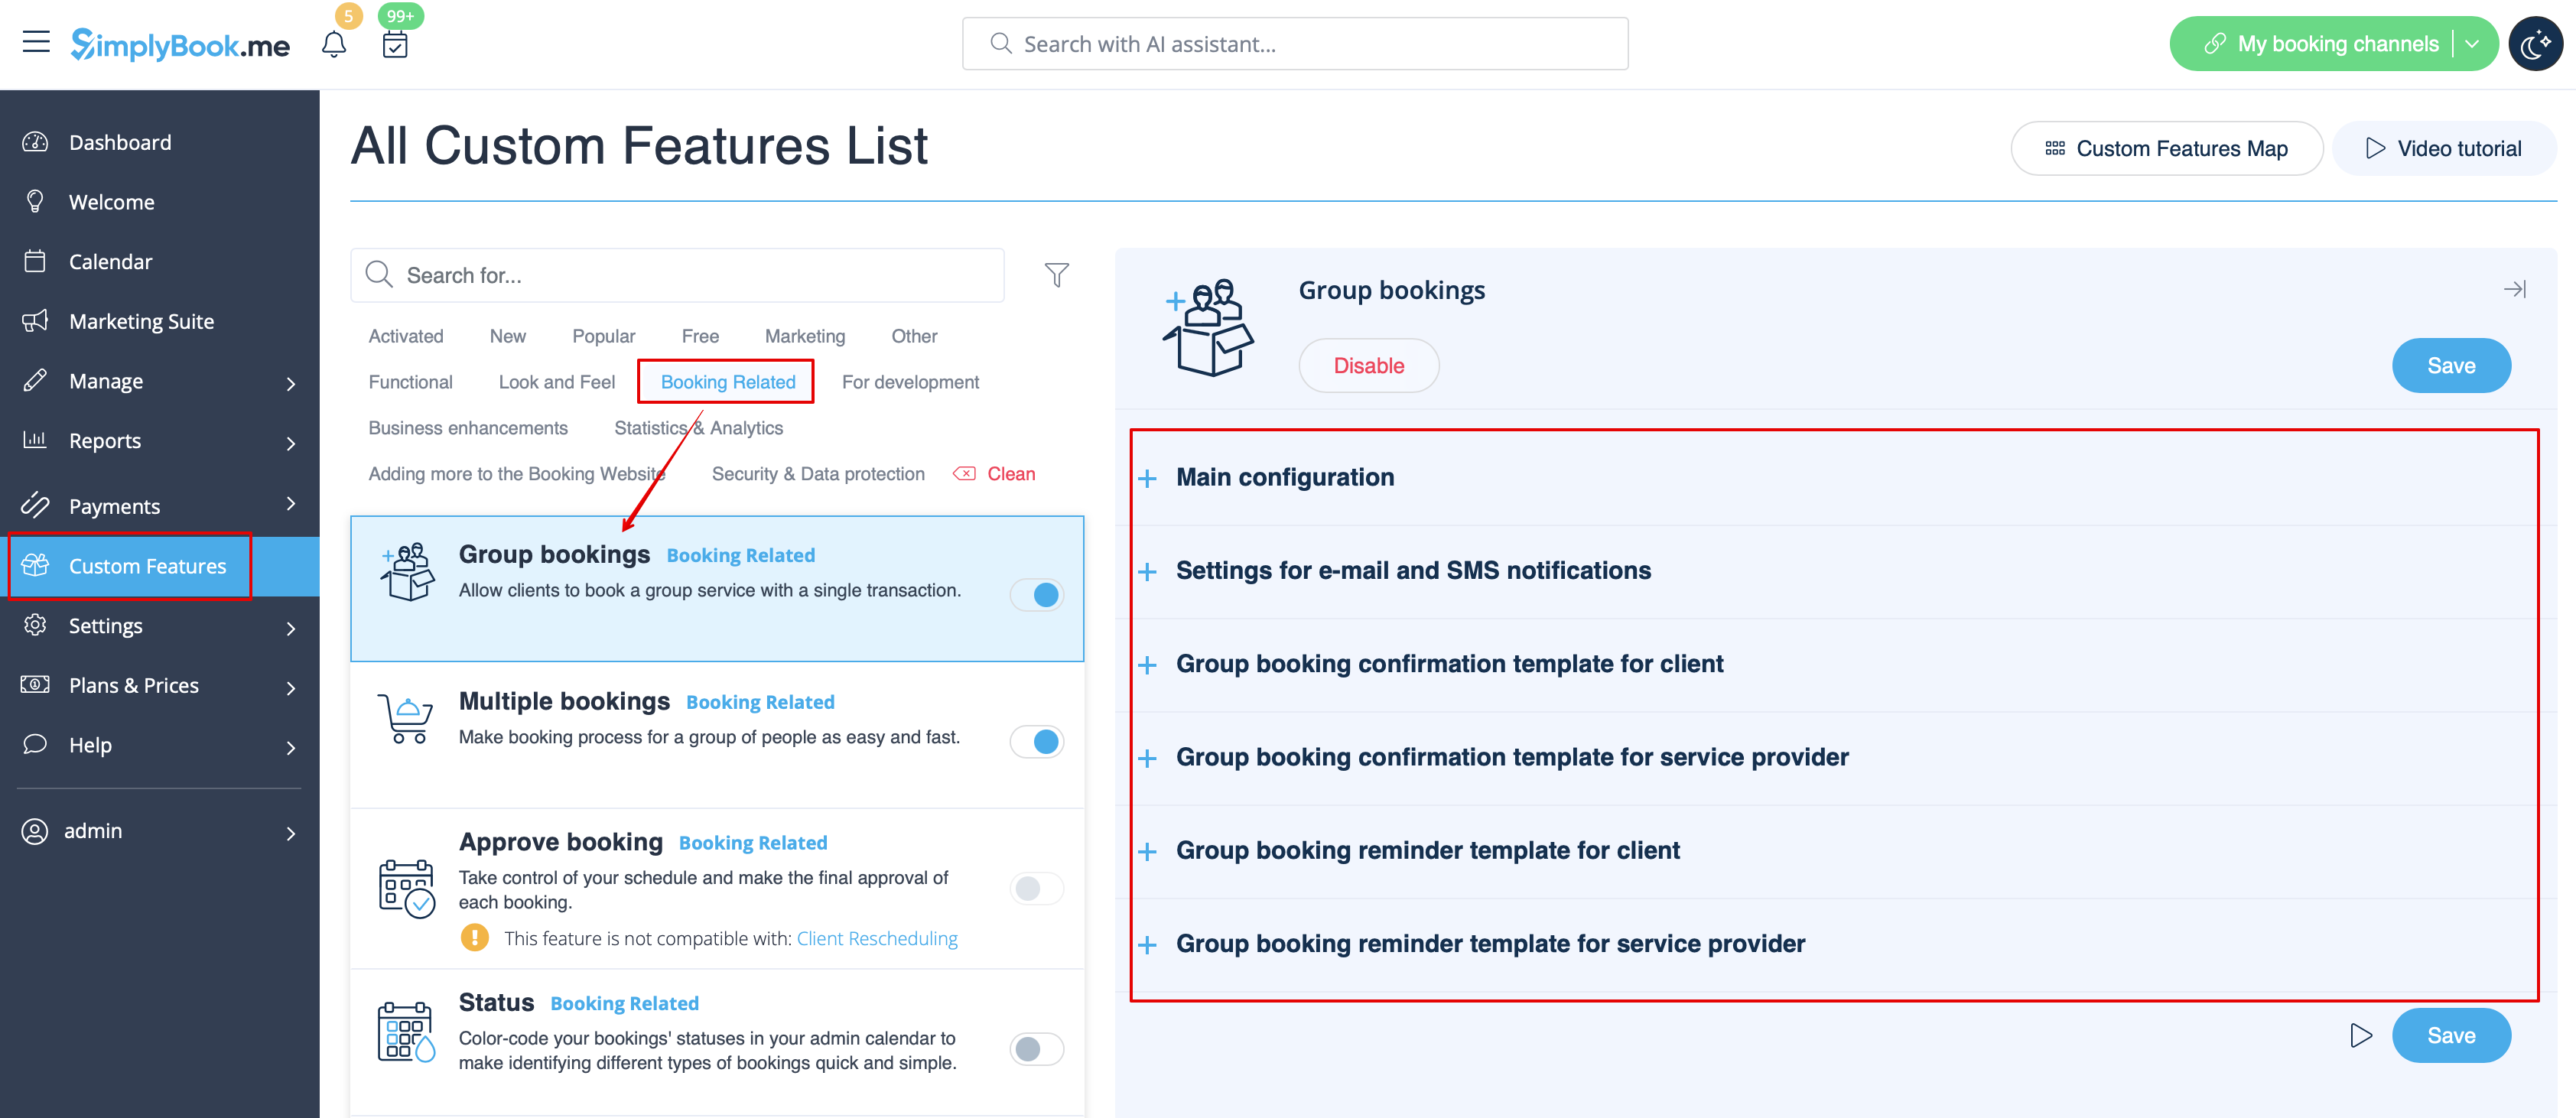
Réservations de groupe
Il existe des modèles spéciaux pour les types suivants :
- Notification de confirmation de réservation au client (modèles d'e-mail et de SMS)
- Notification de rappel de réservation au client (modèles d'e-mail et de SMS)
- Notification de confirmation de réservation au prestataire (modèles d'e-mail et de SMS)
- Notification de rappel de réservation au prestataire (modèles d'e-mail et de SMS)
Ils seront automatiquement appliqués lorsque cette fonctionnalité personnalisée est activée et que le client réserve un rendez-vous en sélectionnant plusieurs participants à l'étape du service du processus de réservation. Tous les modèles peuvent être modifiés dans Fonctionnalités personnalisées -> Réservations de groupe -> à droite de la page.
- En savoir plus sur l'utilisation de cette fonctionnalité personnalisée.
Système de notification « Réservez bientôt »
Permet d'envoyer des rappels aux clients qui ont déjà réservé afin qu'ils reviennent.
Les modèles peuvent être définis dans Fonctionnalités personnalisées -> Système de notification « Réservez rapidement » -> Paramètres -> Ajouter nouveau pour créer un nouveau modèle (e-mail et SMS).
Vous pouvez créer de nombreux modèles spécifiques pour certains services/prestataires. Ils seront envoyés lorsque le délai indiqué depuis le rendez-vous du client aura expiré.
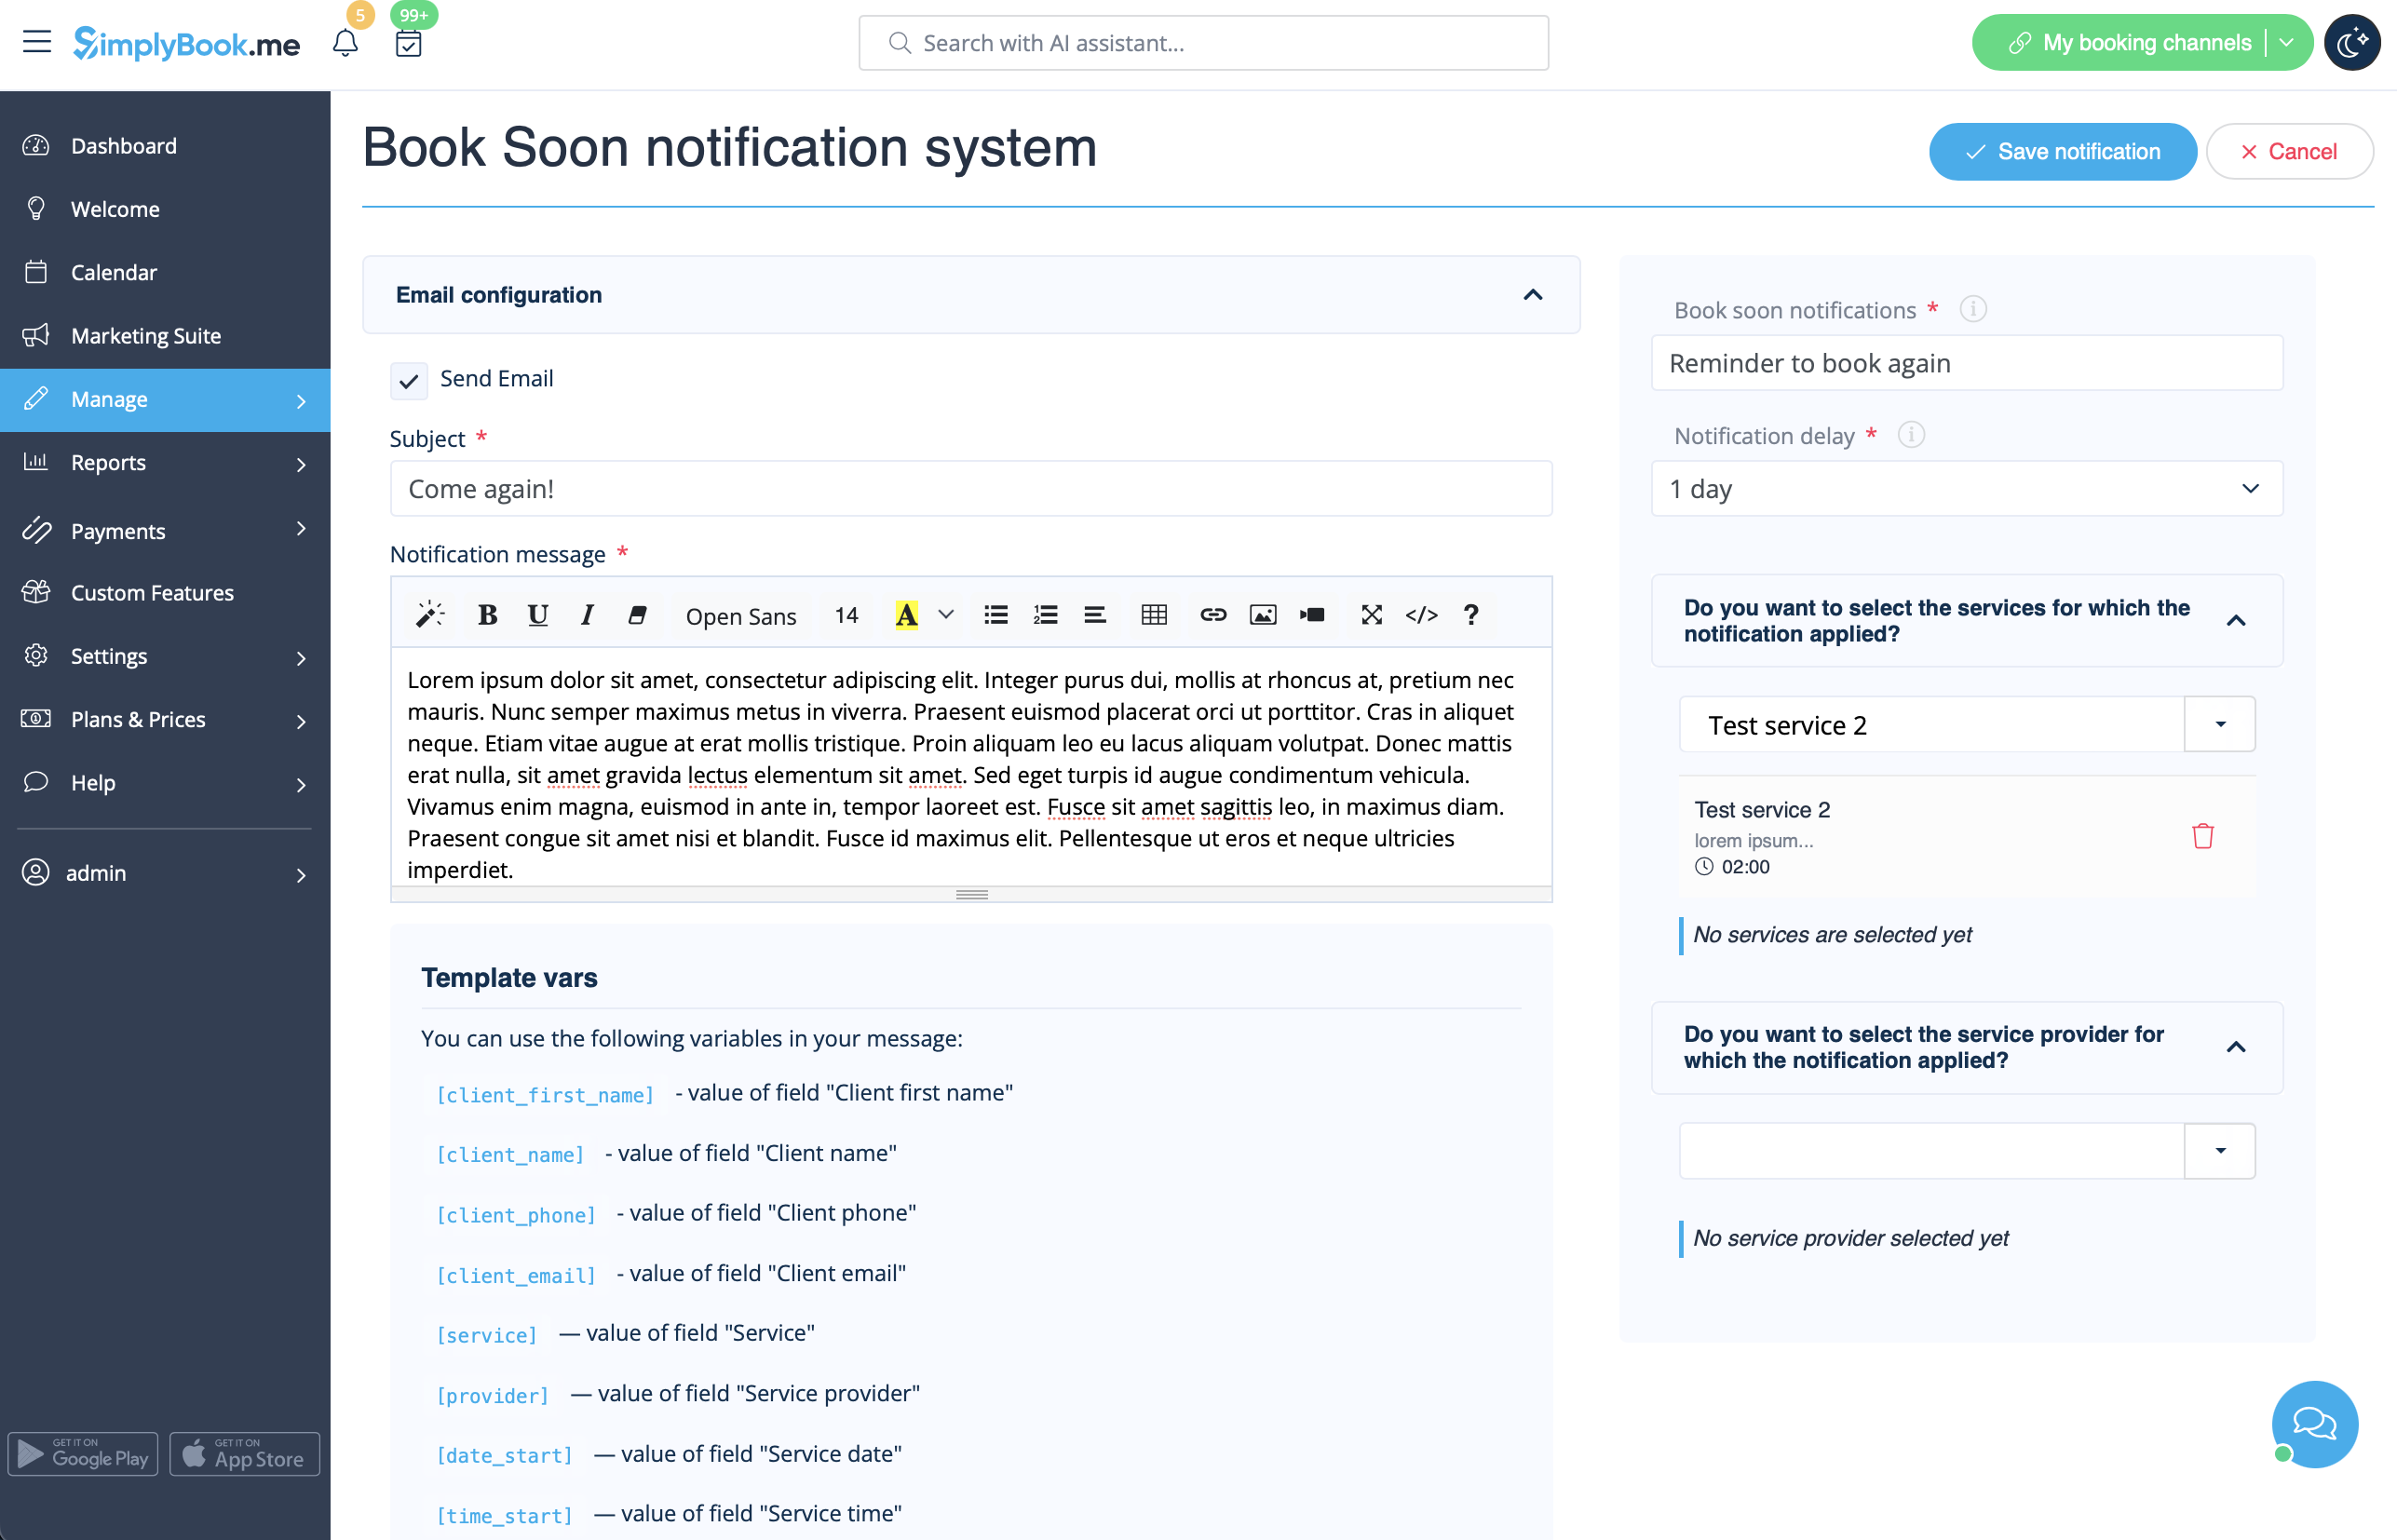
- En savoir plus sur l'utilisation de cette fonctionnalité personnalisée.
Coupons et cartes-cadeaux
Vous pouvez envoyer des notifications spécifiques dans les cas suivants lorsque vous utilisez cette fonctionnalité personnalisée :
- le client achète une carte cadeau sur le site web de réservation (modèles d'e-mails et de SMS)
Ce modèle de notification peut être activé/désactivé et modifié dans Fonctionnalités personnalisées -> Coupons et cartes cadeaux -> sur le côté droit de la page.
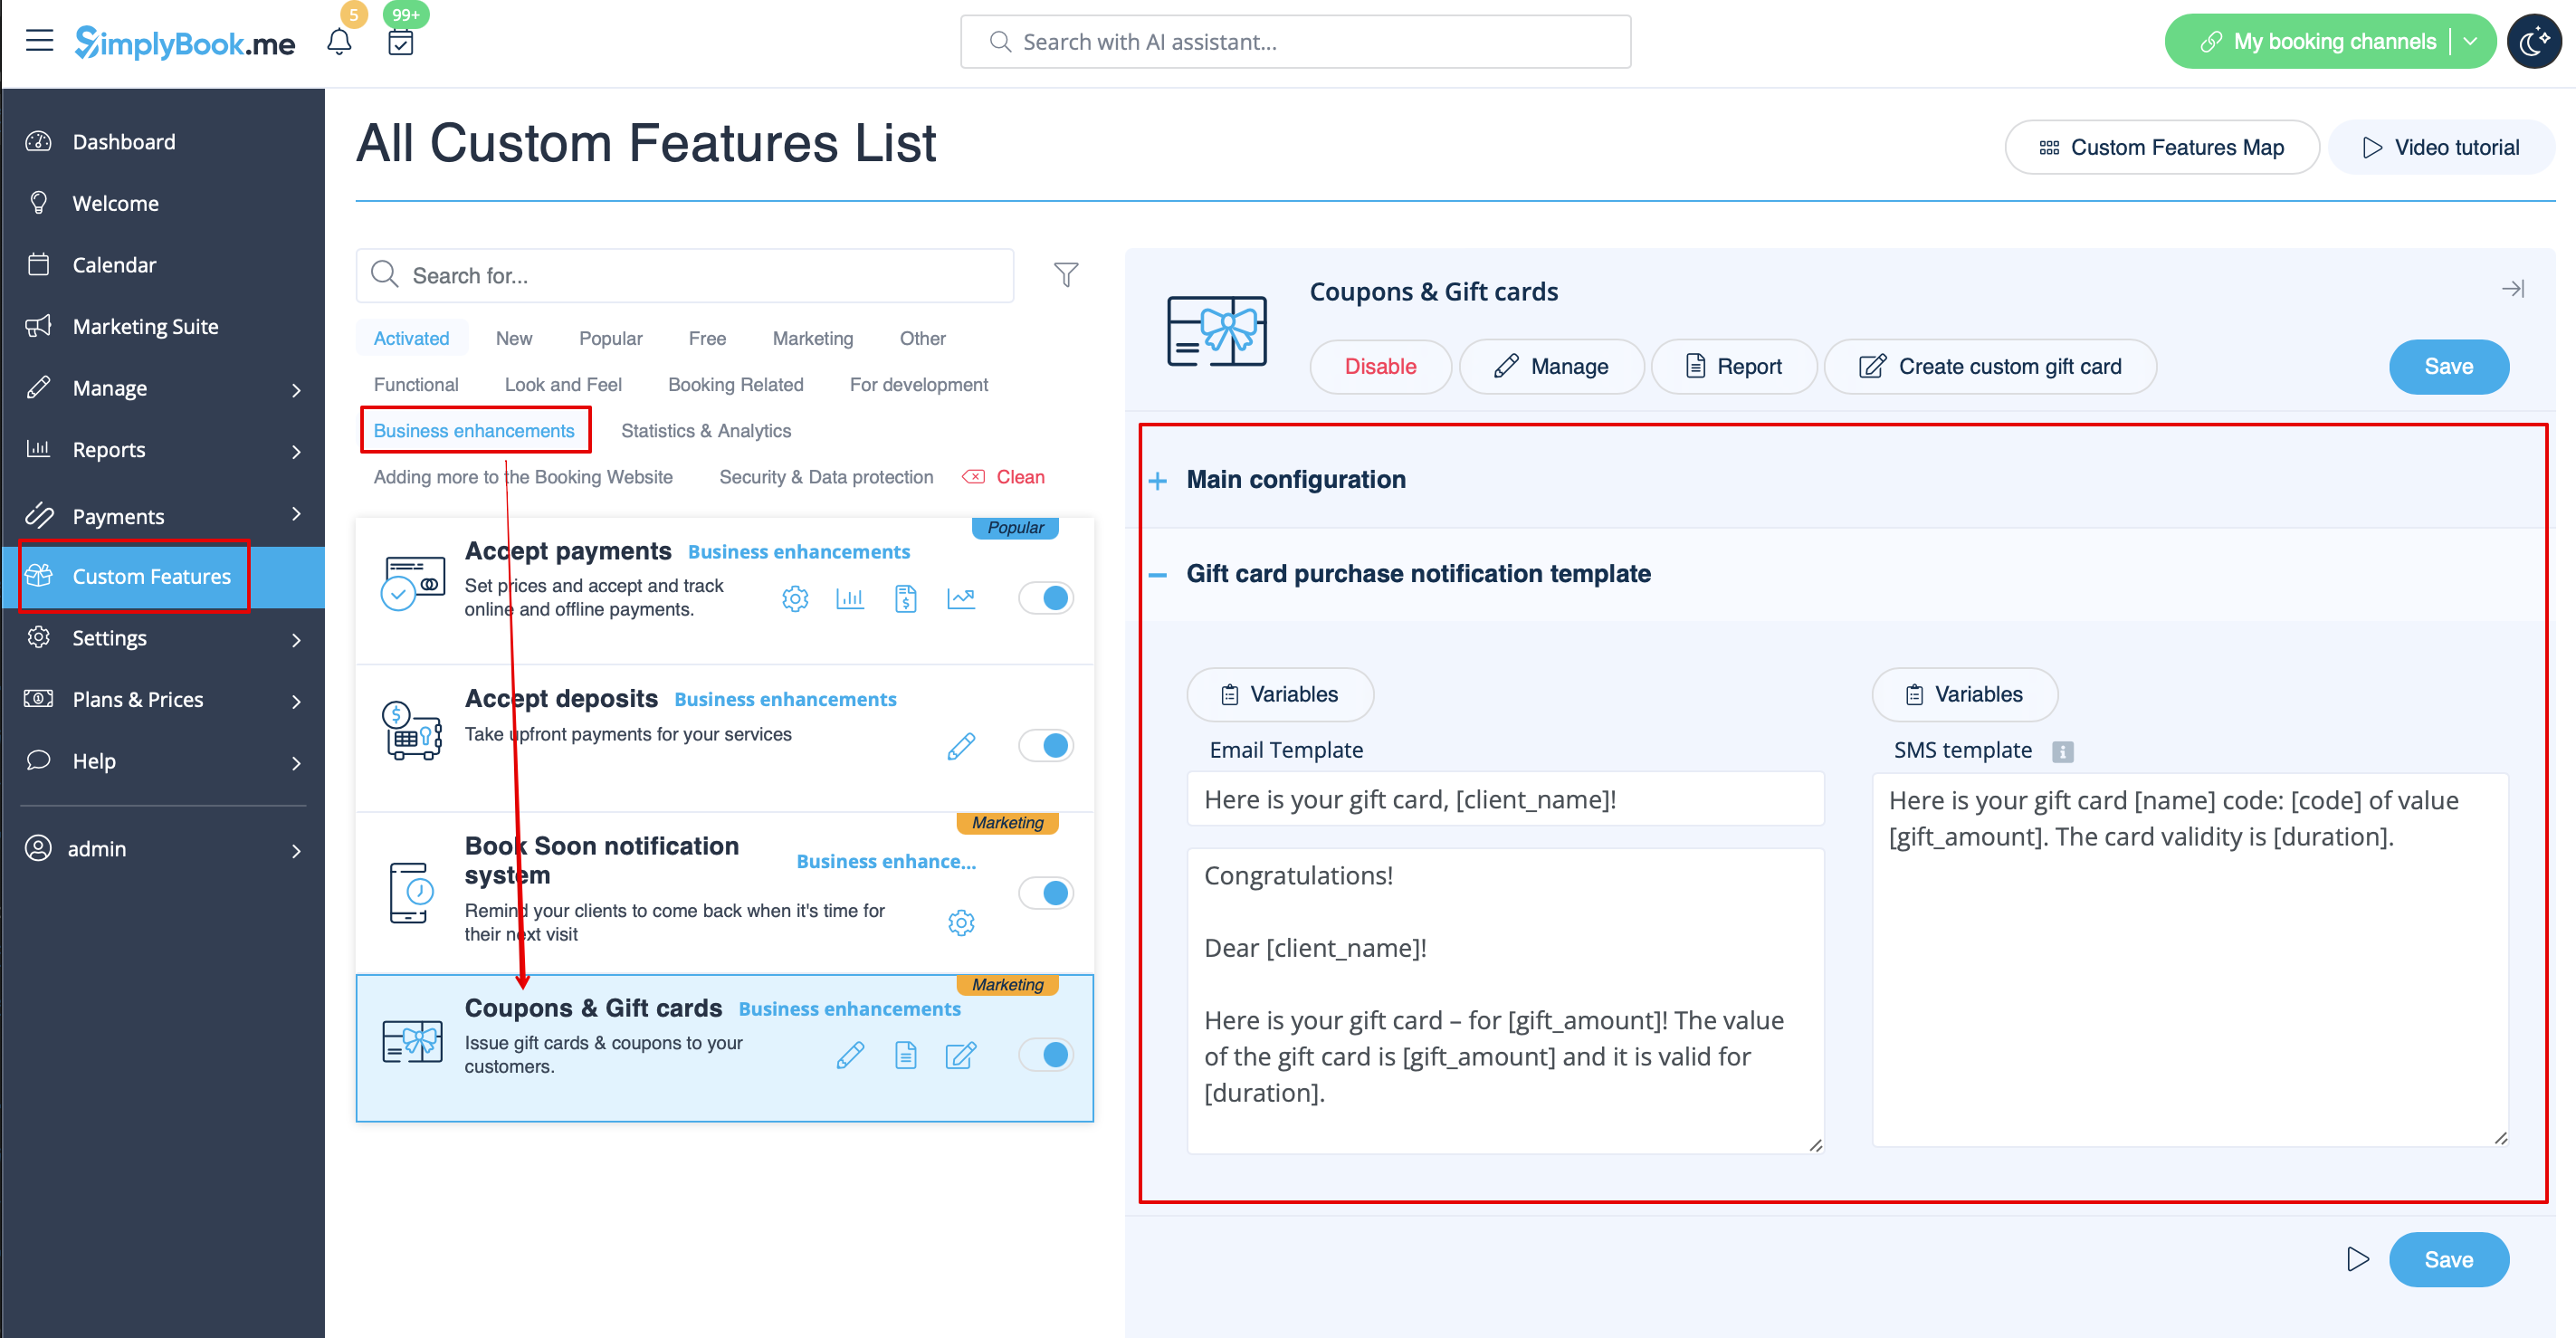
De même, si vous émettez manuellement une carte-cadeau ou un coupon à vos clients, le modèle qui sera utilisé dans ce cas est accessible dans Gérer -> Coupons et cartes-cadeaux -> Émettre la carte-cadeau / Envoyer le message du coupon pour la carte-cadeau/le coupon souhaité -> Envoyer un e-mail/Envoyer un SMS.
- En savoir plus sur l'utilisation de cette fonctionnalité personnalisée.
Application mobile client
Si cette fonctionnalité est activée et que le client a autorisé les notifications, l'application mobile enverra des notifications push liées aux réservations.
Il n'est pas possible de modifier le modèle, mais vous pouvez consulter le rapport des notifications dans Rapports -> Rapport des notifications push.
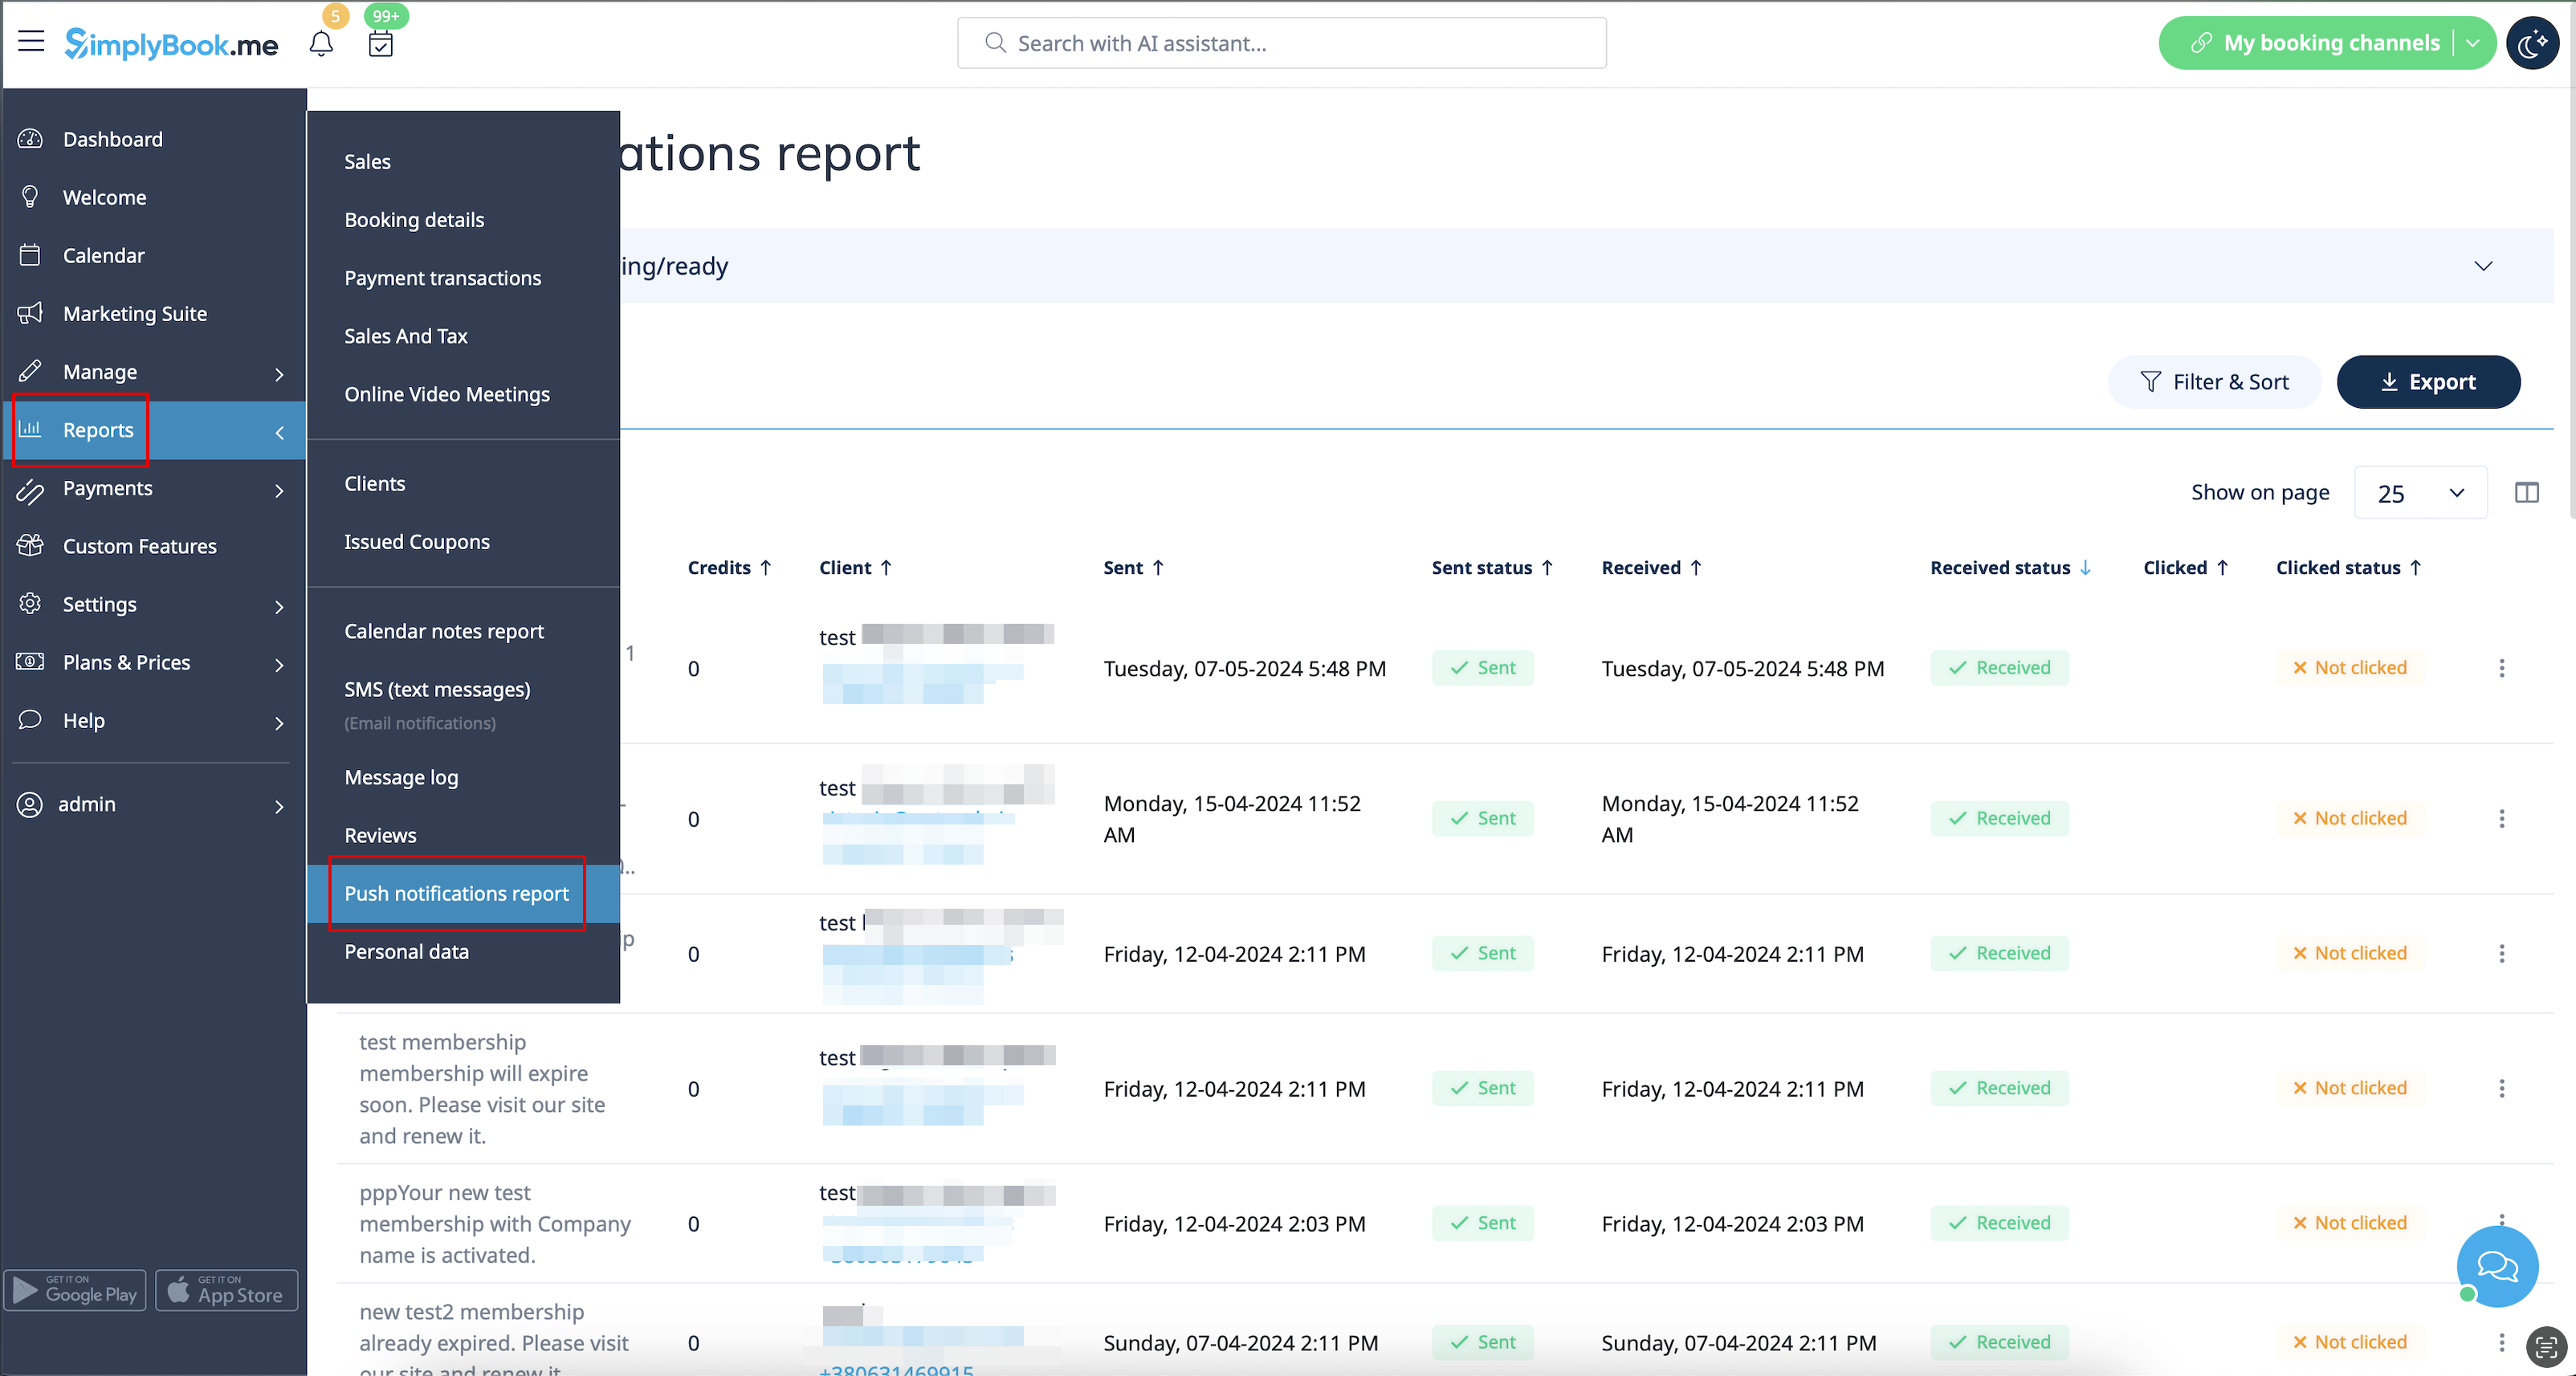
Remarque : vous devez disposer d'un nombre suffisant de crédits de notifications push pour pouvoir envoyer ces notifications aux clients.
- Pour en savoir plus sur l'utilisation de cette fonctionnalité personnalisée,consultez
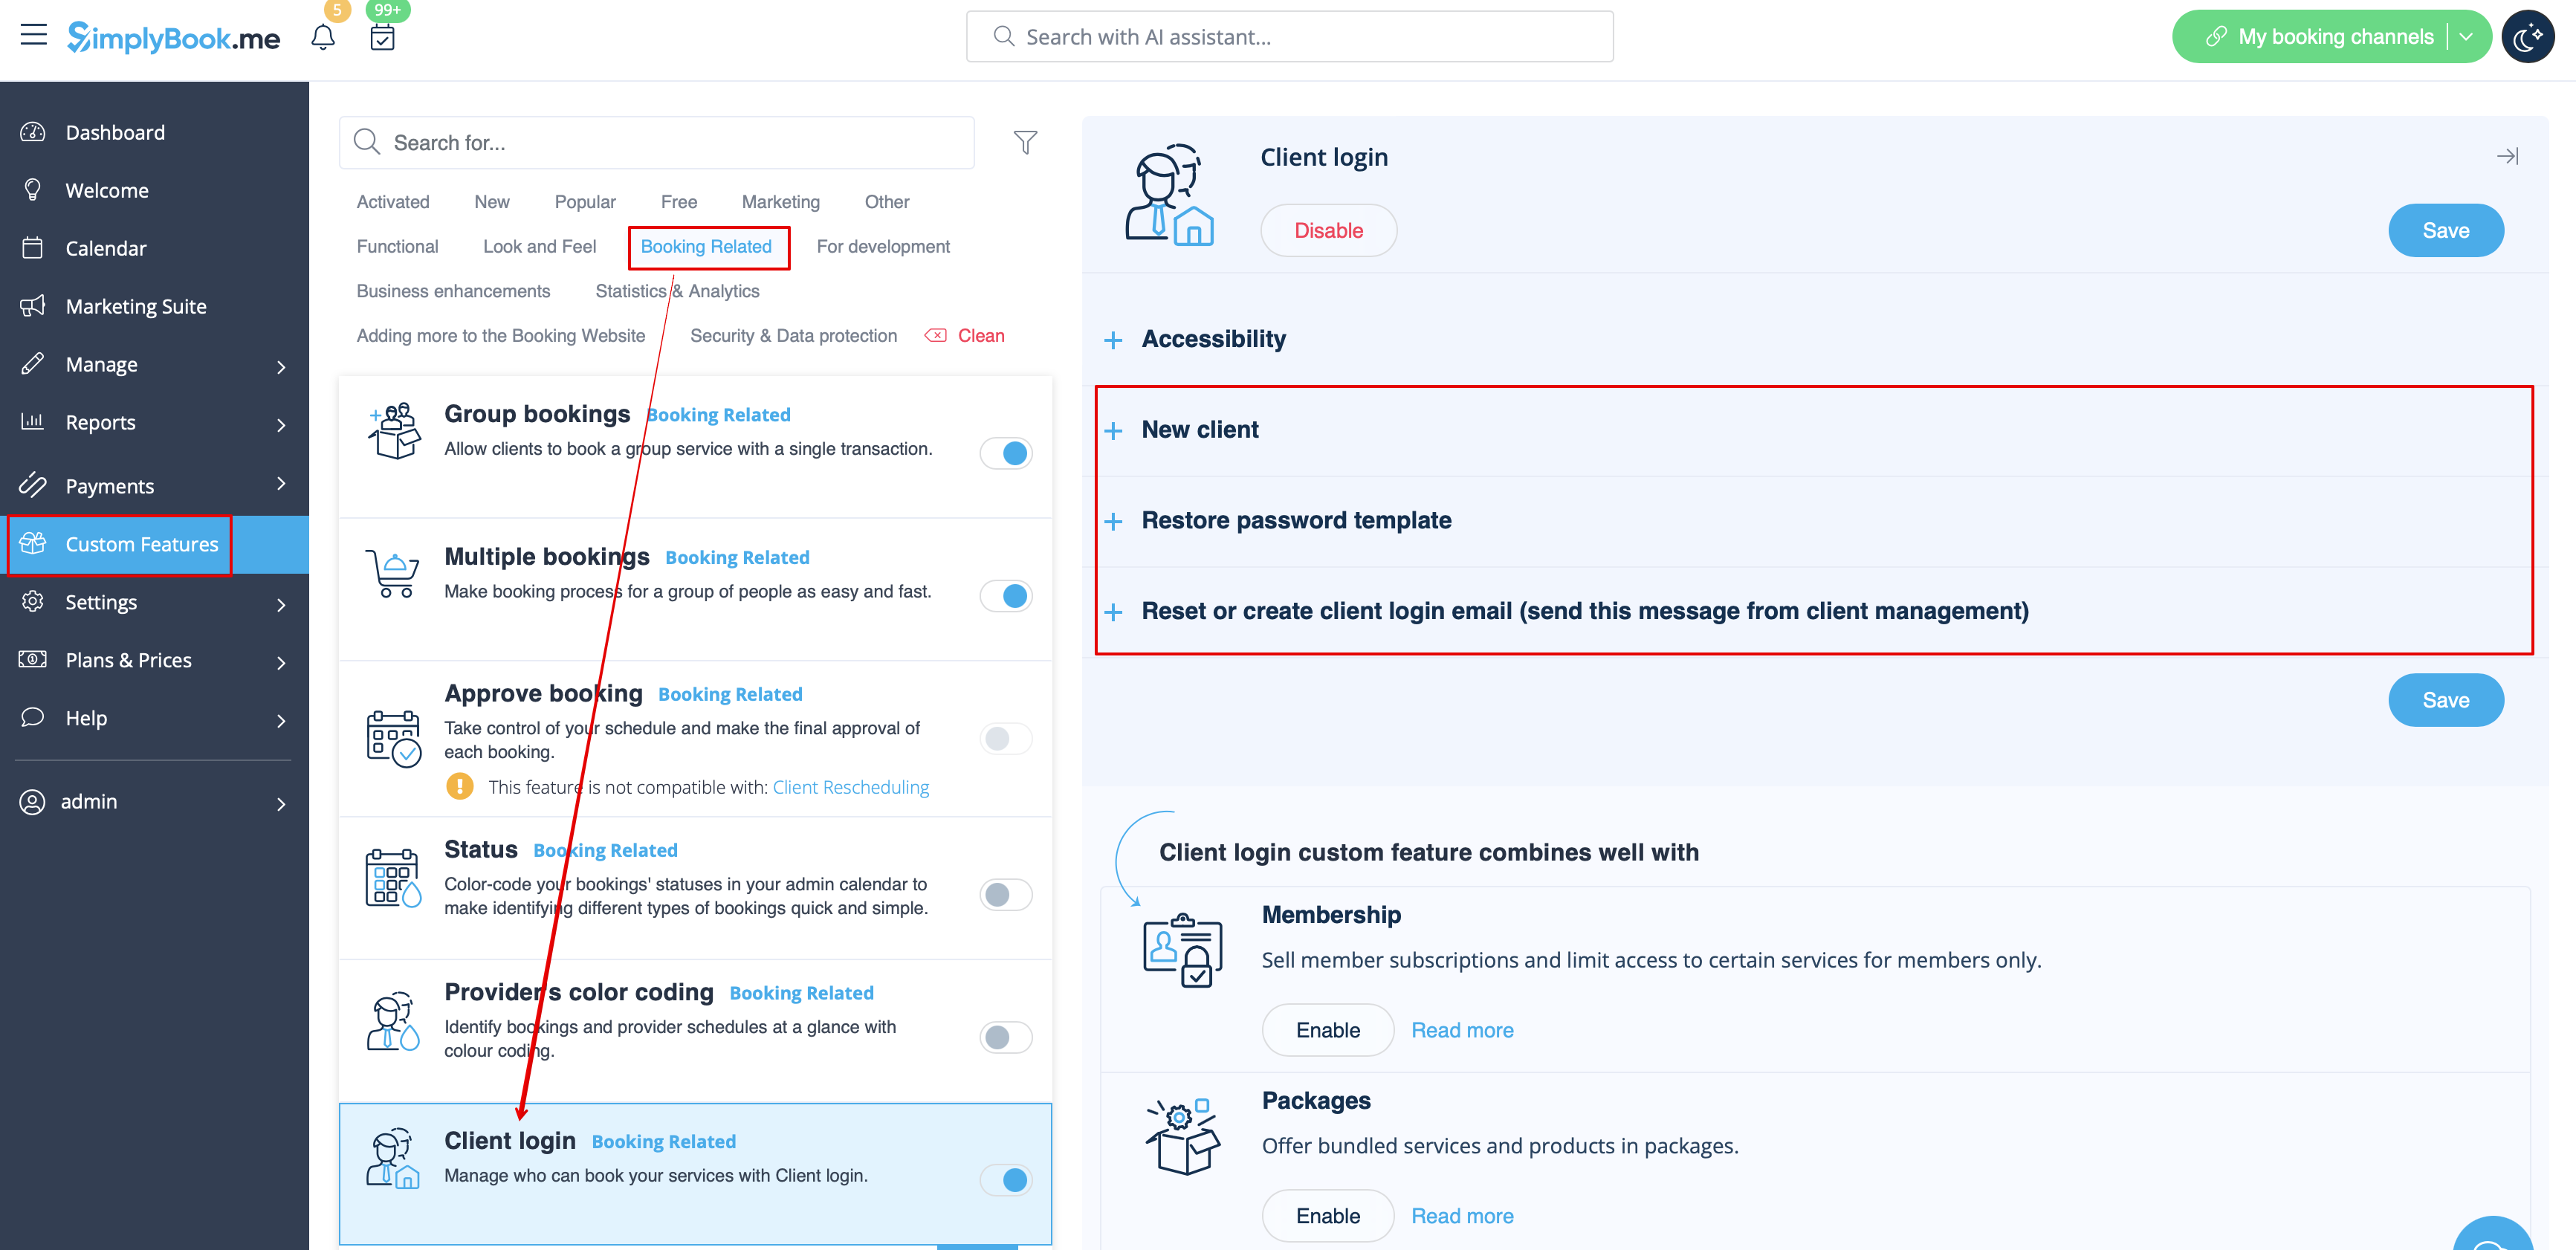
Connexion client
Si vous exigez que les clients se connectent/s'inscrivent pour pouvoir réserver des rendez-vous ou effectuer des achats sur votre site web de réservation et que vous avez activé la fonctionnalité personnalisée de connexion client,
trois types de notifications peuvent être envoyés à vos clients (elles ne peuvent pas être désactivées) :
- inscription d'un nouveau client (e-mail)
- réinitialisation du mot de passe (e-mail)
- réinitialisation du mot de passe ou création d'un client à partir de l'interface d'administration (e-mail)
Vous pouvez modifier les modèles dans Fonctionnalités personnalisées -> Connexion client -> sur le côté droit de la page.
- En savoir plus sur l'utilisation de cette fonctionnalité personnalisée.
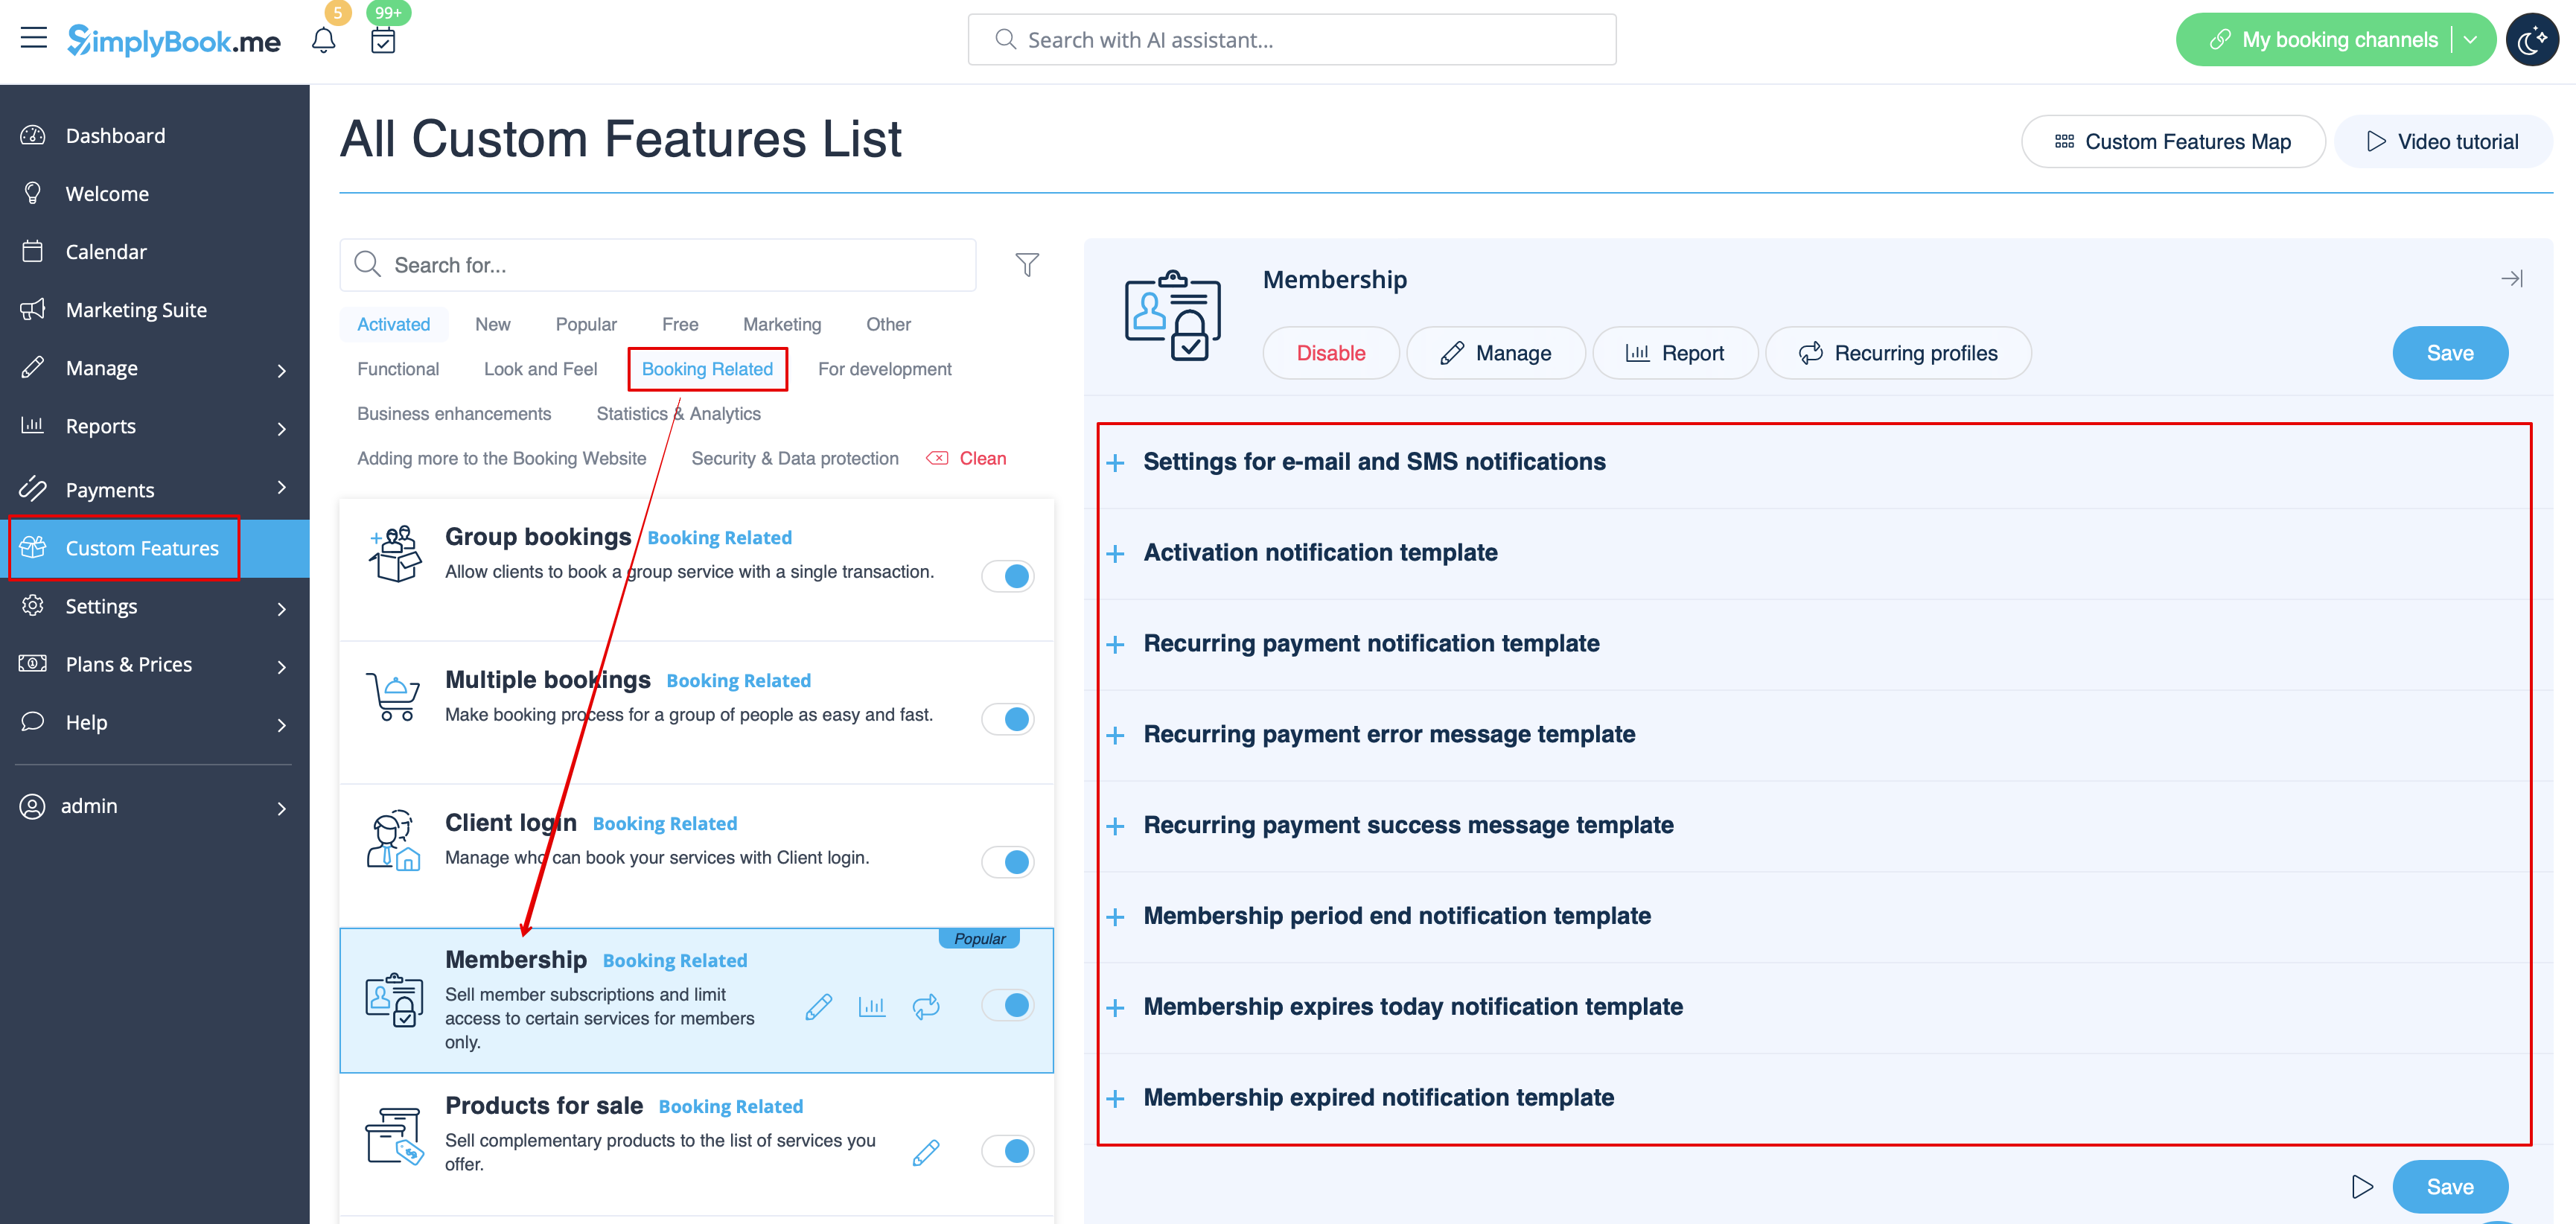
Membership
When you sell memberships on the booking website you may also need to notify your clients about the different points.
This custom feature allows to send:
- membership activation notification(Email and SMS templates)
- recurring payment notification(Email and SMS templates)
- recurring payment error(Email and SMS templates)
- recurring payment success(Email and SMS templates)
- membership period end(Email and SMS templates)
- membership expires today(Email and SMS templates)
- membership expired notification(Email and SMS templates)
You can edit the templates, as well as enable/disable certain notification types in Custom features -> Membership -> on the right side of the page.
- Read more about his custom feature use.
Flexible notifications
This custom feature allows to customize the booking related notification per certain service/provider or both.
The following types can be used:
- booking confirmation to client(Email and SMS templates)
- booking confirmation to provider(Email and SMS templates)
- reminder to client(Email and SMS templates)
- reminder to provider(Email and SMS templates)
- cancellation notification to client(Email and SMS templates)
- cancellation notification for provider(Email and SMS templates)
- booking change notification to client(Email and SMS templates)
- booking change notification to provider(Email and SMS templates)
- recurring event confirmation to client(Email and SMS templates)
- recurring event confirmation to provider(Email and SMS templates)
- batch cancellation notification to client(Email and SMS templates)
- batch cancellation notification to provider(Email and SMS templates)
- multiple bookings batch booking confirmation to client(Email and SMS templates)
- multiple bookings event reminder to client(Email and SMS templates)
- group bookings batch booking confirmation to client(Email and SMS templates)
- group bookings batch booking confirmation to provider(Email and SMS templates)
- group bookings reminder to client(Email and SMS templates)
- group bookings reminder to provider(Email and SMS templates)
You can create all the desired templates in Custom features -> Flexible notifications -> Manage.
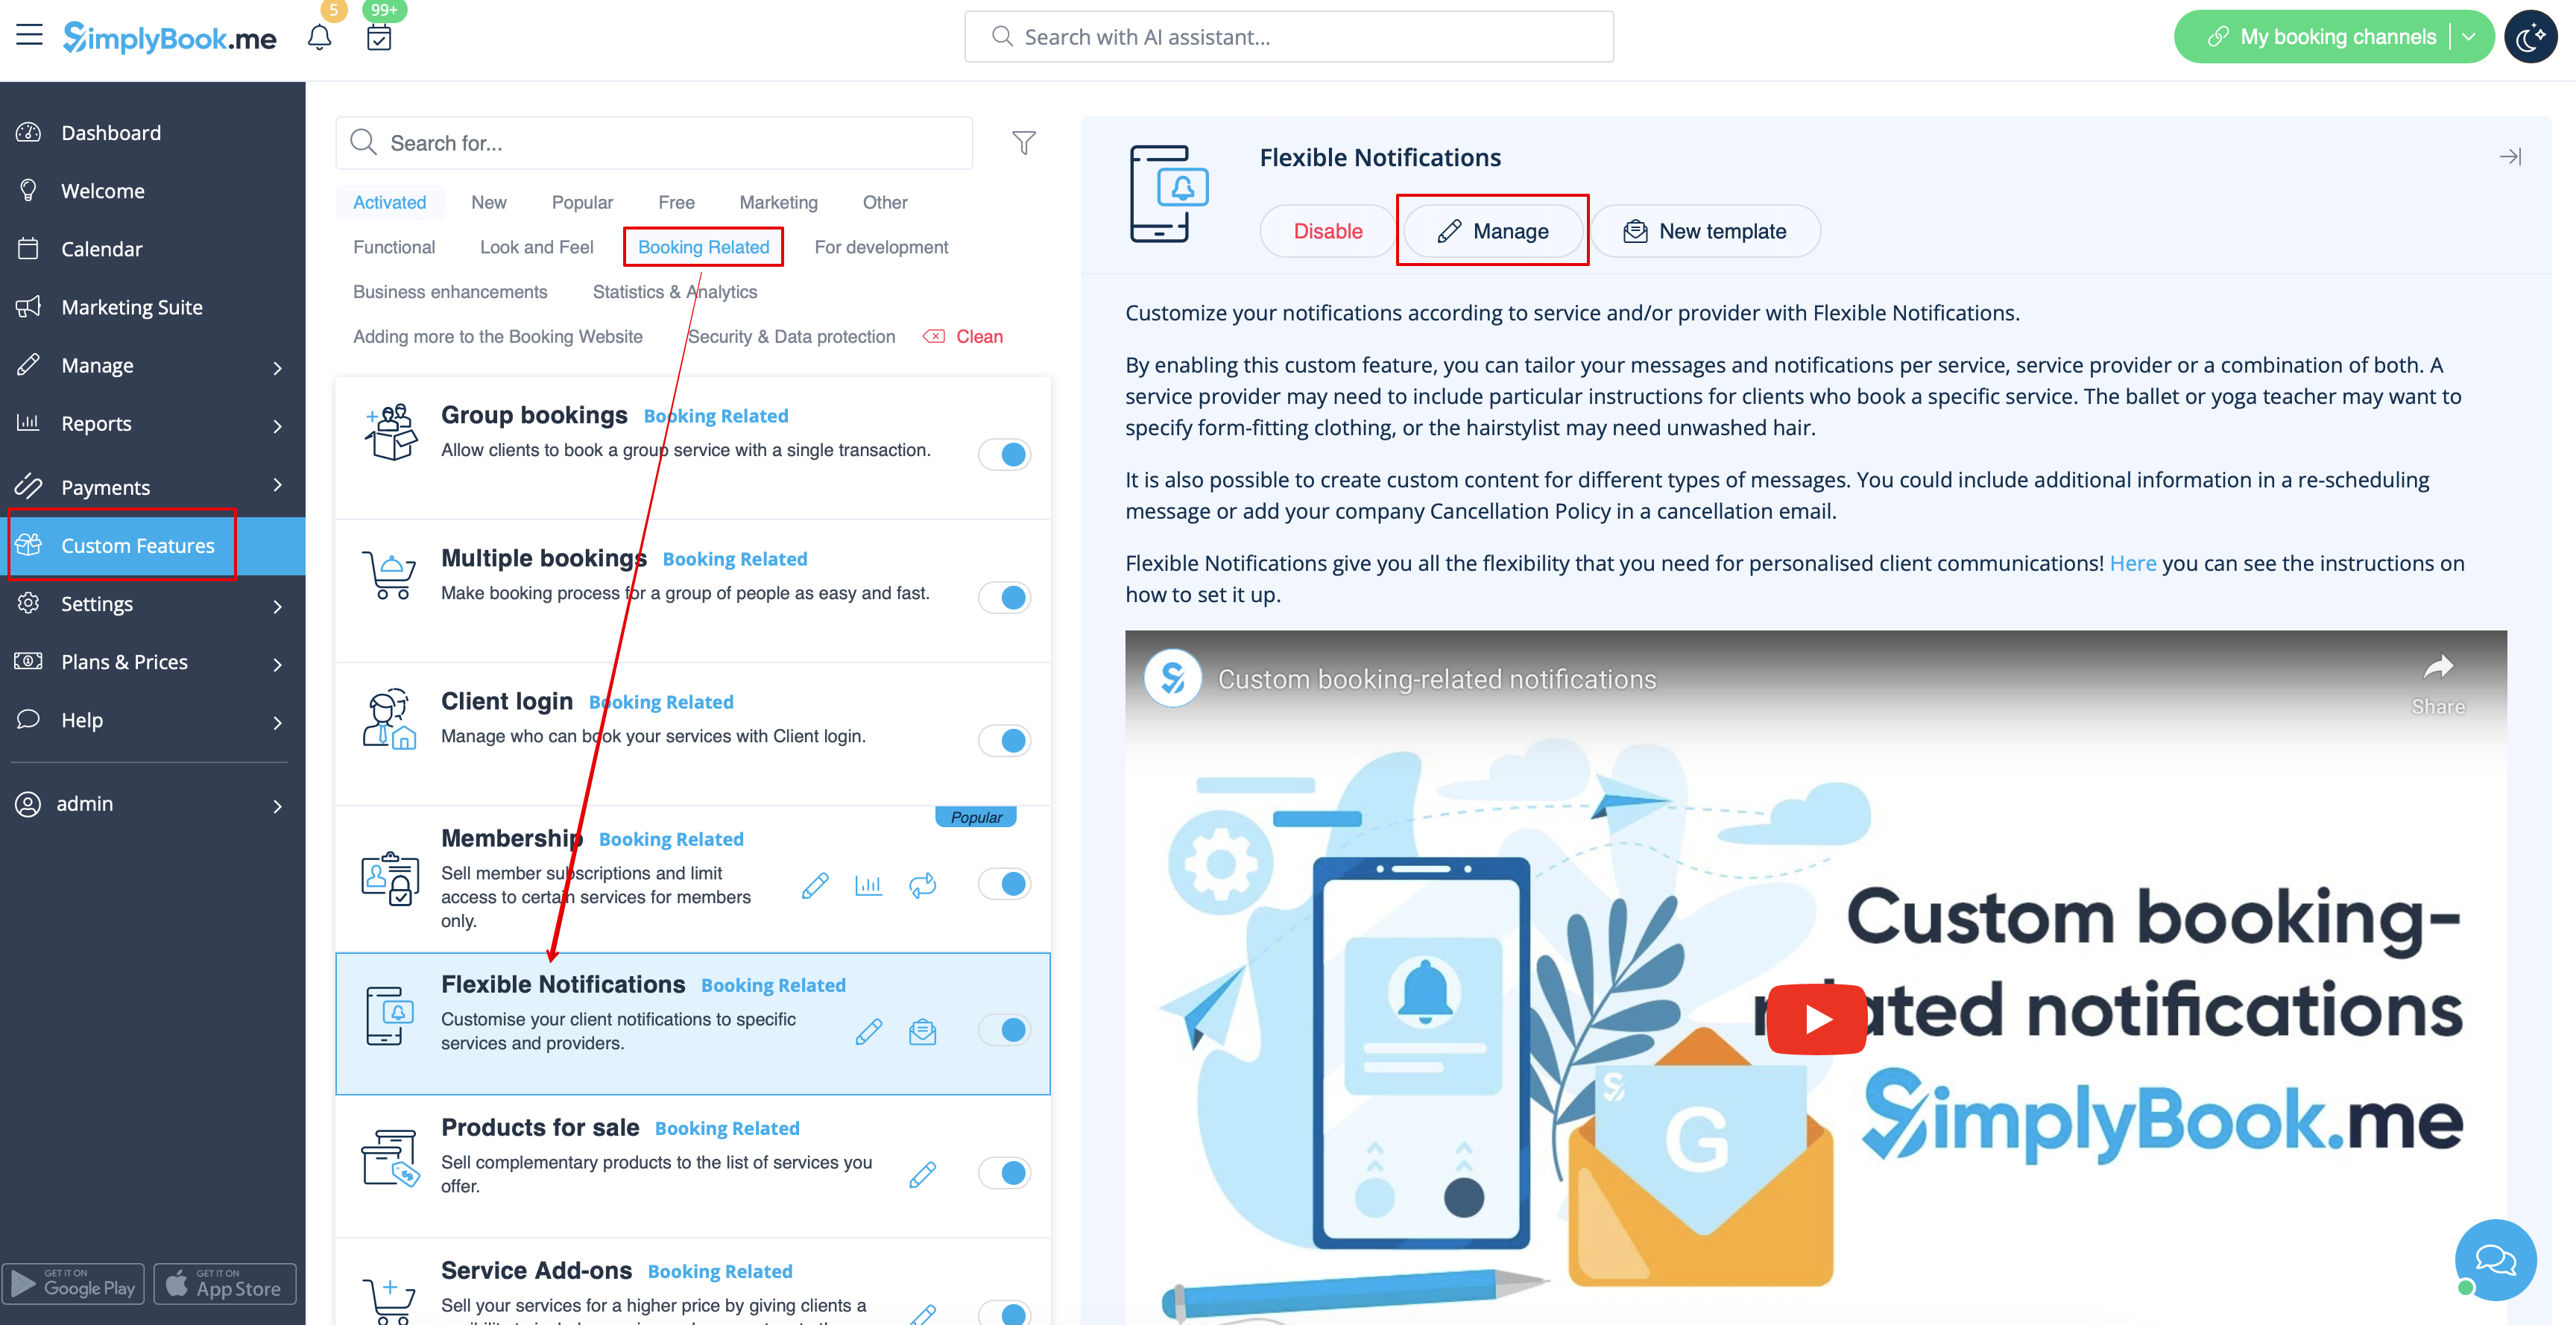
In case you need to enable/disable some of these notification types please navigate to Settings -> Email and SMS settings -> and use the table at the top of the page.
Please note! These are general booking notifications settings so if you turn some of them off it will also influence similar types related to other features(i.e. if you disable booking confirmations to providers there then common confirmations, as well as group, recurring batches confirmation notifications will become off)
- Read more about his custom feature use.
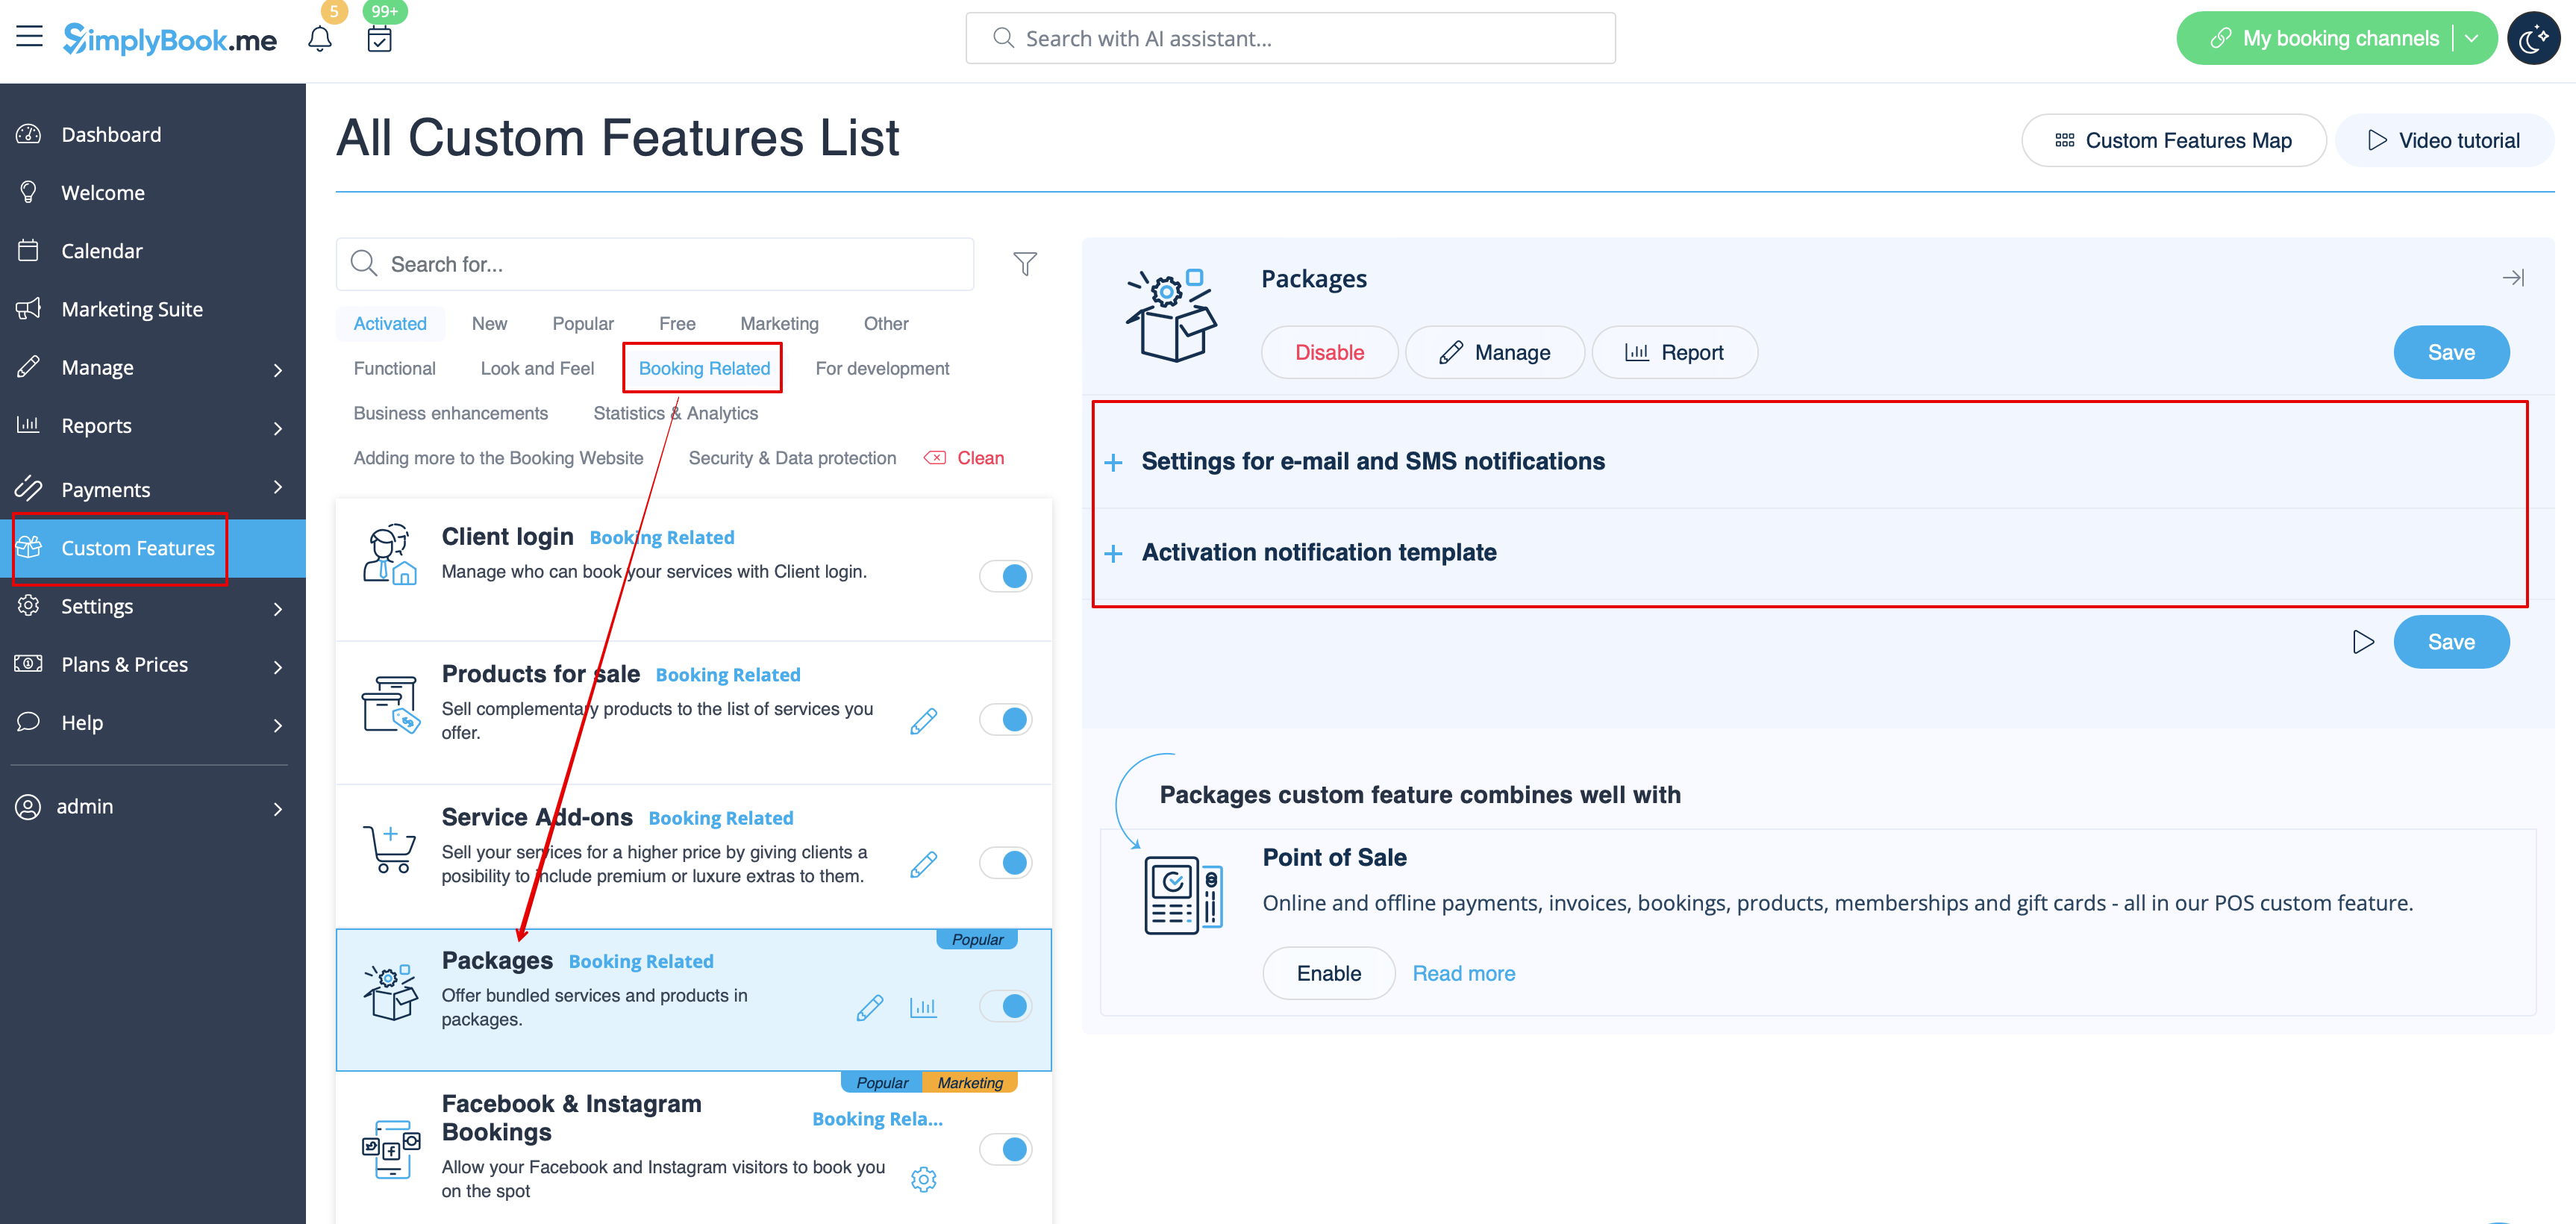
Packages
When you sell the packages of services/classes/products/service add-ons or issue the packages from admin side it is also possible to automatically send the clients the package activation notification(Email and/or SMS).
To edit the template text or enable/disable the notifications please navigate to Custom features -> Packages -> right side of the page.
- Read more about his custom feature use.
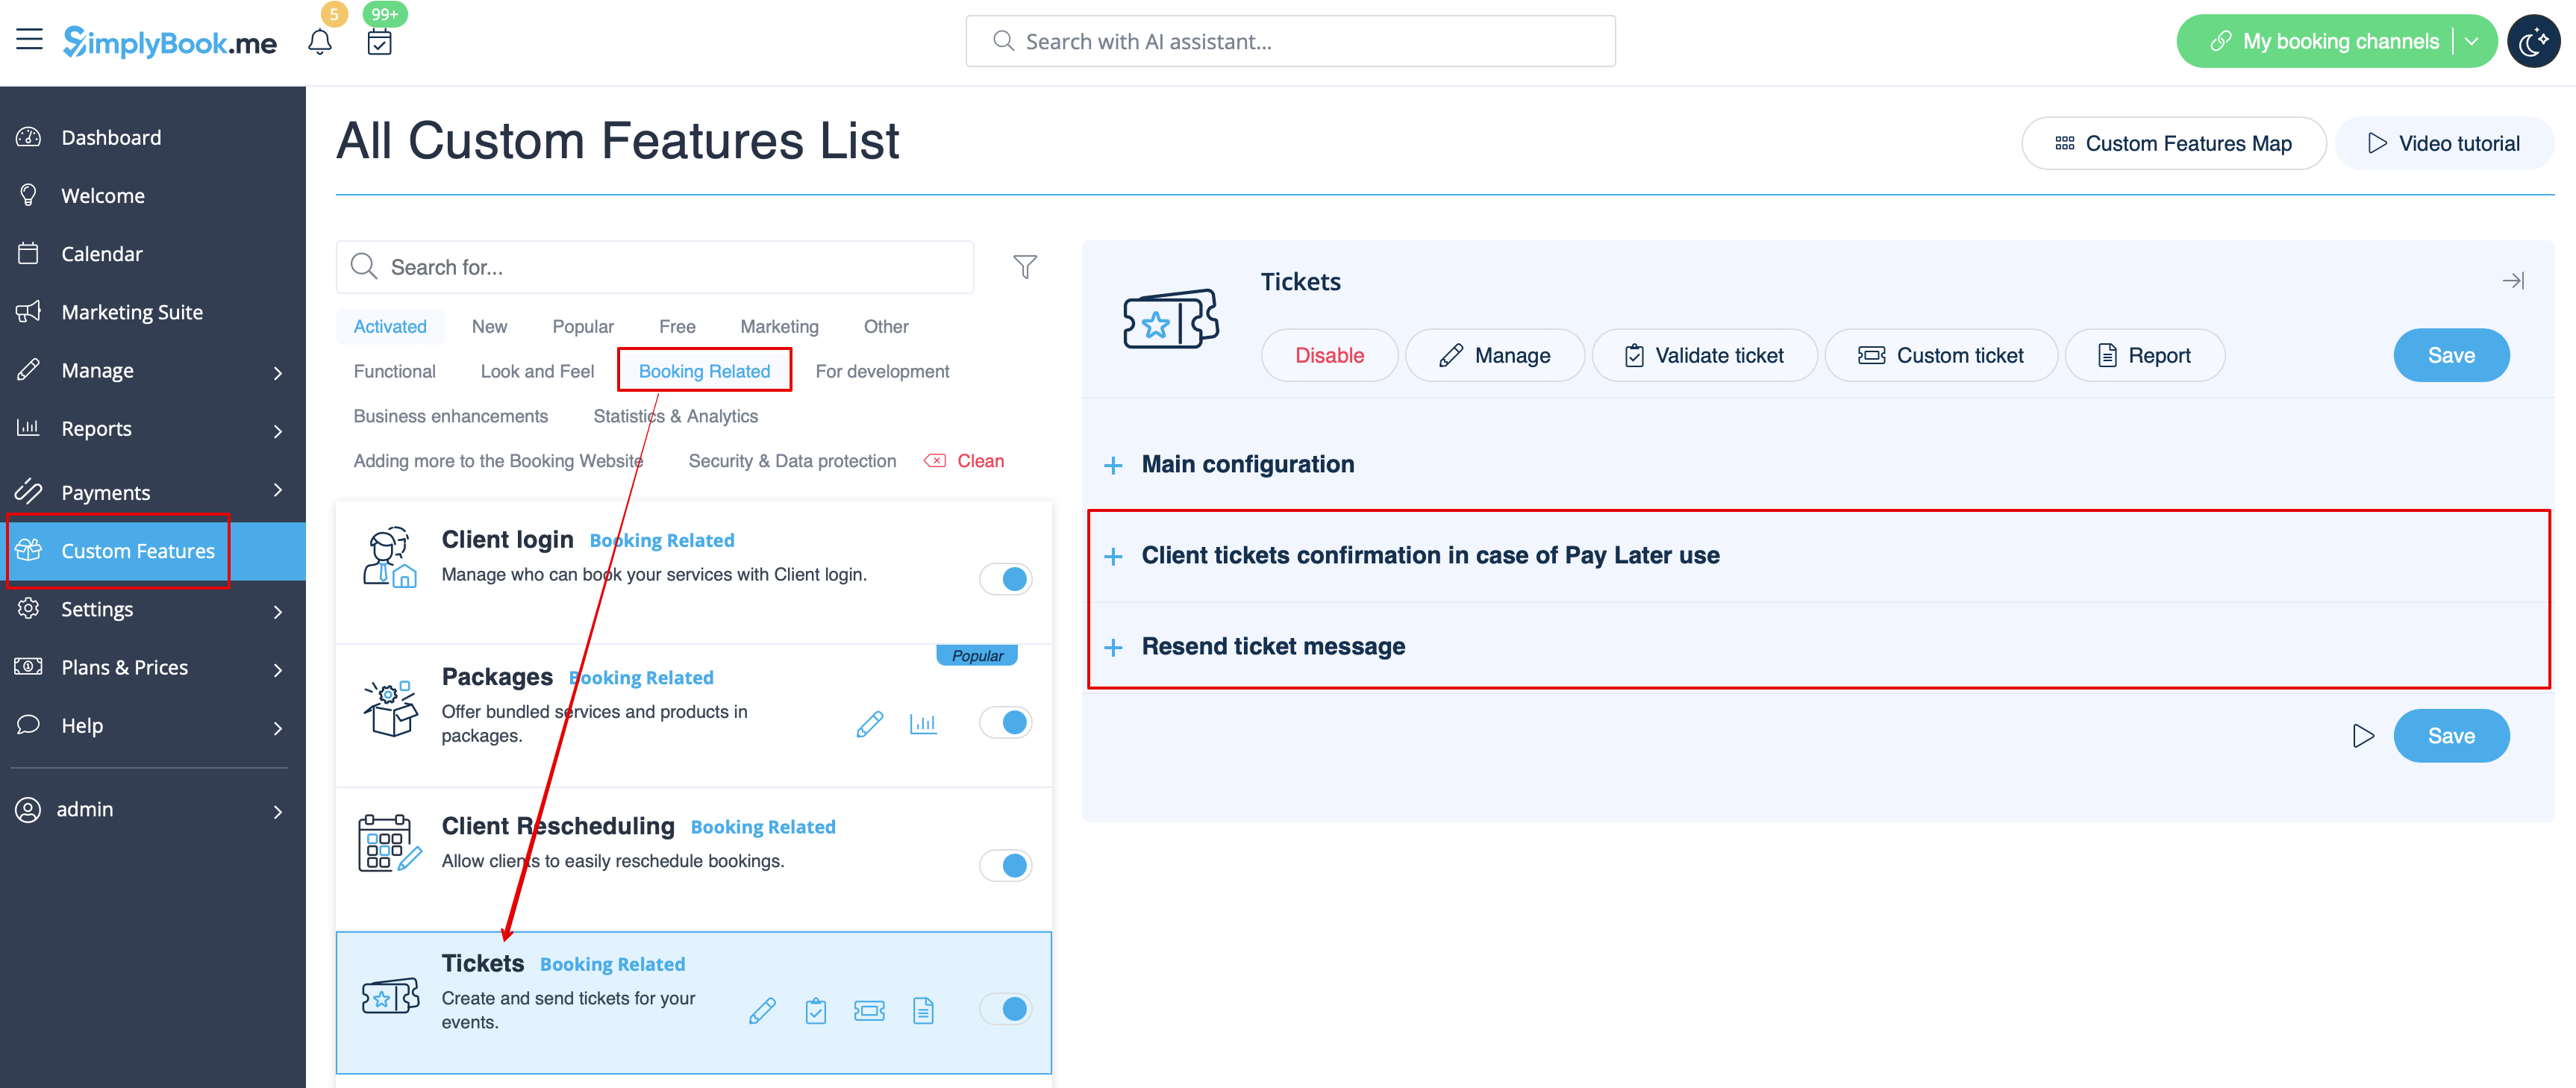
Tickets
By default the ticket is automatically sent to client email together with the corresponding service confirmation email.
But in case you are using online payments and allow to choose pay later option on the booking website and the client select it,
in this case the ticket will be sent with the separate email.
As well you may wish to re-send the ticket to the client in certain cases(it is possible in Reports -> Tickets report).
Both notification templates case be edited in Custom features -> Tickets -> on the right side or the page. There are Email types available only.
- Read more about his custom feature use.
Custom email
Allows to customize the design of the email notifications to match your branding and taste.
To create your designs please go to Custom features -> Custom email -> Create template.
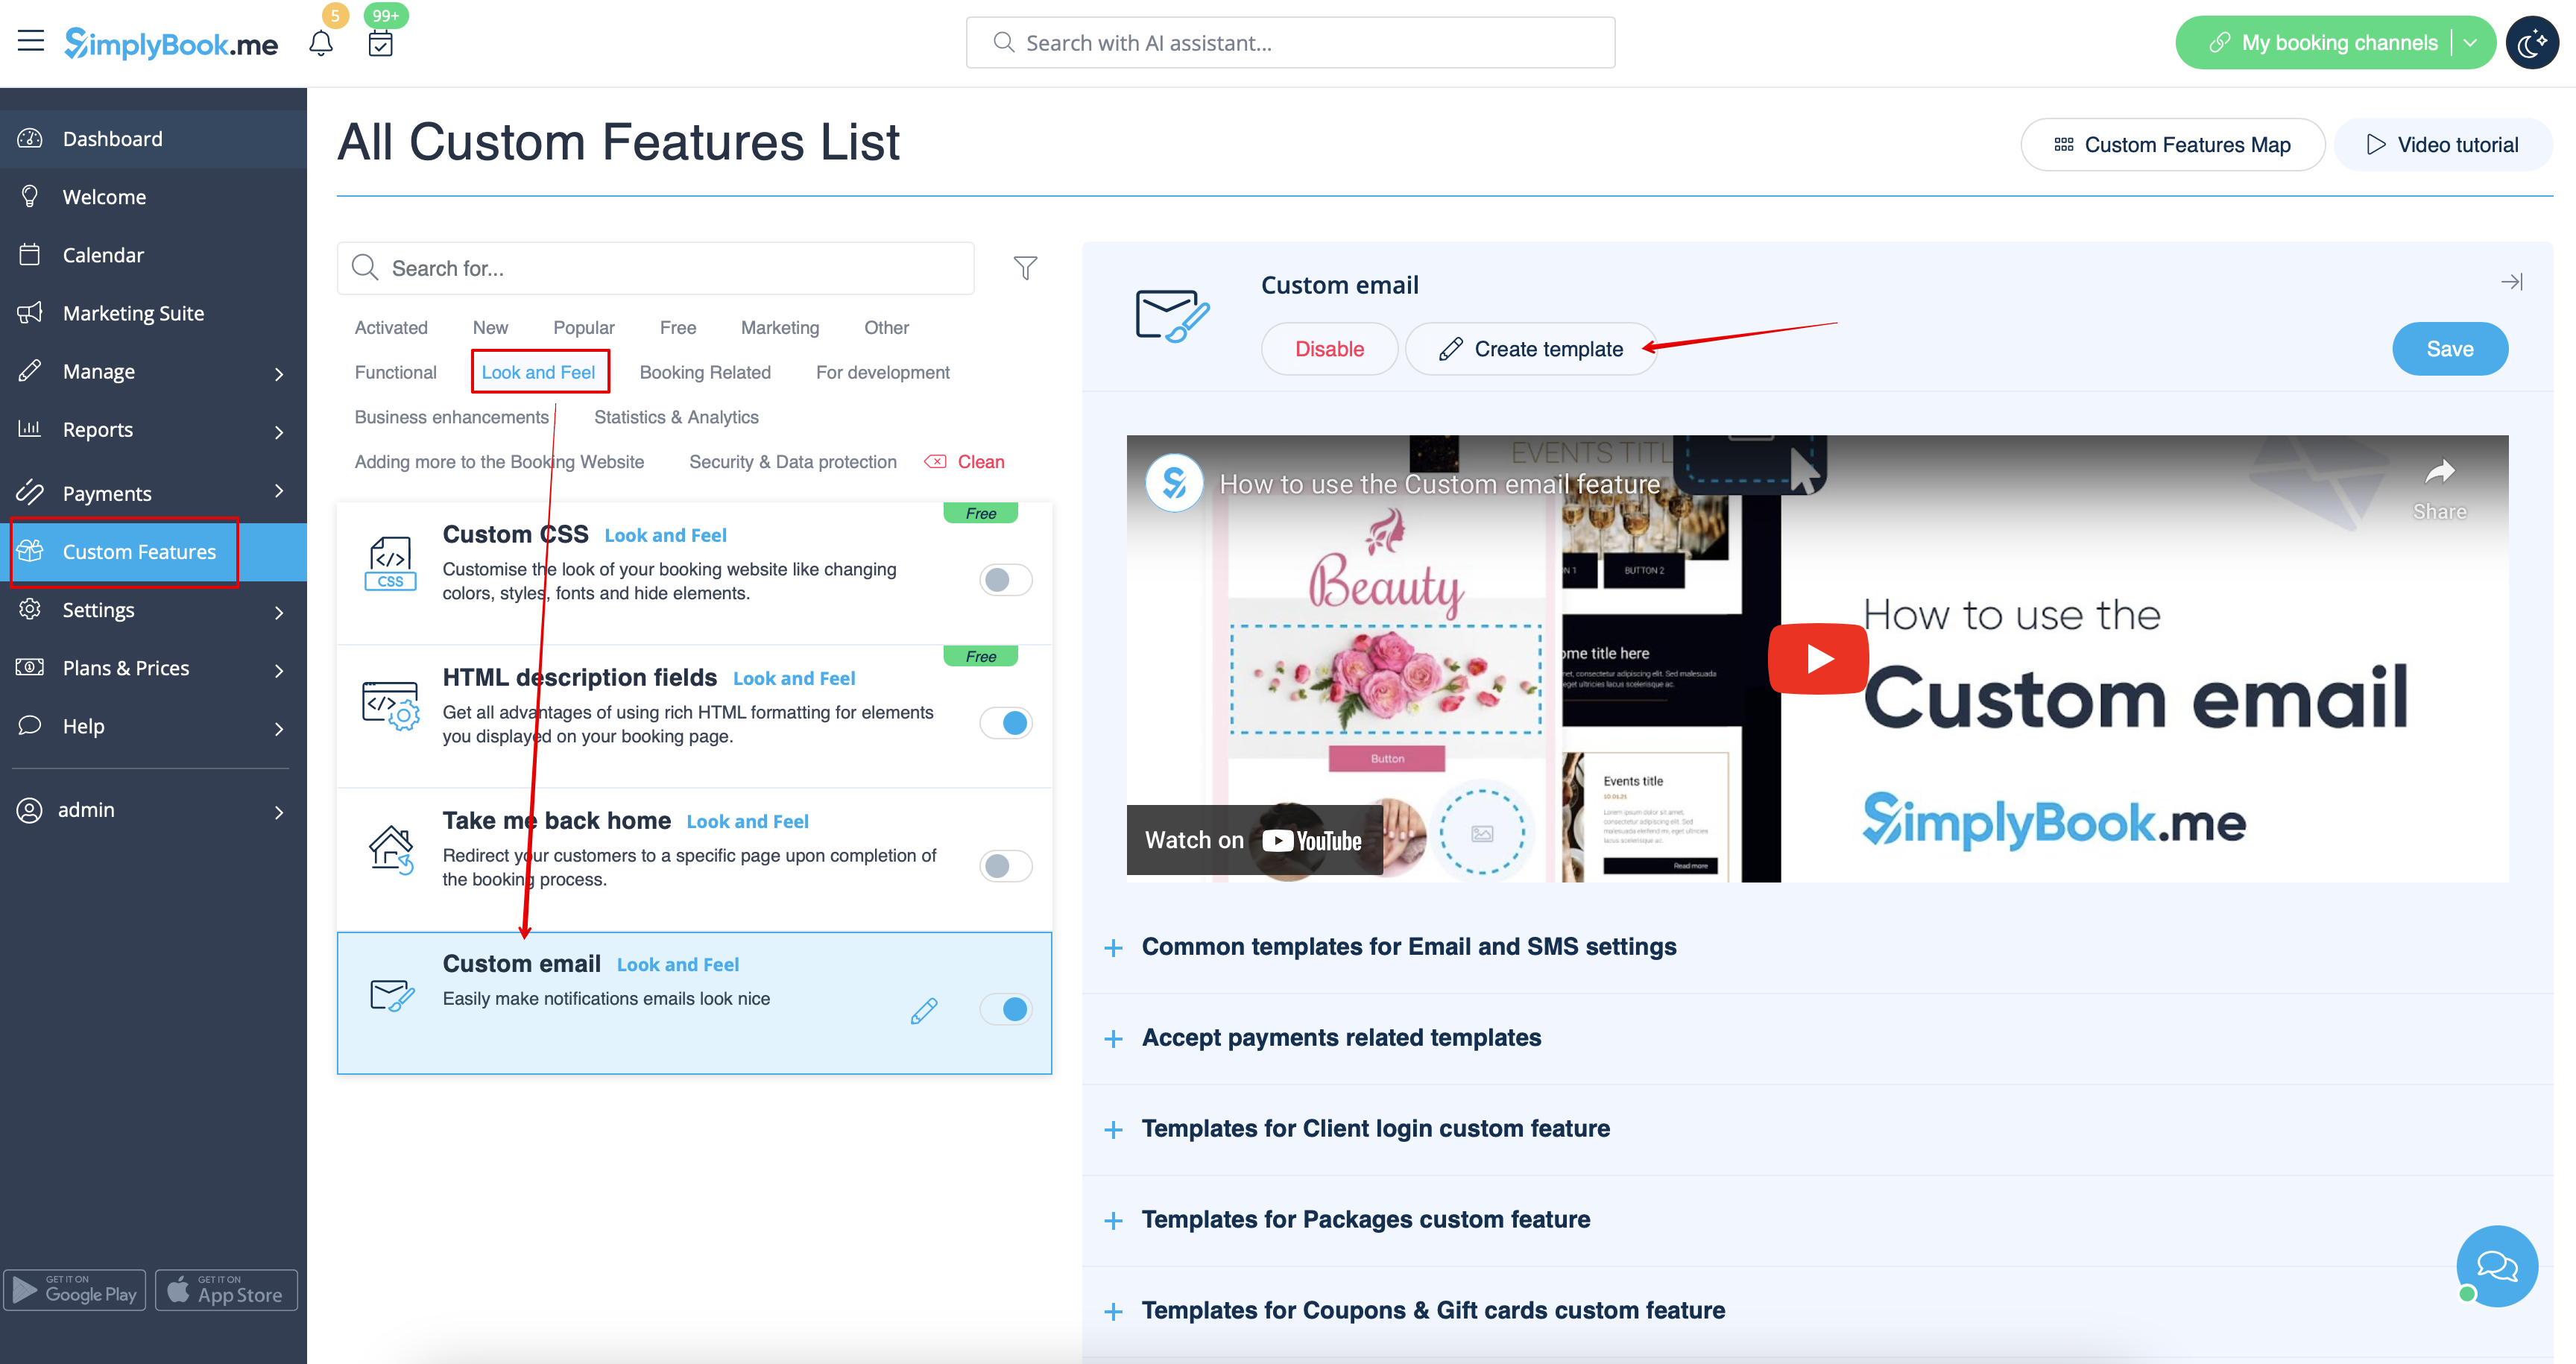
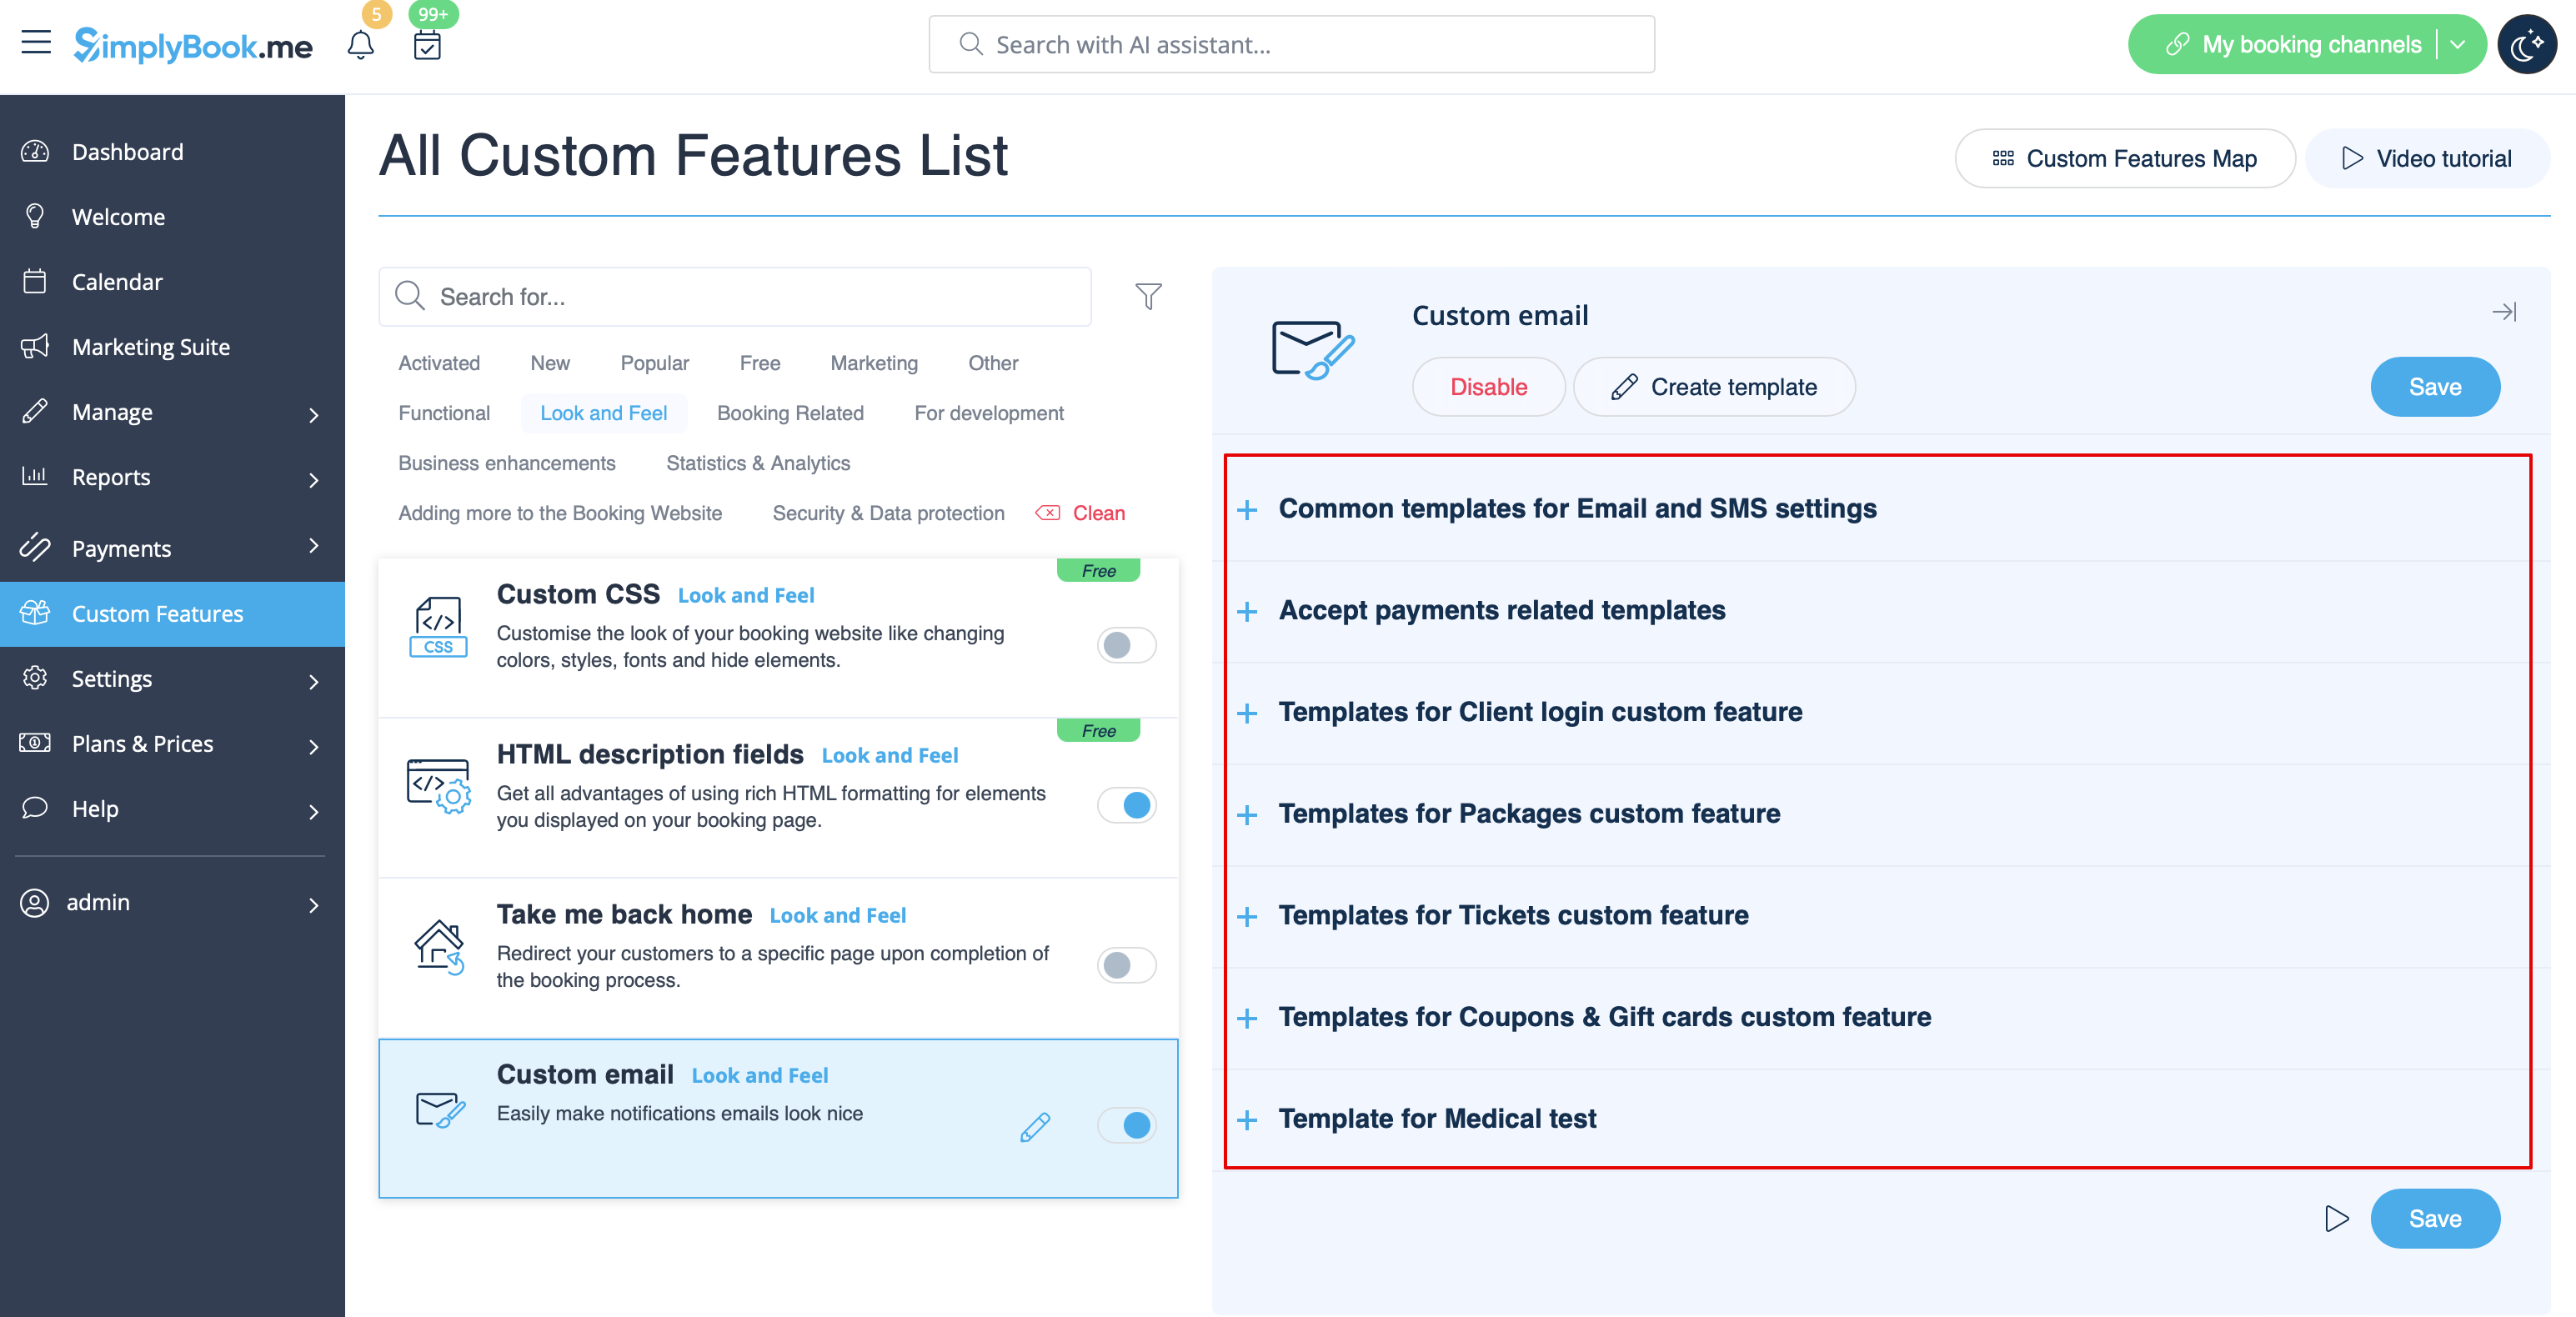
With the help of this custom feature you can influence the look of the following notification types:
- common booking related notifications from Settings -> Email and SMS Settings;
- invoices emails from accept payments custom feature;
- group bookings custom feature notifications;
- multiple bookings custom feature notifications;
- client login custom feature notifications;
- membership custom feature notifications;
- packages custom feature notifications;
- tickets custom feature notifications;
- coupons & gift cards custom feature notifications
- medical test custom feature notifications;
- book soon notification system custom feature notifications.
This feature allows to test each notification type with the pre-created design.
The {{content}} tag that contains the booking/purchase information can be edited in the corresponding feature settings.
- Read more about his custom feature use.
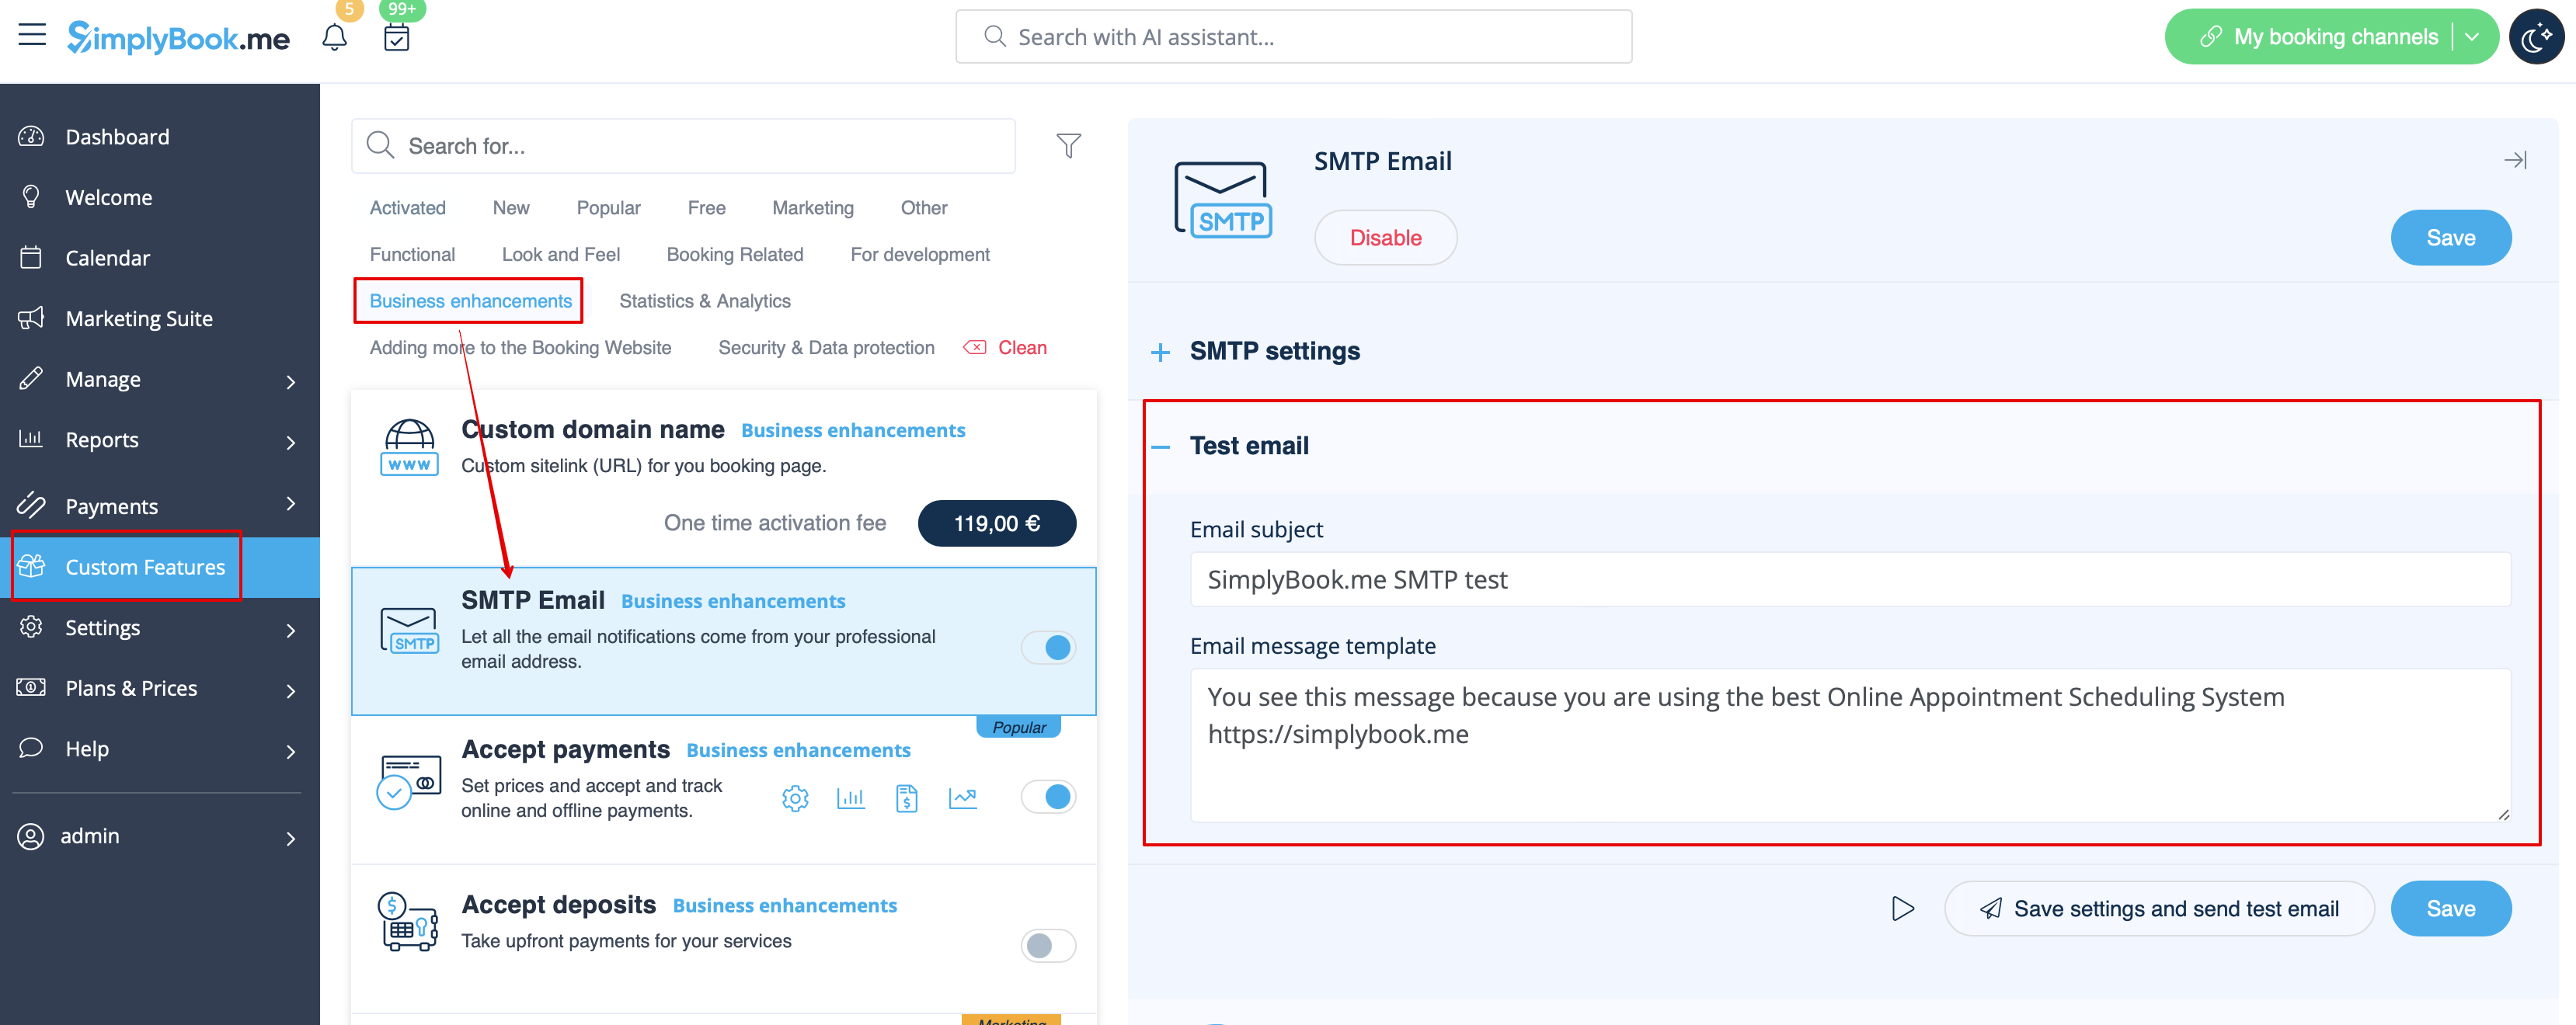
SMTP
This feature allows you to use your own SMTP server for sending the emails.
It has only one template for testing this feature after you have entered the settings.
You can edit and use the test email template in Custom features -> SMTP -> on the right side of the page.
- Read more about his custom feature use.
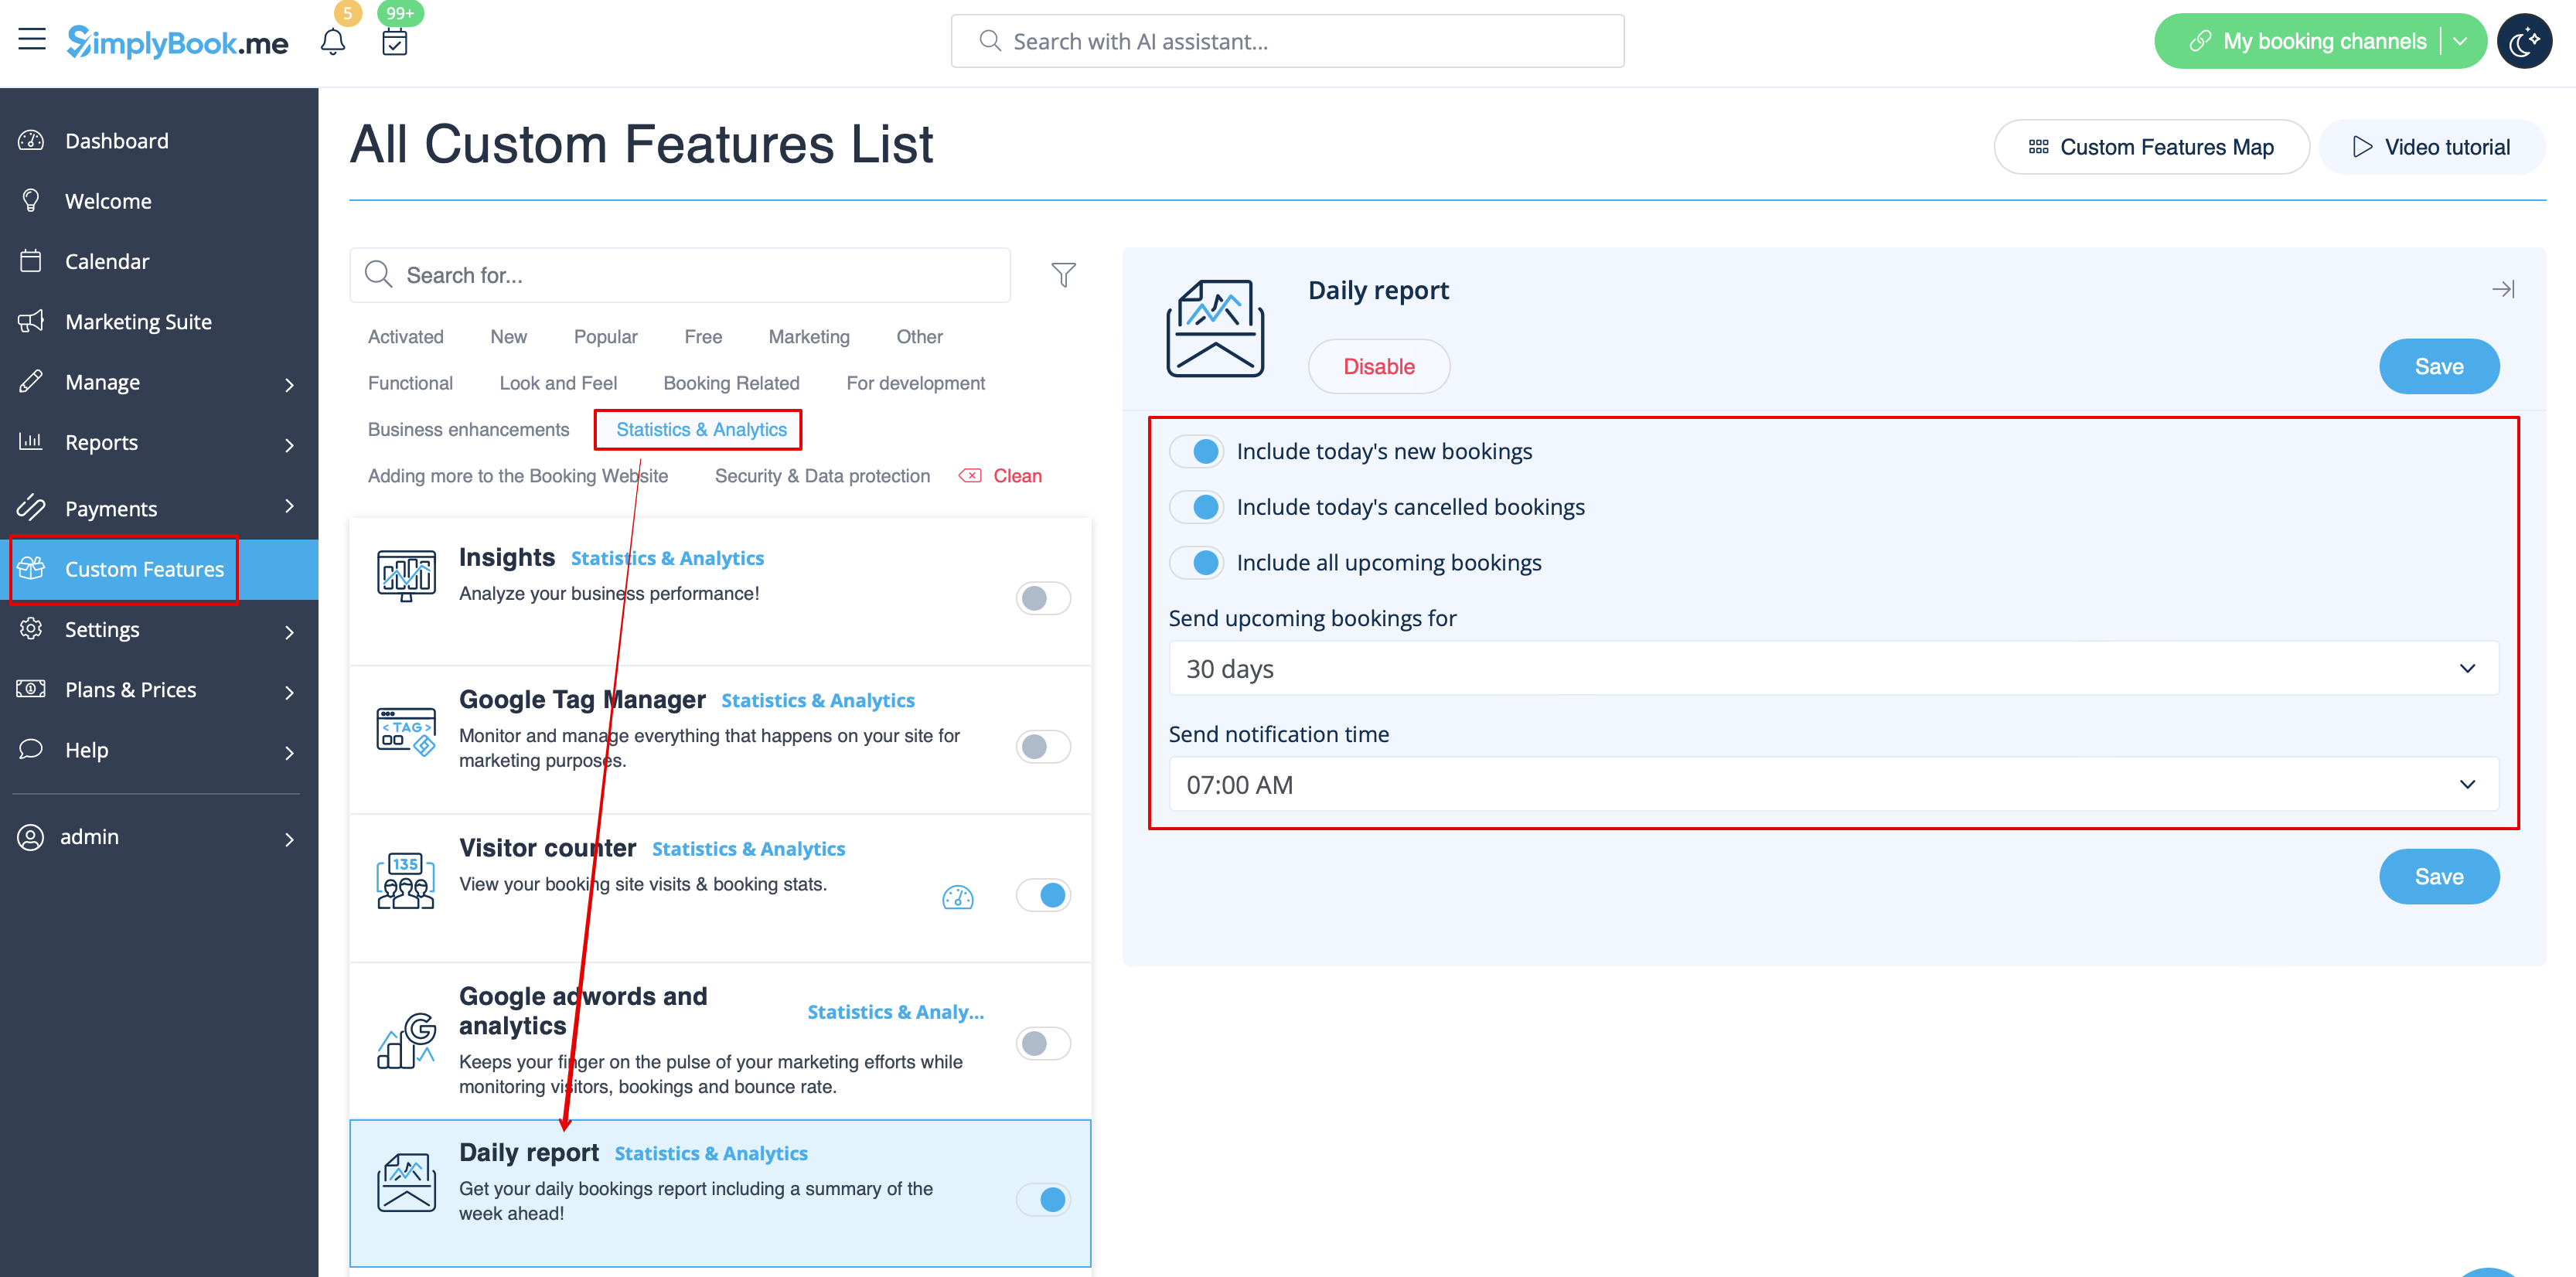
Daily report
When you enable and set this custom feature it will automatically send the email report about new, upcoming and cancelled appointments to your company email address.
There is not template to edit as such, but you can adjust the items included in Custom features -> Daily report -> on the right side of the page.
- Read more about his custom feature use.
HIPAA
This is security-related custom feature and allows to send email notifications when somebody logs in to your system.
It does not contain any email template to be edited and can be enabled/disabled by adding/removing the email address in Custom features -> HIPAA -> right side of the page -> Notify email.
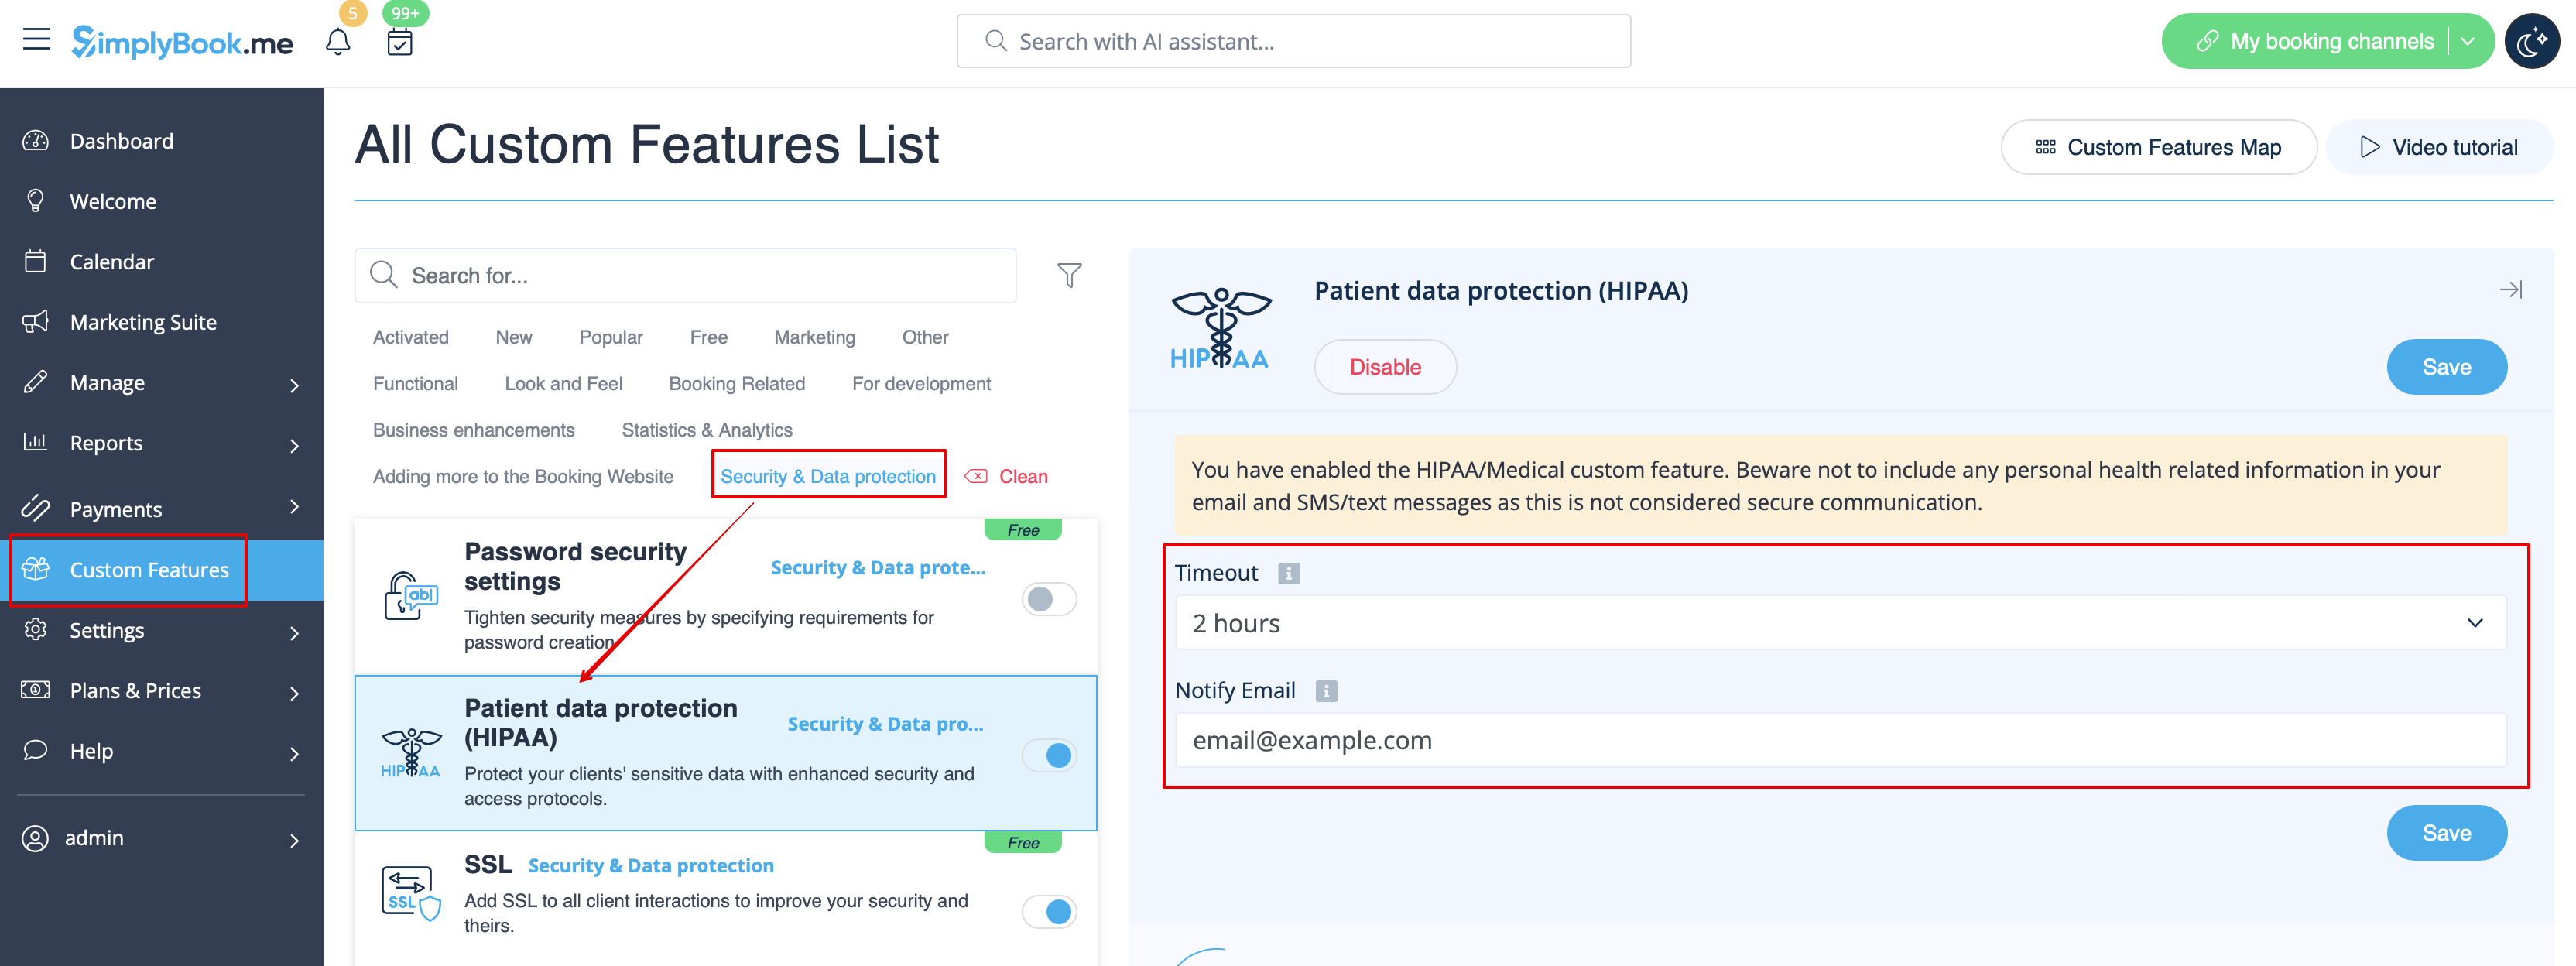
- Read more about his custom feature use.
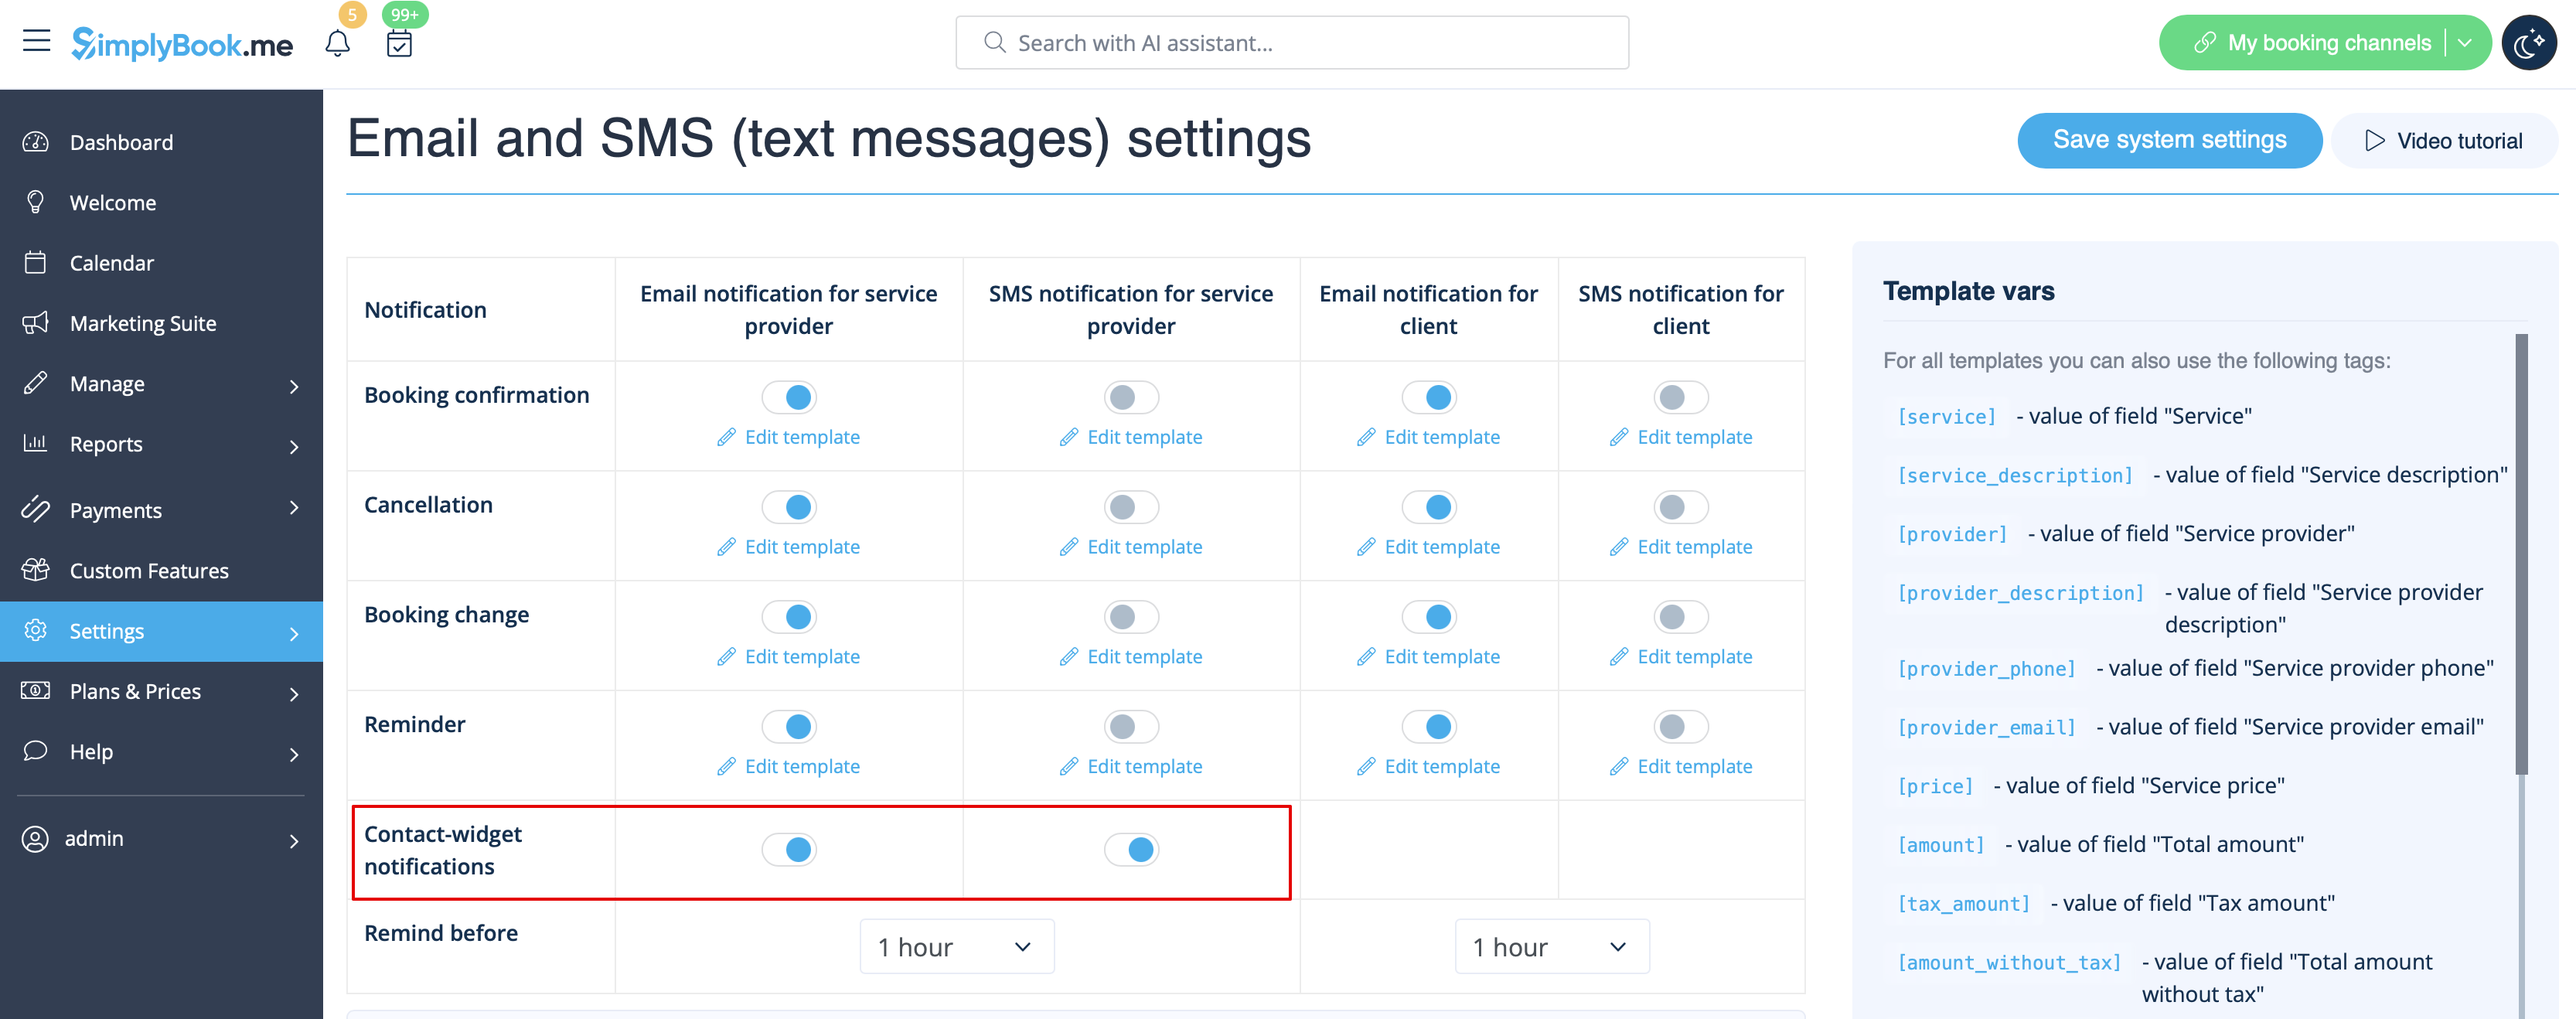
Contact widget
As this custom feature allows to add a contact form to your booking website or create the contact button widget, there is also the email/SMS notification to company that is sent when somebody leaves a message on the booking site or widget so that you will be able to respond right away. There is no template to edit but you can disable such notifications in Settings -> Email and SMS settings -> Contact widget notifications.
- Read more about his custom feature use.
Medical test
When you are using this custom feature you definitely need to send the test results to patients' emails.
In Custom features -> Medical test -> on the right side of the page you can enable/disable or edit the following templates:
- positive results(Email and SMS templates);
- negative results(Email and SMS templates);
- inconclusive results(Email and SMS templates).
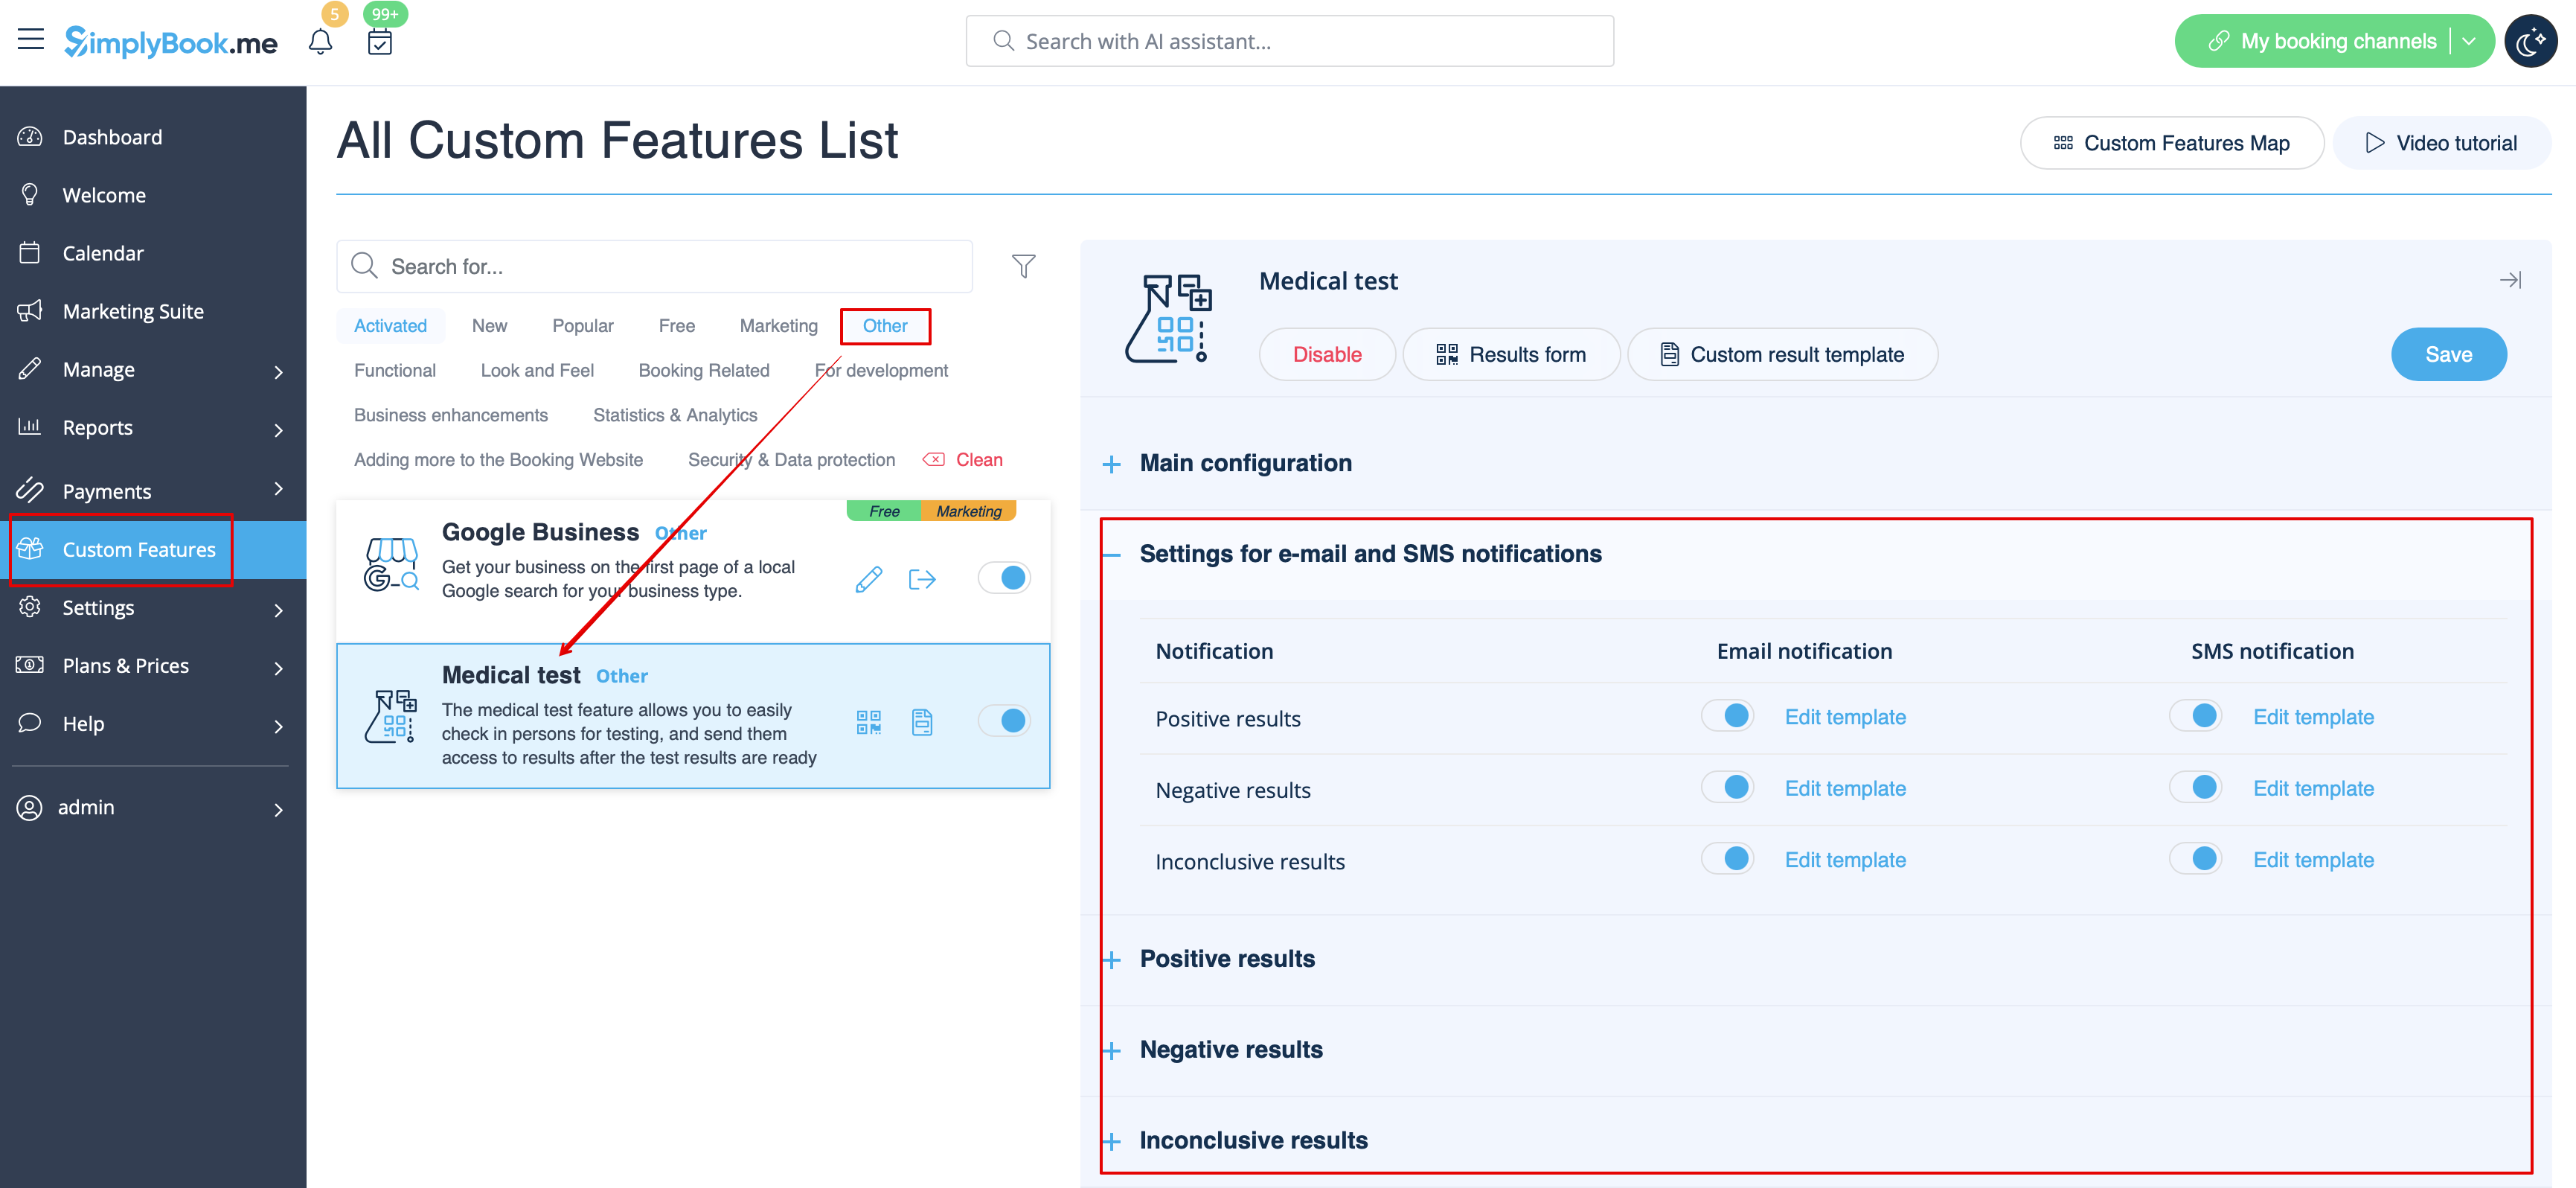
In case you need to adjust the test result template please use Custom result template option above the templates.
- Read more about his custom feature use.
What are variables
Variables are elements that can be inserted in email and sms templates (Settings -> Email and SMS settings). These variables will denote the chosen item after the booking is made. For example you have 2 providers: Mary and John. In email template you insert text "You have booked a service with [provider]". If the client chose on the booking page provider Mary, they would receive the following text "You have booked a service with Mary", if they chose John, they would receive the text "You have booked a service with John."
You can always find the variables that can be used with the certain notification type near the template either on the right side of the page or in the popup that can be access by click on "Variables" button.

iCals and how to use them
In Settings -> Email and SMS settings you can check the box Attach iCal to e-mails and then emails will contain file of .isc format. After clicking that file, it will open in one of your calendars (Google calendar, iCalendar,etc)
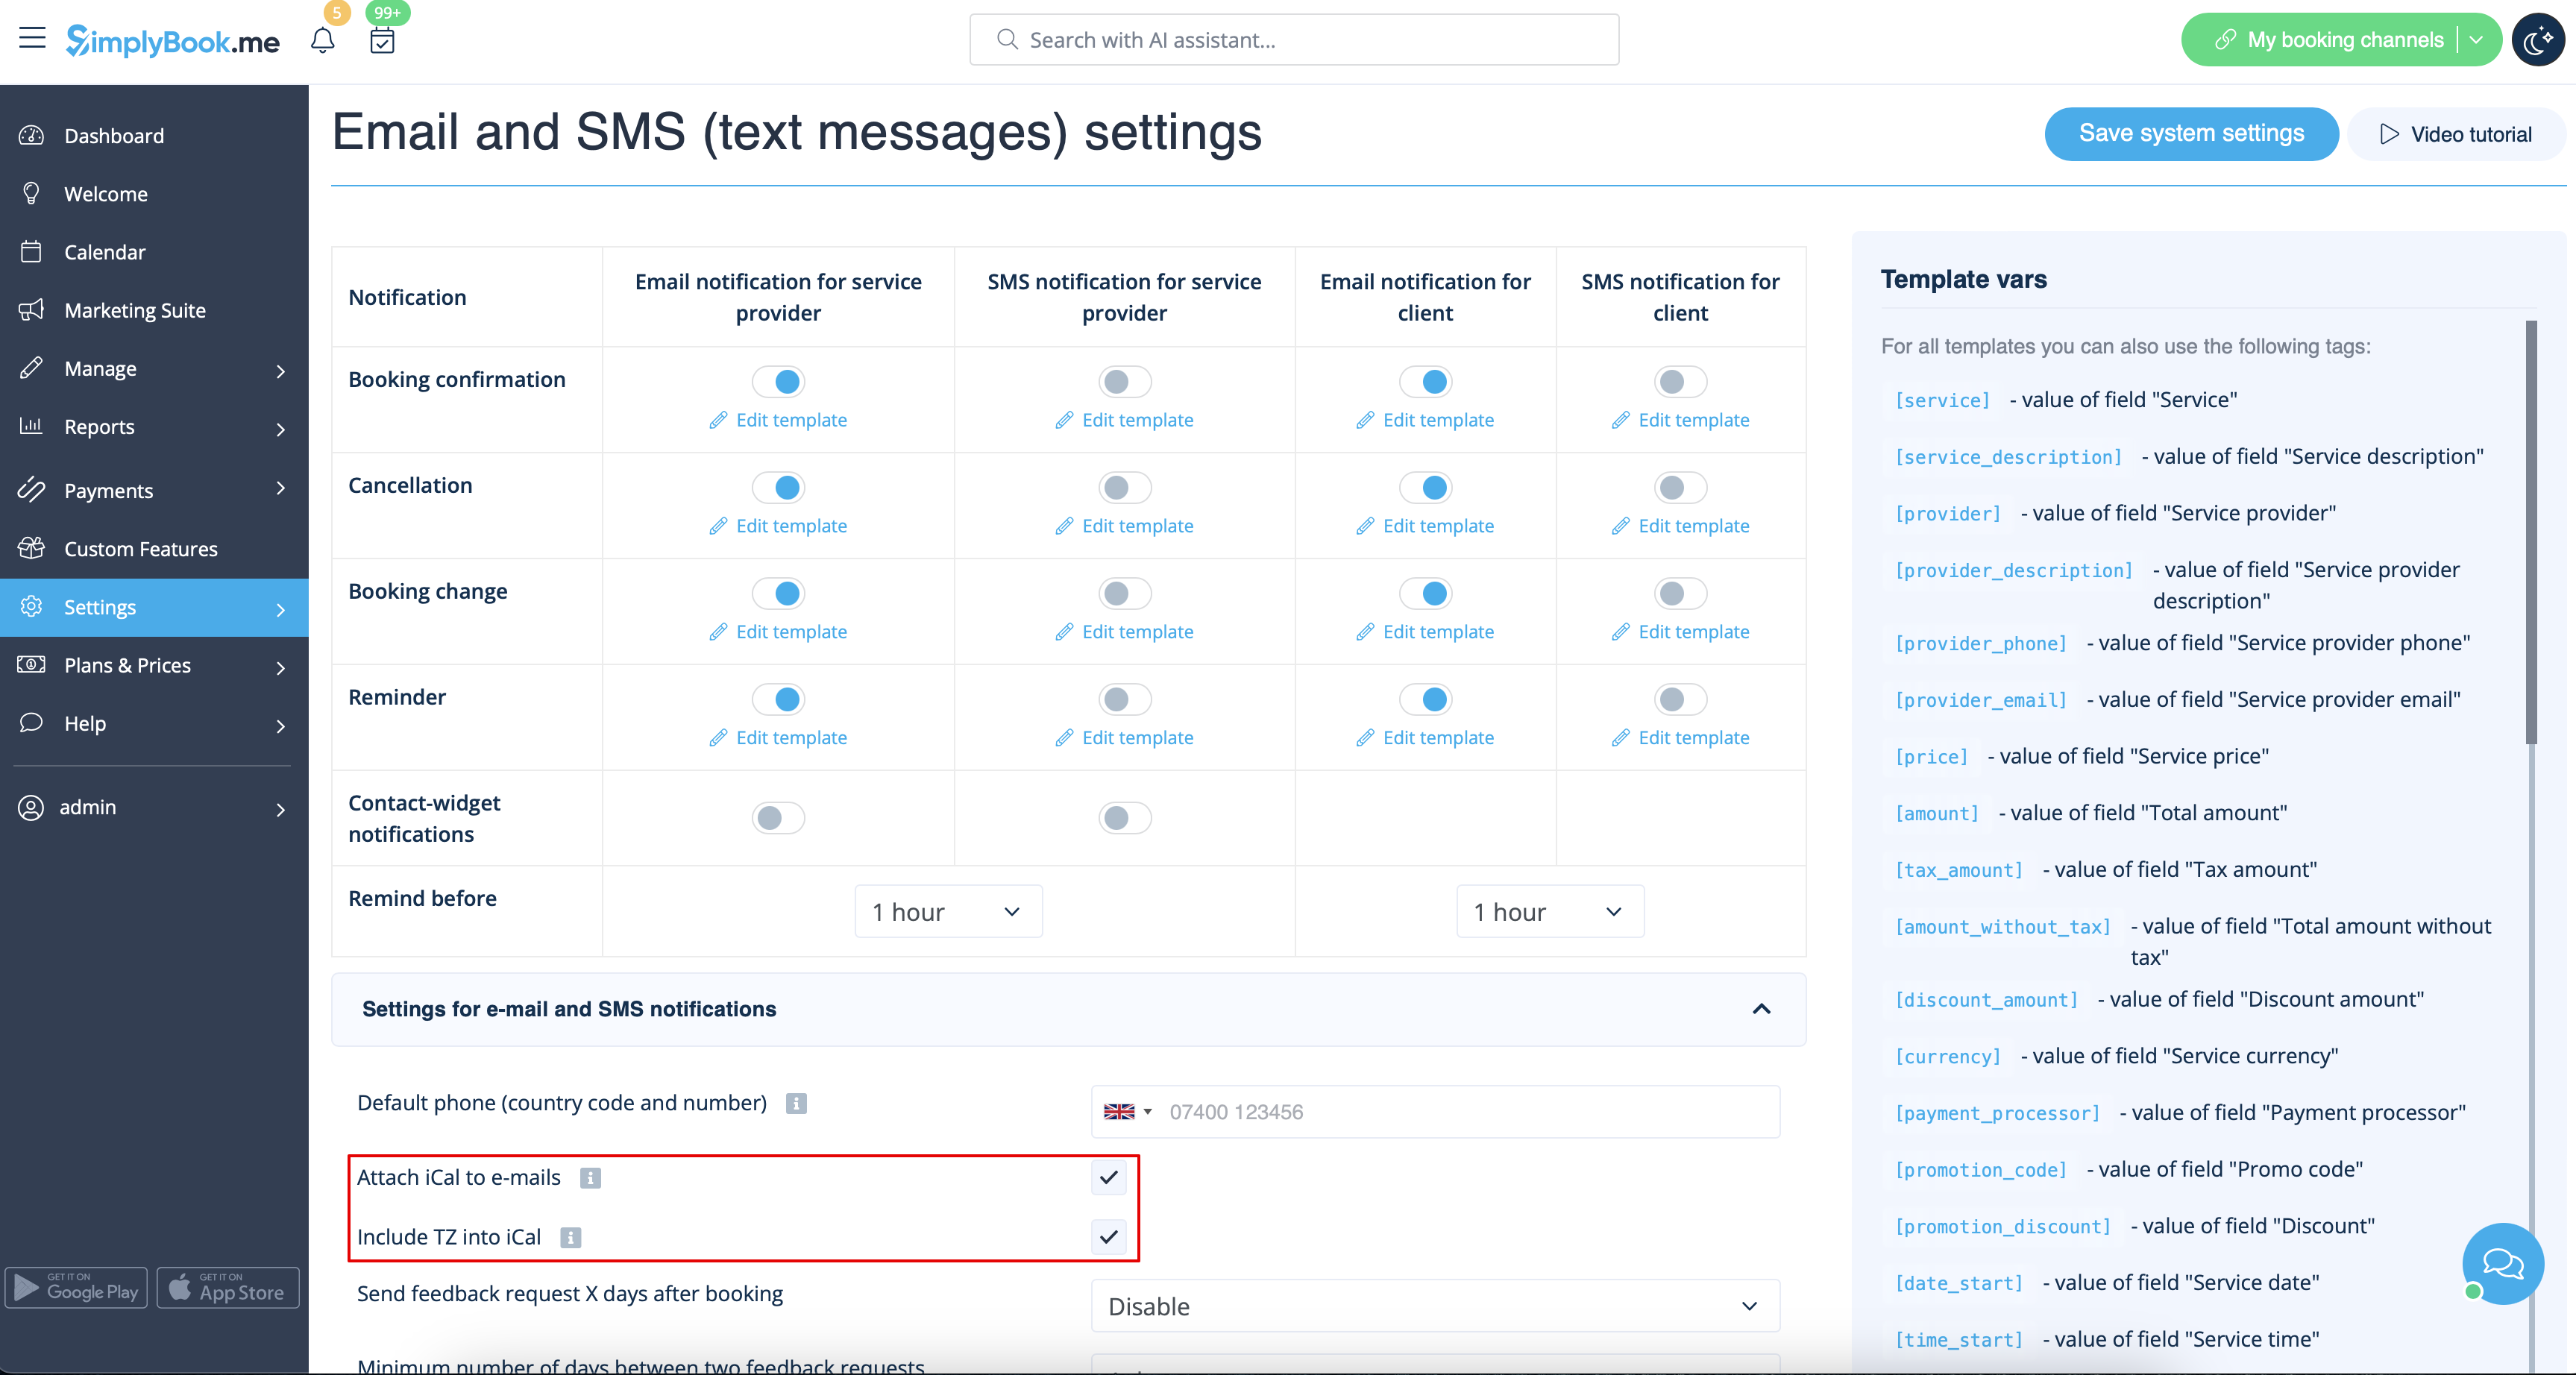
- Please note, that iCal files do not have set timezone so the time in that file will be displayed according to the IP address/device settings.
Clients/Providers do not receive notifications
- Possible reasons
- 1. Corresponding boxes in Settings -> Email and SMS settings are not checked.
- 2. Client/provider entered wrong email or phone.
- 3. Email went to junk (Spam) folder or to Social tab. Please check Whitelisting instructions here.
- 4. SMTP custom feature is not set correctly.
- 5. If sms are not coming, check your sms balance in Plans&Prices -> Subscriptions at the bottom of the page.
Clients/Providers receive wrong notifications
- 1. Please check if you have Multiple Bookings or Group Bookings Custom Feature enabled. These Custom Features have their own templates.
- Multiple bookings template (Custom Features -> Multiple bookings -> on the right side of the page)
- Group bookings template (Custom Features -> Group bookings -> on the right side of the page)
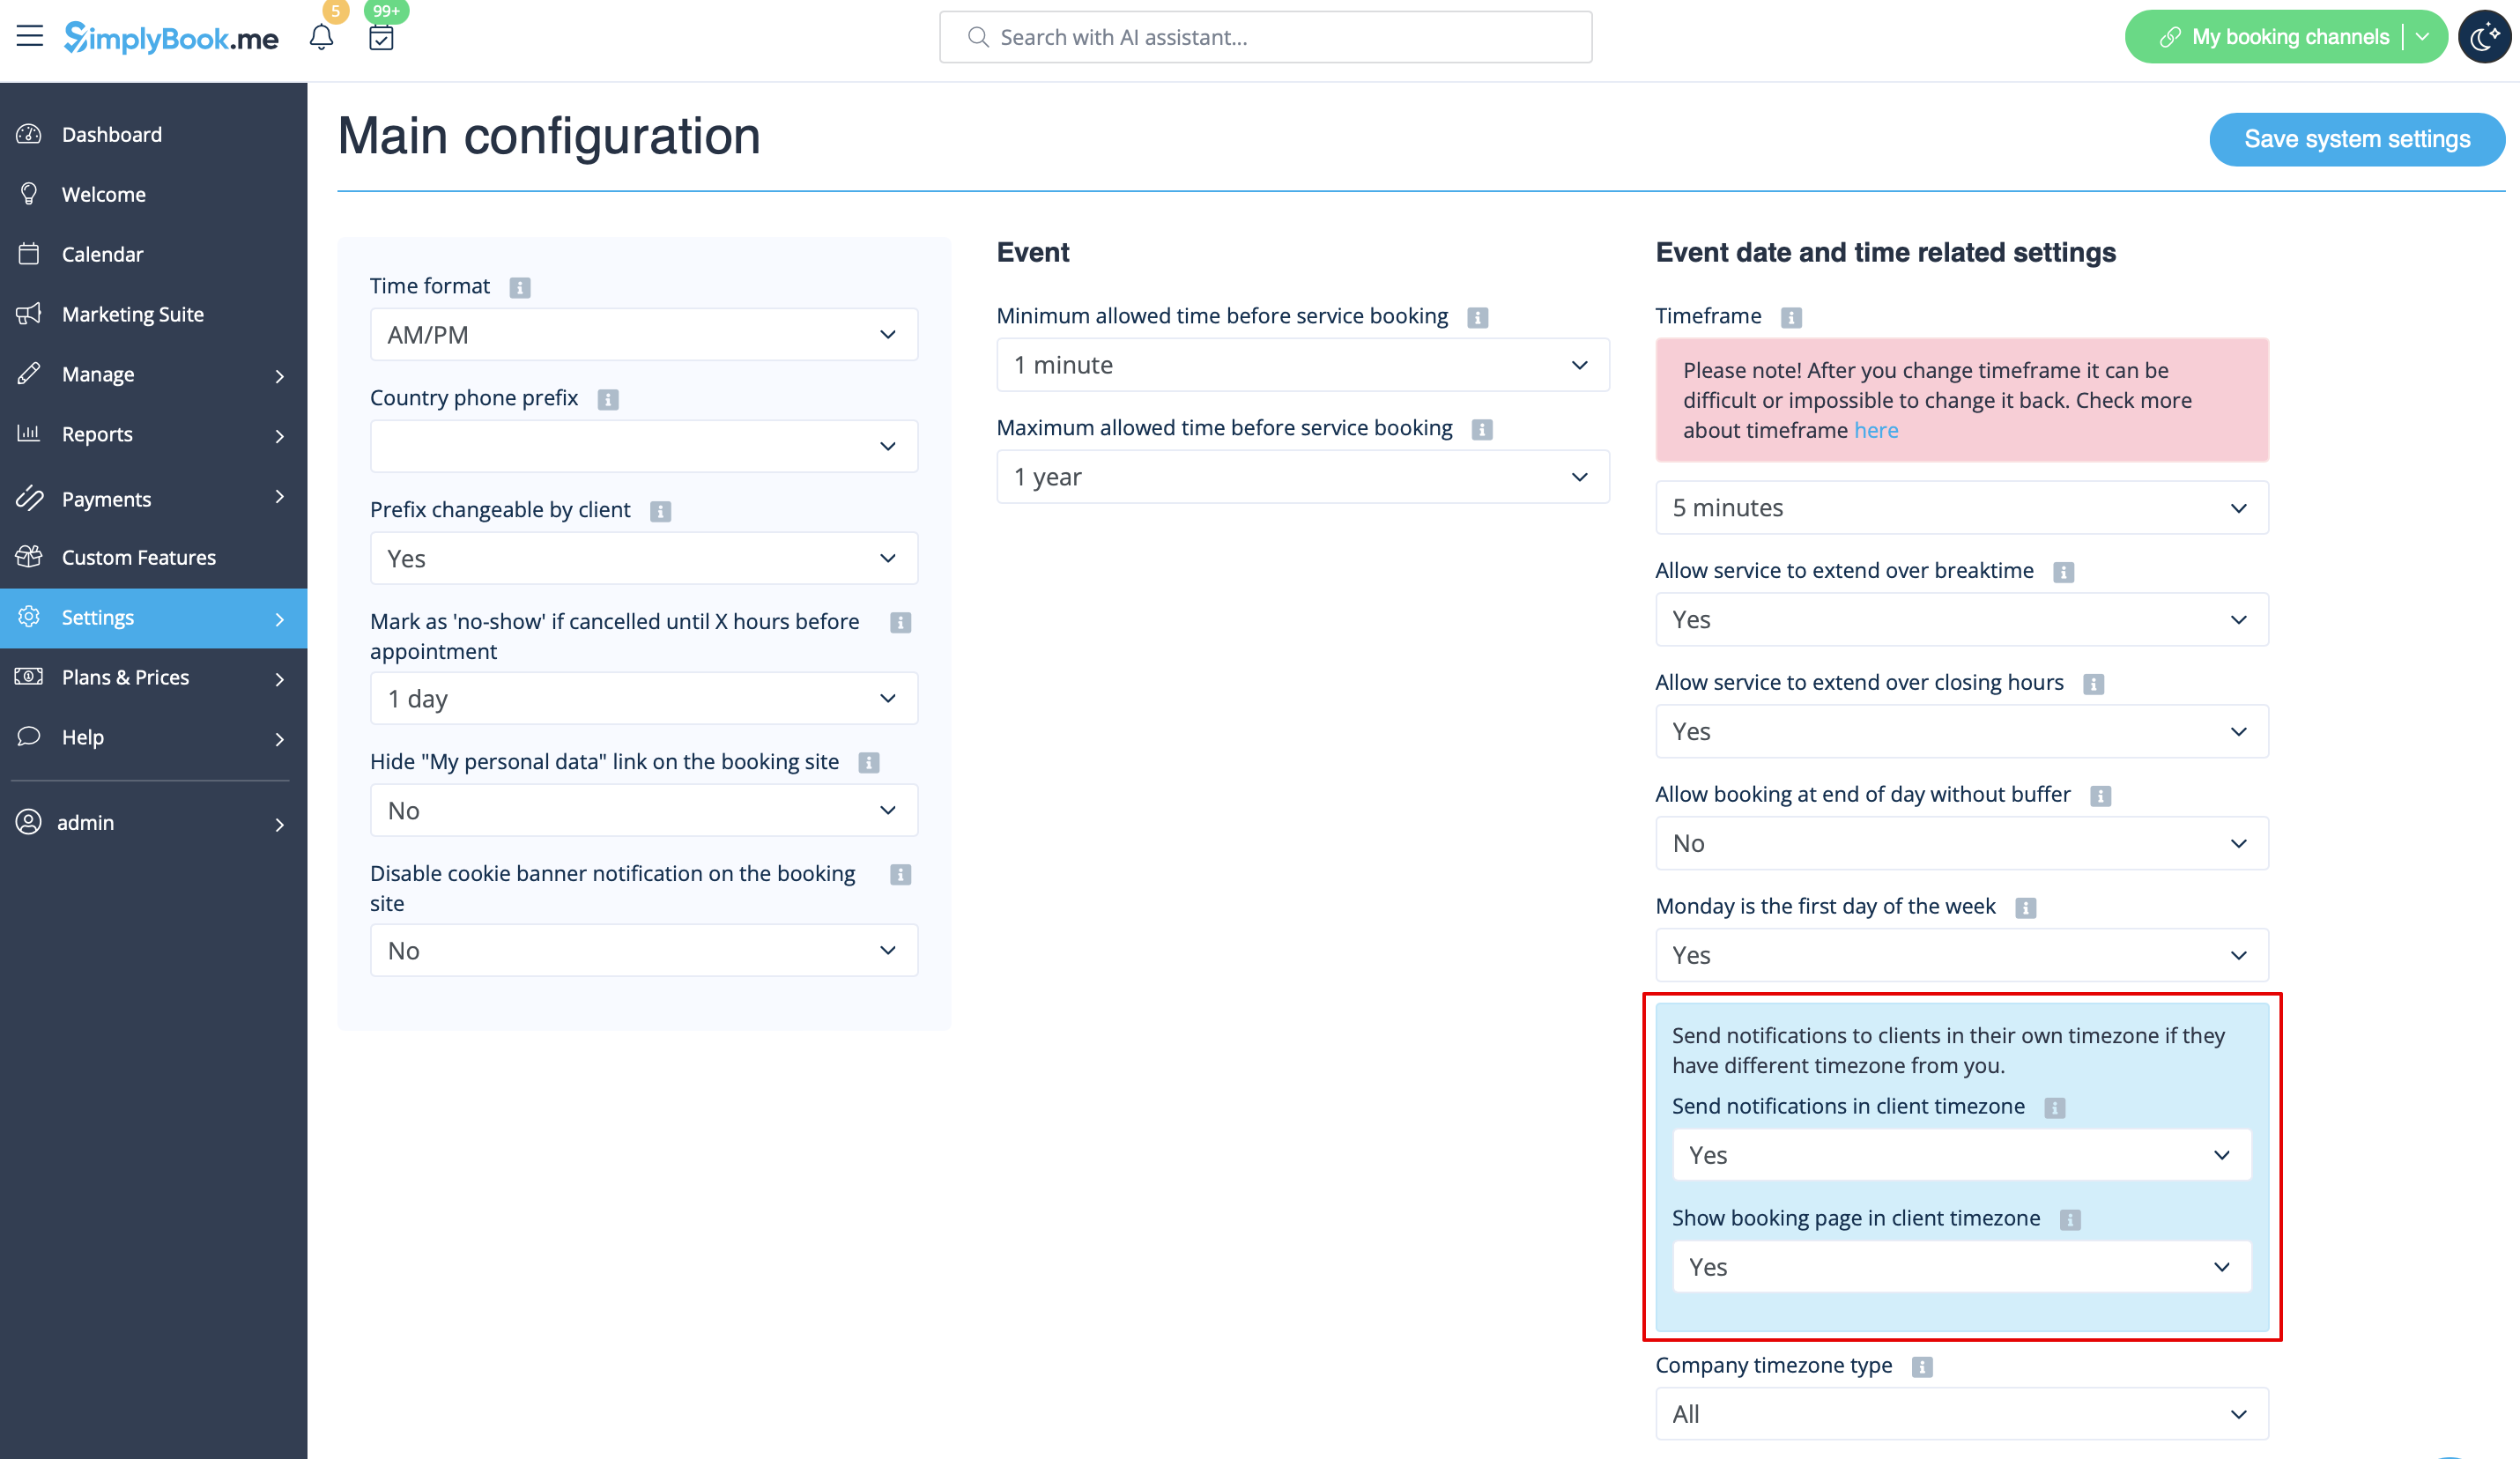
- 2. Check if you have Time Zone settings on in Settings -> Main configuration, in this case client may have selected wrong time zone and received notification in wrong time zone too.
Email whitelisting instructions
So here are a few things that you can do to make sure you get those all important emails from the team here at SimplyBook.me.
You can expect system notifications such as when your subscription is up for renewal, notices about bookings, and helpful information on various things such as how to get the most out of your SimplyBook.me service.
As great as technology is, it isn’t perfect, and sometimes email systems and internet service providers mistake legitimate email for spam. To ensure that you don’t miss important communication from us, please take the following steps:
Please whitelist any emails that come from the @simplybook.me domain.
Why? Because that tells your email service or program that you actually want emails from this domain, so that they can then make sure you get them.
How? Well, this differs between email services and programs but below you can see information about some of the main ones. If you aren’t using one of these, please refer to the help section for yourservice for information.
Using Gmail or Gsuite
Filter messages from @simplybook.me and tell the system to never send it to spam:
- 1. Go to Settings (click the gear icon at the top to the right)

- 2. Select the Filters and Blocked Addresses tab

- 3. Towards the bottom of the tab, click the Create a new filter link

- 4. In the From field write @simplybook.me
- 5. Click Create filter with this search to the bottom right of the window

- 6. Tick the box next to Never send it to Spam
- 7. Click the blue button that says Create filter

Great! Now you won’t miss anything from us!
And to ensure that our emails don’t get lost in that Updates or Promotions tab:
- 1. Find an email from SimplyBook.me in your inbox
- 2. Click and drag it to the Primary tab in your inbox

- 3. You’ll be asked whether you want to do this for future emails, so tell them yes

Using Yahoo! mail
- 1. When you open an email message, hover your mouse on the Sender's name.
- 2. Click the the three dots in the Sender's info window that appears and click Add to contacts.

- 3. When Add Contact form comes up, click Save.

Using Mac Mail
- 1. From the top menu select Mail -> Preferences

- 2. Then select the Rules icon, click Add Rule and type a name for the rule in the description field. Use the following settings:

- 3. “If any of the following conditions are met: From Contains”. In the text field besides Contains type @simplybook.me

- 4. Select Move Message and Inbox from the drop down menus and then click OK to save the rule.
Using Outlook
- 1. Right-click on the message in your inbox.
- 2. Select Junk E-mail from the menu.
- 3. Click Never Block Sender or Never Block Sender's Domain (@example.com).

Great, you’re all set! We look forward to being in touch and seeing your business blossom!