Onlinevideomöten via Zoom
För att ansluta till Zoom behöver du ett Zoom-konto. Alla bidragsgivare med behörighet som schemaläggningsadministratör kan ansluta Simplybook.me till Zoom.
SimplyBook.me kan endast ansluta till ett enda Zoom-konto.
Observera:
- Zoom-bokningar läggs inte till på din Zoom-mötesida i Zoom. För att kontrollera online-möten använder du filter per tjänst i Simplybook.me-administratörskalendern för att endast se bokningar för den nödvändiga tjänsten.
- Även efter att Zoom-kontot har anslutits är videokonferenser inaktiverade som standard för nya tjänster. För att lägga till videokonferenser till en ny tjänst, gå till Hantera ->Tjänster/Klasser, gå till Fler alternativ pertjänst/klass och aktivera det som en onlinemötes-tjänst.
- Kunder som deltar i en gruppklass får unika Zoom-länkar, men dessa länkar leder alla till samma Zoom-möte.
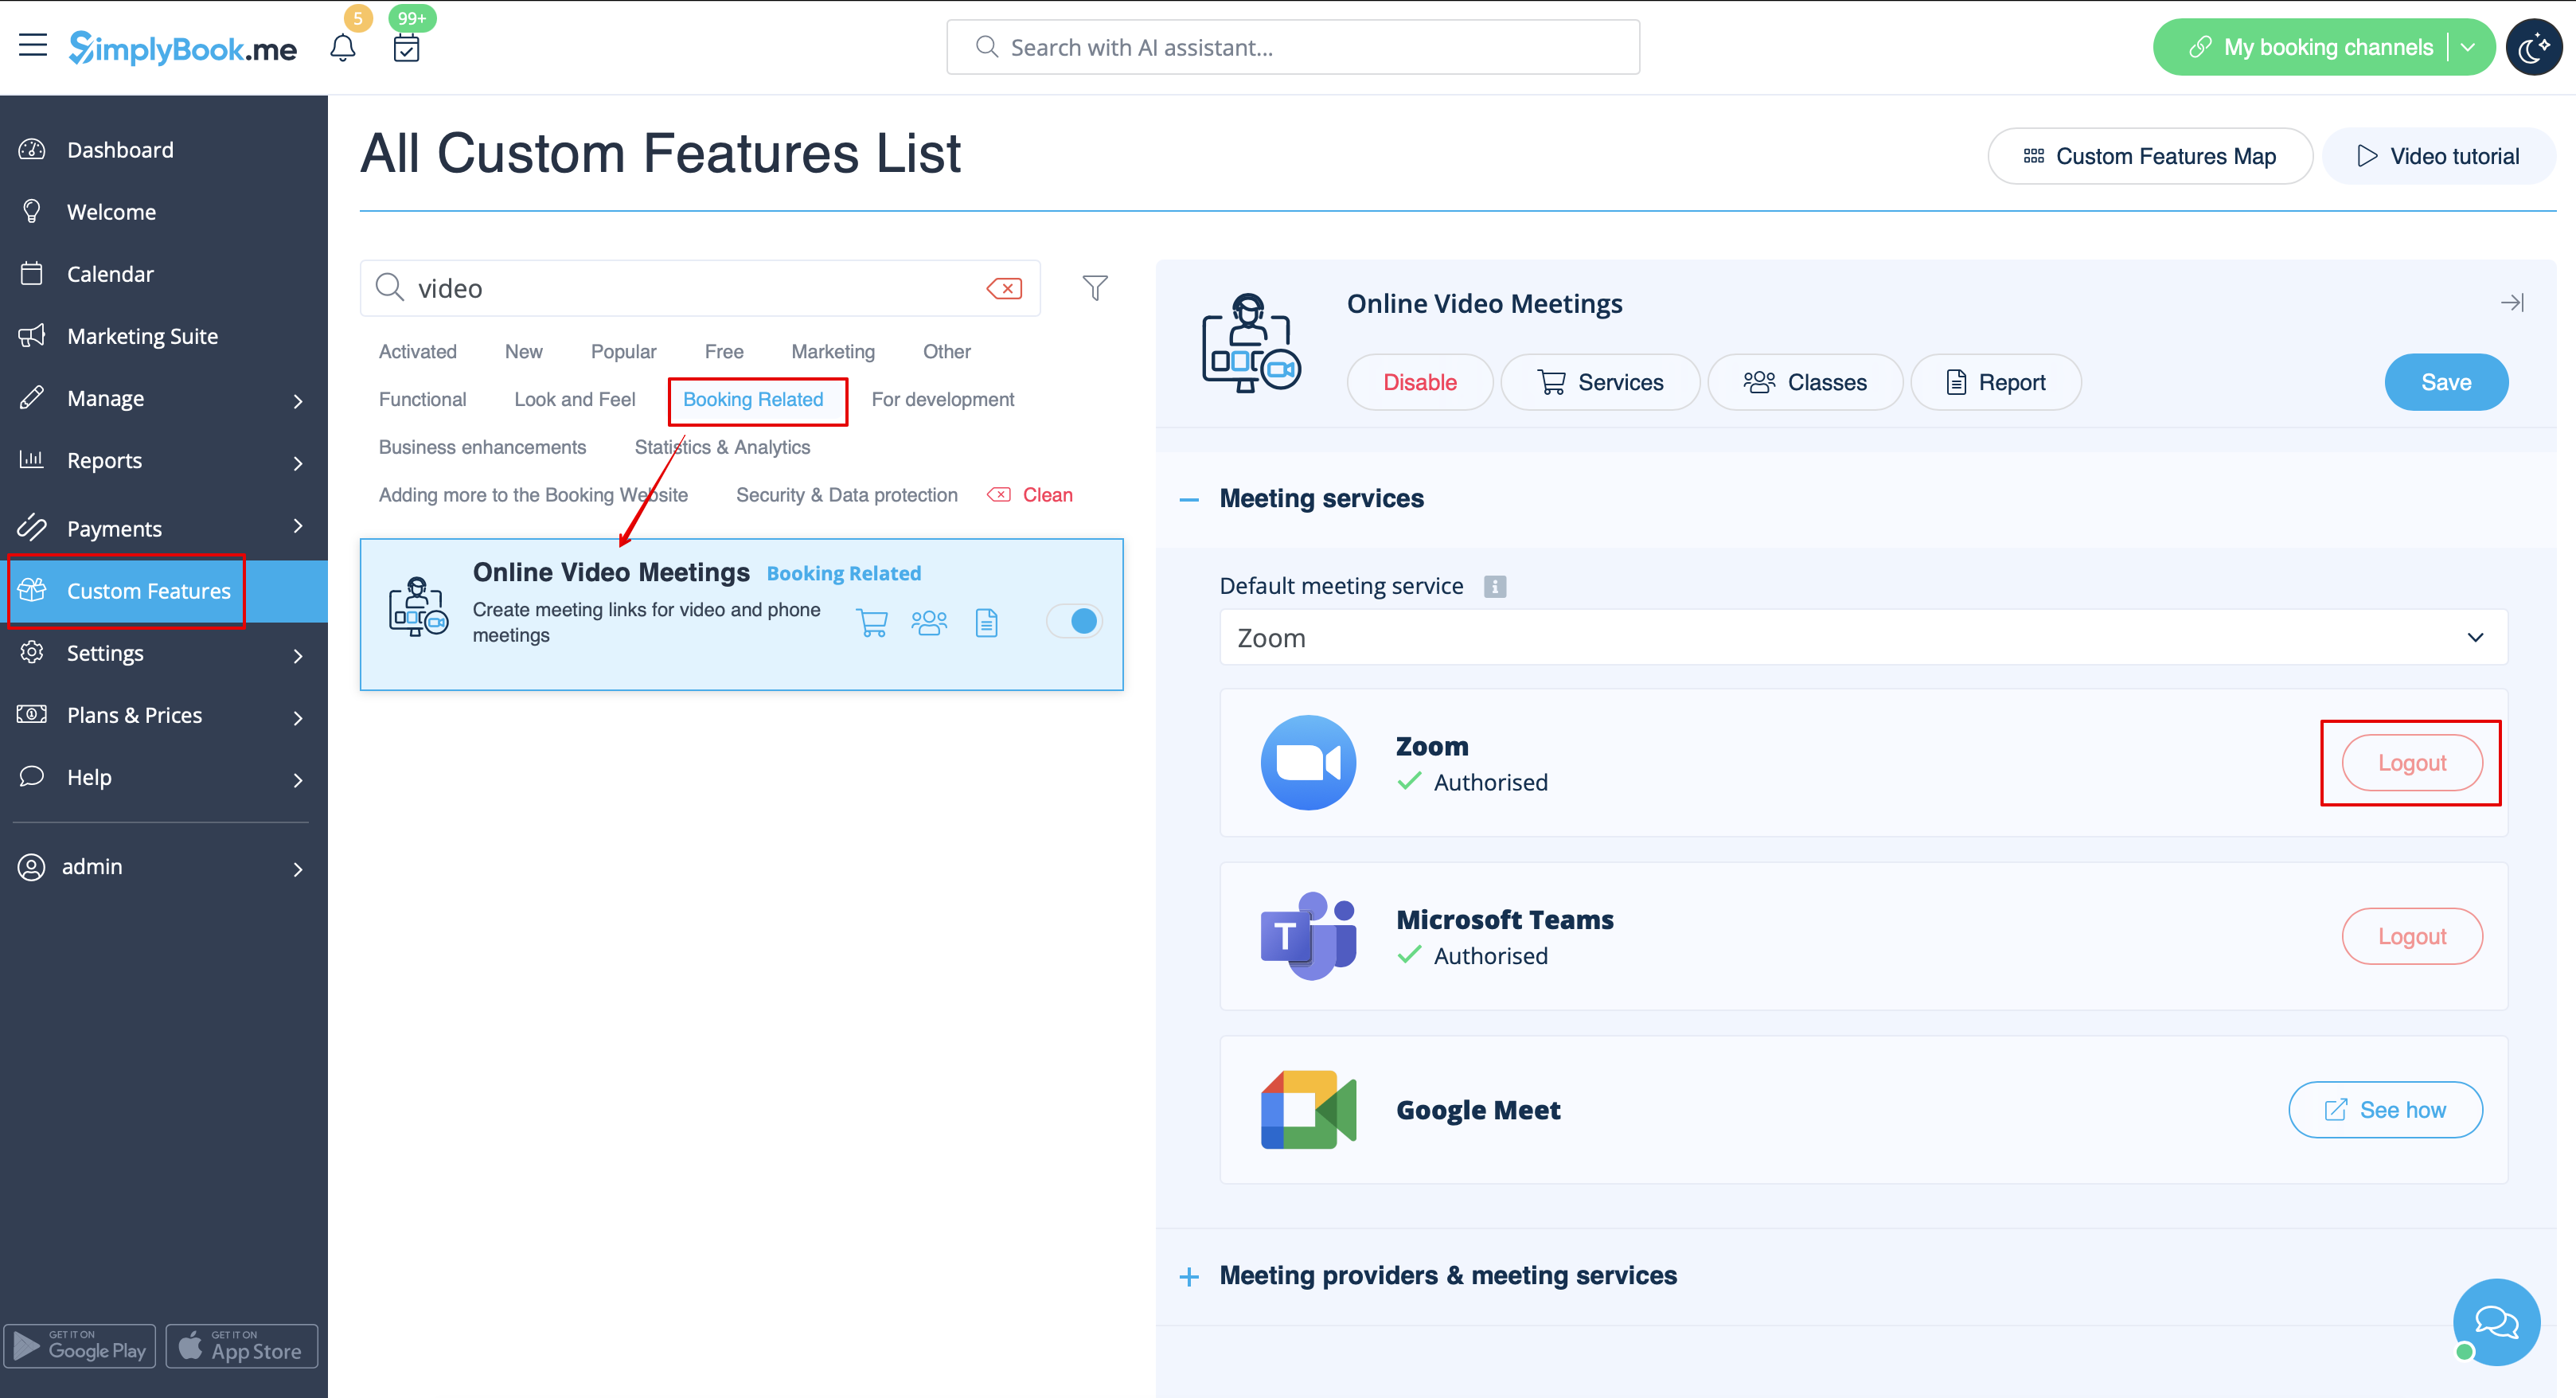
- Hur man ställer in
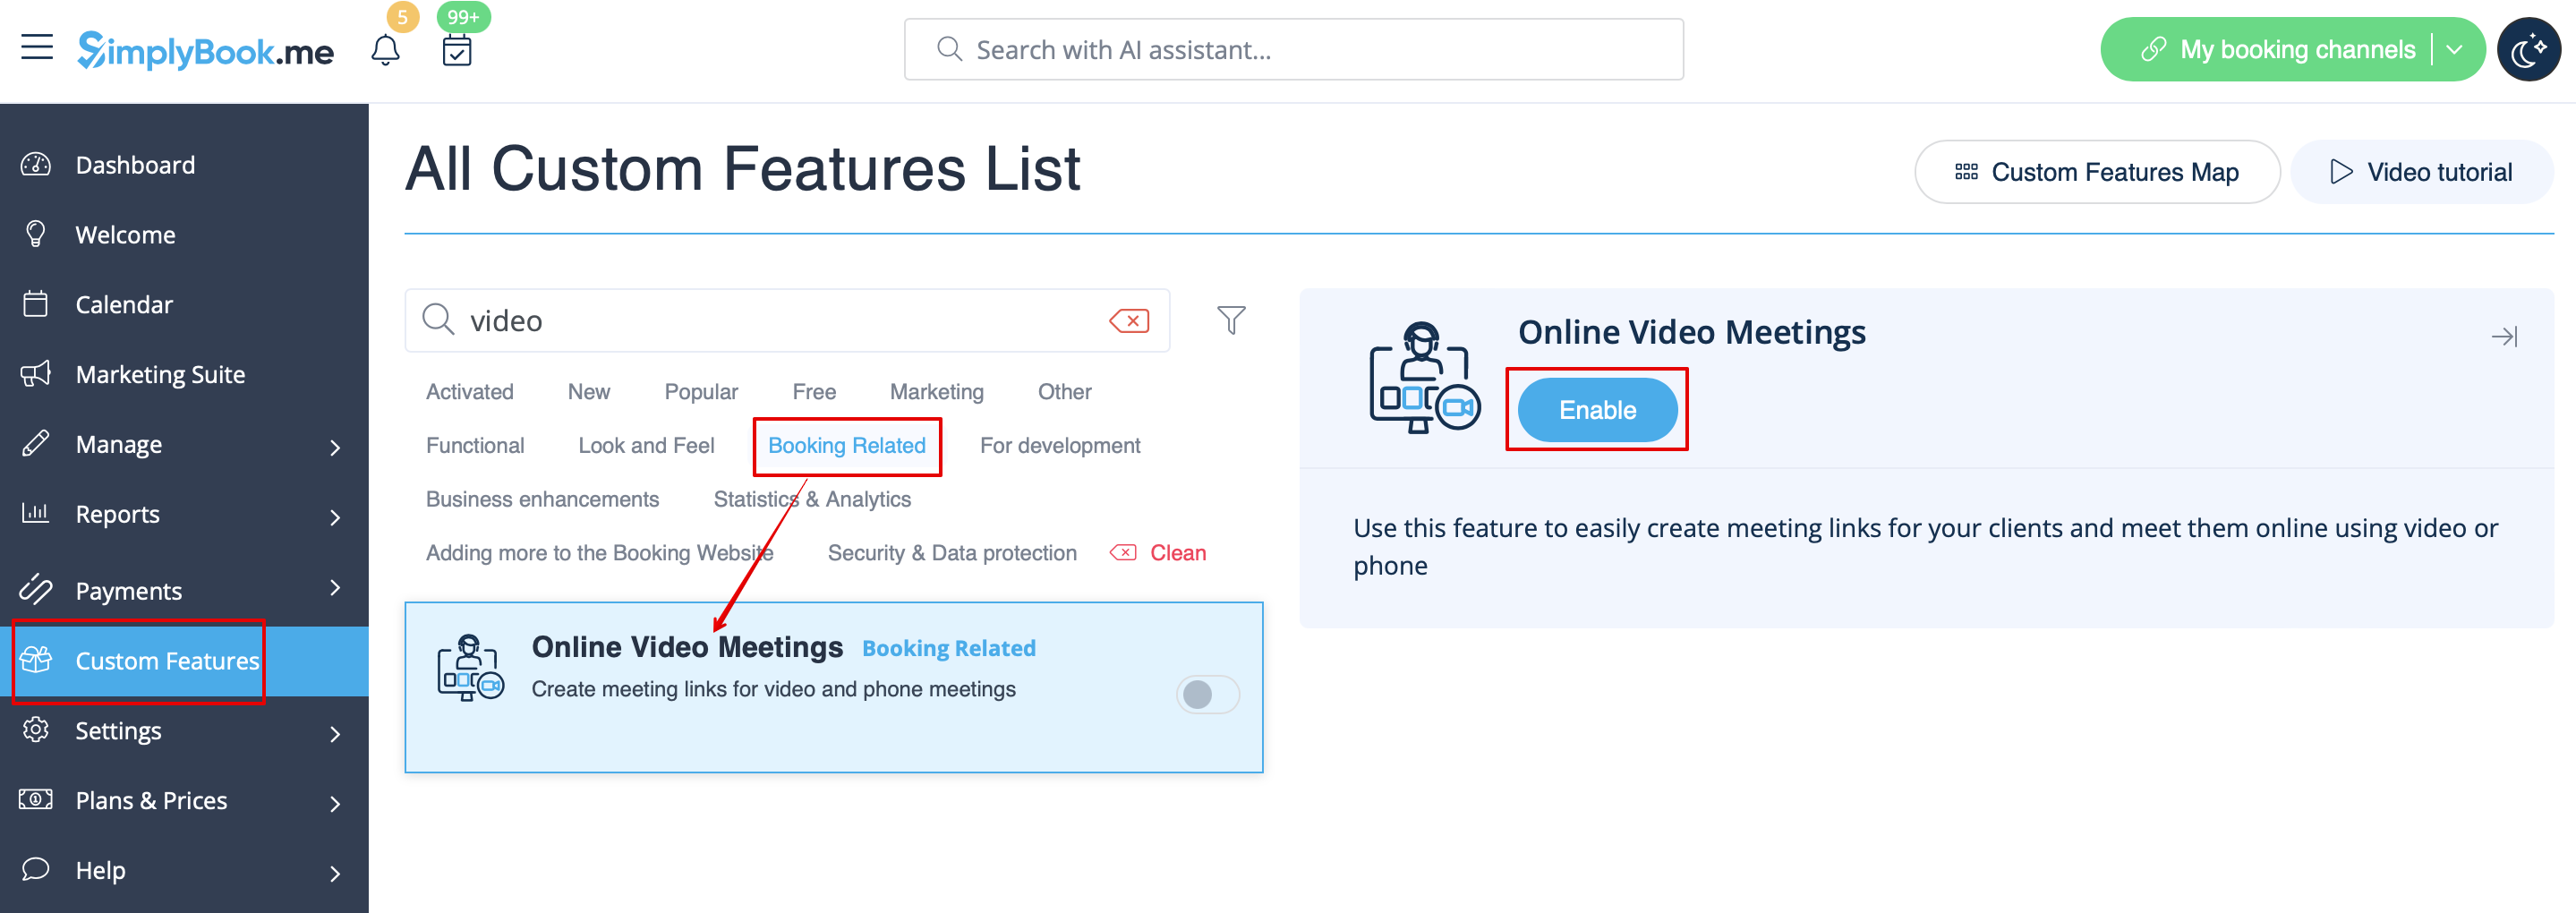
1. Enable Online meetings custom feature in your SimplyBook.me account by navigating to the Custom Features page within your Simplybook.me admin interface and click on the Enable button next to Online video meetings custom feature.
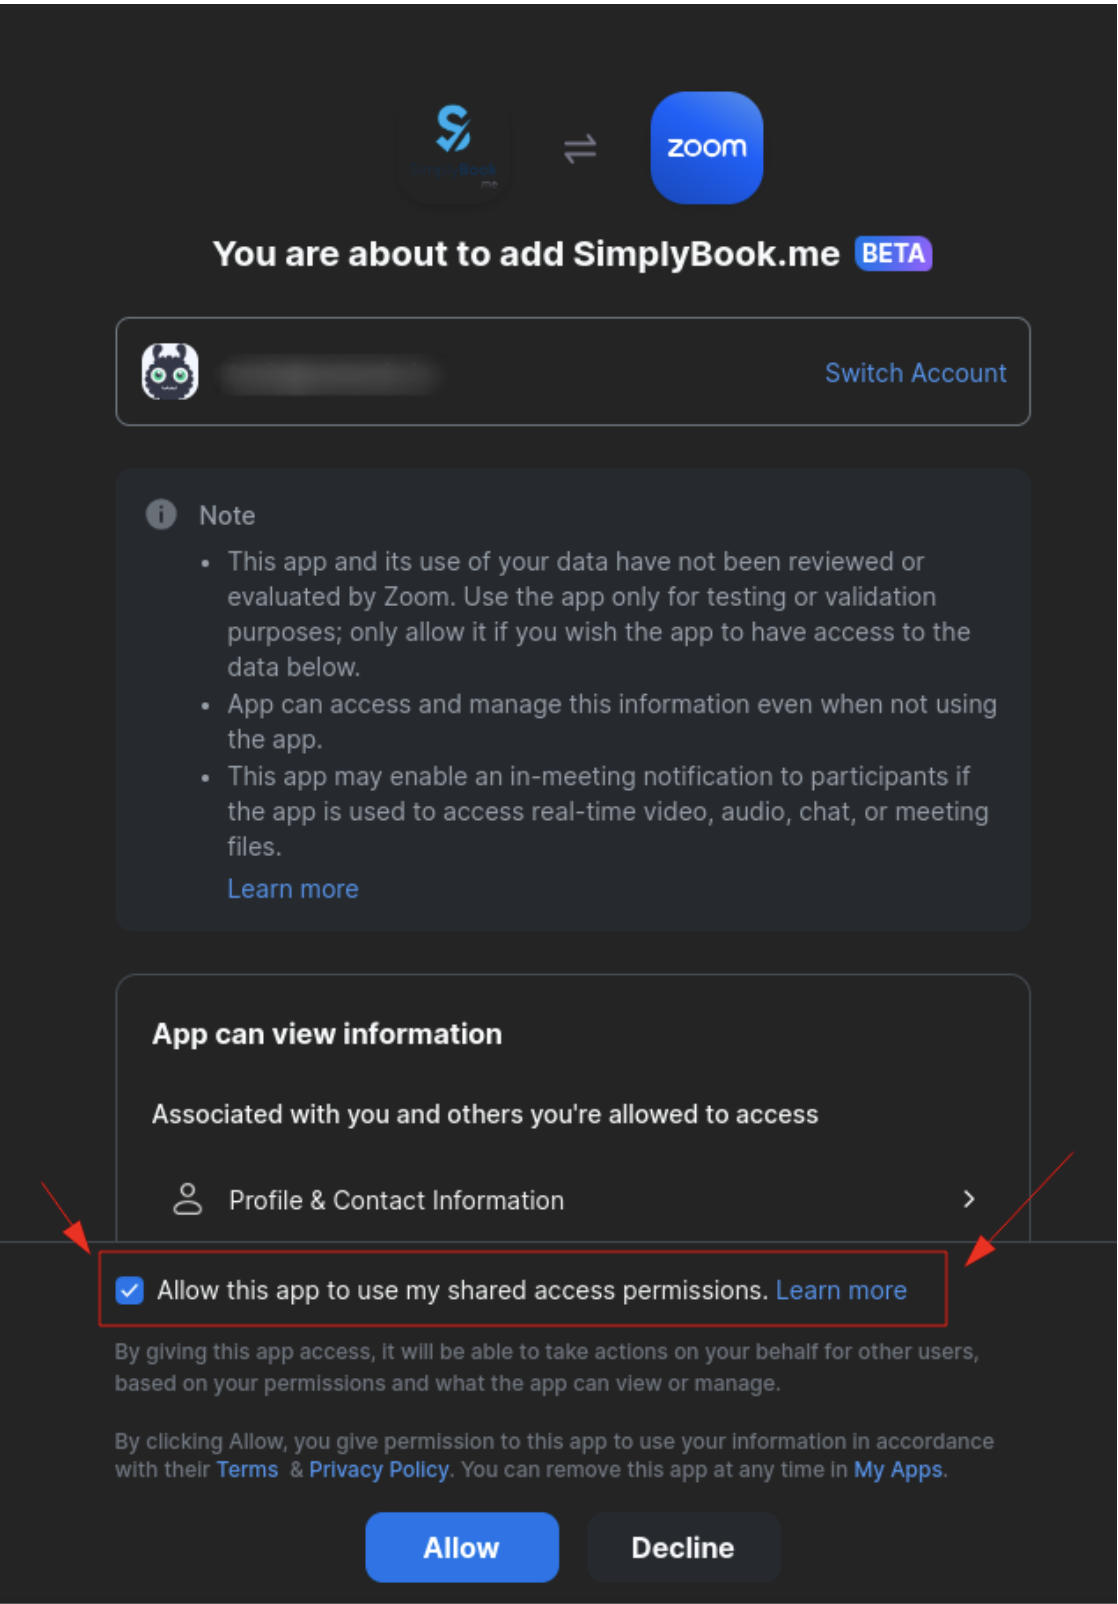
2. In the feature settings click on Authorization button near Zoom option to connect your Zoom account.

3. Enter your credentials to log into Zoom, or click SSO, Google, or Facebook to log in through those services.
You can connect one zoom account per company OR connect all zoom users added to your account by checking the checkbox Allow this app to use my shared access permissions
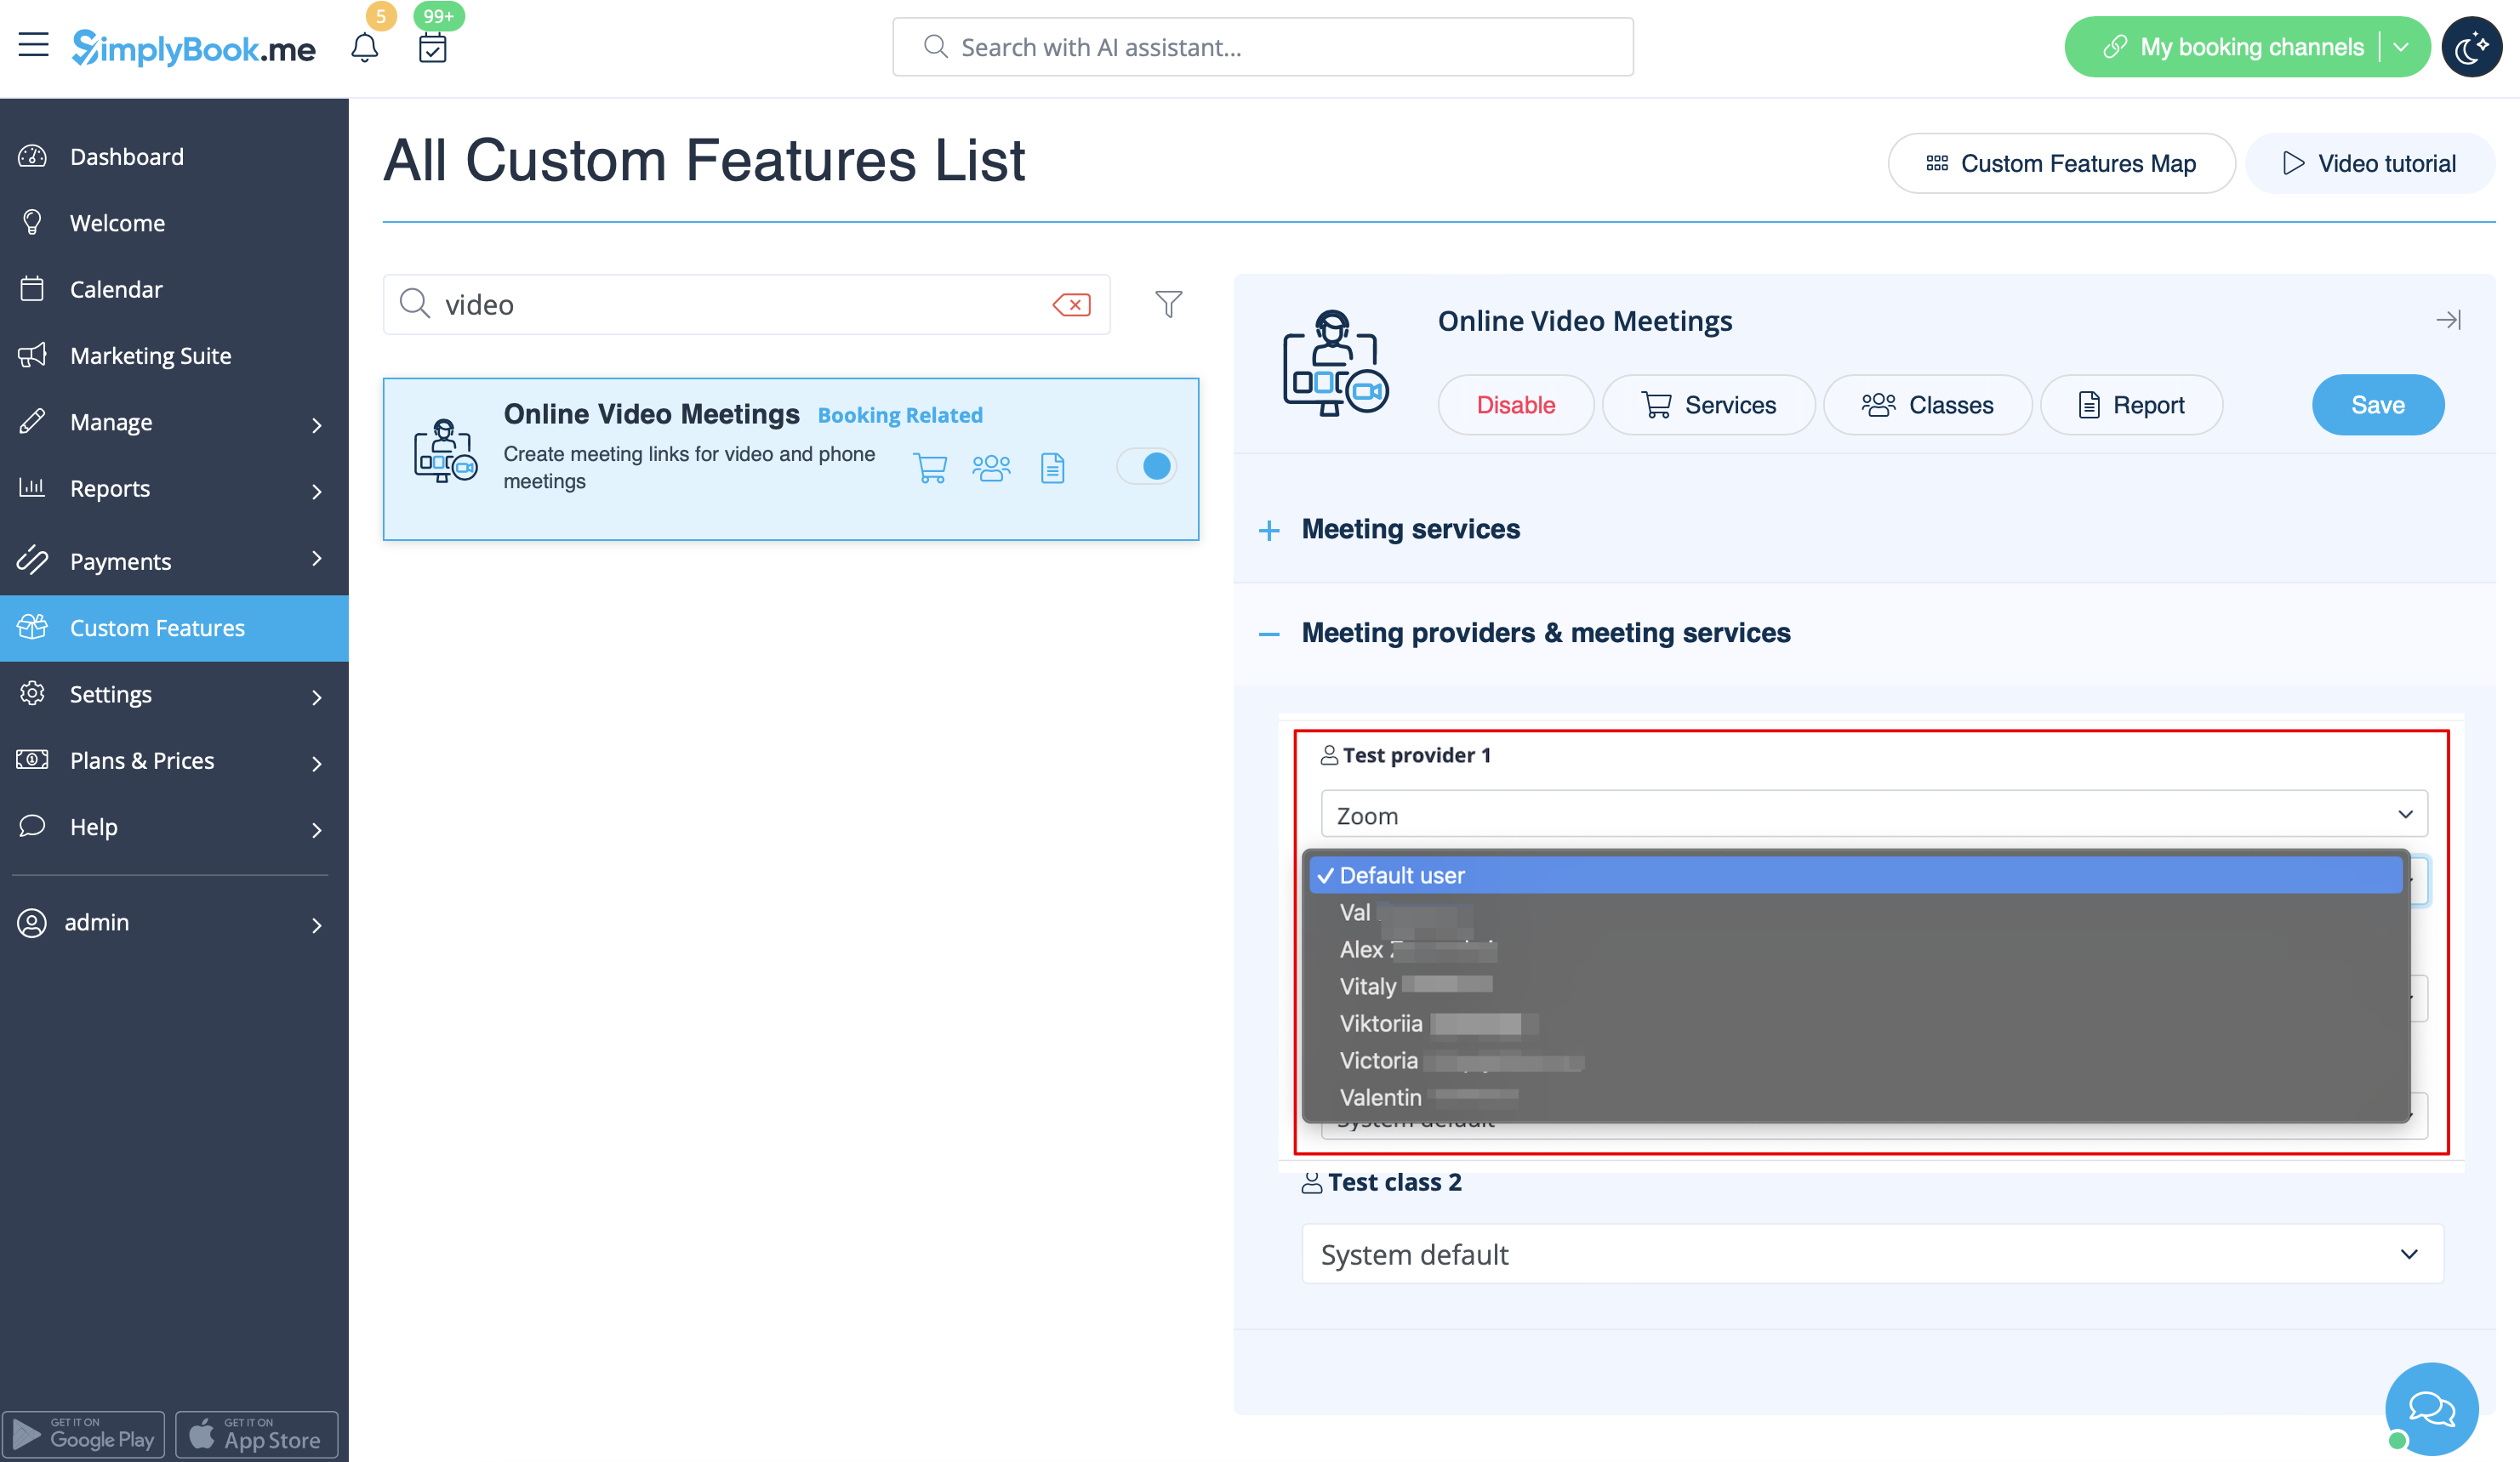
4. After Zoom is authorized, click on Meeting Providers and Meeting Services and choose providers that should be connected to Zoom by selecting Zoom option from the respective drop down. In the next drop-down please select Zoom user (if you have several users under your Zoom account) that should be connected to that provider.
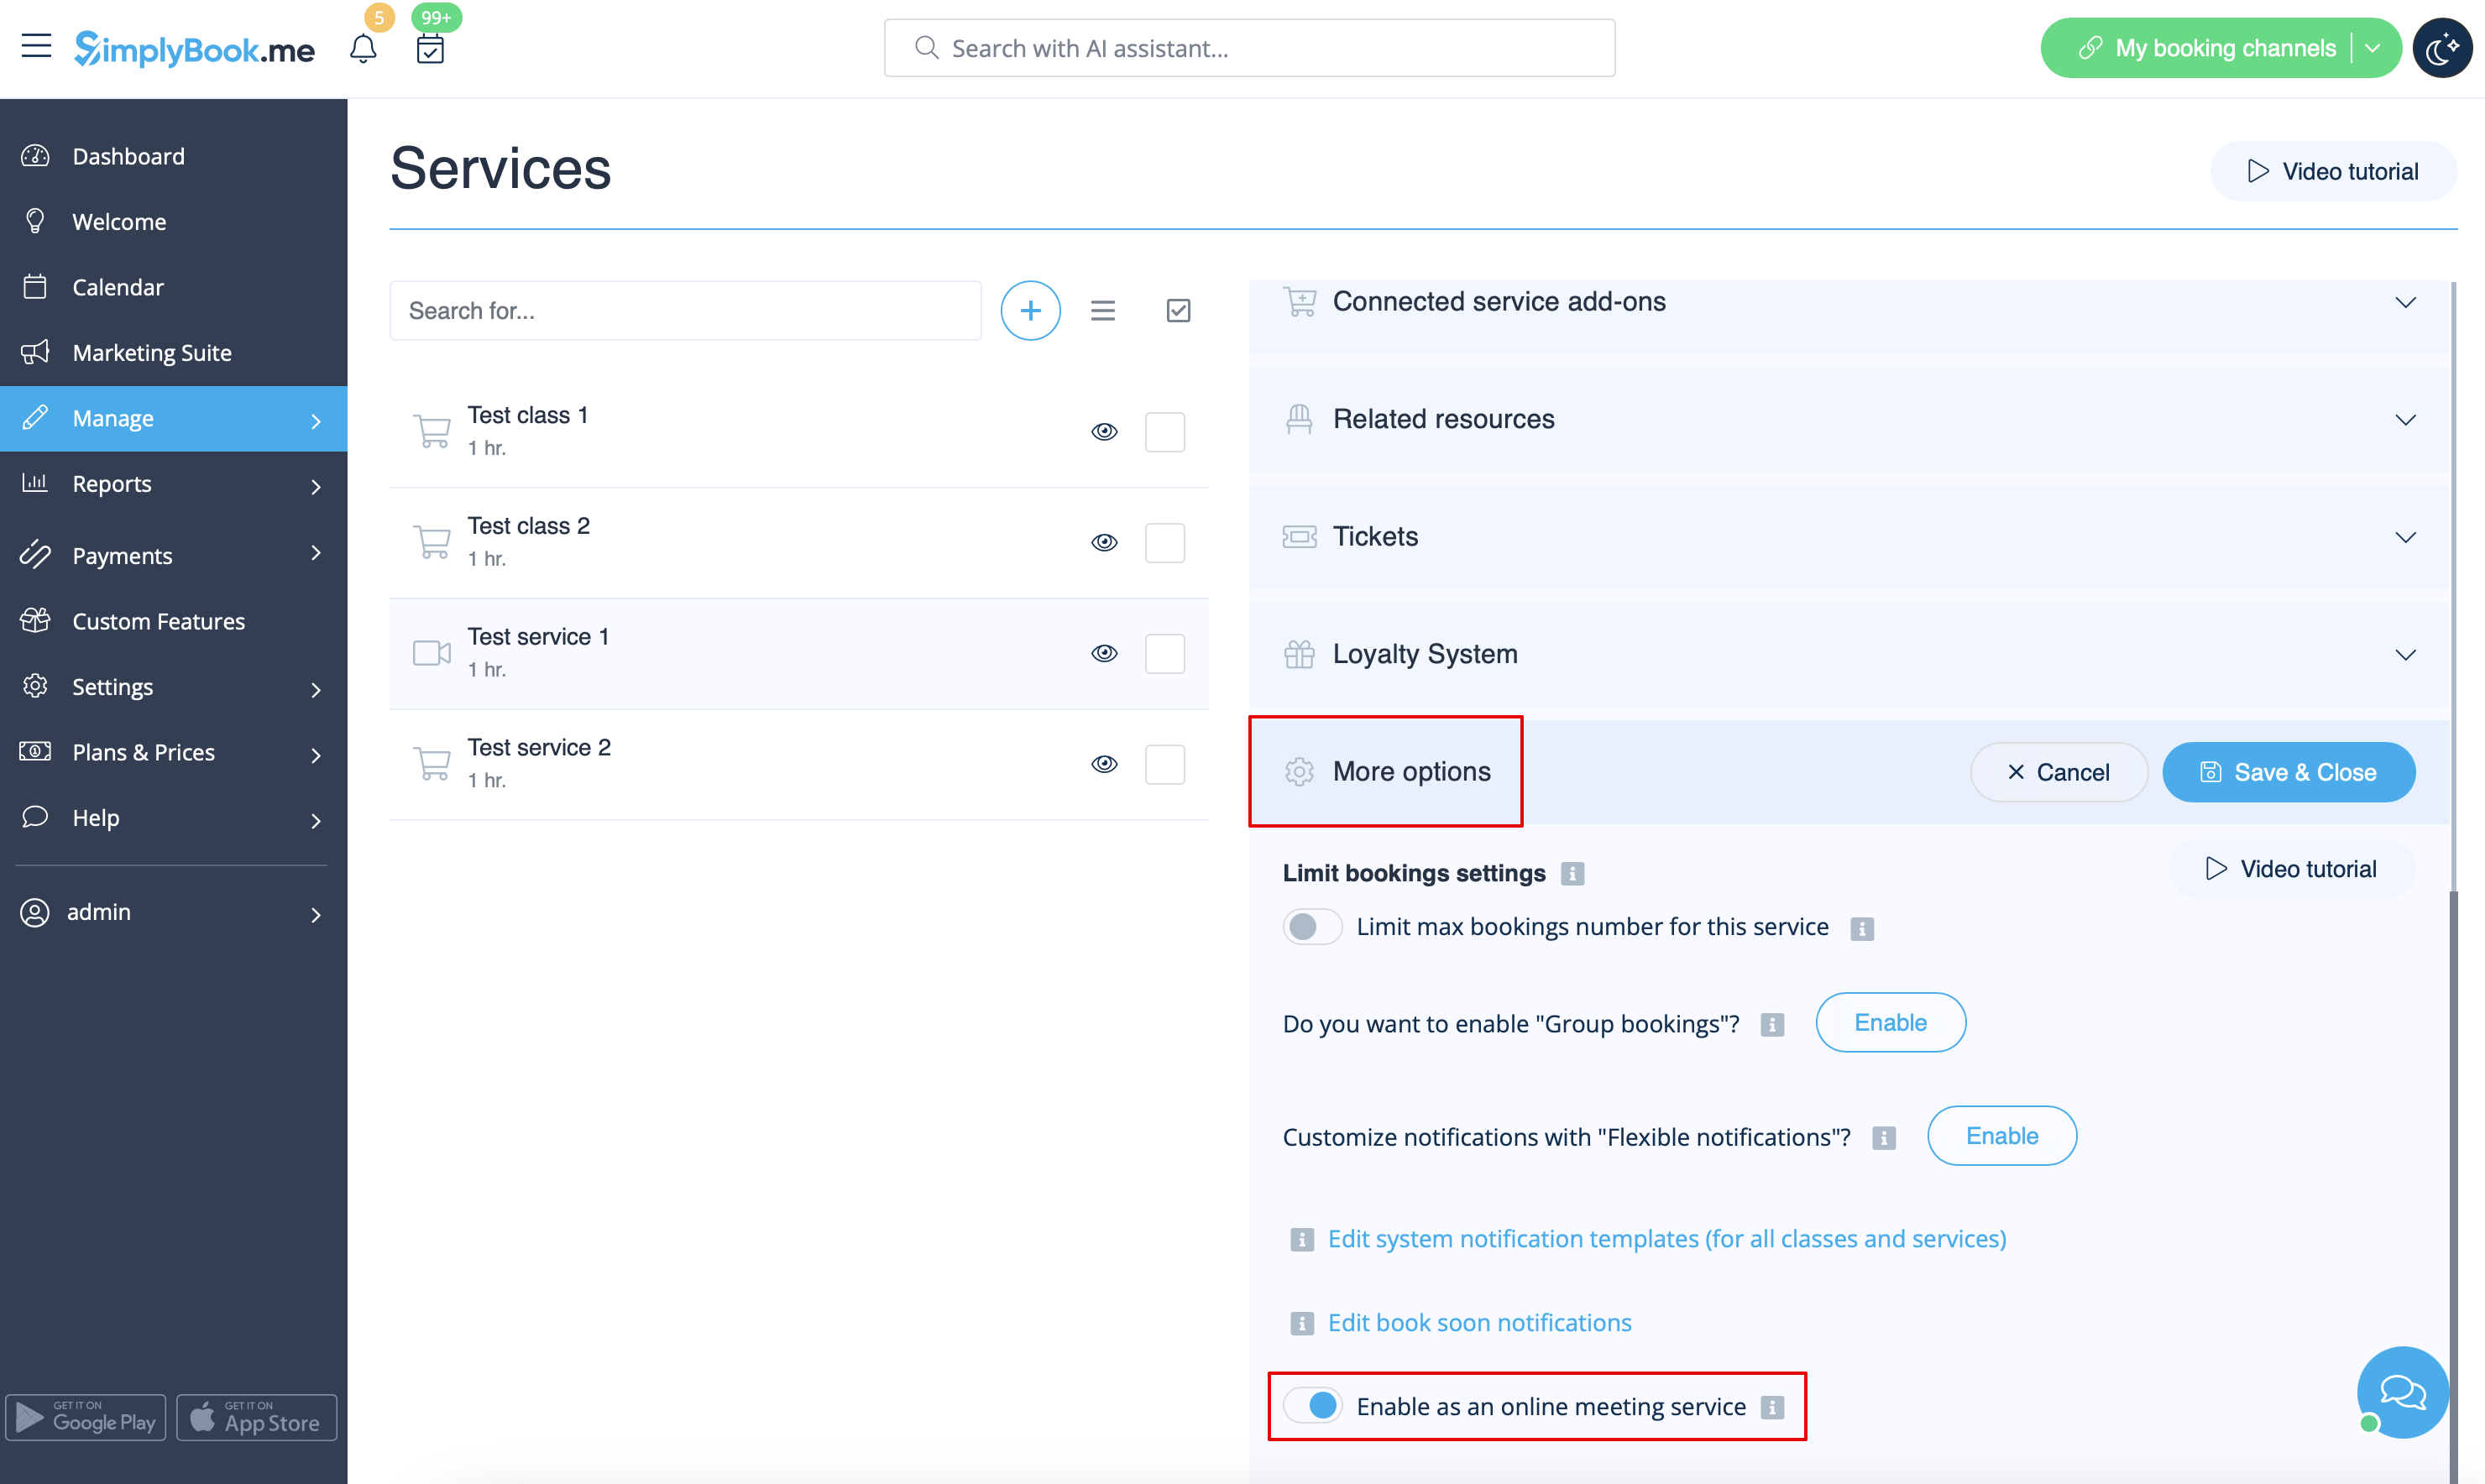
5. After your Zoom connection is set, the last thing you need to do is enable online meeting option for your services. To do that please navigate to Manage -> Services -> click on needed Service name -> scroll down to More options.
(in Manage -> Classes -> click on Class name -> More options if you are using Classes feature) and switch on the option Enable as online meeting service/class.
6. When the clients book such a service/class there will be online meeting link on My bookings page for the associated booking. When the appointment time comes the clients will be able to follow it to access the meeting.
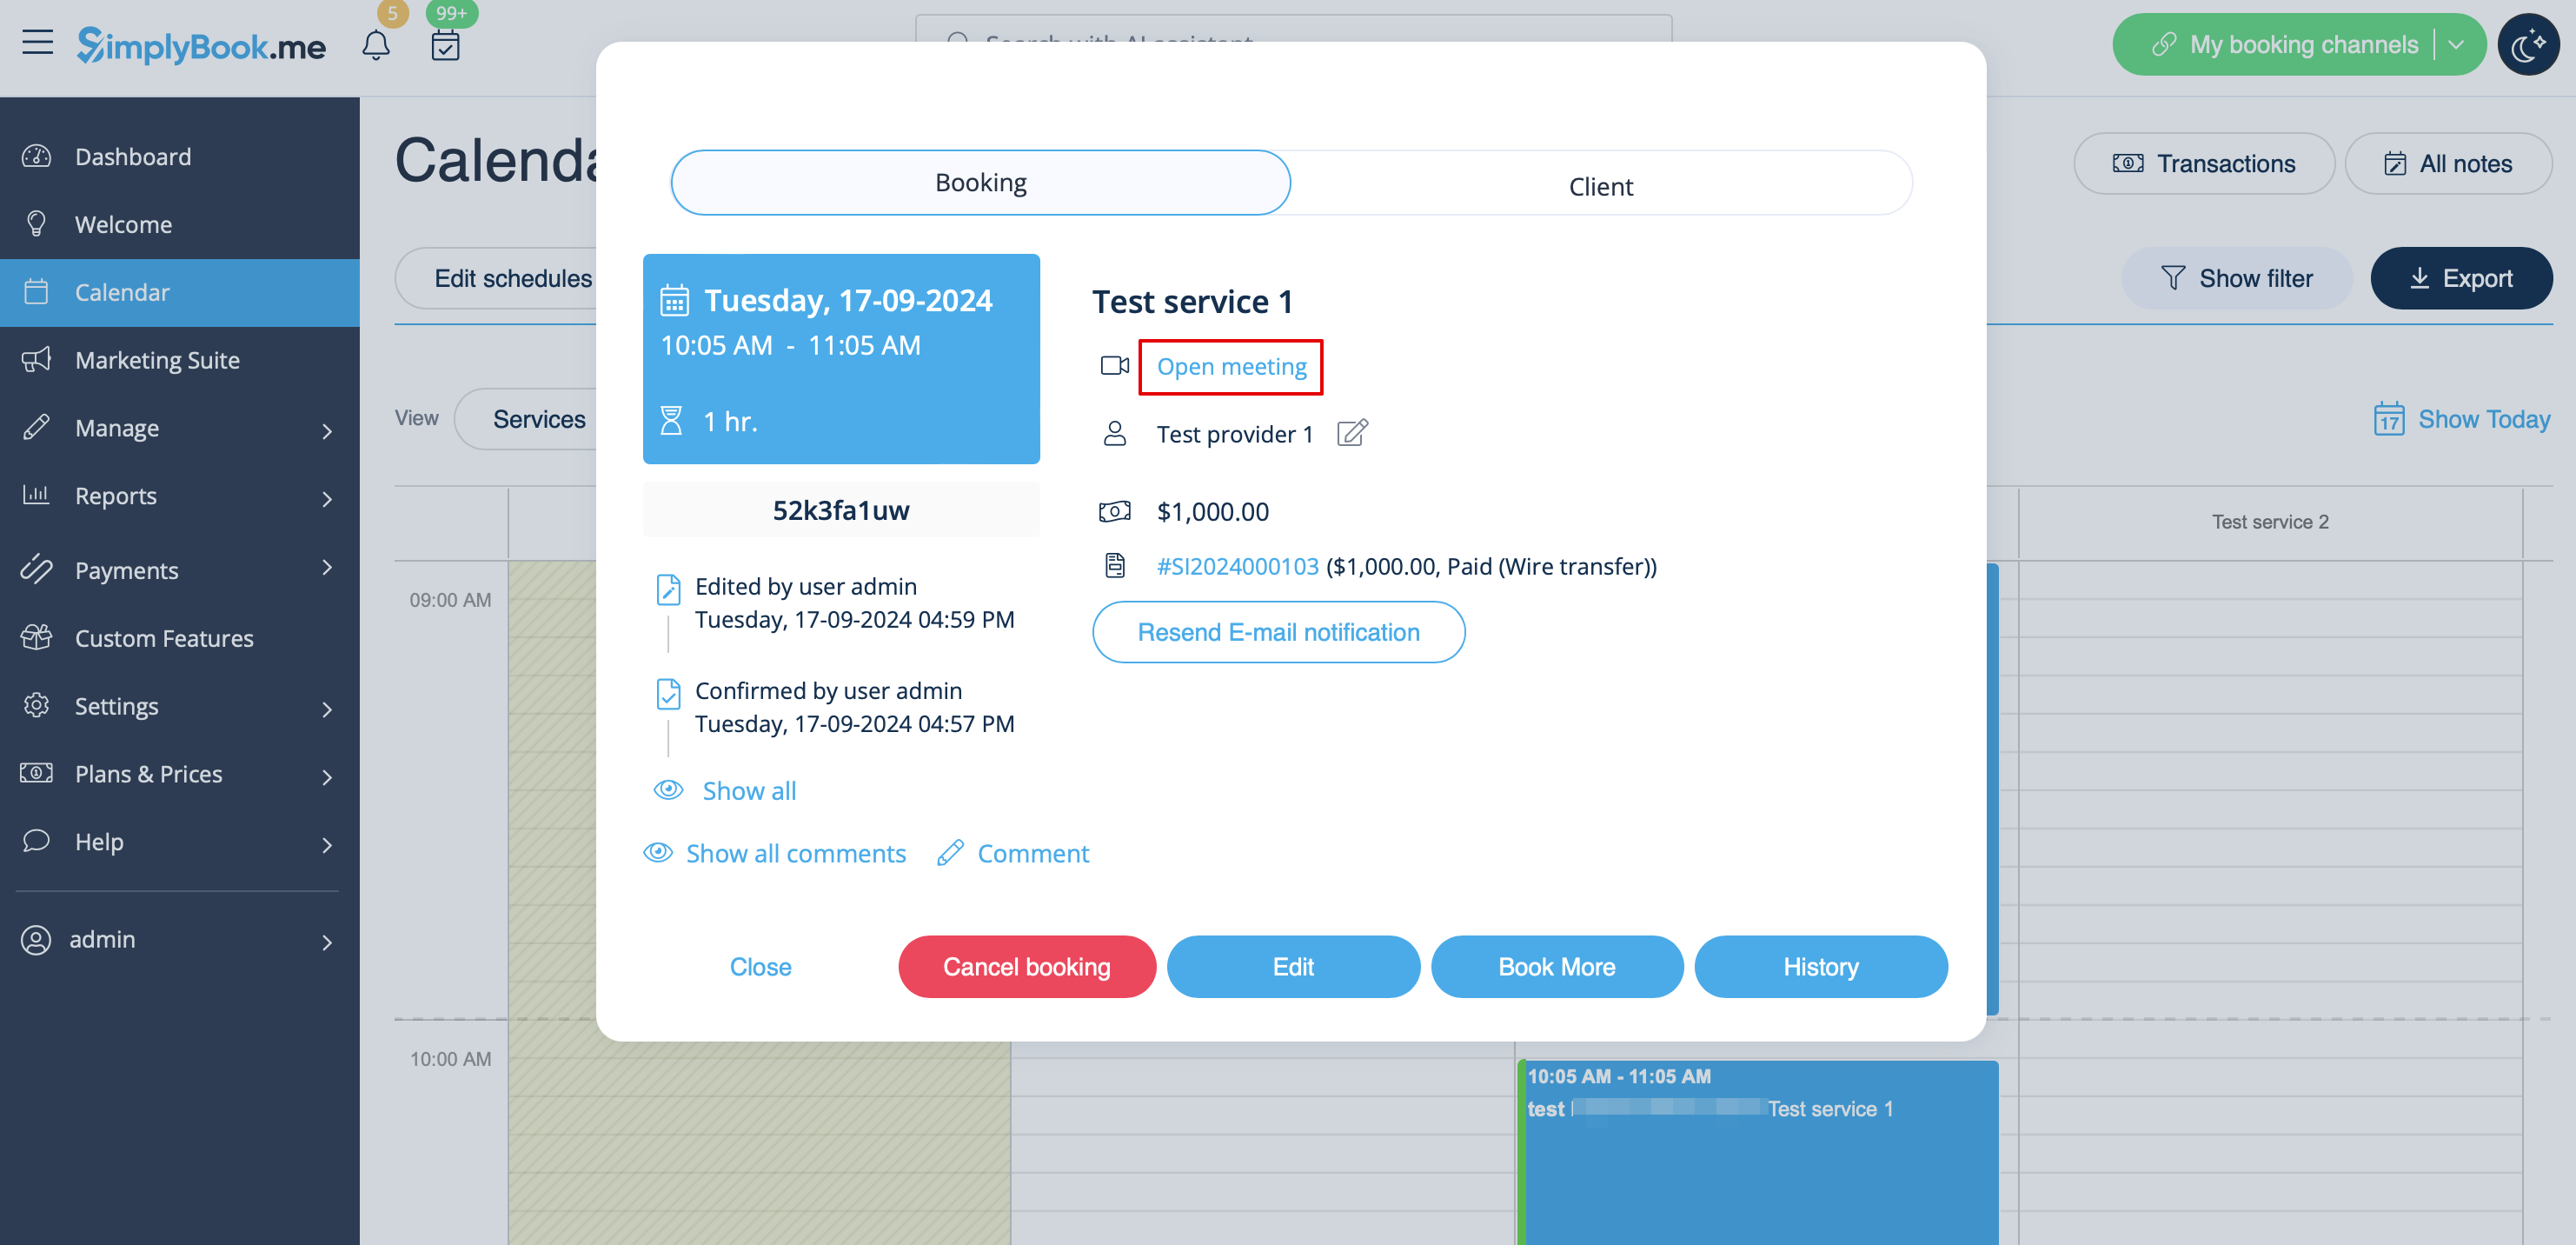
For admin side it will be possible to follow the link from booking info popup form in Calendar or in Reports -> Booking details, or in Reports -> Online video meetings.
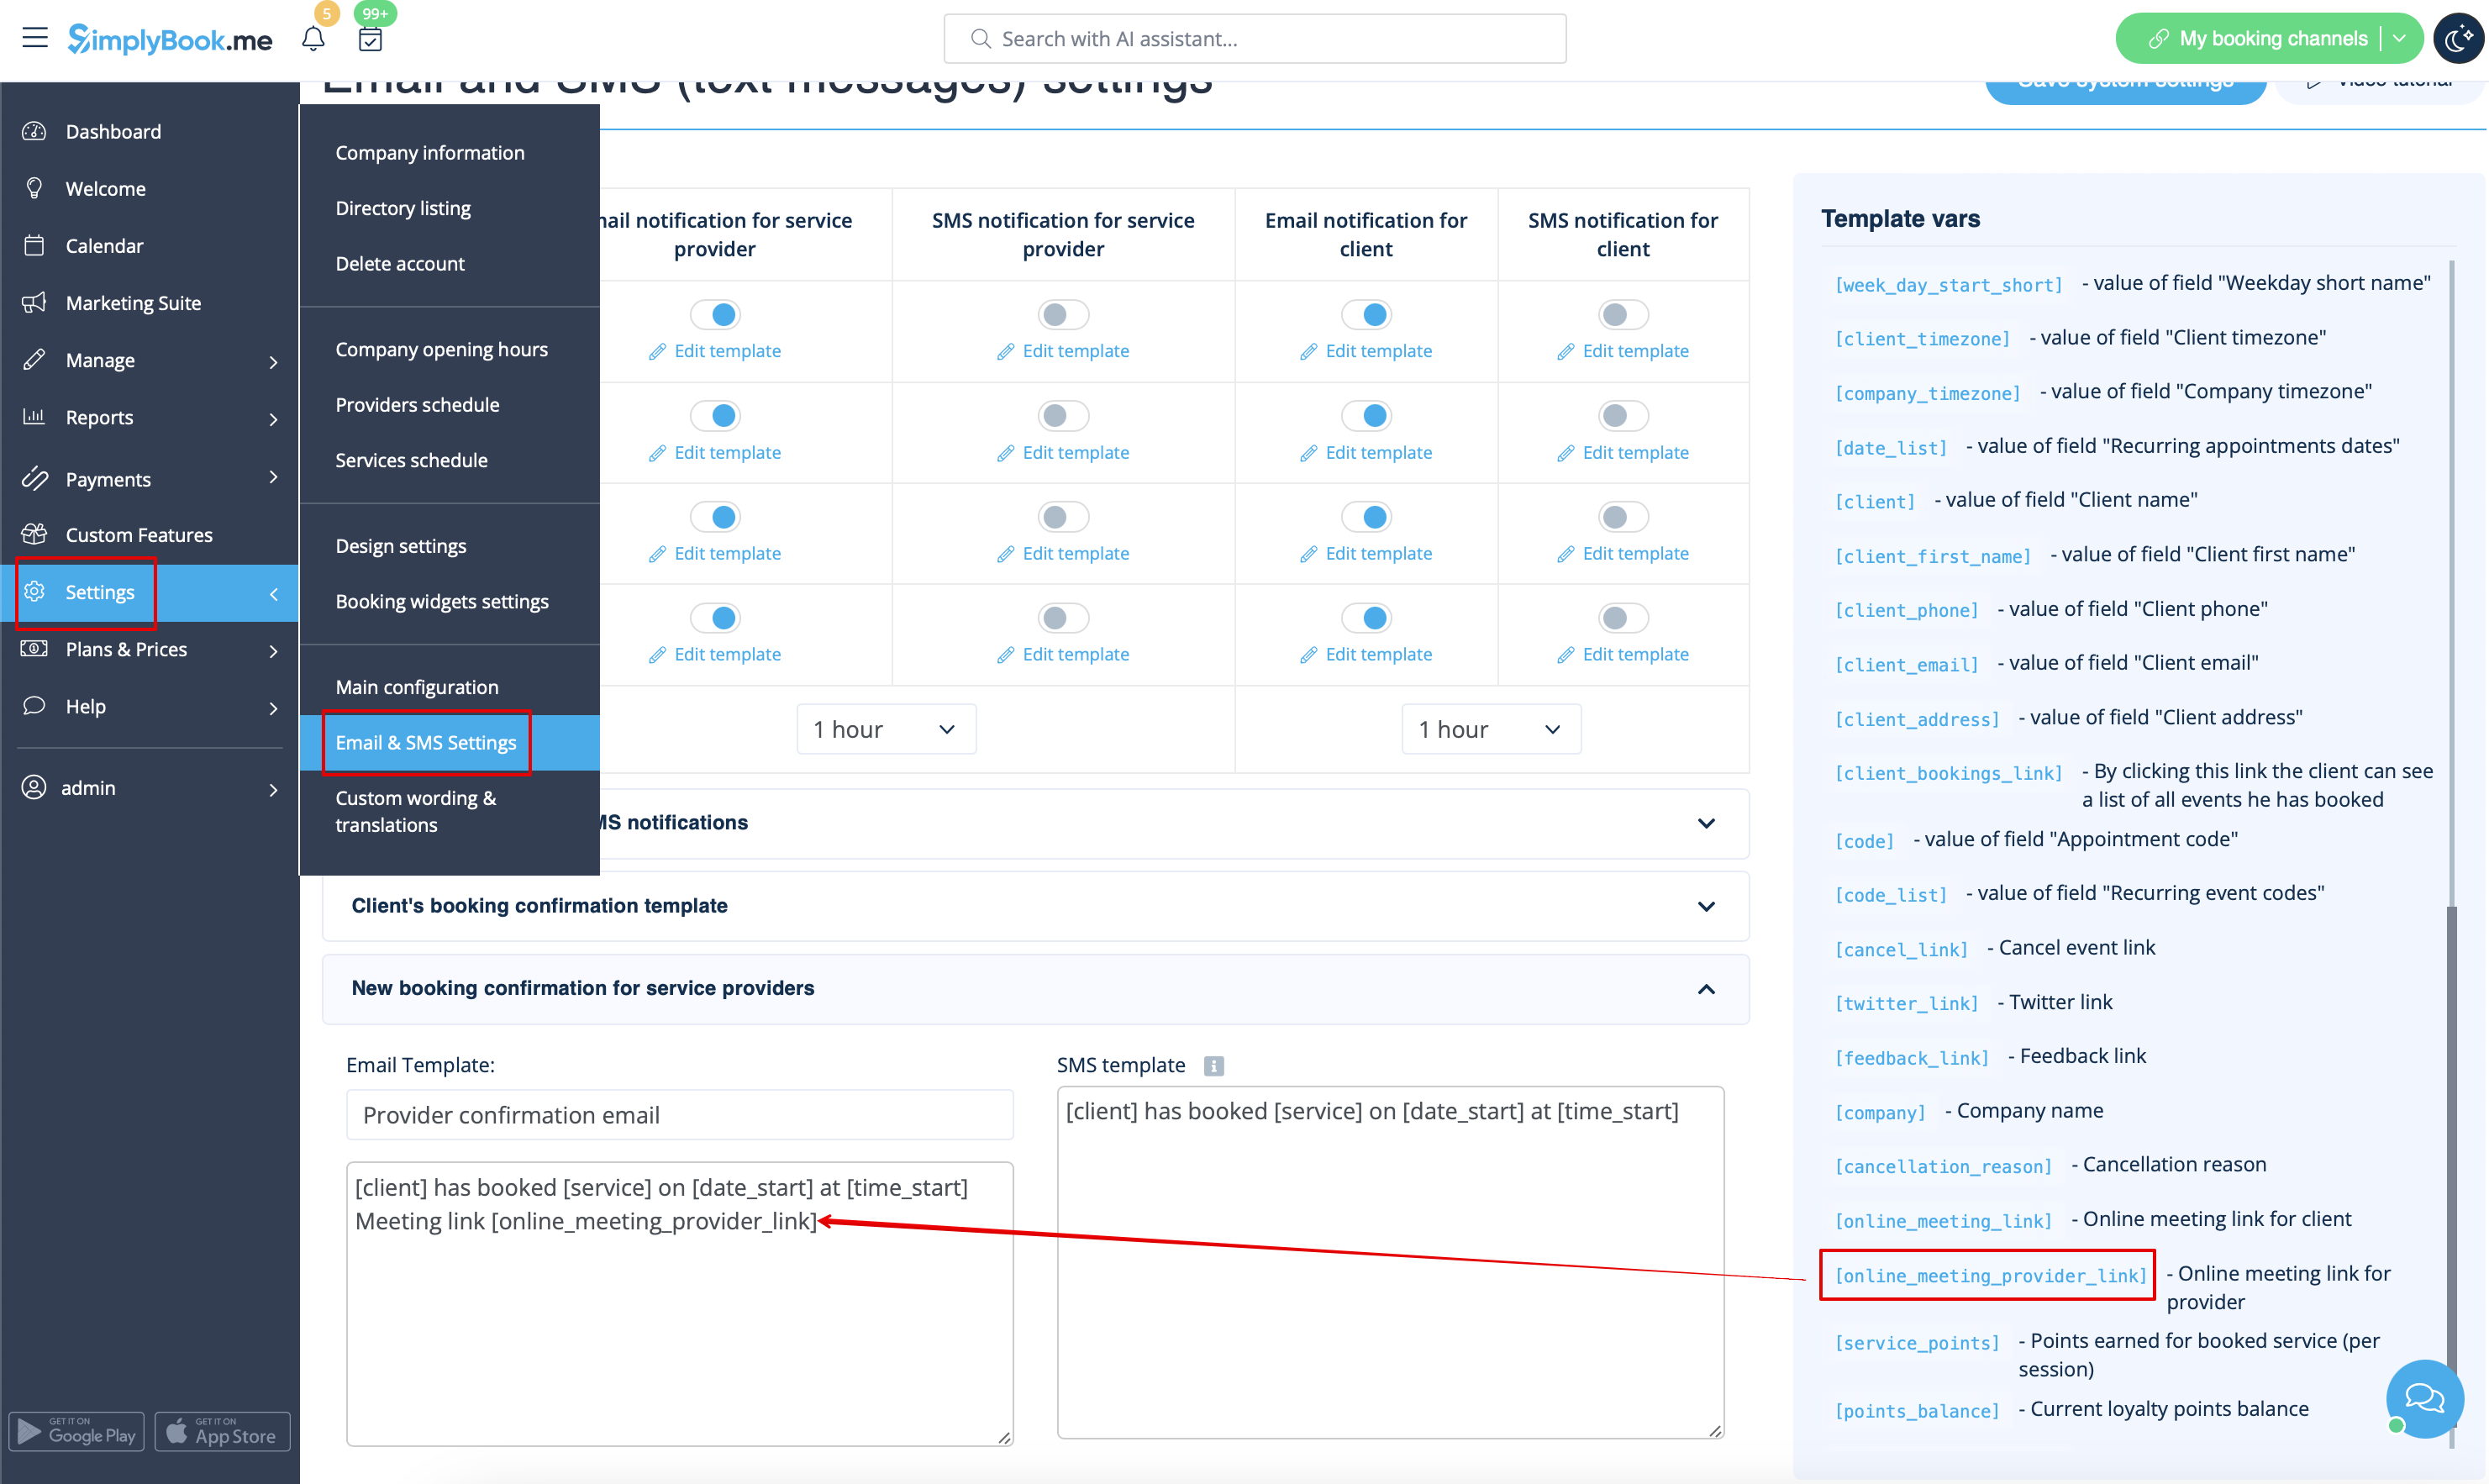
7. (optional) As well you can add online meetings link to provider and client notification templates so that both sides receive them with the booking details.
- To do that for your client notifications please navigate to Settings -> Email and SMS settings (or Custom features -> Flexible notifications -> Manage if you have customized notifications per service and/or provider) and edit your Client's booking confirmation template to add [online_meeting_link] variable to send Zoom links to your clients.
To make everything work simply paste [online_meeting_link] variable to the desired place in your "Client's booking confirmation template" so when a client books a service, a Zoom meeting link will be automatically generated at the place of a variable.
- To let your service providers receive Zoom links in their confirmations please add [online_meeting_provider_link] variable to your New booking confirmation for service providers in Settings -> Email and sms settings (or Custom features -> Flexible notifications -> Manage if you have customized notifications per service and/or provider).
- How the meeting process works
1. After everything is set up and the client books the online meetings related service/class both the client and the provider (or company, depending on your settings) will get the links to the meeting.
2. On the admin end provider can get to the meeting page right from the booking on "Calendar" by clicking on "Open meeting" link in the booking details popup.
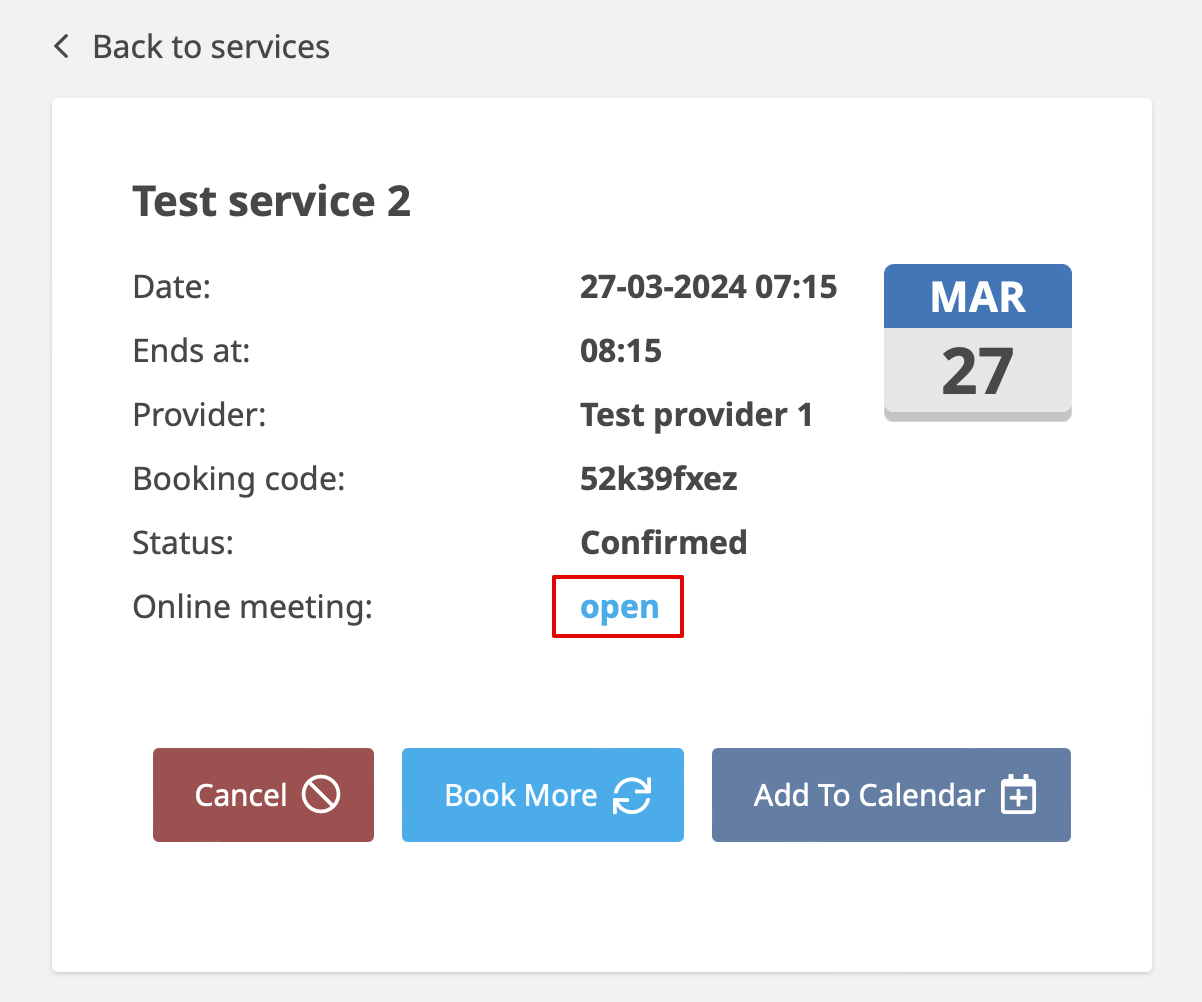
3. Clients can open meeting link from booking details on "My bookings" page of the booking site.
4. After that, when the meeting time comes, both provider and client will be redirected to the Zoom online meeting page.
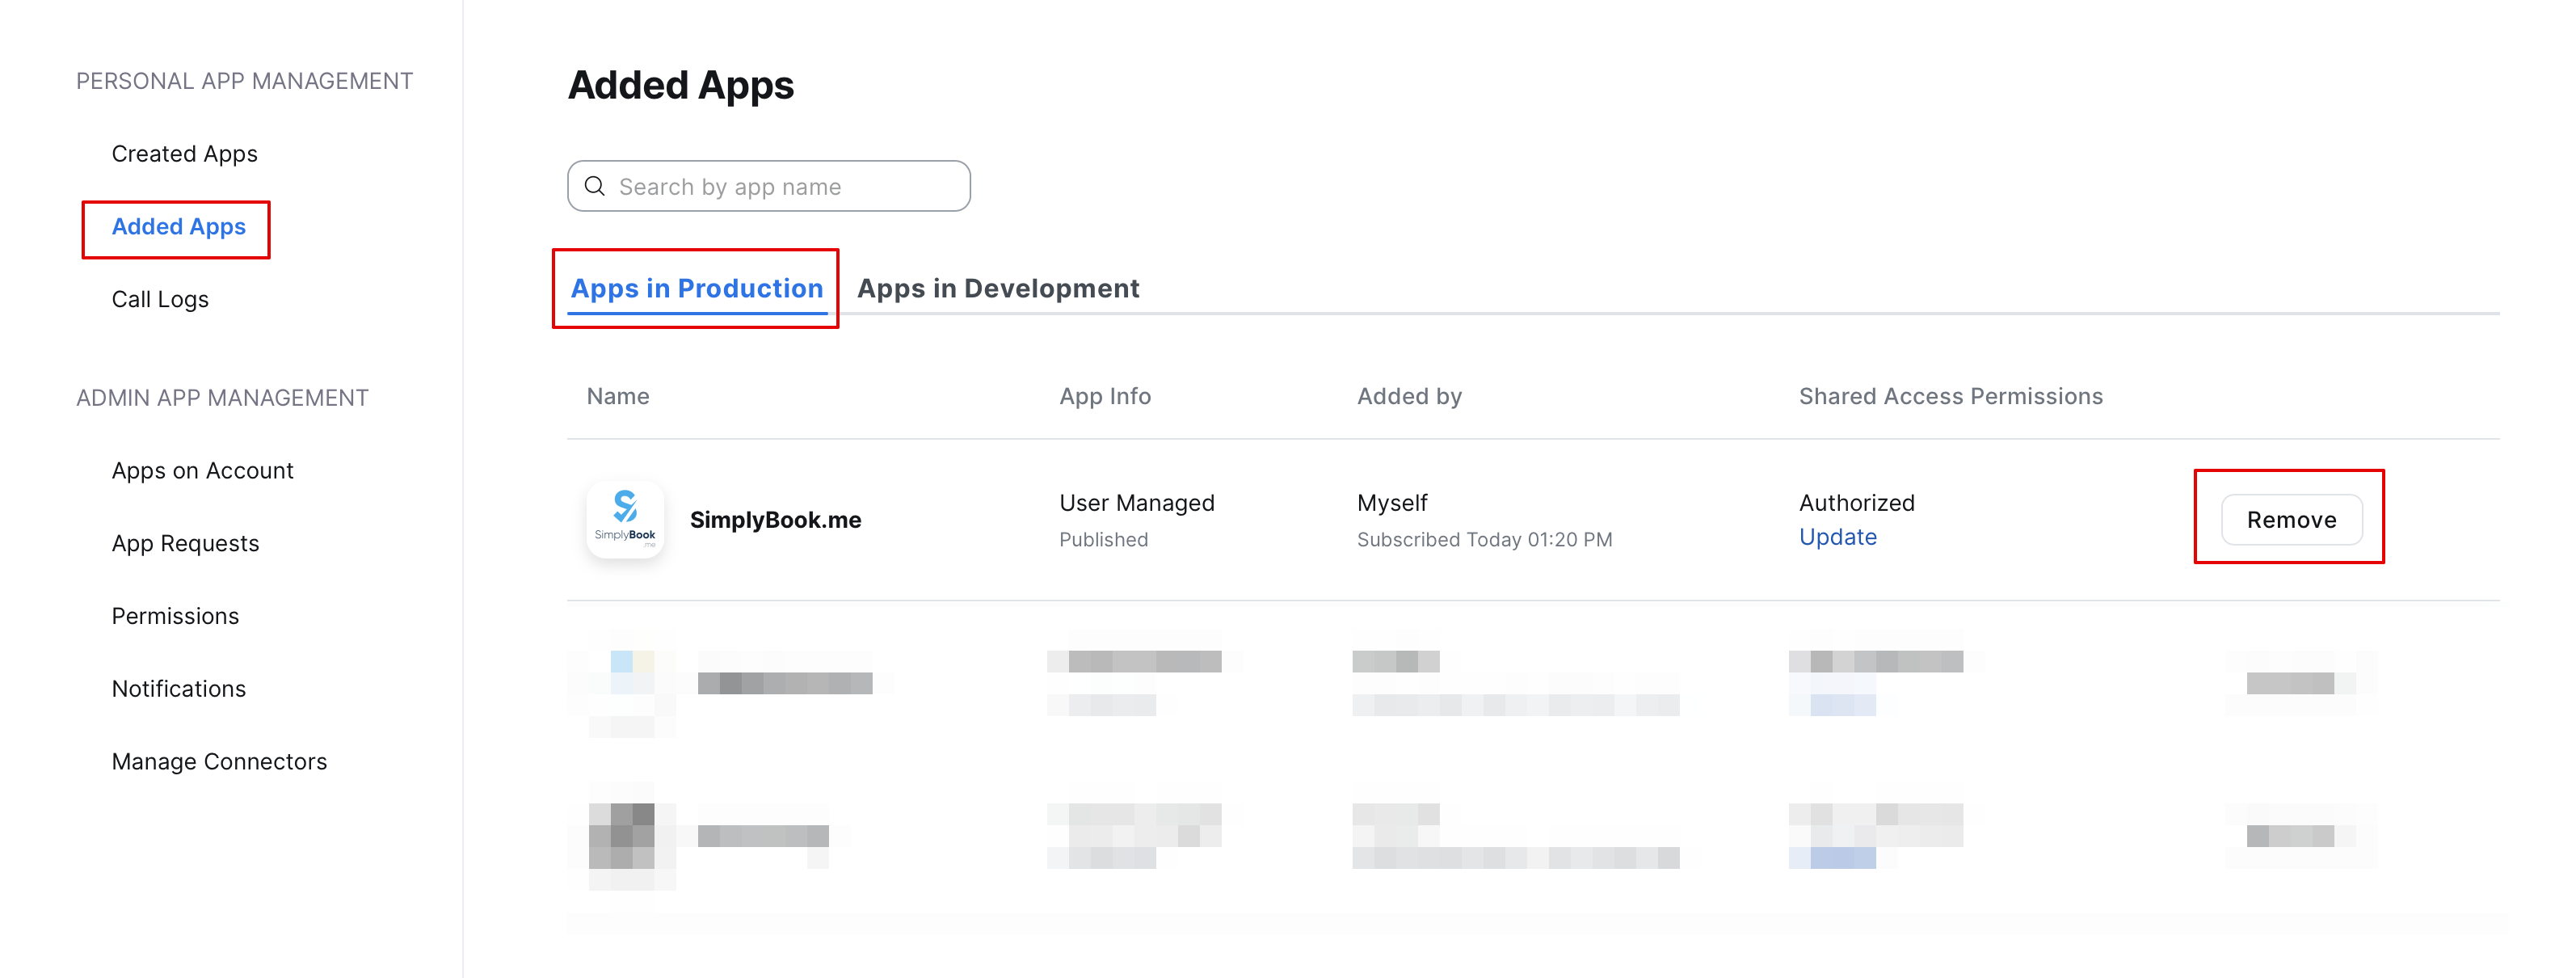
- How to remove integration
From the Simplybook.me side
- Navigate to the Custom Features page within your Simplybook.me admin interface and click on Online video meetings custom feature to open its settings.
- In the feature settings locate Zoom and click Logout.
- After that Zoom integration will be removed from your Simplybook.me account.
From the Zoom side
Please note! If you did not check the box “Allow this app to use my shared access permissions” OR you want to switch connected Zoom account to another one - there will be no option to do that from Simplybook.me side due to technical restrictions.
In order to do that you will need to disconnect Simplybook.me directly from Zoom and after that you will be able to connect new account on the Simplybook.me side.
- To disconnect the integration from the Zoom side please follow this link.
- Locate Simplybook.me in the list of connected apps (you can use search if needed).
- Click on Remove button to disconnect.
- Now the integration is removed and you can connect different account if needed.