Difference between revisions of "Calendar Notes"
From SimplyBook.me
(Created page with "{{#seo: |title=Calendar Notes- SimplyBook.me |titlemode=append |keywords=faq, frequently asked questions, booking software, appointment system questions, appointments online,...") |
|||
| Line 6: | Line 6: | ||
<br><br><br><br> | <br><br><br><br> | ||
| − | It may be necessary to add some important information to the <span style="background-color:#d4f8e5; padding:5px; border-radius:5px;">Calendar</span> page that will be shown along with bookings or you | + | It may be necessary to add some important information to the <span style="background-color:#d4f8e5; padding:5px; border-radius:5px;">Calendar</span> page that will be shown along with bookings or you need to quickly block some period of time and indicate the reason.<br> |
| − | That is why we have launched a new option Calendar Notes that makes | + | That is why we have launched a new option Calendar Notes with time blocking functionality that makes it possible and now you can keep all the necessary things at hand. |
<br><br><br><br> | <br><br><br><br> | ||
;How to use: | ;How to use: | ||
| Line 15: | Line 15: | ||
:2. When all types are ready for use navigate to <span style="background-color:#d4f8e5; padding:5px; border-radius:5px;">Calendar</span> page using the <span style="background-color:#d4f8e5; padding:5px; border-radius:5px;">left-side menu.</span> | :2. When all types are ready for use navigate to <span style="background-color:#d4f8e5; padding:5px; border-radius:5px;">Calendar</span> page using the <span style="background-color:#d4f8e5; padding:5px; border-radius:5px;">left-side menu.</span> | ||
<br><br> | <br><br> | ||
| − | :3. Switch to <span style="background-color:#d4f8e5; padding:5px; border-radius:5px;">Add note</span> mode in the <span style="background-color:#d4f8e5; padding:5px; border-radius:5px;">top right corner.</span> | + | :3. Switch to <span style="background-color:#d4f8e5; padding:5px; border-radius:5px;">Add note/Block time</span> mode in the <span style="background-color:#d4f8e5; padding:5px; border-radius:5px;">top right corner.</span> |
| − | [[File: | + | [[File:Add note mode calendar.png |border|center]] |
<br><br> | <br><br> | ||
| − | :4. Click on the <span style="background-color:#d4f8e5; padding:5px; border-radius:5px;">free space</span> in the <span style="background-color:#d4f8e5; padding:5px; border-radius:5px;">Calendar table</span> where you would like to insert the information to get <span style="background-color:#d4f8e5; padding:5px; border-radius:5px;">note popup form.</span> | + | :4. Click on the <span style="background-color:#d4f8e5; padding:5px; border-radius:5px;">free space</span> in the <span style="background-color:#d4f8e5; padding:5px; border-radius:5px;">Calendar table</span> where you would like to insert the information or block time to get <span style="background-color:#d4f8e5; padding:5px; border-radius:5px;">note popup form.</span> |
<br><br> | <br><br> | ||
| − | :5. | + | :5. Check <span style="background-color:#d4f8e5; padding:5px; border-radius:5px;">Time is blocked</span> option to close the availability if needed, add the details to the <span style="background-color:#d4f8e5; padding:5px; border-radius:5px;">textbox</span> and select the assignee: you can add a note or close time per <span style="background-color:#d4f8e5; padding:5px; border-radius:5px;">specific provider,</span> <span style="background-color:#d4f8e5; padding:5px; border-radius:5px;">service</span> or <span style="background-color:#d4f8e5; padding:5px; border-radius:5px;">everyone.</span> |
| − | [[File: | + | [[File:Block time and assignee for notes.png|border|center]] |
<br><br> | <br><br> | ||
:6. To edit or delete the previously added note <span style="background-color:#d4f8e5; padding:5px; border-radius:5px;">click on it</span> to get the popup and use the needed function there. | :6. To edit or delete the previously added note <span style="background-color:#d4f8e5; padding:5px; border-radius:5px;">click on it</span> to get the popup and use the needed function there. | ||
| − | [[File:Edit | + | [[File:Edit note-block time.png|border|center]] |
<br><br> | <br><br> | ||
<br><br> | <br><br> | ||
;Notes overview options: | ;Notes overview options: | ||
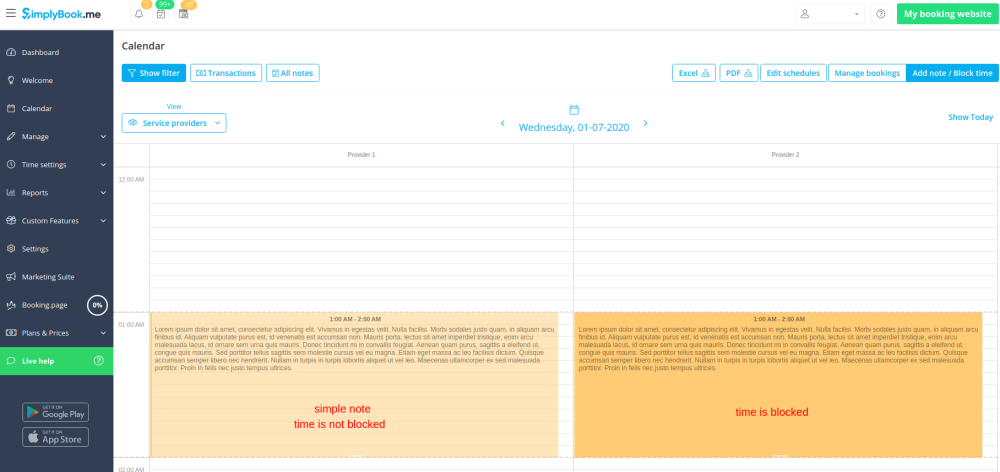
| + | :If you have checked <span style="background-color:#d4f8e5; padding:5px; border-radius:5px;">Time is blocked</span> such notes will have a bit brighter color compared to simple text notes. | ||
| + | [[File:Blocked vs not blocked.png|border|center]] | ||
| + | <br><br> | ||
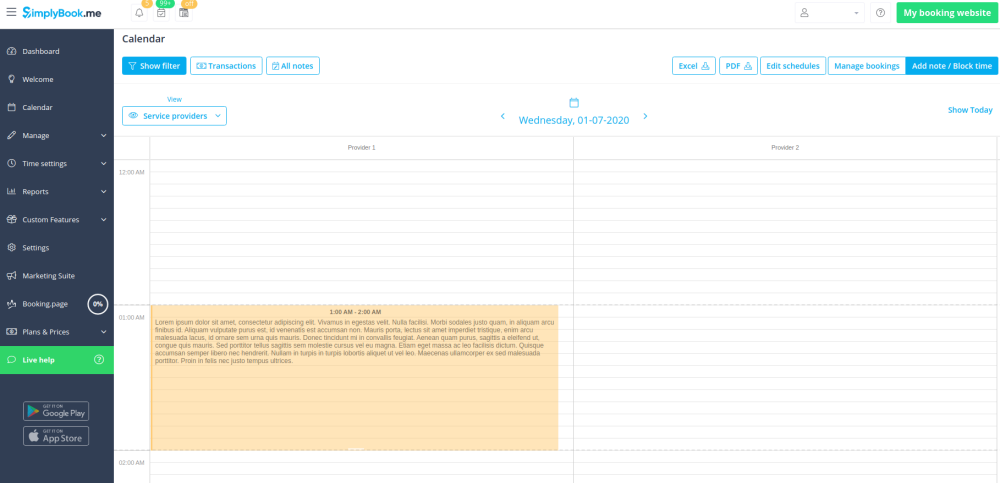
:If you have added a note <span style="background-color:#d4f8e5; padding:5px; border-radius:5px;">per provider</span> it will be shown in <span style="background-color:#d4f8e5; padding:5px; border-radius:5px;">Service Provider,</span> <span style="background-color:#d4f8e5; padding:5px; border-radius:5px;">Timeline,</span> <span style="background-color:#d4f8e5; padding:5px; border-radius:5px;">Day,</span> <span style="background-color:#d4f8e5; padding:5px; border-radius:5px;">Week</span> and <span style="background-color:#d4f8e5; padding:5px; border-radius:5px;">Month</span> views. | :If you have added a note <span style="background-color:#d4f8e5; padding:5px; border-radius:5px;">per provider</span> it will be shown in <span style="background-color:#d4f8e5; padding:5px; border-radius:5px;">Service Provider,</span> <span style="background-color:#d4f8e5; padding:5px; border-radius:5px;">Timeline,</span> <span style="background-color:#d4f8e5; padding:5px; border-radius:5px;">Day,</span> <span style="background-color:#d4f8e5; padding:5px; border-radius:5px;">Week</span> and <span style="background-color:#d4f8e5; padding:5px; border-radius:5px;">Month</span> views. | ||
| − | [[File: | + | [[File:Note per provider new.png|border|center]] |
<br><br> | <br><br> | ||
:If you have added a note <span style="background-color:#d4f8e5; padding:5px; border-radius:5px;">per service</span> you will be able to see it in <span style="background-color:#d4f8e5; padding:5px; border-radius:5px;">Service,</span> <span style="background-color:#d4f8e5; padding:5px; border-radius:5px;">Day,</span> <span style="background-color:#d4f8e5; padding:5px; border-radius:5px;">Week</span> and <span style="background-color:#d4f8e5; padding:5px; border-radius:5px;">Month</span> views. | :If you have added a note <span style="background-color:#d4f8e5; padding:5px; border-radius:5px;">per service</span> you will be able to see it in <span style="background-color:#d4f8e5; padding:5px; border-radius:5px;">Service,</span> <span style="background-color:#d4f8e5; padding:5px; border-radius:5px;">Day,</span> <span style="background-color:#d4f8e5; padding:5px; border-radius:5px;">Week</span> and <span style="background-color:#d4f8e5; padding:5px; border-radius:5px;">Month</span> views. | ||
| − | [[File: | + | [[File:Note per service upd.png|border|center]] |
<br><br> | <br><br> | ||
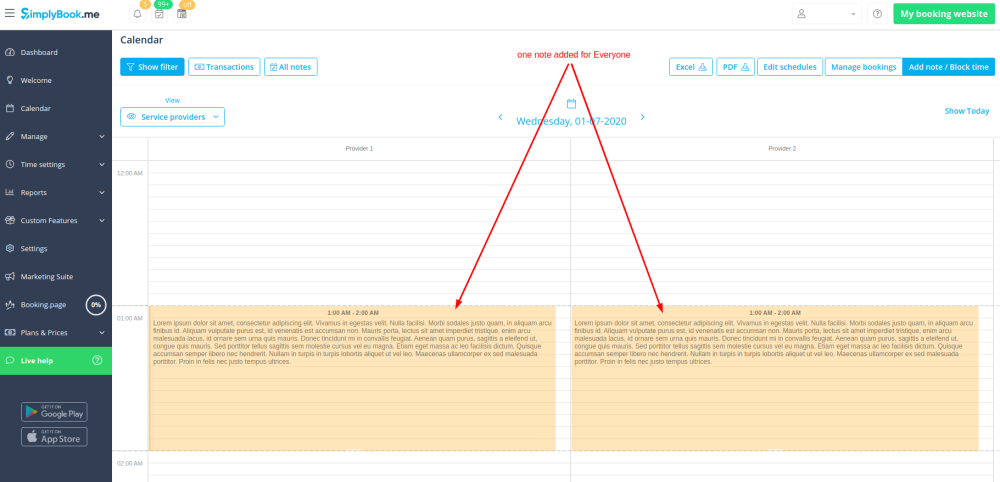
:The notes for <span style="background-color:#d4f8e5; padding:5px; border-radius:5px;">Everyone</span> are displayed in <span style="background-color:#d4f8e5; padding:5px; border-radius:5px;">all calendar views.</span> | :The notes for <span style="background-color:#d4f8e5; padding:5px; border-radius:5px;">Everyone</span> are displayed in <span style="background-color:#d4f8e5; padding:5px; border-radius:5px;">all calendar views.</span> | ||
| − | [[File: | + | [[File:Note for all upd.png|border|center]] |
<br><br> | <br><br> | ||
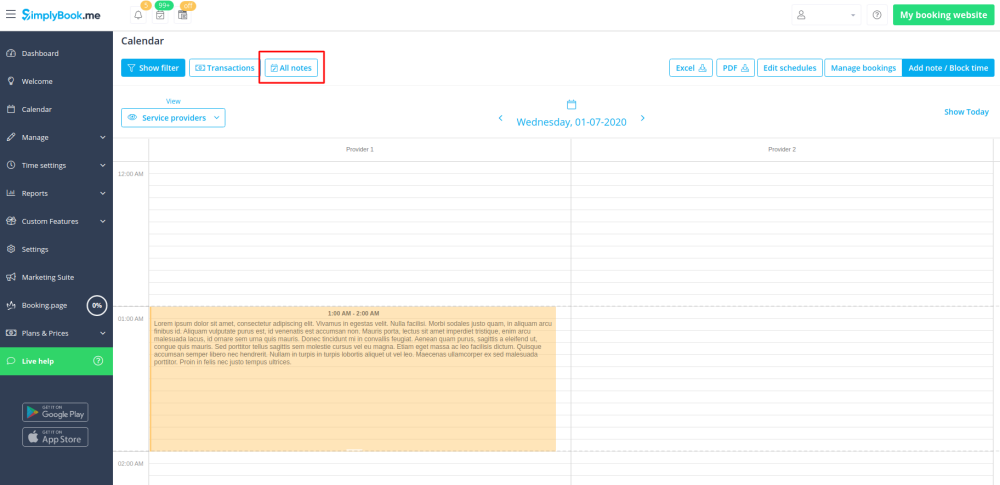
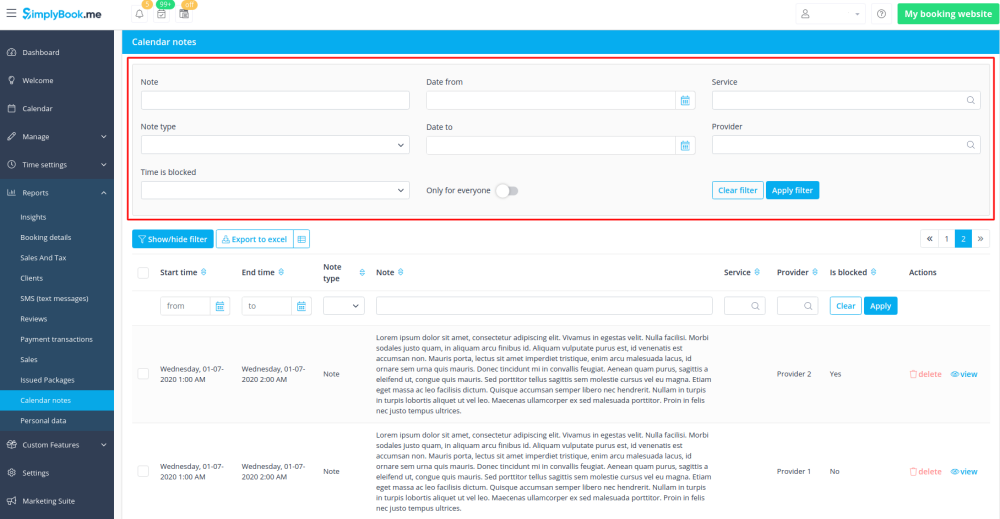
| − | :As well you can access <span style="background-color:#d4f8e5; padding:5px; border-radius:5px;">the list of all the notes</span> added, use filters and export notes to excel in Calendar notes report | + | :As well you can access <span style="background-color:#d4f8e5; padding:5px; border-radius:5px;">the list of all the notes</span> added, use filters and export notes to excel in Calendar notes report by navigating either directly from <span style="background-color:#d4f8e5; padding:5px; border-radius:5px;">Calendar page</span> or from <span style="background-color:#d4f8e5; padding:5px; border-radius:5px;">Reports</span> section in <span style="background-color:#d4f8e5; padding:5px; border-radius:5px;">left-side menu.</span> |
| − | [[File: | + | [[File:All notes path upd.png |border|center]] |
<br><br> | <br><br> | ||
| − | [[File:Notes report | + | [[File:Notes report upd with block.png|border|center]] |
<br><br><br><br> | <br><br><br><br> | ||
Latest revision as of 12:19, 30 June 2020
It may be necessary to add some important information to the Calendar page that will be shown along with bookings or you need to quickly block some period of time and indicate the reason.
That is why we have launched a new option Calendar Notes with time blocking functionality that makes it possible and now you can keep all the necessary things at hand.
- How to use
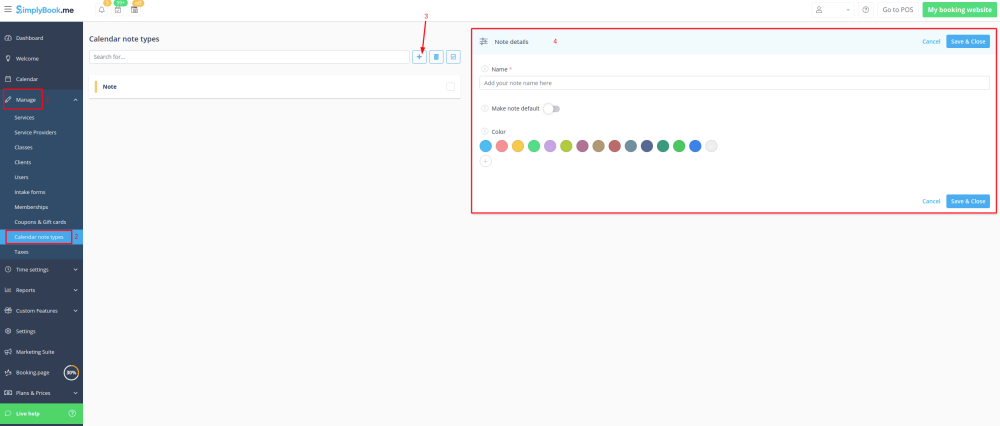
- 1. By default there is one note type added for you in the system, but you can go to Manage -> Calendar Notes Types to add new note types and set the desirable colors for them.
- 2. When all types are ready for use navigate to Calendar page using the left-side menu.
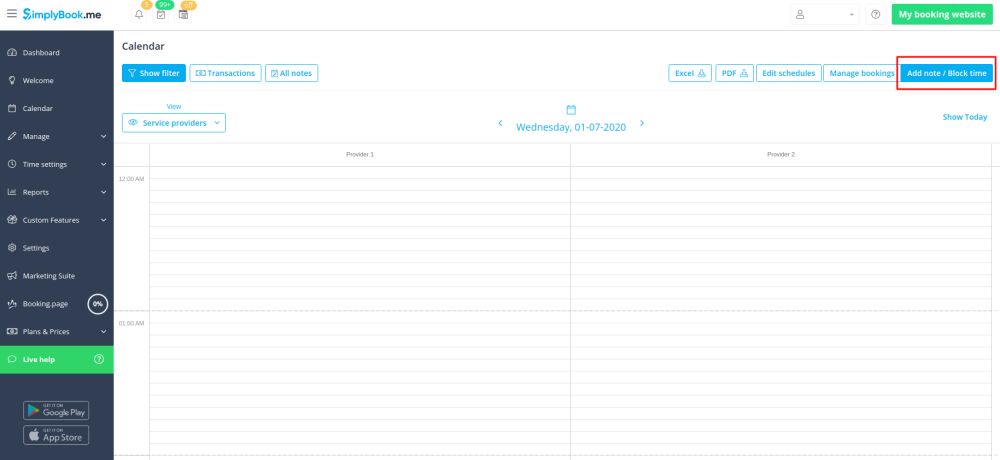
- 3. Switch to Add note/Block time mode in the top right corner.
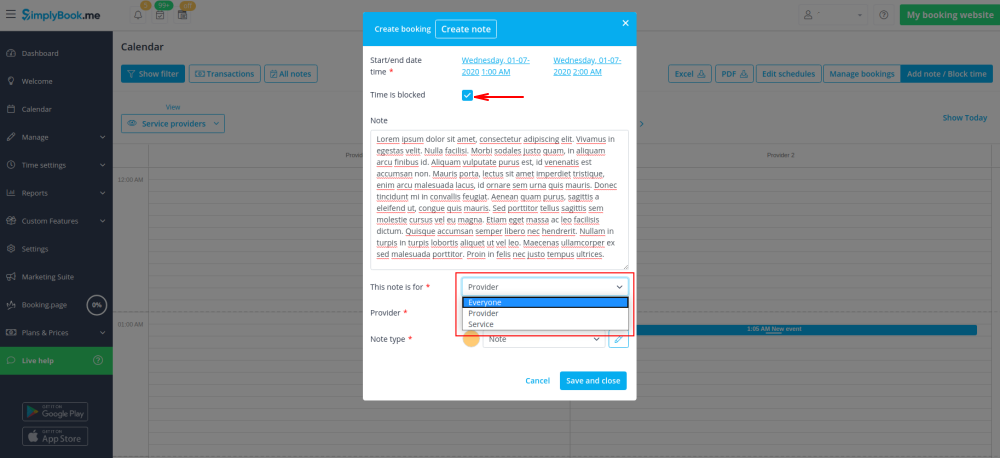
- 4. Click on the free space in the Calendar table where you would like to insert the information or block time to get note popup form.
- 5. Check Time is blocked option to close the availability if needed, add the details to the textbox and select the assignee: you can add a note or close time per specific provider, service or everyone.
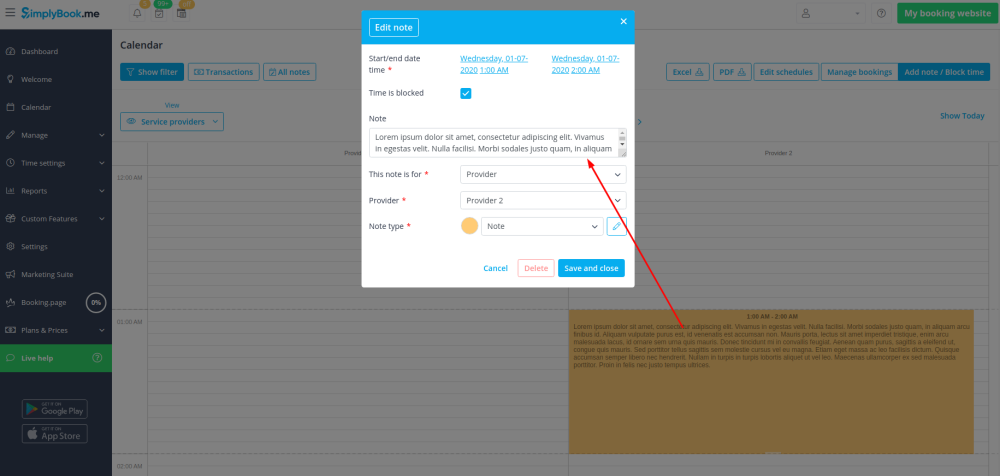
- 6. To edit or delete the previously added note click on it to get the popup and use the needed function there.
- Notes overview options
- If you have checked Time is blocked such notes will have a bit brighter color compared to simple text notes.
- If you have added a note per provider it will be shown in Service Provider, Timeline, Day, Week and Month views.
- If you have added a note per service you will be able to see it in Service, Day, Week and Month views.
- The notes for Everyone are displayed in all calendar views.
- As well you can access the list of all the notes added, use filters and export notes to excel in Calendar notes report by navigating either directly from Calendar page or from Reports section in left-side menu.
