Difference between revisions of "Custom Page custom feature"
From SimplyBook.me
(Prepared the page for translation) |
|||
| (One intermediate revision by the same user not shown) | |||
| Line 11: | Line 11: | ||
| + | <!--T:1--> | ||
[[File:Static page.png | left]] | [[File:Static page.png | left]] | ||
<br> | <br> | ||
| Line 17: | Line 18: | ||
__TOC__ | __TOC__ | ||
| − | =How to use page creation option= | + | =How to use page creation option= <!--T:2--> |
| + | <!--T:3--> | ||
:1. Enable “Custom page” feature on your ''Custom features page -> Adding more to the Booking site'' section. | :1. Enable “Custom page” feature on your ''Custom features page -> Adding more to the Booking site'' section. | ||
| − | [[File:Custom page enable path | + | [[File:Custom page enable path redesigned.png|1200px| center|link=https://help.simplybook.me/images/5/54/Custom_page_enable_path_redesigned.png]] |
<br><br> | <br><br> | ||
:2. Go to "Manage" to setup the desired pages. | :2. Go to "Manage" to setup the desired pages. | ||
| − | [[File:Custom page settings path | + | [[File:Custom page settings path redesigned.png|1200px | center|link=https://help.simplybook.me/images/e/ee/Custom_page_settings_path_redesigned.png]] |
<br><br> | <br><br> | ||
:3. On the next page you will be able to see system booking page tabs. | :3. On the next page you will be able to see system booking page tabs. | ||
:(The ones that are disabled currently are grayed out.) | :(The ones that are disabled currently are grayed out.) | ||
:System pages cannot be edited in this interface. You will need to navigate to the corresponding section using the links provided. | :System pages cannot be edited in this interface. You will need to navigate to the corresponding section using the links provided. | ||
| − | [[File: | + | [[File:Custom page active and disabled pages redesigned.png|1200px | center|link=https://help.simplybook.me/images/1/14/Custom_page_active_and_disabled_pages_redesigned.png]] |
<br><br> | <br><br> | ||
:4. You can use arrows to re-order the tabs and “Eye” icons to hide and show pages. | :4. You can use arrows to re-order the tabs and “Eye” icons to hide and show pages. | ||
:'''Please note''', that if you hide the page it still will be possible to access it using direct link. | :'''Please note''', that if you hide the page it still will be possible to access it using direct link. | ||
| − | [[File: | + | [[File:Custom page hide show reorder redesigned.png|1200px | center|link=https://help.simplybook.me/images/8/87/Custom_page_hide_show_reorder_redesigned.png]] |
<br><br> | <br><br> | ||
:5. If you wish to add new custom page, please click on “+” icon at the top and choose “Add custom page” option. | :5. If you wish to add new custom page, please click on “+” icon at the top and choose “Add custom page” option. | ||
| − | [[File: | + | [[File:Add custom page path redesigned.png|1200px | center|link=https://help.simplybook.me/images/d/d3/Add_custom_page_path_redesigned.png]] |
<br><br> | <br><br> | ||
:6. On the right side the page-building menu will appear. Please add title and desired page content. | :6. On the right side the page-building menu will appear. Please add title and desired page content. | ||
:You may use built-in HTML editor to add elements or if you have HTML coding knowledge you can switch to code mode using “</>” icon. | :You may use built-in HTML editor to add elements or if you have HTML coding knowledge you can switch to code mode using “</>” icon. | ||
:'''Please note''', it is necessary to switch coding mode off before saving the page for the code to be saved correctly. | :'''Please note''', it is necessary to switch coding mode off before saving the page for the code to be saved correctly. | ||
| − | [[File: | + | [[File:Custom page coding mode on redesigned.png|1200px | center|link=https://help.simplybook.me/images/9/93/Custom_page_coding_mode_on_redesigned.png]] |
<br><br> | <br><br> | ||
| Line 46: | Line 48: | ||
<br><br> | <br><br> | ||
| − | =How to use adding links= | + | =How to use adding links= <!--T:4--> |
<br> | <br> | ||
It may happen that you need to redirect your clients to some other page(ex. your website, etc.). <br> | It may happen that you need to redirect your clients to some other page(ex. your website, etc.). <br> | ||
| Line 53: | Line 55: | ||
| + | <!--T:5--> | ||
:1. Click on “+” icon at the top and choose “Add link to menu bar” option. | :1. Click on “+” icon at the top and choose “Add link to menu bar” option. | ||
| − | [[File:Add | + | [[File:Add custom links redesigned.png|1200px | center|link=https://help.simplybook.me/images/1/19/Add_custom_links_redesigned.png]] |
<br><br> | <br><br> | ||
:2. Add the title you wish to show in the booking page header to “Custom link text to display” field and indicate the link itself in the corresponding field. | :2. Add the title you wish to show in the booking page header to “Custom link text to display” field and indicate the link itself in the corresponding field. | ||
| − | [[File: | + | [[File:Custom link main settings redesigned.png|1200px | center|link=https://help.simplybook.me/images/f/f9/Custom_link_main_settings_redesigned.png]] |
<br><br> | <br><br> | ||
:3. You can also choose whether the link should be opened in the new browser tab or in the same one. <br> | :3. You can also choose whether the link should be opened in the new browser tab or in the same one. <br> | ||
:For this please choose “''self''” if you wish the page to be opened in the same tab or “''blank''” if you wish to be opened in the separate tab in the “Choose how link will be opened” setting. | :For this please choose “''self''” if you wish the page to be opened in the same tab or “''blank''” if you wish to be opened in the separate tab in the “Choose how link will be opened” setting. | ||
| − | [[File: | + | [[File:Custom link blank or self redesigned.png|1200px | center|link=https://help.simplybook.me/images/2/2b/Custom_link_blank_or_self_redesigned.png]] |
<br><br> | <br><br> | ||
</translate> | </translate> | ||
Latest revision as of 09:41, 4 September 2024
This custom feature allows you to add your own custom static pages to your booking website, re-order all booking site pages in the main menu, hide menu items, and add custom links to the main menu.
How to use page creation option
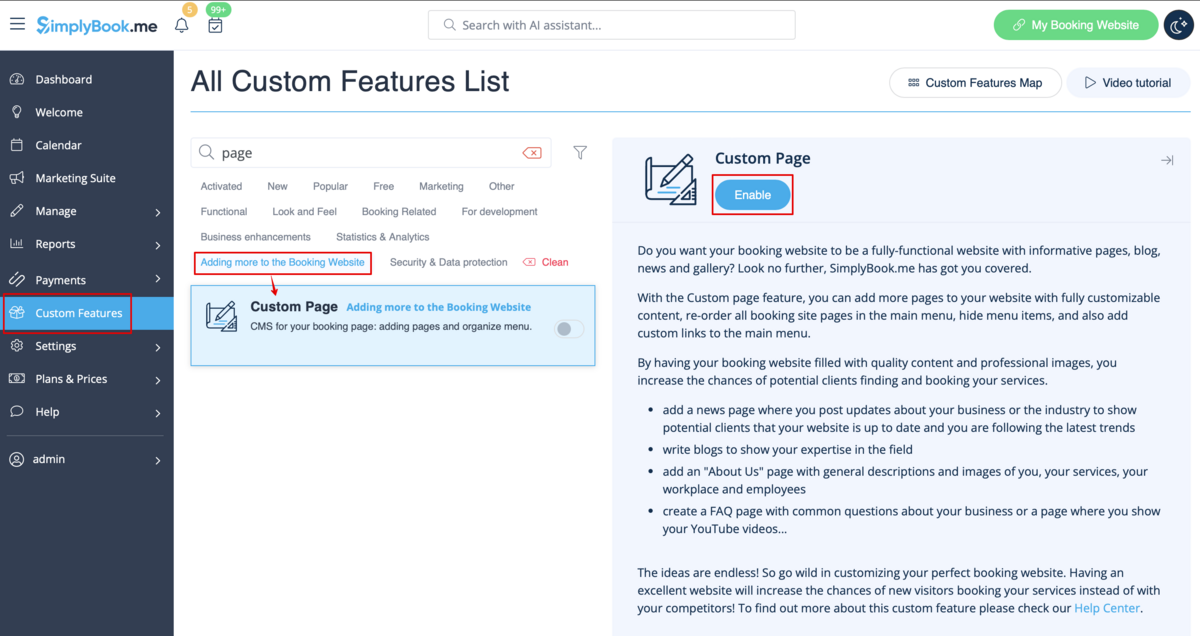
- 1. Enable “Custom page” feature on your Custom features page -> Adding more to the Booking site section.
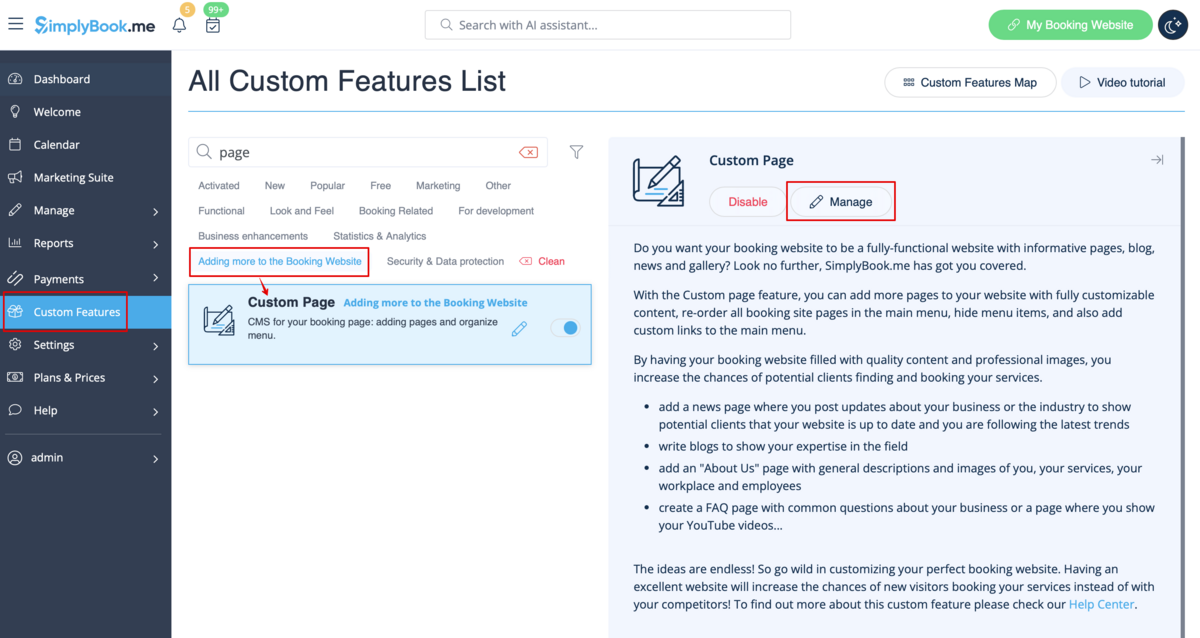
- 2. Go to "Manage" to setup the desired pages.
- 3. On the next page you will be able to see system booking page tabs.
- (The ones that are disabled currently are grayed out.)
- System pages cannot be edited in this interface. You will need to navigate to the corresponding section using the links provided.
- 4. You can use arrows to re-order the tabs and “Eye” icons to hide and show pages.
- Please note, that if you hide the page it still will be possible to access it using direct link.
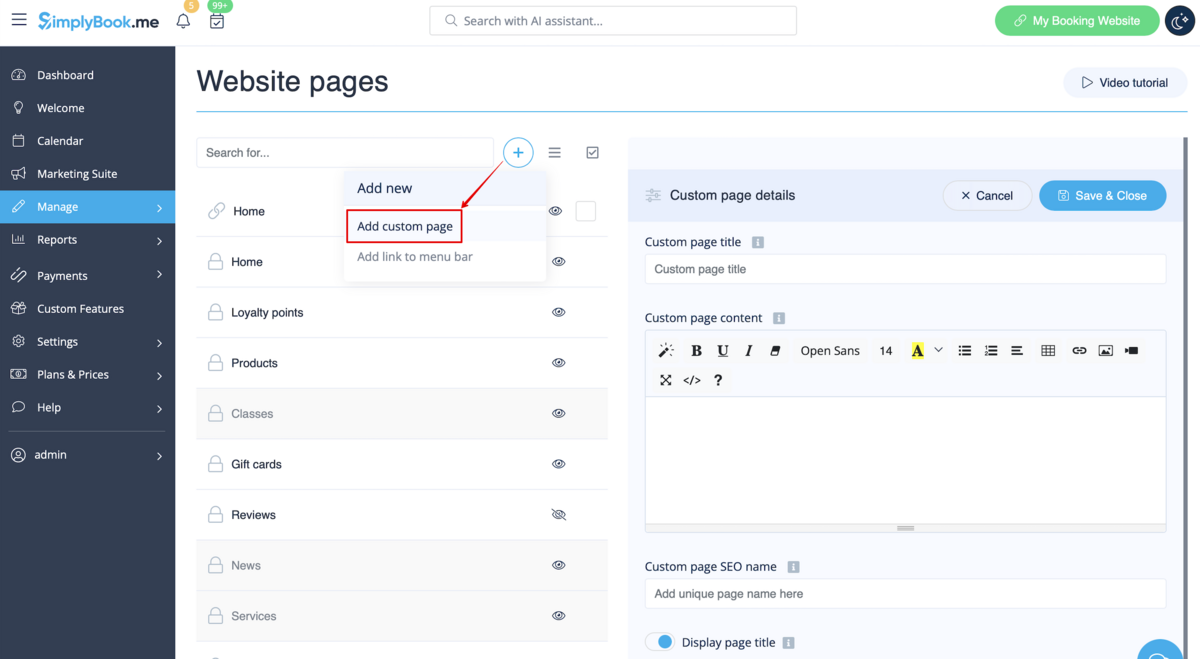
- 5. If you wish to add new custom page, please click on “+” icon at the top and choose “Add custom page” option.
- 6. On the right side the page-building menu will appear. Please add title and desired page content.
- You may use built-in HTML editor to add elements or if you have HTML coding knowledge you can switch to code mode using “</>” icon.
- Please note, it is necessary to switch coding mode off before saving the page for the code to be saved correctly.
How to use adding links
It may happen that you need to redirect your clients to some other page(ex. your website, etc.).
In this case “Add link to menu bar” will help you.
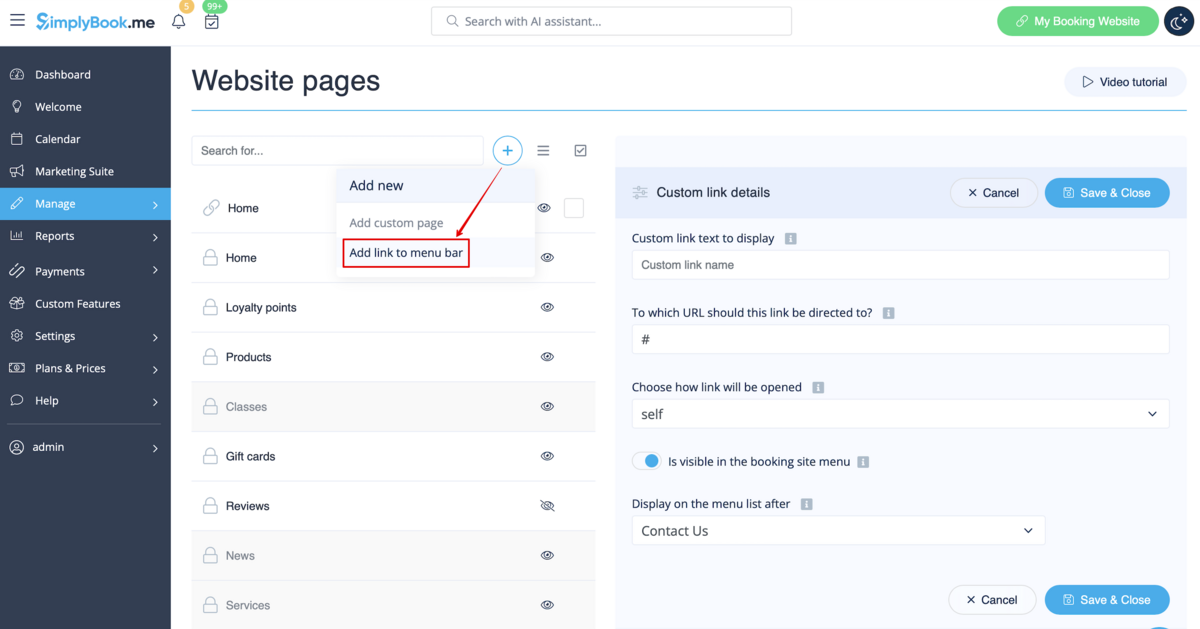
- 1. Click on “+” icon at the top and choose “Add link to menu bar” option.
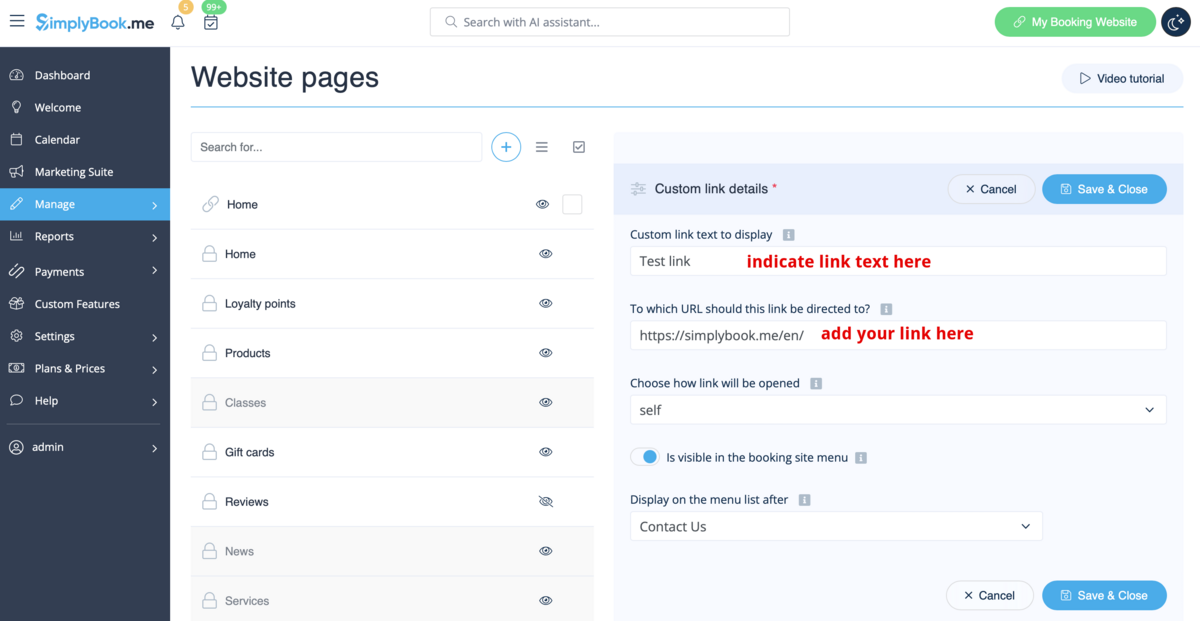
- 2. Add the title you wish to show in the booking page header to “Custom link text to display” field and indicate the link itself in the corresponding field.
- 3. You can also choose whether the link should be opened in the new browser tab or in the same one.
- For this please choose “self” if you wish the page to be opened in the same tab or “blank” if you wish to be opened in the separate tab in the “Choose how link will be opened” setting.

